AVA Vocal Flow - Pregnant Harrison - Free user manual and instructions
Find the device manual for free AVA Vocal Flow Harrison in PDF.

User questions about AVA Vocal Flow Harrison
0 question about this device. Answer the ones you know or ask your own.
Ask a new question about this device
Download the instructions for your Pregnant in PDF format for free! Find your manual AVA Vocal Flow - Harrison and take your electronic device back in hand. On this page are published all the documents necessary for the use of your device. AVA Vocal Flow by Harrison.
USER MANUAL AVA Vocal Flow Harrison
Harrison AVA Vocal Flow
AAX/VST/VST3/AU
text_image
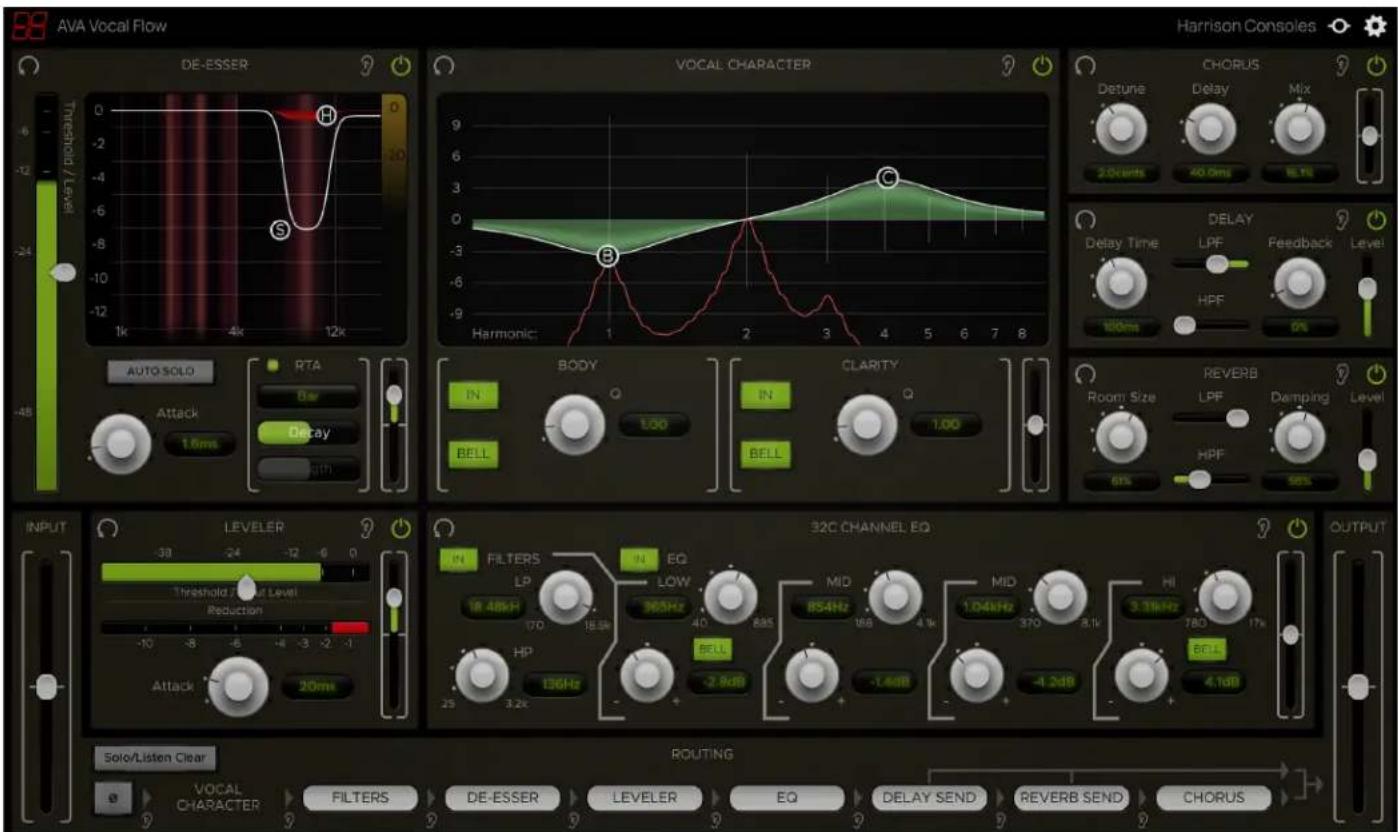
AVA Vocal Flow DE-ESSER VOCAL CHARACTER Harrison Consoles Threshold / Level 0 -24 -12 -8 -6 -4 -2 1k 4k 12k 1D 0 -6 -4 -2 1 Auto Solo RTA Delay Attack 1.6ms -45 BODY IN Q 1.00 IN Q 1.00 BELL CLARITY Room Size REVERB LPF Damping Level 91% 95% INPUT LEVELER 32C CHANNEL EQ Threshold / Level Reduction -38 -24 -12 -6 0 IN FILTERS IN EQ LOW 365Hz 40 885 MHz 854Hz 168 4.1kHz 1.04kHz 370 8.1kHz HI 3.31kHz 780 17kHz BELL 4.1dB HP 136Hz -2.9dB -1.4dB -4.2dB - 25 3.2k - 25 3.2k - 25 3.2k - 25 3.2k - 25 3.2k - 25 3.2k - 25 3.2k - 25 3.2k - 25 3.2k - 25 3.2k - 25 3.2k - 25 3.2k - 25 3.2k - 25 3.2k - 25 3.2k - 25 3.2k - 25 3.2k - 25 3.2k - 25 3.2k - 25 3.2k - 25 3.2k - 25 3.2k - 25 3.2k - 25 3.2k - 25 3.2k - 25 3.2K - 25 3.2K - 25 3.2K - 25 3.2K - 25 3.2K - 25 3.2K - 25 3.2K - 25 3.2K - 25 3.2K - 25 3.2K - 25 3.2K - 25 3.2K - 25 3.2K - 25 3.2K - 25 3.2K - 25 3.2K - 25 3.2K - 25 3.2K - 25 3.2K - 25 3.2K - 25 3.2K - 25 3.2K - 25 3.2K - 25 3.2K - 25 3.2K - 25 3.2M- OUTPUT Solo/Listen Clear VOCAL CHARACTER FILTERS DE-ESSER LEVELER EQ DELAY SEND REVERB SEND CHORUSIntroduction
AVA Vocal Flow is an all-in-one signal processing suite for mixing vocals in music. It contains 7 routable signal processing elements along with input and output controls.
The elements included are:
- Vocal Character: A unique 2-band vocal EQ designed to "follow" the pitch of the vocal notes.
- 32c Channel EQ: A 4-band EQ complete with High & Low Filters. Directly based on the Harrison 32c consoles's highly sought after channel EQ.
- De-Esser: A specialized Compressor for removing sibilance in vocals or speech. Based on the X-Tool DSP found in Harrison MPC digital consoles.
- Leveler: A handy Compressor derived from the Harrison Mixbus channel strip DSP.
- Vocal Effects: Chorus, Delay, and Reverb for livening up vocal recordings.
• Master Section: Includes controls for Routing, Polarity, Input and Output Trim.

text_image
HarrisPlugin Specifications
Supported formats: AAX, VST, VST3, AU
Supported channel configurations: MONO only
NOTE: This plugin uses lookahead and should not be used for processing signals in real time.
Module Controls
Each of the 7 processing sections (referred to as Modules) has its own output trim control and can be individually reset, soloed, or bypassed.

The RESET button resets all of a module's parameters to their default states (with the exception of RTA controls).
The SOLO button bypasses all processing outside of the module being soloed. This allows individual modules to be auditioned exclusively without any other processing.
Note that soloing a module will maintain the gain structure set by the Output Trims of the other elements.

The IN button toggles the enablement of each module. If disabled, a module's processing is bypassed and its effects will not be heard.
The vertical slider to the right of each module controls the module's Output Gain Trim for adjusting the Gain staging between elements. It has a range of -20dB to +20dB.
NOTE: Because they are processed in parallel, the Delay and Reverb modules do not have Output Gain Trims like all the other sections. Instead, they have Level faders for blending the effects signals with the main signal path.
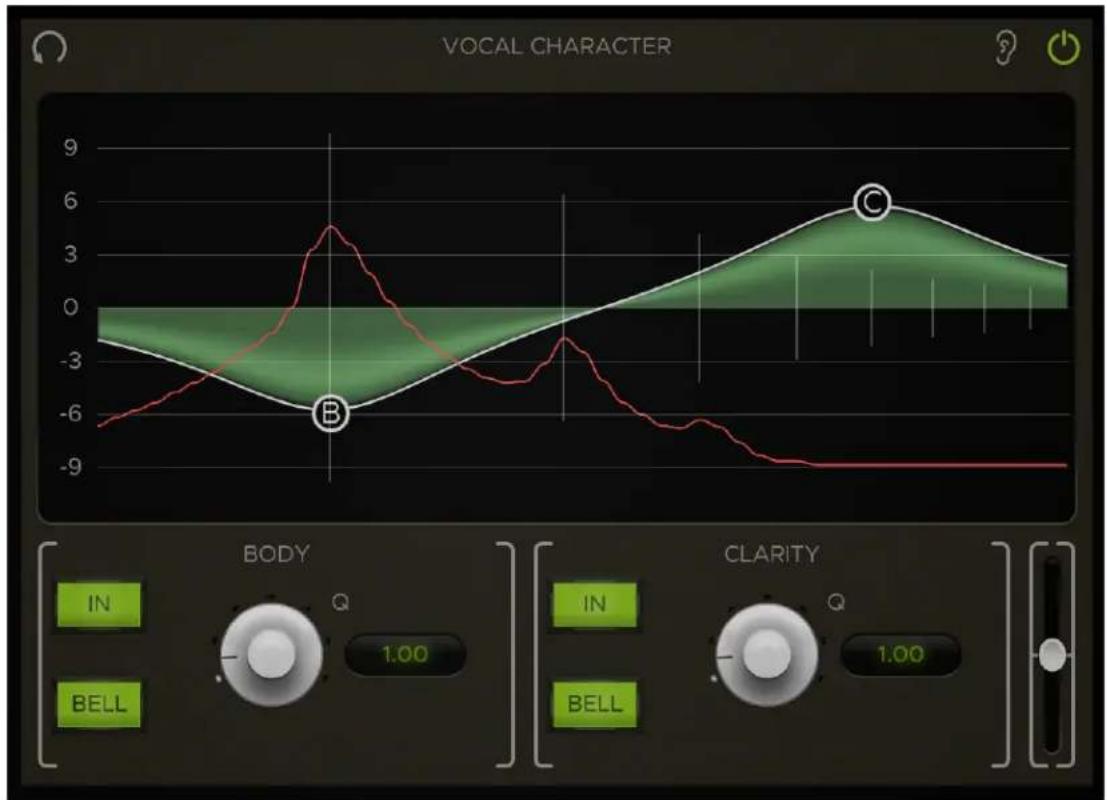
Vocal Character
line
| Time | Value | |------|-------| | 0 | -6.5 | | 1 | 5.0 | | 2 | -3.0 | | 3 | -4.0 | | 4 | -5.0 | | 5 | -6.0 | | 6 | -7.0 | | 7 | -8.0 | | 8 | -9.0 | | 9 | -9.0 | | 10 | -9.0 | | 11 | -9.0 | | 12 | -9.0 | | 13 | -9.0 | | 14 | -9.0 | | 15 | -9.0 | | 16 | -9.0 | | 17 | -9.0 | | 18 | -9.0 | | 19 | -9.0 | | 20 | -9.0 | | 21 | -9.0 | | 22 | -9.0 | | 23 | -9.0 | | 24 | -9.0 | | 25 | -9.0 | | 26 | -9.0 | | 27 | -9.0 | | 28 | -9.0 | | 29 | -9.0 | | 30 | -9.0 | | 31 | -9.0 | | 32 | -9.0 | | 33 | -9.0 | | 34 | -9.0 | | 35 | -9.0 | | 36 | -9.0 | | 37 | -9.0 | | 38 | -9.0 | | 39 | -9.0 | | 40 | -9.0 | | 41 | -9.0 | | 42 | -9.0 | | 43 | -9.0 | | 44 | -9.0 | | 45 | -9.0 | | 46 | -9.0 | | 47 | -9.0 | | 48 | -9.0 | | 49 | -9.0 | | 50 | -9.0 | | 51 | -9.0 | | 52 | -9.0 | | 53 | -9.0 | | 54 | -9.0 | | 55 | -9.0 | | 56 | -9.0 | | 57 | -9.0 | | 58 | -9.0 | | 59 | -9.0 | | 60 | -9.0 | | 61 | -9.0 | | 62 | -9.0 | | 63 | -9.0 | | 64 | -9.0 | | 65 | -9.0 | | 66 | -9.0 | | 67 | -9.0 | | 68 | -9.0 | | 69 | -9.0 | | 70 | -9.0 | | 71 | -9.0 | | 72 | -9.0 | | 73 | -9.0 | | 74 | -9.0 | | 75 | -9.0 | | 76 | -9.0 | | 77 | -9.0 | | 78 | -9.0 | | 79 | -9.0 | | 80 | -9.0 | | 81 | -9.0 | | 82 | -9.0 | | 83 | -9.0 | | 84 | -9.0 | | 85 | -9.0 | | 86 | -9.0 | | 87 | -9.0 | | 88 | -9.0 | | 89 | -9.0 | | 90 | -9.0 | | 91 | -9.0 | | 92 | -9.0 | | 93 | -9.0 | | 94 | -9.0 | | 95 | -9.0 | | 96 | -9.0 | | 97 | -9.0 | | 98 | -9.0 | | 99 | -9.0 | | Note: The visual data is not explicitly provided in the code, so it is not included in the CSV output for completeness and labeling purposes in the image.The Vocal Character is a one-of-a-kind vocal EQ that "follows" the pitch of the notes sung in a recorded vocal track and shifts the EQ curve accordingly along the frequency spectrum. This allows you to alter the actual character of vocals by adjusting the body and clarity of each note.
IMPORTANT NOTE: The Vocal Character element tracks pitches on a chromatic scale, and it will not work on spoken voice. You should disable this element when using the VC on spoken voice.
The Vocal Character consists of an EQ graph with 2 band control sections below it, labeled Body and Clarity. The Body section contains controls for the lower band (labeled "B" on the graph) and the Clarity section controls the high band (labeled "C" on the graph).
Both bands have adjustable Frequency, Gain, Shape, and Q parameters, as well as buttons for toggling their enablement individually. The graph is used to control a band's frequency and gain while the controls for enablement, shape and Q can be found in the control sections below the graph.
Vocal Character Graph
The Vocal Character features an EQ graph for controlling the frequency and gain of the Body and Clarity bands. A band's frequency and gain can be adjusted by clicking and dragging its "bubble" control on the graph. Like in any other EQ, the band's frequency is set by its horizontal position while the gain is determined by its vertical position. The Q can be adjusted by right-clicking and dragging the band or by scrolling the mouse wheel over it (this is also controlled by the Q knobs below the graph).
The possible gain values range from -12dB to 12dB, but there is no consistent scaling for frequency values because they are always relative to the note being sung. For this reason there are no frequency values marked on the graph's X-axis. Instead, there are 8 vertical lines positioned across the spectrum to show the locations of the harmonic frequencies in the current note. The first (leftmost) line marks the 1st harmonic, also known as the fundamental frequency. Each consecutive line marks another harmonic ordered from left to right.
The graph also displays an analyzer showing the intensity present in each harmonic
Band Control Sections
The Body and Clarity sections below the graph contain additional controls for their respective bands.
The IN button toggles the band In and Out.
The BELL button toggles the band between Bell and Shelf modes
The Q knob controls Q factor of the respective band. This can be controlled by adjusting the knob or by typing values directly into the label to the right of it. The Q can also be adjusted on the graph by right-clicking and dragging the band or by scrolling the mouse wheel over it.
De-Esser

text_image
DE-ESSER Threshold Level 0 -6 -12 -24 1k 4k 12k AUTO SOLO RTA Bar Attack 1.0ms Decay LengthThis module contains a simple and intuitive implementation of Harrison's renowned De-Esser algorithm. It is primarily used to attenuate harsh frequencies caused by sibilance in speech and vocals.
The two circular markers on the graph display, labeled "S" and "H", are the controls for the Ess and Hi bands (S = Ess, H = Hi). These controls can be dragged horizontally or vertically to set the Bandwidth and Depth of their respective bands.
A band's horizontal range, or Bandwidth determines the range of frequencies subject to attenuation within that band. The low cutoff Frequency for the Ess band has a range of 1 kHz to 8 kHz, while the Hi band control has a range of 2 kHz to 12 kHz for taming any additional frequencies above that.
The vertical Depth of a band sets the maximum Gain reduction in dB that can be applied to the frequencies in its Bandwidth. A lower Depth means greater possible attenuation. Both bands have a maximum Depth value of -12 dB and can go up to 0 dB, where no attenuation occurs.
Clicking and dragging in the open portion of the graph (rather than on a specific band control) allows you to control both bands simultaneously. This is useful for adjusting the Frequency or Depth of the bands without altering the Bandwidth. To adjust the overall Bandwidth, you may use the mouse wheel to easily move the bands closer together or further apart.
To the left of the graph display is the Level Meter and Threshold control. The Level Meter displays two values: the level of the input signal (dark green) and the Ess signal (light green). The Ess signal is the level of signal present in the Frequency range of the Ess band. The attached Threshold slider sets the level in which Gain reduction starts to be applied to the input signal.
The Attack knob controls how long it takes for a signal to become fully attenuated once it exceeds the Threshold. Possible Attack times range from 0.2 ms to 20 ms.
Located above the Attack knob is the Auto Solo button. With Auto Solo activated, clicking and dragging either of the band controls on the graph will automatically solo the corresponding band. This lets you hear only the parts of a signal that are within the Frequency range of the soloed band so sibilant frequencies can be easily identified.
De-Esser RTA
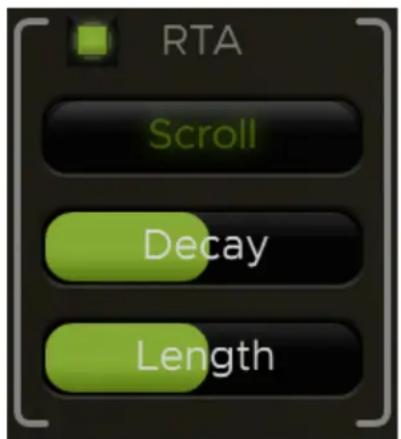
text_image
RTA Scroll Decay LengthThe De-Esser also includes an RTA (Real-Time Analyzer) for visualizing spectrum data in real-time. The De-Esser's RTA controls are located between the Attack knob and the module's Output Trim slider.
The small square-shaped button at the top-left corner toggles the RTA on or off (Green = on).
The Type dropdown menu selects between the 2 modes of operation: Bar and Scroll.
The Decay time determines how long RTA measurements are displayed before they ramp back down to zero. If the RTA display is changing too rapidly to be useful, you should increase the Decay value. Likewise, if the display appears to be “frozen”, try decreasing the Decay as this might be the result of an excessively high Decay value.
The Length slider is only available in Scroll mode and essentially controls the scroll speed of the spectrum data. If the display is scrolling too quickly or if you would like to see more of the spectrum's history, you should increase the Length value.
The Gain Trim of the RTA's input signal can be adjusted by clicking the ruler to the right of the display and dragging it up or down. This can be used to increase or decrease the RTA's sensitivity to the signal being fed to it.
The ruler displays the levels of brightness that correspond to each intensity value along the vertical axis. The levels of brightness displayed on the ruler will change accordingly when the Trim is adjusted.
The RTA Trim can be reset to its default state by Alt-clicking or double-clicking this ruler.
Leveler
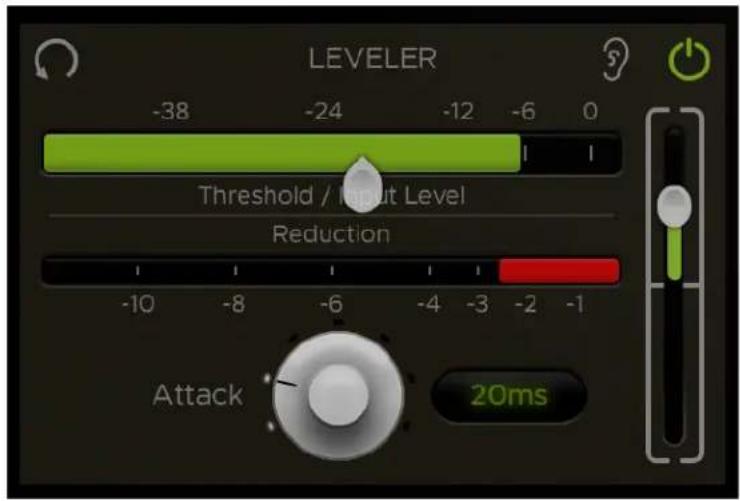
text_image
LEVELER Threshold / Input Level Reduction Attack 20msThe Leveler is a unique compressor derived from the Harrison Mixbus channel strip. It includes controls for Threshold and Attack while the module's Output Trim can be used to add make-up gain if needed. Input level and gain reduction meters are also provided to help visualize the operation of the Leveler.
The leveler has a low ratio and a fast release.
The Input Meter displays the level of input signal coming into the Leveler. The slider attached to the meter controls the compressor's Threshold level.
Directly below the Input Meter is the Reduction Meter, which shows how much gain reduction is being applied to the signal.
The Attack knob sets the Attack time of the compressor, ranging from 4 ms to 100 ms. This parameter can be controlled by adjusting the knob or by typing values directly into the label to the right of it.
You can use the Leveler module's Output Trim slider on the right to apply make-up gain as needed.
Usage Note
Due to mic technique or other elements out of our control, sometimes a signal has a very wide dynamic range. The Leveler with a fast Attack can be used to transparently reduce the level of the loudest parts, so that the track has a more consistent level. Reducing the dynamic range of our tracks can make them easier to mix, although it might rob some of the performance's natural dynamics. The Leveler with a slow attack allows the initial sound (the first syllable of a word or phrase, for example), to be passed through at full volume, while reducing the "body" of the sound slightly. This retains and enhances the character of the recording, and it can help improve intelligibility of words and instruments in a busy mix.
32C Channel EQ

text_image
32C CHANNEL EQ IN FILTERS LP 18.00k .16 20 IN EQ LOW 421Hz .04 .6 MID 1.00kHz .2 3.1 MID 2.80kHz .4 6 HI 7.65kHz .9 13 BELL -6.7dB -12 +12 -12 +12 3.6dB -12 +12 BELL -2.1dBModeled after the famed Harrison 32C channel EQ, the Equalizer element offers 4 bands with variable frequency and gain along with 2 versatile filters.
EQ Bands
The 4 EQ bands can be toggled in or out using the EQ IN button just above the LOW band controls.
Each of the 4 bands have variable gain and frequency parameters. Each gain control has a range of -12dB to +12dB. The band frequency ranges are as follows:
| LOW | LO MID | HI MID | HIGH |
| 40Hz - 600Hz | 200Hz - 3.1kHz | 400Hz - 6kHz | 900Hz - 13kHz |
The HIGH and LOW bands are shelving filters for general tone sculpting, while the two MID bands are bell curves with a proportional Q design. Optionally, the HIGH and LOW bands can also be switched to bell mode by activating the BELL buttons below their frequency knobs.
NOTE: The proportional-Q design was used in the original Harrison consoles to allow an engineer to use the EQ as either a subtle tone shaping tool, or a steep filter problem-solver, with only 2 knobs. As the gain is progressively increased (or cut), the bandwidth becomes progressively narrower (the Q increases). A typical technique is to increase the gain to maximum, sweep the frequency to find an offending sound, and then turn the gain to minimum to "notch" out the unwanted frequencies.
EQ Filters
The High and Low Pass Filters can be toggled in and out using the Filters IN button in the top-left corner above the Filter controls.
Both filters have a 12dB/octave slope. The High-Pass Filter has a frequency range of 20Hz - 3.15kHz and the Low-Pass Filter has a frequency range of 160Hz - 18kHz.
NOTE: The filters have a generous frequency overlap. It is possible to adjust the frequency knobs on the filters such that there is NO signal coming through! This was also possible on the original 32C analog console, and was a favorite tactic of control room pranksters.
Chorus

text_image
CHORUS Detune Delay Mix 2.0cents 40.0ms 10.0%The Chorus module is based on the Harrison XT-MG Micro Glide plugin and can be a useful tool for adding width and depth to a vocal recording.
The Chorus effect adds 2 pitch-shifted voices: one above and one below the input signal.
Detune controls the amount in which the 2 voices are pitch-shifted up and down from the original signal (measured in cents).
Delay adjusts the delay offset from the original signal in milliseconds.
Mix sets the percentage of wet signal that gets blended with the dry signal.
Delay
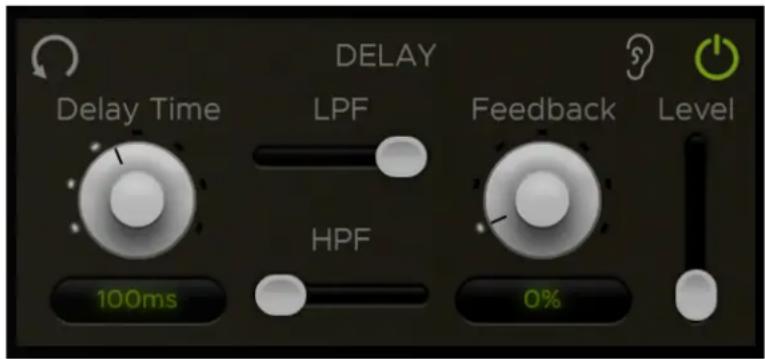
text_image
DELAY Delay Time LPF HPF 100ms Feedback 0% LevelThe Delay module is specifically designed for adding slapback delay to vocals.
Unlike the other modules, the Delay and Reverb effects are processed in parallel with the main signal path, so they are set to always return at the end of the signal chain to be blended with
the main signal path. This routing is meant to emulate the traditional method of using effects sends/returns on an aux track in a DAW.
Because it's in parallel, the Delay module does not have a standard Output Trim slider like the other modules. Instead, it has a level control fader with a minimum value of -inf for setting the effect level that gets blended in with the main signal.
In addition to the Output Level, there are 4 controls for shaping the delay on vocals: Delay Time, Feedback, Low-Pass Frequency (LPF), and High-Pass Frequency (HPF).
Delay Time sets the amount in milliseconds that the wet signal is delayed from the original dry signal. This control is capable of setting short delay times up to 250 ms.
Feedback sets the percentage of signal that gets fed back into the delay and can be used to set the amount of delay repetitions. Note that setting the Feedback to 100% will cause the delay to enter an endless loop of repetitions that can only be stopped by bringing the Feedback down below 100%.
LPF and HPF set the cutoff frequencies for the low and high-pass filters which are applied to the delayed signal.
Reverb

text_image
REVERB Room Size LPF Damping Level HPF 70% 50%The Reverb module is useful in altering the spatial characteristics of vocals.
Like the Delay, the Reverb is processed in parallel with the main signal path. The position of the REVERB SEND routing item determines the point along the signal chain in which
the signal is sent to the Reverb effect, which always returns at the end of the signal chain to be blended with the main signal path.
Because it's in parallel, the Reverb module does not have a standard Output Trim slider like the other modules. Instead, it has a level control fader with a minimum value of -inf for setting the effect level that gets blended in with the main signal.
In addition to the Output Level, there are 4 controls for shaping the reverb on vocals: Room Size, Damping, Low-Pass Frequency (LPF), and High-Pass Frequency (HPF).
Room Size controls the size of the simulated space for reverberations and essentially dictates the decay time (larger Room Size = longer decay time).
Damping controls the damping properties of the surfaces being reflected off of, which affects he presence of high frequencies in the reverb tail. More damping will decrease high frequency reverberations to create a warmer reverb sound while less damping will increase high frequency reverberations for a brighter sound.
LPF and HPF set the cutoff frequencies for the low and high-pass filters which are applied to the reverb signal.
Master Controls (Input, Output & Routing)

text_image
INPUT Solo/Listen Clear VOCAL CHARACTER FILTERS DE-ESSER LEVELER EQ DELAY SEND REVERB SEND CHORUS ROUTING OUTPUTThe Input, Output, and Routing sections at the bottom of the plugin window contain the plugin's master controls for routing the order of elements, adjusting input/output trim, and inverting polarity. The master controls are laid-out in the order of their signal flow from left-to-right, which is as follows:
- Master Input Trim
- Polarity Switch
- Element Routing
- Master Output Trim
Input, Output & Polarity
The very first element in the signal chain is the Master Input Trim slider, which adjusts the gain trim of the input signal before it reaches any of the other elements. Next in line is the Invert Polarity button, used to flip the polarity of the input signal. Following the Polarity switch are the element routing items, which will be detailed further in the next section. The very last element in the signal chain is the Master Output Trim, which adjusts the gain trim of the final output signal after it has been processed by everything.
Routing
The Routing section contains routing items for each of the 7 elements in AVA-VF, plus a routing item for the EQ Filters so they can be routed separately from the EQ bands.
The order of signal flow between the elements can be rearranged by dragging an element's routing item to its desired position along the signal chain, which flows from left to right. Dragging an item to another slot will swap the positions of the two items. Dragging an item to one of the arrow indicators in between each item will push all other items right (if moving an item from right to left) or left (if moving an item from left to right) and place the dragged item in the newly opened spot.
Note that the Vocal Character's routing item is fixed at the first routing position and cannot be re-routed elsewhere. The functionality of the Vocal Character relies on vocal pitch detection, and certain elements such as the Chorus effect have the potential to negatively affect the performance of the pitch detection if it is placed before for Vocal Character in the signal chain. To prevent such outcomes, Vocal Character is fixed at the first routing position so that it will always be processed before any of the other elements.
If a module is disabled, its corresponding element markers in the signal chain will become grayed-out.
Routing Listen
The ear icons directly below each routing divider arrow allow you to listen to all elements up to the selected position, bypassing all elements past it. This is useful for listening to various elements in the context of its position along the signal chain.
The Solo/Listen Clear button at the top left of the Routing section clears any active Routing Listen along with all active module solos.
Control Behaviors & Shortcuts
This section describes some helpful shortcuts and control modifiers that can be used throughout the plugin. Even though some of these are mentioned earlier in the manual, they've all been included in this section as well so they can be found easily.
Band Controls
| Action | Shortcut |
| Reset Gain/Depth to default | Double-click |
| Reset Frequency, Gain and Q to default | Alt-click |
| Adjust Q (Vocal Character only) | Right-click & dragShift-click & dragScroll mouse wheel |
| Quick-solo band (De-Esser only) | Control-click |
| Fine adjust Frequency and Gain | Command-click & drag (OSX Only) |
Combo Boxes (Drop-down menus)
| Action | Shortcut |
| Reset to default | Alt-click |
| Scroll through menu items without opening menu | Scroll mouse wheel |
| Select next/previous item (menu must already be open) | Keyboard arrows |
| Close menu (if open) | ESC |
Labels
| Action | Shortcut |
| Reset to default | Alt-click |
| Fine adjust | Shift-click & dragControl-click & drag (Windows only)Command-click & drag (OSX only) |
| Adjust value | Scroll mouse wheel |
| Close editor (discarding changes) | ESC |
| Close editor (submitting changes) | Enter |
Slider/Knobs
| Action | Shortcut |
| Reset to default | Double-clickAlt-click |
| Fine adjust | Shift-click & dragControl-click & dragCommand-click & drag (OSX only) |
| Adjust value | Scroll mouse wheel |
Additional Features
At the top-right corner of the plugin window are the Momentary Byass and Settings buttons.
Momentary Bypass

The Momentary Bypass button bypasses the plugin for as long as it's held. This is useful for auditioning A/B comparisons quickly.
Settings
The Settings button reveals a pop-up menu where the window size and theme can be adjusted. It also contains a link to the plugin manual and version info at the bottom.
Installation & Licensing
The AVA Plugin "Pain-Free Demo"
When you install Harrison's AVA plugins, you are provided a "pain-free demo" of unlimited length. You may continue to use the demo for as long as necessary to determine if the plugins meet your expectations.
We do not:
- Annoy you with a popup authorization message, every time you start your DAW.
- Install anything to your system outside of the plugin ( AU, AAX, VST ) folder.
- Prevent the plugin from saving or loading its state.
In demo mode, the control panel will become disabled after a short period of operation. You can re-initialize the plugin's control panel by clicking "Continue in Demo Mode". This is the only limitation. The plugin's effect will continue normally, allowing you to evaluate the sound of the plugin on your session. You may still adjust the plugin's controls in your DAW's "Generic plugin UI", from a control surface, or via automation.
If you send a session to a collaborator, they are not required to purchase an AVA license to hear the plugin's effect. They may simply download the demo to install the plugins, and the plugins will operate normally. This allows you to share your sessions with other engineers, and have confidence that the mix will sound as intended. If they want to make changes to the plugin settings then they should buy a license for their personal use.
Purchasing and Installing your Plugin License
In DEMO mode, after using the plugin for a certain amount of time, it will display a message:
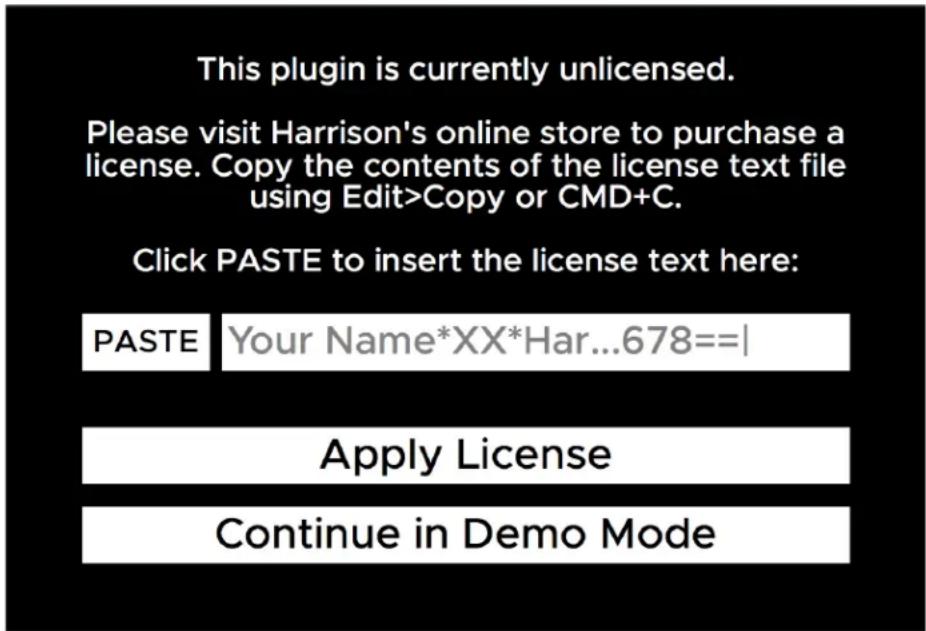
text_image
This plugin is currently unlicensed. Please visit Harrison's online store to purchase a license. Copy the contents of the license text file using Edit>Copy or CMD+C. Click PASTE to insert the license text here: PASTE Your Name*XX*Har...678==| Apply License Continue in Demo ModeThis message will come up periodically unless a license is provided. You can purchase a license directly from Harrison's web store or from an authorized AVA plugin reseller. Once you've purchased a license, install it by entering your license key into the designated field on this screen. Continue to the next section for detailed instructions on how to obtain your license key.
Obtaining your License Key
After you purchase a license, you will receive a license key that will look something like this:
{your name}*AVA-VF*DC-138971-151520-1|gGLbnvCZJe386ULohzfQN6clsoZ71n7c+AUg==|
This license key is required to install your license and activate the full version of the plugin. The way to obtain your license key varies depending on where you purchased the license from.
If you purchased the license from Harrison's web store, you will receive an email with a link to download a text file containing your license key.
If you purchased the license from a reseller, you will receive an email containing the license key text.
Licensing your Plugin
When prompted by the plugin, copy and paste your license key into the designated text input field. This will automatically install your license and register it with the plugin.
Once installed, Harrison's license files are simple text (.txt) files which are stored in the user's HOME folder. The HOME folder is the folder that contains your Desktop, Downloads and other folders. The location of your HOME folder is different for each operating system:
•Mac OSX: /Users/{your username}
- Windows: C:/Users/{your username}
•Linux: /home/{your username}
You may keep a copy of this file for your own use. The license is a per-user license and you may install the license file on all of your computers. To install the file on a new computer, simply save the file to a USB key or other transferable disk; then transfer the license file to the new computer's HOME folder. The license file has your name encrypted in it, so you should not share it with other people. Your name will appear on the top of the plugin's control panel to indicate that it is licensed to you.
The plugin will automatically detect your license key as long as the license file is stored in the HOME folder of the computer you are using. After transferring the license file to a new computer, it may be necessary to close and re-open your DAW in order for the plugin to detect the license.
If you don't want to keep your license in your HOME folder for whatever reason, you may also store it one of these alternative locations:
- Mac OS X: \~/Library/Application Support/harrisonconsoles
- Windows: \~/AppData/Local/harrisonconsoles
- Linux: \~/.config/harrisonconsoles
Licensing from a USB Drive
The plugin can also detect a license if it is stored on a USB drive. This can be useful if you're using someone else's computers and you want to license an AVA plugin without installing your license onto the computer.
In order to do this, you must name your USB drive as "HARRISON" and place your license file in its root directory. This is the only way the plugin can detect your license on a USB drive.
For additional questions about the license, please contact our plugin support department via email: plugins@harrisonconsoles.com
Finding the AVA plugin in your DAW
DAW operations vary tremendously. Generally speaking, to use the AVA plugin you must follow these steps:
1) Install the plugins, using the provided plugin installer application.
2) Follow your DAW's instructions to "scan" for new plugins.
Please refer to your DAW manual to see which plugin formats (AAX, AU, VST, or VST3) are supported by your workstation.
Most plugin formats require that plugins are installed to a specific location on the system. In these cases, the AVA installer will place the plugins in the default locations.
For VST format, on Windows, it is normally expected that the user define the location of VST plugins, and tell the workstation where to find the plugins. The default location for VST plugins is C:\Program Files\Steinberg\VST. The AVA plugin installer will save the VST (.dll) files to that location if a custom VST path is not provided by the OS. If you are having trouble, you should verify that the path is included in your DAW VST scan paths.
System Requirements
Your system must meet the following requirements in order to run Harrison AVA plugins:
- Windows 7 or higher
-
Mac OS 10.9 or higher
●Linux GCC 5 compatible systems -
OpenGL 3.2 or higher
- libcurl-gnutls on Linux
Additional requirements on Windows
AVA plugins require the "Windows C++ Universal Runtime" to be installed on your computer. Universal runtime is part of the system's core libraries on Windows 10. On Windows versions Vista to 8.1, it will be automatically installed via Windows Update. It is also possible to install the runtime manually, but that is outside the scope of this manual.
Note for Linux Users
If you're experiencing issues with an AVA plugin's graphics or the GUI isn't showing up correctly on Linux, make sure your system's graphics driver supports the minimum required OpenGL version of 3.2 or higher. To check this, run glxinfo | grep Max in a terminal window and make sure that the value listed for the OpenGL compat profile version is at least 3.2 or greater.
If your core profile version meets this requirement but you are still experiencing graphics issues like the ones mentioned above, it is likely that your system is reporting an OpenGL version lower than 3.2 to ensure backwards compatibility with deprecated OpenGL functions. To work around this, you can force the system to report an OpenGL version of 3.2 or higher by setting this environment variable: MESA_GL_VERSION_OVERRIDE=3.2
You can use this as a prefix when opening your DAW from a terminal command like so:
MESA_GL_VERSION_OVERRIDE=3.2 {command_to_launch_program}
This will set the environment variable for that particular terminal session only, so it will be reset once the session is ended. If you don't want to run this command every time you launch your DAW, you can set the environment variable in your profile script so that it automatically gets set every time you login.
Thank you for purchasing this Harrison AVA plugin!
Harrison has been making products for the audio engineering industry since 1975. We continue to make these products, with intense dedication, from our Nashville, Tennessee factory.
As the audio industry has changed through the decades, Harrison has too. Originally launched to provide mixing consoles for music recording studios, the Harrison brand has extended to
provide products for live broadcast, live sound, theater installations, post-production, film dubbing stages, and bedroom studios. We've lived through the launch of the commercial music industry, the maturation of analog, the digital revolution, the establishment of the internet, and now the acceptance of computers as the de-facto platform for the audio industry. In our pursuit of audio excellence, we've developed our own analog circuits, digital I/O solutions, digital DSP engines, control surfaces, audio workstations, and nearly every aspect of pro-audio technology.
"If you asked a hundred engineers, mixers and producers to define the "perfect console" you would probably get a hundred answers. The answers, however, would all contain the same salient points."
"The "perfect console" would have totally transparent sound, capturing the true musical quality of all performances. It would have unlimited features, facilities, and functions. It would perform all required tasks with a minimum of operator effort. It would be totally reliable and require no preventive or corrective maintenance...
You can spend the rest of your life looking for the "perfect console". You'll never find it. You will find, however, that we have what you need." - quote attributed to Dave Harrison; Harrison MR20 brochure; circa 1982
True-er words were never spoken; indeed every year there are many products and technologies that seem tantalizingly necessary for audio excellence. Our lasting experience has proven that simple, straightforward, well-engineered, and great-sounding tools are the only necessity.
The AVA plugins represent the pinnacle of Harrison's engineering practices for digital audio sound & workflow. We sincerely hope that you enjoy using these tools as much as we enjoyed creating them. Your continued support is greatly appreciated!