LWN1862QAS - Washing machine LG - Free user manual and instructions
Find the device manual for free LWN1862QAS LG in PDF.

User questions about LWN1862QAS LG
0 question about this device. Answer the ones you know or ask your own.
Ask a new question about this device
Download the instructions for your Washing machine in PDF format for free! Find your manual LWN1862QAS - LG and take your electronic device back in hand. On this page are published all the documents necessary for the use of your device. LWN1862QAS by LG.
USER MANUAL LWN1862QAS LG
Room Air Conditioner
(Window Type)
OWNER'S MANUAL

natural_image
Abstract circular design with a stylized white 'L' and a white circle, no text or symbols present.Safety Precautions
To prevent injury to the user or other people and property damage, the following instructions must be followed.
■ Incorrect operation due to ignoring of instruction will cause harm or damage, the seriousness is classified by the following indications.

WARNING
This symbol shows the possibility of causing death or serious injury.

CAUTION
- This symbol indicates the possibility of injury or damage to properties only.
■ The items to be followed are classified by the following symbols.
 | Never Do This | ||
 |  |  | Always Do This |

WARNING
• Otherwise, it will cause electric shock or fire due to heat generation or electrical shock.
- It will cause electrical shock or fire due to heat generation.
- It will cause electrical shock or fire.
- If the supply cord is damaged, it must be replaced by a special cord or assembly available from the manufacturer or its service agent.


text_image
Diagram showing a hand inserting a socket into an electrical outlet with a prohibition symbol and directional arrow indicating disconnection or disassembly.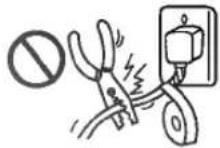
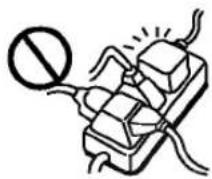
- It will cause electrical shock or fire due to heat generation.
- It may cause electrical shock.
• This could damage your health.

text_image
Illustration showing a person reacting to a noise disturbance with a prohibition symbol
CAUTION
• It may cause an injury.
• Water may enter the unit and degrade the insulation. It may cause an electric shock.
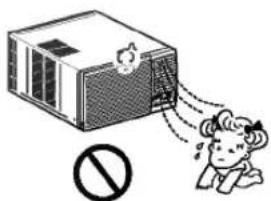
• An oxygen shortage may occur.
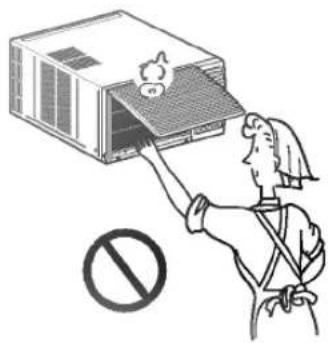
natural_image
Illustration of a person using a device to remove a small box, with a prohibition symbol below (no text or labels)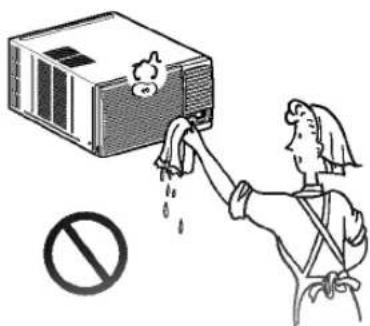
text_image
Illustration showing a person cleaning a large industrial machine with a prohibition symbol below
natural_image
Illustration showing a smiling computer monitor and a person cleaning a window with a warning symbol (no text or labels)• Since the fan rotates at high speed during operation, it may cause an injury.
• This could injure the pet or plant.
- Do not use this air conditioner to preserve precision devices, food, pets, plants, and art objects. It may cause deterioration of quality, etc.

natural_image
Illustration of a person using a device to clean an air conditioner unit, with a warning symbol and electrical outlet nearby (no text or symbols on the device itself)
text_image
Diagram illustrating a birdhouse ventilation system with a prohibition sign, a potted plant, and airflow direction arrows.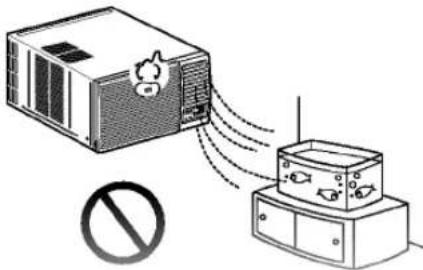
text_image
Diagram showing airflow from a device to a box with a prohibition symbol below- It may cause an electric shock.
- It may cause a fire or deformation of the cabinet.
• It may cause imperfect combustion.

text_image
Illustration showing a person collapsing from a device with a 'no' symbol below, indicating no pollution or damage.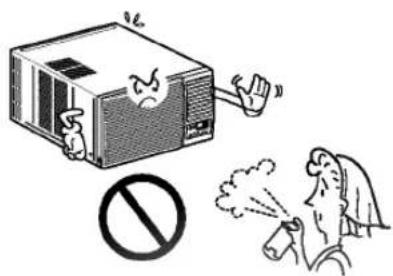
text_image
Illustration showing a computer emitting exhaust smoke, with a prohibition symbol and a person emitting smoke.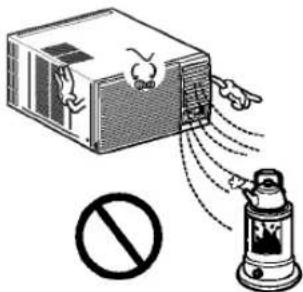
text_image
Diagram showing a device emitting particles with a prohibition symbol below, indicating no protection or no action.The controls will look like the following.

text_image
Mode Fan Cool Dry Timer On 22 Fan Speed Temp Auto Swing Power ① ② ③ ④ ⑤ ⑥ ⑦ Mode Fan Cool Defrost Heat Timer On 22 Fan Speed Temp Auto Swing Power ① ② ③ ④ ⑤ ⑥
text_image
Diagram of two remote control devices with labeled buttons and icons, showing numbered positions for function callouts.
Controls
Precaution: The Remote Control unit will not function properly if strong light strikes the sensor window of the air conditioner or it there are obstacles between the Remote Control unit and the air conditioner.
POWER BUTTON
Operation starts, when this button is pressed and stops when you press the button again.
OPERATION MODE SELECTION BUTTON
Select Cooling, Heating, Fan or Dehumidification(Dry) mode with this button.
3 ON/OFF TIMER BUTTON
Set the time of starting and stopping operation.
The timer is set by 1 hour.
FAN SPEED SELECTOR
- Cooling Model: High[F3] → Low[F1] → Med[F2] → High[F3] ....
- Heating Model: High[F2] → Low[F1] → High[F2] ....
ROOM TEMPERATURE SETTING BUTTON
Control the room temperature within a range of 16°C to 30°C.
The unit takes an average of 30 minutes to adjust the room temperature by 1 °C (1.8 °F).
Temperature increases only by 2°C and no longer increase thereafter.
AUTO SWING
The vertical louver swings horizontally by the automatic system and stops when you press the button again.
SIGNAL RECEIVER
- STORAGE
The remote control may be stored mounted on a wall.

flowchart
graph TD
    A["Hand holding tool"] --> B["Inserted component"]
    B --> C["Arrow to device with 'B' label"]
    C --> D["Arrow to device with 'B' label"]
    D --> E["Final device"]
Auto Restart
In case the power comes on again after a power failure, Auto Restarting Operation is the function to operate procedures automatically to the previous operating conditions.
How to Insert the Batteries
Remove the battery cover by pulling it according to the arrow direction.
2 Insert new batteries making sure that the (+) and (-) of battery are installed correctly.
3 Reattach the cover by pushing it back into position.
NOTES:
- Use 2 AAA(1.5volt) batteries. Do not use rechargeable batteries.
- Remove the batteries from the remote control if the system is not going to be used for a long time.

natural_image
Two-step illustration showing hand positioning of a device, with arrows indicating movement direction (no text or symbols)Vent Control
The vent control is located above the control knobs.
When set at CLOSE, only the air inside the room will be circulated and conditioned. When set at OPEN, some inside air is exhausted outside.

natural_image
Pure mechanical diagram showing a lever mechanism with an arrow indicating direction (no text or symbols)CLOSE VENT OPEN
To open the vent, pull the lever toward you. To close it, push it in.
Air Direction
The direction of air can be controlled horizontally or vertically by using the horizontal louver or vertical louver.
• Horizontal Air-Direction
The horizontal air direction is adjusted by pressing the AUTO SWING ( ≈ ) button. If you want to stop the air flow from moving, press the button again at the desired position of the louver.
• Vertical Air-Direction
Fingertip pressure on the bank of horizontal louvers adjusts the air direction up or down

natural_image
Illustration of two server units connected to a remote control panel with a hand pointing to the right (no text or symbols present)Grille and Case
Turn the air conditioner off and remove the plug from the wall outlet before cleaning.
To clean, use water and a mild detergent. Do not use bleach or abrasives.
Outdoor Coils
The coils on the outdoor side of the air conditioner should be checked regularly. If they are clogged with dirt or soot they may be professionally steam cleaned, a service available through a dealer.

natural_image
Line drawing of a rectangular industrial air conditioner unit with grid-patterned insulation (no text or symbols)Air Filter
The air filter behind the front grille should be checked and cleaned at least once every 2 weeks or more often if necessary. The grille is designed to clean the filter both upward and downward.
To remove:
Open the inlet grille upward by pulling out the bottom of the inlet grille or downward by pulling out the top of the inlet grille.
2 Using the tab, pull up slightly on the filter to release it and pull it down or up.
3 Clean the filter with warm, soapy water below 40°C (104°F).
Rinse and gently shake the water from the filter and let it dry before replacing it.
CAUTION: DO NOT operate the air conditioner without a filter because dirt and lint will clog it and reduce performance.

natural_image
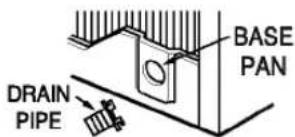
Illustration of three different household air conditioner unit designs: front panel, back panel, and floor drain (no text or symbols present)Drainage
In humid weather, excess water may cause the BASE PAN to overflow.
1. When the rear hole of the BASE PAN is open, connect the drain pipe.
2. When the rear hole of the BASE PAN is capped with HOLE RUBBER, replace with the DRAIN PIPE if you need to drain.
text_image
BASE PAN DRAIN PIPE2 In very humid area, you can install the drain pan as below.
1. Take the drain pan which is located in the air discharge.
2. Remove the hole rubber from the base-pan. (for some models).
3. Install the drain pan to the right corner of the cabinet with screws.
Connect the drain hose to the outlet located at the DRAIN PIPE or the bottom of the drain pan.
You can purchase the drain hose or tubing locally to satisfy your particular needs. (Drain hose is not supplied).

text_image
CABINET DRAIN PAN SCREW DRAIN HOSELearning parts name prior to installation will help you understanding the installation procedure.
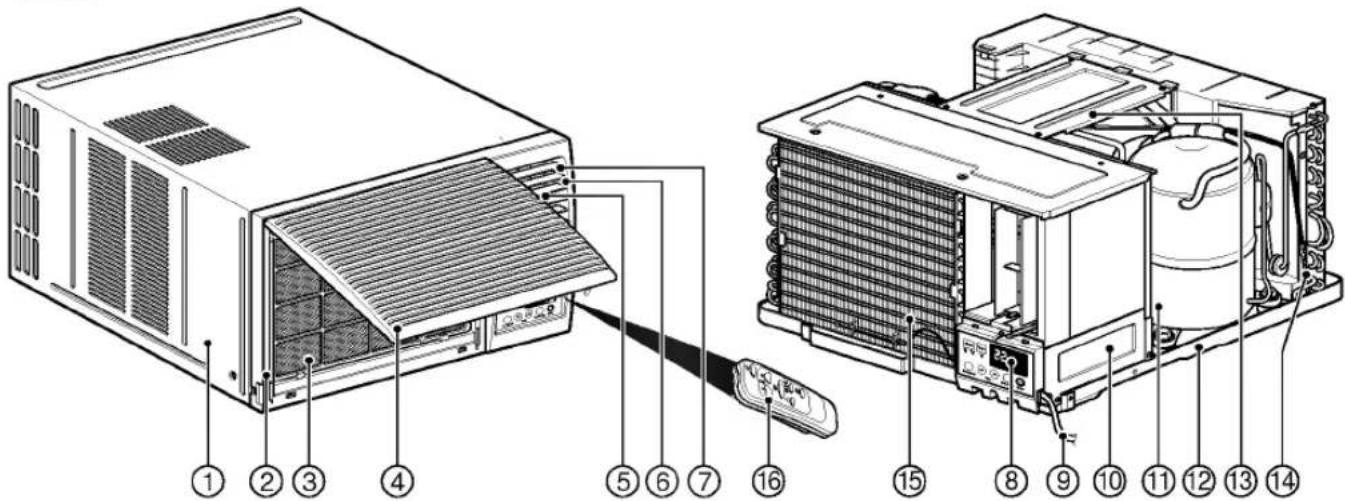
Features
text_image
Technical diagram of an air conditioner unit with numbered components and labeled parts- CABINET
- FRONT GRILLE
- AIR FILTER
- AIR INTAKE(INLET GRILLE)
- AIR DISCHARGE
- VERTICAL AIR DEFLECTOR (HORIZONTAL LOUVER)
-
HORIZONTAL AIR DEFLECTOR (VERTICAL LOUVER)
-
CONTROL PANEL
- POWER CORD
- COVER CONTROL
- COMPRESSOR
- BASE PAN
- BRACE
- CONDENSER
- EVAPORATOR
- REMOTE CONTROL
Installation Hardware
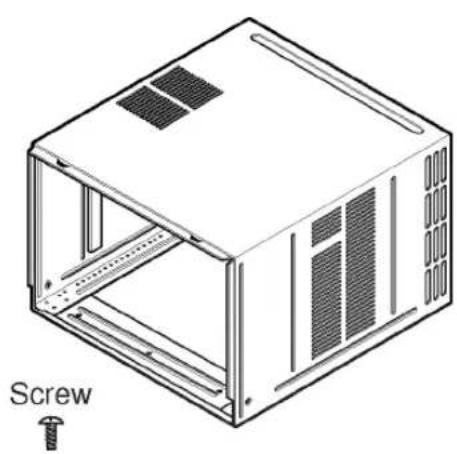
natural_image
Isometric line drawing of a modular electronic device with screw and ventilation slots (no text or symbols)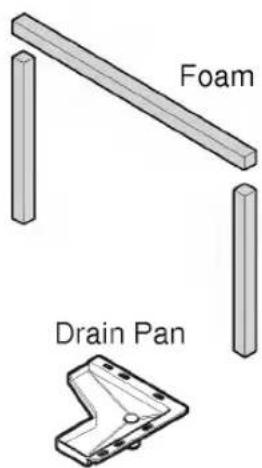
text_image
Foam Drain PanRead completely, then follow step-by step.
• The appliance shall be installed in accordance with national wiring regulation.
- If a power plug isn't to be used, provide a circuit breaker between power source and the unit, as following picture.
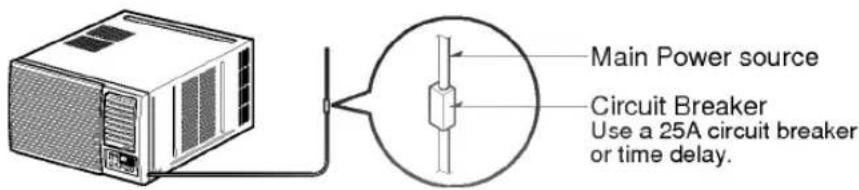
text_image
Main Power source Circuit Breaker Use a 25A circuit breaker or time delay.Select the Best Location
A To prevent vibration and noise, make sure the unit is installed securely and firmly.
B Install the unit where the sunlight does not shine directly on the unit.
There should be no obstacle, such as a fence or wall, within 50cm from the back of the cabinet because it will prevent heat radiation of the condenser.
Restriction of outside air will greatly reduce the cooling efficiency of the air conditioner.
D Install the unit a little obliquely outward not to leak the condensed water into the room (about 10 \~ 15mm or 1/4 bubble with level).
CAUTION: All side louvers of the cabinet must remain exposed to the outside of the structure.
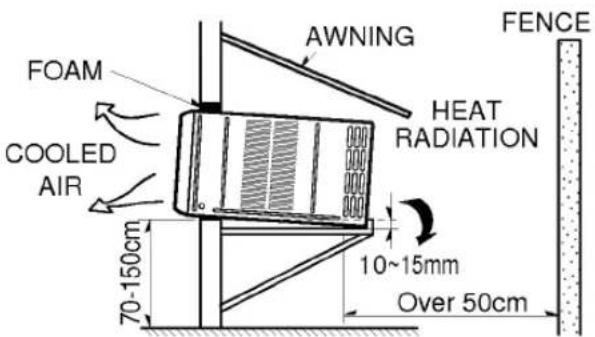
text_image
FOAM COOLED AIR 70-150cm AWNING HEAT RADIATION 10~15mm Over 50cm FENCE
text_image
1/4 Bubble LevelRemove the Air Conditioner From the Case
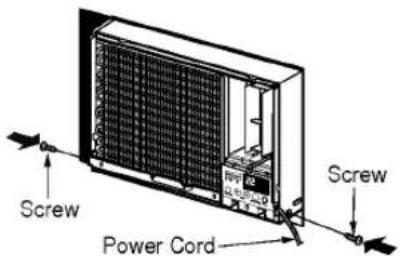
A Remove the 2 shipping screws from the back of the case.
B Remove the 2 screws on each side of the case. Keep these for later use.
C Slide the air conditioner from the case by gripping the base pan handle and pulling forward while bracing the case.

text_image
Shipping screwsInstall the Air Conditioner in the Case
A Slide the air conditioner into the case. Reinstall the 2 screws removed earlier on each side of the case.
text_image
Screw Power Cord ScrewCAUTION: The power cord must be connected to an independent circuit. The green wire must be grounded.
B Stuff the foam between the top of the unit and the wall to prevent air and insects from getting into the room.
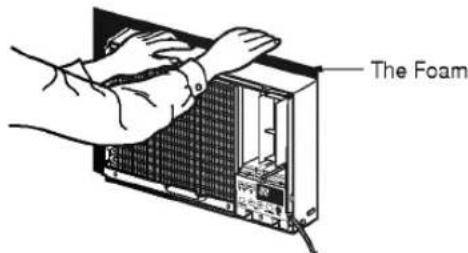
text_image
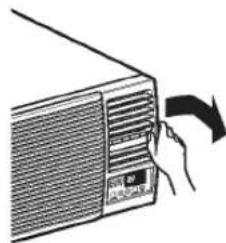
The FoamC Before installing the front grille, pull out the vent control lever located above the unit control knobs, as shown.

natural_image
Technical line drawing of a mechanical assembly with gears and a tool (no text or symbols)D Attach the front grille to the case by inserting the tabs on the grille into the slots on the front of the case. Push the grille in until it snaps into place.

text_image
Diagram showing airflow or ventilation process of an air conditioner unit with labeled components and directional arrowsWhen you detach the front grille from the case, push the grille to your rightside and pull it toward you.
natural_image
Illustration of a hand inserting a fan into an air conditioner unit (no text or symbols)E Lift the inlet grill and secure the front grille with a screw. Lower the inlet grille into place.

natural_image
Illustration of a computer tower with hands inserting a fan into the rack (no text or symbols)Use the Reversible Inlet Grille
A If you want to pull out the filter upward, open the inlet grille slightly. Turn inside out the front grille.
Disassemble the inlet grille from the front grille with separating the hinged part by inserting a "—" type screw-driver tip.
Rotate the inlet grille 180 degrees and insert the hooks into the lower holes of front grille.
Then, insert the filter
B If you want to pull out the filter downward, use the reversible inlet grille without change.(The grille is already assembled for that way.)

natural_image
Illustration showing two steps of installing or adjusting a wall-mounted air conditioner cover (no text or symbols present)
Troubleshooting Tips
Save time and money! Review the chart below first and
you may not need to call for service.

Normal Operation
- You may hear a pinging noise caused by water being picked up and thrown against the condenser on rainy days or when the humidity is high. This design feature helps remove moisture and improve efficiency.
- You may hear the thermostat click when the compressor cycles on and off.
- Water will collect in the base pan during high humidity or on rainy days. The water may overflow and drip from the outdoor side of the unit.
• The fan may run even when the compressor does not.
Abnormal Operation
| Air conditioner does not start | ■ The air conditioner is unplugged. | · Make sure the air conditioner plug is pushed completely into the outlet. |
| ■ The fuse is blown/circuit breaker is tripped. | · Check the house fuse/circuit breaker box and replace the fuse or reset the breaker. | |
| ■ Power failure. | · If power failure occurs, turn the mode control to OFF. When power is restored, wait 3 minutes to restart the air conditioner to prevent tripping of the compressor overload. | |
| Air conditioner does not cool as it should | ■ Airflow is restricted. | · Make sure there are no curtains, blinds, or furniture blocking the front of the air conditioner. |
| ■ The THERMOSTAT may not be set high enough. | · Turn the knob to a higher setting. The highest setting provides maximum cooling. | |
| ■ The air filter is dirty. | · Clean the filter at least every 2 weeks. See the operating instructions section. | |
| ■ The room may have been hot. | · When the air conditioner is first turned on you need to allow time for the room to cool down. | |
| ■ Cold air is escaping. | · Check for open furnace floor registers and cold air returns.· Set the air conditioner's vent to the closed position. | |
| ■ Cooling coils have iced up. | · See Air Conditioner Freezing Up below. | |
| Air conditioner freezing up | ■ Ice blocks the air flow and stops the air conditioner from cooling the room. | · Set the mode control at HIGH fan or HIGH cool with the high temperature. |