ONEPWR SpotlessGo CLSW-SGBS - Vacuum Cleaner VAX - Free user manual and instructions
Find the device manual for free ONEPWR SpotlessGo CLSW-SGBS VAX in PDF.

User questions about ONEPWR SpotlessGo CLSW-SGBS VAX
0 question about this device. Answer the ones you know or ask your own.
Ask a new question about this device
Download the instructions for your Vacuum Cleaner in PDF format for free! Find your manual ONEPWR SpotlessGo CLSW-SGBS - VAX and take your electronic device back in hand. On this page are published all the documents necessary for the use of your device. ONEPWR SpotlessGo CLSW-SGBS by VAX.
USER MANUAL ONEPWR SpotlessGo CLSW-SGBS VAX
VAX ONE PWR CORDLESS
vax SPOTLESSGO
POWERFUL CORDLESS SPOT WASHER
USER GUIDE

natural_image
Close-up of a cleaning tool with a mesh brush and a spherical component labeled 'SPOTLESSGO' (no readable text beyond label)
natural_image
Black and white photo of a Vax OnePaper Complex vacuum cleaner with visible branding and hose (no text-heavy elements)SAFETY GUIDE
This machine is intended for household use only and NOT for commercial or industrial use.
PLEASE KEEP INSTRUCTIONS FOR FURTHER USE AND USE ONLY AS INSTRUCTED IN THIS GUIDE.
DON'TS
- Don't leave the charger plugged in when unattended.
- Don't use the machine if it is faulty or has been dropped, damaged or left outdoors.
- Don't use the machine to pick up any flammable or combustible materials (lighter fluid, petrol, kerosene etc.) or use the machine in an area with explosive vapours or liquid.
- Don't use the machine to pick up hot coals, cigarette butts, matches or smoking hot burning items or use in an area where there may be harmful fluids (chlorine, bleach and ammonia drain cleaner).
- Don't use the machine outside during wet weather conditions.
- Don't handle the charger, battery or use the machine with wet hands.
- Don't unplug the charger by pulling on the power cord.
- The power cord cannot be replaced. If the cord is damaged the charger should be scrapped.
- Don't attempt to remove blockages
user. The correct battery charger information is listed on the battery pack ratings label.
- Don't charge the battery outdoors, or leave the charger connected to the mains when not in use.
- Don't use the machine with a damaged battery. If the battery is damaged contact 08000 927737.
- Don't carry the machine while it's switched on.
- Don't use on a surface that is damaged, uneven or incorrectly fitted.
DO'S
- Only VAX ONEPWR batteries (BV15020/BV15030/BV25040/BV25030) and charger (BV05100UK) should be used with this machine.
• Always stand the charger on a stable, level surface, uncovered and away from any heat source. - Only VAX ONEPWR recommended tools and accessories should be used with this machine.
- Refer to the floor/surface manufacturer's care recommendations before use. Test your flooring/surface - run the machine over a small hidden area, if no damage or discolouration occurs continue cleaning. Not suitable for use on water-sensitive flooring
SAFETY GUIDE
- Keep all openings clear and free from debris as this may affect the airflow/suction.
- Turn off all controls on the machine before disconnecting or connecting the battery.
- Store the machine in a cool, dry area. Before storing ensure all water/solution tanks and filters are thoroughly clean and dry.
- This machine is not intended to be used or cleaned by persons with reduced physical, sensory or mental capabilities, or lack of experience or knowledge, unless they have been given instructions concerning the safe use of the machine by a person legally responsible for their safety. They should be supervised whilst using the machine. Children shall not use, clean or play with this machine, which when not in use should be secured out of their reach.
- Keep fingers, hair and loose clothing away from moving parts and openings whilst using the machine.
- Use only CE approved 13amp extension cords, non-approved extension cords may overheat. Care should be taken to arrange the extension cord as it can be a trip hazard.
-
The water/solution tank should be filled with warm water (mL/40°C)
-
Only VAX recommended solution should be used with the machine. Using other solutions may invalidate the guarantee (see page 7).
• Always use the machine in an upright position. To prevent motor damage from dirty water, never hold the machine upside down or on its side. Always stand the machine on a stable, level surface.
BATTERY SAFETY PRECAUTIONS
- This machine is intended for indoor cleaning and vehicle interiors during dry weather conditions.
- Replace the battery with a VAX ONEPWR battery only. Use of another battery may present a risk of fire or explosion.
- Do not attempt to disassemble the battery, remove any component projecting from the battery terminals and do not dispose of in a fire. The battery and charger have no user serviceable parts. Fire or injury may result.
- Prior to disposal, protect exposed terminals with heavy insulating tape to prevent shorting. The battery is to be disposed of safely at your local battery recycling centre.
- When the battery pack is not in use, keep it away from other metal objects that can make a connection
WARRANTY & TECHNICAL
WARRANTY
If a VAX ONEPWR machine is used in the way it is intended and it breaks down within the guarantee period, it's our responsibility to repair or replace it. Here's what isn't covered:
- Normal wear and tear of consumable items, for example: belts, filters, brushbars, fuses etc.
- Batteries which have become faulty as a result of improper handling.
- Batteries which have a reduced service life as a result of normal wear.
- Accidental damage
- Damage as a result of use not in accordance with the product user guide.
- Damage caused by not carrying out regular maintenance.
- Damage to the charger cable.
- Blockages caused by misuse.
- Faults caused by:
- Negligent use, misuse, neglect or careless operation of the machine.
- Use of the machine cleaner which is not in accordance with the user guide.
- Use of a VAX ONEPWR machine for anything other than normal domestic household purposes in the country in which it was purchased.
- Use of parts, accessories and consumables, which are not genuine VAX components.
- Faulty installation or repairs – unless carried out by a qualified electrician or engineer.
TECHNICAL
EU Statement of Compliance: Manufacturer/EU importer: VAX Limited, hereby on our own responsibility, declare that the VAX ONEPWR SpotlessGo is manufactured in compliance with the following Directives:
Safety: 2014/35/EU Low Voltage Directive.
EMC: 2014/30/EU Electromagnetic Compatibility Directive.

CE
Waste electrical products should not be disposed of with household waste. Please recycle where facilities exist. Check with your Local Authority or retailer for recycling advice.
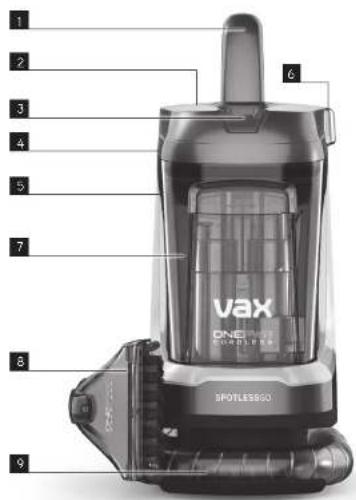
GETTING TO KNOW YOUR MACHINE
text_image
1 2 3 4 5 6 7 8 9 VAX ONE DUTTER SPOTLESSGOCarry handle
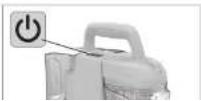
2 Power ON/CFF
3 Dir y water tank release latch
4 Battery dock (hidden)
5 Main unit
6 Water/solution tank
7 Dirty water tank
8 Wash tool
9 Hose
10 Multi-purpose attachment
11 Squeegee attachment
12 Hard floor scrub attachment
13 ONEPWR Battery
14 ONEPWR Charger
15 250ml VAX Solution

10

11

12

13

14

15

TECHNICAL SPECIFICATION
VAX ONEPWR SpotlessGo
Wainth (festival, rural park), 2.9%
GETTING STARTED
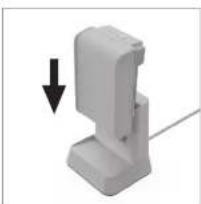
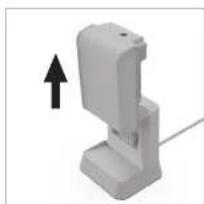
CHARGING THE BATTERY
THIS MACHINE IS ONLY TO BE USED WITH VAX ONEPWR BATTERIES AND CHARGER. PLEASE READ THE SAFETY GUIDE BEFORE USE.
NOTE: Before first use, ensure the battery is fully charged. Failure to fully charge the battery before first use may result in poor battery performance. The life expectancy of the battery will vary depending on the usage of the machine.
natural_image
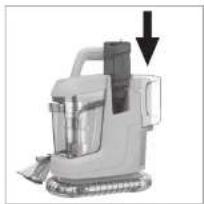
3D rendered image of a white mechanical device with a black arrow pointing downward (no text or symbols)Slide the battery down on to the charger.

natural_image
3D rendered image of a gray plastic electronic device with a cable (no text or symbols visible)The charger light will flash white to show when the battery is charging. The light on the charger will stop flashing and go off when the battery is fully charged.
natural_image
3D rendered image of a white mechanical device with an arrow indicating upward motion (no text or symbols)Once fully charged, side the battery of
the charger to remove.

To check the battery charge level, press the battery symbol.
ASSEMBLY

natural_image
Close-up of a mechanical component with a black arrow indicating rotation or assembly (no visible text or symbols)
natural_image
Close-up of a mechanical component with a downward arrow indicating a process or operation (no visible text or symbols)Holding the cover open, slide the factory

natural_image
Close-up of a mechanical device with a curved arrow indicating rotation or movement (no visible text or symbols)Close the battery cover.Ful. to open the batter
GETTING STARTED
IMPORTANT: Before using the machine to clean dried-on stains and dirt, the flooring should be vacuumed throughly.
- Test for colourfastness - Wet a white absorbent cloth with the solution. In a small hidden area of your carpet/rugs/upholstery/hard floors, gently rub with the dampened cloth. Wait ten minutes and check for colour removal or bleed with white paper towel or cloth. Check all carpets/rugs/upholstery material before first use and if your carpet has more than one colour, check all colours.
- Test all carpets/rugs/upholstery/hard floors before use. Test the spot washer on a small hidden area. If no damage or pile distortion occurs continue cleaning.
- Move furniture out of the area to be cleaned. If the furniture cannot be moved, place aluminium foil or wax paper under the legs. This will prevent wood finishes from staining your carpet.
- When using the spot washer, basic safety precautions should always be observed and don't over saturate your carpets/rugs/upholstery/hard floors.
- Only use VAX ONEPWR Multi-floor Solution, VAX Spot Washer Antibacterial Cleaning Solution or VAX Spot Washer Cleaning Solution. Using other solutions may cause excess foaming and will invalidate your guarantee.
- The water/solution tank should only be filled with warm water (max 40°C). Filling the water/solution tank with hot/boiling water will damage your washer and invalidate the guarantee.
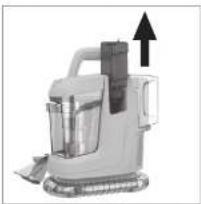
OPERATION
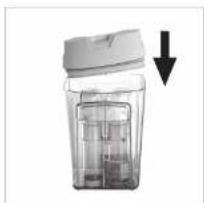
natural_image
3D rendering of a vacuum cleaner with an upward arrow indicating motion (no text or symbols)Lih to remove the water/solution tank from the side of the machine

natural_image
Diagram of a mechanical device with a cylindrical component and transparent casing, showing internal structure (no text or symbols)Unrecr. the cap and fill to the water and solution markers on the bark.
natural_image
Industrial cleaning machine with downward arrow indicating inspection or damage (no text or symbols visible)Replace the cap slightly and push the tack down up to the machine until it clicks into place.
IMPORTANT: Your dirty water tank is fitted with a float. When the dirty water tank is full, the float will shut off the suction on the spot washer. You will be able to hear if this has happened as the motor noise on the washer will increase. Once the float is activated, empty the dirty water tank if full
GETTING STARTED
NOTE: For heavily soiled areas, it may be necessary to repeat the cleaning process. Make criss-crossing strokes across the original pattern and overlap with each pass.
OPERATION
natural_image
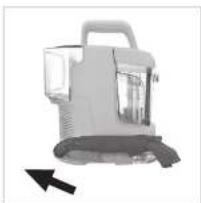
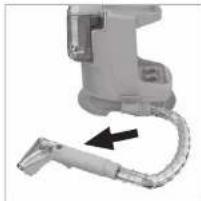
Exterior view of a modern office building (no signage)I did the wash tool and fuse out of the holder to release from the side of the machine.

natural_image
Three mechanical components with textured surfaces, no visible text or symbolsSelect the desired level attachment.
① Multi-purpose Attachment
For clearing carpets, uas, soas and up to story.
② Squeeze Attachment
For clearing epic doors, windows, glass and hard floor spill pick up.
③ Hard Floor Scrub Attachment
Far desiring likes and sealed windows leaves.
natural_image
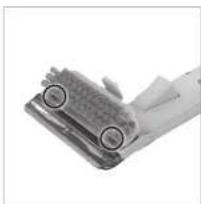
Close-up of a mechanical component with circular features, possibly a tool or bracket (no visible text or symbols)Hock the lakes on the soles: at a barent into the wash tool and clip into place.
natural_image
Close-up of a mechanical lever with fluid jet spraying (no text or symbols visible)Press the trigger on the wash tool to release water and solution.
natural_image
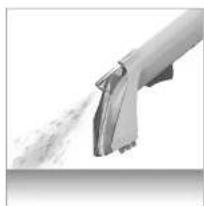
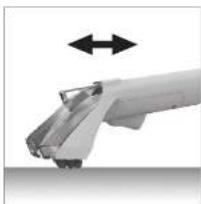
Close-up of a robotic arm with bidirectional arrow indicating movement (no text or symbols)Use the brush to agitate any slubborn slabs.


CLEANING AND MAINTENANCE
WARNING: Always switch off the machine and remove the battery before carrying out any maintenance or troubleshooting.
IMPORTANT: Empty and rinse out the water/solution tank and dirty water tank and leave to air dry before replacing. Do not leave solution stored in the tanks between uses.
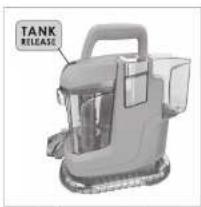
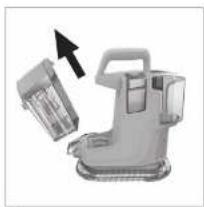
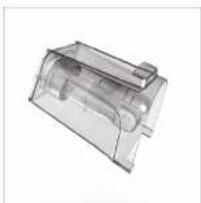
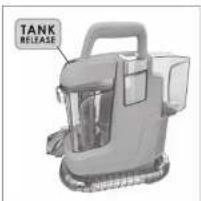
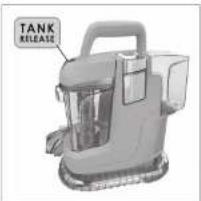
EMPTYING AND CLEANING THE DIRTY WATER TANK
text_image
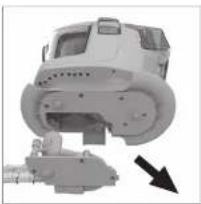
TANK RELEASEPress the dirty water tank release latch and pull the tank to remove.
natural_image
3D rendered image of a mechanical device with an arrow pointing to a component (no text or symbols visible)
natural_image
Diagram of a transparent cylindrical container with internal compartments and a lid, showing an upward arrow (no text or symbols)Lift the lid to remove from the dirty water tank.
natural_image
3D rendering of a transparent plastic mechanical component (no text or symbols visible)Empty the dirty water over a sink or toilet. Rinse the dirty water tank and under water (max 40°C) to remove dirt/debris.
natural_image
Illustration of a glass container with internal compartments and a lid, showing a downward arrow (no text or symbols)Replace the lid.

natural_image
Exterior view of a modern office building (no signage)To re-fit, fit the dirty water tank and line the front of the tank up onto spot was he. Push back until it clicks into place.
CLEANING & MAINTENANCE
WARNING: Always switch off the machine and remove the battery before carrying out any maintenance or troubleshooting.
CLEANING THE FILTER
text_image
TANK RELEASE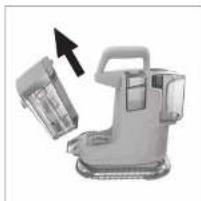
natural_image
Illustration of a kitchen brush with an arrow indicating compression or lifting (no text or symbols)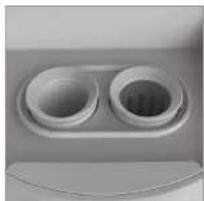
natural_image
Close-up of a white cylindrical object with two circular indentations, possibly a vent or lid (no text or symbols visible)Press the dry water tank release latch and pull be tank to remove. Remove any dirt and debris from the Hein located underneath the dirty water tank.
NOTE: Before using the machine to clean dried-on stains and dirt, the flooring should be vacuumed throughly. This will prevent a build up of dirt and debris in the hose and nozzle.
IMPORTANT: If the nozzle is fitted incorrectly, this will cause poor dirty water pick up.
CLEANING THE WASH TOOL NOZZLE AND ATTACHMENTS

natural_image
Close-up of a mechanical component with an arrow indicating direction (no visible text or symbols)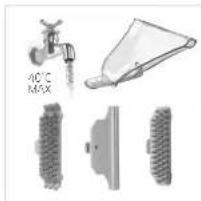
natural_image
Illustration of mechanical components including a faucet, blade, and gear (no text or symbols)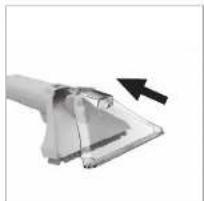
natural_image
Close-up of a metallic mechanical component with an arrow indicating direction (no visible text or symbols)CLEANING & MAINTENANCE
CLEANING AND REMOVING BLOCKAGES IN THE HOSE
text_image
TANK RELEASEPress the early water tank release lake and put the lanes to remove.
natural_image
Close-up of a mechanical device with a curved arm and a black arrow pointing to a component (no visible text or symbols)Re-gase the nose from the side of the washer.

natural_image
Close-up of a mechanical component with circular features and internal structure (no visible text or symbols)Let the washer on its side and undo the 3 screws on the base.
natural_image
Mechanical device with a black arrow pointing to a component (no visible text or symbols)Pull to remove the base assembly away from the base of the washer.

text_image
40°C VAXSince the heat under warm water (45°C) to remove any clay and debris.
TROUBLESHOOTING
THERE IS AN ACCESSORY MISSING
Check the contents on the back of the box.
WHY DOES THE MACHINE HAVE NO POWER?
• The battery is not fitted correctly. See ASSEMBLY page 6.
• The battery has no charge. See CHARGING THE BATTERY page 6.
WHY WON'T THE SOLUTION/WATER DISPENSE?
- Squeeze the trigger on the hose to release solution and water mix.
- Make sure the water/solution tank is fitted securely. See OPERATION page 7.
- The water/solution tank valve may be stuck, hold the water/solution tank over the sink and press the valve underneath to release.
- The water/solution tank is empty. Refill the tank. See OPERATION page 7.
WHY WON'T THE SPOT WASHER PICK UP?
- The float in the dirty water tank may have been activated. Empty the dirty water tank and wait for the float to settle before re-starting your machine.
- The nozzle may not be in contact with the surface, tilt the nozzle forwards. See OPERATION page 8.
- Check the hose for blockages and clear. See CLEANING AND REMOVING BLOCKAGES FROM THE HOSE page 11.
- Check the nozzle for blockages and clear. See CLEANING THE WASH TOOL NOZZLE page 10.
- The dirty water tank may not be assembled correctly or the lid may not pushed down securely. Soc EMPTYING AND CLEANING THE DIRTY WATER TANK page 9.
- Check the nozzle is correctly fitted. See CLEANING THE WASH TOOL NOZZLE page 10.
- Check the filter located under the dirty water tank for dirt and debris. See CLEANING THE FILTER page 10.
ACCESSORIES
Don't forget your solution!
Order at: www.vax.co.uk/spares-and-solutions
VAX
Multi-floor Solution (11)
1-9-142276
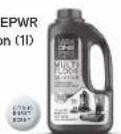
Together with the ONE 'WR Multi-Door Solution, the VAX SpollessGo will not only help tackle stairs, but also remove over 99% of bacteria.
VAX
Cleaning Solution (10)
1-9-142410

Perfect for cleaning rugs, carpets and upholstery around the home.
Specifically formulated for use with VAX sac washers to target spills and stains.

natural_image
Gradient gray bar with no text or symbols
natural_image
Gradient gray bar with no text or symbolsFor how-to videos and warranty registration visit www.vax.co.uk