SyncroIP DNE12TL22 - Security Camera FLIR - Free user manual and instructions
Find the device manual for free SyncroIP DNE12TL22 FLIR in PDF.

User questions about SyncroIP DNE12TL22 FLIR
0 question about this device. Answer the ones you know or ask your own.
Ask a new question about this device
Download the instructions for your Security Camera in PDF format for free! Find your manual SyncroIP DNE12TL22 - FLIR and take your electronic device back in hand. On this page are published all the documents necessary for the use of your device. SyncroIP DNE12TL22 by FLIR.
USER MANUAL SyncroIP DNE12TL22 FLIR
text_image
FLIR® formerly DIGMERGE | Right for BusinessSyncrolP Series IP Cameras
Software Manual
natural_image
Front view of a FLIR security camera with dual-mounted sensors (no visible text or symbols)TABLE OF CONTENTS
Overview 1
Notes 1
Web Configuration Interface 2
Supported Browsers 2
Internet Explorer Setup 2
Safari Setup 2
Live View 3
PTZ Controls (PTZ Cameras Only) 5
PTZ Control Panel 5
Scan 5
Preset 6
Pattern 7
Setup 9
Camera 9
Conditions 9
Profile Management 10
Zoom and Focus (Motorized Lens Cameras Only) 11
Video 12
Snapshot 13
Overlay 13
Path 14
Network 14
TCP-IP 14
Connection 15
PPPoE (Unsupported) 16
DDNS 16
Record Schedule 25
Snapshot Schedule 25
Holiday Schedule 26
Destination - Path 26
Destination - Local 27
Destination - FTP 27
Record Control 28
System 28
General 28
General - Date & Time 29
Account 29
Default 32
Import/Export 32
Auto Maintain 33
Upgrade 33
Information 34
Version 34
Log 34
Playback (Cameras with microSD Only) 35
Playback Controls 36
Backing up Video Files 36
Upgrade Tool 38
Installing a Firmware Upgrade Over the LAN 38
Installing a Firmware Upgrade Over the Internet 39
FLIR SyncrolP Central Management Software For PC 41
System Requirements 41
Installing FLIR SyncrolP CMS 42
Adding an IP camera from the Local Area Network (LAN) 42
Adding an IP camera using a DDNS address 44
CMS Live Viewing Overview 46
Configuring Projects 47
Running Tasks and Projects 48
10.12-5 10.13
Viewing Videos with Local File 58
Using Playback Mode on iPhone 59
Enabling Push Notifications 60
Device Manager 61
iPad 62
System Requirements 62
Prerequisites 62
Connecting to your IP camera on an iPad 62
FLIR SyncrolP NVR HD Interface 64
Device Manager 64
Using Playback Mode on iPad 65
Enabling Push Notifications 66
Android Phones 67
Compatible Devices 67
Prerequisites 67
Connecting to your IP Camera on an Android Phone 67
FLIR SyncrolP NVR Interface 69
Viewing Snapshots and Videos with Local Files 70
Using Playback Mode on Android Phones 70
Enabling Push Notifications 71
Device Manager 73
Android Tablets 73
System Requirements 73
Prerequisites 73
Connecting to your IP Camera on an Android Tablet 73
FLIR SyncrolP NVR HD Interface 75
Using Playback Mode on Android Tablets 76
Enabling Push Notifications 77
Device Manager 78
OVERVIEW
This manual covers the following topics related to your FLIR SyncrolP camera:
- Web browser configuration interface (page 2).
- Firmware update tool (page 38).
• PC CMS Software (page 41). - Smartphone / tablet apps (page 56).
Notes
- For physical installation instructions, please refer to the Quick Connection Guide for your camera model.
- The following models have a different web interface and supporting software: DND13TL2, DNB14L2, DNB13TL2, DNV14TL2, DNE14TL2. For instructions, please refer to the respective manual for these cameras.
WEB CONFIGURATION INTERFACE
The camera includes a built-in web interface that can be accessed using a web browser.
Supported Browsers
- Google Chrome, Mozilla Firefox, and Apple Safari® (via Webplugin)
- Microsoft Internet Explorer® 8.0 or later, 32-bit version (via ActiveX®)
Internet Explorer Setup
- Open Internet Explorer and enter the camera's IP address in the address bar in the following format: http://IP address:HTTP Port
• For example: http://192.168.0.100:80
- A notification bar appears asking if you would like to install ActiveX® plugins. Click Install or Allow to install the plugins.
This webpage wants to run the following add-on: 'Flir Systems' from 'FLIR Systems, Inc.' What's the risk?

Click Allow or Install
- Enter the camera user name (default: admin) and password (default: admin) and click Login.

Enter user name (default: admin) Enter password (default: admin)
Web Configuration Interface
- Click Please click here to download and install the plug-in.

text_image
Please click here to download and install the plug-in.- Double-click we bplugin.pkg in the downloads list to install. Follow the prompts to install.

text_image
Readet Downloads Clear webplugin.pkg 716 KB Double-click to install the pluginNOTE: If video from the camera does not appear after installation, quit Safari by right-clicking on the Safari icon in the dock and then selecting Quit. Then restart Safari and log back into your camera.
Live View
Upon login, the web interface opens to the Live View.
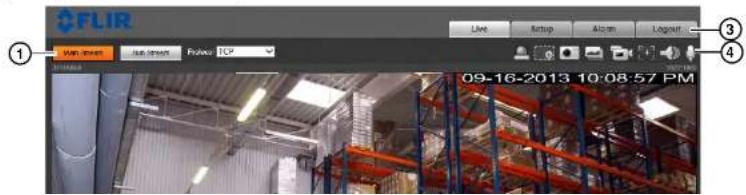
text_image
FLIR ① Wan Street Bus Street Fulwet TCP Live Setup Align Login 09-16-2013 10:08:57 PMWeb Configuration Interface
- Sub Stream: Click to view the Sub Stream. The Sub Stream is recommended for better performance when viewing the camera remotely.
- Protocol: Select the protocol that will be used to stream video: TCP or UDP.
NOTE: Multicast is not supported.
2. Video Display Controls

• Color Settings: Click to open color settings.
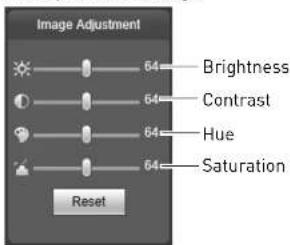
text_image
Image Adjustment 64 Brightness Contrast Hue Saturation Reset- Original Size: Click to view the video in its original size. This depends on the resolution and if you are viewing the Main Stream or Sub Stream.
- Full Screen: Click to view the video in full screen. Double-click or press ESC to exit full screen.
- Width/Height Ratio: Click select Original to use the original proportions of the image or Adaptive to adapt the image proportions to the size of the screen.
• Realtime/Fluency: Click to select Realtime, Normal, or Fluency. - PTZ Controls (PTZ cameras only): Click to hide/show PTZ camera controls. For details, see "PTZ Controls (PTZ Cameras Only)" on page 5.
2 Manu Tabs
Web Configuration Interface
- Snapshot: Click to save a snapshot from the camera to your computer hard drive. To configure the folder where snapshots are saved, see "Path" on page 14.
NOTE: Depending on your computer's security settings, you may need to run your browser as administrator to save snapshots or manual recordings.
- Triple Snapshot: Save the next three frames from the camera as snapshots.
- Manual Record: Click to start manually recording live video to your computer hard drive. Click again to stop recording. To configure the folder where manual recordings are saved, see "Path" on page 14.
- Manual Focus (motorized lens cameras only): Click to display the AF Peak and AF Max parameters for auto focus. The closer AF Peak and AF Max are, the better the focus effect is. To configure auto focus, see "Zoom and Focus (Motorized Lens Cameras Only)" on page 11.
- Audio Output: Click to mute/un-mute audio coming from the camera (audio-enabled cameras only; must have self-powered microphone connected to the camera).
- Intercom: Click to activate the intercom to the camera (audio-enabled cameras only; must have amplifier or speakers connected to the camera.
• Help: Click to access the built-in help file.
PTZ Controls (PTZ Cameras Only)
From Live View, click to open the PTZ control panel.
PTZ Control Panel
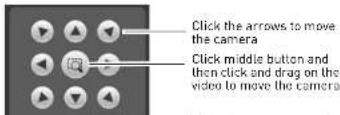
text_image
Click the arrows to move the camera Click middle button and then click and drag on the video to move the cameraWeb Configuration Interface
- Select Scan under PTZ Settings.

text_image
Select Scan Start Scan Save left position Set Left Set Right Set up Scan Save right position PTZ Settings Menu- Click Set.
- Move the camera into the desired left position and then click Set Left to save.
- Move the camera into the desired right position and then click Set Right to save.
- Click Save.
- Click Start to start the Scan.
Preset
You can save preset positions in the camera to recall them later.
To save presets:
- Select Pres et under PTZ Settings.

Web Configuration Interface
- Enter the number of the preset you would like to save.
- Click Del.
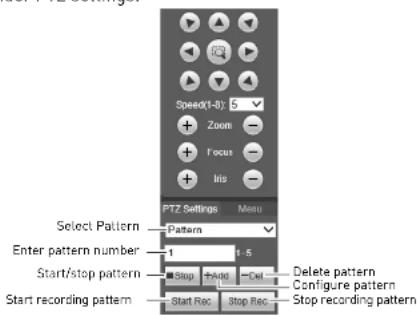
Pattern
You can use the pattern function to record a series of camera movements to recall later.
To save a pattern:
- Select Pat tern under PTZ settings.
text_image
Speed(1-8) 5 + Zoom - + Focus - + Iris - PTZ Settings Menu Select Pattern Pattern Enter pattern number 1 1.5 Start/stop pattern Stop Stop Rec Stop Rec Delete pattern Configure pattern Start recording pattern Start Rec Stop Rec Stop recording pattern- Enter the number of the pattern you would like to save.
- Click Add
- Click Start Rec. Use the PTZ controls to save a series of movements.
- When you finish recording the pattern, click Stop Rec.
To run a pattern:
- Click Start.
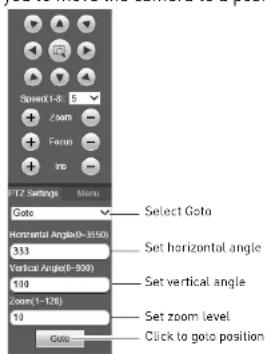
Goto
The Goto function allows you to move the camera to a position with specified parameters.
text_image
SPWWD(1-8) Zoom Focus Inc IFTZ Settings Menu Goto Horizontal Angle(0-3550) 333 Vertical Angle(0-900) 100 Zoom(1-126) 10 Goto Select Goto Set horizontal angle Set vertical angle Set zoom level Click to goto positionTo move the camera to a specified position:
- Select Go to under PTZ settings.
- Enter the Horizontal Angle you would like to move the camera to between 0\~3550.
- Enter the Vertical Angle you would like to move the camera to between 0\~900.
- Enter the Zoom level between 1\~128.
- Click Go to go to the specified position.
Web Configuration Interface
Setup
The Setup menus allow you to configure camera settings.
Camera
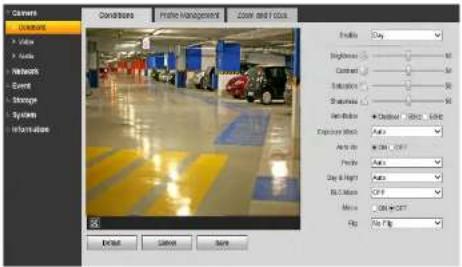
Conditions
The Conditions menu allows you to configure the image sensor settings for the camera. As you make adjustments, the effects will be shown in the video display.
text_image
Camera Conditions Photo Management Zoom and Focus Enabling: Gray Brightness: 50% Contrast: 50% Reflection: 50% Steurometry: 50% Centrifactor: Quadrifier 100% Exposure Method: Auto Auto to: CM-CHF Price: Auto Day & Night: Auto Bit & Sat: CHF Movie: CDF+CHF Flip: File Flip Default Cancel SaveNOTE: Some settings described below may not be available, depending on the features of your camera model.
To configure the image sensor settings:
- Configure the following:
• Profile: Select the camera settings profile you would like to configure: Day, Night, or Normal.
- Brightness: Adjust the brightness of the image between 0 and 100.
- Contrast: Adjust the contrast of the image between 0 and 100.
- Low Motion Blur: The system will automatically adjust the shutter to reduce motion trails in the image. Set the minimum and maximum Shutter Scope.
- Manual: Configure manual exposure settings. Configure the Shutter Regulate and Gain Scope.
- Profile: Select the white balance mode.
• Auto: Automatic white balance.
- Sunny: White balance mode for daylight.
• Night: White balance mode for night time.
- Customized: Manual white balance. Use the sliders to configure the Red Control and Blue Control.
- Auto Iris (auto iris cameras only): Select ON to enable auto iris or OFF to disable auto iris.
• Day & Night: Select one of the following day / night modes.
• Color: Camera will be in day mode at all times.
- Auto: Camera will automatically change between day and night mode based on the lighting.
• B/W: Camera will be in black and white at all times.
- BLC Mode: Select one of the following modes:
- BLC (Backlight Compensation): The camera automatically adjusts the exposure for a clearer image in the darkest areas of the video. Click Default to use default settings or Customized to adjust the BLC area. The darker the area you select, the brighter the image will be.
- WDR(Wide Dynamic Range): The camera compensates for changes in brightness across the image to enhance the picture quality of both light and dark areas. Adjust the WDR level between 1 and 100.
- HLC (Highlight Compensation): The camera dims the brightest areas of the image to make them clearer. Adjust the HLC level between 1 and 100.
- Off: Disable this function.
- Mirror: Select ON to flip the camera left and right.
- Flin. Select one of the options to flin the image or No Flin to disable. Note that 90^ rotations
Web Configuration Interface
• Normal: Camera will use the Normal profile at all times.
text_image
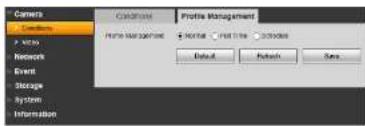
Camera Condition • No. 10 Network Event Storage System Information Condition Profile Management Profile NAME • NETOR • NET LTR • OCSOBER Default Refresh Save• Full Time: Select the profile the camera will use at all times.

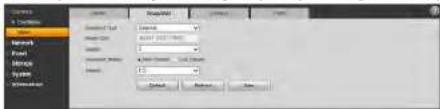
text_image
Controls Customers View Networks Event Storage System Information CONDITION Profile Management Profile Management Manual Full Time Schedule Assign Provider City Default Refresh Save- Schedule: Configure a schedule that the camera will use for Day (yellow) and Night (black) profiles. Click and drag in the time bar to set the schedule.

text_image
Camera Conditions Video Network Event Storage System Information Specifications Profile Management Panel Settings 0:00 4:00 8:00 12:00 16:00 20:00 24:00 Profile (Top) Top Top Bottom Top Bottom Control Auto... Save- Click Save to save changes.
Zoom and Focus (Motorized Lens Cameras Only)
For motorized lens cameras, you can use the Zoom and Focus tab to adjust the lens.

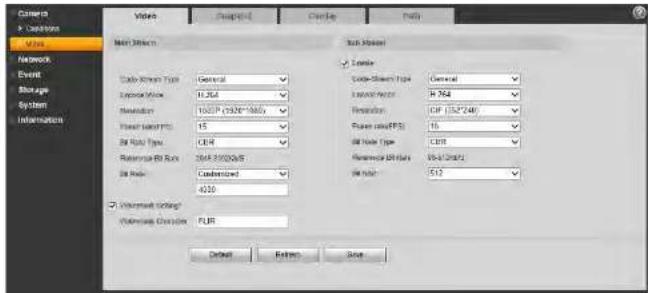
Video
The Video menu allows you to configure the encoding settings for the camera. Video settings are divided into Main Stream and Sub Stream.
text_image
Camera × Cloudnet Wire Network Event Storage System Information Video Proposed Delete Help Main Options Radio Stream Type: General Exchange Mode: 12.564 Resolution: 1000P (392K*1000V) Power Bandwidth: 15 Bit Rate Type: CE14 Reference ID Rate: 264-25502688 Bit Rate: Customized 4230 Sub-Stream Type: General External Filter: H_764 Resolution: CIR (332*248) Power Level(PB): 15 Bit Rate Type: CE14 Reference ID Rate: V-61/6745 Bit Rate: 510 Unmarked Options: Unmarked Options: FUR 确定 Return FinishTo configure video quality settings:
-
Check Ena ble under Sub Stream to enable the sub stream or uncheck to disable.
-
For the Main Stream and Sub Stream, configure the following:
-
Code Stream Type: For the Main Stream, select General to configure settings when motion is not detected or Motion to configure settings when motion is detected.
- Encode Mode: Select the encoding type: H.264 (Main H.264 profile), H.264H (High Profile H.264), H.264B (Baseline H.264 profile), MJPEG.
NOTE: A much higher bitrate and faster connection is required to maintain image quality using MJPEG. It is recommended to use H.264 unless you have special requirements.
- Resolution: Select the desired resolution for the video stream. There is a different recommended bit rate depending on the resolution selected.
Web Configuration Interface
Snapshot
The Snapshot menu allows you to configure images quality settings for snapshots.
text_image
Settings Settings Tool Width: 500 mm Width: 500 mm Width: 500 mm Width: 500 mm OK Cancel HelpTo configure snapshots:
-
Configure the following:
-
Snapshot Type: Select General to configure snapshots taken using scheduled recording. Select Event to configure snapshots activated by alarms.
- Image Size: The image size of snapshots is the same as the resolution for the stream selected.
• Quality: Select the image quality for snapshots between 1 (lowest) and 6 (highest). - Snapshot Stream: Select Main Stream to take snapshots from the Main Stream or Sub Stream to take snapshots from the Sub Stream.
-
Interval: Select the interval between snapshots between 1 and 7 seconds.
-
Click Sav e to save changes.
Overlay
The Overlay tab allows you to configure the OSD text on the camera video display.

text_image
File Edit View Insert Modify Help Select Spread Storage Information Photo History √ Document Title √ Auto Tools Download- Under Location, check to add a custom message, and then click Setup to enter a custom message up to 5 lines.
- Click Sav e to save changes.
Path
The Path tab allows you to configure the folder where snapshots and manual recordings are saved.

text_image
Camera > Conditors Video Network Event Storage System Information Video Snapshot Overlay Path Snapshot Path C:\PictureDownload Browse Record Path C:\RecordDownload Browse Default SaveTo configure the recording and snapshot folder:
-
Configure the following:
-
Snapshot Path: The folder on your hard drive where snapshots are stored. Click Browse to select a different folder.
-
Record Path: The folder on your hard drive where manual recordings are stored. Click Browse to select a different folder.
-
Click Sav e to save changes.
Network
TCP-IP
The TCP-IP menu allows you to configure the camera for DHCP or Static IP addressing.

text_image
Camera Network TCP/IP Connection TCP/IP Host Name IPC Ethernet Card Wire(DEFAULT)Web Configuration Interface
- Under Mode, select Static or DHCP. If you select Static, configure the IP Address, Subnet Mask, Default Gateway, Preferred DNS Server, and Alternate DNS Server.
- Click Save to save changes.
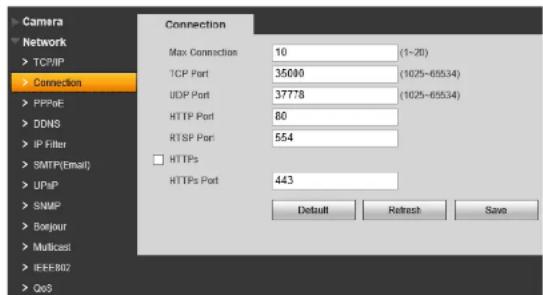
Connection
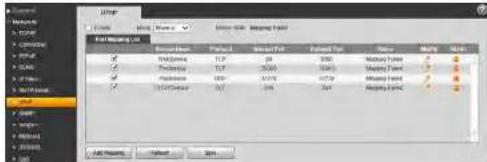
The Connection menu allows you to configure the camera ports and maximum connections to the camera. You must port forward the HTTP (default: 80) and TCP (default: 35000) port numbers on your router to enable remote connection to your camera
NOTE: If you are not using an and are setting up multiple cameras in the same network for remote access, you must assign unique TCP and HTTP ports for each camera. Two cameras cannot share the same port number.
text_image
Camera Network TCP/IP Connection PPPRe DDNS IP Filter SMTP(Email) UPnP SNMP Boejour Multicast IEEE802 QoS Connection Max Connection 10 (1~20) TCP Port 35000 (1025-65534) UDP Port 37778 (1025-65534) HTTP Port 80 RTSP Port 554 HTTPS HTTPS Port 443 Default Refresh SaveTo configure connection settings and ports:
- Under Max C onnection, enter the maximum number of devices that can connect to the camera at the same time between 1 and 20.
- Configure the following port settings:
- TCP Port: Enter the TCP (Client) Port number (default: 35000). The TCP port is used to stream video to remote computers or mobile devices. The TCP Port must be port forwarded to enable
- (Optional) To configure the HTTPS port, enter the custom port number under HTTPS Port (default: 443).
- Click Sav e to save changes.
PPPoE (Unsupported)
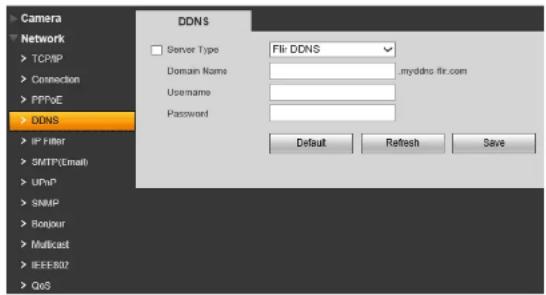
DDNS
The DDNS menu allows you to set up the camera with a free FLIR DDNS account for remote connectivity. You can register for a FLIR DDNS account at ddns.myddns-flir.com.
text_image
Camera Network TCP/IP Connection PPT/VE DDNS IP Filter SMTP(Email) UP/IP SNMP Bonjour Multicast IEEE802 QoS DDNS Server Type Fli: DDNS Domain Name: myddns.fli.com Username: Password: Default Refresh SaveTo configure DDNS:
- Under Server Type, check the checkbox and select FlirDDNS.
- Under Do main Name, enter the Domain Name from the confirmation email you received after registering for DDNS.
- Under Us ername, enter the User Name from the confirmation email.
- Under Password, enter the Password from the confirmation email.
- Click Save
NOTE. It may take between 10-15 minutes for the DDNS senior to update with your new DDNS
Web Configuration Interface
remotely connect to the camera.

text_image
IP Filter Control Site IP address\MSC\access Location Location Start PMSC Lock Finish Save
If you enable the IP filter the camera will block any device that is not listed. Make sure the correct devices are added to the list, or you may not be able to access the camera.
To filter connections based on IP or MAC addresses:
- Click A dd IP/MAC.
- Select IP A address or MAC Address and then enter the address of the device you would like to add to the white list.
- Click Save
- Check T rusted Sites.
- Click Sav e to save changes.
SMTP (Email)
The SMTP menu allows you to set up email alerts for motion or alarms.

text_image
Camera Network TCP/IP Connection SMTP(Email) SMTP Server Port 587 AnonymityWeb Configuration Interface
- Under Port, enter the Port used by the server.
- Check Anonymity if the server allows anonymous logins or uncheck to enter credentials to access the server.
- Under Us ername, enter the user name of the sender's account.
- Under Pa ssword, enter the password of the sender's account.
- Under Se nder, enter the sender's email account.
- If the server uses encryption, select SS L or TLS under Authentication.
- Under Interv al, select the interval for sending email alerts. The system will only send email alerts after this interval has passed.
- Check Health Mail to enable the camera to send health alerts. If you enable health alerts, enter the interval in seconds under Update Period.
- Click Email Test to send a test email using the settings you have entered.
- Click Save to save changes.
UPnP
UPnP allows you to map port numbers between the LAN and the Internet. Depending on your router version, you may need to disable UPnP function.
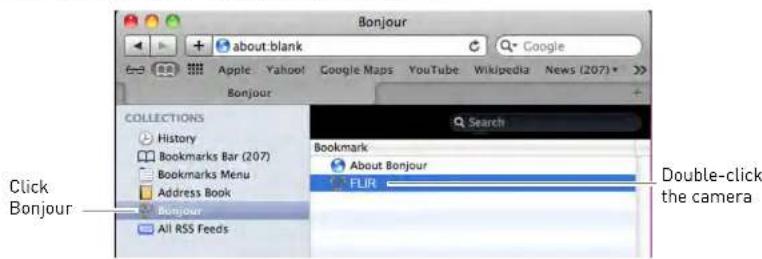
To access the camera through Bonjour:
- In Safari, click 📄 to open the Bookmarks menu.
- Click Bonj our, the IP Camera will appear in the list.
text_image
Bonjour apple Yahoo! Google Maps YouTube Wikipedia News (207) * Bonjour COLLECTIONS History Bookmarks Bar (207) Bookmarks Menu Address Book Bonnour All RSS Feeds Search Bookmark About Bonjour FLIR Click Bonjour Double-click the camera- Double-click the IP camera to open it in a browser tab.
SNMP (Unsupported)
Multicast (Unsupported)
IEEE802 (Unsupported)
QOS (Unsupported)
Event
Video Detect
The Video Detect menu allows you to set up motion detection and recording.
Web Configuration Interface
- Check Enable to enable motion detection.
- To configure a schedule when motion detection will be activated, click Setup next to Working Period.

text_image
Working Period Sunday Monday Tuesday Wednesday Thursday Friday Saturday 9 2 4 6 8 10 12 14 16 18 20 22 24 Setup Setup Setup Setup Setup Setup Click Setup to select the day to configure Configure up to 5 time periods Reset 1: 00 00 00 = 23 : 59 : 59 Reset 2: 00 00 00 = 23 : 59 : 59 Reset 3: 00 00 00 = 23 : 59 : 59 Reset 4: 00 00 00 = 23 : 59 : 59 Reset 5: 00 00 00 = 23 : 59 : 59 Reset 6: 00 00 00 = 23 : 59 : 59 OK Cancel Click the checkboxes to apply the same schedule to multiple days Save Cancel- Select the day you would like to configure by clicking the Setup buttons. You can apply the same schedule to multiple days using the checkboxes.
- Configure up to 6 time periods when motion detection will be activated.
-
Click Save. Repeat the steps above if you would like to apply a different schedule to different days.
-
Under Anti-dither, enter the anti-dither time. After a motion event occurs and motion stops, if motion is detected within the anti-dither time, the system continues the motion event and includes the new motion within the first event, rather than creating a new motion event.
-
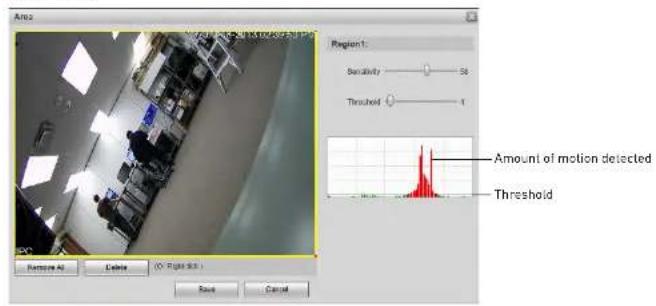
To configure the motion grid, click Setup next to Area.
- Areas where motion detection is enable are represented by yellow boxes.
Web Configuration Interface
- Click Save.
text_image
Area Region 1: Sensitivity 50 Threshold 1 Amount of motion detected Threshold Remove All Delete (0 Right Bit) Save Cancel- Check Record to record when motion is detected. microSD or FTP recording must be configured to use this function.
- Enter number of seconds the camera will record after motion is detected under Record Delay.
- Check Relay Out to trigger an external alarm device when the camera detects motion. The camera must have an Alarm Output to use this function.
- Enter the number of seconds the camera will trigger the external device under Alarm Delay.
- Check Send Email for the camera to send an email alert when motion is detected. Email settings must be configured to receive email alerts.
- Check Snapshot for the camera to save a snapshot when motion is detected. microSD or FTP recording must be configured to use this function.
- Click Save to save changes.
Video Masking (Unsupported)
Alarm (Cameras with Alarm I/O Only)
The Alarm menu allows you to configure settings for alarm devices. Your camera must have an
-
Configure the following:
-
Under Relay-In, select the alarm device you would like to configure.
- Check Enable to enable the selected alarm In device.
- Click Setup next to Working Period to set a schedule for alarm device activation.
• Under Anti-Dither, enter the latch time in seconds. - Under Sensor Type, select NO (Normally Open) or NC (Normally Closed) depending on the type of sensor used.
- Check Record to record when a sensor device is triggered.
- Under Record Delay, enter the amount of time the system will record when a sensor device is triggered.
- Check Relay-out to activate an alarm output device (e.g. strobe light) when the sensor device is triggered. The camera must have an alarm output to use this feature.
- Check Send Email for the camera to send out an alert email when the sensor device is triggered.
-
Check Snapshot for the camera to save a snapshot to FTP or microSD when the sensor device is triggered.
-
Click Sav e to save changes.
Warning
The Warning menu allows you to configure system warnings. The following system warning types are supported: No SD Card, SD card Capacity Warning, SD Card Error, Disconnection, and IP Conflict.
NOTE: No SD Card, Capacity Warning, and SD Card Error are only available on cameras that support microSD.
No SD Card
A No SD Card error occurs if recording is set in the camera, but there is no microSD or SD card installed.
Web Configuration Interface
- Check Send Email to send an email alert when No SD Card errors occur.
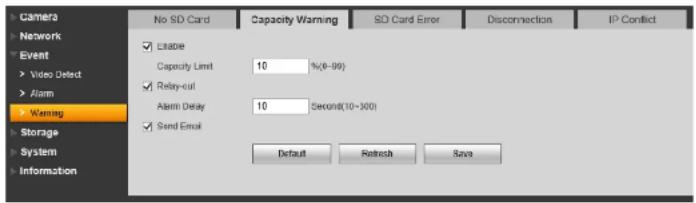
Capacity Warning
A Capacity Warning occurs when the recording destination (microSD or SD card or FTP server) reaches capacity.
text_image
Camera Network Event Video Dect Alarm Warning Storage System Information No SD Card Capacity Warning SD Card Error Disconnection IP Conflict Enable Capacity Limit 10 %(6-99) Relay-cut Alarm Delay 10 Setpoint(10~300) Send Email Default Retrench SaveTo configure Capacity Warnings:
- Check Ena ble to enable Capacity Warnings.
- Under Capacity Limit, set the percentage of free space on the recording destination that will trigger a Capacity Warning. For example, if you enter 10% and your microSD card is 1GB, a warning will occur when there is only 100MB of free space remaining.
- Check Relay-out to trigger an alarm out device when Capacity Warnings occur. Under Alarm Delay, enter the number of seconds the alarm out device will be activated.
NOTE: Relay-out is only available if your camera supports alarm output.
- Check Send Email to send an email alert when Capacity Warnings occur.
- Click Sav e to save changes.
SD Card Error
An SD Card Error occurs if an error occurs recording to the microSD or SD card (for example if the SD card is damaged or is using the wrong file system).

Disconnection
A Disconnection error occurs if the camera is disconnected from the network.
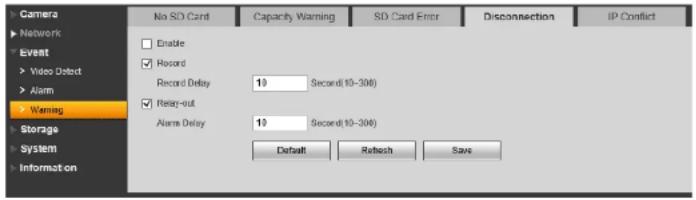
text_image
Camera Network Event Video Detect Alarm Warning Storage System Information No SD Card Capacity Warning SD Card Error Disconnection IP Conflict Enable R Record Record Delay 19 Second(10-306) Relay-out Alarm Delay 19 Second(10-306) Default Retouch SaveTo configure Disconnection Errors:
- Check Ena ble to enable Disconnection errors.
- Check Record to record to the microSD or SD card when Disconnection errors occur.
NOTE: The camera must support microSD or SD card recording to use this function.
- Under Record Delay, enter the number of seconds the camera will record after a Disconnection error.
- Check Relay-out to trigger an alarm out device when Disconnection errors occur. Under Alarm Delay, enter the number of seconds the alarm out device will be activated.
NOTE: Relay-out is only available if your camera supports alarm output.
- Check Send Email to send an email alert when Disconnection errors occur.
- Click Sav e to save changes.
IP Conflict
An IP Conflict error occurs if another device is assigned the same IP address as the IP camera.

Web Configuration Interface
- Click Save to save changes.
Storage
The Storage menu allows you to configure recording settings.
Record Schedule
The Record Schedule determines the schedule for video recording to SD card or FTP.

text_image
Controls Networks Direct Settings Settings Information Record Substrate Default Substrate Preview Substrate 0 1 2 3 4 5 6 7 8 9 10 11 12 13 14 15 16 17 18 19 20 21 22 23 24 Control Environment Environment Environment Environment Environment Environment Default Default SaveTo configure the recording schedule:
- Click Setup next to the day you would like to configure.
- Use the checkboxes if you want to copy the schedule to other days.
- Configure up to 6 time periods for recording. For each period, enter a time range and check the recording types you would like to enable during that period:
- General: Continuous recording.
• Motion: Motion activated recording.
• Alarm: Alarm activated recording.

text_image
Check to copy schedule Configure up to 6 periods Enable recording typesWeb Configuration Interface
To configure the snapshot schedule:
- Click Setup next to the day you would like to configure.
- Use the checkboxes if you want to copy the schedule to other days.
- Configure up to 6 time periods for recording. For each period, enter a time range and check the recording types you would like to enable during that period:
• General: Continuous recording.
• Motion: Motion activated recording.
• Alarm: Alarm activated recording.

text_image
Check to copy schedule Configure up to 6 periods Enable recording types Save Cancel- Click Save
Holiday Schedule
The Holiday Schedule allows you to set certain days of the year as holidays.
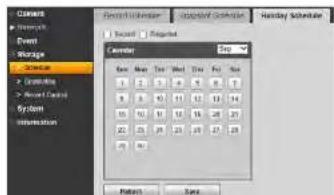
text_image
Camera Event Storage Event Manager Event Manager System Information Forward Event Forward Event Forward Substrate Recent Rejected Calendar Run Name Run Date Run Type Run 1 2 3 4 5 6 7 8 9 10 11 12 13 14 15 16 17 18 19 20 21 22 23 24 25 26 27 28 29 30 Pattern SaveWeb Configuration Interface
- Under Record or Snapshot, check Local to record to the microSD card or FTP to record to FTP. For video recording or snapshot recording, you cannot record to both microSD and FTP.
- Click Say e.
Destination - Local
The Local tab allows you to format or configure the microSD card installed in the camera.

text_image
Actions Networks Event Storage Information Internet System Internet Internet Internet Internet Internet Internet Internet Internet Internet Internet Internet Internet Internet Internet Internet Internet Internet Internet Internet Internet Internet Internet Internet Internet Internet Internet Internet Internet Internet Internet Internet Internet Internet Internet Internet Internet Internet Internet Internet Internet Internet Internet Internet Internet Internet Internet Internet Internet Internet Internet IP地址: IP地址: IP地址: IP地址: IP地址: IP地址: IP地址: IP地址: IP地址: IP地址: IP地址: IP地址: IP地址: IP地址: IP地址: IP地址: IP地址: IP地址: IP地址: IP地址: IP地址: IP地址: IP地址: IP地址: IP地址: IP地址: IP地址: IP地址: IP地址: IP地址: IP地址: IP地址: IP地址: IP地址: IP address: IP address: IP address: IP address: IP address: IP address: IP address: IP address: IP address: IP address: IP address: IP address: IP address: IP address: IP address: IP address: IP address: IP address: IP address: IP address: IP address: IP address: IP address: IP address: IP address: IP address: IP address: IP address: IP address: IP address: IP address: IP address: IP address: IP address : IP address : IP address : IP address : IP address : IP address : IP address : IP address : IP address : IP address : IP address : IP address : IP address : IP address : IP address : IP address : IP address : IP address : IP address : IP address : IP address : IP address : IP address : IP address : IP address : IP address : IP address : IP address : IP address : IP address : IP address : IP address : IP address : IP address : IIP address : IIP address : IIP address : IIP address : IIP address : IIP address : IIP address : IIP address : IIP address : IIP address : IIP address : IIP address : IIP address : IIP address : IIP address : IIP address : IIP address : IIP address : IIP address : IIP address : IIP address : IIP address : IIP address : IIP address : IIP address : ITP address : ITP address : ITP address : ITP address : ITP address : ITP address : ITP address : ITP address : ITP address : ITP address : ITP address : ITP address : ITP address : ITP address : ITP address : ITP address : ITP address : ITP address : ITP address : ITP address : ITP address : ITP address : ITP address : ITP address : ITP address : IIP address : IIP address : IIP address : IIP address : IIP address : IIP address : IIP address : IIP address : IIP address : IIP address : IIP address : IIP address : IIP address : IIP address : IIP address : IIP addresses /IIP addresses /IIP addresses /IIP addresses /IIP addresses /IIP addresses /IIP addresses /IIP addresses /IIP addresses /IIP addresses /IIP addresses /IIP addresses /IIP addresses /IIP addresses /IIP addresses /IIP addresses /IIP addresses /IIP addresses /IIP addresses /IIP addresses /IIP addresses /IIP addresses /IIP addresses /IIP addresses /IIP addresses /IIP addresses /AIP addresses /AIP addresses /AIP addresses /AIP addresses /AIP addresses /AIP addresses /AIP addresses /AIP addresses /AIP addresses /AIP addresses /AIP addresses /AIP addresses /AIP addresses /AIP addresses /AIP addresses /AIP addresses /AIP addresses /AIP addresses /AIP addresses /AIP addresses /AIP addresses /AIP addresses /AIP addresses /AIP addresses /AIP addresses /BIP addresses /BIP addresses /BIP addresses /BIP addresses /BIP addresses /BIP addresses /BIP addresses /BIP addresses /BIP addresses /BIP addresses /BIP addresses /BIP addresses /BIP addresses /BIP addresses /BIP addresses /BIP addresses /BIP addresses /BIP addresses /BIP addresses /BIP addresses /BIP addresses /BIP addresses /BIP addresses /BIP addresses /BIP addresses /AIP addresses /AIP addresses /AIP addresses /AIP addresses /AIP addresses /AIP addresses /AIP addresses /AIP addresses /AIP addresses /AIP addresses /AIP addresses /AIP addresses /AIP addresses /AIP addresses /AIP addresses /AIP addresses /AIP addresses /AIP addresses /AIP addresses /AIP addresses AIPC addresses AIPC addresses AIPC addresses AIPC addresses AIPC addresses AIPC addresses AIPC addresses AIPC addresses AIPC addresses AIPC addresses AIPC addresses AIPC addresses AIPC addresses AIPC addresses AIPC addresses AIPC addresses AIPC addresses AIPC addresses AIPC addresses AIPC addresses AIPC addresses AIPC addresses AIPC addresses AIPC addresses AIPC addresses AIPC addresses AIPC addresses AIPC addresses AIPC addresses AIPC addresses AIPC addresses AIPC addresses AIPC addresses AIPCitudes/AIPC values/AIPC values/AIPC values/AIPC values/AIPC values/AIPC values/AIPC values/AIPC values/AIPC values/AIPC values/AIPC values/AIPC values/AIPC values/AIPC values/AIPC values/AIPC values/AIPC values/AIPC values/AIPC values/AIPC values/AIPC values/AIPC values/AIPC values/AIPC values/AIPC values/AIPC values/AIPC values/AIPC values/AIPC values/AIPC values/AIPC values/AIPC values/AIPC values/AIPC values/IAIC values/IAIC values/IAIC values/IAIC values/IAIC values/IAIC values/IAIC values/IAIC values/IAIC values/IAIC values/IAIC values/IAIC values/IAIC values/IAIC values/IAIC values/IAIC values/IAIC values/IAIC values/IAIC values/IAIC values/IAIC values/IAIC values/IAIC values/IAIC values/IAIC values/IAAC values/IAAC values/IAAC values/IAAC values/IAAC values/IAAC values/IAAC values/IAAC values/IAAC values/IAAC values/IAAC values/IAAC values/IAAC values/IAAC values/IAAC values/IAAC values/IAAC values/IAAC values/IAAC values/IAAC values/IAAC values/IAAC values/IAAC values/IAAC values/IAAC values/IAAAC values/IAAC values/IAAC values/IAAC values/IAAC values/IAAC values/IAAC values/IAAC values/IAAC values/IAAC values/IAAC values/IAAC values/IAAC values/IAAC values/IAAC values/IAAC values/IAAC values/IAAC values/IAAC values/IAAC values/IAAC values/IAAC values/IAAC values/IAAC values/IAAC values/IAAcvies A/Cvies B/Cvies C/Cvies D/Cvies E/Cvies F/Cvies G/Cvies H/Cvies I/Cvies J/Cvies K/Cvies L/Cvies M/Cvies N/Cvies O/Cvies P/Cvies Q/Cvies R/Cvies S/Cvies T/Cvies U/Cvies V/Cvies W/Cvies X/Cvies Y/Cvies Z/Cvies AA/Cvies AB/Cvies AC/Cvies AD/Cvies AE/Cvies AF/Cvies AG/Cvies AH/Cvies AI/Cvies AJ/Cvies AK/Cvies AL/Cvies AM/Cvies AN/Cvies AO/Cvies AP/Cvies AQ/Cvies AR/Cvies AS/Cvies AT/Cvies AU/Cvies AV/Cvies AW/Cvies AX/Cvies AY/Cvies AZ/Cvies BA/Cvies BB/Cvies BC/Cvies BD/Cvies BE/Cvies BF/Cvies BG/Cvies BH/Cvies BI/Cvies BJ/Cvies BK/B/G/H/D/I/G/H/D/I/G/H/D/I/G/H/D/I/G/H/D/I/G/H/D/I/G/H/D/I/G/H/D/I/G/H/D/I/G/H/D/I/G/H/D/I/G/H/D/I/G/H/D/I/G/H/D/I/G/H/D/I/G/H/D/I/G/H/D/I/G/H/D/I/G/H/D/I/G/H/D/I/G/H/D/I/G/H/D/I/G/H/D/I/G/H/D/I/G/H/D/I/G/H/D(I)C- Click Read Only to set the microSD card on read only mode. This disables microSD recording.
- Click Read & Write to enable recording on the microSD card.
- Click Hot Swap to unmount the microSD card if you would like to eject it from the camera.
- Click Format and then click Yes to format the microSD card. The camera will reboot once the format is completed.
Destination - FTP
The FTP tab allows you to set up settings for recording to an FTP server.

text_image
Camera Network Event Storage Schedule Destination Record Control System Information Path Local FTP Enable Server Address Port 21 (0-65535) User Name anconymity Password Remote directory share Emergency (Local)- Click Save to save changes.
Record Control
The Record Control menu allows you to configure recording parameters for the camera.

text_image
Camera Network Event Storage Schedule Destination Record Control System Information Record Control Pack Duration 8 Minutes (1-120) Pre-event Record 5 Second (0-5) Disk Full Overwrite Record Mode ● Auto □ Manual ○ Off Record Stream Main Stream Default Refresh SaveTo configure recording parameters:
- Under Pack Duration, enter the duration in minutes that the camera will use to pack video files.
- Under Pr e-event Record, enter the duration in seconds that the camera will pre-record before motion events.
- Under Di sk Full, select Overwrite to overwrite recordings when the recording medium is full or select Stop to stop recording when the recording medium is full.
- Under Record Mode, select Auto to record according to the schedule, select Manual to record continuously, or select Off to disable recording.
- Under R ercord Stream, select Main Stream to record using the Main Stream settings, or select Substream to record the substream.
- Click Sav e to save changes.
System
General
The General menu allows you to configure general camera settings.
Web Configuration Interface
General - Date & Time
The Date & Time tab allows you to set up date and time settings for the IP camera.

text_image
Camera Network Event Storage System General Account Default Import/Export Auto Maintain Upgrade Information General Date&Time Date Format Month-Day-Year Time Format 12-Hour-based System Time Zone GMT-05.00 Current Time 09 - 19 - 2013 03 : 57 : 07 PM Sync PC DST Enable DST Type Date Week Start Time Mar 2nd Sunday 02 : 00 : 00 AM End Time Nov 1st Monday 02 : 00 : 00 AM Synchronize with NTP NTP Server pool.ntp.org Port 123 Update Period 10 Minute(0~30) Default Refresh SaveTo configure date & time settings:
-
Configure the following:
-
Date Format: Select the date format.
• Time Format: Select the time format (12 hour or 24 hour).
• Time Zone: Select your time zone. - Current Time: Enter the current time or click Sync PC to sync your IP camera to your PC's clock.
- If your area uses Daylight Savings Time (DST) check DST Enable. If you enable DST, configure the following:
- DST Type: Select Date to select a date for the time change or select Week to select the week and day for the time change.
- Start Time and End Time: Enter the start and end times for Daylight Savings.
Web Configuration Interface
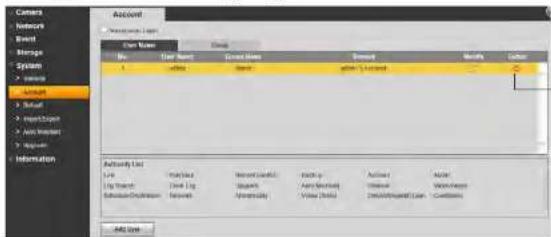
only one that can change permissions assigned to user accounts. Accounts given permission to access the Account menu may change the password for other accounts. Accounts not given permission to access the Account menu may not change any account passwords, including their own. It is essential to change the password of the admin account from the default to prevent unauthorized access to your camera.
You may also check Anonymous Login to allow users to connect to the camera without entering a user name or password. Users connecting anonymously are given limited access to the camera: they may only view live video and the Alarm list.
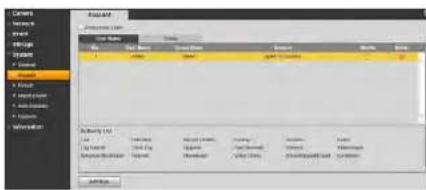
text_image
Name Data Name Current Data Balance Balance Balance (1) Name Data Name Current Data Balance Balance Balance (2) Name Data Name Current Data Balance Balance Balance (3) Name Data Name Current Data Balance Balance Balance (4) Name Data Name Current Data Balance Balance Balance (5) Name Data Name Current Data Balance Balance Balance (6) Name Data Name Current Data Balance Balance Balance (7) Name Data Name Current Data Balance Balance Balance (8) Name Data Name Current Data Balance Balance Balance (9) Name Data Name Current Data Balance Balance Balance (10) Name Data Name Current Data Balance Balance Balance (11) Name Data Name Current Data Balance Balance Balance (12) Name Data Name Current Data Balance Balance Balance (13) Name Data Name Current Data Balance Balance Balance (14) Name Data Name Current Data Balance Balance Balance (15) Name Data Name Current Data Balance Balance Balance (16) Name Data Name Current Data Balance Balance Balance (17) Name Data Name Current Data Balance Balance Balance (18) Name Data Name Current Data Balance Balance Balance (19) Name Data Name Current Data Balance Balance Balance (20) Name Data Name Current Data Balance BalanceTo create a user account:
-
Click Add User.
-
Configure the following:
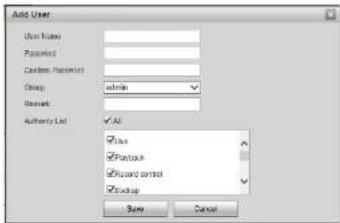
text_image
Add User User Name: Password: Custom Password: Email: admin Remark: Authority List All Bus Facebook Record control Backup CancelWeb Configuration Interface
- Click Add Group.

text_image
Add Remove Paste Delete Export Edit Imported Export Export Export List All Name: 100% Name: 100% Name: 100% Name: 100% Name: 100% Name: 100% Name: 100% Name: 100% Name: 100% Name: 100% Name: 100% Name: 100% Name: 100% Name: 100% Name: 100% Name: Name: Name: Name: Name: Name: Name: Name: Name: Name: Name: Name: Name: Name: Name: Name: Name: Name: Name: Name: Name: Name: Name: Name: Name: Name: Name: Name: Name: Name: Name: Name: Name: Name: Name: Name: Name: Name: Name: Name: Name: Name: Name: Name: Name: Name: Name: Name: Name: Name: Name:- Configure the following:

text_image
Add Groups Group: Forward: Admins List: Live Print Settings Settings Copy Cancel• Group: Enter a name for the group.
- Remark: (Optional) Enter a description for the group.
- Authority List: Use the checkboxes to assign the default permissions for user accounts added to this group.
- Click Save.
To modify a user account or group:
- Select the User or Group tab.
- Click next to the account or group you would like to delete.

Web Configuration Interface
- Click next to the account or group you would like to delete.
text_image
Camera Network Event Storage System Information Access User Name Address Name Address Modify Author Name Gender Status admin1.txt Activity List Up To: Up To:Up Down To: Down To:Up Record Status: Record Up: Record Up: Action Action Action Type: Action Type: Action Type: Action Type: Action Type: Action Type: Action Type: Action Type: Action Type: Action Type: Action Type: Action Type: Action Type: Action Type: Action Type: Action Type: Action Type: Action Type: Action Type: Action Type: Action Type: Action Type: Action Type: Action Type: Action Type: Action Type: Action Type: Action Type: Action Type: Action Type: Action Type: Action Type: Action Type: Action Type: Active Active Active Active Active Active Active Active Active Active Active Active Active Active Active Active Active Active Active Active Active Active Active Active Active Active Active Active Active Active Active Active Active Active Active Active Active Active Active Active Active Active Active Active Active Active Active Active Active Active ActiveClick to delete an account or group
- Click OK.
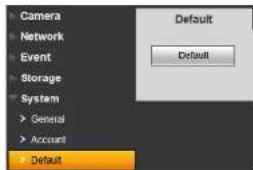
Default
Click the Default button and then click OK to reset the camera to default settings. The camera will reboot.
text_image
Camera Network Event Storage System General Account Default Default DefaultImport/Export
The Import/Export menu allows you to export your camera's configuration or import a saved configuration.

Web Configuration Interface
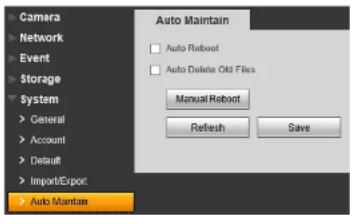
Auto Maintain
The Auto Maintain menu allows you to reboot the camera manually or on a automatic schedule. Rebooting the camera regularly ensures system stability. It also allows you to automatically delete old video files.
text_image
Camera Network Event Storage System > General > Account > Default > Import/Export > Auto Maintain Auto Maintain □ Auto Rabbit □ Auto Delete Old Files Manual Rabbit Refresh SaveTo manually reboot the camera:
- Click Manual Reboot and then click OK to reboot the camera.
To configure auto reboot:
- Check Auto Reboot to set the camera to reboot automatically on schedule.
- Select the day and time for the camera to reboot.
- Click Save.
To configure auto delete:
- Check Auto Del ete Old Files.
- Enter the number of days the camera will retain video files.
- Click Sav e.
Upgrade
The Upgrade menu allows you to upgrade the camera firmware. When firmware upgrades are
Web Configuration Interface
Information

text_image
Menu Event Manager System Systematic F - System F - 10 Change DeleteVersion
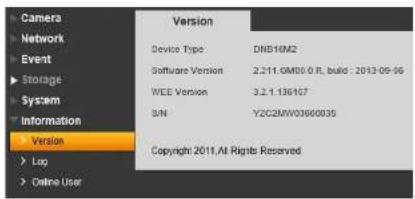
The Version menu shows you information related to the product and firmware version.
text_image
Camera Network Event Storage System Information Version Device Type DNB16M2 Software Version 2.211.0M00.0 FL build : 2013-09-56 WEE Version 3.2.1.136167 S/N Y2C2MW03660035 Copyright 2011, All Rights Reserved Log Online UserLog
The Log menu allows you to view system logs for the camera.

text_image
Log Start Time 2013 - 09 - 18 15 59 64 End Time 2013 - 09 - 18 15 59 64 Type: All Source No. Log Error Start Date Event Detailed InformationWeb Configuration Interface
Playback (Cameras with microSD Only)
Playback mode allows you to playback video from the camera's microSD card.
To playback video from the microSD card:
- Use the calendar to select a day to search for video. The bar on the bottom populates with video recorded on that day.
- Click in the time bar to start playback.
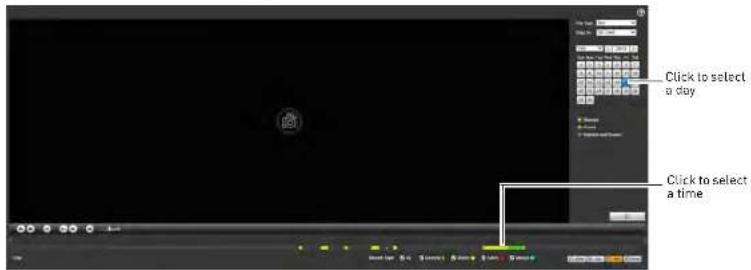
text_image
Click to select a day Click to select a timeOR
- Click in the calendar to select a day to search for video.
- Click ☐ A list appears with video files from the selected day.
- Click a time to select it.

text_image
Start Time Record Type 1 11:29:27 2 11:29:26 3 11:29:25 4 11:29:24 5 11:31:20 6 11:34:07 Click to select a timeWeb Configuration Interface
Playback Controls

text_image
Play Next Frame Fast Volume Stop Slow Mute Select playback time Show/hide recording type in time bar Zoom into time barBacking up Video Files
You can download video files to your computer hard drive. Video files are saved in (.dav) format. You can use the video player available from www.digimerge.com to play backup video files.
To backup video files:
-
Click in the calendar to select a day to search for video.
-
Click ☐ A list appears with video files from the selected day.
Web Configuration Interface
- Click ↓ next to the video file you would like to download to your computer hard drive.
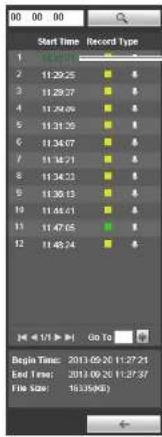
text_image
Start Time Record Type 1 2 11:29:25 ■ 3 11:29:27 ■ 4 11:29:06 ■ 5 11:31:30 ■ 6 11:34:07 ■ 7 11:34:21 ■ 8 11:34:23 ■ 9 11:36:13 ■ 10 11:46:01 ■ 11 11:47:05 ■ 12 11:48:24 ■ Begin Time: 2013.09.20 11:27:21 End Time: 2013.09.20 11:27:37 File Size: 16.35(KB)- Click to select a time
UPGRADE TOOL
To perform a firmware upgrade over the LAN or Internet, a Config Tool is provided on the CD or www.digimerge.com. In an effort to continuously improve the functionality of our products, firmware upgrades are available as a free download on www.digimerge.com.
NOTE: The Config Tool is supported on PC only. Firmware upgrades can also be completed using the web browser interface (see "Upgrade" on page 33).
Installing a Firmware Upgrade Over the LAN
Prerequisites:
- Connect your IP camera to a router or switch on your network.
- Download a firmware upgrade from www.digimerge.com, if one is available. Extract the contents.
To perform a firmware upgrade over the LAN:
- Download the Config Tool from www.d igimerge.com.
- Extract the contents into a folder.
- Open the folder and right-click ConfigTool.exe and Run as administrator. If a Windows Firewall warning appears, click Allow Access. The Config Tool scans your LAN for IP cameras.
- Click Upgrade.
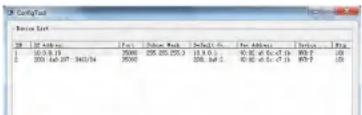
text_image
Configuration File List 08 - 16 Address: Box Dataset Bank Default % For Address Status Fig. 1 16.0.0.13 7500 225.225.23 13.0.0 90.00.45.45.45 (1) 90.0.0 100 2 200.44.007-3453/14 3500 258.34.12 90.00.45.45.45 (1) 90.0.0 100Upgrade Tool
- Click Upgrade. Wait for the upgrade to complete. Do not power off the system or disconnect the power cable during upgrade. The system will restart when the upgrade is complete.

text_image
Check's Click Open and select firmware file Click UpgradeInstalling a Firmware Upgrade Over the Internet
Prerequisites:
- Port forward the Client Port (default: 35000) on the IP camera's local router.
- Obtain the public IP address of the IP camera.
- Download a firmware upgrade from www.digimerge.com, if one is available. Extract the contents.
To perform a firmware upgrade over the Internet:
- Download the Config Tool from www.d igimerge.com.
- Extract the contents into a folder
- Open the folder and right-click ConfigTool.exe and Run as administrator.
- Click Login
- Under IP Address, enter the public IP address of the IP camera. Edit the User Name, Password or Port if these have been changed from the default values
Upgrade Tool
- Click Upgrade. Wait for the upgrade to complete. Do not power off the system or disconnect the power cable during upgrade. The system will restart when the upgrade is complete.
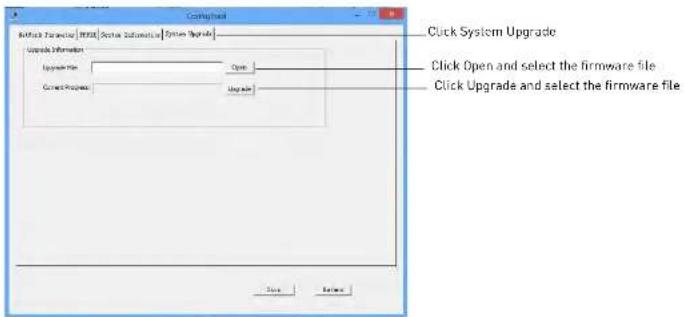
text_image
Create Framework [HTML] [Docker Automatic] [System Upgrade] Update Information Upgrade File Current Progress Open Upgrade Click System Upgrade Click Open and select the firmware file Click Upgrade and select the firmware file OK CancelFLIR SYNCROIP CENTRAL MANAGEMENT SOFTWARE FOR PC
FLIR SyncrolP CMS is a central management software that allows you to view and manage multiple s and IP cameras.

text_image
Screenshot of a video editing interface displaying a grid of various content thumbnails with Chinese text labels.System Requirements
Your system must meet or exceed the system requirements below:
DescriptionRequirement
CPU Core 2 Duo 3.0GHz
Operating System Windows™ 8/7/Vista
Memory 2GB
Video 512 MB of video memory and above
FLIR SyncrolP Central Management Software For PC
Installing FLIR SyncroIP CMS
Install FLIR SyncroIP CMS from the CD included with your IP camera or by downloading it from www.digimerge.com. It is recommended to visit www.digimerge.com for the latest software versions.
To start the software:
- Double-click the FLIR SyncroIP CMS icon [ ] the desktop.
- Click Login.
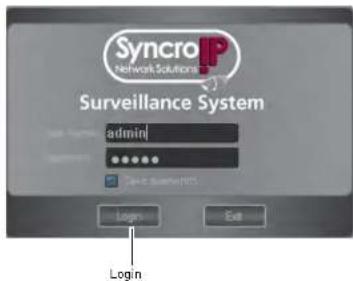
text_image
Syncro Network Solutions Surveillance System admin Log n Log nNOTE: The CMS default User Name is admin and the Password is admin.
Adding an IP camera from the Local Area Network (LAN)
Once you open the software, you can add an IP camera.
Prerequisites:
- Connect the IP camera to a router or switch on the network.
To add a :
- Click Config Manager→Devic e Manage.
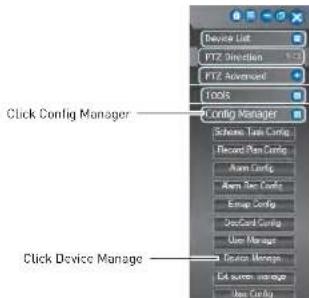
text_image
Device List FT2 Direction FT2 Advanced Tools Config Manager Scheme Task Config Record Plan Config Arm Config Arm Set Config Empag Config SecCard Config User Manage Resource Manage Lab server manage User Manage Click Config Manager Click Device Manage- Click Search Device. If a Windows Firewall alert appears, click Allow.
- Check the IP camera and click Add Management.

text_image
Device Manager Search group Search group Search group Click Search Device Check the 12 1 40000 4 Next group Next group Click Add ManagementFLIR SyncrolP Central Management Software For PC
- Click + next to No Group.
- Double-click the IP camera.
- Click-and-drag the IP camera to the display area to view.
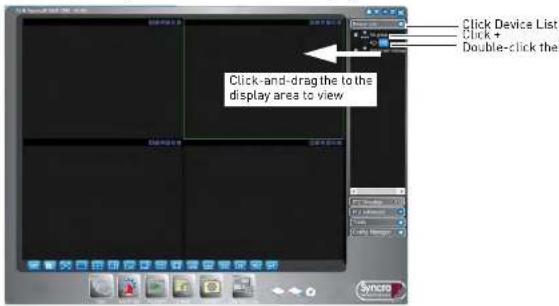
text_image
Click and drag the to the display area to view Click Device List Click + Double-click theAdding an IP camera using a DDNS address
If you have IP camera systems with DDNS set up, you can add them to the CMS.
Prerequisites:
- Create a DDNS account. For details, see the Quick Network Guide provided with your camera or see "DDNS" on page 16.
- Enter the DDNS information into the IP camera locally.
- Port forward the Client and HTTP ports (default, ports 80 and 35000) on the router.
To add an IP camera using a DDNS address:
- Click Config Manager→De vice Manage.

2. Click Manual Add.

text_image
Click Manual Add Close Manager - Close Info Load mode: 10000000000000000000000000000000000000000000000000000000000000000000000000000000000000000000000000000 Edit Save time: 96.25.25.25.25.25.25.25.25.25.25.25.25.25.25.25.25.25.25.25.25.25.25.25.25.25.25.25.25.25.25.25.25.25.25 Management - Make management Management cost 3,487 -4,1113. Configure the following:
- Title: Enter a name for your IP camera of your choice (e.g. home or office).
- Type: Select IP Camera.
- Add Type: Select Single Device.
- Domain Name: Enter the Domain Name from the confirmation email after your registered for DDNS, followed by .myddns-flir.com.
- Port: Enter the Client Port (default: 35000).
- User: Enter the IP camera's user name [default: admin].
- Password: Enter the IP camera's password (default: admin).
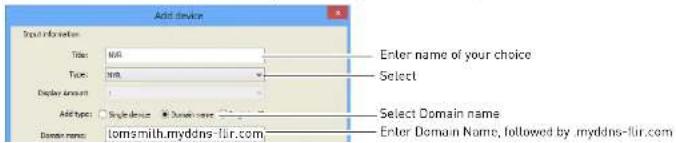
text_image
Add device Select information Title: NKG Type: NKG Display amount: Add type: Single device Domain name: Domain name: tomsmith.myddns-flir.com Enter name of your choice Select Select Domain name Enter Domain Name, followed by myddns-flir.comFLIR SyncrolP Central Management Software For PC
- Click-and-drag the IP camera to the display area to view.

text_image
Click and drag the to the display area to view Click Device List Click + Double-click theCMS Live Viewing Overview
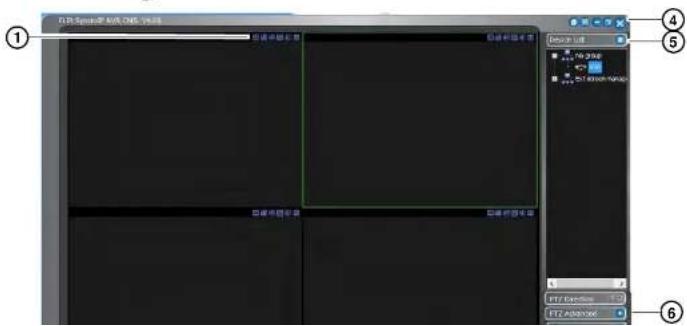
text_image
① ② ③ ④ ⑤ ⑥FLIR SyncrolP Central Management Software For PC
2. Live View Toolbar:

text_image
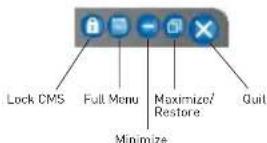
Selectimage quality Full-screen Latency/ Fluency Display views- CMS Quick Menus: Click to access key CMS functions.
4. CMS Window Controls:
-
Device List: Open's and IP cameras in live display.
-
Click + next to 's, Groups, or IP cameras to expand.
- Click and drag 's, Groups, or IP cameras to the display area to open.
- Right-click 's, Groups, or IP cameras to view system options.
6. CMS Menus:
- PTZ Direction: Access basic PTZ controls.
- PTZ Advanced: Access advanced PTZ controls [e.g. Auto Scan, Tour, etc.].
- Tools: Contains the following menus: Begin Record Plan, NVD Control, Health Report, Log Search, Alarm Video, Alarm Output, Color Config, Volume.
- Config Manager: Contains the following menus: Scheme Task Config, Record Plan Config, Alarm Config, Alarm Rec Config, E-Map Config,

text_image
Device List Group1 NVR CAM 1 CAM 2 CAM 3 CAM 4 Alarm Ok Ext screen manage Extension ss Extension scr2. Click Monitor Project.
Click Monitor Project

text_image
Scheme Tool Config Table Type: Model 10.0000 Name: M Number Control ID Source Description View (mm) End 1 2 3 4 5 6 7 8 9 10 11 12 13 14 15 16 17 18 19 20 21 22 23 24 25 26 27 28 29 30 31 32 33 34 35 36 37 38 39 40 41 42 43 44 45 46 47 48 49 50 51 52 53 54 55 56 57 58 59 60 61 62 63 64 65 66 67 68 69 70 71 72 73 74 75 76 77 78 79 80 81 82 83 84 85 86 87 88 89 90 91 92 93 94 95 96 97 98 99 100- Click New.
- Enter a Name for the project. You may not change the name after the project is created.
- Under Mode, select Tour Mode or Schedule Mode. Tour Mode will cycle through tasks on a fixed interval. Schedule Mode will switch tasks at a pre-defined time of the day.
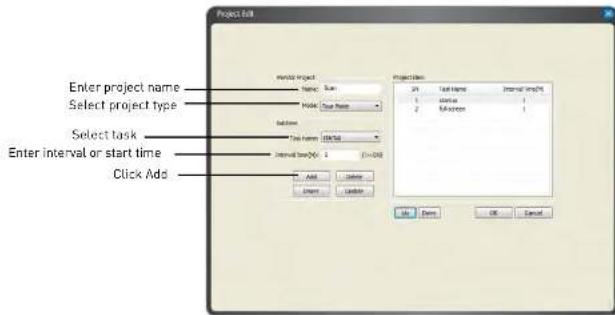
text_image
Project Edit Enter project name Select project type Select task Enter interval or start time Click Add Project Name: Name, Type Node: True Name Balance Test Name: Starting Internal Time(N): 1 (0-24) Add Cancel Insert Cancel Projection: 21 Test Name Internal Time(N) 1 status 1 2 Reference 1 OK Cancel OK Cancel6 Under Task Name select the task you would like to add to the pmieft
FLIR SyncrolP Central Management Software For PC
Using E-Map
The E-Map feature allows you to visually map your cameras over a .jpg image.
Configuring E-Map
Use the steps below to select a .jpg image to use for the E-Map and place your cameras.
To configure the E-Map:
-
Click Config Manager→E-Map Config.
-
Click Picture Edit.

text_image
New Cabs New Cabs Add Cabs SaveClick Picture Edit
- Click Add.

text_image
Click Add4 Click Brnwea Select a inn image on your computer to use as the F-Man
FLIR SyncrolP Central Management Software For PC
- Click Pic.

text_image
Home Click and drag picture to the window Click Pic- Click-and-drag the picture to the window to use it for the E-Map.
- Click Device to view a list of connected s and IP cameras.
- Click + next to an or IP camera. To place cameras, drag cameras from the list to the map.

text_image
Dragcameras to the map Click + Click Device- Click Save.
FLIR SyncrolP Central Management Software For PC
- Click on a display area in the main CMS window, then double-click on the camera to open it.

text_image
Click a display area Double-click on a camera to openConfiguring the CMS
You can configure settings for the CMS such as the admin password, recording directories, and start up settings through the Config menu.
Configuring CMS Options
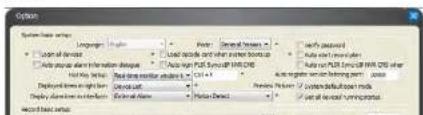
- Click Config()→Options.
- Configure the following:
text_image
Options System basic settings Language: English Font: Normal Color: Normal Load inside: 100 Load outside: 100 Auto text: when the text is displayed Auto text: USB icon or USB QDS Default settings: Red line mirror settings (L): C1+1 Background settings: Normal Background settings: Normal Display settings: Open Text External Audio Portal Direct System default settings: mode Set as default setting status- Auto Login FLIR SyncrolP CMS: Check for the CMS to automatically log in the admin account when it is opened.
- Hotkey Setup: Configure hotkeys for the CMS. Use the drop-down menu to select the command, and then click inside the box on the right and enter the hotkey.
NOTE: Do not use F12 as a hotkey. F12 is reserved for the system debug command. - Displayed items in the right bar: Select which right-side menu is opened when the CMS opens.
- Record Time (M): Select the length in minutes of video files recorded on your computer hard drive. For example, if you select 15 minutes, the system will save a new video file for every 15 minutes of recording.
- Snapshot picture path: Click ... to select the default save folder for snapshots.
- Picture file name rule: Click ... to define the file name rule for snapshots.
- Recorded file path: Click ... to select the default save folder for manual recordings.
- Recorded file name rule: Click ... to select the file name rule for manual recordings.
- Downloaded file path: Click ... to select the folder for downloaded recording files.
- Download record file name rule: Click ... to define the file name rule for downloaded recording files.
- Device free minimum space (MB): Enter the amount of minimum space in MB to maintain on the computer hard drive. The system will stop recording when only this much space is left.
- Auto Start Project: Check for the CMS to automatically run a project when opened. Select the project it will run under Project Name.
- Auto Start Task: Check for the CMS to automatically run a task when opened. Select the task it will run under Task Name.
- Last Run: Check for the CMS to start the last used task or project when opened.
- Save last monitor status: Check to have the CMS restore the previously used display mode when opened.
To change the CMS admin password:
- When logged in as the admin account, click Config
I→Modify Password. - Under Old P password, enter the old password.
- Under New P password and Confirm Password, enter the new password.

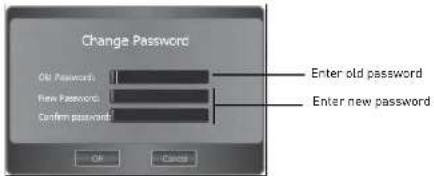
text_image
Change Password Ok Passwords New Passwords Confirm passwords Enter old password Enter new password4. Click OK.
Adding User Accounts to the CMS
You can create multiple user accounts for the CMS with varying levels of access to the system. These user accounts are only used for access to the CMS software and are separate from the passwords on the or IP camera systems.
NOTE: To make sure users must enter their user name and password to access the CMS, you must make sure Verify User is checked and Auto Login is unchecked in Config→Options. For details, see "Configuring CMS Options" on page 51.
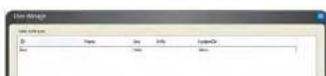
To add a user account to the CMS:
- Click Config Manager→User Manage.
- Click Add.
Multi-Monitor Support
The CMS supports up to 4 monitors on a single system. The recommended system specifications are listed below. If your system does not meet the requirements below, you may experience slow system performance.
Minimum system recommendations to run the CMS on multiple monitors:
- Intel Core i5 or i7 processor.
- 6 GB of RAM.
• Geforce 9500GT video card, 1GB or greater.
Opening Cameras in Secondary Monitors
- To open a single channel on a secondary monitor: Open it in a window on the main screen, then right-click on the display area, and select Output current window to extension screen. Select the monitor you would like to send the channel to.
- To open multiple-channels on a secondary monitor: Open your desired channel view, then right click in the display area, and select Output all windows to extension screen. Select the monitor you would like to send them to.

text_image
File Edit Options Audio Format Output current window to the operation screen Output all windows to the transfer screen Energy Transfer Info Close screen number order Open screen of all switches Video ActivitiesRight-click and select output option to open channels on a secondary monitor
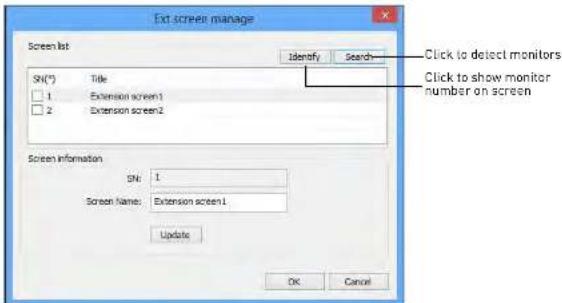
Managing Secondary Monitors
FLIR SyncrolP Central Management Software For PC
- Click Search to detect secondary monitors or Identify to display the monitor number assigned to each secondary monitor.
text_image
Ext screen manage Screen list SN(°) Title 1 Extension screen1 2 Extension screen2 Edit to detect monitors Click to show monitor number on screen Screen information SN: 1 Screen Name: Extension screen1 Update OK Cancel- Check monitors to open them when the CMS software opens or uncheck to disable.

text_image
Ext screen manage Screen list SN(*) Title 1 Extension screen1 2 Extension screen2 Check monitors to have them open when the CMS opens Screen information SN: 1 Screen Name: Extension screen 1 Update OK CancelSMARTPHONE AND TABLET APPS
iPhone
FLIR SyncrolP NVR is an iPhone app that allows you to remotely view your IP camera.
System Requirements
- iOS 4.3 or later.
Prerequisites
- Port 80 and 35000 (or your HTTP and Client Ports, if you have changed them) must be port forwarded on your router to your camera's IP address.
- You must create a DDNS account, and have the DDNS settings configured in your IP camera.
• The IP camera must have Internet access. - You must have a DDNS address to log in remotely.
- An iTunes account.
NOTE: You will need to create an iTunes account before you can download the app. An iTunes store account requires a valid credit card number. The app is free of charge.
Connecting to your IP camera on an iPhone
- Download FLIR SyncrolP NVR for free from the App Store.
- Tap on the FLIR SyncrolP NVR icon ( ) to start the app.

Smartphone and Tablet Apps
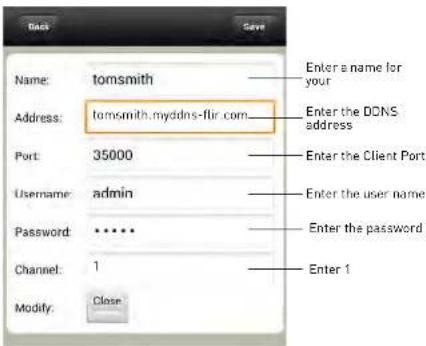
5. Tap Add→Manually Add.

6. Configure the following:
- Name: Enter a name for your IP camera of your choice.
- Address: Enter your DDNS address [e.g. tomsmith.myddns-flir.com].
- Port: Enter the Client Port (default: 35000).
- Username: Enter the IP camera's User Name (default: admin).
- Password: Enter the IP camera's Password (default: admin).
- Channel: Enter 1.
text_image
Name: tomsmith Address: tomsmith.myddns-flir.com Port: 35000 Username: admin Password: ***** Channel: 1 Modify: Close Enter a name for your Enter the DONS address Enter the Client Port Enter the user name Enter the password Enter 17. Tap Save.
- Tap

9. Tap Live Preview.
- Tap + on one of the display areas and select the camera to open it in the selected display area.

Top 1 and select the camera
FLIR SyncrolP NVR Interface
You can use FLIR SyncroIP NVR in portrait and landscape mode.

text_image
Return to Main Menu Double-tap to open a channel in full-screen Disconnect from camera Connect to camera Connect to all previously added cameras Disconnect all PTZ Access Favorites Snapshot Change Camera Start/stop manual record Open image settingsViewing Videos with Local File
If you have saved videos using FLIR SyncrolP, you may open them with Local File.
NOTE: You may open screenshots using the Photos app.
To access Local File:
• From the Main Menu, tap Local File.
Smartphone and Tablet Apps
Using Playback Mode on iPhone
You can access recorded video on your IP camera's microSD card using your iPhone.
NOTE: You must configure your camera to record the sub stream to use playback mode on mobile devices. For details, see "Record Control" on page 28.
To use Playback Mode:
- From the Main Menu, tap Playback.
NOTE: If Playback is not shown, tap Add, check Playback, and return to the Main Menu.
- Tap +.
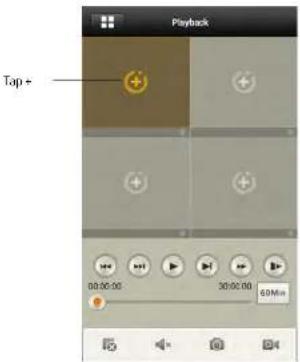
text_image
Playback Tap + 00:00:00 30:00:00 60Min- Select the start and end times to playback.
- Select a camera to playback.

- Use the on-screen controls to control playback.
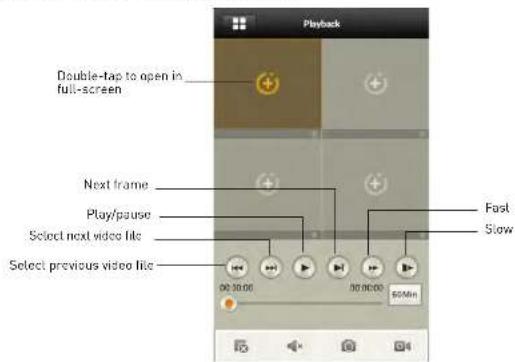
text_image
Playback Double-tap to open in full-screen Next frame Play/pause Select next video file Select previous video file 00:30:00 00:00:00 50Min Fast SlowEnabling Push Notifications
You can have the app send push notifications to the notifications area on your device when the camera detects motion. Once you have received a push notification, you can select it to open live video from the camera.

text_image
mvlan Channel 1 Motion Detect 2013-03-26 12:——— Push notification Videos Newsstand Smartphone Newborn Translate Aportale SportExpress TwitterSmartphone and Tablet Apps
- Tap Motion Detect and then check CAM 1.

text_image
Back nvlan OK Period 365 days Push type Playback Motion Detect CAM 1 Check channels to enable push notifications- Tap OK. A test notification will be sent to your device. After this, whenever the selected cameras detect motion, you will receive a notification.
Device Manager
You can use Device List to manage your IP cameras and NVRs.
To access Device List:
• From the Main Menu, tap Device Manager.
To edit a device:
- Tap the device in Device Manager.
- Edit the connection details as needed.
- Tap Save.
To delete a device:
- Swipe right on the device you would like to delete.

Swipe right on the device you would like to delete and tap delete
- Tap Delete. Tap OK to confirm.
iPad
FLIR SyncrolP NVR HD is an iPad app that allows you to remotely view your IP camera.
System Requirements
- iOS 4.3 or later.
Prerequisites
- Port 80 and 35000 (or your HTTP and Client Ports, if you have changed them) must be port forwarded on your router to your camera's IP address.
- You must create a DDNS account, and have the DDNS settings configured in your IP camera.
- The IP camera must have Internet access.
- You must have a DDNS address to log in remotely.
- You will need to create an iTunes account before you can download the app. An iTunes store account requires a valid credit card number. The app is free of charge.
Connecting to your IP camera on an iPad
-
Install FLIR SyncrolP NVR HD for free from the App Store.
-
Tap on the FLIR Syncro IP NVR HD icon [ ] to start the app.
-
Tap

then

- Tap Device Manager.

text_image
Configuration Device Manager Add Tap Add- Configure the following:

text_image
Configuration Device Manager Relay out Config Favorites Local Config Help Cancel New Device Name: NVR Address: tornsmith.myddns-fur.com Port: 35000 User Name: admin Password: ***** Channel amount: 1 Enter a name for your IP camera Enter the DDNS address Enter the Client Port Enter the user name Enter the password Enter 1- Name: Enter a name for your IP camera of your choice.
- Address: Enter your DDNS address (e.g. tomsmith.myddns-flir.com).
- Port: Enter the Client Port [default: 35000].
- Username: Enter the IP camera's User Name (default: admin).
- Password: Enter the IP camera's Password (default: admin).
• Channel amount: Enter 1.
- Tap Save.
- Tap

- In landscape mode: tap a channel and then select the camera you would like to view on the left.
In portrait mode: tap + on one of the display areas and select the camera you would like to open.

Smartphone and Tablet Apps
FLIR SyncrolP NVR HD Interface
You can use FLIR SyncrolP NVR HD in landscape or portrait mode.
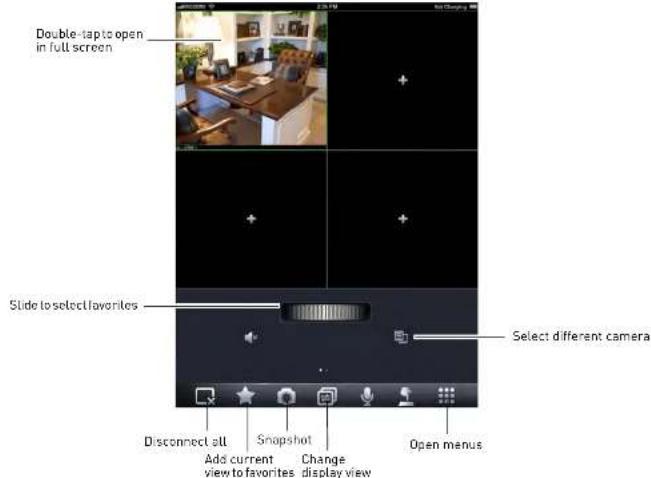
text_image
Double-tap to open in full screen Slide to select favorites Select different camera Disconnect all Snapshot Open menus Add current view to favorites Change display viewDevice Manager
Device Manager allows you to manage your IP cameras and NVRs.
To access Device Manager:
- From live view, tap

A T = 1
Smartphone and Tablet Apps
Using Playback Mode on iPad
You can access recorded video on your IP camera using your iPad.
NOTE: You must configure your camera to record the sub stream to use playback mode on mobile devices. For details, see "Record Control" on page 28.
To use Playback Mode:
- From Live View tap

then

- In Portrait Mode: Ta p+, select the start time and end time for your search, and select the camera you would like to playback.
OR
In Landscape Mode: Select the start time and end time for your search, and select the camera you would like to playback.

text_image
Select start time Select end time Select camera- Use the playback controls.

natural_image
Interior view of an office with computer monitors and a desk, alongside a black background with a small white cross symbol (no readable text or symbols)Smartphone and Tablet Apps
Enabling Push Notifications
You can have the app send push notifications to the notifications area on your device when the camera detects motion. Once you have received a push notification, you can select it to open live video from the camera that detected motion.

text_image
2:37 PM Channel Channel 3 Motion Detect 2013-03-25 14:44:21 2m ago Push notificationNOTE: Motion detection must be activated to receive push notifications. For details on enabling motion detection, see "Video Detect" on page 19.
NOTE: Your camera must be configured to record the sub-stream to open video from push notifications. For details on configuring sub-stream recording, see "Record Control" on page 28.
To enable Push Notifications:
- From live view, tap

then

-
Tap Alarm Push
-
Set the slider to ON next to the IP camera you would like to configure.
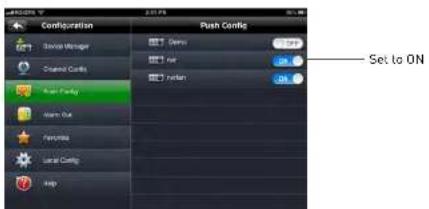
text_image
Configuration Push Config Storage Manager General Controls Push Config Warm Out Performance Local Config Help Set to ON- Tap OK. A test notification will be sent to your device. After this, whenever the selected cameras detect motion, you will receive a notification.
NOTE: You can see a list of notifications through the Event List menu. To show the Event List menu, from live view, tap then
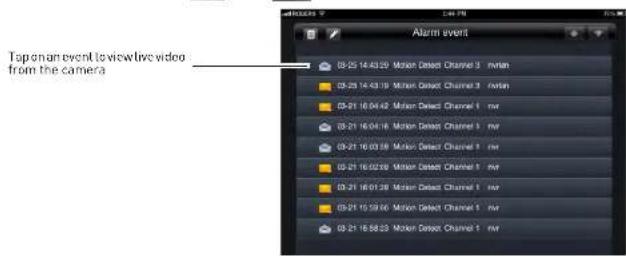
text_image
Tap on an event to view live video from the camera Alarm event 03-25 14:43:29 Motion Detect Channel 3 mvian 03-25 14:43:19 Motion Detect Channel 3 mvian 03-21 16:04:42 Motion Detect Channel 1 mvr 03-21 16:04:18 Motion Detect Channel 1 mvr 03-21 16:03:39 Motion Detect Channel 1 mvr 03-21 16:02:59 Motion Detect Channel 1 mvr 03-21 16:01:38 Motion Detect Channel 1 mvr 03-21 15:59:46 Motion Select Channel 1 mvr 03-21 16:58:23 Motion Select Channel 1 mvrAndroid Phones
FLIR SyncroIP NVR allows you to remotely view your IP camera on Android smartphones. A separate app is available to remotely view your IP camera on Android tablets, to make better use of the larger screen size. For details, see "Android Tablets" on page 73.
Compatible Devices
- Android OS (2.2 and above).
Prerequisites
- Port 80 and 35000 (or your HTTP and Client Ports, if you have changed them) must be port forwarded on your router to your camera's IP address.
4. Tap Device Manager.

text_image
Line Preview Device Manager Local File Local Config Help AddDevice Manager
5. Tap Add→Manually Add.
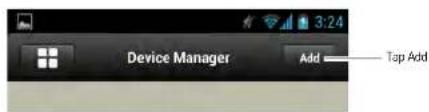
text_image
Device Manager Add Top Add6. Configure the following:
- Name: Enter a name for your IP camera of your choice.
- Address: Enter your DDNS address (e.g. tomsmith.myddns-flir.com).
- Port: Enter the Client Port [default: 35000].
- Username: Enter the IP camera's User Name (default:
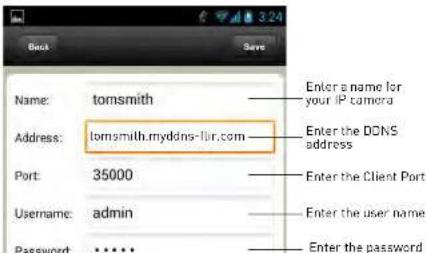
text_image
Back Name: tomsmith Address: tomsmith.myddns-lir.com Port: 35000 Username: admin Password: ***** Enter a name for your IP camera Enter the DCNS address Enter the Client Port Enter the user name Enter the password- Tap + on one of the display areas and select the camera you would like to open in the selected display area.

text_image
Tap + and select a camera- Repeat to view additional cameras.
FLIR SyncrolP NVR Interface
You can use FLIR SyncrolP NVR in portrait and landscape mode.
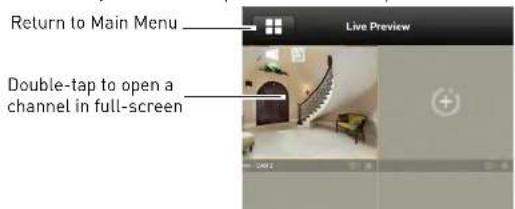
text_image
Return to Main Menu Double-tap to open a channel in full-screenSmartphone and Tablet Apps
Viewing Snapshots and Videos with Local Files
If you have saved snapshots or videos using FLIR SyncrolP NVR, you may open them with Local Files.
To access Local Files:
• From the Main Menu, tap Local Files.
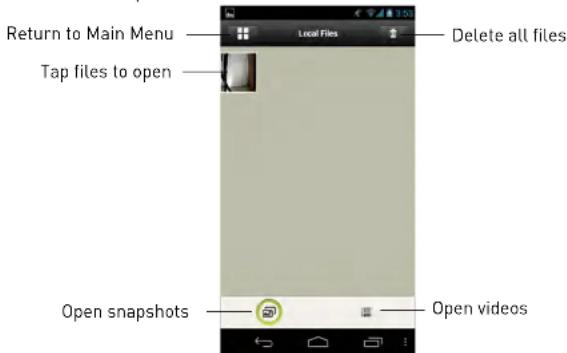
text_image
Return to Main Menu Tap files to open Local Files Delete all files Open snapshots Open videosUsing Playback Mode on Android Phones
You can access recorded video on your IP camera using your Android phone.
NOTE: You must configure your camera to record the sub stream to use playback mode on mobile devices. For details, see "Record Control" on page 28.
To use Playback Mode:
-
From the Main Menu, tap Playback.
-
If Playback is not shown, tap Add. check Playback. and return to the Main Menu.
Smartphone and Tablet Apps
- Tap + and select a camera to playback.
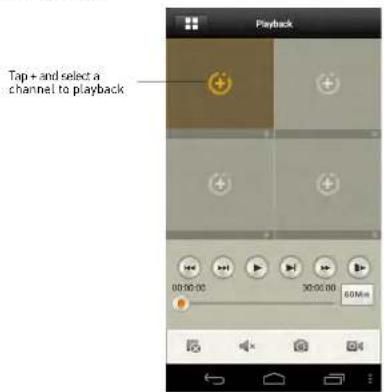
text_image
Playback Top + and select a channel to playback 00:00:00 30:00:00 60Mn-
Select the date then the start and end times to playback.
-
Use the on-screen controls to control playback.

text_image
Playback Double-tap to open in full-screen Next frame Play/pause Fast Slowlive video from the camera that detected motion.
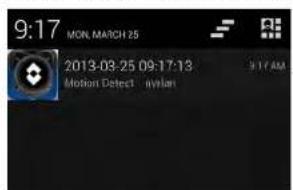
text_image
9:17 MON. MARCH 25 2013-03-25 09-17-18 Motion Detect mylan 9:17 AMPush notification
NOTE: Appearance of notifications may differ depending on the model of your device
NOTE: Motion detection must be activated to receive push notifications. For details on enabling motion detection, see "Video Detect" on page 19.
NOTE: Your camera must be configured to record the sub-stream to open video from push notifications. For details on configuring sub-stream recording, see "Record Control" on page 28.
To enable Push Notifications:
- From the Main menu, tap Push Config.
NOTE: If Push Config is not shown, tap Add, check Push Config, and then return to the Main Menu.
- Tap the IP camera you would like to configure.
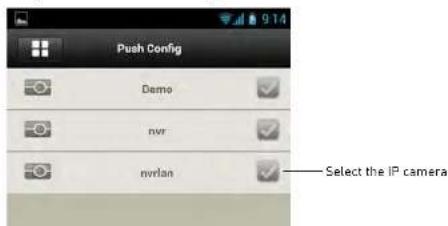
text_image
Push Config Demo nvr nwrlan Select the IP cameraDevice Manager
You can use Device List to manage your IP cameras and NVRs.
To access Device List:
• From the Main Menu, tap Device Manager.
To edit a device:
- Tap the device in Device Manager.
- Edit the connection details as needed.
- Tap Save.
To delete a device:
- Swipe the device you would like to delete to the right.
- Tap Del ete. Tap OK to confirm.
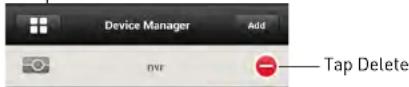
Android Tablets
FLIR SyncrolP NVR HD is an app that allows you to remotely view your IP camera on an Android tablet.
System Requirements
- Android 3.3 or later.
Prerequisites
- Port 80 and 35000 (or your HTTP and Client Ports, if you have changed them) must be port forwarded on your router to your camera's IP address.
- You must create a DDNS account, and have the DDNS settings configured in your IP camera.
Smartphone and Tablet Apps
4. Tap Device Manager.
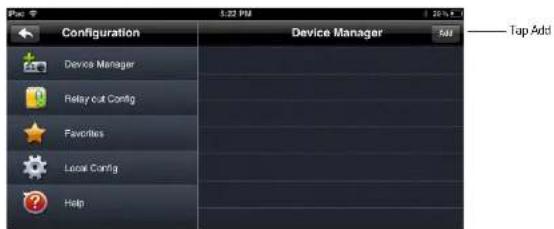
text_image
Configuration Device Manager Relaycut Config Favorites Local Config Help Tap Add5. Tap Add.
6. Configure the following:
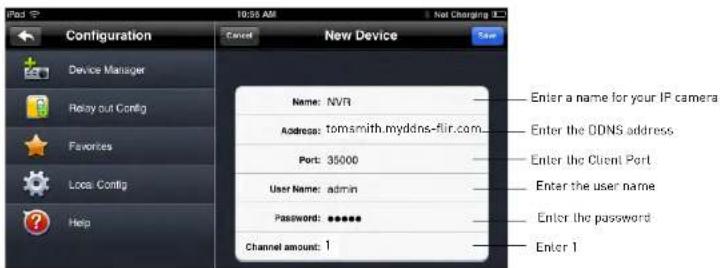
text_image
Configuration Device Manager Ready out Config Favorites Loca: Config Help Cancel New Device Name: NVR Address: tomsmith.myddns-flir.com Port: 35000 User Name: admin Password: ***** Channel amount: 1 Enter a name for your IP camera Enter the DDNS address Enter the Client Port Enter the user name Enter the password Enter 1- Name: Enter a name for your IP camera of your choice.
- Address: Enter your DDNS address (e.g. tomsmith.myddns-flir.com).
- Port: Enter the Client Port [default: 35000].
- Username: Enter the IP camera's User Name (default-admin)
- In landscape mode, tap a display area and then select the camera you would like to view on the left. In portrait mode, tap + on one of the display areas and select the camera you would like to open.

text_image
Click - and then select a cameraFLIR SyncrolP NVR HD Interface
You can use FLIR SyncrolP NVR HD in landscape or portrait mode.

text_image
Double-lap to open in full screenSmartphone and Tablet Apps
Using Playback Mode on Android Tablets
You can access recorded video on your IP camera using your Android tablet.
NOTE: You must configure your camera to record the sub stream to use playback mode on mobile devices. For details, see "Record Control" on page 28.
To use Playback Mode:
- From Live View tap

then

- In Portrait Mode: Ta p+, select the start time and end time for your search, and select the camera you would like to playback.
OR
In Landscape Mode: Select the start time and end time for your search, and select the camera you would like to playback.
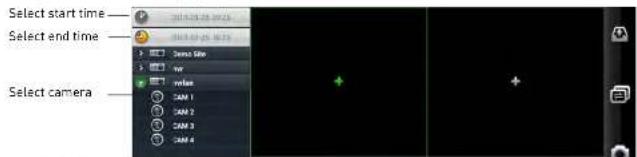
text_image
Select start time Select end time Select camera- Use the playback controls.

natural_image
Interior view of an office with computer monitors and desk, no visible text or symbolsEnabling Push Notifications
You can have the app send push notifications to the notifications area on your device when the camera detects motion. Once you have received a push notification, you can select it to open live video from the camera.
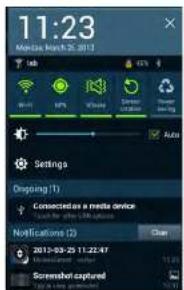
text_image
11:23 Monday March 25, 2013 Settings Dropping (1) Connected as a media device Notifications (2) 2012-03-25 11:22:47 Screenshot-capturedPush notification
NOTE: Appearance of notifications may differ depending on the model of your device
NOTE: Motion detection must be activated to receive push notifications. For details on enabling motion detection, see "Video Detect" on page 19.
NOTE: Your camera must be configured to record the sub-stream to open video from push notifications. For details on configuring sub-stream recording, see "Record Control" on page 28.
To enable Push Notifications:
- From live view, tap

then

- Tap Alarm Push.
- Select the IP camera you would like to configure.
| Config | Alarm Path |
| Device Manager | Demo Site |
| General Manager | [IMAGE] |
Smartphone and Tablet Apps
4. Tap MotionDetect then check CAM 1.
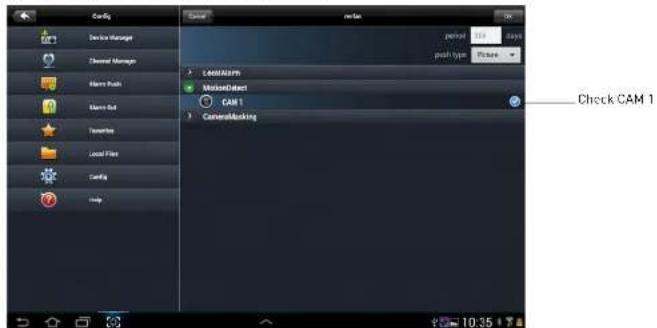
text_image
Config Device Manager Channel Manager Alarm Push Alarm Out Transiters Local Film Config Help LAM30479 NamedObject CAM 1 CameraBlocking Check CAM 1- Tap OK. A test notification will be sent to your device. After this, whenever the selected cameras detect motion, you will receive a notification.
NOTE: You can see a list of notifications through the Event List menu. To show the Event List
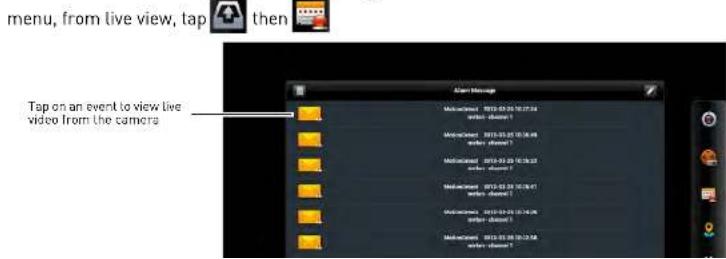
text_image
menu, from live view, tap then Tap on an event to view live video from the camera- Tap . Tap OK to confirm.

text_image
Configuration Device Manager Tap to delete Device Manager Temp or Config Functionnel Local Config HelpTo modify a device:
- Tap a device to select.
- Tap the device again to open the edit screen.
- Update the connection details as needed and then t ap Save.

Need Help?
Please make sure to visit our website www.digimerge.com to receive product updates and information.
3 Easy Ways To Contact Us

natural_image
Woman sitting on a couch using a laptop, wearing an orange sleeveless top and white pants (no visible text or symbols)
natural_image
Elderly couple sitting together, one using a laptop (no visible text or symbols)
text_image
ending productOnline:
Product support is available 24/7 including product information, user manuals, quick start up guides and FAQ's at www.digimerge.com
By Email:
Technical support (for technical/installation issues) tech@digimerge.com