M51086 - Security Camera FLIR - Free user manual and instructions
Find the device manual for free M51086 FLIR in PDF.

User questions about M51086 FLIR
0 question about this device. Answer the ones you know or ask your own.
Ask a new question about this device
Download the instructions for your Security Camera in PDF format for free! Find your manual M51086 - FLIR and take your electronic device back in hand. On this page are published all the documents necessary for the use of your device. M51086 by FLIR.
USER MANUAL M51086 FLIR
Instruction Manual M5100 Series

natural_image
Front view of a black FLIR-branded electronic device with control buttons and indicator lights (no visible text or symbols on body)
Instruction Manual M5100 Series
Thank you for purchasing this product. FLIR Systems, Inc. is committed to providing our customers with a high quality, reliable security solution.
This manual refers to the following models:
M5104 (4-channel)
M5108 (8-channel)
M5116 (16-channel)
For the latest online manual, downloads and product updates, and to learn about our complete line of accessory products, please visit our website at:
www.flir.com/security/pro

WARNING
RISK OF ELECTRIC SHOCK DO NOT OPEN

WARNING: TO REDUCE THE RISK OF ELECTRIC SHOCK DO NOT REMOVE COVER. NO USER SERVICEABLE PARTS INSIDE. REFER SERVICING TO QUALIFIED SERVICE PERSONNEL

The lightning flash with arrowhead symbol, within an equilateral triangle, is intended to alert the user to the presence of uninsulated "dangerous voltage" within the product's enclosure that may be of sufficient magnitude to constitute a risk of electric shock.

The exclamation point within an equilateral triangle is intended to alert the user to the presence of important operating and maintenance (servicing) instructions in the literature accompanying the appliance.
Table of contents
1 Important Safeguards ....1
1.1 General Precautions.... 1
1.2 Installation.... 1
1.3 Service 3
1.4 Use....4
2 Getting Started (M5100 Series) 5
3 Front Panel (M5100 Series)....6
4 Rear Panel (M5100 Series)....7
5 Basic Setup (M5100 Series) 8
5.1 Step 1: Connect the BNC Cameras....8
5.2 Step 2: Connect the Mouse....8
5.3 Step 3: Connect the Ethernet Cable ....8
5.4 Step 4: Connect the Monitor....8
5.5 Step 5: Connect the Power Adapter and Power on the DVR....9
5.6 Step 6: Creating a New, Secure Password....9
5.7 Step 7: Upgrade Firmware to Latest Version (if Available) 9
5.8 Step 8: Verify Camera Image 10
5.9 Step 9: Set the Time 10
5.10 Default System Password & Port Numbers 10
5.10.1 FLIR Cloud™ 10
5.11 Quick Access to System Information 11
6 About MPX.... 12
6.1 What types of cabling and run lengths does MPX work with? 12
7 Mouse Control 13
8 Remote Control 14
8.1 Setting the Remote Control Address 15
9 Using the System 16
9.1 On-Screen Display 16
9.2 Using the Quick Menu.... 16
9.3 Adjusting Camera Settings.... 17
Table of contents
13.2 Backing up Video.... 30
13.3 Using Video Clip Backup 32
13.4 Viewing Backup Files.... 33
13.4.1 Viewing Backup Files on PC 33
13.4.2 Viewing Backup Files on Mac 35
14 Managing Passwords and User Accounts.... 39
14.1 Changing Passwords.... 39
14.2 Adding Users 40
14.3 Modifying Users 41
14.4 Deleting Users 41
14.5 Account Groups 42
14.6 Adding Groups 42
14.7 Modifying Groups 43
14.8 Deleting Groups 43
15 Using the Main Menu 44
15.1 Camera 44
15.1.1 Recording.... 44
15.1.2 Configuring Recording Quality 45
15.1.3 Configuring Audio Recording 47
15.1.4 Configuring Snapshot Recording Settings.... 47
15.1.5 Configuring Video Overlay Settings 48
15.1.6 Creating Custom Channel Names.... 50
15.1.7 Adding a Remote Device 50
15.1.8 Selecting Cable Type 50
15.1.9 Upgrading Camera Firmware (Advanced) 51
15.2 Info 52
15.2.1 HDD Info 53
15.2.2 Record Info 54
15.2.3 Version 55
15.2.4 Alarm Status 55
15.2.5 Online Users 57
Table of contents
15.3.15 Configuring the Snapshot Schedule 77
15.3.16 Configuring Holidays.... 78
15.3.17 Formatting the Hard Drive 80
15.3.18 Configuring Hard Drive Type 80
15.3.19 Configuring General System Settings 81
15.3.20 Setting the Monitor Resolution (Display) 82
15.3.21 Saving Your System Configuration to a USB Thumb
Drive 83
15.3.22 Setting the System to Factory Defaults 85
15.3.23 Upgrading Firmware from USB 85
15.4 Shutdown.... 86
16 Connecting to Your System Over the Internet on PC or Mac 87
16.1 System Requirements.... 87
16.2 Step 1 of 3: Connect your System to Your Router 88
16.3 Step 2 of 3: Obtain the system's Device ID.... 88
16.4 Step 3 of 3: Connect to the System Over the Internet 88
17 Using FLIR Cloud™ Client for PC or Mac 92
17.1 Home Page 92
17.2 Live View 92
17.2.1 Live View Controls 93
17.2.2 Opening Live View in Multiple Monitors 95
17.3 Controlling PTZ Cameras 96
17.3.1 PTZ Presets 97
17.3.2 PTZ Tours 98
17.3.3 PTZ Pattern 99
17.3.4 PTZ Scan 100
17.3.5 PTZ Pan 100
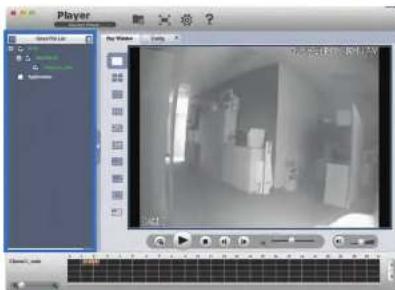
17.4 Playback.... 100
17.5 Playback Controls 102
17.6 Downloading Video to your Computer Hard Drive.... 103
17.7 Alarm 104
Table of contents
18.1.4 Controlling PTZ Cameras.... 129
18.1.5 Viewing Snapshots and Videos with Local Files 130
18.1.6 Using Playback Mode on iPhone / iPad 131
18.1.7 Enabling Push Notifications 132
18.1.8 Using the Event List 134
18.1.9 Using Favorites.... 135
18.1.10 Using the E-Map 136
18.1.11 Device Manager.... 138
18.1.12 Adding Devices Using an IP or DDNS Address (Advanced) 139
18.2 Android 141
18.2.1 Prerequisites.... 141
18.2.2 Connecting to your System on Android 141
18.2.3 Live View Interface 142
18.2.4 Controlling PTZ Cameras.... 143
18.2.5 Viewing Snapshots and Videos with Local Files 144
18.2.6 Using Playback Mode on Android 144
18.2.7 Enabling Push Notifications 145
18.2.8 Using the Event List 147
18.2.9 Using Favorites.... 147
18.2.10 Using the E-Map 149
18.2.11 Device Manager.... 150
18.2.12 Adding Devices Using an IP or DDNS Address
(Advanced) 150
19 DDNS Setup (Advanced) 152
19.1 Accessing your System within a Local Network (LAN) 152
19.1.1 Step 1 of 3: Connect your System to Your Router 152
19.1.2 Step 2 of 3: Obtain the System's Local IP Address ..... 153
19.1.3 Step 3 of 3: Connect to the System's Local IP
Address 153
19.2 DDNS Setup—Access your System Remotely over the
Internet.... 155
Table of contents
| 24 Troubleshooting | 175 |
| 25 M5100 Series System Specifications | 177 |
| 26 Notices | 180 |
| 26.1 FCC/IC Notice | 180 |
| 26.2 Modification | 180 |
| 26.3 ROHS | 180 |
Important Safeguards
In addition to the careful attention devoted to quality standards in the manufacturing process of your product, safety is a major factor in the design of every instrument. However, safety is your responsibility too. This sheet lists important information that will help to ensure your enjoyment and proper use of the product and accessory equipment. Please read them carefully before operating and using your product.
1.1 General Precautions
- All warnings and instructions in this manual should be followed.
- Remove the plug from the outlet before cleaning. Do not use liquid aerosol detergents. Use a water-dampened cloth for cleaning.
- Do not use this product in humid or wet places.
- Keep enough space around the product for ventilation. Slots and openings in the storage cabinet should not be blocked.
- It is highly recommended to connect the product to a surge protector to protect from damage caused by electrical surges. It is also recommended to connect the product to an uninterruptible power supply (UPS), which has an internal battery that will keep the product running in the event of a power outage.

CAUTION
Maintain electrical safety. Power line operated equipment or accessories connected to this product should bear the UL listing mark or CSA certification mark on the accessory itself and should not be modified so as to defeat the safety features. This will help avoid any potential hazard from electrical shock or fire. If in doubt, contact qualified service personnel.
1.2 Installation
- Read and Follow Instructions: All the safety and operating instructions should be read before the product is operated. Follow all operating instructions.
- Retain Instructions: The safety and operating instructions should be retained for future reference.
-
Heed Warnings: Comply with all warnings on the product and in the operating instructions.
-
Polarization: Do not defeat the safety purpose of the polarized or grounding-type plug. A polarized plug has two blades with one wider than the other.

A grounding type plug has two blades and a third grounding prong.

The wide blade or the third prong are provided for your safety.
If the provided plug does not fit into your outlet, consult an electrician for replacement of the obsolete outlet.
-
Power Sources: This product should be operated only from the type of power source indicated on the marking label. If you are not sure of the type of power supplied to you location, consult your video dealer or local power company. For products intended to operate from battery power, or other sources, refer to the operating instructions.
-
Overloading: Do not overload wall outlets or extension cords as this can result in the risk of fire or electric shock. Overloaded AC outlets, extension cords, frayed power cords, damaged or cracked wire insulation, and broken plugs are dangerous. They may result in a shock or fire hazard. Periodically examine the cord, and if its appearance indicates damage or deteriorated insulation, have it replaced by your service technician.
-
Power-Cord Protection: Power supply cords should be routed so that they are not
-
Water and Moisture: Do not use this product near water — for example, near a bath tub, wash bowl, kitchen sink or laundry tub, in a wet basement, near a swimming pool and the like.
-
Heat: The product should be situated away from heat sources such as radiators, heat registers, stoves, or other products (including amplifiers) that produce heat.
-
Accessories: Do not place this product on an unstable cart, stand, tripod, or table. The product may fall, causing serious damage to the product. Use this product only with a cart, stand, tripod, bracket, or table recommended by the manufacturer or sold with the product. Any mounting of the product should follow the manufacturer's instructions and use a mounting accessory recommended by the manufacturer.

-
Camera Extension Cables: Check the rating of your extension cable(s) to verify compliance with your local authority regulations prior to installation.
-
Mounting: The cameras provided with this system should be mounted only as instructed in this guide or the instructions that came with your cameras, using the provided mounting brackets.
-
Camera Installation: Cameras are not intended for submersion in water. Not all cameras can be installed outdoors. Check your camera environmental rating to confirm if they can be installed outdoors. When installing cameras outdoors, installation in a sheltered area is required.
1.3 Service
-
Servicing: Do not attempt to service this product yourself, as opening or removing covers may expose you to dangerous voltage or other hazards. Refer all servicing to qualified service personnel.
-
Conditions Requiring Service: Unplug this product from the wall outlet and refer servicing to qualified service personnel under the following conditions:
1.4 Use
- Cleaning: Unplug the product from the wall outlet before cleaning. Do not use liquid cleaners or aerosol cleaners. Use a damp cloth for cleaning.
- Product and Cart Combination: When product is installed on a cart, product and cart combination should be moved with care. Quick stops, excessive force, and uneven surfaces may cause the product and cart combination to overturn.
- Object and Liquid Entry: Never push objects of any kind into this product through openings as they may touch dangerous voltage points or "short-out" parts that could result in a fire or electric shock. Never spill liquid of any kind on the product
- Lightning: For added protection of this product during a lightning storm, or when it is left unattended and unused for long periods of time, unplug it from the wall outlet and disconnect the antenna or cable system. This will prevent damage to the product due to lightning and power line surges.
Getting Started (M5100 Series)
The system comes with the following components:
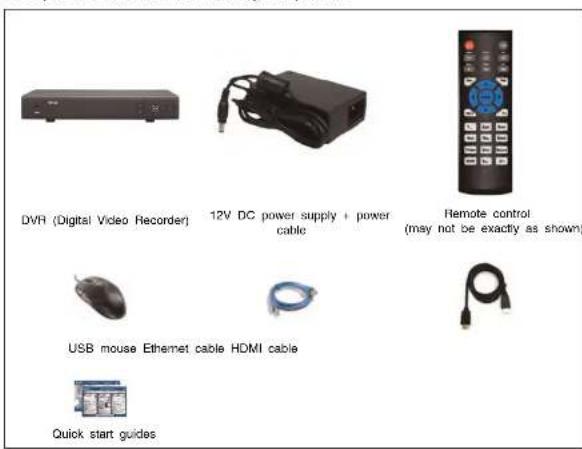
Hard drive size, number of channels, and camera configuration may vary by model. Please refer to your package for specific details. Check your package to confirm that you have received the complete system, including all components shown above.
Front Panel (M5100 Series)

text_image
FLIR ① ② ③ ④ ⑤ ⑥ ⑦- USB port: Connect a USB mouse (included) or connect a USB flash drive (not included) for data backup or firmware upgrades.
- IR: Not supported
- IR receiver and LED indicators: IR receiver for the remote control. Keep the IR receiver clear from obstructions.
• ALARM: Not supported.
- NET: Glows when network is in normal state. Turns off when there is a network error
- HDD: Glows to indicate hard drive is in normal state. Turns off when there is a hard drive error.
• POWER: Glows to indicate the system is on.
- FN: Performs special functions in some menus.
- ESC: In menus, press to go back / exit menus. In playback, press to return to live view
- Directional buttons:
- ENTER: From live view, press once to open the System Information screen. In menus, press to confirm menu options.
- Directional buttons: Press to move cursor in menus. In live view, press up to change split screen layout; press left / right to select channels when single-channel mode is selected.
- Power button: Press and hold to power off the system (system password required). Press to power the system back on.
Rear Panel (M5100 Series)

NOTE
DVR back panel shown below is for illustration purposes only. Your DVR model may appear slightly different, with the same ports in different positions on the back panel.

text_image
Labeled diagram of a server rack with numbered components for identification- Video Input: Connect FLIR MPX or standard analog cameras to the system.
- Audio IN/Audio OUT: RCA input and output for 1-channel audio recording.
- HDMI: Connect to an HDMI monitor or TV (not Included) to view the system interface.
- LAN: Connect a CAT 5 RJ45 Ethernet cable for local and remote connectivity.
- A/B: Connect RS485 cables.

NOTE
For full details on connecting PTZ cameras, see 21 Connecting a PTZ Camera (M5100 Series), page 154 for details.
- USB port(s): Connect a USB mouse (included) or USB flash drive (not included) for data backup or firmware updates.
- VGA: Connect a VGA monitor (not included) to view the system interface.
- DC12V: Connect the included power adapter.
- ON/OFF switch: Turns the DVR on or off.
Basic Setup (M5100 Series)

NOTE
DVR back panels shown below are for illustration purposes only. Your DVR model may appear slightly different, with the same ports in different positions on the back panel.
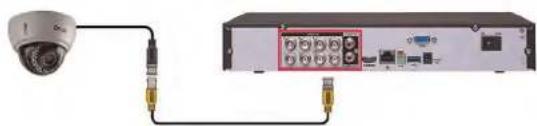
5.1 Step 1: Connect the BNC Cameras
- Connect FLIR MPX or standard analog cameras to the Video Input ports on the rear panel of the DVR.
natural_image
Diagram showing a security camera connected to an external network device with ports and cables (no text or symbols visible)Push and twist the BNC connector clockwise to secure it to the BNC port.
5.2 Step 2: Connect the Mouse
- Connect a USB mouse (included) to one of the USB ports.

natural_image
Diagram showing a computer mouse connected to an internal network device with ports and connectors (no text or labels visible)
text_image
Diagram showing connection between a computer and a server rack with two connected ports labeled ① and ②.- HDMI port.
- VGA port.
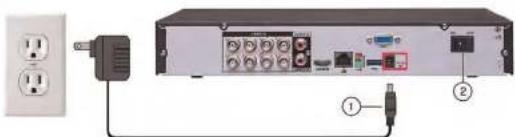
5.5 Step 5: Connect the Power Adapter and Power on the DVR
- Connect the included power adapter to the DC 12V port. Connect the end of the power
- Tum the power switch to ON to turn on the DVR.
natural_image
Exterior view of a network equipment unit with power outlet, switch, and cable (no visible text or labels)At startup, the system performs a basic system check and runs an initial loading sequence. After a few moments, the system loads a live display view and prompts you to create a new, secure 6 character password.
5.6 Step 6: Creating a New, Secure Password
- Click OK. Wait for the firmware update to complete. The system will restart once the firmware has been upgraded.

WARNING
DO NOT POWER OFF THE SYSTEM OR DISCONNECT THE POWER CABLE DURING FIRM-WARE INSTALLATION
5.8 Step 8: Verify Camera Image
- Power on the cameras, and then verify the camera video quality before mounting the cameras to a permanent location.
- Mount the cameras under a sheltered location. Always verify the outdoor rating of your camera before installing it in a permanent location.
5.9 Step 9: Set the Time
- Set the system time and date for accurate video time stamps. Videos with inaccurate times may not be valid as surveillance evidence.
- For details on setting the system time, see 10 Setting The Time, page 22.
5.10 Default System Password & Port Numbers

CAUTION
By default, the system user name is admin. The system does not have a default password. You are required to create a new, secure 6 character password the first time you access the system, see 5.6 Step 6: Creating a New, Secure Password, page 9. To change the password created during initial setup, see 14 Managing Passwords and User Accounts, page 39.
A user name and password is required to log in to the system. Use the new, secure 6 character password created during initial setup to access your system.
Local system and remote connectivity (LAN & Internet) user name and password:
- Username: admin
- Password: Secure 6 character password created during initial setup.
5.11 Quick Access to System Information
To quickly open a window that displays vital system information:
- Right-click to open the Quick Menu and click Info. Enter the system user name (default: admin) and your new, secure password. OR
- Press the ENTER button on the front panel. OR
- Press the ENTER button on the remote control.

text_image
Device ID ch3c94b016 Device Type Firmware Version 2.616.GM02.0 IE Version 3.1.0.4 Build Date 03-10-2014 IP Address 192.168.1.102 MAC Address 98.02.e98.5a16 Domain Name DCNS setup is not available HDD Capacity 195G/232G Video Format NTSC Client Port 3500C HTTP Port 80 OKAbout MPX
FLIR MPXTM is a revolutionary video surveillance format powered by HD-CVI technology. MPX delivers megapixel picture quality over coax, meaning you can upgrade your existing analog systems to HD resolution (1MP, 2.1MP, & 4MP) over a single coax cable (RG59 & RG6 compatible).
| NOTE |
| The DVRs covered in this manual are compatible with 4MP (2K), 2MP (1060p),1MP (720p), 960H, standard analog cameras. |
6.1 What types of cabling and run lengths does MPX work with?
MPX allows a maximum cable run of up to 2300ft (700m) @ 720p, up to 2000ft (610m) @ 1080p, or up to 1300ft (400m) @ 4MP, depending on the type of cable used (see below). is required that the cable runs be made in a single run between camera and DVR, as daisychaining multiple cable runs together can prevent the DVR from getting a picture from the camera or may impact image quality. MPX supports standard UTP baluns for use with CAT5E or CAT6 cabling in your installation. The baluns should have a 12V and BNC connection at both ends. You can run up to 300ft (91m) per segment of CAT5E or CAT6.
| Cable Type Maximum Run Length | |
| RG59 20AWG Conductor 95% Braid CSA/UL or (UL) approved | C720p: Up to 1500ft (455m)1080p: Up to 1000ft (300m)4MP: Up to 1000ft (300m) |
| RG6 20AWG Conductor 95% Braid CSA/UL or (UL) approved | 720p: Up to 2300ft (700m)1080p: Up to 2000ft (600m)4MP: Up to 1300ft (400m) |
| Analog CCTV Baluri | 720p: Up to 300ft (91m)1080p: Up to 300ft (91m)4MP: Up to 300ft (91m) |
Mouse Control
The mouse is the primary control device for the system. To connect a USB mouse:
- Connect a USB mouse to the USB port on the front or rear panel.
- In live view, hover the mouse cursor over the bottom of the screen to open the Navigation Bar. Move the mouse cursor away from the bottom of the screen to close the navigation bar.

text_image
① ② ③1. Left-button:
- In live view, while in a split-screen display mode, click an individual channel to view it in full-screen. Click again to return to the split-screen display mode.
- While navigating menus, click to open a menu option.
2. Right-button:
- During live view, right-click anywhere on the screen to open the Quick Menu.
-
Within system menus, right-click to exit menus.
-
Scroll wheel: In live view, use the scroll wheel to zoom in/out.
Remote Control
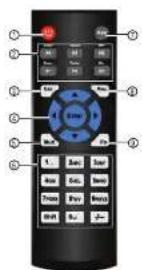
- Power: Press and hold to power off the system. Press to power on.
-
Playback controls:
-
Pause/Play: In live view, press to enter playback mode. Press to play/pause playback.
• Reverse: Press to reverse playback/pause playback.
• Fast: Press to increase playback speed.
• Next: Press to skip to next video.
• Previous: Press to skip to previous video. -
Slow: Press for slow playback.
-
Esc: In menus, press to go back / exit menus. In playback, press to return to live view.
8.1 Setting the Remote Control Address
If you have more than one system, you can set up your remote control to pair with a specific system.
To set the remote control address:
- Right-click and click Main Menu. Enter the system user name (default: admin) and your new, secure password.

- Under Device No., enter the address number you would like to assign to the remote control.
text_image
GENERAL DISPLAY PANTLETZCCM ACCOUNT Config Backup DEFAULT UPGRADE General Data&Time Holiday Device Model: Device No: X Language ENGLISH Video Standard PAL HDD Full Overwire Pack Duration 30 min Instant Playback 5 min Auto Logout 5 min Navigation Bar Startup Wizard Mouse Speed Flow Fast Default OK Cancel ApplyUsing the System
Use the system's graphical on-screen display to navigate menus and configure options and settings.
9.1 On-Screen Display
The system shows the following for all display views:

text_image
① ② ③ ④ ⑤ CAM1 CAM2 CAM3 CAM4 CAM5 CAM6 CAM7 CAM8 CAM9 CAM10 CAM11 CAM12 CAM13 CAM14 CAM15 CAM16 CAM17 CAM18 CAM19 CAM20 CAM21 CAM22 CAM23 CAM24 CAM25 CAM26 CAM27 CAM28 CAM29 CAM30 CAM31 CAM32 CAM33 CAM34 CAM35 CAM36 CAM37 CAM38 CAM39 CAM40 CAM41 CAM42 CAM43 CAM44 CAM45 CAM46 CAM47 CAM48 CAM49 CAM50 CAM51 CAM52 CAM53 CAM54 CAM55 CAM56 CAM57 CAM58 CAM59 CAM60 CAM61 CAM62 CAM63 CAM64 CAM65 CAM66 CAM67 CAM68 CAM69 CAM70 CAM71 CAM72 CAM73 CAM74 CAM75 CAM76 CAM77 CAM78 CAM79 CAM801. Display area:
- Click on a channel to view in full-screen; click again to return to split screen.
• Right-click to open the Quick Menu. - Hover the mouse cursor over the bottom of the screen to open the Navigation Bar. Move the mouse cursor away from the bottom of the screen to close the navigation bar.
- Move the mouse to the top of a channel to view the Camera Toolbar.
- Click-and-drag cameras to rearrange the channel display. This does not affect the channels each camera is connected or recording to.
2. Channel name
- C: Camera is continuously recording.
text_image
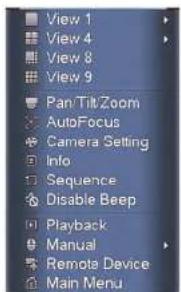
View 1 View 4 View 8 View 9 Pan/Tilt/Zoom AutoFocus Camera Setting Info Sequence Disable Beep Playback Manual Remote Device Main MenuThe Quick Menu has the following options:
• View: Select a camera in full-screen or select a multi-channel display.
- Pan/Tilt/Zoom: Access controls for PTZ cameras (not included).
- AutoFocus: Control auto focus cameras (not included). This menu item is only available when an IP camera channel is enabled, see 15.1.8 Selecting Cable Type, page 50 to enable IP camera channels.
- Camera Setting: Configure image settings for cameras.
• Info: Opens the system information window
- Sequence: Click to start/stop sequence mode.
- In sequence mode, the system will automatically cycle through connected cameras every few seconds.
A will appear to show that sequence mode is on. -
Click the icon to pause sequence mode on the channel that is currently shown (icon
-
Configure the following settings as needed:
text_image
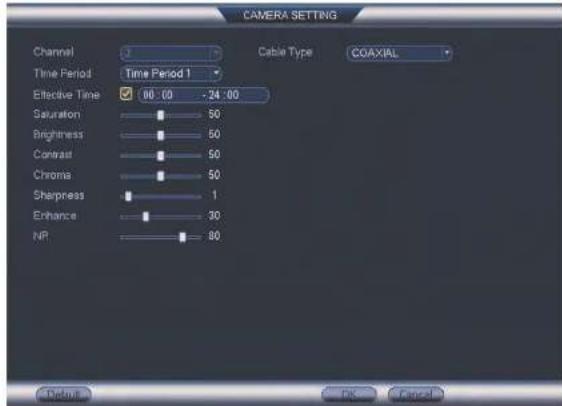
CAMERA SETTING Channel Time Period Effective Time Saturation Brightness Contrast Chroma Sharpness Enhance NP Cable Type COAXIAL 80:00 -24:00 50 50 50 50 1 30 80 OK Cancel
NOTE
The settings listed below are only shown if they are supported on the selected camera. Some camera models do not support all settings.
- Cable Type: Select the cable type. It is recommended to use Coaxial, as it is the default for MPX camera. Use UTP with MPX cameras only if you are using cabling with resistance higher than 10Ω per 100m (330ft) and you are having image quality issues.
9.4 Using the Navigation Bar
The Navigation Bar gives quick access to certain functions and menus.
To open the Navigation bar:
- In live view, hover the mouse cursor over the bottom of the screen to open the Navigation Bar. The Navigation Bar has the following options:

-
Main Menu.
-
Collapse
-
Select display layout.
-
Sequence: Click to start/stop sequence mode.
-
PTZ: Click to open PTZ controls.
-
Camera Setting: Click to open camera image settings.
-
Playback: Search and playback recorded video. See 17.4 Playback, page 100.
-
Event: View alarms in progress. See 15.2.4 Alarm Status, page 55.
-
Channel Info: Click to access status information about connected cameras.
-
Network: Configure network settings for your system. See 15.3.1 Network, page 62.
-
HDD Manager: Manage hard drives connected to the system. See 15.3.17 Format-
ting the Hard Drive, page 80.
-
USB Manager: Click to access options for connected USB thumb drives (not included). You can backup video, logs, or system configurations and install firmware upgrades.
-
Upgrade: Click to check for firmware upgrades. Your system must be connected to the Internet to check for firmware upgrades.
9.5 Using the Camera Toolbar
The Camera Toolbar is used to perform actions on a specific channel.
To access the Camera Toolbar:
- Move the mouse to the top of the channel display. The Camera Toolbar has the follow-
To use Instant Playback:
- Move your mouse to the top of the channel display and click
| NOTE |
| By default, the system will begin playback from 5 minutes ago. You can increase this to up to nutes using the Realtime Play setting in Main Menu>Setting>General. |
- Right-click to exit Instant Playback
9.5.2 Using Digital Zoom In Live Display
- Move your mouse to the top of the channel display and click to activate digital zoom. A check mark will appear in the icon to indicate digital zoom is activated.

-
Click and drag inside the channel to zoom in.
-
Click and drag to pan the zoom area.
- Right-click to zoom out and select a new zoom area.
- Click 📄 to disable digital zoom. Note that the channel will remain at the same zoom level until you right-click inside it.
9.5.3 Using Real-time Backup
Real-time backup allows you to save footage from the live display to a USB thumb drive (not included) or external hard drive (not included).
To use Real-time Backup:
- Insert the USB thumb drive or external hard drive into one of the USB ports on the
Using the System

text_image
1 ? @ # $ % * & ' . ← 1 2 3 q w e r t y u i o p / 4 5 6 a s d l g h j k l : Enter 7 8 9 z x c v b n m . Shift ↩ 0 ← ① ② ③- Backspace.
- Enter capital letters.
- Confirm entry.
Setting The Time

CAUTION
It is highly recommended to set the date and time when first setting up your system. Inaccurate time stamps may render your footage unusable for court evidence.
To set the date and time:
- In the main viewing mode, right-click and click Main Menu.
-
Log in using the system user name (default: admin) and your new, secure password.
-
Click X and select Setting. Click General and select the Date&Time tab.

text_image
GENERAL General Data Time Holiday System Name: 100% (100%) Data Time: 0.0000 System Time: 00:38:34:56:57:58:59:59:59:59:59:59:59:59:59:59:59:59:59:59:59:59:59:59:59:59:59:59:59:59:59:59:59:59:59:59:59:59:59:59: SET DIST#e Week / Day Start Time: Max 2nd Max 3rd Max 4th Max 5th Max 6th Max 7th Max 8th Max 9th Max 10th Max 11th Max 12th Max 13th Max 14th Max 15th Max 16th Max 17th Max 18th Max 19th Max 20th Max 21st Max 22nd Max 23rd Max 24th Max 25th Max 26th Max 27th Max 28th Max 29th Max 30th Max 31st Max 32nd Max 33rd Max 34th Max 35th Max 36th Max 37th Max 38th Max 39th Max 40th Max 41st Max 42nd Max 43rd Max 44th Max 45th Max 46th Max 47th Max 48th Max 49th Max 50th Max 51st Max 52nd Max 53rd Max 54th Max 55th Max 56th Max 57th Max 58th Max 59th Max 60th Max System name: www.dxtd.com System type: DTA - "WMSD" System status: No Status OK Cancel Apply-
Under System Time, enter the current time and select your time zone. Then, click OK.
-
Check the DSTcheck box to enable auto Daylight Savings Time updates.

NOTE
- You can adjust the Start Time and End Time for Daylight Savings Time if the default settings do not match your region.
- Under DST Type, select Week to set the start and end time based on a day and week (e.g. 2nd Sunday in March), or select Date to set the start and end time to a specific date.
Recording
By default, the system is set to immediately record video from connected cameras continuously, 24 hours a day. You can customize the recording settings according to your needs.
11.1 Video Recording Types
The system supports the following recording types.
- Recording—Continuous: Normal, continuous recording. A C icon is shown when recording is in progress.
- Recording—Motion: The system records when motion is detected by the camera. An icon is shown when motion is detected.
11.2 Main Stream and Sub Stream
The system employs two video recording streams, a Main Stream and a Sub Stream. Both Main Stream and Sub Stream recording are enabled by default.
The Main Stream records high quality video to your system's hard drive.
The Sub Stream records lower resolution video for efficient streaming to devices over the Internet. Sub Stream recording must be enabled to view video recordings on a computer or mobile device.
You can configure the video quality parameters for the Main Stream or Sub Stream. For details, see 15.1.2 Configuring Recording Quality, page 45.
11.3 Setting up Scheduled or Manual Recording
You can set the system to record based on a schedule or you can manually turn recording on and off. By default, the system is set to record on an always on recording schedule.
To configure the recording schedule, see 15.3.13 Configuring the Video Recording Schedule, page 75.
To select between scheduled and manual recording:
- Right-click and then select Manual>Record.
Recording11
-
Under Main Stream, select how the system will record the Main Stream for each channel.
-
Schedule: Main Stream Recording will follow the recording schedule.
- Manual: The system will record the Main Stream continuously as long as this option is checked.
-
Stop: The system will not record the Main Stream for this channel. This option is not recommended.
-
Under Sub Stream, select how the system will record the Sub Stream for each channel.
-
Schedule: Sub Stream Recording will follow the recording schedule.
- Manual: The system will record the Sub Stream continuously as long as this option is checked.
-
Stop: The system will not record the Sub Stream for this channel.
-
Under Snapshot, select Enable to enable snapshot recording on each channel. Or, select Disable to disable snapshot recording.
- Click OK to save changes.
11.4 Configuring Hard Drive Overwrite
When the hard drive is full, the system will overwrite the oldest recordings by default. This is recommended, as it makes sure that your system will continue to record without any input from you. You can also set the system to stop recording once the hard drive is full.
To configure hard drive overwrite:
-
Right-click and select Main Menu. Click > Setting>General>General.
-
Under HDD Full, select Overwrite for the system to overwrite the oldest recordings when the hard drive is full. Or, select Stop Record for the system to stop recording when the hard drive is full.

Playback
Playback mode is used to navigate and playback recorded video files on the system.
12.1 Playing Back Video from the Hard Drive
- From live view, right-click and then click Playback.
- Log in using the system user name (default: admin) and your new, secure password.
- Configure the following:

text_image
Flin H50 RECORD PC 1 2 3 FLIR 12:30:00 AM 12:30:00 AM 33.1. Use the calendar on the right to select the day to playback.
3.2. Use the drop-down menus to select the channels you would like to playback.

text_image
NOTE Click the display options( ) to playback multiple channels simultaneously.3.3. Click inside the video bar to select the playback time. The system will begin
Playback12
12.2 Playback Controls

text_image
1 2 3 4 5 6 7 8 9 10 FLIR 11 12 13 14 15 16 17 18 19 20 21 22 23 24 25 26 27 28 29 30 31 32 33 34 35 36 37 38 39 40 41 42 43 44 45 46 47 48 49 50 51 52 53 54 55 56 57 58 59 60 61 62 63 64 65 66 67 68 69 70 71 72 73 74 75 76 77 78 79 80- Select playback device.
- Calendar: Select the day to playback.
- Channel select: Select channels to playback.
- File List: View list of recorded video clips
- Book Mark List: View list of bookmarks.
- Backup video clip: Click to save selected clip.
- Playback Bar: Click inside the bar to select a playback time.
- Zoom Playback Bar: Select scope of time bar.
- Video clip backup: Select video clip start and end times.
Playback12
- Connect the USB thumb drive (not included) or USB external hard drive (not included) with video files on it into a USB port on the system.
- From live view, right-click and click Playback.
- Log in using the system user name (default: admin) and your new, secure password.
- Click From HDD and select From IO Device. Click Browse to open the USB drive and manually select the video file.
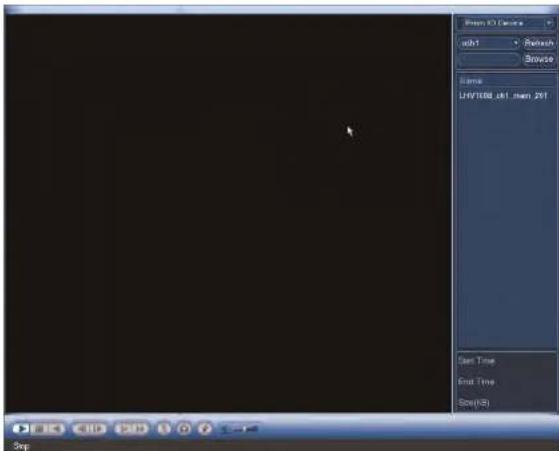
text_image
View 3.1 Case abs1 Refresh Browse Name LUV1000 UK1 Then 201 Start Time End Time Slow (PS) Step- Double click the video file you would like to open.
Playback12
- To create a Smart Search zone, left-click and select the area that you want to detect motion.

natural_image
Outdoor patio scene with a round table and two wicker chairs, set against a green garden background (no visible text or symbols)-
Repeat these steps for each channel that you want to use Smart Search.
-
Click to start the Smart Search playback. To stop the Smart Search playback,
click again.
Backup
Backup video files to external USB flash drive (not included) or self-powered USB external hard drive (not included).

NOTE
USB external hard drives must be formatted in the FAT32 file format to be used with the system.
13.1 Formatting the USB Thumb Drive
It is recommended to format your USB thumb drive (not included) before using it with the system.

CAUTION
Formatting the USB device will permanently erase all data.
To format a USB device:
- Insert a USB thumb drive (not included) into one of the USB ports.
-
From live view, right-click and then select Main Menu. Login if prompted.
-
Click >Backup.
-
Select the USB device you would like to format under Device Name and click Browse.

text_image
Device Name: sdb1(USB DISK) 0.00 KB(Space Needed) 6.05 GB/7.23 GB(Free/Total) Type All Start Time 04 - 25 - 2014 12 : 00 : 00 AM Record Off 1 End Time 04 - 25 - 2014 11 : 25 : 48 AM File Format DAV Add Remove 0 Channel Type Start Time End Time Size(N)Backup13
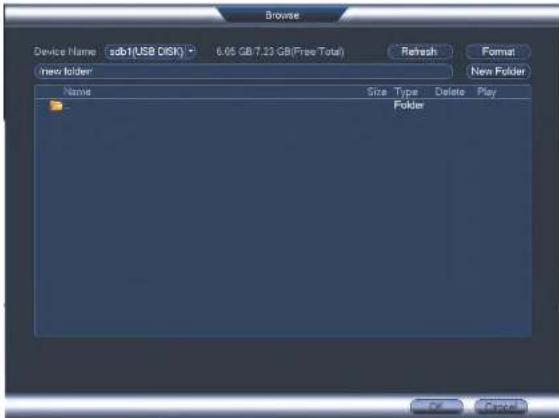
- Click Format. Click OK to confirm.
text_image
Browse Device Name: sdb1(USB DISK) 6.05 GB 7.23 GB(Free Total) Refresh Format new folder Name Size Type Delete Play Folder OK Cancel13.2 Backing up Video
- Insert a USB thumb drive (not included) into one of the USB ports.
- From live view, right-click and then select Main Menu. Login if prompted.
- Click >Backup.
Backup13
- Configure your search options:

text_image
Device Name: sdb1(USB DISK) 0.00 KB(Space Needed) 5.05 GB/7.23 GB(Free Total) Type All Start Time 04:25:2014 12:00:00 AM Record CH 1 End Time 04:25:2014 11:25:48 AM File Format DAV Add Remove 0 Channel Type Start Time End Time Size(HB) Backup- Select the USB device you would like to format under Device Name.
- Type: Select the recording type you would like to search for or select All to search all recording types.
- Record CH: Select the channel you would like to search or select All to search all channels.
- File Format: Select the file format.
DAV: You can playback .dav files using the FLIR video player software. To find
Backup13
- Check files you would like to backup and then click Backup. Wait for the backup to complete.

text_image
NOTE HD video files saved on the system may take up a large amount of disk space. The size of video files selected and the amount of free space on your USB device is shown at the top of the screen.13.3 Using Video Clip Backup
Video clip backup allows you to select a duration of video during playback mode and save it to a USB device (not included).
To use Video Clip Backup:
- Insert a USB flash drive (not included) or USB external hard drive (not included) into one of the USB ports.
- Start playing back video using the steps in 12.1 Playing Back Video from the Hard Drive, page 25.
- Click to mark the beginning of the video clip. Click to mark the end of the video clip.
- Click to open the Backup menu.
- Configure the following:
text_image
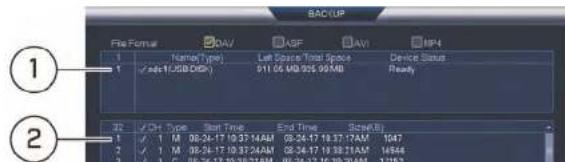
1 2 SAC/UP File Format Name("type) Last Space Total Splice Device Status Ready Vdiv: 100000000 Vdiv Type Start Time End Time Scale 1 M 09.34.17 10 37 14AM 09.34.17 10 37 14AM 1047 2 M 09.34.17 10 37 24AM 09.34.17 10 38 14AM 14564 3 C 09.34.17 10 38 24AM 09.34.17 10 38 24AM 12162Backup13
13.4 Viewing Backup Files
13.4.1 Viewing Backup Files on PC
You need a video player to play back .dav backup video files. To find the video player visit www.flir.com/security/pro, search for the model number of your product, click on your product in the search results, and click on the Downloads tab.
To view backup video files using the Player on PC:
-
Download and install the Video Player for PC from www.llir.com/security/pro.
-
Click to open a back up video file.
text_image
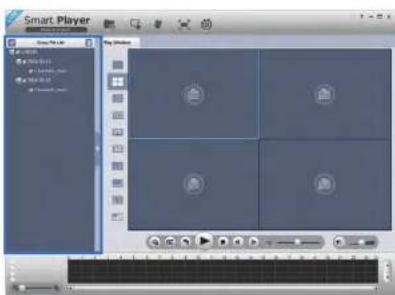
Smart Player My Computer My Video My Audio My Audio Player My Video Player My Audio Player My Video Player My Audio Player My Video Player My Audio Player My Video Player My Audio Player My Video Player My Audio Player My Video Player My Audio Player My Video Player My Audio Player My Video Player My Audio Player My Video Player My Audio Player My Video Player My Audio Player My Video Player My Audio Player My Video Player My Audio Player My Video Player My Audio Entity My Video Entity My Audio Entity My Video Entity My Audio Entity My Video Entity My Audio Entity My Video Entity My Audio Entity My Video Entity My Audio Entity My Video Entity My Audio Entity My Video Entity My Audio Entity My Video Entity My Audio Entity My Video Entity My Audio Entity My Video Entity My Audio Entity My Video Entity My Audio Entity My Video Entity My Audio Entity My Video Entity My Audio Object My Video Object My Audio Object My Video Object My Audio Object My Video Object My Audio Object My Video Object My Audio Object My Video Object My Audio Object My Video Object My Audio Object My Video Object My Audio Object My Video Object My Audio Object My Video Object My Audio Object My Video Object My Audio Object My Video Object- Use the Player controls to control playback or select other files for playback.
Backup13
Video Player Controls
text_image
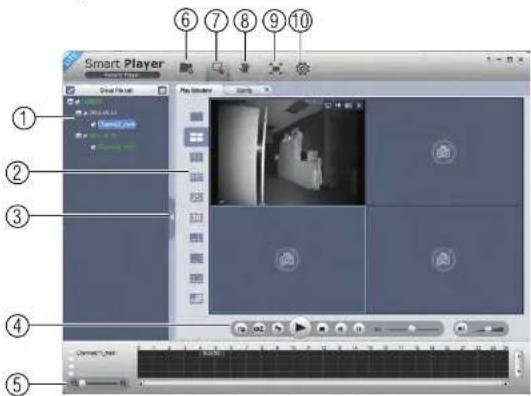
Smart Player File Edit View Play Simulator ① ② ③ ④ ⑤- File List: Double-click to open a file.
- Display Area: Select the split-screen mode. Double-click a video file to expand. Click the controls inside the display area to do the following:
• View information about the video file.
• Start/stop a manual recording from the video file.
• Take a snapshot from the video file.
Backup13
4. Playback controls:
- : Playback files in sequence.
• Synchronize playback times.
• : Play/pause playback. - Stop playback.
•: Previous frame.
• Next frame.
• IX : Playback speed.
• : Volume control.
5. Zoom Timeline.
-
Add Files: Click to open back up video files.
-
Digital Zoom: Click to activate digital zoom mode. Click and drag in the video to zoom in. Right-click to unzoom.
-
Drag: When digital zoom is activated, click to activate drag mode. Then click and drag in the video to view different areas of the image.
-
Full-screen: Click to open the player in full screen. Press ESC to exit full screen.
-
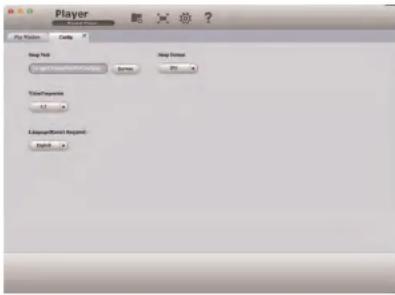
Config: Click to open the configuration menu for the player. From here you can control the default file formats and save locations for snapshots and video files saved from the player.

Backup13
- Double click the downloaded file in Safari to extract the Smart Player app file.

- Drag the Smart Player app to your Desktop or Applications list. Double click Smart
Player (☐) to open it.
- Click 📄 to open a back up video file in another location.
text_image
Player Gross the Game Play Window Control 10:56:40:30 PM / AM 12:41- Use the Player controls to control playback or select other files for playback.
Backup13
Video Player Controls

text_image
Player Play Window 1 2 3 4 5 6 7 8 9 100% 100%-
File List: Double-click to open a file.
-
Display Area: Select the split-screen mode. Double-click a video file to expand. Click the controls inside the display area to do the following:
• View information about the video file.
• Take a snapshot from the video file.
y
Backup13
- Add Files: Click to open back up video files.
- Full-screen: Click to open the player in full screen. Press ESC to exit full screen.
- Config: Click to open the configuration menu for the player. From here you can control the default file formats and save locations for snapshots and control the aspect ratio.
text_image
Player Play Options Copy Drag Pick Drag Forward Start/Start/Start/Start/Start Down Down Down/Down Delete Response Add Response Add Response Name:- About: Click to see version information for the Player software.
Managing Passwords and User Accounts
By default, the system user name is admin. The system does not have a default password. You will be prompted to create a new, secure 6 character password when you connect to the system for the first time. Passwords are enabled by default and are required to access the Main Menu or connect to the system using a computer or mobile device.

The system includes the following default account:
- admin: The admin account has full access to the system, may configure all system settings, and can manage user accounts.
14.1 Changing Passwords
You can change the system password of the admin and user accounts from the Users menu.
To modify an account password:
-
From Live View, right-click and then select Main Menu.
-
If prompted, enter the system user name (default: admin) and your new, secure password.
-
Click and select Setting. Select Account.
-
Click next to the user account you would like to modify.
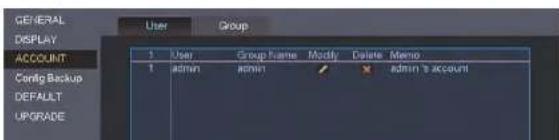
text_image
GENERAL DISPLAY ACCOUNT Config Backup DEFAULT UPGRADE User Group Form Name Modify Delete Memo 1 user Group Name admin admin's account- Under New Password, enter a new 6 character password for the account. Repeat the new password under Confirm Password.
- Click OK to save changes.
14.2 Adding Users
You can allow multiple users to log in to the system. When adding different users, you can assign which menus they have access to. For example, you may want your friend to monitor your system while you are away, while not giving full access to your system.
To add a user account:
- From Live View, right-click and then select Main Menu.
-
If prompted, enter the system user name (default: admin) and your new, secure password.
-
Click and select Setting. Select Account.
-
Click Add User.
Managing Passwords and User Accounts14
- Configure the following:
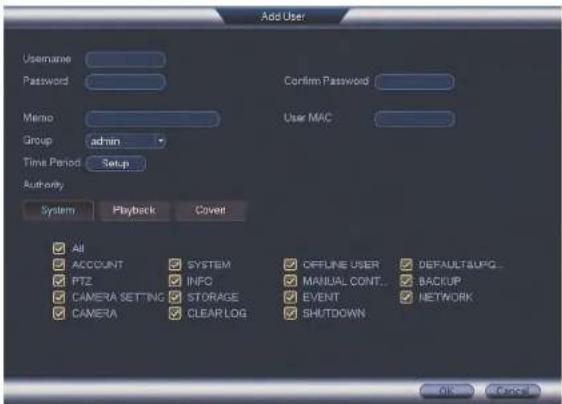
text_image
Add User Username Password Confirm Password Memo Group admin Time Period Setup User MAC Authority System Playback Cover All ACCOUNT SYSTEM offline user DEFAULTSUPG... PTZ INFO MANUAL CONT...BACKUP CAMERA SETTING STORAGE EVENT CAMERA CLEARLOG_SHUTDOWN NETWORK OK Cancel- User Name: Enter a name for the user account.
- Password: Enter a 6 character password for the user account. Enter the password again under Confirm Password.
- Memo (optional): Enter a description of the user account.
- Group: Select the group you would like to assign to this user account. A user account cannot be given permissions its group does not have.
- Time Period: Customize the time period during which the user can access the system.
• Authority: Check the permissions you would like the user account to have. Under
Managing Passwords and User Accounts14
- Click OK to confirm.

14.5 Account Groups
Account groups can be used to easily manage permissions for multiple user accounts. User accounts can be given all the permissions of a group, but cannot be given permissions that the group does not have.
The system includes the following groups by default:
- admin: Accounts in the admin group are system administrators. They have full access
to the system, may configure all system settings, and can manage user accounts. - user: Accounts in the user group are normal users. They have limited access to system menus
14.6 Adding Groups
- From Live View, right-click and then select Main Menu.
-
If prompted, enter the system user name (default: admin) and your new, secure password.
-
Click K and select Setting.
-
Click Account and select the Group tab.
-
Click Add Group.

text_image
GENERAL DISPLAY RS232 PANTLTZOOM ACCOUNT Config Backup User Group Name Modify Delete Memo admin user administrator group user groupManaging Passwords and User Accounts14
- Configure the following:
text_image
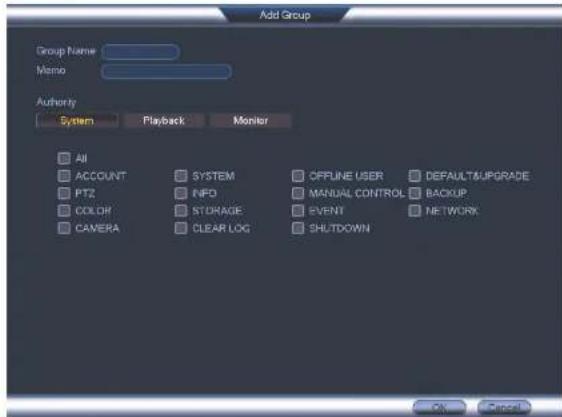
Add Group Group Name Memo Authority System Playback Monitor All ACCOUNT SYSTEM OFFLINE USER DEFAULT&UPGRADE PTZ NFD MANUAL CONTROLBACKUP COLOR STORAGE EVENT NETWORK CAMERA CLEAR LOG SHUTDOWN OK Cancel• Group Name: Enter a name for the group.
- Memo: Enter an optional comment for this group.
- Authority: Check the permissions that the group will have. User accounts assigned to this group can not be given any permissions the group does not have.
- Click OK to save changes.
14.7 Modifying Groups
Using the Main Menu
To open the Main Menu:
- Using the Mouse: Right-click and click Main Menu.
text_image
1 2 3 4 5 6 FLIR MAIN MENU- PLAYBACK: Open Playback mode. For details, see 12 Playback, page 25.
- BACKUP: Export files to USB device. For details, see 13 Backup, page 29.
- CAMERA: Configure image settings, recording parameters, and titles for your cameras.
- INFO: View system information.
- SETTING: Configure general system, schedule, network, recording, display, and motion settings. Restore system to factory defaults.
- SHUTDOWN: Logout, restart, or shutdown the system.
15.1 Camera
The Camera menu allows you to configure image settings, recording parameters, and titles for your cameras.

text_image
CAMERA SETTING RECORDING CHANNEL NAME REMOTE DEVICE CABLE TYPEUsing the Main Menu15
15.1.2 Configuring Recording Quality
The system employs two video recording streams, a Main Stream and a Sub Stream. The Main Stream records high quality video to your system's hard drive. The Sub Stream records lower resolution video for efficient streaming to devices over the Internet. You can customize the video quality settings for these streams according to your needs.
To configure recording quality:
- From the Main Menu, click and select Recording>Recording.
- Select the camera you would like to configure.
Using the Main Menu15
- Configure the following settings. Settings for the Main Stream are in the left column. Settings for the Sub Stream are in the right column.

text_image
RECORDING Recording Snapshot Overlay Channel 1 Type Continuous Sub Stream1 Compression H.364H H.264H Super H.264 Resolution 1920*1000(1000P) 302*40(CIF) Frame Rate(FPS) 12 7 Bit Rate Type CBR CBR Bit Rate(Kbps) 4096 16 Reference Bit Rate 612.6144kbps 14.258kbps Audio Video Audio Format G711a Audio Source NORMAL Default Copy OK Cancel Apply RECORDING- Type: For the Main Stream, you can set different recording quality settings for Continuous, MD (Motion Detect), and Alarm recording. Select the type of recording you would like to configure.
- Resolution: Select the resolution that you want to use to record the selected channel. Higher resolutions create a more detailed image, but take up more hard drive space to record and require more bandwidth to stream to connected computers or mobile devices.
1
Using the Main Menu15
15.1.3 Configuring Audio Recording
The system supports audio recording. Audio-enabled cameras (not included) are required to use audio recording. The MIC IN port is reserved for two-way audio.

text_image
NOTE You must connect an RCA audio input device to the system to use audio recording or you must in MPX camera that supports audio.To configure audio recording:
- From the Main Menu, click and select Recording>Recording.

text_image
RECORDING Recording Snapshot Overlay Channel 1 Type Continuous Sub Stream1 Compression H.264H H.264H Super H.264 Resolution 1920*1000 (1080P) 352*240(CIF) Frame Rate(PP3) 12 7 Bit Rate Type CBR CBR Bit Rate(Kbps) 4056 56 Reference Bit Rate 517.814Kbps 14.258Kbps Audio/Video Audio Format G711a Audio Source NORMAL Default Copy OK Cancel Apply RECORDINGUsing the Main Menu15

NOTE
In order to enable Snapshot recording, the following menu options must be configured:
- The Snapshot schedule must be enabled for times that you would like to save snapshots. See Configuring the Snapshot Schedule, page 77.
- Snapshot recording must be enabled for motion detection in the Event menu. See 15.3.7 Configuring Motion Detection, page 66.
To configure snapshot recording settings:
- From the Main Menu, click 🙏 and select Recording>Snapshot.
- Under Snap Number, select the number of snapshots the system will take when the
- Configure the following settings for snapshots saved automatically from motion detection or the snapshot schedule:

text_image
RECORDING Recording Snapshot Overlay Snap Number 1 /Time Channel 1 Mode Timing Image Size 362*240(CIF) Image Quality 4 Snapshot Frequency 1 SPLUsing the Main Menu15
15.1.5 Configuring Video Overlay Settings
The Overlay tab allows you to configure the text and information that appears overtop of the camera image, such as time and channel display.
To configure video overlay settings:
- From the Main Menu, click and select Recording>Overlay.
- Under Channel, select the camera you would like to configure.
Using the Main Menu15
- Configure the following settings:
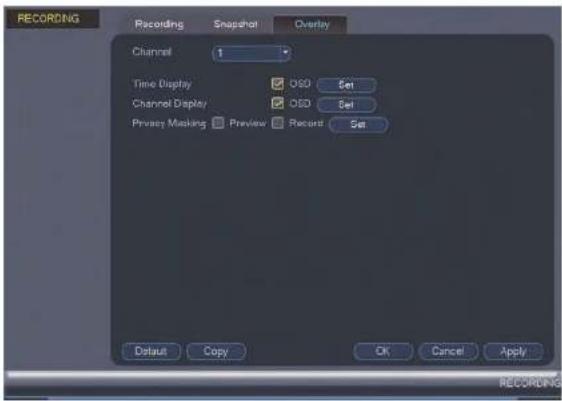
text_image
RECORDING Recording Snapshot Overlay Channel 1 Time Display □ OSD Set Channel Display □ OSD Set Privacy Masking □ Preview □ Record Set Dataut Copy OK Cancel Apply RECORDING- Time Display: Check this option to display the time information. Click Set next to Time Display to choose the position of the time display overlay. A live view screen of the currently-selected channel appears. Click and drag the time display to position it in any desired area. Right-click to exit the live screen.
- Channel Display: Check this option to display the channel information. Click Set next to Channel Display to choose the position of the channel display overlay. A live view screen of the currently-selected channel appears. Click and drag the channel display to position it in any desired area. Right-click to exit the live screen.
- Privacy Masking: Check this option to hide certain parts of the camera image in
Using the Main Menu15
15.1.6 Creating Custom Channel Names
You can assign custom names to your cameras. For example, you can name your cameras based on their location (e.g. hallway or front door).
To create custom channel names:
-
From the Main Menu, click and select Channel Name.
-
Enter a custom name for each channel.
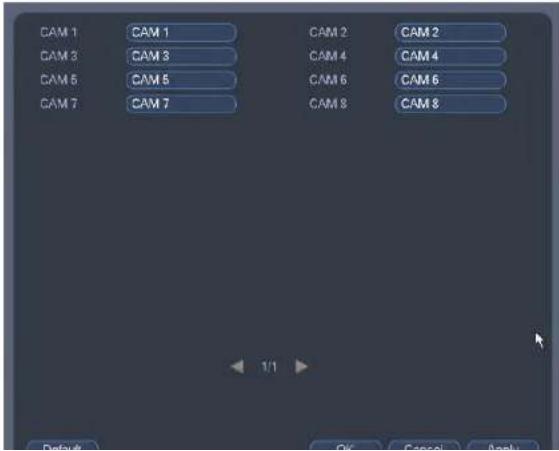
text_image
CAM 1 CAM 1 CAM 2 CAM 2 CAM 3 CAM 3 CAM 4 CAM 4 CAM 5 CAM 5 CAM 6 CAM 6 CAM 7 CAM 7 CAM 8 CAM 8 1/1 Default OK Cancel ApplyUsing the Main Menu15
To configure cable type options:
- From the Main Menu, click and select Cable Type.
- For each channel, select the appropriate cable type option.

text_image
CABLE TYPE Channel AUTO CVI AHD CVBS TV P 1 2 3 4 5 6 7 8 Tips Disable one analog channel, you can add one IP channel. IP channel setup shall begin from the last channel. Default Add IP CAM OK Cancel Apply CABLE TYPE
NOTE
It is recommended to select Auto, the default for MPX cameras. When Auto is selected, the system automatically selects the camera format. Choose another analog cable type only if you are having picture quality issues. Select IP to replace an analog channel with an IP camera channel, see 22. Connecting Cameras to the Local Area Network (LAN): page 169 for more information about using IP cameras with the custom
Using the Main Menu15
- From the Main Menu, click and select IPC Upgrade.

text_image
NOTE IPC Upgrade is only available if at least one IP camera channel is enabled. See 15.1.8 Selecting Cable Type, page 51.- Click Browse to search for and select the .bin camera firmware file.
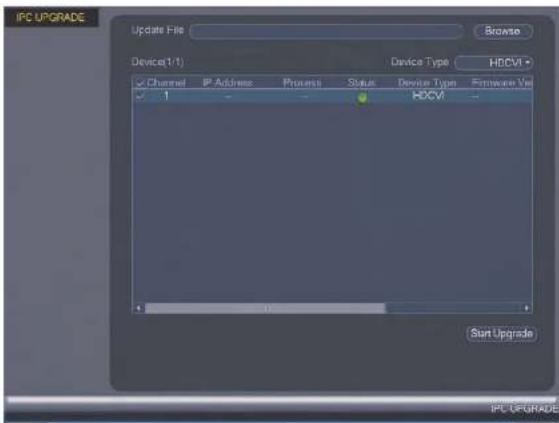
text_image
IPC UPGRADE Update File Browse Device(1): Device Type HDCVI Channel IP Address Process Status Device Type Infrastructure Unit HDCVI Start Upgrade- Select the Device Type from the dropdown.
Using the Main Menu15

text_image
INFO EVENT STATUS NETWORK BPS LOG FLIR MAIN MENU15.2.1 HDD Info
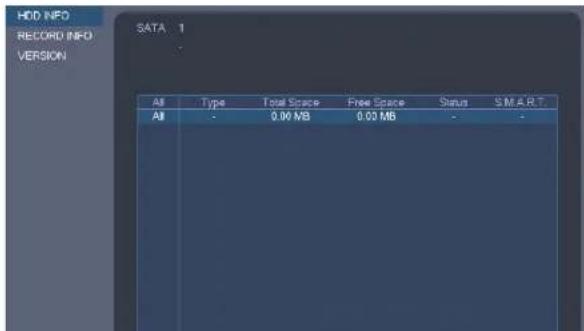
text_image
HDD INFO RECORD INFO VERSION SATA : 1 All Type Total Space Free Space Status S M A R T All - 0.00 MB 0.00 MB - -Using the Main Menu15
15.2.2 Record Info

text_image
HDD INFO RECORD INFO VERSION SATA 1 AI Start Time End Time AI 00:00:2008 12:00:30AM 00:00:2008 12:30:00AMThe Record Info menu shows the start and end times of recordings saved on the hard drive.
To access the Record Info menu:
- From the Main Menu, click 📁 and then select Info>Record Info.
Using the Main Menu15
15.2.3 Version
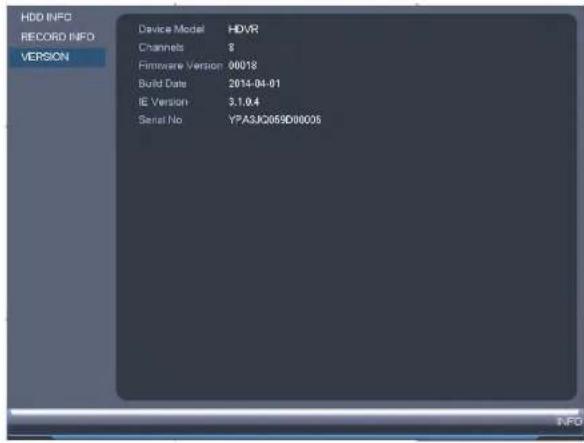
text_image
HDD INFO RECORD INFO VERSION Device Model HDVR Channels 8 Firmware Version 00018 Build Date 2014-04-01 IE Version 3.1.0.4 Serial No YPA3JC059D00005The Version sub-menu allows you to view information about the current firmware installed on the system.
To access the Version menu:
- From the Main Menu, click 📄 and then click Info>Version.
15.2.4 Alarm Status
Using the Main Menu15

text_image
EVENT Device Status Device(NIC No. 1:HDD No.0) No HDD No Disk Disk Error Disk full Net Disconnection IP Conflict MAC Conflict Channel Status Channel(CH:8 Local Alarm 0) Local Alarm Net Alarm Video Loss 2 3 4 5 6 7 8 Motion Refresh ALARM STATUSThe following alarms are shown in the Alarm Status menu:
- No HDD: No hard drive is detected.
- Disk Error: Hard drive error detected.
- Disk Full: Hard drive is full.
- Net Disconnection: System is not connected to the network.
- IP Conflict: More than one device on the network is using the same IP address.
• MAC Conflict: More than one device on the network is using the same MAC address. - Local Alarm: Not supported.
- Not Alarm: Not supported
Using the Main Menu15
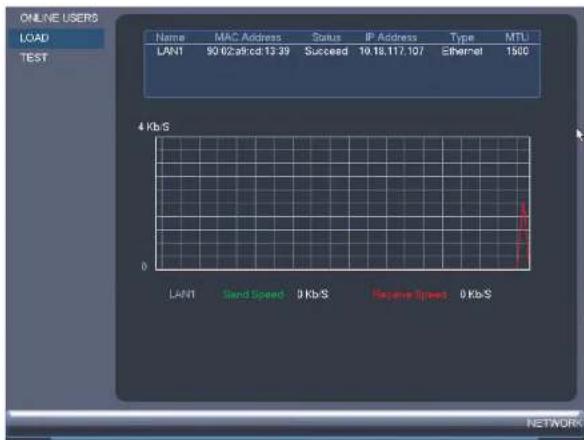
15.2.5 Online Users

text_image
ONLINE USERS LOAD TEST User Name IP User Login Time Block for None Block for : 60 NETWORKThe Online Users menu shows a list of users connected to the system using computers or mobile devices.
To access Online Users:
- From the Main Menu, click 📄 and then select Network.
Using the Main Menu15
15.2.6 Load
text_image
ONLINE USERS LOAD TEST Name MAC Address Status IP Address Type MTU LAN1 90.02a9cd 13.39 Succeed 10.18.117.107 Ethernet 1500 4 Kb/s 0 LAN1 Send Speed 0 Kb/s Reserve Speed 0 Kb/s NETWORKThe Load menu shows you the network traffic your system is sending and receiving.
To access Load:
- From the Main Menu, click 📁 and then select Network>Load.
Using the Main Menu15
15.2.7 Test
text_image
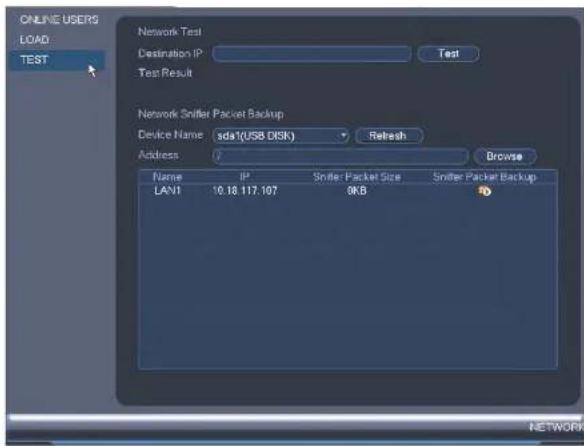
ONLINE USERS LOAD: TEST Network Test Destination IP Test Test Result Network Sniffer Packet Backup Device Name:sda1(USB DISK)Refresh Address: Browse Name IP Sniffer Packet Size Sniffer Packet Backup LAN1 10.18.117.107 0KB NETWORKThe Test menu allows you to test if your system can connect to other devices over the LA or Internet. You can enter the IP address of a device and click Test to determine if your system can connect to it.
To access Test:
- From the Main Menu, click and then select Network>Test.
Using the Main Menu15
text_image
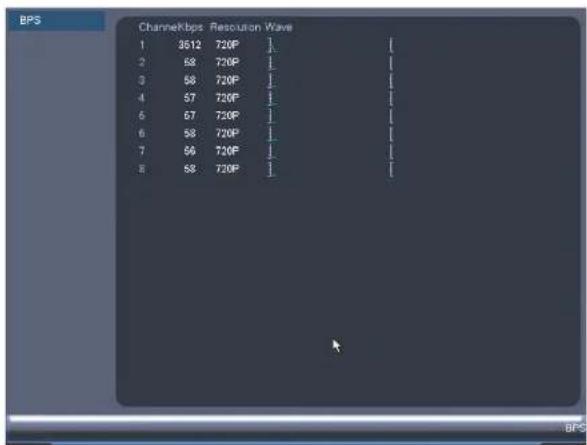
BPS Channelbps Resolution Wave 1 3512 720P 2 58 720P 3 58 720P 4 57 720P 5 67 720P 6 58 720P 7 56 720P 8 58 720PTo access BPS:
- From the Main Menu, click E and then select BPS.
15.2.9 Log
The Log sub-menu allows you to search for system logs.
Using the Main Menu15

text_image
LOG Type All Start Time 04 - 24 - 2014 12 : 00 : 00 AM End Time 04 - 25 - 2014 12 : 00 : 00 AM Details Search 100 Log Time Event 85 2014-04-24 18:47:18 Shut down at (04-24-14 05:45:47PM) 86 2014-04-24 18:47:18 Reboor with Flag [0x01] 87 2014-04-24 18:47:18 Disk totals<0>, Current working disk<=> 88 2014-04-24 18:50:54 Shut down at (04-24-14 05:49:57PM) 89 2014-04-24 18:50:54 Reboor with Flag [0x01] 90 2014-04-24 18:50:54 Disk totals<0>, Current working disk<=> 91 2014-04-24 18:51:54 User logged in admin> 92 2014-04-24 18:51:54 Save RECORDING Config! 93 2014-04-24 18:51:54 Save RECORDING Config! 94 2014-04-24 18:51:54 Save RECORDING Config! 95 2014-04-24 18:51:54 Save RECORDING Config! 96 2014-04-24 18:51:54 Save RECORDING Config! 97 2014-04-24 18:51:54 Save RECORDING Config! 98 2014-04-24 18:51:54 Save RECORDING Config! 99 2014-04-24 18:51:55 Save RECORDING Config! 100 2014-04-24 18:51:55 Save RECORDING Config! Backup Clear Jump to GoTo search for system logs:
- From the Main Menu, click and then select Log.
- Under Type, select the log type to search for.
- Under Start Time and End Time, select the start and end time for your search.
- Click Search.
- (Optional) Click Backup to export logs to a USB flash drive connected to the system.
Using the Main Menu15
15.3.1 Network
The Network menu allows you to configure network parameters for your system.
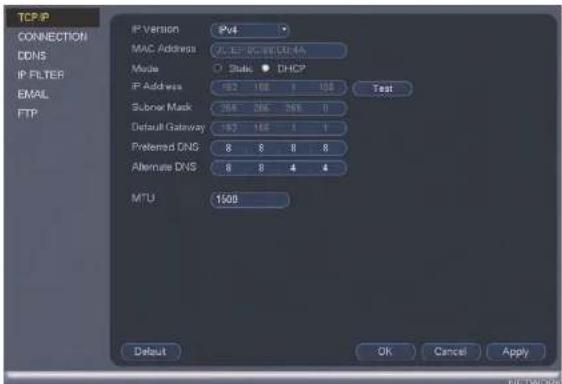
15.3.2 Selecting DHCP or Static IP Address (TCP/IP)
The TCP/IP menu allows you to configure IP address settings.
To configure IP address settings:
-
From the Main Menu, click and then select Network>TCP/IP.
-
Check DHCP (recommended) to let the system automatically obtain an IP address from the router or uncheck to assign a static IP address.
text_image
TCP/IP CONNECTION DDNS IP FILTER EMAIL FTP IP Version P4 MAC Address AC EP DC WLDN-NA Mode State DHCP IP Address 162 168 1 108 Subnet Mask 266 266 266 0 Default Gateway 162 168 1 1 Preferred DNS 8 8 8 8 Alternate DNS 8 8 4 4 MTU 1500 Default OK Cancel ApplyUsing the Main Menu15
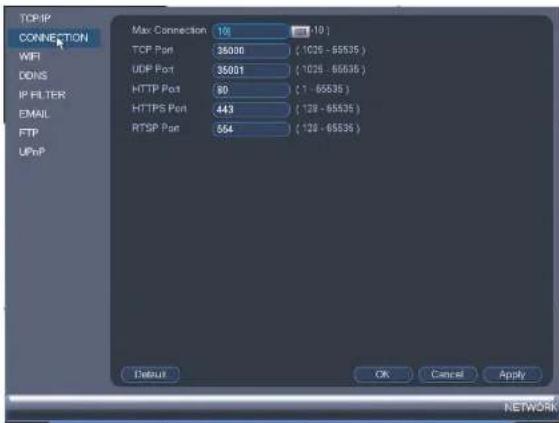
- From the Main Menu, click and then select Network>Connection.
text_image
TCP/IP CONNECTION WIFI DONS IP FILTER EMAIL FTP UPnP Max Connection 10 (10) TCP Port 35000 (1026 - 65535) UDP Port 35001 (1026 - 65535) HTTP Port 90 (1 - 65535) HTTPS Port 443 (128 - 65535) RTSP Port 564 (128 - 65535) Detaur OK Cancel Apply NETWORK- Configure the ports as needed and click OK to save changes.

NOTE
Up to 3 devices may connect to the system at the same time when using FLIR Cloud™.
15.3.4 Configuring DDNS Settings
Using the Main Menu15
- From the Main Menu, click and then select Network>DDNS.

text_image
TCP/IP CONNECTION WIFI DDNS IP FILTER EMAIL FTP UPnP Switch Settings Enable DDNS Type MYDDNS-FLIR Domain Name User ID Password Default Status OK Cancel Apply NETWORK- Check Enable.
- Under Domain Name, enter the Domain Name/URL Request your received in the email after registering for DDNS.
- Under User ID, enter your DDNS User Name.
- Under Password, enter your DDNS Device password.
- Click OK to save your settings.
Using the Main Menu15
To configure Email Alerts:
- From the Main Menu, click X and then select Network>Email.

text_image
TCP/IP CONNECTION DONE IP FILTER EMAIL FTP Enable Mail Select FLIR SMTP Senier https://10.123.com Port 1995 Anonymous Username Password EmailSchedule Setup Receiver Sender Subject ALERT Attachment Encrypt Type NONE Interval 3 min. Health Enable Interval 60 min. Default Test OK Cancel Apply NETWORK-
Check Enable to enable email notifications.
-
Configure the following:
-
Mail Select: Select the email provider.
- SMTP Server: Enter the SMTP server address.
- Port: Enter the port used by the SMTP server.
- Anonymous: Check if your server supports anonymous log ins. Otherwise, leave this unchecked
Using the Main Menu15
15.3.6 Event
The Event menu allows you to configure settings for motion detection, video loss, and system warnings.
15.3.7 Configuring Motion Detection
Motion Detection events allow the system to mark footage that has motion. This allows you to quickly locate relevant footage through Search. You can also configure system responses to motion detection events, such as activating the system buzzer or sending an email alert.
To configure Motion Detection events:
text_image
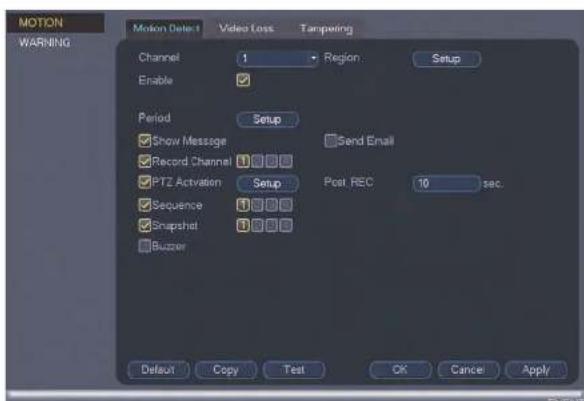
MOTION WARNING Motion Detect Video Loss Tampering Channel 1 Region Setup Enable ✓ Period Setup ✓ Show Message ✓ Record Channel ✓ PTZ Activation Setup Send Email Post REC 10 sec. ✓ Sequence ✓ Snapshot ✓ Bluzzer Default Copy Test OK Cancel ApplyUsing the Main Menu15
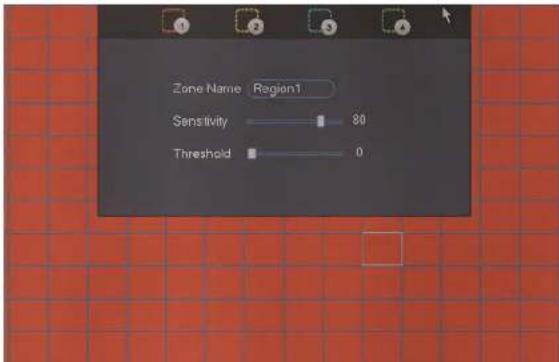
- Click Setup next to Region to configure which areas of the image will be enabled for motion detection. A grid will appear over the camera's live view.
Motion Grid
text_image
Zone Name Region1 Sensitivity 80 Threshold 0- Areas enabled for motion detection are shown in color and areas that are disabled are transparent.
- Hover the mouse at the top of the screen to select which motion area you would like to configure. You can set up to 4 motion detection areas and customize the sensitivity and threshold for motion detection separately for each area between 0 (lowest) and 100 (highest).
-
The Sensitivity determines how sensitive the camera is to motion. For example, if the sensitivity is high, small amounts of motion are more likely to trigger an event. It is recommended to select a Sensitivity between 30–70.
-
Configure the following system actions when motion is detected:
-
Show Message: Check to enable an on-screen pop-up when one of your cameras detects motion. On-screen pop-up shows the channels an event occurred on and the type of event.
- Send Email: Check to enable email alerts. You must configure email alerts before you will be able to receive them (see 15.3.5 Configuring Email Alerts, page 65).
- Recording Channel: Select the channels that will record when motion is detected on the selected channel.
- PTZ Activation: Check to enable PTZ actions when motion is detected (PTZ camera required; not included). Click Setup to select which PTZ actions will be taken by each camera.
- Post_REC: Enter the time the system will record after a motion event occurs.
- Sequence: Check to enable a custom sequence mode when motion is detected on the selected channel. Then click the channels you would like to display in the custom sequence mode.
- Snapshot: Check to save a snapshot when the camera detects motion.
-
Buzzer: Check to enable the system buzzer.
-
Click OK to save changes.
15.3.8 Configuring Video Loss Settings
Video Loss occurs if the system loses connection to one of the cameras.
To configure Video Loss settings:
- From the Main Menu, click X and then click Event>Motion>Video Loss.

text_image
MOTION WARNING Motion Detect Video Loss Tampering Channel 1 Enable Period Setup Show Message Send Email-
Configure the following to customize settings for video loss events:
-
Period: Click Setup to configure a schedule for video loss events. It is recommended to leave this on the default setting, so you can be alerted at any time one of your cameras loses video.
- Show Message: Check to show a popup message on the monitor if one of your cameras loses video.
- Send Email: Check to enable email alerts. You must configure email alerts before you will be able to receive them (see 15.3.5 Configuring Email Alerts, page 65).
- Record Channel: Click the checkbox to enable video recording when video loss occurs. You can then select the channels the system will record when video loss occurs on the currently selected channel.
- PTZ Activation: Check to enable PTZ actions when video loss occurs (PTZ camera required; not included). Click Setup to select which PTZ actions will be taken by each camera.
- Post_REC: Enter the number of seconds the system will record after video loss
- Sequence: Check to enable a custom sequence mode when video loss occurs on the selected channel. Then click the channels you would like to display in the custom sequence mode.
- Snapshot: Click the box to enable snapshot recording when video loss occurs. You can then select which channels will save snapshots when video loss occurs on the currently selected channel.
-
Buzzer: Check to enable the system buzzer when video loss occurs on the currently selected channel.
-
Click OK to save changes.
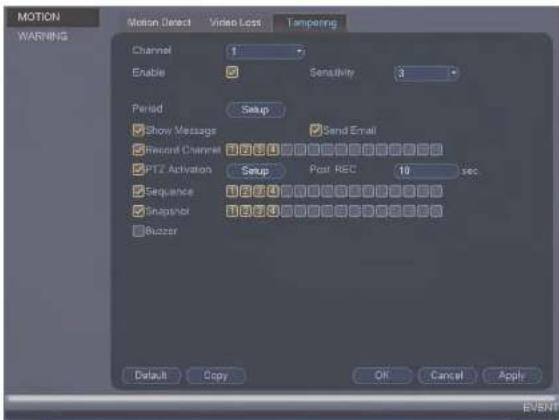
15.3.9 Configuring Tamper Detection
You can choose how the system reacts to any signs of tampering (i.e., cameras being moved, damaged or blocked out). Configure tamper detection for recording and notification options in the event of tampering.
To configure tamper detection:
Using the Main Menu15
- Select the channel to configure tamper detection for.
text_image
MOTION WARNING Motion Detect Video Loss Tampering Channel 1 Enable Sensitivity 3 Period Setup Show Message Send Email Record Channel 12 5 4 PTZ Activation Setup Post REC 18 sec Sequence 12 5 4 Snapshot 12 5 4 Buzzer Default Copy OK Cancel Apply EVENT-
Check Enable.
-
Select a Sensitivity level to determine the amount of movement needed to trigger tamper detection.

NOTE
Tampering events usually involve dramatic changes in the camera image, so it is recommended to keep the sensitivity for tamper detection relatively low.
Using the Main Menu15
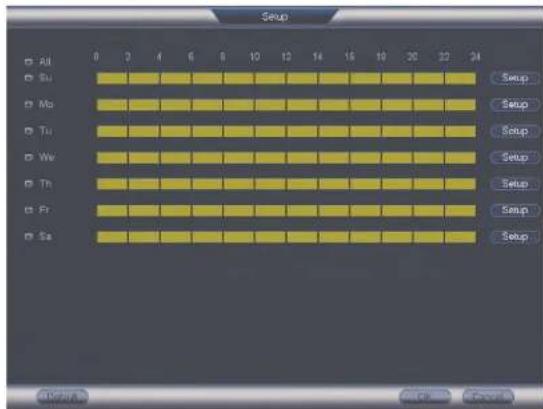
- Click Setup next to Period to customize active hours for tamper detection (for example, during hours when your business is closed).
- By default, tamper detection is enabled at all times. Click or click-and-drag over portions of the schedule you want to add/remove from the schedule.
text_image
Setup All Su Mo Tu Wt Th Fr Sa 0 2 4 6 8 10 12 14 16 18 20 22 24 Setup Setup Setup Setup Setup Setup Setup Setup Setup Setup Setup Setup Setup Setup Setup Setup Setup Setup Setup Setup Setup Setup Setup Setup Setup Setup Setup Setup Setup Setup Setup Setup Setup Setup Setup Setup Setup Setup Setup Setup Setup Setup Setup Setup Setup Setup Setup Setup Setup Setup Setup Setup Setup Setup Setup Setup Setup Setup Setup Setup Setup Setup Setup Setup Setup Setup Setup Setup Setup Setup Setup Setup Setup Setup Setup Setup Setup Setup Setup Setup Setup Setup Setup Setup Setup Setup Setup Setup Setup Setup Setup Setup Setup Setup Setup Setup Setup Setup Setup Setup Setup OK Cancel Cancel- Click beside any days you want to link while adding/removing sections of the schedule, or beside All to link all days.
- Click Setup to manually enter different time periods for the active hours on the selected day.
Using the Main Menu15
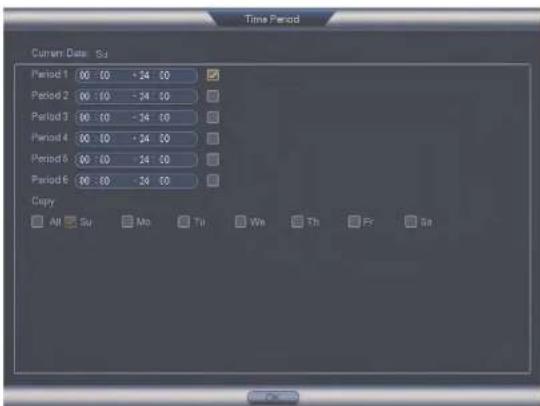
text_image
Time Period Current Date: Su Period 1 00 : 00 + 24 00 Period 2 00 : 00 - 24 00 Period 3 00 : 00 - 24 00 Period 4 00 : 00 + 24 00 Period 5 00 : 00 - 24 00 Period 6 00 : 00 - 24 00 Copy Alt Su Mo Tu We Th Fr Sa- Enter the video recording time in seconds for tamper events beside Post REC.
- Check tampering notification options: Show Message, Send Email and Buzzer.
Using the Main Menu15
- Check recording and system options in the event of tampering: Record Channel, PTZ Activation, Sequence and Snapshot.
- For options with channel numbers beside them, select the channels that should be included. For example, check Sequence, then select the channels your system should sequence through.

- Click Setup next to PTZ Activation to determine how PTZ cameras behave during a tampering event. Choose an event from the PTZ channel's dropdown to select Preset. Tour or Pattern. Enter the ID number for the desired preset viewing point, tour or pattern to have it executed in the event of tampering. Click OK to confirm.
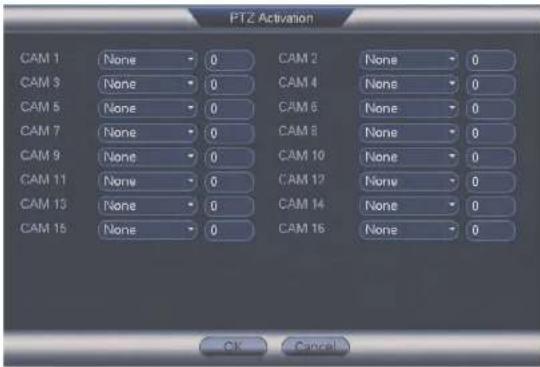
text_image
PTZ Activation CAM 1 None 0 CAM 2 None 0 CAM 3 None 0 CAM 4 None 0 CAM 6 None 0 CAM 6 None 0 CAM 7 None 0 CAM 8 None 0 CAM 9 None 0 CAM 10 None 0 CAM 11 None 0 CAM 12 None 0 CAM 13 None 0 CAM 14 None 0 CAM 15 None 0 CAM 16 None 0 OK CancelUsing the Main Menu15
To configure hard drive warnings:
- From the Main Menu, click X and then click Event>Warning>HDD.
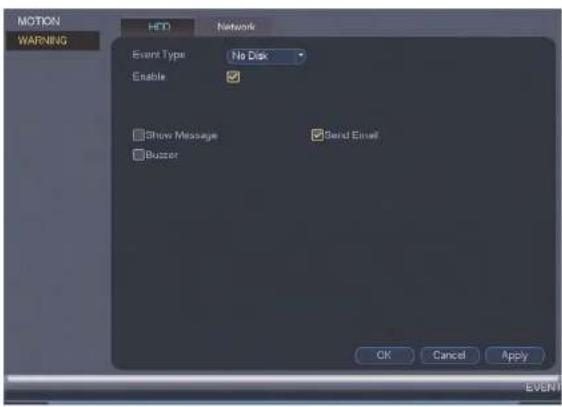
text_image
MOTION WARNING HDD Network Event Type No Disk Enable Show Message Send Email Buffer OK Cancel Apply EVENT- Under Event Type, select the hard drive event you would like to configure.
• No Disk: No hard drive detected.
- Disk Error: A hard drive error has been detected.
- Disk Full: The hard drive is full or almost full. You can enter the percentage of disk space remaining that will trigger a warning under Less Than (e.g. when less than 10% of the hard drive is empty, trigger a warning). Disk Full warnings will not occur overwrite is enabled
Using the Main Menu15
To configure network warnings:
- From the Main Menu, click ✕ and then click Event>Warning>Network.
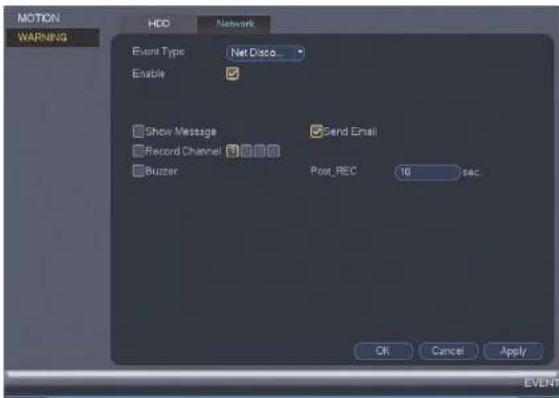
text_image
MOTION WARNING HDD Network Event Type Net Disco... Enable Show Message Send Email Record Channel Buzzer Post_REC 10 sec OK Cancel Apply EVENT- Under Event Type, select the event type you would like to configure.
• Net Disconnection: The system has lost connection to the network.
- IP Conflict: More than one device on your network has the same IP address.
• MAC Conflict: More than one device on your network has the same MAC address.
- All: Configure responses for all network events.
- Configure the following for the selected event type:
Using the Main Menu15
To configure the video recording schedule:
-
From the Main Menu, click and then click Storage>Schedule>Record.
-
Under Channel, select the channel you would like to configure or select All.
-
Configure the schedule as needed:

text_image
SCHEDULE HDD MANAGER RECORD Record Snapchat Channel 1 PrefRecord 4 sec. Monifing All Continuous MD Alarm MD&Alarm Su Mo Tu Vie Th Fr Sa Default Copy OK Cancel Apply STORAGE- Check Continuous, MD (motion detection), or Alarm to select the recording type you would like to configure.
- Click and drag on each day to customize the recording schedule. The schedule is set up as a grid, which each block representing one hour.
Using the Main Menu15
To configure pre-recording:
- From the Main Menu, click ✕ and then click Storage>Schedule>Record.

text_image
SCHEDULE HDD MANAGER RECORD Record Snapchat Channel 1 PreRecord 4 Java Binarying All 0 2 4 6 8 10 12 14 16 18 20 22 24 Su Mo Tu Vie Th Fr Sr Continuous MD Alarm MD&Alarm Default Copy OK Cancel Apply STORAGE- Under Channel, select the camera you would like to configure or select All.
- Under PreRecord, select the duration for pre-recording.
- Click OK to save settings.
15.3.15 Configuring the Snapshot Schedule
You can set a schedule for recording snapshots from the cameras.
To set the successful schedule.
Using the Main Menu15
- From the Main Menu, click X and then click Storage>Schedule>Snapshot.
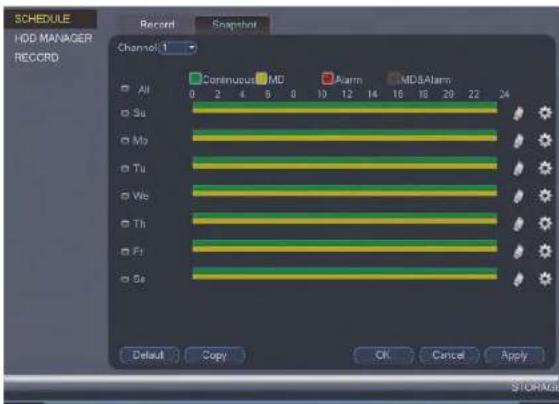
text_image
SCHEDULE HDD MANAGER RECORD Record Snapshot Channel 1 All 0 2 4 6 8 10 12 14 16 18 20 22 24 Su Mo Tu We Th Fr Se Continuous MD Alarm MDSAlarm Default Copy OK Cancel Apply STORAGE-
Under Channel, select the channel you would like to configure or select All.
-
Configure the schedule as needed:
-
Check Continuous, MD (motion detection), or Alarm to select the recording type you would like to configure.
- Click and drag on each day to customize the recording schedule. The schedule is set up as a grid, which each block representing one hour.
- Click 📄 next to All to link the recording schedules for all days. The iron for a day
Using the Main Menu15
To configure holidays:
- From the Main Menu, click X and then click Setting>General>Holiday.

- Click Add New Holidays.
- Configure the following:

text_image
Add New Holidays Holiday Name Repeat Mode Once Only All-Year Holiday Range Date Week Start Time 04 - 24 - 2016 End Time 04 - 24 - 2014Using the Main Menu15
- Click Add. Now that you have added a holiday, an extra holiday setting is added to the recording schedule.

text_image
NOTE You can disable holiday schedules by selecting Close under the Status dropdown and then click Apply.15.3.17 Formatting the Hard Drive
The HDD Manager menu allows you to format the hard drive. If you install a new hard drive, you must format the hard drive using the system before you will be able to record.
To format the hard drive:

- From the Main Menu, click and then click Storage>HDD Manager.
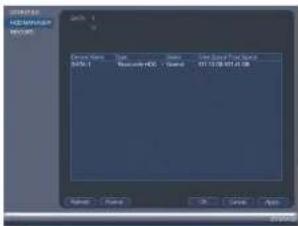
text_image
HKEYCORI HKEYCORI COMPUTER COMPUTER COMPUTER COMPUTER COMPUTER COMPUTER COMPUTER COMPUTER COMPUTER COMPUTER COMPUTER COMPUTER COMPUTER COMPUTER COMPUTER COMPUTER COMPUTER COMPUTER COMPUTER COMPUTER COMPUTER COMPUTER COMPUTER COMPUTER COMPUTER COMPUTERO COMPUTERO COMPUTERO COMPUTERO COMPUTERO COMPUTERO COMPUTERO COMPUTERO COMPUTERO COMPUTERO COMPUTERO COMPUTERO COMPUTERO COMPUTERO COMPUTERO COMPUTERO COMPUTERO COMPUTERO COMPUTERO COMPUTERO COMPUTERO COMPUTERO COMPUTERO COMPUTERO COMPUTERO COMPUTERTO COMPUTERTO COMPUTERTO COMPUTERTO COMPUTERTO COMPUTERTO COMPUTERTO COMPUTERTO COMPUTERTO COMPUTERTO COMPUTERTO COMPUTERTO COMPUTERTO COMPUTERTO COMPUTERTO COMPUTERTO COMPUTERTO COMPUTERTO COMPUTERTO COMPUTERTO COMPUTERT01.12.13.14.15.16.17.18.19.20.21.22.23.24.25.26.27.28.29.30.31.32.33.34.35.36.37.38.39.40.41.42.43.44.45.46.47.48.49.50.51.52.53.54.55.56.57.58.59.60.61.62.63.64.65.66.67.68.69.70.71.72.73.74.75.76.77.78.79.80.81.82.83.84.85.86.87.88.89.90.91.92.93.94.95.96.97.98.99.100.- Select the hard dive you would like to format and then click Format. Click OK to
Using the Main Menu15
- From the Main Menu, click K and then click Storage>HDD Manager.
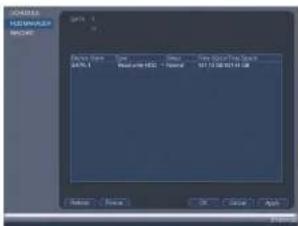
text_image
SAMSUNG HEDDER MOUNT File Name: SAMSUNG Format: Normal File Size/Price Range: 017.12.00:037.01.08 Balance Finish OK Cancel Apply- Click the hard drive you would like to configure.
- Under Type, select Read-write HDD or Read-only HDD.
- Click OK to save changes. The system will restart to complete this operation.
15.3.19 Configuring General System Settings
You can use the General menu to configure miscellaneous system settings.
To configure general settings:
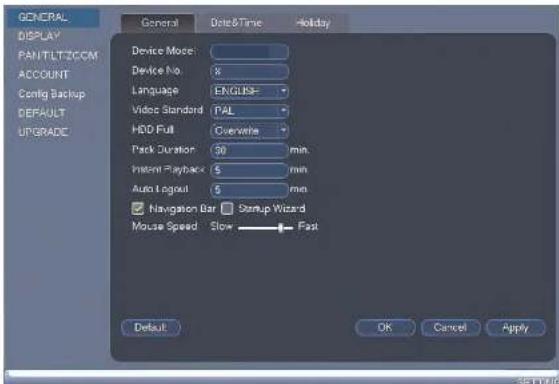
- From the Main Menu, click X and then click Setting>General>General.

text_image
GENERAL DISPLAY RS232 PANTILT/200M ACCOUNT Config Backup DEFAULT General Date&Time Holiday Device Type: Device No. 8 Language ENGLISH Video Standard NTSC HDD Full Overwrite- Configure the following:
• Device Type: Shows the model number of your system.
• Device No.: Select the remote control address of the system. See 8.1 Setting the
Remote Control Address, page 15.
- Language: Set the system languages. Available options are English, French, and Spanish.
• Video Standard: Select NTSC (North America) or PAL (Europe).
- HDD Full: Select Overwrite for the system to overwrite the oldest recordings when the hard drive is full or select Stop Record for the system to stop recording when the hard drive is full.
- Pack Duration: Select the length (in minutes) of video files stored on the system. For example, if this is set to 30 minutes, the system will create a new video file for each 30 minutes of continuous recording.
- Instant Playback: Select the amount of time (in minutes) the system will go back when instant playback is activated in live view.
- Auto Logout: Select the idle time (in minutes) before the system will logout the current user.
- Navigation Bar: Check to enable the Navigation Bar that comes up when you left click in live view.
- Startup Wizard: Check to enable a setup wizard when you start up the system.
- Mouse Speed: Use the slider to adjust the mouse speed.
- Click OK to save changes.
15.3.20 Setting the Monitor Resolution (Display)
The Display menu allows you to configure the systems monitor resolution and other display settings.
To set the monitor resolution:
- From the Main Menu, click X and then click Setting>Display>Display.

Using the Main Menu15
-
Under Resolution, select the correct resolution for your monitor: 1920x1080, 1280x1024, 1280x720, or 1024x768.
-
Click OK to save changes. Click OK again to restart the system using the new resolution.
To configure other display settings:
- From the Main Menu, click X and then click Setting>Display>Display.
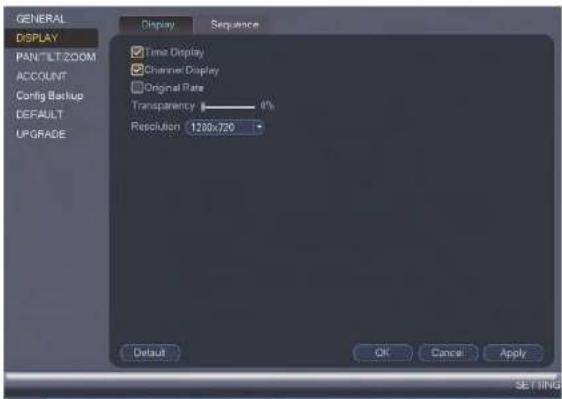
text_image
GENERAL DISPLAY PAN*LTZOOM ACCOUNT Config Backup DEFAULT UPGRADE Display Sequence Time Display Channel Display Original Rate Transparency 10% Resolution 1780x720 Default OK Cancel Apply SET FING- Configure the following:
• Time Display: Check to show the time on the monitor.
Using the Main Menu15
- From the Main Menu, click X and then click Setting>Config Backup.
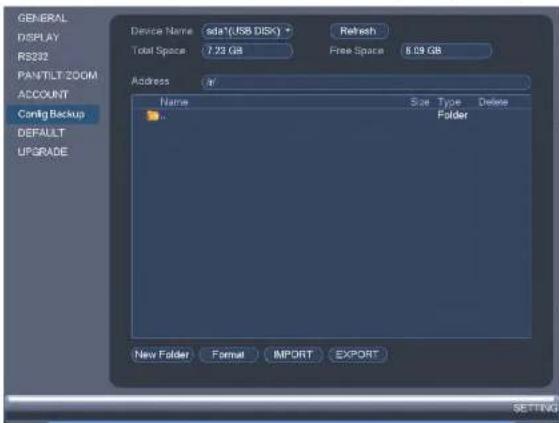
text_image
GENERAL DISPLAY RS322 PAINTLT ZOOM ACCOUNT Config Backup DEFAULT UPGRADE Device Name sda*(USB DISK) + Total Space 7.23 GB Address # Name Size Type Delete Folder New Folder Format IMPORT EXPORT REFRESH Free Space 6.09 GB SETTING-
Under Device Name, select the USB device where you would like to save the configuration.
-
Click EXPORT to save your current system configuration.
To restore a saved system configuration:
- Insert a USB thumb drive (not included) with a saved system configuration into one of the USB ports.
Using the Main Menu15
- Click OK to confirm. The system will restart to complete the operation.
15.3.22 Setting the System to Factory Defaults
The Default menu allows you to reset the system to factory default settings.
To reset the system to factory default settings:
- From the Main Menu, click X and then click Setting>Default.

text_image
GENERAL DISPLAY PAN'TLTZOOM ACCOUNT Config Backup DEFAULT UPGRADE Please select setting entries that you want to default. ALL CAMERA EVENT SYSTEM NETWORK STORAGE FACTORY DEFAULT OK Cancel Apply SETTING- Check the menus you would like to reset to default settings or check Factory Default to reset the entire system to default settings.
A 2011
Using the Main Menu15
- Right-click and then click Main Menu. Click >Setting>Upgrade.

text_image
ORANGE DISPLAY ADDR FANATE TODO ADDR ADDRESS TCP20000000000000000000000000000000000000000000000000000000000000000000000000000000000000000000000000000 UPDATES If you have an upgrade option then please insert TCP200000000000000000, you will start up to date. Don't check down the power during upgrade. Next-
Click Start.
-
Select the firmware file on the USB drive and click Start.

text_image
WARNING DO NOT POWER OFF THE SYSTEM OR DISCONNECT THE POWER CABLE DURING FIRM- WARE INSTALLATION15.4 Shutdown
Use the Shutdown menu to shutdown, restart, or log out of the system.
To access the Shutdown menu:
- From live view, right-click and select Main Menu.
- Enter the system user name (default: admin) and your new, secure password and click
OK.
- Click >Shutdown.
A. Select one of the following:
Connecting to Your System Over the Internet on PC or Mac
This system features connectivity using the exclusive FLIR Cloud™. This cloud-enabled service allows for Internet connectivity without requiring any network configuration. Up to 3 devices may connect to the system at the same time.
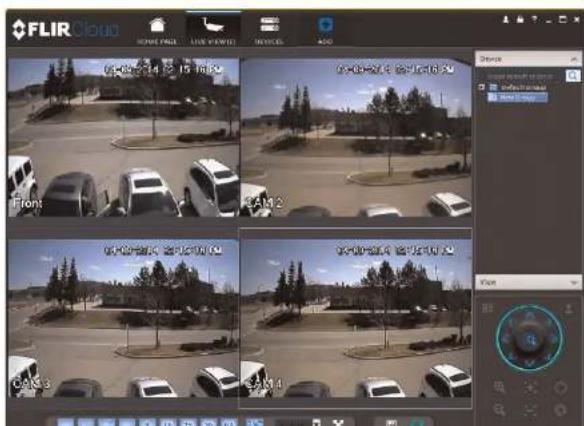
text_image
FLIR Cloud HOME PAGE LAST VIEWED DEVICES ADD 04-02-14 2:15:16:02 04-03-14 2:15:16:02 Front CAM 2 04-03-14 2:15:16:02 CAM 3 CAM 4 Device View16.2 Step 1 of 3: Connect your System to Your Router
- Power off your system by disconnecting the power adapter.
- Connect an Ethernet cable (included) to the LAN port on the rear panel of the system. Connect the other end of the Ethernet cable to an empty LAN port (usually numbered 1\~4) on your router.
- Reconnect the power adapter to power the system back on.

flowchart
graph LR
    A["Internet\n(not required for local viewing)"] --> B["Router"]
    C["Computer"] --> B
    B --> D["Security System\n(may not be exactly as shown)"]
16.3 Step 2 of 3: Obtain the system's Device ID
The Device ID is a unique code that allows your system to handshake with FLIR Cloud™ servers for a secure connection over the Internet.
To find the Device ID:
- The Device ID is located on a sticker on the system.
- Write down the Device ID of the system.
16.4 Step 3 of 3: Connect to the System Over the Internet
Follow the steps below to connect to the system over the Internet.
- Log into the Client Software using the Client Software user name (default: admin) and password (default: admin) and then click Login.

text_image
FLIR Cloud Login NAME: admin Password: ****** Enter your password { logis } { Fok }- Click Add Device.

text_image
FLIR Cloud NEW PACK DEVICES Auto Server Panel A1 B2 C3 D4 E5 F6 G7 H8 I9 J0 K1 L2 M3 N4 O5 P6 Q1 R2 S3 T4 U5 V6 W7 X8 Y9 Z1 A10 B11 C12 D13 E14 F15 G16 H17 I18 J19 K20 L21 M22 N23 O24 P25 Q26 R27 S28 T29 U30 V31 W32 X33 Y34 Z35 A36 B37 C38 D39 E40 F41 G42 H43 I44 J45 K46 L47 M48 N49 O50 P51 Q52 R53 S54 T55 U56 V57 W58 X59 Y60 Z61
text_image
Add Device Input Info ① Device Name: HD System Group Name: Default Group Type: DVR Device ID: dem538454001 Client Port: 35000 User Name: admin Password: ****** Retrieve Info Device Information Serial Number: Video Input: Video Output: Alarm Input: Alarm Output: Add More Add Cancel- Click and drag Default Group to the display window to open your cameras in live view.
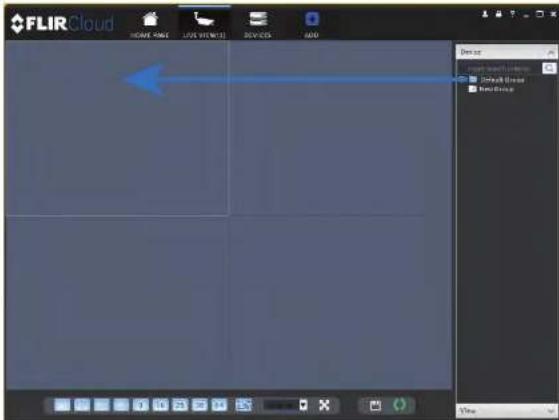
text_image
FLIR Cloud HOME HONG LIVE VIEW 13 DIVICES ADD Device Show Start Window Show Close Show GroupCongratulations! You can now connect over the Internet to view and playback video on your computer.

text_image
FLIR Cloud HKEYE NAME: FLIR HKEYE NAME: FLIR HKEYE NAME: FLIR HKEYE NAME: FLIR HKEYE NAME: FLIRUsing FLIR Cloud™ Client for PC or Mac
FLIR Cloud™ Client allows you to connect to multiple systems from a PC or Mac.
17.1 Home Page
The Home Page allows you to access all the tabs within the software. Each tab allows you to access different features.

text_image
FLIR Cloud HOME PAGE SUPPORT BASIC 14:09:28 2018-04-09 LIVE VIEW PLAYBACK ALARM LOG EXTENSION VIDEO WALL EAVAP DISPLAY ACCESSIVE DEVICES SERVICE COMPLS ALARM CDS TOUR & TIME POWER WALL CONTING ACCOUNT GENERALTo open tabs:
Click a tan from the Home Page to open it or add a button at the tan of the corner.
- Click and drag a DVR, NVR, group, or individual camera to open live video. To access individual cameras, you can click + to expand groups or systems.
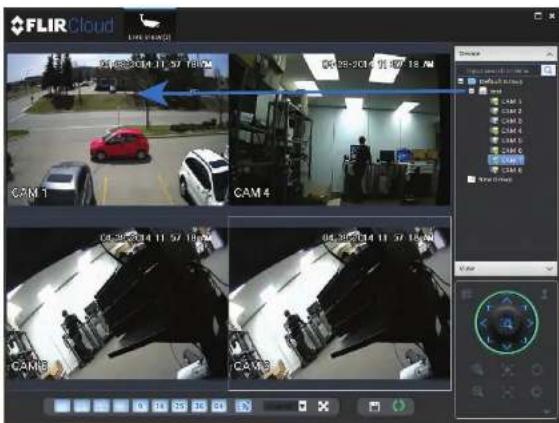
text_image
FLIR Cloud 04:48:04.11:57 16:00 AM 04:28:04.11:57 18:00 AM CAM 1 CAM 4 CAM 5 CAM 6 CAM 7 CAM 8 CAM 9 CAM 10 CAM 11 CAM 12 CAM 13 CAM 14 CAM 15 CAM 16 CAM 17 CAM 18 CAM 19 CAM 20 CAM 21 CAM 22 CAM 23 CAM 24 CAM 25 CAM 26 CAM 27 CAM 28 CAM 29 CAM 30 CAM 31 CAM 32 CAM 33 CAM 34 CAM 35 CAM 36 CAM 37 CAM 38 CAM 39 CAM 40 CAM 41 CAM 42 CAM 43 CAM 44 CAM 45 CAM 46 CAM 47 CAM 48 CAM 49 CAM 50 CAM 51 CAM 52 CAM 53 CAM 54 CAM 55 CAM 56 CAM 57 CAM 58 CAM 59 CAM 60 CAM 61 CAM 62 CAM 63 CAM 64 CAM 65 CAM 66 CAM 67 CAM 68 CAM 69 CAM 70 CAM 71 CAM 72 CAM 73 CAM 74 CAM 75 CAM 76 CAM 77 CAM 78 CAM 79 CAM 8017.2.1 Live View Controls

1.1. Streaming quality: Shows the bitrate and resolution for the stream, and shows if display is showing the Sub Stream or Main Stream.
1.2. Manual recording: Click to start/stop manual recording.
1.3. Snapshot: Click to save a snapshot.
1.4. Mute/unmute: Click to mute/unmute audio (audio camera required).
1.5. Not supported
1.6. Instant playback: Plays back the most recently recorded video from the camera. By default, it will play back the last 5 minutes of recorded video from the camera.
1.7. Digital zoom: Click to enable digital zoom mode. Click and drag over the display area to zoom on the camera. Then click and drag to pan. Click the icon again to zoom out.
1.8. Disconnect.
- Split-screen mode: Click to select split-screen layout.

- Aspect ratio: Use the drop down menu to select the aspect ratio for the selected camera. Original uses the actual aspect ratio of the image. Full-win stretches the image to fill up the entire display area.

- Full-screen: Click to open full-screen mode. Press ESC to exit full-screen mode.

- Devices: Shows a list of groups, cameras, and systems connected to the client. Drag items to the display area to open live video. Right-click to view additional options.
17.2.2 Opening Live View in Multiple Monitors
If your computer has multiple monitors, you can open more than one Live View tab and move them to secondary monitors. This allows you to monitor cameras on multiple monitors at the same time.
| NOTE |
| Using multiple monitors significantly increases the amount of computing resources necessary to run application and may affect performance. |
To open Live View in multiple monitors:
-
Click 📄 and then click to create a Live View tab.
-
Click and drag the tab outside of the client window to create a new window. You can drag the window to one of the secondary monitors.

text_image
FLIR Cloud HKEY KEY LIFE RED LIFE FREE 4:00 Device Default/Group PropertiesResult

text_image
FLIR Cloud FLIR CloudTo control PTZ cameras:
- Click the display area with the PTZ cameras and use the on-screen PTZ controls.
PTZ controls:

text_image
Diagram of a device control panel with numbered labels pointing to various function buttons and icons.-
Open menu: Click to open camera OSD menu controls. This feature may not be supported for all camera models.
-
Move camera: Click the arrows to move the camera. Click to open dynamic zoom mode. Then click and drag in the video area to zoom in the camera on an area.

text_image
2. Click 1 8 Preset 1- Select the number of the preset you would like to add.
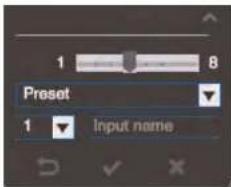
text_image
1 8 Preset 1 Input name-
Move the camera to the desired position.
-
Click √ to save the current position as a preset.
To go to a saved preset:
- Select the preset number from the list or click to go to the currently selected preset.
1722 BT7 Tour
- Use the chart to select which presets you would like to include in the tour and the order of presets.

text_image
Tour List Cruise ID 1 Cruise Name Preset Time(s) Operation 1 10 + 2 10 + OK Cancel- Preset: Select the preset number.
- Time(s): Enter the time in seconds the camera will remain on the selected preset.
-
Operation: Click to add a preset to the tour. Click to delete a preset from the tour.
-
Click OK to save changes.
-
Move the camera into the desired start position.
- Click to start recording the pattern.
- Move the camera to the desired end position. Then, click to stop recording the pattern.
To run a pattern:
- Select the pattern number and click
17.3.4 PTZ Scan
Scan automatically cycles between a left and right point.
To set up scan mode:
- Click ▼ to open the Advanced controls. Select Scan.
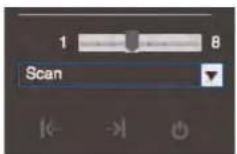
- Move the camera to the desired left position and
- Move the camera to the desired right position and
To run scan mode:
- Click


text_image
FLIR Cloud Volume Back Performance Develers Audio Scene Type: A1 Balance: 0.0000000000 Time: 2014-04-28 23:30:36 5:00:00 ① ② ③ ④ ⑤To playback video:
- Check the channels you would like to play back from in the Device List.
- Under Type, check the file types you would like to search for.
• All: All recordings.
• General: Continuous recordings.
• MD: Motion recordings.
- Alarm: Alarm recordings. Your system must support alarm devices (not included) to use this feature.
-
Under Stream, select Main Stream to search for Main Stream recordings (high qual-
-
-
-
-
-
-
-
- 9.
-
-
-
-
-
-
-
Click inside the play back bar to start playback.
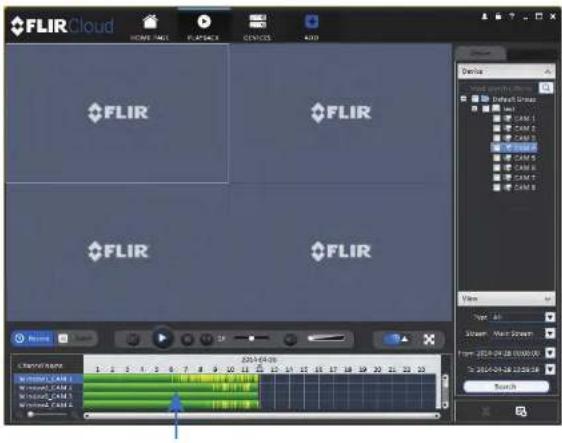
text_image
FLIR Cloud HOME PAGE FLIPBACK DEVICES ADD FLIR FLIR FLIR FLIR FLIR FLIR FLIR FLIR FLIR FLIR FLIR FLIR FLIR FLIR FLIR FLIR FLIR FLIR FLIR FLIR FLIR FLIR FLIR FLIR FLIR FLIR FLIR FLIR FLIR FLIR FLIR FLIR FLIR FLIR17.5 Playback Controls

text_image
FLIR Cloud Main Connection Cloud Platform ①- Display area: Double-click to expand/return to split-screen mode. Hold the mouse over the display area to open the camera toolbar.

- Snapshot: Click to save a snapshot.
-
Digital zoom: Click to enable digital zoom mode. Then, click and drag to zoom in. Click and drag to pan the camera. Click again to zoom out.
-
Event: Click to view recordings based on a list of events and files.
-
Record: Click to view recordings on a timeline.
-
Sync: Click to sync playback between channels. This forces all channels to playback from the same time.
-
Pause/play.
-
Stop.
- Frame-by-frame: Click to advance the video by a single frame.
-
Playback speed: Use the slider to adjust the playback speed.
-
Mute.
-
Volume.
-
Split-screen: Select split screen configuration.
- Full-screen: Click to open playback in full-screen. Press ESC to exit full-screen.
- Timeline zoom: Use the slider to zoom in/out on the timeline.
- Playback timeline: Shows recordings from the selected channels on a timeline. Click inside the timeline to start playback or select a playback time. Each type of recordings is shown in a different color. Continuous recordings are green, motion recordings are yellow, and alarm recordings are red.
- Video clip: Click to start a video clip. You can download video clips to your hard drive
- Download list: Click to see a list of files you have downloaded and the progress of files that are currently downloading.
- Search: Search for video on the selected channels based on the search parameters you set.
-
Device list: Select the channels you would like to search or playback video from.
-
Configure the following save options:
text_image
Export Setup Path: RCloudClient\Record\DownLoad\ Browse File Format: AVI Download Video Player Free Space: 122423M OK Cancel- Path: Use the default save folder or click Browse to select a different folder.
- File Format: Select the video file format.
-
Download Video Player: Check to save a copy of the video player with the downloaded file.
-
Click OK to start the download. A status screen will pop up to show progress on downloaded files.
text_image
NOTE To retrieve downloaded video files: • PC Users: Browse to the folders listed in General>File. • Mac Users: Browse to the folders listed in General>File. To get to the default location, open Applications in Finder, right click on FLIR Cloud Client and select Show Package Contents. Then, navigate to the desired folder.Alarm menu overview:

text_image
FLIR Cloud File Edit View Insert Tools Help Options Help Settings Help Options Help Settings Help Settings Help Settings Help Settings Help Settings Help Settings Help Settings Help Settings Help Settings Help Settings Help Settings Help Settings Help Settings Help Settings Help Settings Help Settings Help Settings Help Settings Help Settings Help Settings Help Settings Help Settings Help Settings Help Settings Help Settings Help Settings Help Settings Help Settings Help Settings Help Settings Help Settings Help Settings Help Settings Help Settings Help Settings Help Settings Help Settings Help Settings Help Settings Help Settings Help Settings Help Settings Help Settings Help Settings Help Settings Help Settings Help Settings Help Settings Help Settings Help Settings Help Sections Help Settings Help Settings Help Settings Help Settings Help Settings Help Settings Help Settings Help Settings Help Settings Help Settings Help Settings Help Settings Help Settings Help Settings Help Settings Help Settings Help Settings Help Settings Help Settings Help Settings Help Settings Help Settings Help Settings Help Settings Help Settings Help Settings Help Settings Help Settings Help Settings Help Settings Help Settings Help Settings Help Settings Help Settings Help Settings Help Settings Help Settings Help Settings Help Settings Help Settings Help Settings Help Settings Help Settings Help Settings Help Settings Help Settings Help Settings Help Settings Help Settings Help Setting Help Settings Help Settings Help Settings Help Settings Help Settings Help Settings Help Settings Help Settings Help Settings Help Settings Help Settings Help Settings Help Settings Help Settings Help Settings Help Settings Help Settings Help Settings Help Settings Help Settings Help Settings Help Settings Help Settings Help Settings Help Settings Help Settings Help Settings Help Settings Help Settings Help Settings Help Settings Help Settings Help Settings Help Settings Help Settings Help Settings Help Settings Help Settings Help Settings Help Settings Help Settings Help Settings Help Settings Help Settings Help Settings Help Settings Help Settings Help Settings Help Settings Help settings help settings help settings help settings help settings help settings help settings help settings help settings help settings help settings help settings help settings help settings help settings help settings help settings help settings help settings help settings help settings help settings help settings help settings help settings help settings help settings help settings help settings help settings help settings help settings help settings help settings help settings help settings help settings help settings help settings help settings help settings help settings help settings help settings help settings help settings help settings help settings help settings help settings help settings helps File Edit View Insert Tools From Event List Error Check F0 F1 F2 F3 F4 F5 F6 F7 F8 F9 F10 F11 F12 F13 F14 F15 F16 F17 F18 F19 F20 F21 F22 F23 F24 F25 F26 F27 F28 F29 F30 F31 F32 F33 F34 F35 F36 F37 F38 F39 F40 F41 F42 F43 F44 F45 F46 F47 F48 F49 F50 F51 F52 F53 F54 F55 F56 F57 F58 F59 F60 F61 F62 F63 F64 F65 F66 F67 F68 F69 F70 F71 F72 F73 F74 F75 F76 F77 F78 F79 F80 F81 F82 F83 F84 F85 F86 F87 F88 F89 F90 F91 F92 F93 F94 F95 F96 F97 F98 F99 G00 G01 G02 G03 G04 G05 G06 G07 G08 G09 G10 G11 G12 G13 G14 G15 G16 G17 G18 G19 G20 G21 G22 G23 G24 G25 G26 G27 G28 G29 G30 G31 G32 G33 G34 G35 G36 G37 G38 G39 G40 G41 G42 G43 G44 G45 G46 G47 G48 G49 G50 G51 G52 G53 G54 G55 G56 G57 G58 G59 G60 G61 G62 G63 G64 G65 G66 G67 G68 G69 G70 G71 G72 G73 G74 G75 G76 G77 G78 G79 G80 G81 G82 G83 G84 G85 G86 G87 G88 G89 G90 G91 G92 G93 G94 G95 G96 G97 G98 G99 H00 H01 H02 H03 H04 H05 H06 H07 H08 H09 H10 H11 H12 H13 H14 H15 H16 H17 H18 H19 H20 H21 H22 H23 H24 H25 H26 H27 H28 H29 H30 H31 H32 H33 H34 H35 H36 H37 H38 H39 H40 H41 H42 H43 H44 H45 H46 H47 H48 H49 H50 H51 H52 H53 H54 H55 H56 H57 H58 H59 H60 H61 H62 H63 H64 H65 H66 H67 H68 H69 H70 H71 H72 H73 H74 H75 H76 H77 H78 H79 H80 H81 H82 H83 H84 H85 H86 H87 H88 H89 H90 H91 H92 H93 H94 H95 H96 H97 H98 H99 H100- Number of alarms: Shows the number of open alarms.
- Alarm list: Shows the list of alarms and information on when they occurred and which systems and channels triggered them.
- Alarm Process: You can close alarms by selecting one of the options and clicking OK.
- Options: Check to enable the following:
- Display Link Video: Open live video to monitor alarms on a continuous basis.
- Display Overlay Window: Show the overlay controls. They allow you to enable/disable sound alerts and quickly jump back to the Alarm menu from another tab.
To view client logs:
- Click Client Log to view logs for the client software.

text_image
FLIR Cloud Start Time: 2018-04-29 00:00:00 End Time: 2018-04-29 00:00:00 Log Type: System Log Log Value: Search Description No. Times Current Type Current Type Ground Type Change Type Frequency 2018-04-29 05:33:00 Log Rate: 1.6- Configure the following:
- Start Time/End Time: Select the start and end times to search for logs. - Log Type: Select the type of logs to search for.
- Click Search.
To view logs from connected systems:
- Click Device Log to view logs from connected systems.
text_image
FLIR Cloud Start Time: 10:46:25 00:00:00 Log Type: Active End Time: 2014-09-25 00:00:00 Send to: Active Log Name: No Log On Page: 30-
Configure the following:
-
Start Time/End Time: Select the start and end times to search for logs.
-
Log Type: Select the type of logs to search for.
• Device Name: Select the system you would like to view logs from. -
Click Search.
17.9 E-map
- Click Add Map.
text_image
FLIR Cloud HOME PASS E-MAF ADD Add User to add user at Email + Add User- Configure the following:

text_image
Add Map Name: Home- Click Edit to edit the e-map.

text_image
FLIR Cloud HOME CARD DEVICES LIST SYSTEMS FRAME ADD View Help Device Smartphone Control Panel Search Floor 1 Floor 2 Floor 3 Floor 4 Floor 5 Floor 6 Floor 7 Floor 8- Click and drag cameras from the device list to place them on the map.

text_image
FLIR Cloud Service FLIR Cloud Group FLIR Cloud Group- Double-click cameras on the map to open live video.

text_image
FLIR Cloud Floor Plan CABAT CAR STRESS ADD Details FLIR Cloud Floor Plan CABAT CAR STRESS ADD CABAT CAR STRESS ADD CABAT CAR STRESS ADD CABAT CAR STRESS ADD CABAT CAR STRESS ADD CABAT CAR STRESS ADD CABAT CAR STRESS ADD CABAT CAR STRESS ADD CABAT CAR STRESS ADD CABAT CAR STRESS ADD CABAT CAR STRESS Add CABB 100% 0.000000000000000000000000000000000000000000000000000000000000000000000000000000000000000000000000000017.10 Devices
The Devices menu is where you can manage systems connected to the client software.
To access the Devices menu:

Devices overview:

- Devices Found: Shows systems that are connected to the same network as the computer where the client is installed. Once you connect to the system, it moves to the botom of the screen.
- Search: Refresh the list of systems connected to the network.
- Add: Add checked systems to the client software.
- Device list: Shows a list of systems connected to the client software, and shows which systems are online.
- Add Device: Add a remote system using a Device ID or IP/DDNS address.
- Delete: Delete the selected system.
- Import: Import a list of systems from a saved .xml file.
- Export: Export a list of currently connected systems to an .xml file. This is useful if you need to re-install the software or if you want to open the same list of systems on a different computer.
- Edit: Edit the connection details for the system.
- Manual connect/disconnect: Manually connect/disconnect the system.
- Delete: Delete system.
17.11 Device Config
The Device Config menu allows you to remotely configure settings for connected systems.
To access the Device Config menu:

- Click on a system in the device list to see the settings available for that system and their configure settings as needed.

text_image
FLIR Cloud HOME PAGE ALABRA CDS DEVICE CORNERS DEVICES ADD Search COM 1 COM 2 COM 3 COM 4 COM 5 RETURN ON REDADED SOFTWARE17.12 Alarm CFG
The Alarm CFG menu allows you to configure alarms for the client software. The client software will alert you by popping up live video and playing sound alerts.

To create alarms:


and then click

- Click Add to create a new alarm.
text_image
FLIR Cloud HOME PAGE ALABR PCG ALABR ADD Add Remove Export Export Add Add Remove Description Connection- In the Alarm sources menu, you set up the parameters that trigger the alarm.
text_image
Name Channel Description Auto 1 2 3 Properties Channel Motion Settings Input Length/Steps No Channel Plane Type Operation CAM 1 Motion Settings Back Cancel• Under Alarm Type, select the alarm type that will trigger an alarm. For example,
you can select Motion Detect for the alarm to be triggered by motion.
- Select the systems or channels you would like to trigger an alarm. Continuing the example, if CAM 1 is selected, the alarm will be triggered if there is motion on CAM 1
- Click Next.
- In the Alarm link menu, you set up the responses to alarms. Select the channels that will pop up or alarm out devices (not included; not all systems support alarm out devices) that will be triggered by an alarm. For each channel selected, configure the following:
text_image
Screenshot of a software interface showing a panel with color channels and tool options, likely from an older application or design tool.• Video: Pop up a window with live video from the selected channel, like the one below.

text_image
Flash Link Flash Source: Flash Type: Times Flash 1: 300000000.00 Flash Link (Flash 1) Detection Flash 2: Name: Flash Input Language: None Flash Link: Name: Flash 1: Flash 2: Flash 3: Flash 4: Flash 5: Flash 6: Flash 7: Flash 8: Flash 9: Flash 10: Flash 11: Flash 12: Flash 13: Flash 14: Flash 15: Flash 16: Flash 17: Flash 18: Flash 19: Flash 20: Flash 21: Flash 22: Flash 23: Flash 24: Flash 25: Flash 26: Flash 27: Flash 28: Flash 29: Flash 30: Flash 31: Flash 32: Flash 33: Flash 34: Flash 35: Flash 36: Flash 37: Flash 38: Flash 39: Flash 40: Flash 41: Flash 42: Flash 43: Flash 44: Flash 45: Flash 46: Flash 47: Flash 48: Flash 49: Flash 50: Flash 51: Flash 52: Flash 53: Flash 54: Flash 55: Flash 56: Flash 57: Flash 58: Flash 59: Flash 60: Flash 61: Flash 62: Flash 63: Flash 64: Flash 65: Flash 66: Flash 67: Flash 68: Flash 69: Flash 70: Flash 71: Flash 72: Flash 73: Flash 74: Flash 75: Flash 76: Flash 77: Flash 78: Flash 79: Flash 80: Flash 81: Flash 82: Flash 83: Flash 84: Flash 85: Flash 86: Flash 87: Flash 88: Flash 89: Flash 90: Flash 91: Flash 92: Flash 93: Flash 94: Flash 95: Flash 96: Flash 97: Flash 98: Flash 99: Flash 100:- In the Period window, configure times the alarm will be activated.
text_image
New Sliver Name: 01clnpt Description: Ex-Sale Sun Mail Tax Ward Tay Im Iod Back Continue Cancel- Click Confirm to save the alarm.
To manage alarms:

text_image
① ② ③ ④ FLIR Cloud OK Cancel Import Export- Add: Add new alarm.
- Alarms.
- On/off: Click to enable/disable alarm.
- Delete: Click to delete alarm.
- Edit: Click to edit alarm settings.
17.13 Tour & Task
The Tour & Task menu is where you can set up custom views for the system. You can also set up tours, which sets the client to automatically cycle through views.
To start a tour:
- Click in Live View to start a tour. The live view will automatically cycle through all views you have set up in the Tour & Task menu. Click again to stop the tour.
To add views:
- Click and then click .

- Click + to create a new view.

text_image
FLIR Cloud HOME PAGE TODAY & TIME DEVICE ALABUS CPG SARLEM ADD Cloud + to config your cloud for users- Select the split-screen mode you would like to use for the view and then click and drag channels to the empty grid areas to select channels to be shown in the view.
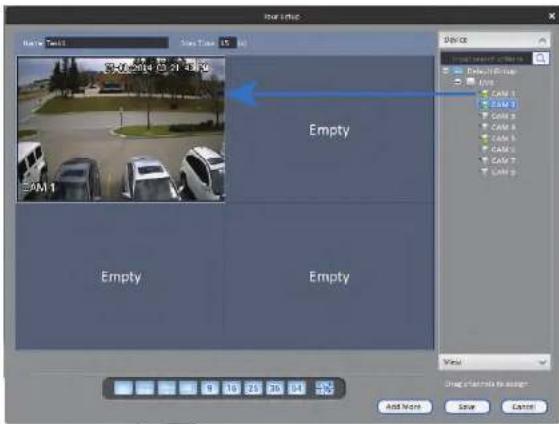
text_image
Normal Tools Time Time: 15.00 Control Tools Control Tools Device Default/Off-Stop CAM 1 CAM 2 CAM 3 CAM 4 CAM 5 CAM 6 CAM 7 CAM 8 CAM 9 Empty Empty Empty View Add Now Save Cancel- Click Save to save the view. Or click Add More to save the view and create another view.
17.14 Account
The Account menu is where you can set up user accounts and passwords for the client software. To simplify management, you can group user accounts according to role. A role determines the permissions an individual user account can have
To create a user account:
- Click Add.
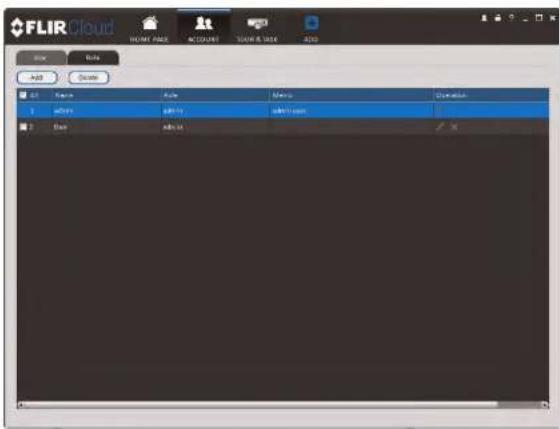
text_image
FLIR Cloud HOME PAGE ACCOUNT TOUR & SIZE ADD Add Delete Add Remove Add Remove Remove Remove Add Add Add- Configure the following settings for the user account:
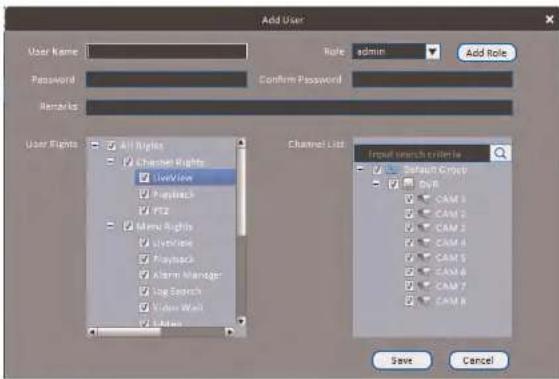
text_image
Add User User Name Password Remarks All Rights Channel Rights ViewLine Playback PT2 Menu Rights Update Playback Alarm Manager Log Search Video Wall Libraries Role admin Confirm Password Add Role Channel List Input search criteria Default Group ByR CAM 1 CAM 2 CAM 3 CAM 4 CAM 5 CAM 6 CAM 7 CAM 8 Save Cancel- User Name: Enter a user name for the account.
- Role: Select the role for the user account. By default, the user account gains all the permissions of the role selected, but you can deactivate permissions as needed.
- Password/Confirm Password: Enter the password for the user account.
- Remarks (Optional): Enter a text description of the user account.
-
User Rights: Check the permissions that will apply to the user account. If you click onLiveView, Playback, and PTZ, you can select which channels the user account can access in the Channel List section.
-
Click Save to create the account.
To switch between user accounts:
To create a role:
- Click the Role tab.
- Click Add.
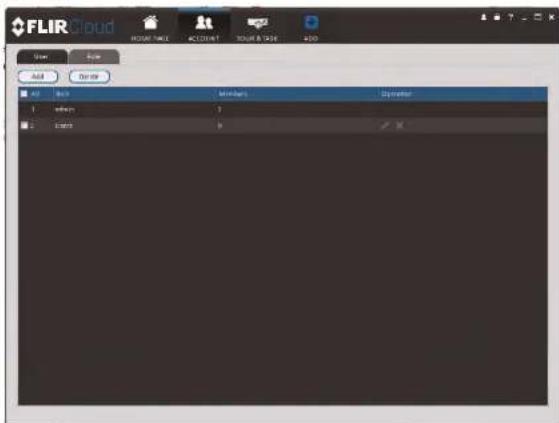
text_image
FLIR Cloud ROOM NAME ACCOUNT TOUR & CASE ADD Add Cancel Add OK Help 1 2 OK OK OK OK- Configure the following settings for the role:
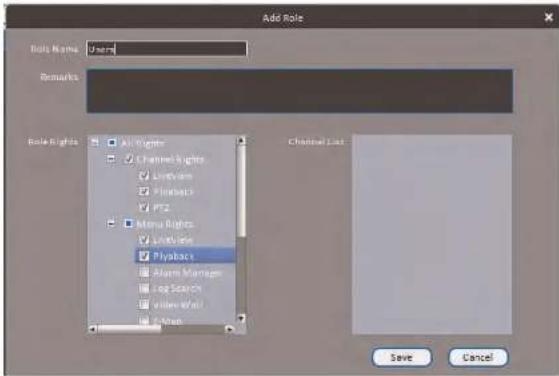
text_image
Add Role Role Name: User Remarks: Role Rights Right Chrome Rights Preview Playback PTZ Menu Rights Linearity Playback Alarm Manager Log Search Video World Mail Classical List Save Cancel• Role Name: Enter a name for the role.
- Remarks (Optional): Enter a text description of the role.
- Role Rights: Check the permissions that will apply to user accounts assigned this role. If you click onLiveView,Playback, and PTZ, you can select which channels may be accessed in the Channel List section.
- Click Save.
To modify a role:
- Click

next to the role you would like to modify. Edit the role details and click Save.
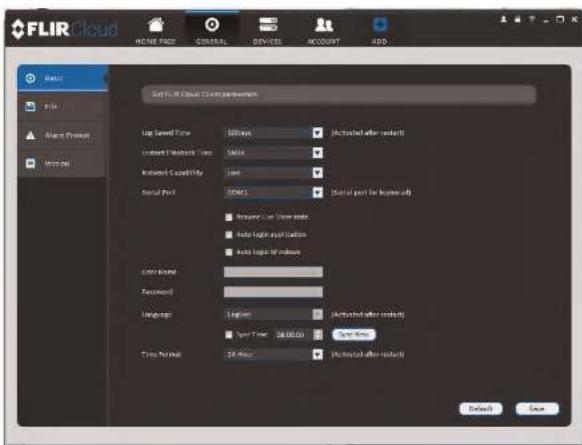
text_image
FLIR Cloud LOG Scaled Time: 500ms (Activated after restart) Internet Workload Link: None Network Capacity: Low Serial Port: 100001 (Not at port for lower port) ■ Reserved on network state ■ Note logic application ■ Note logic of index user name: Password: Language: English (Activated after restart) ■ Sport Time: 24.00000 (Start Time) Time format: 24 hours (Not at port after restart) Default SaveThe Basic menu contains the following settings:
- Log Saved Time: Select the number of days you would like the client to save log entries.
- Instant Playback Time: Select the number of minutes the system will go back when you start an instant playback.
• Network Capability: Select the speed of your computer's network connection. - Resume Live View State: Check for the client to resume live view when it starts up. The live view will open to the last view that you had open.

text_image
FLIR Cloud HOME PAGE GENERAL DEVICES ACCOUNT ADD Browse File Allow Procat Remove Set the selected, recording, and use any information before... Search/Get Path Install/Remove/Show Document/Show File/Show ID/Show Document/Show ID/Show Document/Show Document Browse Record Path Only/Remove/Show Document/Show File/Show ID/Show Document/Show ID/Show Document/Show Document Browse Forming Path Only/Remove/Show Document/Show File/Show ID/Show Document/Show ID/Show Document/Show ID/Show Document/Show ID/Show Document/Show ID/Show Document/Show ID/Show Document/Show ID/Show Document/Show ID/Show Document/Show ID/Show Document/Show ID/Show Document/Show ID/Show Document/Show ID/Show Document/Show ID/Show Document/Show ID/Show Document/Show ID/Show Document/Show ID/Show Document/Show ID/Show Document/Show ID/ Browse Class should be reprinted offset to configuration for the save dialog Adder. Default SaveThe File menu contains the following options:
- Snapshot Path: Click Browse to select the default folder to save snapshots.
- Record Path: Click Browse to select the default folder to save video recordings.
- Config Path: Click Browse to select the folder where the client will save software con-
fig files

NOTE
Click Save to save setting changes.
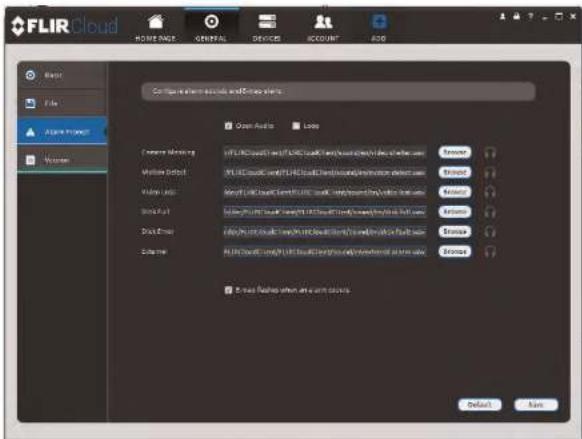
text_image
FLIR Cloud HOME PAGE GENERAL DEVICES ACCOUNT ADD Master File ASP.NET Project Women Configure the remote access and drive paths: Open Audio Loop Current Monitoring CPU/CCPU/CCPU/CCPU/CCPU/CCPU/CCPU/CCPU/CCPU/CCPU/CCPU/CCPU/CCPU/CCPU/CCPU/CCPU/CCPU/CCPU/CCPU/CCPU/CCPU/CCPU/CCPU/CCPU/CCPU/CCPU/CCPU/CCPU/CCPU/CCPU/CCPU/CCPU/CCPU/CCPU/CCPU/ Maintenance Method CPU/CCPU/CCPU/CCPU/CCPU/CCPU/CCPU/CCPU/CCPU/CCPU/CCPU/CCPU/CCPU/CCPU/CCPU/CCPU/CCPU/CCPU/CCPU/CCPU/CCPU/CCPU/CCPU/CCPU/ Model Path Model Path: C:\Users\Cloud\Cloud\Cloud\Cloud\Cloud\Cloud\Cloud\Cloud\Cloud\Cloud\Cloud\Cloud\Cloud\Cloud\Cloud\Cloud\Cloud\Cloud\Cloud\Cloud\Cloud\Cloud\Cloud\Cloud\Cloud\Cloud\Cloud\Cloud\Cloud\Cloud\Cloud\Cloud\Cloud\Cloud\Cloud\Cloud\Cloud\Cloud\Cloud\Cloud\Cloud\Cloud\Cloud\Cloud\Cloud\Cloud\Cloud\Cloud\Cloud\Cloud\Count Doub Path Doub Path: C:\Users\Cloud\Cloud\Cloud\Cloud\Cloud\Cloud\Cloud\Cloud\Cloud\Cloud\Cloud\Cloud\Cloud\Cloud\Cloud\Cloud\Cloud\Cloud\Cloud\Cloud\Cloud\Cloud\Cloud\Cloud\Cloud\Cloud\Cloud\Cloud\Cloud\Count Doub Path Doub Path: C:\Users\Cloud\Cloud\Cloud\Cloud\Cloud\Cloud\Cloud\Cloud\Cloud\Cloud\Cloud\Cloud\Cloud\Count Browse Browse Browse Browse Browse Browse Browse Browse Browse Browse Browse Browse Browse Browse Browse Browse Browse Browse Browse Browse Browse Browse Browse Browse Browse Browse Browse Browse Browse Browse Browse Browse Browse Browse Browse Browse Browse Browse Browse Browse Browse Browse Browse Browse Browse Browse Browse Browse Browse Browse Buller Flakes when done on accountThe Alarm Prompt menu has the following options:
- Open Audio: Check to enable audio alerts.
- Loop: Check to repeat audio alerts until acknowledged.
- Camera Masking: Select or preview the sound that will play for camera masking alarms.
- Motion Detect: Select or preview the sound that will play for motion detection.
• Video Loss: Select or preview the sound that will play for video loss alarms. - Disk Full: Select or preview the sound that will play for disk full alarms.
- Rich Frous Calest on version the second that will also for dish space
Using FLIR Cloud™ Client for PC or Mac
text_image
FLIR Cloud Client FLIR Cloud Client Version No: 2.15 API Version: 1.38.14 Model Date: 2015-04-26Connecting to Your System Using Smartphone or Tablet Apps
The system is compatible with iPhone, iPad and Android devices.
| Platform App Name Get App | From | |
| iPhone/iPad FLIR CloudTM Apple | App Store | |
| Android FLIR CloudTM Google Play | Play Store |
See www.flir.com/security/pro for the latest list of supported apps and devices.
18.1 iPhone / iPad
FLIR Cloud™ is an iPhone / iPad app that allows you to remotely view your system.
18.1.1 Prerequisites
- Connect your system to your router using an Ethernet cable (included).
• Make sure to upgrade your system to the latest firmware version. You must have the latest firmware and mobile apps to connect to the system over the Internet.
| NOTE |
| For the latest list of supported apps and devices, visit www.flir.com/security/pro. |
| NOTE |
| The app will ask for permission to send push notifications and to access Photos. It will only se cations if you enable motion-activated push notifications in the Push Config menu. It needs acc Photos to save snapshots and video clips to the local storage on your mobile device. |
18.1.2 Connecting to your System on iPhone / iPad
- Download FLIR Cloud™ for free from the App Store.
- Tap on the FLIR Cloud™ icon() to start the app.
- Tap Sign up and enter your email address and password to create a new account.

text_image
EXAMPLE 1 Scan Off Scale Register Mode Device 8 2 Alarm: HD System Device ID InV8014230s Client Port $5000 Username admin Access ... Live Time Sub > Playback Sub > COMOUNT5.1. Tap Scan QR Code and line up the QR code on the top of your system using the camera on your mobile device.

OR
Under Device ID, manually enter the Device ID printed on the label.
5.2. Name: Choose a name for your system of your choice.
5.3. Client Port: Enter the Client Port (default: 35000).
5.4. User Name: Enter the system's User Name (default: admin).
5.5. Password: Enter the system's Password (your new, secure password created during initial setup).
[NO TEXT]
Live View Overview
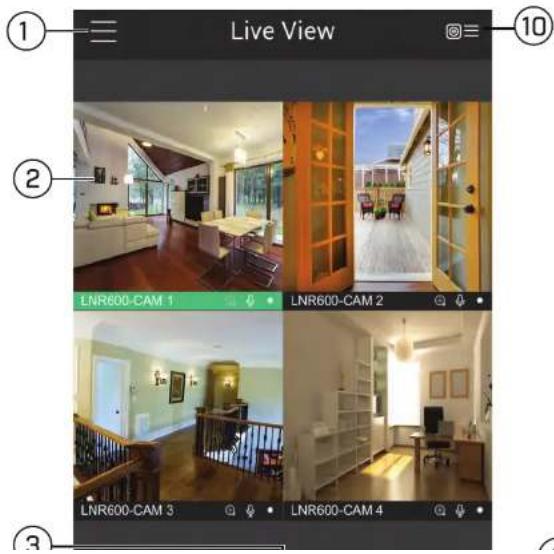
text_image
Live View LNR600-CAM 1 LNR600-CAM 2 LNR600-CAM 3 LNR600-CAM 4- Snapshot: Tap to take a snapshot from the currently selected channel.
- Control Bar: Contains the following options. Swipe left or right to access more options.

text_image
QUICK PI AYBACK PTZ CONTROL MIC VIDEO QUALITY ALARMS AUDIO ① ② ③ ④ ⑤ ⑥6.1. Quick Playback: Tap to start/stop quick playback.
6.2. PTZ Controls: Open/close PTZ controls. PTZ camera required (not included).
6.3. Microphone: Audio enabled cameras required.
6.4. Video Quality: Open/close streaming quality panel.
6.5. Alarms: Not supported.
6.6. Audio: Audio enabled cameras required.
- Manual record: Tap to start/stop manual recording.
- Access Favorites.
- Connect/disconnect all: Connect to/disconnect from all previously added cameras.
- Device List: Tap to open a list of devices. You can use the Device List to open multip systems or cameras at once.
18.1.4 Controlling PTZ Cameras
If you have PTZ cameras (not included), you can control them from the app.
To control PTZ cameras:
-
Tap the display area the PTZ camera is connected to.
-
Tap to open PTZ controls.
PTZ Controls

text_image
Live View ① ② ③ ④ ⑤- Live Display: Swipe to move the camera. Pinch to zoom in/out.
- Focus: Tap to show focus controls
- Zoom: Tap to show zoom controls.
- Iris: Tap to show Iris controls.
- Goto preset: Tap to access preset controls. Then use the sliders to select a preset and then tap the checkmark to goto the preset.

NOTE
You must set presets for the camera using the system's local menus before you can use this feature.
Local Files Overview

text_image
Smartphone screen displaying a grid of surveillance camera images with numbered annotations pointing to each panel.- Menu: Return to Menu.
- Files: Tap to open files.
- File Type: Tap the options to select video files or snapshots.
- Options: Tap to delete or export files to your device's local storage.

Exported snapshots and video files are saved to the Photos app. Video files are saved to MP4 format.
18.1.6 Using Playback Mode on iPhone / iPad
You can access recorded video on your system using your iPhone / iPad.
| NOTE |
| You must enable Sub Stream Recording to use playback mode on mobile devices. |
-
Select the date then the start and end times to playback.
-
Use the on-screen controls to control playback.

text_image
Playback Controls 1 2 3 4 CAM 1 CAM 1 2017-08-02 06:30 06:32.43 07:00 10 9 SNAPSHOT STORMS AVANCE RPGD MANUAL SCORE
text_image
File Export File Export File Export File Export File Export File Export File Export File Export File Export
NOTE
Your cameras must have motion detection activated to receive push notifications.
To enable Push Notifications:
- Tap ☐ to access the Menu, and then tap Push Config.
- Tap the system you would like to configure.
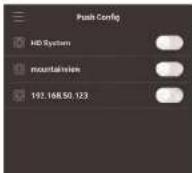
- Tap Motion Detect and then check each channel you would like to receive push notifications from.

text_image
lakeside.myddra-fir co... Period(Day) 365 Push type Video Motion Descent Main Lobby Fireplace Main Lobby South Gate Main Lobby West Main Lobby East Starwell East Starwell West User Starwell East User Starwell West- Tap to save changes. You will now receive a notification when one of the selected cameras detect motion.
18.1.8 Using the Event List
The Event List menu shows a list of events that were sent to your device via push notifications.

NOTE
You must configure push notifications before you can use the Event List.
To access the Event List:
- Tap ☐ to access the Menu, and then tap Event List.
Event List Overview
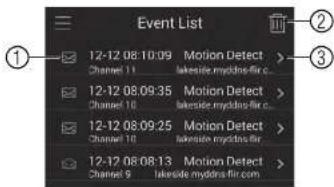
text_image
Event List 12-12 08:10:09 Motion Detect > Channel 11 lakeside.mydbra-fir.c > 12-12 08:09:35 Motion Detect > Channel 10 lakeside.mydbra-fir.c > 12-12 08:09:25 Motion Detect > Channel 10 lakeside.mydbra-fir.c > 12-12 08:08:13 Motion Detect > Channel 5 lakeside.mydbra-fir.com- Events: Shows the details of each motion detection event. Tap the event to view the video or snapshot.
- Delete All: Tap to delete all events in the Event List.
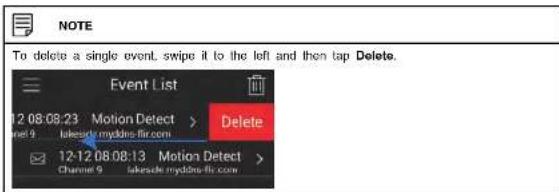
text_image
NOTE To delete a single event, swipe it to the left and then tap Delete. Event List 12 08:08:23 Motion Detect > Channel 9 lakeside myddies-fir.com Delete 12-12 08:08:13 Motion Detect > Channel 9 lakeside myddies-fir.com- View: Tap to view the video or snapshot for the selected event.
18.1.9 Using Favorites
Favorites allows you to select a group of cameras as a favorite. You can then quickly bring up the group of cameras in Live View without having to individually select each camera.
To use Favorites:
- Select the cameras you would like to add to the group to save changes.
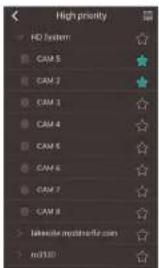
text_image
High priority HD system CAM 5 CAM 7 CAM 3 CAM 4 CAM 6 CAM 5 CAM 7 CAM 8 Landscape mydrolife.com mod/100
NOTE
To delete cameras that have been added to the group, select the group in the group list. Then, swipe left and tap Delete.
To open Favorites in Live View:
- Tap ☐ to access the Menu, and then tap Live View.
- Tap, and then tap to open the group.
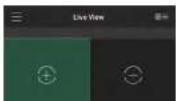
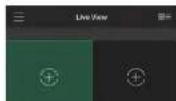

text_image
2. Tap + 3 Mag-
Select a .jpg image on your mobile device.
-
Press 14 and select a camera. Drag the camera on the screen to place it on the map. Repeat to add additional cameras.

- Select the E-Map in the Device List.
text_image
Device List E-Map Home Device HD System Inverter 102.168.50.1933- Tap the camera or cameras to select and then tap Connect to open the cameras.
text_image
Home CONNECTTo edit a system:
- Tap the system in Device Manager.

text_image
Device Manager HD System CONFIG SETTINGS ALARMS STORAGE DELETE- Edit the connection details as needed.
- Tap Connect to save changes and connect to the system.
To delete a system:
- Tap the system you would like to delete.
- Tap 📄. Tap OK to confirm.
18.1.12 Adding Devices Using an IP or DDNS Address (Advanced)
The app can connect directly to a device via the IP address or DDNS address as an optional advanced connectivity method or for systems that do not support FLIR Cloud™.
Prerequisites:
• The device you are connecting to must be connected to the Internet.
- You must port forward the HTTP Port (default: 80) and Client port (35000) on your
router to the device's local IP address
- To ensure connectivity, it is highly recommended to register for a free DDNS domain to use with your system
text_image
EXAMPLE Start OR Start 1 Register Mode: 00000000 2 Name: HD System 3 Editends: tomomith's myelino-fir.com 4 Start Menu: 97500 5 Editments: 6 Options: 7 Printers: 8 Printers: 9 Printers: CONNECT2.1. Tap Register Mode and select IP/Domain.
2.2. Name: Choose a name for your system of your choice.
2.3. Address: Enter the IP address or DDNS address of your system.
2.4. Client Port: Enter the Client Port (default: 35000).
2.5. User Name: Enter the system's User Name (default: admin).
2.6. Password: Enter the system's Password (your new, secure password created during initial setup).

NOTE
If you are accessing your system for the first time, you must create a new password through your recorder, see 5.6 Step 6: Creating a New, Secure Password, page 9.
- Tap Connect.
- The app opens in Live View and streams video from your cameras.
18.2 Android
FLIR Cloud™ allows you to remotely view your system on Android devices.
18.2.1 Prerequisites
- Connect your system to your router using an Ethernet cable (included).
- Make sure to upgrade your system to the latest firmware version. You must have the latest firmware and mobile apps to connect to the system over the Internet.

NOTE
For the latest list of supported apps and devices, visit www.flir.com/security/pro.
18.2.2 Connecting to your System on Android
- Download FLIR Cloud™ for free from the Google Play Store.
- Tap on the FLIR Cloud™ icon() to start the app.
- Tap Sign up and enter your email address and password to create a new account.
- Tap then +


- Configure the following:
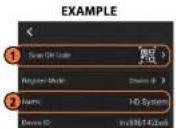
5.2. Name: Choose a name for your system of your choice.
5.3. Client Port: Enter the Client Port (default: 35000).
5.4. User Name: Enter the system's Username (default: admin).
5.5. Password: Enter the system's Password (your new, secure password created during initial setup).

text_image
NOTE If you are accessing your system for the first time, you must create a new password through your recorder, see 5.6 Step 6: Creating a New, Secure Password, page 9.- Tap Connect.
- The app opens in Live View and streams video from your cameras.
18.2.3 Live View Interface
You can use FLIR Cloud™ in portrait and landscape mode.
Live View Overview
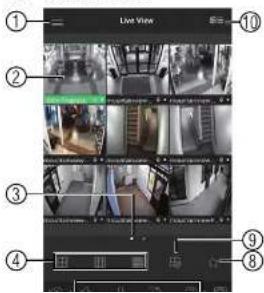
text_image
Live View ① ② ③ ④ ⑨ ⑧6.1. Quick Playback: Tap to start/stop quick playback.
6.2. PTZ Controls: Open/close PTZ controls. PTZ camera required (not included).
6.3. Video Quality: Open/close streaming quality panel.
6.4. Alarms: Not supported.
6.5. Audio: Audio enabled cameras required.
6.6. Microphone: Audio enabled cameras required.
6.7. Digital Zoom: Tap to activate digital zoom mode. Pinch to zoom in/out.
6.8. Color Settings: Tap to access color controls for the currently selected camera.
- Manual record: Tap to start/stop manual recording.
- Access Favorites.
- Connect/disconnect all: Connect to/disconnect from all previously added cameras.
- Device List: Tap to open a list of devices. You can use the Device List to open multi-systems or cameras at once.
18.2.4 Controlling PTZ Cameras
If you have PTZ cameras (not included), you can control them from the app.
To control PTZ cameras:
-
Tap the display area the PTZ camera is connected to.
-
Tap to open PTZ controls.
PTZ Controls
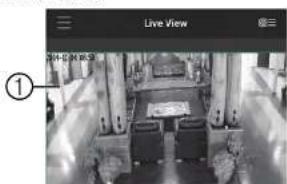
text_image
Live View ①- Go to preset: Tap to access preset controls. Then use the sliders to select a preset and then tap the checkmark to go to the preset.

NOTE
You must set presets for the camera using the system's local menus before you can use this feature.
18.2.5 Viewing Snapshots and Videos with Local Files
If you have saved snapshots or videos using the app, you may open them with Local Files To access Local Files:


to access the Menu, and then tap Local Files.
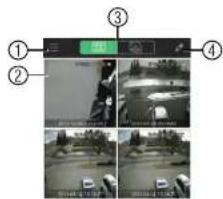
text_image
Screenshot of a surveillance camera interface with numbered UI elements and four video frames showing traffic or vehicle detection.- Menu: Return to Menu.
- Files: Tap to open files.
- File Type: Tap the options to select video files or snapshots.
-
Options: Tap to share, delete, or export files to your device's local storage.
-
Use the on-screen controls to control playback.
Playback Controls
text_image
Screenshot of a surveillance camera interface with numbered UI elements and a central screen showing a room photo.4.1. Display Area: Double-tap to open in full-screen.
4.2. Play/pause.
4.3. Time Bar: Tap inside the bar to fast forward or rewind.
4.4. Previous: Select previous video file.
4.5. Next: Select next video file.
4.6. Snapshot: Tap to take a snapshot from the selected camera.
4.7. Stop All: Stop playback on all channels.
4.8. Not supported.
4.9. Manual Record: Tap to start/stop recording to your mobile device's local storage.
4.10. Fast.
411 Slow

text_image
9:51 2014-09-03 09:51:00 Outlook Time - 10% Session 7th Outlook
NOTE
Your cameras must have motion detection activated to receive push notifications.
To enable Push Notifications:
- Tap ☐ to access the Menu, and then tap Push Config.
- Tap the system you would like to configure.

- Tap Motion Detect and then check each channel you would like to receive push notifications from.
text_image
HD System Period(Day) 365 Push type Video 3 Motion Unlock CAM 3 CAM 1 CAM 3 CAM 4 CAM 5 CAM 6 CAM 7-
Under Push type, select Video to attach a video clip to each push notification. Or, select Image to attach an image to each push notification.
-
Tap to save changes. You will now receive a notification when one of the selected cameras detect motion.
18.2.8 Using the Event List
The Event List menu shows a list of events that were sent to your device via push notifications.
| NOTE |
| You must configure push notifications before you can use the Event List. |
To access the Event List:
-
- Tap to access the Menu, and then tap Favorites.
- Tap a group to configure an existing group.
| NOTE |
| Tap to create a new group and then enter a name for the new group. |
- To add cameras to the group, lap.
- Select the cameras you would like to add to the group into save changes.
text_image
High priority HD System CAST 3 CAST 2 CAST 3 CAST 4 CAST 5 CAST 6 CAST 7 CAST 8 modulation 100% (100%)
text_image
NOTE To delete cameras that have been added to the group, select the group in the group list. The and hold to delete cameras from the group.To open Favorites in Live View
18.2.10 Using the E-Map
E-Map allows you to place cameras over a still image. For example, you can use the E-Map to create a virtual map of your cameras over a floor plan of your home or business.
To add an E-Map:
-
Tap ☐ to access the Menu, and then tap E-Map.
-
Tap +

text_image
Map Map File-
Select a .jpg image on your mobile device.
-
Press 📋 and select a camera. Drag the camera on the screen to place it on the map. Repeat to add additional cameras.

- Select the E-Map in the Device List.
text_image
Device List E- May Home Device HD System Insgnathode 192.146 50:123- Tap the camera or cameras to select and then tap Connect to open the cameras.
18.2.11 Device Manager
You can use Device List to add, delete, or edit your systems.
To access Device Manager:
- Tap to access the Menu, and then tap Device Manager.
To edit a system:
- Tap the system in Device Manager.


Prerequisites:
• The device you are connecting to must be connected to the Internet.
- You must port forward the HTTP Port (default: 80) and Client port (default: 35000) on
your router to the device's local IP address.
- To ensure connectivity, it is highly recommended to register for a free DDNS domain to use with your system.
- For more information on port forwarding and DDNS, visit www.flir.com/security/pro.
To add a device using an IP or DDNS address:
- Tap


- Configure the following:
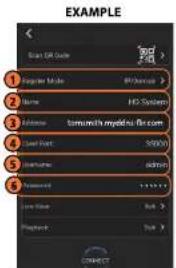
text_image
EXAMPLE Scan Edit Color 1 Register Mode 2 Name HD System 3 License tomushi mydata@tom.com 4 User Word: 50000 5 User Name: admin 6 Password: ******** 7 User Name: Web 8 Playback: Web CONNECT2.1. Tap Register Mode and select IP/Domain.
22 Name: Choose a name for your system of your choice
DDNS Setup (Advanced)
Free DDNS service is available as an optional connectivity method to connect to your system over the Internet.

text_image
FLIR 2004 FLIR 2004 FLIR 2004 FLIR 2004 FLIR 2004 FLIR 2004 FLIR 2004 FLIR 2004 FLIR 2004 FLIR 2004 FLIR 2004 FLIR 2004 FLIR 2004 FLIR 1999 FLIR 1999 FLIR 1999 FLIR 1999 FLIR 1999 FLIR 1999 FLIR 1999 FLIR 1999 FLIR 1999 FLIR 1999 FLIR 1999 FLIR 1999 FLIR 1999 FLIR FLIR FLIR FLIR FLIR FLIR FLIR FLIR FLIR FLIR FLIR FLIR FLIR FLIR FLIR FLIR FLIR FLIR FLIR FLIR FLIR FLIR FLIR FLIR FLIR FLIR FLIR FLIR FLIR FLIR FLIR FLIR FLIR FLIR
NOTE
Except where noted, the instructions in this section are the same on PC or Mac.
19.1 Accessing your System within a Local Network (LAN)
You can connect to your system through using the Client Software through the local area network (LAN). It is recommended to confirm connectivity over a local network before setting up your system for DDNS connectivity.

NOTE
To complete the steps below, your computer must be on the same network as your system.
- Reconnect the power adapter to power the system back on.

flowchart
graph LR
    A["Internet\n(not required for local viewing)"] --> B["Router"]
    C["Computer"] --> B
    B --> D["Security System\n(may not be exactly as shown)"]
19.1.2 Step 2 of 3: Obtain the System's Local IP Address
- Right-click to open the Quick Menu and click Info. Enter the system user name (default: admin) and your new, secure password.
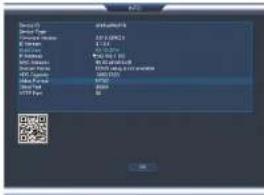
text_image
Device ID Design Name: C:\Program Files\* C:\Program Files\* C:\Program Files\* C:\Program Files\* C:\Program Files\* C:\Program Files\* C:\Program Files\* C:\Program Files\* C:\Program Files\* C:\Program Files\* C:\Program Files\* C:\Program Files\* C:\Program Files\* C:\Program Files\* C:\Program Files\* C:\Program Files\* C:\Program Files\* C:\Program File C:\Program File C:\Program File C:\Program File C:\Program File C:\Program File C:\Program File C:\Program File C:\Program File C:\Program File C:\Program File C:\Program File C:\Program File C:\Program File C:\Program File C:\Program File C:\Program File C:\Program File C:\Program File C:\Program File C:\Program File2 Write down the IP Address of the system
- Log into the Client Software using the Client Software user name (default: admin) and password (default: admin) and then click Login.

text_image
FLIR Cloud User NAME: www FLIR Password: ****** Enter your password: { login } { Not }- The client scans your LAN for connected systems. Check your system (a) and click Add (b).
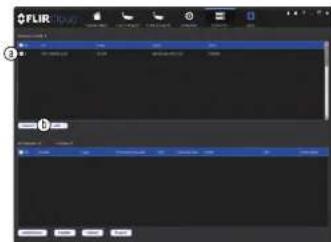
text_image
FLIR ① ②-
Enter your new, secure password and click OK.
-
Click and drag Default Group to the display window to open your cameras in live view.

text_image
FLIR ControlResult
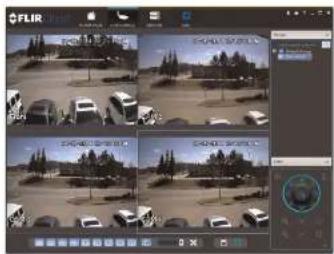
text_image
FLIR 2014 2015 2016 2017 2018 2019 2020 2021 2022 2023 2024 2025 2026 2027 2028 2029 2030 2031 2032 2033 2034 2035 2036 2037 2038 2039 2040 2041 2042 2043 2044 2045 2046 2047 2048 2049 2050 2051 2052 2053 2054 2055 2056 2057 2058 2059 2060 2061 2062 2063 2064 2065 2066 2067 2068 2069 2070 2071 2072 2073 2074 2075 2076 2077 2078 2079 2080 2081 2082 2083 2084 2085 2086 2087 2088 2089 2090 2091 2092 2093 2094 2095 2096 2097 2098 2099 31.1.119.2 DDNS Setup—Access your System Remotely over the Internet

NOTE
If the above ports are not forwarded on your router, you will not be able to access your system remotely.
19.2.2 Step 2 of 4: Create a DDNS Account
To setup your free FLIR DDNS account:
- In your browser, go to http://ddns.myddns-flir.com and click Create Account.
FLIR
Login
Create Account
Lost Password
- Complete the Account Information fields with your personal information. Complete the Warranty Information with your purchase details (optional).

text_image
Email: email@email.com Password: ******** Password center: ******** File name: type Last name: Smith Region: Ontario Country: Canada Missouri: Eastern Province (East) By clicking on "CreditaBank Account" you access the "Copyright Service"-
Complete the System Information fields:
-
Product License: Select your product model from the Product License drop down menu (i.e. M5100 Series).
- : Enter the MAC address of your system.
To find the MAC address, right-click to open the Quick Menu and click Info.
text_image
Device Type: 2000000 Device Type: 1.0 GB/10000 Device Type: 1.0 GB/10000 Device Type: 1.0 GB/10000 Device Type: 1.0 GB/10000 Device Type: 1.0 GB/10000 Device Type: 1.0 GB/10000 Device Type: 1.0 GB/10000 Device Type: 567 GB/10000 Device Type: 567 GB/10000 Device Type: 567 GB/10000 Device Type: 567 GB/10000 Device Type: 567 GB/10000 Device Type: 567 GB/10000 Device Type: 567 GB/10000 Device type: 2.5 GB/1.5 GB Device type: 2.5 GB/1.5 GB Device type: 2.5 GB/1.5 GB Device type: 2.5 GB/1.5 GB Device type: 2.5 GB/1.5 GB Device type: 2.5 GB/1.5 GB Device type: 2.5 GB/1.5 GB Device type: 2.5 GB/1.5 GB Disk type: 2.5 GB/1.5 GB Disk type: 2.5 GB/1.5 GB Disk type: 2.5 GB/1.5 GB Disk type: 2.5 GB/1.5 GB Disk type: 2.5 GB/1.5 GB Disk type: 2.5 GB/1.5 GB Disk type: 2.5 GB/1.5 GB Disk type: Disk type: Disk type: Disk type: Disk type: Disk type: Disk type: Disk type: Disk type: Disk type: Disk type: Disk type: Disk type: Disk type: Disk type: Disk type: Disk type: Disk type: Disk type: Disk type: Disk type: Disk type: Disk type: Disk type: Disk type: Disk type: Disk type: Disk type: Disk type: Disk type: Disk type: Disk type: Disk type: Disk type: disk type: disk type: disk type: disk type: disk type: disk type: disk type: disk type: disk type: disk type: disk type: disk type: disk type: disk type: disk type: disk type: disk type: disk type: disk type: disk type: disk type: disk type: disk type: disk type: disk type: disk type: disk type: disk type: disk type: disk type: disk type: disk type: disk type: disk type: disk types: disk types: disk types: disk types: disk types: disk types: disk types: disk types: disk types: disk types: disk types: disk types: disk types: disk types: disk types: disk types: disk types: disk types: disk types: disk types: disk types: disk types: disk types: disk types: disk types: disk types: disk types: disk types: disk types: disk types: disk types: disk types: disk types: disk types:- URL Request: Choose a URL for your DDNS connection (i.e. your name, your company or business name, or anything of your choice).

text_image
System Information Product License DNR200 URL Request myddns-fir.com What is this? Create New Account- Click Create New Account.
- Your account information will be sent to you at the email Address you used in Step 2. You will need this information for remote access to your system. Record your information below:
| Domain name/URL Request: | |
| Response ID: |
2.

text_image
Click and then click Network>DDNS. ADD Type: DDNS-01 Delete Status: Enter (0) Password: OK Cancel Apply- Check Enable.
- Under Domain Name, enter the Domain Name/URL Request your received in the email after registering for DDNS.
- Under User Name, enter your DDNS User Name.
- Under Password, enter your DDNS Device password.
- Click OK to save your settings.

NOTE
Please allow 10-15 minutes for the DDNS servers to update with your new DDNS address before attempting to connect.
19.2.4 Step 4 of 4: Connect to the System's DDNS Address

NOTE
Please allow 10–15 minutes for the DDNS servers to update with your new DDNS address before attempting to connect.
- Log into the Client Software using the Client Software user name (default: admin) and password (default: admin) and then click Login.

text_image
FLIR Cloud User Name: admin Password: ****** Reminder Password: { log } { file }- Click Add Device.
text_image
FLIR File Edit View Help Browse... Save... Save As... Save As... Save As... Save As... Save As... Save As... Save As... Save As... Save As... Save As... Save As... Save As... Save As... Save As... Save As... Save As... Save As... Save As... Save As... Save As... Save As... Save As... Save As... Save As... Save As... Save As... Save As... Save As... Save As... Save As... Save As... Save As... Save As... Save As...
text_image
Add Device Device Name: HD System Group Name: Default Group Type: DVR P/DDNS Address: tommith.myddns-flir.com Port: 35000 User Name: admin Password: ****** Retrieve Info Device Information Serial Number: Video Input: Video Output: Alarm Input: Alarm Output: Add More Add Cancel5.1. Check By IP/Domain to add a system using the DDNS address.
5.2. Device Name: Choose a name for your system of your choice.
5.3. IP/DDNS Address: Enter the Domain Name/URL Request you received in the email when you registered for DDNS followed by .myddns-flir.com.

NOTE
For example, if your Domain Maryland Request is tomorrow, actor tomorrow makes his
- Click and drag Default Group to the display window to open your cameras in live view.
text_image
Screenshot of a digital interface with a blue cursor hovering over a grid, likely from an older software application or game editor.Congratulations! You can now connect over the Internet to view and playback video on your computer.

text_image
Screenshot of a video editing interface showing a grid of vehicle images and a control panel with Chinese text.RTSP Streaming (Advanced)
RTSP streaming allows you to stream video from a specific camera using a web address. It is an optional connectivity method used by 3rd party software applications.

NOTE
The instructions in this section are using VLC Media Player. VLC Media Player is a free software provided at www.videolan.org. FLIR cannot provide support for VLC Media Player or any other 3rd party software. Please contact the software vendor for technical support related to 3rd party software applications.
To connect to the video stream using VLC Media Player:
- Open VLC Media Player.
- Click Media>Open Network Stream.
text_image
File Edit View Insert Help Open Path... Ctrl+O Open Path... Ctrl+R Open Path... Ctrl+P Open Path... Ctrl+Q Open Path... Ctrl+R Open Path... Ctrl+S Open Path... Ctrl+T Open Path... Ctrl+S Open Path... Ctrl+S Open Path... Ctrl+S Open Path... Ctrl+S Open Path... Ctrl+S Open Path... Ctrl+S Open Path... Ctrl+S Open Path... Ctrl+S Open Path... Ctrl+S Open Path... Ctrl+S Open Path... Ctrl+S Open Path... Ctrl+S Open Path... Ctrl+S Open Path... Ctrl+S Open Path... Ctrl+S Open Path... Ctrl+S Open Path... Ctrl+S Open Path: 0.0000000000000000000000000000000000000000000000000000000000000000000000000000000000000000000000000000 Cute-
Enter the RTSP address in the following format:
-
rtsp://
: @ : /cam/realmonitor?channel= &subtype= : The user name of the system (default: admin). : Your new, secure password. : The IP address of the system.

In order to view the RTSP stream over the Internet, you must port forward the RTSP port (default: 554) on your router to the system's IP address.
: The RTSP port (default: 554) of the system. : The number of the channel you would like to stream from. : Enter 1 for the Sub Stream of the camera or 0 for the Main Stream. It is recommended to use the Sub Stream if connecting over the Internet.
The example below shows the correct format to connect to the Sub Stream on channel
1.
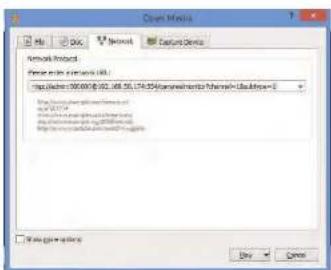
text_image
Open Metrics File Edit View Network Capture Devices Network Interface Network name: 100.000 (0.02, 105.55, 174.35) (Windows/Internet Channel: Desktop=1) http://www.100.000.com http://www.100.000.com File path: http://www.100.000.com File path: http://www.100.000.com Winning options: OK CancelConnecting a PTZ Camera (M5100 Series)
You can connect PTZ cameras (not included) to the system. You can use FLIR MPX or analog PTZ cameras with the system. FLIR MPX PTZ cameras can accept PTZ commands directly through the video cable. FLIR MPX PTZ cameras do not require wiring for RS485.
To connect a PTZ camera to the system:
- Connect the camera video cable to one of the Video IN ports on the system. If you have an MPX PTZ camera, it will automatically be detected and can be controlled by the DVR. If you have an analog PTZ camera, follow the steps below to set up the camera:
- You can connect the RS485 wires for analog PTZ cameras to the AB ports on the rear panel of the DVR. A is positive (+) and B is negative (-).
-
Right-click and click Main Menu. Enter the system user name (default: admin) and your new, secure password if prompted.
-
Click >Setting>Pan/Tilt/Zoom.

text_image
GENERAL DISPLAY RS332 PANTLT/200M ACCOUNT Config Backup DEFAULT LPGRADE Channel 4 Control Mode Serial Protocol PELTCP Address 1 Baseline 9636 Data Bits 8 Stop Bit 1 Parity None- Under Control Mode, select Serial. Configure the following settings for your PTZ camera.

NOTE
See the instruction manual for your PTZ camera for details on how to find the information below.
- Protocol: Select the camera's PTZ protocol (for example, Pelco P).
- Address: Enter your PTZ camera's address.
• Baud Rate: Enter the baud rate for your PTZ camera. - Data Bits: Enter your PTZ camera's data bit setting.
- Stop Bit: Enter your PTZ camera's stop bit setting.
-
Parity: Enter your PTZ camera's parity setting.
-
Click OK. You can now control your PTZ camera using the system.
21.1 Controlling a PTZ Camera (Local DVR)
- In Live View, double-click the channel that has the PTZ camera connected to open in full-screen.
- Right-click and click Pan/Tilt/Zoom. Enter the system user name and password if prompted. The PTZ menu opens.
- Use the on-screen PTZ controls to control the camera.
PTZ Controls

text_image
SIT Speed 5 Zoom Focus Iris
text_image
Speed & Zoom Focus Ins → Speed & Zoom Zoom Focus Ins No 0Advanced PTZ controls overview:
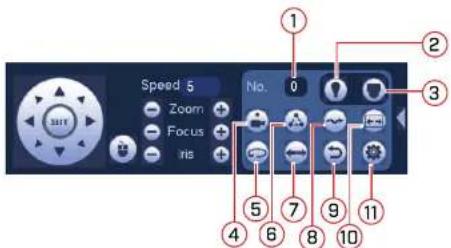
text_image
Speed 5 Zoom Focus Iris No. 1 2 3 4 5 6 7 8 9 10 11- No.: Select the number of the action you want to perform.
- Not supported.
- PTZ camera menu: Click to open the camera's OSD menu. This may not be supported on all camera models.
- Preset: Click to call the selected preset.
- Autopan: Click to start autopan. During autopan, the camera will continuously pan 360°.
- Tour: Click to run the selected tour.
- Flip: Click to flip the camera 180".
-
Pattern: Click to run the selected pattern.
-
Click the Preset tab.

text_image
PANTILT ZOOM Preset Tour Pattern Border Preset 1 Set Dot Preset- Enter the number of the preset you want to create under Preset.
- Move the camera to the desired position and click Set.
To go to a preset:
- Under No., select the number of the preset you would like to go to and click
21.2.2 Tours
Tours will cycle through a set of presets.
To create a tour:
- Click 📋 to open the aux menu.
- Click the Tour tab.

- Click the Pattern tab.
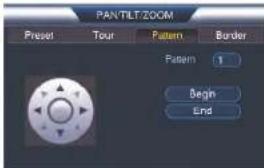
text_image
PANTILT:ZOOM Preset Tour Pattern Border Pattern 1 Begin End- Under Pattern, enter the pattern you would like to configure.
- Move the camera into the desired start position and click Begin.
- Move the camera into the desired end position and click End.
To run a pattern:
- Under No., select the number of the pattern you would like to go to and click
21.2.4 Auto Scan
An auto scan automatically cycles between a left and right point.
To create a new auto scan:
- Click 📄 to open the aux menu.
- Click the Border tab.

Connecting Cameras to the Local Area Network (LAN)
The M5100 Series (8-channel and 16-channel) can support IP camera channels, in addition to the MPX/analog channels it already has. The 8-channel system can accommodate 4 additional IP camera channels and the 16-channel system can accommodate 8 additional IP camera channels. Since the system does not have PoE (Power over Ethernet), the cameras must be connected to the same Local Area Network (LAN) as the system and powered by a separate PoE switch (not included) or power adapter (not included).
Follow the steps below to enable IP cameras and add them over the network.

NOTE
The 4-channel system cannot accommodate additional IP camera channels. To connect an IP camera using the 4-channel system, enable an IP camera channel by selecting IP using the Cable Type menu. See 15.1.8 Selecting Cable Type, page 51.
Prerequisites
- Connect the IP cameras to the same LAN as the system.
• Power the IP cameras via a PoE switch or power adapter.
Enabling additional IP camera channels in the system:
- Right-click and select Main Menu.
-
Log in using the admin account (default User Name: admin and your new, secure password).
-
Click and then Cable Type.
-
Click the Add IP Cam button to add the additional IP camera channels.

text_image
CABLE TYPE Channel 1 2 3 4 5 6 7 Analog AJTC CVI AHD CVBS TVI IP ✓ ✓ ✓ ✓ ✓ ✓ ✓ ✓- Log in using the admin account (default User Name: admin and your new, secure password).
- Click Device Search. The system searches the network for compatible cameras.
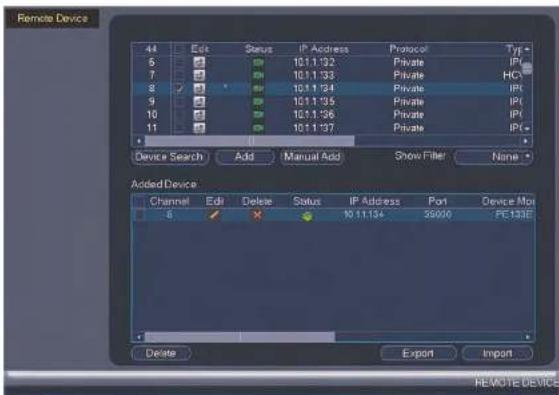
text_image
Remote Device 44 Edit Status IP Address Protocol Typ 6 10.1.192 Private IPI 7 10.1.193 Private HCI 8 10.1.194 Private IPI 9 10.1.195 Private IPI 10 10.1.196 Private IPI 11 10.1.197 Private IPI+ Device Search Add Manual Add Show Filter None Added Device Channel Edit Delete Status IP Address Port Device Max 6 10.1.194 29000 FCE3AE Delete Export Import REMOTE DEVICE- Check the camera(s) you would like to add.
- Click Add. The Status indicator turns green to show the camera is successfully connected.

M5100 Series Hard Drive Installation
The system comes with a pre-installed 3.5" SATA hard drive. You can replace the hard drive with one up to a maximum size of 8TB.
23.1 Installing a Hard Drive

CAUTION
Make sure that the system is OFF and the power adapter is disconnected before removing/installing the hard drive.
To install the hard drive:
- Insert hard drive screws (4x) on the hard drive and tighten them half way.
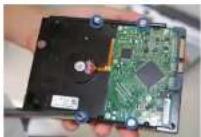
-
Power off the system, and unplug all cabling from the system.
-
Remove the rear panel screws (4x) and side panel screws (1x on each side). Remove the cover.


- Place the hard drive over the screw slots on the bottom of the system and then slide the hard drive into place. The SATA connectors on the hard drive should face the right side of the unit if looking at it from the rear.


- Connect the SATA power and data cable to the hard drive.
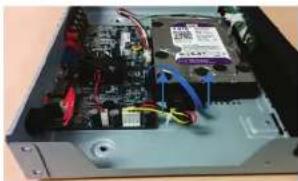
natural_image
Interior view of a computer drive bay showing internal components like CPU socket, RAM slots, and wiring (no visible text or labels)- Turn the system over carefully. Tighten the hard drive screws (4x) to secure the hard drive.
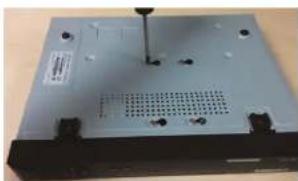
natural_image
Exterior view of a computer drive chassis (no visible text or labels)
CAUTION
Hold the hard drive in place when turning the system over to prevent damage to the system.
- Replace the cover and cover screws (6x).

NOTE
- Turn the system over and loosen the hard drive screws (4x), but do not remove them.
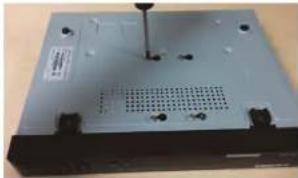
natural_image
Exterior view of a black electronic device casing with a perforated vent and mounting holes (no visible text or symbols)- Disconnect the SATA power and data cable from the hard drive.

natural_image
Interior view of a computer drive bay showing internal circuit board and cable (no visible text or labels)- Carefully turn the system over. Slide the hard drive and then lift it out of the system.

natural_image
Two-panel photo showing a device being processed into an open circuit board, with no visible text or symbols.- From the Main Menu, click X and then click Storage>HDD Manager.

text_image
SUPPORT HEDDAMLER MACHINE Current Name: 1 DATE: 1 Date: 01/23/08/16 Status: Normal Date: 01/23/08/16 OK Cancel Apply- Select the hard dive you would like to format and then click Format. Click OK to confirm
- Click OK to save changes. The system will restart to complete the formatting process.
Troubleshooting
When a malfunction occurs, it may not be serious and can be corrected easily. The following describes the most common problems and solutions. Please refer to the following before calling FLIR Technical Support:
| Error | Possible Causes Solutions | |
| System is not receiving power, or is not powering up. | Cable from power adapter is loose or is unplugged. | Confirm that all cables are connected correctly.Confirm that the power adapter is securely connected to the back of the unit |
| Power switch is set to OFF position. | Confirm that the power switch is in the ON position. | |
| Cables are connected, but system is not receiving sufficient power. | Confirm that the system is powered on (LED indicators on the front should be ON).If the unit is connected through a power bar or surge protector, try bypassing the bar and connecting the power directly to the wall outlet.Confirm that there is power at the outlet:Connect the power cable to another outlet.Test the outlet with another device (such as a lamp or phone charger). | |
| Hard drive is not detected by the system. | Hard drive cables are loose or not properly connected. | Remove the housing and check that hard drive cables are firmly connected. |
| There is no hard drive in the system. | Open the housing and install compatible hard drive. Make sure to format the drive after installation. For details see 23 |
Troubleshooting24
| Error Possible Causes Solutions | ||
| • Mouse not detected by system. | • Mouse cable is not firmly connected to the system.Mouse is not connected to the system. | • Firmly connect the mouse cable to one of the USB ports. |
| • System needs to be reset • Power off the system (disconnect power cable). Firmly connect a USB mouse to one of the USB ports. Reconnect the power cable to the DC 12V port on the rear panel. | ||
| • There is no picture on selected channels / camera picture is not being displayed. | • Camera cables are loose or have become disconnected. | • Check the camera video cable and connections.• Disconnect and reconnect the cable at the system and at the camera.• Try moving the camera to another channel or use another cable. |
| • The system beeps at startup. | • The beep at startup is normal. | |
| • The system beeps during motion detection. | • Motion detection is enabled and the alarm buzzer is activated. | • Open the Main Menu andclick Event>Motion-Motion Detect. Uncheck Buzzer for each channel and click Apply. |
| • I am not receiving email notifications. | • Email notification is disabled. | • Ensure you have configured email notification. For details, see 15.3.5 Configuring Email Alerts, page 65. |
| • Send Email setting not enabled in Event menu. | • Make sure that Send Email is enabled for any events you want to be notified of. | |
M5100 Series System Specifications
System
| Operating System Linux (embedded) | |
| Pontaplox Simultaneous view, record, playback, backup & remote monitoring | |
| Number of Channels 4/8/16 channel | |
Inputs/Outputs
| Video IN 4/8/16 x 1Vp-p, BNC | |
| BNC Video OUT No | |
| VGA OUT Yes | |
| HDMI Yes | |
| Audio IN | Audio IN 1 channel (RCA), supports 2-way talk |
| Audio OUT Audio OUT 1 channel (RCA), supports 2-way talk | |
| USB Port USB 2.0 x 2 (1 at the back, 1 at the front) | |
| Alarm IN None | |
| Alarm OUT | None |
| Video Output Resolution | 4 ch: 4MP8/16 ch: 4k |
| PTZ Control BNC-CVI + RS-485 Pelco D & P Protocol | |
Display
| Live Display 4 ch: 1, 4 | 8 ch: 1, 4, 816 ch: 1, 4, 8, 9, 16 |
| Live Display Speed 4 ch: 120 NTSC, 100 PAL | 8 ch: 240 NTSC, 200 PAL16 ch: 480 NTSC, 400 PAL |
| Recording Frame Rate (FPS) NTSC: | 4 ch: 48fps @ 4MP/3MP, 120fps @ 1080p/720p/960H8 ch: 120fps @ 4MP/3MP, 240fps @ 1080p/720p/960H16 ch: 240fps @ 4MP/3MP, 480fps @ 1080p/720p/960HPAL:4 ch: 48fps @ 4MP/3MP, 100fps @ 1080p/720p/960H8 ch: 120fps @ 4MP/3MP, 200fps @ 1080p/720p/960H16 ch: 240fps @ 4MP/3MP, 400fps @ 1080p/720p/960H |
| Recording Resolution Setting Per camera for different resolutions | |
| Recording Quality Control | 6 levels |
| Recording Schedule | By hour, by day, by recording mode, by motion,alarm, by channel |
| Pre Recording Max. 30 Seconds | |
| Post Recording Max. 5 Minutes / Min. 10 Seconds | |
| Reliability Watch-Dog, auto-recovery after power failure | |
| Covort Video Yes | |
Playback
| Playback Channel Single channel or quad playback | |
| Playback Speed Variable Max 4x | |
| Playback Players Backup Player | |
| Search By Time/Date, MD & Exact search (accurate to second) | |
Low Search Inc to 1,000 lines for motion detected continue
| System Configuration Full setup configuration over network | |
| Ports Programmable by User | |
| Network Protocol HTTP, IPv4/IPv6, TCP/IP, UPNP, RTSP, UDP, SMTP, NTP, DHCP, DNS, PPPOE, DDNS, FTP, IP Filte | |
| Network Interface 10/100-Base-TX, RJ-45 | |
| Network Speed Control 96Kb - 4096Kb/sec, per camera | |
General
| Power Consumption Approx. 10 watts (No HDD | Installed |
| Supply Voltage 4/8 ch: 100VAC-240VAC, 12VDC, 2A, 50/60Hz | 16 ch: 100VAC-240VAC, 12VDC, 3A, 50/60Hz |
| Unit Dimensions (W x D x H) 12.8 x 10 x 2.2" / 325 x 255 x 55mm | |
| Unit Weight | 3.3 lb / 1.5 kg (without HDD) |
| Operating Temperature 14° - 131° F / -10° - 55°C | |
| Humidity 10 ~ 90% RH | |
Recording Resolution (Pixels) & Speed (FPS - Frames per second)
| Model | FPS (NTSC/PAL) | 960H(960x480/960x576) | 720P1280x720 | 1080P1920x1000 | 4MP |
| 4ch | Total 120/100 | 120/100 | 120/100 | 50/48 | |
| Per channel | 30/25 | 30/25 | 30/25 | 15/12 | |
| 8ch | Total 240/200 | 240/200 | 240/200 | 120/96 | |
| Per channel | 30/25 | 30/25 | 30/25 | 15/12 | |
| 16ch | Total 480/400 | 480/400 | 480/400 | 240/192 | |
| Per channel | 30/25 | 30/25 | 30/25 | 15/12 |
As our products are subject to continuous improvement, FLIR Systems, Inc. and its subsidiaries reserve the right to modify product design, specifications, and prices without no-
Notices
This product has been certified and found to comply with the limits regulated by FCC, EMC, and LVD. Therefore, it is designated to provide reasonable protection against interference and will not cause interference with other appliance usage. However, it is imperative that the user follows the guidelines in this manual to avoid improper usage, which may result in damage to the product, electrical shock and fire hazard injury.
26.1 FCC/IC Notice
This equipment has been tested and found to comply with the limits for a Class B digital device, pursuant to Part 15 of the FCC Rules. These limits are designed to provide reasonable protection against harmful interference in a residential installation. This equipment generates, uses, and can radiate radio frequency energy and, if not installed and used in accordance with the instruction, may cause harmful interference to radio communications.
However, there is no guarantee that interference will not occur in a particular installation. If this equipment does cause harmful interference to radio or television reception (which can be determined by turning the equipment on and off), the user is encouraged to try to correct the interference by one or more of the following measures:
- Reorient or relocate the receiving antenna.
- Increase the separation between the equipment and receiver.
- Connect the equipment into an outlet on a circuit different from that to which the receiver is connected.
- Consult the dealer or an experienced radio or television technician for assistance.
26.2 Modification
Any changes or modifications not expressly approved by the grantee of this device could void the user's authority to operate the device.
This product is fully compliant with the European Union Restriction of the Use of Certain Hazardous Substances in Electrical and Electronic Equipment ("RoHS") Directive (2002/

Website
www.flirsecurity.com/pro
Technical Support
1-866-816-5919
Customer Service
1-866-344-4674
Copyright
© 2017. FLIR Systems, Inc.
All rights reserved worldwide. Names and marks appearing herein are either registered trademarks or trademarks of FLIR Systems and/or its subsidiaries. All other trademarks, trade names or company names referenced herein are used for identification only and are the property of their respective owners.
Legal disclaimer
Specifications subject to change without further notice. Camera models and accessories subject to regional market considerations. License procedures may apply. Products described herein may be subject to US Export Regulations. Please refer to exportquestions@fiir.com with any questions.