VLD1A - Security Camera Speco Technologies - Free user manual and instructions
Find the device manual for free VLD1A Speco Technologies in PDF.

User questions about VLD1A Speco Technologies
0 question about this device. Answer the ones you know or ask your own.
Ask a new question about this device
Download the instructions for your Security Camera in PDF format for free! Find your manual VLD1A - Speco Technologies and take your electronic device back in hand. On this page are published all the documents necessary for the use of your device. VLD1A by Speco Technologies.
USER MANUAL VLD1A Speco Technologies
Thank you for purchasing our All in One camera!
This user's manual is designed to be a reference tool for your system.
Please read the following safeguard and warnings carefully before you use this product!
Please keep this user manual for future reference!
Important Safeguards and Warnings
1. Electrical safety
All installaon and operaon here should conform to your local electrical safety codes.
Please check if the power supply is correct before operang the device.
The power shall conform to the requirement in the SELV (Safety Extra Low Voltage) and the Limited power source is rated DC 12V or AC24V in the IEC60950-1. (Power supply requirement is subject to the device label).
Please install easy-to-use device for power o before installing wiring, which is for emergent power o when necessary.
Please prevent the line cord from being trampled or pressed, especially the plug, power socket and the juncon from the device.
Note: Do not connect these two power supplying sources to the device at the same me; it may result in device damage!
We assume no liability or responsibility for all the res or electrical shock caused by
Please do not allow water and other liquid falling into the camera in case that the internal components are damaged.
Please do not allow rain or damp to the indoor device in case re or lightning may occur.
Please keep the sound venlaon in case of heat accumulaon.
Please pack the device with standard factory packaging or material with same quality when transporng the device.
Heavy stress, violent vibraon or water splash are not allowed during transportaon, storage and installaon.
3. Operaon and Daily Maintenance
Please do not touch the heat dissipacn component of the device directly in order to avoid scald.
Please do not dismantle the device; there is no component which can be xed by users themselves in the machine. It may cause water leakage or bad image for the device due to unprofessional dismantling.
It is recommended to use the device with thunder proof device in order to improve thunder proof eect.
The grounding holes of the product are recommended to be grounded to further enhance the reliability of the camera.
Do not touch the CCD (CMOS) opc component directly. You can use the blower to clean the dust or dirt on the lens surface. Please use a dry cloth weed by alcohol to wipe away the dust gently if it is necessary to clean.
Warning
Please use the standard accessories and make sure the device is installed and xed by professional engineers.
Please prevent the device surface from the radiaon of laser beam when using laser beam device.
Please do not provide two or more power supply modes for the device, otherwise it may cause damage to the device.
Statement
Please refer to the actual product for more details; this manual is just for reference. The manual will be regularly updated according to the product update; the updated content will be added in the manual without prior announcement.
Please contact Speco Technologies if there are any problems when using the device. There may be deviation between the actual value of some data and the value provided in the manual due to the reasons such as the real environment is not stable and so on.
Speco Technologies is not liable for any loss caused by the operaon which is not followed by the manual.
1 General Introducon
1.1 Features
● High-performance CMOS image sensor, megapixel denion.
● Support HD video, control signal coaxial transmission.
● Support HDTVI/AHD/CVI/CVBS output.
● Support OSD menu adjustment parameters.
● Support smart IR funcon.
● Support DWDR funcon.
● Support High speed, long distance real-me transmission.
● Support DC12V power supplying.
● Support IP67 compliance.
● Support ICR switch to realize surveillance both in the dayme and at night.
● Support photosensor IR control funcon.
- It can be applied to the various scenes such as store, supermarket, coee shop, school, hotel, oce, restaurant, garden, parking lot and etc.
2 Device Framework
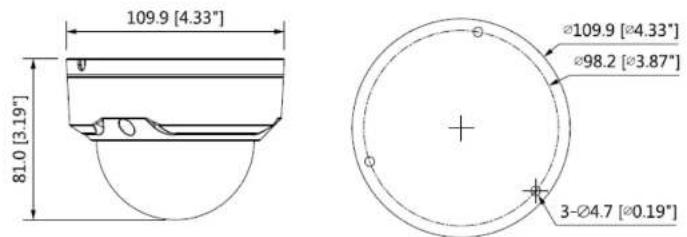
See Figure 2-1 for the dimension.
text_image
109.9 [4.33"] 81.0 [3.19"] Ø109.9 [Ø4.33"] Ø98.2 [Ø3.87"] 3-Ø4.7 [Ø0.19]Figure 2-1
See Figure 2-2 for the structure components.

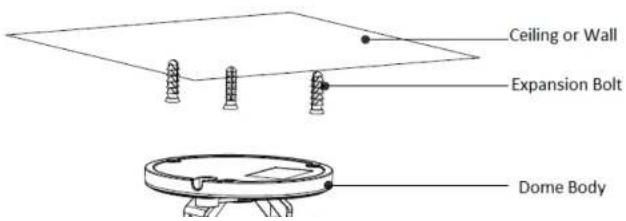
3 Installaon
Dome camera mainly uses ceiling installaon; installaon surface includes ceiling and wall.
Aenon:
- Please install the device in me aer it is taken apart, which is to avoid the camera module being exposed to damp environment for too long.
- Please make sure the installaon surface is thick enough to sustain at least 3X weight of the camera.
- For the installaon mode of side outlet, you have to pull the cable through the pedestal cable slot before locking the screws.
- Before you complete the installaon and debugging, do not remove the electrostac aracon Im on the transparent enclosure. Otherwise it may result in injury. Aer removing the electrostac aracon Im, don't touch the dome enclosure in case it may leave stain.
● The gures below are for reference only.
text_image
Ceiling or Wall Expansion Bolt Dome BodyStep 2
Conrm the installaon locaon and dig holes on the installaon surface.
Step 3
Use tools to put the expansion bolts into the installaon holes and x them rmly.
Step 4
Adjust the locaon of the device installaon pedestal; pull the cable through the hole on the installaon surface. Align the bolt xing holes of the device pedestal with the expansion bolt xing holes on the installaon surface; insert the self-tapping screws into the expansion bolts and fasten them rmly to x the pedestal on the installaon surface.
Step 5
Connect the video output port of the device cable to the back-end encoding device, and make the power port connect to power.
Step 6
Adjust lens angle to a proper monitoring loca on aer displaying image on the back-end encoding device (if it is model B, it can adjust focal length to make image clear via focusing tool). See Figure 3-2.

Note
- This manual is for reference only. Slight dierence may be found in the user interface.
- All the designs and soware here are subject to change without prior written noce.
- All trademarks and registered trademarks menoned are properes of their respective owners.
- Please visit our website at www.specotech.com for more informaon.