DS-MH4172I/4T - NAS Hikvision - Free user manual and instructions
Find the device manual for free DS-MH4172I/4T Hikvision in PDF.

User questions about DS-MH4172I/4T Hikvision
0 question about this device. Answer the ones you know or ask your own.
Ask a new question about this device
Download the instructions for your NAS in PDF format for free! Find your manual DS-MH4172I/4T - Hikvision and take your electronic device back in hand. On this page are published all the documents necessary for the use of your device. DS-MH4172I/4T by Hikvision.
USER MANUAL DS-MH4172I/4T Hikvision
text_image
HIKVISIONDesktop Body Camera Dock Station
TABLE OF CONTENTS
Chapter 1 Introduction....7
1.1 Introduction ......7
1.2 Key Features ....7
1.3 Packing List....7
Chapter 2 Panels Description....8
2.1 Top View....8
2.2 Dock Station Cradle 9
2.3 Front Panel 10
2.4 Rear Panel 11
Chapter 3 Basic Operation ....12
3.1 Start Up Dock Station 12
3.2 Activate Dock Station Software....12
3.3 Access Dock Station via Web Browser 13
Chapter 4 Department and Officer Management ....15
4.1 Add Department....15
4.2 Police Officer Management....15
Chapter 5 Data Collection....17
5.1 Set Data Saving Path....17
5.1.1 For Dock Station Software User 17
5.1.2 For User Accesses Dock Station via Web Browser 17
5.2 Configure Collection Format....18
5.2.1 For Dock Station Software User 18
5.2.2 For User Accesses Dock Station via Web Browser 19
5.2 Collect Data 10
Desktop Body Camera Dock Station User Manual
9.2.2 Edit via Web Browser 26
9.3 Edit Web Accessing Password via Web Browser 26
User Manual
COPYRIGHT © 2017 Hangzhou Hikvision Digital Technology Co., Ltd.
ALL RIGHTS RESERVED.
Any and all information, including, among others, wordings, pictures, graphs are the properties of Hangzhou Hikvision Digital Technology Co., Ltd. or its subsidiaries (hereinafter referred to be "Hikvision"). This user manual (hereinafter referred to be "the Manual") cannot be reproduced, changed, translated, or distributed, partially or wholly, by any means, without the prior written permission of Hikvision. Unless otherwise stipulated, Hikvision does not make any warranties, guarantees or representations, express or implied, regarding to the Manual.
About this Manual
This Manual is applicable to Desktop Body Camera Dock Station.
The Manual includes instructions for using and managing the product. Pictures, charts, images and all other information hereinafter are for description and explanation only. The information contained in the Manual is subject to change, without notice, due to firmware updates or other reasons. Please find the latest version in the company website
(http://overseas.hikvision.com/en/)
Please use this user manual under the guidance of professionals.
Trademarks Acknowledgement
HIKVISION and other Hikvision's trademarks and logos are the properties of Hikvision in various jurisdictions. Other trademarks and logos mentioned below are the properties of their respective owners.
Legal Disclaimer
TO THE MAXIMUM EXTENT PERMITTED BY APPLICABLE LAW, THE PRODUCT DESCRIBED, WITH ITS HARDWARE, SOFTWARE AND FIRMWARE, IS PROVIDED "AS IS", WITH ALL FAULTS AND ERRORS, AND HIKVISION MAKES NO WARRANTIES, EXPRESS OR IMPLIED, INCLUDING WITHOUT LIMITATION, MERCHANTABILITY, SATISFACTORY QUALITY, FITNESS FOR A PARTICULAR PURPOSE, AND NON INFRINGEMENT OF THIRD PARTY. IN NO EVENT WILL HIKVISION ITS DIRECTORS OFFICERS
Regulatory Information
FCC Information
Please take attention that changes or modification not expressly approved by the party responsible for compliance could void the user's authority to operate the equipment.
FCC compliance: This equipment has been tested and found to comply with the limits for a Class A digital device, pursuant to part 15 of the FCC Rules. These limits are designed to provide reasonable protection against harmful interference when the equipment is operated in a commercial environment. This equipment generates, uses, and can radiate radio frequency energy and, if not installed and used in accordance with the instruction manual, may cause harmful interference to radio communications. Operation of this equipment in a residential area is likely to cause harmful interference in which case the user will be required to correct the interference at his own expense.
FCC Conditions
This device complies with part 15 of the FCC Rules. Operation is subject to the following two conditions:
- This device may not cause harmful interference.
- This device must accept any interference received, including interference that may cause undesired operation.
EU Conformity Statement

This product and - if applicable - the supplied accessories too are marked with "CE" and comply therefore with the applicable harmonized European standards listed under the
EMC Directive 2014/30/EU, the LVD Directive 2014/35/EU, the RoHS Directive 2011/65/EU
Applicable Models
This manual is applicable to DS-MH4172I.
Symbol Conventions
The symbols that may be found in this document are defined as follows.
| Symbol | Description |
| (DHYA)NOTE | Provides additional information to emphasize or supplement important points of the main text. |
| (727C)WARNING | Indicates a potentially hazardous situation, which if not avoided, could result in equipment damage, data loss, performance degradation, or unexpected results. |
| (8T43)DANGER | Indicates a hazard with a high level of risk, which if not avoided, will result in death or serious injury. |
Safety Instructions
- Proper configuration of all passwords and other security settings is the responsibility of the installer and/or end-user.
- In the use of the product, you must be in strict compliance with the electrical safety regulations of the nation and region. Please refer to technical specifications for detailed information.
- Input voltage should meet both the SELV (Safety Extra Low Voltage) and the Limited Power Source with 100 to 240 VAC according to the IEC60950-1 standard. Please refer to technical specifications for detailed information.
- Please make sure that the plug is firmly connected to the power socket.
- If smoke, odor or noise rise from the device, turn off the power at once and unplug the power cable, and then please contact the service center.
Preventive and Cautionary Tips
Before connecting and operating your device, please be advised of the following tips:
- Ensure unit is installed in a well-ventilated, dust-free environment.
- Unit is designed for indoor use only.
- Keep all liquids away from the device.
- Ensure environmental conditions meet factory specifications.
- Ensure unit is properly secured to a rack or shelf. Major shocks or jolts to the unit as a result of dropping it may cause damage to the sensitive electronics within the unit.
- Use the device in conjunction with an UPS if possible.
Chapter 1 Introduction
1.1 Introduction
Desktop body camera dock station (hereinafter referred to as the dock station) provides you a simplified way to access and back up law-enforcement data in Hikvision body camera.
1.2 Key Features
● Automatically copy data in connected body camera.
● Charge connected body camera.
● Simultaneously collect data for up to 8 body cameras. Collection priority is configurable.
- Save collected data in dock station HDD.
- Accessible via web browser.
1.3 Packing List
You are recommended to check the objects in the package. Please contact us if anything is damaged or lost.
Table 1-1 Packing List
| Item | Quantity |
| Deck station | 1 |
Chapter 2 Panels Description
2.1 Top View

natural_image
Eight identical line drawings of rectangular plastic or plastic enclosure units arranged in a 2x2 grid, each with circular holes and mounting brackets (no text or symbols)2.2 Dock Station Cradle
Purpose:
Cradle is designed to charge Hikvision body camera and collect data.

text_image
1 2 3Figure 2-2 Dock Station Cradle
Table 2-2 Description
| No. | Name | Description |
| 1 | Charge indicator | ● Solid red: Battery placed in cradle is being charged. ● Solid green: Battery placed in cradle is fully charged. |
| 2 | Power indicator | Solid green: Cradle power supply is connected. |
2.3 Front Panel

text_image
1 2 3 4 5Figure 2-3 Front Panel
Table 2-3 Front Panel Description
| No. | Name | Description |
| 1 | Power button | ● When device is off, press it to start up device.● When device is on, hold it for 3 seconds to shut down device. |
| 2 | Reset | Press it to reboot the device. |
| 3 | SATA | ● HDD indicator. |
2.4 Rear Panel
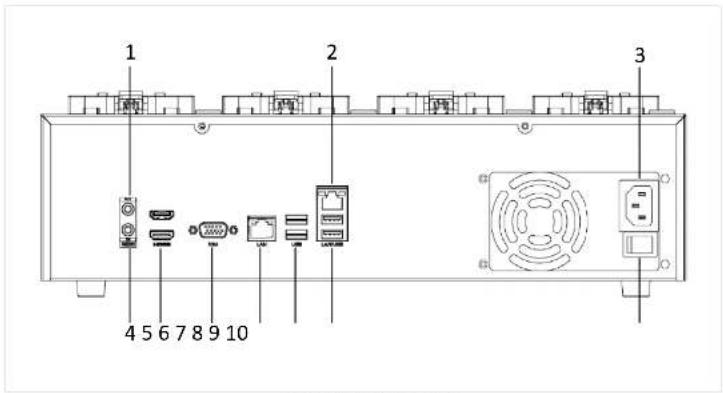
text_image
1 2 3 4 5 6 7 8 9 10Figure 2-4 Rear Panel
Table 2-4 Rear Panel Description
| No. | Name | Description |
| 1 | Audio output | Connector for audio output. |
| 2 | Network interface | 10M/100M/1000M Ethernet interface. |
| 3 | Power supply | Connector for power supply. |
Chapter 3 Basic Operation
3.1 Start Up Dock Station
Step 1 Connect a VGA/HDMI display.
Step 2 Plug in power supply into a power socket.
Step 3 Turn on power switch.
Step 4 Enter dock station power-on user name and password and press Enter.
● Default user name: Administrator
● Default password: 12345
i NOTE
The default password (12345) for the Admin account is for first-time log-in purposes only. You must change this default password to better protect against security risks, such as the unauthorized access by others to the product that may prevent the product from functioning properly and/or lead to other undesirable consequences.
For your privacy, we strongly recommend changing the password to something of your own choosing (using a minimum of 8 characters, including upper case letters, lower case letters, numbers, and special characters) in order to increase the security of your product.
Proper configuration of all passwords and other security settings is the responsibility of the installer and/or end-user.
Desktop Body Camera Dock Station User Manual

text_image
Enter Management Password Password: •••••••• Confirm Password: •••••••• 1 2 3 4 5 6 7 8 9 0 Close OKFigure 3-1 Set Password
3.3 Access Dock Station via Web Browser
Purpose:
You can manage dock station after accessing via web browser installed in dock station or in personal computer that in the same network segment with your dock station.
Step 1 Open web browser, enter the IP address of the dock station and press Enter
Desktop Body Camera Dock Station User Manual

text_image
User activation admin ...... ...... ActivationFigure 3-2 Set Admin Password
1) Set the password for the admin user account.
2) Click Activation.
- If the dock station is already activated, enter the user name and password in the login interface, and click Login.
Chapter 4 Department and Officer Management
Purpose:
After adding officer information, you can view officer information when collecting body camera data. Add department information first and then add police officer information.
4.1 Add Department
Step 1 Go to Department Management page in web browser.
Step 2 Click Add.
Step 3 Enter Department Name, Department No., and Remark.
Step 4 Optionally, select Parent Department if necessary.
Step 5 Click OK.

text_image
Add Department Information Department Name: Department01 Department No.: 1 Parent Department: Select department RemarksDesktop Body Camera Dock Station User Manual
Step 6 Click OK.
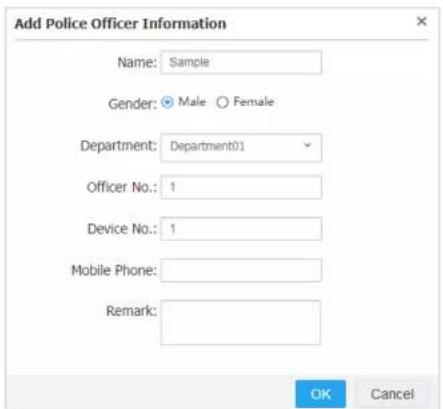
text_image
Add Police Officer Information Name: Sample Gender: Male Female Department: Department01 Officer No.: 1 Device No.: 1 Mobile Phone: Remark: OK CancelFigure 4-2 Add Police Officer Information
Chapter 5 Data Collection
5.1 Set Data Saving Path
5.1.1 For Dock Station Software User
Purpose:
Set the saving path for collected data and data clear strategy.
Step 1 Go to Settings > Disk in dock station software.
Step 2 Configure following parameters.
● Path: Select local disks for collected data.
- When Free Space Under and Clean Up: When the free space of selected local disks is smaller than the value of When Free Space Under, dock station will clear the earliest files to release a space which is specified in Clean Up.
- Delete Original Data: Delete the data in body camera after it has been collected by dock station.
Step 3 Click Save.

text_image
Path: D When Free Space Under: 10 G- Free Space and Min. Space to Clean Up: When the free space of selected local disks is smaller than the value of Free Space, dock station will clear the earliest files to release a space which is specified in Min. Space to Clean Up.
- Delete Original Data: Delete the data in body camera after it has been collected by dock station.
Step 2 Click Save.

text_image
Disk Management Configuration Root Saving Directory: C:\1 Free Space: 10 G Min. Space to Clear Up: 5 G Delete Original Data: ✓ Delete File in Camera After Upload SaveFigure 5-2 Disk
5.2 Configure Collection Format
5.2.1 For Dock Station Software User
Purpose:
Dock station will only collect the files of specified format. Follow the steps to view, modify, or
Desktop Body Camera Dock Station User Manual
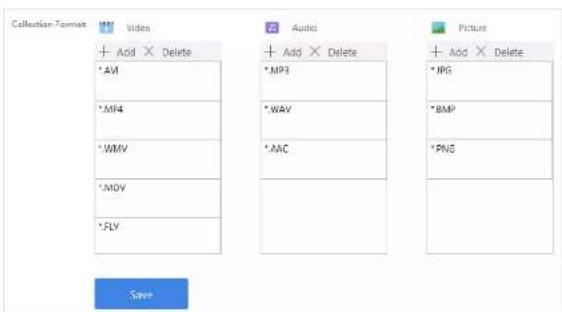
text_image
Collection Format Video + Add × Delete *AM *MP4 *WMV *MOV *SLY Audio + Add × Delete *MP3 *WAV *AAC Picture + Add × Delete *JPG *BMP *PNG SaveFigure 5-3 Collection Format
5.2.2 For User Accesses Dock Station via Web Browser
Step 1 Go to System Configuration > Dock Station Parameter.
Step 2 Add or delete format for video, audio, and picture.
Step 3 Click Save.
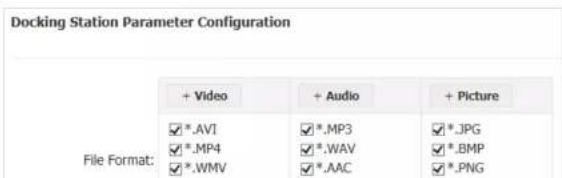
text_image
Docking Station Parameter Configuration File Format: + Video + Audio + Picture ✓*.AVI ✓*.MP3 ✓*.JPG ✓*.MP4 ✓*.WAV ✓*.BMP ✓*.WMV ✓*.AAC ✓*.PNGStep 3 Connect the body camera USB interface to a USB cable of dock station or a cradle. And then dock station will automatically collect data in the body camera.
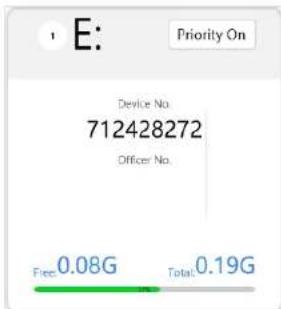
text_image
E: Priority On Device No. 712428272 Officer No. Free: 0.08G Total: 0.19GFigure 5-5 Body Camera Data Collection
- Priority on: Click it to set the data collection of the body camera as the first priority. Data collection of other body cameras will be stopped till the first priority data collection finished. The feature is only available for one body camera at a time. If no body camera has turned on the function, dock station will collect data from all body cameras simultaneously.
● Free: The capacity of uncollected data.
● Total: The total capacity of data to collect.
● Green bar: Show the collection progress.
Collected data will be saved in folder: Data saving disk > StationData folder> device No. folder.
Chapter 6 Maintenance
6.1 Exception
When network is abnormal or HDD capacity is insufficient, alarm message will appear and audible warning will be triggered.
- Alarm message: Pop up alarm message in lower-right corner. Alarm message appears after HDD capacity or network recovers to normal.
● Audible warning: Device will send out audible warning. You can turn off audible warning.
Refer to Logs tab for detailed alarm information.
6.2 Log Search
Purpose:
Operations of dock station software are recorded in the log. Search and view logs to get knowledge of dock station processes, information, etc.
Step 1 Go to Logs interface.
Step 2 Set search conditions, including Date and Event Type.
Step 3 Click Search.

Chapter 7 Collected Data Management
Purpose:
In Local Files tab, you can search and manage the successfully collected videos, audios, pictures, etc.
7.1 Search Data
Step 1 Go to Local Files interface.
Step 2 Set search conditions.
Step 3 Click Search.
7.2 Play Data
Step 1 Search data to play. For details, refer to 7.1 Search Data.
Step 2 Click of a file to play it.
7.3 Lock Data
Purpose:
You can lock collected data to prevent it from being deleted or modified.
Chapter 8 Data Backup
Purpose:
When dock station software is abnormal or is re-installed, you can restore database.
8.1 Auto Backup
Step 1 Go to Settings > Data.
Step 2 Enable Auto-back.
Step 3 Set Auto-back Interval.
Step 4 Enter Backup to Keep value.
Backup to Keep: The upper limit of number of database backup file. Once exceeds the number, the earliest database backup file will be replaced by the new one.
Step 5 Click Save. Go to installation root directory of dock station software > BodyCamaraStationBackup folder to view the database backup file.

text_image
Organize Include in library Share with Burn New folder Favorites Desktop Downloads Recent Places Libraries Documents Name Date modified Type Size backup_2017-11-06-19-39-56.sql 2017/11/0 19:40 SQL File 7 KB backup_2017-11-06-19-40-25.sql 2017/11/6 19:40 SQL File 7 KBStep 1 Go to Settings > Data.
Step 2 Click Restore Backup and select the database backup file to restore.
Restore Backup
2017/11/06 19:39:58
2017/11/06 19:40:26
Figure 8-2 Restore Backup
Chapter 9 Other Settings
9.1 Basic Settings
Step 1 Go to Settings > Basic.
Step 2 Configure parameters as needed.
● Station No.: Number of the dock station.
- Logo: Modify the logo shown in the top-left corner. The logo format must be PNG and logo pixel must be 60 × 42 .
● Station Name: Modify the name shown in the top-left corner.
● Launch at Startup: Run dock station software when dock station starts up.
Step 3 Click Save.
9.2 Edit Dock Station Software Password
Purpose:
Modify the password of docks station software.
9.2.1 Edit via Dock Station Software
Step 1 Go to Settings > Basic.
Step 2 Enter Current Password.
9.2.2 Edit via Web Browser
Step 1 Go to System Configuration > User Management > Management Password.
Step 2 Enter Current Password.
Step 3 Enter the same password in New Password and Confirm.
Step 4 Click Save.

text_image
User Configuration Management Password User Password Current Password: New Password: Confirm: SaveFigure 9-2 Management Password
9.3 Edit Web Accessing Password via Web Browser
Purpose:
Modify the web accessing password of dock station.

See Far, Go Further