ERCB90TS - Range hood Esatto - Free user manual and instructions
Find the device manual for free ERCB90TS Esatto in PDF.

User questions about ERCB90TS Esatto
0 question about this device. Answer the ones you know or ask your own.
Ask a new question about this device
Download the instructions for your Range hood in PDF format for free! Find your manual ERCB90TS - Esatto and take your electronic device back in hand. On this page are published all the documents necessary for the use of your device. ERCB90TS by Esatto.
USER MANUAL ERCB90TS Esatto
Everything you need for your 90cm Box Canopy Rangehood is in this User Manual
esatto
User Manual
2
Welcome
Residentla Group
Head Office
165 Barkly Avenue
Burnley, Victoria
Australia 3121
ACN
600 546 656
Online
residentia.group
www.esatto.house
@esotto.house
Postage
PO Box 5177
Burnley, Victoria
Australia 3121
Telephone
1300 114357
Congratulations on purchasing your new Rangehood. The Esatto brand is
proudly distributed within Australia by Residential Group Pty Ltd.
Please refer to the warranty cord at the rear of this manual for information
regarding your product's parts and labour warranty, or visit us online at:
www.residentia.group
At Residentia Group, we are customer obsessed and our Support Team are
there to ensure you get the most out of your appliance. Should you want to learn
more about your new rangehood, it's features or importantly taking care of the
appliance, our Support Team are here to help.
You can use our online Support Centre at anytime by visiting:
http://support.residentiagroup.com.au
Or you can contact us via phone by dialing: 1300 11 HELP (4357).
It is important that you read through the following use and care manual
thoroughly to familiarise yourself with the installation and operation
requirements of your appliance to ensure optimum performance.
Again, thank you for choosing an Esotto appliance and we look forward
to being of service to you.
Kind Regards,
The Residentia Team
esatto.house
esatto
Contents
| Page 2Welcome | Page 4Safety Instructions |
| Page 8Product Overview | Page 10InstallationInstructions |
| Page 13OperationInstructions | Page 14Maintenance& Cleaning |
| Page 16Troubleshooting | Page 18Your Receipt |
| Page 19Purchase Details | Page 20Warranty |
esatto
User Manual
4
Safety Instructions
IMPORTANT SAFETY INSTRUCTIONS READ CAREFULLY AND KEEP FOR FUTURE REFERENCE
Read this manual thoroughly before first use, even if you are familiar with this type of product. The safety precautions enclosed herein reduce the risk of fire, electric shock and injury when correctly adhered to. Make sure you understand all instructions and warnings.
Keep the manual in a safe place for future reference, along with the completed warranty card and purchase receipt. If you sell or transfer ownership of this product, pass on these instructions to the new owner.
Always follow basic safety precautions and accident prevention measures when using an electrical appliance. The following statements you will see in this booklet have these meanings:
WARNING: Indicating information concerning your personal safety.
CAUTION: Indicating information on how to avoid damaging the appliance or cabinetry.
IMPORTANT: Indicating tips and information about use of the appliance.
USAGE CONDITIONS AND RESTRICTIONS
- Domestic use only: This appliance is intended for indoor household use only. It is not intended for commercial, industrial or outdoor use. It is not intended for use in a recreational vehicle.
- Purpose: Do not use this appliance for anything other than its intended purpose. Other uses are not recommended and may cause fire, electric shock or personal injury.
- Attachments: The use of attachments is not recommended by the appliance manufacturer and distributor as they may be hazardous.
- Improper use: Damage due to improper use, or repairs made by unqualified personnel will void your warranty. We assume no liability for any eventual damages caused by misuse of the product or noncompliance with these instructions.
BEFORE USING YOUR APPLIANCE
This manual explains the proper use of your new Esatto rangehood. Please read this manual carefully before using the product. This manual should be kept in a safe place for handy reference. This rangehood is a domestic appliance which has been manufactured and tested to comply with Australian and New Zealand Standard AS/NZS 60335.2.31.
This rangehood must only be installed in accordance with the instructions provided. Incorrect installation may cause harm to persons, damage property and void the product's warranty.
Read the following carefully to avoid damage or injury.
IMPORTANT: Check for any damage or marks. If you find the appliance is damaged or marked, you must report it within 7 days if you wish to claim for damage/ marks under the manufacturer's warranty. This does not affect your statutory rights.
WARNING: Follow these instructions carefully to avoid injury, electric shock or fire.
- Young children should be supervised to ensure they do not play with the rangehood.
- This appliance is not intended for use by persons (including children) with reduced physical, sensory or mental capabilities, or lack of experience and knowledge, unless they have been given supervision or instruction concerning the use of the appliance by a person responsible for their safety.
- Ensure the rangehood is switched off before carrying out maintenance, to avoid any possibility of electric shock.
- Do not flambé under the rangehood.
- This rangehood is not suitable for use
over barbecues.
- This rangehood cannot be installed for external
use—only to be installed indoors.
• The rangehood and filters must be cleaned
- The exhaust from the rangehood must not be discharged into any heating flue, which may carry combustion products from other sources. (Figure 1)
- Exhaust air must not be discharged into a wall cavity, unless the cavity is designed for the purpose.
- There shall be adequate ventilation of the room when the rangehood is used at the same time as appliances burning gas or other fuels (not applicable that only discharge the air back into the room).
- Regulations concerning the discharge of air have to be fulfilled.
- There must be adequate ventilation of the room when the rangehood is used at the same time as appliances burning gas or other fuels.
- Your new rangehood is guaranteed against electrical or mechanical defects, subject to certain exclusions that are noted in the Warranty Terms and Conditions (at the rear of this user

natural_image
Simple line drawing of a kitchen appliance with a tray, counter, and control panel (no text or symbols)Figure 1

Figure 2
esatto
User Manual
6
Safety Instructions (Continued)
ELECTRICAL CONNECTION
- Check that the mains voltage matches with the voltage on the data plate inside the rangebond
- Check that the installation complies with
standards of local building, gas and electrical authorities.
- Before connecting to the mains supply ensure that the mains voltage corresponds to the
voltage on the rating plate inside the rangehood.
- Only plug this unit into a properly earthed outlet. If in doubt seek advise from a suitably qualified person or service agent.
WARNING: If the supply cord is damaged, it must be replaced by the manufacturer or its service agent or similarly qualified person in order to avoid a hazard.
WARNING: All electrical work must be done in accordance with local and national electrical codes as applicable and should be undertaken by licenced and qualified persons only. Failure to follow these instructions can result in death, fire or electrical shock.
SAFETY WARNINGS: FOR THE INSTALLER
When installing the rangehood, make sure you adhere to the minimum and maximum distances from the rangehood base to the cooktop surface (as per table on page 10).
Exhaust flue installation:
The following rules must be strictly followed to
obtain optimal air extraction.
- Keep exhaust flue short and straight.
- Do not reduce the size or restrict exhaust flue.
- Keep bends in the exhaust flue to a minimum; the more bends the lower the extraction performance.
- When using flexible flue always install duct with helix pulled tout to minimise pressure loss.
- Failure to observe these basic instructions will drastically reduce the performance and increase the noise levels of the rangehood.
Exhaust air must not be discharged into a wall cavity, unless the cavity is designed for that purpose. The exhaust from the rangehood must not be discharged into any heating flue, which may carry combustion products from other sources.
NOTE: Some installations may require the expandable/telescopic ducting to be cut to length. Cut with sharp tin snips or a fine-tooth hack saw blade, taking care not to distort or dent the exhaust cover. Where using expandable ducting, it's important to have the ducting fully taught to maximise efficiency of the airflow.
UNPACKING
During transportation, protective packaging was used to protect the appliance against any damage. After unpacking, please dispose of all elements of packaging in a way that will not cause damage to the environment.
All materials used for packaging the appliance are environmentally friendly; they are 100% recyclable and are marked with the appropriate symbol.
CAUTION: During unpacking, the packaging materials (polythene bags, polystyrene pieces, etc.) should be kept out of reach of children.
DISPOSAL OF THE APPLIANCE
Old appliances should not simply be disposed of with normal household waste and should be delivered to a collection and recycling centre for electric and electronic equipment. A symbol shown on the product, the instruction manual or the packaging shows that it is suitable for recycling.
Materials used inside the appliance are recyclable and are labelled with information concerning this. By recycling materials or other parts from used devices you are making a significant contribution to the protection of our environment.
Information on appropriate disposal centres for used devices can be provided by your local authority.
esatto
User Manual
8
Product Overview
YOUR RANGEHOOD
text_image
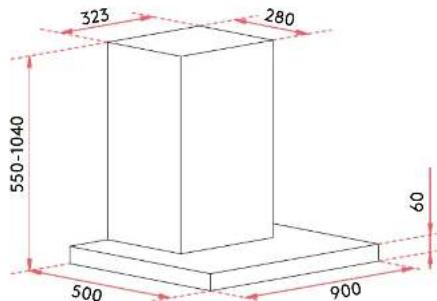
323 280 550-1040 60 500 900Figure 3
| Model/s ERCB90TS | |
| Product Dimensions (W, D, H): 900mm, 500mm, 550-1040mm | |
| Extraction: 750m | ^2 /hr |
| Weight (Net): 15.3kg | |
| Speed Settings: 3 | |
| Lighting: 2 × 1.5W LED | |
| Aluminium Filters 3 | |
| Power Supply: 220-240 Volts 50/60Hz | |
| Max Noise Rating: 72dB(A) | |
RANGEHOOD COMPONENTS
Your Esatto Box Canopy Rangehood is supplied with:
- 1× Rangehood
• 1 x Expandable 150mm pipe - 1 x One-way valve (2pcs)
- 1 × Packet of screws and wall plugs
- 2 × Flue pieces (upper and lower)
- 1 × Wall Bracket ("hook")
- 1 × Lower Chimney Bracket
• 1 × Outside Chimney bracket
• 1× User Manual
• 1× Quick Start Guide
ADDITIONAL ITEMS REQUIRED FOR INSTALLATION
- Duct tape or cable
- Ducting relevant to your installation requirements
(including any rigid bends, vents and/or adapters) - Drill and/or screwdriver
- Spirit Level
- Tape Measure
• Jigsaw
• Ladder
• Pencil
OPTIONAL ACCESSORIES
Residentia Group sell the following optional accessories, which can
be purchased separately by contacting our After Sales Support Team.
- Carbon Filter
- Various ducting solutions (rigid ducting, adapters, vents/outlets and elbow bends)
esatto
User Manual
10
Installation Instructions
WARNING: Before starting the installation, please refer to the Safety Information section.
- Always switch the power off prior to beginning the installation.
- Stainless steel is very easily damaged during installation.
- Wherever possible, protect the rangehood with the cardboard box or plastic.
- A power point must be located within 1.5m of the power cord exit from the rangehood, and it should be always accessible to allow isolation from power during cleaning or maintenance.
- A 150mm round ducting adapter is supplied,
- All ducting must comply with building codes and local requirements.
- If you are re-circulating the air, rather than ducting, please ensure that the side outlet grilles are not obstructed in any way as this will affect the efficiency of the rangehood.
- Ensure that the rangehood is mounted in a level position, both horizontally and vertically. This is essential to ensure the rangehood operates correctly and prevents grease build up at one end.
IMPORTANT: Never use a silicone around your rangehood or flue pieces. Never install the rangehood or flue pieces into the plaster ceiling which prevents easy access to the rangehood for servicing requirements.
IMPORTANT: Before installing your rangehood, please record the details of your rangehood's rating label (located within the rangehood, behind the aluminium grease filters) into the form on page 19. This will be helpful should you need to contact our service team in the future.
| COOKTOPFUEL TYPE: | DIMENSION A | |
| Minimum* | Maximum | |
| Gas (multiple burnswith maximum 45.4 MJ/htotal output and nosingle burner exceeding16.2 MJ/h output) | 600mm | 800mm |
| Gas (multiple burnswith total output greaterthan 45.4 MJ/h but lessthan 77.8 MJ/h, and nosingle burner exceeding17.3 MJ/h output) | 760mm | 800mm |
| Gas (single burner notexceeding 21.6 MJ/houtput) | 650mm | 800mm |
| Gas (single burner withan output greater than21.6 MJ/h but notexceeding 29.2 MJ/h) | 760mm | 800mm |
| Electric 600mm | 800mm | |
INSTALLATION PREPARATION
Before beginning the installation of your rangehood, the method of ducting should be considered. This rangehood cannot be operated in recirculation mode. We recommend to duct wherever possible.
Please follow the below tips on how to correctly duct your rangehood:
• Always use correctly sized ducting.
- Do not reduce the size of the ducting.
• Always use solid ducting
• Always use non-flammable ducting.
• Always duct to the outside atmosphere.
- Avoid use flexible ducting.
- Do not duct into the ceiling space.
Always vent to the outside atmosphere.
- Avoid sharp 90 degree bends as much as possible. Use 45 degree bends instead wherever possible.
WALL MOUNTING INSTALLATION
Prepare for installation
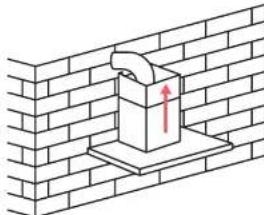
- If you have an outlet to the outside, your rangehood can be connected as below picture by means of an extraction duct (enamel, aluminum, flexible pipe or inflammable material with an interior diameter of 150mm)

natural_image
Diagram of a mechanical or electrical component with directional arrows indicating flow or movement (no text or symbols)- Before installation, ensure that turn the unit off and unplugged from the outlet.
- The rangehood should adhere to the minimum and maximum distances from the rangehood base to the cooktop surface (as per the Position the Rangehood section on page 10).
- Determine the position of the three holes on the wall.
- Drill the three holes in the wall with the 8 mm drill.
- Insert the three wall plugs.
- Attach the wall bracket to the wall plugs with the three ST4 × 30mm screws.
Safety holes
- Determine the position of the two safety holes on the wall.

- Drill the two safety holes in the wall with the 8 mm drill.
- Insert the two wall plugs.
- Lift up the rangehood and hang onto the wall bracket hook. Use the two ST4 x 30mm screws to secure it.

natural_image
Technical line drawing of a brick wall and support structure with no text or symbolsWall bracket Rangehood
- Fix the one-way valve to the air outlet of the rangehood. Then attached the exhaust pipe onto the one-way valve as shown below.


esatto
User Manual
12
Installation Instructions (Continued)
Installing the lower chimney bracket
13. Determine the position of the two chimney
bracket holes on the wall.
14. Drill the two holes into the wall using a 8 mm drill.
15. Insert the two wall plugs.
16. Attach the lower chimney bracket to the wall plugs using the two ST4 x 30mm screws.

text_image
Lower chimney bracket Well plugs Screws ST4×30mm- Attach the upper chimney into lower chimney, then hange the fixing hole to the upper chimney bracket's hooks, as shown below.
1B. Then pull out the upper chimney upwards, adjusting the height required.
natural_image
Diagram of a pipe outlet mounted on a brick wall, with an upward arrow indicating direction (no text or symbols)Installing the upper chimney bracket
- Determine the position of the two chimney bracket holes on the wall.
- Drill the two holes into the wall using a 8 mm drill.
- Insert the two wall plugs.
- Attach the upper chimney bracket to the wall plugs using the two ST4 × 30mm screws.
- Assembly the chimney onto the unit and fit with two ST4 × 8mm screws shown below.
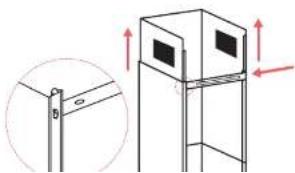
natural_image
Technical line drawing of a cabinet with an inset showing a vertical support structure (no text or symbols)
text_image
Upper chimney Screws bracketWall plug@14x30mmOperation Instructions
CAUTION:
- Do not touch the light for 30 minutes after using the appliance as it can be hot.
- Do not cover the globe with thermal insulation or other materials.
CONTROL PANEL

14235


1. Power Button
Press this button to turn off the fan.
2. Low Fan Speed Button
Press this button to extracting at the lowest speed. It is suitable for simmering and cooking without much steam.
3. Medium Fan Speed Button
Press this button to extracting at a medium speed. It is suitable for regular cooking.
4. High Fan Speed Button
Press this button to extracting at the highest speed. Use this fan speed for heavy smoke or steam to achieve the maximum exhaust efficiency.
5. Light Button
Press this button to turn the light on and off.
esatto
User Manual
14
Maintenance & Cleaning
PRIOR TO CLEANING YOUR RANGEHOOD
WARNING!
- Be sure to turn off the appliance and remove the plug before any maintenance is perform.
• Always let the appliance and its components cool down before cleaning them.
- Do not use abrasive wipes, chemicals or alcohol as these could damage the surface.
- Do not clean any Electrical/Electronic parts.
- Do not use any acid or corrosive detergents.
- Do not use any abrasive detergents or any alkaline dishwasher detergents!
- Maintenance and inspection should be undertaken on a frequent basis.
If there is any visible damage, a strong odour or excessive overheating of components,
stop using the appliance.
- Clean the appliance in accordance with instructions. Failure to do so may result in a risk of fire.
RISK OF ELECTRIC SHOCK!
- Do not use a steam cleaner.
CLEANING OF THE RANGEHOOD
| TASK FREQUENCY | |
| Clean the stainless surface with a soft cloth and lukewarm water. A cleaning fluid suitable for stainless steel may be used.NOTE: To prevent any crisis-cross scratches, ensure that you wipe along the grain of the stainless steel. | Weekly |
| Clean the control panel with a soft cloth and warm water.Ensure that the cloth is clean and is not too wet. Use a dry soft cloth to remove any excess moisture. | Weekly |
| Cleaning the mesh filters Monthly | (See Cleaning the mesh filters for more details) |
| Cleaning the active carbon filter Every 3 to 6 months | (See Installing and replacing the carbon filter for more details) |
CLEANING THE MESH FILTERS
- Remove a mesh filter.
Cleaning option #1: Cleaning Manually (max 30°C)
- Soak the filter for about 3 minutes in water with a mild non-corrosive grease-removing detergent.
- Wash the filter separately from crackery and kitchen utensils.
- Brush the filter gently with a soft brush.
NOTE: Do not apply too much pressure to avoid damaging the filter
• Over time, fading and discolouration may happen.
This is normal and is not considered a warranty issue.
- Cleaning option #2: Cleaning using the dishwasher (max 30°C)
- Place the hiter in the dishwasher and run a program with a mild non-corrosive grease-removing
detergent. NOTE: It is advisable not to use rinse aids.
- Wash the filter separately from crockery and kitchen utensils.
- Brush the filter gently with a soft brush.
NOTE: Do not apply too much pressure to avoid damaging the filter
• Over time, fading and discolouration may happen.
This is normal and is not considered a warranty issue. - Leave the filter to dry naturally out of direct sunlight.
- Put the filter back in its correct position.
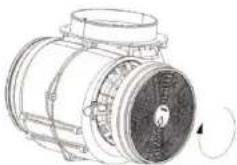
INSTALLING AND REPLACING THE CARBON FILTER
The carbon filter is an optional spare part available to purchase by contacting our After Sales Support Team.
Do not clean or wash the carbon filters. If a carbon filter
is used, we recommend replacing the carbon filter every
3 to 6 months.
To install and replace the carbon filter:
1. Disconnect the power supply from the wall socket.
2. Remove the mesh filter.
3. Install or replace the active carbon filters
(refer to the image on the right)
4. Place the mesh filter back into position
5. Reconnect power supply to the wall socket.
REPLACING THE LIGHT GLOBE
WARNING! Only a qualified electrician or service agent may replace the globe.
- Unplug all power connections before opening the appliance.
• RISK OF BURNING! Always let the globe cool down before replacing it.
• Always use gloves or a cloth to avoid direct contact with your hands.

esatto
User Manual
16
Troubleshooting
OPERATION IN CASE OF EMERGENCY
In the event of an emergency you should:
- Switch off all rangehood controls.
- Switch the rangehood off at the power outlet and immediately unplug.
• Call After Sales Support on 1300 11 4367 or email support@residentiagroup.com.au
Some minor faults can be fixed by referring to the instructions given in the table below.
IMPORTANT: If your appliance appears to be operating incorrectly, then you should disconnect it
from your electrical supply and then contact After Sales Support.
WARNING: Do not attempt to repair the rangehood yourself.
Please note that if an engineer is asked to attend whilst the product is under warranty and finds that the problem is not the result of an appliance fault, then you may be liable for the cost of the call out charge.
The appliance must be accessible for the engineer to perform any necessary repair. If your appliance is installed in such a way that an engineer is concerned that damage will be caused to the appliance or your kitchen, then they will not complete a repair. This includes situations where the rangehood has been tiled in or sealed in with a sealant.
Please refer to the conditions of that appear on the warranty card at the rear of this user manual.
| FAULT COMMON CAUSE COMMON SOLUTIONS | ||
| The lights can be turned on,however the motor does notwork | Fan switch is broken Call After Sales Support for further guidance. | |
| The motor is broken | ||
| Both the light and motor donot work | The fuse is broken Reset or replace the fuse. | |
| The power supply cord is looseor disconnected | Reconnect the power supply to thewall socket. | |
| Oil is leaking The one-way-valve | and exhaustpipe are not tightly seal | Disassemble the one-way-valve andseal with a sealant. |
| There is a leakage betweensection and cover | Disassemble the section and sealwith sealant. | |
| The light is not working The light | globes are damagedor blown | The globes need replacing.Refer to Replacing the light globe. |
| The is insufficient suctionpower or air is not extractadequately. | The distance between therangehood and the cooktop istoo great. | Have your installer re-adjust theinstallation position, ensuring thatthe minimum distances are observedas per the building code and relevantstandards. |
| Ducting is loose, kinked, toolong or too many bends. | Check that your rangehood has beenducted correctly and in accordancewith the installation instructions. | |
| The rangehood is no longer ina horizontal position | The screws or not tight enough Tighten the screws and level therangehood in a horizontal position. | |
| The rangehood is vibratingagainst the wall or cupboard | The rangehood undermount isnot fixed correctly. | Tighten the internal safety screws. |
esatto
User Manual
18
Attach your receipt to this page

Purchase Details
For your records, please record details of your purchase below and staple
your receipt on the opposite page. Your serial number can be found on the rear of your Rangelood.
STORE DETAILS
STORE NAME
ADDRESS
TELEPHONE
PURCHASE DATE
PRODUCT DETAILS
MODEL NO.
SERIAL NO.*
esatto
User Manual
20
Warranty
WARRANTY TERMS AND CONDITIONS RANGEHOODS
This document sets out the terms and conditions of the product warranties for Residential Group Appliances. It is an important document. Please keep it with your proof of purchase documents in a safe place for future reference should you require service for your Appliance.
1. IN THIS WARRANTY
(a) 'acceptable quality' as referred to in clause 10 of this warranty has the same meaning referred to the ACL:
(b) 'ACL' means Trade Practices Amendment (Australian Consumer Law) Act (No.2) 2010;
(c) 'Appliance' means any Residential Group product purchased by you accompanied by this document
(d) 'ASR' means Residentia Group authorised service representative;
(e) 'Residentia Group' means Residentia Group Pty Ltd of 165 Barkly Ave, Burnley VIC 3121, ACN 600 546 656 in respect of Appliances purchased in Australia:
(1) 'major failure' as referred to in clause 10 of this warranty has the same meaning referred to in the ACL and includes a situation when an Appliance cannot be repaired or it is uneconomic for Residential Group, at its discretion, to repair an Appliance during the Warranty Period;
(g) 'Warranty Period' means:
(i) where the Appliance is used for personal, domestic or household use (i.e. normal single family use) as set out in the instruction manual, the Appliance is warranted against manufacturing defects for 24 months, following the date of original purchase of the Appliance:
(h) 'you' means the purchaser of the Appliance not having purchased the Appliance for re-sale, and 'your' has a corresponding meaning.
-
This warranty only applies to Appliances purchased and used in Australia and is in addition to (and does not exclude, restrict, or modify in any way) any non-excludable statutory warranties in Australia.
-
During the Warranty Period Residential Group or its ASR will, at no extra charge if your Appliance is readily accessible for service, without special equipment and subject to these terms and conditions, repair or replace any parts which it considers to be defective. Residential Group or its ASR may use remanufactured parts to repair your Appliance. You agree that any replaced Appliances or parts become the property of Residential Group. This warranty does not apply to light globes, batteries, filters, seals or similar perishable parts.
-
Parts and Appliances not supplied by Residentia
-
You will bear the cost of transportation, travel and delivery of the Appliance to and from Residential Group or its ASR. If you reside outside of the service area, you will bear the cost of:
(a) travel of an authorised representative; (b) transportation and delivery of the Appliance to and from Residential Group or its ASR, in all instances, unless the Appliance is transported by Residential Group or its ASR, the Appliance is transported at the owner's cost and risk while in transit to and from Residential Group or its ASR.
-
Proof of purchase is required before you can make a claim under this warranty.
-
You may not make a claim under this warranty unless the defect claimed is due to faulty or defective parts or workmanship. Residential Group is not liable in the following situations (which are not exhaustive):
(a) the Appliance is damaged by: (i) accident
(ii) misuse or abuse, including failure to properly maintain or service
(iii) normal wear and tear (iv) power surges, electrical storm damage or incorrect power supply
(v) incomplete or improper installation (vi) incorrect, improper or inappropriate operation (vii) insect or vormin infestation
(viii) failure to comply with any additional instructions supplied with the Appliance; (b) the Appliance is modified without authority from Residentia Group in writing; (c) the Appliance's serial number or warranty seal has been removed or defaced;
(d) the Appliance was serviced or repaired by anyone other than Residentia Group, an authorised repairer or ASR.
-
This warranty, the contract to which it relates and the relationship between you and Residentia Group are governed by the law applicable where the Appliance was purchased.
-
To the extent permitted by law, Residentia Group excludes all warranties and liabilities (other than as contained in this document) including liability for any loss or damage whether direct or indirect arising from
-
For Appliances and services provided by Residential Group in Australia, the Appliances come with a guarantee by Residential Group that cannot be excluded under the Australian Consumer Law. You are entitled to a replacement or refund for a major failure and for compensation for any other reasonably foreseeable loss or damage. You are also entitled to have the Appliance repaired or replaced if the Appliance fails to be of acceptable quality and the failure does not amount to a major failure. The benefits to you given by this warranty are in addition to your other rights and remedies under a law in relation to the Appliances or services to which the warranty relates.
-
At all times during the Warranty Period, Residential Group shall, at its discretion, determine whether repair, replacement or refund will apply if an Appliance has a valid warranty claim applicable to it.
-
Missing parts are not covered by warranty. Residential Group reserves the right to assess each request for missing parts in a case by case basis. Any parts that are not reported missing in the first week after purchase will not provide free of charge.
-
To enquire about claiming under this warranty, please follow these steps:
(a) carefully check the operating instructions, user manual and the terms of this warranty;
(b) have the model and serial number of the Appliance available:
(c) have the proof of purchase (e.g. an invoice) available; (d) telephone the numbers shown below.
- You accept that if you make a warranty claim, Residentia Group and its ASR may exchange information in relation to you to enable Residentia Group to meet its obligations under this warranty.
IMPORTANT Before calling for service, please ensure that the steps in point 1S have been followed.
CONTACT SERVICE → Service: 1300 11 HELP (4357)
esatto
User Manual
22
Warranty (NZ)
NEW ZEALAND WARRANTY TERMS & CONDITIONS RANGEHOOD APPLIANCES
To help care for your investment, be sure to register your appliance online. Registration will help you if you need to arrange service in the future, and serves as a record of your purchase—including critical information like model number and serial number—that you can refer to at any time. Simply visit the below website, or ask your retailer for help: www.esatto.house/nz/registration
WARRANTY
These products are covered by a warranty for a period of 24 months from the date of purchase, subject to the following conditions*. The warranty covers rectification free of charge of any fault arising from defective materials or components, or faulty workmanship or assembly.
* The conditions above mentioned are:
- That the purchaser carefully follows all instructions packed with the product;
- That the purchaser and/or installer carefully follows the installation instructions provided and complies with electrical wiring regulations, gas and/or plumbing codes;
- That the purchaser carefully follows instructions provided in the owner's handbook relating to the proper use and care of the product and does not use the product for any purpose other than the domestic use for which it has been designed;
- Commercial use of the product for professional or industrial purposes will void this warranty.;
- That the product was purchased and installed in New Zealand;
- That this warranty does not extend to:
a) optional glass lids for holes apart from claims which relate to mechanical or physical damage thereof at the date of purchase;
b) 'consumable' parts such as light bulbs or filters;
c) damage to ceramic glass caused by liquid or solid spill-overs, lack of maintenance, or impact;
d) damage to surface costings caused by cleaning or maintenance using products not recommended by the rawers handlessly.
a) defects caused by normal wear and tear, accident, negligence, alteration, misuse or incorrect installations;
f) a product dismantled, repaired or serviced by any serviceman other than an authorised service agent;
g) a product not in possession of the original purchaser;
h) damage caused by power outages or surges
i) damage caused by pests (eg. rats, cockroaches etc.)
7. That it the product is a freestanding microwave oven or small appliance it must be returned to the dealer/retailer for servicing. These products, unless stated otherwise, have a 12 month warranty from original date of purchase with 24 months on the microwave magnetron; Waste disposers have a 12 month warranty.
8. The provision of service under this warranty is limited by a 25km boundary from the retailer where the product was purchased except for microwaves. Such travelling outside of these limits will incur commercial cost to be paid by you, regulated by the number of kilometres travelled beyond the 25km limit (50km return trip). Microwaves are to be delivered to the nearest authorised service agent by the customer.
Please refer to your user manual for any further conditions that may apply to your specific model.
Nothing herein contained shall be construed in any way as excluding or limiting your rights under the Consumer Guarantees Acts 1993.
For Service please visit www.applico.co.nz/service or contact the dealer/retailer from whom you purchased the product from or call the 0800 number listed below. If you are unable to establish the date of purchase, or the fault is not covered by this warranty, or if the product is found to be in working order, you will be required to bear all service call charges.
Registration of this warranty constitutes acceptance of the terms and conditions of this warranty.
Should you require any assistance, please call Customer Services on 0800 765 448.
Distributed by Applico Ltd. www.applico.co.nz July 2019
After registering your appliance online, we recommend you will out the below information for your reference and keep
This page is intentionally blank.
But if you want to draw something, make notes or even write a recipe, it's all yours!
