9R84 - Watch SEIKO - Free user manual and instructions
Find the device manual for free 9R84 SEIKO in PDF.

User questions about 9R84 SEIKO
0 question about this device. Answer the ones you know or ask your own.
Ask a new question about this device
Download the instructions for your Watch in PDF format for free! Find your manual 9R84 - SEIKO and take your electronic device back in hand. On this page are published all the documents necessary for the use of your device. 9R84 by SEIKO.
USER MANUAL 9R84 SEIKO
SEIKO WATCH CORPORATION www.grand-seiko.com
JSYGS9R5-1901 Printed in Japan
CE
GS Grand Seiko
Spring Drive Operating Instructions
Thank you very much for choosing a Grand Seiko watch. For proper and safe use of your Grand Seiko watch, please read the instructions carefully in this booklet before using it.
Keep this manual handy for easy reference.
Length adjustment service for metallic bands is available at the retailer from whom the watch was purchased. If you cannot have your watch repaired by the retailer from whom the watch was purchased because you received the watch as a gift or you moved to a distant place, please contact Grand Selko International service network mentioned on CERTIFICATE OF GUARANTEE or our website. The service may also be available on a chargeable base at other retailers, however, some retailers may not undertake the service.
If your watch has a protective film for preventing scratches, make sure to peel it off before using the watch. If the watch is used with the film on it, dirt, sweat, dust, or moisture may be attached to the film and may cause rust.
CONTENTS
■INTRODUCTION - Spring Drive watch - 2
- History of Spring Drive Mechanism - Spring Drive Mechanism
- Differences between the Spring Drive and mechanical watch ......7
■HANDLING CAUTIONS (applicable to all models) 8
■ CHECK THE CALIBER NUMBER AND WATER-RESISTANT LEVEL----9
■ CAUTIONS ON WATER RESISTANCE....10
- If water-resistant level of your watch is defined as "WATER RESISTANT"…10
- If water-resistant level of your watch is defined as "DIVER'S WATCH 200m"
or "AIR DIVER'S 200m"
■ NAMES OF THE PARTS 13
■HOW TO USE 17
• Growth
- Power Reserve Indicator 19
For Cal. 08/1, 09:15, 09:65....20
Chromograph (For Col. 0708, 0709, 0710) 24
- For Cal 0P06 0P98 0P16 0P88 ...... 09
※ List of time zone differences in major regions of the world ...... 38
■ FUNCTIONS OF DIVER'S MODEL ......37
• Unidirectional rotating bezel 37
• Diver adjuster 38
■ TO PRESERVE THE QUALITY OF YOUR WATCH 39
- After-sale service 39
- Guarantee 40
• Daily care 41
* Hard
• Magnetic resistance (Magnetic Influence) 43
* Luminio
- Troubicshooting 45
■ SPECIFICATIONS (Movement) 46
■INTRODUCTION - Spring Drive watch -
Thank you for purchasing the Grand Seiko Spring Drive watch.
The Spring Drive is Seiko's unique mechanism in which the mainspring is wound by the natural motions of the user and accuracy is controlled by a microelectronics quartz mechanism while using the unwinding power of the mainspring to move the hands.
The Spring Drive powered by natural motions of the user can be called a watch that strongly combines and connects the user with the latest advancements in technology.
A mechanical watch of taste and refinement with an accuracy equivalent to a quartz watch, this sophisticated and innovative watch ticks in step with the pace of a person's life. This is a watch that creates a lifestyle for modern individuals who seek influence and convenience in their life. That is what the Grand Seiko Spring Drive watch is all about.
SEIKO WATCH CORPORATION
History of Spring Drive
Decades-long dream lives in the Grand Seiko
Grand Seiko's history symbolizes the culmination of efforts and development aiming for better practical watches. The Grand Seiko watch was born in 1960, reached the very top in the mechanical watch field around the world at the end of the 1960's. After a hiatus of dozen years or so, in 1993, the Grand Seiko 9F series equipped with world-class quartz movement was released. In 1998, the 9S series mechanical movement that combined traditional craftsmanship and advanced technology was developed to reintroduce the Grand Seiko mechanical caliber. While using the unwinding power of the mainspring as its sole power source, the new mechanism Spring Drive realizes an average monthly rate of ±15 seconds (For Cal. 9R96 9R16 and 9R15, ±10 seconds), substantially exceeding the accuracy of conventional mechanical watches. The watch also embodies the concepts of Grand Seiko that continues the challenge of creating the best practical watch.
1960 ● Releged the first Grand Seiko.
1964 ● Participated in the Neuchatel Observatory Competition in Switzerland for the first time.
1968 ● Released Japan's first automatic winding, 10-beat model, 61GS.
1968 ● Won the first prize in the mechanical wrist chronometer category of the Geneva Observatory Competition in Switzerland.
1978 ● Filed a patent for the Spring Drive mechanism for the first time.
1982 ● Filed a patent for the Spring Drive mechanism (registered). Sta initial development.
1988 ● Released the first Grand Seiko quartz caliber.
1993 ● Started the second development of the Spring Drive
● Released the Grand Seiko 9F series equipped with world-class quartz movement.
1997 ● Started the third development of the Spring Drive.
● Released technological announcement of the Spring Drive at the Swiss Society of Chronometry (SSO)
1998 ● Exhibited the Spring Drive at BASELWORLD.
- Released the Grand Seiko 9S series mechanical caliber combining traditional craftsmanship and advanced technology.
1999 ● Released the manual-winding Spring Drive (CAL.7H68) limited edition from SEIKO.
2000 ● Started the fourth development of the Spring Drive.
2002 ● Released the manual-winding Spring Drive (CAL/7R88) from CREDOR.
2004 ● Released the Grand Seiko automatic winding Spring Drive (CAL.9165).

Spring Drive Mechanism ① Spring Dr
Taste of a Mechanical Watch
[Non-Text]
High accuracy equivalent to a Quartz Watch
That is the concept of the Spring Drive.
Let's start from the drive method of a watch.
The method for driving a watch is divided into two types.
They are mechanical type and quartz type.
In a mechanical watch, the mainspring is wound and its unwinding
power moves the hands.
Amazing mechanism created by high quality workmanship,
and admiration goes to skilled craftsmen with passion.
You can feel the appreciation and personal touch of the craftsmen in
the ticking sound.
On the other hand, with quartz watches, the quartz is oscillated by a
battery and the hands are turned by a motor.
It is characterized by accuracy using state-of-the-art technology.
What is the Spring Drive like?
This is not a mechanical watch or a quartz watch.
In one word, this is a *mechanical watch having accuracy equivalent
to a quartz watch."
The Spring Drive is a self-contained drive system that realizes
accuracy equivalent to a quartz watch with only the power of the
mainspring and has no battery, motor, or secondary battery.
Accuracy of monthly rate of ±15 seconds (daily rate of ±1 second)
equivalent to a quartz watch is achieved while using a mainspring.
The Spring Drive is Seiko's proprietary mechanism which is made
available only by SEIKO's unique combination of skills in both
mechanical and electronic micro-engineering.
Then, how could it be possible to achieve such a degree of
accuracy?
That is explained on the next page.
※ For Cal. 9R96, 9R16 and 9R15, the average monthly rate is ±10
seconds
(equivalent to daily rate of ±0.5 second).
②
The power of the mainspring is regulated by electronic control. That is the essence of the Spring Drive.
What controls the accuracy of a mechanical watch is
the balance spring, a part of the speed-regulating unit, called the balance.
This part influences the accuracy to some extent
because it is made of metal which expands and contracts with charges in temperature.
The Spring Drive is
completely different from a mechanical watch in this speed-regulating unit.
The Spring Drive is powered by a mainspring.
but adopts an electronic speed-regulating unit comprising a generator, IC circuit, and crystal oscillator.
In a little more detail,
at the end of the train wheel that moves the hands, a series of speed increasing wheels with a glide wheel are provided.
The unwinding power of the mainspring rotates the glide wheel,
generating electricity in the coil to drive the crystal oscillator and IC.
The IC controls the spinning speed of the glide wheel by applying
and releasing the electromagnetic brake, while comparing the
accuracy of the electric signals generate
and the spinning speed of the glide wheel.
In addition, by making the energy transfer of the train wheel efficient
and adopting an IC that drives with low power consumption, power
reserve of more than 72 hours far exceeding normal mechanical
watches is realized.
An unprecedented drive system which offers quartz accuracy.
This is the Spring Drive.
Spring Drive Mechanism ③
Here is the step-by-step description of the Spring Drive in an easy-to-understand manner. This is how the Spring Drive works.

Mainspring
The mainspring is wound by rotation of the oscillating weight (or by turning of the crown), and its unwinding power is the sole power source.

Gear train • hands
The unwinding power of the mainspring is transmitted via the gear train to move the hands. No motor or battery is mounted.

Tri-synchro regulator
The unwinding power of the mainspring also rotates the glide wheel. This generates small electricity in the coil to drive the IC and crystal oscillator. At the same time, an electric magnetic field is generated on the glide wheel. The IC detects the spinning speed of the glide wheel based on the accuracy of the electric signals of the crystal oscillator, and adjusts the spinning speed of the glide wheel while applying and releasing the electromagnetic brake.
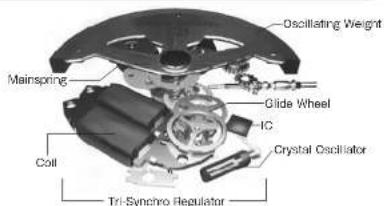
text_image
Oscillating Weight Mainspring Glide Wheel IC Crystal Oscillator Coll Tri-Synchro RegulatorDifferences between the Spring Drive and mechanical watch
For the Spring Drive, the mainspring is wound and the unwinding power of the mainspring moves the hands in the same manner as the mechanical watch. It differs from the mechanical watch only in the speed-regulating unit (mechanism for controlling accuracy).
Temperature change
Accuracy of mechanical watches depends on a balance spring attached to a part called the balance. This part has properties for expanding and contracting with temperature changes, and influences the accuracy of a watch. Accuracy of the Spring Drive is never largely influenced by temperature changes like that of mechanical watches since the crystal oscillator controls it. (Note) Accuracy of the Spring Drive
Average monthly rate of +15 seconds (equivalent to daily rate of +1 second) is the accuracy of a watch when it is worn on a wrist at a temperature range between 5°C and 35°C.
* For Cal. 9R35, 9R16 and 9R15, the average monthly rate is ± 10 seconds (equivalent to daily rate of ±0.5 second).
Difference in position
For mechanical watches, the accuracy is influenced even by a difference in position or direction of a watch. This is also caused by the balance that controls the accuracy of mechanical watches. Due to the difference in position, the area where the shaft of the balance contacts with other parts differs, and such differences in resistance influence the accuracy. As the Spring Drive adopts a crystal oscillator not a balance, the accuracy is not influenced by a difference in position.
Impact
Mechanical watches are susceptible to impacts. If a mechanical watch was subject to impact, amplitude of vibration of the balance (angle for which the balance rotates right and left) is changed, and even the form of the balance spring is changed. In this regard, the Spring Drive is superior to mechanical watches in impact resistance because it adopts a crystal oscillator not a balance.
Overhaul
Parts that become worn or severely damaged are the balance, pallet fork, and escape wheel & pinion which are collectively called the speed-regulating unit or escapement. These parts come into contact or collide mutually and control unwinding of the mainspring. For the Spring Drive, wear and damage occur less than mechanical watches since the spinning speed of the glide wheel is adjusted by a "contact tree" (the motor) to be used in the car of a train is the same as mechanical watches, abrasion powder may be generated by contact of the wheels & pinions. An overhaul is recommended every three to four years.
■HANDLING CAUTIONS (applicable to all models)
WARNING
To indicate the risks of serious consequences such as severe
In focus unless the following safety regulations are strictly observed.
Immediately stop wearing the watch in the following cases.
○ If the watch body or band becomes edged by corrosion etc.
© In the pins protrude from the band.
% Immediately consult the retailer from whom the watch was purchased
or Grand Seiko international service network mentioned on CERTIFICATE OF GUARANTEE or our website.
Keep the watch and accessories out of the reach of babies and children.
Care should be taken to prevent a baby or a child accidentally swallowing
the accessories. If a baby or child swallows the battery or accessories,
immediately consult a doctor, as it will be harmful to the health of the baby or child.
CAUTIONS
To indicate the risks of light injuries or material damages
unless the following safety regulations are strictly observed.
Avoid wearing or storing the watch in the following places.
○ Places where volatile agents (cosmetics such as polish remover, bug
repellent, thinners etc.) are vaporizing
○ Places where the temperature drops below 5°C or rises above 35°C for
a long time.
- Places affected by strong magnetism of static electricity
○ Places of high humidity ○ Places affected by strong vibrations
○ Dusty places
If you observe any allergic symptoms or skin irritation
Stop wearing the watch immediately and consult a specialist such as a
dermatologist or an allergist.
Other cautions
Replacement of the metal band requires professional knowledge and skill. Please ask the retailer from whom the watch was purchased for replacement of the metal band, as there is a risk of hand or finger injury and fear of losing parts.
○ Do not disassemble or tamper with the watch.
○ Keep the watch out of the reach of babies and children. Extra care should be taken to avoid risks of any injury or allergic rash or itching that may be caused when they touch the watch.
☐ If your watch is of the fob or pendant type, the strap or chain attached to the watch may damage your clothes, or injure the hand, neck, or other parts of your body.
Please keep in mind that if a watch is taken off and placed down as it is, the case back, the band and the clasp will rub against each other possibly causing scratches on the case back. We recommend placing a soft cloth between the case back, the band and the clasp after taking off your watch.
CHECK THE CALIBER NUMBER AND WATER-RESISTANT LEVEL
About the caliber number
The caliber number is a four-digit number that indicates the model of a movement
(mechanical part of a watch). The Grand Selko which is mounted with an exclusive coilber. The mechanical colibes number starts with "05" the series drive coilber.
number starts with "9B" and the quartz caliber number starts with "9F" and "4J"
How to check the caliber number
The four-digit model number on the case back is the caliber number.
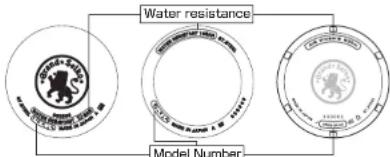
flowchart
graph TD
    A["Water resistance"] --> B["Model Number"]
    B --> C["Circle Component 1"]
    B --> D["Circle Component 2"]
[Ex] LORSE OAAO
[EX.] SHOD-GARU Caliber Number
※ The above illustrations are examples and may differ from the case back of the watch you purchased.
Water resistance
Refer to the table below for the description of each degree of water resistant performance of your watch before using
| Indication on the case back | Water resistant performance | Conditions of Use |
| No indication No | n-water resistance | Avoid drops of water or sweat |
| WATER RESISTANT | Water resistance for everyday life | The watch withstands accidental contact with water in everyday life. |
| WARNINGNot suitable for swimming | ||
| WATER RESISTANT 5 BAR | Water resistance for everyday life at 5 barometric pressures | The watch is suitable for swimming. |
| WATER RESISTANT 10 (20) BAR | Water resistance for everyday life at 10 (20) barometric pressures | The watch is suitable for diving not using an air cylinder. |
| DIVER S WATCH 200m or AR DIVER S 200m | The watch can be worn for diving using a compressed air cylinder and can withstand water pressure to a depth of 200 msters. | The watch is suitable for genuine scuba diving use. |


■ CAUTIONS ON WATER RESISTANCE
CAUTIONS

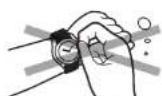
Do not turn or pull out the crown when the watch is wet.
Water may get inside of the watch. ※ if the inner surface of the glass is clouded with condensation or water droplets appear inside at the watch for a long line, the water resistant performance of the watch is deteriorated. Immediately consult the retailer from whom the watch was purchased or Grand Seko international service network mentioned on CERTIFICATE OF GUARANTEE or our website.

Do not leave moisture, sweat and dirt on the watch for a long time.
Be aware of a risk that a water resistant watch may lessen its water resistant performance because of deterioration of the adhesive on the glass or gasket, or the development of rust on stainless steel.

Do not wear the watch while taking a bath or a sauna.
Steam, soap or some components of a hot spring may accelerate the deterioration of water resistant performance of the watch.
If water-resistant level of your watch is defined as "WATER RESISTANT"
WARNING

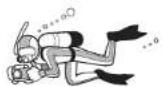
Do not use the watch in scuba diving or saturation diving.
The various tightened inspections under simulated harsh environment, which are usually required for watches designed for scuba diving or saturation diving, have not been conducted on the water-resistant watch with the BAR (barometric pressure) display. For diving, use special watches for diving.
CAUTION

Do not pour running water directly from the faucet.
The water pressure of tap water from a faucet is high enough to degrade the water resistant performance of a water resistant watch for everyday life.
If water-resistant level of your watch is defined as "DIVER'S WATCH 200m" or "AIR DIVER'S 200m"
WARNING
Never use the watch in saturation diving using helium gas.
While diving, never operate the watch in any other manner than described in this instruction manual.
CAUTION
Before using the diver's watch, you have to be properly trained in various types of diving and possess the requisite experience and skill to dive safely. When diving strictly abide by the rules of diving.
Precautions for diving
Before diving
Inspect the following items before diving.
⇒ "NAMES OF THE PARTS" page 13
① The time is correctly set.
② The power reserve indicator shows the level of remaining power not less than one-half. If the remaining power shows less than one-half, turn the crown to wind the mainspring.
⇒ "How to read the power reserve indicator" page 18.
⇒ "How to wind the main spring" page 22.
③ The rotating bezel turns smoothly. (Thebezel rotation must not be too loose or too tight.) = "Unidirectional rotating bezel" page 37.
(4) The crown is completely screwed in
= "Screw-lock type crown" page 17.
⑤ No abnormalities such as flaws or cracks exist on the band or glass.
⑥ The band is reliably fixed with spring bars, buckles or other parts.


CAUTION
If you notice any abnormalities, contact the retailer from whom the watch was purchased or Grand Seiko international service network mentioned on CERTIFICATE OF GUARANTEE or our website.
CAUTIONS ON WATER RESISTANCE
○ While diving
Make sure to observe the following instructions when you wear the watch while diving.
Wear the watch air diving within the water depth indicated on the dial.
Do not operate the crown or buttons underwater.
Take care not to bump the watch against hard objects such as rocks.
Bezel rotation may become slightly harder underwater, but this is not a malfunction.
○ After diving
Please follow the care instructions below after diving.

Rinse the watch in fresh water and wipe it thoroughly dry. Do not pour running water directly from a faucet onto the watch. Soak the watch in a container filled with water to wash it.
■NAMES OF THE PARTS
9R31 (Regular model)
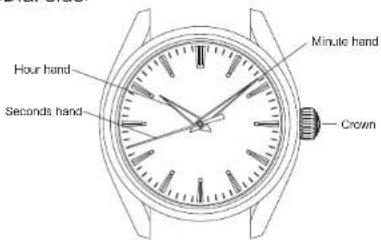
text_image
Hour hand Seconds hand Minute hand Crown⇒ "How to set the time" page 20.

text_image
Power reserve indicator9R15, 9R65 (Regular models)
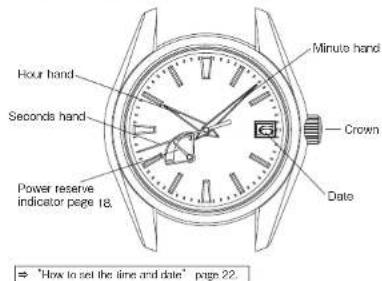
text_image
Hour hand Seconds hand Power reserve indicator page 18. Minute hand Crown Date ⇒ "How to set the time and date" page 22.9R15, 9R65 (Diver's models)
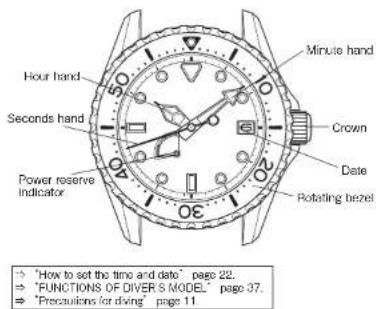
text_image
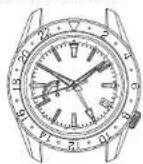
Hour hand Seconds hand Power reserve Indicator Minute hand Crown Date Rotating bezel "How to set the time and date" page 22. "FUNCTIONS OF DIVER'S MODEL" page 37. "Precautions for diving" page 119R16, 9R66 (Regular models)

text_image
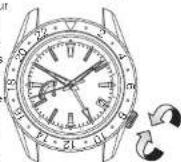
Hour hand Minutes hand Crown Date 24-hour hand Seconds hand Power reserve indicator ⇒ "How to set the time and date" page 29.9R16, 9R66 (Models with a rotating bezel)

text_image
Hour hand Rotating bezel with a 24-hour indicators Outer frame of the dial with a 24-hour indicators Minute hand Crown Hours Seconds hand Power reserve indicator 24-hour hand Date 18 10 9 7 6 5 4 3 2 1 0 → "How to set the time and date" page 29. → "How to use the bi-directional rotating bezel" page 35.9R96, 9R86, 9R84
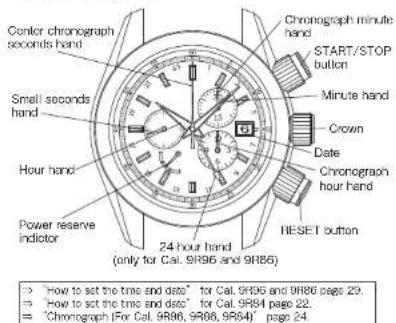
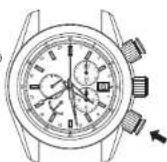
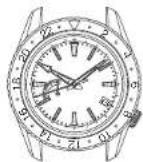
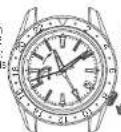
text_image
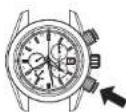
Center chronograph seconds hand Small seconds hand Hour hand Power reserve indicator 24-hour hand (only for Cal. 9R86 and 9R86) Chronograph minute hand START/STOP button Minute hand Crown Date Chronograph hour hand RESET button → "How to set the time and date" for Cal. 9R86 and 9R86 page 29. → "How to set the time and date" for Cal. 9R84 page 22. → "Chronograph (For Cal. 9R86, 9R86, 9R84)" page 24.※ The orientation and design of the display may vary depending on the model.
HOW TO USE
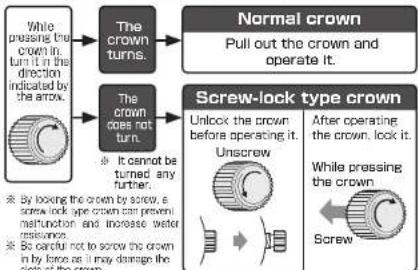
Crown
There are two types of crowns, a normal crown and a screw-lock crown.
flowchart
graph TD
    A["While pressing the crown in turn it, turn it is indicated by the arrow."] --> B["The crown turns."]
    B --> C["Normal crown Pull out the crown and operate it."]
    D["While pressing the crown in turn it, turn it is indicated by the arrow."] --> E["The crown does not turn."]
    E --> F["Screw-lock type crown Unlock the crown before operating it. Unscrew After operating the crown. Screw"]
    G["By looking the crown by screw, a screw-lock type crown can prevent malnutrition and increase water resistance. Be careful not to screw the crown in by force as it may damage the parts of the crown"] --> H["After operating the crown, lock it."]
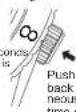
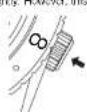
Screw-lock type crown
The screw-lock type crown features a mechanism that can securely lock the crown when they are not being operated in order to prevent any operational errors and to improve its water resistant property.
It is necessary to unlock the screw-lock type crown before operating it.
Once you have finished operating the crown, make sure to relock it.
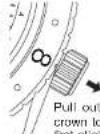
[To unlock the crown] Turn the crown counterclockwise (6 o'clock direction) to unscrew it. Now the crown can be operated. [To lock the crown] Turn the crown clockwise (12 o'clock direction) while gently pressing it in toward the watch body until it stops.

flowchart
graph LR
    A["Unlock the crown before operating it. Unscrew"] --> B["Crown locked"]
    B --> C["Crown unlocked"]
    C --> D["After operating the crown, lock it. While pressing the crown in Screw"]
When looking the crown, turn it slowly with care, ensuring that the screw is properly engaged. Be careful not to push it in forcefully, as doing so may damage the screw hole in the case.
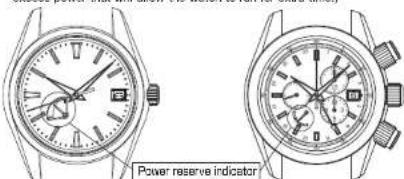
Power reserve indicator
The power reserve indicator lets you know the winding state of the mainspring.
Before removing the watch from your wrist, observe the power reserve indicator to check if the watch has stored enough power to keep running until the next time you wear it. If necessary, wind the mainspring. (To prevent the watch from stopping, wind the mainspring to store the excess power that will allow the watch to run for extra time.)
text_image
Power reserve indicator※ The continuous operating time of the watch may vary depending on the condition of use, such as the number of hours you wear the watch or the claim of your movement while wearing it.
※ In a case where you wear the watch for a short period of time, observe the power reserve indicator to check the level of the remaining power. If necessary, manually wind the mainspring.
How to read the power reserve indicator
| Power reserve indicator | |||||
| Winding state of the main spring. | Fully wound Hair wound Unwound. | ||||
| Number of hours the watch can run | Approximately 72 hours (3 days) | Approximately 36 hours (1.5 days) | The watch either steps or is running down. | ||
The watch employs a device to prevent overwinding of the mainspring. Once the mainspring is fully wound, the mainspring slips inside, disengaging the winding mechanism. When the happens, you can still turn the crown without damaging the watch, however, please refrain from excessive operation of the mainspring.
The power reserve indicator is on the case back of the watch.

text_image
Power reserve indicator※ The continuous operating time of the watch may vary depending on the condition of use, such as the number of hours you wear the watch or the extent of your movement while wearing it.
※ In a case where you wear the watch for a short period of time, observe the power reserve indicator to check the level of the remaining power. It necessary, manually wind the mainspring.
How to read the power reserve indicator
| Power reserve indicator | |||
| Winding state of the maniping | Fully wound Half wound Unwound | ||
| Number of hours the watch can run | Approximately 72 hours (3 days) | Approximately 36 hours (1.5 days) | The watch either stops or is running down. |
To prevent the main spring from being overwound, the crown can no longer be wound forward once the spring is fully wound. Do not force the crown to turn any further at this point; doing so could damage the watch.
HOW TO USE (For Cal. 9R31)
How to wind the main spring
○ This watch has a manually wound spring drive.
You can wind the crown to wind the main spring to drive the watch.
Please see the power reserve indicator to check the level of the remaining power.
→ "How to read the power reserve indicator" page 19.
To wind the mainspring, turn the crown at the normal position clockwise (12 o'clock direction) slowly. If you turn the crown counterclockwise (6 o'clock direction), it will turn free. Seven full rotations of the crown will provide the power to run the watch for approximately ten hours.
When starting to use a watch after it has stopped, wind the mainspring sufficiently (so it is fully wound).
※ Under a low-temperature condition (below 0°C), always keep at least one-sixth of the watch power shown by the power reserve indicator.
How to set the time
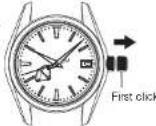
① Pull out the crown to the first click when the seconds hand is at the 0 position. (The seconds hand stops.)
② Turn the crown counterclockwise (6 o'clock direction) to advance the hands to set the current time.
③ Push the crown back in to the normal position in accordance with a time signal. The watch starts operating.

Tips for more accurate time setting
To ensure effective operation of the Spring Drive mechanism, observe the following instructions when you set the time.
① Before setting the time, make sure to wind the mainspring sufficiently. (Ensure that the power reserve indicator is showing a full wound state.)
② When starting to use a watch after it stops, wind the mainspring sufficiently. To set the time after that, wait for approximately 30 seconds after the seconds band starts moving, then pull the crown out to the first click.
③ The seconds hand will stop moving when the crown is pulled out to the first click. Do not stop the movement of the seconds hand for longer than 30 minutes. If the stoppage of the seconds hand movement exceeds 30 minutes, push the crown back in, and wait for approximately 30 seconds after the seconds hand restarts moving, and then set the time.

HOW TO USE (For Cal. 9R84, 9R15, 9R65)
For the instructions on how to use the chronograph (stopwatch function) of Cal. 9R84, refer to "Chronograph (For Cal. 9R96, 9R86, 9R84)" on page 24.
How to wind the main spring
○ This watch is an automatic winding type (with manual winding function).
The mainspring can be sufficiently wound automatically by natural movement of the arm while it is worn on the wrist. In addition, the mainspring can be wound by turning the crown. Please see the power reserve indicator to check the level of the remaining power.
⇒ "How to read the power reserve indicator", page 18
When starting to use a stopped watch, it is recommended that you turn the crown to wind the mainspring. To wind the mainspring, turn the crown at the normal position clockwise (12 o'clock direction) slowly. If you turn the crown counterclockwise (6 o'clock direction), it will turn free. Five full rotations of the crown will provide the power to run the watch for approximately ten hours.
○ If you wear the watch for twelve hours per day consecutively for three to five days, the watch will be fully wound.
※ Under a low-temperature condition (below 0°C), always keep at least one-sixth of the watch power shown by the power reserve indicator.
CAUTIONS
Do not adjust the date when the time the watch indicates is between 9 p.m. and 1 a.m. If the date is adjusted in this condition, the date may not change properly the following day, or a malfunction may occur.
If you set the date when the time the watch indicates is between 9:00 p.m. and 1:00 a.m., pull out the crown to the second click, and turn it counterclockwise (6 o'clock direction) to advance the hour hand until it passes 1:00 a.m. temporarily, and then set the date.
How to set the time and date
This watch is equipped with the date display function. The date advances one day once every 24 hours around midnight. Therefore, if AM/PM is incorrectly set, the date will change around noon. When setting the date and time, ensure that the watch is working.
① Pull out the crown to the first click. (If the watch is equipped with a screw-lock type crown, unscrew the crown before pulling it out.)
② The date can be adjusted by turning the crown counterclockwise (6 o'clock direction). First turn the crown until the previous day's date from the desired date appears.
[Ex.] If you want to set the date to "6," set the date to "5" by turning the crown.

③ Pull out the crown to the second click when the seconds hand (or the small seconds hand) is at the 0 position. The seconds hand (or the small seconds hand) stops. Turn the crown counterclockwise (6 o'clock direction) to advance the hands until the desired date appears. If the
date changes, it means that the watch is set in the morning. Turn the crown further until the watch is set to the current time.
④ Push the crown back in to the normal position in accordance with a time signal. The watch starts operating.

Date adjustment at the end of the month
It is necessary to adjust the date after February (which has 28 days, 29 days in a leap year) and a 30-day month.
[Ex.] To adjust the date in the morning on the first day of a month following a 30-day month.
On the first day of a 30-day month, "31" is displayed. Pull out the crown to the list click. Turn the crown counterclockwise to set the date to "1," and push the crown back in to the normal position.
CAUTION
For models with a screw-lock type crown, remember to screw the crown in.
Tips for more accurate time setting
To ensure effective operation of the Spring Drive mechanism, observe the following instructions when you set the time.
① Before setting the time, make sure to wind the mainspring sufficiently. (Ensure that the power reserve indicator is showing a full-wound state.)
(2) When starting to use a watch after it stops, wind the mainspring sufficiently. To set the time after that, wait for approximately 30 seconds after the seconds hand (or the small seconds hand) starts moving, then pull the crown cut to the second click.
③ The seconds hand (or the small seconds hand) will stop moving when the crown is pulled out to the second click. Do not stop the movement of the seconds hand (or the small seconds hand) for longer than 30 minutes. If the stoppage of the seconds hand (or the small seconds hand) movement exceeds 30 minutes, push the crown back in, and wait for approximately 30 seconds after the seconds hand for the small seconds hand restarts moving, and then set the time.
CAUTION
For models with a screw-lock type crown, remember to screw the crown in.
HOW TO USE (For Cal. 9R84, 9R15, 9R65)
Chronograph (For Cal. 9R96, 9R86, 9R84)
A chronograph is a watch that has a stopwatch function in addition to a time display function. This watch features a stopwatch function which can measure time up to 12 hours.
Before using the stopwatch function
① Make sure that the mainspring is sufficiently wound. Ensure that the power reserve indicator shows a full-wound state of the mainspring. When using the stopwatch, ensure that the watch is working
② Make sure that the center chronograph seconds hand is pointing at the 0 position. If it is not pointing at the 0 position, press the RESET button.
Do not pull out the crown while the stopwatch function is operating, as doing so will stop the measurement.
Names of the chronograph parts and their function
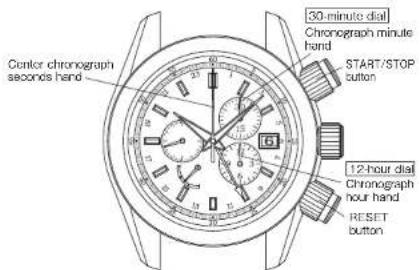
text_image
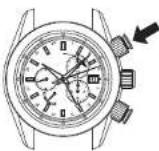
30-minute dial Chronograph minute hand START/STOP button Center chronograph seconds hand 12-hour dial Chronograph hour hand RESET button※ The orientation and design of the display may vary depending on the model. ※ Some models may have screw-lock type buttons. → "How to use the screw-lock type button" page 25.
Screw-lock type button
Some models may have a START/STOP button and RESET button with a screw-lock mechanism. Buttons with a screw-lock mechanism are equipped with a button ring. To operate the screw-lock type buttons, turn the button ring first to unlock it.
This procedure is not necessary for watches without screw-lock type buttons. Turn the button all the way until the side cover descends and the button ring can no longer be turned. Once you finish turning the button completely, the button becomes fully unlocked.

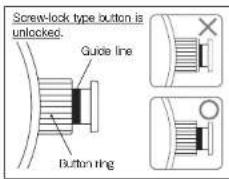
text_image
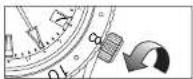
Screw-lock type button is unlocked. Guide line Button ringHow to use the screw-lock type button

text_image
How to unlock. How to lock To loosen Turn: the button ring, until it stops
Turn the button ring counterclockwise (6 o'clock direction) to lower the slide cover gradually. Turn the button ring further until you can clearly so the guide line and the button ring can no longer be turned. Now the screw-lock type button unlocked and can be operated
Turn the button ring clockwise (12 o'clock direction) until it stops. Now the screw-lock type button is completely locked. Once you have finished operating the button, make sure that you relock it
※ Foreign particles and contamination can cause operational failure of the screw and/or butterst.
'Daily care' page 41.
Chronograph (For Cal. 9R96, 9R86, 9R84)
How to use the stopwatch function
Make sure that the mainspring is sufficiently wound and the watch is working.
② If your watch has screw-lock type buttons, unlock them. → "How to use the screw-lock type button" page 25.
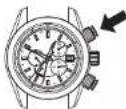
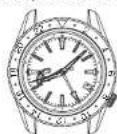
③ Start measuring time. Upon pressing of the START/STOP button, the chrono-graph hands start moving and the stopwatch starts measuring time.
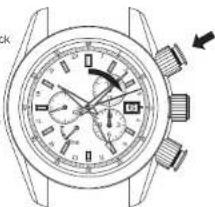
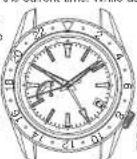
natural_image
Top-down view of a wristwatch with analog dials and buttons (no visible text or labels)④ Stop measuring time. At the moment you want to finish the measurement, press the START/STOP button again to stop the chronograph hands.
Example: 6 hours 20 minutes 10 seconds and 8
The chronograph minute hand on the 30-minute dial completes two full rotations in an hour. To read the 30-minute dial, see the display of the 12-hour dial as a rough

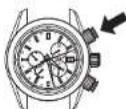
⑤ Reset the chronograph hands. After stopping the chronograph hands, press the RESET button to return all the chronograph hands to the 0 position.
Accumulated elapsed time measurement
① Make sure that the mainspring is sufficiently wound and the watch is working.
② If your watch has screw-lock type buttons, unlock them. ⇒ "How to use the screw-lock type button" page 25.
⑧ Start measuring time. Upon pressing of the START/STOP button, the chronograph hands start moving and the stopwatch starts measuring time.
(4) Stop measuring time. At the moment you want to stop the first measurement, press the START/STOP button again to stop the chronograph hands. The measured time will be displayed.
⑤ Restart measuring time. Upon pressing of the START/STOP button again, the chronograph hands restart moving from the position they had previously stopped.
⑥ Stop measuring time. At the moment you want to stop the second measurement, press the START/STOP button again to stop the chronograph hands. The measured time displayed at this time will be the total of the first and the second measurements (accumulated elapsed time).
⑦ Repeat measuring time cumulatively. Step 5 and 6 above can be repeated as required. As you repeat pressing of the START/STOP button, the measurement will stop and restart and each elapsed time measurement will be accumulated.
(1) Reset the chronograph hands. After stopping the chronograph hands, press the RESET button to return all the chronograph hands to the 0 position.

How to use the tachymeter
The lachymeter can be used to measure average speed or productivity rate per unit time.
○ How to measure average speed of your vehicle
[Ex.] Measure the time taken by your vehicle to go one kilometer
① When the car passes the start line, press the START/STOP button to start the stopwatch.
② When the car crosses the 1-kilometer mark, press the START/STOP button to stop the stopwatch. Read the number on the tachymeter scale to which the center stopwatch seconds hand is pointing.

text_image
START/STOP button 1 km START/STOP buttonThe measured result shows that the average speed
of the vehicle is 80 km/h.
○ How to compute productivity rate per hour
[Ex.] Measure the time required to produce one unit
① At the start of production, press the START/STOP button to start the stopwatch.
② When the production is completed, press the START/STOP button to stop the stopwatch. Read the number on the tachymeter scale to which the center stopwatch seconds hand is pointing.

text_image
START/STOP button 1 unit START/STOP buttonThe measured result shows that the average productivity rate
is 300 units/h.

Chronograph (For Cal. 9R96, 9R86, 9R84)
HOW TO USE (For Cal. 9R96, 9R86, 9R16, 9R66)
For the instructions on how to use the chronograph (stopwatch function) of Cal. 9R96 and 9R86, refer to "Chronograph(For Cal. 9R96, 9R86, 9R84)* onpage 24.

How to wind the main spring
☐ This watch is an automatic winding type (with manual winding function).
☐ Themainspring can be sufficiently wound automatically by natural movement of the arm while it is worn on the wrist. In addition, the mainspring can be wound by turning the crown. Please see the power reserve indicator to check the level of the remaining power.
→ "How to read the power reserve indicator" page 18.
When starting to use a stopped watch, it is recommended that you turn the crown to wind the mainspring. To wind the mainspring, turn the crown at the normal position clockwise (12 o'clock direction) slowly. If you turn the crown counterclockwise (6 o'clock direction), it will turn free. Five full rotations of the crown will provide the power to run the watch for approximately ten hours.
☐ If you wear the watch for twelve hours per day consecutively for 3 to 5 days, the watch will be fully wound.
※ Under a low-temperature condition (below 0°C), always keep at least one-sixth of the watch power shown by the power reserve indicator.
How to set the time and date
To set the time and date, set the 24-hour hand and minute hand first, and then set the hour hand and date.
When setting the time, make sure that the mainspring is sufficiently wound.
How to set the time
① Make sure that the mainspring is sufficiently wound and the watch is working.
When setting the date and time, ensure that the watch is working.
② Unlock the crown.
⇒ "Screw-lock type crown" page 17.
③ Pull out the crown to the second click when the seconds hand (or the small seconds hand) is pointing at the "0" second position. The seconds hand (or the small seconds hand) will stop on the spot.
Pull out the crown to the second click.

④. Turn the crown counterclockwise to move the 24-hour and minute hands clockwise and set them to the current lime. While doing so, set
the minute hand a few minutes behind the correct time, and then slowly advance it to the desired time.
※ Only the 24-hour and minute hands are to be set first. Even if the hour hand is indicating incorrect time, or the date may be altered depending on the position of the hour hand, it is not necessary to make an adjustment at this stage.
↓
set the 24-hour and minute hands.
⑤ Push the crown back in simultaneously with the time signal.
The setting of the 24-hour, minute and second hands (or small seconds hands) to the current time is now completed.

Pull the crown out to the first click.
To move on to the hour hand and date setti pull the crown out to the first click.
Turn the crown to set the hour hand. While turning the crown, the moment the date changes is midnight. When setting the hour hand, make sure that AM/PM is correctly set. Adjust the date also at this point if necessary.
※ The crown can be turned in either direction to adjust the date, however, it is recommended to turn the crown in the direction which enables you to set the date with a greater adjustment.
※ Turn the crown slowly, checking that the hour hand moves in one-hour increments.
※ When adjusting the hour hand, the other hands may move slightly. However, this is not a malfunction.
⑤ Push the crown back in to complete the time setting. Relock the crown. → "Screw-lock type crown" page 17.
How to set the date
Two full rotations of the hour hand will change the date for one day. When the hour hand makes two full rotations clockwise (equivalent to 24 hours), the date is advanced one day. On the other hand, when the hour hand makes two full rotations counterclockwise, the date is set back one day.
※ Manual date adjustment is required on the first day after a month that has less than 31 days: February, April, June, September and November.
① Make sure that the mainspring is sufficiently wound and the watch is working.
※ When setting the date and time, ensure that the watch is working.
② Unlock the crown. → "Screw-lock type crown" page 17.
③ Pull out the crown to the first click.
④ Turn the crown to rotate the hour hands. Each time the hour hand makes two full rotations, the date is adjusted one day. While turning the crown, the moment the date changes is midnight. When setting the hour hand, make sure that AM/PM is correctly set.


Pull out the crown to the first click.
Turn the crown clockwise (12 o'clock direction) to rotate the hour hand counterclockwise:
Each time the hour hand makes two full rotations, the date is set back one day.
The crown can be turned in either direction to adjust the date, however, it is recommended to turn the crown in the direction which enables you to set the date with a smaller adjustment.
@When adjusting the hour hand, the other hands.
Turn the crown counterclockwise (6 o'clock direction) to rotate the hour hand clockwise:
Each time the hour hand makes two full rotations, the date advances one day.
Upon completion of setting, make sure that the time indicated is correct, and then push the crown back in. The date setting is now completed. Back the crown.
→ "Screw-lock type crown" page 17.
The date is designed to work in conjunction with the movement of the hour band, therefore, if AM/PM is incorrectly not, the date will be off by 12 hours.
The crown can be turned in either direction to adjust the date, however, it is recommended to turn the crown in the direction which enables you to set the date with a smaller adjustment.
※ Turn the crown slowly, checking that the hour hand moves in one-hour increments.
※ When adjusting the hour hand, the other hands may move slightly. However, this is not a malfunction.
Tips for more accurate time setting
To ensure effective operation of the Spring Drive mechanism, observe the following instructions when you set the time.
① Before setting the time, make sure to wind the mainspring sufficiently. (Ensure that the power reserve indicator is showing a full-wound state.)
② When starting to use a watch after it stops, wind the mainspring sufficiently. To set the time after that, wait for approximately 30 seconds after the seconds hand (or the small seconds hand) starts moving, then pull the crown out to the second click.
The seconds hand (or the small seconds hand) will stop moving when the crown is pulled out to the second click. Do not stop the movement of the seconds hand (or the small seconds hand) for longer than 30 minutes. If the stoppage of the seconds hand (or the small seconds hand) movement exceeds 30 minutes, push the crown back in, and wait for approximately 30 seconds after the seconds hand (or the small seconds hand) restarts moving, and then set the time.
④ If you set the time when the time the watch indicates is between 9:00 p.m. and 1:00 a.m., set the hour hand back to 8:00 p.m. temporarily, and then set the time. (This procedure is required to ensure the proper engagement of the date driving wheels.)
How to use the 24-hour hand
This watch has two different types of 24-hour hand usage.
AM/PM indicator
Simply using the 24-hour hand to show the 24-hour time as an AM/PM indicator. (This is the standard usage type for the 24-hour hand.)
Both the hour hand and the 24-hour hand are indicating the Japan time 10:00 a.m.
Using the time difference adjustment function, set the 24-hour hand to indicate a time different from the time that the hour and minute hand indicate, which is of a place in a different time zone area with at least one hour of time difference from where you are.
Hour hand: Japan time 10:00 a.m. 24-hour hand: New York time 8:00 p.m.
Time difference adjustment function
For example, while traveling abroad and staying in a place with a different time from where you live, you can conveniently set the watch to indicate the local time in the different time zone area without stopping the watch. The hour hand indicates the time of the place where you currently are, while the 24-hour hand indicates the time of the place of origin. The date works in conjunction with the movement of the hour hand. If the time difference is correctly adjusted, the watch displays the correct date of the place where you are staying.
How to use the time difference adjustment function
① Make sure that the mainspring is sufficiently wound and the watch is working.
When setting the hour hand to use the time difference adjustment function, ensure that the watch is working.
② Unlock the crown.
→ "Screw-lock type crown" page 17.
③ Pull out the crown to the first click.
④ Turn the crown to set the hour hand to indicate the time of the place where you are slaying. Make sure that AM/PM and date are correctly set. ⑤ The date is designed to work in conjunction with the movement of the hour hand, therefore, if AM/PM is incorrectly set, the date will be off by 12 hours.

Turning the crown
clockwise (12
o clock direction)
The hour hand is
set back one hour.
Turning the crown
coumerclockwise [5
o'clock direction]
The hour hand is
advanced at hour.
The crown can be turned in either direction to adjust the line, however. It is recommended to turn the crown in the direction which enables you to set the date with a smaller adjustment.
* Turn the crown slowly, checking that the hour hand moves in one-hour increments.
※ While turning the crown, the moment the date changes is midnight. ※ When adjusting the hour hand, the other hands may move slightly. However, this is not a malfunction.
⑤ Upon completion of setting, make sure that the time indicated is correct, and then push the crown back in. The setting procedure is now completed. Relock the crown. → 'Screw-lock tree crown', page 17.
※ If you set the time when the time the watch indicates is between 9:00 p.m. and 1:00 a.m., set the hour hand back to 8:00 p.m. temporarily, and then set the time.
Selectable display mode
With the time difference adjustment function, the watch features a dual time display which shows time in two different time zones. It offers two display modes which you can select to suit your needs and preference.

[Ex. 1] [Ex. 2] Hour hand and date: Area A Hour hand and date: Area B (New York) (Japan) 24-hour hand: Area B (New York)
Set the 24-hour hand first, and then set the hour hand.
How to use the bi-directional rotating bezel
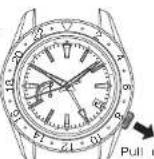
Some models may have a bi-directional rotating bezel, the rim of the glass. By utilizing the 24-hour indicators imprinted on the rotating bezel, the watch can independently display the time in one or two different time zones in addition to the time indicated by the hour hand.
[Ex.] To set the 24-hour hand to indicate the time in Paris and Bangkok which are located in two different time zones, while setting the hour hand to display 10:00 a.m., Japan time. *To use the 24-hour indicators on the rotating boxel to indicate the hour in Bangkok.
① First, set the "▽" mark on the rotating bezel to the 12 o'clock position.
⑨ Refer to "Time difference adjustment function" page 33, and set the hour and minute hands to 10:08 a.m. and align the 24-hour hand with "2" on the rotating bezel. Time in Paris is 8 hours behind Japan except for summer seasons when daylight saving time is observed.
③ There is a 6-hour time difference between Paris and Bangkok; the time in Bangkok is 6 hours ahead of the time in Paris (when daylight saving time is not in effect). Turn the rotating bezel counterclockwise to move the "7" mark back 6 hours on the 24-hour indicators. The hour in Paris is shown by the 24-hour hand pointing to "2" (2:00 a.m.) of the 24-hour indicators on the dial (or the outer frame of the dial), while the hour in Bangkok is shown by the 24-hour hand pointing to "8" (8:00 a.m.) of the 24-hour indicators on the rotating bezel.
For time differences from Japan time, refer to list of time zone differences in major regions of the world* on page 36.
Turn the rotating bezel
counterclockwise 6 gradations, so that the 24-hour indicators on the rotating bezel are advanced for 6 hours.

text_image
that the is on the ours. Bar 8:00Bangkok
8:00 a.m.
Paris
2:00 a.m.
List of time zone differences in major regions of the world
| Names of the cities | UTC ± (Hours) JST ± (Hours) | Other cities in the same region |
| Tokyo +8:00 -0:00 Seoul | ||
| Beijing +8:00 -1:00 | Hong Kong, Manila, Singapore | |
| Bangkok +7:00 -2:00 Jakarta | ||
| Dacca +6:00 -3:00 | ||
| Karachi +5:00 -4:00 Tadheri | ||
| Dubai | +4:00 -5:00 | |
| Jeccah +3:00 -6:00 Nairobi, Mecca | ||
| Cairo +2:00 -7:00 | ★ Athens | |
| Paris | +1:00 -8:00 | ★ Rome, ★ Berlin, ★ Madrid |
| London | +0:00 -9:00 | |
| Azores -1:00 | -10:00 | |
| Rio de Janeiro | -3:00 | -12:00 |
| Santo Domingo | 4:00 | 13:00 |
| New York | 5:00 | 14:00 |
| Chicago | -6:00 | -15:00 |
| Denver | -7:00 | -16:00 |
| Los Angeles | 8:00 | 17:00 |
| Anchorage -9:00 | 18:00 | |
| Honolulu | -10:00 | -10:00 |
| Moscow Island | -11:00 | -20:00 |
| Wellington | +12:00 | 13:00 |
| Noumada | +11:00 | +2:00 |
| Sydney | -10:00 | +1:00 Guam |
※ UTO = Coordinated Universal Time / JUST = Jason Standard Time
※ Regions marked with ★ use daylight saving time
The time zone differences and use of daylight seeing time in each city are based on date as of October, 2018. These are subject to charge according to the governments of the respective countries or regions.
■ FUNCTIONS OF DIVER'S MODEL
Unidirectional rotating bezel
By using the rotating bezel, you can measure the elapsed time since the start of an event or an activity such as diving.
This watch has a undirectional rotating bezel. As the evaluation of the remaining air in your cylinder is based on the information of the elapsed time of the dive, the rotating bezels for a diver's watch is designed to rotate only counterclockwise, so that the watch is prevented from displaying the elapsed time shorter than it actually
CAUTION
Make sure that you check the correct remaining amount of air in your cylinder before diving. Use the display of the elapsed time by the rotating bezel only as a guide during diving.
How to use the rotating bezel
(1) At the start of the activity, for which you want to measure the elapsed time (for example, when you start diving), rotate the bezel so that the mark on the bezel is aligned with the minute hand.
② Read the graduation on the rotating bezel to which the minute hand is pointing.
[Ex.] When you start diving at 10:10.
Start of the dive
After 15 minutes

text_image
Align the ▼ mark with the minute hand Rotating direction of the bozel Read the graduation on the rotating bezel to which the minute hand is pointing. Has clobo Elapsed timeDiver adjuster
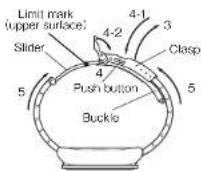
If your watch has a metal bracelet equipped with a diver adjuster mechanism, you can easily adjust the bracelet length by yourself. This is very useful when you wear the watch over a wetsuit or a heavy winter clothing.
How to use the diver adjuster
① Lift up the flap approximately 90° and press it down further approximately 20° and hold it there.
※ You may feel slight resistance, but doing this requires only a light force.
Please do not push the flap down forcibly.
② Lightly pull the bracelet on the 6 o'clock side of the watch along the curved line of the bracelet.
Again, doing this requires only a light force. Please do not pull the bracelet forcibly. The slider can be pulled out approximately 30 mm. Be careful not to
The slider can be pulled out, approximately 50 mm. Be careful not to pull it out beyond the limit mark inscribed on it.

text_image
Flop 1 2 Bracelet on the 6 o'clock side of your watch 12 o'clock side of your watch③ Holding down the push button, lift up the clasp to release the buckle, and strap the watch on your wrist.
④ Close the clasp first and then, the flap.
⑤ With the hand which is not wearing the watch, adjust the length of the slider so that the watch fits well around your wrist.
■TO PRESERVE THE QUALITY OF YOUR WATCH
After-sale service
Notes on guarantee and repair
Contact the retailer from whom the watch was purchased or Grand Seiko international service network mentioned on CERTIFICATE OF GUARANTEE or our website for repair or overhaul.
○ Within the guarantee period, present the certificate of guarantee to receive repair services.
☐ Guarantee coverage is provided in the certificate of guarantee. Read carefully and retain it.
For repair services after the guarantee period has expired, if the functions of the watch can be restored by repair work, we will undertake repair services upon request and payment.
Replacement parts
Please keep in mind that if original parts are not available, they may be replaced with substitutes whose outward appearance may differ from the originals.
Inspection and adjustment by disassembly and cleaning (overhaul)
Periodic inspection and adjustment by disassembly and cleaning (overhaul) is recommended approximately once every 3 to 4 years in order to maintain optimal performance of the watch for a long time.
The movement of this watch has a structure that consistent pressure is applied on its power-transmitting wheels. To ensure these parts work together properly, periodic inspection including cleaning of parts and movement, oiling, adjustment of accuracy, functional check and replacement of worn parts is needed, inspection and adjustment by disassembly and cleaning (overhaul) within 3 to 4 years from the date of purchase is highly recommended for long-time use of your watch. According to use conditions, the oil retaining condition of your watch mechanical parts may deteriorate, abrasion of the parts may occur due to contamination of oil, which may ultimately lead the watch to stop. As the parts such as the gasket may deteriorate, water-resistant performance may be impaired due to intrusion of perspiration and moisture. Please contact the retailer from whom the watch was purchased for inspection and adjustment by disassembly and cleaning (overhaul). For replacement of parts, please specify "GRAND SEIKO GENUINE PARTS". When asking for inspection and adjustment by disassembly and cleaning (overhaul), make sure that the gasket and push pin are also replaced with new ones.
When your watch is inspected and adjusted by disassembly and cleaning (overhauled), the movement of your watch may be replaced.
Guarantee
Within the guarantee period, we guarantee free repair/adjustment service against any defects according to the following guarantee regulations, provided that the watch was properly used as directed in this instruction booklet.
Guarantee coverage
○ The watch body (movement, case) and metallic band.
Exceptions from guarantee
In following cases, repair/adjustment services will be provided at cost even within the guarantee period or under guarantee coverage.
Exchange of leather, urethane, or fabric band.
○ Troubles or damage to the case, glass, or band, caused by accidents or improper usage.
○ Scratches or grime caused by use.
○ Troubles and damage caused by acts of God, natural disasters including fire, floods or earthquakes.
○ Text in certificate has been altered.
○ No certificate is presented.
Procedure to claim free repair services
☐ For any defects under guarantee, submit the watch together with the attached certificate of guarantee to the retailer from whom the watch was purchased.
In the case where you cannot accept the guarantee from the retailer from whom the watch was purchased due to gift-giving or relocation, etc., ask Grand Soiko international service network mentioned on CERTIFICATE OF GUARANTEE or our website by attaching the certificate without fail.
Others
☐ For the watch case, dial plate, hands, glass, band etc., some alternative parts may be used for repair if necessary.
For length adjustment service of metallic band, ask the retailer from whom the watch was purchased or Grand Solko international service network mentioned on CERTIFICATE OF GUARANTEE or our website. Other retailers may undertake the service on a chargeable basis or may not undertake the service.
○ Free repair services are guaranteed only under the period and conditions specified in the certificate of guarantee. It does not affect specific legal rights of a consumer.
Daily care
The watch requires good daily care
○ Do not wash the watch when its crown is at the extended position.
○ Wipe away moisture, sweat or dirt with a soft cloth.
☐ Aftersoaking the watch in seawater, be sure to wash the watch in clean pure water and wipe it dry carefully.
※ If your watch is rated as "non-water resistant" or "water resistant for daily use", do not wash the watch.
→ "CHECK THE CALIBER NUMBER AND WATER-RESISTANT LEVEL" page 9.
Turn the crown from time to time
☐ In order to prevent corrosion of the crown, turn the crown from time to time.
○ The same practice should be applied to a screw lock type crown. ⇒ "Crown" page 17.
Band
The band touches the skin directly and becomes dirty from sweat or dust. Therefore, lack of care may accelerate deterioration of the band or cause skin irritation or stain on the sleeve edge. The watch requires a lot of attention for long usage.
Metallic band
Moisture, sweat or soil will cause rust even on a stainless steel band if they are left for a long time.
☐ Lack of care may cause a yellowish or gold stain on the lower sleeve edge of shirts.
○ Wipe off moisture, sweat or soil with a soft cloth as soon as possible.
○ To clear the soil around the joint gaps of the head, wine it out in
To clean the soft around the joint gaps of the band, wipe it out in water and then brush it off with a soft toothbrush (Protect the watch body from water splashes by wrapping it up in plastic wrap etc.).
Because some titanium bracelets use pins made of stainless steel, which has outstanding strength, rust may form in the stainless steel parts.
☐ If rust advances, pins may poke out or drop out, and the watch case may fall off the bracelet, or the clasp may not open.
○ If a pin is poking out, personal injury may result. In such a case, refrain from using the watch and request repair.
Leather band
○ A leather band is susceptible to discoloration and deterioration from moisture, sweat and direct sunlight.
○ Wipe oil moisture and sweat as soon as possible by gently blotting them up with a dry cloth.
Do not expose the watch to direct sunlight for a long time.
Please take care when wearing a watch with light-colored band, as dirt is likely to show up.
○ Retain from wearing a leather band watch other than Aqua Free bands while bathing, swimming, and when working with water even if the watch itself is water-resistant enforced for daily use (10-BAR/20-BAR water resistant).
Silicone band
As for material characteristics, the band is easily dirtied, and may be stained and discolored. Wipe cft dirt with a wet cloth or cleaning tissue.
○ Unlike bands of other materials, cracks may result in the band being cut. Take care not to damage the band with an edged tool.
Notes on skin irritation and allergy
Skin irritation caused by a band has various reasons such as allergy to metals or leathers, or skin reactions against friction on dust or the band itself.
Notes on the length of the band
Adjust the band to allow a little clearance with your wrist to ensure proper airflow. When wearing the watch, leave enough room to insert a finger between the band and your wrist.

Magnetic resistance (Magnetic influence)
Affected by nearby magnetism, a watch may temporarily gain or lose time or stop operating.
| Indication on the case back | Condition of use | Certified level |
| No indication | Keep the watch more than 5cm away from magnetic products. | 4,800A/m |
| Keep the watch more than 1 cm away from magnetic products. | 16,000A/m | |
| MAGNETIC RESISTANT 40000A/m | The watch can maintain its performance in most cases where it is brought close to (at least 1 cm spaced family) magnetic products not only in normal daily life circumstances but also in a special work environment. | 40,000A/m |
| MAGNETIC RESISTANT 80000A/m | 80,000A/m |
- Arm (ampere meter) is the international unit (SI unit) for indicating the magnetic field.
Examples of common magnetic products that may affect watches

Cellular phone (speaker)

AC adapter

Bag
(with magnet buckle)

AC-powered shaver

Magnetic cocking device

Portable radio (speaker)

Magnetic necklace

Magnetic health pillow
If the watch becomes magnetized and its accuracy deteriorates to an extent exceeding the specified rate under normal use, the watch may need to be demagnetized. In this case, you will be charged for demagnetization and accuracy readjustment even if it happens within the guarantee period.
The reason why this watch is affected by magnetism
The built-in speed-regulating mechanism is provided with a magnet, which may be influenced by a strong external magnetic field.
Lumibrite
If your watch has Lumibrite
Lumibrile is a luminous paint that is completely harmless to human beings and the natural environment; containing no noxious materials such as radioactive substance. Lumibrile is a newly-developed luminous paint that absorbs light energy of the sunlight and lighting apparatus in a short time and stores it to emit light in the dark. For example, if exposed to a light of more than 500 lux for approximately 10 minutes, Lumibrile can emit light for 3 to 5 hours.
Please note, however, Lumibrite emits the light it stores, the luminance level of the light decreases gradually over time. The duration of the emitted light may also differ slightly depending on such factors as the brightness of the place where the watch is exposed to light and the distance from the light source to the watch.
※ In general, when you enter a dark place from a bright environment, your eye cannot adapt to the change in light levels quickly. At first, you can hardly see anything, but as time passes, your vision gradually improves. (Dark adaptation of the human eye)
Reference data on the luminance
| Condition Illumination | ||
| Sunlight | Fine weather 100,000 lux | |
| Cloudy weather 0,000 lux | ||
| Indoor(Window-side during daytime) | Fine weather more than 3,000 lux | |
| Cloudy weather 1,000 to 3,000 lux | ||
| Rainy weather less than 1,000 lux | ||
| Lighting apoparatus(40-watt daylight fluorescent light) | Distance to the watch: 1 m | 1,000 lux |
| Distance to the watch: 3 m | 500 lux (average room luminance) | |
| Distance to the watch: 4 m | 250 lux | |
Troubleshooting
| Troubles Possible causes Solutions | ||
| The watch stops operating.(The chronograph hands do not move.) | The mainspring has not been wound. | Turn the crown to wind the mainspring and reset the time. While you are wearing the watch or when you take it off, check the remaining power shown by the power reserve indicator and wind the mainspring if necessary. |
| The watch stops even though the power reserve indicator is not showing "0." | The watch has been left at a low temperature (below 0°C). | Turn the crown is wind the mainspring and reset the time. At a temperature below 0°C, the watch may stop if the power reserve indicator is showing less than one-third of the power reserve. |
| The watch temporarily gains/losses time. | The watch has been lost or worn in extremely high or low temperatures. | Return the watch to a normal temperature so hot it works accurately as usual, and then reset the time. The watch has been adjusted so that it works accurately when it is worn on your wrist under a normal temperature range between 5°C and 35°C. |
| The watch has been left close to an object with a strong magnetic field. | Correct this condition by moving and scoping the watch away from the magnetic source, and reset the time. If this action does not correct the condition, contact the retailer from whom the watch was purchased. | |
| You drop the watch, hit against a hard surface, or wear it while playing active spots. The watch is exposed to strong vibrations. | Reset the time, if the watch does not return to its normal accuracy after resetting the time, contact the retailer from whom the watch was purchased. | |
| The date changes during daytime. | The time is set 12 hours ahead or behind the correct time. | When you set the time move that the moment the date changes is midnight. When setting the hour hand, he sure that AM/PM is correctly set. |
| Even though you rest the watch every day, the power reserve indicator does not move up. | The watch is worn on your wrist only for a short period of time, or the amount of arm movement is small. | Wear the watch for an extended period of time. Or turn the crown to wind the mainspring. |
| Right after starting the watch, it seems that the seconds hand moves more quickly than usual when setting the time. | When the watch starts moving, it takes a little time before the speed regulating unit starts operating. (This is not a malfunction.) | It takes several seconds before the speed-regulating unit starts operating. To set the time correctly, wait for approximately 30 seconds after the seconds hand starts to move, and set the time. |
| Blur in the display persists. | Small amount of water has got inside the watch due to coloration of the gasket, etc. | Consult the retailer from whom the watch was purchased. |
※ For the solution of troubles other than above, contact the retailer from whom the watch was purchased.
■SPECIFICATIONS (Movement)
| Calumber No. 096, SF888, SF84 | |
| Common features | Hour, minute seconds hands and sidePower reserve indicator |
| Stop switch functionCenter chronogram seconds band, Chronograph head and side Hand | |
| Extra features for Cal. SF888, SF84 | 24 Hour of time the difference adjustment function interrelated with the date display |
| Frequency of crystal oscillator | 32,700 Hz |
| Loss/gain (SR6) | Average monthly rate of ±10 seconds equivalent to daily rate of ±0.5 seconds* |
| Loss/gain (SR88, SF84) | Average 100% of 15 seconds [up/down] to daily rate of ±3 seconds* |
| Overload detonated stage | -10% to +60°C* |
| Driving system | Automatic winding type with manual winding condition |
| Hand movement | Slide motion |
| Continuous operating time | Normal use with stopwatch operationApproxed 24 hoursFigure 3, max*# |
| IC (Integrated Circuit) | Oscillator, frequent device, and spring drive controlCell C=MSD, IC 3 piece |
| Number of poles | 50 MHz band, SF888, SF84 / 41 poles for Cal. SF84 |
| Callout no. 2015. No/ES | |
| Features | Hour, minute, second hour, rate, power source, inductor |
| Frequency of manual oscillator | 32/780 Hz |
| Loss/gain (BRD) | Average monthly rate of ± 1.0 seconds equivalent to daily rate of ± 1.0 second ^1 |
| Loss/gain (RRSD) | Average running rate of ± 1.0 seconds equivalent, by daily rate of ± 1 second ^1 |
| Operational temperature range | -10^ to +60^ |
| Driving system | Automatic winding type with manual winding function |
| Hand movement | Gains motion |
| Continuous operating time | Approx. 72 hours Approx. 400 days |
| IC (Intelligent Group) | Contacting the following: a driving and spring clocked channel (CAOSO-5.1 peak) |
| Number of records | 32 records |
| Caliber no. 981, 98-065 | |
| Features | Four, minute, seconds,24 hour hands and side.Time difference agreement,busque time is the one size,solar pressure time difference |
| Frequency ofcrystal localization | 32,000 Hz |
| Loss/gain(SR16) | Average monthly rate of1.0 seconds equivalent to daily rate of 10.5 seconds* |
| Loss/gain(SR65) | Average monthly rate of-15 seconds equivalent to daily rate of 1 season* |
| Dorsifiedtransportable range | -10 to +90°C * |
| Driving system | Automatic winding type and manual driving function |
| Hard movement | Wide motion |
| Continuousoperating time | Approx. 75 hoursApprox. 3 days* |
| IC(Integrated Circuit) | Oscillator, frequency device,and image output capacity(C-R/DC+EC-1) ranges |
| Number of pixels | 20 pixels |
| Caliber no. 051 | |
| Features | Heat, min/m, seconds hands, power meters indicator |
| Frequency of crystal oscillation | 32/780 Hz |
| Loss/gain | Average monthly rate of ±10 seconds equivalent to daily rate of ±1 second ^-1 |
| Operations Temperature range | 10°C to 140°C ^-2 |
| Driving system | Manual winding type |
| Hand movement | Grid motion |
| Continuous operating time | Approx. 72 hoursApprox. 1 second ^3 |
| IC (Integrated Circuit) | Oscillator, frequency divider, and spring drive control circuit (IC-MS-IC-1 piece |
| Number of kowls | 30 kowls |
*1: The average rate is estimated in a condition when the watch is worn on your wrist within a temperature range between 5°C and 35°C.
*2 Under a low-temperature condition (below 0°C), always keep at least one-third of the watch power shown by the power reserve indicator.
- When the power search indicator shows the answer supplied by the engineering is full, the continuous operating time may become shorter during on the condition of use.
* Transpecifications are subject to change without prior notice due to product implementation.