A09LH2 - Air-conditioner LG - Free user manual and instructions
Find the device manual for free A09LH2 LG in PDF.

User questions about A09LH2 LG
0 question about this device. Answer the ones you know or ask your own.
Ask a new question about this device
Download the instructions for your Air-conditioner in PDF format for free! Find your manual A09LH2 - LG and take your electronic device back in hand. On this page are published all the documents necessary for the use of your device. A09LH2 by LG.
USER MANUAL A09LH2 LG
Please read this manual carefully before operating your set and retain it for future reference.
TYPE: WALL MOUNTED
TABLE OF CONTENTS
A. Safety Precautions ......3
B. Electrical Safety......6
Temporary Use of an Adapter ......6
Temporary Use of an Extension Cord ...6
Symbols used in this Manual......6
C. Product Introduction......7
Indoor Units 7
Outdoor Unit 7
D. Operating Instructions......8
How to insert the Batteries 8
Wireless Remote Controller
Maintenance....8
Operating Method......8
Operation Indication Lamps 8
Wireless Remote Controller....9
Operation Mode....10
Healthy Dehumidification Operation....11
Auto Operation
(Cooling Only Model)....11
Auto Changeover Operation
(Heat Pump Model) 11
Jet Cool/Heat Operation....12
NEO PLASMA Purification Operation
(Optional)....12
Auto Clean (Optional)....12
Energy-Saving Cooling Mode
(Optional)....13
Forced operation 13
Sleep Mode 14
Setting the Current Time 14
Timer Setting 14
Airflow Direction Control 15
Air Circulation Mode 15
Auto Restart Function....15
E. Maintenance and Service......16
Indoor Unit....16
How to replace picture & photograph ..17
Outdoor Unit 18
Operation Tips!......18
Self-Diagnosis Function .....18
Troubleshooting Tips!
Save time and money!......19
Call the service immediately in the
following situations 19

FOR YOUR RECORDS
Write the model and serial numbers here:
Model #
Serial #
You can find them on a label on the side of each unit.
Dealer's Name
Date Purchased
■Staple your receipt to this page in the event you need it to prove date of purchase or for warranty issues.

READ THIS MANUAL
Inside you will find many helpful hints on how to use and maintain your air conditioner properly. Just a little preventive care on your part can save you a great deal of time and money over the life of your air conditioner.
You'll find many answers to common problems in the chart of troubleshooting tips. If you review our chart of
Troubleshooting Tips first, you may not need to call for service at all.

PRECAUTION
- Contact the authorized service technician for repair or maintenance of this unit.
- Contact the installer for installation of this unit.
• The air conditioner is not intended for use by young children or invalids without supervision. - Young children should be supervised to ensure that they do not play with the air conditioner.
- When the power cord is to be replaced, replacement work shall be performed by authorized personnel only using only genuine replacement parts.

natural_image
Simple line drawing of people relaxing at a table with sun and palm trees in the background (no text or symbols)Safety Precautions
To prevent injury to the user or other people and property damage, the following instructions must be followed.
■ Incorrect operation due to ignoring instruction will cause harm or damage. The seriousness is classified by the following indications.

WARNING
This symbol indicates the possibility of death or serious injury.

CAUTION
This symbol indicates the possibility of injury or damage.
■Meanings of symbols used in this manual are as shown below.


Be sure not to do.
Be sure to follow the instruction.

WARNING
Always use a power plug and socket with a ground terminal.
• There is a risk of electric shock.
For electrical work, contact the dealer, seller, a qualified electrician, or an Authorized Service Center. Do not disassemble or repair the product by yourself.
• There is risk of fire or electric shock.
Use the correctly rated breaker or fuse.
• There is risk of fire or electric shock.
Do not install the product on a defective installation stand. Be sure that the installation area does not deteriorate with age.
- It may cause product to fall.
In outdoor unit the step-up capacitor supplies high voltage electricity to the electrical components. Be sure to discharge the capacitor completely before conducting the repair work.
- An charged capacitor can cause electrical shock.
Do not use a defective or underrated circuit breaker. Use the correctly rated breaker and fuse.
• There is risk of fire or electric shock.
Always ground the product as per the wiring diagram. Do not connect the ground wire to gas or water pipes lightening rod or telephone ground wire.
• There is risk of fire or electric shock.
Do not modify or extend the power cable. If the power cable or cord has scrathes or skin peeled off or deteriorated then it must be replaced.
• There is risk of fire or electric shock.
Never install the outdoor unit on a moving base or a place from where it can fall down.
- The falling outdoor unit can cause damage or injury or even death of a person.
When installing the unit, use the installation kit provided with the product.
- Otherwise the unit may fall and cause severe injury.
Do not use a multi consent. Always use this appliance on a dedicated circuit and breaker.
- Otherwise it can cause electric shock or fire.
Install the panel and the cover of control box securely.
- There is risk of fire or electric shock due to dust, water etc.
For installation, removal or reinstall, always contact the dealer or an Authorized Service Center.
- There is risk of fire, electric shock, explosion, or injury.
When the product is soaked (flooded or submerged) in water, contact an Authorized Service Center for repair before using it again.
• There is risk of fire or eletric shock.
Be sure to use only those parts which are listed in the svc parts list. Never attempt to modify the equipment.
- The use of inappropriate parts can cause an electrical shock, excessive heat generation or fire.
| Indoor/outdoor wiring connections must be secured tightly and the cable should be routed properly so that there is no force pulling the cable from the connection terminals. | Safely dispose off the packing materials. Like screws, nails, batteries, broken things etc after installation or svc and then tear away and throw away the plastic packaging bags. | Make sure to check that the power cable plug is not dirty, loose or broken and then only insert the plug completely. |
| Improper or loose connections can cause heat generation or fire. | Children may play with them and cause injury. | Dirty, loose or broken power plug can cause electric shock or fire. |
| Be sure to check the refrigerant to the used. Please read the label on the product. | Don't use a power cord, a plug or a loose socket which is damaged. | Do not touch , operate, or repair the product with wet hands. Hold the plug by hand when taking out |
| Incorrect refrigerant used can prevent the normal operation of the unit. | Otherwise it may cause a fire or electrical shock. | There is risk of electric shock or fire. |
| Do not place a heater or other heating appliances near the power cable. | Do not allow water to run into electric parts. Install the unit away from water sources. | Do not store or use or even allow flammable gas or combustibles near the product. |
| There is risk of fire and electric shock. | There is risk of fire, failure of the product, or electric shock. | There is risk of fire. |
| Do not use the product in a tightly closed space for a long time. Perform ventilation regularly. | Do not open the front grille of the product during operation. (Do not touch the electrostatic filter, if the unit is so equipped.) | If strange sounds, smell or smoke comes from product.Immediately turn the breaker off or disconnect the power supply cable. |
| Oxygen deficiency could occur and hence harm your health. | There is risk of physical injury, electric shock, or product failure. | There is risk of electric shock or fire. |
| Ventilate the product room from time to time when operating it together with a stove, or heating element etc. | Turn the main power off and unplug the unit when cleaning or repairing the product. | When the product is not to be used for a long time, disconnect the power supply plug or turn off the breaker. |
| Oxygen deficiency can occur and hence harm your health. | There is risk of electric shock. | There is risk of product damage or failure, or unintended operation. |
| Take care to ensure that nobody especially kids could step on or fall onto the outdoor unit. | Take care to ensure that power cable could not be pulled out or damaged during operation. | Do not place ANYTHING on the power cable. |
| This could result in personal injury and product damage. | There is risk of fire or electric shock. | There is risk of fire or electric shock. |
| Do not plug or unplug the power supply plug to turn the unit ON/OFF . | When flammable gas leaks, turn off the gas and open a window for ventilation before turn the product on. | For inner cleaning, contact an Authorized Service Center or a dealer. Do not use harsh detergent that causes corrosion or damage on the unit. |
| There is risk of fire or electric shock. | Do not use the telephone or turn switches on or off. There is risk of explosion or fire. | Harsh detergent may also cause failure of product, fire, or electronic shock. |
| CAUTION | ||
| Two or more people must lift and transport the product. | Do not install the product where it will be exposed to sea wind (salt spray) directly. | Install the drain hose to ensure that the condensed water is drained away properly. |
| Avoid personal injury. | It may cause corrosion on the product. | A bad connection may cause water leakage. |
| Keep level even when installing the product. | Do not install the product where the noise or hot air from the outdoor unit could damage or disturb the neighborhoods. | Always check for gas (refrigerant) leakage after installation or repair of product. |
| To avoid vibration or noise. | It may cause a problem for your neighbors and hence dispute. | Low refrigerant levels may cause failure of product. |
CAUTION
| Do not use the product for special purposes, such as preserving foods, works of art, etc. It is a consumer air conditioner, not a precision refrigeration system. | Do not block the inlet or outlet of air flow. | Use a soft cloth to clean. Do not use harsh detergents, solvents or splashing water etc . |
| · There is risk of damage or loss of property. | · It may cause product failure. | · There is risk of fire, electric shock, or damage to the plastic parts of the product. |
| Do not touch the metal parts of the product when removing the air filter. | Do not step on or put anything on the product. (outdoor units) | Always insert the filter securely after cleaning. Clean the filter every two weeks or more often if necessary. |
| · There is risk of personal injury. | · There is risk of personal injury and failure of product. | · A dirty filter reduces the efficiency. |
| Do not insert hands or other objects through the air inlet or outlet while the product is operating. | Be cautious when unpacking and installing the product. | If the refrigerant gas leaks during the repair, do not touch the leaking refrigerant gas. |
| · There are sharp and moving parts that could cause personal injury. | · Sharp edges could cause injury. | · The refrigerat gas can cause frostbite (cold burn) |
| Do not tilt the unit when removing or uninstalling it. | Do not mix air or gas other than the specified refrigerant used in the system . | If the refrigerant gas leaks during the installation, ventilate the area immediately. |
| · The condensed water inside can spill . | · If air enters the refrigerant system, an excessively high pressure results, causing equipment damage or injury. | · Otherwise it can be harmful for your health. |
| Dismantling the unit, treatment of the refrigerant oil and eventual parts should be done in accordance with local and national standards. | Replace the all batteries in the remote control with new ones of the same type. Do not mix old and new batteries or different types of batteries. | Do not recharge or disassemble the batteries. Do not dispose off batteries in a fire. |
| · There is risk of fire or product failure. | · They may burn or explode. | |
| If the liquid from the batteries gets onto your skin or clothes, wash it well with clean water. Do not use the remote if the batteries have leaked. | Do not let the air conditioner run for a long time when the humidity is very high and a door or a window is left open. | Do not expose your skin or kids or plants to the cool or hot air draft. |
| · The chemicals in batteries could cause burns or other health hazards. | · Moisture may condense and wet or damage furniture. | · This could harm to your health. |
| Do not drink the water drained from the product. | Use a firm stool or ladder when cleaning, maintaining or repairing the product at an height. | If you eat the liquid from the batteries, brush your teeth and see doctor. Do not use the remote if the batteries have leaked. |
| · It is not sanitary and could cause serious health issues. | · Be careful and avoid personal injury. | · The chemicals in batteries could cause burns or other health hazards. |
Operation ranges
For Heat & Cool model, heating operation range follows the below table.
| Heating operation range | Outdoor temperature |
| 0 ~ 24 °C |
* When the outdoor temperature drops below 0 °C, heating capacity may drop slightly depending on the operation condition.
Electrical Safety
▲ WARNING
• This appliance must be properly grounded.
To minimize the risk of electric shock, you must alway plug into a grounded outlet.
- Do not cut or remove the grounding prong from the power plug.
- Attaching the adapter ground terminal to the wall receptacle cover screw does not ground the appliance unless the cover screw is metal and not insulated, and the wall receptacle is grounded through the house wiring.
- If you have any doubt whether the air conditioner is properly grounded, have the wall receptacle and circuit checked by a qualified electrician.
Temporary Use of an Adapter
We strongly discourage the use of an adapter due to potential safety hazards. For temporary connections, use only a genuine adapter, available from most local hardware stores. Ensure that the large slot in the adapter is aligned with the large slot in the receptacle for a proper polarity connection.
To disconnect the power cord from the adapter, use one hand on each to avoid damaging the ground terminal. Avoid frequently unplugging the power cord as this can lead to eventual ground terminal damage.
▲ WARNING
- Never use the appliance with a broken adapter.
Temporary Use of an Extension Cord
We strongly discourage the use of an extension cord due to potential safety hazards.
▲ WARNING
This appliance should be installed in accordance with national wiring regulations. This guide acts as a guide to help to explain product features.
Symbols used in this Manual

This symbol alerts you to the risk of electric shock.

This symbol alerts you to hazards that may cause harm to the air conditioner.
NOTE
This symbol indicates special notes.
Product Introduction
Here is a brief introduction of the indoor and outdoor units. Please see the information specific to your indoor unit type.
Indoor Units
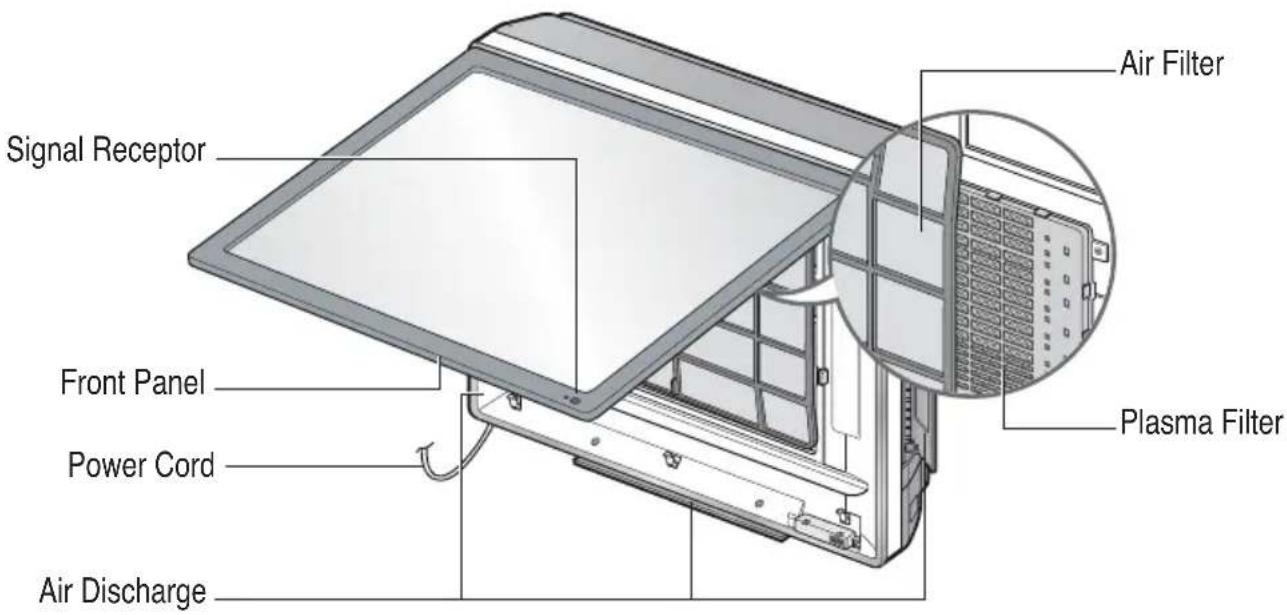
text_image
Signal Receptor Front Panel Power Cord Air Discharge Air Filter Plasma FilterOutdoor Unit
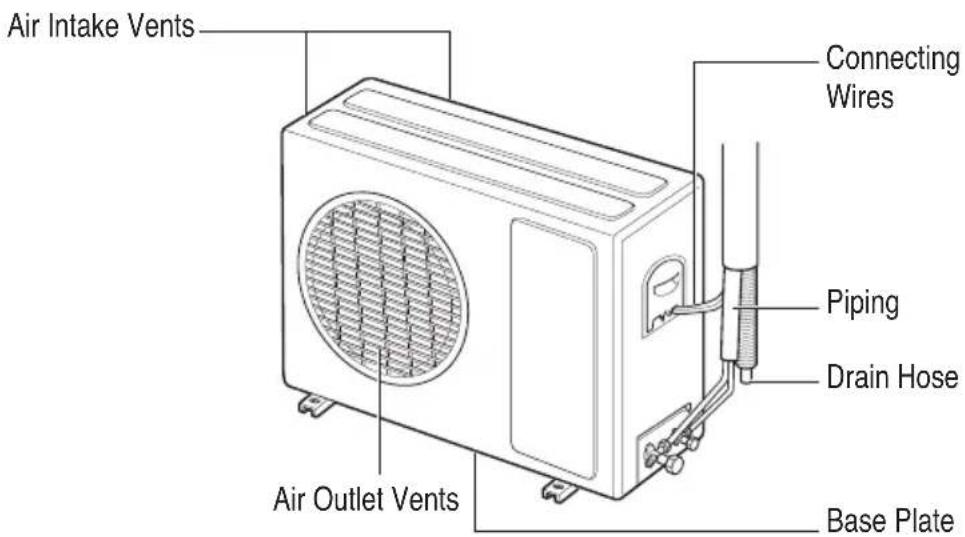
text_image
Air Intake Vents Connecting Wires Piping Drain Hose Air Outlet Vents Base PlateOperating Instructions
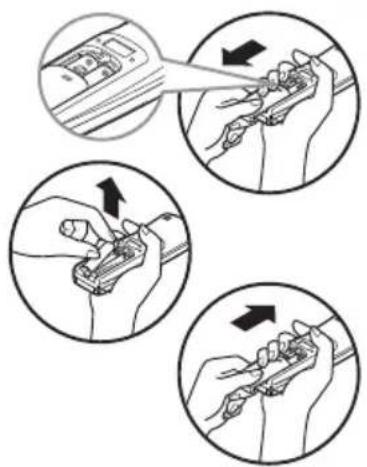
How to insert the Batteries
- Remove the battery cover by pulling it according to the arrow direction.
- Insert new batteries making sure that the (+) and (-) of battery are installed correctly.
- Reattach the cover by sliding it back into position.
NOTE
- Always use/replace both batteries of same type.
- If the system is not to be used for a long time, remove the batteries to save their working life.
- If the display screen of remote controller starts, fading replace both of the batteries.
- Use 2 AAA(1.5volt) batteries.
text_image
Illustration showing four steps of a hand tool application, with arrows indicating direction and movement.Wireless Remote Controller Maintenance
- Choose a suitable place where its safe & easy to reach.
- Fix the holder to wall etc with the supplied screws firmly.
- Slide the remote controller inside the holder.
NOTE
- Remote controller should never be exposed to direct sunlight.
- Signal transmitter & receiver should always be clean for proper communication. Use a soft cloth to clean them.
- In case some other appliances also get operated with remote control, change their position or consult your serviceman.

flowchart
graph TD
    A["Hand holding device"] --> B["Inserted device"]
    B --> C["Step 1: Insert/Down"]
    C --> D["Step 2: Insert/Down"]
    D --> E["Step 3: Use/Hold"]
Operating Method
- The signal receiver is inside the unit.
- Aim the remote controller towards the unit to operate it. There should not be any blockage in between.
Operation Indication Lamps
On/Off : Lights up during the system operation, error code and auto restart setting.

natural_image
Illustration of a computer monitor connected to a remote control via cable (no text or symbols)* Hot start operation: Stops the indoor fan in heating operation for minutes to prevent cold air from blowing out from unit.
* In defrost mode unit stops heating operation for few minutes to remove formation of ice on the heat exchanger coils to maintain the efficiency.
Wireless Remote Controller
The controls will look like the following.

text_image
Signal transmitter 5 6 1 3 4 2 7 9 10 11 12 8 13 14 15 RESET 2MFC CANCEL ON - OFF SET AUTO CLEAN FLASHA 16 Flip-up door (opened)Operation Mode
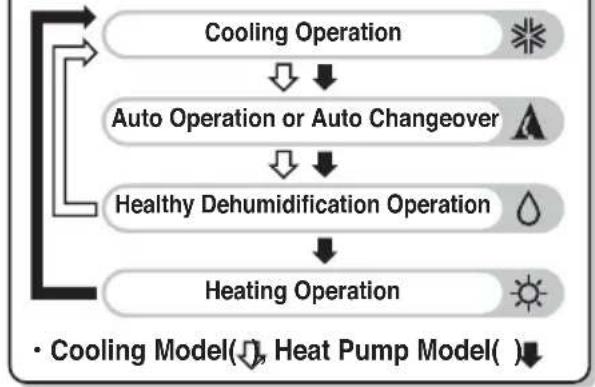
flowchart
graph TD
    A["Cooling Operation"] --> B["Auto Operation or Auto Changeover"]
    B --> C["Healthy Dehumidification Operation"]
    C --> D["Heating Operation"]
    style A fill:#f9f,stroke:#333
    style B fill:#ccf,stroke:#333
    style C fill:#cfc,stroke:#333
    style D fill:#fcc,stroke:#333
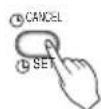
NOTE
- START/STOP BUTTON
Used to turn off/on the unit.
- OPERATION MODE SELECTION BUTTON
Used to select the operation mode.
- ROOM TEMPERATURE SETTING BUTTONS
Used to select the room temperature.
- INDOOR FAN SPEED SELECTOR BUTTON
Used to select fan speed in four steps low, medium, high and CHAOS.
- JET COOL BUTTON
Used to start or stop the speed cooling, heating. (It operates fan in super high speed in cooling mode, heating mode)
- CHAOS SWING BUTTON
Used to stop or start louver movement and set the desired up/down airflow direction.
- ON/OFF TIMER BUTTONS
Used to set the time of starting and stopping operation.
- TIME SETTING BUTTONS
Used to adjust the time.
- TIMER SET/CANCEL BUTTON
Used to set and to cancel the timer operation.
- SLEEP MODE AUTO BUTTON
Used to set sleep mode auto operation.
- AIR CIRCULATION BUTTON
Used to circulate the room air without cooling or heating.
ENERGY-SAVING COOLING MODE BUTTON (OPTIONAL) For inverter type models
- ROOM TEMPERATURE CHECKING BUTTON
Used to check the room temperature.
- PLASMA BUTTON(OPTIONAL)
Used to start or stop the plasma-purification function.
- HORIZONTAL AIRFLOW DIRECTION CONTROL BUTTON (OPTIONAL)
Used to set the desired horizontal airflow direction.
- RESET BUTTON
Used prior to resetting time.
- 2nd F BUTTON
Used prior to using modes printed in blue at the bottom of buttons.
- AUTO CLEAN BUTTON(OPTIONAL)
Used to set auto clean mode.
In some models this button has a 2nd function of LED luminosity control.
- HEATER BUTTON(OPTIONAL)
(Not available in all models)
- LCD LUMINOSITY BUTTON(OPTIONAL)
Used to adjust LCD luminosity.
To use the functions printed in blue at the bottom of the buttons press 2^nd F button first and then the required function button. Pressing the 2^nd F button activates the blue printed function of the respective button. To cancel the function press the 2nd F button again else it will automatically cancel if remains idle after 10 seconds.
Operation Mode

text_image
18°C 1 3 4 2 ON1 Press the START/STOP BUTTON to turn the unit on.
The unit will respond with a beep.
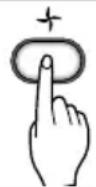
natural_image
Illustration of a hand pressing a button with an oval shape and a small circle above it (no text or symbols)2 Open the door of the remote controller and press the operation mode button. Each time the button is pressed, the operation mode is shifted in the direction of the arrow.
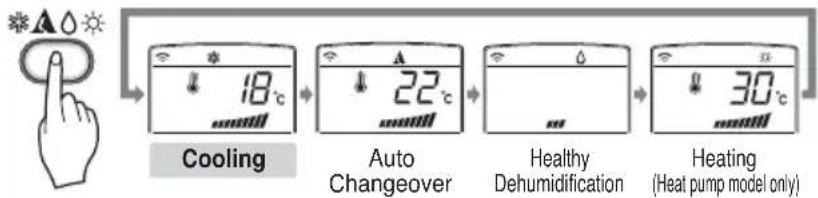
flowchart
graph LR
    A["Hand with °C"] --> B["18°C Cooling"]
    B --> C["22°C Auto Changeover"]
    C --> D["Healthy Dehumidification"]
    D --> E["30°C Heating (Heat pump model only)"]
Auto Operation (Cooling Only Model)
Auto Changeover (Heat Pump Model)
3 For cooling or heating operation set the desired indoor temperature by pressing the ROOM TEMPERATURE SETTING BUTTONS.
For cooling the temperature can be set within 18^ C\~ 30^ C and for heating the temperature range is 16^ C\~ 30^ C.
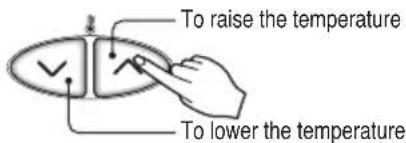
text_image
To raise the temperature To lower the temperature4 Set the fan speed with the remote controller. You can select the fan speed in four steps-low, medium, high and CHAOS by pressing the INDOOR FAN SPEED SELECTOR BUTTON.
Each time the button is pressed, the fan speed mode is shifted.

flowchart
graph LR
    A["Power Supply"] --> B["Charging Station"]
    B --> C["Charging Unit"]
    C --> D["Charging Unit"]
Fan speed is on low. Fan speed is on medium. Fan speed is on high. CHAOS Air
Natural wind by the CHAOS logic
☐ For fresher feeling, press the INDOOR FAN SPEED SELECTOR BUTTON selector and set to CHAOS mode. In this mode, the wind blows like a natural breeze by automatically changing fan speed according to the CHAOS logic.
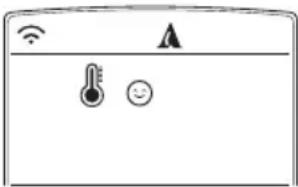
Healthy Dehumidification Operation

text_image
Diagram showing Wi-Fi and water droplet symbols above a rectangular device with battery iconsHealthy Dehumidification

During Healthy Dehumidification Operation
☐If you select the dehumidification mode on the OPERATION MODE SELECTION BUTTON, the product starts to run the dehumidification function. It automatically sets the room temperature and airflow volume to the best condition for dehumidification, based on the sensed current room temperature.
In this case, however, the setting temperature is not displayed on the remote controller and you are not able to control the room temperature either.
☐During the healthy dehumidification function, the airflow volume is automatically set according to the optimization algorithm responding to the current room temperature status, so that the room condition is kept healthy and comfortable even in the very humid season.
To run the healthy dehumidification mode follow steps 1, and 2 and 4 (See operation mode)
Auto Operation (Cooling Only Model)
text_image
Diagram showing Wi-Fi interface with temperature and alarm icons, likely representing a smart home or weather control system.Auto
In this operation mode the actual setting temperature and the fan speed are automatically set by the electronic control logic based on the current room temperature. If you feel hot or cold press the temperature setting buttons respectively for more cooling or heating effect.
NOTE : You cannot set the actual setting temperature and the indoor fan speed in this operation mode. But you can use the Chaos swing in this operation. If the system is not operating as desired, switch manually to another mode.
To run the auto operation follow steps 1, and 2. (See operation mode)
Auto Changeover Operation (Heat Pump Model)

text_image
22°CAuto Changeover
Auto operation basically is heating or cooling function of the air conditioner.
But during this operation the controller changes the operation mode automatically to keep the temperature within ±2^ with respect to the setting temperature.
To run this operation follow steps 1, 2, 3, and 4. (See operation mode)
Jet Cool/Heat Operation

text_image
P0 JETJet cool function can be used to cool the room quickly in hot summer. When this function is turned on, the air conditioner runs in cooling operation mode with super high fan speed and 18^ setting temperature for 30 minutes for fast and effective cooling. Similarly, jet heat function (available only in some models) warms up the room quickly by operating at super high fan speed and 30^ setting temperature for 60 minutes.
You can activate this operation by pressing the JET COOL BUTTON.
To change from jet cool mode to high fan speed cooling mode, press the JET COOL BUTTON or INIDOOR FAN SPEED SELECTOR BUTTON or the ROOM TERPERATURE SETTING BUTTON again.
NOTE
- Jet cool function cannot be activated during heating or auto changeover operations.
- In case of Inverter, Art Cool and Art Cool Wide(non-Deluxe) model, you can use jet heat function by pressing JET COOL BUTTON for heating operation.
- Art Cool and Art Cool Wide models close the side discharges during jet cool/heat operation, for strong cooling and heating.
NEO PLASMA Purification Operation (Optional)
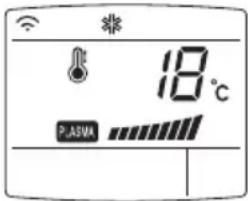
text_image
18°C P.A.SWAPlasma filter is a technology developed by LG to get rid of microscopic contaminants in the intake air by generating a plasma of high charge electrons. This plasma kills and destroys the contaminants completely to provide clean and hygienic air.
Plasma purification can be started by pressing the PLASMA BUTTON on the remote controller. Repressing it will deactivate the operation.
NOTE
This feature can be used in any operation mode and any fan speed can be used while plasma filter is functioning.

Auto Clean (Optional)
☐ During auto clean function, moistures left in indoor units after cooling operation or healthy dehumidification operation can be removed.
AUTO CLEAN

- Press the AUTO CLEAN BUTTON to activate this function.
- Now whenever the unit is turned off, the indoor fan is still running for about 30 minutes internally without cooling or dehumidification operation. Also the louver is closed.
- This dries up any remains of moisture & cleans the unit internally.
- If you press AUTO CLEAN BUTTON again during operation, this function is cancelled.
NOTE
During auto clean function, only START/STOP BUTTON, PLASMA BUTTON and AUTO CLEAN BUTTON can be used.
Energy-Saving Cooling Mode (Optional)
Energy-saving cooling mode can save energy in cooling and healthy dehumidification operation, because it can operate efficiently by setting body-adaptation time according to the change of time and temperature and adjusting automatically desired temperature.

- Press the START/STOP BUTTON to start the unit.
- Open the door on the remote controller. Select cooling operation or healthy dehumidification operation.
- Press the ENERGY-SAVING COOLING MODE BUTTON.
- To cancel the energy-saving cooling mode, press the ENERGY-SAVING COOLING MODEL BUTTON again and unit will operate in previous mode(Cooling or healthy dehumidification mode).
Display Luminosity (Optional)
The Display Luminosity can be adjusted by using the remote control.
Press the start/stop button to start the unit. Open the door on the remote control, press the 2ndF button and, press display luminosity button.
Display will be dark. Press the button again to set bright display.
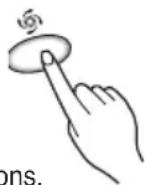
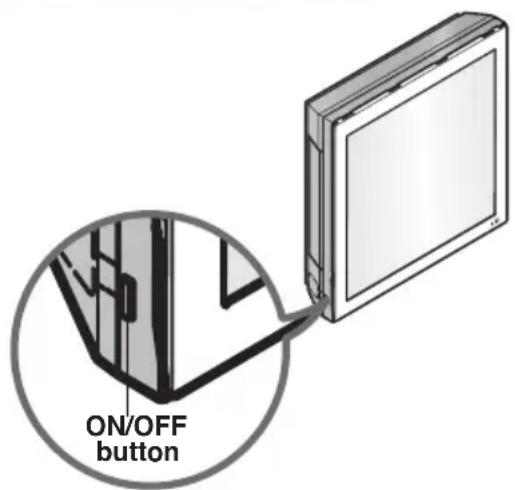
Forced operation
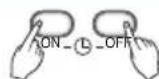
Operation procedures when the remote control can't be used. The operation will be started if the ON/OFF button is pressed. If you want to stop operation, re-press the button.
text_image
ON/OFF button| Cooling Model | Heat pump Model | |||
| Room Temp. ≥ 24°C 21°C ≤ Room Temp. < 24°C Room Temp. < 21°C | ||||
| Operating mode | Cooling Cooling | Healthy Dehumidification | Heating | |
| Indoor FAN Speed | High High | High High | ||
| Setting Temperature | 22°C 22°C | 23°C 24°C | ||
Test operation
During the TEST OPERATION, the unit operates in cooling mode at high speed fan, regardless of room temperature and resets in 18 minutes.
During test operation, if remote controller signal is received, the unit operates as remote controller sets.
If you want to use this operation, Press and hold the ON/OFF button for 3\~5 seconds, then the buzzer sound 1 "beep".
If you want to stop the operation, re-press the button.
Sleep Mode
-
Press the SLEEP MODE AUTO BUTTON to set the time when you want the unit to stop automatically.
-
The timer is programmed in one-hour increments by pressing the SLEEP MODE AUTO BUTTON 1 to 7 times.
The sleep mode is available for 1 to 7 times.
To alter the time period in steps of 1 hour, press the SLEEP MODE AUTO BUTTON while aiming at air conditioner.

NOTE
- The sleep mode will operate indoor fan at slow speed in cooling and heating mode for pleasant sleep.
- Art Cool and Art Cool Wide (non-Deluxe) close the lower discharge partially in sleep mode for pleasant sleep.
In cooling mode or healthy dehumidification mode:
The setting temperature will rise automatically two times by 1^ C over next consecutive 30 minutes ( 2^ C in 1 hour) for a comfortable sleep. Now this will be the final setting temperature as long as sleep mode is functioning.
Setting the Current Time
- Time can be set only when you press the RESET BUTTON. Having replacing the batteries, you should press the RESET BUTTON to reset the time. Press the Start/Stop button.
- Press 2nd F button and check if 2^ndF icon is on.
- Press the TIME SETTING BUTTONS until the desired time is set.
- Press the TIME SET/CANCEL BUTTON.
NOTE
Check the indicator for A.M. and P.M.


Timer Setting
- Make sure to set current time correctly on the display of the remote controller.
- Press 2nd F button.
- Press the ON/OFF TIMER BUTTONS to turn timer on or off.
- Press the TIME SETTING BUTTONS until the desired time is set.
- To set the selected time, press the TIMER SETTING BUTTONS aiming the remote controller at the signal receptor.


To cancel the timer setting
Check if 2^ndF icon is off.
Press the TIMER CANCEL BUTTON aiming the remote controller at the signal receptor. (The timer lamp on the air conditioner and the display will go off.)
NOTE
Select one of the following four types of operation.

text_image
OFF a.m. 12:00 ON a.m. 6:00 ON OFF a.m. 3:30 a.m. 3:00 ON OFF a.m. 3:00 a.m. 3:30Delay off timer Delay on timer Delay off and on timer Delay on and off timer
Airflow Direction Control
The up/down and right/left airflow can be adjusted by using the remote control.
natural_image
Illustration of a computer monitor with scroll arrows indicating data transfer (no text or symbols)Press the Start/Stop button to start the unit.
Press Chaos Swing button and the louvers will swing.

Press the button again and the louvers will stop. After 30 minutes, the louvers return to the maximum airflow position automatically.
Air Circulation Mode

This operation circulates the air without cooling or heating. It can be activated by pressing the AIR CIRCULATION BUTTON. Once the air circulation is activated you can select the air speed by pressing the INDOOR FAN SPEED SELECTOR BUTTON.
NOTE
CHAOS Air economizes power consumption and prevents overcooling. The fan speed is automatically changed from high to low or vice versa, depending on the ambient temperature.
- In case of inverter type models where there is no AIR CIRCULATION BUTTON, air circulation can be operated by pressing the PLASMA BUTTON.
Auto Restart Function
This function is useful in the situation of power failure.
When power regains after a failure this feature restore the previous operating condition and the air conditioner will run in the same settings.
NOTE
This feature is enabled by factory default setting, but you can disable it by pressing the ON/OFF button for 6 seconds. The unit will beep twice and the lamp will blink twice 4 times. To enable it, press the button again for 6 seconds. The unit will beep twice and the indicator lamp(1) will blink 4 times.

Maintenance and Service
CAUTION
Before performing any maintenance, turn off the main power to the system, disconnect the circuit breaker and unplug the power cord.
Indoor Unit
Clean the unit with a soft dry cloth. Do not use bleach or abrasives.
CAUTION
Never use any of these
- Water hotter than 40^ . It may cause deformation and discoloration.
- Volatile substances. They may damage the surface of the air conditioner.
Air Filters
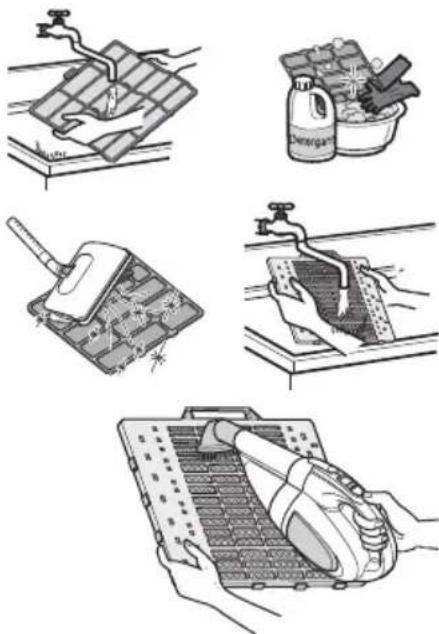
The air filters behind the front panel / grill should be checked and cleaned once in every 2 weeks or more often if necessary. To remove the filters see the self explanatory diagrams for each model type. Clean the filters with a vacuum cleaner or warm soapy water. If dirt is not easily removed, wash with a solution of detergent in luke warm water. Dry well in shade after washing and reinstall the filters back in place.
Plasma Filters
The plasma filters behind the air filter should be checked and cleaned once in every 3 months or more often if necessary. To remove the filters see the self explanatory diagrams for each model type. Clean the filters with a vacuum cleaner. If it is dirty wash it with water and dry well in shade an install back in place.
Deodorizer Filters
Remove the deodorizer filters behind the air filter and expose them in direct sunlight for 2 hours.
And then insert these filters into original position.

natural_image
Illustration showing five different cleaning and cleaning techniques: roof tiles, spray bottle, circuit board, handwashing, and cleaning device (no text or symbols present)Removal of Filters
1. Art Cool Type :
Pull out the upper section of front panel and lift it up. Take out a filter with front panel held.
With PUSH button pressed, pull out grip to take out a plasma filter. Dry it completely in the shade after cleaning.
Then set a plasma filter and a filter orderly. Put the hook of front panel onto the hanger, in order to close the front panel.

flowchart
graph TD
    A["Front panel"] --> B["Plasma filter"]
    B --> C["Back panel hook"]
    C --> D["Air filter"]
    D --> E["Air filter hook"]
    style A fill:#f9f,stroke:#333
    style B fill:#ccf,stroke:#333
    style C fill:#cfc,stroke:#333
    style D fill:#fcc,stroke:#333
    style E fill:#ffc,stroke:#333
CAUTION
Don't touch this plasma filter within 10 seconds after opening the inlet grille, it may cause an electric shock.
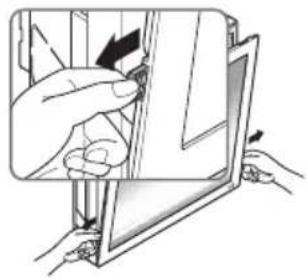
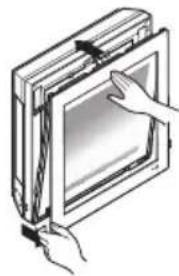
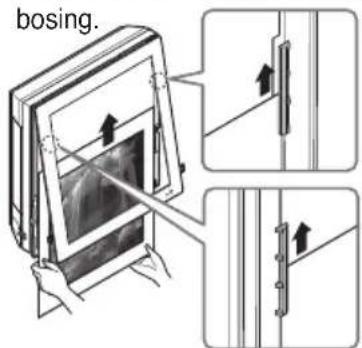
How to replace picture & photograph
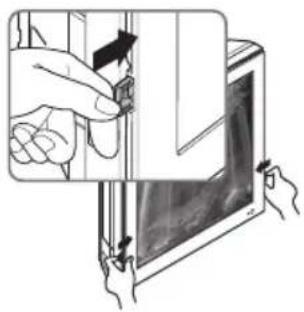
- Turn off power and then open the upper part of front panel.

natural_image
Illustration of a hand holding a blank sheet with a black clip, no text or symbols present- Pull out the both links of lower part of front panel, as described in the below picture.
natural_image
Illustration of hands installing or adjusting a door panel with arrows indicating movement (no text or symbols)- Push and close the top part of the front panel and then pull the bottom part of the panel forward until it is secured.
natural_image
Illustration of hands interacting with a rectangular device (no text or symbols visible)- Take out picture.

natural_image
Illustration of hands holding a laptop with a screen and arrow indicating rotation (no text or symbols)- Turn upside-down of the picture and turn over mat, then take off a protective tape attached at the mat.
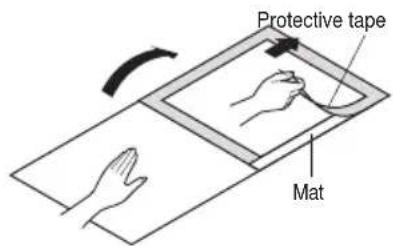
text_image
Protective tape Mat- Place the picture/photograph between the exited picture and mat. (Recommended size of a photo/picture: 450mm x 450mm)
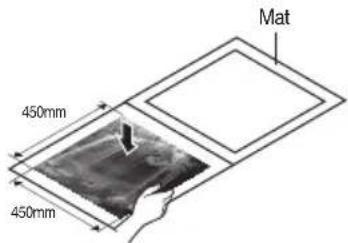
text_image
450mm 450mm Mat- Cover mat and press down with hand(s) until contacting closely.

natural_image
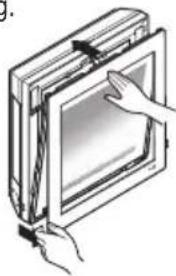
Illustration of two hands holding a tablet with a screen, showing a magnified view of the screen (no text or symbols present)- Slide the photo graph/drawing requested under both hanger parts as following, and fix them. Press the front panel lightly to close.
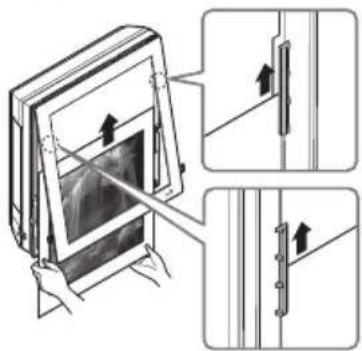
text_image
Technical diagram showing assembly steps of a device with directional arrows indicating movement or assembly.- Push both links of lower part of panel inside and fix it. Then turn on.
natural_image
Illustration of a hand inserting a component into a device panel (no text or symbols visible)※ In case a mat is not used, recommended size of a photo/picture: 522mm x 522mm
When powering on after replacing filter and picture, the front panel doesn't intervene.

text_image
re: 522mm 522mmOutdoor Unit
The heat exchanger coils and panel vents of the outdoor unit should be checked regularly. If clogged with dirt or soot, the heat exchanger and panel vents may be professionally steam cleaned.
NOTE
Dirty or clogged coils will reduce the operating efficiency of the system and cause higher operating costs.
Operation Tips!
Do not overcool the room.
This is not good for the health and wastes electricity.
Keep blinds or curtains closed.
Do not let direct sunshine enter the room when the air conditioner is in operation.
Keep the room temperature uniform.
Adjust the vertical and horizontal airflow direction to ensure a uniform temperature in the room.
Make sure that the doors and windows are shut thight.
Avoid opening doors and windows as much as possible to keep the cool air in the room.
Clean the air filter regularly.
Blockages in the air filter reduce the airflow and lower cooling and dehumidifying effects. Clean at least once every two weeks.
Ventilate the room occasionally.
Since windows are kept closed, it is a good idea to open them and ventilate the room now and ten.
Use high fan speed for effective and fast cooling.
The unit gives its rated cooling capacity when the fan speed is high.
Self-Diagnosis Function
This unit has an inbuilt error diagnosis capability. Unit LED will blink in case if thermistor fails. Please contact your serviceman/dealer in such a situation

text_image
Error Display LED (once) 3 sec 3 sec 3 sec (once) 3 sec 3 sec 3 secTroubleshooting Tips! Save time and money!
The air conditioner may be operating abnormally when:
| Problem | What To DoPossible Cause | |
| Air conditioner does not start | ■The air conditioner is unplugged. | ·Make sure the air conditioner plug is pushed completely into the outlet. |
| ■The fuse is blown/circuit breaker is tripped. | ·Check the house fuse/circuit breaker box and replace the fuse or reset the breaker. | |
| ■Power failure. | ·If power failure occurs, turn the mode control to OFF.When power is restored, wait 3 minutes to restart the air conditioner to prevent tripping of the compressor overload. | |
| ■High voltage. | ·If the voltage is unusually very high or low the circuit Breaker will trip. | |
| Air conditioner does not cool as it should | ■Airflow is restricted. | ·Make sure there are no curtains, blinds, or furniture blocking the front of the air conditioner. |
| ■The air filter is dirty. | ·Clean the filter at least every 2 weeks.See the Maintenance and Service section. | |
| ■The room may have been hot. | ·When the air conditioner is first turned on, you need to allow time for the room to cool down. | |
| ■Cold air is escaping. | ·Check for open furnace floor registers and cold air returns. | |
| ■Check the temperature settings. | ·Make sure they are correct. | |
| ■There might be any heating source in the room. | ·Check and remove such source or turn it off while using the air conditioner. |
Call the service immediately in the following situations
- Anything abnormal such as burning smell, loud noise etc. happen. Stop the unit and turn the breaker off. Never try to repair by yourself or restart the system in such cases.
- Main power cord is too hot or damaged.
- Error code is generated by self diagnosis.
- Water leaks from indoor unit even if the humidity is low.
- Any switch, breaker (safety, earth) or fuse fails to work properly
User must carry routine checkup & cleaning to avoid unit's poor performance. In case of special situation, the job must be carried out by service person only.
РУКОВОДСТВО
ПОЛЬЗОВАТЕЛЯ
КОНДИЦИОНЕР
natural_image
Simple line drawing of people enjoying a picnic at a table with sun and palm trees in the background (no text or symbols)text_image
Illustration showing three steps of a hand tool application: adding a brush, adjusting the tool, and adjusting the tool with a handle.natural_image
Illustration of a computer monitor connected to a remote control unit (no text or symbols)natural_image
Hand pressing a button on an oval button with a small circle above (no text or symbols)natural_image
Simple line drawing of a refrigerator with icons for Wi-Fi, water drop, and battery (no text or symbols)Режим дегидратации

text_image
Diagram showing Wi-Fi connectivity icons including Wi-Fi, Wi-Fi, temperature thermometer, and alarm symbolnatural_image
Illustration of a computer monitor with curved arrows indicating data flow or rotation (no text or symbols)natural_image
Illustration of five different cleaning or cleaning techniques: surface cleaning, spray bottle, cleaning board, handwashing, and cleaning tray (no text or symbols)natural_image
Illustration of hands holding a blank sheet with a black clip, no text or symbols presentnatural_image
Illustration of a hand holding a laptop with a screen, showing no text or symbols on the device itself.natural_image
Illustration of two hands holding a tablet with a screen, showing a dark abstract image (no text or symbols)natural_image
Illustration of hands installing or adjusting a door panel with arrows indicating movement (no text or symbols)text_image
Diagram illustrating a mechanical assembly with labeled components and directional arrows indicating movement or force.natural_image
Illustration of hands inserting a rectangular device into a screen (no text or symbols visible)natural_image
Illustration of hands interacting with a laptop screen and tablet (no text or symbols visible)text_image
522mm 522mmНаружный блок
natural_image
Illustration of two people sitting on a table with floating objects, no text or symbols presentEhtiyot choralari
text_image
Illustration showing four steps of a hand tool application, with arrows indicating direction and movement.Simsiz masofadan boshqarish pultiga texnik xizmat ko'rsatish
natural_image
Illustration of a computer monitor connected to a cable (no text or symbols)natural_image
Hand pressing a button on an oval object with a small circle above (no text or symbols)2 Masofadan boshqarish pulti eshigini oching va ishlatish rejimi tugmasini bosing. Har safar tugma bosilganda ishlatish rejimi mil bilan ko'rsatilgan yo'nalishda o'zgaradi.


text_image
sovutish Avtomatik o'zgartirish Sog'lom namsizlantirish Isitish (Faqat isitish nasosiga ega bol'gan modellar)text_image
Diagram showing Wi-Fi and water droplet symbols above a rectangular device with battery iconsSog'lom namsizlantirish

Sog'lom namsizlantirish rejimi davomida
☐Agar siz ISHLATISH REJIMINI TANLASH TUGMASIDA namsizlantirish rejimini tanlasangiz, mahsulot namsizlantirish funksiyasini ishlatishni boshlaydi. U sezilgan joriy xona harorati asosida xona harorati va havo oqimi hajmini namsizlantirish uchun eng yaxshi sharoitga avtomatik ravishda o'rnatadi.
text_image
Diagram showing weather icons including Wi-Fi, temperature gauge, and alarm symbol with corresponding iconsAvto
natural_image
Illustration of a CD-ROM with a curved arrow indicating rotation or data transfer (no text or symbols)Qurilmani ishga tushirish uchun ishga tushirish/to'xtatish tugmasini bosing.
Xaosli tebranish tugmasini bosing va jalyuzalar tebranadi.

Shu tugmani qayta bosing va jalyuzalar to'xtaydi. 30 daqiqadan keyin jalyuzalar maksimal havo oqimi hola-tiga avtomatik ravishda qaytadi.
Havo aylanishi rejimi

Bu ishlash rejimi havoni sovutishsiz yoki isitishsiz aylantiradi. Uni HAVO AYLANISHI TUGMASINI bosish orqali faollashtirish mumkin. Havo aylanishi faollashtirilgandan so'ng, ICHKI BLOK VENTILYATORI TEZLIGINI TANLASH TUGMASINI bosish orqali siz havo tezligini tanlashingiz mumkin.
ESLATMA
XAOS havo quvvat iste'molini tejaydi va ortiqcha qizib ketishning oldini oladi. Atrofdagi haroratga bog'liq ravishda ventilyator tezligi yuqoridan quyiga yoki quyidan yuqoriga avtomatik ravishda o'zgartiriladi.
- HAVO AYLANISHI TUGMASI mavjud bo'Imagan invertor turidagi modellarda havo aylanishini PLAZMA TUGMASINI bosish orqali ishlatish mumkin.
natural_image
Illustration of cleaning and cleaning steps: surface water treatment, spray bottle, cleaning board, and handwashing (no text or symbols)1. Art Cool turi :
Old panelning yuqori qismini torting va uni yuqoriga ko'taring. Old panelni ushlab turgan holda filtrni chiqarib oling.
BOSISH tugmasini bosib turgan holda plazma filtrini chiqarib olish uchun ushlagichni torting. Tozalagandan keyin uni soyada yaxshilab quriting. Keyin plazma fitri va filtrni tartib bo'yicha joylashtiring. Old panelni yopish uchun old panel ilgagini osgichga joylashtiring.

flowchart
graph TD
    A["Old panel"] --> B["Plazma filtrator"]
    B --> C["Havo filtri"]
    C --> D["Old panel ilgagi"]
    D --> E["Ilgak-osgich"]
    style A fill:#f9f,stroke:#333
    style B fill:#ccf,stroke:#333
    style C fill:#cfc,stroke:#333
    style D fill:#fcc,stroke:#333
    style E fill:#cff,stroke:#333
DIQQAT
Havo kiritish panjarasini ochgandan keyin 10 soniyacha ushbu plazma filtriga tegmang, bu elektr toki urishiga olib kelishi mumkin.
Rasm va fotosurat qanday almashtiriladi
- Elektr ta'minotini o'chiring va keyin old panelning yuqori qismini oching.

natural_image
Illustration of a hand holding a tablet or tablet device, no text or symbols present- Old panelning quyi qismidagi ikkala ulagichlarni quyidagi rasmda ko'rsatilgani kabi torting.

natural_image
Illustration of hands installing or adjusting a device panel with arrows indicating motion (no text or symbols)- Old panel yuqori qismini bosing va old panelni yoping va keyin old panel quyi qismini u mahkamlangunicha oldinga torting.
natural_image
Illustration of hands inserting a rectangular device into a screen (no text or symbols visible)natural_image
Illustration of a hand holding a laptop with a screen and arrow indicating rotation (no text or symbols)- TRasmni teskarisiga aylantiring va gilamcha ustida aylantiring, keyin taglikka biriktirilgan himoya plyonkasini olib tashlang.

text_image
Himoya tasmasi paspartunatural_image
Illustration of two hands holding a tablet with a magnified view showing the screen (no text or symbols)- Talab qilingan fotosurat/chizmani har ikkala ilmoq qismlari ostida sirpantiring va ularni mahkamlang. Uni yopish uchun old panelni yengil bosing.
text_image
bosing.- Panelning quyi qismidagi har ikkala ulovchilarni ichkariga bosing va panelni mahkamlang. Keyin yoqing.

natural_image
Illustration of a hand inserting a small object into a device, with hands holding the component (no text or symbols visible)※ Taglikdan foydalanilmagan hollarda fotosurat/rasmning tavsiya qilingan o'lchami:
522mm × 522mm
text_image
522mm 522mmTashqi blok
Tashqi blokning issiqlik almashish g'altagi va panel ventilyatorlari muntazam ravishda tekshirib turilishi lozim. Agar kirlar yoki qurum bilan to'lib qolgan bo'lsa, issiqlik almashtirgich va panel ventilyatorlarini maxsus tarzda bug' bilan tozalanishi mumkin.