VTD-A4F/IM - Security Camera Vitek - Free user manual and instructions
Find the device manual for free VTD-A4F/IM Vitek in PDF.

User questions about VTD-A4F/IM Vitek
0 question about this device. Answer the ones you know or ask your own.
Ask a new question about this device
Download the instructions for your Security Camera in PDF format for free! Find your manual VTD-A4F/IM - Vitek and take your electronic device back in hand. On this page are published all the documents necessary for the use of your device. VTD-A4F/IM by Vitek.
USER MANUAL VTD-A4F/IM Vitek
text_image
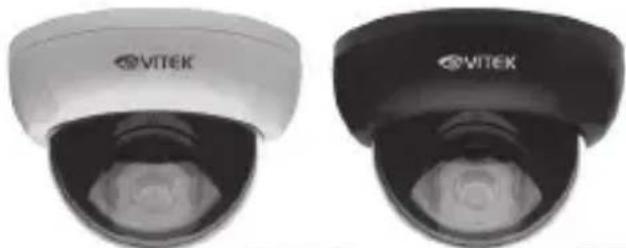
VITEK® INDUSTRIAL VIDEO PRODUCTS, INC.Alpha Mega Series
Indoor Dome
Cameras
natural_image
Two VITEK-branded security cameras shown from different angles (no text or symbols visible)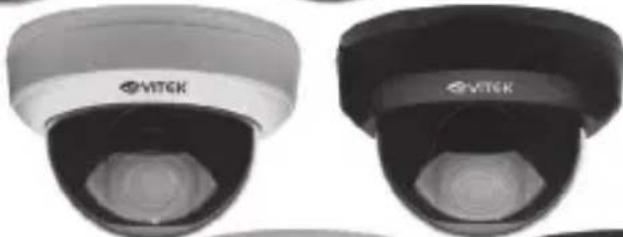
natural_image
Two identical VITEK security camera modules shown from top and bottom angles (no text or symbols visible)Alpha MEGA

natural_image
Two identical VTEK security cameras shown from top and bottom angles (no text or symbols visible)• 1000 TV Lines of Resolution (1.39 MegaPixel)
• 1/2.9" CMOS Sensor
• Highly Advanced EN773E Digital Signal Processor
• 3.6mm Fixed & 2.8-12mm Varifocal Lens Options
• Available with 35 IR LEDs (120' Range)
- Advanced OSD Functions: WDR, 3D DNR, DSS, DIS, Sens-up, Motion Detection, Privacy
• Secondary Video Output (Cable Included)
• 3-Axis Mount for Optimum Viewing Angle
• 12VDC/24VAC Dual Voltage Operation
TABLE OF CONTENTS
BOX CONTENTS / MOUNTING ACCESSORIES 2
AVAILABLE MODELS 3
VTD-A4F/IM INSTALLATION 4
VTD-A2812/IM INSTALLATION 5
VTD-AR2812/IM INSTALLATION 6
INSTALLATION TIPS 7
SETUP MENU 8
OSD OPERATION 9-19
DIMENSIONS 20
SPECIFICATIONS 21-23
NOTES 24-26
BOX CONTENTS
1) Alpha Mega Dome Camera
2) Mounting Accessories
3) Secondary Video Output Cable
4) This instruction Manual & Mounting Template
MOUNTING ACCESSORIES

natural_image
Line drawing of a screw with threaded shaft and circular head (no text or symbols)Self Tapping Screws
For attaching the housing base to a solid surface.
Type #: Phillips ST4x30
Qty: 4 (2 screws - VTD-A4F/IM)
natural_image
Line drawing of a USB cable connector (no text or symbols)Secondary Video Output Cable
To be used with a service monitor for adjusting
the angle, focus and zoom.
Qty: 1
AVAILABLE MODELS
VTD-A4F/IWM
Alpha Mega Series 1000 TVL (1.39MP) Indoor Fixed 3.6mm Dome - Ivory
VTD-A4F/IBM
Alpha Mega Series 1000 TVL (1.39MP) Indoor Fixed 3.6mm Dome - Black
VTD-A2812/IWM
Alpha Mega Series 1000 TVL (1.39MP) Indoor 2.8-12mm Varifocal Dome - Ivory
VTD-A2812/IBM
Alpha Mega Series 1000 TVL (1.39MP) Indoor 2.8-12mm Varifocal Dome - Black
VTD-AR2812/IWM
Alpha Mega Series 1000 TVL (1.39MP) Indoor 2.8-12mm Varifocal Dome & 35 IR LEDs - Ivory
VTD-AR2812/IBM
Alpha Mega Series 1000 TVL (1.39MP) Indoor 2.8-12mm Varifocal Dome & 35 IR LEDs - Black
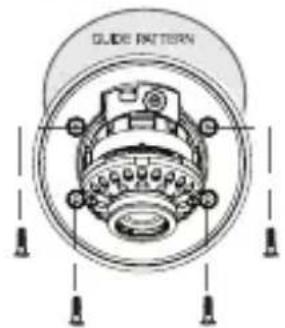
VTD-A4F/IM INSTALLATION
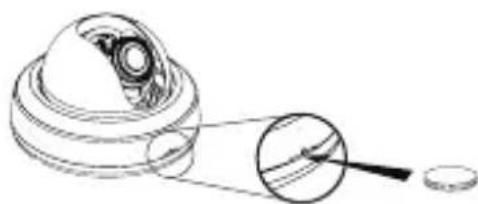
1. Opening
Use a coin to open the cover.
2. Place the camera in the desired location and install using the screws supplied,

natural_image
Diagram of a spherical object with internal structure and magnified view showing internal components (no text or symbols)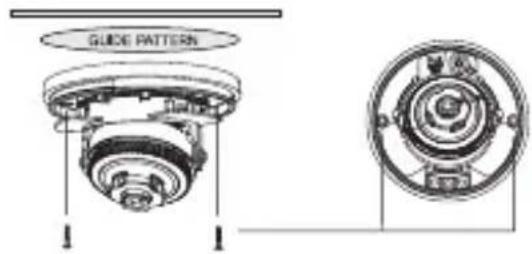
text_image
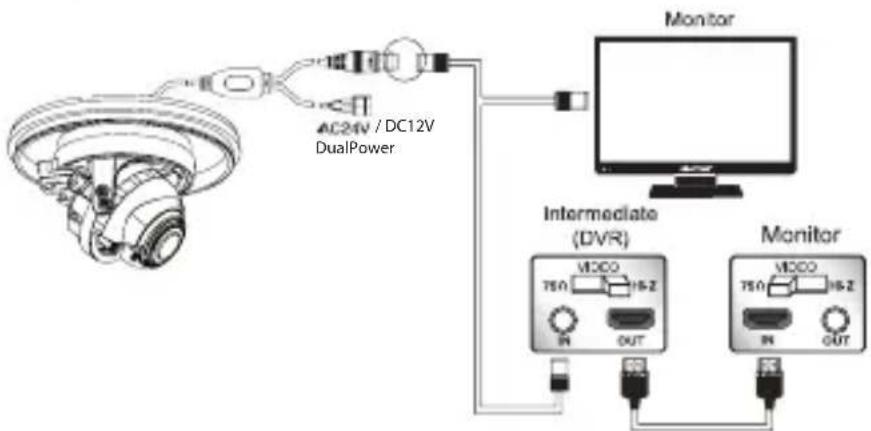
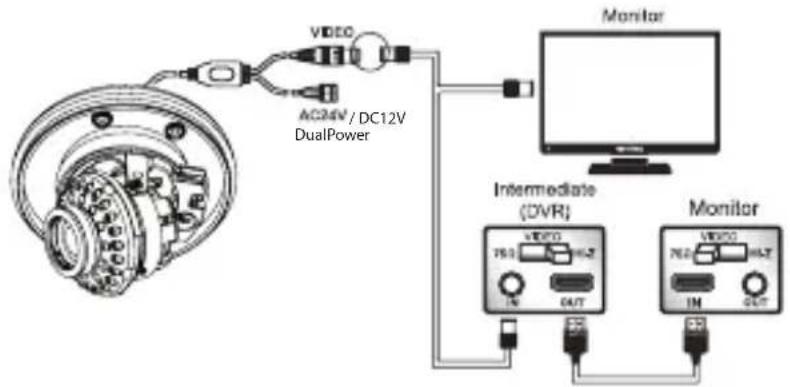
GUIDE PATTERN3. Connecting Cables
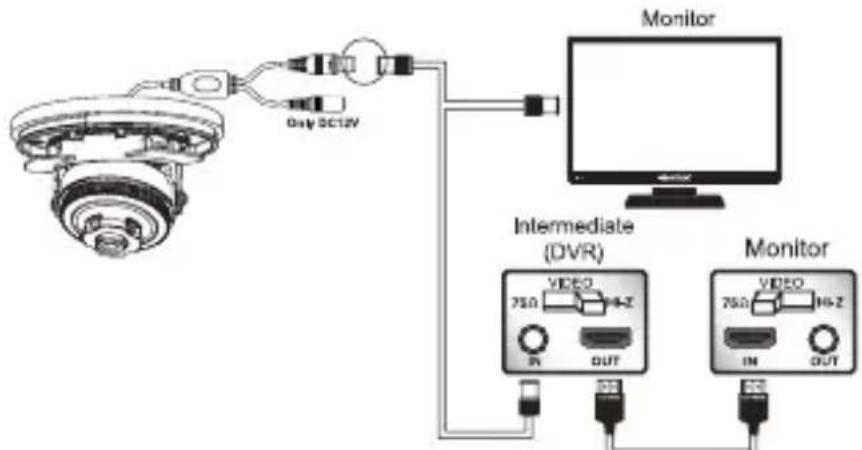
text_image
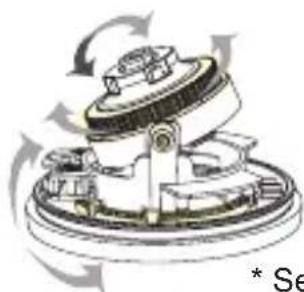
Monitor Day 0C12V Intermediate (DVR) Monitor 75Ω 1Hz IN OUT 75Ω 1Hz IN OUT4. Pan / Tilt (3Axis) Controls
- Closing the cover
natural_image
Mechanical assembly diagram showing a rotating component with no visible text or symbols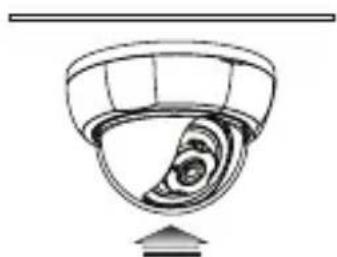
natural_image
Simple line drawing of a bowl with a spiral pattern inside, no text or symbols present.* See Installation Tips on page 7
VTD-A2812/IM INSTALLATION
INSTALLATION
1. Opening
Use a coin to open the cover.
- Place the camera in the desired location and install using the screws supplied.
natural_image
Technical line drawing of a mechanical component with a magnified inset showing internal detail (no text or symbols)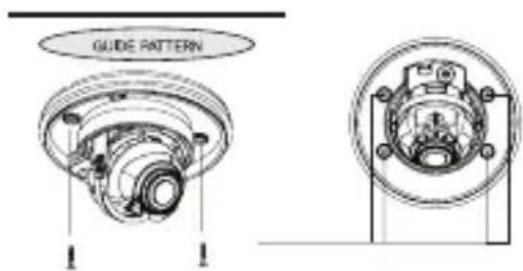
text_image
GUIDE PATTERN3. Connecting Cables
flowchart
graph TD
    A["AC24V / DC12V DualPower"] --> B["Monitor"]
    B --> C["Intermediate (DVR)"]
    C --> D["Monitor"]
    D --> E["750 15-2 OUT"]
    E --> F["Monitor"]
    F --> G["750 15-2 OUT"]
4. Pan / Tilt (3Axis) Controls
5. Closing the cover

natural_image
Mechanical assembly diagram showing rotating components with no visible text or symbols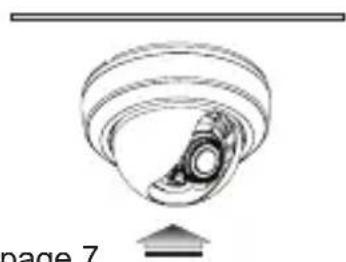
natural_image
Diagram of a mechanical component with concentric rings and a central gear-like structure, labeled 'page 7' at bottom (no text or symbols on diagram itself)* See Installation Tips on page 7
VTD-AR2812/IM INSTALLATION
Use a coin to open the cover.

natural_image
Technical line drawing of a mechanical bearing assembly (no text or symbols)- Place the camera in the desired location and install using the screws supplied.
text_image
GLIDE PATTERN- Connecting Cables
text_image
AC24V / DC12V DualPower VIDEO Monitor Intermediate (DVR) Monitor VIDEO IN OUT IN OUT-
Pan / Tilt (3Axis) Controls
-
Closing the cover

text_image
natural_image
Technical line drawing of a mechanical bearing assembly (no text or symbols)INSTALLATION TIPS
1.) Power Consumption - Amperage/Voltage
It is of utmost importance that the proper Voltage and Amperage is used when applying power to your VITEK Alpha Series Dome Camera. They can be powered by either 12V DC or 24V AC (except for the model VTD-A4F/IM - 12V DC only). Always use a UL Listed power transformer.
The Voltage must be measured at the camera location. It is very important that the camera receives no less than the required Voltage or it will be “Starved” and eventually die out. Cameras with Infrared LEDs require substantially more Amperage than others so please refer to the Specifications (page 21-23) for the camera you are installing.
SETUP MENU
MENU
| SETUP MENU |
| EXPOSURESENS-UP BRIGHTNESS LENS SHUTTER AGC RETURN |
| WHITE BALAUTO AUTOext PRESET MANUAL |
| IMAGESHARPNESS DEFOG D-ZOOM MIRROR FLIPPRIVACY SHADING COLOR GAIN ACE RETURN |
| BACKLIGHTOFF HLC BLC WDR |
| DAY&NIGHTMODE RETURN(AUTO, B/W, COLOR, EXTERN) |
| DNROFF LOW MIDDLE HIGH |
| MOTIONMOTION ALARM QUICK ZOOM RETURN |
| SYSTEMSERIAL GAMMA PEDESTAL VIEW ANGLECVBS LANGUAGE FOCUS ADJ FACTORY SET RETURN |
Above specifications may be changed without any notice.
OSD OPERATION
SETTINGS
Settings can be made using the Joystick located on the rear of the camera.

text_image
To Setup, please Push Up Left Right Down Extra Video Output- Please press joystick down
- Settings can now be made. The Main Menu is displayed on monitor.
- Please select any function you wish to activate by pushing the joystick Up or Down
• The cursor position will appear yellow on your screen.
Push the joystick up or down to highlight the function you wish to change.
OSD OPERATION
MENU
Select any function you wish to operate by pushing the joystick Up or Down.

text_image
MANU EXPOSURE AUTO WHITE BAL IMAGE BACKLIGHT OFF DAY&NIGHT DNR MIDDLE MOTION SYSTEM EXITModes can be changed pushing the joystick Right or Left.
- Please press the joystick Right or Left if you wish to change mode.
- When the joystick is pressed Right or Left, available values and mode are displayed in order. Please keep pressing the joystick until you get the mode you wish.
- Please select "EXIT" and then press the joystick to finish the setting.
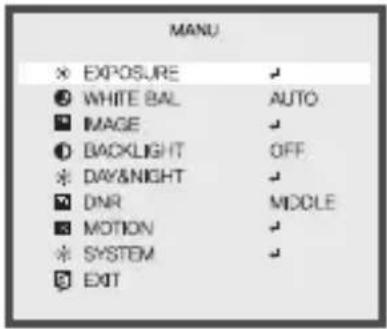
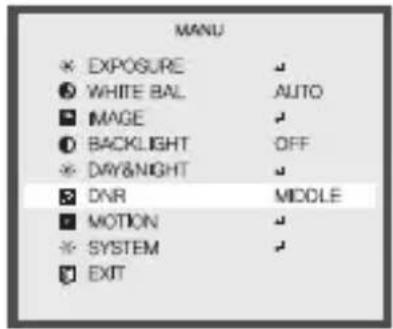
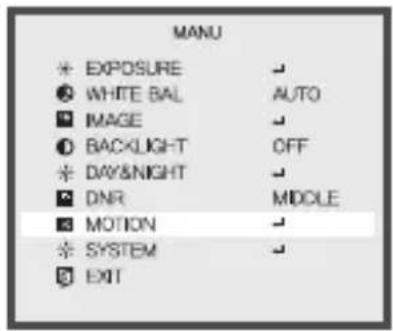
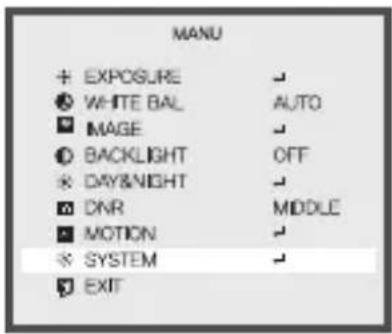
MAIN MENU
EXPOSURE, WHITE BAL, IMAGE, BACKLIGHT, DAY&NIGHT, DNR, MOTION, SYSTEM, EXIT control can be selected.
OSD OPERATION
EXPOSURE
- When the Main Menu screen is displayed move highlighted area to EXPOSURE using the up/down of the joystick and then press down on the joystick to enter EXPOSURE Mode.
- Highlight section to change by using joystick Up/Down. After section is highlighted us joystick Left/Right to adjust settings.
- Brighter video can be obtained by increasing the exposure time at night with SENS-UP. SENS-UP is the maximum integration of frames by DSS(Digital Slow Shutter) in low light.
- When "SENS_UP" is on, shutter cannot be adjusted.
- BRIGHTNESS: Adjusts the brightness of video(0\~20).
- LENS: When using the built-in lens, select either Manual (default) or DC.
• DC MODE : OUTDOOR / INDOOR / DEBLUR
• MANUAL MODE : DEBLUR / NORMAL /
- SHUTTER: AUTO / MANUAL / FLICKER
- When selecting Manual choose which Shutter speed to use. (1/60, 1/120, 1/240, 1/500, 1/1000, 1/2000, 1/4000, 1/8000, 1/16000, 1/30000, 1/60000)
- AGC (Auto Gain Control)
• The higher the gain level, the brighter the screen - but the higher the noise.
- RETURN
OSD OPERATION
WHITE BAL
- Use the White Balance function to adjust the screen color.
- When in the MAIN MENU highlight WHITE BAL by using the joystick up/down.
- Select mode by moving joystick left or right.

text_image
MANU × EXPOSURE ● WHITE BAL AUTO ■ IMAGE ○ BACKLIGHT OFF × DAY&NIGHT ■ DNR MIDDLE ■ MOTION × SYSTEM ● EXIT• AUTO
: Default · This function continuously adjusts the while balance automatically to adapt to changes in lighting conditions.
• AUTOext
: This mode is for use in Halogen or extremely bright white light.
- PRESET
: This function adjusts the white balance regardless of the subject conditions.
• MANUAL
KELVIN : LOW / MIDDLE / HIGH
R-GAIN : Joystick left to decrease, joystick right to increase.
B-GAIN : Joystick left to decrease, joystick right to increase.
RETURN
NOTE
- Under the following conditions the WHITE BALANCE function may not operate properly. In such cases, please select the AWB mode.
- When the object's surroundings have a very high color temperature
When the object's surroundings are dark
OSD OPERATION
IMAGE

- SHARPNESS: Adjust from 0\~10 by using joystick left or right.
- DEFOG : MODE (you can select AUTO / MANUAL) . LEVEL (you can select LOW / MIDDLE / HIGH)
-DZOOM: You can use a digital zoom of 1.0 X \~ 8.0 X
-MIRROR / FLIP : Used to inverse the picture.
(1)

MIRROR (ON)
FLP(3N)
-PRIVACY: This mode conceals the areas you do not wish to appear on the screen.

text_image
IMAGE SHARPNESS DEFOG D-ZOOM MIRROR FLIP PRIMACY SHADING COLOR GAIN ACE RETURN
text_image
PRIN'ACY ZONE NUM 0 ZONE DISP ON H-POS 12 V-POS 2 H-SIZE 3 V-SIZE 3 ↓ Y LEVEL |n(n)| CR LEVEL |n(n)| CB LEVEL |n(n)| RETURN OFF- SHADING : When using wide angle lens, you can compensate darkness of corners on the screen.
- COLOR GAIN : Adjust from 0\~20 by using joystick left or right.
- ACE (Adaptive Color & Contrast Enhancement) :
OFF, LOW, MIDDLE, HIGH, ACE performs an image enhancement process to enhance the image by changing the brightness value.
OSD OPERATION
① BACKLIGHT
When there is a strong backlight behind the object, clear images of the background as well as the object can still be obtained by using the BACKLIGHT function.
text_image
MANU EXPOSURE WHITE BAL IMAGE BACKLIGHT DAY&NIGHT DNR MOTION SYSTEM EXIT
text_image
HLC LEVEL [mm(mm) 10 MODE ALL DAY RETURN
text_image
BLC H-POS 7 V-POS 6 H-SIZE 6 V-SIZE 5 RETURN
text_image
WDR WEIGHT HIGH RETURN• OFF : Turn off 'BACKLIGHT' function
- HLC : LEVEL - Adjust from 0\~20 by using joystick left or right MODEL - you can choice NIGHT ONLY or ALL DAY.
• BLC
H-POS : Adjust from 0\~20 with 0 being the left most V-POS : Adjust from 0\~20 with 0 being the top area. H-SIZE : Adjust from 0\~20 with 0 being the smallest H-SIZE : Adjust from 0\~20 with 0 being the smallest
• WDR (Wide Dynamic Range)
This function extends the gain range of the screen that is used, the camera takes a simultaneous picture of both indoor and outdoor. It improves contrast of the picture in outdoor scene well as indoor. Video image is processed from two images by shutter (long and short shutter) in a field to provide the best dynamic range. Highlight area is compensated by the short s and dark area is compensated by the long shutter. Final video have less contrast compared to the conventional camera which does not have WDR function.

WOR (ON)

WDR (OFF)
OSD OPERATION
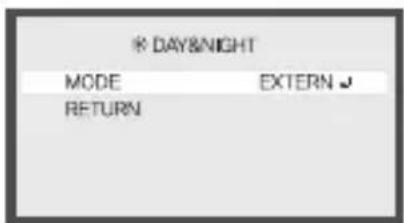
DAY&NIGHT

- EXTERN : DAY or NIGHT is determined by the built-in light photo sensor. Camera with IR LED must be set to EXTERN
text_image
* DAY&NIGHT MODE EXTERN ↕ RETURN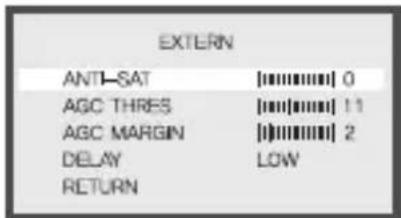
text_image
EXTERN ANTI-SAT 0 AGC THRES 11 AGC MARGIN 2 DELAY LOW RETURN• AUTO : Used when DAY or NIGHT is determined by light level through the lens and DAY from/to NIGHT is switched automatically by the scene brightness.

• COLOR : This picture is always displayed in color.
* B&W : The picture is always displayed in black and white. You can turn on or off the burst signal on B/W mode.
OSD OPERATION
DNR
DNR (Digital Noise Reduction)
- DNR is a technique of removing image noise from a video signal by applying a digital comb filter. It makes images clearer and reduces video file size.
text_image
MANU EXPOSURE WHITE BAL AUTO MAGE BACKLIGHT OFF DAY&NIGHT DNR MIDDLE MOTION SYSTEM EXIT- OFF : DNR function does not operate.
- LOW / MIDDLE / HIGH : You can select 'LOW', 'MIDDLE' or 'HIGH' menu as DNR condition.
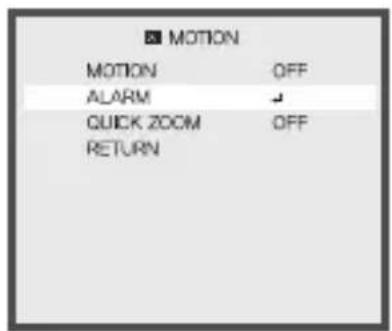
MOTION
This Product has a feature that allows you to observe movement in 3 different areas on the screen and the word MOTION will appear on screen when motion is detected.
text_image
DET. SETTING SENSITIVITY | [mm]mm[ 5 OBJ. KEEP LV 0 MOTION EST. | [mm]mm[ 0 SIGNAL OUT OFF RETURN- DET. SETTING
- SENSITIVITY: Adjust from 0\~20 by using joystick left or right.
- OBJ. KEEP LV: Adjust from 0\~60 by using joystick left or right.
• MOTION EST: Adjust from 0\~20 by using joystick left or right.
• SIGNAL OUT : You can select ON / OFF -
RETURN
-
WINDOW TONE: Adjust from 0\~6 by using joystick left or right.
- WINDOW ZONE: Adjust from 0\~4 by using joystick left or right.
- WINDOW USE : You can select ON / OFF
- DET H-POS: Adjust from 0\~60 by using joystick left or right.
- DET V-POS: Adjust from 0\~40 by using joystick left or right.
- DET H-SIZE: Adjust from 0\~40 by using joystick left or right.
- DET V-SIZE: Adjust from 0\~40 by using joystick left or right.
- RETURN
text_image
■ MOTION MOTION OFF ALARM ✓ QUICK ZOOM OFF RETURN
text_image
ALARM SHAKING ON SHAKE SCALE 10 BRIGHT CHG. ON BRIGHT SCL. 3 RETURNOSD OPERATION
- ALARM
• SHAKING : You can select ON / OFF
- SHAKE SCALE: Adjust from 0\~20 by using joystick left or right.
• BRIGHT CHG : You can select ON / OFF
• BRIGHT SCL: Adjust from 0\~20 by using joystick left or right.
• RETURN

text_image
■ MOTION MOTION OFF ALARM ✓ QUICK ZOOM ON ✓ RETURN
text_image
QUICK ZOOM MOVING 30 / 60sec ZOOM N 30 / 60sec STANDBY 30 / 60sec SYNCHRONOUS OFF TRACKING OFF REPEAT OFF RETURN- QUICK ZOOM
• MOVING : 0/60sec \~240/60sec
• ZOOM N : 0/60sec \~240/60sec
• STANDBY : 0/60sec \~240/60sec
• SYNCHRONOUS : You can select ON / OFF
• TRACKING : You can select ON / OFF
• REPEAT : You can select ON / OFF
• RETURN
OSD OPERATION
※ SYSTEM
After entering FOCUS ADJ a box with 3 different boxes within will appear on screen. Each box is to aid in focusing of different scene contrasts, LEFT box for low contrast MIDDLE box for medium contrast and RIGHT box for high contrast. Adjust focus so no green will be in box of selected contrast.
- FACTORY SET : Factory initialize
- RETURN
DIMENSIONS
VTD-A4F/IM

text_image
4.6" (117mm)
text_image
3.75" (95.1mm)
text_image
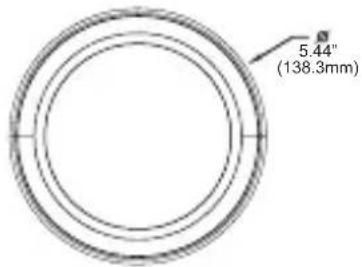
1.4" (35.5mm) 3.18" (80.8mm) 4.6" (117mm)VTD-A2812/IM
text_image
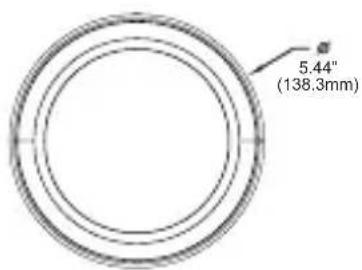
5.44" (138.3mm)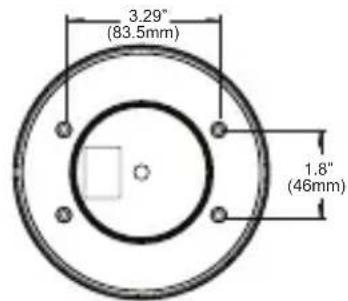
text_image
3.29" (83.5mm) 1.8" (46mm)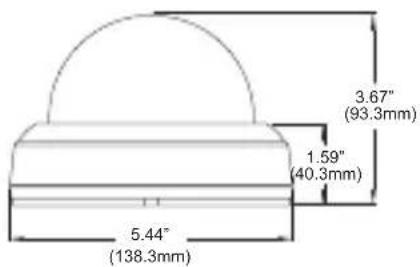
text_image
3.67" (93.3mm) 1.59" (40.3mm) 5.44" (138.3mm)VTD-AR2812/IM
text_image
5.44" (138.3mm)
text_image
3.29" (83.5mm) 1.8" (46mm)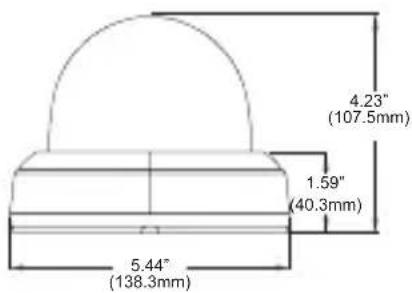
text_image
4.23" (107.5mm) 1.59" (40.3mm) 5.44" (138.3mm)SPECIFICATIONS
VTD-AF4/IM
| Image Device 1/2.9" CMOS Sensor |
| Resolution 1000 TV Lines |
| Min. Illumination 0.1 Lux (B/W) / 1.0 Lux (Color) |
| Effective Pixels 1305 x 1049 (1.39 MegaPixel) |
| S/N Ratio More Than 52dB (AGC Off) |
| Smart Motion Zoom YES |
| 3D DNR YES |
| Defog YES |
| Standard Lens 3.6mm Fixed Lens |
| Power Source 12VDC Operation |
| Power Consumption 120 mA |
| Environmental 14°F~122°F (-10°C~50°C) at 30%~80% RH |
| Dimensions 4.6" x 3.07" (117mm x 78mm) |
| Weight 0.5lbs (227g) |
SPECIFICATIONS
VTD-A2812/IM
| Image Device 1/2.9" CMOS Sensor | |
| Resolution 1000 TV Lines | |
| Min. Illumination 0.1 Lux (B/W) / 1.0 Lux (Color) | |
| Effective Pixels 1305 x 1049 (1.39 MegaPixel) | |
| S/N Ratio More Than 52dB (AGC Off) | |
| Smart Motion Zoom YES | |
| 3D DNR YES | |
| Defog YES | |
| Standard Lens Varifocal 2.8-12mm IR Corrected | |
| Power Source Dual Voltage 12VDC/24VAC Operation | |
| Power Consumption (12VDC) 210 mA | |
| Power Consumption (24VAC) 230 mA | |
| Environmental 14°F~122°F (-10°C~50°C) at 30%~80% RH | |
| Dimensions 5.45" x 3.7" (138.30mm x 93.76mm) | |
| Weight | 0.62lbs (272g) |
SPECIFICATIONS
VTD-AR2812/IM
| Image Device 1/2.9" CMOS Sensor | |
| Resolution 1000 TV Lines | |
| Min. Illumination 0.1 Lux (B/W) / 1.0 Lux (Color) / 0 Lux w/IR LEDs On | |
| Effective Pixels 1305 x 1049 (1.39 MegaPixel) | |
| S/N Ratio More Than 52dB (AGC Off) | |
| Smart Motion Zoom YES | |
| 3D DNR YES | |
| Defog YES | |
| Standard Lens Varifocal 2.8-12mm IR Corrected | |
| IR LEDs (Built-In) 35 840nm LEDs | |
| Power Source Dual Voltage 12VDC/24VAC Operation | |
| Power Consumption (12VDC) 210ma / 800ma (IR OFF/ON) | |
| Power Consumption (24VAC) 230ma / 760ma (IR OFF/ON) | |
| Environmental 14°F~122°F (-10°C~50°C) at 30%~80% RH | |
| Dimensions | 5.44" x 4.23" (138.3mm x 107.5mm) |
| Weight | 0.75lb (318g) |
NOTES
NOTES
NOTES
VITEK LIMITED PRODUCT WARRANTY
VITEK products carry a three (3) year limited warranty. VITEK warrants to the purchaser that products manufactured by VITEK are free of any rightful claim of infringement or the like, and when used in the manner intended, will be free of defects in materials and workmanship for a period of three (3) years, or as otherwise stated above, from the date of purchase by the end user. This warranty is nontransferable and extends only to the original buyer or end user customer of a Vitek Authorized Reseller.
The product must have been used only for its intended purpose, and not been subjected to damage by misuse, wilful or accidental damage, caused by excessive voltage or lightning.
The product must not have been tampered with in any way then the guarantee will be considered null and void.
This guarantee does not affect your statutory rights.
Contact your local VITEK Reseller should servicing become necessary.
Vitek makes no warranty or guarantee whatsoever with respect to products sold or purchased through unauthorized sales channels. Warranty support is available only if product is purchased through a Vitek Authorized Reseller.

text_image
VITEK® INDUSTRIAL VIDEO PRODUCTS. INC.28492 CONSTELLATION ROAD VALENCIA, CA 91355
WWW.VITEKCCTV.COM
Version 3.0
September 2016
3700-8622B