AY3 MKII - Synthesizer Twisted Electrons - Free user manual and instructions
Find the device manual for free AY3 MKII Twisted Electrons in PDF.

User questions about AY3 MKII Twisted Electrons
0 question about this device. Answer the ones you know or ask your own.
Ask a new question about this device
Download the instructions for your Synthesizer in PDF format for free! Find your manual AY3 MKII - Twisted Electrons and take your electronic device back in hand. On this page are published all the documents necessary for the use of your device. AY3 MKII by Twisted Electrons.
USER MANUAL AY3 MKII Twisted Electrons
text_image
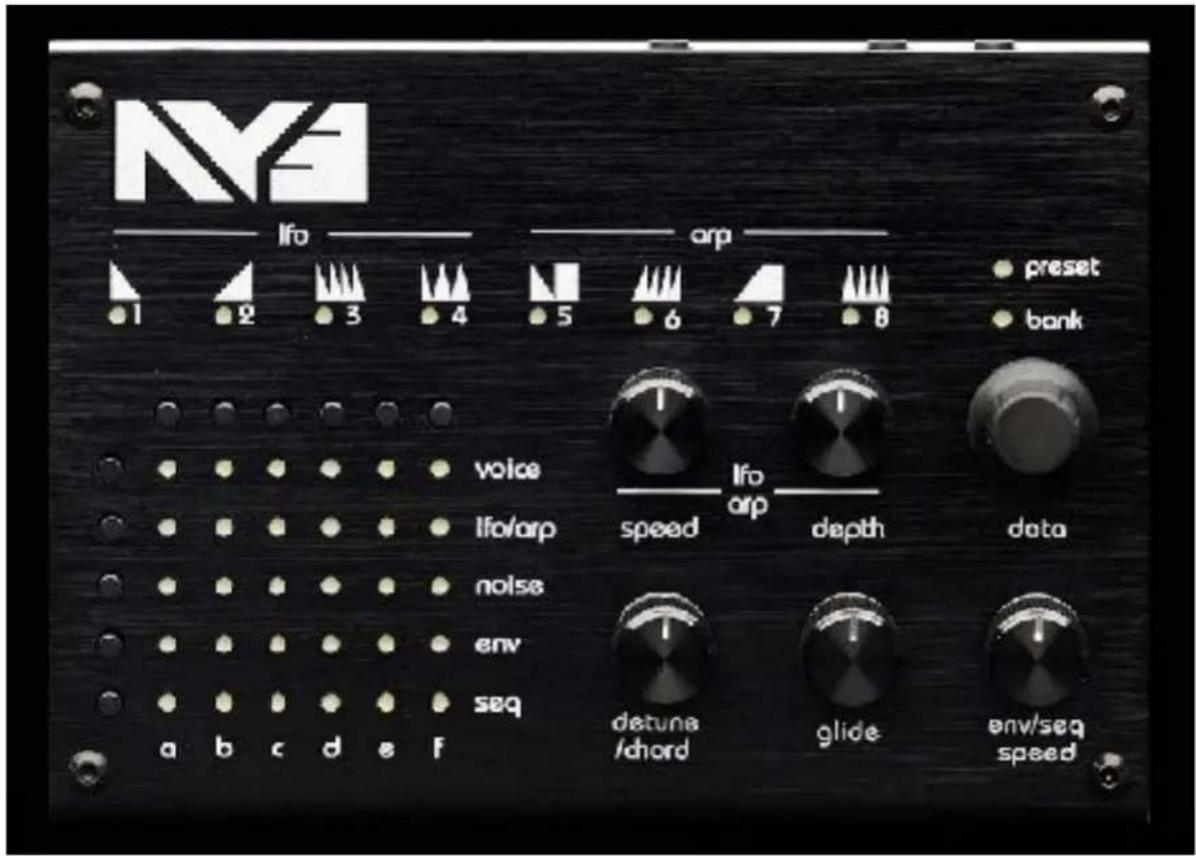
NV3 Ifo arp 8 preset hank voice Ifoarp seed Ifo arp both data a b c d e f seq decune fchord glide env/seq speedThanks! ...Overview
Thank-you for choosing the AY3! Time to take a break from HI-FI land and enjoy some good old 8-BIT nostalgia!
The AY3 features two 8912 chips boasting 6 voice polyphony. You can apply sequences, arpeggiators, noise, envelopes and pitch modulation to each voice with a click of a button.
Take the video AY3 Tour!
https://www.youtube.com/watch?v=lcXeGEhGb5l
About the AY-8912:
The AY-3-8912 and its variants became popular chips in many arcade games, and were used on, among others, the Intellivision and Vectrex video game consoles and the MSX, Amstrad CPC, Oric 1, Colour Genie, Elektor TV Games Computer and Sinclair ZX Spectrum 128/+2/+3 home computers as well as the Mockingboard sound card for the Apple II family.
1- Connectivity & Power
The AY3 features two 1/4" audio outputs, a MIDI input and a power socket
The AY3 is equipped with a bridge rectifier so can be powered by any AC or DC voltage source between 8v and 15v, 4 between 500mA and 2000mA.
text_image
NYM lfo arp preset bank 1 2 3 4 5 6 7 8 voice lfo/arp noise env seq a b c d e f lfo/arp speed depth data detuna /chord glide env/seq speed2- Preset load/save
The AY3 can hold 64 presets in 8 banks of 8 presets.
2-1 Load: Press the data wheel down to toggle between preset and bank mode (displayed above the data wheel). Roll the data wheel to load a preset.
2-2 Save: Hold the data wheel down for 3 seconds to save a preset (count-down displayed on leds 8 thru 1).
3- Voice
Voice edit mode has 3 sub-modes to enable/disable, adjust tuning & volume of each voice.
Cycle through these sub-modes by tapping row button 1. The led matrix will announce the selected sub-mode by displaying the letters E, V or T.
3-1 Enable: Enable/disable a voice via buttons a thru f.
3-2 Volume: Select a voice via buttons a thru f. Adjust the selected voice's volume with the data wheel. Volume is displayed on leds 1 thru 8
3-3 Tune: Select a voice via buttons a thru f. Transpose the selected voice with the data wheel.
4- Lfo/arp
Lfo/arp mode offers 2 types of pitch modulation: lfo & arpeggiator. Tap row button 2 to enter lfo/arp mode. There are 4 modes for both lfo and arp. Enable or diable the arp/lfo on each voice by clicking the buttons a thru f. Scroll through them with the data wheel.
4-1 lfo: The icons above leds 1 thru 4 indicated the selected lfo shape. Use the speed and depth knobs to adjust the lfo accordingly
4-2 arp: The 4 arp modes are up, down, up/down & random. The speed knob will adjust the arp's rate and the depth knob changes it's range in octaves
Note: The arp loves to slave itself to midi clock!
5- Noise
Noise can be applied to each voice by clicking on the buttons a thru f. Click row button 3 to enter noise mode.
The overall noise frequency can be adjusted by rolling the data wheel. Noise frequency is represented by leds 1 thru 8
6- Env
Envelopes can be applied to control a voice's volume. Tap row button 4 to enter env mode. There are 8 envelope shapes represented by icons above led 1 thru 8. Scroll through them with the data wheel.
Adjust the speed of the envelopes via the env/seq speed knob
Note: at high speeds the envelope will self-oscillate!
7- Sequencer
Each preset can store a 16 step sequence of 3 parameters: Note, Voice on/off and noise on/off. Tap row button 5 to enter env mode.
Apply the sequencer to a voice using buttons a thru f. Adjust the speed of the sequencer via the env/seq speed knob
Programming the sequencer:
Hold row button 5 for 3 seconds to enter sequencer program mode (countdown displayed on leds 1 thru 8).
Now simply roll the data wheel to select a step to edit (1-16 displayed on led matrix) then play a key on your midi keyboard to input the note. Tap the row 1 button to toggle the voice on and off. Tap the row 3 button the toggle the noise on and off. The led rows 1 and 3 indicate that voice and/or noise are activated for the selected step.
Hold row button 5 for 3 seconds to exit sequencer program mode (count-down displayed on leds 1 thru 8).
Note: The sequencer loves to slave itself to midi clock!
8- Detune/chord & glide
8-1 Detune/chord: The detune/chord knob has multiple modes:
At 0%: hold all voices to perfect unison.
Between 1-50%: detune the 6 voices (Aka fatness).
51 - 99%: choose between 7 voicing chords (displayed on leds 1 thru 8). at 100% the AY3 becomes a polysynth. You can play up to 6 voices simultaneously on your midi keyboard.
8-2 Glide: The glide knob has multiple modes adds glide aka portamento to the synth's pitch. More glide=longer portamentos.
Note: try gliding between the chords!
9- MIDI
9-1 Change Midi channel
To change the midi channel Ay3 responds to (default 1):
-Hold the bottom left button (seq) on startup
-You will see number 1 on the display, turn the encoder to set the desired channel then unplug the ay3 and reboot.
9-2 Midi implementation
| Midi Message | Range | Result |
| Note On/Off CH1 | 1-127 | Unison/Poly Voice |
| Note On/Off CH2 | 1-127 | AY3#1, Voice1 |
| Note On/Off CH3 | 1-127 | AY3#1, Voice2 |
| Note On/Off CH4 | 1-127 | AY3#1, Voice3 |
| Note On/Off CH5 | 1-127 | AY3#2, Voice1 |
| Note On/Off CH6 | 1-127 | AY3#2, Voice2 |
| Note On/Off CH7 | 1-127 | AY3#2, Voice3 |
| Note On/Off CH8 | 1-127 | Polyphonic mode |
| Note On/Off CH9 | 1-127 | Noise on/off AY3#1, Voice1 |
| Note On/Off CH10 | 1-127 | Noise on/off AY3#1, Voice2 |
| Note On/Off CH11 | 1-127 | Noise on/off AY3#1, Voice3 |
| Note On/Off CH12 | 1-127 | Noise on/off AY3#2, Voice1 |
| Note On/Off CH13 | 1-127 | Noise on/off AY3#2, Voice2 |
| Note On/Off CH14 | 1-127 | Noise on/off AY3#2, Voice3 |
| Control CC#2 | 0-127 | Lfo/arp speed |
| Control CC#3 | 0-127 | Lfo/arp depth |
| Control CC#6 | 0-127 | Detune amount |
| Control CC#7 | 0-127 | Glide Amount |
| Control CC#8 | 0-127 | Sequencer Speed |
| Control CC#9 | 0-127 | Noise Frequency Chips 1+2 |
| Control CC#10 | 0-127 | Noise Frequency Chip 1 |
| Control CC#11 | 0-127 | Noise Frequency Chip 2 |
continued on next page...
| Midi Message | Range | Result |
| Control CC#12 | 0-127 | Tune, Voice1 |
| Control CC#13 | 0-127 | Tune, Voice2 |
| Control CC#14 | 0-127 | Tune, Voice3 |
| Control CC#15 | 0-127 | Tune, Voice4 |
| Control CC#16 | 0-127 | Tune, Voice5 |
| Control CC#17 | 0-127 | Tune, Voice6 |
| Control CC#18 | 0-127 | Volume, Voice1 |
| Control CC#19 | 0-127 | Volume, Voice2 |
| Control CC#20 | 0-127 | Volume, Voice3 |
| Control CC#21 | 0-127 | Volume, Voice4 |
| Control CC#22 | 0-127 | Volume, Voice5 |
| Control CC#23 | 0-127 | Volume, Voice6 |
| Control CC#24 | 0-63=off 64-127=on | Enable/Disable Voice1 |
| Control CC#25 | 0-63=off 64-127=on | Enable/Disable Voice2 |
| Control CC#26 | 0-63=off 64-127=on | Enable/Disable Voice3 |
| Control CC#27 | 0-63=off 64-127=on | Enable/Disable Voice4 |
| Control CC#28 | 0-63=off 64-127=on | Enable/Disable Voice5 |
| Control CC#29 | 0-63=off 64-127=on | Enable/Disable Voice6 |
| Control CC#30 | 0-63=off 64-127=on | Enable/Disable Noise1 |
| Control CC#31 | 0-63=off 64-127=on | Enable/Disable Noise2 |
| Control CC#32 | 0-63=off 64-127=on | Enable/Disable Noise3 |
| Control CC#33 | 0-63=off 64-127=on | Enable/Disable Noise4 |
| Control CC#34 | 0-63=off 64-127=on | Enable/Disable Noise5 |
| Control CC#35 | 0-63=off 64-127=on | Enable/Disable Noise6 |
| Control CC#36 | 0-63=off 64-127=on | Enable/Disable lfo/arp Voice1 |
| Control CC#37 | 0-63=off 64-127=on | Enable/Disable lfo/arp Voice2 |
| Control CC#38 | 0-63=off 64-127=on | Enable/Disable lfo/arp Voice3 |
| Control CC#39 | 0-63=off 64-127=on | Enable/Disable lfo/arp Voice4 |
| Control CC#40 | 0-63=off 64-127=on | Enable/Disable lfo/arp Voice5 |
| Control CC#41 | 0-63=off 64-127=on | Enable/Disable lfo/arp Voice6 |
| Control CC#42 | 0-63=off 64-127=on | Enable/Disable env Voice1 |
| Control CC#43 | 0-63=off 64-127=on | Enable/Disable env Voice2 |
| Control CC#44 | 0-63=off 64-127=on | Enable/Disable env Voice3 |
| Control CC#45 | 0-63=off 64-127=on | Enable/Disable env Voice4 |
| Control CC#46 | 0-63=off 64-127=on | Enable/Disable env Voice5 |
| Control CC#47 | 0-63=off 64-127=on | Enable/Disable env Voice6 |
| Control CC#48 | 0-63=off 64-127=on | Enable/Disable seq Voice1 |
| Control CC#49 | 0-63=off 64-127=on | Enable/Disable seq Voice2 |
| Control CC#50 | 0-63=off 64-127=on | Enable/Disable seq Voice3 |
| Control CC#51 | 0-63=off 64-127=on | Enable/Disable seq Voice4 |
| Control CC#52 | 0-63=off 64-127=on | Enable/Disable seq Voice5 |
| Control CC#53 | 0-63=off 64-127=on | Enable/Disable seq Voice6 |
10- Firmware updating
The AY3 supports firmware updates via midi system exclusive messages (sysex).
To enter update mode aka bootloader:
-unplug the unit's power cord.
-hold the encoder button down while plugging the unit power back in.
Three bright stripes will show on the led matrix indicating that bootloader mode is active.
Now you are ready to send the sysex to the AY3 via your computer.
10-1 Pc:
For a windows pc, we recommend MIDI-OX. It is a free and very useful app!
- Launch MIDI-OX
- In the Sysex window, choose Command > Window > Load File and navigate the location where you stored the file.
- Choose Command Window > Send Sysex
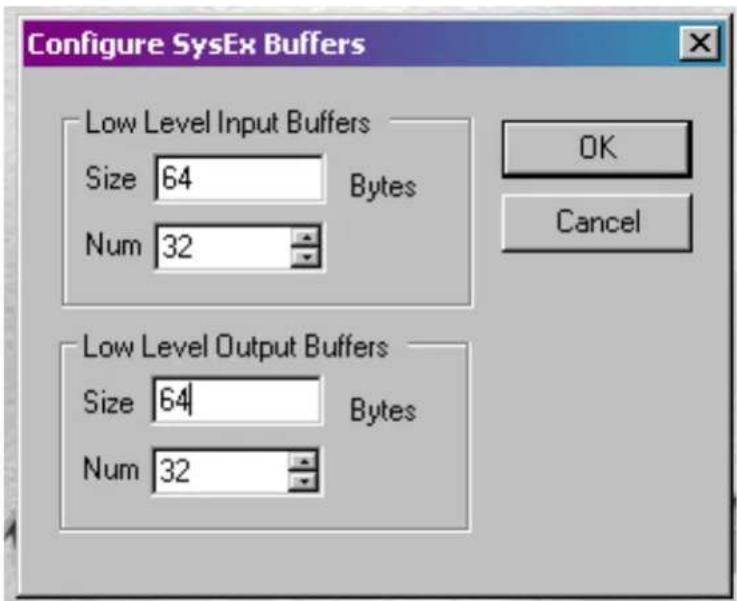
IMPORTANT: the buffer settings must be numb 32 and size 64 bytes output buffers to avoid transfer corruptions, (thanks Joel for pointing this out)
text_image
Configure SysEx Buffers Low Level Input Buffers Size 64 Bytes Num 32 OK Cancel Low Level Output Buffers Size 64 Bytes Num 3210-2 Mac:
For a mac, we recommend SysEx Librarian. It is also free!
- Launch SysEx Librarian.
- Select your MIDI interface in the dropdown menu at the top (if it's not already selected)
- Drag the MIDI SysEx file from the Finder into the frame of SysEx Librarian (if it's not already in there).
- Select it with the mouse.
- Click Play.
During upload, the led bars will flash and fill the matrix from left to right, then your AY3 will boot into the new software.