12178 - Suivi MONOPRICE - Free user manual and instructions
Find the device manual for free 12178 MONOPRICE in PDF.

User questions about 12178 MONOPRICE
0 question about this device. Answer the ones you know or ask your own.
Ask a new question about this device
Download the instructions for your Suivi in PDF format for free! Find your manual 12178 - MONOPRICE and take your electronic device back in hand. On this page are published all the documents necessary for the use of your device. 12178 by MONOPRICE.
USER MANUAL 12178 MONOPRICE
24" Monoprice Gaming Monitor
natural_image
Computer monitor displaying a racing car with motion blur effect, no visible text or symbols on the car or background


12178
CONTENTS
SAFETY WARNINGS AND GUIDELINES....3
FEATURES 4
PACKAGE CONTENTS......4
CONNECTIONS 5
CONTROLS....6
SETUP 7
MONITOR STAND & BASE....7
VIEWING ANGLE ADJUSTMENT....9
MAIN INPUT SELECTION....9
QUICK FUNCTION BUTTONS....10
ON-SCREEN DISPLAY (OSD) MENU 10
Basic Menu Operation....10
Brightness Menu 11
Image Menu 12
Color Temp Menu 13
OSD Setting Menu 14
Reset Menu....15
Misc Menu....16
SPECIFICATIONS....17
TECHNICAL SUPPORT....18
WARRANTY....18
TROUBLESHOOTING....19
COMPLIANCE....20
CE Mark Warning....20
FCC Statement 20
SAFETY WARNINGS AND GUIDELINES
- Do not place the monitor on an unstable surface where it could fall and cause either personal injury or damage to the monitor and/or other equipment.
- Do not expose the monitor to water or moisture of any kind. Do not place objects containing moisture, such as a glass or vase, where it could tip over and spill into or onto the monitor.
- If the monitor is exposed to water or moisture, immediately unplug it from its power source and allow it to completely dry out before reapplying power.
- Do not block the ventilation holes in the monitor's casing. Do not place the monitor in a confined space with inadequate ventilation.
- Do not place the monitor near a heat source, such as a fireplace, heating vent, radiator, etc.
- The power supply for this monitor uses a NEMA 5-15 three prong, grounded plug. Do not use a "cheater" plug or otherwise bypass the grounding pin.
- The power supply for this monitor accepts a wide range of input voltages, from 100 to 240 VAC, 50 or 60 Hz, with a current of at least 1.7A. Ensure that your power source is within these limits. If not, consult a professional electrician or your power company for a resolution.
- Unplug the monitor if it will go unused for a long period of time.
- This monitor has no user serviceable parts. Do not open the case or otherwise attempt to modify this monitor.
- Clean only using a soft, dry cloth. Do not use chemical cleaners, solvents, or detergents. For stubborn deposits, moisten the cloth with warm water.
- Do not leave a single image on the display for a long period of time. Doing so could cause "burn-in" of the image. It is recommended to use a variable desktop background and to use a screen saver to prevent "burn-in". Alternatively, ensure that the monitor is powered off for at least 2 hours out of every 12.
FEATURES
• 24" FHD monitor with LED backlighting
• 16:9 aspect ratio
• 1920 x 1080 @ 144Hz maximum resolution using the DVI and DP inputs
- 1 DisplayPort input
- 1 HDMI input
• 1 Dual Link DVI-D input
- 1 VGA input
- Detachable stand allows for tilt and swivel, plus rotation for easy portrait/landscape orientation changes
• Built-in stereo speakers with 2 watts/channel amplifier
- 100 x 100 VESA mounting pattern
PACKAGE CONTENTS
Please take an inventory of the package contents to ensure you have all the items listed below. If anything is missing or damaged, please contact Monoprice Customer Service for a replacement.
1x 24" FHD LED monitor
1x Adjustable stand
1x Stand base
4x M4x8 stand mount screws
1x AC power adapter
1x AC power cord
1x 3.5mm TRS audio cable
1x Dual Link DVI-D video cable
1x User's manual
CONNECTIONS

text_image
1 2 3 4 5 6| 1 | DP | DisplayPort 1.2 video input |
| 2 | VGA | Analog VGA video input |
| 3 | DVI | Dual Link DVI-D video input |
| 4 | HDMI | HDMI video input |
| 5 | LINE IN | 3.5mm TRS stereo audio input |
| 6 | DC IN | DC power input |
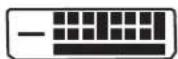
DVI Note: This monitor features a Dual Link DVI-D input port. Your DVI source must support Dual Link DVI-D and you must use a Dual Link DVI-D cable (included), which has a pinout that looks like this:
CONTROLS

text_image
DOWN 1 UP 2 SELECT 3 4 MENU 5- DOWN: If the OSD menu is displayed, pressing the DOWN button moves the selection highlight down. If the OSD menu is not displayed, the button is a selectable hotkey (see page 16).
- UP: If the OSD menu is displayed, pressing the UP button moves the selection highlight up. If the OSD menu is not displayed, the button is a selectable hotkey (see page 16).
- SELECT: If the OSD menu is displayed, pressing the SELECT button enters the OSD highlighted entry. If the OSD menu is not displayed, the button displays the MAIN INPUT SELECTION menu (see page 9).
- MENU: If the OSD menu is not displayed, pressing the MENU button opens the OSD menu. If the OSD menu is displayed, pressing the MENU button will back out of a submenu or close the OSD menu, if already at the top menu level.
- POWER: Press the POWER button to toggle the monitor ON or OFF. When the monitor is powered on and a video signal is present, the power indicator will glow blue. When the monitor is powered on but no video signal is present, the power indicator will glow yellow/orange.
SETUP
- Install the stand and base, using the instructions in the following section or mount the monitor to a wall or desk mount using the included M4x8 screws.
- Connect video cable(s) from your source device(s) to the monitor's input(s). The monitor has 4 video inputs (1x DVI, 1x HDMI, 1x DisplayPort, 1x VGA).
- Use the included 3.5mm TRS audio cable to connect the audio output of your computer to the audio input on the monitor.
- Plug the DC power connector on the AC power adapter into the DC IN port on the back of the monitor.
- Plug the included AC power cord into the AC power adapter. Plug the other end into a nearby power outlet.
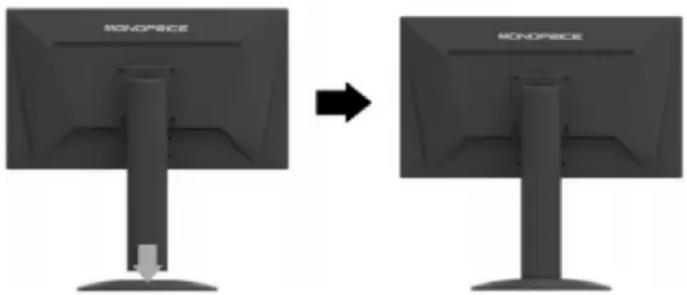
MONITOR STAND & BASE
To install the stand, perform the following steps:
- Place a blanket or towel on a flat surface, such as a table or the floor.
- Place the monitor face down on the blanket or towel.
- Install the stand on the VESA mount using the four included M4x8 screws.
- Fit the base on the bottom of the stand and press it until it clicks into place.
natural_image
Two identical computer monitors with 'MONOPRICE' branding, shown from front and side views (no text or symbols on the screens themselves)To remove the base, perform the following steps:
- Place a blanket or towel on a flat surface, such as a table or the floor.
- Place the monitor face down on the blanket or towel.
- Squeeze the plastic clip on the bottom of the base and pull the base off the stand.
text_image
MONOPRICE MONOPRICENote that the stand can be removed from the back of the monitor so that the monitor can be attached to a desk or wall mount. To remove the stand, perform the following steps:
- Place a blanket or towel on a flat surface, such as a table or the floor.
- Place the monitor face down on the blanket or towel.
- Remove the four M4x8 screws attaching the stand to the back of the monitor.
- Follow the mounting instructions for your wall/desk mount to attach the monitor to the mount.
- Store the stand and mount screws in a safe place for future use.

text_image
MONOPECE MONOPECE 100mm 100mmNote: The monitor uses a VESA mounting size of 100x100mm.
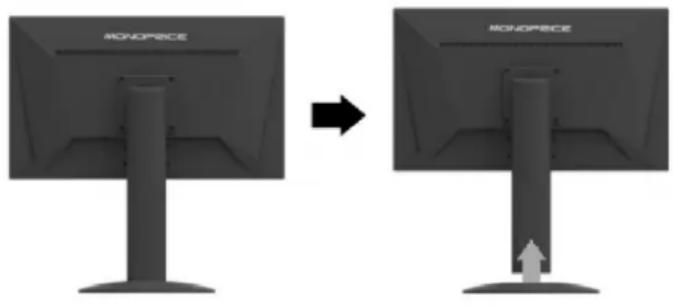
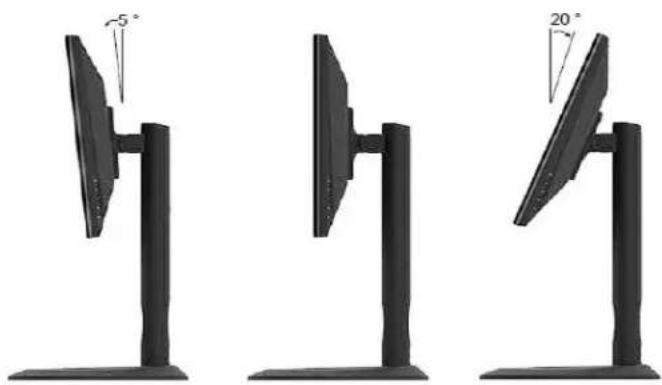
VIEWING ANGLE ADJUSTMENT
The included monitor stand supports tilt adjustment from -5^ (down) to +20^ (up). To adjust the angle, grasp the bezel at both the top and bottom of the monitor and move it as desired. Use soft cloth gloves or a soft, dry cloth to grasp the monitor without touching the screen.
natural_image
Three identical black computer monitors with stand angles labeled 5°, 20°, and an angle marker (no text or symbols on monitors)MAIN INPUT SELECTION
To change the main input, perform the following steps:
- Press the SELECT button to display the Input Selection menu.
- Use the UP or DOWN buttons to move the highlight to the desired input.
- Press the SELECT button to select the highlighted input.
Note that if the input selection is set to an unused source, the monitor will automatically switch to the next active source in the source list.
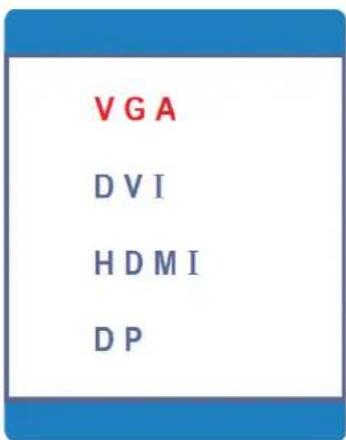
text_image
VGA DVI HDMI DPQUICK FUNCTION BUTTONS
When the OSD is not displayed, the DOWN and UP buttons act as hotkeys with specific functions. The functions of each button are determined by the setting on the Hotkey Type setting on the Misc Menu (see page 16).
Whenever the button assigned the ECO function is pressed, the monitor will cycle to the next ECO setting in the list and will display one of the following icons to indicate the new ECO setting. See page 11 for ECO setting details.

ON-SCREEN DISPLAY (OSD) MENU
Press the MENU button to access the OSD menu.
Basic Menu Operation
DOWN: When the OSD menu is displayed, pressing the DOWN button moves the selection highlight down. When the OSD menu is displayed and an item has been opened for editing, pressing the DOWN button decreases the selected value.
UP: When the OSD menu is displayed, pressing the UP button moves the selection highlight up. When the OSD menu is displayed and an item has been opened for editing, pressing the UP button increases the selected value.
SELECT: When the OSD menu is displayed, pressing the SELECT button either selects the currently highlighted menu option or opens the currently highlighted menu entry for editing. If the OSD menu is not displayed, pressing the SELECT button opens the MAIN INPUT SELECTION menu and selects the currently highlighted video input.
MENU: If the OSD menu is not displayed, pressing the MENU button opens the OSD menu. When the OSD menu is displayed, pressing the MENU button will back out of a submenu or close the OSD menu, if already at the top menu level.
Brightness Menu

text_image
BRIGHTNESS BRIGHTNESS 80 CONTRAST 50 ECO STANDARD DCR OFFBRIGHTNESS: Adjusts the image brightness. The adjustment range is 0 to 100.
CONTRAST: Adjusts the image contrast. The adjustment range is 0 to 100.
ECO: ECO is a preset display mode option, which automatically adjusts the Brightness and Contrast settings for ideal display characteristics. The four display mode options are:
Standard: Uses the user defined Brightness and Contrast settings.
Text: Adjusts the screen for use with text.
Movie: Adjusts the screen for an ideal movie watching experience.
Game: Adjusts the screen for an ideal gaming experience.
DCR: DCR stands for Dynamic Contrast Ratio, which is a circuit that increases the effective picture contrast by changing the light intensity of the LED backlighting. DCR tends to cause too much contrast fluctuation when dealing with swiftly moving images and is usually better suited to applications use than for use with games. DCR can be turned ON or OFF.
Image Menu

text_image
IMAGE H.POSITION 50 V.POSITION 50 CLOCK 50 PHASE 100 ASPECT WIDEH. POSITION: Allows adjustment of the horizontal position of the image on the screen. The adjustment range is from 0 to 100. This option is only available when using the analog VGA input.
V. POSITION: Allows adjustment of the vertical position of the image on the screen. The adjustment range is from 0 to 100. This option is only available when using the analog VGA input.
CLOCK: Allows adjustment of the monitor's CLOCK frequency. On a gray test screen, an incorrect CLOCK setting will manifest itself as large vertical lines and the display may have an incorrect width. The CLOCK should be corrected before attempting to correct the PHASE. The adjustment range is from 0 to 100. This option is only available when using the analog VGA input.
PHASE: Allows adjustment of the monitor's PHASE setting. On a gray test screen, an incorrect PHASE setting will manifest itself as a series of horizontal lines. The CLOCK should be corrected before attempting to correct the PHASE. The adjustment range is from 0 to 100. This control only affects the analog VGA input.
ASPECT: Adjusts the aspect ratio of the display. The available options are WIDE (16:9) and 4:3.
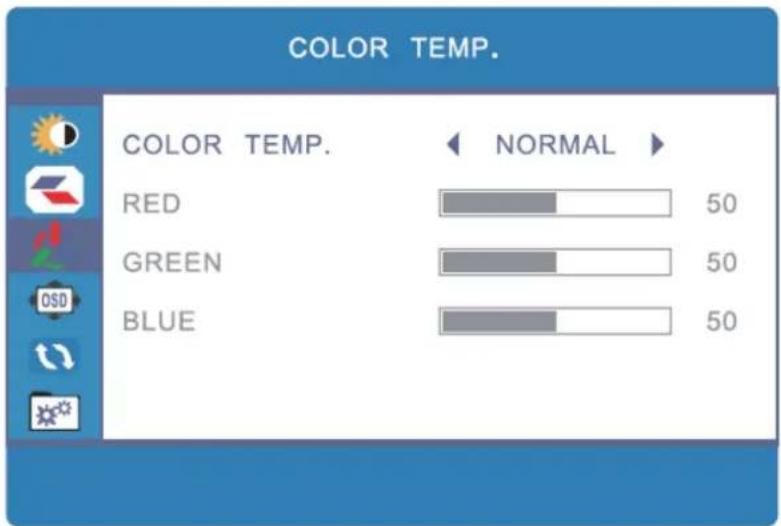
Color Temp Menu
text_image
COLOR TEMP. COLOR TEMP. NORMAL RED 50 GREEN 50 BLUE 50COLOR TEMP.: Allows selection of one of three preset color temperature settings, plus the user setting. The four options are: Warm, Normal, Cool, and User.
RED: Adjusts the amount of red in the display. The adjustment range is from 0 to 100. This option is only available when the Color Temp option is set to User.
GREEN: Adjusts the amount of green in the display. The adjustment range is from 0 to 100. This option is only available when the Color Temp option is set to User.
BLUE: Adjusts the amount of blue in the display. The adjustment range is from 0 to 100. This option is only available when the Color Temp option is set to User.
OSD Setting Menu

text_image
OSD SETTING LANGUAGE OSD H. POS. OSD V. POS. OSD TIMER TRANSPARENCY 50 50 10 0LANGUAGE: This menu allows you to set the language to be used in the OSD. The six possible options are: English, Français, Deutsche, Italiano, Español, and Nederlands.
OSD H. POS.: Adjusts the horizontal position of the OSD menu on the screen. The adjustment range is 0 to 100.
OSD V. POS.: Adjusts the vertical position of the OSD menu on the screen. The adjustment range is 0 to 100.
OSD Timer: Sets the amount of time (in seconds) that the OSD menu will display on screen without any input before it automatically closes. The possible options are: 5, 10, 15, 20, 25, 30, 35, 40, 45, 50, 55, and 60.
TRANSPARENCY: Adjusts how transparent the OSD menu will appear on screen, expressed as a percentage of maximum transparency. The possible options are: 0 (minimum transparency), 25, 50, 75, and 100 (maximum transparency).
Reset Menu

text_image
RESET IMAGE AUTO ADJUST COLOR AUTO ADJUST RESETIMAGE AUTO ADJUST: Automatically adjusts the Horizontal and Vertical position of the display on the screen and automatically adjusts the CLOCK and PHASE values. In most cases, this will produce ideal display settings. This option is only available when using the analog VGA input.
COLOR AUTO ADJUST: Automatically adjusts the red, green, and blue color values. In most cases, this will produce ideal color settings. This option is only available when using the analog VGA input.
RESET: Resets all settings to their factory default values.
Misc Menu
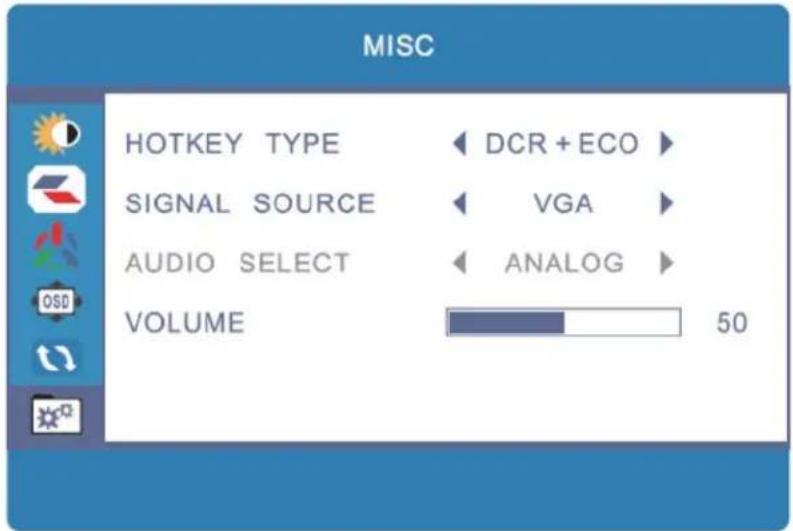
text_image
MISC HOTKEY TYPE DCR + ECO SIGNAL SOURCE VGA AUDIO SELECT ANALOG VOLUME 50HOTKEY TYPE: This option determines the functionality of the DOWN and UP buttons when the OSD is not displayed. The available option sets are:
DCR+ECO: Allows quick adjustment of the DCR and ECO settings (see page 11 for settings details).
CON+BRI: Allows quick adjustment of the CONTRAST and BRIGHTNESS settings (see page 11 for settings details).
ECO+ASP: Allows quick adjustment of the ECO and ASPECT settings (see pages 11-12 for settings details).
In all cases, the setting on the left is controlled by the DOWN button (which is to the left of the UP button) and the setting on the right is controlled by the UP button (to the right of the DOWN button). See page 10 for a list of the ECO function on-screen icons.
SIGNAL SOURCE: Selects the input source. The available options are: VGA, DVI, HDMI, and DP.
Note that if the input selection is set to an unused source, the monitor will automatically switch to the next active source in the source list.
AUDIO SELECT: Selects the audio input source. When using the VGA or DVI video inputs, the option is set to Analog and cannot be changed. When using the HDMI or DisplayPort video inputs, the entry can be set to either Analog (3.5mm audio input) or Digital (HDMI audio input).
VOLUME: Sets the volume output level for the built-in speakers. The adjustment range is 0 to 100.
SPECIFICATIONS
| Display Type | TN panel with LED backlight |
| Screen Size | 24" (610mm) |
| Dot Pitch | 0.27675 x 0.27675 mm |
| Maximum Resolution | 1920 x 1080p @ 144Hz (FHD) |
| Brightness | 350cd/m2 |
| Viewing Angle | 170° left/right, 160° up/down |
| Video Inputs | 1x Dual Link DVI-D, 1x DisplayPort v1.2, 1x HDMI, 1x VGA |
| Audio Inputs | 1x 3.5mm TRS Line Input |
| Horizontal Frequency (HFR) | 30~158 kHz |
| Vertical Frequency (VFR) | 60 ~ 75Hz |
| Pixel Clock Frequency | 300 MHz |
| PNP Standard | VESA DDC2BTM |
| Power Consumption | Operation: < 50WStandby:<1W |
| Monitor Input Power | 12 VDC, 5.42A |
| AC Adapter Input Power | 100 ~ 240 VAC, 50-60Hz, 1.7A |
| Operating Temperature | +32 ~ +122°F (0 ~ +50°C) |
| Storage Temperature | -4 ~ +140°F (-20 ~ +60°C) |
| Operating Humidity | 10 ~ 85%, non-condensing |
| VESA Mount Size | 100 x 100 |
| Dimensions | 22.3" x 9.6" x 21.4" (566 x 245 x 537 mm) |
| Weight | 12.6 lbs. (5.7 kg) |
| Certifications | ETL, FCC, CE |
TECHNICAL SUPPORT
Monoprice is pleased to provide free, live, online technical support to assist you with any questions you may have about installation, setup, troubleshooting, or product recommendations. If you ever need assistance with your new product, please come online to talk to one of our friendly and knowledgeable Tech Support Associates. Technical support is available through the online chat button on our website (www.monoprice.com) during regular business hours, 7 days a week. You can also get assistance through email by sending a message to tech@monoprice.com.
WARRANTY
MONOPRICE will replace defective monitors with a new monitor if the RMA is issued within thirty (30) days of the original date of purchase, as shown on the original invoice. Monitors identified as defective after 30 days, but within the twelve (12) month warranty period, will be replaced with refurbished, reconditioned, or used monitors at MONOPRICE'S discretion. All returned products are the property of MONOPRICE and must be returned to MONOPRICE for a replacement to be issued.
TROUBLESHOOTING
Following are some common problems and possible solutions. If you cannot solve a problem yourself, please contact Monoprice Technical Support for assistance.
Q: The power LED is off.
A: Verify that the power adapter is plugged into the monitor. Verify that the power cord is plugged into both the AC adapter and the power outlet. Verify that the power outlet is live by plugging something else into it, such as a lamp.
Q: The picture is weak, washed out, or over saturated.
A: Adjust the Brightness and/or Contrast settings.
Q: The image flashes or distorts.
A: Verify that there are no nearby sources or Radio Frequency or Electromagnetic Interference (RFI or EMI).
Q: The power LED is glowing blue, but the display is blank.
A: Press a key on the keyboard to ensure the computer is not asleep or that a screen saver is not active. Verify that the proper input is selected. Verify that the display cable is securely attached to both the display and the video source. Replace the cable with another of the same type to verify that it is not faulty.
Q: One of the primary colors (red, green, or blue) is missing.
A: Replace the video cable with another of the same type. Connect to a different video source to verify that there are no problems with the video card or source device.
Q: The colors are not correct.
A: Adjust the color temperature or the individual mix or red, green, and blue picture elements.
Q: No picture using the DVI input.
A: Verify that you are using a Dual Link DVI-D cable. Verify that your video card is capable of delivering a Dual Link DVI-D signal. A Dual Link DVI-D cable will have a pinout that looks like this:


COMPLIANCE
C€
CE Compliance Statement
This product is in compliance with CE directives and bears the CE mark. For detailed information on specific directives please contact Customer Service or sales office or distributor.

FCC Statement
This equipment has been tested and found to comply with the limits for a Class B digital device, pursuant to part 15 of the FCC Rules. These limits are designed to provide reasonable protection against harmful interference when the equipment is operated in a commercial environment. This equipment generates, uses, and can radiate radio frequency energy and, if not installed and used in accordance with the instruction manual, may cause harmful interference to radio communications. Operation of this equipment in a residential area is likely to cause harmful interference in which case the user will be required to correct the interference at his own expense.
FCC Caution: Any changes or modifications not expressly approved by the party responsible for compliance could void the user's authority to operate this equipment.
This device complies with part 15 of the FCC Rules. Operation is subject to the following two conditions: (1) This device may not cause harmful interference, and (2) this device must accept any interference received, including interference that may cause undesired operation.
NOTE: (1) The manufacturer is not responsible for any radio or TV interference caused by unauthorized modifications to this equipment. (2) To avoid unnecessary radiation interference, it is recommended to use a shielded video cable.
WEEE Directive Compliance Statement

This symbol on the product or on its packaging indicates that the product must not be disposed of with normal household waste. Instead, it is your responsibility to dispose of your waste equipment by arranging to return it to a designated collection point for the recycling of waste electrical and electronic equipment. By separating and recycling
your waste equipment at the time of disposal you will help to conserve natural resources and ensure that the equipment is recycled in a manner that protects human health and the environment.