
U344-001-R - Computer accessory Tripp Lite - Free user manual and instructions
Find the device manual for free U344-001-R Tripp Lite in PDF.


| Product Type | USB 3.0 to DVI Adapter (U344-001-R) / USB 3.0 to HDMI Adapter (U344-001-HDMI-R) |
| Brand | Tripp Lite |
| Model | U344-001-R |
| Connectivity | USB 3.0 A Male (via included cable) to DVI-I Female (with included DVI-to-VGA adapter) or HDMI Female (U344-001-HDMI-R) |
| Maximum Resolution | 2048 x 1152 @ 60 Hz (16-bit or 32-bit) |
| Video Streaming | Up to 1080p |
| Maximum Number of Adapters | 6 on Windows |
| Power Source | Bus-powered via USB, 340 mA operating power |
| RAM | 512 MB DDR2 SDRAM |
| Supported Operating Systems | Windows XP (32-bit), Vista (32/64-bit), 7 (32/64-bit), 8 (32/64-bit), 8.1 (32/64-bit) |
| Operating Temperature | 10° to 40°C (50° to 104°F) |
| Storage Temperature | -10° to 80°C (14° to 176°F) |
| Relative Humidity | Less than 85%, non-condensing |
| Dimensions (approx.) | 2.5 x 1.5 x 0.5 inches (6.4 x 3.8 x 1.3 cm) |
| Weight (approx.) | 1 oz (28 g) |
| Package Contents | Adapter, USB 3.0 cable (attached for HDMI model), driver CD, owner's manual, DVI-to-VGA adapter (U344-001-R only) |
| System Requirements (1-2 adapters) | 1.2 GHz single-core CPU, 512 MB RAM |
| System Requirements (3 adapters) | 1.6 GHz single-core CPU, 1 GB RAM |
| System Requirements (4-6 adapters) | 1.8 GHz Core Duo CPU, 1 GB RAM |
| DVD Playback Requirement | 2.0 GHz Core Duo CPU, 1 GB RAM, resolution 800x600 with 32-bit color |
| Warranty | 1-year limited |
Frequently Asked Questions - U344-001-R Tripp Lite
User questions about U344-001-R Tripp Lite
0 question about this device. Answer the ones you know or ask your own.
Ask a new question about this device
Download the instructions for your Computer accessory in PDF format for free! Find your manual U344-001-R - Tripp Lite and take your electronic device back in hand. On this page are published all the documents necessary for the use of your device. U344-001-R by Tripp Lite.
USER MANUAL U344-001-R Tripp Lite
USB 3.0 to DVI Adapter
Model #: U344-001-R
USB 3.0 to HDMI Adapter
Model #: U344-001-HDMI-R
PROTECT YOUR INVESTMENT!
Register your product for quicker service and ultimate peace of mind. You could also win an ISOBAR6ULTRA surge protector—a \$50 value!
www.tripplite.com/warranty

Copyright © 2014 Tripp Lite.
All trademarks are the property of their respective owners.
1111 W. 35th Street, Chicago, IL 60609 USA
www.tripplite.com/support
Table of Contents
1. Introduction 3
1.1 Features 3
1.2 Package Contents 3
1.3 System Requirements 4
2. Installation 5
3. Using the Adapter 7
3.1 Display Properties 7
3.2 Extending Video to the Add-On Display 9
3.3 Mirroring Video on the Add-On Display 10
3.4 Making the Add-On Display the 11 Primary Display
4. Troubleshooting 12
5. Specifications 15
6. Warranty and Product Registration 16
1. Introduction
1.1 Features
- Adds an additional monitor, LCD or projector through a single USB 3.0 port
- USB 3.0 is 10 times faster than USB 2.0, with transfer rates up to 5 Gbps
- Backward compatible with USB 2.0
- Simultaneously connect up to 6 display adapters on a Windows® PC
- Automatically resumes from hibernation and suspend modes
• Supports video resolutions up to 2048 x 1152 @ 60Hz
• Video streaming is supported up to 1080p - Set additional monitors to extend the primary display, duplicate the primary display, or set an additional monitor as the primary display
- U344-001-R comes with a DVI to VGA adapter, allowing you to connect either a DVI or VGA display
1.2 Package Contents
Before installation, please check the items in the package. The package should contain the following items:
• (1) U344-001-R or (1) U344-001-HDMI-R
• (1) Driver CD
• (1) USB 3.0 Cable (U344-001-R only; cable is attached to U344-001-HDMI-R)
• (1) Owner's Manual
• (1) DVI to VGA Adapter (U344-001-R only)
1. Introduction
1.3 System Requirements
- Windows XP (32-bit), Vista (32- and 64-bit), 7 (32- and 64-bit), 8 (32- and 64-bit) and 8.1 (32- and 64-bit)
- USB 2.0 or 3.0 port; USB 3.0 port required for USB 3.0 speeds
• VGA, DVI or HDMI monitor
Minimum computer requirements when using 1 – 2 display adapters:
• 1.2GHz Single Core CPU
- 512MB of RAM
Minimum computer requirements when using 3 display adapters:
• 1.6GHz Single Core CPU
- 1GB of RAM
Minimum computer requirements when using 4 – 6 display adapters:
• 1.8GHz Core Duo CPU
- 1GB of RAM
Note: Only 1 added monitor can support DVD playback. In order to support DVD playback, your computer must meet the following minimum requirements:
• 2.0GHz Core Duo CPU
- 1GB of RAM
- Adapter screen resolution must be set to 800 x 600 with 32-bit color
2. Installation
Note: Install the driver on your computer before connecting the display adapter(s).
- Insert the driver CD into your computer's CD-ROM drive. The setup program should run automatically. If the setup program fails to start on its own, open the CD and double-click on the appropriate driver file.
Note:
- If you encounter a User Account Control popup, choose to allow the installation to proceed. This may require an administrator's password. If you encounter a driver signature dialog box, choose to continue the installation.
-
If a message stating “Display Link software for USB display adapter is already up to date,” then the necessary software for this unit is already installed, and you can proceed to step 5.
-
Follow the prompts that appear to complete the process.
-
When this process is complete, you will need to restart your computer to finish the installation.
-
After restarting your computer, connect the included USB cable from an available USB 2.0 or 3.0 port to the display adapter.
-
Connect your display adapter to a monitor using an HDMI, DVI or VGA cable, depending on your adapter/monitor connection type.
2. Installation
- Once connected, the computer will recognize the display adapter, and complete the installation. The video should now be displayed on the add-on monitor. Note: It may take a few moments before the screen appears on the add-on monitor. Also, it is normal for the screen to flicker on and off a few times when first connected. If the add-on monitor remains blank, you may need to restart your computer one more time.
Using Multiple Display Adapters
When using multiple display adapters, it is only necessary to install the driver software once. After connecting the first display adapter to the computer, simply move on to connecting the next display adapter.
Note: When using Windows Vista XDDM mode, only one display adapter will be able to be configured to use Extended mode, and the remaining display adapters will be forced to use Mirror mode. Windows Vista XDDM mode is a video card driver mode that provides a Windows XP interface on a Vista computer.
3. Using the Adapter
3.1 Display Properties
Once installed, the computer video can be Extended from the primary display to the add-on display, Mirrored to display the same thing on both, or changed to use the add-on display as the primary display. This can be done by opening the Display Settings page on your computer (see below) and changing the settings.
To access the display settings, right-click on your computer's desktop, and select the Properties or Personalize option, depending on your Windows operating system. From there you will need to access the Settings or Display option to get to the Display Settings page. A quick way to access this page is to use the display adapter icon in the lower-right corner of your computer screen. Right-click on this icon and select the DisplayLink Manager or Video Setup option to automatically pull up your computer's Display Settings page.
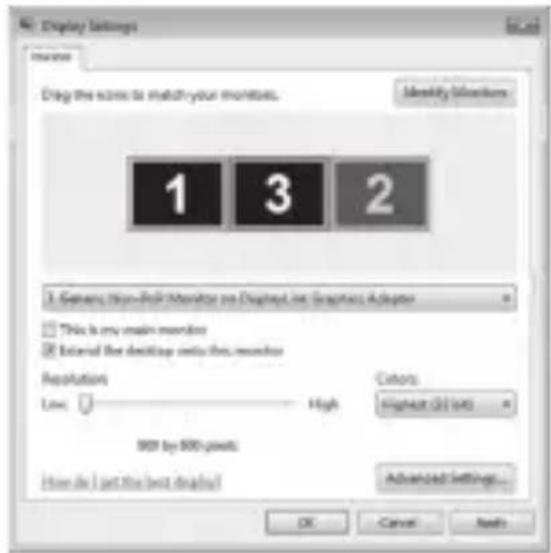
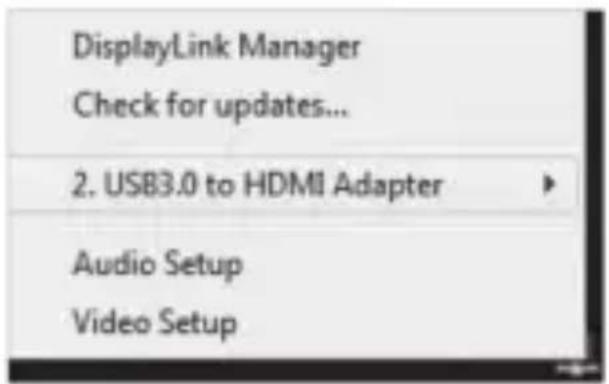
On page 8 are additional settings that are available via the display adapter right-click menu. Note: The settings available in this right-click menu may vary depending on your operating system.
3. Using the Adapter
| Option Description | |
| DisplayLink Manager | Opens an “About” screen that shows the DisplayLink driver version installed on your computer. |
| Check for Updates | Connects to the internet and checks for newer versions of the DisplayLink software, and downloads them if available. |
| USB 3.0 Adapter | Depending on the connected adapter, this will display as either USB 3.0 to HDMI or DVI, and provides a list of settings when selected. When multiple adapters are connected, a separate menu option will be available for each one.•Screen Resolution– Click this option to bring up a list of available screen resolutions for the add-on monitor. Select the desired resolution from this list.•Screen Rotation– This setting allows you to rotate the screen according to your desired orientation.•Extend To– This setting allows you to select which direction to extend the add-on monitor to; Right, Left, Up, Down.•Set as Main Monitor– This setting allows you to make the add-on monitor the primary display.•Notebook Monitor Off– This setting appears on laptop computers only, and allows you to turn off the laptop monitor, leaving only the add-on monitor displayed.•Mirror– This setting allows you to mirror the video of the primary display to your add-on monitor, so that the same thing is displayed on both screens.•Off– This setting turns off the add-on monitor.•Optimize for Video– When playing video content on an add-on monitor, this setting can help to improve playback performance. Note: Text may appear less clear when this is enabled.•Fit to TV– When using your display adapter to connect a TV to your computer, the desktop may not always completely appear on the screen. This setting can be used to adjust the picture to display properly. |
| Audio Setup | Opens your computer's sound settings screen.Note:This function only works in specific models. |
| Video Setup | Opens your computer's display settings screen. |
3. Using the Adapter
In addition to the display adapter right-click menu, Windows Vista and 7 users can press the [Windows Key] and the [P] key at the same time to pull up the menu below, which quickly allows you to switch the display settings.
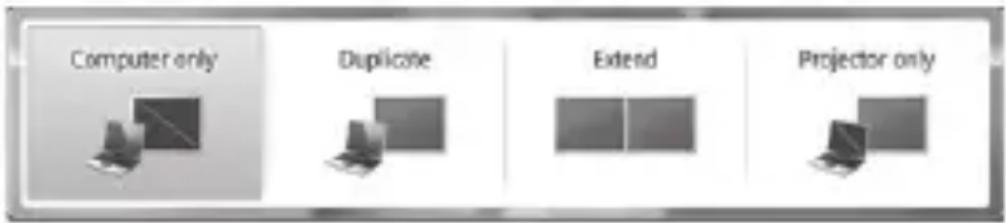
Note: Only Mirror mode is supported under Windows Vista Display Driver Model (WDDM) mode. In addition, the Aero Experience (Flip 3D effect) will be disabled under Windows Vista Display Driver Model (WDDM) mode as long as the display adapter is connected.
3.2 Extending Video to the Add-On Display
To extend the video of the primary monitor to the add-on monitor, follow the steps below:
- Open your computer's Display Settings page.
- Select the monitor icon that represents the add-on display you wish to change, or choose the add-on display from the drop-down menu. The primary display is always icon 1.
- Once you've selected the monitor icon for the add-on display, check the checkbox to extend video onto the monitor, or select the extension option from the drop-down list.
- Drag the monitor icons in the Display Settings page so that they are positioned to replicate the location of the actual displays. For example, if display 1 is directly to the left of display 2, the monitor icons should be positioned that way. This affects which side of the screen the mouse is allowed to move to the next display from, and is therefore essential to ensure smooth mouse movement between displays.
3. Using the Adapter
- Click the Apply button to activate the changes. The computer video will now be extended from the primary display to the add-on display.
Note: When playing a DVD, it is recommended that you play the DVD on a monitor connected to the computer via standard cabling, and not an add-on monitor connected via display adapter. If you need to play a DVD on an add-on monitor, you must have a 2.0GHz Core Duo CPU with 1GB of RAM, and the screen resolution must be set to 800 x 600 with 32-bit color. If multiple display adapters are connected to a computer, only 1 of them can play DVD content.
3.3 Mirroring Video on the Add-On Display
To show the same image on both the primary and add-on displays, follow the steps below:
- Open your computer's Display Settings page.
- Select the monitor icon that represents the add-on display you wish to change, or choose the add-on display from the drop-down menu. The primary display is always icon 1.
- Un-check the box next to Extend the desktop onto this monitor, or select the option from the drop-down menu to duplicate the display, and then click the apply button.
Note: In Mirror mode, the add-on display settings are limited by those of the primary display. If the primary display only supports a resolution of 1280 x 1024, the add-on monitor will be limited to a resolution of 1280 x 1024 or less.
3. Using the Adapter
3.4 Making the Add-On Display the Primary Display
To make the add-on display the primary display for the computer, follow the steps below:
- Open your computer's Display Settings page.
- Select the monitor icon that represents the add-on display you wish to change, or choose the add-on display from the drop-down menu. The primary display is always icon 1.
- Check the box next to This is my main monitor and click the Apply button to make the add-on display the primary display for the computer.
Note:
- Some computers require you to first un-select the original primary display before setting a new primary display.
- Once set as the primary display, the add-on display will continue to be the primary display as long as it is connected to the computer. Once disconnected, the primary display will default back to the monitor connected to the computer via standard cable.
4. Troubleshooting
Q: Why is the display on the add-on monitor blank?
A: If the monitor power LED is Green, wait a moment for the monitor to display the video, as it may take some time for the video to be displayed on the add-on monitor. If after a few minutes the video does not display, restart your computer. Also, make sure the computer is not in standby or hibernation mode, which will cause the add-on monitor to be blank.
If the monitor power LED is Red, check if the connection is properly made. If the connection is fine and the problem still exists, uninstall the driver, unplug the adapter and reinstall the driver.
Q: Why is the add-on monitor flickering?
A: This is usually caused by a low refresh rate. When in “Mirror Mode,” increase the refresh rate of the main monitor. This will in turn increase the refresh rate of the add-on monitor, which should stop the flickering. When in “Extended Mode,” increase the refresh rate of the add-on monitor.
Q: When I play a MPEG file on Windows Media Player on the extended monitor, why does the display become abnormal when I switch it to full screen mode?
A: If your system is Windows XP SP1, upgrading to SP2 will solve this problem.
4. Troubleshooting
Q: Why does the video not display properly when in “Full-Screen” mode?
A: Try the following tips to improve the smoothness of the movie playback:
- Reduce the resolution of the display to 640 x 480 or 800 x 600.
- Use the adapter in extended mode.
- Terminate any other CPU intensive applications running on the computer.
- As some media players require DirectX hardware support to correctly operate, try a different media player which requires less DirectX support.
- Drag the media player to the add-on screen and close the player. Restart the player and it should open on the add-on monitor. Now try playing the media file again.
- Try reducing the hardware acceleration level of the primary display (NOT the add-on monitor) to level 1, 2 or 3 and restarting the media player. The hardware acceleration can be found by right-clicking on your desktop and click “Properties > Settings > Advanced > Troubleshoot.”
- The video playback may be unusual when the add-on monitor is mirroring the primary display and there is another extended screen connected to the computer. The extended screen must be disabled before the content will be correctly cloned to the add-on monitor.
Q: In “Extended Mode,” why does the add-on monitor have a black border around the desktop?
A: This happens when the resolution used by the add-on monitor is higher than the resolution used by the primary monitor. To solve this problem, configure the add-on monitor to use the same resolution as the primary monitor.
4. Troubleshooting
Q: In “Extended” mode, why does the cursor disappear?
A: If you're in extended mode but have not yet connected the add-on monitor, the desktop will still pan to the add-on monitor. It's possible that your cursor has moved to the extended desktop and is no longer visible on the primary display.
When this occurs, try the following:
- Connect the add-on monitor to the display adapter. You should be able to see the mouse cursor once the computer screen is displayed.
- Move your mouse to try and drag the cursor back onto the primary monitor.
- Unplug the display adapter from the computer to restore the cursor.
5. Specifications
| Feature Specification | |||
| Source Connector | USB A Male (via the included or attached USB cable) | ||
| Display Connector HDMI | F, DVI-I F or HD15 F | ||
| Maximum Number of Display Adapters | 6 (Windows) | ||
| RAM 512 MB DDR2 SDRAM | |||
| Power Bus-powered (340 mA operating power) | |||
| Supported Operating Systems | Windows® XP (32-bit), Vista (32- and 64-bit), 7 (32- and 64-bit), 8 (32- and 64-bit), and 8.1 (32- and 64-bit) | ||
| Operating Temperature 10° to 40°C (50° to 104°F) | |||
| Storage Temperature -10° to 80°C (14° to 176°F) | |||
| Relative Humidity Less than 85%, Non-Condensing | |||
| Supported Video Resolutions (Note: Interlaced and reduced blanking modes are not supported) | Resolution | 16-Bit Refresh Rate | 32-Bit Refresh Rate |
| 640 x 480 60, | 72, 75, 85 60, | 72, 75, 85 | |
| 800 x 600 | 56, 60, 72, 75, 85 | 56, 60, 72, 75, 85 | |
| 1024 x 768 60, | 70, 75, 85 60, | 70, 75, 85 | |
| 1280 x 720 (720p) | 60 60 | ||
| 1280 x 768 60, | 75, 85 60, 75, | 85 | |
| 1280 x 800 60 | 60 | ||
| 1280 x 1024 60, | 75, 85 60, 75 | ||
| 1366 x 768 60 | 60 | ||
| 1400 x 1050 60, | 75, 85 60, 75, | 85 | |
| 1600 x 1200 60 | 60 | ||
| 1680 x 1050 60 | 60 | ||
| 1920 x 1080 (1080p) | 60 60 | ||
| 1920 x 1200 60 | 60 | ||
| 2048 x 1152 60 | 60 | ||
6. Warranty and Product Registration
1-Year Limited Warranty
Tripp Lite warrants its products to be free from defects in materials and workmanship for a 1-year period from the date of retail purchase by end user.
Tripp Lite's obligation under this warranty is limited to repairing or replacing (at its sole option) any such defective products. To obtain service under this warranty you must obtain a Returned Material Authorization (RMA) number from Tripp Lite or an authorized Tripp Lite service center. Products must be returned to Tripp Lite or an authorized Tripp Lite service center with transportation charges prepaid and must be accompanied by a brief description of the problem encountered and proof of date and place of purchase. This warranty does not apply to equipment which has been damaged by accident, negligence or misapplication or has been altered or modified in any way, including opening of the unit's casing for any reason. This warranty applies only to the original purchaser who must have properly registered the product within 10 days of retail purchase.
EXCEPT AS PROVIDED HEREIN, TRIPP LITE MAKES NO WARRANTIES, EXPRESS OR IMPLIED, INCLUDING WARRANTIES OF MERCHANTABILITY AND FITNESS FOR A PARTICULAR PURPOSE. Some states do not permit limitation or exclusion of implied warranties; therefore, the aforesaid limitation(s) or exclusion(s) may not apply to the purchaser.
EXCEPT AS PROVIDED ABOVE, IN NO EVENT WILL TRIPP LITE BE LIABLE FOR DIRECT, INDIRECT, SPECIAL, INCIDENTAL OR CONSEQUENTIAL DAMAGES ARISING OUT OF THE USE OF THIS PRODUCT, EVEN IF ADVISED OF THE POSSIBILITY OF SUCH DAMAGE. Specifically, Tripp Lite is not liable for any costs, such as lost profits or revenue, loss of equipment, loss of use of equipment, loss of software, loss of data, costs of substitutes, claims by third parties, or otherwise.
Warranty Registration
Visit www.tripplite.com/warranty to register your new Tripp Lite product. You'll be automatically entered into a drawing for a chance to win a FREE Tripp Lite product!*
* No purchase necessary. Void where prohibited. Some restrictions apply. See website for details.
Warning!
Use of this equipment in life support applications where failure of this equipment can reasonably be expected to cause the failure of the life support equipment or to significantly affect its safety or effectiveness is not recommended. Do not use this equipment in the presence of a flammable anesthetic mixture with air, oxygen or nitrous oxide.
6. Warranty and Product Registration
FCC Notice, Class B
This device complies with part 15 of the FCC Rules. Operation is subject to the following two conditions: (1) This device may not cause harmful interference, and (2) this device must accept any interference received, including interference that may cause undesired operation.
Note: This equipment has been tested and found to comply with the limits for a Class B digital device, pursuant to part 15 of the FCC Rules. These limits are designed to provide reasonable protection against harmful interference in a residential installation. This equipment generates, uses and can radiate radio frequency energy and, if not installed and used in accordance with the instructions, may cause harmful interference to radio communications. However, there is no guarantee that interference will not occur in a particular installation. If this equipment does cause harmful interference to radio or television reception, which can be determined by turning the equipment off and on, the user is encouraged to try to correct the interference by one or more of the following measures:
- Reorient or relocate the receiving antenna.
- Increase the separation between the equipment and receiver.
- Connect the equipment into an outlet on a circuit different from that to which the receiver is connected.
- Consult the dealer or an experienced radio/TV technician for help.
Any changes or modifications to this equipment not expressly approved by Tripp Lite could void the user's authority to operate this equipment.
WEEE Compliance Information for Tripp Lite Customers and Recyclers (European Union)

Under the Waste Electrical and Electronic Equipment (WEEE) Directive and implementing regulations, when customers buy new electrical and electronic equipment from Tripp Lite they are entitled to:
- Send old equipment for recycling on a one-for-one, like-for-like basis (this varies depending on the country)
- Send the new equipment back for recycling when this ultimately becomes waste
Tripp Lite follows a policy of continuous improvement. Product specifications are subject to change without notice.


1111 W. 35th Street, Chicago, IL 60609 USA www.tripplite.com/support
- USB 3.0 TO DVI ADAPTER
- USB 3.0 TO HDMI ADAPTER
- PROTECT YOUR INVESTMENT
- TABLE OF CONTENTS
- INTRODUCTION 3
- INSTALLATION 5
- USING THE ADAPTER 7
- TROUBLESHOOTING 12
- SPECIFICATIONS 15
- WARRANTY AND PRODUCT REGISTRATION 16
- INTRODUCTION
- 1.1 FEATURES
- 1.2 PACKAGE CONTENTS
- 1.3 SYSTEM REQUIREMENTS
- MINIMUM COMPUTER REQUIREMENTS WHEN USING 1 – 2 DISPLAY ADAPTERS
- MINIMUM COMPUTER REQUIREMENTS WHEN USING 3 DISPLAY ADAPTERS
- MINIMUM COMPUTER REQUIREMENTS WHEN USING 4 – 6 DISPLAY ADAPTERS
- INSTALLATION
- NOTE
- USING MULTIPLE DISPLAY ADAPTERS
- USING THE ADAPTER
- 3.1 DISPLAY PROPERTIES
- 3.2 EXTENDING VIDEO TO THE ADD-ON DISPLAY
- 3.3 MIRRORING VIDEO ON THE ADD-ON DISPLAY
- 3.4 MAKING THE ADD-ON DISPLAY THE PRIMARY DISPLAY
- TROUBLESHOOTING
- Q: WHY IS THE DISPLAY ON THE ADD-ON MONITOR BLANK
- Q: WHY IS THE ADD-ON MONITOR FLICKERING
- Q: WHEN I PLAY A MPEG FILE ON WINDOWS MEDIA PLAYER ON THE EXTENDED MONITOR, WHY DOES THE DISPLAY BECOME ABNORMAL WHEN I SWITCH IT TO FULL SCREEN MODE
- Q: WHY DOES THE VIDEO NOT DISPLAY PROPERLY WHEN IN “FULL-SCREEN” MODE
- Q: IN “EXTENDED MODE,” WHY DOES THE ADD-ON MONITOR HAVE A BLACK BORDER AROUND THE DESKTOP
- Q: IN “EXTENDED” MODE, WHY DOES THE CURSOR DISAPPEAR
- SPECIFICATIONS
- WARRANTY AND PRODUCT REGISTRATION
- 1-YEAR LIMITED WARRANTY
- WARRANTY REGISTRATION
- WARNING
- FCC NOTICE, CLASS B
- WEEE COMPLIANCE INFORMATION FOR TRIPP LITE CUSTOMERS AND RECYCLERS (EUROPEAN UNION)
Brand : Tripp Lite
Model : U344-001-R
Category : Computer accessory