RC68222P1 - DVD player LG - Free user manual and instructions
Find the device manual for free RC68222P1 LG in PDF.

User questions about RC68222P1 LG
0 question about this device. Answer the ones you know or ask your own.
Ask a new question about this device
Download the instructions for your DVD player in PDF format for free! Find your manual RC68222P1 - LG and take your electronic device back in hand. On this page are published all the documents necessary for the use of your device. RC68222P1 by LG.
USER MANUAL RC68222P1 LG
Before connecting, operating or adjusting this product, please read this instruction booklet carefully and completely.
Safety Precautions

CAUTION
RISK OF ELECTRIC SHOCK DO NOT OPEN

CAUTION: TO REDUCE THE RISK OF ELECTRIC SHOCK
DO NOT REMOVE COVER (OR BACK) NO USER-SERVICEABLE PARTS INSIDE REFER SERVICING TO QUALIFIED SERVICE PERSONNEL.

This lightning flash with arrowhead symbol within an equilateral triangle is intended to alert the user to the presence of uninsulated dangerous voltage within the product's enclosure that may be of sufficient magnitude to constitute a risk of electric shock to persons.

The exclamation point within an equilateral triangle is intended to alert the user to the presence of important operating and maintenance (servicing) instructions in the literature accompanying the product.
WARNING: TO REDUCE THE RISK OF FIRE OR ELECTRIC SHOCK, DO NOT EXPOSE THIS PRODUCT TO RAIN OR MOISTURE.
WARNING: Do not install this equipment in a confined space such as a book case or similar unit.
CLASS 1 LASER PRODUCT KLASSE 1 LASER PRODUKT LUOKAN 1 LASER LAITE KLASS 1 LASER APPARAT CLASSE 1 PRODUIT LASER
CAUTION:
This DVD Recorder employs a Laser System.
To ensure proper use of this product, please read this owner's manual carefully and retain for future reference should the unit require maintenance, contact an authorized service location (see service procedure).
Use of controls, adjustments, or the performance of procedures other than those specified herein may result in hazardous radiation exposure.
To prevent direct exposure to laser beam, do not try to open the enclosure. Visible laser radiation when open. DO NOT STARE INTO BEAM.
CAUTION: The apparatus should not be exposed to water (dripping or splashing) and no objects filled with liquids, such as vases, should be placed on the apparatus.

This product is manufactured to comply with the radio interference requirements of EEC DIRECTIVE 89/336/EEC, 93/68/EEC and 73/23/EEC.

NOTES ON COPYRIGHTS:
It is forbidden by law to copy, broadcast, show, broadcast via cable, play in public, or rent copyrighted material without permission.
This product features the copy protection function developed by Macrovision. Copy protection signals are recorded on some discs. When recording and playing the pictures of these discs on a VCR, picture noise will appear.
This product incorporates copyright protection technology that is protected by method claims of certain U.S. patents and other intellectual property rights owned by Macrovision Corporation and other rights owners. Use of this copyright protection technology must be authorized by Macrovision Corporation, and is intended for home and other limited viewing uses only unless otherwise authorized by Macrovision Corporation. Reverse engineering or disassembly is prohibited.
SERIAL NUMBER: The serial number is found on the back of this unit. This number is unique to this unit and not available to others. You should record requested information here and retain this guide as a permanent record of your purchase.
Model No.
Serial No.
SHOWVIEW®
SHOWVIEW is a registered trademark of Gemstar Development Corporation. The SHOWVIEW system is manufactured under licence from Gemstar Development Corporation.
Table of Contents
INTRODUCTION
Safety Precautions....2
Table of Contents 3-4
Overview 5-10
Recordable Discs 5
Playable Discs 5
Disc-related terms 6
Types of video CDs 6
About Symbols....6
- About the symbol display....6
- About the disc symbols for instructions....6
About DVD-R and DVD-RW disc. 7
• What are 'recording modes'? .....7
• Is editing a DVD like editing a video tape? . 7
- About word 'Original' and 'Playlist' ..... 7
About DVD+R and DVD+RW disc....7
About DVD recording 8
- Disc types and recording formats, modes, and settings....8
- Notes for recording....8
- Restrictions on video recording....9
• What is 'CPRM'? 9
• Copyright....9
Remote Control Operation Range....9
Remote Control Battery Installation....9
Reset the Recorder 9
Precautions 10
- Handling the unit 10
- Cleaning the unit 10
Notes on Discs....10
- Handling discs .... 10
- Storing discs 10
- Cleaning discs 10
Front Panel....11
Function Display Window 12
Remote Control Overview 13
Rear Panel 14
HOOKUP
Connections 15-18
Connecting to the Aerial 15
Connections to Your TV 15
Connecting to a cable box or satellite receiver..16
Connecting an external decoder box.....16
Connecting to an Amplifier 17
Accessory Audio/Video (A/V) Connections
to Recorder 18
Connecting a Digital Camcorder ..... 18
Before Operation....19-31
Initial Settings....19
General Operation 19
GENERAL....19-23
• Auto Programming 19
• Program Edit....20-21
• Auto Clock Set....22
- Manual Clock Set....22
• TV Aspect 22
• VCR Play Aspect 22
• VCR Play System....23
• AV2 Connection 23
• Progressive Scan....23
• Factory Setting....23
LANGUAGE 23
• Display Language 23
• Disc Language 23
AUDIO 24
• Dolby Digital....24
• DTS....24
• MPEG 24
- Sampling Frequency 24
• DRC (Dynamic Range Control).....24
• Vocal 24
LOCK (Parental Control) 25-26
- Set Password....25
• Movie Rating 25
• Country Code....26
RECORD....26-27
• Disc Record Mode 26
• VCR Record Mode....26
• VCR Record System ..... 27
• DV Record Audio 27
• Auto Chapter 27
DISC 27-29
• Disc Initialize 27
• Disc Finalize 28
• Disc Label 28
• Disc Protect 29
• PBC....29
• Auto Play 29
General Explanation of On-Screen Display. 30-32
• Displaying Information on-screen.....30-32
• Displaying Information While Watching TV .. 30
- Changing TV Channels 30
- Changing TV Audio Channel. . . . . . . . . . 30
Table of Contents
PLAYBACK
Operation with DVD and Video CD.....33-36
Playing a DVD or Video CD 33
General Features 33
- Moving to another TITLE .... 33
- Moving to another CHAPTER/TRACK ... 33
- Search 33
• Still Picture and Frame-by-Frame Playback . 33
- Slow Motion....34
• Random....34
- Repeat 34
- Repeat A-B 34
• Time Search. 34
- Zoom 35
- Marker Search 35
- Checking the contents of DVD Video discs: Menus .... 35
• Title Menu 35
• Disc Menu 35
- Camera Angle 35
- Changing the Audio Soundtrack ..... 35
- Changing the Audio Channel ..... 36
• 3D Surround ..... 36
- Subtitles....36
• Finding Locations on a Disc ..... 36
- Last Condition Memory. 36
Audio CD and MP3/WMA Operation ..... 37-38
Playing an Audio CD or MP3/WMA Disc ..... 37
Music menu options 37
- Pause 38
- Moving to Another Track. 38
- Repeat Track/All(Folder)/Off .... 38
• Random....38
- Changing the Audio Channel .... 38
- Search 38
- Repeat A-B 38
Notes on MP3/WMA Recordings ..... 38
Programmed Playback with Audio CD and MP3/WMA
39
JPEG File Operation 40
Viewing a JPEG File....40
- Skip Image....40
- Rotate Images 40
• View Slide Shows. 40
• Notes on JPEG Recordings ..... 40
VCR Mode Tape Playback 41
Preparation....41
Normal Playback 41
- Tracking Control....41
Special Effect Playback....41
- Search 41
• Still Picture and Frame-by-Frame Playback..41
- Slow Motion 41
- Counter Memory Function ..... 41
RECORDING
Basic Recording 42-43
Basic Recording from a TV 42
Instant Timer Recording 42
Copying from DVD to VCR 43
Copying from VCR to DVD 43
Timer Recording 44
Timer Recording with ShowView® System ... 45
Checking Timer Recording Details ..... 45
Canceling a Timer Recording 45
Stopping a Timer Recording in Progress ..... 45
Timer Recording Troubleshooting ..... 45
Recording from an External Input ..... 46-47
Recording from External Components.....46
Recording from a Digital Camcorder ..... 46
What is DV? 47
• DV-Related Messages 47
- Troubleshooting 47
EDITING
Title List and Chapter List Menu ..... 48-52
Using the Title List-Original menu VR ..... 48
Using the Chapter List-Original menu VR...48
Using the Title List-Playlist menu VR ..... 49
Using the Chapter List-Playlist menu VR ... 49
Using the Title List menu Video 50
Deleting a Title 50
- If the disc has already been finalized .... 50
Using the Title List menu +RW 51
Using the Chapter List menu +RW ..... 51
Using the Title List menu +11 52
Using the Chapter List menu 52
Title and Chapter Editing ..... 53-58
Titles, Chapters and Parts. 53
Adding Chapter Markers....53
Changing Title Thumbnails 53
Making a New Playlist....54
Adding Additional Title/Chapters to the Playlist 54
Deleting a Title/Chapter 55
Deleting a Part 55
Naming a Title 56
Combining Two Chapters Into One ..... 56
Moving a Playlist Chapter 57
Protect a Title 57
Hide a Title/Chapter 58
Divide One Title Into Two 58
Additional Information....59
Clean-up Recording 59
Overwrite Recording....59
Viewing Title List menu displayed on other
DVD recorders or players 59
Playing Your Recordings on other
DVD Players (Finalizing a Disc) ..... 59
REFERENCE
Language Code List....60
Country Code List 61
Controlling Your TV with the Supplied Remote . 62
Troubleshooting 63-64
Specifications 65
About the symbols for instructions
⚠️ Indicates hazards likely to cause harm to the unit itself or other material damage.
Indicates special operating features of this unit.
Overview
Recordable Discs
| DVDRW | DVD-RW (Digital Video Disc - ReWritable): These Discs can be recorded on repeatedly. Recordings can be erased, then you can record again on the same Disc. |
| DVDR | DVD-R (Digital Video Disc - Recordable): These Discs can be recorded only once. After you finalize a DVD-R, you cannot record on it or edit it any more. |
| RDWDVD+ReWritable | DVD+RW (Digital Video Disc + ReWritable): These Discs can be recorded on repeatedly. Recordings can be erased, then you can record again on the same Disc. |
| RDWDVD+R | DVD+R (Digital Video Disc + Recordable): These Discs can be recorded only once. After you finalize a DVD+R, you cannot record on it or edit it any more. |

otes
- This recorder cannot record CD-R or CD-RW discs.
- DVD-R/RW, DVD+R/RW and CD-R/RW discs recorded using a personal computer or a DVD or CD recorder may not play if the disc is damaged or dirty, or if there is dirt of condensation on the recorder's lens.
- If you record a disc using a personal computer, even if it is recorded in a compatible format, there are cases in which it may not play because of the settings of the application software used to create the disc. (Check with the software publisher for more detailed information.)
- The company does not hold any responsibility to compensate the contents which should have been recorded, and any losses or damages (e.g. losses of business profit, or business intermission) that may arise from malfunction of this recorder (not recording/editing as intended).
Problems arising in the following situations are included.
- When a DVD disc recorded on this recorder is used in a DVD recorder of another manufacturer, or used (insertion, playback, recording or editing) in a personal computer DVD drive.
- When a DVD that has been used as above is used again in this recorder.
- When a DVD disc recorded in a DVD recorder of another manufacturer, or in a personal computer DVD drive is used.
playable Discs
 | DVD(8 cm/12 cm disc) |
 | Video CD (VCD)(8 cm / 12 cm disc) |
 | Audio CD(8 cm/12 cm disc) |
In addition, this unit can play DVD-R/DVD-RW discs; DVD+R/DVD+RW discs; CD-R/CD-RW discs that contain audio titles, MP3 files, WMA files, or JPEG files; SVCD; and kodak picture CDs.

otes
- Depending on the conditions of the recording equipment or the CD-R/RW (or DVD±R/±RW) disc itself, some CD-R/RW (or DVD±R/±RW) discs cannot be played on the unit.
- Do not attach any seal or label to either side (the labeled side or the recorded side) of a disc.
- Do not use irregularly shaped CDs (e.g., heart-shaped or octagonal). Doing so may result in malfunctions.
Regional code of the DVD Recorder and DVDs
This DVD Recorder is designed and manufactured for playback of Region 2 encoded DVD
software. The region code on the labels of some DVD discs indicates which type of DVD Recorder can play those discs. This unit can play only DVD discs labeled 2 or ALL. If you try to play any other discs, the message "Incorrect region code. Can't play back" will appear on the TV screen. Some DVD discs may not have a region code label even though their playback is prohibited by area limits.


otes on DVDs and Video CDs
Some playback operations of DVDs and Video CDs may be intentionally fixed by software manufacturers. As this unit plays DVDs and Video CDs according to disc content designed by the software manufacturer, some playback features of the unit may not be available or other functions may be added.
Refer also to the instructions supplied with the DVDs and Video CDs. Some DVDs made for business purposes may not be played on the unit.
Overview (Continued)
Disc-related terms
Title (DVD only)
The main film content or accompanying feature content or music album.
Each title is assigned a title reference number enabling you to locate it easily.
Chapter (DVD only)
Sections of a picture or a musical piece that are smaller than titles. A title is composed of one or several chapters. Each chapter is assigned a chapter number to enable you to locate the chapter you want. Depending on the disc, chapters may not be labeled.
Track (Video CD and audio CD only)
Sections of a picture or a musical piece on a video CD or an audio CD. Each track is assigned a track number, enabling you to locate the track you want.
Scene
On a video CD with PBC (Playback control) functions, moving pictures and still pictures are divided into sections called "Scenes". Each scene available is displayed on the Scene menu and assigned a scene number, enabling you to locate the scene you want.
A scene may be composed of one or several tracks.
Types of video CDs
There are two types of video CDs:
Video CDs equipped with PBC (Version 2.0)
PBC (Playback control) functions allow you to interact with the system via menus, search functions, or other typical computer-like operations. Moreover, high resolution still pictures can be played if they are included on the disc.
Video CDs not equipped with PBC (Version 1.1)
Operated in the same way as audio CDs, these discs allow playback of video pictures as well as sound, but they are not equipped with PBC.
About Symbols
About the ⏻ symbol display
“∅” may appear on the TV screen during operation. This icon means the function explained in this owner's manual is not available on that specific disc.
About the disc symbols for instructions
A section whose title has one of the following symbols are applicable only to those discs represented by the symbol.
Many functions of this recorder are dependent on the recording mode. One or more of the symbols
(Video, VR, +R, +RW) appear by each function explained in this manual so that you can see at a glance whether it's relevant for the disc loaded.
Video DVD-R/RW with Video recording mode
VR DVD-RW with VR recording mode
+R DVD+R disc
+RW DVD+RW disc
DVD DVD-Video disc
VCD Video CDs
CD Audio CDs
MP3 MP3 CDs
JPEG JPEG CDs
VHS VHS Tape.
The finalized DVD disc is as DVD-Video disc
Overview (Continued)
About DVD-R and DVD-RW disc
How are DVD-R and DVD-RW discs different?
The essential difference between DVD-R and DVD-RW is that DVD-R is a record-once medium, while DVD-RW is a re-recordable/erasable medium. You can re-record/ erase a DVD-RW disc approximately 1,000 times.
Can I play my recordable discs in a regular DVD player?
Generally, DVD-R discs and DVD-RW discs recorded in Video mode are playable in a regular DVD player, but they must be 'finalized' first. This process fixes the contents of the disc to make them readable to other DVD players as DVD-Video discs.
DVD-RW discs recorded in VR (Video Recording) mode are playable in some players.

This indicates a product feature that is capable of playing DVD-RW discs recorded with Video Recording format.
What are 'recording modes'?
There are two recording modes available using this recorder: VR mode and Video mode. When recording to a DVD-R disc, recordings are always in Video mode.
DVD-RW discs can be formatted for VR mode recording or Video mode recording.
VR mode recording
- 4 different picture quality/recording time settings available (XP, SP, LP, EP)
• Not playable on regular DVD players - Recordings can be extensively edited
Video mode recording
- 4 different picture quality/recording time settings available (XP, SP, LP, EP)
- Playable on regular DVD players (after finalizing)
- Limited editing features

DVD-Video Format (Video mode) is a new format for recording on DVD-R/RW and DVD+R/RW discs that was approved by the DVD Forum in 2000. You may therefore experience problems playing recordable DVD discs in some players. Symptoms include video artifacts, audio and/or video dropouts and playback suddenly stopping.
Our company cannot take responsibility for problems playing discs recorded on this recorder in other players.
Is editing a DVD like editing a video tape?
No. When you edit a video tape you need one video deck to play the original tape and another to record the edits. With DVD, you edit by making a 'Playlist' of what to play and when to play it. On playback, the recorder plays the disc according to the Playlist.
About word 'Original' and 'Playlist'
Throughout this manual, you will often see the words Original and Playlist to refer to the actual content and the edited version.
- Original: content refers to what's actually recorded on the disc.
- Playlist: content refers to the edited version of the disc — how the Original content is to be played.
About DVD+R and DVD+RW disc
How are DVD+R and DVD+RW discs different?
The essential difference between DVD+R and DVD+RW is that DVD+R is a record-once medium, while DVD+RW is a re-recordable/erasable medium. You can re-record/ erase a DVD+RW disc approximately 1,000 times.
DVD+RW mode recording
- 4 different picture quality/recording time settings available (XP, SP, LP, EP)
- Playable on regular DVD players
- The edited contents is playable on regular DVD players only after finalizing
• Recordings can be edited the title/chapter
DVD+R mode recording
- 4 different picture quality/recording time settings available (XP, SP, LP, EP)
- Playable on regular DVD players (after finalizing)
- Any edited contents are not be compatible on regular DVD players. (Hide, chapter combine, added chapter mark, etc.)
- Limited title/chapter editing features
Overview (Continued)
About DVD recording

otes
- This recorder cannot make recordings on CD-R or CD-RW discs.
- Our company takes no responsibility for recording failure due to power cuts, defective discs, or damage to the recorder.
- Fingerprints and small scratches on a disc can affect playback and/or recording performance. Please take proper care of your discs.
Disc types and recording formats, modes, and settings
This recorder can play five different kinds of DVD disc: pre-recorded DVD-Video discs, DVD-RW, DVD-R, DVD+RW and DVD+R discs. The disc format for DVD-R discs is always "Video format"—the same as pre-recorded DVD-Video discs. This means that once finalized, you can play a DVD-R in a regular DVD player. By default, the DVD-RW disc format is Video Recording format, though you can change this to Video format, if required. (Reinitializing the disc will erase the contents of the disc.)
The recording mode is closely related to the disc format. If the disc format is Video Recording format, then the recording mode is VR mode; if the disc format is Video mode, then the recording mode is Video mode (except for DVD-Video, which is not recordable, and so does not have a recording mode).
Within the recording modes (which are fixed for the whole disc) are the record settings. These can be changed as required for each recording and determine the picture quality and how much space the recording will take up on the disc.
Notes for recording
- The recording times shown are not exact because the recorder uses variable bit-rate video compression. This means that the exact recording time will depend on the material being recorded.
- When recording a TV broadcast, if the reception is poor or the picture contains interference, the recording times may be shorter.
- If you record still pictures or audio only, the recording time may be longer.
- The displayed times for recording and time remaining may not always add up to exactly the length of the disc.
- The recording time available may decrease if you heavily edit a disc.
- If using a DVD-RW disc, make sure you change the recording format (Video mode or VR mode) before you record anything on the disc. See page 27 (Disc Initialize) for how to do this.
- When using a DVD-R disc, you can keep recording until the disc is full, or until you finalize the disc. Before you start a recording session, check the amount of recording time left on the disc.
- When using a DVD-RW disc in Video mode, recording time available will only increase if you erase the last title recorded on the disc.
- The Erase Title option in the Title List-Original menu only hides the title, it does not actually erase the title from the disc and increase the recording time available (except for the last recorded title on a DVD-RW disc in Video mode).
- The overwrite recording is available with DVD+RW disc.
| Disc type | Disc format | Recording mode | Functions |
| DVD-Video | Video format | n/a | Playback only |
| DVD-RW | Video Recording format (default) | VR mode | Playback, recording, Original/Playlist editing |
| Video format | Video mode | Playback, limited recording, limited editing | |
| DVD-R | Video format | Video mode | Playback, limited recording, limited editing |
| DVD+RW | +RW Video format | DVD+RW | Playback, limited recording, Title/Chapter editing |
| DVD+R | +R Video format | DVD+R | Playback, limited recording, limited Title/Chapter editing |
Overview (Continued)
Restrictions on video recording
- You cannot record copy-protected video using this recorder. Copy-protected video includes DVD-Video discs and some satellite broadcasts. If copy-protected material is encountered during a recording, recording will pause or stop automatically and an error message will be displayed on-screen.
- Video that is 'copy-once only' can only be recorded using a DVD-RW disc in VR mode with CPRM (see below).
- NTSC format signals from the analog or the DV inputs is not recorded correctly with this recorder.
- Video signals in SECAM format (from the built-in TV tuner or from the analog inputs) are recorded in PAL format.
What is 'CPRM'?
CPRM is a copy protection system (with scramble system) only allowing the recording of 'copy once' broadcast programs. CPRM stands for Content Protection for Recordable Media.
This recorder is CPRM compatible, which means that you can record copy-once broadcast programs, but you cannot then make a copy of those recordings. CPRM recordings can only be made on DVD-RW discs formatted in VR mode, and CPRM recordings can only be played on players that are specifically compatible with CPRM.
Copyright
- Recording equipment should be used only for lawful copying and you are advised to check carefully what is lawful copying in the country in which you are making a copy. Copying of copyright material such as films or music is unlawful unless permitted by a legal exception or consented to by the rights owner.
- This product incorporates copyright protection technology that is protected by method claims of certain U.S. patents and other intellectual property rights owned by Macrovision Corporation and other rights owners. Use of this copyright protection technology must be authorized by Macrovision Corporation, and is intended for home and other limited viewing uses only unless otherwise authorized by Macrovision corporation. Reverse engineering or disassembly is prohibited.
- CONSUMERS SHOULD NOTE THAT NOT ALL HIGH DEFINITION TELEVISION SETS ARE FULLY COMPATIBLE WITH THIS PRODUCT AND MAY CAUSE ARTIFACTS TO BE DISPLAYED IN THE PICTURE. IN CASE OF 625 PROGRESSIVE SCAN PICTURE PROBLEMS, IT IS RECOMMENDED THAT THE USER SWITCH THE CONNECTION TO THE 'STANDARD DEFINITION' OUTPUT. IF THERE ARE QUESTIONS REGARDING OUR TV SET COMPATIBILITY WITH THIS MODEL 625p RECORDER, PLEASE CONTACT OUR CUSTOMER SERVICE CENTER.
Remote Control Operation Range
Point the remote control at the remote sensor and press the buttons.
Remote Control Battery Installation

Detach the battery cover on the rear of the remote control, and insert two R03 (size AAA) batteries with + and - aligned correctly.

Do not mix old and new batteries. Never mix different types of batteries (standard, alkaline, etc.).
Reset the Recorder
If you observe any of the following symptoms...
• The front panel display is not working.
• The Recorder is not operating normally.
...you can reset the Recorder as follows:
- Press and hold the POWER button for at least five seconds. This will force the unit to power off. Press the POWER button again to turn the unit back on.
- Unplug the power cord, wait at least five seconds, and then plug it in again.
Overview (Continued)
Precautions
Handling the unit
When shipping the unit
The original shipping carton and packing materials come in handy. For maximum protection, re-pack the unit as it was originally packaged at the factory.
When setting up the unit
The picture and sound of a nearby TV, VCR, or radio may be distorted during playback. In this case, position the unit away from the TV, VCR, or radio, or turn off the unit after removing the disc.
To keep the surface clean
Do not use volatile liquids, such as insecticide spray, near the unit. Do not leave rubber or plastic products in contact with the unit for a long period of time. They will leave marks on the surface.
Cleaning the unit
To clean the cabinet
Use a soft, dry cloth. If the surfaces are extremely dirty, use a soft cloth lightly moistened with a mild detergent solution. Do not use strong solvents such as alcohol, benzine, or thinner, as these might damage the surface of the unit.
Notes on Discs
Handling discs
Do not touch the playback side of the disc. Hold the disc by the edges so that fingerprints will not get on the surface. Do not stick paper or tape on the disc.


Storing discs
After playing, store the disc in its case.
Do not expose the disc to direct sunlight or sources of heat, or leave it in a parked car exposed to direct sunlight, as there may be a considerable temperature increase inside the car.
Cleaning discs
Fingerprints and dust on the disc can cause poor picture quality and sound distortion. Before playing, clean the disc with a clean cloth. Wipe the disc from the center outward.

text_image
YesNo

Do not use strong solvents such as alcohol, benzine, thinner, commercially available cleaners, or anti-static spray intended for older vinyl records.
Front Panel

text_image
POWER Switches the Recorder ON or OFF. EJECT (▲) Ejects the tape in the VCR deck. AV3 IN (VIDEO IN/AUDIO IN (Left/Right)) Connect the audio/video output of an external source (Audio system, TV/ Monitor, VCR, Camcorder, etc.). PLAY (▶) Starts playback. STOP (■) Stops playback or recording. PAUSE/STEP (II/II▶) AV3 IN (S-VIDEO IN) Connect the S-Video output of an external source (TV/ Monitor, VCR, Camcorder, etc.). Pause playback or recording temporarily, press repeatedly for frame-by-frame playback. REC (●) Starts recording. Press repeatedly to set the recording time. Cassette Compartment (VCR deck) Insert a video cassette here. DV INPUT Connect the DV output of a digital camcorder. VCR Indicator Power indicator Lights up red when the recorder is in standby mode. Disc Tray Insert a disc here. DVD Indicator Display window Shows the current status of the Recorder. Remote Sensor Point the Recorder remote control here. DVD/VCR Toggles control between the DVD deck and the VCR deck. PROG. (▲ / ▼) Scans up or down through memorized channels. DUB Press to copy DVD to VCR (or VCR to DVD). Go to beginning of current chapter/ track or to previous chapter/track. Press and hold for two seconds for a fast reverse search during playback. Rewinds the tape. Go to NEXT chapter/track. Press and hold for two seconds for a fast forward search during playback. Winds the tape forwards.Function Display Window

text_image
Disc type indicators Indicates the type of disc loaded. ○ Indicates when the recorder is in timer recording or a timer recording is programmed. REC The recorder is recording. PRG Programmed playback active TTL Indicates current title. A disc is inserted in the DVD deck. A VHS tape is inserted in the VCR deck. Indicates a DVD-RW disc (VR mode only) is inserted in the DVD deck. TV Indicates when the recorder is in TV tuner mode. CHP/TRK Indicates current chapter or track number DVD -RW SVCD -RW A B REPEAT Indicates repeat mode. Character indicators Indicates clock, total playing time, elapsed time, remaining time, title number, chapter/track number, channel, etc. DUB Indicates that a DVD to VCR (or VCR to DVD) copy is in progress. Indicates when the Recorder is Locked. Hi-Fi Indicates when the Recorder is playing a tape in Hi-Fi. ST Indicates a stereo broadcast is being received. BIL Indicates when a BILINGUAL broadcast is being received.Remote Control Overview

text_image
POWER Switches the recorder ON or OFF. DVD Select the Recorder's function mode to DVD. VCR Select the Recorder's function mode to VCR. AV Changes the input to use for recording (Tuner, AV1-3, or DV IN). 0-9 numerical buttons Selects numbered options in a menu. TITLE Displays the disc's Title menu, if available. AUDIO Selects an audio language (DVD) or an audio channel (CD). SUBTITLE Selects a subtitle language. ANGLE Selects a DVD camera angle, if available. REC (●) Starts recording. Press repeatedly to set the recording time. REC MODE Selects the recording mode: XP, SP, LP, or EP. TIMER REC Displays Timer Record menu. MARKER Marks any point during playback. SEARCH Displays Marker Search menu. ZOOM Enlarges DVD video image. DUBBING Press to copy DVD to VCR (or VCR to DVD). LOCK Locks/unlocks front panel buttons. CHP ADD Inserts a chapter marker when playing/ recording a VR mode DVD-RW (and DVD+RW/+R) disc. THUMBNAIL Selects a thumbnail picture for the current title and chapter for use in the Original and Playlist menu. CLEAR - Removes a track number on the Program List or a mark on the Marker Search menu. - Reset tape counter to zero. SHOWVIEW To display the program menu for SHOWVIEW System programming. POWER EJECT OPEN/CLOSE TV POWER DVD VCR AV AV 1 2 3 PR + 4 5 6 - - 7 8 9 VOL + TITLE MUTE - AUDIO SUBTITLE ANGLE ● REC REC MODE TIMER REC BACKWARD FORWARD SKIP PAUSE/STEP STOP LIST/ DISC MENU PR/TRK SETUP ENTER DISPLAY RETURN MARKER-SEARCH ZOOM DUBBING LOCK CHP ADD THUMBNAIL CLEAR REPEAT A-B RANDOM TWVCR SHOWVIEW VIDEO Plus®EJECT, OPEN/CLOSE
- Opens and closes the disc tray.
- Ejects the tape in the VCR deck.
TV Control Buttons
(See page 62)
POWER: Turns the TV on or off.
AV: Selects the TV's source.
PR +/-: Selects TV's channel.
VOL +/-: Adjusts TV's volume.
MUTE: Temporarily turns TV sound OFF, press again to restore.
BACKWARD / FORWARD (◄◄/►►)
- DVD: Search backward or forward.
- VCR: Rewinds the tape during the STOP mode, for fast reverse picture search and Advances the tape during the STOP mode, fast forward picture search.
SKIP (I ◀◀ / ▶▶▶)
Go to next chapter or track. Returns to beginning of current chapter or track or go to previous chapter or track.
PAUSE/STEP (II)
Pause playback temporarily / press repeatedly for frame-by-frame playback.
▶ (PLAY)
Starts playback.
STOP (■)
Stops playback or recording.
LIST / DISC MENU
Accesses menu on a DVD disc, Title List or Playlist menu.
◀ / ▶ / ▲ / ▼ (left/right/up/down)
Selects an option in the menu.
PR/TRK(+/-)
- Select channel programme of the recorder.
- To adjust tracking.
- To control vertical tremble during picture still.
ENTER
- Acknowledges menu selection.
- Displays information while viewing a TV program.
SETUP
Accesses or removes the Setup menu.
DISPLAY
Accesses On-Screen Display.
RETURN (○)
- Removes the menu.
- Displays the menu of a video CD with PBC.
REPEAT
Repeat chapter, track, title, all.
A-B
Repeat sequence.
RANDOM
Plays tracks in random order.
TV/VCR
To view channels selected by the recorder tuner or by the TV tuner.
Rear Panel
text_image
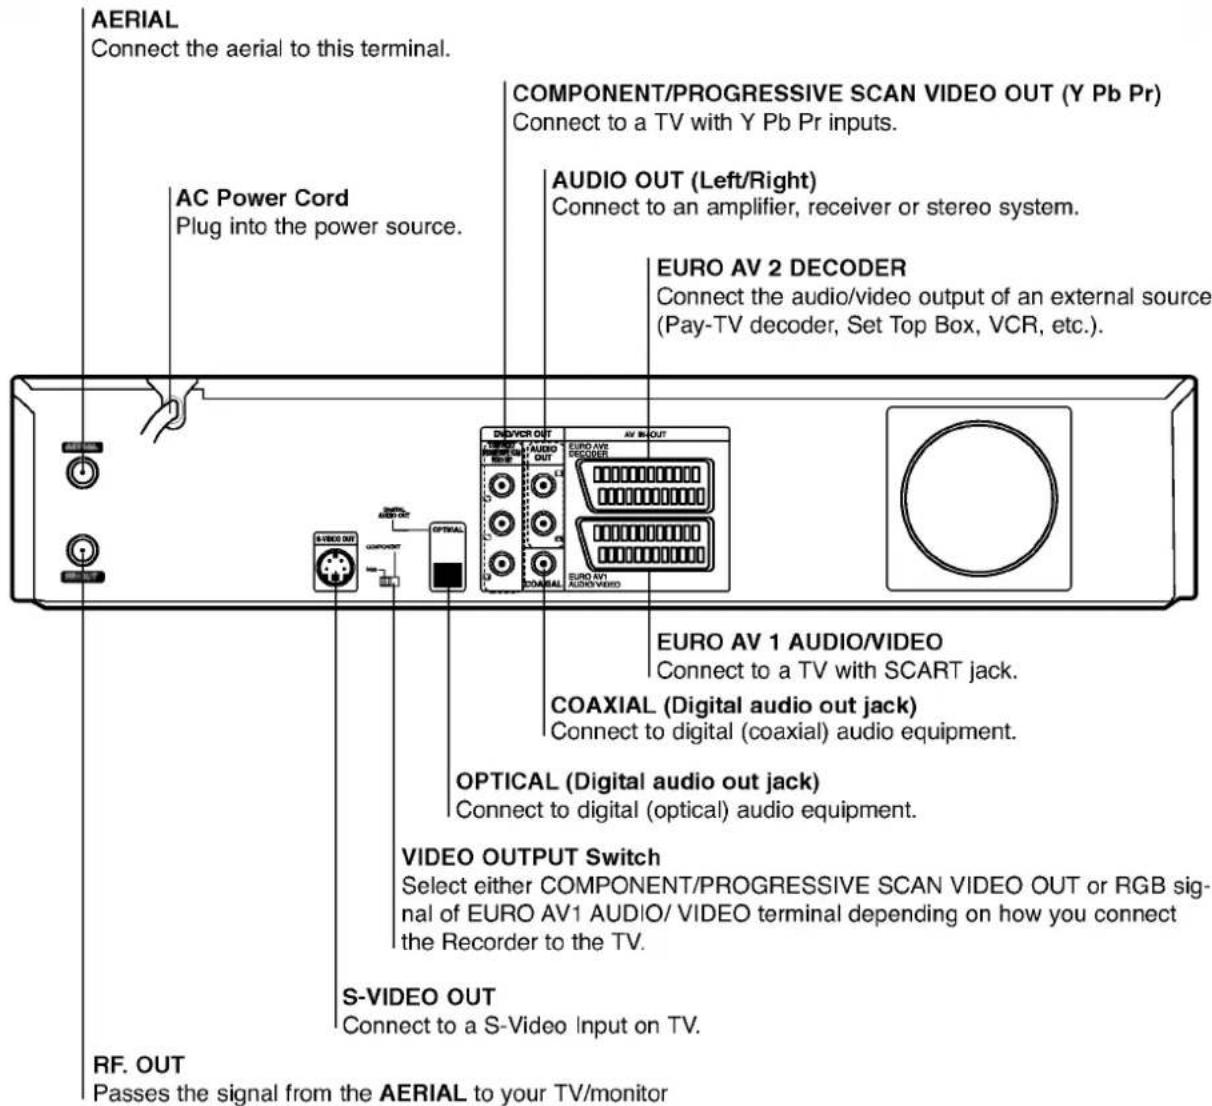
AERIAL Connect the aerial to this terminal. AC Power Cord Plug into the power source. COMPONENT/PROGRESSIVE SCAN VIDEO OUT (Y Pb Pr) Connect to a TV with Y Pb Pr inputs. AUDIO OUT (Left/Right) Connect to an amplifier, receiver or stereo system. EURO AV 2 DECODER Connect the audio/video output of an external source (Pay-TV decoder, Set Top Box, VCR, etc.). EURO AV 1 AUDIO/VIDEO Connect to a TV with SCART jack. COAXIAL (Digital audio out jack) Connect to digital (coaxial) audio equipment. OPTICAL (Digital audio out jack) Connect to digital (optical) audio equipment. VIDEO OUTPUT Switch Select either COMPONENT/PROGRESSIVE SCAN VIDEO OUT or RGB signal of EURO AV1 AUDIO/VIDEO terminal depending on how you connect the Recorder to the TV. S-VIDEO OUT Connect to a S-Video Input on TV. RF. OUT Passes the signal from the AERIAL to your TV/monitor
Important Note
About Ferrite Core
Be sure to attach the ferrite core to the power cord (for connecting to this unit).
This ferrite core can reduce noises.
1 Push the stopper [a] of the ferrite core to open.
2 Wind the power cord twice on ferrite core.
3 Close the ferrite core until it clicks.

Caution
Do not touch the inner pins of the jacks on the rear panel. Electrostatic discharge may cause permanent damage to the unit.

text_image
1 [a] 2Connections

ips
- Depending on your TV and other equipment you wish to connect, there are various ways you could connect the recorder. Use only one of the connections described below.
- Please refer to the manuals of your TV, VCR, Stereo System or other devices as necessary to make the best connections.

Caution
- Make sure the Recorder is connected directly to the TV. Tune the TV to the correct video input channel.
- Do not connect the Recorder's AUDIO OUT jack to the phono in jack (record deck) of your audio system.
- Do not connect your Recorder via your VCR. The DVD image could be distorted by the copy protection system.
Connecting to the Aerial
Remove the aerial cable plug from your TV set and insert it into the aerial socket at the back of the recorder. Plug one end of the aerial cable into the TV socket on the recorder and the other end into the aerial input socket on your TV set.
RF coaxial connection
Connect the RF. OUT jack on the Recorder to the aerial input jack on the TV using the 75-ohm Coaxial Cable supplied (R). The RF. OUT jack passes the signal through from the AERIAL jack.

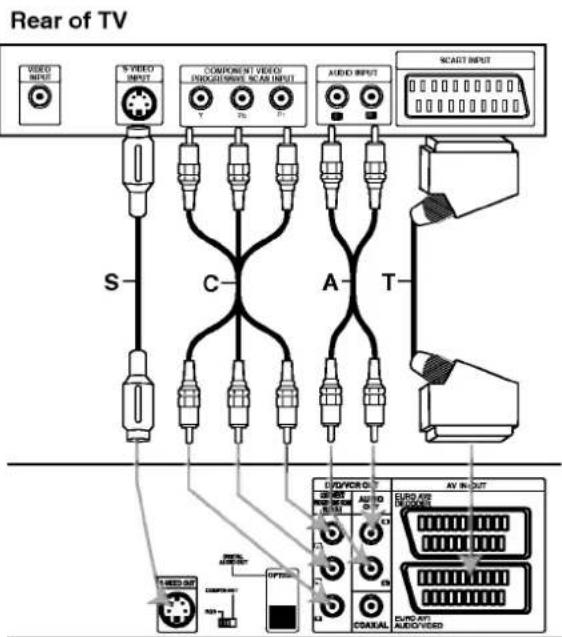
Connections to Your TV
- Make one of the following connections, depending on the capabilities of your existing equipment.
- When using the COMPONENT/PROGRESSIVE SCAN VIDEO OUT jacks, set the VIDEO OUTPUT switch to COMPONENT. When using the SCART jack, set the VIDEO OUTPUT switch to RGB.
SCART connection
Connect the EURO AV1 AUDIO/VIDEO scart jack on the Recorder to the corresponding in jacks on the TV using the scart cable (T).
S-Video connection
Connect the S-VIDEO OUT jack on the Recorder to the S-Video in jack on the TV using the S-Video cable (S).
Component Video connection
Connect the COMPONENT/PROGRESSIVE SCAN VIDEO OUT jacks on the Recorder to the corresponding input jacks on the TV using an Y Pb Pr cable (C).
Progressive Scan (ColorStream®Pro) connection If your television is a high-definition or "digital ready" television, you may take advantage of the recorder's progressive scan output for the highest video resolution possible. If your TV does not accept the Progressive Scan format, the picture will appear scrambled if you try Progressive Scan on the recorder.
Connect the COMPONENT/PROGRESSIVE SCAN VIDEO OUT jacks on the Recorder to the corresponding input jacks on the TV using an Y Pb Pr cable (C).

otes
- Set the Progressive to "ON" on the setup menu for progressive signal, see page 23.
- Set the progressive to "Off" by removing any disc from the unit and close the disc tray. Then press STOP and hold it for five seconds before releasing it.
- Progressive scan does not work with the analog video connections or S-VIDEO connection.
Audio (Left/Right) Connection
Connect the left and right AUDIO OUT jacks of the Recorder to the audio left and right IN jacks on the TV using the audio cables (A). Do not connect the Recorder's AUDIO OUT jack to the phono in jack (record deck) of your audio system. If you are using the COMPONENT/PROGRESSIVE SCAN VIDEO OUT jacks, but are connecting the recorder to a standard (analog) television, set Progressive Scan to OFF.
text_image
Rear of TV VIDEO INPUT S VIDEO INPUT COMPONENT VIDEO AUDIO/UNIVE SCAR INPUT AUDIO INPUT SCART INPUT S C A T L/DVDOR AV IN OUT EURO AND AUDIO COMPUTER AVI AVI OUT 1400.000 OFFICE COMPUTER AVI OUTRear of Recorder
Connections (Continued)
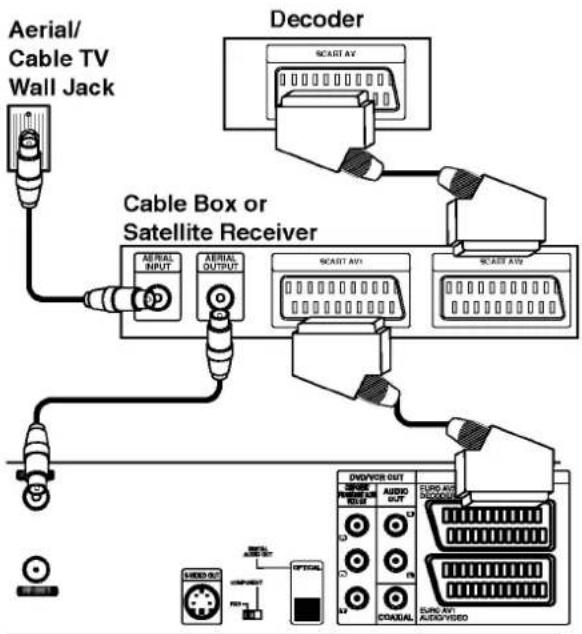
Connecting to a cable box or satellite receiver
If you have a cable or satellite receiver with a built-in decoder, connect it to this recorder and your TV as shown on this page. If you are using a separate decoder box for your cable/satellite TV, set up following the instructions on the right.
Using the setup on this page you can:
- Record any channel by selecting it on the cable box/satellite tuner.
1 Connect RF cables as shown. This enables you to watch and record TV channels.
2 Use the SCART cable to connect the EURO AV1 AUDIO/VIDEO connector to a SCART AV connector on your TV.
3 Use a SCART cable to connect the EURO AV2 DECODER connector to a SCART AV connector on your satellite/cable box. This enables you to record scrambled TV channels.

This recorder has a 'loop through' function. This feature allows you to record a TV program from the built-in TV tuner in this recorder, while watching a satellite or cable channel. Press TV/VCR to select the TV mode during recording. The TV indicator appears.

Caution:
Do not connect this recorder 'through' your VCR, satellite receiver or cable box. Always connect each component directly to your TV or AV receiver.
Aerial/Cable TV
Wall Jack

text_image
Cable Box or Satellite Receiver AERIAL INPUT AERIAL OUTPUT SCART AV1 SCASS A20 DVD/VOI OUT AUDIO OUT AUDIO AUDIO AUDIO AUDIO AUDIO AUDIO AUDIO AUDIO AUDIO AUDIO AUDIO AUDIO AUDIO AUDIO AUDIO AUDIO AUDIO AUDIO AUDIO AUDIO AUDIO AUDIO AUDIO AUDIO AUDIO AUDIO AUDIO AUDIO AUDIO AUDIO AUDIO AUDIO AUDIO AUDIO AUDIO AUDIO AUDIO AUDIO AUDIO AUDIO AUDIO AUDIO AUDIO AUDIO AUDIO AUDIO AUDIO AUDIO AUDIO AUDIO AUD/CV1 AUD/CV2 AUD/CV3 AUD/CV4 AUD/CV5 AUD/CV6 AUD/CV7 AUD/CV8 AUD/CV9 AUD/CV10 AUD/CV11 AUD/CV12 AUD/CV13 AUD/CV14 AUD/CV15 AUD/CV16 AUD/CV17 AUD/CV18 AUD/CV19 AUD/CV20Rear of Recorder
Connecting an external decoder box
If you have an external, dedicated decoder box for your satellite or cable TV system, use the setup described on this page.
1 Connect the cable from the aerial/cable TV outlet to the aerial input on your cable/satellite tuner.
2 Use a SCART cable to connect your decoder to your cable/satellite tuner. See the manual for your decoder box for more detailed instructions.
3 Use a SCART cable to connect the EURO AV2 DECODER connector to a SCART AV connector on your satellite/cable box.
4 Use the SCART cable to connect the EURO AV1 AUDIO/VIDEO connector to a SCART AV connector on your TV.
Caution:
- Do not connect your decoder box directly to this recorder.
- Information from the decoder (for example, relating to pay TV services), is only viewable when this recorder is off (in standby).
- For timer recording to work properly on this recorder, the satellite/cable box must also be switched on during recording.
text_image
Aerial/ Cable TV Wall Jack Decoder SCART AV Cable Box or Satellite Receiver AERIAL INPUT AERIAL OUTPUT SCART AV1 SCART AV2 DVD/VER OUT SPRING RISK AUDIO OUT EURO AV SINEMA COADUAL ELECTR AUDIO AUDIO VDD/OUT AUDIO VDD VDD/OUT VDD/OUT VDD/OUT VDD/OUTRear of Recorder
Connections (Continued)
Connecting to an Amplifier
Connecting to an amplifier equipped with two channel analog stereo or Dolby Pro Logic II/Pro Logic
Connect the Left and Right AUDIO OUT jacks on the Recorder to the audio left and right in jacks on your amplifier, receiver, or stereo system, using the audio cables (A).
Connecting to an amplifier equipped with two channel digital stereo (PCM) or to an Audio/Video receiver equipped with a multi-channel decoder (Dolby Digital™, MPEG 2, or DTS)
1 Connect one of the Recorder's DIGITAL AUDIO OUT jacks (OPTICAL O or COAXIAL X) to the corresponding in jack on your amplifier. Use an optional digital (optical O or coaxial X) audio cable.
2 You will need to activate the recorder's digital output. (See "AUDIO" on page 24).
Digital Multi-channel sound
A digital multi-channel connection provides the best sound quality. For this you need a multi-channel Audio/Video receiver that supports one or more of the audio formats supported by your Recorder (MPEG 2, Dolby Digital and DTS). Check the receiver manual and the logos on the front of the receiver.
Caution:
Due to the DTS Licensing agreement, the digital output will be in DTS digital out when DTS audio stream is selected.
Notes
- If the audio format of the digital output does not match the capabilities of your receiver, the receiver will produce a strong, distorted sound or no sound at all.
- Six Channel Digital Surround Sound via digital connection can only be obtained if your receiver is equipped with a Digital Multi-channel decoder.
- To see the audio format of the current DVD in the on-screen display, press AUDIO.
- This recorder does not perform internal (2 channel) decoding of a DTS sound track. To enjoy DTS multi channel surround, you must connect this recorder to a DTS compatible receiver via one of this recorder's digital audio outputs.
Rear of Recorder

text_image
S-4000 OUT OPTIMAL AUDIO OUT AV IN-OUT AUTO-AV AUDIO DIGITAL AUDIO-AV AUDIO-VI/WEED O X A OPTICAL DIGITAL INPUT COAXIAL DIGITAL INPUT AUDIO INPUTAmplifier (Receiver)
Connections (Continued)
Accessory Audio/Video (A/V) Connections to Recorder
Connect the input jacks (AV3) on the Recorder to the audio/video out jacks on your accessory component, using audio/video cables.

ote
If you use the S-VIDEO IN jack on the front panel, the VIDEO IN jack on the front panel is not available.
Jack panel of Accessory Component (VCR, Camcorder, etc.)

text_image
VIDEO OUTPUT AUDIO OUTPUT VIDEO OUTPUT ORFront of Recorder
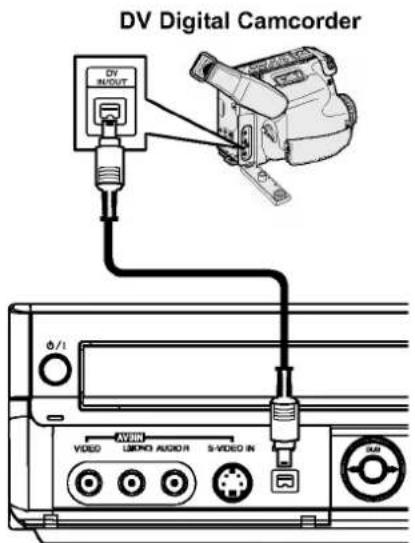
Connecting a Digital Camcorder
Using the front panel DV IN jack, it is possible to connect a DV digital camcorder or video deck or DVD-R/RW recorder and digitally transfer DV tapes or DVD-R/RW discs to DVD-R/RW.
Use a DV cable (not supplied) to connect the DV in/out jack of your DV camcorder/video deck to the front panel DV IN jack of this recorder.

ote
This jack is for connection to DV equipment only. It is not compatible with digital satellite tuners or D-VHS video decks.
text_image
DV Digital Camcorder DV INPUT AVBR VIDEO LEMON AUDITOR S-VIDEO IN DAIFront of Recorder
Before Operation
Initial Settings
In this menu system, there are several ways to customize the settings provided. Most menus consist of three levels to set up the options, but some require greater depth for the variety of settings. If you press SETUP, only the first and second level of the menu system will appear on the TV screen. The third level can be displayed by pressing ▶. For navigating the menu levels, you will see “▶” on the right side of the menu label to help you go to the next level.
To bring up and exit the Menu:
Press SETUP to bring up the menu. A second press of SETUP will take you back to initial screen.
To go to the next level:
Press ▶ on the remote control.
To go back to the previous level:
Press ◀ on the remote control.
General Operation
1 Press SETUP.
The Setup menu appears.
2 Use ▲ / ▼ to select the desired option.
3 While the desired item is selected, press ▶ to move to the second level.
4 Use ▲ / ▼ to select the second desired option.
5 Press ▶ to move to the third level.
6 Use ▲ / ▼ to select the desired setting then press ENTER to confirm your selection.
Some items require additional steps.
7 Press SETUP to exit the Setup menu.
GENERAL
Auto Programming
This Recorder is equipped with a frequency synthesized tuner capable of receiving up to 99 TV channels.
Preparation:
- Connect the Recorder to the desired type of aerial, as shown in Connecting to the Aerial on page 15.
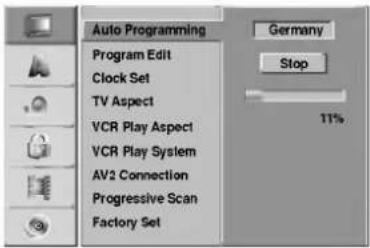
text_image
Auto Programming Program Edit Clock Set TV Aspect VCR Play Aspect VCR Play System AV2 Connection Progressive Scan Factory Set Germany Stop 11%1 Press SETUP.
The Setup menu appears.
2 Use ▲ / ▼ to select the GENERAL option.
3 While the GENERAL option is selected, press ▶ to move to the second level.
4 Use ▲ / ▼ to select the Auto Programming option.
5 Press ▶ to move to the third level. Country option is highlighted.
6 Use ▲ / ▼ to select a country then press ▶.
"Start" icon is highlighted.
7 Press ENTER to begin the channel search. The tuner will automatically cycle through all available channels in the area and place them in the tuner's memory.
Before Operation (Continued)
Program Edit
You can edit a channel manually (add, delete, name, move, etc.).
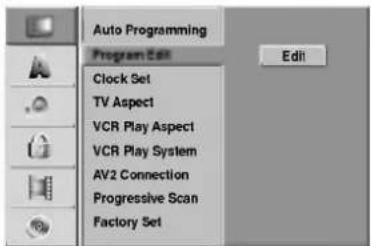
text_image
Auto Programming Program Edit Clock Set TV Aspect VCR Play Aspect VCR Play System AV2 Connection Progressive Scan Factory Set1 Press SETUP.
The Setup menu appears.
2 Use ▲ / ▼ to select the GENERAL option.
3 While the GENERAL option is selected, press ▶ to move to the second level.
4 Use ▲ / ▼ to select the Program Edit option then press ▶ to move to the third level.
"Edit" icon is highlighted.
5 Press ENTER.
Program List menu appears.
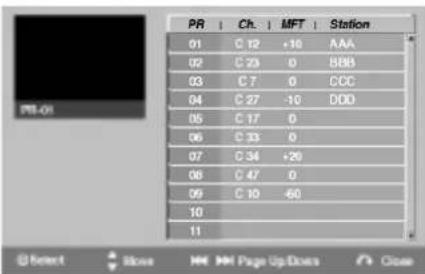
text_image
PR | Ch. | MFT | Station 01 C 12 +10 AAA 02 C 23 0 BBB 03 C 7 0 CCC 04 C 27 -10 DDD 05 C 17 0 06 C 33 0 07 C 34 +20 08 C 47 0 09 C 10 -60 10 11 @Select ▲ Store HM HM Page Up/Down Close6 Use ▲ / ▼ to select a PR number then press ENTER.
Program List options appears on the left side of the menu display.
7 Use ▲ / ▼ to select an option then press ENTER to confirm.
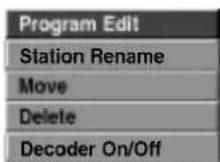
Program Edit: Edits the selected program.
Station Rename: Edits the station name.
Move: Moves the program's location on the program list.
Delete: Deletes the program from program list.
Decoder On/Off: Set the decoder for the program to On or Off.
8 Press RETURN (💡) repeatedly to exit Program List menu.
Program Edit
You can perform a search to select and store TV channels manually.
-
Use ▲ / ▼ to select a program on the Program List menu then press ENTER. Program List options appears on the left side of the Program List menu.
-
Use ▲ / ▼ to select 'Program Edit' option from the options then press ENTER. Program Edit menu appears.
text_image
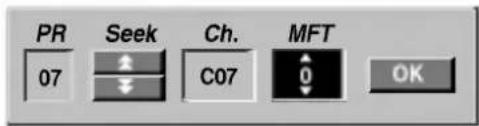
PR 07 Seek ← ← Ch. C07 MFT 0 OK- See the descriptions on below to use Program Edit menu.
◀ / ▶ (left/right): Moves the cursor to the previous or next column.
▲ / ▼ (up/down): Changes the setting at the current cursor position.
PR: Indicates program number (display only)
Seek: Searches a station automatically. Use
◀ / ▶ to select Seek option then press ▲ / ▼.
Searching stops when the recorder tunes in a station.
Ch.: Changes the channel number to edit. Use ◀ / ▶ to select Ch. option then press ▲ / ▼.
MFT: Changes the frequency for fine tuning. Use ◀ / ▶ to select MFT option then press ▲ / ▼.
- Choose OK then press ENTER to confirm the setting and returns to the Program List menu.
Before Operation (Continued)
Program Edit (Continued)
Station Rename
You can name stations independently. Names can be up to 5 characters long.
-
Use ▲ / ▼ to select a program on the Program List menu then press ENTER. Program List options appears on the left side of the Program List menu.
-
Use ▲ / ▼ to select 'Station Rename' option from Program List options then press ENTER. Keyboard menu appears.
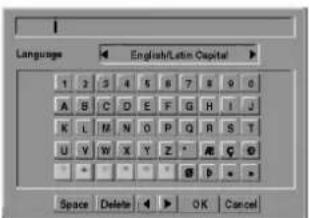
text_image
Language 1 2 3 4 5 6 7 8 9 0 A B C D E F G H I J K L M N O P Q R S T U V W X Y Z * R Q G * * * * * * * * * * * * * * * * * * * * * * * * * * * * * * * * * * * * * * * * * * * * * * * * * * * * * * * * * * * * * * * * * * * * * Space Delete OK Cancel-
Enter a name for the station. Use ▲▼◀▶ to select a character then press ENTER to confirm your selection.
-
English/Latin Capital: Switches the keyboard upper case characters.
- English/Latin Lowercase: Switches the keyboard to lower case characters.
- Symbols: Switches the keyboard to symbol characters.
• Space: Inserts a space at the cursor position. - Delete: Deletes the previous character at the cursor position.
- ◀ / ▶: Moves cursor to left or right.
• OK: Select to finish. -
Cancel: Select to exit the menu.
-
Choose 'OK' icon then press ENTER to fix the name and returns to the Program List menu.
Sort TV channels manually
You can sort the program's position on the Program List menu.
- Use ▲ / ▼ to select a program on the Program List menu then press ENTER. Program List options appears on the left side of the Program List menu.
- Use ▲ / ▼ to select 'Move' option from Program List options then press ENTER.
- Use ▲ / ▼ to select a desired position then press ENTER to store.
Deleting a program
You can delete a program on the Program List menu.
- Use ▲ / ▼ to select a program on the Program List menu then press ENTER.
Program List options appears on the left side of the Program List menu. - Use ▲ / ▼ to select 'Delete' option from Program List options then press ENTER. The Program is deleted.
Setting the Decoder On/Off
- Use ▲ / ▼ to select the program you wish to link with the decoder function on the Program List menu then press ENTER.
Program List options appears on the left side of the Program List menu. - Use ▲ / ▼ to select 'Decoder On/Off' option from Program List options then press ENTER. If you select On, 'Decoder' appears on the menu screen.
Before Operation (Continued)
Auto Clock Set
When Channel auto search is completed the actual Time and Date are also set automatically. If the time in the recorder display is not correct, the clock must be set manually.
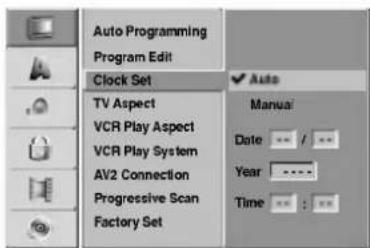
text_image
Auto Programming Program Edit Clock Set TV Aspect VCR Play Aspect VCR Play System AV2 Connection Progressive Scan Factory Set Auto Manual: Date : / :\ Year : - - - Time : : :1 Press SETUP.
The Setup menu appears.
2 Use ▲ / ▼ to select the GENERAL menu.
3 While the GENERAL option is selected, press ▶ to move to the second level.
4 Use ▲ / ▼ to select the Clock Set option.
5 Press ▶ to move to the third level.
6 Use ▲ / ▼ to select the Auto option then press ENTER.
7 Press SETUP to exit the Setup menu.
Note
There are cases where the TV station does not send, or sends wrong date and/or time information and the Recorder sets the incorrect time.
If this happens, we recommend that you set the clock manually.
Manual Clock Set
1 Follow steps 1-5 as shown above (Auto Clock Set).
2 Use ▲ / ▼ to select the Manual option then press ENTER.

text_image
Auto Programming Program Edit Clock Set TV Aspect VCR Play Aspect VCR Play System AV2 Connection Progressive Scan Factory Set Auto Manual Date Year Time3 Enter the necessary information for date and time.
◀/▶ (left/right): Moves the cursor to the previous or next column.
▲ / ▼ (up/down): Changes the setting at the current cursor position.
4 Press ENTER to confirm your setting, then press SETUP to exit the Setup menu.
TV Aspect
To record a wide screen format programme successfully the correct type of wide screen signal must be broadcast by the TV station.
You can choose:
4:3 Letter Box: Select when a standard 4:3 TV is connected. Displays theatrical images with masking bars above and below the picture.
4:3 Pan Scan: Select when a standard 4:3 TV is connected. The video material formatted in the Pan & Scan style is played back in that style (Both sides of the picture are cut off).
16:9 Wide: Select when a 16:9 wide TV is connected.
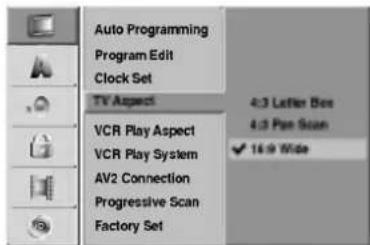
text_image
Auto Programming Program Edit Clock Set TV Aspect VCR Play Aspect VCR Play System AV2 Connection Progressive Scan Factory Set 4:3 Letter Box 4:3 Pan Scan ✓ 16.9 WideVCR Play Aspect
You can choose:
AUTO : Automatically plays back Wide-Screen programmes as Wide-Screen and Normal programmes as normal.
4:3 : Only for playing back Normal format recordings (4:3).
16:9:Only for playing back Wide-Screen format recordings (16:9).
text_image
Auto Programming Program Edit Clock Set TV Aspect VCR Play Aspect ✓ Auto VCR Play System 4.2 AV2 Connection 16.9 Progressive Scan Factory SetBefore Operation (Continued)
VCR Play System
Your video recorder uses dual colour standards, PAL and MESECAM. During play your video recorder should select the colour system automatically, however if you experience problems you may need to do it manually.
text_image
Auto Programming Program Edit Clock Set TV Aspect VCR Play Aspect VCR Play System AV2 Connection Progressive Scan Factory Set Auto PIL MESECAMAV2 Connection
You can connect a decoder, satellite receiver or other device to the EURO AV2 socket on the back.
text_image
Auto Programming Program Edit Clock Set TV Aspect VCR Play Aspect VCR Play System JV2 Connection Progressive Scan Factory Set Decoder Satellite Receiver Other DevicesProgressive Scan
Progressive Scan Video provides the highest quality pictures with less flickering.
If you are using the COMPONENT/PROGRESSIVE SCAN VIDEO OUT jacks, but are connecting the recorder to a standard (analog) television, set Progressive Scan to OFF.
If you are using the component video jacks for connection to a TV or monitor that is compatible with a progressive scan signal, set Progressive Scan to ON.

text_image
Auto Programming Program Edit Clock Set TV Aspect VCR Play Aspect VCR Play System AV2 Connection Progressive Scan Factory Set OFF ON
ote
Progressive Scan will not be set when the VIDEO OUTPUT switch is set at RGB position.

Caution
Once the setting for progressive scan output is entered, an image will only be visible on a progressive scan compatible TV or monitor. If you set Progressive Scan to On in error, you must reset the unit.
1) Remove any disc from the unit and close the disc tray.
2) Press STOP and hold it for five seconds before releasing it. The video output will be restored to the standard setting and a picture will once again be visible on a conventional analog TV or monitor.
Factory Setting
If you need to, you can reset the recorder to all its factory settings. Select 'SET' icon then press ENTER.

ote
Some options can not be reset.

text_image
Auto Programming Program Edit Clock Set TV Aspect VCR Play Aspect VCR Play System AV2 Connection Progressive Scan Factory Set SETLANGUAGE
Display Language
Select a language for the Setup menu and on-screen display.
text_image
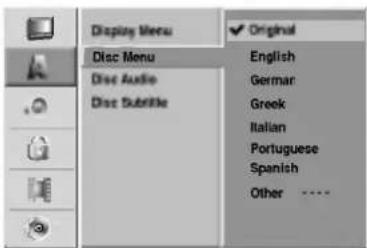
Display Menu Disc Menu Disc Audio Disc Substric English Deutsch Eliquiseå Italiano Português EspañolDisc Language
Select a language for the disc's Menu, Audio, and Subtitle.
- Original: The original language set for the disc is selected.
- Other: To select another language, select Other option then press ENTER. Use the numbered and ENTER buttons to key-in the corresponding 4-digit number according to the language code list on page 60. If you a mistake before pressing ENTER, press ▶ repeatedly to delete one by one and correct it.
text_image
Display Menu Disc Menu Disc Audio Disc Subtile English German Greek Italian Portuguese Spanish Other ....Before Operation (Continued)
AUDIO
Each DVD disc has a variety of audio output options. Set the recorder's Audio Output according to the type of audio system you use.
Dolby Digital
PCM: Select when connected to a 2-channel digital stereo amplifier. The Recorder's digital audio outputs sounds in the PCM 2ch format when you play a DVD video disc recorded on the Dolby Digital recording system.
Bitstream: Select "Bitstream" if you connected the Recorder's DIGITAL OUT jack to a Dolby Digital decoder (or an amplifier or other equipment with a Dolby Digital decoder).

text_image
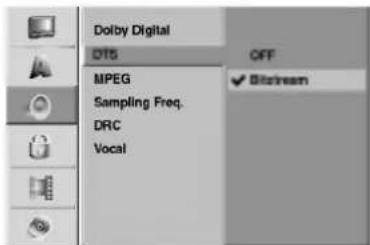
Delay Digital DTS MPEG Sampling Freq. DRC Vocal PCM ✓ BitstreamDTS
OFF: If you select "OFF", the DTS signal is not output through the DIGITAL OUT jack.
Bitstream: Select "Bitstream" if you connected the Recorder's DIGITAL OUT jack to a DTS decoder (or an amplifier or other equipment with a DTS decoder).
text_image
Dolby Digital OTS OFF MPEG Sampling Freq. DRC Vocal BitstreamMPEG
PCM: Select when connected to a 2-channel digital stereo amplifier. The Recorder's digital audio outputs sounds in the PCM 2ch format when you play a DVD video disc recorded on the MPEG2 recording system.
Bitstream: Select "Bitstream" if you connected the Recorder's DIGITAL OUT jack to a MPEG decoder (or an amplifier or other equipment with a MPEG decoder).
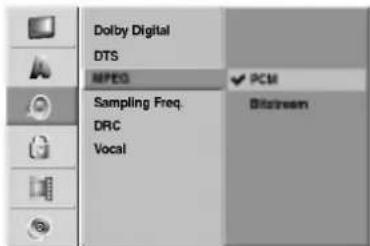
text_image
Dolby Digital DTS MPDG Sampling Freq. DRC Vocal PCM BitstreamSampling Frequency
If your receiver or amplifier is NOT capable of handling 96 kHz signals, select 48 kHz. When this choice is made, this unit will automatically convert any 96 kHz signals to 48 kHz so your system can decode them. If your receiver or amplifier is capable of handling 96 kHz signals, select 96 kHz. When this choice is made, this unit will pass each type of signal through without any further processing.
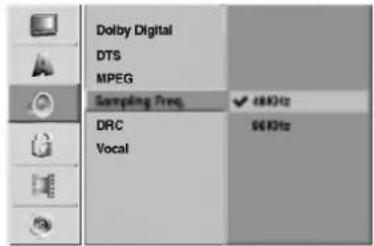
text_image
Dolby Digital DTS MPEG Sampling Freq ✓ 48kHz DRC Vocal 56kHzDRC (Dynamic Range Control)
With the DVD format, you can hear a program's soundtrack in the most accurate and realistic presentation possible, thanks to digital audio technology. However, you may wish to compress the dynamic range of the audio output (the difference between the loudest sounds and the quietest ones). Then, you may listen to a movie at a lower volume without losing clarity of sound. Set DRC to ON for this effect.
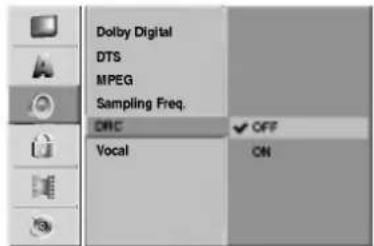
text_image
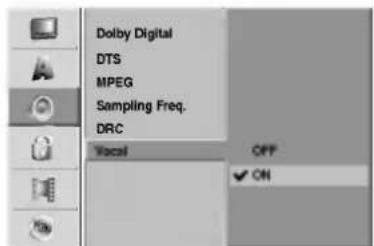
Dolby Digital DTS MPEG Sampling Freq. CRC OFF Vocal ONVocal
Set Vocal to ON only when a multi-channel karaoke DVD is playing. The karaoke channels on the disc will mix into normal stereo sound.
text_image
Dolby Digital DTS MPEG Sampling Freq. DRC Vocal OFF ONBefore Operation (Continued)
LOCK (Parental Control)
Set Password
To access the Movie Rating, Set Password and Country Code features, you must enter a 4-digit security password.
1 Press SETUP.
The Setup menu appears.
2 Use ▲ / ▼ to select the LOCK option.
3 While the LOCK option is selected, press ▶ to move to the second level.
4 Use ▲ / ▼ to select the Set Password option.
5 Press ▶ to move to the third level.
6 When you have not entered a password yet; Enter a 4-digit password using the numbered buttons to create a personal 4-digit security password. Enter the 4-digit password again to verify.

text_image
Movie Rating Set Password Country Code Chang New Password Delete 0-9 InputWhen you have already entered a password; You can change or delete the password.
Use ▲ / ▼ to select "Change" or "Delete" then press ENTER.
Change : Enter a 4-digit password using the numbered buttons to confirm the personal 4-digit security password, then enter a 4-digit new password twice.
Delete : Enter a 4-digit password using the numbered buttons to confirm the personal 4-digit security password.

If you make a mistake, press ▶ repeatedly to delete password numbers one by one then correct it.
If you forget your 4-digit code
If you forget your password, to clear the current password, follow the procedure below.
- Press SETUP to display the Setup menu.
- Use the Number buttons to enter the 5-digit number "21019".
- Select "Yes" then press ENTER. The 4-digit password is cleared. Enter a new code as shown above.
Movie Rating
Movies on DVDs may contain scenes not suitable for children. Therefore, discs may contain Parental Control information that applies to the complete disc or to certain scenes on the disc. These scenes are rated from Level 1 to 8, and alternatively, more suitable scenes are available for selection on some discs. Ratings are country-dependent. The Parental Control feature allows you to prevent discs from being played by your children or to have certain discs played with alternative scenes.
1 Follow steps 1-3 as shown above to the left (Set Password).
2 Use ▲ / ▼ to select the Movie Rating option.
3 Press ▶ to move to the third level.
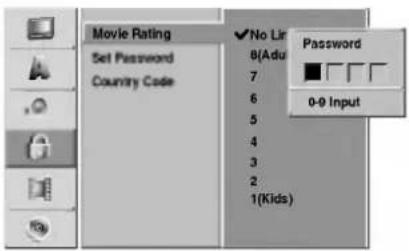
text_image
Movie Rating Set Password Country Code ✓ No List 8(Adu) Password 7 6 5 4 3 2 1(Kids)4 Enter a 4-digit password using the numbered buttons to confirm the personal 4-digit security password.
5 Select a rating from 1 to 8 using the ▲/▼ buttons. One (1) has the least playback restrictions. Eight (8) has the most playback restrictions. No Limit: If you select No Limit, Parental Control is not active. The disc will play in full.
Level 1 to 8: Some discs contain scenes not suitable for children. If you set a rating for the recorder, all disc scenes with the same rating or lower will be played. Higher rated scenes will not be played unless an alternative scene is available on the disc. The alternative must have the same rating or a lower one. If no suitable alternative is found, playback will stop. You must enter the 4-digit password or change the rating level in order to play the disc.
6 Press ENTER to confirm your rating selection, then press SETUP to exit the menu.
Before Operation (Continued)
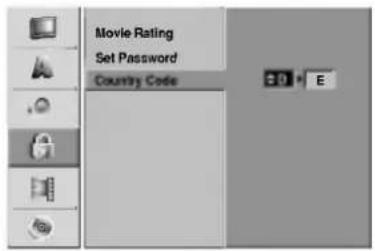
Country Code
Enter the code of a country/area whose standards were used to rate the DVD video disc, referring to the list (See "Country Code List", page 61.).
text_image
Movie Rating Set Password Country Code E1 Press SETUP.
The Setup menu appears.
2 Use ▲ / ▼ to select the LOCK option.
3 While the LOCK option is selected, press ▶ to move to the second level.
4 Use ▲ / ▼ to select the Country Code option.
5 Press ▶ to move to the third level.
6 When you have not entered a password yet; Enter a 4-digit password using the numbered buttons to create a personal 4-digit security password. Enter the 4-digit password again to verify. When you have already entered a password; Enter a 4-digit password using the numbered buttons to confirm the personal 4-digit security password.
T ip
If you a mistake, press ◀ repeatedly to delete password numbers one by one then correct it.
7 Select the first character using the ▲ / ▼ buttons.
8 Shift the cursor using ▶ buttons and select the second character using ▲ / ▼ buttons.
9 Press ENTER to confirm your country code selection, then press SETUP to exit the menu.
RECORD
Disc Record Mode
You can set the picture quality for DVD recording; XP (High Quality), SP (Standard Quality), LP (Low Quality), EP (Extend Quality).

text_image
Disc Record Mode VCR Record Mode VCR Record System DV Record Audio Auto Chapter XP ✓ SP LP EP1 Press SETUP.
The Setup menu appears.
2 Use ▲ / ▼ to select the RECORD option.
3 While the RECORD option is selected, press ▶ to move to the second level.
4 Use ▲ / ▼ to select the Disc Record Mode option.
5 Press ▶ to move to the third level.
6 Use ▲ / ▼ to select a desired Record Mode (XP, SP, LP or EP)
7 Press ENTER to confirm your selection, then press SETUP to exit the menu.
VCR Record Mode
You can set the picture quality for VCR recording; SP (Standard Play), LP (Long Play).

text_image
Disc Record Mode VCR Record Mode VCR Record System DV Record Audio Auto Chapter ✓ SP LPBefore Operation (Continued)
VCR Record System
Your video recorder uses dual colour standards, PAL and MESECAM. During recording your video recorder should select the colour system automatically, however if you experience problems you may need to do it manually.

text_image
Disc Record Mode VCR Record Mode VCR Record System DV Record Audio Auto Chapter Auto PAL MESECAMDV Record Audio
You need to set this if you have a camcorder using 32kHz/12-bit sound connected to the front panel DV IN jack.
Some digital camcorders have two stereo tracks for audio. One is recorded at the time of shooting; the other is for overdubbing after shooting.
On the Audio 1 setting, the sound that was recorded while shooting is used.
On the Audio 2 setting, the overdubbed sound is used.
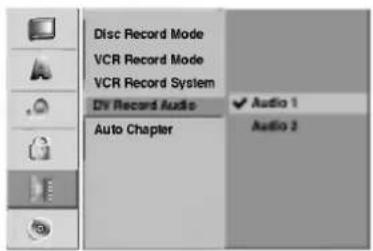
text_image
Disc Record Mode VCR Record Mode VCR Record System DV Record Audio Auto Chapter Audio 1 Audio 2Auto Chapter
When recording, chapter markers are put in specified setting. You can change this interval to 5 minutes, or 10 minutes. If you select None, switch off automatic chapter marking altogether with the No Separation setting.

text_image
Disc Record Mode VCR Record Mode VCR Record System DV Record Audio Auto Chapter None 5 Min 10 MinDISC
Disc Initialize
If you load a completely blank disc, the recorder will initialize the disc.
DVD-R: The recorder initialize the disc to Video mode. The recording mode will always be Video mode.
DVD-RW: The recorder initialize the disc to VR mode. DVD+R: The Initialize menu will appears. Select "Yes" then press ENTER.
DVD+RW: The recorder initialize the disc to DVD+RW mode.
Also, you can format the disc from the Setup menu as below.
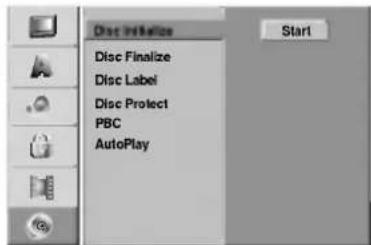
text_image
Disc Initialize Disc Finalize Disc Label Disc Protect PBC AutoPlay Start1 Press SETUP.
The Setup menu appears.
2 Use ▲ / ▼ to select the DISC option.
3 While the DISC option is selected, press ▶ to move to the second level.
4 Use ▲ / ▼ to select the Disc Initialize option.
5 Press ▶ to move to the third level.
Start icon is highlighted.
6 Press ENTER.
Disc Initialize menu appears.
7 In case of DVD-RW, use ◀ / ▶ to select a desired Disc Format Mode (VR Mode or Video Mode) then press ENTER.
In case of DVD+RW, go to step 8.

8 Use ◀/▶ to select "OK" then press ENTER. It takes a few moments to format the disc.

Caution
If you want to change the disc format, everything recorded on the disc will be erased.
Before Operation (Continued)
Disc Finalize
Finalizing 'fixes' the recordings in place so that the disc can be played on a regular DVD player or computer equipped with a suitable DVD-ROM drive.
Finalizing a Video mode disc creates a menu screen for navigating the disc. This is accessed by pressing LIST/DISC MENU or TITLE.
Caution
- When DVD-R, DVD-RW, and DVD+R recording, you've finalized a disc recording, you can't edit or record anything else on that disc except DVD+RW.

text_image
Disc Initialize Disc Finalize Disc Label Disc Project PBC AutoPlay Finalize Instruction1 Follow steps 1-3 as shown on page 27 (Disc Initialize).
2 Use ▲ / ▼ to select the Disc Finalize option.
3 Press ▶ to move to the third level. Finalize is highlighted.
4 Press ENTER.
Finalize menu appears.

5 Select OK then press ENTER. The recorder starts finalizing the disc.
Note
How long finalization takes depends on the type of disc, how much is recorded on the disc, and the number of titles on the disc. A disc recorded can take up to 8 minutes or more to finalize.
T ip
If you load a DVD-RW or DVD+RW that has already been finalized, you can 'unfinalize' it by choosing Unfinalize from the Disc Finalize menu. After doing this, you can edit and re-record onto the disc.
Disc Label
Use this to enter a name for the disc. This name appears when you load the disc and when you display disc information on-screen.
- The disc name can be up to 32 characters long. - For discs formatted on a different Recorder, you will see only a limited character set.

text_image
Disc Initialize Disc Finalize Disc Label Disc Protect PBC AutoPlay Edit1 Follow steps 1-3 as shown Disc Initialize on page 27.
2 Use ▲ / ▼ to select the Disc Label option.
3 Press ▶ to move to the third level.
Edit icon is highlighted.
4 Press ENTER.
Keyboard menu appears.
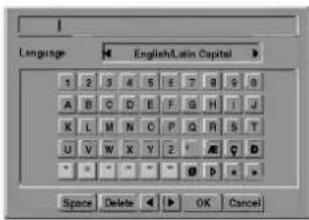
text_image
Language English/Latin Capital 1 2 3 4 5 6 7 8 9 10 A B C D E F G H I J K L M N O P Q R S T U V W X Y Z ' A E C D Space Delete OK Cancel5 Enter a name for the disc. Use ▲▼◀▶ to select a character then press ENTER to confirm your selection. Refer step 3 as shown on page 21 (Station Rename).
Remote control buttons for entering a name (PLAY): Inserts a space at the cursor position.
II (PAUSE/STEP): Deletes the after character at the cursor position.
■ (STOP), CLEAR: Deletes the previous character at the cursor position.
|◀◀ / ▶▶▶: Moves cursor to left or right.
Numbers (0\~9): Enters the character of corresponding location on the selected column.
LIST/DISC MENU, DISPLAY: Switches the keyboard type (English/Latin Capital, English/Latin Lowercase, Symbols)
6 Choose OK then press ENTER to fix the name and return to the Setup menu.
7 Press SETUP to exit the menu.
Before Operation (Continued)
Disc Protect
When recording in DVD+RW / +R disc or VR mode formatted DVD-RW disc, set to ON to prevent accidental recording, editing or deleting of the disc loaded. If you need to unlock the disc to make edits, select OFF.
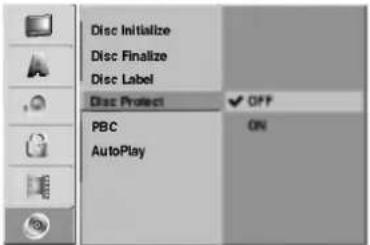
text_image
Disc Initialize Disc Finalize Disc Label Disc Protect PBC AutoPlay OFF ONPBC
Set Playback Control (PBC) to On or Off.
- ON: Video CDs with PBC are played according to the PBC.
- OFF: Video CDs with PBC are played the same way as Audio CDs.
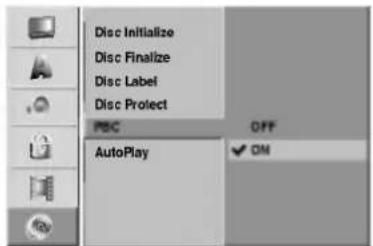
text_image
Disc Initialize Disc Finalize Disc Label Disc Project PSC AutoPlay OFF ONAuto Play
You can set up the Recorder so a DVD disc automatically starts playing whenever the DVD is inserted.
If Auto Play mode is set to On, this Recorder will search for title that has the longest playback time and then play back the title automatically.
ON: Auto Play function is active.
OFF: Auto Play function is not active.
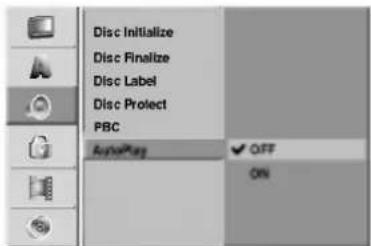
text_image
Disc Initialize Disc Finalize Disc Label Disc Protect PBC AutoPlug OFF ON
ote
The Auto Play function may not work for some DVDs.
Before Operation (Continued)
General Explanation of On-Screen Display
This manual gives basic instructions for operating the Recorder. Some DVDs require specific operation or allow only limited operation during playback. When this occurs, the symbol ☉ appears on the TV screen, indicating that the operation is not permitted by the Recorder or is not available on the disc.
Displaying Information on-screen
You can display various information about the disc or tape loaded on-screen.
1 Press DISPLAY repeatedly to display/change the information displayed on-screen.
2 To remove the on-screen display, press DISPLAY or RETURN(♂) repeatedly until it disappears. See the descriptions on next pages for detailed explanation during playing.
Notes
- Some discs may not provide all of the features on the on-screen display example shown on next pages.
- If no button is pressed for 7 seconds, the on-screen display disappears.
Temporary Feedback Field Icons

Resume play from this point

Action prohibited or not available
Displaying Information While Watching TV
During viewing the TV, press DISPLAY to display/remove the information displayed on-screen.
e.g., when DVD-RW in VR mode is inserted.

text_image
Indicates channel number, station name, and audio input signal received by the tuner. Indicates the record mode, free space, and elapsed time progress bar. Indicates disc name and format. DVD-RW VR Mode SP VR JUM Free DVD PR-93 BOMD StereoMain 01/01/2004.11:38 Indicates output audio signal. Indicates current date and time.Changing TV Channels
If no disc or tape is playing, you can change TV channels using the number or PR/TRK (▲ / ▼) buttons on the remote control, or the PROG. (▲ / ▼) buttons on the front panel.
Changing TV Audio Channel
Some TV programs are broadcast with a bilingual audio program (BIL). You can change the TV audio using the AUDIO button.
Press AUDIO repeatedly to change the TV audio as shown below.

flowchart
graph TD
    A["Stereo/Main"] --> B["Stereo/Sub"]
    B --> C["Mono/Main"]
    C --> A
The current audio channel is displayed on-screen.
- For the detailed information, refer to the step 4 on page 42.
- If the sound is poor quality when set to Stereo, you can often improve it by changing to Mono.
- When an external input is selected, the audio channel can be switched only to Stereo.
Before Operation (Continued)
Displaying Information on-screen (Continued)
DVD

text_image
Shows the current title/chapter number and total number of titles/chapters. Title : 1/4 Chapter: 3/28 0:06:32 / 2:12:10 Shows the elapsed playing time and total time. CVD Shows the Current mode.| Menu Options | Function (Use ▲ / ▼ to select desired option) | Selection Method | |
| Title Number | Shows the current title number and total number of titles, and skips to the desired title number. | ◀ / ▶, or Numbers, ENTER | |
| Chapter Number | Shows the current chapter number and total number of chapters, and skips to the desired chapter number. | ◀ / ▶, or Numbers, ENTER | |
| Time search | Shows the elapsed playing time, and searches the point by the elapsed time directly. | ◀ / ▶, Numbers, ENTER | |
| Audio language and Digital Audio Output mode | Shows the current audio soundtrack language, encoding method, and channel number, and changes the setting. | ◀ / ▶ | |
| Subtitle language | Shows the current subtitles language, and changes the setting. | ◀ / ▶ | |
| Angle | Shows the current angle number and total number of angles, and changes the angle number. | ◀ / ▶ | |
| Sound | Shows the current sound mode, and changes the setting. | ◀ / ▶ | |
VCD
Shows the current track number and total number of tracks, or shows PBC On mode.

text_image
TRACK : 1/17 0:06:32 / 1:00:00Shows the elapsed playing time and total time.

Shows the Current mode.
| Menu Options | Function (Use ▲ / ▼ to select desired option) | Selection Method | |
| Track Number |  | Shows the current track number and total number of tracks or PBC On mode, and skip to the desired track number. | ◀ / ▶, or Numbers, ENTER |
| Time |  | Shows the elapsed playing time (Display only). | - |
| Audio Channel |  | Shows the audio channel, and changes the audio channel. | ◀ / ▶ |
| Sound |  | Shows the current sound mode, and changes the setting. | ◀ / ▶ |
Before Operation (Continued)
Displaying Information on-screen (Continued)

text_image
VR Shows the title name, recording date, recording mode, etc. ORG: Original PList: Playlist TITLE 1 01/01/04 ORG SP 0:06:32 / 2:12:10 Shows the elapsed playing time and total time. DVD Shows the Current mode.| Menu Options | Function (Use ▲ / ▼ to select desired option) | Selection Method | |
| Title Number |  | Shows the current title number and total number of titles, and skips to the desired title number. | ◀ / ▶, or Numbers, ENTER |
| Chapter Number |  | Shows the current chapter number and total number of chapters, and skips to the desired chapter number. | ◀ / ▶, or Numbers, ENTER |
| Time search |  | Shows the elapsed playing time, and searches the point by the elapsed time directly. | ◀ / ▶, Numbers, ENTER |
| Digital Audio Output mode |  | Shows the current audio encoding method, and channel number, and changes the setting. | ◀ / ▶ |
| Sound |  | Shows the current sound mode, and changes the setting. | ◀ / ▶ |
+RW +R Video
Shows the title name, recording date, recording mode, etc.
TITLE 1 01/01/04
Shows the elapsed playing time and total time.


Shows the Current mode.
| Menu Options | Function (Use ▲ / ▼ to select desired option) | Selection Method | |
| Title Number |  | Shows the current title number and total number of titles, and skips to the desired title number. | ◀ / ▶, or Numbers, ENTER |
| Chapter Number |  | Shows the current chapter number and total number of chapters, and skips to the desired chapter number. | ◀ / ▶, or Numbers, ENTER |
| Time search |  | Shows the elapsed playing time, and searches the point by the elapsed time directly. | ◀ / ▶, Numbers, ENTER |
| Digital Audio Output mode |  | Shows the current audio encoding method, and channel number, and changes the setting. | ◀ / ▶ |
| Sound |  | Shows the current sound mode, and changes the setting. | ◀ / ▶ |

text_image
Shows playing speed, the elapsed playing progress bar and elapsed playing time. VCR SP 0:06:32 Shows the Current modeVHS
| Menu Options | Function (Use ▲ / ▼ to select desired option) | Selection Method | |
| Time |  | Shows the elapsed playing time (Display only). | - |
| Audio Channel |  | Shows the audio channel, and changes the audio channel. | ◀ / ▶ |
Operation with DVD and Video CD
Playing a DVD or Video CD

Playback Setup
- Before using the remote control, press the DVD button to select the device to be operated.
- Turn the TV on and select the video input source connected to the Recorder.
- Audio system: Turn the audio system on and select the input source connected to the Recorder.

Press OPEN/CLOSE (▲) to open the disc tray.

Load your chosen disc in the tray, with the playback side down.

Press OPEN/CLOSE (▲) to close the tray. READING appears on the display window, and playback starts automatically. If playback does not start, press ▶ (PLAY).
In some cases, the disc menu might appear instead.

ip
If a menu screen is displayed
The menu screen may be displayed first after loading a DVD or Video CD which contains a menu.
DVD
Use the ◀▶▲▼ buttons to select the title/chapter you want to view, then press ENTER to start playback. Press TITLE or LIST/DISC MENU to return to the menu screen.
VCD
- Use the number buttons to select the track you want to view. Press RETURN (💡) to return to the menu screen.
- Menu setting and the exact operating procedures for using the menu may differ depending on the disc. Follow the instructions on the each menu screen. You may also set PBC to OFF under Setup menu. See page 29.

otes
- If Parental Control is set and the disc is not within the Rating settings (not authorized), the 4-digit code must be entered and/or the disc must be authorized (see "Movie Rating", on page 25).
- DVDs may have a Region Code. Your recorder will not play discs that have a region code different from your recorder. The region code for this recorder is 2 (two).
General Features

ote
Unless stated otherwise, all operations described use the remote control. Some features may also be available on the Setup menu.
Moving to another TITLE

DVD
Video
VR
+RW
+R
When a disc has more than one title, you can move to another title as follows:
- Press DISPLAY then use ▲ / ▼ to select the title icon. Then, press the appropriate numbered button (0-9) or ◀ / ▶ to select a title number.
Moving to another CHAPTER/TRACK


DVD
Video
VR
+RW
+R
VCD
When a title on a disc has more than one chapter/track, you can move to another chapter/track as follows:
- Press SKIP (I◄◄ or ►►I) briefly during playback to select the next chapter/track or to return to the beginning of the current chapter/track.
- Press SKIP (◀◀) twice briefly to step back to the previous chapter/track.
- To go directly to any chapter/track during playback, press DISPLAY twice. Then, use ▲ / ▼ to select chapter icon (or for a Video CD, select track icon). Then, enter the chapter/track number using the numbered buttons (0-9) or press ◀ / ▶.
Search
DVD
Video
VR
+RW
+R
VCD
1 Press BACKWARD (◀◀) or FORWARD(▶▶) during playback.
The recorder will now go into SEARCH mode.
2 Press BACKWARD (◀◀) or FORWARD(▶▶) to select the required speed: ◀ (Reverse play), ◀◀, ◀◀◀, ◀◀◀◀, ◀◀◀◀◀, ◀◀◀◀◀◀ (backward) or ▶▶, ▶▶▶, ▶▶▶▶, ▶▶▶▶▶, ▶▶▶▶▶▶ (forward). With a Video CD, the Search speed changes: ◀◀, ◀◀◀, ◀◀◀◀◀ (backward) or ▶▶, ▶▶▶, ▶▶▶▶ (forward).
3 To exit SEARCH mode, press ▶ (PLAY).
Still Picture and Frame-by-Frame Playback
DVD
Video
VR
+RW
+R
VCD
1 Press PAUSE/STEP (Ⅲ) during playback. The recorder will now go into PAUSE mod
2 You can advance or back up the picture frame-by-frame by pressing ◀ / ▶ repeatedly during PAUSE mode.
3 To exit PAUSE mode, press ▶ (PLAY).

ote
The picture frame-by-frame in reverse is not available for Video CD.

ip
You can advance the picture frame-by-frame by pressing PAUSE/STEP (Ⅲ) repeatedly on the remote control.
Operation with DVD and Video CD (Continued)
General Features (Continued)
Slow Motion
DVD Video VR +RW +R VCD
1 Press PAUSE/STEP (II) during playback. The recorder will now go into PAUSE mode.
2 Press BACKWARD (◀◀) or FORWARD(▶▶) during PAUSE mode. The Recorder will enter SLOW mode.
3 Use the BACKWARD (◀◀) or FORWARD(▶▶) to select the required speed: ◀ 1/16, ◀ 1/8, ◀ 1/4, or ◀ 1/2 (backward), or ▶ 1/16, ▶ 1/8, ▶ 1/4, or ▶ 1/2 (forward).
With a Video CD, the Slow speed changes: ▶ 1/8, ▶ 1/4 or ▶ 1/2 (forward).
4 To exit Slow Motion mode, press ▶ (PLAY).
Note
Slow motion playback in reverse is not possible with Video CDs.
Random Karaoke DVD VCD
1 Press RANDOM during playback. The unit automatically begins Random Playback and "RANDOM" appears on the TV screen.
2 To return to normal playback, press RANDOM until "NORMAL" appears on the TV screen.
T ip
By pressing SKIP ▶▶ during Random playback, the unit selects another title (track) and resumes Random playback.
Note
- This function only works with DVD Karaoke discs or video CDs without PBC.
- On a Video CD with PBC, you must set PBC to OFF in the Setup menu to use the Random function. See page 29.
Repeat

DVD Video VR +RW +R VCD
DVD Discs - Repeat Chapter/Title/All/Off
Press REPEAT to select a desired repeat mode.
• Chapter: repeats the current chapter.
• Title: repeats the current title
• All: repeats the all titles on the disc. (VR mode DVD-RW disc only)
• OFF: does not play repeatedly.
Video CDs - Repeat Track/All/Off
Press REPEAT to select a desired repeat mode.
- Track: repeats the current track.
• All: repeats the all tracks on the disc.
• OFF: does not play repeatedly.
Note
-
On a Video CD with PBC, you must set PBC to OFF in the Setup menu to use the Repeat function. See page 29.
Repeat A-B

DVD Video VR +RW +R VCD
To repeat a sequence in a title:
1 Press A-B at your chosen starting point.
Repeat icon and REPEAT A- appears on the TV screen.
2 Press A-B again at your chosen end point.
Repeat icon and REPEAT A-B appears on the TV screen, and the repeat sequence begins.
3 To cancel the sequence, press A-B repeatedly to select REPEAT OFF.
Time Search

DVD Video VR +RW +R
The Time Search function allows you to start playing at any chosen time on the disc.
1 Press DISPLAY twice during playback. The on-screen display appears on the TV screen.
The Time Search box shows the elapsed playing time of the current disc.
2 Within 7 seconds, use ▲ / ▼ to select the Time Search icon in the on-screen display.
The “-:-:-” appears in the Time Search box.
3 Within 7 seconds, use the number buttons to enter the required start time. Enter hours, minutes, and seconds from left to right in the box.
You can not enter an invalid time.
If you enter the wrong numbers, press ◀ / ▶ to move the under bar (_) to the wrong number. Then enter the correct numbers.
4 Within 7 seconds, press ENTER to confirm the start time.
Playback starts from the selected time on the disc.
Operation with DVD and Video CD (Continued)
General Features (continued)
Zoom
DVD
Video
VR
+RW
+R
The Zoom function allows you to enlarge the video image and to move through the enlarged image.
1 Press ZOOM during playback or still playback to activate the Zoom function.
Each press of the ZOOM button changes the TV screen in the sequence shown below.
x1 size → x2 size → x4 size → x1 size (normal size)
2 Use the ◀▶▲▼ buttons to move through the zoomed picture.
3 To resume normal playback, press CLEAR or press ZOOM repeatedly until the normal picture appears.

ote
The zoom function may not work for some DVDs.
Marker Search

DVD
Video
VR
+RW
+R
VCD
You can start playback from a memorized point. Up to six points can be memorized.
To enter a mark, follow these steps.
1 During disc playback, press MARKER when playback reaches the spot that you want to memorize.
The Marker icon will appear on the TV screen briefly.
2 Repeat step 1 to enter up to six Marker points on a disc.
To Recall a Marked Scene
1 Press SEARCH.
The Marker Search menu will appear on the TV screen.
2 Use the ◀▶▲▼ buttons to select a Marked scene that you want to recall.
3 Press ENTER.
Playback will start from the Marked scene.
4 To remove the Marker Search menu, press RETURN (💡).
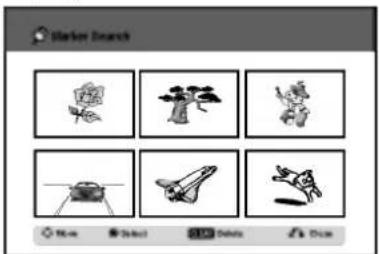
text_image
Marker Search New Select Edit Delete AddTo clear a Marked Scene
1 Press SEARCH during playback or in stop mode. The Marker Search menu will appear on the TV screen.
2 Use ◀▶▲▼ to select the Marked scene that you want to erase.
3 Press CLEAR.
"Delete selected marker. Continue?" message appears.
4 Use ◀ / ▶ to select "Yes" then press ENTER.
5 Repeat steps 2-4 to erase additional Marked scene.
6 To remove the Marker Search menu, press RETURN (♂).
Checking the Contents of DVD Video Discs: Menus
DVDs may contain menus that allow you to access special features. To open the disc menu, press LIST/DISC MENU. Then, press the appropriate number button to select an option. Or, use the ◀▶ ▲▼ buttons to highlight your selection, then press ENTER.
Title Menu
DVD
1 Press TITLE.
If the current title has a menu, the menu will appear on the TV screen. Otherwise, the disc menu may appear.
2 The menu may contain camera angles, spoken language and subtitle options, and chapters for the title.
Disc Menu
DVD
1 Press LIST/DISC MENU.
The disc menu is displayed.
2 To remove the disc menu, press LIST/DISC MENU again.
Camera Angle

DVD
If the disc contains scenes recorded at different camera angles, you can change to a different camera angle during playback.
- Press ANGLE then press ◀ / ▶ repeatedly during playback to select a desired angle.
The number of the current angle appears on the TV screen.

ip
The ANGLE indicator will blink on the TV screen at scenes recorded at different angles to indicate that angle switching is possible.
Changing the Audio Soundtrack

DVD
Press AUDIO then press ◀ / ▶ repeatedly during play-back to hear a different audio language or audio soundtrack if available.

ote
Some discs feature both Dolby Digital and DTS soundtracks. There is no analog audio output when DTS is selected. To listen to the DTS soundtrack, connect this recorder to a DTS decoder via one of the digital outputs. See page 17 for connection details.
Operation with DVD and Video CD (Continued)
Changing the Audio Channel
VCD
Video
VR
+RW
+R
With a Video CD, press AUDIO then press ◀ /▶ repeatedly during playback to hear a different audio channel (STEREO, LEFT or RIGHT). With DVD-RW discs recorded in VR mode that have both a main and a Bilingual audio channel, you can switch between Main (L), Bilingual (R), or a mix of both (Main + Bilingual) by pressing AUDIO.
3D Surround

DVD
Video
VR
+RW
+R
VCD
This unit can produce a 3D Surround effect, which simulates multi-channel audio playback from two conventional stereo speakers, instead of the five or more speakers normally required to listen to multi-channel audio from a home theater system.
1 Press DISPLAY twice then use ▲ / ▼ to select the sound icon. Then, use ◀ / ▶ to select "3D SUR.".
2 To turn off the 3D Surround effect, select "NORMAL".
Subtitles

DVD
Press SUBTITLE then press ◀ / ▶ repeatedly during playback to see the different subtitle languages.
Finding Locations on a Disc
VCD
You can directly access any point on a video CD using this function. Use this function only while a video CD is playing. Playback jumps to the point specified.
1 Press SEARCH during playback. The progress bar appears on the TV screen.

text_image
PROC PREL2 Use ◀ / ▶ to find a start position for playback.
3 Press ENTER to confirm the selected position. Playback starts from the selected position.

ote
This function works only when no marker is memorized.
Last Condition Memory DVD
This recorder memorizes the user settings for the last disc that you have viewed. Settings remain in memory even if you remove the disc from the recorder or switch off the recorder. If you load a disc that had its settings memorized, the latest stop position is automatically recalled.

otes
- Settings are stored in memory for use any time.
- This recorder does not memorize settings of a disc if you switch off the recorder before commencing to play it.
Audio CD and MP3/WMA Operation
Playing an Audio CD or MP3/WMA
Disc CD MP3 WMA
The Recorder can play audio CDs. Also, the Recorder can play MP3/WMA formatted recordings on CD-ROM, CD-R, CD-RW, DVD±R or DVD±RW disc. Before playing MP3/WMA recordings, read the notes on MP3/WMA Recordings on page 38.
1 Insert a disc and close the tray. AUDIO CD or MP3/WMA CD menu appears on the TV screen.

text_image
Track 1 Track 2 Track 3 Track 4 Track 5 Track 6 Track 7 Track 8 Track 9 Track 10 Duration 04:01 03:05 03:06 04:02 05:01 03:48 04:09 05:10 04:11 Select Tools Help OptionsAUDIO CD Menu
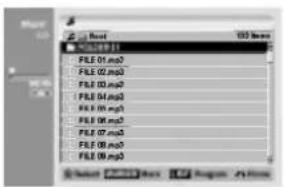
text_image
File 01.mp3 File 02.mp3 File 03.mp3 File 04.mp3 File 05.mp3 File 06.mp3 File 07.mp3 File 08.mp3 File 09.mp3MP3/WMA CD Menu
2 Use ▲ / ▼ to select a track then press ▶ (PLAY).
Playback starts.
During playback, the current track's elapsed playing time will appear on the display window and menu. Playback will stop at the end of the disc.
Tips
- You can view TV channel or video input source by pressing RETURN. If you want to return to the Music menu, press LIST/DISC MENU.
- You can switch between the Track List and Program List menus by pressing LIST/DISC MENU.
- On CDs with mixed content (audio tracks, MP3/WMA files and JPEG files), you can select among the Music-Audio CD menu, Music-MP3/WMA CD menu, and Photo CD menu by pressing TITLE repeatedly in Stop mode.
- If you select a MP3/WMA and press DISPLAY, the file informations are displayed. Press DISPLAY again to remove the file informations. If you select a folder and press DISPLAY, the number of subfolders and number of MP3/WMA files in the folder are displayed.
- If you are in a file list and want to return to the Folder list, use the ▲/▼ to highlight ■- and press ENTER to return to the previous menu screen.
3 To stop playback at any other time, press STOP (■).
Music menu options
- To display menu options, select a tack (or folder) on the menu then press ENTER.
- Use ▲ / ▼ to select an option then press ENTER to confirm your selection.
Music-Audio CD menu options CD
Play
Program Add
Play: Starts playback the selected track.
Program Add: Adds the track(s) to Program List. (page 39)
Music-CD menu options MP3 WMA
- When you select a track.
Play
Program Add
Play: Starts playback the selected track.
Program Add: Adds the track(s) to Program List. (page 39)
- When you select a folder.
Open
Program Add
Open: Displays sub-folders and MP3/WMA files only in the folder.
Program Add: Adds all track(s) in the folder to Program List. (page 39)
Audio CD and MP3/WMA Operation (Continued)
Pause CD MP3 WMA
1 Press PAUSE/STEP (Ⅲ) during playback.
2 To return to playback, press ▶ (PLAY) or press PAUSE/STEP (Ⅱ) again.
Moving to Another Track CD MP3
WMA
- Press SKIP ◀◀◀ or ▶▶◀ briefly during playback to go to the next track or to return to the beginning of the current track.
- Press SKIP I◄◄ twice briefly to step back to the previous track.
- On an Audio CD, to go directly to any track, enter the track number using the numbered buttons (0-9) during playback on the Track List.
Repeat Track/All(Folder)/Off CD MP3
WMA
Press REPEAT to select a desired repeat mode.
- TRACK: repeats the current track.
- ALL (CD): repeats the all tracks on the disc.
- FOLDER (MP3/WMA): repeats the all tracks in the current folder.
• OFF (No display): does not play repeatedly.
Random CD MP3 WMA
1 Press RANDOM during playback or in stop mode. The unit automatically begins Random Playback and "RANDOM" appears on the menu screen.
2 To return to normal playback, press RANDOM repeatedly until "RANDOM" disappears from the menu screen.
T ip
By pressing SKIP ▶▶I during Random playback, the unit selects another track and resumes Random playback.
Changing the Audio Channel
CD MP3 WMA
Press AUDIO repeatedly to hear a different audio channel (stereo, left or right).
Search CD
1 Press BACKWARD (◀◀) or FORWARD(▶▶) during playback.
The recorder will now go into SEARCH mode.
2 Press BACKWARD (◀◀) or FORWARD(▶▶) to select the required speed: ◀◀, ◀◀◀, ◀◀◀◀ (backward) or ▶▶, ▶▶▶, ▶▶▶▶ (forward).
Search speed and direction are indicated on the menu screen.
3 To exit SEARCH mode, press ▶ (PLAY).
Repeat A-B CD
To repeat a sequence in a track:
1 Press A-B at your chosen start point.
Repeat icon and 'A-' appears on the menu screen.
2 Press A-B again at your chosen end point.
The Repeat icon and 'A - B' appears on the menu screen, and the repeat sequence begins.
3 To exit the sequence and return to normal play, press A-B again.
The Repeat icon disappears from the menu screen.
Notes on MP3/WMA Recordings
About MP3
- An MP3 file is audio data compressed by using the MPEG1 audio layer-3 file-coding scheme. We call files that have the ".mp3" file extension "MP3 files".
- The recorder can not read an MP3 file that has a file extension other than ".mp3".
About WMA(Window Media Audio)
- An WMA file is a Microsoft audio compression technology.
- WMA(Windows Media Audio) offers double the audio.compression of the MP3 format.
MP3/WMA Disc compatibility with this recorder is limited as follows:
- CD-R physical format should be "ISO 9660" and "JOLIET".
- If you record MP3/WMA files using the software which cannot create a FILE SYSTEM, for example "Direct-CD" etc., it is impossible to playback MP3/WMA files. We recommend that you use "Easy-CD Creator", which creates an ISO9660 or JOLIET file system.
- Total number of files and folders on the disc should be less than 999.
This Recorder requires discs/recordings to meet certain technical standards in order to achieve optimal playback quality. Pre-recorded DVDs are automatically set to these standards. There are many different types of recordable disc formats (including CD-R containing MP3 or WMA files) that require certain pre-existing conditions (see above) to insure compatible playback.
Customers should also note that permission is required in order to download MP3/WMA files and music from the Internet. Our company has no right to grant such permission. Permission should always be sought from the copyright owner.
Programmed Playback with Audio CD and MP3/WMA
The Program function enables you to store your favorite tracks from any disc in the recorder memory. Program can contain 99 tracks (Audio CD) or 256 tracks (MP3/WMA).
1 Insert an Audio CD or MP3/WMA disc. Audio CD or MP3/WMA CD menu will appear.
2 Use ▲▼ to select a track or folder on the List then press ENTER. The options appears on the left side of the menu.
3 Use ▲▼ to highlight the "Program Add" icon then press ENTER. The selected track is added to the Program List.
4 Repeat steps 2-3 to place additional tracks on the Program list.
T ip
You can add multi tracks on the List to the Program List.
- Select a track then press MARKER.
- Repeat step 1 to mark additional tracks.
- Select any track then press ENTER. The options appear on the left side of the menu.
- Use ▲ / ▼ to highlight the "Program Add" icon then press ENTER. The all marked tracks are added to the Program List.
Notes
- Use the CLEAR button to select all tracks, or cancel all marked tracks.
- If you select folder for Programmed Playback, all tracks in the folder are added to the program list.
5 AUDIO CD : Use ▶ to move to the Program list.
6 Use ▲ / ▼ to select the track you want to start playing.
7 Press PLAY (▶) to start. Playback begins in the order in which you programmed the tracks and "PRG" indicator appears on the display window. Playback stops after playing the last programmed track on the program list.
8 To resume normal playback from programmed playback, select a track on the List then press PLAY (▶).
"PRG" indicator disappears from the display window.
Program List menu options
CD MP3
WMA
- To display menu options, select a tack on the Program List menu then press ENTER.
The menu options appear on the left side of the menu. - Use ▲ / ▼ to select an option then press ENTER to confirm your selection.
Play
Move
Delete
Play: Playback begins in the order in which you programmed the tracks from the selected track.
Move: Moves the track(s) to change the program order.
Delete: Deletes the track(s) from the Program List menu.
Repeat Programmed Tracks
Press REPEAT repeatedly during playback to select a desired repeat mode.
- TRACK: repeats the current track.
- ALL : repeats the all tracks on the Program list.
• OFF (No display): does not play repeatedly.
Erasing a Track from the Program List
- Select the track you wish to erase from the Program List.

Use the MARKER button to select multiple tracks.
- Press ENTER. The menu options appear on the left side of the menu.
- Select 'Delete' option then press ENTER. The selected track is deleted from the Program List.
Changing Track Order in the Program List
- Select the track you wish to move.

Use the MARKER button to select multiple tracks.
- Press ENTER. The menu options appear on the left side of the menu.
- Select 'Move' option then press ENTER. A yellow bar appears in the Program List.
- Use ▲ / ▼ to move the yellow bar to the desired location, then press ENTER. The selected track is moved.
JPEG File Operation
Viewing a JPEG File JPEG
The recorder can play discs with JPEG files.
Before playing JPEG recordings, read "Notes on JPEG Recordings" at right.
1 Insert a disc and close the tray. The Photo menu appears on the TV screen.

text_image
Auto <0 JPEG Folder 01 Folder 02 Folder 03 Folder 04 Folder 05 Folder 06 Folder 07 Folder 08 Select OK Cancel Ab Close2 Use ▲▼◀▶ to select a folder, then press ENTER. Open icon is highlighted on the left side of the menu.
3 Press ENTER. A list of files in the folder appears.

text_image
Photo -CD Select OK Cancel ApplyNote
If the 🔒 icon displays in the Photo menu, it means you cannot see those JPEG files.
4 Use ▲▼◀▶ to select a file, then press ENTER. The options appear on the left side of the menu.
T ip
- If you are in a file list and want to return to the Folder list, use the ▲ / ▼ buttons on the remote to highlight the 📄 icon and press ENTER.
- You can view TV channel or video input source by pressing RETURN. If you want to return to the Photo menu, press LIST/DISC MENU.
- On CDs with mixed content (audio tracks, MP3/WMA files and JPEG files), you can select among the AUDIO CD menu, MP3/WMA CD menu, and Photo CD menu by pressing TITLE repeatedly in Stop mode.
5 Use ▲ / ▼ to select "Full Screen" option then press ENTER.

natural_image
Line drawing of a spacecraft in flight (no text or symbols)6 To stop viewing at any time, press STOP. The Photo menu reappears.
Skip Images
While viewing a picture, press SKIP (◀◀ or ▶▶) once to advance to the next file or return to the previous file.
Rotate Images
Use ▲ / ▼ while viewing a picture to flip the picture clockwise or counterclockwise.
View Slide Shows
- Select "Slide Show" option on the Photo menu.
- Press ENTER. The Slide Show menu appears.

text_image
Slide Show Object All Speed Normal Start Cancel-
Use ▲▼◀▶ to set the options. Object: Selected file or All files. Speed: Sets the speed for Slide Show (Slow, Normal, or Fast)
-
Select the Start option then press ENTER to start the Slide Show.
- Press STOP to stop the Slide Show and returns to the Photo menu.
Note
Use the MARKER button to select multiple files.
Notes on JPEG Recordings
- Depending on the size and number of JPEG files, it may take several minutes for the recorder to read the disc's content. If you don't see an on-screen display after several minutes, some of the files are too big — reduce the resolution of the JPEG files to less than 4 mega pixels and burn another disc.
- The total number of files and folders are free but the total number of files on the folder should be less than 999.
- Some discs may be incompatible due to different recording formats or the condition of the discs.
- When you are using software such as "Easy CD Creator" to burn JPEG files on a CD-R, ensure that all selected files have the ".jpg" or ".jpeg" extension before copying them into the CD layout.
- If the files have ".jpe" extensions, please rename them as ".jpg" or ".jpeg" files.
- File names without the ".jpg" or ".jpeg" extension cannot be read by this recorder, even though the files are shown as JPEG image files in Windows Explorer®.
VCR Mode Tape Playback
Preparation
- Before using the remote control, press the VCR button to select the device to be operated.
- Turn the TV on and select the video input source connected to the Recorder.
- Audio system: Turn the audio system on and select the input source connected to the Recorder.
Normal Playback VHS
1 Insert a prerecorded video cassette.
The indicator will light and the Recorder will power-up automatically.
- Make sure that the TIMER indicator in the display window is not lighted. If it is, press POWER once.
- If a tape without a safety tab is inserted, the Recorder will start playback automatically.
Press PLAY (▶) once.
PLAY icon appears on the TV screen.
- It is not necessary to select the tape speed for play-back. It will be automatically selected by the Recorder.
3 Press STOP (■) to stop playback. STOP icon appears on the TV scree
If the tape reaches the end before STOP (■) is pressed, the Recorder will automatically stop, rewind and eject the tape, and turn itself off.
Tracking Control VHS
Auto Tracking
The automatic tracking function adjusts the picture to remove snow or streaks.
The AUTO TRACKING function works in the following cases:
• A tape is played back for the first time.
- Tape speed (SP, LP) changes.
- Streaks or snow appear because of scratches on the tape.
Manual Tracking
If noise appears on the screen during playback, press either PR/TRK (▲/▼) on the remote control or PROG. (▲/▼) on the front panel until the noise on the screen is reduced.
- In case of vertical jitter, adjust these controls very carefully.
- Tracking is automatically reset to normal when the tape is ejected or the power cord is unplugged for more than 3 seconds.
Special Effect Playback VHS
N Special effects playback notes
- Horizontal lines (noise bars) will appear on the TV screen. This is normal.
- The audio is automatically muted during special effect modes, so there is no sound during search.
- During the high-speed picture search modes, a short time is needed to stabilize tape speed when re-entering the PLAY mode. Slight interference may be observed during this time.
Search
This function lets you visually search forward and backward for a desired scene on your tape.
1 Press BACKWARD (◀◀) or FORWARD (▶▶) during playback. The Recorder will be activated in the SEARCH mode.
- If the Recorder is left in the SEARCH mode for more than 3 minutes, the Recorder will automatically enter the PLAY mode, to protect the tape and video heads.
2 To return to playback, press PLAY (▶).
Still Picture and Frame-by-Frame Playback
1 Press PAUSE/STEP (III) during playback. A still picture appears on the TV screen.
- If a still picture vibrates vertically, stabilize it by using PR/TRK (▲/▼) on the remote control.
- If the Recorder is left in the STILL mode for more than 5 minutes, the Recorder will automatically enter the STOP mode to protect the tape and video heads.
2 Press PAUSE/STEP (III) repeatedly to advance the video picture one frame at a time while viewing a still picture.
3 To return to playback, press PLAY (▶).
Slow Motion
1 While in still mode, press FORWARD (▶▶).
The tape will be played back at a speed 1/19 times slower than the normal speed.
- During slow playback, use PR/TRK (▲/▼) on the Remote Control to minimize noise bands.
- If slow motion mode continues for more than 3 minutes, the Recorder will automatically change to normal play mode.
2 To return to playback, press PLAY (▶).
Counter Memory Function
This is useful if there is a section of tape you want to view immediately after recording or if you want to return to the same point several times.
1 Begin recording or playing a tape.
2 Press DISPLAY repeatedly to display the real-time counter on the TV screen.
3 At the point you want to locate later, reset the real-time counter to 0:00:00 by pressing CLEAR. Continue to play or record.
4 Press STOP when recording or playback finishes.
5 Press RETURN (♂). The tape automatically stops when the tape counter returns to about "0:00:00".
Basic Recording
Basic Recording from a TV
Follow the instructions below to record a TV program. Recording starts immediately and continues until the disc or tape is full or you stop the recording.
1 Switch on the Recorder, select the device (VCR or DVD) for Recording and load a recordable disc or tape.
Also make sure that the TV input is set to this recorder. If you load a completely blank DVD-RW disc, Disc initialize menu will appear, to select a desired Recording Mode to initialize the disc (See page 27).
2 Set a recording mode as necessary by pressing REC MODE repeatedly.
DVD: SP (Standard quality), LP (Low quality), XP(High quality), EP (Extended quality)
VCR: SP (Standard Play), LP (Long Play)
3 Use PROG. (▲/▼) on the front panel or PR/TRK(▲/▼) on the remote control to select the TV channel to record.
4 Use AUDIO to select the audio channel to record.
The table below shows what will be recorded on the different settings for different types of broadcast. The last column (Monitor Audio) shows what you'll hear as it is recording.
| TV Broadcast Audio | Selected Audio | Broadcast Audio | Monitor Audio | |||
| VR mode or Tape | Video, +R or +RW mode | |||||
| L Ch | R Ch | L Ch | R Ch | |||
| STEREO | STEREO/MAIN | STEREO | STEREO | STEREO | ||
| STEREO/SUB | STEREO | STEREO | STEREO | |||
| MONO/MAIN | MONO | MONO | MONO | |||
| MAIN+SUB | STEREO/MAIN | MAIN | SUB | MAIN | MAIN | MAIN |
| STEREO/SUB | MAIN | SUB | SUB | SUB | SUB | |
| MONO/MAIN | MAIN | SUB | MAIN | MAIN | MAIN | |
| MONO | STEREO/MAIN | MONO | MONO | MONO | ||
| STEREO/SUB | MONO | MONO | MONO | |||
| MONO/MAIN | MONO | MONO | MONO | |||
5 Press REC (●) once.
Recording will start. (The REC indicator lights in the display window.)
- Recording continues until you press STOP (■) or the disc (or tape) is full.
- To record for a fixed length of time, see Instant Timer Recording on right.
6 Press STOP (■) to stop recording.
Instant Timer Recording
Instant Timer Recording allows you to make a recording easily of a preset length without using the program timer.
1 Follow steps 1-5 as shown left (Basic Recording from a TV).
2 Press REC (●) repeatedly to select the recording time length.
Recording starts after the first press.
DVD: Each subsequent press increases the recording time by 10 minutes within free space.
VCR: Each subsequent press increases the recording time by 30 minutes. Please confirm the VHS tape has enough remaining time to be recorded before recording.

text_image
Input: PR 09 MONO 2H 31M Free Input: PR 09 0:00 0:17:30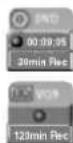
Instant Timer Record Menu
Checking the Recording Time
Press REC (●) or DISPLAY once to check the recording time. The recalled setting will automatically return to the TV screen for a moment.
Also, remaining time of recording is shown in the display window.
To Extend the Recording Time
The recording time can be extended anytime by pressing REC (●).
Each subsequent press increases the recording time by 10 minutes (DVD) within free space or 30 minutes (VCR).
To Pause the Recording
1 Press PAUSE/STEP (III) to pause the disc or tape during recording.
2 When you want to continue recording, press PAUSE/STEP (III) or REC (●).

- If you press PAUSE/STEP (III) during the Instant Timer Recording, it will be canceled.
• The Recorder will automatically power off when the Instant Timer Recording ends.
To record one TV program while watching another
1 Press TV/VCR to select the TV mode during recording. The TV indicator appears.
2 Using the TV remote controller, select the channel to be viewed.
ips (VCR mode only)
Always use PAUSE/STEP (Ⅲ) for best results when making changes during recording.
For example: To change channels during recording, first press PAUSE/STEP (Ⅱ) to put the unit in pause mode. Then select the desired channel on the Recorder, and press PAUSE/STEP
(Ⅲ) again to resume recording.
Basic Recording (Continued)
Copying from DVD to VCR
You can copy the contents of a DVD to a VHS tape using the DUBBING (or DUB) button.
Note
If the DVD (or Discs) you are attempting to copy is copy protected, you will not be able to copy the disc. It is not permitted to copy Macrovision encoded DVDs (or Discs).
1 Insert a VHS Tape
Insert a blank VHS video tape into the VCR deck.
2 Insert a Disc
Insert the disc you wish to copy in the DVD deck and close the disc tray.
3 Select DVD mode by pressing DVD on the remote control or pressing DVD/VCR on the front panel.
4 Find the place on the DVD (or Disc) from which you want to start recording using the PLAY and PAUSE functions.
For best results, pause playback at the point from which you want to record.
5 Press the DUBBING button on the remote control or press DUB button on the front panel.
The Dubbing menu appears.
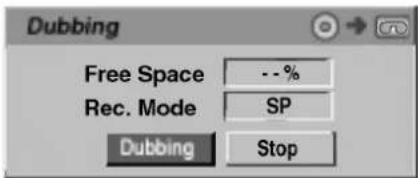
text_image
Dubbing Free Space --% Rec. Mode SP Dubbing Stop6 Use ▲/▼/◄/► to select the desired Record Mode:
- SP (Standard Play)
• LP (Long Play, 2 times SP).
7 Select Dubbing then press ENTER or DUBBING (or DUB) to start copying.

If you press PAUSE/STEP during Copy mode, both the DVD and VCR decks go into Pause mode and the "DUB" indicator blinks on the front panel display. While in Pause mode, you can adjust the DVD playback position using PLAY, BACKWARD, FORWARD, PAUSE/STEP, etc. The VCR deck will remain in Pause mode. To resume copying, press the DUBBING (or DUB) button twice.
Stop the Copy Process
To stop copying at any other time, press STOP (■). You must stop the Copy process manually when the DVD movie ends, or the unit may replay and record over and over again.
Copying from VCR to DVD
You can copy the contents of a VHS tape to a recordable DVD disc using the DUBBING (or DUB) button. This allows you to archive your old VHS tapes to DVD.
Note
If the VHS video tape you are attempting to copy is copy protected, you will not be able to copy the tape. It is not permitted to copy Macrovision encoded tapes.
1 Insert a recordable DVD disc.
Insert a blank recordable DVD disc in the DVD deck and close the disc tray.
2 Insert a VHS Tape
Insert the VHS video tape you wish to copy into the VCR deck.

When using a DVD±RW disc, you must initialize before copying; see page 27.
3 Select VCR mode by pressing VCR on the remote control or pressing DVD/VCR on the front panel.
4 Find the place on the VHS tape from which you want to start recording using the PLAY, BACKWARD, FORWARD and PAUSE functions.
For best results, pause playback at the point from which you want to record.
5 Press the DUBBING button on the remote control or press DUB button on the front panel. The Dubbing menu appears.
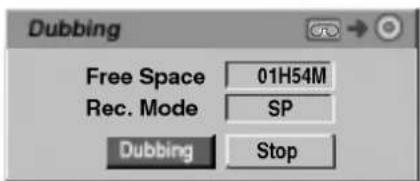
text_image
Dubbing Free Space 01H54M Rec. Mode SP Dubbing Stop6 Use ▲ / ▼ / ◀ / ▶ to select the desired Record Mode:
• EP (Extended Quality)
• LP (Low Quality)
• SP (Standard Quality)
- XP (High Quality)
7 Select Dubbing then press ENTER or DUBBING (or DUB) to start copying.

If you press PAUSE/STEP during Copy mode, both the DVD and VCR decks go into Pause mode and the "DUB" indicator blinks on the front panel display. While in Pause mode, you can adjust the VCR playback position using PLAY, BACKWARD, FORWARD, PAUSE/STEP, etc. The DVD deck will remain in Pause mode. To resume copying, press the DUBBING (or DUB) button twice.
Stop the Copy Process
To stop copying at any other time, press STOP (■). Copying will stop automatically when the VHS tape ends.
Timer Recording
This Recorder can be programmed to record up to 8 programs within a period of 1 month.
1 Press TIMER REC.
The Timer Record menu will appear.
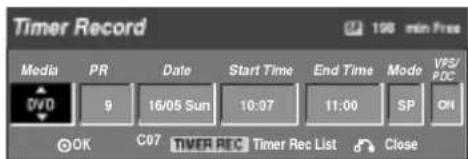
text_image
Timer Record 198 min Free Media PR Date Start Time End Time Mode VPS/ PDC DVD 9 16/05 Sun 10:07 11:00 SP ON OK C07 TIMER REC Timer Rec List Close• Media – Choose a media (DVD or VCR).
- PR – Choose a memorized program number, or one of the external inputs from which to record.
- Date – Choose a date up to 1 month in advance, or select a daily or weekly program.
- Start Time – Set the recording start time.
- End Time – Set the recording end time.
- Mode – Choose a record mode.
DVD: SP, LP, EP, XP, or AT (Auto)
VCR: SP, LP, AT (Auto)
AT (Auto) mode determines how much time is available on the disc or tape and switches record mode, if necessary, to complete recording the program.
- VPS/PDC – The VPS/PDC system automatically adjusts the recording time so that even if a program is not running to schedule, you won't miss it. For VPS/PDC to work properly, you must input the correct announced time and date of the program you want to record.
Note that VPS/PDC may not work with every station.
Notes
- Stations that use VPS/PDC typically include VPS/PDC information in the teletext TV guide pages. Please refer to these pages when setting a timer recording.
- This recorder takes approximately 20 seconds to switch on and start recording. This means that when using VPS/PDC, there may be instances where the beginning of the program is not recorded.
2 Enter the necessary information for your timer recording(s).
- ◀ / ▶ (left/right) – move the cursor left/right
- ▲ / ▼ (up/down) – change the setting at the current cursor position
- Press RETURN (💡) to exit the Timer Record menu.
- Press TIMER REC to display Timer Record List.
3 Press ENTER to save the program. The Timer Record List will appear.
4 Press RETURN (💡) to exit the Timer Record List.
5 Make sure that you load a recordable disc or tape and press POWER to switch your unit to Standby.
Notes
• The Timer indicator lights on the front panel display.
- If the Disc and Tape indicator are blinking, either no disc or tape is loaded, or the loaded disc is not recordable.
- The Recorder will record the audio according to the current TV tuner setting (Stereo, Mono or Bilingual). Use the AUDIO button to set the audio before switching the Recorder to Standby mode.
- You must press POWER to stop the Timer Recording.
- The Recorder will automatically power off when the Timer Recording ends.
- There is a short delay when a timer recording finishes to confirm the recorded program. If two timer recordings are set to record sequentially (one right after the other), the very beginning of the later program may not be recorded.
• The Recommendable DVD discs :
| DVD-R | DVD+R | DVD-RW | DVD+RW |
| SONY | SONY | SONY | SONY |
| TDK | TDK | TDK | TDK |
| Imation | Imation | Imation | Imation |
| Verbatim | MAXELL | Verbatim | Verbatim |
| RiDATA | RiDATA | Memorex | RiDATA |
| Panasonic | Fujifilm | Fujifilm | Fujifilm |
| LG | Ricoh | LG | Ricoh |
| Mitsubishi | HP | Mitsubishi | HP |
| That's | That's | Samsung | Ritek |
| Pioneer | Philips | Pioneer | Radius |
Timer Recording with SHOWVIEW® System
This system makes programming timer recordings very simple. Most TV guides publish SHOWVIEW programming numbers with their program details. If you want to make a timer recording of a program, you just input the corresponding SHOWVIEW programming number. The date, start, stop and channel settings are made automatically. All you have to do is tell the recorder the recording mode and quality, and whether it's a once-only recording, or a regular recording. Up to 8 timer programs can be stored in the recorder.
1 Press SHOWVIEW.
The SHOWVIEW menu will appear.
Press SHOWVIEW again to exit the menu.
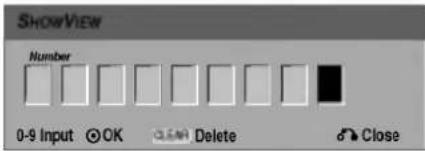
text_image
SHOWVIEW Number 0-9 Input OK Delete Close2 Use the number buttons then press ENTER to enter the SHOWVIEW programming number.
- If you make a mistake before pressing ENTER, press CLEAR repeatedly to delete password numbers one by one then correct it.
To check the programming, the Timer Record menu will appear.
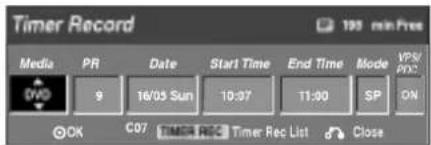
text_image
Timer Record 195 min-Press Media PR Data Start Time End Time Mode VPS/PDC DVD 9 16/05 Sun 10:07 11:00 SP DN OK C07 TIMEA REC Timer Rec List CloseYou can change the settings as required (Mode, VPS/PDC, etc.)
3 Follow steps 2-5 as shown on previous page (Timer Recording).
Checking Timer Recording Details
Programming can be checked whenever the Recorder is turned on. Press TIMER REC twice.
- Use ▲ / ▼ to select a timer recording.
- Press ENTER to edit the selected program. Timer Record menu appears.
- Press CLEAR to delete the selected program from the Timer Record List.
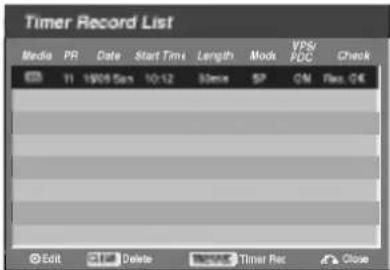
text_image
Timer Record List Media PR Date Start Time Length Mod VPS/ PDC Check 11 1906.5pm 10:12 Time SP CM Rev. €€ Edit Delete Timer Rec CloseCanceling a Timer Recording
You can clear a timer setting anytime before the recording actually starts.
- Use ▲ / ▼ to select a program you want to erase on the Timer Recorder List. If you want to erase the program, press CLEAR.
Stopping a Timer Recording in Progress
After a timer recording has started, you can still cancel the program.
- Press POWER.
Timer Recording Troubleshooting
Even though the timer is set, the recorder will not record when:
• There is no disc (or tape) loaded.
• A non-recordable disc (or tape) is loaded.
- Disc Protect is set to ON in the Setup menu (see page 29).
• Power is turned on.
• There are already 99 titles (DVD-RW, DVD-R) or 49 titles (DVD+RW, DVD+R) recorded on the disc.
You cannot enter a timer program when:
• A recording is already underway.
- The time you're trying to set has already passed.
• There are already 8 timer programs set.
If two or more timer programs overlap:
• The earlier program takes priority.
- When the earlier program finishes, the later program starts.
- If two programs are set to start at exactly the same time, the program entered first takes priority.
If the disc is damaged, the recording may not complete successfully. In this case even though the Check field shows "Rec. OK", it may not be.
Recording from an External Input
Recording from External Components
You can record from an external component, such as a camcorder or VCR, connected to any of the recorder's external inputs.
1 Make sure that the component you want to record from is connected properly to the Recorder. See page 18.
2 Press AV repeatedly to select the external input to record from.
• Tuner: Built-in tuner
• AV1: EURO AV1 AUDIO/VIDEO mounted on back panel
• AV2: EURO AV2 DECODER mounted on back panel
• AV3: AV3 IN (VIDEO, AUDIO (L/R), S-VIDEO IN) mounted on front panel
• DV: DV IN mounted on front panel

ote
Check that the Audio In settings DV Record Audio are as you want them. See page 27.

Load a recordable disc or tape.

Select the recording mode as necessary by pressing REC MODE repeatedly.
DVD: SP (Standard Quality), LP (Low Quality), XP(High Quality), EP (Extended Quality)
VCR: SP (Standard Play), LP (Long Play)

Press REC (●) once.
Recording will start. (The REC indicator lights in the display window.)
- Recording continues until you press STOP (■) or the disc or tape is full.
- To record for a fixed length of time, see Instant Timer Recording on page 42.

Press STOP (■) to stop recording.

ote
If your source is copy-protected using CopyGuard, you will not be able to record it using this recorder. See Copyright on page 9 for more details.
Recording from a Digital Camcorder
You can record from a digital camcorder connected to the DV IN jack on the front panel of this recorder. Using the recorder's remote, you can control both the camcorder and this recorder.
Before recording, make sure that the audio input for the DV IN jack is set up (see page 27).

ips
• The source signal must be DVC-SD format.
- Some camcorders cannot be controlled using this recorder's remote.
- If you connect a second DVD Recorder using a DV cable, you cannot control the second DVD Recorder from this one.
- You can't control this unit remotely from a component connected to the DV IN jack.
- You can't record date and time information from a DV cassette.

Make sure your digital camcorder is connected to the front panel DV IN jack. See page 18.

Check that the DV audio input is as you require. You can choose between Audio 1 (original audio) and Audio 2 (overdubbed audio).
- DV Input is set from the DV Record Audio in sub-menu of the Setup menu. See DV Record Audio on page 27 for more information.

Press AV repeatedly to select the DV input. DV appears in the display window.

Find the place on the camcorder tape that you want to the recording to start from.
For best results, pause playback at the point from which you want to record.
- Depending on your camcorder, you can use this recorder's remote to control the camcorder using the STOP, PLAY and PAUSE functions.

Press REC (●) once to start recording.
- Recording is automatically stopped if the recorder detects no signal.
- You can pause or stop the recording by pressing PAUSE/STEP (■) or STOP (■). You cannot control the camcorder from this remote control during recording.
- In Video mode, the final frame of the recording may remain displayed on screen for a while after recording stops.
- For timer recording to work properly on this recorder, the digital camcorder must also be switched on and in operating.
Recording from an External Input (Continued)
What is DV?
Using DV, also known as i.LINK, you can connect a DV-equipped camcorder to this recorder using a single DV cable for input and output of audio, video, data and control signals.
The i.LINK interface is also known as IEEE 1394-1995. "i.LINK" and the "i.LINK" logo are trademarks.
- This recorder is only compatible with DV-format (DVC-SD) camcorders. Digital satellite tuners and Digital VHS video recorders are not compatible.
- You cannot connect more than one DV camcorder at a time to this recorder.
- You cannot control this recorder from external equipment connected via the DV IN jack (including two DVD recorders).
- It may not always be possible to control the connected camcorder via the DV IN jack.
- Digital camcorders can usually record audio as stereo 16-bit/48kHz, or twin stereo tracks of 12-bit/32kHz. This recorder can only record one stereo audio track. Set DV Record Audio to Audio 1 or Audio 2 as required (see page 27).
- Audio input to the DV IN jack should be 32 or 48kHz (not 44.1kHz).
- Picture disturbance on the recording may occur if the source component pauses playback or plays an unrecorded section of tape, or if the power fails in the source component, or the DV cable becomes disconnected.
- Although DV Record Audio is set to Audio 2 and Audio 2 signal is not present, DV Record Audio will be reset to Audio 1 automatically.
DV-Related Messages
You may see the following messages appear on your TV screen when using the DV IN jack.
Not connected to Camcorder.
The camcorder is not connected properly, or the camcorder is switched off.
Too many devices connected.
The DV jack on this recorder supports connection to just one camcorder.
Check the tape.
There is no cassette loaded into the connected equipment.
Uncontrollable device.
This recorder cannot control the camcorder.
Updating the information.
Camcorder is updating the information for DV.
Camera mode.
Camcorder is set to camera mode.
Troubleshooting
If you can't get a picture and/or audio through the DV IN jack, check the bullet points:
• Make sure the DV cable is properly connected.
- Try switching off the connected equipment then switch back on.
- Try switching the audio input.
Notes
- Depending on the connected camcorder, you may not be able to control it using the remote control supplied with this recorder.
- Before you set the mode of your Camcorder to camera mode, turn down the volume of connected Sound device. There can be a howling sound.
Title List and Chapter List Menu
Using the Title List-Original menu VR
The Title List-Original is where you build and edit your Playlist, and where you can delete titles and make other changes to the Original content of the disc. You can also play individual titles directly from the Title List-Original menu.
The recorder must be stopped in order to edit using the Title List-Original.
1 Press LIST/DISC MENU repeatedly to display the Title List-Original menu.
- Use the ▲ / ▼ buttons to display the previous/ next page if there are more than 6 titles.
- To exit the Title List-Original menu, press RETURN (💡).
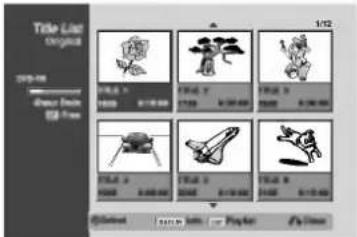
text_image
Title List Original 1/12 200-78 Dance: 3.00 22-Peers Flower A 1500 2400 2500 2600 2700 2800 2900 3000 3100 3200 3300 3400 3500 3600 3700 3800 3900 4000 4100 4200 4300 4400 4500 4600 4700 4800 4900 5000 5100 5200 5300 5400 5500 5600 5700 5800 5900 6000 6100 6200 6300 6400 6500 6600 6700 6800 6900 7000 7100 7200 7300 7400 7500 7600 7700 7800 7900 8000 8100 8200 8300 8400 8500 8600 8700 8800 8900 9000 9100 9200 9300 9400 9500 9600 9700 9800 9900 10002 To view Title List-Original options, select the title you want then press ENTER.
Title List-Original options appears on the left side of the menu.
3 Use ▲ / ▼ to select an option then press ENTER to confirm.
| Play | |
| Chapter | |
| Delete | |
| Protect | |
| Edit | > |
| Playlist Add | > |
| Dubbing | |
| Title Name |
| Delete Part |
Play: Starts playback the selected title.
Chapter: Moves Chapter List-Original menu of the title. (refer to right on this page)
Delete: Deletes the title. (page 55)
Protect: Protects accidental recording, editing or deleting of the title. (page 57)
Edit: Selects Edit options.
• Title Name: Edits the title name. (page 56)
- Delete Part: Deletes a part of the Title. (page 55)
Playlist Add: Adds the title to the Playlist. (page 54)
Dubbing: Copies the title to a VHS tape.
4 Press RETURN (💡) repeatedly to exit Title List-Original menu.

-
Press DISPLAY to display more detailed title information for selected title.
Using the Chapter List-Original menu VR
1 Press LIST/DISC MENU repeatedly to display Title List-Original menu.
2 Use ▲▼◀▶ to choose the title you want to view Chapter List-Original menu then press ENTER.
Title List-Original options appears on the left side of the menu.
3 Use ▲/▼ to select 'Chapter' from Title List-Original options then press ENTER.
Chapter List-Original menu appears on the TV screen.
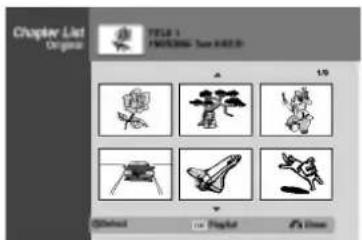
text_image
Chapter List Original TITLE 1 FORMER: New HTML 1.0 Default PlayList OK4 To view Chapter List-Original options, select the chapter you want then press ENTER.
Chapter List-Original options appears on the left side of the menu.
5 Use ▲ / ▼ to select an option then press ENTER to confirm.
| Play | |
| Title | |
| Delete | |
| Combine | |
| Playlist Add | > |
Play: Starts playback of the selected chapter.
Title: Moves to Title List-Original menu of the chapter. (refer to left on this page)
Delete: Deletes the chapter. (page 55)
Combine: Merges two chapters into one. (page 56)
Playlist Add: Adds the chapter to the Playlist. (page 54)
6 Press RETURN (💡) repeatedly to exit Chapter List-Original menu.
Title List and Chapter List Menu (Continued)
Using the Title List-Playlist Menu VR
1 Press LIST/DISC MENU repeatedly to display the Title List-Playlist menu.
- Use the ▲ / ▼ buttons to display the previous/ next page if there are more than 6 titles.
- To exit the Title List-Playlist, press RETURN (💡).
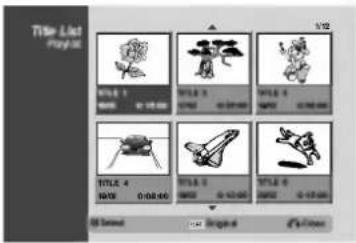
text_image
Title List Playlist TITLE 1 0:00:00 TITLE 2 0:00:00 TITLE 3 0:00:00 TITLE 4 0:00:00 TITLE 5 0:00:00 TITLE 6 0:00:00 TITLE 7 0:00:00 TITLE 8 0:00:00 TITLE 9 0:00:00 TITLE 10 0:00:00 TITLE 11 0:00:00 TITLE 12 0:00:00 TITLE 13 0:00:00 TITLE 14 0:00:00 TITLE 15 0:00:00 TITLE 16 0:00:00 TITLE 17 0:00:00 TITLE 18 0:00:00 TITLE 19 0:00:00 TITLE 20 0:00:00 TITLE 21 0:00:00 TITLE 22 0:00:00 TITLE 23 0:00:00 TITLE 24 0:00:00 TITLE 25 0:00:00 TITLE 26 0:00:00 TITLE 27 0:00:00 TITLE 28 0:00:00 TITLE 29 0:00:00 TITLE 30 0:00:00 TITLE 31 0:00:00 TITLE 32 0:00:00 TITLE 33 0:00:00 TITLE 34 0:00:00 TITLE 35 0:00:00 TITLE 36 0:00:00 TITLE 37 0:00:00 TITLE 38 0:00:00 TITLE 39 0:00:00 TITLE 40 0:15.552 To view Title List-Playlist options, select the title you want then press ENTER.
Title List-Playlist options appears on the left side of the menu.
3 Use ▲ / ▼ to select an option then press ENTER to confirm.
| Play |
| Chapter |
| Title Name |
| Delete |
| Delete Part |
| Dubbing |
Play: Starts playback the selected title.
Chapter: Moves Chapter List-Playlist menu of the title. (refer to right on this page)
Title Name: Edits the title name. (page 56)
Delete: Deletes the title from the Title List-Playlist menu. (page 55)
Delete Part: Deletes a part of the Title. (page 55)
Dubbing: Copies the title to a VHS tape.
4 Press RETURN (💡) repeatedly to exit Title List-Playlist menu.

Press DISPLAY to display more detailed title information for selected title.
Using the Chapter List-Playlist Menu VR
1 Press LIST/DISC MENU repeatedly to display the Title List-Playlist menu.
2 Use ▲▼◀▶ to choose the title you want to view Chapter List-Playlist menu then press ENTER.
Title List-Playlist options appears on the left side of the menu.
3 Use ▲ / ▼ to select 'Chapter' from Title List-Playlist options then press ENTER.
Chapter List-Playlist menu appears on the TV screen.

text_image
Chapter List Footlet TITLE 1 100000000000-0429.31 Default Original F5 Close4 To view Chapter List-Playlist options, select the chapter you want then press ENTER.
Chapter List-Playlist options appears on the left side of the menu.
5 Use ▲ / ▼ to select an option then press ENTER to confirm.
| Play |
| Title |
| Delete |
| Move |
| Combine |
Play: Starts playback of the selected chapter.
Title: Moves to Title List-Playlist menu of the chapter. (refer to left on this page)
Delete: Deletes the chapter from the Chapter List-Playlist menu. (page 55)
Move: Moves a chapter of Chapter List-Playlist menu to a position on the menu. (page 57)
Combine: Merges two chapters into one. (page 56)
6 Press RETURN (💡) repeatedly to exit Chapter List-Playlist menu.
Title List and Chapter List Menu (Continued)
Using the Title List menu Video
From the Title List display you can play, name and delete titles.
Once a Video mode disc is finalized, the Title List screen changes its appearance and all you can do is select titles to play.
1 Press LIST/DISC MENU to display the Title List.
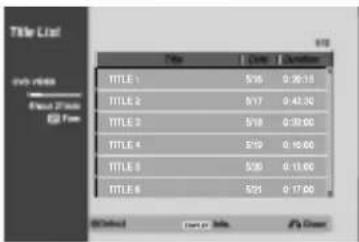
text_image
Title List GO PRICE Input: Title File Date Duration TITLE 1 5/16 0:36:13 TITLE 2 5/17 0:43:30 TITLE 3 5/18 0:39:00 TITLE 4 5/19 0:10:00 TITLE 5 5/20 0:13:00 TITLE 6 5/21 0:17:002 Use ▲ / ▼ to choose a title then press ENTER.
Title List options appears on the left side of the Title List display.
3 Use ▲ / ▼ to select an option then press ENTER to confirm.
| Play |
| Title Name |
| Delete |
| Dubbing |
Play: Starts playback the selected title.
Title Name: Edits the title name. (page 56)
Delete: Deletes the title from the Title List.
Dubbing: Copies the title to a VHS tape.
4 Press RETURN (💡) repeatedly to exit Title List.
ip
Press DISPLAY to display more detailed title information for selected title.
Deleting a Title Video
Before a disc is finalized, you can delete titles recorded on the disc.
Caution
- If you delete a title from a DVD-R disc, the title will disappear from the Title List, but the available recording time will not increase.
- When deleting a title from a DVD-RW disc, the remaining time available for recording will only increase if it is the last title on the disc.
1 Press LIST/DISC MENU to display Title List
2 Use ▲▼◀▶ to choose a title you want to delete then press ENTER.
Title List options appears on the left side of the Title List menu.
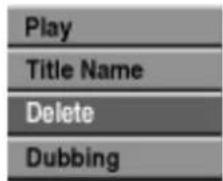
text_image
Play Title Name Delete Dubbing3 Use ▲ / ▼ to select 'Delete' then press ENTER to confirm.
The confirm message for deleting will appear.
4 Use ◀/▶ to select 'Yes' then press ENTER.
The selected chapter or title is deleted.
After pressing ENTER, the new, updated menu is displayed.
5 Repeat steps 2-4 to delete additional titles from the Title List.
6 Press RETURN (💡) repeatedly to remove the Title List display.
If the disc has already been finalized
You should see a screen like the one below.

text_image
Indicates total and current page number Disc name Title list 1 TITLE 1 5/16 0:30:21 2 TITLE 2 5/17 0:20:00* 3 TITLE 3 5/18 1:10:03 4 TITLE 4 5/19 0:43:21* 5 TITLE 5 5/20 0:15:21 6 TITLE 6 5/21 1:13:21 Moves to the next or previous page Exits the Title List screen.Title List and Chapter List Menu (Continued)
Using the Title List menu
+RW
The Title List is where you can see the all recorded titles, and where you can delete titles and make other changes to the Original content of the disc. You can also play titles directly from the Title List menu. The recorder must be stopped in order to edit using the Title List menu.

Press LIST/DISC MENU to display the Title List menu.
- Use the ▲ / ▼ buttons to display the previous/ next page if there are more than 6 titles.
- To exit the Title List menu, press RETURN (💡).
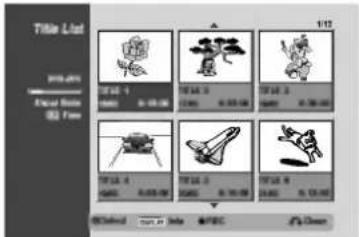
To view Title List options, select the title you want then press ENTER.
Title List options appears on the left side of the menu.

Use ▲ / ▼ to select an option then press ENTER to confirm.
| Play | |
| Full Play | |
| Chapter | |
| Delete | |
| Protect | |
| Edit | > |
| Dubbing | |
Play: Starts playback the selected title except the hidden chapters.
Full Play: Starts playback the selected title including the hidden chapters.
Chapter: Moves Chapter List menu of the title. (refer to right on this page)
Delete: Deletes the title. (page 55)
Protect: Protects accidental recording, editing or deleting of the title. (page 57)
| Title Name |
| Divide |
| Hide |
Edit: Selects Edit options.
• Title Name: Edits the title name. (page 56)
- Divide: Divides one title into two titles. (page 58)
- Hide (Show): Hides (or Shows) the all chapters within the title. (page 58)
Dubbing: Copies the title to a VHS tape.

Press RETURN (💡) repeatedly to exit Title List menu.

ip
Press DISPLAY to display more detailed title information for selected title.

Caution
If you press REC (●) when the Title List menu appears, the selected title is erased then overwrite recording starts. (See page 59 for more details.)
Using the Chapter List menu
+RW

Press LIST/DISC MENU to display Title List menu.

Use ▲▼◀▶ to choose the title you want to view Chapter List menu then press ENTER. Title List options appears on the left side of the menu.

Use ▲ / ▼ to select 'Chapter' from Title List options then press ENTER.
Chapter List menu appears on the TV screen.
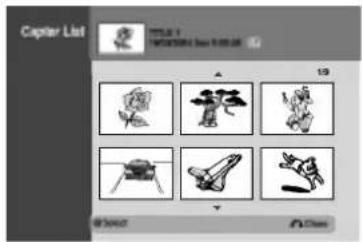
text_image
Capter List TITLE 1 TOMATOO BAN 01:00:00 19 @ Select Class
To view Chapter List options, select the chapter you want then press ENTER.
Chapter List options appears on the left side of the menu.

Use ▲ / ▼ to select an option then press ENTER to confirm.
| Play |
| Title |
| Combine |
| Hide |
Play: Starts playback of the selected chapter.
Title: Moves to Title List menu of the chapter. (refer to left on this page)
Combine: Combines two chapters into one. (page 56)
Hide (Show): Hides (or Shows) the selected chapter. (page 58)

Press RETURN (💡) repeatedly to exit Chapter List menu.
Title List and Chapter List Menu (Continued)
Using the Title List menu
+R
The Title List is where you can see the all recorded titles, and where you can delete titles and make other changes to the Original content of the disc. You can also play titles directly from the Title List menu. The recorder must be stopped in order to edit using the Title List menu.

Press LIST/DISC MENU to display the Title List menu.
- Use the ▲ / ▼ buttons to display the previous/ next page if there are more than 6 titles.
• To exit the Title List menu, press RETURN (💡).
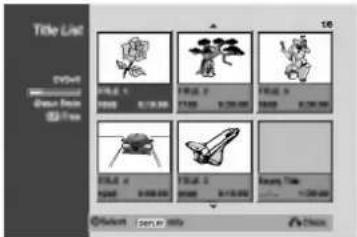
text_image
Title List C:\Users\Molecular\Drawn\Image\Box\Fox TITLE 1 名称: 37.000.000 TITLE 2 名称: 37.000.000 TITLE 3 名称: 37.000.000 TITLE 4 名称: 37.000.000 TITLE 5 名称: 37.000.000 Drawing Tools ...
To view Title List options, select the title you want then press ENTER.
Title List options appears on the left side of the Title List menu.

Use ▲ / ▼ to select an option then press ENTER to confirm.
| Play | |
| Full Play | |
| Chapter | |
| Delete | |
| Protect | |
| Edit | > |
| Dubbing | |
Play: Starts playback the selected title except the hidden chapters.
Full Play: Starts playback the selected title including the hidden chapters.
Chapter: Moves Chapter List menu of the title. (refer to right on this page)
Delete: Deletes the title. (page 55)
Protect: Protects accidental recording, editing or deleting of the title. (page 57)
| Title Name |
| Divide |
| Hide |
Edit: Selects Edit options.
• Title Name: Edits the title name. (page 56)
- Hide (Show): Hides (or Shows) the all chapters within the title. (page 58)
Dubbing: Copies the title to a VHS tape.

Press RETURN (💡) repeatedly to exit Title List menu.

ip
Press DISPLAY to display more detailed title information for selected title.
Using the Chapter List menu
+R

Press LIST/DISC MENU to display Title List menu.

Use ▲▼◀▶ to choose the title you want to view Chapter List menu then press ENTER. Title List options appears on the left side of the menu.

Use ▲ / ▼ to select 'Chapter' from Title List options then press ENTER. Chapter List menu appears on the TV screen.

text_image
Captor List FIGURE 1 FROCCIÓN: 2019-03-06 19 ● ● ● ● ● ● ●
To view Chapter List options, select the chapter you want then press ENTER.
Chapter List options appears on the left side of the menu.

Use ▲ / ▼ to select an option then press ENTER to confirm.
| Play |
| Title |
| Combine |
| Hide |
Play: Starts playback of the selected chapter.
Title: Moves to Title List menu of the chapter. (refer to left on this page)
Combine: Combines two chapters into one. (page 56)
Hide (Show): Hides (or Shows) the selected chapter. (page 58)

Press RETURN (♂) repeatedly to exit Chapter List menu.
Title and Chapter Editing
Edits you make to the Original content changes the actual content of the disc. For example, if you delete a title or chapter from the Original content (Title or Chapter), that title or chapter is deleted from the disc, freeing up extra recording time. When you edit the Playlist, on the other hand, you are not changing the content of the disc. For example, when you delete a title from the Playlist, you are just telling the recorder not to play that title; nothing is actually deleted from the disc.
Titles, Chapters and Parts VR
Titles in the disc's original content contain one or more chapters. When you insert a title into the Playlist, all the chapters within that title also appear. In other words, chapters in the Playlist behave exactly as chapters on a DVD-Video disc do. Parts are sections of Original or Playlist titles. From the Original and Playlist menu you can add or delete parts. Adding a chapter or title to the Playlist creates a new title made up of a section (ie., chapter) of an Original title. Deleting a part removes part of a title from the Original or Playlist menu.
Caution
- When editing using the Delete, Add and Move functions, the start and end frames may not be exactly as set in the start and end point display.
- During Playlist playback, you may notice a momentary pause between edits. This is not a malfunction.
Adding Chapter Markers VR +RW

You can put a chapter marker anywhere in a Playlist or Original title during recording or playback.
Once the chapter is marked, you can use the Chapter Search feature, as well as delete, combine and move chapters in the Chapter List-Original or Chapter List-Playlist menu.
You can insert up to 999 chapter markers in both the Original and Playlist contents.
Note
Chapter markers are inserted at regular intervals automatically. You can change this interval from the Initial Setup menu (see Auto Chapter on page 27).
1 Play the title (Original or Playlist).
2 At the point you want to start a new chapter, press CHP ADD.
A chapter marker icon appears on the TV screen.
- You can also put chapter markers in during recording.
Changing Title Thumbnails

Each title displayed in the Title List menu is represented by a thumbnail picture taken from the start of that title or chapter.
If you prefer, select a different still picture from within a title.
1 Play the title (Original or Playlist).
2 Press THUMBNAIL to make the currently displayed picture the one that appears in the Original or Playlist menu.
The still picture that you choose appears in both the Original or Playlist menu.
T ip
You can also change the thumbnail picture of the title on the Chapter List-Original or Chapter List-Playlist menu. Select a chapter on the Chapter List-Original or Chapter List-Playlist menu then press THUMBNAIL. The thumbnail picture of the title that includes the chapter is changed.
Title and Chapter Editing (Continued)
Making a New Playlist VR
Use this function to add an Original title or chapter to the Playlist. When you do this, the whole title is put into the Playlist (you can delete bits you don't need later — see Deleting an Original or Playlist title/chapter on page 55).
The title appears in the Playlist complete with the chapter markers that appear in the Original. However, if you add more chapter markers to the Original later, these are not automatically copied over into the Playlist title.
You can add up to 999 chapters to one disc. If you only want to add a chapter of a title, use the Adding a title/chapter to the Playlist on this page.
1 Press LIST/DISC MENU repeatedly to display Title List-Original menu.
If you want to display the Chapter List-Original menu, refer to "Using the Chapter List-Original menu" on page 48.
2 Choose a title or chapter on the Original menu to put into the Playlist, then press ENTER.
Original (Title or Chapter) options appears on the left side of the Original menu.
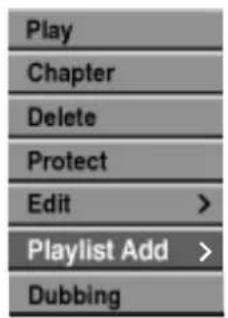
text_image
Play Chapter Delete Protect Edit > Playlist Add > DubbingTitle List-Original
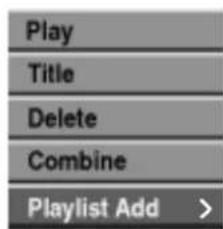
text_image
Play Title Delete Combine Playlist Add >Chapter List-Original
3 Use ▲ / ▼ to select 'Playlist Add' from Original options then press ENTER.

text_image
Select a playlist. New Playlist4 Select 'New Playlist' then press ENTER. The new title appears in the updated Playlist. All chapters of the title are added to the Playlist.
Adding Additional Title/Chapters to the
Playlist VR
You can add an Original title or chapter to add to a Playlist title even if it is already registered.
1 Press LIST/DISC MENU repeatedly to display Title List-Original menu. If you want to show the Chapter List-Original menu, refer to "Using the Chapter List-Original menu" on page 48.
2 Choose an Original title or chapter to put into the Playlist, then press ENTER. Original menu options appears on the left side of the screen.

text_image
Play Chapter Delete Protect Edit > Playlist Add > DubbingTitle List-Original
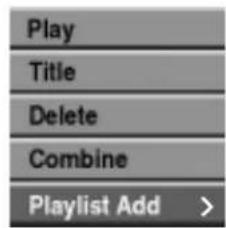
text_image
Play Title Delete Combine Playlist Add >Chapter List-Original
3 Use ▲ / ▼ to select 'Playlist Add' from Original menu options then press ENTER.
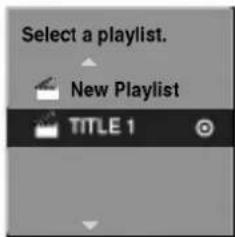
text_image
Select a playlist. New Playlist TITLE 14 Choose a Title List-Playlist that is already registered to insert a title or chapter, then press ENTER.
The title or chapter appears in the updated Playlist menu.
5 Repeat steps 1-4 to add additional title or chapter on the Playlist.
6 Press RETURN (💡) to exit, or LIST/DISC MENU to go back to the Title List-Original menu.
Title and Chapter Editing (Continued)
Deleting a Title/Chapter
VR
+RW
+R
When you erase a title or chapter from the Playlist menu on DVD-RW discs formatted in VR mode, you only remove it from the Playlist; the title/chapter remains in the Original menu.
If you choose to delete a title or chapter from Title List or Chapter List menu, the title or chapter is actually deleted from the disc and the remaining time available for recording increases. Titles/chapters deleted from the Original are also removed from the Playlist.

ote
It may not be possible to delete chapters that are less than 3 seconds long.

On the Title List or Chapter List menu, use ▲▼◀▶ to choose a chapter or title you want to delete then press ENTER.
Options appears on the left side of the screen.

Select 'Delete' option on the options on the menu.
e.g., If you select "Delete" on Title List-Original menu.
| Play | |
| Chapter | |
| Delete | |
| Protect | |
| Edit | > |
| Playlist Add | > |
| Dubbing | |

Press ENTER to confirm.
The confirm message for deleting will appear.

Use ◀ / ▶ to select 'Yes' then press ENTER.
The selected chapter or title is deleted.
After pressing ENTER, the new, updated menu is displayed.

Repeat steps 1 - 4 to continue to delete from the menu.

Press RETURN (💡) repeatedly to exit the menu.

ote
- When DVD+RW recording, the deleted title's name is changed to 'Deleted Title'.
- If the deleted titles more than two are continued, the titles are combined into one.
Deleting a Part
VR
You can delete a part which you do not want in the title.
1 Press LIST/DISC MENU repeatedly to display Title List-Original or Title List-Playlist menu.
2 Use ▲▼◀▶ to choose a title you want to delete then press ENTER.
The options appears on the left side of the menu.
3 Select 'Delete Part' from the options on the menu.
e.g., If you select "Delete Part" on Title List-Original menu.
| Play | |
| Chapter | |
| Delete | |
| Protect | |
| Edit | Title Name |
| Playlist Add | Delete Part |
| Dubbing | |

Press ENTER.
Title Edit (Delete Part) menu appears on the TV screen.
'Start Point' icon is highlighted.

text_image
Table Edit Create Part Start Point End Point Close Close Start End
Starts playback and use pause step, search and slow-motion to find the starting point.

Press ENTER at the starting point of the section you want to delete.
'End Point' icon is highlighted.
The part is indicated on the Progress Bar.

Use pause step, search, skip and slow-motion to find the ending point.

Press ENTER at the ending point of the section you want to delete.
You can cancel the selected point, use ▲ / ▼ to select 'Cancel' icon then press ENTER.

If you finish to edit, select 'Done' icon then press ENTER.
The confirm message for deleting will appear.

Use ◀ / ▶ to select 'Yes' then press ENTER. The selected part is deleted from the title.

When finished editing, press RETURN (○).
Title and Chapter Editing (Continued)
Naming a Title
VR
Video
+RW
+R
You can name titles independently. Names can be up to 32 characters long.
1 On the Title List menu, use ▲▼◀▶ to choose the title you want to name then press ENTER. Options appears on the left side of the menu.
2 Use ▲/▼ to select 'Title Name' option then press ENTER. Keyboard menu appears.
e.g., If you select "Title Name" on Title List-Original menu.
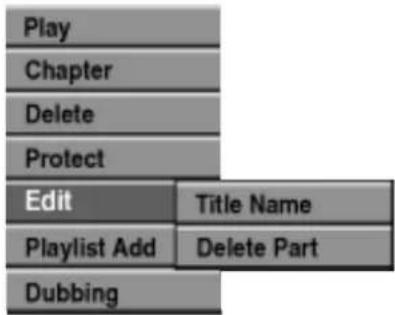
text_image
Play Chapter Delete Protect Edit Title Name Playlist Add Delete Part Dubbing3 Enter a name for the title. Use ▲▼◀▶ to select a character then press ENTER to confirm your selection. Refer step 3 as shown on page 21 (Station Rename).
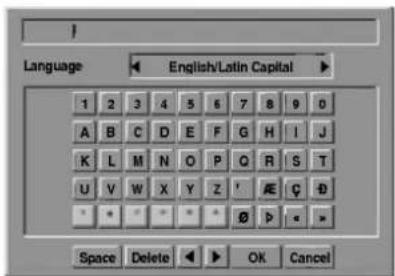
text_image
Language English/Latin Capital 1 2 3 4 5 6 7 8 9 0 A B C D E F G H I J K L M N O P Q R S T U V W X Y Z ' A E C D * * * * * Ø D < > Space Delete OK Cancel4 Choose OK then press ENTER to fix the name and return to the previous menu screen.
5 Press RETURN (💡) repeatedly to exit the menu.
Notes
- Names can be up to 32 characters long.
- For discs formatted on a different DVD Recorder, you will see only a limited character set.
- When recording in DVD-R, DVD+R or DVD+RW, the entered name is displayed on the DVD player only after finalizing.
Combining Two Chapters Into One
VR
+RW
+R
Use this function to combine two adjacent Playlist or Original chapters into one.
Note
This function is not available if there is only one chapter within the title.
1 On the Chapter List menu, select the second chapter of the two chapters you want to combine then press ENTER. Chapter List options appears on the left side of the menu.
2 Use ▲ / ▼ to select 'Combine'. The combine indicator appears between the two chapters you want to combine.
e.g., If you select "Combine" on Chapter List-Original menu.

text_image
Play Title Delete Combine Playlist Add >Press ENTER to confirm.
After pressing ENTER, the new, updated menu is displayed.
4 Repeat steps 1 - 3 to continue to combine from the menu.
5 Press RETURN (💡) repeatedly to exit the menu.
Note
This function cannot operate listed below;
- If there is only one chapter within the title.
- If two chapters created by erasing a part from an original title.
• If two chapters created from different titles. - If two chapters created by moving an order from an original title.
Title and Chapter Editing (Continued)
Moving a Playlist Chapter VR
Use this function to re-arrange the playing order of Playlist chapters on the Title List-Playlist menu.
1 Press LIST/DISC MENU repeatedly to display Title List-Playlist menu. To display the Chapter List-Playlist menu, refer to "Using the Chapter List-Playlist Menu" on page 49.

This function is not available if there is only one chapter.

text_image
Chapter List Playout TITLE 1 MASCULAR: Tom Miller 10 Select Original 4% Close2 Select a chapter from the Chapter List-Playlist menu.
3 Press ENTER.
Chapter List-Playlist options appears on the left side of the menu.
4 Use ▲ / ▼ to select 'Move' from Playlist options then press ENTER.
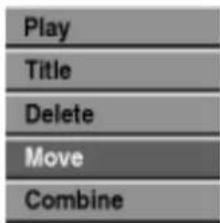
text_image
Play Title Delete Move Combine5 Use ▲▼◀▶ to choose the place you want to move the chapter to then press ENTER.
After pressing ENTER, the new, updated menu is displayed.
6 Repeat steps 2 - 5 to continue to move from the menu.
7 Press RETURN (💡) repeatedly to exit the menu.
Protect a Title VR +RW +R
Use this function to protect accidental recording, editing or deleting of the title.
1 Press LIST/DISC MENU to display Title List menu.
2 Use ▲▼◀▶ to choose a title you want to protect then press ENTER.
Options appears on the left side of the screen.
3 Select 'Protect' option on the options.
e.g., If you select "Protect" on Title List menu.(DVD+RW/+R)

text_image
Play Full Play Chapter Delete Protect Edit > Dubbing4 Press ENTER to confirm. The lock mark will appears on the title's thumbnail.

If you select a title that has already been protected on the Title List menu, you can unprotect it by choosing "Unprotect" from the Title List menu options. After doing this, you can edit and delete the title.
Title and Chapter Editing (Continued)
Hide a Title/Chapter +RW +R
Use this function to hide a title/chapter on the Title List or Chapter List menu.
1 On the Title List or Chapter List menu, use ▲▼◀▶ to choose a title or chapter you want to hide then press ENTER. Options appears on the left side of the screen.
2 Select 'Hide' option on the options.
e.g., If you select "Hide" on Title List menu.
| Play | |
| Full Play | |
| Chapter | |
| Delete | |
| Protect | Title Name |
| Edit | Divide |
| Dubbing | Hide |
3 Press ENTER to confirm. The title's thumbnail will be dim.
T ip If you select a title that has already been dim on the Title List menu, you can show it by choosing "Show" from the Title List menu options. After doing this, you can see the title.
Divide One Title Into Two +RW
Use this command to split a title up into two new titles.
1 On the Title List menu, select a title you want to divide then press ENTER. The menu options appear on the left side of the screen.
2 Select 'Divide' from the Title List menu options.
| Play | |
| Full Play | |
| Chapter | |
| Delete | |
| Protect | Title Name |
| Edit | Divide |
| Dubbing | Hide |
3 Press ENTER when 'Divide' option is highlighted. Title Edit-Divide menu appears and goes into STOP mode.

text_image
Current picture The first title's thumbnail The second title's thumbnail4 Use pause step, search, skip and slow-motion to find the point you want to divide the title.
5 When 'Divide' option is highlighted, press ENTER at the point.
You can clear the dividing point and exit the Title Edit-Divide menu, use ▲/▼ to select 'Cancel' option then press ENTER. The dividing point is clear.
6 Choose 'Done' option then press ENTER to fix the dividing point. The title is divided into two new titles. It take up to 4 minutes to divide.
Additional Information
Clean-up Recording
Video
VR
+RW
You can simply clean-up (erase) all contents on the disc then start recording from the first section of the disc. The disc format is not changed.
1 Switch on the recorder and load a recordable disc.
2 Press and hold REC (●) button for more than 3 seconds. The message will appears on the TV screen.

3 Use ◀/▶ to select "Yes" then press ENTER. Recording will start. (The REC icon appears on the TV screen.)
Overwrite Recording
+RW
To overwrite a new video recording to a previously recorded title, follow these steps. This feature is not available on DVD+R, which always record at the end of the Disc.
1 Select input source you want to record (channel, AV1-3, DV).
2 Press LIST/DISC MENU to display the Title List menu.
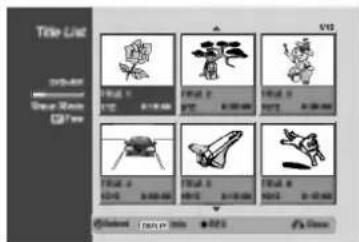
text_image
Title List Source: New World View 175 175 175 175 175 175 175 175 175 175 175 175 175 175 175 175 175 175 175 175 175 175 175 175 175 170 170 170 170 170 170 170 170 170 170 170 170 170 170 170 170 170 170 170 170 170 170 165 165 165 165 165 165 165 165 165 165 165 165 165 165 165 165 165 165 165 165 165 165 165 165 165 160 160 160 160 160 160 160 160 160 160 160 160 160 160 160 160 160 160 160 1603 Use ▲▼◀▶ to choose a title you want to overwrite.
4 Press REC (●) to start overwrite recording. Overwrite recording is started from the start point of the title.
5 Press STOP (■) to stop the overwrite recording. The new title is created and updated menu is displayed.
Notes
- This function is not available with a protected title.
- If the overwriting is elapsed more than the recording length of the current title, the next title is overwrited. But if next title is protected, the overwriting is stopped at the starting point of the title.
- If the selected title's recording length is less than 10 seconds, the next title is overwrited. But if next title is protected, the overwriting is stopped.
Viewing Title List menu displayed on other DVD recorders or players
+RW
+R
You can view the Title List menu displayed on the another DVD player that is capable of playing DVD+RW or DVD+R discs.
1 Insert DVD+R or DVD+RW disc recorded already.
2 Press TITLE button.
Title List menu will appear as below.

You can remove the Title List menu by pressing STOP (■).

text_image
Title List 1.0 2.0 3.0 4.0 5.0 6.0 7.0 8.0 9.0 10.0 11.0 12.0 13.0 14.0 15.0 16.0 17.0 18.0 19.0 20.0 21.0 22.0 23.0 24.0 25.0 26.0 27.0 28.0 29.0 30.0 31.0 32.0 33.0 34.0 35.0 36.0 37.0 38.0 39.0 40.0 41.0 42.0 43.0 44.0 45.0 46.0 47.0 48.0 49.0 50.0 51.0 52.0 53.0 54.0 55.0 56.0 57.0 58.0 59.0 60.0 61.0 62.0 63.0 64.0 65.0 66.0 67.0 68.0 69.0 70.0 71.0 72.0 73.0 74.0 75.0 76.0 77.0 78.0 79.0 80.0 81.0 82.0 83.0 84.0 85.0 86.0 87.0 88.0 89.0 90.0 91.0 92.0 93.0 94.0 95.0 96.0 97.0 98.0 99.0 100.03 To play back a title, select the title you want then press ENTER or ▶ (PLAY).
Playing Your Recordings on other DVD Players (Finalizing a Disc)
Most regular DVD players can play finalized discs recorded in Video mode, finalized DVD+R or DVD+RW. A small number of players can also play DVD-RW discs recorded in VR mode, finalized or not. Check the manual that came with the other player to check what kinds of discs it will play.
Finalizing 'fixes' the recordings and editings in place so that the disc can be played on a regular DVD player or computer equipped with a suitable DVD-ROM drive. Finalizing a Video mode disc creates a menu screen for navigating the disc. This is accessed by pressing LIST/DISC MENU or TITLE.
To finalize a disc, refer to "Disc Finalize" on page 28.
Notes
- Unfinalized DVD+RW is playable on regular DVD players.
- The edited contents of DVD+RW disc is compatible on regular DVD players only after finalizing.
- Any edited contents of the DVD+R disc are not be compatible on regular DVD players. (Hide, chapter combine, added chapter mark, etc.)
Language Code List
Enter the appropriate code number for the initial settings "Disc Audio", "Disc Subtitle" and/or "Disc Menu" (See page 23).
| Code | Language | Code | Language | Code | Language | Code | Language |
| 6566 | Abkhazian | 7074 | Fiji | 7678 | Lingala | 8373 | Singhalese |
| 6565 | Afar | 7073 | Finnish | 7684 | Lithuanian | 8375 | Slovak |
| 6570 | Afrikaans | 7082 | French | 7775 | Macedonian | 8376 | Slovenian |
| 8381 | Albanian | 7089 | Frisian | 7771 | Malagasy | 8379 | Somali |
| 6577 | Amharic | 7176 | Galician | 7783 | Malay | 6983 | Spanish |
| 6582 | Arabic | 7565 | Georgian | 7776 | Malayalam | 8385 | Sudanese |
| 7289 | Armenian | 6869 | German | 7784 | Maltese | 8387 | Swahili |
| 6583 | Assamese | 6976 | Greek | 7773 | Maori | 8386 | Swedish |
| 6588 | Aymara | 7576 | Greenlandic | 7782 | Marathi | 8476 | Tagalog |
| 6590 | Azerbaijani | 7178 | Guarani | 7779 | Moldavian | 8471 | Tajik |
| 6665 | Bashkir | 7185 | Gujarati | 7778 | Mongolian | 8465 | Tamil |
| 6985 | Basque | 7265 | Hausa | 7865 | Nauru | 8484 | Tatar |
| 6678 | Bengali; Bangla | 7387 | Hebrew | 7869 | Nepali | 8469 | Telugu |
| 6890 | Bhutani | 7273 | Hindi | 7879 | Norwegian | 8472 | Thai |
| 6672 | Bihari | 7285 | Hungarian | 7982 | Oriya | 6679 | Tibetan |
| 6682 | Breton | 7383 | Icelandic | 8065 | Panjabi | 8473 | Tigrinya |
| 6671 | Bulgarian | 7378 | Indonesian | 8083 | Pashto, Pushto | 8479 | Tonga |
| 7789 | Burmese | 7365 | Interlingua | 7065 | Persian | 8482 | Turkish |
| 6669 | Byelorussian | 7165 | Irish | 8076 | Polish | 8475 | Turkmen |
| 7577 | Cambodian | 7384 | Italian | 8084 | Portuguese | 8487 | Twi |
| 6765 | Catalan | 7465 | Japanese | 8185 | Quechua | 8575 | Ukrainian |
| 9072 | Chinese | 7487 | Javanese | 8277 | Rhaeto-Romance | 8582 | Urdu |
| 6779 | Corsican | 7578 | Kannada | 8279 | Romanian | 8590 | Uzbek |
| 7282 | Croatian | 7583 | Kashmiri | 8285 | Russian | 8673 | Vietnamese |
| 6783 | Czech | 7575 | Kazakh | 8377 | Samoan | 8679 | Volapük |
| 6865 | Danish | 7589 | Kirghiz | 8365 | Sanskrit | 6789 | Welsh |
| 7876 | Dutch | 7579 | Korean | 7168 | Scots Gaelic | 8779 | Wolof |
| 6978 | English | 7585 | Kurdish | 8382 | Serbian | 8872 | Xhosa |
| 6979 | Esperanto | 7679 | Laothian | 8372 | Serbo-Croatian | 7473 | Yiddish |
| 6984 | Estonian | 7665 | Latin | 8378 | Shona | 8979 | Yoruba |
| 7079 | Faeroese | 7686 | Latvian, Lettish | 8368 | Sindhi | 9085 | Zulu |
Country Code List
Enter the appropriate code number for the initial setting "Country Code" (See page 26).
| Code | Country | Code | Country | Code | Country | Code | Country |
| AD | Andorra | ER | Eritrea | LC | Saint Lucia | SC | Seychelles |
| AE | United Arab Emirates | ES | Spain | LI | Liechtenstein | SD | Sudan |
| AF | Afghanistan | ET | Ethiopia | LK | Sri Lanka | SE | Sweden |
| AG | Antigua and Barbuda | FI | Finland | LR | Liberia | SG | Singapore |
| AI | Anguilla | FJ | Fiji | LS | Lesotho | SH | Saint Helena |
| AL | Albania | FK | Falkland Islands | LT | Lithuania | SI | Slovenia |
| AM | Armenia | FM | Micronesia | LU | Luxembourg | SJ | Svalbard and Jan Mayen Islands |
| AN | Netherlands Antilles | FO | Faroe Islands | LV | Latvia | ||
| AO | Angola | FR | France | LY | Libya | SK | Slovak Republic |
| AQ | Antarctica | FX | France (European Territory) | MA | Morocco | SL | Sierra Leone |
| AR | Argentina | MC | Monaco | SM | San Marino | ||
| AS | American Samoa | GA | Gabon | MD | Moldavia | SN | Senegal |
| AT | Austria | GB | Great Britain | MG | Madagascar | SO | Somalia |
| AU | Australia | GD | Grenada | MH | Marshall Islands | SR | Suriname |
| AW | Aruba | GE | Georgia | MK | Macedonia | ST | Saint Tome and Principe |
| AZ | Azerbaijan | GF | French Guyana | ML | Mali | SU | Former USSR |
| BA | Bosnia-Herzegovina | GH | Ghana | MM | Myanmar | SV | El Salvador |
| BB | Barbados | GI | Gibraltar | MN | Mongolia | SY | Syria |
| BD | Bangladesh | GL | Greenland | MO | Macau | SZ | Swaziland |
| BE | Belgium | GM | Gambia | MP | Northern Mariana Islands | TC | Turks and Caicos Islands |
| BF | Burkina Faso | GN | Guinea | MQ | Martinique (French) | TD | Chad |
| BG | Bulgaria | GP | Guadeloupe (French) | MR | Mauritania | TF | French Southern Territories |
| BH | Bahrain | GQ | Equatorial Guinea | MS | Montserrat | ||
| BI | Burundi | GR | Greece | MT | Malta | TG | Togo |
| BJ | Benin | GS | S. Georgia & S. Sandwich IsIs. | MU | Mauritius | TH | Thailand |
| BM | Bermuda | MV | Maldives | TJ | Tadjikistan | ||
| BN | Brunei Darussalam | GT | Guatemala | MW | Malawi | TK | Tokelau |
| BO | Bolivia | GU | Guam (USA) | MX | Mexico | TM | Turkmenistan |
| BR | Brazil | GW | Guinea Bissau | MY | Malaysia | TN | Tunisia |
| BS | Bahamas | GY | Guyana | MZ | Mozambique | TO | Tonga |
| BT | Bhutan | HK | Hong Kong | AN | Namibia | TP | East Timor |
| BV | Bouvet Island | HM | Heard and McDonald Islands | NC | New Caledonia (French) | TR | Turkey |
| BW | Botswana | NE | Niger | TT | Trinidad and Tobago | ||
| BY | Belarus | HN | Honduras | NF | Norfolk Island | TV | Tuvalu |
| BZ | Belize | HR | Croatia | NG | Nigeria | TW | Taiwan |
| CA | Canada | HT | Haiti | NI | Nicaragua | TZ | Tanzania |
| CC | Cocos (Keeling) Islands | HU | Hungary | NL | Netherlands | UA | Ukraine |
| CF | Central African Republic | ID | Indonesia | NO | Norway | UG | Uganda |
| CG | Congo | IE | Ireland | NP | Nepal | UK | United Kingdom |
| CH | Switzerland | IL | Israel | NR | Nauru | UM | USA Minor Outlying Islands |
| CI | Ivory Coast | IN | India | NU | Niue | ||
| CK | Cook Islands | IO | British Indian Ocean Territory | NZ | New Zealand | US | United States |
| CL | Chile | OM | Oman | UY | Uruguay | ||
| CM | Cameroon | IQ | Iraq | PA | Panama | UZ | Uzbekistan |
| CN | China | IR | Iran | PE | Peru | VA | Vatican City State |
| CO | Colombia | IS | Iceland | PF | Polynesia (French) | VC | Saint Vincent & Grenadines |
| CR | Costa Rica | IT | Italy | PG | Papua New Guinea | ||
| CS | Former Czechoslovakia | JM | Jamaica | PH | Philippines | VE | Venezuela |
| CU | Cuba | JO | Jordan | PK | Pakistan | VG | Virgin Islands (British) |
| CV | Cape Verde | JP | Japan | PL | Poland | VI | Virgin Islands (USA) |
| CX | Christmas Island | KE | Kenya | PM | Saint Pierre and Miquelon | VN | Vietnam |
| CY | Cyprus | KG | Kyrgyzstan | PN | Pitcairn Island | VU | Vanuatu |
| CZ | Czech Republic | KH | Cambodia6 | PR | Puerto Rico | WF | Wallis and Futuna Islands |
| DE | Germany | KI | Kiribati | PT | Portugal | WS | Samoa |
| DJ | Djibouti | KM | Comoros | PW | Palau | YE | Yemen |
| DK | Denmark | KN | Saint Kitts & Nevis Anguilla | PY | Paraguay | YT | Mayotte |
| DM | Dominica | KP | North Korea | QA | Qatar | YU | Yugoslavia |
| DO | Dominican Republic | KR | South Korea | RE | Reunion (French) | ZA | South Africa |
| DZ | Algeria | KW | Kuwait | RO | Romania | ZM | Zambia |
| EC | Ecuador | KY | Cayman Islands | RU | Russian Federation | ZR | Zaire |
| EE | Estonia | KZ | Kazakhstan | RW | Rwanda | ZW | Zimbabwe |
| EG | Egypt | LA | Laos | SA | Saudi Arabia | ||
| EH | Western Sahara | LB | Lebanon | SB | Solomon Islands |
Controlling Your TV with the Supplied Remote
You can control the sound level, input source, and power switch of your LG TV with the supplied remote.
You can control your TV using the buttons below.

text_image
POWER EJECT OPEN/CLOSE TV POWER DVD VOR AV AV PR 1 2 3 4 5 6 7 8 9 TITLE MUTE AUDIO SUBTITLE ANGLE ● REC REC MODE TIMER REC BACKWARD FORWARD SKIP PAUSE/STEP STOP LIST| By pressing | You can |
| POWER | Turn the TV on or off. |
| AV | Switch the TV's input source between the TV and other input sources. |
| PR +/- | Scans up or down through memorized channels. |
| VOL +/- | Adjust the volume of the TV. |
| MUTE | Temporarily turns TV sound OFF, press again to restore. |
Controlling other TVs with the remote
You can control the sound level, input source, and power switch of non-LG TVs as well. If your TV is listed in the table below, set the appropriate manufacturer code.
-
While holding down TV POWER button, press the number buttons to select the manufacturer code for your TV (see the table below).
-
Release TV POWER button.
Code numbers of controllable TVs
If more than one code number is listed, try entering them one at a time until you find the one that works with your TV.
| Manufacturer | Code Number |
| LG / GoldStar | 1 (Default), 2 |
| Zenith | 1, 3, 4 |
| Samsung | 6, 7 |
| Sony | 8, 9 |
| Hitachi | 4 |

otes
- Depending on your TV, some or all buttons may not function on the TV, even after entering the correct manufacturer code.
- If you enter a new code number, the code number previously entered will be erased.
- When you replace the batteries of the remote, the code number you have set may be reset to the default setting. Set the appropriate code number again.
Troubleshooting
Check the following guide for the possible cause of a problem before contacting service.
| Symptom | Cause | Solution |
| No power. | The power cord is disconnected. | Plug the power cord into the wall outlet securely. |
| No picture. | The TV is not set to receive Recorder signal output. | Select the appropriate video input mode on the TV so the picture from the Recorder appears on the TV screen. |
| The video cable is not connected securely. | Connect the video cable securely. | |
| The connected TV power is turned off. | Turn on the TV. | |
| No sound. | The equipment connected with the audio cable is not set to receive Recorder signal output. | Select the correct input mode on the audio receiver so you can listen to the sound from the Recorder. |
| The audio cables are not connected securely. | Connect the audio cable securely. | |
| The power of the equipment connected with the audio cable is turned off. | Turn on the equipment connected with the audio cable. | |
| The audio connecting cord is damaged. | Replace it with new one. | |
| The playback picture is poor. | The disc is dirty. | Clean the disc. |
| The Recorder does not start playback. | No disc is inserted. | Insert a disc. |
| An unplayable disc is inserted. | Insert a playable disc. (Check the disc type, color system, and regional code.) | |
| The disc is placed upside down. | Place the disc with the playback side down. | |
| The disc is not placed within the guide. | Place the disc on the disc tray correctly inside the guide. | |
| The disc is dirty. | Clean the disc. | |
| The Movie Rating level is set. | Cancel the Rating function or change the rating level. | |
| The picture from the external input is distorted | The video signal from the external component is copy-protected. | You cannot connect via this recorder. Connect the component directly to your TV. |
| Some channels are skipped over when using ▲ / ▼. | Those channels are not stored in the recorder. | Restore channels. See “Program Edit” on pages 20-21. |
| The picture or sound of broadcasting channel is weak or missing. | Aerial or cables are loose. | Tighten connections or replace cable. |
| Camcorder image is not shown. | Camcorder is off. | Turn camcorder on and operate properly. |
| Camcorder image via A/V input or DV IN to Recorder is not shown on TV screen. | Recorder INPUT SELECT is incorrect. | Use AV to select input channel (AV1, AV2, AV3, DV, etc.) |
| Can't play a disc recorded using this recorder on another player. | The disc was recorded in Video mode. | Finalize the disc. (page 28) |
| Some players will not play even a finalized disc recorded in Video mode. | No solution. | |
| The disc was recorded in VR mode, | The other player must be RW compatible in order to play it. | |
| Discs recorded with copy-once material cannot be played on other players. | No solution. | |
| Cannot record or did not record successfully. | The remaining blank space on the disc is insufficient. | Use another disc. |
| The source you are trying to record is copy protected. | You cannot record the source. | |
| When setting the recording channel, the channel is tuned on the TV's own tuner. | Select the channel on the recorder's built-in TV tuner. | |
| When recording to a Video mode disc, programs that are copy-once protected cannot be recorded. | Use a VR mode formatted disc for copy-once material. | |
| Timer recording is not possible. | Clock in Recorder is not set to correct time. | Set clock to correct time. See "Auto Clock Set" or "Manual Clock Set" on page 22. |
| Timer has been programmed incorrectly. | Reprogram Timer. See "Timer Recording" on page 44-45. | |
| Timer record indicator light does not appear after programming timer. | Reprogram Timer. | |
| Stereo Audio Record and/or Playback is not present. | TV is not Stereo-compatible. | No solution. |
| Broadcast program is not in stereo format. | No solution. | |
| Recorder A/V Out jacks are not connected to TV A/V In jacks. | Make A/V connections. Stereo is available only via A/V output from Recorder. | |
| Recorder Audio/Video Out is not selected for viewing at the TV. | Select AUX or A/V source as TV input. | |
| Recorder's TV audio channel is set to mono. | Set TV audio channel mode to Stereo. See "Changing TV audio channel" on page 30. | |
| The remote control does not work properly. | The remote control is not pointed at the remote sensor of the Recorder. | Point the remote control at the remote sensor of the Recorder. |
| The remote control is too far from the Recorder. | Operate the remote control within 7 m. | |
| There is an obstacle in the path of the remote control and the Recorder. | Remove the obstacle. | |
| The batteries in the remote control are exhausted. | Replace the batteries with new ones. |
Moisture Condensation
| Moisture condensation can occur: | In locations where moisture condensation may occur: |
| When the Recorder is moved from a cold place to a warm place.Under extremely humid conditions. | Keep the Recorder plugged into an AC power outlet with POWER On. This will help prevent condensation.When condensation has occurred, wait a few hours for the Recorder to dry before using it. |
Specifications
General
| Power requirements | AC 200-240V, 50 Hz |
| Power consumption | 35W |
| Dimensions (approx.) | 430 X 78.5 X 354 mm (w x h x d) |
| Mass (approx.) | 5.7 kg |
| Operating temperature | 5°C to 35°C |
| Operating humidity | 5 % to 90 % |
| Television system | PAL B/G, PAL I/I, SECAM D/K colour system |
| Recording format | PAL |
System
| Laser | Semiconductor laser, wavelength 650 nm |
| Video head system | Double azimuth 4 heads, helical scanning |
| Signal system | PAL |
Recording
| Recording format | DVD VideoRecording, DVD-VIDEO |
| Recordable discs | DVD-ReWritable, DVD-Recordable, DVD+ReWritable, DVD+Recordable |
| Recordable time | Approx. 1 hour (XP mode), 2 hours (SP mode), 4 hours (LP mode),6 hours (EP mode) |
| Video recording format | |
| Sampling frequency | 27MHz |
| Compression format | MPEG 2 |
| Audio recording format | |
| Sampling frequency | 48kHz |
| Compression format | Dolby Digital |
Playback
| Frequency response | DVD (PCM 48 kHz): 8 Hz to 22 kHz, CD: 8 Hz to 20 kHz |
| DVD (PCM 96 kHz): 8 Hz to 44 kHz | |
| Signal-to-noise ratio | More than 100 dB (AUDIO OUT connector) |
| Harmonic distortion | Less than 0.008% (AUDIO OUT connector) |
| Dynamic range | More than 95 dB (AUDIO OUT connector) |
Inputs
| AERIAL IN | Aerial input, 75 ohms |
| VIDEO IN | 1.0 Vp-p 75 ohms, sync negative, RCA jack x 1 / SCART x 2 |
| AUDIO IN | 0 dBm more than 47 kohms, RCA jack (L, R) x 1 / SCART x 2 |
| DV IN | 4 pin (i.LINK/IEEE 1394 standard) |
| S-VIDEO IN | (Y) 1.0 V (p-p), 75 Ω, negative sync, Mini DIN 4-pin x 1(C) 0.3 V (p-p) 75 Ω |
Outputs
| S-VIDEO OUT | (Y) 1.0 V (p-p), 75 Ω, negative sync, Mini DIN 4-pin x 1(C) 0.3 V (p-p) 75 Ω |
| COMPONENT VIDEO OUT | (Y) 1.0 V (p-p), 75 Ω, negative sync, RCA jack x 1(Pb)/(Pr) 0.7 V (p-p), 75 Ω, RCA jack x 2 |
| Audio output (digital audio) | 0.5 V (p-p), 75 Ω, RCA jack x 1 |
| Audio output (optical audio) | 3 V (p-p), 75 Ω, Optical connector x 1 |
| Audio output (analog audio) | 2.0 Vrms (1 KHz, 0 dB), 600 Ω, RCA jack (L, R) x 1 / SCART |
- Design and specifications are subject to change without notice.
- Manufactured under license from Dolby Laboratories. "Dolby", "Pro Logic" and the double-D symbol are trademarks of Dolby Laboratories.
• DTS and DTS Digital Out are registered trademarks of Digital Theater Systems, Inc.

LG Electronics Inc.