P10051R1F - Washing machine LG - Free user manual and instructions
Find the device manual for free P10051R1F LG in PDF.

User questions about P10051R1F LG
0 question about this device. Answer the ones you know or ask your own.
Ask a new question about this device
Download the instructions for your Washing machine in PDF format for free! Find your manual P10051R1F - LG and take your electronic device back in hand. On this page are published all the documents necessary for the use of your device. P10051R1F by LG.
USER MANUAL P10051R1F LG
Washing Machine OWNER'S MANUAL
MODEL : P10051R1F
WP-9005/820/952
WP-9003/930/953/9004S/954S
WP-951S/1020/1021S
WP-1220/1221S
WP-9005N/10005N
WP-25145SD
Please read this manual carefully before operating your set. Retain it for future reference.
Record model number and serial number of the set.
See the label attached on the back cover and quote this information to your dealer when you require service.
This washing machine is designed and manufactured for household use only.
CONTENTS
IMPORTANT INSTRUCTIONS----2
SAFETY MEASURE 3
PARTS IDENTIFICATION ----4\~5
INSTALLATION 6\~7
PREPARATIONS BEFORE WASHING----8
HOW TO WASH----8\~9
HOW TO RINSE 10\~11
HOW TO SPIN 11
AFTER FINISHING 11
REFERENCE----12
CARE AND MAINTENANCE----13\~14
TROUBLESHOOTING GUIDE 14
SPECIFICATIONS----15
IMPORTANT INSTRUCTIONS
- Before operating machine read the instruction manual carefully.
- Always keep the machine on the floor level.
- During operation machine should be kept perpendicular to the slope of the floor to avoid motion.
- Before operating properly earth the machine, to avoid electric shock.
- When not in use take the power cord out from the socket.
- During spinning and drain check that drain hose is lowered.
- Before putting clothes in the Wash Tub check the pockets thoroughly for Coins, Keys and other objects.
- Transfer the clothes from Wash Tub to Spin Dryer Basket one by one.
- In case you notice excessive vibration or abnormal noise during spinning, immediately open the Spin Dryer Cover and rearrange the laundry evenly.
- In case of any doubt contact the nearest service center or Dealer.
SAFETY MEASURE
Manufacturer is not responsible for accidents caused by the user as a result of not following the user's guide.
| WARNING | ||
| In OperationDo not insert the hand inside the spin dryer basket while the machine is in operation.(Do not let children climb on the machine or climb into the tub. Injury may occur) |  | Installation AreaAvoid area exposed to snow, rain, or where humidity is high. It may cause electric shock.  |
| Switch AreaAvoid watering on the switch area. It may cause electric shock or fire. |  | Electric OutletAvoid connecting several electric devices to single outlet. It may cause fire.  |
Volatile MaterialDo not use volatile material such as Benzene; 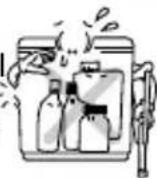 Gasoline, bug killer. Do not leave strong alkaline substance such as bleach inside the tub. Damage on plastic surface and rubber parts may occur. Gasoline, bug killer. Do not leave strong alkaline substance such as bleach inside the tub. Damage on plastic surface and rubber parts may occur. | HeatAvoid electric heater, candle light, cigarette light, bug smoker, etc. near the machine. It may ignite or deform plastic part  | |
| Power CordIf the power supply cord is damaged, it must only be replaced by a repair shop appointed by the manufacturer, because special purpose tools are required. | ||
| Hot WaterAvoid using hot water over 50°C. It may deform plastic parts or cause malfunction. |  | InstallationInstall the washing machine on a horizontal support. 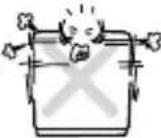 Otherwise, it may cause vibration and noise Otherwise, it may cause vibration and noise |
| Power CordDo not treat the power supply cord with your wet hand |  | Plug out the power supply cord, when cleaning or not using the washing machine for a long time.  |
PARTS IDENTIFICATION
Control Panel

-
Hot water inlet
Select this inlet when opting for hot water wash. -
Cold Water inlet
Select this inlet when opting cold water wash.
- Water Selector
Select "WASH" to supply water for washing and rinsing and "SPIN" for spin shower rinse.
- Wash Timer
Select the desired time for soaking, washing or rinsing. (Soaking facility is not available in P10051R1F/WP-820/930/952/953/9003/9005/1020/1220/9005N/10005N)
-
Wash Selector Set the Selector to "GENTLE", "NORMAL", "STRONG" according to kinds and quantity of the laundry. (Not available in P10051R1F)
-
Drain Selector Select "WASH RINSE" for washing and rinsing, and "DRAIN" to drain the water from the tub.
-
Spin Timer Select the desired time for spinning. Don't rotate the knob more than prescribed limit.
(Please do not match this figure with model as it may be different from your model. These are schematic diagrams only.)
PARTS IDENTIFICATION

text_image
Accessories ■ WASHING COVER ■ SPIN DRYER COVER ■ SAFETY COVER-2 ■ OVER FLOW FILTER ■ COLUMN FILTER-C ■ COLLAR SCRUBBER ■ TUB ■ PULSATOR* ■ PANEL ■ SPIN DRYER BASKET ■ EARTH WIRE (For models with two prong plug) ■ SAFETY COVER-1 ■ POWER CORD Inlet Hose Safety Cover(Please do not match this figure with model as it may be different from your model. These are schematic diagrams only.)
Wash Timer (Only for WP-9004S/954S/951S/1021S/1221S/25145SD exists with soak option)

Wash Timer
The wash timer can be used for SOAK, WASH and RINSE operations. Following combinations can be selected.
a) Soak + Wash : Select the desired soak time by setting the timer between 15\~40 min. Then total wash time will be selected soak time + 15 min. of wash time.
b) Wash/Rinse : Any Wash/Rinse time 1\~15 min. can be selected by setting the timer between 1\~15 min.
Washing will take place for the set period, then machine stops automatically.
Soak Function
a) Soaking is provided for better cleaning of clothes as detergent water goes to inner pores of clothes resulting dirt removal in better way.
b) Soak time by default will be 25 min. so total time of cycle will be Soak + Wash time (25 min. + wash time)
c) In soak option, machine operates for 1.5 min. & remains off for 5 min. This cycle continues for selected soak time.
INSTALLATION
Installation area
- Select flat and firm floor.
- Incorrect installation may cause severe noise and break down.
- Maintain more than 10 cm gap between the side of drain hose and the wall.

natural_image
Four cartoon illustrations showing a computer monitor with an open circle and a 'X' symbol, each holding a book or document (no text or symbols present)
natural_image
Simple line drawing of a box with arrows indicating motion or force, no text or symbols present- The base openings must not be obstructed by carpeting when the washing machine is installed on a carpeted floor.
Drain Hose Installation
- Drain Hose is installed at back side of the washing machine.

natural_image
Pure technical line drawing of a cable being inserted into a bracket (no text or symbols)- Don't remove Drain Hose.

natural_image
Diagram of a hand holding a coiled tube with a valve, no text or symbols presentNotes
- Be sure to re-route the hose so that it is not kinked or has sharp bends which will prevent proper drainage.
● The level of the drain should be slightly lower than the lowest part of the washing machine in order to ensure proper and complete drainage. - Use only new hose set provided with the machine.

natural_image
Illustration of a child opening a door next to an electric washing machine (no text or symbols)
natural_image
Diagram of a U-tube manometer connected to a liquid-filled container with a pipe (no text or labels)
natural_image
Diagram showing a container with liquid and a curved pipe inserted into a container (no text or symbols)INSTALLATION
Connecting the earth wire
● Install the earth wire to prevent short-circuit due to leaking current and electric shock.
- It is attached at the back of the washer. Connect it to the metal water pipe. If the water pipe is made of plastic, it does not have the earth effect.
● Never connect the earth wire to the gas pipe, lightning arrester, telephone connector etc.

text_image
Gas pipe Earth wire★ WARNING : This appliance must be earthed .
Other earthing method
After connecting the earth wire to the earth copper plate, bury it at least 75 cm deep under the wet ground. | Connect to the earthing-only outlet. | When installing it in an area where earthing is not possible, purchase a short-circuit breaker (15mA at operation, 7.5mA at idle) and connect it to the outlet. |
Connecting the power plug
- Insert the power plug into the outlet.
- Before connecting the power plug, check if the voltage setting of the machine matches the outlet voltage.
- If AC outlet with ground terminal is used, grounding is not needed. If not, never forget earthing (earthing method above).

text_image
Ground terminalPREPARATION BEFORE WASHING
Preparation
■ Connect the water supply hose to the water supply inlet.
■ Set the supply selector lever to "WASH" for washing and rinsing to "SPIN" for interim spin rinse.
- Note : The water Selector lever should not be placed near the center (as shown in Fig. (A) otherwise water flows to the wash and spin tub simultaneously).

text_image
Inlet hose Connect the power cord to the electrical outlet. Drain Hose
(Fig. A)
- Lay down the drain hose. Keep the drain hose flipped down while washing is in process
Before washing
1 Check the washing instruc-tions labels on the clothing to be washed.

natural_image
Line drawing of a jacket with short sleeves and front trim (no text or symbols)2 Remove any objects from the pockets of the clothing. Object left in the pockets may damage the clothing or washing machine (especially cause clogging of the drain hose).

3 After separating an oiled or dyed laundry, wash.

natural_image
Cartoon illustration of a beer barrel and a document with a sad face (no text or symbols)HOW TO WASH
1 Set the drain selector to "WASH ● RINSE" position.

text_image
Wash-Miss DrainDRAIN SELECTOR
2 Set the water selector to "WASH".

WATER SELECTOR
3 Open the water tap and fill water in the wash tub about halfway to the desired water level.

natural_image
Diagram of a showerhead spraying water from a sink, with no text or symbols presentHOW TO WASH
4 Put the appropriate amount of detergent and the laundry into the wash tub. And add water to the desired water level.

natural_image
Illustration of hands operating a sewing machine with a cloth and fabric (no text or symbols)- Refer to TABLES for REFERENCE on page 12.
5 Select the wash selector to "GENTLE", "NORMAL" "STRONG" according to kinds and quantity of the laundry.
(Not available in P10051R1F/WP-9005/952/820)

text_image
Gentle Normal Strong ConveranceWASH SELECTOR
- Refer to TABLES for REFERENCE on page 12.
6 Set the desired wash time.

text_image
Off 40 5 10 15 SoskWASH TIMER (For WP-954S/WP-9004S/ WP-951S/ WP-1021S/ WP-1221S/WP-25145SD)

text_image
QM 1E 3 12 6WASH TIMER (For P10051R1F WP-820/930/9005/9003/ WP-952/10005N/953/ WP-1020/1220/9005N)
- Refer to TABLE for REFERENCE on page 14 for information on how to select the appropriate washing time.
7 When washing is finished, select the drain selector to "DRAIN" position and drain the water out.

text_image
Wash-in DrainDRAIN SELECTOR
8 Spinning in the spin dryer basket :
- Put the laundry into the spin dryer basket.
- Put the laundry down lightly.
- Place the safety cover horizontally on the laundry.
- Set the desired spin time with the spin timer.

natural_image
Line drawing of a washing machine with liquid and cloth, showing a hand cleaning the interior (no text or symbols)Interim spin rinse
■ Interim spin rinse prior to regular rinsing will remove sudsy water from the laundry and improve rinsing efficiency.
1 After washingPut the laundry into the spin dryer basket.Place the safe ty cover hori-zontally on the laundry. | 2 Set the water selector to "SPIN".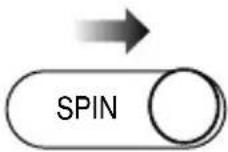 WATER SELECTOR WATER SELECTOR | 3 Allow the water to flow appropriately.4 Turn off the water supply, close the safety cover-2 and spin dryer cover. | |
5 Set the desired spin time with the spin timer. | 6 After spinningPut the laundry into the wash tub and rinse. |  | |
Economical water supply rinse
■ This course allows you to save water as this course is to rinse after feeding appropriate water to the tub.
1 Set the drain selector to “WASH ● RINSE” position and feed appropriate water to the tub.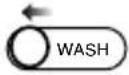 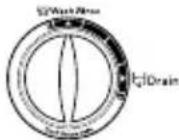 Water Selector Drain Selector Water Selector Drain Selector | 2 Set the rinse time with the wash timer.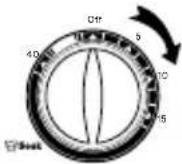  WASH TIMER (For WP-954S/WP-9004S/WP-951S/ WP-1021S/WP-1221S/WP-25145SD) WASH TIMER (For P10051R1FWP-820/930/9005/9003/WP-952/10005N/953/WP-1020/1220/9005N) WASH TIMER (For WP-954S/WP-9004S/WP-951S/ WP-1021S/WP-1221S/WP-25145SD) WASH TIMER (For P10051R1FWP-820/930/9005/9003/WP-952/10005N/953/WP-1020/1220/9005N) | 3 Put the laundry into the spin dryer basket and set the spin time with the spin timer.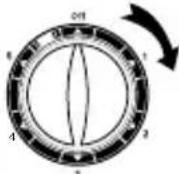 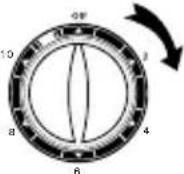 Spin Timer 10min Spin Timer (WP-25145SD) Spin Timer 10min Spin Timer (WP-25145SD) |
| 4 Put the laundry into the wash tub and repeat 1 to 3 course | ||
HOW TO RINSE
Continuous water supply rinse
■ The course is to rinse while feeding water continuously
1 Set the drain selector to "WASH • RINSE position.

Water Selector Drain Selector

2 Put the laundry into the wash tub and open the water faucet.

natural_image
Simple line drawing of a washing machine with a glass and cartoon eyes (no text or symbols)3 Set the rinse time with the wash timer and feed water continuously.

WASH TIMER (For WP-954S/WP-9004S/WP-951S/WP-1021S/WP-1221S/WP-25145SD)

WASH TIMER (For P10051R1F WP-820/930/9005/9003/ WP-952/10005N/953/ WP-1020/1220/9005N)
HOW TO SPIN
- Put the laundry evenly into the spin dryer basket.
- Put the laundry down lightly.
- Place the safety cover horizontally on the top of the laundry.
- Close the spin dryer cover.
- Set the spin timer according to the following table.

Safety cover


natural_image
Line drawing of a mechanical component with a hand holding a circular part, no text or symbols presentSPIN TIME GUIDE
| Type of clothing | Spin Time |
| Thin fabrics (synthetic fabrics, mixed fabrics) | 1 minute |
| Sweaters (synthetic fabrics) | 1~3 minutes |
| Cotton underwear | 3~5 minutes |
| Sheets, towels | 5 minutes |
- If the spin dryer basket is off-balance and vibrates excessively, stop the spinning, rearrange the clothes evenly, and then resume spinning.
- If the spinning fail to stop when the spin dryer cover is opened, the brake is out of order. Immediately stop using the machine and request repair service.
CAUTION: For woollen clothes, spin for 1 min. only for clothes protection.
AFTER FINISHING
- Remove the laundry from the spin dryer basket and close the spin dryer cover
- If there is water in the wash tub, set the drain selector to "DRAIN" in order to drain it out.
- Disconnect the power cord from the electrical outlet.
- Clean the washing machine. (Refer to CARE AND MAINTENANCE on page 13\~14).

natural_image
Simple line drawing of a washing machine with clothes hanging from its side (no text or symbols)REFERENCE
TABLE 1. WEIGHT GUIDE FOR CLOTHES
| Type of Clothing | Type of Fabric | Weight Per Piece |
| Under shirt | Cotton | 150 g |
| Handkerchief | Cotton | 50 g |
| Bath towel | Cotton | 300 g |
| Shirt | Mixed fabric | 200 g |
| Socks (1 pair) | Mixed fabric | 50 g |
| Pajama (shirt and pants) | Cotton | 500 g |
| Winter undershirt | Woollen | 600 g |
| Workclothes | Mixed fabric | 800 g |
| Blouse | Mixed fabric | 200 g |
TABLE 2. GUIDE FOR WASHING
**(A=P10051R1F B=WP-9005/820/952)
| Type of Fabric | Wash Time | Water Level | Amount of Water (Ltr.) | Amount of Detergent(gms) | ||
| A** | B** | A** | B** | |||
| Synthetics, Silk, Woolen, Knits | 2~5 min. | L | 50 | 47 | 45~49 | 45~49 |
| M | 55 | 54 | 51~55 | 51~55 | ||
| H | 60 | 62 | 56~60 | 56~66 | ||
| Cotton, Linen | 5~10 min. | L | 50 | 47 | 45~49 | 45~49 |
| M | 55 | 54 | 51~55 | 51~55 | ||
| H | 60 | 62 | 56~60 | 56~66 | ||
| Very soiled cotton and linen | 10~15 min. | L | 50 | 47 | 45~49 | 45~49 |
| M | 55 | 54 | 51~55 | 51~55 | ||
| H | 60 | 62 | 56~60 | 56~66 | ||
TABLE 3. GUIDE FOR WASHING (WITHOUT SOAK)
**(A=WP-9005N/10005N B=WP-9003/953/930 C=WP-1020/1220)
| Type of Fabric | Wash Selector | Wash Time | Water Level | Amount of Water (Ltr) | Amount of Detergent (gms) | ||||
| A** | B** | C** | A** | B** | C** | ||||
| Woollen, Knits | Gentle | ~5 min. | H | 50 | 62 | 66 | 60~66 | 56~66 | 60~72 |
| Synthetics, Silk | GENTLE | 8~12 min. | L | 40 | 47 | 51 | 45~51 | 45~49 | 45~51 |
| M | 45 | 54 | 58 | 54~58 | 51~55 | 54~58 | |||
| H | 50 | 62 | 66 | 60~66 | 56~66 | 60~72 | |||
| Cotton, Linen | NORMAL | 12~15 min. | L | 40 | 47 | 51 | 45~51 | 45~49 | 45~51 |
| M | 45 | 54 | 58 | 54~58 | 51~55 | 54~58 | |||
| H | 50 | 62 | 66 | 60~68 | 56~66 | 60~72 | |||
| Very soiled cotton and linen | STRONG | 12~15 min. | L | 40 | 47 | 51 | 45~51 | 45~49 | 45~51 |
| M | 45 | 54 | 58 | 54~58 | 51~55 | 54~58 | |||
| H | 50 | 62 | 66 | 60~66 | 56~66 | 60~72. | |||
TABLE 4. GUIDE FOR WASHING (WITH SOAK)
** (A=WP-954S/9004S B=WP-951S/1021S/1221S C=WP-25145SD)
| Type of Fabric | Wash Selector | Wash Time | Water Level | Amount of Water (Ltr) | Amount of Detergent (gms) | ||||
| A** | B** | C** | A** | B** | C** | ||||
| Soiled | Soak-Gentle | 15+15 min. | S | - | - | 45 | - | - | 50~60 |
| Synthetics, Silk | L | 47 | 51 | 53 | 45~51 | 45~51 | 60~70 | ||
| M | 54 | 58 | 62 | 54~58 | 54~58 | 70~75 | |||
| H | 62 | 66 | 71 | 60~66 | 60~72 | 76~80 | |||
| Soiled | Soak-Normal | 20+15 min. | S | - | - | 45 | - | - | 50~60 |
| Cotton, Linen | L | 47 | 51 | 53 | 45~51 | 45~51 | 60~70 | ||
| M | 54 | 58 | 62 | 54~58 | 54~58 | 70~75 | |||
| H | 62 | 66 | 71 | 60~66 | 60~72 | 76~80. | |||
| Worst Condition | Soak-Strong | 25+15 min. | S | - | - | 45 | - | - | 50~60 |
| Very soiled cotton and linen | L | 47 | 51 | 53 | 45~51 | 45~51 | 60~70 | ||
| M | 54 | 58 | 62 | 54~58 | 54~58 | 70~75 | |||
| H | 62 | 66 | 71 | 60~66 | 60~72 | 76~80 . | |||
Notes :
- Amount of laundry is a weight of dry laundry.
- Detergent is a general synthetic detergent.

CAUTION : Fill in wash to height 20mm above the level you desire. When washing will start water level will automatically come to level you desire.
CARE AND MAINTENANCE
- Be sure to disconnect the power cord from the electric outlet before starting care and maintenance.
Washing machine
■ If the washing machine itself becomes dirty
- The washing machine can be cleaned with a mild liquid detergent. Never use abrasive cleaner or chemicals such as benzene or thinner to clean the washing machine, because these materials will damage both the painted surfaces and the plastic parts.
Pulsator
If a button or some other object gets caught in the pulsator.
- Take out the pulsator cap with “-” type driver. (Fig. a)
- Use a screwdriver to loosen the screw in the center of the pulsator and lift the pulsator straight up in order to remove the button or other object. (Fig.b)
- Replace the pulsator and tighten the screw.
- Replace the pulsator cap.

natural_image
Diagram of a hand holding a circular object with internal blades and a central shaft, labeled 'Fig. a' (no text or symbols on the diagram itself)
natural_image
Diagram of a hand operating a rotating mechanical component, labeled Fig. b (no text or symbols on the diagram itself)Overflow filter & Rotation filter-C
| 1 | 2 | 3 |
| ● Lift up the area of the overflow filter. ● Take out the rotation filter-C by pulling in direction shown. | ● Pull the overflow filter forward from the wash tub in the direction of the arrow. | ● Turn the net over and rinse in water |
| 4 | 5 | 6 |
| ● Use a brush or your hand to remove all of the lints which has adhered to the overflow filter. | ● Insert the overflow filter back into the wash tub. | ● Insert the rotation filter-C back into the overflow filter. |


* For WP-25145SD
- If only rotation filter-C need washing, proceed the process 1 > 3 > 6 on the upper figure.
CARE AND MAINTENANCE
Detergent Box
- Pull the detergent box follow the arrow direction in picture 1.
- Press at side of detergent box and rotate down follow the arrow direction in picture 2.
- Clean detergent box with water.
- Reverse method for assemble detergent box.

text_image
1 2 3Spin dryer basket
■ If clothing becomes trapped between the spin dryer basket and the spin tub.
1. Unscrew the screw at the left corner in the safety cover-1.
2. Take hold of the front of the safety cover-1
3. Pull the tub by the other hand.
4. Pull the safety cover-1 upward.
5. Remove the article of clothing.
6. Close the safety cover-1, pressing down on it so that it fits securely into the spin tub.
7. Tighten the screw at the left corner in the safety cover-1.

text_image
Safety cover -1 TubTROUBLESHOOTING GUIDE
Before requesting service
| Troubles | Checking points |
| Motor does not operate | Is the power cord firmly plugged in ?Is a household fuse blown ?Is the timer turned to a suitable point except "OFF"?Is the wash selector set to a suitable position except "OFF" ? (wash motor)Is the "START/PAUSE" button pressed ? |
| Spin dryer basket does not operate | Is there any cloth dropped between the basket and tub?Is the spin dryer cover closed? |
| Water does not enter washer | Is the water faucet hooked up?Is the water faucet frozen? |
| No draining | Is the drain hose laid down?Is the drain hose twisted?Is the threshold higher? |
WIRING DIAGRAM

flowchart
graph TD
    A["Door SW"] -->|BK| B["SPIN TIMER"]
    B --> C["WASH TIMER"]
    C --> D["T1"]
    D --> E["BUZZER"]
    E --> F["WH"]
    G["SPIN MOTOR"] --> H["BY"]
    I["WASH MOTOR"] --> J["BY"]
    K["BUZZER"] --> L["WH"]
    M["SPIN MOTOR"] --> N["BY"]
    O["BUZZER"] --> P["WH"]
    Q["SPIN MOTOR"] --> R["BY"]
    S["BUZZER"] --> T["WH"]
    U["SPIN MOTOR"] --> V["BY"]
    W["BUZZER"] --> X["WH"]
    Y["SPIN MOTOR"] --> Z["BY"]
    AA["BUZZER"] --> AB["WH"]
For P10051R1F/WP-9005/820/952

flowchart
graph TD
    A["Door"] -->|BK| B["SPIN TIMER"]
    B -->|T1| C["WASH TIMER"]
    C -->|TL| D["Buzzer"]
    D -->|WL| E["BUZZER"]
    E -->|YL| F["RD"]
    F -->|RD| G["WASH MOTOR"]
    G -->|WH| H["WN"]
    H --> I["GN(GN/YL)"]
    I --> J["WH(RD)(BR)"]
    J --> K["SPIN MOTOR"]
    K --> L["BY/BL"]
    L --> M["DOOR/SW"]
    M --> N["BY"]
    N --> O["SPIN"]
    O --> P["BY/BL"]
    P --> Q["SPIN MOTOR"]
    Q --> R["BY/BL"]
    R --> S["SPIN MOTOR"]
    S --> T["BY/BL"]
    T --> U["SPIN MOTOR"]
    U --> V["BY/BL"]
    V --> W["SPIN MOTOR"]
    W --> X["BY/BL"]
    X --> Y["SPIN MOTOR"]
    Y --> Z["BY/BL"]
For WP-9003/9004S/930/953
WP-954S/951S/1020/1021S/1220/1221S
WP-9005N/25145SD/10005N
SPECIFICATIONS
P10051R1F
| Power Source | On Specification Label |
| Water level | High : 60 / |
| Water Pressure | Less than 1,00kPa (1kgf/cm2) |
| Dimensions | 795 x 470 x 975 mm (W x D x H) |
| Weight (net) | 24.0 kg |
WP-9005/953/9003/820/930/952/954S/9004S
| Power Source | On Specification Label |
| Water level | High : 62 / |
| Water Pressure | Less than 100kPa ( 1kgf/cm^2 ) |
| Dimensions | 810 x 479 x 954 mm (W x D x H) |
| Weight (net) | 29.5 kg |
WP-951S/1020/1021S/1220*/1221S*
| Power Source | On Specification Label |
| Water level | High : 66 l |
| Water Pressure | Less than 100kPa (1kgf/cm2) |
| Dimensions | 810 x 490 x 991 mm (W x D x H) |
| Weight (net) | 30.5 kg |
| *Dimensions | 810 x 490 x 1001 mm (W x D x H) |
| *Weight (net) | 31.0 kg |
WP-9005N/10005N
| Power Source | On Specification Label |
| Water level | High : 50 / |
| Water Pressure | Less than 100kPa (1kgf/cm2) |
| Dimensions | 775 x 467 x 964 mm (W x D x H) |
| Weight (net) | 27.5 kg |
WP-25145SD
| Power Source | On Specification Label |
| Water level | High : 71 / |
| Water Pressure | Less than 100kPa (1kgf/cm2) |
| Dimension | 850 x 530 x 1017 mm (W x D x H) |
| Weight (net) | 34.0 kg |
natural_image
Illustration of three-step cleaning or repair procedure: hand holding a tool, hand adjusting a component, and hand holding a tool (no text or symbols)text_image
User User User User User User User User User User User User User User User User User User User User User User User User User User User User User User User User User User User User User User User User User User User User User User User User User User User
natural_image
Cartoon illustration of a washing machine with food being brushed out (no text or symbols)natural_image
Hand holding a computer monitor with visible screen and scroll (no text or symbols)

natural_image
Hand holding a handheld device with a spring-like symbol above it (no text or symbols present)
natural_image
Simple line drawing of a hand pouring liquid from a container into a tank (no text or symbols)


natural_image
Simple line drawing of a mechanical assembly or tool with no visible text, numbers, or symbols.


* WP-25145SD
natural_image
Simple line drawing of a washing machine with hands washing dishes and a smiling face (no text or symbols)natural_image
Line drawing of a mechanical device with a hand holding a component, no text or symbols presenttext_image
Illustration showing clothing items being processed with a smartphone displaying a blank image containing placeholder symbolsnatural_image
Illustration of a classic telephone with cord and keypad, connected to a power outlet (no text or symbols)natural_image
Cartoon illustration of a smiling book character and a plug, no text or symbols presentnatural_image
Simple line drawing of a box with arrows indicating motion or force, no text or symbols presentnatural_image
Illustration of a hand holding a tool interacting with a pipe fitting (no text or symbols present)natural_image
Pure technical line drawing of a mechanical or electrical component with no text, numbers, or symbolsملاحظات:
natural_image
Simple line drawing of a container with liquid and a pipe, no text or symbols present
natural_image
Diagram of a laboratory setup with a beaker, tubing, and liquid container (no text or labels)
natural_image
Illustration of a child opening a refrigerator with a hose, next to an empty refrigerator (no text or symbols)التعريف بالأجزاء

text_image
4 5 7 1 2 6 Line Timer Push Program Line Timer Onset Substrate Onset Substrate LG 3WP-951S
WP-1020
WP-1021S

text_image
4 5 1 2 Wash Timer Wash Program Wash Substrate 3 6 Drain Substrate Spin Timer LGWP-1220
WP-1221S
WP-9005N
WP-10005N

text_image
④ ⑤ ② ⑥ ⑦ 3 Water Selector Wash Washer Drain ① Ld ③ ④ Crests Normal Strong Wash Water Water SupportWP-25145SD
