KX-TG8062FR - Cordless phone Black Box - Free user manual and instructions
Find the device manual for free KX-TG8062FR Black Box in PDF.

User questions about KX-TG8062FR Black Box
0 question about this device. Answer the ones you know or ask your own.
Ask a new question about this device
Download the instructions for your Cordless phone in PDF format for free! Find your manual KX-TG8062FR - Black Box and take your electronic device back in hand. On this page are published all the documents necessary for the use of your device. KX-TG8062FR by Black Box.
USER MANUAL KX-TG8062FR Black Box
2.1 Introduction....4
2.2 Features ....4
2.3 What's Included....4
2.4 System Requirements .... 4
2.5 Hardware Description....5
2.5.1 Front Panel 5
2.5.2 Back Panel 6
- INSTALLATION 7
3.1 Console Connection....7
3.2 Computer Connection ....7
3.3 Connection Pattern....7
4. HOTKEYS 8
4.1 Hotkey Control 8
4.2 Alternative Hotkey Commands 9
APPENDIX A: REGULATORY INFORMATION .... 10
A.1 FCC 11
A.2 NOM....12
A.3 CE....12
A.4 VCCI 12
A.5 RoHS 12
APPENDIX B: DISCLAIMER/TRADEMARKS 13
B.1 Disclaimer....13
B.2 Trademarks Used in this Manual....13
CHAPTER 1: SPECIFICATIONS
NEED HELP?
LEAVE THE TECH TO US
LIVE 24/7
TECHNICAL
SUPPORT
1.87 7.877.2269
TABLE 1-1. SPECIFICATIONS
| SPECIFICATION DESCRIPTION | |
| Approvals FCC, CE, VCCI, RoHS | |
| Video Resolution (Maximum) 3840 x 2160 @ 60 Hz (4:4:4) | |
| Connectors | Computer Interface (Video and USB input): (2) USB Type C;Console Interface:USB 3.0 Port: (1) USB Type A (front), (1) USB Type A (rear);USB HID Port: (1) USB Type A (front), (3) USB Type A (rear);Video Output: (1) DisplayPort |
| Indicators | (4) LEDs:(2) Computer Ready LEDs (green);(2) Computer Selected LEDs (red) |
| User Controls | (1) Pushbutton (for selection);(1) Mode Switch:4K @ 60 Hz + U2 (picture oriented);4K @ 60 Hz (4:2:0) +U3 or 4K @ 30 Hz (4:4:4) + U3 (USB speed oriented);Keyboard Hotkeys |
| Automatic Scan Interval 3, 8, 15, 30 seconds | |
| Power Supply 9 to 12 VDC | |
| Dimensions 1.6" H x 8.7" W x 5.2" D (4 x 22 x 13 cm) | |
| Weight | 1.35 lb. (0.615 kg) |
NOTE: Switch between 3G and 6G modes ONLY when power is NOT connected.
2.1 INTRODUCTION
The 4K 2-Port KVM Switch with USB-C, DisplayPort allows two USB-C enabled computers to share multiple USB peripherals (four HID devices plus two USB 3.0 devices).
2.2 FEATURES
- Allows two Type-C (DP Alt Mode) Devices to share USB Console and Peripherals ([4] HID devices + [2] USB 3.0 devices)
◆ Supports maximum resolution of 3840 x 2160 @ 60 Hz (4:4:4)
- Enables Keyboard and mouse plug and play without drivers
- Has front-panel buttons/hotkey for easy computer selection and auto-scan function
- Offers selectable scan time function
◆ Supports Windows and Mac with no software required
Select between 4K 6 G + USB 2.0 (picture oriented) and 4K 3G + USB 3.0 (USB oriented)
- Features front USB/USB HID design for easy access of USB devices
2.3 WHAT'S INCLUDED
(1) KVM Switch
◆ (1) power adapter with necessary AC cord or (1) plug-in power adapter
(1) set of foot pads
2.4 SYSTEM REQUIREMENTS
Console side:
(1) DisplayPort monitor
(1) USB Keyboard
(1) USB mouse
Computer side:
(1) USB-enabled computer
(1) USB Type-C cable
2.5 HARDWARE DESCRIPTION
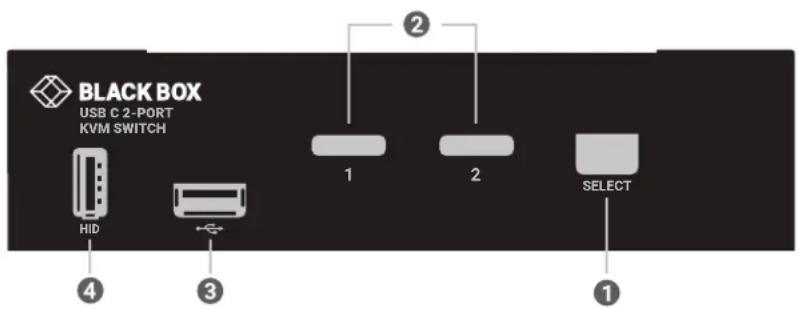
Figures 2-1 and 2-2 show the front and back panels of the 4K 2-Port KVM Switch with USB-C, DisplayPort. Tables 2-1 and 2-2 describe their components.
2.5.1 FRONT PANEL
text_image
BLACK BOX USB C 2-PORT KVM SWITCH 1 2 SELECT 3 4FIGURE 2-1. FRONT PANEL OF THE KVMC4K-2P
TABLE 2-1. FRONT-PANEL COMPONENTS
| NUMBER IN FIGURE 2-1 COMPONENT DESCRIPTION | ||
| 1 | Port Selection button | Press the button to select a computer |
| 2 Port Status LEDs | Green: Computer connected (Power On);Red: Computer selected (Power On) | |
| 3 USB 3.0 port Links to USB 3.0 device | ||
| 4 USB HID port Links to USB HID device (keyboard, mouse, etc.) | ||
2.5.2 BACK PANEL

text_image
DC 9-12V + - CONSOLE HD DP OUT PC 2 PC 1 40KΩ (10.4Ω) +0.5 30Ω (4.7Ω) +0.5 40Ω (6.7Ω) +0.5 ① ② ③ ④ ⑤ ⑥FIGURE 2-2. BACK PANEL OF THE KVMC4K-2P
TABLE 2-2. BACK-PANEL COMPONENTS
| NUMBER IN FIGURE 2-2 COMPONENT DESCRIPTION | ||
| 1 Console Video port Connects to DisplayPort monitor | ||
| 2 USB Type C port Connect to PC's Type C port | ||
| 3 | Power supply | Apply appropriate 12 VDC power to KVM switch |
| 4 USB HID port | Links to USB HID device (keyboard, mouse, etc.) | |
| 5 USB 3.0 port Links to USB 3.0 device | ||
| 6 | Mode Select switch | Switch between 3G + USB 3.0 and 6G + USB 2.0 |
NOTE: Switch between 3G and 6G modes ONLY when power is NOT connected.
CHAPTER 3: INSTALLATION
NEED HELP?
LEAVE THE TECH TO US
LIVE 24/7
TECHNICAL
SUPPORT
1.87 7.877.2269
Before installation, power off all devices that will be connected to this system.
Make sure that all devices you will connect are properly grounded.
- Place cables away from fluorescent lights, air conditioners, and machines that are likely to generate electrical noise.
3.1 CONSOLE CONNECTION
- Plug the monitor(s) into the Console Video port; plug a USB keyboard and USB mouse into the corresponding USB HID ports on the Console.
3.2 COMPUTER CONNECTION
- Use Type-C cable(s) to connect the computer and the unit's PC side.
- Plug the power adapter from an appropriate DC power source to the switch power port.
3.3 CONNECTION PATTERN
Figure 3-1 shows a typical installation of the 4K 2-Port KVM Switch with USB-C, DisplayPort.
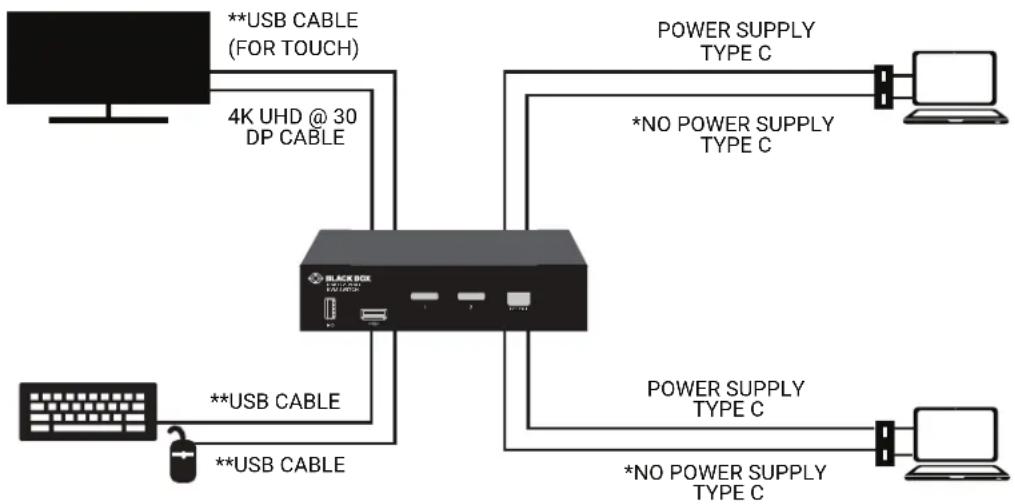
flowchart
graph TD
    A["Computer"] -->|**USB CABLE (FOR TOUCH)| B["Black Box"]
    B -->|4K UHD @ 30 DP CABLE| A
    B -->|**USB CABLE| C["User"]
    B -->|**USB CABLE| D["User"]
    B -->|POWER SUPPLY TYPE C| E["Laptop"]
    B -->|*NO POWER SUPPLY TYPE C| F["Laptop"]
    B -->|POWER SUPPLY TYPE C| G["User"]
    B -->|*NO POWER SUPPLY TYPE C| H["User"]
*KVM'S TYPE C CONNECTOR DOES NOT SUPPLY POWER.
POWER SUPPLY IS REQUIRED FOR MAC PRO.
**REQUIRES 10 GB USB C CABLES
FIGURE 3-1. TYPICAL INSTALLATION
4.1 HOTKEY CONTROL
TABLE 4-1. HOTKEY CONTROL
| KEY SEQUENCE FUNCTION | |
| "Ctrl" + "Ctrl" + "1-2" Selects the computer at port 1 - 2 | |
| "Ctrl" + "Ctrl" + "F1" Start Auto Scan | |
| "Ctrl" + "Ctrl" + "F2" | Start Manual Scan: Allows users to manually switch back and forth between powered-on computers. Press the up-arrow or down-arrow key to select the previous or the next computer. |
| "Ctrl" + "Ctrl" + "F3" | Adjust Scan Rate: The KVM switch generates 1 to 4 beeps indicating duration of scan time for 3, 8, 15 and 30 seconds respectively. |
| "Ctrl" + "Ctrl" + "F7" Turn ON/OFF the USB-Port Rule (USB device follows selected computer or not) | |

NOTE: Do not use the keypad on the right of the keyboard.
4.2 ALTERNATIVE HOTKEY COMMANDS
In addition to the Left Ctrl + Left Ctrl hotkeys, there are two alternative hotkey sequences available.
- For the following operations, users may press Scroll Lock twice instead of pressing Left Ctrl twice.
- To select a computer:
Press "Scroll Lock" + Press "Scroll Lock" + Press "1"
(Example: Select the computer at port 1.)
Press "Scroll Lock" + Press "Scroll Lock" + Press "2"
(Example: Select the computer at port 2.)
- For those keyboards do not have or support Scroll Lock, press and HOLD the Left Shift and press Num Lock twice instead of pressing Left Ctrl twice.
- To select a computer:
Hold Left "Shift" + Press "Num Lock" + Press "Num Lock" then release shift + Press "1"
(Example: Select the computer at port 1.)
Hold Left "Shift" + Press "Num Lock" + Press "Num Lock" then release shift + Press "2"
(Example: Select the computer at port 2.)
NOTE: Do not use the keypad on the right of the keyboard.
APPENDIX A: REGULATORY INFORMATION
NEED HELP?
LEAVE THE TECH TO US
LIVE 24/7
TECHNICAL
SUPPORT
1.87 7.877.2269
A.1 USA FEDERAL COMMUNICATIONS COMMISSION STATEMENT
This equipment has been tested and found to comply with the limits for a Class A digital device, pursuant to Part 15 of the FCC rules. These limits are designated to provide reasonable protection against harmful interference when the equipment is operated in a commercial environment. This equipment generates, uses, and can radiate radio frequency energy. If it is not installed and used in accordance to the instructions, it may cause harmful interference to radio communications. Operation of this equipment in a residential area is likely to cause harmful interference, in which case users will be required to take whatever measures necessary to correct the interference at their own expense.
Properly shielded and grounded cables and connectors must be used in order to meet FCC emission limits. Dell Networking is not responsible for any radio or television interference caused by using other than recommended cables and connectors or by unauthorized changes or modifications in the equipment. Unauthorized changes or modification could void the user's authority to operate the equipment.
This device complies with Part 15 of the FCC Rules. Operation is subject to the following two conditions: (1) this device may not cause harmful interference, and (2) this device must accept any interference received, including interference that may cause undesired operation.
APPENDIX A: REGULATORY INFORMATION
A.2 NOM STATEMENT
This is a Class A product. In a domestic environment this product may cause radio interference, in which case the user may be required to take corrective actions.
A.5 ROHS

You must recycle or discard this product according to applicable local and national regulations. Black Box encourages owners of information technology (IT) equipment to responsibly recycle their equipment when it is no longer needed.
Waste Electrical and Electronic Equipment (WEEE) Directive for Recovery, Recycle and Reuse of IT and Telecommunications Products
This product is labeled in accordance with European Directive 2002/96/EC concerning waste electrical and electronic equipment (WEEE). The Directive determines the framework for the return and recycling of used appliances as applicable throughout the European Union. This product is not to be thrown away, but rather reclaimed upon end of life per this Directive.
APPENDIX B: DISCLAIMER/TRADEMARKS
NEED HELP?
LEAVE THE TECH TO US
LIVE 24/7
TECHNICAL
SUPPORT
1.87 7.877.2269
B.1 DISCLAIMER
Black Box Corporation shall not be liable for damages of any kind, including, but not limited to, punitive, consequential or cost of cover damages, resulting from any errors in the product information or specifications set forth in this document and Black Box Corporation may revise this document at any time without notice.
B.2 TRADEMARKS USED IN THIS MANUAL
Black Box and the Black Box logo type and mark are registered trademarks of Black Box Corporation.
Any other trademarks mentioned in this manual are acknowledged to be the property of the trademark owners.
NOTES
NEED HELP?
LEAVE THE TECH TO US
LIVE 24/7
TECHNICAL
SUPPORT
1.87 7.877.2269
NOTES
NEED HELP?
LEAVE THE TECH TO US
LIVE 24/7
TECHNICAL
SUPPORT
1.87 7.877.2269
NEED HELP?
LEAVE THE TECH TO US
LIVE 24/7
TECHNICAL
SUPPORT
1.87 7.87 7.2269