
SA-505Z - Computing Posiflex - Free user manual and instructions
Find the device manual for free SA-505Z Posiflex in PDF.


| Product Type | 3-in-1 Magnetic Stripe Reader with optional RFID and iButton |
| Brand | Posiflex |
| Model | SA-505Z |
| Compatibility | Posiflex 15" and 17" XT series terminals |
| Interface | USB (HID, Virtual COM, or KB wedge) |
| Card Support | ISO 7811 magnetic cards, 3-track bi-directional swipe |
| Optional Modules | RFID (MIFARE) and iButton reader |
| Installation | Side mount; requires removing side covers and connecting USB cable internally |
| Power Supply | Powered via USB from connected terminal |
| Package Contents | SA-505 unit, 2 fixing screws, user manual, peripheral information CD, RFID tag or card, 2 iButton keys (if applicable) |
| Driver Installation | Via pre-loaded OS or included CD; Posiflex USB MSR Manager, Virtual COM driver, RFID/iButton setup tools |
| Operating System | Windows (pre-loaded on Posiflex XT terminals) |
| Dimensions | Approximately 120mm x 50mm x 30mm (estimated based on side mount design) |
| Weight | Approximately 150g (estimated) |
| Cleaning | Wipe with a dry, soft cloth. Do not use liquids or abrasives. |
| Safety | Do not install or remove while terminal is powered on. Read manual before use. |
| Spare Parts | Contact Posiflex support for replacement screws or cables. |
| Repairability | No user-serviceable parts inside; refer to qualified service personnel. |
| General Information | Specifications subject to change without notice. Detailed info at posiflex.com. |
Frequently Asked Questions - SA-505Z Posiflex
User questions about SA-505Z Posiflex
0 question about this device. Answer the ones you know or ask your own.
Ask a new question about this device
Download the instructions for your Computing in PDF format for free! Find your manual SA-505Z - Posiflex and take your electronic device back in hand. On this page are published all the documents necessary for the use of your device. SA-505Z by Posiflex.
USER MANUAL SA-505Z Posiflex
natural_image
Close-up of a black plastic hinge component mounted on a white surface (no text or symbols visible)Package Contents
√ SA-505 Magnetic Stripe Reader
√ 2 Fixing Screws
√ User Manual
√ Peripheral Information CD
√ RFID MiFare Ring Tag
or RFID Mifare Card Tag
(if the RFID reader is built in)
√ 2 iButton Keys
(if the iButton reader is built in)
Features
3-in-1 (MSR + iButton Reader + RFID) side attachment for Posiflex 15"/17" XT series terminals
Bi-directional swipe
3-track support
Supporting ISO 7811 magnetic card
➢ Options: RFID module (HID or VCOM) and iButton reader
Interface: USB
Views of the Magnetic Stripe Reader
Front View
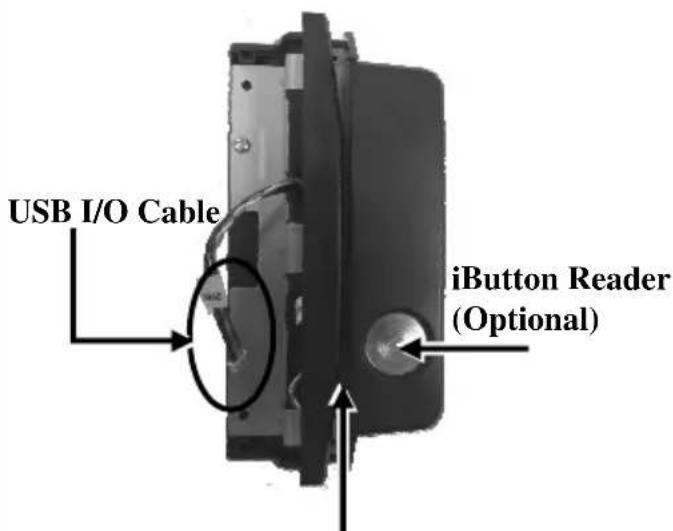
3-track Magnetic Stripe Reader
18640900010 Ver. Original
http://www.posiflex.com
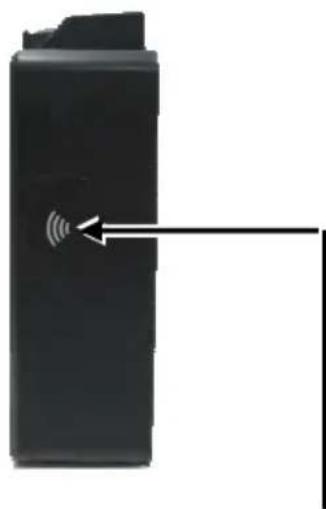
natural_image
Black rectangular device with a white signal icon and an arrow pointing to it, no text or symbols present.RFID Mifare Card Reader (Optional)
Hardware Installation
During Installation of the SA-505, do NOT power ON your terminal and monitor.
Installation of SA-505 onto the 15"/17" XT Series Terminals
Start to install SA-505 onto the terminal according to the following steps.
-
Loosen and remove the two fixing screws from the side mount cover on the back of the right side of the terminal.
-
Remove the side mount cover A from the back of the right side of the terminal.
-
Remove the side mount cover B from the terminal.
-
Insert the USB IO cable of the SA-505 into the cable connector of the main board.

natural_image
Close-up of a computer mouse with two circular buttons on the keyboard (no visible text or symbols)


natural_image
Close-up of a hand holding a tool with a magnified inset showing a mechanical component (no visible text or symbols)-
Determine that the USB IO cable is securely connected to the cable connector of the main board.
-
Put the large side mount cover back in place.
-
Move the USB IO cable to the middle, as shown in the right figure.
-
Align the two screw holes of the SA-505 MSR cover with the two screw holes on the terminal.
-
Fix the SA-505 MSR onto the terminal by locking the two long screws shipped with the package.
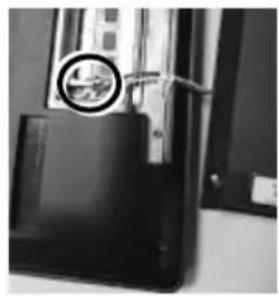
natural_image
Close-up of a black electronic device with a circular logo and cable, no visible text or symbols
natural_image
Close-up of a hand holding a black electronic device with visible internal components (no text or symbols)
natural_image
Close-up of a hand holding a circular mechanical component (no visible text or symbols)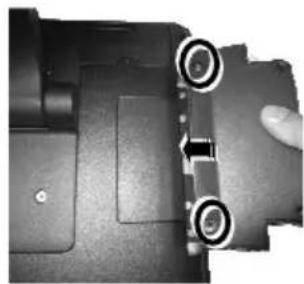
natural_image
Close-up of a mechanical component with two circular features and a central arrow (no visible text or symbols)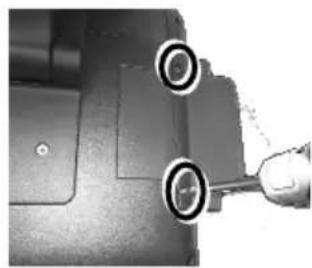
natural_image
Close-up of a mechanical component with two circular features and a hand holding a tool (no visible text or symbols)- The installation of SA-505 onto the terminal is completed, as shown in the right figure.

natural_image
Close-up of a black metal latch or clip attached to a white surface, no visible text or symbolsDriver Installation and Utility Outline
Before installing the drivers of the SA-505, after installing the SA-505, power on your XT-series terminal. If your terminal is a Posiflex XT series terminal of which the OS is pre-loaded, you can find the drivers and utilities for SA-505 from the “Drivers” folder in the Local Disk (C:) and then double click the executing file to install or directly open or insert the Peripheral Information CD, shipped with the SA-505 package, into your CD-ROM for driver and utility installation.
Installing the Posiflex USB MSR Manager
- Insert the Peripheral Information CD and you will see the menu as shown in the right figure, and left click "Peripheral Drivers & Utilities".
-
Left click "SD/SA Series" at the left side of the menu.
-
Left click the Setup logo at the row of USB MSR Manager to install the USB MSR manager.
Posiflex Peripheral Drivers & Manuals v1.3


- Then, follow the step-by-step instructive messages to complete the manager installation.
-
After completion of the manager installation, restart your terminal.
-
Left click Start → Programs → Posiflex Tools → Posiflex USB MSR Manager to open the MSR manager.

※ If you purchase the MSR model of which the interface is KB wedge, ignore the following steps.
- Then, the Posiflex USB MSR Manager appears . If you purchase the MSR model of which the interface is virtual COM, tick off on virtual COM port interface and tap Save & Exit to exit from the manager.

- Left click the Setup logo at the row of USB MSR Virtual COM Driver on the information CD to install the virtual COM driver.

-
Then, follow the step-by-step instructive messages to complete the driver installation.
-
After completion of the driver installation, restart your terminal.
Installing the RFID Setup Tool (for Optional RFID Model Only)
- If you purchase the RFID model of which the interface is Virtual COM, install the RF-3X0 Virtual COM Driver before installing the RF-3X0 Setup Tools. Left click the Setup logo at the row of RF-3X0 Virtual COM Driver on the information CD to install the driver.

※ If you purchase the RFID model of which the interface is KB wedge, ignore this step and just go to step 3 for the RF-3X0 Setup Tool installation.
2. Then, follow the step-by-step instructive messages to complete the virtual COM driver installation.
3. Left click the Setup logo at the row of RF-3X0 Setup Tools on the information CD to install the RFID Setup Tools.

- Then, follow the step-by-step instructive messages to complete the tool installation.
- After completion of the tool installation, restart your terminal.
- Left click the RFID Setup Tools icon and then the tool appears.
Installing the iButton Setup Tool (for Optional iButton Model Only)
- If you purchase the iButton model of which the interface is Virtual COM, install the I-Button Virtual COM Driver before installing the iButton Setup Tool. Left click the Setup logo at the row of I-Button Virtual COM Driver on the information CD to install the driver.

※ If you purchase the iButton model of which the interface is KB wedge, ignore this step and just go to step 3 for the iButton Setup Tool installation.
-
Then, follow the step-by-step instructive messages to complete the virtual COM driver installation.
-
Left click the Setup logo at the row of I-Button Setup Tools on the information CD to install the I-Button Setup Tools.

-
Then, follow the step-by-step instructive messages to complete the tool installation.
-
After completion of the tool installation, restart your terminal.
-
Left click the I-Button Setup Tools icon and then the tool appears.
Operating the SA-505
After installing the drivers and tools, you can start to operate the SA-505.
Magnetic Stripe Reader (MSR)
-
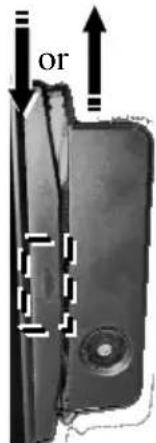
Keep the magnetic stripe of the card facing the arrow head circled in the picture.
-
Move the magnetic stripe card along the track of the reader from top to bottom or from bottom to top in the direction of the arrow.
RFID Reader (Optional)

natural_image
Diagram showing a smartwatch connected to a device with sensor icons, no text or symbols presentSet the Mifare ring tag or card against the proximity area for making the RFID reader to read the tag or card.
iButton Reader (Optional)
- Aim a magnetic iButton key at the reading area of magnetic iButton reader and keep the key close to the reader until the magnetic iButton key is absorbed by the magnetic iButton reader.
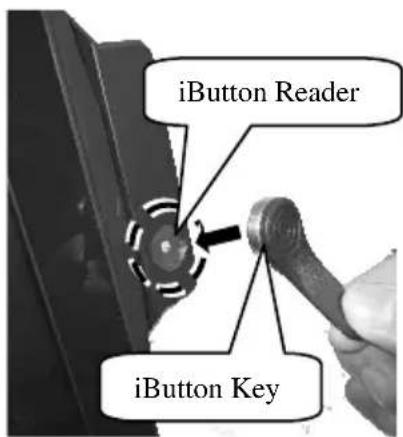
- When the magnetic iButton key is completely absorbed by the magnetic iButton reader, the iButton reader can read the ID data written in the iButton key and sends the ID data to its connected XT-series POS terminal.

natural_image
Close-up of a black metal bracket with a circular clip and mounting hole (no text or symbols visible)※The product information and specifications are subject to change without prior notice. To get the detailed information on SA-505, please check this model from Posiflex Global Website (http://www.posiflex.com/en-global/Download/download).

- Package Contents
- Features
- Views of the Magnetic Stripe Reader
- Hardware Installation
- Installation of SA-505 onto the 15"/17" XT Series Terminals
- Driver Installation and Utility Outline
- Installing the Posiflex USB MSR Manager
- Installing the RFID Setup Tool (for Optional RFID Model Only)
- Installing the iButton Setup Tool (for Optional iButton Model Only)
- Operating the SA-505
- Magnetic Stripe Reader (MSR)
- RFID Reader (Optional)
- iButton Reader (Optional)
Brand : Posiflex
Model : SA-505Z
Category : Computing