KC74WH - Fridge CDA - Free user manual and instructions
Find the device manual for free KC74WH CDA in PDF.

User questions about KC74WH CDA
0 question about this device. Answer the ones you know or ask your own.
Ask a new question about this device
Download the instructions for your Fridge in PDF format for free! Find your manual KC74WH - CDA and take your electronic device back in hand. On this page are published all the documents necessary for the use of your device. KC74WH by CDA.
USER MANUAL KC74WH CDA
Offer up the sink to the worktop and/or the cabinets to confirm that the external dimensions of the bowl are compatible with the cabinets themselves.
Confirm that with the sink in position:
- There is adequate space to install any taps or other required accessories.
- There is adequate space to install the waste pipework and that any necessary modification to internal shelves to accommodate the waste (and trap) is acceptable.
- Access to any water stop-cock or other services will still be adequate after the installation.
Cutting the tap hole
Only cut/punch the tap hole from the top face of the sink.
- Select the tap hole position based on whether left hand or right hand drainer is required.
- Locate the centre of the required tap hole by transferring measurements from the cast in features on the underside. Cover the top of the tap hole cut-out area with masking tape.
- Caution: Ensure that the sink is supported under the hole to be cut out.
- Using a centre punch and hammer, make an initial cut in the glaze at the centre of the required hole.
- Still using the punch and hammer enlarge the cut to the full hole size required for the tap by carefully chipping away.
Installation
- Refer to the cut-out sizes on the back of this manual and use them to mark out where the worktop needs to be cut. Double-check the dimensions before cutting the worktop aperture.
- After cutting out the worktop aperture, we recommend you seal the cut edges with silicone (or similar) sealant to help prevent ingress of water.
- It is often easier to mount the taps, waste-fitting and overflow onto the sink prior to fitting the sink to the worktop.
- Position the sink on the worktop, bedding it into a bed of silicone sealant.
• After positioning the sink, leave it untouched for 24 hours to allow the sealant to cure before any water is run into it. - The taps, waste-fitting and overflow can now be mounted onto the sink (if not already done) and fully connected to their respective services.
- To check the waste for leaks, close the plug/basket of the waste fitting, open the tap and fill the sink to the level of the overflow; turn off the tap and wait several minutes to verify that the water doesn’t drain away.
- Empty the sink.
After fitting, ensure that the enclosed “Ceramic Sinks Use and Maintenance” guide is retained for the customer and/or user of the sink.
E & O E. All instructions, dimensions and illustrations are provided for guidance only. CDA reserve the right to change specifications without prior notice.
Cut-Out Dimensions

text_image
1010 970 510 480 KC23 & KC24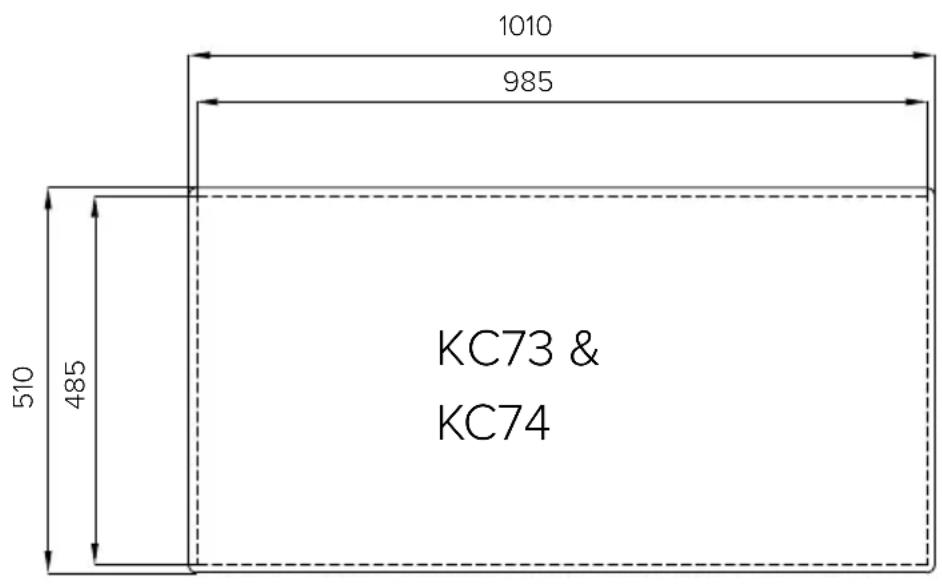
text_image
1010 985 510 485 KC73 & KC74For queries relating to your product please contact:
The Customer Care Department on 01949 862 012 or email customer.care@cda.eu
For more information please contact:
The Sales Department on 01949 862 010 or email sales@cda.eu
Customer Care Department. The CDA Group Ltd, Harby Road, Langar, Nottinghamshire, NG13 9HY T: 01949 862 012 F: 01949 862 003 E: customer.care@cda.eu