DWF EON VES 12U NF STSL - Dishwasher Godrej - Free user manual and instructions
Find the device manual for free DWF EON VES 12U NF STSL Godrej in PDF.

| Product Type | Built-in Dishwasher |
| Brand | Godrej |
| Model | DWF EON VES 12U NF STSL |
| Place Settings | 12 |
| Energy Class | A++ |
| Annual Energy Consumption | 266 kWh |
| Water Consumption per Cycle | 9.5 L |
| Noise Level | 44 dB(A) |
| Dimensions (H x W x D) | 85 x 60 x 60 cm |
| Net Weight | 45 kg |
| Power Supply | 220-240 V, 50 Hz, 10 A |
| Number of Programs | 6 |
| Programs | Eco, Intensive, Normal, Quick, Glass, Pre-Rinse |
| Delay Start | 1-24 hours |
| Child Lock | Yes |
| Self-Cleaning Filter | Yes |
| Adjustable Rack | Upper rack height adjustable |
| Salt and Rinse Aid Indicator | Yes |
| Spare Parts Availability | Spray arms, filters, racks, drain hose, inlet hose |
| Repairability Index | 8.5 / 10 |
| Safety Features | Overflow protection, anti-flood system, door lock |
Frequently Asked Questions - DWF EON VES 12U NF STSL Godrej
User questions about DWF EON VES 12U NF STSL Godrej
0 question about this device. Answer the ones you know or ask your own.
Ask a new question about this device
Download the instructions for your Dishwasher in PDF format for free! Find your manual DWF EON VES 12U NF STSL - Godrej and take your electronic device back in hand. On this page are published all the documents necessary for the use of your device. DWF EON VES 12U NF STSL by Godrej.
USER MANUAL DWF EON VES 12U NF STSL Godrej
natural_image
Simple line drawing of a rectangular container with a horizontal bar at the top (no text or symbols)This image is for representation purpose only.
Congratulations!
You are now the proud owner of a new Godrej Eon Vesta Dishwasher Machine. You can look forward to years of smooth, trouble-free usage from your dishwasher, as well as considerable savings in time, money and effort. Please read this manual carefully as it will tell you how to operate your machine optimally in order to get the best results. If you need any further clarifications, do contact your nearest Godrej dealer or any of our service centres/offices. We would be glad to help you. We wish you an easier, more convenient life with your new Godrej Eon Vesta Dishwasher.
| Icon | Type | Meaning |
 | WARNING | Serious injury or death risk |
 | RISK OF ELECTRIC SHOCK | Dangerous voltage risk |
 | FIRE | Fire risk |
 | CAUTION | Injury or property damage risk |
 | IMPORTANT / NOTE | Operating the system correctly |
CONTENTS
1. SAFETY INSTRUCTIONS
1.1 General Safety Warnings
1.2 Installation Warnings
1.3 During Use
2. INSTALLATION
2.1 Machine Positioning
2.2 Water Connection
2.3 Water Inlet Hose
2.4 Drain Hose
2.5 Electrical Connection
2.6 Fitting the Machine Undercounter
3. TECHNICAL SPECIFICATIONS
3.1 General Appearance
3.2 Technical Specifications
4. BEFORE USING THE APPLIANCE
4.1 Preparing your Dishwasher for first use
4.2 Fill the Salt
4.3 Test Strip
4.4 Water Hardness Table
4.5 Water Softener System
4.6 Setting
4.7 Detergent Usage
4.8 Filling the Detergent
4.9 Using Combined Detergents
4.10 Rinse-aid Usage
4.11 Filling the Rinse-aid and Setting
5. LOADING YOUR DISHWASHER
5.1 Recommendations
5.2 Alternative Basket Loads
6. PROGRAMME TABLE
7. THE CONTROL PANEL
7.1 Changing a Programme
7.2 Cancelling a Programme
8. CLEANING AND MAINTENANCE
8.1 Cleaning the Machine and Filters
8.2 Spray Arms
9. TROUBLESHOOTING
- PRACTICAL INFORMATION
- PRODUCT SPECIFICATIONS
- BRANCH ADDRESS/SERVICE CONNECT
1. SAFETY INSTRUCTIONS
1.1 General Safety Warning
- Read these instructions carefully before using your appliance and keep this manual for future reference.
⚠️ Please check the packaging of your machine before installation and the outer surface of the machine once the packaging has been removed. Do not operate the machine if it appear damaged or if the packaging has been opened.
- Packaging materials protect your machine from any damage that might occur during transportation. The packaging materials are environment friendly as they are recyclable. Use of recycled material reduces raw material consumption and decreases waste production.
1.2 Installation Warning
- Choose a suitable and safe place to install your machine.
- Do not install the appliance in a damp and dusty place. Do not install or store the appliance in any outdoor area or any area that is subjected to weathering conditions such as direct sunlight, wind or rain or temperatures below freezing.
- Only original spare parts should be used with the machine.
⚠️ Unplug the machine before installation.
Your machine must only be installed by an authorised service agent. Installation by anyone other than an authorised agent may cause your warranty to be void.
Check that the indoor electrical fuse system is connected in line with safety regulations.
All electrical connections must match the values on the plate.
⚠️ Ensure the machine does not stand on the electrical supply cable.
- This appliance can be used by children aged from 8 years and above, and by persons with reduced physical, sensory or mental capabilities or lack of experience and knowledge if they have been given supervision or instruction concerning the use of the appliance in a safe way and understand hazards involved. Children should not be allowed to play with the appliance.
- Remove packaging and keep it out of reach of children.
⚠️ Keep children away from detergents and rinse aids.
There may be some residue left in the machine after washing. Keep children away from the machine when it is open.
⚠️ Never use an extension cord or a multiple socket connection.
⚠️ The plug should be accessible after the machine is installed.
- After installation, run your machine unloaded for the first time.
The machine must not be plugged in during positioning.
Always use the coated plug supplied with your machine.
⚠️ If the electrical cable is damaged, it should only be replaced by a qualified electrician.
1.3 During Usage
- This machine is for domestic use only; do not use it for other purposes. Commercial use will void the guarantee.
Do not stand, sit or place loads on the open door of the dishwasher.
⚠️ Only use detergents and rinse aids produced specifically for dishwashers.
Our company is not responsible for any damage that may occur due to misuse.
Do not drink water from the machine.
1.3 During Usage
Due to the danger of explosion, do not place any chemical dissolving agents into the machine's washing section.
- Check the heat-resistance of plastic items before washing them in the machine.
Only put items in the machine which are suitable for dishwashing, and take care not to overfill the baskets.
Do not open the door while the machine is in operation, hot water may spill out. Safety devices ensure the machine stops if the door is opened.
The machine door should not be left open. It may cause accidents.
Place knives and other sharp objects in the cutlery basket in a blade-down position.
⚠️For models with the automatic door-opening system, when the Energy Save option is active, the door will open at the end of a program. To prevent damage to your dishwasher, do not attempt to close the door for one minute after it has opened. For effective drying,
keep the door open for 30 minutes after a programme has ended.
Do not stand in front of the door after the auto-open signal sounds.
In the case of a malfunction, repair should only be performed by Godrej authorised service provider, otherwise the warranty will be void.
⚠️ Before repair work, the machine should be disconnected from the mains.
Do not pull the cable to unplug the machine. Switch off the water tap.
Operation at a low voltage will cause a decline in performance levels.
⚠ For safety, disconnect the plug once a program has finished.
To avoid an electric shock, do not unplug the machine with wet hands.
⚠️ Pull the plug to disconnect the machine from the mains, never pull on the cord.
RECYCLING
- Some machine components and packaging consist of recyclable materials.
- Plastics are marked with international abbreviations:(>PE<, >PP<, etc.)
- The cardboard parts consist of recycled paper. They can be put into waste paper containers for recycling.
- Material unsuitable for domestic waste must be disposed off at recycling centres.
- Contact a relevant recycling centre to obtain information about disposal of different materials.
PACKING AND THE ENVIRONMENT
Packaging materials protect your machine from damage that may occur during transportation. The packaging materials are environmentally friendly as they are recyclable. The use of recycled material reduces raw material consumption and therefore decreases waste production.
CE Declaration of Conformity
We declare that our products meet the applicable European Directives, Decisions and Regulations and the requirements listed in the standards referenced. Producer company has its right to amend design and technical specifications reserved.
Conformity with the standards and Test data / EC Declaration of Conformity
All stages related to the machine are executed in accordance with the safety rules provided in all relevant directives of the European Community.
2004/108/EC/, 2006/95/EC, IEC 436/DIN 44990, EN 50242.
2. INSTALLATION
2.1 Machine positioning
When positioning the machine, place it in an area where dishes can be easily loaded and unloaded. Do not put the machine in an area where the ambient temperature falls below 0^ C.
Read all warnings located on the packaging before removing the packaging and positioning the machine.
Place the machine close to a water tap and drain. Take into consideration that the connections will not be altered once the machine is in position.
Do not hold the machine by its door or panel. Leave an adequate distance around the machine to allow ease of movement when cleaning.
Ensure the water inlet and outlet hoses are not squeezed or trapped and that the machine does not stand on the electrical cable while positioning.
Adjust the feet so the machine is level and balanced. The machine should be placed on flat ground otherwise it will be unstable and the door of the machine will not close properly. Do not place the machine in open area where water splashing is prevalent.
2.2 Water connection
We recommend fitting a filter to your water inlet supply in order to prevent damage to your machine due to contamination (sand, rust, etc.) from indoor plumbing. This will also help prevent yellowish deposit formation after washing.
2.3 Water inlet hose

natural_image
Coiled white cable with two connectors, no visible text or symbols⚠ WARNING: Use the new water inlet hose supplied with your machine, do not use an old machine's hose.
⚠ WARNING: Run water through the new hose before connecting.
⚠ WARNING: Connect the hose directly to the water inlet tap. The pressure supplied by the tap should be a minimum of 0.03 MPa and a maximum of 1 MPa. If the pressure exceeds 1 MPa, a pressure relief valve must be fitted between the connection.
⚠ WARNING: After the connections are made, turn the tap on fully and check for water leaks. Always turn off the water inlet tap after a wash program has finished.
● How to Attach the "Magic" Hose Joint
-
Loosen the four screws and slide the top of the Magic" Hose Joint (Section A in the figure) onto the faucet. Then, securely tighten the four screws provided with the "Magic" Hose Joint using a screwdriver to secure the top of the joint to the faucet.
-
Remove the CAUTION label from the "Magic" Hose Joint.
-
Turn the male couple on the joint (section B in the figure) clockwise to attach it securely to the top of the joint (Section A in the figure)
- The appliance is to be connected to the water mains using new water supply Hose and “Magic” Hose Joint. Old hose sets should be reused.
CAUTION:
If outer diameter of faucet is larger than calbre of the Joint Ring, loosen the four screws and remove the Joint Ring from the "Magic" Hose Joint

text_image
Screw CAUTION label A B About 4mm After tightened (About 2mm or less) Joint RingConnecting the Water Supply Hose to the "Magic" Hose Joint
- While pushing the sleeve on the female coupler (section D in the figure) of the joint down with your fingers, connect the female coupler to the male coupler (section C in the figure).
- Release the sleeve, then push the Water Supply Hose up into the "Magic" Hose Joint until it clicks into place.
- Pull the Water Supply Hose down to make sure that it is securely attached.
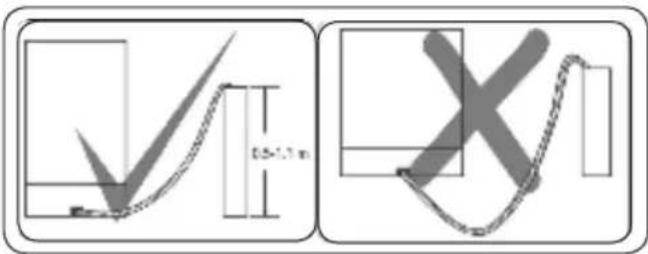
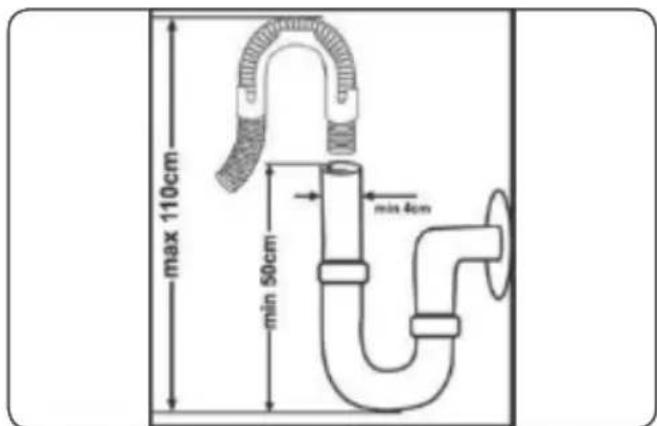
Connect water drain hose directly to water drain hole or to the sink outlet spigot. This connection should be minimum 50 cm and maximum 110 cm from floor plane.

IMPORTANT: Items will not wash properly if a drain hose longer than 4m is used.
text_image
0.5-1.7 m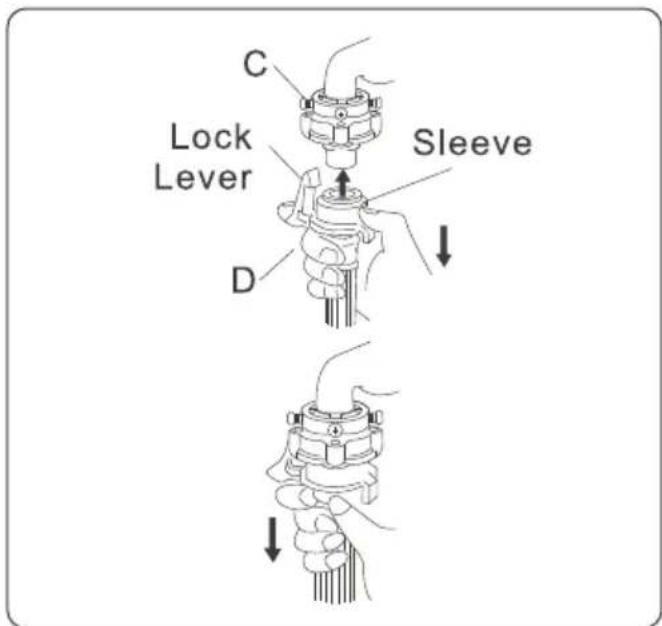
text_image
C Lock Lever D Sleeve⚠ An Aqua stop water spout is available with some models. Do not damage it or allow it to become bent or twisted.
2.4 Drain Hose
text_image
max 110cm min 50cm min 4cm2.5. Electrical connection
⚠ WARNING: Your machine is set to operate at 220-240 V.
The earthed plug of the machine must be connected to an earthed outlet supplied by suitable voltage and current.
In the absence of earthing installation, an authorised electrician should carry out an earthing installation. In the case of use without earthing installed, we will not be responsible for any loss of use that may occur.
The indoor fuse current value should be 10-16 A.
2.6. Fitting the machine undercounter
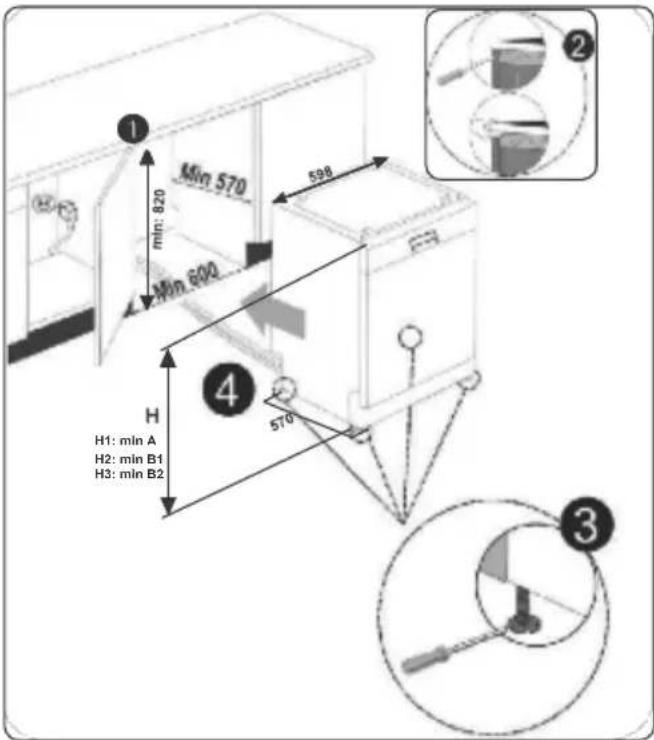
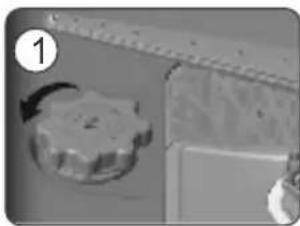
If you wish to fit your machine undercounter, there must be sufficient space to do so and the wiring-plumbing must be suitable to do so (1). If the space under the countertop is suitable for fitting your machine, remove the worktop as shown in the illustration (2).
⚠ WARNING: The countertop, of which the machine will be placed under, must be stable in order to prevent imbalance. The top panel of the dishwasher must be removed to fit the machine under the countertop.
To remove the top panel, remove the screws that hold it on, located at the rear of the machine. Then, push the panel 1 cm from the front towards the rear and lift it. Adjust the machine feet according to the slope of the floor (3).
Fit your machine by pushing it under the counter taking care not to crush or bend the hoses (4).
text_image
1 Min 570 min 820 Min 600 598 H 4 570 H1: min A H2: min B1 H3: min B2 ② ③| A | B | ||
| All Products | B_1 | B_2 | |
| Product's Height (±2 mm) | 820 mm | 835 mm830 mm | |
A: If there is no felt on the top of the product; you should take into account this product's height.
B1: If there is felt on the top of the product with 2nd basket; you should take into account this product's height.
B2: If there is felt on the top of the product with 3rd basket; you should take into account this product's height.
3. TECHNICAL SPECIFICATIONS

text_image
Technical diagram of a multi-level cleaning machine with numbered components for identification
natural_image
Close-up of a mechanical component with a numbered arrow pointing to a circular component (no text or symbols visible)3.1 General appearance
- Worktop
- Upper basket with racks
- Upper spray arm
- Lower basket
- Lower spray arm
- Filters
- Rating plate
-
Control panel
-
Detergent and rinse-aid dispenser
- Cutlery basket
- Salt dispenser
- Upper basket track latch
- Turbo Drying Unit: This system provides better drying performance for your dishes.
3.2 Technical Specifications
| Capacity | 12 place settings |
| Height | 850 mm |
| Height (Without worktop) | 820 mm |
| Width | 598 mm |
| Depth | 598 mm |
| Net Weight | 38 kg |
| Electricity input | 220-240 V, 50 Hz |
| Total power | 1900 W |
| Heating power | 1800 W |
| Pump power | 100 W |
| Drain pump power | 30 W |
| Water supply pressure | 0.03 MPa (0.3 bar) -1 MPa (10 bar) |
| Current | 10A |
4. BEFORE USING THE APPLIANCE
4.1 Preparing your Dishwasher for first use
- Check whether the electricity and supply water specifications match the values indicated in the installation instructions for the machine.
- Remove all packaging materials inside the machine.
- Set the water softener level.
- Fill the rinse aid compartment.
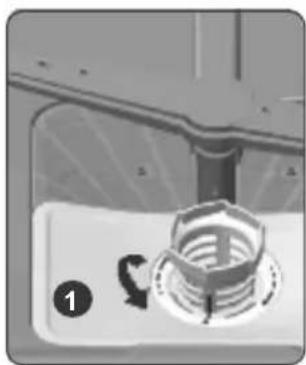
4.2 Fill the salt (IF AVAILABLE)
- To fill with softener salt, open the salt Use softener salt specifically produced for compartment cap by turning it counteruse in dishwashers.
clockwise.
• (1) (2) At first use, fill the compartment compartment is filled with water, therefore with 1 kg salt and water (3) until it is put the softener salt in prior to starting your almost overflowing. If available, using the machine.
funnel (4) provided will make filling easier. If the softener salt has overflowed and you do Replace the cap and close it. not start the machine immediately, run a
• After every 20th-30th wash, add salt into your machine until it fills up (approx. 1 kg).
natural_image
Close-up of a mechanical component with a star-shaped knob and a ruler, no visible text or symbols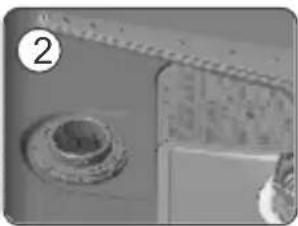
natural_image
Close-up of a mechanical component with a circular base and textured surface (no visible text or symbols)
natural_image
Close-up of a mechanical component with a circular base and textured surface, no visible text or symbols
text_image
SALT 4Use softener salt specifically produced for use in dishwashers.
When you start your dishwasher, the salt compartment is filled with water, therefore put the softener salt in prior to starting your machine.
If the softener salt has overflowed and you do not start the machine immediately, run a short washing program to protect your machine against corrosion.
4.3. Test Strip
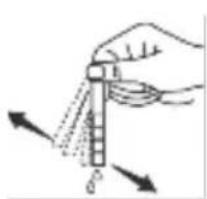
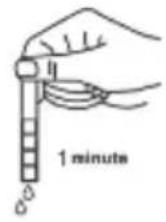
| Run water through the tap (1min.) | Keep the strip in the water (1sec) | Shake the strip. | Wait (1min.) | Set the hardness level of your machine. |
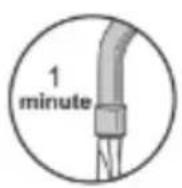 | 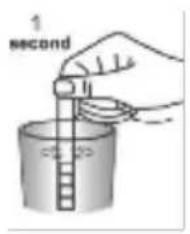 |  |  |  |
NOTE: The level is set to 3 as default. If the water is well water or has a hardness level above 90 dF, we recommend that you use filter and refinement devices.
4.4 Water Hardness Table
| Level | German dH | French dF | British dE | Indicator |
| 1 | 0-5 0-9 0-6 Wash LED is on. | |||
| 2 | 6-11 10-20 7-14 Dry LED is on. | |||
| 3 | 12-17 21-30 15-21 End LED is on. | |||
| 4 | 18-22 31-40 22-28 Wash and End LEDs are on. | |||
| 5 | 23-31 41-55 29-39 Wash and End LEDs are on. | |||
| 6 | 32-50 56-90 40-63 Dry and End LEDs are on. |
4.5. Water Softener System
- The dishwasher is equipped with a water softener which reduces the hardness in the mains water supply. To find out the hardness level of your tap water, contact your water company or use the test strip (if available).
4.6 Setting
- Push the programme button and hold it down.
- Turn on the machine.
- Hold down the programme button until the LEDs flash.
• The machine will display the last setting.
- Set the level by pushing the programme button.
- Switch off the machine to save the setting.
4.7. Detergent usage
- Only use detergents specifically designed for domestic dishwashers.
- Add the recommended amount of detergent for the selected programme to ensure the best performance.
- Keep your detergents in cool, dry places out of reach of children.
- See the detergent manufacturer's instructions for a further information.
4.8. Filling the detergent
- Push the latch to open the dispenser and pour in the detergent.
- Close the lid and press it until it locks in place. The dispenser should be refilled just before the start of each programme.
- If the dishes are heavily soiled, place additional detergent in the pre-wash detergent chamber.

natural_image
3D rendered diagram of a mechanical component with a tool inserted, showing no text or symbols.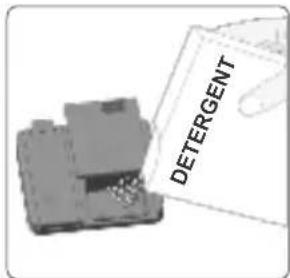
text_image
DETERGENT4.9. Using combined detergents
- These products should be used according to the manufacturer's instructions.
- Never put combined detergents into the interior section or the cutlery basket.
-
Combined detergents contain not only the detergent but also rinse-aid, salt replacement substances and additional components depending on the combination.
• We recommend you do not use combined detergents in short programmes. -
Please use powder detergents in such programmes.
- If you encounter problems when using combined detergents, please contact the detergent manufacturer.
- When you stop using combined detergents, make sure that water hardness and rinse aid settings are set to correct level.
4.10. Rinse-aid usage
- Rinse-aid makes dishes sparkle and helps them to dry without spotting.
- Rinse-aid is required for stain-free utensils and clear glasses.
- Use only rinse-aid for domestic dishwashers.
4.11. Filling the rinse-aid and setting
- To fill the rinse aid compartment, open the rinse-aid compartment cap.
- Fill the compartment with rinse aid to the MAX level and then close the cap.
- Be careful not to overfill the rinse aid compartment and wipe up any spills.
In order to change the rinse aid level, follow the below steps before turning on the machine:
- Push the programme button and hold it down.
- Turn on the machine.
- Hold down the programme button until the LEDs flash twice. Rinse aid set follows water hardness set.
- The machine will display the current setting.
- Change level by pushing the programme button.
- Switch off the machine to save the setting.
The factory setting is "4".
If the dishes are not drying properly or are spotted, increase the level. If blue stains form on your dishes, decrease the level.

natural_image
Illustration of a hand pressing down on a rectangular object with dashed lines, no text or symbols present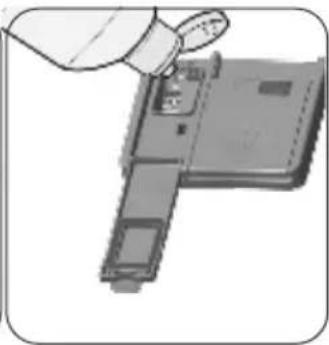
natural_image
Illustration of a hand using a tool to adjust or install a mechanical component (no text or symbols visible)| Level | Brightener Dose | Indicator |
| 1 | Rinse-aid not dispensed | Wash LED is on. |
| 2 | 1 dose is dispensed | Dry LED is on. |
| 3 | 2 doses are dispensed | End LED is on. |
| 4 | 3 doses are dispensed | Wash and Dry LEDs are on. |
| 5 | 4 doses are dispensed | Wash and End LEDs are on. |
WARNING: Use only those rinse aid materials which are allowed for use in the machine. As rinse aid residues left as a result of overflowing will create extremely high amounts of foam and thus reduce the washing performance, remove the excess amount of rinse aid by wiping it with a rag.
5. LOADING YOUR DISHWASHER
- For best results, follow these loading guidelines.
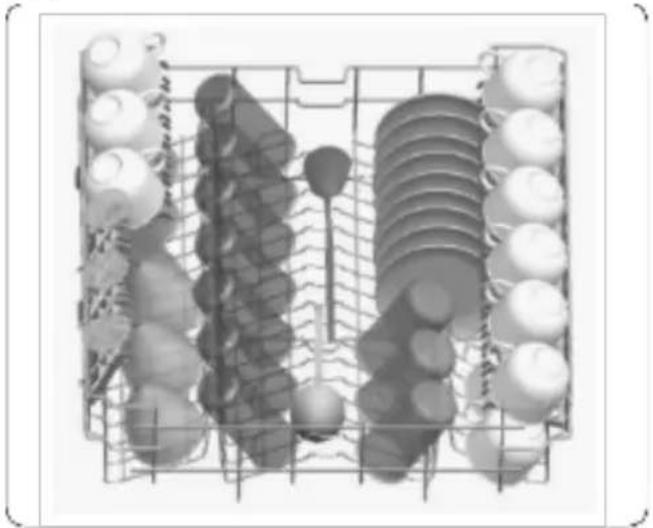
• We recommend that you place large items (pots, pans, lids, plates and bowls) which are heavily soiled in the lower basket. - The upper basket is designed for delicate and lighter dishware such as glasses, coffee and tea cups and saucers. Position the dishes so that they will not get moved by the spray of water.
- Cutlery should be placed in the cutlery basket. Items should be load individually into the appropriate slots with their handles downwards. Long utensils should be placed horizontally on the baskets.

WARNING: Take care not to obstruct the rotation of spray arms.
natural_image
Illustration of a hand using a tool to adjust or install a mechanical component, with no visible text or symbols.
natural_image
Diagram of a mechanical assembly with two wheels and a central shaft, showing directional arrows (no text or symbols)5.1 Recommendations
Remove any coarse residue on dishes before placing the dishes in the machine. Start the machine with full load.

NOTE: Do not overload the drawers or place dishes in the wrong basket.
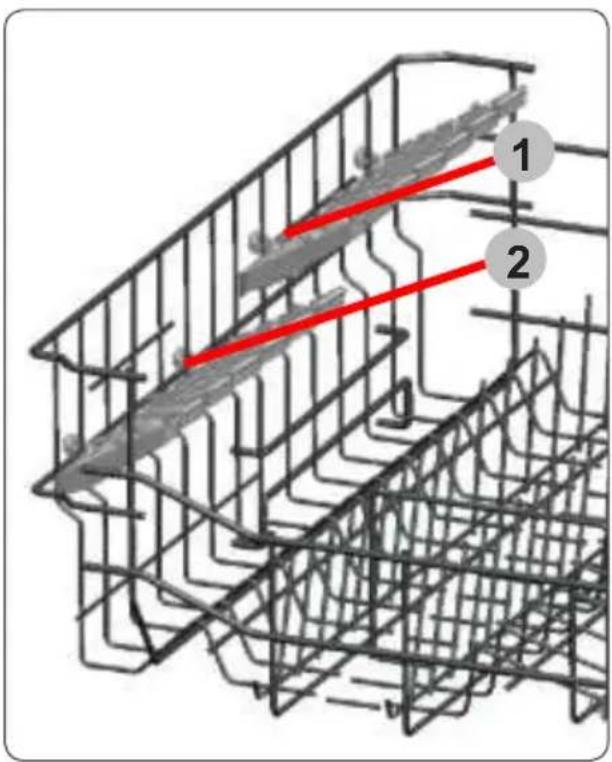
Height Adjustable Rack (peg type)
The height adjustable racks enable glasses and cups to be placed on or under the racks. The racks can be adjusted to 2 different heights. Cutlery and utensils can also be placed on the racks horizontally.
WARNING: Always place sharp utensils with the sharp point down and open utensils with their openings down.
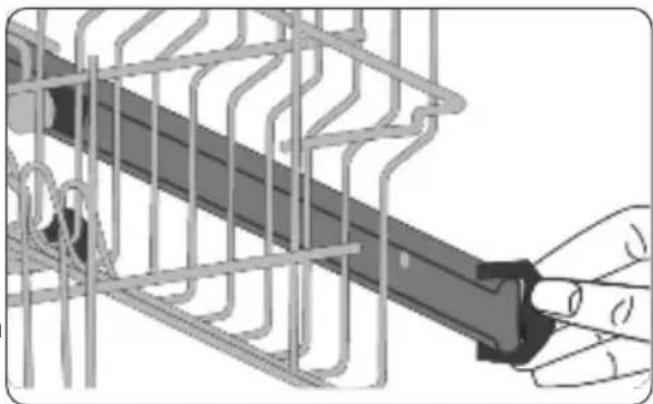
Upper Basket Height adjustment
Turn the Rail Stop Clips, at the ends of the rails, to the sides to open them (as shown in the image below), then pull out and remove the basket. Change the position of the wheels, then reinstall the basket to the rail, making sure to close the Rail Stop Clips.
When the upper basket is in the higher position, large items such as pans can be placed on the lower basket.
text_image
Diagram of a steel cage structure with labeled components and red directional arrows indicating flow or movement.5.2 Alternative basket loads Lower basket

natural_image
Illustration of three electronic components arranged in a grid (no text or symbols visible)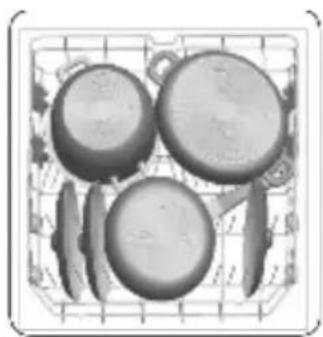
natural_image
Illustration of four kitchen utensils in a grid basket (no text or symbols)Upper basket
natural_image
Illustration of a multi-tiered mechanical or electrical component grid with circular components and a central hub (no text or symbols)Incorrect loads

natural_image
Abstract 3D graphic with a central 'X' and surrounding circular elements, no text or symbols present.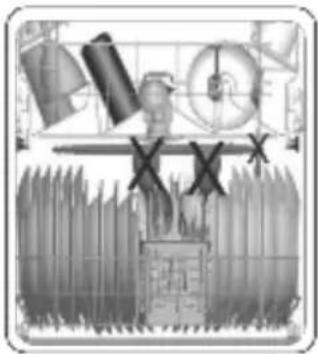
natural_image
Illustration of industrial machinery components including rollers, gauges, and a cross symbol (no readable text or labels)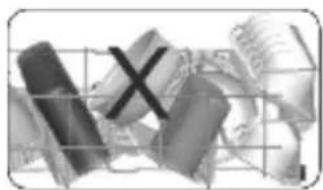
natural_image
Abstract grayscale graphic with fragmented shapes and a central 'X' mark, no readable text or symbols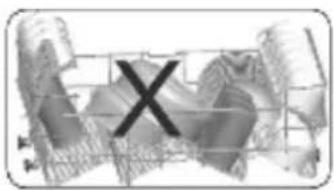
text_image
XUnsuitable items for dishwashing
- Cutlery and utensils made of wood.
- Delicate decorative glasses, craft and antique utensils. These utensils are not dishwasher-proof.
- Plastic parts not resistant to heat.
• Copper and tin utensils. - Utensils which are soiled with ash, wax, lubricating grease or ink.
- Aluminium and silver parts have a tendency to discolour and fade during during the wash cycle. Some types of glass (e.g. crystal glass objects) may turn cloudy after many wash cycles.
Glass and utensil damage Causes:
- Glass type and glass production process.
• Chemical composition of the detergent.
• Water temperature of the wash programme.
Recommendation:
- Use only glasses and porcelain which the manufacturer designates as dishwasher-proof.
- Use a detergent which protects utensils.
• Take glass and cutlery out of the dishwasher as soon as possible after the programme ends.
Unloading the dishwasher
- To prevent water from dripping off the upper basket onto the utensils in the lower basket, it is recommended to empty the appliance from the bottom up.
Tip: Hot utensils are sensitive to shock! Therefore, when the programme ends, leave the utensils to cool down in the dishwasher until they can be handled.
Note: When the programme ends, water droplets can still be seen inside the appliance. This does not affect the drying of the utensils.
6. PROGRAMME TABLE

| No Programme | Duration (min) | Description |
| P1 Eco (Reference) 205 | Standard programme for normally soiled, daily-used dishes. | |
| P2 | Super 50' 65° | 50 For normally soiled, daily-used dishes with a faster programme. |
| P3 | Intensive 65° | 117 For heavily soiled dishes. |
| Auto | 85 - 117 This programme automatically adjusts the temperature and the quantity of water, the energy consumption and program duration. | |

NOTE: THE PROGRAMME DURATION MAY CHANGE ACCORDING TO THE
AMOUNT OF DISHES, THE WATER TEMPERATURE, THE AMBIENT TEMPERATURE AND SELECTED ADDITIONAL FUNCTIONS.
- Only use powder detergent for short programmes.
- Short programmes do not include drying.
• To assist drying, we recommend slightly opening the door after a cycle is complete.
* If your model has turbidity sensor, it has Auto programme instead of Intensive programme.
7. THE CONTROL PANEL

text_image
EDN I VESTA 1 2 3 4 5 6Press the Power On/Off button (1), the Start/Pause light (4) will illuminate.
Select the programme most suitable for your dishes using the Programme Selection button (2).
Additional functions can also be selected.

NOTE: Press the Half Load button (3)
to reduce the duration of a programme, and therefore decrease your energy and water consumption.

NOTE: If an extra feature has been on the most recent wash programme, feature will remain active on the next ccted programme. If you do not want to this feature on the newly selected wash programme, press the feature button until light on the button switches off.
Press the Start/Pause button (4) to start the programme. The light on the Start/Pause button will switch off and the Wash light (6) will illuminate. If the door of your machine is opened while a programme is operating, the Start/Pause light will flash.
The Wash, Dry and End lights on the Control Panel indicate the status of the programme in operation. The machine will remain silent for 40 to 50 minutes while the Drying light is on.

NOTE: Simultaneously press the
Programme Selection (2) and Half Load (3) buttons for 3 seconds to activate/deactivate the Child Lock. When it is first activated, the Wash (6) light will flash once. When it is deactivated, the Wash light (6) will flash twice.

NOTE: When there is insufficient
softening salt, the Salt Lack Warning
Indicator (5) will illuminate to indicate the salt chamber needs filling.

NOTE: When there is insufficient rinse
aid, the Rinse Aid Lack Warning Indicator (5) will illuminate to indicate the rinse aid chamber needs filling.
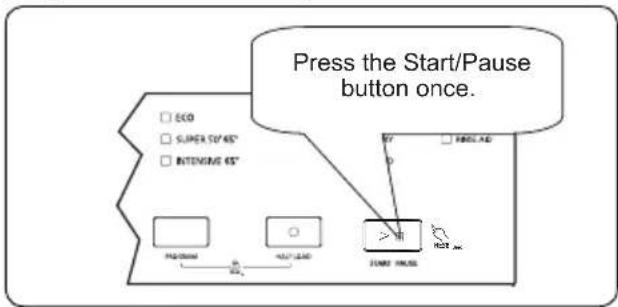
7.1. Changing a Programme
Follow the steps below to change a programme while in operation.
text_image
Press the Start/Pause button once.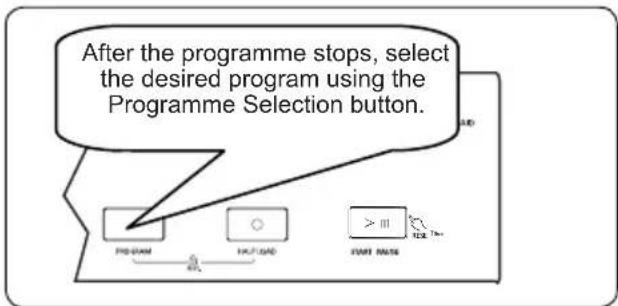
text_image
After the programme stops, select the desired program using the Programme Selection button. PROGRAM OUTPUT START BASE
flowchart
graph TD
    A["Start Pause"] --> B["Programm"]
    B --> C["Eco"]
    B --> D["SUPER 50° 65°"]
    B --> E["INTENSIVE 65°"]
    F["Press the Start/Pause button to start the newly selected programme."] --> G["The new programme will resume the course of the old programme."]
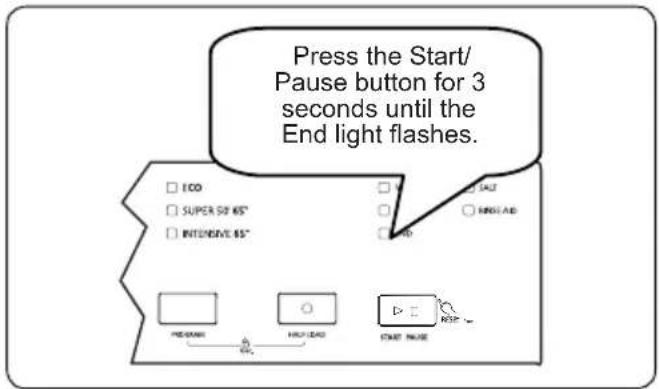
7.2. Cancelling a Programme
Follow the steps below to cancel a programme while in operation.
text_image
Press the Start/ Pause button for 3 seconds until the End light flashes. ECO SUPER 50 65° INTENSIVE 65° SALT MINT AID HOLD HOLDING START MODEwhen the door is closed or the power returns.
text_image
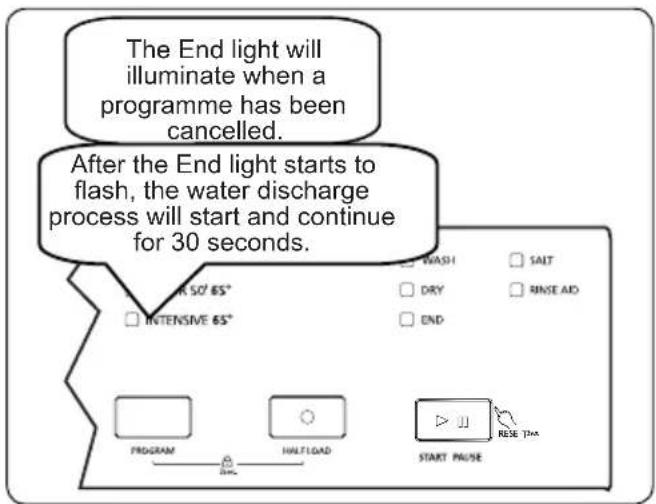
The End light will illuminate when a programme has been cancelled. After the End light starts to flash, the water discharge process will start and continue for 30 seconds. INTENSIVE 65° WASH SAIT DRY RINSE AID END PROGRAM HALFLOAD START PAUSE RESE This7.3. Switching the Machine Off
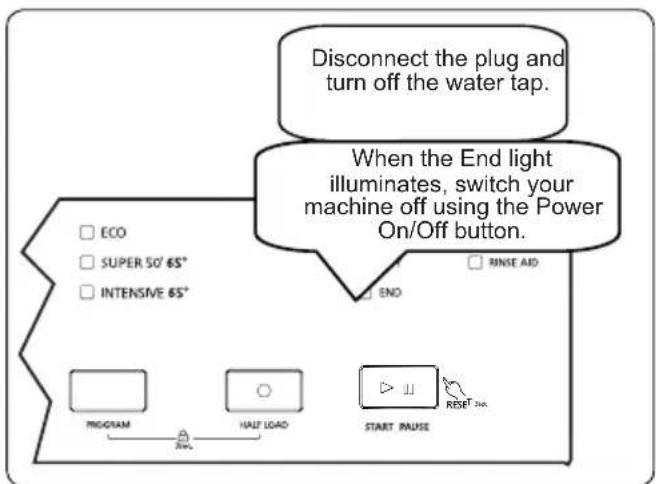
text_image
Disconnect the plug and turn off the water tap. When the End light illuminates, switch your machine off using the Power On/Off button. ECO SUPER 50' 65° INTENSIVE 65° END RINSE AID PROGRAM HALF LOAD START PAUSE RESET 2nd
NOTE: Do not open the door before the gramme is complete.

NOTE: Leave the door slightly open at end of a wash programme to speed up ng.

NOTE: If the door of the machine opened or the power is cut during ration, the programme will continue
8. CLEANING AND MAINTENANCE
Cleaning your Dishwasher is important to maintain the machine's service life.
Oil and lime may build up in your Dishwasher over time. If this occurs:
- Fill the detergent compartment but do not load any dishes. Select a programme which runs at high temperature and run the Dishwasher empty. If this does not clean your Dishwasher sufficiently, use a cleaning agent designed for use with dishwashers.
- Wipe the door seals regularly with a damp cloth to remove any accumulated residue.
8.1. Cleaning machine and filters
Clean the filters and spray arms at least once a week. If any food waste remains on the coarse and fine filters, remove them and clean them thoroughly with water.
a) Micro Filter b) Coarse Filter c) Metal Filter
natural_image
Close-up of a mechanical component with a circular button and directional arrow indicator (no readable text or symbols)
text_image
b a 2
text_image
Control panel diagram with labeled buttons and directional arrow indicator
natural_image
Top-down view of a car interior showing a roof, vent, and gear mechanism (no text or symbols)To remove and clean the filter combination, turn it counter clockwise and remove it by lifting it upwards (1). Pull the coarse filter out of the micro filter (2). Then pull and remove the metal filter (3). Rinse the filter with water until it is free of residue. Reassemble the filters. Replace the filter insert, and rotate it clockwise (4).
- Never use your Dishwasher without a filter.
- Incorrect fitting of the filter will reduce the washing effectiveness.
- Clean filters are necessary for proper running of the machine.
8.2 Spray arms
Make sure that the spray holes are not clogged and that no food waste is stuck to the spray arms. If there is any clogging, remove the spray arms and clean them under water. To remove the upper spray arm undo the nut holding it in position by turning it clockwise and pulling it downwards. Make sure that the nut is properly tightened when refitting the upper spray arm.

natural_image
Diagram of a mechanical assembly with arrows indicating force or movement, no visible text or symbolsNotes;
- Only clean the appliance with special detergents/appliance cleaners which are suitable for use with dishwashers.
-
Regularly wipe the door seats using a damp cloth and a little washing liquid. This will keep the door seal clean and hygienic.
-
Leave the door open slightly if the appliance will not be used for a while. This will prevent an unpleasant odour from developing.
- Never clean the dishwasher using a steam cleaner. The manufacturer is not liable for any consequential damage.
- Wipe the front of the dishwasher and the control panel regularly using a damp cloth and a little washing liquid
- Do not use sponges with a rough surface or abrasive detergents. These could scratch the surface. - For dishwashers with a stainless steel front, avoid using sponge cloth, or rinse these thoroughly several times before using them for the first time. This will prevent corrosion.
WARNING: Health Hazard due to detergents containing chlorine!
Always use chlorine - free detergents.
9. TROUBLESHOOTING
| FAULT POSSIBLE CAUSE TROUBLESHOOTING | ||
| The programme does not start. | Your Dishwasher is not plugged in. Plug your Dishwasher in. | |
| Your Dishwasher is not switched on. | Switch your Dishwasher on by pressing the On/Off button. | |
| Fuse blown. Check your indoor fuses. | ||
| Water inlet tap is closed. Turn on the water inlet tap. | ||
| Your Dishwasher door is open. Close the Dishwasher door. | ||
| Water inlet hose and machine filters are clogged. | Check the water inlet hose and machine filters and make sure they are not clogged. | |
| Water remains inside the machine. | Water drain hose is clogged or twisted. | Check the drain hose, then either clean or untwist it. |
| The filters are clogged. Clean the filters. | ||
| The programme is not finished yet. Wait until the programme is finished. | ||
| Machine stops during washing. | Power failure. Check mains power. | |
| Water inlet failure. Check water tap. | ||
| Shaking and hitting noises are heard during a wash operation. | The spray arm is hitting the dishes in the lower basket. | Move or remove items blocking the spray arm. |
| Partial food wastes remain on the dishes. | Dishes placed incorrectly, sprayed water not reaching affected dishes. | Do not overload baskets. |
| Dishes leaning each another. | Place dishes as instructed in the section on loading your dishwasher. | |
| Not enough detergent used. | Use the correct amount of detergent, as instructed in the programme table. | |
| Wrong wash programme selected. | Use the information in the programme table to select the most appropriate programme. | |
| Spray arms clogged with food waste. | Clean the holes in the spray arms with thin objects. | |
| Filters or water drain pump clogged or filter misplaced. | Check if the drain hose and filters are correctly fitted. | |
| Whitish stains remain on dishes. | Not enough detergent used. | Use the correct amount of detergent, as instructed in the programme table. |
| Rinse aid dosage and/or water softener setting set too low. | Increase rinse aid and/or water softener level. | |
| High water hardness level. Increase water softener level and add salt. | ||
| Salt compartment cap not closed properly. | Check that the salt compartment cap is closed properly. | |
| Dishes do not dry. | Drying option is not selected. Select a programme with a drying option. | |
| Rinse aid dosage set too low. Increase rinse aid dosage setting. | ||
| Rust stains form on the dishes. | Stainless-steel quality of the dishes is insufficient. | Use only dishwasher-proof sets. |
| High level of salt in wash water. | Adjust the water hardness level using water hardness table. | |
| Salt compartment cap not closed properly. | Check that the salt compartment cap is closed properly. | |
| Too much salt spilled in the Dishwasher while filling it with salt. | Use funnel while filling salt to the compartment to avoid spillage. | |
| A poor mains grounding. Consult a qualified electrician immediately. | ||
| Detergent remain in the detergent compartment. | Detergent was added when the detergent compartment was wet. | Make sure detergent compartment is dry before use. |
AUTOMATIC FAULT WARNINGS AND WHAT TO DO
| TROUBLE CODE | POSSIBLE FAULT WHAT TO DO | |||
| Wash Dry End | Start/Pause | |||
 |  | Make sure the water inlet tap is open and water is flowing. | ||
| Separate the inlet hose from the tap and clean the filter of the hose. | ||||
| Contact for service if the error continues. | ||||
 | Pressure system failure | |||
 | Continuous water input | |||
 |  | Inability to discharge water | ||
| Water discharge hose and filters may be clogged. | ||||
| Cancel the program. | ||||
| If the error continues, contact for service. | ||||
 |  | Faulty heater and heater sensor | ||
 |  | Overflow | ||
| Unplug the machine and close the tap. | ||||
| Contact for service. | ||||
 |  |  | Fault electronic card Contact for service. | |
10. PRACTICAL INFORMATION
-
When the machine isn't in operation:
-
Disconnect the plug and close the tap.
-
Leave the door slightly open to prevent odour formation.
-
Select the dry option to remove water droplets.
-
Place dishes in the machine properly to achieve the best energy consumption, washing and drying performance. Please see the programme and consumption table for more information.
-
Rinse dirty dishes before placing them in the dishwasher.
-
Only use the Prewash programme when necessary.
-
Do not place the machine near a refrigerator because it will reach high temperatures.
-
If the machine is located in an area that is at risk of freezing, close the tap, disconnect the inlet hose from the tap and drain the water inside the hose and the machine completely.
11. PRODUCT SPECIFICATIONS
| Brand | GODREJ |
| Model | DWF EON VES 12U NF STSL |
| Capacity of dishwasher 12 | |
| The energy efficiency class | A++ |
| Annual energy consumption in kWh per year (AEc) (280 Cycle)* | 258 |
| Energy consumption (Et) (kWh per cycle) | 0.923 |
| Off-mode power consumption (W) (Po) 0.50 | |
| Left-on mode power consumption (W) (Pi) 1.00 | |
| Annual water consumption in litres per year (AWc) (280 Cycle)** | 3360 |
| Drying efficiency class*** A | |
| Standard programme name**** Eco | |
| Standard program water consumption in litres per cycle 12 | |
| Programme time for standard cycle (min) | 205 |
| Airborne acoustical noise emissions (dB(A) re 1 pW) | 49 |
| Freestanding/Built-in Freestanding |
* Energy consumption 258 kwh per year, based on 280 standard cleaning cycles using cold water fill and the consumption of low power modes. Actual energy consumption will depend on how the appliance is used.
** Water consumption 3360 litres per year based on 280 standard cleaning cycles. Actual water consumption will depend on how appliance is used.
*** Drying efficiency class A on a scale from G (least efficient) to A (most efficient).
**** The “Eco” is the standard cleaning cycle to which the information in the label a the product information sheet relates. This programme is suitable to clean normally soiled tableware and it is the most efficient programme in terms of combined energy and water consumption.
12. BRANCH ADDRESSES / SERVICE CONNECT
For any further assistance, please contact our nearest branch office or service centre:
| Branch Branch | Addresses | Service Connect |
| Ahmedabad | 4^th Floor, APM Shopping Mall Near IOCL Petrol Pump, Shyamal-Karnavati 100 Ft. Road, Satellite, Ahmedabad - 380 015. | Call• 1800-209-5511 (Toll-Free) |
| Bangalore | 3^rd Floor, The Karnataka Film Chamber of Commerce Bldg. 28, 1st Main, Cresent Road, High Grounds Nr. Shivanand Circle, Bangalore - 560 001. | |
| Bhopal | 217, Zone I, M.P. Nagar, Beh. Jyoti Talkies, Bhopal - 462 011. | |
| Bhubaneshwar | Highway Complex NH-5, Rudrapur, Bhubaneshwar - 752 101. | |
| Chandigarh / Mohali | Plot No.A-40, Phase-VIII-A, Industrial Area, Mohali - 160059. | |
| Chennai | No.1, Sidco Industrial Estate. Ambattur, Chennai - 600 098. | |
| Coimbatore | 585-590, Sathya Towers 3^rd floor, D.B. Road R.S. Puram, Coimbatore - 641 002. | |
| Delhi | Godrej Bhavan, 2^nd Floor, Shershah Suri Marg, Okhla, New Delhi - 110 065. | |
| Faridabad | Godrej Bhavan, 2^nd Floor, Shershah Suri Marg, Okhla, New Delhi - 110 065. | |
| Ghaziabad | Godrej Bhavan, 2^nd Floor, Shershah Suri Marg, Okhla, New Delhi - 110 065. | |
| Guwahati | Godrej Building, G.S.Road, Ulubari, Flyover, Guwahati - 781 007. | |
| Hyderabad | 201 & 202, Lala-1 Land Mark, 5-4-94 to 97, 2nd Floor, Above Digital Shoppy, Ranigunj, M.G. Road, Secunderabad - 500 003. | |
| Jaipur | 502-506, 5^th Floor, Gaurav Towers, Malviya Nagar, Jaipur-302 017. | |
| Kochi | 2^nd Floor, Angels' Arcade South Kalamassery, Near CUSAT Signal Ernakulam - 682022. | |
| Kolkata | Block GN, Sector V, Salt lake, Kolkata - 700 091. | |
| Lucknow | C 3/3 & C3/4, Sanjay Complex Behind Akashwani Bhawan, Vidhan Sabha Marg Lucknow - 226001. | |
| Mumbai | Appliance Divn., Plant 4, Pirojshanagar, Vikhroli, Mumbai - 400079. | |
| Nagpur | Dr. Bhiwapurkar Chamber 2nd Floor, Opp: Yashwant Stadium Dhantoli, Nagpur - 440012. | |
| Patna | Jeevan Deep Bldg. Exhibition Road, Patna - 800 001. | |
| Pune | Apollo Building Square, Plot No.60, Survey No.599 Sahaney Sujan Park, Lullanagar, Bibewadi Road, Pune - 411 040. | |
| Raipur | 9/1, Besides Bharat Petrol Pump Opp: Hotel Picadelly, Mahoba Bazaar, GE Road, Raipur - 492001. | |
| Ranchi | C/o. Surya Motors, Near Krishi Bazaar Samiti Panda, Ranchi (Jharkhand) - 835 222. |
Website: www.godrejsmartcare.com & www.godrejappliances.com
E-mail: smartcare@godrej.com SMS:

WARRANTY DISHWASHERS
The Godrej Eon Vesta Dishwasher comes with 1 year comprehensive warranty on from the date of purchase, against defective material or workmanship. In case of any such defect, Godrej & Boyce Mfg. Co. Ltd. - Appliance Division undertakes to get the appliance repaired free of charge during warranty period, subject to terms and conditions below.
INSTRUCTIONS FOR THE CUSTOMER
- Kindly ensure that the dealer fills the warranty card correctly and completely.
- You should retain the warranty card for record and produce the same in the event of any warranty repairs.
- In the event of a defect developing in the product, contact the nearest authorised Godrej & Boyce Service Centre for obtaining warranty service and provide the defect, Model details & Serial No.
- Product will function between +/- 5% of rated volts. For any fluctuation beyond specified limit, company shall not be responsible. In turn, warranty stands terminated.
- Earthing provision is necessary for the safety.
- Frequency must be between 5% variation of 50Hz. Beyond this, company shall not be liable for any unforeseen hazards like fire, shock etc. & in turn, warranty stands terminated.
- Appliance or any part thereof is subjected to neglect, abuse or misuse, tampering, alteration, accident, fire, floods or other act of God, or damage by rodents or insects, the COMPANY is not responsible for any damage caused to the appliances & shall not be liable for any consequential loss or compensation, not refund of purchase price or replacement of the appliances.
- In event of repair/replacement of any part/s of the unit, this warranty will thereafter continue and remain in force only for the unexpired period of warranty. Moreover, the time taken for repair/ replacement and in transit whether under the warranty or otherwise shall not be excluded from the warranty period.
- The pressure supplied by the tap should be a minimum of 0.03 Mpa and a maximum of 1 MPa, if the pressure exceeds 1 MPa, a pressure relief valve must be fitted between the connection.
- Any damage/defect arising due to entry of foreign particle into the machine that causes malfunctioning is not covered under warranty. These calls will be chargeable to customer during warranty period.
- House wiring related issues are not covered under warranty and such calls will be chargeable to customer.
- Defect/Damage due to rust (internal & external components) is not covered under warranty.
- Extended warranty is not applicable for any part of the machine.
TERMS AND CONDITIONS
- Repairs and replacement of parts will be carried out through the Authorised Customer Service Centre.
- All transportation and handling expenses incurred while repairing will be payable by the customer.
- For appliances installed beyond the municipal limits of the jurisdiction of the authorised service centre, charges towards technician's visit and other incidentals will be borne by the customer.
- While the company will make every effort to carry out the repairs at the earliest, it however is made expressly clear that the company is under no obligation to do so in a specified period of time.
- The company/ its authorised service centre will collect any parts, components replaced.
- Warranty does not cover accessories to the appliance.
- The Company's obligation under this warranty shall be limited to repair or providing replacement of part/s only.
- In the event of any unforeseen circumstances, and spares not being available, the company's prevailing depreciation rules will be binding on the purchaser to accept as a commercial solution in lieu of repairs.
- Warranty is not applicable incase the original number (serial no. sticker) is removed, obliterated or altered from the machine or cabinet.
Godrej & Boyce Mfg. Co. Ltd.- Appliance Division
CUSTOMER COPY
MODEL NO. UNIT SR. NO.
CUSTOMER'S NAME & ADDRESS
TEL.
DATE OF PURCHASE
DEALER'S NAME & ADDRESS
TEL.
Customer's Signature:
This warranty is valid only if it is filled in and stamped by our authorised dealer stating the date of purchase. Warranty Voids If: 1. The warranty card is not completed properly at the time of purchase. 2. The completed warranty card is not presented to the authorised personnel at the time of service of the product. 3. The appliance is not operated according to instructions given in the 'User Guide'. 4. Defects are caused by improper use, which shall be determined by the company's authorised personnel. 5. Unauthorised persons carry out any repair work. 6. Defects are caused by reasons beyond control, like abnormal voltage, acts of God or while in transit to service centre or purchaser's residence. 7. The warranty is not valid in case the serial number is deleted, defaced or altered. 8. Damage to the appliance or any parts due to transportation or shifting is not covered by the warranty.
NOTES
NOTES
Protection of Environment:
Protection of environment" is one of the core values of Godrej and we seek your co-operation to make sure that the product, packaging and plastic material is not disposed as unsorted municipal waste.

This symbol is known as the "Crossed-out Wheelie Bin Symbol". It means that the product should not be disposed of with your general house-hold waste.
It should be disposed of only through the company's collection points with special treatment so as to prevent any damage to the environment. Please call: 1800 209 5511 for applicable buy back arrangement or visit: www.godrejappliances.com/green-think for details about Godrej Appliances authorised collection points.

text_image
GodrejAPPLIANCES