
S12BWS - Air conditioner LG - Free user manual and instructions
Find the device manual for free S12BWS LG in PDF.


| Type | Wall Mounted Air Conditioner |
| Model | S12BWS |
| Brand | LG |
| Power Supply | 220-240 V~, 50 Hz |
| Protection Class | Class I |
| Ingress Protection (Indoor/Outdoor) | IPX0 / IPX4 |
| Energy Class (Cooling/Heating) | A / A |
| EER (Cooling) | 3.21 |
| COP (Heating) | 3.61 |
| Cooling Operation | Supported |
| Heating Operation | Supported |
| Dehumidifying Operation | Supported |
| Air Circulation Mode | Supported |
| Jet Cool/Heat Mode | Supported (30 min at 18°C cooling / 30°C heating) |
| Auto Clean Function | Supported (fan runs 30 min after power off) |
| Sleep Mode | Supported (auto temperature adjustment) |
| Timer | On/Off timer with 1 hour resolution |
| Active Energy Control | 80%/60%/40% power reduction |
| Air Filter Cleaning Interval | Every 2 weeks |
| 3M Filter Cleaning Interval | Every 1 month (replace every 6 months) |
| Triple Filter Cleaning Interval | Every 3 months |
| Plasma Filter Cleaning Interval | Every 1 month |
| Remote Control Battery | 2x AAA (1.5V) |
| Heating Operation Outdoor Temperature Range | 0°C to 24°C |
Frequently Asked Questions - S12BWS LG
User questions about S12BWS LG
0 question about this device. Answer the ones you know or ask your own.
Ask a new question about this device
Download the instructions for your Air conditioner in PDF format for free! Find your manual S12BWS - LG and take your electronic device back in hand. On this page are published all the documents necessary for the use of your device. S12BWS by LG.
USER MANUAL S12BWS LG
Please read this manual carefully before
operating your set and retain it for future reference.
TYPE : WALL MOUNTED
The equipment complies with requirements of the Technical Regulation, in terms of restrictions for the use of certain dangerous substances in electrical and electronic equipment.
TIPS FOR SAVING ENERGY
Here are some tips that will help you to minimize the power consumption when you use the air conditioner.
You can use your air conditioner more efficiently by referring to the instructions below :
- Do not cool the indoor excessively. This may be harmful for your health and may consume more electricity.
- Block sunlight with blinds or curtains while you are operating the air conditioner.
- Keep doors or windows closed tightly while you are operating the air conditioner.
- Adjust the direction of the air flow vertically or horizontally to circulate indoor air.
- Speed up the fan to cool or warm indoor air quickly, in a short period of time.
- Open windows regularly for ventilation as the indoor air quality may deteriorate if the air conditioner is used for many hours.
- Clean the air filter once every 2 weeks. Dust and impurities collected in the Air filter may block the air flow or weaken the cooling / dehumidifying functions.
For your records
Staple your receipt to this page in case you need it to prove the date of purchase or for warranty purposes. Write the model number and the serial number here:
Model number :
Serial number :
You can find them on a label on the side of each unit.
Dealer's name :
Date of purchase :
IMPORTANT SAFETY INSTRUCTIONS
READ ALL INSTRUCTIONS BEFORE USING THE APPLIANCE.

Always comply with the following precautions to avoid dangerous situation and ensure peak performance of you product.

WARNING
It can result in serious injury or death when the directions are ignored.

CAUTION
It can result in minor injury or product damage when the directions are ignored.

WARNING
• Installation or repairs made by unqualified persons can result in hazards to you and others.
• Air conditioner shall be installed in accordance with national wiring regulations.
- The information contained in the manual is intended for use qualified service technician familiar with safety procedures and equipped with the proper tools and test instruments.
- Failure to carefully read and follow all instructions in this manual can result in equipment malfunction, property damage, personal injury and/or death.
- This appliance is not intend for use by persons (including children) with reduced physical, senary or mental capabilities, or lack of experience and knowledge, unless they have been given supervision or instruction concerning use of the appliance by a person responsible for theirs safety.
- Children should be supervised to ensure that they do not play with the appliance.
- If the supply cord is damaged, it must be replaced by the manufacturer, its service agent or similarly qualified persons in order to avoid a hazard.
INSTALLATION
- Use a standard circuit breaker and fuse conforming with the rating of the air conditioner. Failure to do so may result in electric shock or product failure.
- Contact an authorized service center when you install or relocate the air conditioner. Failure to do so may result in serious injury or product failure.
- Always use a power plug and socket with a ground terminal. Failure to do so may result in electric shock or product failure.
• Install the panel and the cover of the control box safely. Failure to do so may result in explosion or fire. - Install a dedicated electric outlet and circuit breaker before you use the air conditioner. Failure to do so may result in electric shock or product failure.
- Do not modify or extend the power cable. If the power cable or cord has scratches or skin peeled off or deteriorated then it must be replaced. It may result in fire or electric shock.
- Be cautious when you unpack or install the air conditioner. Failure to do so may result in serious injury or product failure.
- Do not install the air conditioner on an unstable surface or where there may be a danger of it falling. It may result in death, serious injury, or product failure.
OPERATION
- Do not let the air conditioner run for a long time when the humidity is very high or when a door or window has been left open. Failure to do so may result in product failure.
- Make sure that the power cord is not pulled or damaged while the air conditioner is operating. Failure to do so may result in fire, electric shock, or product failure.
- Do not place any objects on the power cord. It may result in electric shock or product failure.
- Do not turn on or off the air conditioner by plugging in or unplugging the power plug. It may result in fire or electric shock.
- Do not touch, operate or repair the air conditioner with wet hands. It may result in electric shock or product failure.
- Do not place a heater or other heating appliances near the power cable. It may result in fire, electric shock, or product failure.
- Do not allow water to run into the air conditioner. It may result in explosion or fire.
- Do not leave flammable substances such as gasoline, benzene and thinner near the air conditioner. It may result in explosion or fire.
- Do not use the air conditioner for an extended period of time in a small place without ventilation. Ventilate the place regularly. Failure to do so may result in explosion or fire.
- When there is a gas leak, ventilate sufficiently before using the air conditioner again. Failure to do so may result in explosion or fire.
- Unplug the power plug if there is a noise, smell or smoke coming from the air conditioner. Failure to do so may result in explosion or fire.
- Stop operating and close the window in storm or hurricane. If possible remove the product from the window before hurricane arrives.
- Do not touch the electrostatic filter after opening the front grille. Failure to do so may result in electric shock or product failure.
- Contact an authorized service center when the air conditioner is submerged into water due to flooding. Failure to do so may result in explosion or fire.
- Be cautious water could not enter the product.
- Make sure to ventilate sufficiently when this air conditioner and a heating appliance such as a heater are used simultaneously. Failure to do so may result in explosion or fire, serious injury, or product failure.
- Turn the main power off and unplug the power plug when you clean or repair the air conditioner. Failure to do so may result in death, serious injury, or product failure.
- Unplug the power plug when the air conditioner is not used for an extended period of time. Failure to do so may result in product failure.
- For inner cleaning, contact an Authorized Service Center or a dealer.
- Do not use harsh detergent that causes corrosion or damage on the unit. Harsh detergent may also cause failure of product, fire, or electric shock.

WARNING
- For inner cleaning, contact an Authorized Service Center or a dealer. Do not use harsh detergent that causes corrosion or damage on the unit. Harsh detergent may also cause failure of product, fire, or electronic shock.

CAUTION
INSTALLATION
- Make sure to check if there is a refrigerant leak after you install or repair the air conditioner. Failure to do so may result in product failure.
• Install the drain hose properly for smooth drainage of condensed water. Failure to do so may result in product failure. - Keep level even when installing the product.
• Install the air conditioner where the noise from the outdoor unit or the exhaust gas will not inconvenience the neighbors. Failure to do so may result in conflict between neighbors. - When transporting the equipment, there should be at least 2 or more people, or a forklift. It may result in serious injury.
- Do not install the air conditioner where it will be exposed to sea wind (salt spray) directly. It may result in product failure.
- Do not turn on the breaker or power under condition that front panel, cabinet, top cover, control box cover are removed or opened. Otherwise, it may cause fire, electric shock, explosion or death.
OPERATION
- Do not expose people, animals or plants to the cold or hot wind from the air conditioner. It may result in serious injury.
- Do not use the product for special purposes, such as preserving foods, works of art, etc. It is a consumer air conditioner, not a precision refrigeration system. It may result in death, fire or electric shock.
- Do not block the inlet or outlet of air flow. It may result in explosion or product failure.
- Do not use strong cleaning agents or solvents when you clean the air conditioner, or spray water. Use a smooth cloth. It may result in serious injury or product failure.
- Never touch the metal parts of the air conditioner when you remove the air filter. It may result in serious injury or product failure.
- Do not place any objects on the air conditioner. It may result in product failure.
• Always insert the filter securely after cleaning. Clean the filter every two weeks or more often if necessary. - Do not insert hands or other objects through the air inlet or outlet while the air conditioner is operating. It may result in electric shock.
- Do not drink the water drained from the air conditioner. It may result in serious health complications.
- Use a sturdy stool or ladder when you clean, maintain or repair the air conditioner at a height. Failure to do so may result in serious injury or product failure.
- Do not mix the batteries for the remote control with other types of batteries or mix new batteries with used batteries. Failure to do so may result in product failure.
- Do not recharge or disassemble the batteries. Failure to do so may result in explosion, fire or serious injury.
- Stop using the remote control if there is a battery fluid leak. If your cloth or skin is explosion to the battery fluid from a leak, wash it off with clean water. Failure to do so may result in serious injury.
- If you swallow the battery fluid from a leak. Wash out the inside of your mouth thoroughly and then consult a doctor. Failure to do so may result in serious health complications.
CONTENTS
2 TIPS FOR SAVING ENERGY
3 IMPORTANT SAFETY INSTRUCTIONS
7 BEFORE USE
7 COMPONENTS
7 - INDOOR UNIT
7 - OUTDOOR UNIT
8 INSERTING BATTERIES
8 INSTALLING THE REMOTE CONTROL HOLDER
8 OPERATING METHOD
9 USING THE REMOTE CONTROL
10 BASIC FUNCTIONS
10 COOLING YOUR ROOM (COOLING OPERATION)
10 REMOVING HUMIDITY (DEHUMIDIFYING OPERATION)
10 HEATING YOUR ROOM (HEATING OPERATION)
10 AIRING YOUR ROOM (AIR CIRCULATION OPERATION)
11 ADJUSTING THE FAN SPEED
11 ADJUSTING THE AIR FLOW DIRECTION
11 SETTING THE TIMER
11 - SETTING THE CURRENT TIME
11 - TURNING ON THE AIR CONDITIONER AUTOMATICALLY AT A SET TIME
11 - TURNING OFF THE AIR CONDITIONER AUTOMATICALLY AT A SET TIME
11 - CANCELING THE TIMER SETTING
12 SETTING SLEEP MODE
12 ADVANCED FUNCTIONS
12 CHANGING ROOM TEMPERATURE QUICKLY (JET COOL/HEAT) (OPTIONAL)
13 INDOOR AIR PURIFICATION (AUTO CLEAN OPERATION)
18 CLEANING PLASMA FILTER (OPTIONAL)
19 CLEANING 3M FILTER (OPTIONAL)
20 TROUBLESHOOTING
20 SELF-DIAGNOSIS FUNCTION
20 BEFORE REQUESTING SERVICE
22 SPECIFICATION
BEFORE USE

*The feature can be changed according a type of model.

NOTE
- The number of operation lamps and their locations may vary, depending on the model of the air conditioner.
OUTDOOR UNIT

*The feature can be changed according a type of model.
INSERTING BATTERIES
Insert batteries before using the remote control. The battery type used is AAA (1.5 V).
- Remove the battery cover.

- Insert the new batteries and make sure that the (+) and (-) terminals of the batteries are installed correctly.

natural_image
Line drawing of a remote control casing with internal components and a handle (no text or symbols)- Reattach the battery cover.

NOTE
- If the display screen of the remote control starts to fade, replace the batteries.
INSTALLING THE REMOTE CONTROL HOLDER
Install the holder where there is no direct sunlight to protect the remote control.
-
Choose a safe and easily-accessible place.
-
Fix the holder by fastening the 2 screws firmly with a screwdriver.

natural_image
Technical line drawing of a mechanical device with a handle and internal components (no text or symbols)- Slide the remote control into the holder.

natural_image
Line drawing of a mobile phone with keypad and control buttons (no text or symbols)OPERATING METHOD
Point the remote control towards the signal receiver at the bottom of the air conditioner to operate it.

*The feature can be changed according a type of model.

NOTE
• The remote control may operate other electronic devices if pointed towards them. Make sure to point the remote control towards the signal receiver of the air conditioner.
- For proper operation, use a soft cloth to clean the signal transmitter and receiver.
USING THE REMOTE CONTROL
You can operate the air conditioner more conveniently with the remote control.
![Display screen FAN WATT OPTION AUTO CLEAN TEMP MODE JET MODE FAN SPEED SWING LIGHT 1TOUCH SOFT AIR TIMER SLEEP ON OFF SET CLEAR TIME [DSEC] ROOM TEMP LG](/content/2026/06/1210493/images/ec89cd01f3cb1788c9955e6f7c7dd027e2c7f4311a058b90aa7e5c1b055f9323.jpg)
| Control panel | Display screen | Description |
| Air circulation button: Used to circulate the room air without cooling or heating. | ||
| Active energy control button: Select Active energy control Option. | ||
| Auto clean button: Remove moisture and clean inside of the indoor unit when turn off the power. | ||
| - On/Off button: Turn the power On/Off. | ||
| Temperature adjustment buttons: Adjust the room temperature when cooling. | ||
| Operation mode selection button: Select the operation mode.Cooling operation (*) / Auto operation (AI)Fresh dry operation () / Heating operation( | ||
| Jet cool/heat button: Cools/heats down the indoor temperature within a short period of time. | ||
| Indoor fan speed button: Adjust the fan speed. | ||
| Air flow direction button: Adjust the air flow direction vertically. | ||
| - | Light button: Adjusts the brightness of the indoor unit display. | |
| or | 1 Touch soft air button: To prevent air flow directly to person. | |
| Sleep mode auto button: Sets the sleep mode auto operation. | ||
| Timer button: Sets the current time and the start / end time. | ||
| Temperature display button: Displays the room temperature. | ||
| - Set/clear button: Sets or cancels functions. | ||
| - | Reset button: Initialize the air conditioner settings. | |
HSI75NE
BASIC FUNCTIONS
COOLING YOUR ROOM (COOLING OPERATION)
- Press ⏻ to turn on the power.
- Press ⬤ repeatedly to select the cooling operation.
- ✱ is displayed on the display screen.

- Press ⬇ or ⬇ to set the desired temperature.
REMOVING HUMIDITY (DEHUMIDIFYING OPERATION)
This mode removes excess moisture from an environment with high humidity or in the rainy season, in order to prevent mold. This mode adjusts the room temperature and the fan speed automatically to maintain the optimal level of humidity.
- Press ⏻ to turn on the power.
- Press MODE repeatedly to select the dehumidifying operation.
- △ is displayed on the display screen.

NOTE
- In this mode you cannot adjust the room temperature, as it is adjusted automatically. Also, the room temperature is not displayed on the display screen.
HEATING YOUR ROOM (HEATING OPERATION)
- Press ⏻ to turn on the power.
- Press MODE repeatedly to select the heating operation.
- 🙏 is displayed on the display screen.

- Press ⬇ or ⬇ to set the desired temperature.
- The temperature range is 16° C- 30° C.
NOTE
- This function may not be supported, depending on the model.
AIRING YOUR ROOM (AIR CIRCULATION OPERATION)
- Press ⏻ to turn on the power.
- Press 📂 turn on the air cuiculation operation.
- ✿ is displayed on the display screen.

- Press FAN SPEED to adjust the fan speed.
ADJUSTING THE FAN SPEED
- Press 📄 repeatedly to adjust the fan speed.
| Remark Speed | |
 | High |
 | Medium High |
 | Medium |
 | Medium Low |
 | Low |
 | Natural wind |
ADJUSTING THE AIR FLOW DIRECTION
- To adjust the direction of the air flow vertically, press change the air flow direction automatically.
- Select 🔍 to adjust the direction of the air flow automatically.
NOTE
- Adjusting the air deflector arbitrarily may cause product failure.
- If you restart the air conditioner, it starts to operate with the previously set direction of air flow, so the air deflector may not match the icon displayed on the remote control. When this occurs, press SWING to adjust the direction of the air flow again.
SETTING THE TIMER
You can use the timer function to save energy and to use the air conditioner more efficiently.
SETTING THE CURRENT TIME
- Press SET CLEAR and hold it for longer than 3 seconds.
- The AM/PM icon flickers at the bottom of the display screen.

- Press √ or ∧ to select the minutes.
- Press SET CLEAR TO finish.
TURNING ON THE AIR CONDITIONER AUTOMATICALLY AT A SET TIME
- Press ON
- The icon below flickers at the bottom of the display screen.
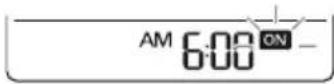
- Press √ or ^ to select the minutes.
-
Press SET CLEAR to finish.
-
When setting the timer, current time and ON icon are displayed on the display screen indicating that the desired time is set.
TURNING OFF THE AIR CONDITIONER AUTOMATICALLY AT A SET TIME
- Press OFF
- The icon below flickers at the bottom of the display screen.

- Press √ or ∧ to select the minutes.
- Press SET CLEAR to finish.
- When setting the timer, current time and OFF icon are displayed on the display screen indicating that the desired time is set.
CANCELING THE TIMER SETTING
- Press SET CLEAR TIME [5SEC] to cancel all timer setting.

SETTING SLEEP MODE
Use the sleep mode to turn off the air conditioner automatically when you go to sleep.
- Press ⏻ to turn on the power.
- Press SLEEP
- Press √ or ∧ to select the hour (Up to
7 hours). - Press to finish.
- ☆ is displayed on the display screen.


NOTE
- In the Cooling and Dehumidifying modes, the temperature increases by 1°C after 30 minutes and by a further 1°C after another 30 minutes for a more comfortable sleep. The temperature increases with up to 2°C from the preset temperature.
ADVANCED FUNCTIONS
The air conditioner offers some additional advanced functions.
CHANGING ROOM TEMPERATURE QUICKLY (JET COOL/HEAT) (OPTIONAL)
- Press ⏻ to turn on the power.
- Press ® JET MODE
- P0 is displayed on the display screen.

- In jet cooling mode, strong air blows out at a temperature of 18° C for 30 minutes. - In jet heating mode, strong air blows out at a temperature of 30° C for 30 minutes.

NOTE
- Powerful Cooling/Heating enable in Cooling/Fan /Dehumidifying/Artificial intelligent.
• This function may not be supported, depending on the model.
INDOOR AIR PURIFICATION (AUTO CLEAN OPERATION)
In the cooling and dehumidifying operations, moisture is generated inside the indoor unit. Use the auto cleaning function to remove such moisture.
- Press AUTO CLEAN
- ≡ is displayed on the display screen.

- If you turn off the power, the fan operates for 30 minutes and clean the inside of the indoor unit.

NOTE
Some buttons cannot be used while the auto cleaning function is in operation.
In this mode, the fan speed and the temperature adjust automatically, based on the room temperature.
- Press ⏻ to turn on the power.
- Press MODE repeatedly to select auto operation.
- Press ⬆ or ⬇ to select the desired operation code if the temperature is higher or lower than the desired temperature.
- AI is displayed on the display screen.


NOTE
- In this mode, you cannot adjust the fan speed, but you can set the air deflector to rotate automatically.
- This function may not be supported, depending on the model.
You can adjust the brightness of the indoor unit display screen.
- Press LIGHT to turn on/off the lamp on the front cover.
The comfort vane option conveniently sets the vane to a preset position that deflects the supply air away from blowing directly onto room occupants.
- Press ⏻ to turn on the power.
- Press 100µM repeatedly and select the desired direction.
- or is displayed on the display screen.


NOTE
- Pressing MODE or JET MODE during comfort vane operation will turn off the comfort vane feature.
- Pressing during comfort vane operation will turn off the comfort vane feature and set up the auto swing of vertical direction.
- When this feature is off, the horizontal vane operates automatically depending on the set mode.
This mode reduces power input from rated power input during the Cooling/Heating mode.
*Active energy control operation : 80% / 60% / 40% compared to the rated power input
- Press ⏻ to turn on the power.
-
Press 📥 repeatedly to select the cooling/ Heating operation.
-
Press ☐ WATT OPTION to select 80
- 80 and 7 are displayed on the screen.

- Press ☐WATT OPTION to select 60
- 60 and 7 are displayed on the screen.
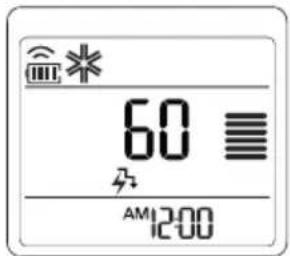
- Press ☐ to select 40
- 40 and 7 are displayed on the screen.

Displayed on the Indoor unit (The display on the unit depending on the model)
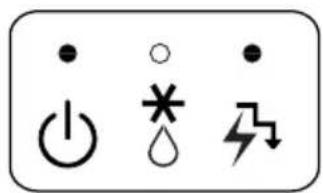
- Press ⬤WETT OPTION one more time to return to the normal Cooling/Heating operation.
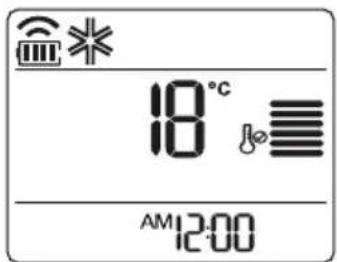
Displayed on the Indoor unit (The display on the unit depending on the model)
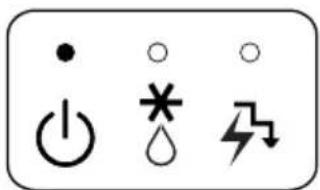

NOTE
- Due to 'Active energy control operation'
- Cooling/Heating capacity for 'Active energy control': Approximately 80% / 60% / 40% of rated cooling/heating capacity.
- You can set desired temperature in 'Active energy control operation'. Setting temperature will be displayed for 5 seconds and then return to the display 80% / 60% / 40% .
- 'Active energy control operation' is memorized. Ex) In case of restarting the air-conditioner during 'Active energy control operation 80%', It operates 'Active energy control operation 80%' automatically.

HS175NE
OPERATING THE AIR CONDITIONER WITHOUT THE REMOTE CONTROL
You can use the on/off button of the indoor unit to operation the air conditioner when the remote control is unavailable. However, the fan speed is set to high.
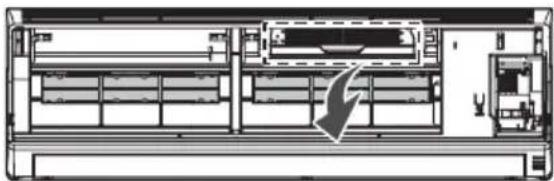
- Open the front cover.
- Lift up both side of the cover slightly.

*The feature can be changed according a type of model.
2. Press the On/Off button.

*The feature can be changed according a type of model.
- For cooling and heating model, the operation mode changes, depending on the room temperature.
| Room Temp. | Set Temp. Operation mode |
| Below 21°C | 24°C Heating operation |
| Above 21°C and below 24°C | 23°C Dehumidifying operation |
| Above 24°C | 22°C Cooling operation |
- For cooling only model, the temperature is set to 22° C.
RESTARTING THE AIR CONDITIONER AUTOMATICALLY
When the air conditioner is turned on again after a power failure, this function restores the previous settings. This function is a factory default setting. DISABLING AUTO RESTART
- Open the front cover.
- Lift up both side of the cover slightly.
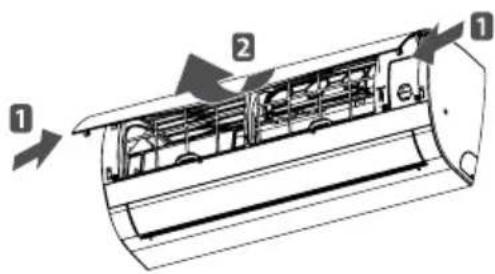
*The feature can be changed according a type of model.
- Press the On/Off button and hold it for 6 seconds.
- The unit will beep twice and the lamp will blink twice 4 times.

*The feature can be changed according a type of model.
- To re-enable the function, press the On/Off button and hold it for 6 seconds. The unit will beep twice and the lamp will blink 4 times.

NOTE
- If you press and hold the On/Off button for 3-5 seconds, the unit will switch to the test operation. In the test operation, the unit blows out strong air for cooling for 18 minutes and then returns to the factory default setting.
MAINTENANCE
Clean the product regularly to maintain optimal performance and to prevent possible breakdown.
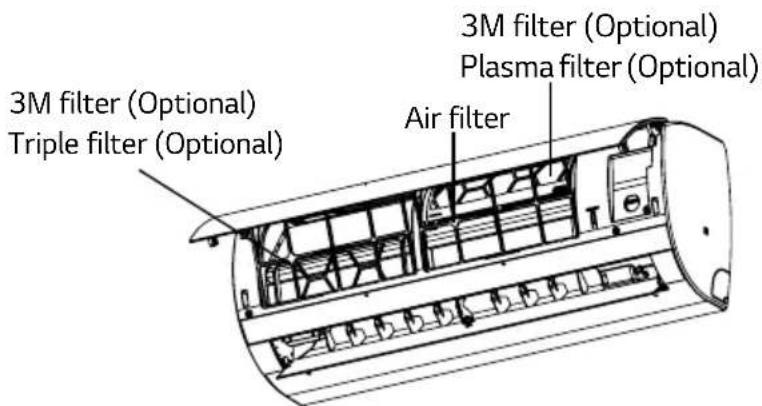
* The feature can be changed according a type of model.
| Item Cleaning | interval Cleaning method | |
| Air filter 2 weeks See “Cleaning Air filter” | ||
| 3M filter 1 month See “Cleaning 3M filter” | ||
| Triple filter 3 months See “Cleaning Triple filter” | ||
| Plasma filter 1 month See “Cleaning Plasma filter” | ||
| Indoor unit surface Regularly Use a soft, dry cloth. Do not use bleach or abrasives. | ||
| Outdoor unit | Regularly | Use steam to clean the heat exchanger coils and the panel vents (consult with technician). |

CAUTION
- Turn off the power and unplug the power cord before you perform any maintenance; otherwise it may cause electric shock.
- Never use water that is hotter than 40°C when you clean the filters. It may cause deformation or discoloration.
- Never use volatile substances when you clean the filters. They may damage the surface of the product.
- Do not washed the 3M filter with water, because the filter can be damaged.

NOTE
• The location and shape of the filter may differ, depending on the model.
- Make sure to clean the heat exchanger coils of the outdoor unit regularly, as dirt collected in the coil may decrease the operational efficiency or increase energy costs.
HS175NE
CLEANING THE AIR FILTER
Cleaning the Air filter once every 2 weeks or more if necessary.
-
Turn off the power and unplug the power cord.
-
Open the front cover.
- Lift up both sides of the cover slightly.

natural_image
Line drawing of a car air vent with airflow direction indicated by arrows (no text or symbols)* The feature can be changed according a type of model.
- Hold the knob of the Air filter, lift it up slightly and remove it from the unit.

natural_image
Line drawing of a car air conditioner unit with hands operating it (no text or symbols)* The feature can be changed according a type of model.
- Clean the filter with a vacuum cleaner or with warm water.
- If dirt is difficult to remove, wash the filter in lukewarm water with detergent.
- Dry the filter in the shade.

NOTE
- For inner cleaning, contact an Authorized Service center or a dealer. Do not use harsh detergent that causes corrosion or damage on the unit. Harsh detergent may also cause failure of product, fire, or electric shock.
CLEANING TRIPLE FILTER (OPTIONAL)
-
Turn off the power and unplug the power cord.
-
Open the front cover and remove Air filter (See "Cleaning Air filter").
-
Pull out the Triple filter.
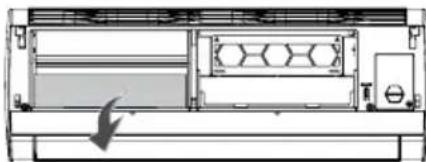
natural_image
Technical line drawing of a mechanical assembly with no visible text or symbols* The feature can be changed according a type of model.
- Dry the filer in direct sunlight for 2 hours.

NOTE
- The location and shape of the filters may differ, depend on the model.
CLEANING PLASMA FILTER (OPTIONAL)
- Turn off the power and unplug the power cord.
- Open the front cover and remove Air filter. (See "Cleaning Air filter").
- Remove the plasma filter in 10 seconds.
natural_image
Architectural cross-section diagram of a room with storage tanks and equipment (no text or labels)* The feature can be changed according a type of model.
4. Use a vacuum cleaner to remove any dirt. Do not wash the filter with water may be makes damage to the filter.
CLEANING 3M FILTER (OPTIONAL)
Clean the filter once every 1 months and change the new filter once every 6 months.
- Turn off the power and unplug the power cord.
- Open the front cover and remove Air filter. (See "Cleaning Air filter").
- Pull out 3M filter.

* The feature can be changed according a type of model.
4. Use a vacuum cleaner to remove any dirt. Do not wash the filter with water may be makes damage to the filter.

NOTE
- The location and shape of the filters may differ, depend on the model.

TROUBLESHOOTING
SELF-DIAGNOSIS FUNCTION
This product has a built-in self-diagnosis function. If an error occurs, the lamp of the indoor unit will blink in 2 second intervals. If this occurs, contact your local dealer or service center.
BEFORE REQUESTING SERVICE
Please check the following before you contact the service center. If the problem persists, contact your local service center.
| Problem Possible causes Corrective action | ||
| There is a burning smell and a strange sound coming from the unit. | - | Turn off the air conditioner, unplug the power cord and contact the service center. |
| Water leaks from the indoor unit even when the humidity level is low. | ||
| The power cord is damaged or generating excessive heat. | ||
| A switch, a circuit breaker (safety ground) or a fuse is not operated properly. | ||
| The air conditioner does not works. | The air conditioner is unplugged. | Check whether the power cord is plugged into the outlet. |
| A fuse is blown or the power supply is blocked. | Replace the fuse or check if the circuit breaker has tripped. | |
| A power failure has occurred. | Turn off the air conditioner when a power failure occurs. When the power is restored, wait 3 minutes, and then on the air conditioner. | |
| The voltage is too high or too low. | Check if the circuit breaker has tripped. | |
| The air conditioner turned off automatically at a preset time. | Press the power button again. | |
| The air conditioner does not generate cool air. | Air is not circulating properly. | Make sure that there are no cur-tains, blinds or furniture blocking the front of the air conditioner. |
| The Air filter is dirty. | Clean the Air filter once every 2 weeks. See “Cleaning Air filter” for more information. | |
| The room temperature is too high. | In summer, it may take some time to cool indoor air. In this case, select the jet cool operation to cool indoor air quickly. | |
| Cold air is escaping from the room. | Make sure that no cold air is escaping through ventilation points in the room. | |
| The desired temperature is higher than the set temperature. | Set the desired temperature to a level lower than the current temperature. | |
| There is a heating source nearby. | Avoid using a heat generator such as an electric oven or a gas burner while the air conditioner is in operation. | |
| Air circulation operation is selected. | In the air circulation operation, air blows from the air conditioner without cooling or heating the indoor air. Switch the operation mode to the cooling operation. | |
| It is not possible to adjust the fan speed. | The auto operation, jet operation or dehumidifying operation is selected. | In some operation modes, such as the jet or dehumidifying operation modes, you cannot adjust the fan speed. Select an operation mode in which you can adjust the fan speed. |
| It is not possible to adjust the temperature. | The air circulation operation or jet operation is selected. | In some operation modes, such as the air circulation or jet operation mode, you cannot adjust the temperature. Select an operation mode in which you can adjust the temperature. |

Operation ranges
For Heat & Cool model, heating operation range follows the below table.
| Heating operation range | outdoor temperature |
| 0 ~ 24°C |
* When the outdoor temperature drops below 0° C, heating capacity may drop slightly depending on the operation condition.
SPECIFICATION
• Power supply : 220-240 V\~, 50Hz
- Protection against electrical sock : Class I
- Protection against harmful ingress of solid particles and moisture : IPX4 (Outdoor unit), IPX0 (indoor unit)
- You can find further information on energy label affixed on the product.
| Model Name | EEI | Energy Efficiency Class (Cooling/Heating) | ||
| Cooling (EER) | Heating (COP) | |||
| BS-W096WEA0 S | 09BWH SWE0 3.24 | 3.61 A/A | ||
| BS-W126HEA0 S | 12BWH SHE0 3.21 | 3.61 A/A | ||
| BS-W096WEA0 S | 09BWH SWE0U 3.24 | 3.61 A/A | ||
| BS-W126HEA0 S | 12BWH SHE0U 3.21 | 3.61 A/A | ||
| BS-W096WYA0 S | 09BWS SWG0U 3.24 | 3.61 A/A | ||
| BS-W126HYA0 | S12BWS SHG0U | 3.21 3.61 A/A | ||
NOTE

LG
Life's Good
natural_image
Technical line drawing of a remote control casing with internal components and a handle (no text or symbols)natural_image
Technical line drawing of a mechanical device with a handle and internal components (no text or symbols)natural_image
Line drawing of a mobile phone with keypad and button (no text or symbols)УПРАВЛЕНИЕ
natural_image
Line drawing of a wall-mounted air conditioner unit with a close-up view showing the exterior panel (no text or symbols)

ПРИМЕЧАНИЕ
! ПРИМЕЧАНИЕ
natural_image
Diagram of a car air vent with airflow direction indicated by arrows (no text or symbols)natural_image
Line drawing of a car air conditioner unit with hands installing or adjusting the panel (no text or symbols)natural_image
Technical line drawing of a mechanical assembly with no visible text or symbolsnatural_image
Architectural floor plan showing room layouts and structural elements (no text or labels)natural_image
Technical line drawing of a remote control casing with internal components and a handle (no text or symbols)natural_image
Technical line drawing of a mechanical device with a handle and internal components (no text or symbols)КЕРУВАННЯ
natural_image
Diagram showing a door panel connected to a control panel, with an arrow pointing to the door (no text or symbols present)! ПРИМІТКА

! ПРИМІТКА
! ПРИМІТКА
natural_image
Line drawing of a car air vent system with airflow direction indicated by arrows (no text or symbols)natural_image
Line drawing of a car air conditioner unit with hands installing or adjusting the panel (no text or symbols)natural_image
Pure technical diagram of a mechanical or electrical component with no visible text, numbers, or symbolsnatural_image
Architectural diagram of a server room with labeled components and an arrow indicating a directional flow (no text or symbols present)natural_image
Line drawing of a remote control casing with internal components and a handle (no text or symbols)natural_image
Technical line drawing of a mechanical device with a handle and internal components (no text or symbols)natural_image
Line drawing of a mobile phone with keypad and button (no text or symbols)ЭРЕКЕТ ЕТУ ЭДІСІ
natural_image
Line drawing of a wall-mounted air conditioner unit with a remote control panel inserted, showing no text or symbols.
ECKEPTNE
! ECKEPTNE
natural_image
Line drawing of a car air vent with airflow direction indicated by arrows (no text or symbols)natural_image
Line drawing of a car air conditioner unit with hands installing or adjusting the panel (no text or symbols)natural_image
Technical line drawing of a mechanical or electrical component with no visible text or symbolsnatural_image
Technical line drawing of a server rack with internal compartments and a directional arrow indicating movement (no text or symbols)natural_image
Line drawing of a remote control casing with internal components and a handle (no text or symbols)natural_image
Technical line drawing of a mechanical device with a handle and internal components (no text or symbols)natural_image
Line drawing of a mobile phone with keypad and buttons, showing a downward arrow (no text or symbols)СПОСАБ ПРАЦЫ
natural_image
Line drawing of a wall-mounted air conditioner unit with a remote control panel inserted, showing no text or symbols.ЗАЎВАГА
ЗАЎВАГА
natural_image
Line drawing of a car air duct with airflow and ventilation system (no text or symbols)natural_image
Line drawing of a car air conditioner unit with hands installing or adjusting the panel (no text or symbols visible)natural_image
Technical diagram of a mechanical or electrical component with no visible text, numbers, or symbols.natural_image
Architectural cross-section diagram of a multi-level building with structural layout and ventilation duct (no text or labels)- TIPS FOR SAVING ENERGY
- For your records
- IMPORTANT SAFETY INSTRUCTIONS
- READ ALL INSTRUCTIONS BEFORE USING THE APPLIANCE.
- WARNING
- CAUTION
- INSTALLATION
- OPERATION
- CONTENTS
- TIPS FOR SAVING ENERGY
- IMPORTANT SAFETY INSTRUCTIONS
- BEFORE USE
- USING THE REMOTE CONTROL
- BASIC FUNCTIONS
- ADVANCED FUNCTIONS
- TROUBLESHOOTING
- SPECIFICATION
- BEFORE USE
- NOTE
- INSERTING BATTERIES
- INSTALLING THE REMOTE CONTROL HOLDER
- OPERATING METHOD
- USING THE REMOTE CONTROL
- HSI75NE
- BASIC FUNCTIONS
- COOLING YOUR ROOM (COOLING OPERATION)
- REMOVING HUMIDITY (DEHUMIDIFYING OPERATION)
- HEATING YOUR ROOM (HEATING OPERATION)
- AIRING YOUR ROOM (AIR CIRCULATION OPERATION)
- ADJUSTING THE FAN SPEED
- ADJUSTING THE AIR FLOW DIRECTION
- SETTING THE TIMER
- SETTING THE CURRENT TIME
- TURNING ON THE AIR CONDITIONER AUTOMATICALLY AT A SET TIME
- TURNING OFF THE AIR CONDITIONER AUTOMATICALLY AT A SET TIME
- CANCELING THE TIMER SETTING
- SETTING SLEEP MODE
- ADVANCED FUNCTIONS
- CHANGING ROOM TEMPERATURE QUICKLY (JET COOL/HEAT) (OPTIONAL)
- INDOOR AIR PURIFICATION (AUTO CLEAN OPERATION)
- HS175NE
- OPERATING THE AIR CONDITIONER WITHOUT THE REMOTE CONTROL
- RESTARTING THE AIR CONDITIONER AUTOMATICALLY
- MAINTENANCE
- CLEANING THE AIR FILTER
- CLEANING TRIPLE FILTER (OPTIONAL)
- CLEANING PLASMA FILTER (OPTIONAL)
- CLEANING 3M FILTER (OPTIONAL)
- TROUBLESHOOTING
- SELF-DIAGNOSIS FUNCTION
- BEFORE REQUESTING SERVICE
- Operation ranges
- SPECIFICATION
- LG
- УПРАВЛЕНИЕ
- ПРИМЕЧАНИЕ
- ! ПРИМЕЧАНИЕ
- КЕРУВАННЯ
- ! ПРИМІТКА
- ЭРЕКЕТ ЕТУ ЭДІСІ
- ECKEPTNE
- ! ECKEPTNE
- СПОСАБ ПРАЦЫ
- ЗАЎВАГА
Brand : LG
Model : S12BWS
Category : Air conditioner