
EHG8321BC - Cooker ELECTROLUX - Free user manual and instructions
Find the device manual for free EHG8321BC ELECTROLUX in PDF.


| Product Type | Freestanding Cooker |
| Brand | Electrolux |
| Model | EHG8321BC |
| Energy Type | Dual Fuel (Gas Hob + Electric Oven) |
| Width | 60 cm |
| Height | 85 cm |
| Depth | 60 cm |
| Weight | 55 kg |
| Hob Burners | 4 gas burners (1 triple-ring wok burner) |
| Oven Capacity | 71 L |
| Oven Functions | Conventional, Grill, Fan-assisted |
| Oven Cleaning | Easy-clean enamel |
| Control Type | Knobs + Digital Display |
| Safety Features | Flame failure device, child lock, cool touch door |
| Power Supply | 220-240 V, 50-60 Hz |
| Gas Connection | Natural gas or LPG convertible (injectors included) |
| Energy Efficiency Class | A |
| Noise Level | < 50 dB |
| Additional Features | Digital timer, interior oven light, telescopic shelves |
| Repairability | Spare parts available for 10 years |
| Included Accessories | Grill tray, baking tray, trivet |
Frequently Asked Questions - EHG8321BC ELECTROLUX
User questions about EHG8321BC ELECTROLUX
0 question about this device. Answer the ones you know or ask your own.
Ask a new question about this device
Download the instructions for your Cooker in PDF format for free! Find your manual EHG8321BC - ELECTROLUX and take your electronic device back in hand. On this page are published all the documents necessary for the use of your device. EHG8321BC by ELECTROLUX.
USER MANUAL EHG8321BC ELECTROLUX
Installation & User manual
Enjoy peace of mind. Register your appliance today.
Stay updated on better living services, safety notices and shop for accessories.
- Open the camera app on your smartphone and point at the QR code to scan.
Product Registration QR code is located on the top surface or underside of your appliance.
-
Tap the notification or link to open the registration form.
-
Complete your details and enjoy peace of mind.
Safety instructions .... 3
Parts identification .... 4
Installation instructions 6
Installation procedure 7
Gas connection 8
Operation 9
Ignition burners 9
Using the hob correctly 9
Maintenance and care ....10
Glass top 10
Burner - caps & crowns 10
What to do if....10
Technical specifications 11
Warranty conditions 11
Thank you for choosing and using Electrolux home appliances.
Electrolux Group of Sweden is one of the world largest home appliances companies. With more than 65 million Electrolux products being used by millions of households worldwide each year, it is also the world largest manufacturer of kitchen electrical appliances. The group has sold more than 55 million kitchen products, which is equivalent to the combined heights of 5 Mount Everest. Besides that, more than 2/3 of the world star hotels use Electrolux professional kitchen equipment.
Clearly, the excellent achievement of Electrolux over the last 80 years has been widely recognized by 450 million families all over the world. Now, we are pleased to make some of the best products from this renowned brand available to consumers in Southeast Asia. To us, not only is Electrolux one of the most reliable brands in dealing with home appliances, it is also a brand that promises to bring innovative lifestyles to all families through its cutting edge technologies and excellent designs. For not only do they add a touch of elegance to your kitchen, but Electrolux products also makes cooking easier, more enjoyable and something to share with. Enjoy happy cooking now with Electrolux kitchen appliances!
Once again, we would like to extend our heartiest thanks to you for your trust in choosing Electrolux products!
Before installing or using this appliance, please read this instruction book carefully and pay particular attention to the safety warnings in the following page.
Should you have further enquiries regarding this appliance, kindly contact our Customer Care for advice. Please keep this instruction book for future reference and pass it on to any future owners of this appliance.
Safety instructions
Do not use gas other than that which is specified on the label attached.
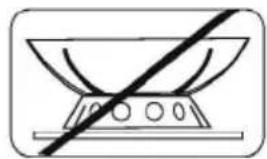
Do not place anything, e.g. flame tamer, asbestos mat, between pan and pan support as serious damage to the appliance may result. (Fig 1)
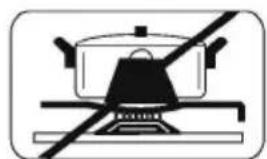
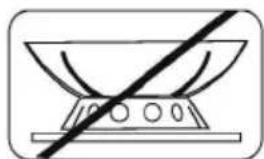
Do not remove the pan support and enclose the burner with a wok stand not supplied by Electrolux as this will concentrate the flame and deflect the heat onto the top plate. (Fig 2)
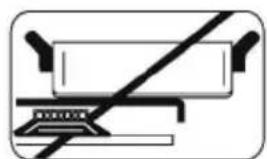
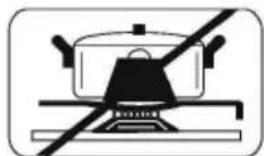
Do not use large pots or heavy weights which can bend the pan support or deflect the flame onto the top plate. (Fig 3)
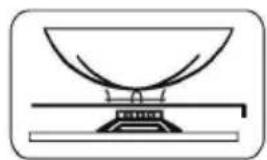
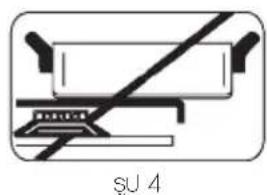
Locate pan centrally over burner so that it is stable and does not overheat the appliance. (Fig 4)
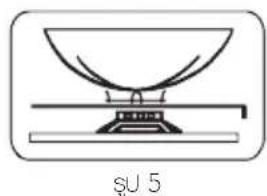
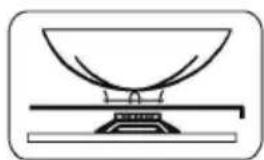
Use only wok support supplied or recommended by the manufacturer of the appliance. (Fig 5)
Wok support to be used for wok and other trivets for flat bottom pot.
The unit to be used for cooking only. Do not dry towels, clothes, etc., over it. If this is done, there is danger of fire.
If a gas leak is found, close stopcock, open up all windows and call your dealer. Do refrain from turning an electric switch on or off, lighting a match, smoking or using a lighter.
Use the appliance in a well-ventilated room.
Do not use vinyl gas hose. It is liable to be softened by heat. Use only a rubber hose.
Be sure to turn off the ignition knob and regulator of the cylinder after use.
Avoid touching the burner, pan stand etc., immediately after use. Otherwise you will get burnt.
Ensure that the rubber hose does not touch any part of the unit or lies underneath it.
Connect the rubber hose to the gas inlet and fasten it with a hose clamp.
The pan stand leg nearest to the flame will have discoloration after use. Such phenomenon is normal.

WARNING:-
- In the event of the burner flames being accidentally extinguished, turn off the burner control knob and do not attempt to re-ignite the burner for at least 1 minute.
- For burner fitted with a flame supervision device, if after 15 seconds of ignition operation the burner has not lit, stop operating the device and open the compartment door and wait at least 1 minute before attempting a further ignition of the burner.
- If nozzle holes are blocked, use a thin wire or pin to pierce and clean the nozzle holes.

natural_image
Pure electrical circuit lines without any symbolsFig. 1
natural_image
Simple line drawing of a bowl with a diagonal line crossing through it, no text or symbols present.Fig. 2
natural_image
Simple line drawing of a cooking pot with a diagonal line crossing it, no text or symbols present.Fig. 3
natural_image
Simple line drawing of a crossed-out electrical circuit with no text or symbolsFig. 4
natural_image
Simple line drawing of a laboratory funnel on a stand (no text or symbols)Fig. 5
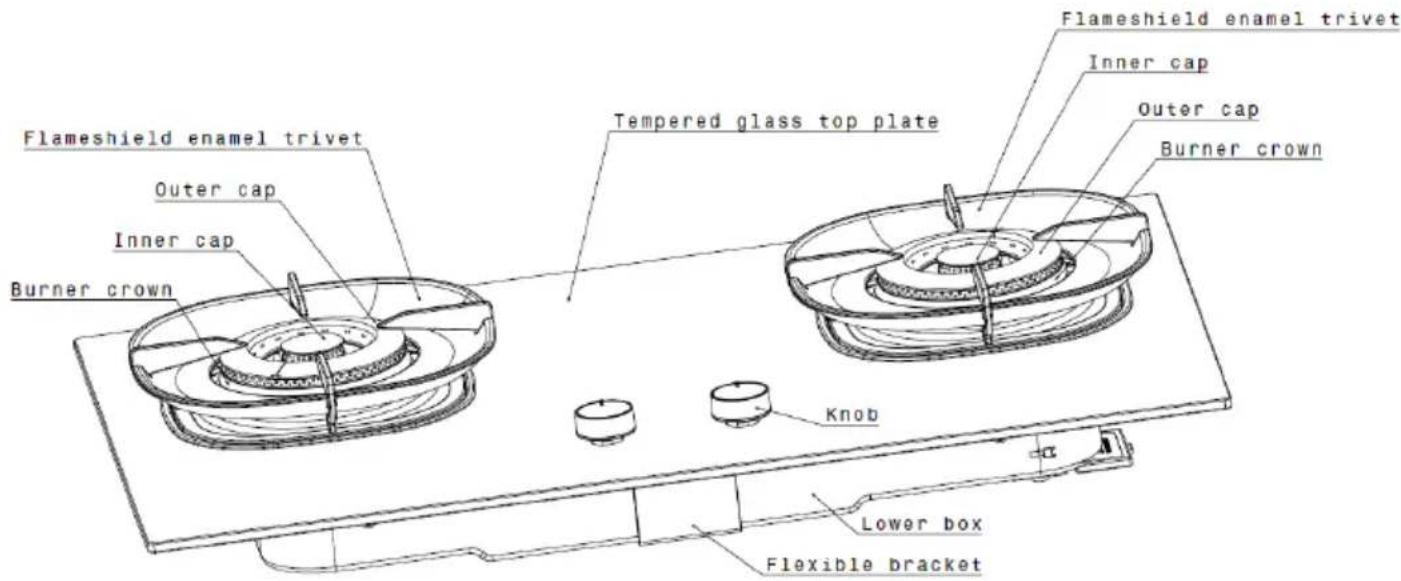
EHG8241GE/EHG8260GE
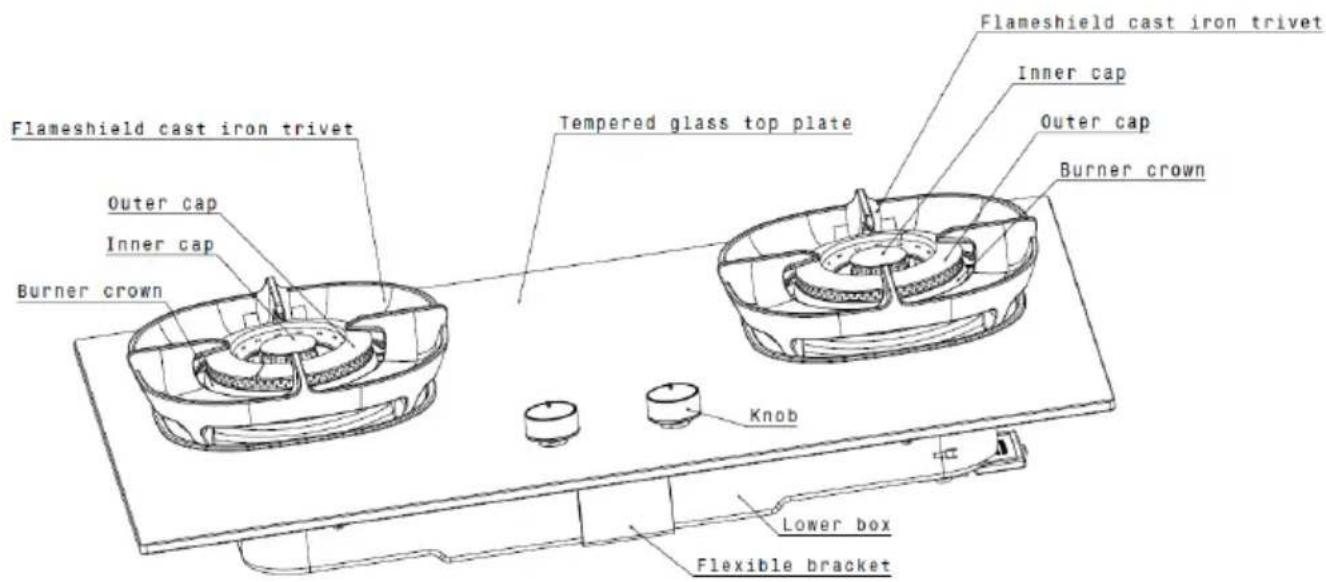
EHG8250BC / EHG8251BC / EHG9251BC / EHG8260BC / EHG9261BC EHG8250BCP
Flameshield Trivet
The Flameshield Trivet reduces heat -loss to deliver more intense heat to the cooking process, for effortlessly perfecting dishes from soups to sauces to stir-fries. the curved trivet profile works like cradling a candle, cupping the flame and channeling the energy directly onto the bottom of the pan. By directly heat more efficiently, our FlameShield Trivet cook tops cook faster and consumer less energy than previous models, helping you to achieve quick, tasty meals, whilst also lowering your energy bills over time.
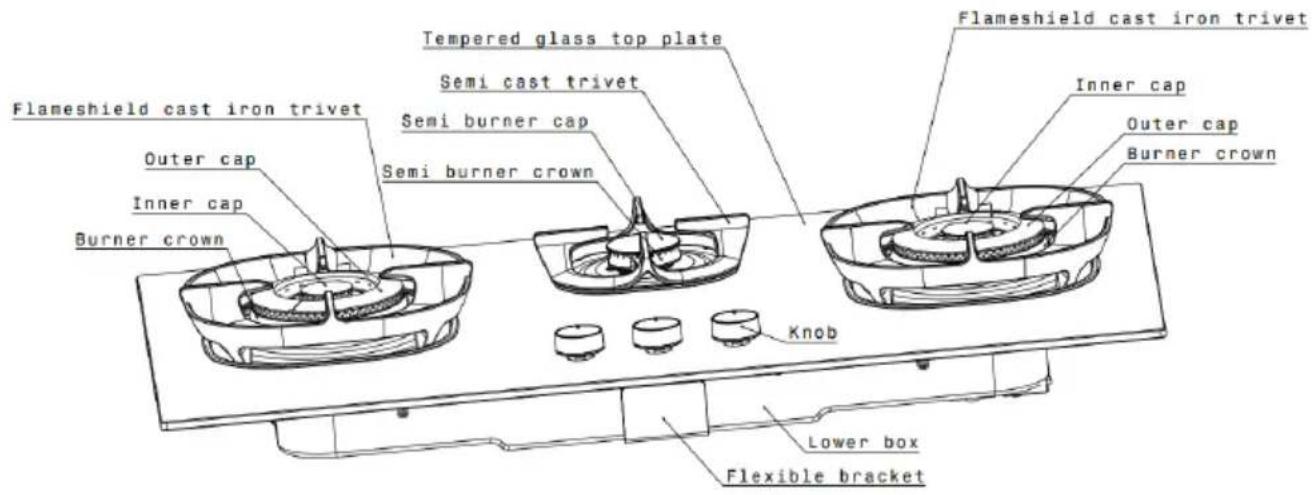
EHG9350BC / EHG9351BC / EHG9361BC EHG9350BCP

EHG8321BC/EHG9331BC
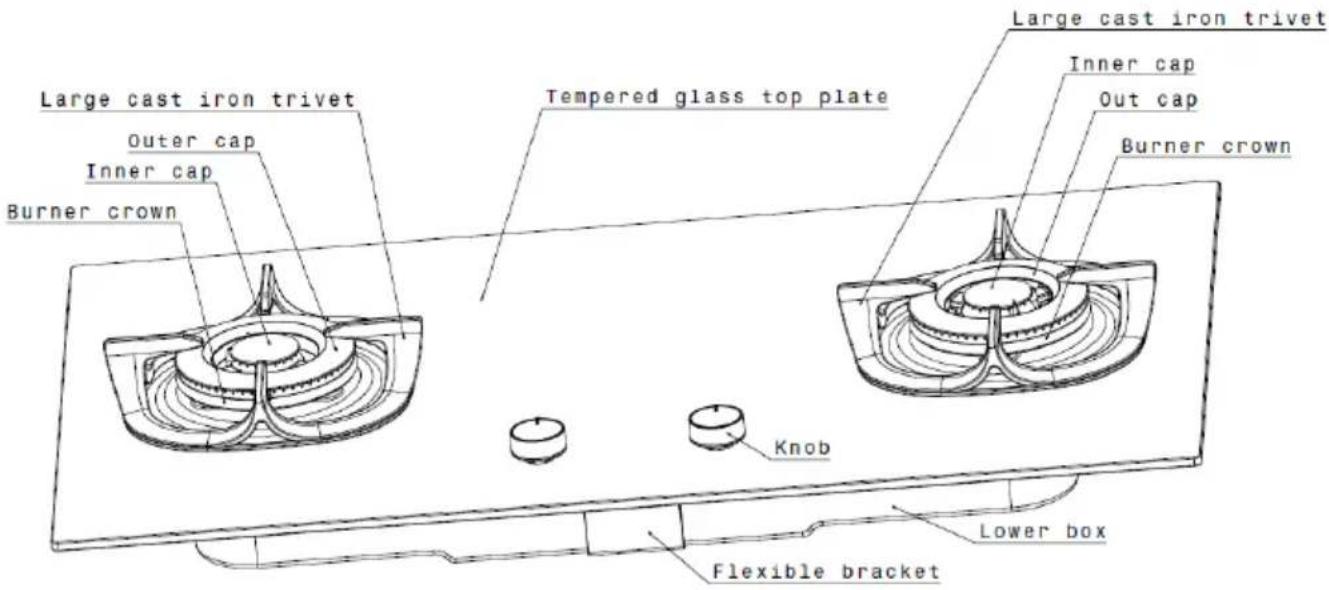
EHG9231BC
The Class of the appliance: Class 3
These instructions are only valid if the country symbol appears on the appliance.
If the symbol does not appear on the appliance, it is necessary to refer to the technical instructions which will provide the necessary instructions concerning modification of the appliance to the conditions of use of the country.
Prior to installation, ensure that the local distribution conditions (nature of the gas and gas pressure) and the adjustment of the appliance are compatible
The adjustment conditions for this appliance are stated on the label (or data plate).
This appliance is not connected to a combustion products evacuation device. It shall be installed and connected in accordance with current installation regulations.
Particular attention shall be given to the relevant requirements regarding ventilation.
Avoid using of cooking vessels on the hotplate that overlap its edges.
The use of inappropriate hob guards can cause accidents.
Hob guards cannot be used.
The use of a gas cooking appliance results in the production of heat, moisture and products of combustion in the room in which it is installed.
Ensure that the kitchen is well ventilated, especially when the appliance is in use: keep natural ventilation holes open or install a mechanical ventilation device (mechanical extractor hood).
Prolonged intensive use of the appliance may call for additional ventilation, for example opening of a window, or more effective ventilation, for example increasing the level of mechanical ventilation where present.
CAUTION:
“ In case of hotplate glass breakage:
_shut immediately off all burners and any electrical heating element and isolate the appliance from the power supply.
_ do not touch the appliance surface,
_ do not use the appliance."
Installation instructions
- Have the installer show you the location of the gas shut off valve and how to shut it off in emergency.
- Be certain all packing materials are removed from the hob before operating to prevent fire or smoke damage that could be caused by the presence of these materials.
- Observe all instructions for minimum clearance to any combustible surfaces. These should be in accordance with information on the rating plate and with national fire laws.
- If the hob is installed near windows, proper precautions should be taken to prevent curtains from blowing over burners creating FIRE HAZARD.
- When choosing a location for this hob consider, availability and position of gas and electric supply paths.
- Any openings around gas and electric service outlets shall be closed at the time of installation.
- Do not install another hob next to this unit.
- The underside of the hob must be checked to ensure that there are no projections which might foul the hob. Make sure that the countertop is solidly supported and can withstand the weight of the hob.
- Check that the cabinet is leveled from side to side and from front to back in its installed position.
- Cabinet ventilation can be improved by the provision of air holes to the cabinet. Care should be taken to ensure that ventilation holes are not obstructed.
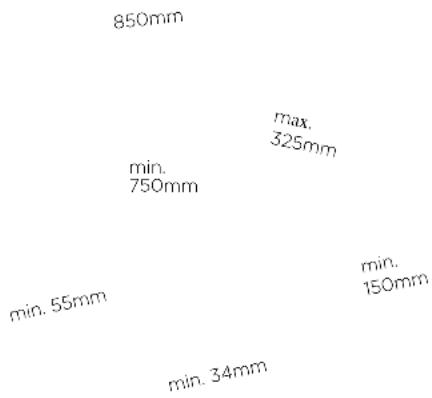
- When fitting a vent hood above the hob, refer to the manufacturer own installations relating to that product. However as a general rule, a minimum clear vertical distance of 750mm (30" should be maintained between the cooktop and the underside of any cupboard, wall unit or vent. (Fig 6)
- Any cabinet installed above the cooktop must not be greater than 325mm (13" deep. (Fig 6)
- The edge of the hob must have a minimum distance from the real wall of 55mm. (Fig 6)
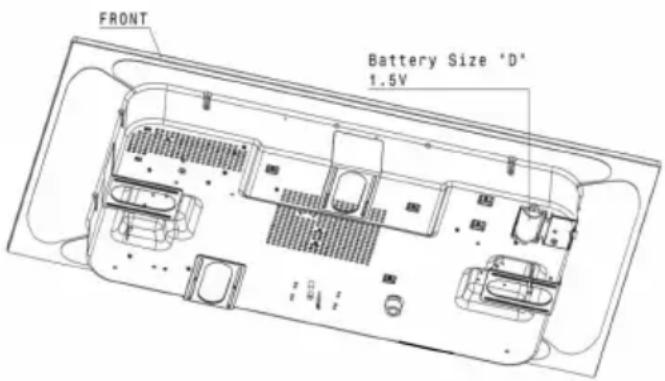
BATTERY COMPARTMENT
- When the battery is exhausted; or the spark become weakness, a new battery should be replaced.
- The battery compartment is located as shown in the diagram. Please place the battery in correct polarity as shown.
Warning: Please take out the battery if not use for a long time.
scatter
| Label | Value (mm) | |---|---| | 850mm | | | min. 750mm | max. 325mm | | min. 55mm | min. 150mm | | min. 34mm | | The data points are not explicitly labeled but correspond to the labels on the axes.Fig.6 (in mm)
If clearance between side/back walls and periphery of the burner is less than 200mm, the walls must be protected with a non-combustible material. The protection must extend a minimum distance of 450mm above the burner. Horizontal surfaces less than 750mm vertically above the cooktop must also be protected.

Installation procedure
- Before installing the appliance, check that the location provides the required clearances from combustible materials and check if necessary to provide protection to adjacent surfaces as required by the regulation. Make provision for the gas supply to be connected to the location.
- Cut the opening in the bench top by the cardboard - template given in the hob packing or to the dimensions shown in Fig 7.
- Remove the hob from the carton.
• Install the hob in the cut-out (Fig 7) - Connect gas supply to inlet of hob. Turn the gas on and check for leaks using soap solution and brush around all the joints and connection.
- Test the appliance; depress the control knob and turn to full flame setting to activate the electric igniter. The burner will ignite. Adjust control knob to the desired setting. On initial usage you may have to repeat this ignition function several times (to allow air to be purged from the gas supply system). No adjustment should be necessary. If any problem occurs, refer to the servicing instructions or the fault finding chart.
- Ensure the manual is left with the user. If any of the above procedures do not produce satisfactory results, the agent service department should be consulted for more specialized assistance.
- This gas hob has been tested for operating on town gas pressure up to 31 mbar
- Gas connection
- The supply hose must be visible for its entire length (max. one meter) and must be secured with a hose clamp X (Fig 8). The sealing washer must be fitted.

IMPORTANT SAFETY INSTRUCTION:
Upon completion of gas installation connections, it is compulsory to check for gas leakage at the joint. (Soap test)

Soap test procedure
- Turn the burner controls off and turn on the gas supply.
- Apply soapy solution to each joint. (Figure 8)
- Formation of bubbles indicates leakage and must be tightened.
- Repeat soap test
WARNING:-
Check the data plate to ensure that the appliance is suitable for the available gas supply.
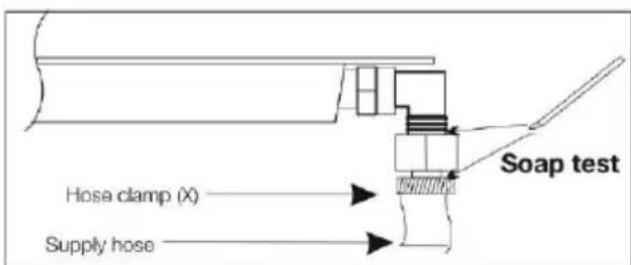
Fig 8
Flexi Installation Cut Out
- The smaller burner (lower) box of this cooktop combined with the extended glass overhang, and flexible bracket makes installation into existing counter cut-outs easy without additional modification.
- For replacement purchase, ensure cutout size fall within the given dimension for the desired hob.
• Gas hobs should be secured properly with the flexible brackets provided to prevent it from moving in Fig 7.
Model
Cut-out Dimension
| EHG8321BC | Width (630-765)*Depth(350-465) R50 |
| EHG8241GE | Width (630-765)*Depth(350-465) R50 |
| EHG8250BC | Width (630-765)*Depth(350-465) R50 |
| EHG8251BC | Width (630-765)*Depth(350-465) R50 |
| EHG8260GE | Width (630-765)*Depth(350-465) R50 |
| EHG8260BC | Width (630-765)*Depth(350-465) R50 |
| EHG9231BC | Width (700-865)*Depth(405-480) R50 |
| EHG9331BC | Width (700-865)*Depth(405-480) R50 |
| EHG9251BC | Width (700-865)*Depth(405-480) R50 |
| EHG9350BC | Width (700-865)*Depth(405-480) R50 |
| EHG9351BC | Width (700-865)*Depth(405-480) R50 |
| EHG9261BC | Width (700-865)*Depth(405-480) R50 |
| EHG9361BC | Width (700-865)*Depth(405-480) R50 |
| EHG8250BCP | Width (630-765)*Depth(350-465) R50 |
| EHG9350BCP | Width (700-865)*Depth(405-480) R50 |
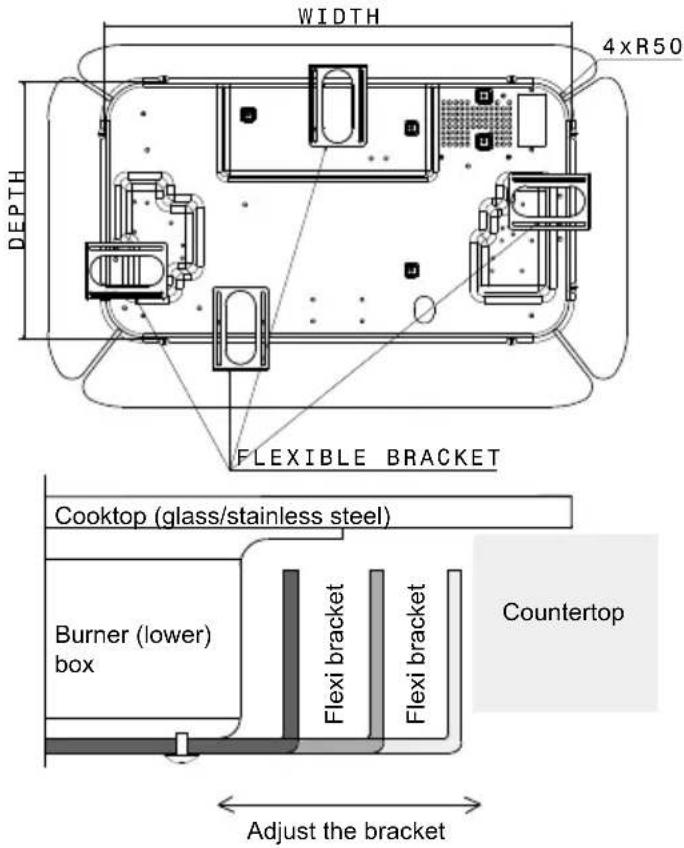
Fig. 7 (in mm)
Bench cut-out size viewed from front of bench, i.e. control panel at front. If clearance between side/back walls and periphery of the burner is less than 200mm, the walls must be protected with non-combustible material. The protection must extend a minimum distance of 50mm above the burner. Horizontal surfaces less than 750mm vertically above the hob must also be protected.
Ignition burners
- Check to make sure that the gas supply is accessible and set up with the necessary and appropriate fittings/connectors.
- Turn all control knobs to off position.
- This device is fitted with a safety tap to control the gas flow. When the dot on the knob lines up with the following symbols on the panel, these conditions prevail:
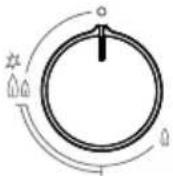
EHG8321BC/EHG9231BC/EHG9331BC/
EHG8241GE/EHG8250BC/EHG9350BC/
EHG8260GE/EHG8250BCP/EHG9350BCP
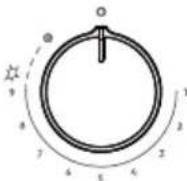
EHG8251BC/EHG9251BC/EHG9351BC/EHG8260BC/EHG9261BC/EHG9361BC
To turn off the gas, rotate the knob anticlockwise until you feel the distinct click on the knob and the indicator on the knob is pointing to "0".
- To ignite, hold the knob and depress for several seconds, rotate anti-clockwise to maximum gas flow position. For models with thermocouple, keep the knob depressed about 5\~8 seconds, otherwise the flame will extinguish.
- If the burner does not light the first time, repeat Step 4.
- If the flame extinguishes suddenly, repeat Step 4.
- When using the unit again immediately after having once turned it off, wait for about ten seconds before re-igniting.
- Each burner has its own independent ignitor.
- When the burner is lit, turn the knob to adjust the flame size according to your needs. This needs no depression of the knob.
For burner fitted with a flame supervision device, if after 15 seconds of ignition operation the burner has not lit, stop operating the device and wait at least 1 minute before attempting a further ignition of the burner.
Using the hob correctly
- To ensure maximum burner efficiency, it is strongly recommended that you use only pots and pans with a bottom fitting the size of the burner used, so that the flame will not spread beyond the bottom of the vessel (Table 1).
- It is also advisable, as soon as the liquid starts boiling, to turn down the flame so that it will barely keep the liquid simmering
| Burner | Minimum Diameter | Maximum Diameter |
| Wok burner | 120mm | 280mm |
| Semi-rapid | 120mm | 260mm |
Choice of burner
- A semi-rapid burner is for special low heat, simmering and slow cooking.
- A wok burner is for very fast heating using a wok or large pan.

NOTE: Remember that a wide-bottomed pan allows a faster cooking than a narrow one.
Always use pots which properly fit what you have to cook.
Particularly make sure that the pans are not too small for liquids, since these could easily overflow.
The pans should not be too large for a faster cooking.
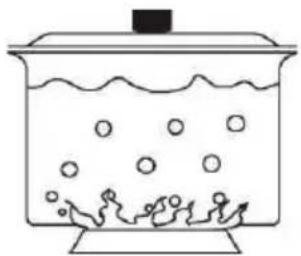
You should use pans with the right diameter to fit the burner, in order to make the most out of it, thus reducing gas consumption as in Fig 12.
It is also advisable to cover any boiling casserole and as soon as the liquid starts to boil, lower the flame enough to keep the boiling point
natural_image
Simple line drawing of a beaker with bubbles and two smaller figures inside, no text or symbols present.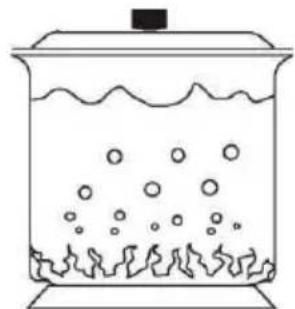
natural_image
Simple line drawing of a beaker with bubbles and liquid, no text or symbols present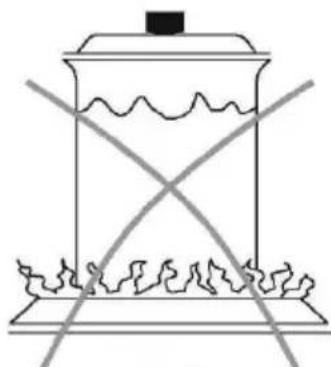
natural_image
Simple line drawing of a container with wavy liquid and two crossed lines below, no text or symbols present.Fig. 12
Glass top
- Persistent stains may require vigorous rubbing with nylon scourer or creamed powder cleansers. Household enamel cleaners are available, follow the manufacturer instructions in their use. Harsh abrasive cleaners, powder cleaners, steel wool or wax polishes should not be used.
- Do not use the glass top as a work table.
Burner caps & crowns
• These can all be lifted off and removed for separate cleaning.
- Ensure burner caps and crowns are thoroughly dried after cleaning or spillage.
- When cleaning the burner, ensure that all the flame ports, injector hole and other holes are free of any blockage. (Fig 13,14)
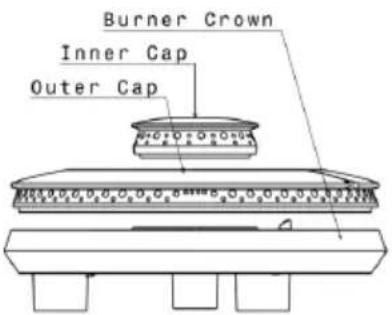
Fig 13
• After cleaning, ensure the burner caps are reassembled properly into position.
- After cleaning service, when assembling the burner crown and caps, care must be taken to ensure the spark plug is not knocked. The spark plug will crack if knocked and may face risk with flame ignition problem.
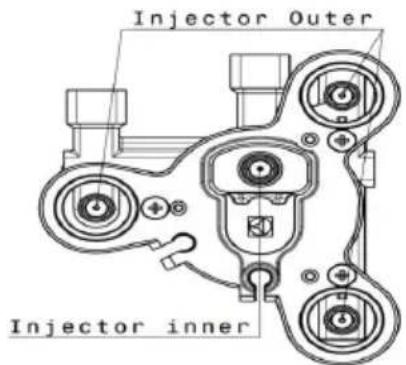
Fig 14

NOTE:-
When refitting the burner caps & crowns, ensure that
What to do if
| Phenomenon | Reason | Solution |
| Burner will not light... | Air in gas lineBlockage in lineIgnition not sparkingBattery is flatBurner not fitted correctly | Purge gas lineTrace back & clearCheck lead & electrodeReplace batteryFit burner in correct position |
| Burner lights back to injector... | Excessive lint up of burner mixing tubeExcessive gas pressure | Remove & clean burnerCheck gas regulator pressure & adjust if necessary |
| Burner has explosive ignition... | Excessive gas pressure | Check gas regulator pressure & adjust if necessary |
| Ignitor not sparking... | Excessive electrode gapIgnitor connections looseBattery is flat | Check gap, and adjust so it is 4-5mmCheck connections to ignitor, replace if faultyChange a new battery |

WARNING:
Do not spray aerosols in the vicinity of this hob while in operation. Some propellant gases can break down when heated and produce corrosive vapours which will attack some materials.
Articles which are made from flammable materials should not be stored in drawers or cupboards immediately below this hob.
Do not store articles within 50mm of the base.
Do not touch spark ignitor while lighting the burner.
Where this appliance is installed in a marine craft or in caravans, it shall not be used as a space heater.
Technical specifications
| Burner Photo | Burner Description | Gas Type | Heat Input | Gas Pressure | Model Name |
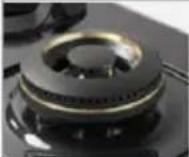 | Triple ring burner | TG | 4.0kW | 1lmbar | EHG8250BCP/EHG9350BCP |
| LPG | 5.2kW | 30mbar | EHG8241GE/EHG8250BC/EHG8251BC/ EHG9251BC/ EHG9350BC/EHG9351BC/ EHG8260BC/EHG8260GE | ||
| LPG | 5.5kW | 30mbar | EHG9261BC/EHG9361BC | ||
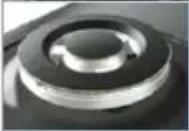 | Double ring burner | LPG | 5.0kW | 30mbar | EHG8321BC/EHG9231BC/EHG9331BC |
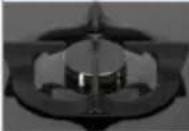 | Semi rapid burner | LPG | 2.0kW | 30mbar | EHG9350BC/EHG9351BC/EHG9361BC |
| TG | 1.8kW | 1lmbar | EHG9350BCP | ||
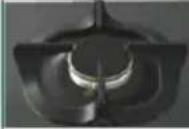 | Semi rapid burner | LPG | 1.65kW | 30mbar | EHG8321BC/EHG9331BC |
| Reduce Rate | 1.0kW | ||||
| Gas connection | 0.5 Inch straight thread (14 threads per inch) | ||||
| Battery | 1.5V D.C | ||||
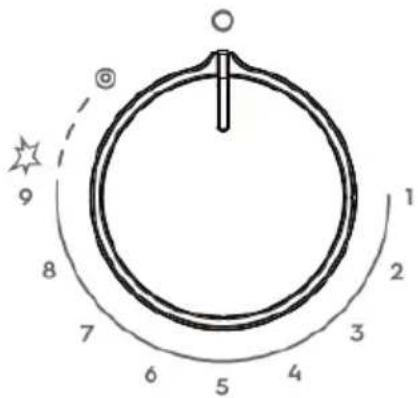
StepFlame
StepFlame delivers precise control on three rings of flame with stepped settings that click into place as you change the heat intensity. The pre-defined settings guarantee the same flame and heat level every single time, giving you both control and flexibility. This is perfect for a variety of techniques and dishes from delicately melting chocolate, to gently simmering sauces or stir-frying rice at high temperatures.
| StepName Cooking MethodSuggested Recipe Suggested Recipe | ||
| 1 | Melt | For melting chocolate. Method: Directly melt 20 grams of chocolate for 30 seconds in capitol. |
| 2 Simme6/Keep/Veep Warm | For simmering or keeping food warm. | |
| 3 | Stew | For stewing soup. |
| 4 | Poach (egg) | For poaching egg. Method: Swirl the water to create g tornado. Slide in the egg once the water is hot enough and poach for 3 minutes. |
| 5 Pan fryPan fry | For pan frying | |
| 6 | Stir fry | For low heat Stir Frying |
| 7 | Stir fry and Deep Fry | For high heat Stir Frying and Deep Fry |
| 8 | Sear | For searing meat and fish with skin down. |
| 9 | Boil | For fast boiling. |
 | Pancake mode | For cooking pancakes and crepes with even herb distribution from large surface. Method: Mix 1 egg, 1 cup milk, 11⁄4coppottl purpose oilour, 1⁄4despombolding powder. Cook for 2 minutes or until lightly brown. Then flip to cook the other side. |
Standard warranty conditions
We, Electrolux, undertake that with warranty period (refer to each country location for warranty period – months) this Electrolux appliance or any part thereof is proved to be defective by reason only of faulty workmanship or materials, we will, at our option repair or replace the same FREE OF CHARGE for labor materials or carriage on condition that:
The appliance has been correctly installed and used only on the electricity supply stated on the rating plate. The appliance has been used for normal domestic purposes only, and in accordance with the manufacturer instructions. The appliance has not been serviced, maintained, repaired, taken apart or tampered with by any person not authorized by us.
All service work under this guarantee must be undertaken by an Electrolux Service Center. Any appliance or defective part replaced shall become the Company property.
This warranty is in addition to your statutory and other legal rights.
This warranty does not include maintenance, like cleaning of hob.
It is encouraged to change regulator every 5 years and the hose every 2 years.
The manufacturer waives all liability for failure to observe the instructions for the appropriate installation, maintenance and use of the appliance.
If you need any technical help or would like more information about our products, please do not hesitate to contact our Customer Care Center, listed below:
Indonesia
Hotline service: 08041119999
Corporate Office Address: Unit T2-7, 7th Floor, Tower 2,
Jaya33 Hyperoffice, No. 3, Jalan Semangat, Seksyen 13,
46100 Petaling Jaya, Selangor
Office Tel : (+60 3) 7843 5999
Office Fax : (+60 3) 7955 5511
Consumer Care Center Address: Lot C6, No. 28,
Jalan 15/22, Taman Perindustrain Tiong Nam,
40200 Shah Alam, Selangor
Consumer Care Center Fax : (+60 3) 5524 2521
Email : malaysia.customercare@electrolux.com
Philippines
Consumer Care Center Toll Free :
1-800-10-845-CARE 2273
Consumer Care Hotline : (+63 2) 845 CARE 2273
Electrolux Philippines, Inc.
10th Floor. W5th Avenue Building
5th Avenue Corner 32nd Street
Bonifacio Global City,
Taguig Philippines 1634
Trunkline: +63 2 737- 4756
Website : www.electrolux.com.ph
Email : wecare@electrolux.com
Singapore
Consumer Care Center Tel: (+65) 6727 3699
Electrolux S.E.A. Pte Ltd.
1 Fusionopolis Place,
07-10 Galaxis, West Lobby
Singapore 138522.
Office Fax : (+65) 6727 3611
Email: customer-care.sin@electrolux.com
Thailand
Consumer Care Tel : (+66 2) 725 9000
Electrolux Thailand Co., Ltd.
Electrolux Building 14th Floor
1910 New Phetchaburi Road,
Bangkapi, Huai Khwang, Bangkok 10310
Office Tel : (+66 2) 7259100
Office Fax : (+66 2) 7259299
Email: customercarethai@electrolux.com
Vietnam
Consumer Care Center Toll Free :
1800-58-88-99
Floor 9th, A&B Tower
76 Le Lai street - Ben Thanh Ward - District 1
Ho Chi Minh City, Vietnam
Office Tel : (+84 8) 3910 5465
Office Fax : (+84 8) 3910 5470
Email: vncare@electrolux.com
PN:305536618-B
| EHG8321BC | EHG9350BC |
| EHG9231BC | EHG9351BC |
| EHG9331BC | EHG8260GE |
| EHG8241GE | EHG8260BC |
| EHG8250BC | EHG9261BC |
| EHG8251BC | EHG9361BC |
| EHG9251BC | EHG8250BCP |
| EHG9350BCP |
TH ตาเกิส
A
มือการตํา
WHASOUNHOTAIASHOTAI....10
natural_image
Simple line drawing of a bowl with a diagonal line crossing through it, labeled 'SU 2' below (no text or symbols on the diagram itself)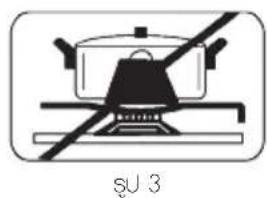
natural_image
Simple line drawing of a laboratory setup with a funnel and test tube (no text or symbols)

ขั้นตอนในการติดตั้ง
EHG8251BC/EHG9251BC/EHG9351BC/ EHG8260BC/EHG9261BC/EHG9361BC/ EHG8260SC
natural_image
Simple line drawing of a beaker with bubbles and two smaller figures inside, no text or symbols present.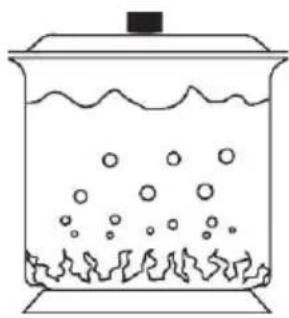
natural_image
Simple line drawing of a beaker with liquid and bubbles, no text or symbols present
natural_image
Simple line drawing of a container with wavy liquid and two crossed lines above it, no text or symbols present.SU 12
Wons:on
Corporate Office Address: Unit T2-7, 7th Floor, Tower 2,
Jaya33 Hyperoffice, No. 3, Jalan Semangat, Seksyen 13,
46100 Petaling Jaya, Selangor
Office Tel : (+60 3) 7843 5999
Office Fax : (+60 3) 7955 5511
Consumer Care Center Address: Lot C6, No. 28,
Jalan 15/22, Taman Perindustrain Tiong Nam,
40200 Shah Alam, Selangor
Consumer Care Center Fax: (+60 3) 5524 2521
Email : malaysia.customercare@electrolux.com
Philippines
Consumer Care Center Toll Free :
1-800-10-845-CARE 2273
Consumer Care Holline: (+63 2) 845 CARE 2273
Electrolux Philippines, Inc.
10th Floor. W5th Avenue Building
5th Avenue Corner 32nd Street
Bonifacio Global City.
Taguig Philippines 1634
Trunkline: +63 2 737- 4756
Website : www.electrolux.com.ph
Email : wecare@electrolux.com
Singapore
Consumer Care Center Tel: (+65) 6727 3699
Electrolux S.E.A. Pte Ltd.
1 Fusionopolis Place,
07-10 Galaxis, West Lobby
Singapore 138522.
Office Fax : (+65) 6727 3611
Email: customer-care.sin@electrolux.com
Thailand
Consumer Care Tel: (+66 2) 725 9000
Electrolux Thailand Co., Ltd.
Electrolux Building 14th Floor
1910 New Phetchaburi Road.
Bangkapi, Huai Khwang, Bangkok 10310
Office Tel : (+66 2) 7259100
Office Fax : (+66 2) 7259299
Email: customercarethai@electrolux.com
Vietnam
Consumer Care Center Toll Free :
1800-58-88-99
Tel: (+84 8) 3910 5465
Electrolux Vietnam Ltd.
Floor 9th, A&B Tower
76 Le Lai street - Ben Thanh Ward - District 1
Ho Chi Minh City, Vietnam
Office Tel : (+84 8) 3910 5465
Office Fax : (+84 8) 3910 5470
Email : vncare@electrolux.com
PN:305536618-B
| EHG8321BC | EHG9350BC |
| EHG9231BC | EHG9351BC |
| EHG9331BC | EHG8260GE |
| EHG8241GE | EHG8260BC |
| EHG8250BC | EHG9261BC |
| EHG8251BC | EHG9361BC |
| EHG9251BC | EHG8250BCP |
| EHG9350BCP |

VN Bép gas
natural_image
Pure electrical circuit lines without any symbolsHình 1
natural_image
Simple line drawing of a bowl with a diagonal line crossing it, no text or symbols present.Hình 2
natural_image
Simple line drawing of a cooking pot with a diagonal line crossing it, no text or symbols present.Hình 3

natural_image
Simple line drawing of a cooking pot with a diagonal line crossing over it, no text or symbols present.Hình 4
natural_image
Simple line drawing of a laboratory funnel on a stand (no text or symbols)Hình 5
scatter
| Measurement | Value | |---|---| | 850mm | | | min. 750mm | max. 325mm | | min. 55mm | min. 150mm | | min. 34mm | | The data points are not explicitly labeled but correspond to the labels on the axes.Fig.6 (in mm)
Hinh 6 (đơn vị: mm)
EHG8251BC/EHG9251BC/EHG9351BC/EHG8260BC/EHG9261BC/EHG9361BC
natural_image
Simple line drawing of a beaker with bubbles and submerged objects (no text or symbols)
natural_image
Simple line drawing of a beaker with liquid and bubbles, no text or symbols present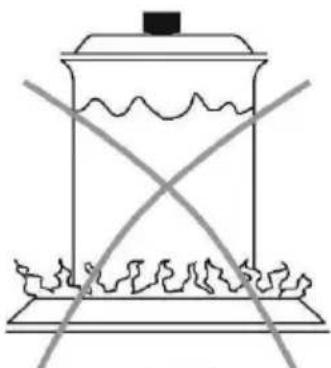
natural_image
Simple line drawing of a container with wavy liquid and two crossed lines above it, no text or symbols present.Hinh 12
Mặt kính
Corporate Office Address: Unit T2-7, 7th Floor, Tower 2,
Jaya33 Hyperoffice, No. 3, Jalan Semangat, Seksyen 13,
46100 Petaling Jaya, Selangor
Office Tel : (+60 3) 7843 5999
Office Fax : (+60 3) 7955 5511
Consumer Care Center Address: Lot C6, No. 28,
Jalan 15/22, Taman Perindustrain Tiong Nam,
40200 Shah Alam, Selangor
Consumer Care Center Fax : (+60 3) 5524 2521
Email : malaysia.customercare@electrolux.com
Philippines
Consumer Care Center Toll Free :
1-800-10-845-CARE 2273
Consumer Care Hotline : (+63 2) 845 CARE 2273
Electrolux Philippines, Inc.
10th Floor. W5th Avenue Building
5th Avenue Corner 32nd Street
Bonifacio Global City,
Taguig Philippines 1634
Trunkline: +63 2 737-4756
Website : www.electrolux.com.ph
Email : wecare@electrolux.com
Singapore
Consumer Care Center Tel: (+65) 6727 3699
Electrolux S.E.A. Pte Ltd.
1 Fusionopolis Place,
07-10 Galaxis, West Lobby
Singapore 138522.
Office Fax : (+65) 6727 3611
Email : customer-care.sin@electrolux.com
Thailand
Consumer Care Tel : (+66 2) 725 9000
Electrolux Thailand Co., Ltd.
Electrolux Building 14th Floor
1910 New Phetchaburi Road,
Bangkapi, Huai Khwang, Bangkok 10310
Office Tel : (+66 2) 7259100
Office Fax : (+66 2) 7259299
Email: customercarethai@electrolux.com
Việt Nam
- Enjoy peace of mind. Register your appliance today.
- Safety instructions
- WARNING:-
- Flameshield Trivet
- The Class of the appliance: Class 3
- CAUTION:
- Installation instructions
- BATTERY COMPARTMENT
- Installation procedure
- IMPORTANT SAFETY INSTRUCTION:
- Soap test procedure
- Flexi Installation Cut Out
- Ignition burners
- Using the hob correctly
- Choice of burner
- Glass top
- Burner caps & crowns
- NOTE:-
- WARNING:
- StepFlame
- Standard warranty conditions
- Indonesia
- Philippines
- Singapore
- 07-10 Galaxis, West Lobby
- Thailand
- Vietnam
- ขั้นตอนในการติดตั้ง
- Wons:on
- Mặt kính
- Việt Nam
Brand : ELECTROLUX
Model : EHG8321BC
Category : Cooker