GV-N1080G1 ROCK-8GD - Graphic card GIGABYTE - Free user manual and instructions
Find the device manual for free GV-N1080G1 ROCK-8GD GIGABYTE in PDF.

| Product Type | Graphics Card |
| Brand | Gigabyte |
| Model | GV-N1080G1 ROCK-8GD |
| GPU | NVIDIA GeForce GTX 1080 |
| Memory | 8 GB GDDR5X |
| Memory Interface | 256-bit |
| Core Clock | 1759 MHz (OC mode) / 1721 MHz (Gaming mode) |
| CUDA Cores | 2560 |
| Dimensions | 280 x 114 x 40 mm |
| Weight | ~1.2 kg |
| Power Connectors | 1 x 8-pin, 1 x 6-pin |
| Recommended PSU | 500 W |
| Outputs | 3 x DisplayPort 1.4, 1 x HDMI 2.0b, 1 x Dual-link DVI-D |
| Maximum Digital Resolution | 7680 x 4320 |
| Cooling | WindForce 2X with alternate spinning fans |
| Key Features | VR Ready, G-SYNC compatible, RGB Fusion |
| Maintenance | Keep fans free of dust; use compressed air for cleaning |
| Safety | Ensure proper ventilation; install in a grounded PCIe slot |
| Spare Parts & Repairability | Fans are replaceable; thermal paste may be reapplied after warranty |
Frequently Asked Questions - GV-N1080G1 ROCK-8GD GIGABYTE
User questions about GV-N1080G1 ROCK-8GD GIGABYTE
0 question about this device. Answer the ones you know or ask your own.
Ask a new question about this device
Download the instructions for your Graphic card in PDF format for free! Find your manual GV-N1080G1 ROCK-8GD - GIGABYTE and take your electronic device back in hand. On this page are published all the documents necessary for the use of your device. GV-N1080G1 ROCK-8GD by GIGABYTE.
USER MANUAL GV-N1080G1 ROCK-8GD GIGABYTE
NVIDIA® Graphics Accelerator
User's Manual
Rev. 107
Copyright
© 2018 GIGABYTE TECHNOLOGY CO., LTD
Copyright by GIGA-BYTE TECHNOLOGY CO., LTD. ("GBT"). No part of this manual may be reproduced or transmitted in any form without the expressed, written permission of GBT.
Travista
Table of Contents
- Introduction ...... 1
1.1. Minimum System Requirements.... 1 - Hardware Installation 3
2.1.SLI Technology 4 - Software Installation .... 5
3.1. Driver and Utility Installation 5
3.1.1. Driver and AORUS ENGINE Installation 5
3.1.2. GIGABYTE AORUS ENGINE 10 - Troubleshooting Tips 13
1. Introduction
1.1. Minimum System Requirements
- Hardware
- Motherboard with one or above PCI-Express x 16 slot
- 2GB system memory (4GB recommended)
- Optical drive for software installation (CD-ROM or DVD-ROM drive)
- Operating System
- Windows ^® 10
- Windows ^® 8
- Windows ^® 7
※ Expansion cards contain very delicate Integrated Circuit (IC) chips. To protect them against damage from static electricity, you should follow some precautions whenever you work on your computer.
- Turn off your computer and unplug power supply.
- Use a grounded wrist strap before handling computer components. If you do not have one, touch both of your hands to a safely grounded object or to a metal object, such as the power supply case.
- Place components on a grounded antistatic pad or on the bag that came with the components whenever the components are separated from the system.
The card contains sensitive electric components, which can be easily damaged by static electricity, so the card should be left in its original packing until it is installed. Unpacking and installation should be done on a grounded anti-static mat. The operator should be wearing an anti-static wristband, grounded at the same point as the anti-static mat. Inspect the card carton for obvious damage. Shipping and handling may cause damage to your card. Be sure there are no shipping and handling damages on the card before proceeding.
DO NOT APPLY POWER TO YOUR SYSTEM IF THE GRAPHICS CARD IS DAMAGED.
In order to ensure that your graphics card can work correctly, please use
2. Hardware Installation
Now that you have prepared your computer, you are ready to install your graphics card.
Step 1.
Locate the PCI Express x16 slot. If necessary, remove the cover from this slot; then align your graphics card with the PCI Express x16 slot, and press it in firmly until the card is fully seated.

■ Make sure that the gold edge connector of the graphics card is securely inserted.
Step 2.
Replace the screw to fasten the card in place, and replace the computer cover.
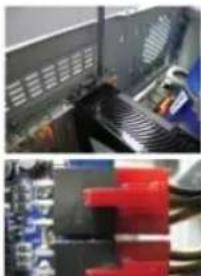
natural_image
Two-panel image showing a computer monitor with ventilation grilles and a close-up of a circuit board (no visible text or symbols)If there are power connectors on your card, remember to connect the power cable to them, or the system will not boot. Do not touch the card when it's operating to prevent
2.1. SLI Technology
How NVIDIA®SLI™ (Scalable Link Interface) technology works:
If you are planning on using this graphics card as part of an SLI system, the following are required:
- An SLI certified motherboard with two or above PCI-E x16 slots and correct chipset driver
• A two-way SLI bridge connector
In an SLI configuration, two SLI-ready graphics cards of the same model and the same manufacturers are connected together via SLI bridge connector in a system that provides two or above PCI Express x16 slots to scale graphics performance. The picture below shows that two graphics cards are linked in parallel in an SLI configuration.
2-Way SLI Configuration:
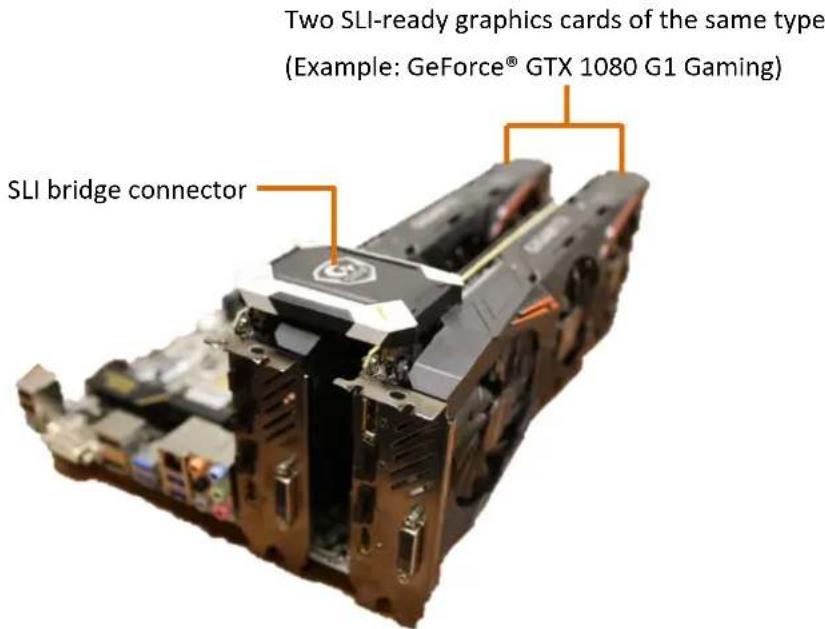
text_image
Two SLI-ready graphics cards of the same type (Example: GeForce® GTX 1080 G1 Gaming) SLI bridge connector3. Software Installation
Notice the following guidelines before installing the drivers:
- First make sure your system has installed DirectX 11 or later version.
- Make sure your system has installed the appropriate motherboard drivers (For the motherboard drivers, please contact the motherboard manufacturer.)
※ Notice : The photos in this manual are for reference only and may not match what you exactly see on your screen
3.1. Driver and Utility Installation
3.1.1. Driver and AORUS ENGINE Installation
After installing the operating system, insert the driver disk into your optical drive. The driver Autorun screen is automatically displayed which looks like that shown in the screen shot on the right. (If the driver Autorun screen does not appear automatically, go to My Computer, double-click the optical drive and execute the setup.exe program.)

text_image
AORUS Install Display Driver AORUS Graphics Engine Google Chrome Google Toolbar Google Drive User Manual GIGABYTE recommends Google Drive. One safe place for all your stuff. Google Drive Install Google Drive Get going with up to 150B of free storage. By installing the application,you agrees to the Google Drive Terms of use and Privacy policy Note:Please connect to the Internet first. Install ExitThe window of AORUS ENGINE installation would appear first as the following picture.
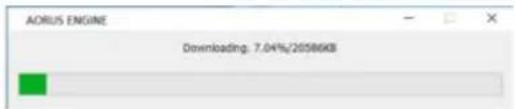
text_image
AORUS ENGINE Downloading: 7.04%/20586KBStep 2:
Click the Next button.

text_image
Setup - AORUS ENGINE Welcome to the AORUS ENGINE Setup Wizard This will install AORUS ENGINE on your computer. It is recommended that you close all other applications before continuing. Click Next to continue, or Cancel to exit Setup.Step 4:
Click Browse to choose where you'd like to place the shortcuts in Start Menu. And then click Next.
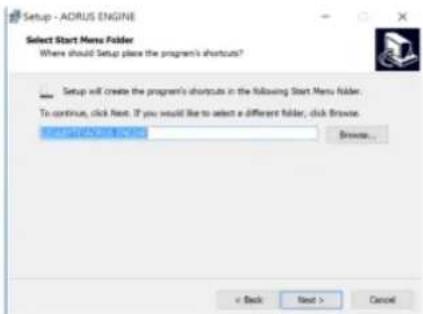
text_image
Setup - ADRUS ENGINE Select Start Menu Folder Where should Setup place the program's shortcuts? Setup will create the program's shortcuts in the following Start Menu folder. To continue, click Next. If you would like to select a different folder, click Browse... Browse... < Back Next > CancelStep 5:
Check the box if you'd like to create a desktop icon, and then click Next.

text_image
Setup - ADRUS ENGINE Select Additional Tasks Which additional tasks should be performed? Select the additional tasks you would like Setup to perform while installing ADRUS ENGINE, then stick Text. Additional icons: □ Create a desktop iconStep 7:
Click the Finish button to complete AORUS ENGINE installation.

text_image
Setup : AORUS ENGINE Completing the AORUS ENGINE Setup Wizard Setup has finished installing AORUS ENGINE on your computer. The application may be launched by selecting the installed icons. Click Finish to exit Setup. Launch AORUS ENGINE FinishStep 8:
After installing AORUS ENGINE, the window of NVIDIA Driver would appear.

text_image
NVIDIA Graphics Driver Version 372.54 System Check License Awardment Options Install Fees Checking system compatibilityStep 10:
Check Express
(Recommended) and then click the NEXT button.
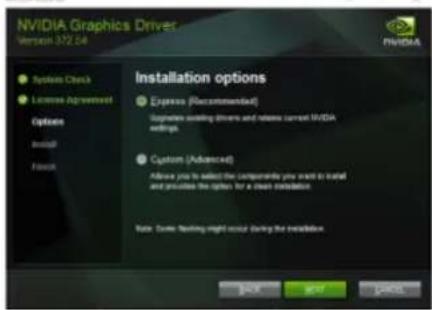
text_image
NVIDIA Graphics Driver Version 372.54 System Check License Agreement Options Install Finish Installation options Express (Recommodated) Supplies adding drivers and releases current NVIDIA software. Customs (Advanced) Allow you to select the component you want to install and provide the option for a clean installation. Note: Some testing might occur during the installation. BACK START CancelStep 11:
Installation begins.

text_image
GEARS OF WAR GEARS OF WAR 4 GAME CODE GIVEAWAY SELECT MEMBERS OF GIVEWILE, EXPRIEANCE TO GEFORCE3.1.2. GIGABYTE AORUS ENGINE
Users could adjust clock speeds, memory speeds, fan performance, and LED etc. according to their own preference through this intuitive interface.
※ The interface and functionality of the software is subject to each model.
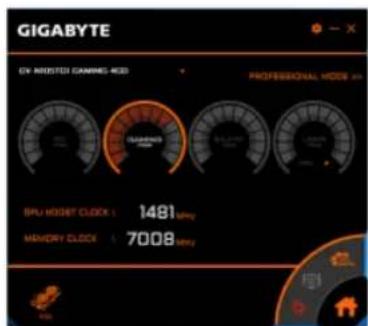
text_image
GIGABYTE ON PROSTED CAMPOS 400 PROFESSIONAL MODE 40 CPU HOURS T CLOCK 1: 1481 mpy MEMORY CLOCK: 7008 mpyEasy setting
- OC mode
High performance over clocking mode - Gaming mode
Default setting gaming mode
• ECO mode
Energy saving, silent ECO mode
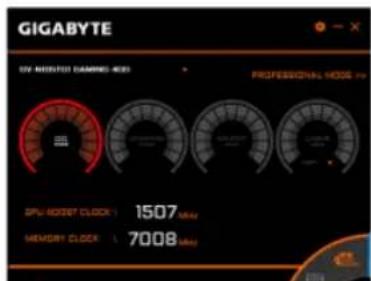
text_image
GIGABYTE UV MOUNTED DAMPS-400 PROFESSIONAL MODE 400 CPU: 1507 MHz MEMORY: 7008 MHzUsers could also choose CUSTOMIZED for fan setting, and move the white dots on the line chart to adjust fan speed and temperature.

text_image
GIGABYTE GO NUMBER: COMING INDEX GO NUMBER: COMING INDEX GO NUMBER: COMING INDEX GO NUMBER: COMING INDEX GO NUMBER: COMING INDEX GO NUMBER: COMING INDEX GO NUMBER: COMING INDEX GO NUMBER: COMING INDEX GO NUMBER: COMING INDEX GO NUMBER: COMING INDEX GO NUMBER: COMING INDEX GO NUMBER: COMING INDEX GO NUMBER: COMING INDEX GO NUMBER: COMING INDEX GO NUMBER: COMING INDEX COLO MARKET GO NUMBER: COMING INDEX GO NUMBER: COMING INDEX GO NUMBER: COMING INDEX GO NUMBER: COMING INDEX GO NUMBER: COMING INDEX GO NUMBER: COMING INDEX GO NUMBER: COMING INDEX GO NUMBER: COMING INDEX GO NUMBER: COMING INDEX GO NUMBER: COMING INDEX GO NUMBER: COMING INDEX GO NUMBER: COMING INDEX GO NUMBER: COMING INDEX GO NUMBER: COMING INDEX Go to Go in the following two rows: 1. Go to Go in the second row: 2. Go to Go in the third row: 3. Go to Go in the fourth row: 4. Go to Go in the fifth row: 5. Go to Go in the sixth row: 6. Go to Go in the seventh row: 7. Go to Go in the eighth row: 8. Go to Go in the nine row: 9. Go to Go in the 10th row: 10. Go to Go in the 11th row: 11. Go to Go in the 12th row: 12. Go to Go in the 13th row: 13. Go to Go in the 14th row: 14. Go to Go in the 15th row: 15. Go to Go in the 16th row: 16. Go to Go in the 17th row: 17. Go to Go in the 18th row: 18. Go to Go in the 19th row: 19. Go to Go in the 20th row: 20. Go to Go in the 21st row: 21. Go to Go in the 22nd row: 22. Go to Go in the 23rd row: 23. Go to Go in the 24th row: 24. Go to Go in the 25th row: 25. Go to Go in the 26th row: 26. Go to Go in the 27th row: 27. Go to Go in the 28th row: 28. Go to Go in the 29th row: 29. Go to Go in the 30th row: 30. Go to Go in the 31st row: 31. Go to Go in the 32nd row: 32. Go to Go in the 33rd row: 33. Go to Go in the 34th row: 34. Go to Go in the 35th row: 35. Go to Go in the 36th row: 36. Go to Go in the 37th row: 37. Go to Go in the 38th row: 38. Go to Go in the 39th row: 39. Go to Go in the 40th row: 40. Go to Go in the 41st row: 41. Go to Go in the 42nd row: 42. Go to Go in the 43rd row: 43. Go to Go in the 44th row: 44. Go to Go in the 45th row: 45. Go to Go in the 46th row: 46. Go to Go in the 47th row: 47. Go to Go in the 48th row: 48. Go to Go in the 49th row: 49. Go to Go in the 50th row: 50. Go to Go in the 51st row: 51. Go to Go in the 52nd row: 52. Go to Go in the 53rd row: 53. Go to Go in the 54th row: 54. Go to Go in the 55th row: 55. Go to Go in the 56th row: 56. Go to Go in the 57th row: 57. Go to Go in the 58th row: 58. Go to Go in the 59th row: 59. Go to Go in the 60th row: 60. Go to Go in the 61st row: 61. Go to Go in the 62nd row: 62. Go to Go in the 63rd row: 63. Go to Go in the 64th row: 64. Go to Go in the 65th row: 65. Go to Go in the 66th row: 66. Go to Go in the 67th row: 67. Go to Go in the 68th row: 68. Go to Go in the 69th row: 69. Go to Go in the 70th row: 70. Go to Go in the 71st row: 71. Go to Go in the 72nd row: 72. Go to Go in the 73rd row: 73. Go to Go in the 74th row: 74. Go to Go in the 75th row: 75. Go to Go in the 76th row: 76. Go to Go in the 77th row: 77. Go to Go in the 78th row: 78. Go to Go in the 79th row: 79. Go to Go in the 80th row: 80. GO TO GO TO GO TO GO TO GO TO GO TO GO TO GO TO GO TO GO TO GO TO GO TO GO TO GO TO GO TO GO TO GO TO GO TO GO TO GO TO GO TO GO TO GO TO GO TO GO TO GO TO GO TO GO TO GO TO GO TO GO TO GO TO GO TO GO TO GO TO GO TO GO TO GO TO GO TO GO TO GO TO GO TO GO TO GO TO GO TO GO TO GO TO GO TO GO TO GO TO GO To GO TO GO TO GO TO GO TO GO TO GO TO GO TO GO TO GO TO GO TO GO TO GO TO GO TO GO TO GO TO GO TO GO TO GO TO GO TO GO TO GO TO GO TO GO TO GO TO GO TO GO TO GO TO GO TO GO TO GO TO GO TO GO TO GO TO GO TO GO TO GO TO GO TO GO TO GO TO GO TO GO TO GO TO GO TO GO TO GO TO GO TO GO TO GO TO GO TO GO GO NUMBER: COMING INDEX GO NUMBER: COMING INDEX GO NUMBER: COMING INDEX GO NUMBER: COMING INDEX GO NUMBER: COMING INDEX GO NUMBER: COMING INDEX GO NUMBER: COMING INDEX GO NUMBER: COMING INDEX GO NUMBER: COMING INDEX GO NUMBER: COMING INDEX GO NUMBER: COMING INDEX GO NUMBER: COMING INDEX GO NUMBER: COMING INDEX GO NUMBER: COMING INDEX FCO LOGO MARKET GO LOGO MARKETLED
Choose LED on the lower right, users could choose different styles, brightness, colors; they could also turn off the LED effects through this software.

text_image
GIGABYTE BY APTESTO GAMENS-800 3D COMPUTER 1200000000000000000000000000000000000000000000000000000000000000000000000000000000000 3D COMPUTER 120000000000000000 SPR SPR SPR SPR SPR SPR SPR SPR SPR SPR SPR SPR SPR SPR SPR SPR SPR SPR SPR SPR SPR SPR SPR SPR SPR SPR SPR SPR SPR SPR SPR SPR SPR SPRFan control
Choose SEMI PASSIVE/ACTIVE FAN on the lower right to switch the fan mode between semi passive and continuous spin.

text_image
GIGABYTE GV-NIOSTGI GAMING-460 PROFESSIONAL MODE >> CPU GAMING MODE SILENT MODE USER MODE GPU BOOST CLOCK \ 1481 MHz MEMORY CLOCK \ 7008 MHz VISA4. Troubleshooting Tips
The following troubleshooting tips may help if you experience problems.
Contact your dealer or GIGABYTE for more advanced troubleshooting information.
- Check whether the card is seated properly in the PCI Express x16 slot.
- Ensure that the display cable is securely fastened to the card's display connector.
● Make sure that the monitor and computer are plugged in and receiving power.
- If necessary, disable any built-in graphics capabilities on your motherboard. For more information, consult your computer's manual or manufacturer.
(NOTE: Some manufacturers do not allow the built-in graphics to be disabled or to become the secondary display.)
● Make sure you selected the appropriate display device and graphics card when you install the graphics driver.
- Restart your computer.
Press
- If you are not able to find the desired monitor color/resolution settings: The color and screen resolution options available for selection depend on the graphics card being installed.
※ If necessary, adjust your monitor's setting using monitor's adjust panel to make the screen looks focused, crisp, and sharp.
5. Appendix
5.1. Regulatory Statements
Regulatory Notices
This document must not be copied without our written permission, and the contents there of must not be imparted to a third party nor be used for any unauthorized purpose. Contravention will be prosecuted. We believe that the information contained herein was accurate in all respects at the time of printing. GIGABYTE cannot, however, assume any responsibility for errors or omissions in this text. Also note that the information in this document is subject to change without notice and should not be construed as a commitment by GIGABYTE.
Our Commitment to Preserving the Environment
In addition to high-efficiency performance, all GIGABYTE VGA Cards fulfill European Union regulations for RoHS (Restriction of Certain Hazardous Substances in Electrical and Electronic Equipment) and WEEE (Waste Electrical and Electronic Equipment) environmental directives, as well as most major worldwide safety requirements. To prevent releasing harmful substances into the environment and to maximize the use of our natural resources, GIGABYTE provides the following information on how you can responsibly recycle or reuse most of the materials in your "end of life" product:
● Restriction of Hazardous Substances (RoHS) Directive Statement
GIGABYTE products have not intended to add hazardous substances (Cd, Pb, Hg, Cr+6, PBDE and PBB). The parts and components have been carefully selected to meet RoHS requirement. Moreover, we at GIGABYTE are continuing our efforts to develop products that do not use internationally banned toxic chemicals.
● Waste Electrical & Electronic Equipment (WEEE) Directive Statement
GIGABYTE will fulfill the national laws as interpreted from the 2002/96/EC WEEE (Waste Electrical and Electronic Equipment) directive. The WEEE Directive specifies the treatment, collection, recycling and disposal of electric and electronic devices and their components. Under the Directive, used equipment must be marked, collected separately, and disposed of properly.
● WEEE Symbol Statement

The symbol shown on the left is on the product or on its packaging, which indicates that this product must not be disposed of with other waste. Instead, the device should be taken to the waste collection centers for activation of the treatment, collection, recycling and disposal procedure. The separate collection and recycling of your waste
equipment at the time of disposal will help to conserve natural resources and ensure that it is recycled in a manner that protects human health and the environment. For more information about where you can drop off your waste equipment for recycling, please contact your local government office, your household waste disposal service or where you purchased the product for details of environmentally safe recycling.
When your electrical or electronic equipment is no longer useful to you, "take it back" to your local or regional waste collection administration for recycling.
If you need further assistance in recycling, reusing in your "end of life" product, you may contact us at the Customer Care number listed in your product's user's manual and we will be glad to help you with your effort.
Finally, we suggest that you practice other environmentally friendly actions by understanding and using the energy-saving features of this product (where applicable), recycling the inner and outer packaging (including shipping containers) this product was delivered in, and by
● China Restriction of Hazardous Substances Table
The following table is supplied in compliance with China's Restriction of Hazardous Substances (China RoHS) requirements:

Management Methods on Control of Pollution from Electronic Information Products
(China RoHS Declaration)
产品中有毒有害物质或元素的名称及含量
Address: No.6, Baoqiang Rd., Xindian Dist.,
New Taipei City 231, Taiwan
TEL: +886-2-8912-4888
FAX: +886-2-8912-4003
Tech. and Non-Tech. Support
(Sales/Marketing):
G.B.T. INC. - U.S.A.
TEL: +1-626-854-9338
FAX: +1-626-854-9339
Web address:
https://www.gigabyte.com/us/
● G.B.T. INC (USA) - Mexico
Web address:
https://www.gigabyte.com/mx/
● Giga-Byte SINGAPORE PTE. LTD. - Singapore
WEB address :
tps://www.gigabyte.com/sg/
- Thailand
WEB address :
https://www.gigabyte.com/th/
Vietnam
WEB address :
https://www.gigabyte.com/vn/
● GIGABYTE TECHNOLOGY (INDIA) LIMITED - India
WEB address :
https://www.gigabyte.com/in/
● NINGBO G.B.T. TECH. TRADING
CO., LTD. - China
WEB address : http://www.gigabyte.cn/
- Shanghai
TEL: +86-21-63400912
FAX: +86-21-63410100
Beijing
TEL: +86-10-62102838
FAX: +86-10-62102848
♦ Wuhan
TEL: +86-27-87851061
FAX: +86-27-87851330
◆ GuangZhou
TEL: +86-20-87540700
FAX: +86-20-87509080
♦ Chengdu
TEL: +86-28-85236930
FAX: +86-28-85256822
♦ Xian
TEL: +86-29-85531943
FAX: +86-29-85510930
♦ Shenyang
TEL: +86-24-83992901
FAX: +86-24-83992909
Saudi Arabia
WEB address :
https://www.gigabyte.com/sa/
● Gigabyte Technology Pty. Ltd. - Australia
WEB address :
https://www.gigabyte.com/au/
● G.B.T. TECHNOLOGY TRADING GMBH - Germany
WEB address :
https://www.gigabyte.com/de/
● G.B.T. TECH. CO., LTD. - U.K.
WEB address :
https://www.gigabyte.com/uk/
● Giga-Byte Technology B.V. - The Netherlands
WEB address :
https://www.gigabyte.com/nl/
● GIGABYTE TECHNOLOGY FRANCE - France
WEB address :
https://www.gigabyte.com/se/
Italy
WEB address : http://it.gigabyte.com/
- Spain
https://www.gigabyte.com/ro/
Serbia
WEB address : http://www.gigabyte.rs/
- Kazakhstan
WEB address : http://www.gigabyte.kz/
You may visit the GIGABYTE website, select your language in the language list at the bottom left corner of the website.
GIGABYTE Global Service System
To submit a technical or non-technical (Sales/Marketing) question, please link to: https://esupport.gigabyte.com