EWW1044ADWA - Washing machine ELECTROLUX - Free user manual and instructions
Find the device manual for free EWW1044ADWA ELECTROLUX in PDF.

User questions about EWW1044ADWA ELECTROLUX
0 question about this device. Answer the ones you know or ask your own.
Ask a new question about this device
Download the instructions for your Washing machine in PDF format for free! Find your manual EWW1044ADWA - ELECTROLUX and take your electronic device back in hand. On this page are published all the documents necessary for the use of your device. EWW1044ADWA by ELECTROLUX.
USER MANUAL EWW1044ADWA ELECTROLUX
PRODUCT WITH YOUR SMARTPHONE
Photograph the camera icon located on your product's serial tag, including
the 4 dots (●).
Easy register with your smartphone
-
Photograph the camera icon, including the 4 dots(●)
-
Sera R in via Line, Facebook Messenger or go online
delureg delureg delureg.com
Electrolux

natural_image
Line drawing of a washing machine with a speaker grille and fan blade (no text or symbols)2 Send it in via Line, Facebook Messenger or go online.

@eluxreg

eluxreg

eluxreg.com
3 Enjoy many privileges.*
*Terms and conditions apply.

Electrolux
IMPORTANT INFORMATION THAT MAY IMPACT YOUR MANUFACTURER'S WARRANTY
Adherence to the directions for use in this manual is extremely important for health and safety. Failure to strictly adhere to the requirements in this manual may result in personal injury, property damage and affect your ability to make a claim under the Electrolux manufacturer's warranty provided with your product. Products must be used, installed and operated in accordance with this manual. You may not be able to claim on the Electrolux manufacturer's warranty in the event that your product fault is due to failure to adhere to this manual.
WE'RE THINKING OF YOU
Thank you for purchasing an Electrolux appliance. You've chosen a product that brings with it decades of professional experience and innovation. Ingenious and stylish, it has been designed with you in mind. So whenever you use it, you can be safe in the knowledge that you'll get great results every time. Welcome to Electrolux.
Visit our website to:

Get usage advice, brochures, trouble shooter, service information, buy accessories & spare parts, online product registration : www.electrolux.com.tw
CUSTOMER CARE AND SERVICE
We recommend the use of original spare parts. When contacting Service, ensure that you have the following data available. The information can be found on the rating plate. Model, PNC, Serial Number.
⚠ Warning / Caution-Safety information.
i General information and tips
Environmental information.
Subject to change without notice.
CONTENTS
1. SAFETY INFORMATION......4
1.1 Conditions Of Use ....4
1.2 Child Safety 5
1.3 General Safety......5
1.4 Installation ......6
1.5 Use 6
2. PRODUCT DESCRIPTION .....8
2.1 Parts 8
2.2 Accessories ......9
3. CONTROL PANEL....10
3.1 Control Panel Description......10
3.2 Program Chart....11
3.3 Program Options Compatibility......13
3.4 Options 13
3.5 Settings....16
3.6 Start/Pause (▷) and Add Clothes (💡) Touchpad......17
4. BEFORE FIRST USE 17
5. DAILY USE - WASHING (Only)......18
5.1 Loading The Laundry....18
5.2 Using Detergent And Additives......18
5.3 Options Setting....19
5.4 Starting A Cycle (▷)......20
5.5 Interruption Of A Program....20
5.6 Changing A Program 20
5.7 Changing The Options......20
5.8 Opening The Door......20
5.9 At The End Of The Program ......20
5.10 When The Washing Program Is Completed, But There Is Water In The Drum....21
5.11 AUTO Off Mode 21
6. DAILY USE - DRYING (Only) .....22
7. DAILY USE - WASHING & DRYING (Non-Stop Program) 22
7.1 Washing Program + "Dryness Level" Option 22
7.2 Washing Program +
"Time Dry ⚙Option....23
8. WASHING HINTS......24
8.1 Sorting The Laundry 24
8.2 Temperatures....24
8.3 Before Loading The Laundry .....24
8.4 Maximum Loads 24
8.5 Removing Stains 24
8.6 Detergents Type And Quantity Of Detergent 25
9.1 Preparing The Drying Cycle .....26
9.2 Laundry Not Suitable For Drying ....26
9.3 Garment Labels......26
9.4 Drying Cycle Duration....26
9.5 Additional Drying....27
9. DRYING HINTS......26
10. INTERNATIONAL WASH CODE SYMBOLS 27
11. CARE AND CLEANING......28
11.1 External Cleaning 28
11.2 Descaling 28
11.3 After Each Wash 28
11.4 Maintenance Wash With "Tub Clean" Program ....28
11.5 Cleaning The Dispenser Drawer...28
11.6 Cleaning The Drawer Recess......29
11.7 Cleaning The Pump 29
11.8 Cleaning The Water Inlet Filter .....31
11.9 Frost Precautions....32
12. TROUBLESHOOTING ....33
12.1 Possible Failures ....33
12.2 Emergency Door Opening......37
13. TECHNICAL DATA 38
14. INSTALLATION 38
14.1 Unpacking....38
14.2 Positioning....40
14.3 Water Inlet 41
14.4 Water Drainage ....41
14.5 Electrical Connection....43
15. ENVIRONMENT CONCERNS .....43
15.1 Packaging Materials ....43
15.2 Old Machine 43
15.3 Ecological Hints....43
1. SAFETY INFORMATION
1.1 Conditions Of Use
This appliance is intended to be used in household and similar applications such as:
- staff kitchen areas in shops, offices and other working environment;
- farm houses;
- by clients in hotels, motels, and other residential type environments;
• bed and breakfast type environments; - areas for communal use in blocks of flats or in launderettes.
WARNING! The appliance must not be supplied through an external switching device, such as timer, or connected to a circuit that is regularly switched on and off by utility.
In the interest of your safety and to ensure the correct use, before installing and first using the appliance, read this user manual carefully, including its hints and warnings.
To avoid unnecessary mistakes and accidents, it is important to ensure that all people using the appliance are thoroughly familiar with its operation and safety features.
Save these instructions and make sure that they remain with the appliance if it is moved or sold, so that everyone using it through its life will be properly informed on appliance use and safety.
1.2 Child Safety
- This Washer-Dryer is not intended for use by young children or infirm persons without supervision.
- Young children should be supervised to ensure that they do not play with the appliance.
- The packaging components (e.g. plastic film, polystyrene) can be dangerous to children - danger of suffocation! Keep them out of children's reach.
- Keep all detergents in a safe place out of children's reach.
- Make sure that children or pets do not climb into the drum.
- This machine is provided with child safety lock option (☐) to prevent children playing with the control panel. (see page 16)
1.3 General Safety
- It is dangerous to alter the specifications or attempt to modify this product in any way.
- During high temperature wash program the door glass may get hot. Do not touch it!
- Make sure that small pets do not climb into the drum. To avoid this, please check inside the drum before using the appliance.
- Any objects such as coins, safety pins, nails, screws, stones or any other hard, sharp material can cause extensive damage and must not be placed into the machine.
-
Wash small items such as socks, laces, washable belts etc in a washing bag or pillow case as it is possible for such items to slip down between the tub and the inner drum.
-
Only use manufacturer's recommended quantities of fabric softener and detergent. Damage to the fabric or appliance can occur if you exceed the recommended amount.
- Do not use your Washer-Dryer to wash articles with whalebones, material without hems or torn material.
- Always unplug the appliance and turn off the water supply after use, clean and maintenance.
- This appliance is not intended for use by persons (including children) with reduced physical, sensory or mental capabilities, or lack of experience and knowledge, unless they have been given supervision or instruction concerning use of the appliance by a person responsible for their safety.
- Under no circumstances should you attempt to repair the machine yourself. Repairs carried out by inexperienced persons may cause injury or serious malfunctioning. Contact your local Service Centre. Always insist on genuine spare parts.
1.4 Installation
- This appliance is heavy. Care should be taken when moving it.
- When unpacking the appliance, check that it is not damaged. If in doubt, do not use it and contact the Service Centre.
- All packing and transit bolts must be removed before use. Serious damage can occur to the product and to property if this is not adhered to. See relevant section in the user manual.
- After having installed the appliance, check that it is not standing on the inlet and drain hose and the worktop is not pressing the electrical supply cable.
- If the appliance is installed on a carpeted floor, please adjust the feet in order to allow air to circulate freely.
● Always be sure, that there is no water leakage from hoses and their connections after the installation. - Any plumbing work required to install this appliance should be carried out by a qualified plumber.
- Any electrical work required to install this appliance should be carried out by a qualified electrician.

May cause electric shock! if the machine is not connected to an earthed/ground system. DO NOT touch the wet clothes and metal parts.

For safety reasons do not use double adaptors, extension cords and multi-plug adapters.
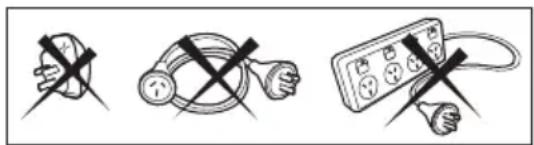
natural_image
Four black cross symbols on white background: a hand holding a plug, a cable with plug, a plug with plug, and a power cord (no text or labels)1.5 Use
- Only wash fabrics which are designed to be machine washed. Follow the instructions on each garment label.
- Do not overload the appliance. See the relevant section in the user manual.
- Before washing, ensure that all pockets are empty and buttons and zips are fastened. Avoid washing frayed or torn articles and treat stains such as paint, ink, rust, and grass before washing.
● Garments which have been in contact with volatile petroleum products should not be machine washed. If volatile cleaning fluids are used, care should be taken to ensure that the fluid is removed from the garment before placing in the machine. - Never pull the power supply cable to remove the plug from the socket; always take hold of the plug itself.
- Never use the Washer-Dryer if the power supply cable, the control panel, the working surface or the base are damaged so that the inside of the Washer-Dryer is accessible.
-
As some duvets and eiderdowns should be washed/dried in large commercial machine because of their bulk, please check with the manufacturer of the item before washing/drying in a domestic machine.
-
The users should always check that they have not left their gas lighters (disposable or otherwise) in their clothing.
- Never tumble dry items which have had contact with chemicals such as dry cleaning fluid. These are of volatile nature and could cause an explosion. Only tumble dry items which have been washed in water or require airring.
- Plastic detergent dispensers should not remain in the drum during the drying cycle, as the plastic used is not designed to withstand the heat. If you wish to wash-through-to dry you should use the conventional detergent dispenser drawer.

CAUTION!
- Never stop a washer-dryer before the end of the drying cycle unless all items are quickly removed and spread out so that the heat is dissipated.
- Do not dry cloths in washer-dryer with dry clean solvents. Also, do not use laundry enhancement products during the drying cycle.
To minimize the risk of fire in a washer-dryer, the following should be observed:
- Items that have been spotted or soaked with vegetable or cooking oil constitute a fire hazard and should not placed in a washer-dryer.
Oil-affected items can ignite spontaneously, especially when exposed to heat sources such as in washer-dryer. The items become warm, causing an oxidation creates heat.
If the heat cannot escape, the items can become hot enough to catch fire. Piling, stacking or storing oil-affected items can prevent heat from escaping and so create a fire hazard.
- If it is unavoidable that fabrics contain vegetable or cooking oil or have been contaminated by hair care products be placed in washer-dryer, it should first be washed in hot water with extra detergent - this will reduce, but not eliminate the hazard. The “cool down” cycle of washer-dryer is used to reduce the temperature of the items. It should not be removed from the washer-dryer or piled or stacked while hot.
- Items that have been previously cleaned in, washed in, soaked in or spotted with petrol/gasoline, dry-cleaning solvents or other flammable or explosive substances should not be placed in washer-dryer.
- Highly flammable substances commonly used in domestic environments include acetone, denatured alcohol, petrol/gasoline, kerosine, spot removers (some brands), turpentine, waxes and wax removers.
- Items containing foam rubber (also known as latex foam) or similarly textured rubber, like materials should not be dried in a washer-dryer on a heat setting.
- Foam rubber materials can produce fire by spontaneous combustion when heated.
- Fabric softeners or similar products should not be used in a washer-dryer to eliminate the effects of static electricity unless this practice is specifically recommended by the manufacturer of the fabric softener or product.
- Undergarments that contain metal reinforcements should not be placed in a washer-dryer. Damage to the washer-dryer can result if metal reinforcements come loose during drying. When available a drying rack could be used for such itmes.
- Plastic articles such as shower caps or babies' waterproof napkin covers should not be placed in washer-dryer.
2. PRODUCT DESCRIPTION
2.1 Parts
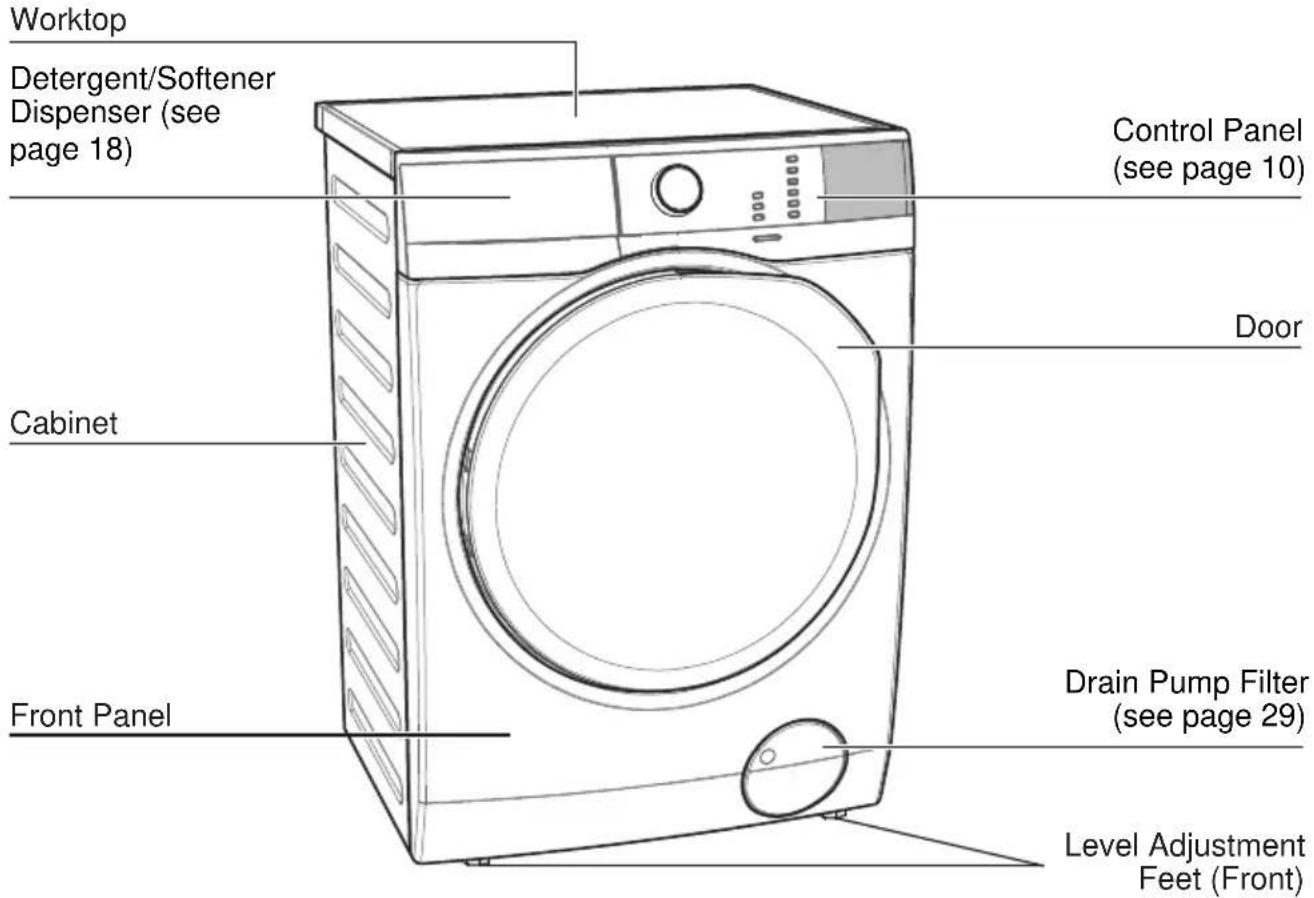
text_image
Worktop Detergent/Softener Dispenser (see page 18) Control Panel (see page 10) Door Cabinet Front Panel Drain Pump Filter (see page 29) Level Adjustment Feet (Front)
text_image
Transit Bolts Mains Cable Water Inlet Hose (see page 41) Transit Bolts & Hose Support Transit Bolts & Hose Support Water Drain Hose (see page 41) Level Adjustment Feet (Back)Detergent/Softener Dispenser
(For more informations, see page 18, 28)

text_image
Prewash Main Wash SoftenerDoor (when open)
(for more informations, see page 18)

text_image
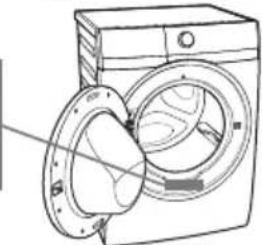
Drum Lifter Stainless Steel Washing DrumDrain Pump Filter (when open)
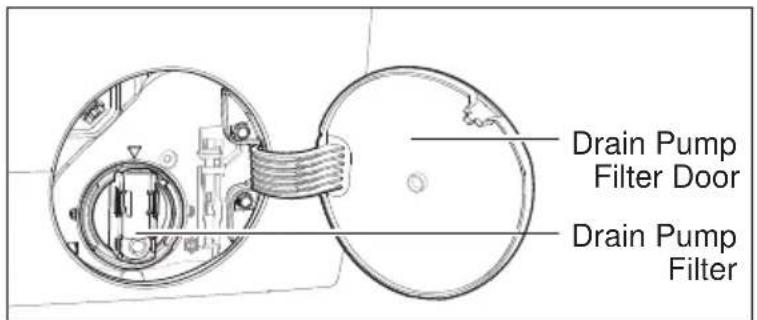
text_image
Drain Pump Filter Door Drain Pump FilterLevel Adjustment Feet
natural_image
Technical diagram showing mechanical assembly with two components and directional arrows (no text or symbols)Transit Bolt (when remove)

natural_image
Technical line drawing of a mechanical assembly with a shaft and housing (no text or symbols)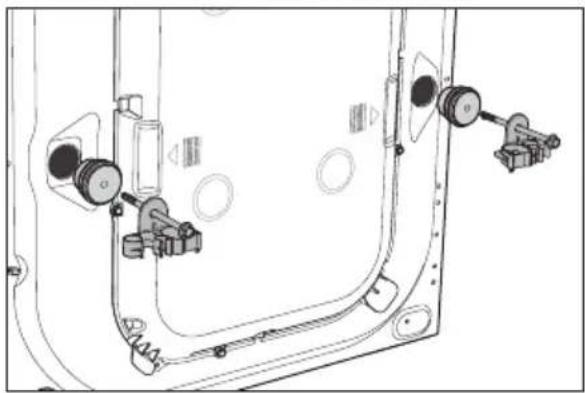
natural_image
Technical line drawing of a vehicle door frame with mechanical components and mounting holes (no text or symbols)
Transit bolts must be removed before using the appliance.
2.2 Accessories
Plastic Caps
To close the holes on the rear side of the cabinet after the removal of the transit bolts.

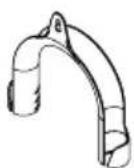
Plastic Hose Guide
To connect the drain hose on the edge of a sink.
3. CONTROL PANEL
3.1 Control Panel Description

text_image
A B C D 1:88 I MAX H G E F| Program; Temperature range | Spin Speed | Max. Load (Dry Clothes) | Type of load and soil level Max. | |
| Wash Dry | ||||
| Cottons;Cold to 60°C | 1400 rpm | 10 kg | 7 kg | White and coloured cotton. |
| Mixed;Cold to 60°C | 1200 rpm | 4 kg | 3 kg | Synthetic or mixed fabric items. |
| Bedding; Cold to 60°C | 800 rpm | 60000000000000000000000000000000000000000000000000000000000000000000000000000000000000000000000000000 | synthetic blanket,duvet, bedspread and so on. | |
| Energy Saver;40°C and 60°C1) | 1400 rpm | 10 kg | 7 kg | White and colourfast cotton. Set this program to have a good washing results and decrease the energy consumption. The time of the washing program is extended. |
| Baby Care;Cold to 40°C | 1200 rpm | 4 kg | - | Baby cotton clothes and delicate knitting items with normal soil. |
| Vapour Refresh | - | 1 .5 kg | - | This cycle removes odours and helps to dewrinkle the laundry. i Do not add detergent. |
| Tub Clean60°C | - | - | - | For cleaning the tub. |
| Spin To spin the laundry and the water in the drum. | ||||
| Rinse + Spin To take and spend the laundry. | ||||
| Quick 15;30°C | 800 rpm | 1.5 kg | - | Lightly soiled synthetics or mixed fabrics. |
| Daily 60;30°C to 60°C | 1400 rpm | 5.5 kg | 4 kg | Coloured cotton e.g. shirts, blouses, towels and undergarments with normal level of soil. |
Wool  Cold to 40°C Cold to 40°C | 1200 rpm | 2 kg | 1 kg | Specially tested program for woollen garments bearing the “Pure new woollen, non-shrink, machine washable” label. |
| Delicates; Cold to 40°C | 1200 rpm | 4 kg – | Delicate fabrics such as acrylics, viscose, polyester items. | |
| WashDry 60; 30°C, 40°C | 1200 rpm | 1 kg | 1 kg | Non-Stop washing and drying program for 3 - 5 shirts with lightly soil. |
| Favourite Recall you favourite program. | – | |||
1) Energy Saver Program with 60degC option selected is recommended for a full load of normally soiled cotton and is the Energy and Water rating label program
Woolmark Apparel Care - Blue

text_image
WOOL HAND WASH SAFEThe wool wash cycle of this machine has been approved by The Woolmark Company for the washing of wool garments labelled as “hand wash” provided that the garments are washed according to the instructions issued by the manufacturer of this machine.
Follow the garment care label for drying and other laundry instructions. M1749
The Woolmark symbol is a Certification mark in many countries.
3.3 Program Options Compatibility
| Program | Option | |||||||
| Spin | Rinse Hold | Dryness ^2) Level | ^2) Dry | Delay Start | Extra Rinse | Prewash | VapourNo | |
| Cottons | O | O | O | O | O | O | O | O |
| Mixed | O | O | O^3) | O | O | O | O | O |
| Bedding | O | × | × | × | O | × | × | O |
| Energy Saver | O | O | O | O | O | O | O | O |
| Baby Care | O | O | × | × | O | O | O | O |
| Vapour Refresh | × | × | × | × | O | × | × | O |
| Tub Clean | × | × | × | × | × | × | × | × |
| Spin | O | × | O | O | O | × | × | × |
| Rinse + Spin | O | O | O | O | O | × | × | × |
| Quick 15 | O | O | × | × | O | × | × | × |
| Daily 60 | O | O | O | O | O | O | × | × |
| Wool | O | O | × | O | O | × | × | × |
| Delicates | O | O | × | × | O | O | O | O |
| WashDry 60 × | × | × | × | O | × | × | × | |
| Favourite | - | - | - | - | - | - | - | - |
1) Vapour option can be combined with temperature 40^ C to 60^ C only.
2) Do not select a spin speed LOWER than that proposed by the appliance to avoid a too long drying time so saving energy. In any case the reduction of the spin speed is only possible after selecting drying.
3) This program can select only "Cupboard Dry" option.
3.4 Options
Wash/Dry Mode Touchpad
This touchpad is used to select Program Mode of your machine. Program mode available are :
- Wash-Only Mode (default)
- Wash + Dry Mode
- Dry-Only Mode

If a mode is not compatible with program selected, the symbol “---” will flash on display along with buzzer sound.

Changing a running program mode is possible only by switching off the machine.
Temperature Touchpad
Press this touchpad repeatedly to increase or decrease the wash temperature if you want your laundry to be washed at a temperature different from the one proposed by the Washer-Dryer.
Spin Selection Touchpad
Press this touchpad repeatedly to increase or decrease the spin speed or select Rinse Hold, if you want your laundry to be spun at a speed different from the one proposed by the Washer-Dryer.
- No Spin ( Ⓞ )
No spin option eliminates all the spin phases and increase the number of rinses.
- Rinse Hold (☐)
By selecting this option the water of the last rinse is not emptied out and the drum turns regularly to prevent the laundry creases.
The door is still locked to indicate that the water must be emptied out.

The door stays locked with the water in the drum. To continue the cycle, you must press ▷∥ (Start/Pause).
Vapour (💡) Touchpad
Select this option to add approximately 30 minutes of tumbling in vapour after the rinse cycle. The indicator of this option will be on.
- Vapour may not necessarily be visible inside the drum during a vapour cycle. Vapour is created below the drum and allowed to naturally rise into the clothes.
- Vapour may not be present during the entire vapour cycle.
- Vapour function is more effective with half load.
- At the end of the Vapour cycle, the clothes will be warmer, softer and detached from the drum.

NOTE
If Vapour option is selected, rinse temperatures will be elevated.
During a vapour cycle, you may notice vapour exiting from the drain hose of the Washer-Dryer, this is normal and there is no cause for alarm.
Prewash Touchpad
Select this option if you wish your laundry to be pre-washed before the main wash. Use this option for heavy soil. The indicator of this option will be on.
When you set this function, put the detergent into the “☐” compartment. This function increases the program duration.
Delay Start Touchpad
This option makes it possible to delay the start of the program by 30 min, 60 min or 90 min and then by every hour from 2 to 20 hours. The delay you have selected is indicated on the display. The end time will increase in order to show you the selected delay.
You must select this option after you have set the program and before you press the Start/Pause button.
If you wish to add laundry in the machine during the delay time, press Start/Pause touchpad to put the machine in pause mode. Add laundry, close the door and press Start/Pause touchpad again.
You can cancel the delay time at any moment, by pressing "Delay Start" touchpad repeatedly till the display shows delay time "☐", then press the Start/Pause touchpad.
Time Dry ( 🔊 Touchpad
If you wish to carry out a timed drying program, keep pressing this touchpad until the desired time is reached.

NOTE
- Maximum allowable timed drying changes based on wash program selected.
- The final time value is the total duration of the washing + detachment + drying cycles.
- At the end of the program the appliance performs the anti-crease phase for approximately 10 minutes. During this time, the display will show time remaining “End” and door is locked “→0”.

If you wish to open the door during the anti-crease phase or interrupt it, press Start/Pause touchpad.
Dry Time Option Guidelines:
| Type of fabric | Load (kg) | Spin Speed (rpm) | Suggested Times (Hrs) |
| Cotton and linen(bathrobes, bath towels, etc.). | 5 - 7 | 1400 | 3 - 4 |
| 3 - 5 | 1400 | 2 - 3 | |
| 2 - 3 | 1400 | 1 - 2 | |
| Synthetic or mixed fabric items(jumpers, blouses, underwear, household linen, etc.). | 3 | 1200 | 2 - 3 |
| 1 | 1200 | 1 | |
| Wool and hand washable wool. | 1 | 1 0 | 20 2 |
Dryness Level Touchpad
Press this touchpad to set dryness level using auto sensing feature. The display will show the selected option.
- Extra dry
- Cupboard dry
- Iron dry
i NOTE
- Dryness level settings are based on wash program selected.
- The final time value is the total duration of the washing + detachment + drying cycles, calculated on a default load size.
- At the end of the program the appliance performs the anti-crease phase for approximately 10 minutes. During this time, the display will show time remaining "End" and door is locked "→0".

If you wish to open the door during the anti-crease phase or interrupt it, press Start/Pause touchpad.
Dryness Option Guidelines:
| Level of dryness Type of fabric Load | ||
| Extra DryIdeal for towels or similar | Cotton and linen(bathrobes, bath towels, etc) | up to 7 kg |
| Cupboard DrySuitable for items to put away without ironing | Cotton and linen(bathrobes, bath towels, etc) | up to 7 kg |
| Synthetics and mixed fabrics (jumpers, blouses, underwear, household linen) | up to 3 kg | |
| Iron DrySuitable for ironing | Cotton and linen(sheets, tablecloths, shirts, etc.) | up to 7 kg |
i Duration of the drying cycle
The drying time can vary according to :
• the final spin speed;
- dryness level (Extra Dry or Cupboard Dry or Iron Dry);
• the type of laundry;
- the size of load.
Fibre residue
After drying fluffy fabrics, such as new towels, it is advisable to perform a "Tub Clean" program to ensure that any residue that may remain in the tub is completely removed and does not stick to garments dried afterwards. After each drying cycle, clean the drain pump filter. Please refer to care and cleaning in section 11 "CARE AND CLEANING".

Additional drying
Should the laundry still be too wet at the end of the program, set another short drying cycle.
- The final part of a washer-dryer cycle occurs without heat (cool down cycle). This ensures the laundry will be left at a low temperature.
- WARNING!
To prevent the formation of creases or shrinking of fabrics, avoid excessive drying.
3.5 Settings
Save Favourite (☆) Program
Program settings that are frequently used can be saved (e.g. Cotton, 60°C, 1200 rpm, with Prewash and Vapour).
To program/re-program Favourite with your own selections and save them, proceed as follows:
- Put machine in Stand-By mode.
- Select your desired wash settings.
- To save favourite program, press and hold "Vapour (💡)" touchpad about 2 seconds and you will hear "Bip, Bip" sound and "F AU" is flashing on the display.
To recall the favourite wash program, turn selector knob to “Favourite ☆” program. You will get acknowledgement on the display when the Favourite program is loaded.
Child Safety Lock (☐) Option
Your appliance is provided with CHILD SAFETY LOCK which permits you to leave the appliance unsupervised with the door closed without having to worry that children might be injured by or cause damage to the appliance.

Set this option after pressing the Start/Pause touchpad.
To set "Child Lock" option:
- To activate the function, press and hold "Prewash" and "Delay Start" touchpads about 3 seconds until the display shows the icon "LOC".

If you press any touchpad while Child Lock is activated, the icon "LOC" will flash on display 3 times along with buzzer sound.

The touchpads are locked (except for the On/Off button).

This function remains enabled even after the appliance is switched off.
- To deactivate the function, press and hold "Prewash" and "Delay Start" touchpads about 2 seconds until the display shows the icon "unL".
Extra Rinse Option

This option is recommended for people who are allergic to detergents, and in areas where the water is very soft. Use this option to add two rinse phases to a program.
- To activate the option, press and hold "Prewash" touchpad about 2 seconds until the display shows the icon "💡".
- To deactivate the option, press and hold "Prewash" touchpad about 2 seconds until the icon "💡" goes off.

This option remains enabled even after the appliance is switched off.
Enabling/Disabling End-Of-Wash Buzzer
This setting permits you to either enable or disable the buzzer at the end of the program. As an example, you might wish to disable this buzzer when you start a wash when going to bed, so that when the wash finished approximately 1 hour later, it will not disturb you through the night.
i Error warning beeps such as critical faults are not disabled.
- To disable the buzzer sound, press "Temp" and "Spin" touchpads at the same time about 3 seconds, the icon "bOF" will show on display along with buzzer sound.
- To return to default configuration press these 2 touchpads at the same time about 3 seconds, the icon "bOn" will show on display along with buzzer sound.
3.6 Start/Pause ( ▷) and Add Clothes ( ✉) Touchpad
This touchpad has 2 functions:
Start/Pause ( ▷∥ )1.
After you have selected the desired program and options, press this touchpad to start the machine. The Start/Pause pilot light will stop flashing and remain lit until the water level is above the bottom edge of the door then pilot light goes OFF.
If you have selected a "Delay Start" option, the countdown will begin and will be shown on the display.
To interrupt a program which is running, press this touchpad to pause the machine, the Start/Pause pilot light flashes.
To restart the program from the point at which it was interrupted, press this touchpad again, the Start/Pause pilot light will stop flashing.
Add Clothes ( ✉ )2.
You can only add clothes when the icon "⚡" shown on the display.
To add clothes:
- Pressing the "Start/Pause" touchpad to pause the program.
- Wait for the machine to come to a complete stop before opening the door (wait for door lock "→" icon to turn off).
- Add clothing and close the door.
- Resume the program by pressing "Start/Pause" touchpad again.
4. BEFORE FIRST USE
i NOTE
During installation or before first use you may observe some water in the machine. This is a residual water left in the machine after a full functional test in the factory to ensure the machine is delivered to customers in perfect working order and is no cause for concern.
- Ensure that the electrical and water connections comply with the installation instructions.
- Put 2 litres of water in the detergent compartment for washing phase. This activates the drain system.

natural_image
Line drawing of a hand inserting a device into a rack, showing internal components and cable (no text or symbols)- Select a Cottons cycle at 60 °C, without any laundry in the machine, to remove any manufacturing residue from the drum and tub then start the machine.
5. DAILY USE - WASHING (Only)
5.1 Loading The Laundry 5.2 Using Detergent And
- Turn the water tap on.
- Connect the main plug to the main socket.
- Press the On/Off button to turn on the Washer-Dryer. Turn the knob to set a program. The Washer-Dryer will propose a temperature and automatically select the spin value provided for the program you have chosen.
The selector knob can be turned either clockwise or counter-clockwise. - Check and remove objects (if there are any) that could be trapped in the fold.

natural_image
Line drawing of a washing machine with hands operating the door (no text or symbols)-
Place the laundry in the drum, one item at a time, shaking them out as much as possible. (Refer to page 24 "WASHING HINTS")
-
Close the door.

Make sure that no laundry remains between the seal and the door.

natural_image
Line drawing of a washing machine with hands operating the lid (no text or symbols)Additives
i Please read "Detergents Type and Quantity of Detergent" on page 25 before use.
- Detergent Dispenser Drawer The detergent dispenser is divided into three compartments.

natural_image
Line drawing of a refrigerator interior showing internal compartments and a circular object (no text or symbols)- Compartment "PREWASH" This compartment is only used for detergent when a "Prewash" option is selected.
- Compartment "MAIN WASH" This compartment is used for detergent on all programs.

Detergent flap

text_image
Position up: for powder detergent.
text_image
Position down: for liquid detergent.• Compartment "SOFTENER"
This compartment is used for fabric conditioner and starching agent.
When you use the liquid detergent
- Do not use gelatinous or thick liquid detergents.
- Do not put more liquid than the maximum level.
- Do not set the "Prewash" phase.
-
Do not set the "Delay Start".
-
Measure out the detergent and the fabric softener;
-
Pull out the dispenser drawer until it stops.
- Measure out the amount of detergent required, pour it into the main wash compartment 🐎.

natural_image
Line drawing of a hand inserting a component into a computer tower (no text or symbols)- If you wish to carry out the "Prewash" phase, pour it into the compartment marked Ⓗ.

natural_image
Line drawing of a hand inserting a component into a device (no text or symbols visible)- If required, pour fabric softener into the compartment marked ✉.
natural_image
Line drawing of a hand inserting a component into a computer tower (no text or symbols)- Close the drawer gently.
i NOTE
The softener amount used must not exceed the "MAX" mark in the drawer.
If you use thick softeners it is recommended to dilute with water.
i NOTE
Residues of detergent, softener and water may remain in the dispenser. It is recommended to clean the dispenser regularly to remove any residue.
5.3 Options Setting
- If you want your laundry to be spun or use temperature different from the one proposed by the Washer-Dryer, press "Spin" and "Temp" touchpads repeatedly to change the spin speed and temperature.
Press the option touchpads, if you want your laundry to be washed with special functions.
i NOTE
- Different functions can be combined which is dependent on the program selected.
-
If an option is not compatible with the wash program selected, the symbol “---” will flash on display along with buzzer sound.
-
If you want to delay the start of the washing program, press the "Delay Start" touchpad repeatedly to choose your Washer-Dryer delay time.
5.4 Starting A Cycle (▷) 5.7 Changing The Options
To start a program, press the Start/Pause touchpad. The corresponding pilot light will stop flashing and a default program duration will be displayed on the screen.
After approx. 15 minutes from the start of a program:
- The appliance will automatically adjust the selected program duration according to the type and size of the load.
- The display will show adjusted program duration.
i NOTE
If you press any touchpad while a program is operating, the symbol “- - -” will flash on display along with buzzer sound. (except Start/Pause touchpad and On/Off button)
5.5 Interruption Of A Program
- To pause, press Start/ Pause. The indicator will start flashing.
- Press the Start/Pause again. The program will continue.
5.6 Changing A Program
Changing a running program is possible only by switching off the appliance.
- Press the "On/Off" button to cancel the program and to turn off the appliance.
- Press the "On/Off" button again to start the appliance.
Now you can set a new wash program and change any available options. Press Start/Pause to start the new program.
i NOTE
The appliance will not drain the water (except programs; Vapour Refresh, Spin, Rinse + Spin, Tub Clean).
It may be possible to change some of the options after a program has started.
- Press the touchpad Start/Pause. The indicator will start flashing.
- If available change the options that you wish.
- Press Start/Pause again. The program will continue.
5.8 Opening The Door
While a program or the Delay Start is operating, the appliance door is locked and the display shows the indicator “→”. First, set the machine to PAUSE by pressing the “Start/Pause” touchpad. Wait until the door lock indicator goes off, then the door can be opened.
If the door lock indicator “☐” does not disappear, this means that the machine is already heating and the water level is above the bottom edge of the door or the drum is turning. In this case the door CAN NOT be opened. If you need to open it, you must drain the water to open the door.

In case of emergency please refer to "Emergency door opening" on page 37.
5.9 At The End Of The Program
- The appliance stops automatically.
- The acoustic signal will operate.
- The display will show "End".
- The indicator of the touchpad Start/Pause goes off.
- The door lock indicator “→” goes off.
- Remove the laundry from the appliance. Make sure that the drum is empty.
- Keep the door partly open, to prevent the mildew and odours.
- Turn off the water tap.

NOTE
At the end of the program, the time remaining can suddenly decrease from 7 minutes or less to 0 due to the overestimated total program time during the load sensing phase. In some cases (with perfectly balanced load) the program time can be shorter than the time estimated after the load sensing phase is completed. This is a normal behavior of the machine and not a cause for concern as it does not compromise its performance.
5.10 When The Washing Program Is Completed, But There Is Water In The Drum
(Option "Rinse Hold □" is used)
- The drum turns regularly to prevent the creases in the laundry.
- The indicator "Start/Pause" flashes to remind you to drain the water.
- The door lock indicator “→” is on. The door stays locked.

You must drain the water to open the door.
To drain the water:
- Press the "Start/Pause ▷" touchpad. The appliance drains the water and spins with the maximum spin speed for selected program.
Alternatively, before pressing the "Start/Pause" touchpad, you can press the "Spin" touchpad to change the spin speed. You can select "No Spin (☐)", if you want the machine to only drain the water. - When the program is completed and the door lock indicator "→" goes off, you can open the door.
- Press the "On/Off" button to deactivate the appliance.

NOTE
After approximately 18 hours, if you do not press Start/Pause touchpad, the appliance will drain and spin automatically (except for "Wool" program).
5.11 AUTO Off Mode
The AUTO Off mode automatically deactivates the appliance to decrease the energy consumption when:
- You do not press any buttons for 5 minutes before you press "Start/Pause".
- Press the "On/Off" button to activate the appliance again.
• After 5 minutes from the end of the washing program. - Press the "On/Off" button to reactivate the appliance. Display will show the end of the last wash.
- Press any touchpad again to show the last wash program.
6. DAILY USE - DRYING (Only)
- Press the On/Off button to turn on the machine.

The water tap must be open and the drain hose must be positioned in the sink or connected to the drain pipe.
- Make sure the load size does not exceed the maximum drying capacity of the machine.
- Turn the knob to set a wash program which can select drying option (refer to Program Chart on page 11), according to your clothes then press Mode touchpad to switch your machine to Dry Only Mode.
- If you wish to select an automatic drying, press the "Dryness Level" option until the icon corresponding to the required dryness level appears on the display. (see page 15)
- If you wish to select a timed drying, press the "Time Dry ⚙" option repeatedly until desired drying time reached. (see page 14)
-
Press "Start/Pause ▷" touchpad to start the program. The time remaining is updated every minute.
-
At the end of the program :
-
The acoustic signal will operate.
- The display will show "End" and "Anti Crease (")" icon is lit.
- The door lock indicator “→” is still on.
- The appliance will perform the anti-crease phase for approximately 10 minutes.
After anti-crease phase finish, the door lock indicator “→” goes off.
The display will show "End".

If you wish to open the door during the anti-crease phase or interrupt it, press Start/Pause touchpad.
- Press "On/Off" button to switch the machine off.
- At the end of each drying cycle, the temperature of your clothing will be high. For your safety, please leave the door open to let your clothes cool before removing your laundry.
7. DAILY USE - WASHING & DRYING (Non-Stop Program)
7.1 Washing Program + "Dryness Level" Option
- Load the laundry and add detergent and fabric softener. Make sure the load size does not exceed the maximum drying capacity of the machine.
- Turn the knob to set a wash program which can select drying option (refer to Program Chart on page 11), according to your clothes then press Mode touchpad to switch your machine to Wash + Dry Mode.
-
Select the required options by pressing the relevant touchpads. If possible, do not select a spin speed lower than that proposed by the machine to avoid unnecessary longer drying time therefore saving energy.
-
Set the dryness level by pressing "Dryness Level" touchpad.
The display will then show the whole duration of wash & dry cycle.

If a program is not compatible with the drying option selected, the symbol “---” will flash on display.
-
Start the program by pressing Start/Pause touchpad. The time remaining is updated every minute on the display.
-
At the end of the program press the On/Off button to switch the machine off.

At the end of each drying cycle, the temperature of your clothing will be high. For your safety, please leave the door open to let your clothes cool before removing your laundry.
i NOTE
- If you wish to open the door during the anti-crease phase or interrupt it, press Start/Pause touchpad.
- Some drying level options are not available for some programs.
- When “Iron Dry ⚙” option is selected, the display time will be adjusted after approximately 15 minutes from the start of the program, based on the laundry type and load size.
The display will show the new adjusted time.
- When “Extra Dry ⚙” or “Cupboard Dry ⚙” is selected the display time will be adjusted towards the end of the drying cycle when machine senses required dryness level has been achieved. In case of laundry quantity lower than maximum load capacity, the time remaining can suddenly decrease from e.g. approximately 50 minutes to 0.
7.2 Washing Program + "Time Dry ⚙️ Option
- Load the laundry and add detergent and fabric softener. Make sure the load size does not exceed the maximum drying capacity of the machine.
- Turn the knob to set a wash program which can select drying option (refer to Program Chart on page 11), according to your clothes then press Mode touchpad to switch your machine to Wash + Dry Mode.
- Select the required options by pressing the relevant touchpads. If possible, do not select a spin speed lower than that proposed by the machine to avoid unnecessary longer drying time therefore saving energy.
- Set the drying time by pressing "Time Dry ⚙" touchpad repeatedly until desired drying time reached. The display will then show the whole duration of wash & dry cycle.

If a program is not compatible with the drying option selected, the symbol “---” will flash on display.
-
Start the program by pressing Start/Pause touchpad. The time remaining is updated every minute on the display.
-
At the end of the program press the On/Off button to switch the machine off.

At the end of each drying cycle, the temperature of your clothing will be high. For your safety, please leave the door open to let your clothes cool before removing your laundry.
i NOTE
- If you wish to open the door during the anti-crease phase or interrupt it, press Start/Pause touchpad.
- If you set only 10 minutes of drying, the appliance performs only a Cooling phase.
8. WASHING HINTS
8.1 Sorting The Laundry
Follow the wash code symbols on each garment label and the manufacturer's washing instructions. Sort the laundry as follows: whites, coloureds, synthetics, delicates, woollens.
8.2 Temperatures
| Temp Soil level | |
| For normally soiled white cottons and linen (e.g. teacloths, towels, tablecloths, sheets...). | |
| 60°C | For normally soiled, colourfast garments (e.g. shirts, night dresses, pajamas....) in linen, cotton or synthetic fibres and for lightly soiled white cotton (e.g. underwear). |
| 50°C | |
| 40°C | For delicate items (e.g. net curtains), mixed laundry including synthetic fibres and woollens bearing the label pure new wool, machine washable, non-shrink. |
| 30°C | |
| Cold | |
8.3 Before Loading The Laundry
- Make sure that no metal objects are left in the laundry (e.g. coin, hair clips, safety pins, pins).

natural_image
Line drawing of two hands holding a small object with circular markers, no text or symbols present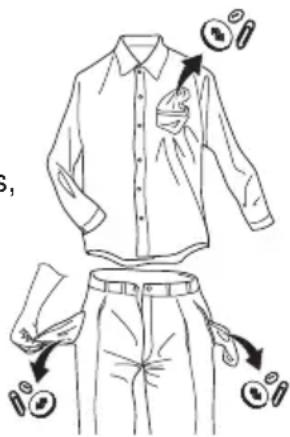
text_image
Technical line drawing of a shirt with buttons and accessories, showing front and side views with labels like 'S' and 'i'.- Button up pillowcases, close zip fasteners, hooks and poppers. Tie any belts or long tapes.

natural_image
Illustration of a hand holding a tool with an arrow indicating direction (no text or symbols)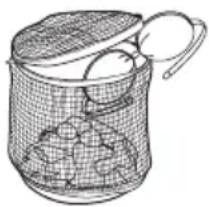
natural_image
Line drawing of a woven basket filled with food items, no text or symbols present- Wash bras, pantyhose and other delicates in a mesh laundry bag, which you can purchase from your supermarket.
- Make sure that you wash lint collectors separately from lint producers.
- Never wash whites and coloured fabrics together. Whites may lose their "whiteness" in the wash.
- New coloured items may run in the first wash; they should therefore be washed separately the first time.
- Remove persistent stains before washing.
- Rub particularly soiled areas with a special detergent or detergent paste. Treat curtains with special care. Remove hooks or tie them up in a bag or a net.
8.4 Maximum Loads
Recommended loads are indicated in the program charts on page 11.
General rules:
| Clothes Load | Q uantity |
| Cotton, linen | drum full but not too tightly packed; |
| Synthetics | drum no more than half full; |
| Delicate fabrics and woollens | drum no more than one third full. |
Washing a maximum load makes the most efficient use of water and energy. For heavily soiled laundry, reduce the load size.
8.5 Removing Stains
Stubborn stains may not be removed by just water and detergent. It is therefore advisable to treat them prior to washing.
Blood: treat fresh stains with cold water. For dried stains, soak overnight in water with a special detergent then rub in the soap and water.
Oil based paint: moisten with benzine stain remover, lay the garment on a soft cloth and dab the stain; treat several times.
Dried grease stains: moisten with turpentine, lay the garment on a soft surface and dab the stain with the fingertips and a cotton cloth.
Rust: oxalic acid dissolved in hot water or a rust removing product used in cold water. Be careful with rust stains which are not recent since the cellulose structure will already have been damaged and the fabric tends to hole.
Mould stains: treat with bleach, rinse well (whites and fast coloureds only).
Grass: soap lightly and treat with bleach (whites and fast coloureds only).
Ball point pen and glue: moisten with acetone (*), lay the garment on a soft cloth and dab the stain.
Lipstick: moisten with acetone (*) as above, then treat stains with methylated spirits. Remove any residual marks from white fabrics with bleach.
Red wine: soak in water and detergent, rinse and treat with acetic or citric acid, then rinse. Treat any residual marks with bleach.
Ink: depending on the type of ink, moisten the fabric first with acetone (*), then with acetic acid; treat any residual marks on white fabrics with bleach and then rinse thoroughly.
Tar stains: first treat with stain remover, methylated spirits or benzine, then rub with detergent paste.
(*) do not use acetone on artificial silk.
8.6 Detergents Type And Quantity Of Detergent
Low sudsing detergent is required for this Washer-Dryer to prevent oversudsing problems, unsatisfactory washing result and harm to the machine.
Low sudsing detergents designed for front load washing machines are labelled "Front Loading", "high efficiency", "HE", such as Cold Power for Front Loaders or "Matic".
Do not use wrong types of detergent, such as Top Loading, Handwash detergent or Soap-Based products in your frontload Washer-Dryer. This can result in excessive suds, longer cycle time, low spin speeds, poor rinsing and overloading of the motor.
Quantity of detergent to be used
The choice of detergent and use of correct quantities not only affects your wash performance, but also helps to avoid waste and protect the environment. Although biodegradable detergents contain substances which in large quantities can upset the delicate balance of nature.
The choice and quantity of detergent will depend on ;
- type of fabric (delicates, woollens, cottons, etc.) ;
• the colour of clothes ; - size of the load ;
- degree of soil ;
- wash temperature ; and
- hardness of the water used.
Water hardness is classified by so-called "degrees" of hardness.
Information on hardness of the water in your area can be obtained from the relevant water supply company, or from your local authority.
You may have to try using the detergent quantity as per manufacturers' instructions then compare the wash result to the list below and adjust the amount of detergent for your future washes accordingly.
Not enough detergent causes:
• the washload to turn grey,
- greasy clothes.
Too much detergent causes:
- oversudsing,
• reduced washing effect, - inadequate rinsing.
Use less detergent if:
• you are washing a small load,
• the laundry is lightly soiled,
• large amounts of foam during washing.
9. DRYING HINTS
9.1 Preparing The Drying Cycle
As a dryer, the appliance works on condensation principle.
Therefore, the water tap must be open and the drain hose must drain water into a sink or into the drain pipe, even during the drying cycle.

ATTENTION!
Before starting the drying program. Make sure the load size does not exceed the maximum drying capacity of the machine. In order to obtain good performances.
9.2 Laundry Not Suitable For Drying
- Particularly delicate items such as synthetic curtains, woollen and silk, garments with metal inserts, nylon stockings, bulky garments such as anoraks, bed covers, quilts, sleeping bags and duvets must not be machine dried.
- Avoid drying dark clothes with light coloured fluffy items such as towels as these can attract fluff.
- Remove the laundry when the appliance has finished drying.
- To avoid a static charge when drying is completed, use either a fabric softener when you are washing the laundry or a fabric conditioner specifically for tumble dryers.
- Garments padded with foam-rubber or materials similar to foam-rubber must not be machine dried; they represent a fire hazard.
- Also, fabrics containing residue of setting lotions or hair sprays, nail solvents or similar solutions must not be machine dried to avoid formation of harmful vapours.
The detergent and any additives must be placed in the appropriate compartments of the dispenser drawer before starting the wash program.

If using liquid detergents, a program without prewash must be selected.
9.3 Garment Labels
For drying, follow the indications given on the manufacturer's labels:
☐ = May be tumble dried
☐ = Drying at high temperature
☐ = Drying at reduced temperature
∅ = Do not tumble dry.
9.4 Drying Cycle Duration
The drying time may vary depending on:
• speed of the final spin;
- dryness level required (Extra dry, Cupboard dry, Iron dry);
- type of laundry;
- weight of the load.
The average drying time for a timed drying are indicated in the “Time Dry ⚙” option (see page 14). The experience will help you to dry your laundry in a more suitable way according to the different fabrics.
9.5 Additional Drying
If the laundry is still damp at the end of the drying program, select a short drying cycle again.

WARNING!
Do not over dry the laundry in order to avoid creasing of fabrics or garments shrinking.
10. INTERNATIONAL WASH CODE SYMBOLS

These symbols appear on fabric labels, in order to help you choose the best way to treat your laundry.
 Energetic wash Energetic wash Delicate wash Delicate wash |  Max. wash temperature 95 °C Max. wash temperature 95 °C |  Max. wash temperature 60 °C Max. wash temperature 60 °C |  Max. wash temperature 40 °C Max. wash temperature 40 °C |  Max. wash temperature 30 °C Max. wash temperature 30 °C |  Hand wash Hand wash |  DO NOT wash at all DO NOT wash at all |
 Bleaching Bleaching |  Bleach in cold water DO NOT bleach Bleach in cold water DO NOT bleach |  | ||||
 Ironing Ironing |  Hot iron max. 200 °C Hot iron max. 200 °C |  Warm iron max. 150 °C Warm iron max. 150 °C |  Lukewarm iron max. 110 °C Lukewarm iron max. 110 °C |  DO NOT iron DO NOT iron | ||
 Dry cleaning Dry cleaning |  Dry cleaning in all solvents Dry cleaning in all solvents |  Dry cleaning in perchlorethylene, petrol, pure alcohol, R 111 & R 113 Dry cleaning in perchlorethylene, petrol, pure alcohol, R 111 & R 113 |  Dry cleaning in petrol, pure alcohol and R 113 Dry cleaning in petrol, pure alcohol and R 113 |  DO NOT dry clean DO NOT dry clean | ||
 Drying Drying |  Flat Tumble Flat Tumble |  Dry tBCINOT Dry tBCINOT |  On clothes hanger On clothes hanger | High temperatureLow temperature |  tumble dry tumble dry | |
11. CARE AND CLEANING

WARNING!
You must DISCONNECT the appliance from the electricity supply, before you can carry out any cleaning or maintenance work.
To run a maintenance wash:
• The drum should be empty of laundry.
- Select the "Tub Clean" program.
- Press Start/Pause to start the program.
11.1 External Cleaning 11.5 Cleaning The Dispenser Drawer Clean the appliance only with soap and
Clean the appliance only with soap and warm water. Fully dry all the surfaces.

CAUTION!
Do not use alcohol, solvents or chemical products.
11.2 Descaling
The water we use normally contains lime. It is a good idea to periodically use a water softening powder in the machine.
Do this separately from any laundry washing, and according to the softening powder manufacturer's instructions.
This will help to prevent the formation of lime deposits.
11.3 After Each Wash
Leave the door open for a while. This helps to prevent mould and stagnant smells forming inside the appliance.
Keeping the door open after a wash will also help to preserve the door seal.
11.4 Maintenance Wash With "Tub Clean" Program
With the use of low temperature washes it is possible to get a build up of residues inside the drum.
We recommend to use "Tub Clean" program to clean the drum regularly to remove any residue.
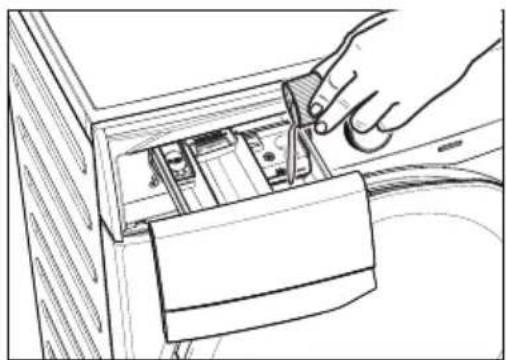
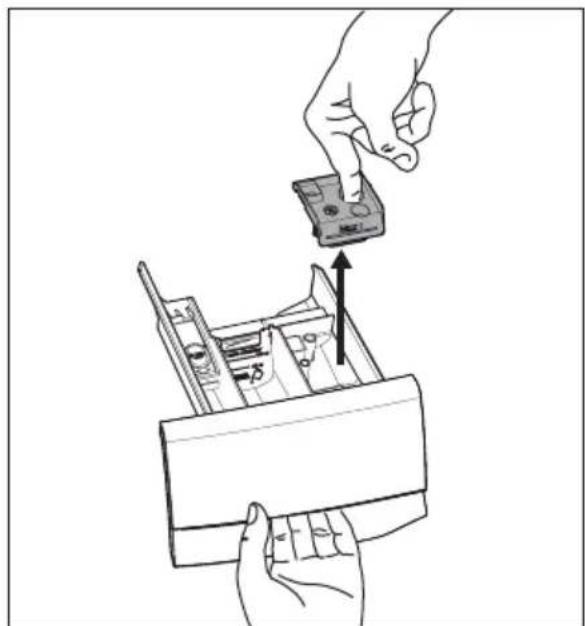
The washing powder and additive dispenser drawer should be cleaned regularly.
Remove the drawer by pressing the catch downwards and by pulling it out.

natural_image
Line drawing of hands inserting a device into a rack, showing internal components and directional arrows (no text or symbols)To aid cleaning, the top part of the additive compartment should be removed.
natural_image
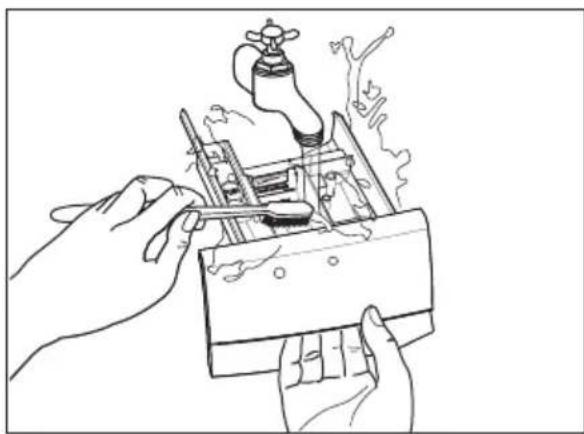
Line drawing of hands inserting a component into a device (no text or symbols)Flush it out under a tap to remove any traces of accumulated powder.
natural_image
Line drawing of hands assembling or repairing a mechanical component with a faucet and steam rising (no text or symbols)11.6 Cleaning The Drawer Recess
Having removed the drawer, use a small brush to clean the recess, ensuring that all washing powder residue is removed from the upper and lower part of the recess. Replace the drawer and run the rinse program without any clothes in the drum.

natural_image
Line drawing of a hand using a screwdriver to adjust or install an open device into a rack (no text or symbols visible)11.7 Cleaning The Pump

Regularly examine the drain pump and make sure that it is clean.
Clean the pump if:
• The appliance does not drain the water.
• The drum cannot turn.
- The appliance makes an unusual noise because of the blockage of the drain pump.
- The display shows an alarm code because of the problem with water drain.

WARNING!
- Disconnect the mains plug from the mains socket.
- Do not remove the filter while the appliance is operating. Do not clean the drain pump if the water in the appliance is hot. The water must be cold before you clean the drain pump.
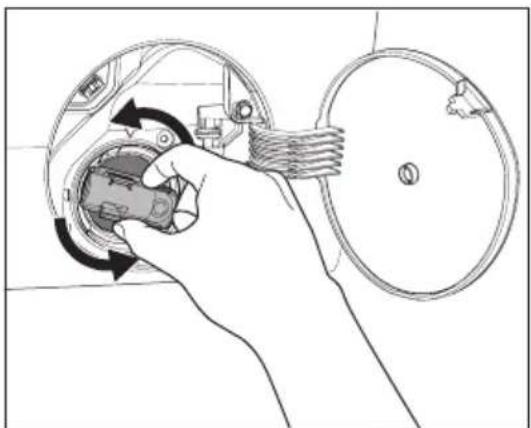
To clean the drain pump:
- Open the drain pump door.
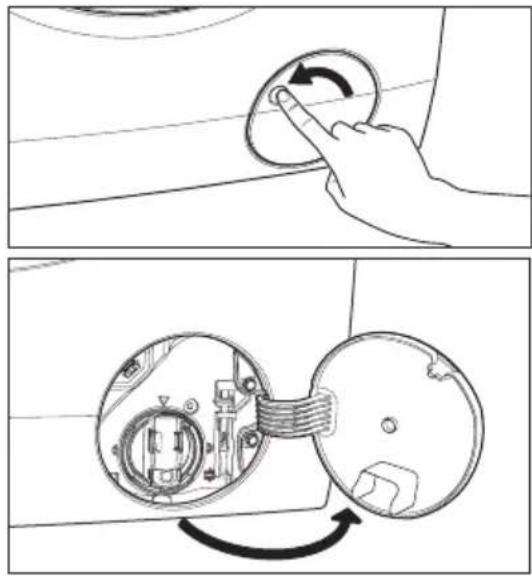
text_image
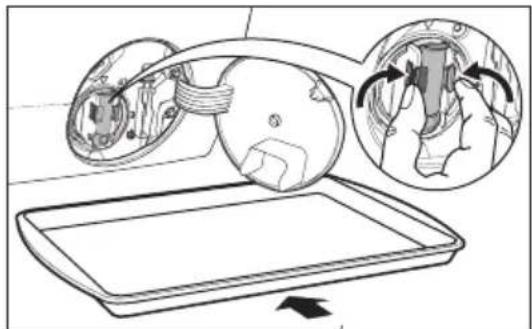
Diagram illustrating a mechanical switch mechanism with labeled components and rotation arrows- Place a suitable water container below the recess of the drain pump to collect the water that flows out.
Press the two levers and pull forward the drainage duct to let the water flow out.
natural_image
Diagram showing mechanical components and motion arrows, no text or symbols present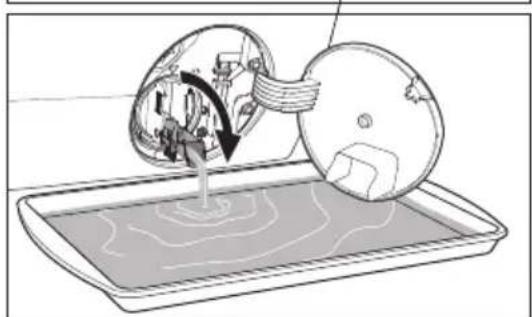
natural_image
Diagram showing a device being inserted into a tray with a magnified view of internal components (no text or symbols)- When the container is full of water, put the drainage duct back again and empty the container. Do step 2, 3 again and again until no more water flows out from the drain pump.
natural_image
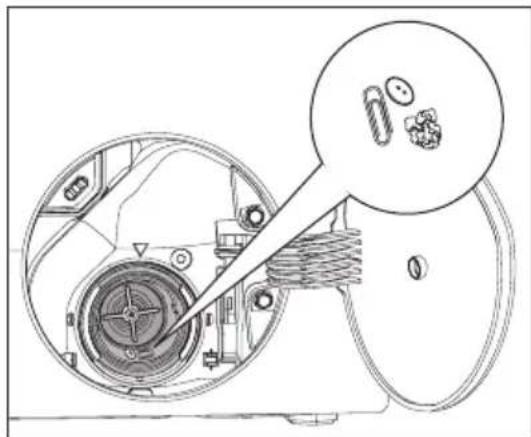
Illustration of a kitchen cleaning procedure showing hand pouring liquid into a sink while using a washing machine (no text or symbols present)- Push back the drainage duct and turn the filter counter-clockwise to remove it.
natural_image
Hand inserting a component into a circular device (no text or symbols visible)
natural_image
Line drawing of a hand holding a mechanical device with internal components (no text or symbols)- Remove fluff and objects from the pump (if there are any).
natural_image
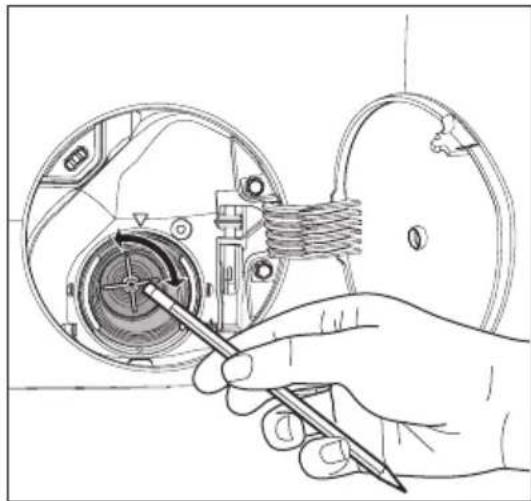
Technical line drawing of a mechanical device with internal components and a magnified inset showing internal parts (no text or symbols)- Make sure that the impeller of the pump can turn. If this does not occur, contact the service centre.
natural_image
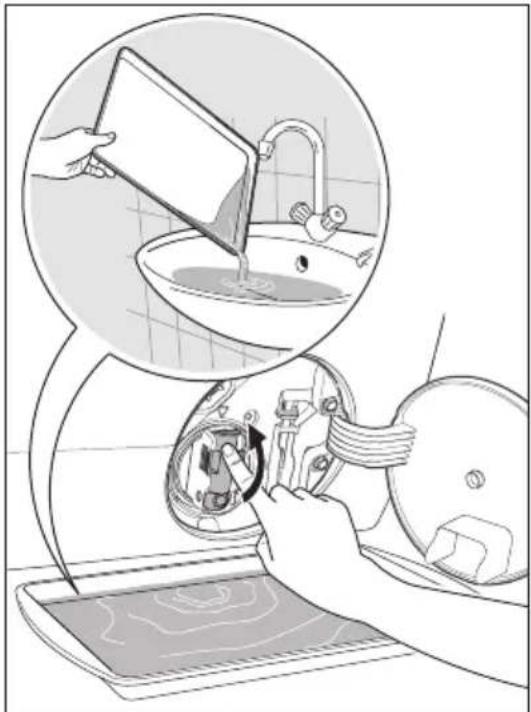
Hand holding a screwdriver inside a mechanical device with a coiled spring (no text or symbols visible)- Clean the filter under the water tap.

natural_image
Illustration of hands cleaning a bathroom sink with a showerhead and pipe (no text or symbols)- Put the filter back into the housing with exposed section facing up. Make sure that you correctly tighten the filter to prevent leakages.

text_image
Guide UP UP- Close the drain pump door.
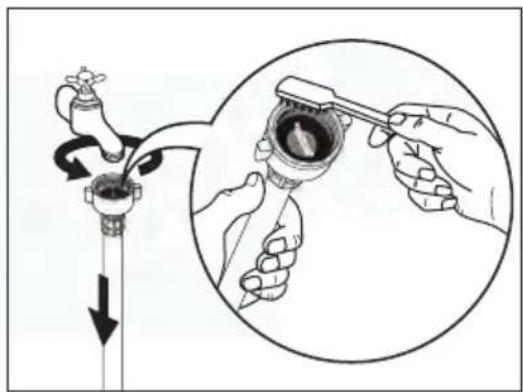
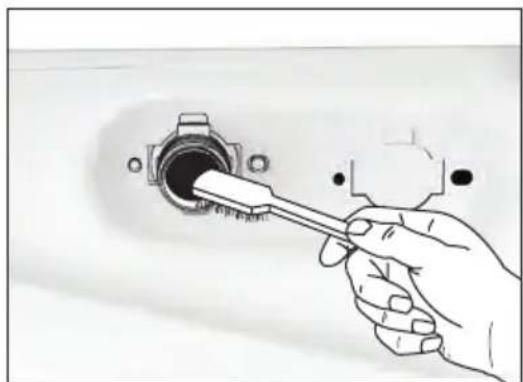
11.8 Cleaning The Water Inlet Filter
If your water is very hard or contains traces of lime deposit, the water inlet filter may become clogged. It is therefore a good idea to clean it from time to time.
To clean the water inlet filters:
- Close the water tap.
-
Remove the water inlet hose from the water tap.
-
Clean the filter in the inlet hose with a stiff brush.
text_image
Diagram illustrating a hand using a tool to adjust or install a water level, with labeled components and directional arrows.- Remove the inlet hose behind the appliance.

text_image
Diagram showing hand operating a valve mechanism with labeled components and directional arrows indicating rotation or adjustment.- Clean the filter in the valve with a stiff brush or a towel.
natural_image
Hand using a tool to adjust or install a component into a socket (no text or symbols visible)- Install the inlet hose again. Make sure that the couplings are tight to prevent leakages.
- Open the water tap.
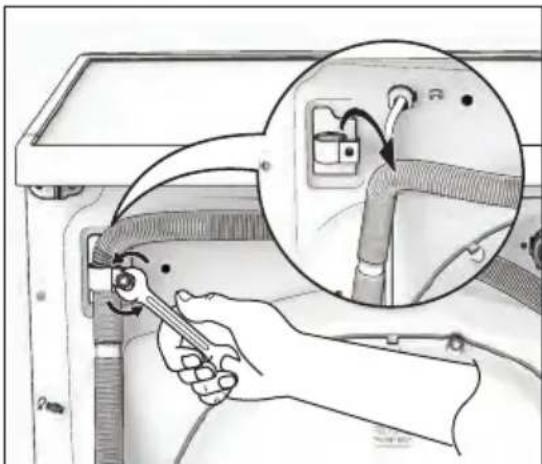
11.9 Frost Precautions
If the appliance is installed in an area where the temperature can be less than 0 °C, remove the remaining water from the inlet hose and the drain pump.
Emergency Drain
- Disconnect the main plug from the main socket. Turn off the water tap.
- Remove the water inlet hose.
- Remove the drain hose from the rear support and unhook it from sink or spigot.
natural_image
Illustration of a hand using a wrench to adjust or install a device inside a washing machine, with an inset showing the close-up of the component (no text or symbols present)- Put the end of the drain and inlet hose in a container. Let the water flow out of the hoses.
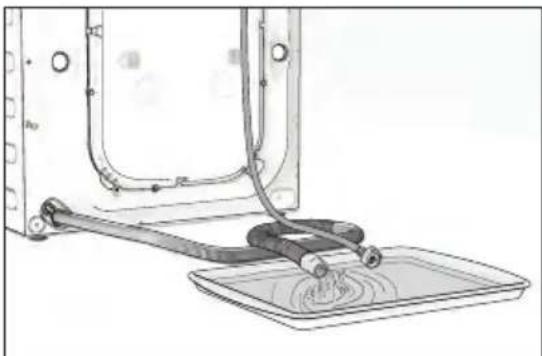
natural_image
Technical line drawing of a mechanical device with a lever and base plate (no text or symbols)- When no more water flows, install the inlet hose and the drain hose again.

NOTE
Make sure that the temperature is more than 0 °C before you use the appliance again.
12. TROUBLESHOOTING
12.1 Possible Failures
Certain problems are due to lack of simple maintenance or oversights, which can be solved easily without calling out an engineer. Before contacting your local Service Centre, please check troubleshooting.
Once the problem has been eliminated, press the Start/Pause button to restart the program. If after all checks, the problem persists, contact your local Service Centre.

WARNING! Deactivate the appliance before you do the checks.
Alarm Code:
| E10 | The appliance does not fill with water properly. |
| E20 | The appliance does not drain the water. |
| E40 | The appliance door is open or not closed correctly. Please check the door! |
| E40 | The main supply is unstable. Wait until the main supply is stable. |
| E91 | No communication between electronic elements of the appliance. Switch off and switch on again. |
| Malfunction Possible cause Solution | ||
| Machine does not start: | The door has not been closed. (Error code:E40) | Close the door firmly. |
| The plug is not properly inserted into the power socket. | Insert the plug into the power socket. | |
| There is no power at the socket. | Please check your domestic electrical installation. | |
| The Start/Pause touchpad has not been pressed. | Press the Start/Pause touchpad. | |
| The “Delay Start” has been selected. | If the laundry are to be washed immediately, cancel the “Delay Start”. | |
| The Main supply is unstable. (If EHO appears on the display.) | Wait until the main supply is stable. Appliance will start automatically. | |
| Machine does not fill the water: | The water tap is closed. (Error code:E10) | Open the water tap. |
| The inlet hose is squashed or kinked. (Error code:E10) | Check the inlet hose connection. | |
| The filter in the inlet hose is blocked. (Error code:E10) | Clean the water inlet hose filter. | |
| The door is not properly closed. (Error code:E40) | Close the door firmly. | |
| Machine fills then empties immediately: | The end of the drain hose is too low. (Error code:E10) | Refer to relevant paragraph in “water drainage” section. |
| Machine does not empty and/or does not spin: | The drain hose is squashed or kinked. (Error code: E20) | Check the drain hose connection. |
| The drain pump is clogged. (Error code: E20) | Clean the drain filter. | |
| The option “Rinse Hold” has been selected. | Press Start/Pause touchpad to drain the water or select spin program. | |
| The laundry is not evenly distributed in the drum. | Pause the machine and redistribute laundry manually. | |
| There is water on the floor: | Too much detergent or unsuitable detergent (creates too much foam) has been used. | Reduce detergent quantity and use correct type of detergent (refer page 25). |
| Check whether there are any leaks from one of the inlet hose fittings. It is not always easy to see this as the water runs down the hose; check to see if it is damp. | Check the water inlet hose connection. | |
| The drain hose is damaged. Call Service. | ||
| Unsatisfactory washing results: | Too little detergent or unsuitable detergent has been used. | Increase detergent quantity or use different detergent (refer page 25). |
| Stubborn stains have not been treated prior to washing. | Use commercial products to treat the stubborn stains. | |
| The correct temperature was not selected. | Check if you have selected the correct temperature. | |
| Excessive laundry load. Reduce load. | ||
| The door will not open: | The program is still running. Wait until the end of cycle. | |
| There is water in the drum. | You must drain the water to open the door (refer “Opening The Door” on page 20. | |
| This problem may be caused by a failure of the appliance. | Contact Service. If you need to open the door, please read carefully “Emergency door opening” on page 37. | |
| Machine vibrates or is noisy: | The transit bolts and packing have not been removed. | Check the correct installation of the appliance. |
| The support feet have not been adjusted. | Check the correct levelling of the appliance. | |
| Machine vibrates or is noisy: | The laundry is not evenly distributed in the drum. | Pause the machine and redistribute laundry manually. |
| There is very little laundry in the drum. | Load more laundry. | |
| Unstable floors eg. wooden floors. Refer to relevant paragraph in “Positioning” section. | ||
| Cycle time longer than displayed: | Detergent over dose. | Reduce the detergent quantity or use another one. (Refer page 25 “Detergents Type And Quantity Of Detergent”). |
| Machine unbalance. Redistribute laundry manually in the drum and start the spin phase again. | ||
| The cycle is shorter than the time displayed. | The appliance calculated a new time according to the laundry load. | |
| Spinning starts late or machine does not spin: | The electronic unbalance detection device has cut in because the laundry is not evenly distributed in the drum. The laundry is redistributed by reverse rotation of the drum. This may happen several times before the unbalance disappears and normal spinning can resume. If, after 10 minutes, the laundry is still not evenly distributed in the drum, the machine will not spin. In this case, redistribute the load manually and select the spin program. | Pause the machine and redistribute laundry manually. |
| Machine makes an unusual noise: | Machine not installed properly. | Make sure the levellir the appliance is correct. Refer to “Installation”. |
| Transit bolts or packaging not removed. | Make sure that the packaging and/or the transit bolts are removed. Refer to “Unpacking”. | |
| The load may be too small. Add more laundry in the drum. | ||
| No water is visible in the drum: | Machines based on modern technology operate very economically using very little water without affecting performance. | |
| Machine does not dry or does not dry properly: | The “Time Dry” or the “Dryness Level” degree has not been selected. | Select the drying time or the dryness level degree. |
| The water tap is not turned on. (Error code: E10) | Open the water tap. | |
| The drain filter is clogged. (Error code: E20) | Clean the drain filter. | |
| The machine is overloaded. Reduce the laundry load in the drum. | ||
| The selected drying program, time or dryness level was not suitable for the laundry. | Select the suitable drying program, time or dryness level for the laundry. | |
| Display time is frozen at the end of drying cycle for more than 30 minutes: | Machine is optimizing the drying cycle according to the laundry type and load size. It will vary for each kind of fabric as the water absorption is different. | This is a normal behavior of the machine and not a cause for concern as it does not compromise its performance. |

NOTE
If you are unable to identify or solve the problem, contact our service centre. Before calling service centre, make a note of the model, serial number and purchase date of your machine: the Service Centre will require this information.
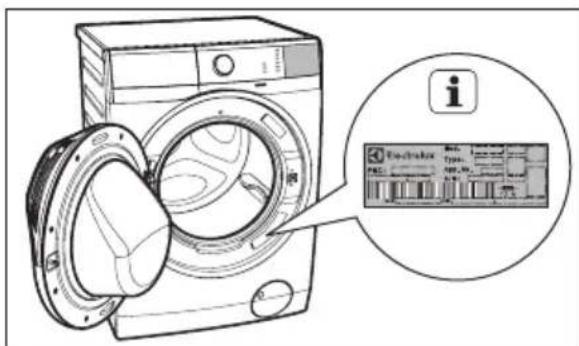
text_image
Diagram of a washing machine with an inset showing its electrical control panel and information icon12.2 Emergency Door Opening
In case of power failure or appliance failure, the appliance door remains locked. The wash program continues when power is restored. If the door remains locked in case of failure, it is possible to open it using the emergency unlock feature.
Before opening the door:

WARNING!
Make sure that the water temperature and the laundry are not hot. Wait until they cool down if necessary.
Make sure that the water level inside the drum is not too high. If necessary, perform an Emergency Drain
(see page 32).
Make sure that the drum is not rotating. Wait until the drum stops rotating if necessary.
To open the door proceed as follows:
-
Press the On/Off button to switch the appliance off.
-
Disconnect the mains plug from the mains socket.
-
Open the filter cover.
-
Using a suitable tool to pulling the emergency unlock strap (red strap) downward twice (you will hear "click" sound) and hold it, at the same time pull the door handle to open the door.
If the door cannot open while holding the strap, try to release it then open the door.
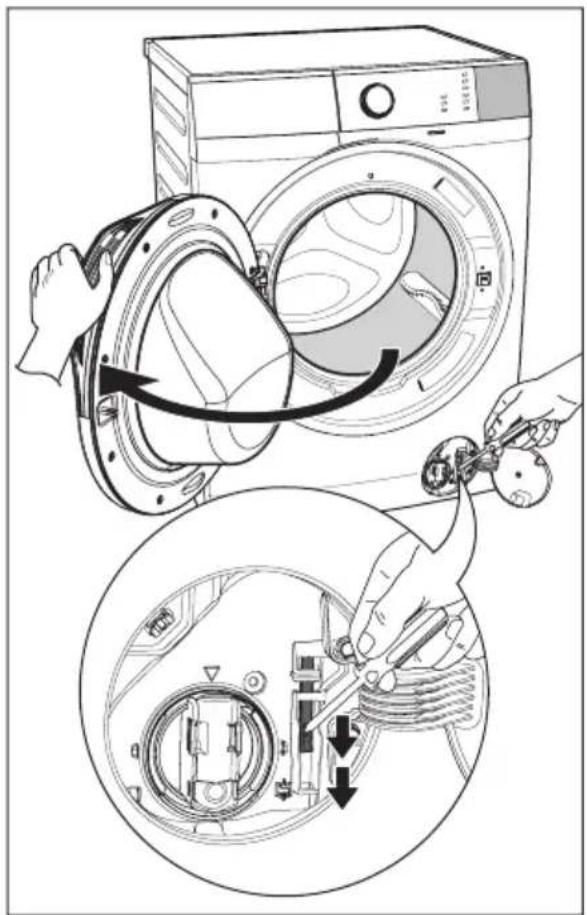
text_image
Diagram illustrating washing machine operation with labeled parts and mechanical assembly steps- Take out the laundry.
- Close the filter flap.
13. TECHNICAL DATA
| Dimensions (Height / Width / Depth) | 85 X 60 X 69.5 cm | ||
| Power supply (Voltage / Frequency) | 120 V~ / 60 Hz | ||
| Total power absorbed | Wash: 1100 W / Dry: 1000 W | ||
| Minimum fuse protection | 10 A | ||
| Water supply pressure (Maximum / Minimum) | 0.8 MPa / 0.05 MPa | ||
| Maximum dry clothes capacity | Program | Washing | Drying |
| Cottons | 10 kg | 7 kg | |
| Mixed | 4 kg | 3 kg | |
| Bedding | 3 kg | - | |
| Baby Care | 4 kg | - | |
| Energy Saver | 10 kg | 7 kg | |
| Vapour Refresh | 1.5 kg | - | |
| Tub Clean | - | - | |
| Spin | 10 kg | 7 kg | |
| Rinse + Spin | 10 kg | 7 kg | |
| Quick 15 | 1.5 kg | - | |
| Daily 60 | 5.5 kg | 4 kg | |
| Wool 📋. | 2 kg | 1 kg | |
| Delicates | 4 kg | - | |
| WashDry 60 | 1 kg | 1 kg | |
| Favourite ☆ | - | - | |
| Spin speed (Maximum / Minimum) 1400 rpm / 400 rpm | |||
14. INSTALLATION
14.1 Unpacking

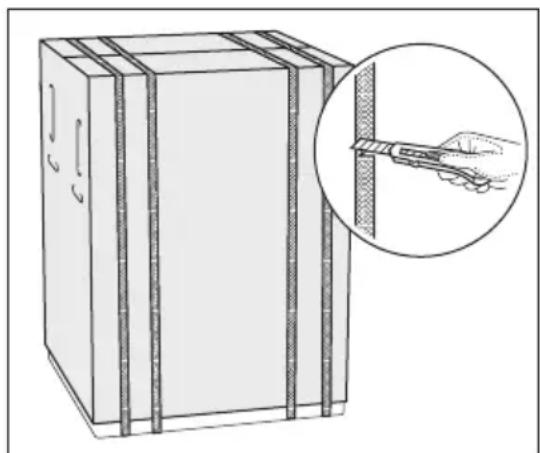
CAUTION!
All transit bolts and packing must be removed before using the appliance.
You are advised to keep all transit devices so that they can be refitted if the machine ever has to be transported again.
- Use gloves. Cut and remove four cut out straps as shown.
natural_image
Illustration of a cabinet with attached straps and a magnified inset showing a hand holding a tool (no text or symbols present)- Remove the carton box. Remove the polystyrene packaging materials.

natural_image
Technical line drawing of a mechanical device with a circular component and directional arrow (no text or symbols)- Open the door. Remove the polystyrene piece from the door seal and all the items from the drum.

natural_image
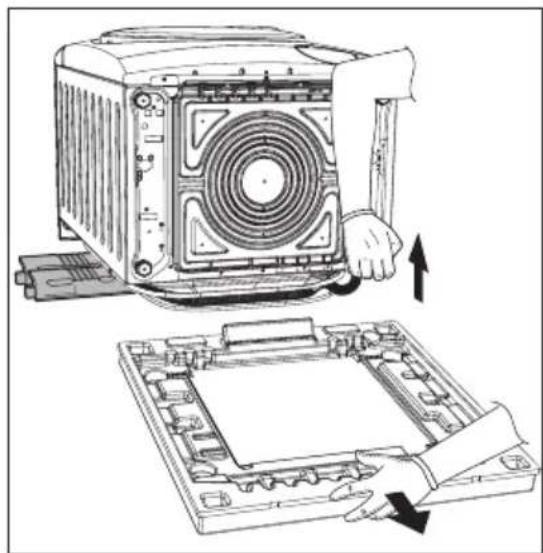
Line drawing of a washing machine with a hand inserting a component into the air gap (no text or symbols)- Put one of the polystyrene packaging elements on the floor behind the appliance. Carefully put down the appliance with the rear side on it. Make sure not to damage the hoses.

natural_image
Line drawing of a person working on a computer motherboard with a fan and drive unit (no text or symbols)- Remove the polystyrene base.
natural_image
Technical illustration of a computer motherboard with a fan and heatsink, showing part assembly (no text or symbols)-
Pull up the appliance in vertical position.
-
Remove the power supply cable and the drain and inlet hoses from the hose holders (A) on the rear of the appliance.
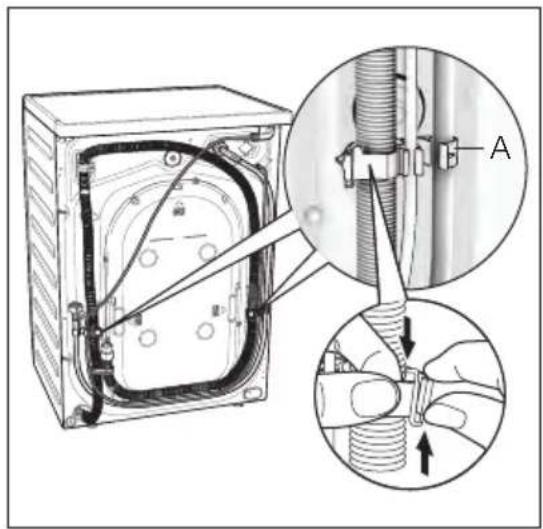
text_image
Technical diagram showing mechanical assembly with labeled component 'A' and magnified detail view- Remove the three transit bolts.
- Pull out the plastic spacers.
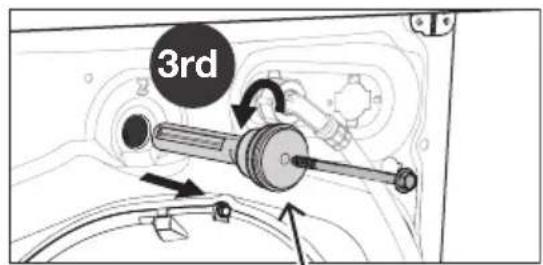
text_image
3rd
text_image
1st 2nd- Put the plastic caps in the holes (X3). You can find these caps in the user manual bag.

natural_image
Line drawing of hands using scissors to cut small circular objects (no text or symbols)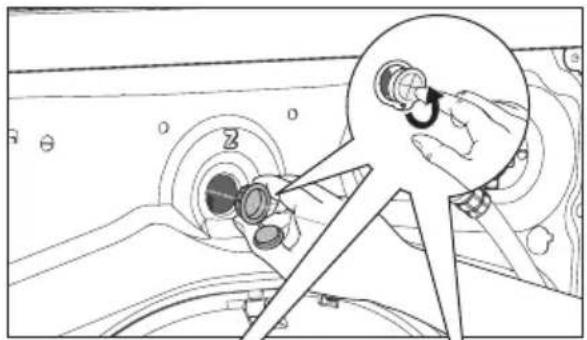
natural_image
Technical line drawing of a mechanical assembly with circular components and a magnified inset showing a hand adjusting a component (no text or symbols)
natural_image
Line drawing of hands installing or adjusting a door panel with buttons and adjustment knobs (no text or symbols)14.2 Positioning
It is important that your Washer-Dryer stands firm and leveled on the floor to ensure correct operation. The appliance must not be installed behind a lockable door, a sliding door or a door with a hinge on the opposite side to avoid restricting the Washer-Dryer door.
Use a spirit level on the top and side of the Washer-Dryer to check the levels.
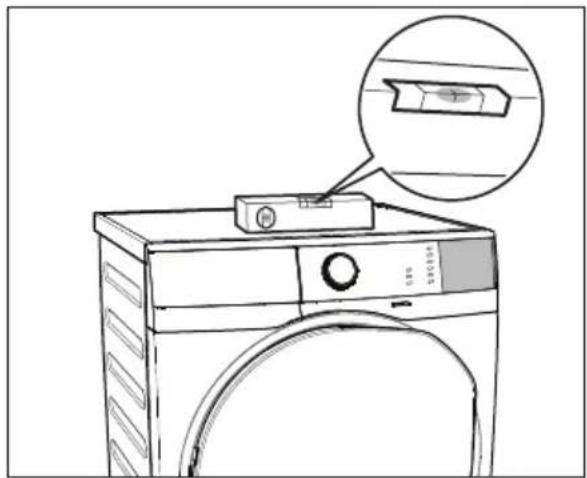
natural_image
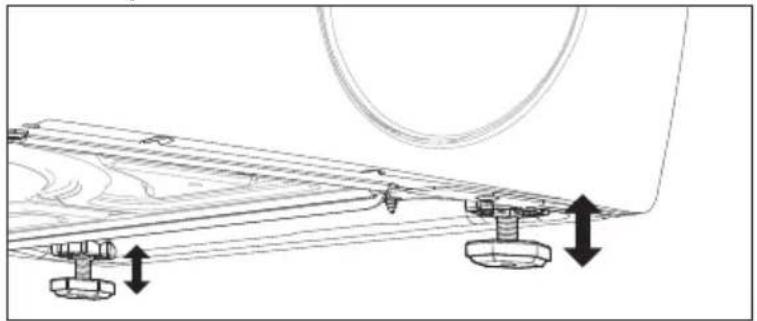
Line drawing of a washing machine with a close-up inset showing a magnified view of the front panel (no text or symbols)If you do not have a spirit level, as a guide use the edge of a door frame, cupboard or bench to check that the Washer-Dryer is leveled.
Loosen or tighten the feet to adjust the level. A correct adjustment of the appliance level prevents vibration, noise and the movement of the appliance when in operation.
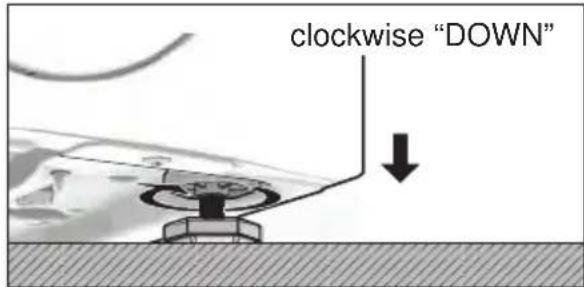
text_image
clockwise "DOWN"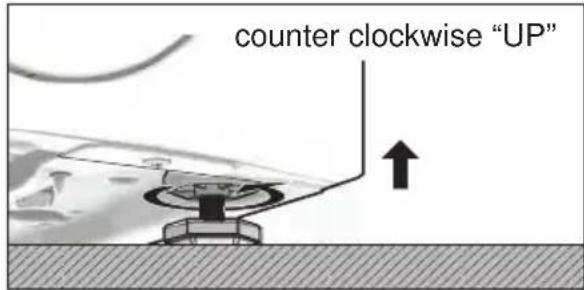
text_image
counter clockwise "UP"When the Washer-Dryer is levelled, try to rock it from corner to corner. If it does rock, adjust the legs again until it is levelled and does not rock.
natural_image
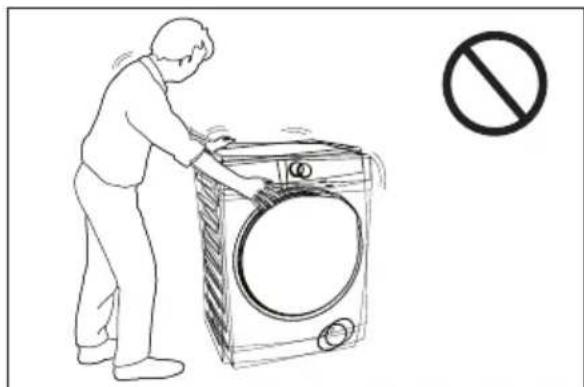
Illustration of a person washing a washing machine with a no-smoking symbol (no text or labels)Never place cardboard, wood or similar materials under the machine to compensate for any unevenness in the floor. Install the machine on a flat hard floor. Make sure that air circulation around the machine is not impeded by carpets, rugs etc.
Check that the machine does not touch the wall or cupboard units.
14.3 Water Inlet
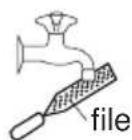
- Check the mouth of water tap, if it is not flat, please make it flat with file.
- Push down the slider, pull the tap adapter out of the slider.

- Loosen the 4 screws on the tap adapter, insert the mouth of the water tap into the tap adapter, then, tighten the 4 screws. (If the mouth of the water tap is too big, please get the bushing out of the tap adapter before installation.
Screw

Bushing

natural_image
Two mechanical diagrams showing pipe connection and rotation, no text or symbols present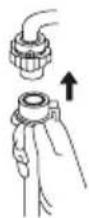
- Push down the slider, fasten it into the other side of the tap adapter, let go the slider.

- After finishing the installation of the water supply hose to the water tap, connect the other side of the water
supply hose with the water inlet hole of the machine.

text_image
Plastic screw nut Water inlet hole- Turn in the plastic screw nut to
tighten the connection of the water supply hose with the water inlet hole.

Turn in Turn out
The inlet hose must not be lengthened. If it is too short and you do not wish to move the tap, you will have to purchase a new, longer hose specially designed for this type of use.
14.4 Water Drainage
The end of the drain hose can be positioned in three ways:
- Hooked over the edge of a sink, using the plastic hose guide supplied with the machine.
Fitting Hose Guide

text_image
1. Pull apart to insert hose. 450 approx. Hose Guide bend hose pull hose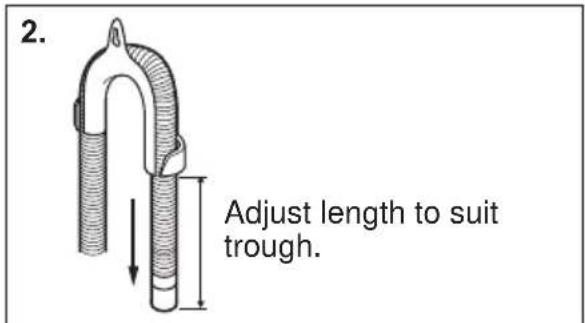
text_image
2. Adjust length to suit trough.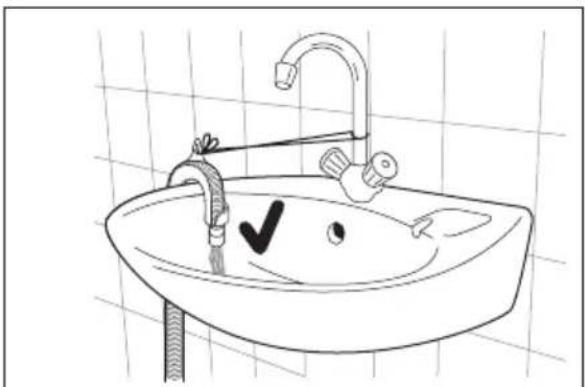
natural_image
Line drawing of a bathroom sink with faucet and hand valve, no text or symbols present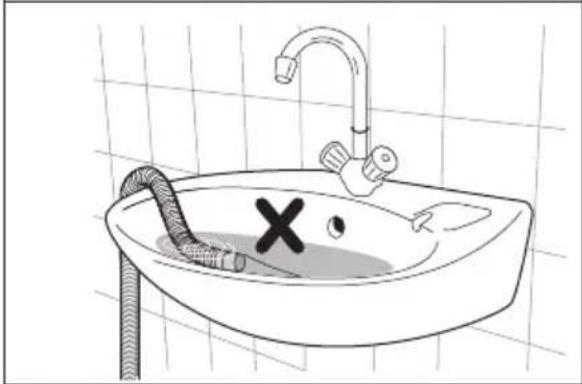
natural_image
Line drawing of a bathroom sink with a pipe and a cross mark, no text or symbols presentIn this case, make sure the end cannot come unhooked when the machine will be emptied. This could be done by tying it to the tap with a piece of string or attaching it to the wall.
• In a sink, drain pipe branch.
This branch must be above the trap so that the bend is at least 60 cm above the ground.
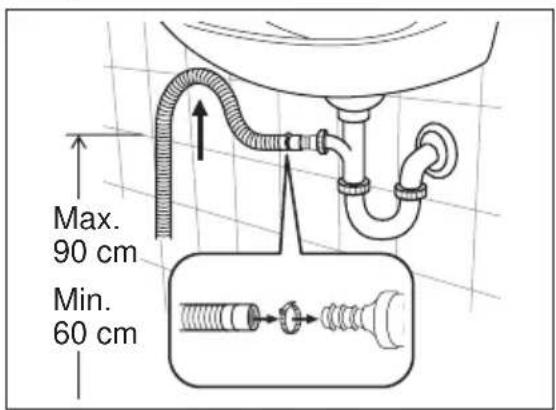
text_image
Max. 90 cm Min. 60 cmPush the drain hose onto the spigot and secure with a clamp, ensure a loop is formed in the drain hose to prevent waste from the sink entering the appliance.
- Directly into a drain pipe, at a height of not less than 60 cm and not more than 90 cm.
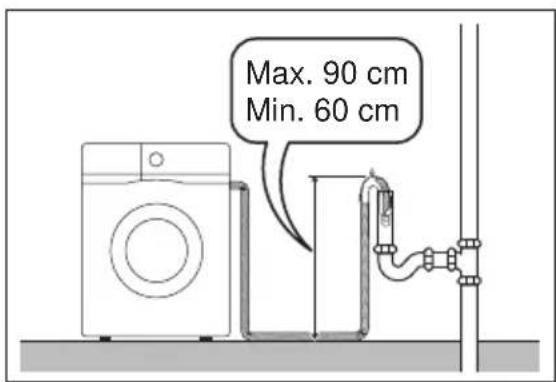
text_image
Max. 90 cm Min. 60 cmThe end of the drain hose must always be ventilated, i.e. the inside diameter of the drain pipe must be larger than the outside diameter of the drain hose.
The drain hose must not be twisted or curled. Run it along the floor; only the part near the drainage point must be raised.
For the correct functioning of the machine, the drain hose must remain hooked on the proper support piece situated on the top part of back side of the appliance.
14.5 Electrical Connection
This machine is designed to operate on a 120 V, single-phase, 60 Hz supply.
"An incorrect power supply may void your warranty."
Check that your domestic electrical installation can take the maximum load required (refer page 38), also taking into account any other appliances in use.
Should the appliance power supply cable need to be replaced, this shall be carried out by our Service Centre.
When the appliance is installed, the power supply cable must be easily accessible.

CAUTION!
Connect the machine to an earthed socket outlet.

The manufacturer declines any responsibility for damage or injury through failure to comply with the above safety precaution.
15. ENVIRONMENT CONCERNS
15.1 Packaging Materials

The materials marked with the symbol 🌐 are recyclable.
PE<=polyethylene
PS<=polystyrene
PP<=polypropylene
This means that they can be recycled by disposing them properly in appropriate collection containers.
15.2 Old Machine
Use authorized disposal sites for your old appliance. Help to keep your country tidy!
The symbol 📋 on the product or on its packaging indicates that this product may not be treated as household waste.
Instead it shall be handed over to the applicable collection point for the recycling of electrical and electronic equipment. By ensuring this product is disposed of correctly, you will help prevent potential negative consequences for the environment and human health, which could otherwise be caused by inappropriate waste handling of this product.
For more detailed information about recycling of this product, please contact your local city office, your household waste disposal service or the shop where you purchased the product.
15.3 Ecological Hints
To save water, energy and to help protect the environment, we recommend that you follow these tips:
- Normally soiled laundry may be washed without prewashing in order to save detergent, water and time (the environment is protected too!).
- The machine works more economically if it is fully loaded.
- With adequate pre-treatment, stains and limited soiling can be removed; the laundry can then be washed at a lower temperature.
- Measure out detergent according to the water hardness, the degree of soiling and the quantity of laundry being washed.
可能影響製造商保固的重要資訊
natural_image
Three black cross symbols on white background: a hand holding a plug, a cable with plug, and a plug with switches (no text or labels)natural_image
Technical diagram of a mechanical assembly with mounting base and circular component (no text or symbols)搬運螺栓(當卸下時)
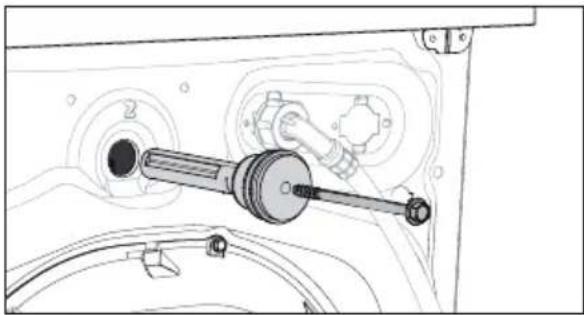
natural_image
Technical line drawing of a mechanical assembly with a shaft and housing (no text or symbols)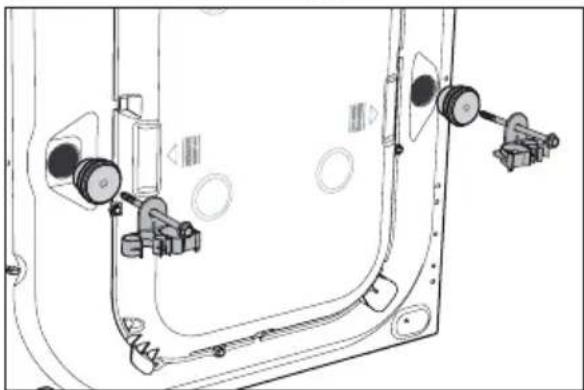
natural_image
Technical line drawing of a vehicle door frame with mechanical components and mounting holes (no text or symbols)
text_image
A B C D 8:88 I MAX H G E Ftext_image
WOOL HAND WASH SAFEnatural_image
Line drawing of a hand inserting a device into a rack (no text or symbols)5. 日常使用 - 洗衣
natural_image
Line drawing of a hand opening a washing machine with a circular vent and handle (no text or symbols)natural_image
Line drawing of a washing machine with hand inserting a bag into the inner casing (no text or symbols)text_image
Diagram showing a device with labeled components including 'O' and 'E', likely illustrating a cable or cable assembly.- 山主洗盛載格
natural_image
Line drawing of a hand inserting a device into a rack (no text or symbols)natural_image
Line drawing of a hand inserting a component into a drawer (no text or symbols)natural_image
Line drawing of a hand inserting a component into a device drawer (no text or symbols visible)natural_image
Line drawing of hands holding a small object with circular buttons (no text or symbols)
text_image
Technical line drawing of a shirt with buttons and accessories, showing front and side views with labels like 'ear' and 'back'.natural_image
Illustration of a hand holding a tool with an arrow indicating direction (no text or symbols present)natural_image
Line drawing of hands inserting a device into a rack, showing internal components and a cable (no text or symbols)natural_image
Line drawing of hands inserting a small object into a device (no text or symbols)natural_image
Line drawing of hands assembling a mechanical device with a faucet and tools (no text or symbols)11.6 清潔抽屉盒的凹槽
natural_image
Line drawing of a hand inserting a screwdriver into a device casing (no text or symbols)11.7 清潔排水泵
定期檢查排水泵,確保排水泵清潔。
發生以下情況時清潔排水泵:
natural_image
Hand pressing a circular button with an arrow, no text or symbols present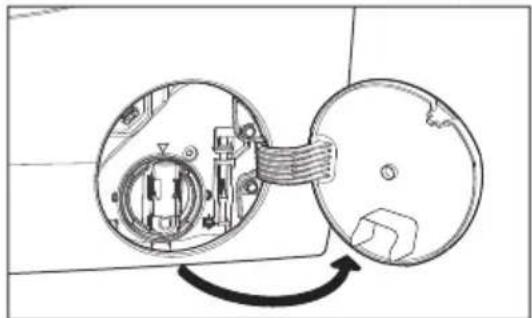
natural_image
Diagram of a mechanical device with internal components and a rotating arrow indicating rotation (no text or symbols)natural_image
Diagram of a device with internal components and a hand holding a remote control panel, showing no text or symbols.
natural_image
Diagram of a mechanical device pouring liquid into a tray with a circular component (no text or symbols)natural_image
Illustration of a kitchen cleaning procedure showing hand pouring liquid into a sink while using a tool on a laptop (no text or symbols present)natural_image
Two-panel line drawing showing a hand operating a mechanical device with rotating components and a close-up of the internal mechanism (no text or symbols)- 清除泵中的絮狀物和髒物(如果有的話)。
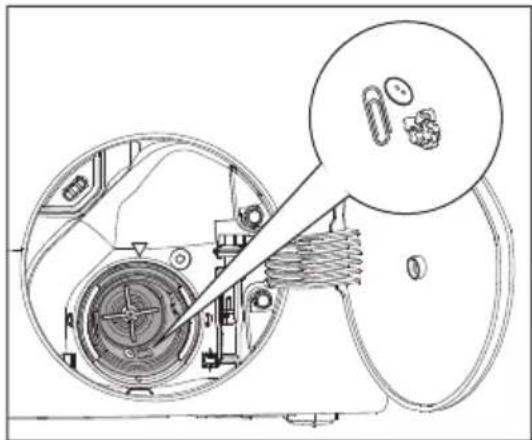
natural_image
Technical line drawing of a mechanical assembly with internal components and a magnified inset showing two parts (no text or symbols)natural_image
Hand using a screwdriver to adjust internal components of a mechanical device (no text or symbols visible)- 在水龍頭下清洗過濾器。
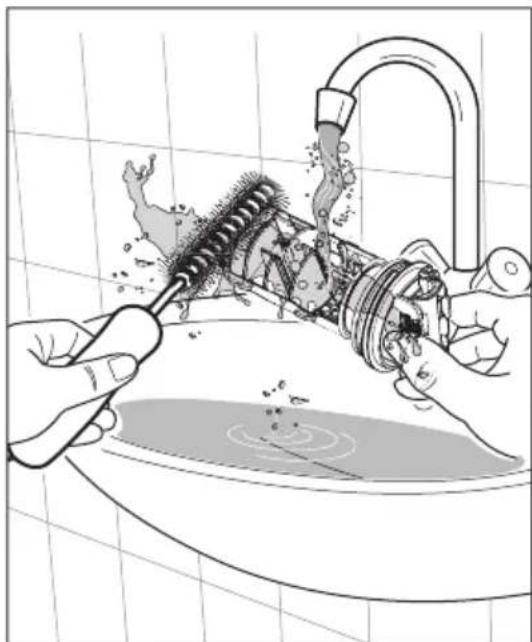
natural_image
Illustration of hands cleaning a bathroom sink with a showerhead and mechanical components (no text or symbols)natural_image
Hand operating a mechanical device with rotating components (no text or symbols visible)- 將擋板推回原位,然後關閉排水泵門。
11.8 清潔進水管過濾器
text_image
Diagram illustrating a hand using a tool to adjust or install a water level, with labeled parts and directional arrows.- 卸下機背的進水軟管。
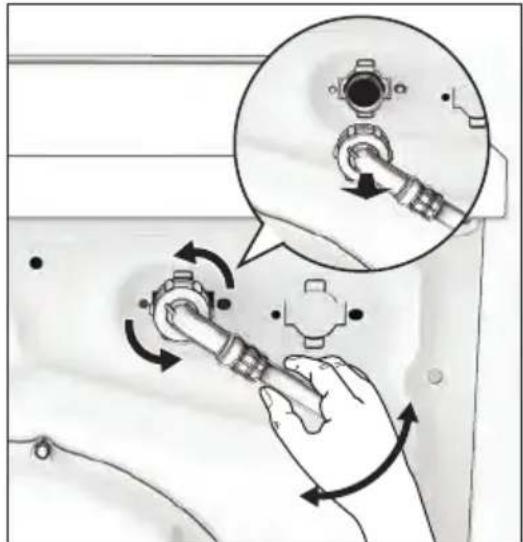
text_image
Diagram showing hand operating a valve mechanism with labeled parts and directional arrows indicating rotation or adjustment.- 使用硬毛刷或毛巾清潔閥門中的過濾器。

natural_image
Hand using a tool to insert or install a component into a socket (no text or symbols visible)natural_image
Illustration of a hand using a wrench to adjust or install a device, with an inset showing a close-up of the switch (no text or symbols present)natural_image
Line drawing of a medical device with attached tubing and a plate (no text or symbols)text_image
Diagram showing a washing machine with a close-up view of its side panel, labeled with 'Electroluxion' and 'i'.12.2 緊急開門
text_image
Diagram illustrating the installation of a washing machine with labeled components and directional arrows indicating motion.- 取出衣物。
- 關閉過濾器蓋。
13. 技術參數
| 尺寸(高/寬/深) | 85 X 60 X 65.9 cm | ||
| 電源(電壓/頻率) | 120 V~ / 60 Hz | ||
| 額定的總功率 | 洗衣:1100 W / 乾衣:1000 W | ||
| 最小熔斷保護 | 10 A | ||
| 供水壓力(最大/最小) | 0.8 MPa / 0.05 MPa | ||
| 最大衣物量(晾衣服) | 程序 | 洗衣 | 乾衣 |
| Cottons | 10 kg | 7 kg | |
| Mixed | 4 kg | 3 kg | |
| Bedding | 3 kg | - | |
| Energy Saver | 10 kg | 7 kg | |
| Baby Care | 4 kg | - | |
| Vapour Refresh | 1.5 kg | - | |
| Tup Clean | - | - | |
| Spin | 10 kg | 7 kg | |
| Rinse + Spin | 10 kg | 7 kg | |
| Quick 15 | 1.5 kg | - | |
| Daily 60 | 5.5 kg | 4 kg | |
| Wool 📋. | 2 kg | 1 kg | |
| Delicates | 4 kg | - | |
| WashDry 60 | 1 kg | 1 kg | |
| Favourite ☆ | - | - | |
| 脫水速度(最快/最慢) | 1400 rpm / 400 rpm | ||
14. 安装
14.1 拆除包装

小心!
natural_image
Illustration of a rectangular box with horizontal strips and a magnified inset showing a hand holding a tool near a vertical panel (no text or symbols)natural_image
Technical line drawing of a washing machine with an air vent and fan assembly (no text or symbols)natural_image
Line drawing of a washing machine with a hand inserting a component into the air gap (no text or symbols)natural_image
Line drawing of a person assembling a computer motherboard with visible fan and socket (no text or symbols)- 拆下聚苯乙烯泡沫底座。

natural_image
Diagram showing a computer motherboard with a fan and heatsink being inserted, no text or symbols presenttext_image
Technical diagram showing mechanical assembly with labeled component 'A' and magnified detail view- 拆下三個搬運螺栓。
- 拔出塑膠墊片。
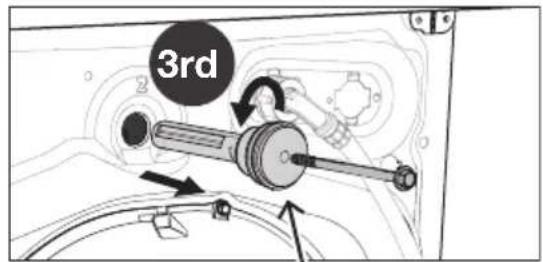
text_image
3rd
flowchart
graph TD
    A["1st"] --> B["2nd"]
    B --> C["Part of Component"]
    style A fill:#f9f,stroke:#333
    style B fill:#bbf,stroke:#333
    style C fill:#dfd,stroke:#333
natural_image
Line drawing of hands using scissors to cut mechanical parts (no text or symbols)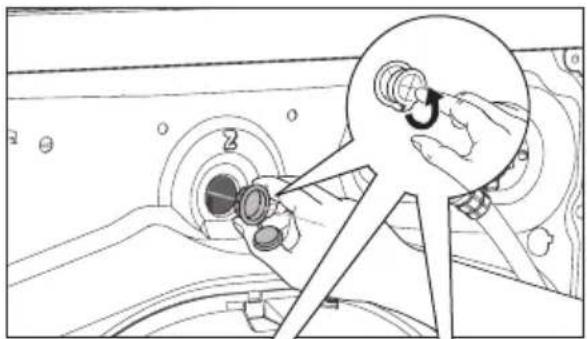
natural_image
Technical line drawing of a mechanical assembly with a magnified inset showing a hand adjusting components (no text or symbols)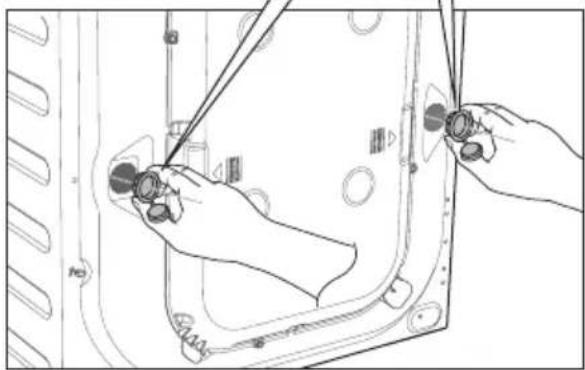
natural_image
Technical line drawing of hands operating a mechanical component with adjustment knobs (no text or symbols)14.2 洗衣機放置
natural_image
Line drawing of a washing machine with a close-up inset showing a hand holding a screwdriver (no text or symbols present)natural_image
Illustration of a person washing a washing machine with a prohibition symbol (no text or labels)natural_image
Diagram of a U-shaped pipe with a bent end and a vertical dimension line, no text or symbols present調整長度, 與凹槽契合。

natural_image
Line drawing of a bathroom sink with faucet and pipe, no text or symbols present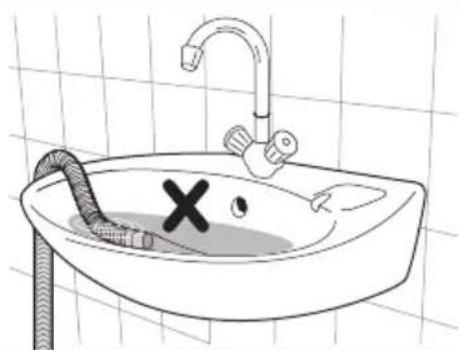
natural_image
Line drawing of a bathroom sink with a pipe and a cross mark, no text or symbols present>PE<=polyethylene
>PS<=polystyrene
>PP<=polypropylene