N1 - Network adapter LEXMARK - Free user manual and instructions
Find the device manual for free N1 LEXMARK in PDF.

User questions about N1 LEXMARK
0 question about this device. Answer the ones you know or ask your own.
Ask a new question about this device
Download the instructions for your Network adapter in PDF format for free! Find your manual N1 - LEXMARK and take your electronic device back in hand. On this page are published all the documents necessary for the use of your device. N1 by LEXMARK.
USER MANUAL N1 LEXMARK
natural_image
Illustration of a stylized cloud-shaped object with two circular elements on its surface (no text or symbols)Edition: December 2001
The following paragraph does not apply to any country where such provisions are inconsistent with local law: LEXMARK INTERNATIONAL, INC., PROVIDES THIS PUBLICATION "AS IS" WITHOUT WARRANTY OF ANY KIND, EITHER EXPRESS OR IMPLIED, INCLUDING, BUT NOT LIMITED TO, THE IMPLIED WARRANTIES OF MERCHANTABILITY OR FITNESS FOR A PARTICULAR PURPOSE. Some states do not allow disclaimer of express or implied warranties in certain transactions; therefore, this statement may not apply to you.
This publication could include technical inaccuracies or typographical errors. Changes are periodically made to the information herein; these changes will be incorporated in later editions. Improvements or changes in the products or the programs described may be made at any time.
Comments about this publication may be addressed to Lexmark International, Inc., Department F95/032-2, 740 West New Circle Road, Lexington, Kentucky 40550, U.S.A. Lexmark may use or distribute any of the information you supply in any way it believes appropriate without incurring any obligation to you. You can purchase additional copies of publications related to this product by calling 1-800-553-9727. In other countries, contact your point of purchase.
References in this publication to products, programs, or services do not imply that the manufacturer intends to make these available in all countries in which it operates. Any reference to a product, program, or service is not intended to state or imply that only that product, program, or service may be used. Any functionally equivalent product, program, or service that does not infringe any existing intellectual property right may be used instead. Evaluation and verification of operation in conjunction with other products, programs, or services, except those expressly designated by the manufacturer, are the user's responsibility.
Lexmark and Lexmark with diamond design are trademarks of Lexmark International, Inc., registered in the United States and/or other countries.
Other trademarks are the property of their respective owners.
© Copyright 2001 Lexmark International, Inc. All rights reserved.
UNITED STATES GOVERNMENT RESTRICTED RIGHTS
This software and documentation are provided with RESTRICTED RIGHTS. Use, duplication or disclosure by the Government is subject to restrictions as set forth in subparagraph (c)(1)(ii) of the Rights in Technical Data and Computer Software clause at DFARS 252.227-7013 and in applicable FAR provisions: Lexmark International, Inc., Lexington, KY 40550.
Federal Communications Commission (FCC) compliance information statement
The Lexmark N1 Ethernet Adapter has been tested and found to comply with the limits for a Class B digital device, pursuant to Part 15 of the FCC Rules. Operation is subject to the following two conditions: (1) this device may not cause harmful interference, and (2) this device must accept any interference received, including interference that may cause undesired operation.
The FCC Class B limits are designed to provide reasonable protection against harmful interference in a residential installation. This equipment generates, uses and can radiate radio frequency energy and, if not installed and used in accordance with the instructions, may cause harmful interference to radio communications. However, there is no guarantee that interference will not occur in a particular installation. If this equipment does cause harmful interference to radio or television reception, which can be determined by unplugging the equipment and then plugging it back in, the user is encouraged to try to correct the interference by one or more of the following measures:
- Reorient or relocate the receiving antenna.
- Increase the separation between the equipment and receiver.
- Connect the equipment into an outlet on a circuit different from that to which the receiver is connected.
- Consult your point of purchase or service representative for additional suggestions.
The manufacturer is not responsible for any radio or television interference caused by using other than recommended cables or by unauthorized changes or modifications to this equipment. Unauthorized changes or modifications could void the user's authority to operate this equipment.
Note: To assure compliance with FCC regulations for a Class B computing device, use a properly shielded and grounded cable such as Lexmark part number 12A2405 for USB attach. Use of a substitute cable not properly shielded and grounded may result in a violation of FCC regulations.
Any questions regarding this compliance information statement should be directed to Director of Lab Operations, Lexmark International, Inc., 740 New Circle Road NW, Lexington, KY 40550, (859) 232-3000.
Industry Canada compliance statement
This Class B digital apparatus meets all requirements of the Canadian Interference-Causing Equipment Regulations.
- Use only the Lexmark power supply provided with this product or an authorized Lexmark replacement power supply.
- Connect the power cord to an electrical outlet that is near the product and easily accessible.
- Refer service or repairs, other than those described in the manual, to a professional service person.
Contents
Introduction ....1
Setup 1
Troubleshooting 16
An indicator light is not on 16
The Lexmark printer software installation screen did not appear 17
An error message appears 17
There is not a Network button on the Results: No Printer Attached screen 17
My network printer does not appear in the list of available printers 18
There is not an Install Selected Printer button on the Network Configuration screen 18
The New Network Printer Found screen appears 19
The Printer Selection screen appears 19
My network printer will not print 19
How Do I....21
Print a test page 22
Uninstall the printer software 22
Manually configure the network printer ....23
Select the network printer port (Windows) 25
Select the printer in the Chooser (Mac OS 8.6 to 9.2) ......26
Check the printer status ....26
Set up other computers on the network 27
Relocate the adapter 27
Contact Lexmark 29
Glossary 30
Frequently asked questions ....31
Statement of Limited Warranty 32
Introduction
Thank you for purchasing the Lexmark™ N1 Ethernet Adapter, the solution to all your printer sharing needs!
The adapter makes it easy for you to:
- Share your printer between two or more network computers.
- Locate your printer anywhere in your home or office.
You no longer need to locate the printer next to a host computer or make sure a host computer is powered on before sending your print job from a remote location. - Quickly transfer information.
Your new adapter has the capability to transfer information at up to 100 Mbps.
Setup
For setup, you need:
• The Lexmark N1 Ethernet Adapter
• An existing Ethernet (10/100 BaseTX) network
- An Ethernet (RJ-45, category 5) cable, purchased separately
• A network-capable Lexmark printer
To find out if your printer is network-capable or for other printer-specific information, refer to the documentation that came with your printer or visit our Web site at www.lexmark.com.
- The printer software CD that came with your printer
• A computer with a CD-ROM drive
The computer must be connected to the network, have TCP/IP active and running, and have one of the following operating systems:
- Windows 98
- Windows Me
- Windows 2000
- Windows XP (32 bit only)
- Mac OS 8.6 to 9.2
- Mac OS X version 10.0.3 to 10.1
Step 1: Select a location for your adapter
Choosing the correct location for your new adapter is vital to ensuring that it provides you with the quality of service you expect.
Make sure the location is:
- Firm, level, and stable
- Accessible to a network wall connection or network hub connection
- Large enough to accommodate a printer attached to the adapter
- Away from the direct airflow of air conditioners, heaters, or ventilators
• Free of temperature or humidity extremes and fluctuations - Clean, dry, and free of dust
• Away from direct sunlight
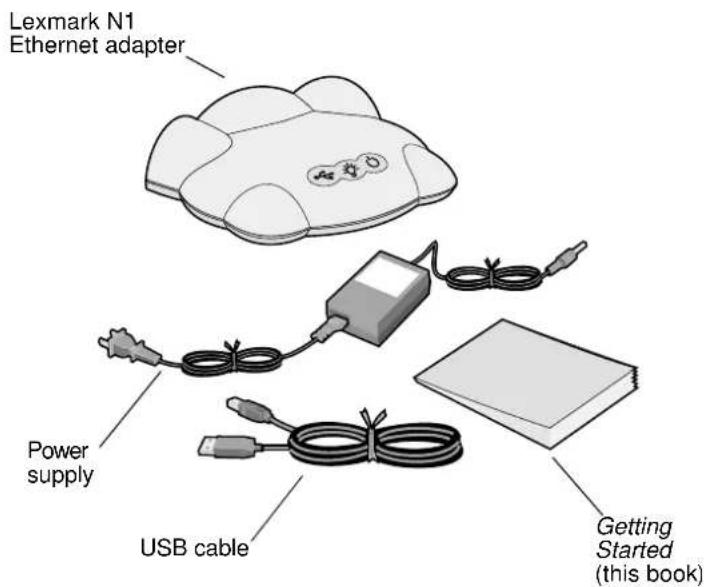
Step 2: Unpack your adapter
text_image
Lexmark N1 Ethernet adapter Power supply USB cable Getting Started (this book)If any items are missing, contact Lexmark (see page 29).
Step 3: Prepare your printer
1 Unpack and set up your printer. For help, refer to the instructions that came with your printer.
To help configure your printer on the network,
- Do not connect your printer to your computer, however, if you have already done so, disconnect the USB or parallel cable.

text_image
Diagram showing a prohibition symbol with two opposing circular objects and a hand holding a plant, indicating a biological or chemical process.- Do not install the printer software, however, if you have already done so, you do not need to uninstall it.

natural_image
Cross-sectional diagram of a device with a disc and screen, no text or symbols present3 Place the printer next to your adapter.
Note: If necessary, disconnect the printer power supply, and then reconnect it at its new location.
Make sure the printer power light is on.

text_image
Diagram showing a device with labeled components and an arrow pointing to a power button, likely illustrating a physical or electrical concept.Note: Your printer may look different from the one shown.
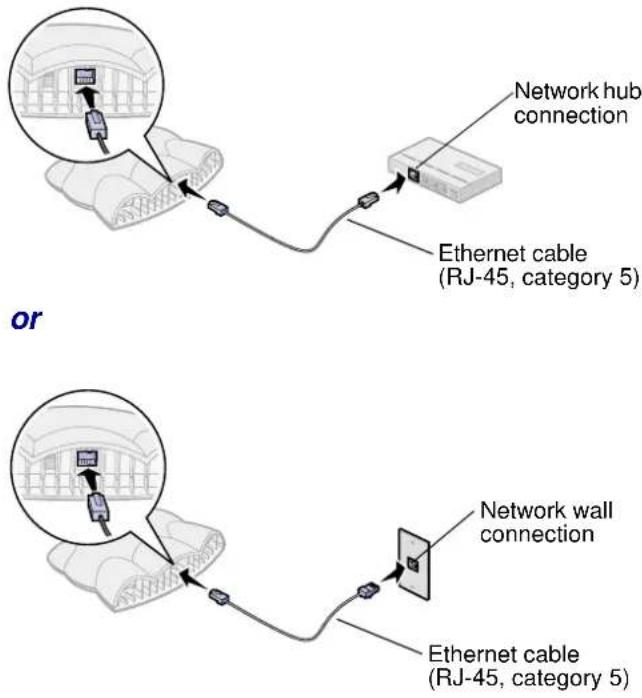
Step 4: Connect your adapter to your network
text_image
Network hub connection Ethernet cable (RJ-45, category 5) or Network wall connection Ethernet cable (RJ-45, category 5)Note: The Ethernet cable is not included with your adapter. You must purchase it separately.
Step 5: Connect your adapter to your printer

text_image
USB cableNote: Your printer may look different from the one shown.
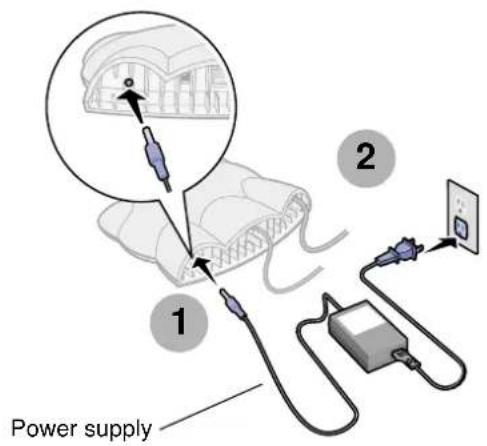
Step 6: Connect your adapter power supply
text_image
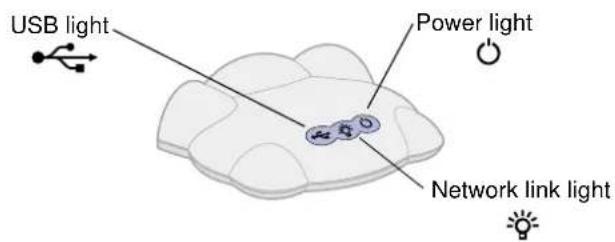
Power supply 1 2Step 7: Make sure all indicator lights are on
text_image
USB light Power light Network link lightIf, after 30 seconds, one or more of the indicator lights are not on, see page 16.
Note: The Network link light blinks to indicate network activity.
Step 8: Turn on your computer

text_image
Microsoft WindowsWindows 98
Windows Me
Windows 2000
Windows XP

text_image
Mac OSMac OS 8.6 to 9.2
Mac OS X
version 10.0.3 to 10.1
Step 9: Configure your network printer
Choose a procedure from the following table to install your printer software and configure your network printer.
If you have questions about the software screens and messages that appear during installation, see
Troubleshooting beginning on page 16.
| Operating system | Printer software previously installed? Page | |
| Windows | No 7 | |
| Yes8 | ||
| Mac OS 8.6 to 9.2 No 1 | 1 | |
| Yes11 | ||
| Mac OS X version 10.0.3 to 10.1 | No 12 | |
| Yes13 | ||
Windows, software not previously installed
1
Insert the printer software CD as shown.

2
When the Lexmark printer software installation screen appears, click Install Now.

text_image
Lexmark The Lexmark 205 CD-ROM has been created. Click "Tools" to view the documentation, license agreement and other options. Click "Install Now" to install the necessary software files and accept the License Agreement. Cancel Finish Install Now3
From the Results: No Printer Attached screen, click Network.

text_image
Access 1. No Policy Allowed The power consumption installed password is only Connected Currently 1. Close after screen cable: - Enter the user's network activity - If permission closed, it will be saved Run Connection containing the Cable connections 2. End effects by use 3. Use a special condition Details: - Select your own desktop access - Select a specific common device OK CancelNote: If the Results: No Printer Attached screen does not appear, continue with step 6 on page 8.
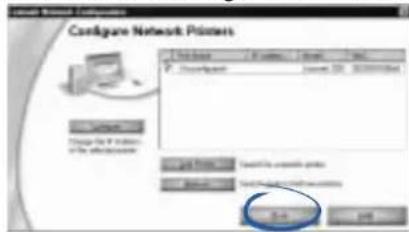
4 From the Network Configuration screen, select your network printer from the list of available printers.
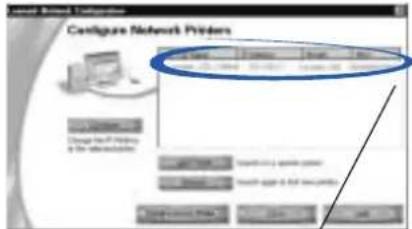
text_image
Configure Network Printers Name: 12340000000000000000000000000000000000000000000000000000000000000000000000000000000000000000000000000000 Change in P Printing & the information. Store this software Store your own software Importing the other software Imported the system Imported the system to the systemYour network printer is the one whose MAC address matches the MAC address on the bottom cover of your adapter.
MAC address
Note: If your network printer is
5 Click Install Selected Printer.
6 Follow the instructions on your screen to complete software installation.
You are finished setting up your computer to work with your network printer.
To set up other computers on your network, see page 27.
Windows, software previously installed
1 From your desktop, double-click the icon for the Lexmark Solution Center.

Note: If the icon is not on your desktop, click Start Programs or All Programs the name of your Lexmark printer Lexmark Solution Center.
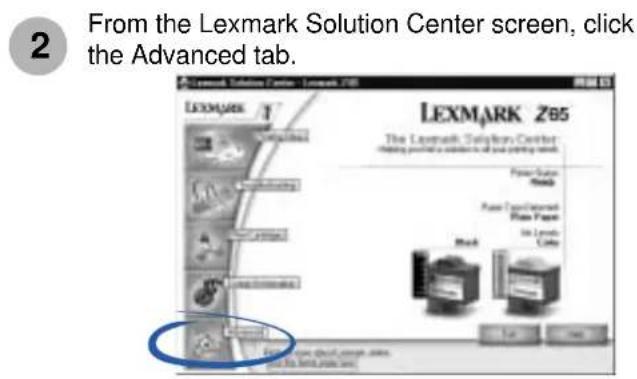
3 From the Advanced window, click Networking.

text_image
LEMMARE Advanced Printing and Software Options Drawing Color Change from software options New Textiles Downloadable text files about this Communication Options Testing Edit the script, coding, and Authentication Other Information Help Use software options OK Cancel The license does not apply to the Microsoft Word. ©2016-0534-0944-08.004 From the Networking Options screen, click Configure.

text_image
Network Networking Options Show remote messages to network packets. From to your points allowed on the network? Is connecting channels to coordinates that a network attached: 1 Lowering and information based on system games checking 2 Does the remote network commands as ordered, internal network, other Configure or access IP address and other settings 3 Use TCP and information based using network adaptive OK Cancel5 On the Network Configuration screen, find your network printer in the list of available printers.
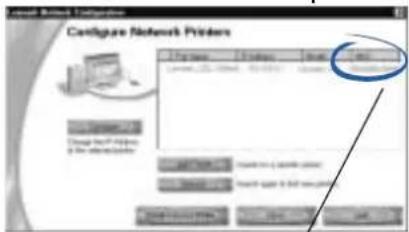
text_image
Configure Network Printers 1. Top line: 1.0 GB/GB 2. Bottom line: 1.0 GB/GB 3. Start Start: 1.0 GB/GB End: 1.0 GB/GB Start point: 1.0 GB/GB End point: 1.0 GB/GB End point: 1.0 GB/GB End point: 1.0 GB/GB End point: 1.0 GB/GB End point: 1.0 GB/GB End point: 1.0 GB/GB End point: 1.0 GB/GB End point: 1.0 GB/GB End point: 1.0 GB/GB End points: 1.0 GB/GB End points: 1.0 GB/GB End points: 1.0 GB/GB End points: 1.0 GB/GB End points: 1.0 GB/GB End points: 1.0 GB/GB End points: 1.0 GB/GB End points: 1.0 GB/GB End points: 1.0 GB/GB End points: End points: End points: End points: End points: End points: End points: End points: End points: End points: End points: End points: End points: End points: End points: End points: End points: End points: End points: End points: End points: End points: End points: End points: End points: End points: End points: End points: End points: End points: End points: End points: End points: End points: Next step: Next step: Next step:Your network printer is the one whose MAC address matches the MAC address on the bottom cover of your adapter.
MAC address
6
Verify that an IP address is listed for your network printer.

text_image
Configure Network Printers File Edit View Tools Help Help 1.0000000000000000000000000000000000000000000000000000000000000000000000000000000000000000000000000000 Design the P Status the instance Edit From Remove the user's print Export to Search the user's print OK CancelNote: If there is not an IP address listed or your network printer is
7
Click Close.
8
From the Networking Options screen, click Cancel.
9
Exit the Lexmark Solution Center.
10
Select the network printer port.
Windows 98/Me/2000
a From the Start menu, click Settings Printers.
b Right-click the icon for your network printer.
c Make sure Set as Default is selected and Use Printer Offline is not selected, and then click Properties.
d Click the Details or Port tab.
e From the Print to the following port: menu, select the printer port that consists of the printer name followed by the last six characters of the adapter MAC address (for example, Lexmark_Z65_1008e8).
f Click OK.
Windows XP
a From the Start menu, click Control Panel ▶ Printers and Other Hardware ▶ Printers and Faxes.
b Click the Ports tab.
c From the list of ports, select the one that consists of the printer name followed by the last six characters of the adapter MAC address (for example, Lexmark_Z65_1008e8).
d Click Apply.
e Click OK.
You are finished setting up your computer to work with your network printer.
To set up other computers on your network, see page 27.
Mac OS 8.6 to 9.2, software not previously installed
1 Insert the printer software CD into your computer CD-ROM drive.

2 When the Lexmark printer installation screen appears, click Install and Agree.
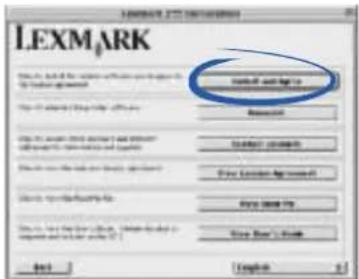
text_image
LEXMARK Start and End Start and End Start and End Start and End Start and End Start and End Start and End Start and End Start and End Start and End Start and End Start and End Start and End Start and End Start and End Start and End Start and End Start and End Start and End Start and End Start and End Start and End Start and End Start and End Start and End Start and Start Start and End Start and End Start and End Start and End Start and End Start and End Start and End Start and End Start and End Start and End Start and End Start and End Start and End Start and End Start and End Start and End Start and End Start and End Start and End Start and End Start and End Start and End Start and End Start and End Start and NextNote: If the New Network Printer Found screen or the Printer Selection screen appears, see page 19.
3 Follow the instructions on your screen to complete software installation.
You are finished setting up your computer to work with your network printer.
To set up other computers on your network, see page 27.
Mac OS 8.6 to 9.2, software previously installed
1 From the Apple menu, choose Control Panels the name of your network printer Control Panel.
2 The Printer Selection screen appears.
text_image
Update Text Web Please click the text and log your own text "http://www.100.com/s/100.com/s/100.com/s/100.com/s/100.com/s/100.com/s/100.com/s/100.com/s/100.com/s/100.com/s/100.com/s/100.com/s/100.com/s/100.com/s/100.com/s/100.com/s/100.com/s/100.c File Path: Name: View by Location: View to Web: Name: Edit View: View to Web: Name: Edit View: View to Web: Name: Edit View: View to Web: Name: Edit View: View to Web: Name: Edit View: View to Web: Name: Edit View: View to Web: Name: Edit View: View to Web: Name: Edit View: View to Web: Name: Edit View: View to Web: Name: Edit View: View to Web: Name: Edit View: View to Web: Name: Edit View: View to Web: Name: Edit View: View to Web: Name: Edit View: View to Web: Name: Edit View: View to Web: Name: Edit View: View to Web: Name: Edit View: View to Web: Name: Edit View: View to Web: Name: Edit View: Show to the Web at 9.12.2023 OK Cancel HelpNote: If the screen does not appear, choose Select Printer from the Advanced menu.
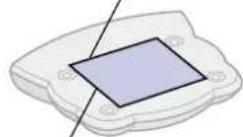
3 From the Printer Selection screen: a Select your network printer.
Your network printer is the one whose MAC/Serial Number matches the MAC/Serial
Number on the bottom cover of your adapter.
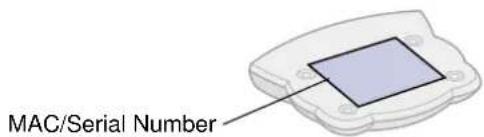
text_image
MAC/Serial NumberNote: If there is not an IP address listed or your network printer is
b Verify the Make Default box is checked.
c Click Select.
You are finished setting up your computer to work with your network printer.
To set up other computers on your network, see page 27.
Mac OS X version 10.0.3 to 10.1, software not previously installed
1
Insert the printer software CD as shown.

2
From your desktop, double-click the Lexmark printer CD icon.
3
Double-click the Install icon.

Click Install and Agree.
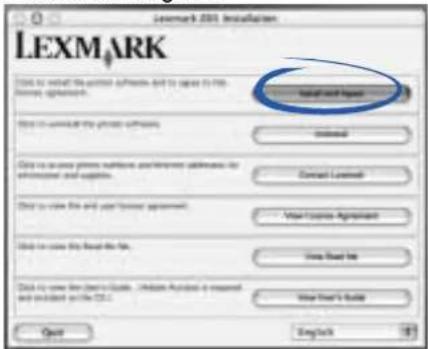
text_image
Lexmark 2001 Installation Install and Image Install to install the license software and to agree to file. License agreement. Install to install the license software Install to save phone syncers and install permission details for appropriate and applicable. Install to write file and use form agreement: View Course Agreement View Book Top View Book's Guide - Include Password is required and include on file (C.D.) View Book's Guide Open EnglishNote: If the New Network Printer Found screen or the Printer Selection screen appears, see page 19.

Follow the instructions on your screen to complete software installation.
You are finished setting up your computer to work with your network printer.
To set up other computers on your network, see page 27.
Mac OS X version 10.0.3 to 10.1, software previously installed

From the Finder, click Computer, and then double-click the OS X disk icon library folder Printers folder Lexmark folder.

Double-click the Lexmark Utility icon for your network printer.

The Printer Selection screen appears.
text_image
Primary Detection Please find your primary language in the main language (e.g. "Microsoft" or similar) to add a new primary language. Primary language: Microsoft (100%) Address: 107-2648-25 Add Cyclic Number Configure Add Numbers List to display the primary language of the main language. Sub-Select the main language in the main language. Browse... Cancel...Note: If the screen does not appear, choose Select Printer from the Advanced menu.

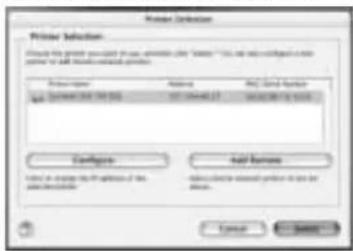
From the Printer Selection screen:
a Select your network printer.
Your network printer is the one whose MAC/Serial Number matches the MAC/Serial Number on the bottom cover of your adapter.

text_image
MAC/Serial NumberNote: If there is not an IP address listed or your network printer is
b Click Select.

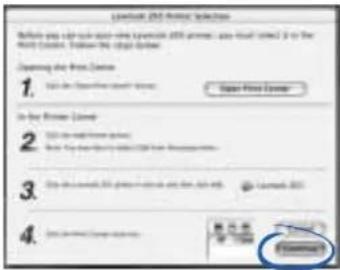
From the Printer Selection screen, click Open Print Center.
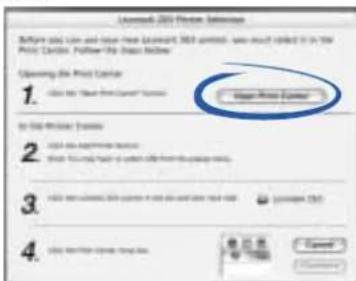
text_image
Lemonade 203 Phone Options Before you call on and leave from Lemonade, 203 phone, will reach 15% in the Print Center. Follow the Print Button Opening the Print Center 1. Close my Mail Print Center to the Print Center 2. Add to the Print Center's name: then you need to pay a payment for your mail from the paper name. 3. Add more than 500 times in the next week 4. Add more than 500 times in the next week Search Print Center Cancel Cancel
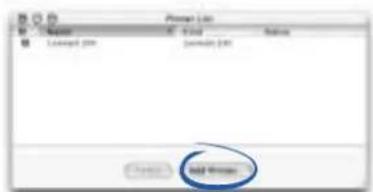
From the Printer List screen, select your network printer.
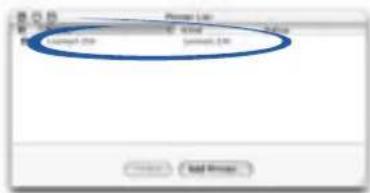
text_image
Send Import Send Import Send Import Send Import Send Import Send Import Send Import Send Import Send Import Send Import Send Import Send Import Send Import Send Import Send Import Send Import Send Import Send Import Send Import Send Import Send Import Send Import Send Import Send Import Send Import Send Import Send Import Send Import Send Import Send Import Send Import Send Import Send Import Send Import Send Import Send Import Send Import Send Import Send Import Send Import Send Import Send Import Send Import Send Import Send Import Send Import Send Import Send Import Send Import Send Import Send Import Send Import Send Import Send Import Send Import Send Import Send Import Send Import Send Import Send Import Send Import Send Import Send Import Send Import Send Import Send Import Send Import SendImport
Click Add Printer.
text_image
Add From Add From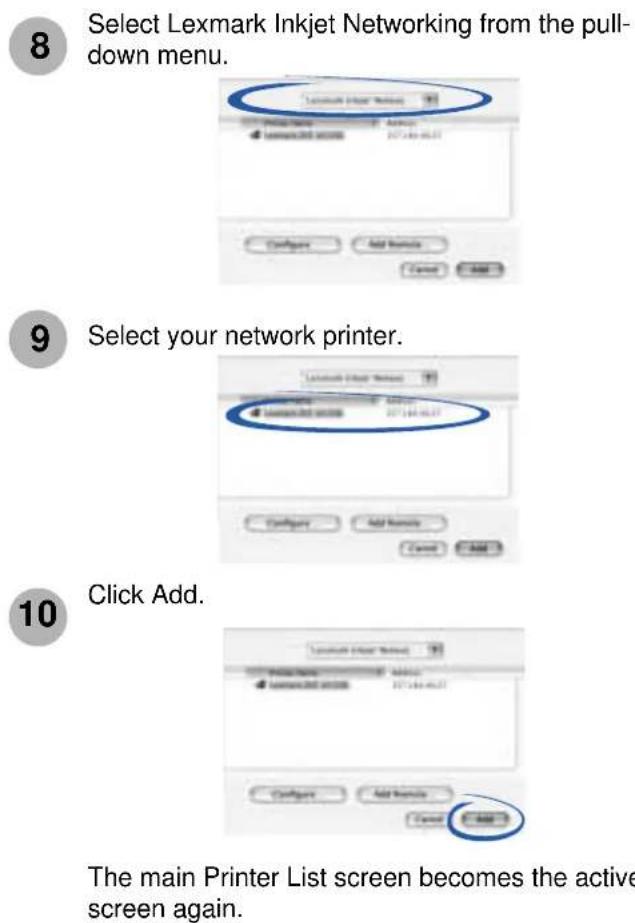
Select Lexmark Inkjet Networking from the pull-down menu.
Select your network printer.
Click Add.
The main Printer List screen becomes the active screen again.
11
Click the red Close button.

From the Printer Selection screen, click Continue.
text_image
Lanmark 2017 - Normal Selection Before you call back on-line Llanmark 2017 program, also closed to it in the Web (Session). Follow the right menu. Accounting the Web Course 1. Use the Software Course (Web) Open Web Course In the Web Course 2. Use the Web Course (Web) Make the Web Course (Web) from Web application 3. Use the Web Course (Web) for this course and then use Web Lanmark 2017 4. Use the Web Course (Web)13
Follow the instructions on your screen to complete software installation.
You are finished setting up your computer to work with your network printer.
To set up other computers on your network, see page 27.
Troubleshooting
Use this chapter to solve problems you may have while setting up your adapter.
| For this problem: See page: | |
| An indicator light is not on 16 | |
| The Lexmark printer software installation screen did not appear | 17 |
| An error message appears 17 | |
| There is not a Network button on the Results: No Printer Attached screen | 17 |
| My network printer does not appear in the list of available printers | 18 |
| There is not an Install Selected Printer button on the Network Configuration screen | 18 |
| The New Network Printer Found screen appears | 19 |
| The Printer Selection screen appears 19 | |
| My network printer will not print 19 |
An indicator light is not on
| If this indicator light is not on: | Make sure the: |
| Power Adapter power supply is connected properly. | |
| USB USB cable connecting the adapter to the printer is secure and the printer is on.Note: This light blinks to indicate USB activity. | |
| Network link Ethernet cable connecting the adapter to the network is secure.If the cable is connected properly and the light is still not on, make sure the network is operating properly. For additional help, refer to your network documentation or contact your network administrator.Note: This light blinks to indicate network activity. | |
Note: See page 5 to locate the indicator lights.
The Lexmark printer software installation screen did not appear
Windows
1 Close all open software applications.
2 Restart your computer.
3 Reinsert the printer software CD.
- If the Lexmark printer software installation screen appears, continue with step 3 on page 7.
- If not, continue with the following steps:
a From your desktop, double-click My Computer.
b Double-click the CD-ROM drive icon.
c If necessary, double-click setup.exe.
d Continue with step 3 on page 7.
Macintosh
1 Close all open software applications.
2 Reinsert the printer software CD.
- If the Lexmark printer software installation screen appears, continue with step 2 on page 11 (Mac OS 8.6 to 9.2) or step 4 on page 13 (Mac OS X version 10.0.3 to 10.1).
- If not, continue with the following steps:
a From your desktop, double-click the Lexmark printer CD icon.
b Double-click the Install icon.
c Continue with step 2 on page 11 (Mac OS 8.6 to 9.2) or step 4 on page 13 (Mac OS X version 10.0.3 to 10.1)).
An error message appears
Follow the instructions on any error message that appears on your computer screen. Click the ? or Help button for additional information.
There is not a Network button on the Results: No Printer Attached screen
1 From the Search Results: No Printer Attached screen, click Select.

text_image
Search Results: The Files Attached For your computer is installed successfully available in a Microsoft company. 1. Check of the printer buttons: - Click this print file (e-mail) - If any other (all text files are available, this format) 2. Click Continue to copy the search. OK Enteruate on clicking the links (computer) Select your own link parameters Finish Help2 From the Printer Installation screen, click Configure Network Printer.
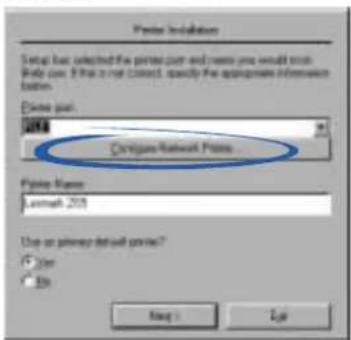
text_image
Printer Installations Setup has selected the printer port and means you would think Port port. If this is not correct, specify the appropriate information button. Print path: 2006 Computer-network Ports... Printer Name: Lennah 2019 Use as proxy default price? ● User ○ Buy King > Edit3 Continue with step 4 on page 8.
My network printer does not appear in the list of available printers
- Unplug the adapter power supply, and then plug it in again.
- Make sure all cables to the printer, adapter, electrical outlet, and network connection are secure. (pages 4 through 5)
- Click Refresh (Windows).
- If your network printer is on a remote subnet, click Add Printer (Windows) or Add Remote (Macintosh), and then follow the instructions on your screen.
- Restart the computer.
There is not an Install Selected Printer button on the Network Configuration screen
1 From the Network Configuration screen, click Close.
text_image
Configure Network Printers File Edit View Insert Help Configure Start: 100% (Start) 100% (End) Next Step Next Step to install printers Next Step to install printers OK Cancel2 From the Printer Installation screen, select your printer port from the pull-down menu, and then click Next.

text_image
Data Source Data Source: 100,000.00 Source Address D:\data\data\data\data\data\data\data\data\data\data\data\data\data\data\data\data\data\data\data\data\data\data\data\data\data\data\data\data\data\data\data\data\data\data\data\data\data\data\data\data\data\data\data\data\data\data\data\data\data\data\data\nData Source: Data Source\nData Source: Data Source\nData Source: Data Source\nData Source: Data Source\nData Source: Data Source\nData Source: Data Source\nData Source: Data Source\nData Source: Data Source\nData Source: Data Source\nData Source: Data Source\nData Source: Data Source\nData Source: Data Source\nData Source: Data Source\nData Source: Data Source\nData Source: Data Source\nData Source: Data Source\nData Source: Data Source\nData Source: [1] Data Source [2] Data Source [3] Data Source [4] Data Source [5] Data Source [6] Data Source [7] Data Source [8] Data Source [9] Data Source [10] Data Source [11] Data Source [12] Data Source [13] Data Source [14] Data Source [15] Data Source [16] Data Source [17] Data Source [18] Data Source [19] Data Source [20] Data Source [21] Data Source [22] Data Source [23] Data Source [24] Data Source [25] Data Source [26] Data Source [27] Data Source [28] Data Source [29] Data Source [30] Data Source [31] Data Source [32] Data Source [33] Data Source [34] Data Source [35] Data Source [36] Data Source [37] Data Source [38] Data Source [39] Data Source [40] Data Source [41] Data Source [42] Data Source [43] Data Source [44] Data Source [45] Data Source [46] Data Source [47] Data Source [48] Data Source [49] Data Source [50] Data Source [51] Data Source [52] Data Source [53] Data Source [54] Data Source [55] Data Source [56] Data Source [57] Data Source [58] Data Source [59] Data Source [60] Data Source [61] Data Source [62] Data Source [63] Data Source [64] Data Source [65] Data Source [66] Data Source [67] Data Source [68] Data Source [69] Data Source [70] Data Source [71] Data Source [72] Data Source [73] Data Source [74] Data Source [75] Data Source [76] Data Source [77] Data Source [78] Data Source [79] Data Source [80] Data Source3 Follow the instructions on your screen to complete software installation.
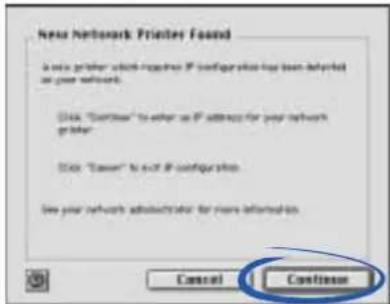
The New Network Printer Found screen appears
This screen appears if the printer software found only one new network printer but could not automatically configure it.
1 From the New Network Printer Found screen, click Continue.
text_image
New Network Printer Found A new printer which requires IP configuration has been notified to your network. Click "Continue" to either use IP address for your network provider. Click "Turner" to exit IP configuration. See your network administrator for more information. Cancel Continue2 From the Configure Network Printer screen, enter an IP address that is valid for your network.

text_image
Configure network printer HRC: 301 IP Address(s): https://www.rsc.org/2018-05-04 Cancel OKFor help, refer to your network documentation or contact your network administrator.
3 Click OK.
4 Continue with step 3 on page 11 (Mac OS 8.6 to 9.2) or step 5 on page 13 (Mac OS X version 10.0.3 to 10.1).
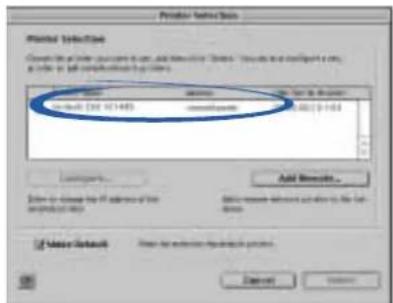
The Printer Selection screen appears
This screen appears if the printer software found more than one printer on your network or did not find any printer on your network.
- If your network printer is listed with an IP address, continue with step 3a on page 11 (Mac OS 8.6 to 9.2) or step 4a on page 14 (Mac OS X version 10.0.3 to 10.1).
- If your network printer is listed as
- If your network printer does not appear in the list of available printers, see page 18.
My network printer will not print
Windows
- Make sure all cables to the printer, adapter, electrical outlet and network connection are secure. (pages 4 through 5)
• Make sure all indicator lights are on. (page 5)
- Check the printer status. (page 26)
- Make sure the network is operating properly.
Refer to your network documentation or contact your network administrator. - Make sure the printer software is installed on the computer you are sending the print job from. (page 6)
Note: You must install the printer software on each computer that uses the network printer.
- Make sure an IP address for your network printer appears in the Network Configuration screen. For help accessing the Network Configuration screen, follow steps 1 through 4 on pages 8 and 9.
If there is not an IP address listed for your network printer, see Manually configure the network printer on page 23.
- Make sure you have selected the correct printer port for the network printer. For help selecting the network printer port, see page 25.
- Restart the computer.
- Make sure there is not a problem with the printer itself.
a Disconnect the printer from the adapter.
b Attach the printer directly to your computer with a USB or parallel cable.
If you are able to print when the printer is directly attached, there may be a problem with your network.
Refer to your network documentation or contact your network administrator.
- Uninstall and then reinstall the printer software. (page 22)
If the printer still does not print, refer to your printer documentation for help.
Macintosh
- Make sure all cables to the printer, adapter, electrical outlet and network connection are secure. (pages 4 through 5)
- Make sure all indicator lights are on. (page 5)
- Make sure the network is operating properly.
Refer to your network documentation or contact your network administrator.
- Make sure the printer software is installed on the computer you are sending the print job from. (page 6)
Note: You must install the printer software on each computer that uses the network printer.
- Make sure your printer is selected in the Chooser (Mac OS 8.6 to 9.2 only). (page 26)
- Make sure your printer appears on the Printer List screen in Print Center (Mac OS X version 10.0.3 to 10.1 only). (page 14)
- Check the printer status. (page 26)
- Make sure there is not a problem with the printer.
a Disconnect the printer from the adapter.
b Attach the printer directly to your computer with a USB or parallel cable.
If the printer still does not print, refer to your printer documentation for help.
If you are able to print when the printer is locally attached, there may be a problem with your network. Refer to your network documentation or contact your network administrator.
- Uninstall and then reinstall the printer software. (page 22)
How Do I...
Use this chapter to find out how to perform common tasks related to your adapter and network printer.
| To find out how to: See page: | |
| Print a test page 22 | |
| Uninstall the printer software 22 | |
| Manually configure the network printer 23 | |
| Select the network printer port (Windows) 25 | |
| Select the printer in the Chooser (Mac OS 8.6 to 9.2) | 26 |
| Check the printer status 26 | |
| Set up other computers on the network 27 | |
| Relocate the adapter 27 | |
| Contact Lexmark | 29 |
Print a test page
Follow the steps for your operating system.
Windows
1 Make sure your printer is set as the default printer and is not offline. For help, see Check the printer status on page 26.
2 From your desktop, double-click the icon for the Lexmark Solution Center.

If the icon is not on your desktop, click Start Programs or All Programs the name of your Lexmark printer Lexmark Solution Center.
3 From the Lexmark Solution Center screen, click the Troubleshooting tab.
4 From the Troubleshooting window, click Print a test page.
Mac OS 8.6 to 9.2
1 From the Apple menu, choose Control Panels ▶ the name of your network printer Control Panel.
2 From the Cartridges tab, click Print Test Page.
Getting Started
Mac OS X version 10.0.3 to 10.1
1 From the Finder, click Computer, and then double-click the OS X disk icon library folder Printers folder Lexmark folder.
2 Double-click the Lexmark Utility icon for your network printer.
3 If more than one printer is available, select your network printer from the list.
4 From the Cartridges tab, click Print Test Page.
Uninstall the printer software
Follow the steps for your operating system.
Windows
1 From the Start menu, click Programs or All Programs the name of your Lexmark printer Lexmark Uninstall.
2 Follow the instructions on your screen.
Note: To reinstall the printer software, restart your computer, and then follow the instructions on page 6.
Macintosh
1 Insert the printer software CD. If you are using Mac OS X version 10.0.3 to 10.1, double-click the Lexmark printer CD icon, and then click Install.
2 When the Lexmark printer software installation screen appears, click Uninstall.
3 Follow the instructions on your screen to uninstall the printer software.
Note: To reinstall the printer software, restart your computer, and then follow the instructions on page 11 for Mac OS 8.6 to 9.2, or page 12 for Mac OS X version 10.0.3 to 10.1.
Manually configure the network printer
Your printer software automatically configures your network printer. However, there are some instances when you may need to configure it manually. These include:
- Your network printer is
. - There is not an IP address listed for your network printer on the screen that lists the available printers.
- You manually assigned IP addresses for other network devices.
- You want to assign a specific IP address.
- You want to use your network printer on a remote subnet.
Windows
1 From the Network Configuration screen, select your

text_image
Configure Network Printers Open Close Unopen New Print... New Print... New Print... New Print... New Print... New Print... New Print... New Print... New Print... New Print... New Print... New Print... New Print... New Print... New Print... New Print... New Print... New Print... New Print... New Print... New Print... New Print... New Print... New Print... New Print... New Print... New Print... New Print... New Print... New Print... New Print... New Print... New Print... New Print... Nan Nan Nan Nan Nan Nan Nan Nan Nan Nan Nan Nan Nan Nan Nan Nan Nan Nan Nan Nan Nan Nan Nan Nan Nan Nan Nan Nan Nan Nan Nan Nan Nan Nan Mn Mn Mn Mn Mn Mn Mn Mn Mn Mn Mn Mn Mn Mn Mn Mn Mn Mn Mn Mn Mn Mn Mn Mn Mn Mn Mn Mn Mn Mn Mn Mn Mn MnYour network printer is the one whose MAC address matches the MAC address on the bottom cover of your adapter.

text_image
MAC addressNote: If you want to print to a network printer on a remote subnet, click Add Printer and follow the instructions on your screen.
2 Click Refresh.
3 Click Configure.
4 Enter an IP address that is valid for your network.

text_image
Microsoft Network Configuration Configure IP Address IP Address: No CancelFor help, refer to your network documentation or contact your network administrator.
5 Click OK.
6 Continue with step 5 on page 8 (software not previously installed) or step 7 on page 10 (software previously installed).
Macintosh
1 From the Printer Selection screen, select the
text_image
Printer settings Printer settings Close to all other printer names in the main, and also contains "commoderate" options. These are not specified in any case. All other printer types include: - Print (301-971485) Commoderate Add Presets... Enter to create the print address of the printer (http://www.psd.com) Other response settings available to the next page. Value Settings Enter for extension: http://www.psd.com Cancel Add Presets...If you want to print to a network printer on a remote subnet, click Add Remote and follow the instructions on your screen.
2 Click Configure.

text_image
Printer Selection P rimer Selection C:\Users\200-01349\... Configure... Add Options... Add to the user's name or address Name: 100.0000000000000000000000000000000000000000000000000000000000000000000000000000000000000000000000000000 Value Select Enter for any other printer selection option Cancel Help3 From the Configure Network Printer screen, enter an IP address that is valid for your network.

text_image
Custipure Internet Provider Address Address: 00000000000000 IP Address: Imaging IP address: http://www.custipure.com/ http://www.custipure.com/123456888888888888888888888888888888888888888888888888888888888888888888888888888For help, refer to your network documentation or contact your network administrator.
4 Click OK.
The Configure Network Printer screen disappears and the Printer Selection screen becomes the active screen again. In addition, the newly configured printer is automatically selected.
5 Continue with step 3b on page 12 (Mac OS 8.6 to 9.2) or step 4b on page 14 (Mac OS X 10.0.3 to 10.1).
Select the network printer port (Windows)
Windows 98/Me/2000
1 From the Start menu, click Settings Printers.
2 From the Printers folder, right-click the icon for your network printer.
3 Click Properties.
4 Click the Details or Port tab.
5 From the pull-down menu labeled Print to the following port:, select the printer port that consists of the printer name followed by the last six characters of the adapter MAC address (for example, Lexmark_Z65_1008e8).
6 Click OK.
Windows XP
1 From the Start menu, click Control Panel Printers and Other Hardware Printers and Faxes.
2 Click the Ports tab.
3 From the list of ports, select the one that consists of the printer name followed by the last six characters of the adapter MAC address (for example, Lexmark_Z65_1008e8).
4 Click Apply.
5 Click OK.
Select the printer in the Chooser (Mac OS 8.6 to 9.2)
1 From the Apple menu, choose Chooser.
2 In the left window, highlight the printer icon for your network printer.

text_image
Document 3.0.01.jpg Image1.jpg Image2.jpg Image3.jpg Appetector (VDD) Current Image Library Database Hotels Hot's Bars TV Support Organic Business Open, OpenNote: If your network printer is not listed, install the printer software. For help, see page 11.
3 In the Connect to: box, highlight the icon for your network printer.
Note: If your network printer is not listed, check the cable connections.
4 Click the box at the top left to close the Chooser.
5 When the Page Setup message dialog box appears, click OK.
Check the printer status
Windows
1 From the Start menu, click Settings Printers.
2 From the Printers folder, right-click the icon for your network printer.
3 Make sure Set as Default is selected and Use Printer Offline is not selected.
Mac OS 8.6 to 9.2
1 From your desktop, highlight the icon for your network printer.
2 From the menu bar, choose Printing.
3 Make sure Set Default Printer is selected.
4 Choose Start Queue if available.
Mac OS X version 10.0.3 to 10.1
1 From the Dock, click the Finder icon.
2 From the Finder window, click the Applications icon in the toolbar.
3 Double-click the Utilities folder.
4 Double-click the Print Center icon.
5 Select your printer in the printer list.
6 From the Printers menu, choose Make Default.
7 From the Printers menu, choose Show Queue.
8 From the Queue menu, choose Start Queue, if available.
Set up other computers on the network
You must install the printer software on each computer that uses the network printer. Follow all of the steps for your operating system.
Windows
1 Insert the printer software CD.
2 When the Lexmark printer software installation screen appears, click Install or Install Now.
If the printer software was previously installed, you are prompted to update the existing driver or install another copy of the driver. Choose Install another copy of the driver only if you plan to print to multiple printers of the same model. For example, you might have a Lexmark Z65 locally attached and another Lexmark Z65 on your network. If you choose to Install another copy of the driver make sure you change your printer selection whenever you want to print to the network printer.
3 Continue with step 3 on page 7.
Mac OS 8.6 to 9.2
1 Insert the printer software CD.
2 When the Lexmark printer installation screen appears, click Install and Agree.
3 Follow the instructions on your screen to complete printer software installation.
Mac OS X version 10.0.3 to 10.1
1 Insert the printer software CD.
2 From your desktop, double-click the Lexmark printer CD icon.
3 Double-click the Install icon.
4 Click Install and Agree.
5 Follow the instructions on your screen to complete printer software installation.
Relocate the adapter
Your adapter supports Dynamic Host Configuration Protocol (DHCP). When DHCP is active, an IP address is automatically assigned each time the adapter is connected to the network, making it easy to use your adapter to connect a printer to a different network.
Note: If DHCP is not active you may need to change your adapter switch settings. For help, see page 28.
To relocate your adapter to a different network:
1 Disconnect the adapter from the original network.
Note: The Ethernet cable connects the adapter to the network. For help disconnecting the Ethernet cable, see page 29.
2 Unplug the adapter power supply.
3 Complete the hardware setup, software installation, and configuration for your printer and adapter on the new network. For help, see Steps 1 through 9 on pages 2 through 6.
Change adapter switch settings
These instructions are provided for use by a network administrator only.

text_image
01 2 3The default settings of your adapter switches facilitate automatic configuration on most networks. However, if it is necessary to change your adapter switch settings, follow these steps:
Getting Started
1 Unplug the adapter power supply.
2 Position the switches as outlined in the following table.
Note: The switches shown in the illustration are all in the up (OFF) position. To change a switch to the down (ON) position, use a narrow pointed object (for example, an ink pen).
| Switch 1 | Switch 2 | Switch 3 | Function |
| down down | down Auto negotiation with DHCP (default) | ||
| down down | up Auto negotiation without DHCP | ||
| down up | down Reset | IP address to default (157.184.0.1) | |
| down up | up Not defined | ||
| up down | down 100MB, Full Duplex | ||
| up down | up 100MB, Half Duplex | ||
| up up | down 10MB, Full Duplex | ||
| up up | up 10MB, Half Duplex | ||
3 Complete the hardware setup, software installation, and configuration for your printer and adapter on the new network. For help, see Steps 1 through 9 on pages 2 through 6.
Disconnect the Ethernet cable from the adapter
1 Unplug the adapter and printer power supply.
2 Push up on the release tab of the Ethernet connector with a narrow pointed object (for example, an ink pen).

natural_image
Diagram showing a tool interacting with a curved object, possibly a device or tool, with no visible text or symbols.3 Pull the Ethernet cable toward you until the connector is completely removed from the adapter.

Contact Lexmark
Visit our Web site at www.lexmark.com to:
- Receive technical support.
- Register your adapter.
Other ways to contact our Customer Support Center:
Windows
- From the Lexmark Solution Center, click Contact Information ▶ Customer Support.
- Insert the printer software CD that came with your printer into your CD-ROM drive, and then click Contact Lexmark ▶Technical Support.
Mac OS 8.6 to 9.2
- From your printer folder, double-click Technical Support.
- Insert the printer software CD that came with your printer into your CD-ROM drive, and then click Contact Lexmark ▶Technical Support.
Mac OS X version 10.0.3 to 10.1
1 Insert the printer software CD that came with your printer into your CD-ROM drive.
2 Double-click the CD icon.
3 Double-click Install and then click Contact Lexmark Technical Support.
Glossary
DHCP: Dynamic Host Configuration Protocol, a protocol for assigning dynamic IP addresses to devices on a network. With dynamic addressing, a device can have a different IP address every time it connects to the network. This means that a new device can be added to a network without the hassle of manually assigning it a unique IP address.
Ethernet (category 5) cable: A network cable with RJ-45 connectors. This cable connects the Lexmark printer to the Ethernet network. Also referred to as a Cat 5 cable.
IP address: A number that identifies each device connected to the network. For example, 157.184.0.1.
MAC address: A 12-character identifier that is unique for each network hardware device. For example, 00.02.00.10.08.e8.
network-capable printer: A Lexmark printing device that does not need to be locally attached to a computer. When connected to a network it can be accessed by any computer on the same network.
printer port: Windows terminology for a physical or logical connection to a printer. For example:
- LPT1 indicates the printer is attached to a physical parallel port with a parallel cable.
- USB001 indicates the printer is attached to a physical USB port with a USB cable.
- Lexmark_Z65_1008e8 indicates a logical connection to the printer across your network.
subnet: A portion of a network that shares a common address component. On TCP/IP networks, subnets are defined as all devices whose IP addresses have the same prefix. For example, all devices with IP addresses that start with 192.168.0. would typically be part of the same subnet.
TCP/IP: The Transmission Control Protocol (TCP) and the Internet Protocol (IP) are protocols that let different types of computers communicate with each other. The internet is based on this suite of protocols.
Frequently asked questions
Q: I am currently sharing my printer by way of the operating system (OS). What are the benefits of having the adapter?
A: Sharing your printer by way of the OS requires the printer to be attached to a host computer that must be powered on while printing. The Lexmark N1 adapter gives you the freedom to place your printer anywhere in your home or office without being attached to a host computer.
Q: My new printer has diagnostic utilities to report the status or condition of my print cartridges and ink levels. Will this utility still work with the adapter?
A: Yes. The Lexmark N1 adapter was designed specifically to work with your Lexmark printer. Therefore, it maintains the printer's full functionality.
Q: Can each computer on my network send a print job at the same time?
A: Yes. Each computer automatically waits until the adapter is ready to receive a new print job. If the printer is busy printing a job from another computer, you will receive the status message "Waiting for Printer". The message displays until the printer can process your print job.
Q: What happens if power to the adapter is interrupted while I am printing?
A: Whether your printer is locally attached or connected to an adapter, loss of power during printing may cause data loss. You may need to resend your print job after power is restored.
Q: How do I change the IP address of my network printer?
A: See Manually configure the network printer on page 23.
Q: How do I use my network printer on a remote subnet?
A: See Manually configure the network printer on page 23.
Q: How do I resolve problems setting up my network printer?
A: See the Troubleshooting section of this book. (page 16)
Q: I cannot solve my problem using the Troubleshooting information in this book. How do I contact Lexmark?
A: See Contact Lexmark on page 29.
Statement of Limited Warranty
Lexmark International, Inc. Lexington, KY
This limited warranty applies to the United States. For customers outside the U.S., refer to the country-specific warranty information that came with your product.
This limited warranty applies to this product only if it was originally purchased for your use, and not for resale, from Lexmark or a Lexmark remarketer, referred to in this statement as "Remarketer."
Limited warranty
Lexmark warrants that this product:
- Is manufactured from new parts, or new and serviceable used parts, which perform like new parts
- Is, during normal use, free from defects in material and workmanship
If this product does not function as warranted during the warranty period, contact a Remarketer or Lexmark for repair or replacement (at Lexmark's option).
If this product is a feature or option, this statement applies only when that feature or option is used with the product for which it was designed. To obtain warranty service, you may be required to present the feature or option with the product.
If you transfer this product to another user, warranty service under the terms of this statement is available to that user for the remainder of the warranty period. You should transfer proof of original purchase and this statement to that user.
Limited warranty service
The warranty period starts on the date of original purchase as shown on the purchase receipt. The warranty period ends 12 months later.
To obtain warranty service you may be required to present proof of original purchase. You may be required to deliver your product to the Remarketer or Lexmark, or ship it prepaid and suitably packaged to a Lexmark designated location. You are responsible for loss of, or damage to, a product in transit to the Remarketer or the designated location.
When warranty service involves the exchange of a product or part, the item replaced becomes the property of the Remarketer or Lexmark. The replacement may be a new or repaired item. The replacement item assumes the remaining warranty period of the original product.
Replacement is not available to you if the product you present for exchange is defaced, altered, in need of a repair not included in warranty service, damaged beyond repair, or if the product is not free of all legal obligations, restrictions, liens, and encumbrances.
Before you present this product for warranty service, remove all print cartridges, programs, data, and removable storage media (unless directed otherwise by Lexmark).
For further explanation of your warranty alternatives and the nearest Lexmark authorized servicer in your area, contact Lexmark at (407) 563-4600, or on the World Wide Web at www.lexmark.com.
Remote technical support is provided for this product throughout its warranty period. For products no longer covered by a Lexmark warranty, technical support may not be available or only be available for a fee.
Extent of limited warranty
We do not warrant uninterrupted or error-free operation of any product.
Warranty service does not include repair of failures caused by:
- Modification or attachments
- Accidents or misuse
• Unsuitable physical or operating environment - Maintenance by anyone other than Lexmark or a Lexmark authorized servicer
• Operation of a product beyond the limit of its duty cycle - Use of printing media outside of Lexmark specifications
- Supplies (such as ink) not furnished by Lexmark
- Products, components, parts, materials, software, or interfaces not furnished by Lexmark
TO THE EXTENT PERMITTED BY APPLICABLE LAW, NEITHER LEXMARK NOR ITS THIRD PARTY SUPPLIERS OR REMARKETERS MAKE ANY OTHER WARRANTY OR CONDITION OF ANY KIND, WHETHER EXPRESS OR IMPLIED, WITH RESPECT TO THIS PRODUCT, AND SPECIFICALLY DISCLAIM THE IMPLIED WARRANTIES OR CONDITIONS OF MERCHANTABILITY, FITNESS FOR A PARTICULAR PURPOSE, AND SATISFACTORY QUALITY. ANY WARRANTIES THAT MAY NOT BE DISCLAIMED UNDER APPLICABLE LAW ARE LIMITED IN DURATION TO THE WARRANTY PERIOD. NO WARRANTIES, EXPRESS OR IMPLIED, WILL APPLY AFTER THIS PERIOD. ALL INFORMATION, SPECIFICATIONS, PRICES, AND SERVICES ARE SUBJECT TO CHANGE AT ANY TIME WITHOUT NOTICE.
Limitation of liability
Your sole remedy under this limited warranty is set forth in this document. For any claim concerning performance or nonperformance of Lexmark or a Remarketer for this product under this limited warranty, you may recover actual damages up to the limit set forth in the following paragraph.
Lexmark's liability for actual damages from any cause whatsoever will be limited to the amount you paid for the product that caused the damages. This limitation of liability will not apply to claims by you for bodily injury or damage to real property or tangible personal property for which Lexmark is legally liable. IN NO EVENT WILL LEXMARK BE LIABLE FOR ANY LOST PROFITS, LOST SAVINGS, INCIDENTAL DAMAGE, OR OTHER ECONOMIC OR CONSEQUENTIAL DAMAGES. This is true even if you advise Lexmark or a
Remarketer of the possibility of such damages. Lexmark is not liable for any claim by you based on a third party claim.
This limitation of remedies also applies to claims against any Suppliers and Remarketers of Lexmark. Lexmark's and its Suppliers' and Remarketers' limitations of remedies are not cumulative. Such Suppliers and Remarketers are intended beneficiaries of this limitation.
Additional rights
Some states do not allow limitations on how long an implied warranty lasts, or do not allow the exclusion or limitation of incidental or consequential damages, so the limitations or exclusions contained above may not apply to you.
This limited warranty gives you specific legal rights. You may also have other rights that vary from state to state.
LEXMARK™
P/N 12J0040 EC 2J0003 Printed in USA 12/010
Lexmark and Lexmark with diamond sign are trademarks of Lexmark International, Inc., registered in the United States and/or other countries. © 2001 Lexmark International, Inc. 740 West New Circle Road, Lexington, Kentucky 40550, USA
www.lexmark.com