CS545 - Suivi LG - Free user manual and instructions
Find the device manual for free CS545 LG in PDF.

User questions about CS545 LG
0 question about this device. Answer the ones you know or ask your own.
Ask a new question about this device
Download the instructions for your Suivi in PDF format for free! Find your manual CS545 - LG and take your electronic device back in hand. On this page are published all the documents necessary for the use of your device. CS545 by LG.
USER MANUAL CS545 LG
FCC Compliance Statement
This equipment has been tested and found to comply with the limits for a Class B digital device pursuant to Part 15 of the FCC Rules. These limits are designed to provide reasonable protection against harmful interference in a residential installation.
This equipment generates, uses and can radiate radio frequency energy and if not installed and used in accordance with the instructions, may cause harmful interference to radio communications. However, there is no guarantee that interference will not occur in a particular installation.
If this equipment does cause harmful interference to radio or television reception (which can be determined by turning the equipment off and on), the user is encouraged to try to correct the interference by using one or more of the following measures :
- Reorient or relocate the receiving antenna.
- Increase the separation between the equipment and the receiver.
- Connect the equipment into an outlet on a circuit different from that to which the receiver is connected.
- Consult the dealer or an experienced radio/TV technician for help.
Caution: Changes or modifications not expressly approved by LG Electronics Company for compliance could void the user's (or your) authority to operate the equipment. Only peripherals (digital input/output devices, terminals, printers, etc.) certified to comply with the Class B limits may be attached to this monitor. Operation with non-certified peripherals is likely to result in interference to radio and TV reception.
Only shielded Signal Cables may be used with this System.
Canadian D. O. C. Notice
This Class B digital apparatus meets all requirements of the Canadian Interference-Causing Equipment Regulations.
DECLARATION OF CONFORMITY
We LG Electronics Inc.
184 Kongdan-dong, Kumi-city
Kyoungbuk, Korea
declare under our sole responsibility that the product
The model name of color monitor : CS545DM
to which this declaration relates is in conformity with the following standard or other normative documents:
EN 50082-1/1992, EN 55022/1987, EN 60555-2 and 3/1987
following the provisions of the EMC Directives 89/336/EEC, 92/31/EEC and 93/68/EEC.
EN 60950 : 1992 Safety of Information Technology Equipment, including electrical business equipment
+A1:1993
+A2:1993
following the provisions of the Low Voltage Directives
73/23/EEC & 93/68/EEC
98
Monitor OBU, Kumi Plant LG Electronics Inc.
Kumi, Korea
January 21, 1998
(place and date of issue)
Daehyo Jeong, Manager
(Name and signature of authorized person)
Table of Contents
Monitor Registration ....1
Important Precautions 2
Tilt/Swivel Base 4
Installation 5
Control Layout and Descriptions 6
Image Control Panel....7
Power Management System 9
Low Radiation Compliance (MPR II) 9
DDC (Display Data Channel)....9
General Operation....10
Troubleshooting 11
Service....12
Specifications ....13
Monitor Registration
The model and serial numbers are found on the rear of this unit. These numbers are unique to this unit and not available to others. You should record requested information here and retain this guide as a permanent record of your purchase. Staple your receipt here.
Date of Purchase
Dealer Purchased From
Dealer Address
Dealer Phone No.
Model No.
Serial No.
Notice
All rights reserved. Reproduction in any manner, in whole or in part, is strictly prohibited without the written permission of LG Electronics Inc.
Trademark Acknowledgments
IBM is a registered trademark and VGA is a trademark of International Business Machines Corporation.
WARNING: To reduce the risk of fire or electric shock, do not expose this appliance to rain or moisture.
- Keep children from dropping or pushing objects into the monitor's cabinet openings. Some internal parts carry hazardous voltages.
■Do not add accessories that have not been designed for this monitor.
■ During a lightning storm or when the monitor is to be left unattended for an extended period of time, unplug it from the wall outlet.
■ Do not bring magnetic devices such as magnets or motors near the picture tube.
On installation
- Do not allow anything to rest upon or roll over the power cord, and do not place the monitor where the power cord is subject to damage.
- Do not use this monitor near water such as near a bathtub, washbowl, kitchen sink, laundry tub, in a wet basement, or near a swimming pool.
- Monitors are provided with ventilation openings in the cabinet to allow the release of heat generated during operation. If these openings are blocked, built-up heat can cause failures which may result in a fire hazard. Therefore, NEVER:
■Block the bottom ventilation slots by placing the monitor on a bed, sofa, rug, etc.
■Place the monitor in a built-in enclosure unless proper ventilation is provided.
■ Cover the openings with cloth or other material.
■Place the monitor near or over a radiator or heat source.
On cleaning
■Unplug the monitor before cleaning the face of the picture tube.
■Use a slightly damp (not wet) cloth. Do not use an aerosol directly on the picture tube because overspray may cause electrical shock.
On repacking.
■Do not throw away the carton and packing materials. They make an ideal container in which to transport the unit. When shipping the unit to another location, repack it in its original material.
Tilt/Swivel Base
■ Turn Off the equipment and all attached options.
■ Carefully set the monitor face-down with the underside facing you.
Installation
- Align the hooks on the tilt/swivel stand with the matching slots in the base of the monitor.
- Insert the hooks into slots.
- Slide the tilt/swivel stand toward the front of the monitor until the latches click into the locked position.
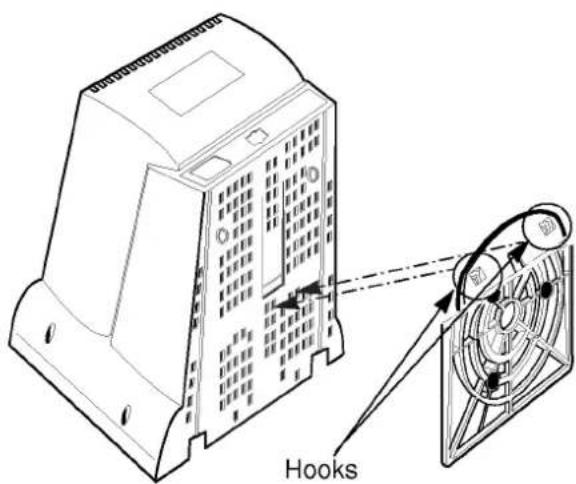
text_image
HooksInstallation
The supply voltage is marked on the ID label located on the rear panel of the monitor. If your local voltage is different, do not use the monitor and contact your supplier before using the display.
Connections
To connect your monitor after the video adapter is properly installed:
- Turn OFF the power to your computer and all its attached options.
- Position the monitor and the computer so that you can easily get to the back panel of each.
- Connect the signal cable with D-sub connector to the graphics board on your PC as described in your PC Owner's Manual.
- Tighten the screws on the video cable connectors to keep them from coming loose and to prevent radio and TV interference.
- Connect the power cord to the AC receptacle on the back of the monitor. Plug the other end of the power cord into a properly grounded electrical outlet.
- The socket-outlet should be installed near the equipment and should be easily accessible.
Control Layout and Descriptions

text_image
Front View Image Control Panel Brightness Contrast Power On/Off Button Power Indicator
text_image
Rear View ID Label AC Power Connector Signal CablePower On/Off Button
This Button is Used to turn the power On or Off.
Power Indicator
The power indicator lights when the power is On, and indicates the operating status of the display.

Contrast
Adjust the display to the contrast desired. Move the thumbwheel located beneath this indicator to increase or decrease the display contrast.

Brightness
Used to adjust the brightness of the screen. Move the thumbwheel located beneath this indicator to increase or decrease the display brightness.
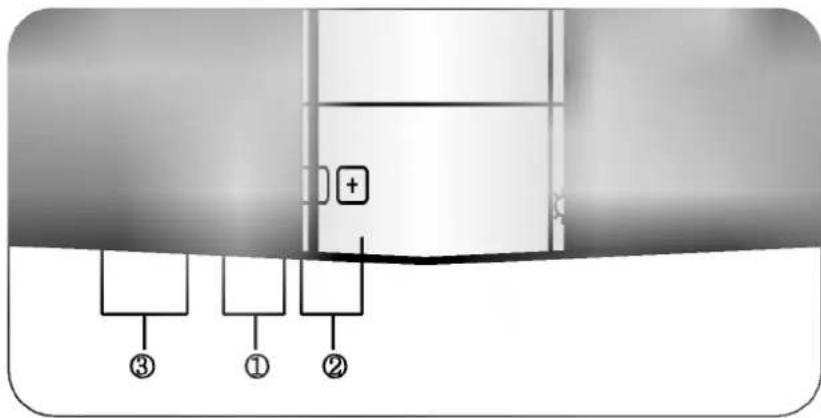
Image Control Panel
text_image
Diagram showing three labeled components (①, ②, ③) with a plus sign in the upper section, likely illustrating a mechanical or electrical assembly.① Image Selection and Adjustment
Use either the ◀ or ▶ button to select the icons which you wish to adjust and display.
② -/+ buttons
Used to set digital values for each of the select on screen control item by pressing + button for increment or - button for decrement.
③ Image Control Icons
Listed below are the icons, icon names, and icon descriptions of the items.
| icon | Description |
| Horizontal Position | To move picture image left and right.- Moves the screen image left.+ Moves the screen image right. |
| Horizontal Size | To adjust image width.- Decreases the size of the screen image.+ Increases the size of the screen image. |
| Vertical Position | To move image up and down.- Moves the screen image down.+ Moves the screen image up. |
| Vertical Size | To adjust image height.- Decreases the size of the screen image.+ Increases the size of the screen image. |
| Side Pincushion | To correct the bowing in and out of the image.- Curves the image's edges inwards.+ Curves the image's edges outwards. |
| Trapezoid | To correct geometric distortion.- Makes the screen image narrower at the top.+ Moves the screen image wider at the top. |
\* Recall Function
When the user wants to recall one of the 6 factory fixed image modes, push the - and + buttons simultaneously. To recall the next image mode, press both the - and + buttons again.
Power Management System
When used in conjunction with a PC having power saving circuitry, or a PC running screen blanking software this monitor automatically reduces its power consumption when the computer is not in use. The monitor has power-saving states, indicated by the light-emitting diode (LED) on the front panel. These power-saving states exceed the Environmental Protection Agency (EPA) Energy Star requirements using the methodology for Display Power Management Signals(DPMS). Developed by the Video Electronics Standards Association(VESA).
Low Radiation Compliance (MPR II)
This monitor meets one of the strictest guidelines available today for low radiation emissions, offering the user extra shielding and an anti-static screen coating. These guidelines, set forth by a government agency in Sweden, limits the amount of emission allowed in the Extremely Low Frequency (ELF) and Very Low Frequency (VLF) electromagnetic range.
DDC (Display Data Channel)
DDC is a communication channel over which the monitor automatically informs the host system(PC) about its capabilities. This monitor has three DDC function; DDC2B carry out uni-directional communication between PC and monitor. Under these situations, the PC sends display data to the monitor but not commands to control the monitor servings.
NOTE : ■ PC must support DDC functions to do this.
■ Some older computer systems are not compatible with the DDC standard. If your monitor is displaying a monochrome image or the wrong resolution, need to change with a DDC compatible VGA card.
General Operation
After following the installation instructions and getting familiar with the controls, you are ready to operate the monitor.
- Turn on the monitor, PC and other peripherals you plan to use.
- After the PC has booted (powered up and finished self-testing), enter a software application that uses the full screen display.
- While looking at the image on the screen, adjust the controls for the image size, centering, brightness and contrast levels you prefer.
- This monitor is an auto scanning monitor, capable of synchronizing with a variety of video standards automatically. The Scanning Mode Table below indicates the resolution, as well as the horizontal and vertical refresh rates, of some of the modes that this monitor can match to the output of your PC's graphics card.
Other resolutions and standards can also be synchronized and displays on this monitor as long as they are within the horizontal and vertical frequency range of this monitor. See the specifications for this information.
Scanning Mode Table
| Mode | Display Mode | Horizontal Frequency | Vertical Frequency | Polarity | |
| Horiz sync | Verti sync | ||||
| 1 | 640 x 480 | 31.5 kHz | 60 Hz | - | - |
| 2 | 640 x 480 | 43.3 kHz | 85 Hz | - | - |
| 3 | 720 x 400 | 31.5 kHz | 70 Hz | - | + |
| 4 | 800 x 600 | 37.9 kHz | 60 Hz | + | + |
| 5 | 800 x 600 | 53.7 kHz | 85Hz | + | + |
| 6 | 1024 x 768 | 48.4 kHz | 60 Hz | - | - |
Troubleshooting
Symptom: The power LED is amber
Possible causes:
■Display power management mode.
■These is no sync signal.
■The signal cable is not fastened securely.
■Check the computer power and graphics adapters configuration.
■The frequency of the sync input is outside the operating range of the monitor.
HORZ: 30kHz-54kHz
VERT: 50Hz-90Hz
Symptom: The image on the SCREEN is not centered, or too small or not a rectangle shape.
Possible Causes: Image adjustment not been done yet in the current operating mode. Use the SELECT and +/- buttons to set the image to your liking.
Symptom: The monitor doesn't enter the power saving off mode (Amber led).
Possible Causes: Computer video signal is not VESA DPMS standard. Enter the PC or the video controller card is not using the VESA DPMS power management function.
Service
- Unplug the monitor from the wall outlet and refer servicing to alified service personnel when :
■The power cord or plug is damaged or frayed.
■Liquid has been spilled into the monitor.
■The monitor has been exposed to rain or water.
The monitor does not operate normally following the operating instructions. Adjust only those controls that are covered in the operating instructions. An improper adjustment of other controls may result in damage and often requires extensive work by a qualified technician to restore the monitor to normal operation.
■The monitor has been dropped or the cabinet has been damaged.
■The monitor exhibits a distinct change in performance.
■ Snapping or popping from the monitor is continuous or frequent while the monitor is operating. It is normal for some monitors to make occasional sounds when being turned on or off, or switching video modes.
-
Do not attempt to service the monitor yourself, as opening or removing covers may expose you to dangerous voltage or other hazards. Refer all servicing to qualified service personnel.
-
When replacement parts are required, have the service technician verify in writing that the replacements used have the same safety characteristics as the original parts. Use of manufacture specified replacements can prevent fire, shock and other hazards.
-
Upon completion of any service or repairs to the monitor, ask the service technician to perform the safety check described in the manufacturer's service manual.
-
When a video monitor reaches the end of its useful life, improper disposal could result in a picture tube implosion. Ask a qualified service technician to dispose of the monitor.
Specifications
| Picture tube | : 15 inch (13.8 inches viewable), Tinted,90 degree deflection0.28 mm, Non-Glare screen |
| Horizontal Frequency | : 30 ~ 54 kHz |
| Vertical Frequency | : 50 ~ 90 Hz |
| Video Bandwidth | : 65 MHz |
| Resolution | : 1024 X 768 Non Interlace, 60Hz Refresh Rate |
| Signal connector | : 15 pin D-Sub type |
| Power input | : 100-240VAC, 50/60Hz, 1.5A |
Power Consumption Table
| LED Color | States | Power Consumption |
| Green | On | ≤85 watts |
| Amber | Stand-by/Suspend | ≤15 watts |
| Amber | VESA Off | ≤8watts |
| Dimensions(WXHXD) | : 14.2 x 15.1 x 15.6 inches (With Tilt/Swivel Stand))360 x 383 x 395 mm |
| Weight (net) | : 13.3kg (29.32 lbs) |
Information in this document is subject to change without notice and does not represent a commitment on the part of LG Electronics Inc.