GSD5124DBB - Washing machine GE - Free user manual and instructions
Find the device manual for free GSD5124DBB GE in PDF.

User questions about GSD5124DBB GE
0 question about this device. Answer the ones you know or ask your own.
Ask a new question about this device
Download the instructions for your Washing machine in PDF format for free! Find your manual GSD5124DBB - GE and take your electronic device back in hand. On this page are published all the documents necessary for the use of your device. GSD5124DBB by GE.
USER MANUAL GSD5124DBB GE
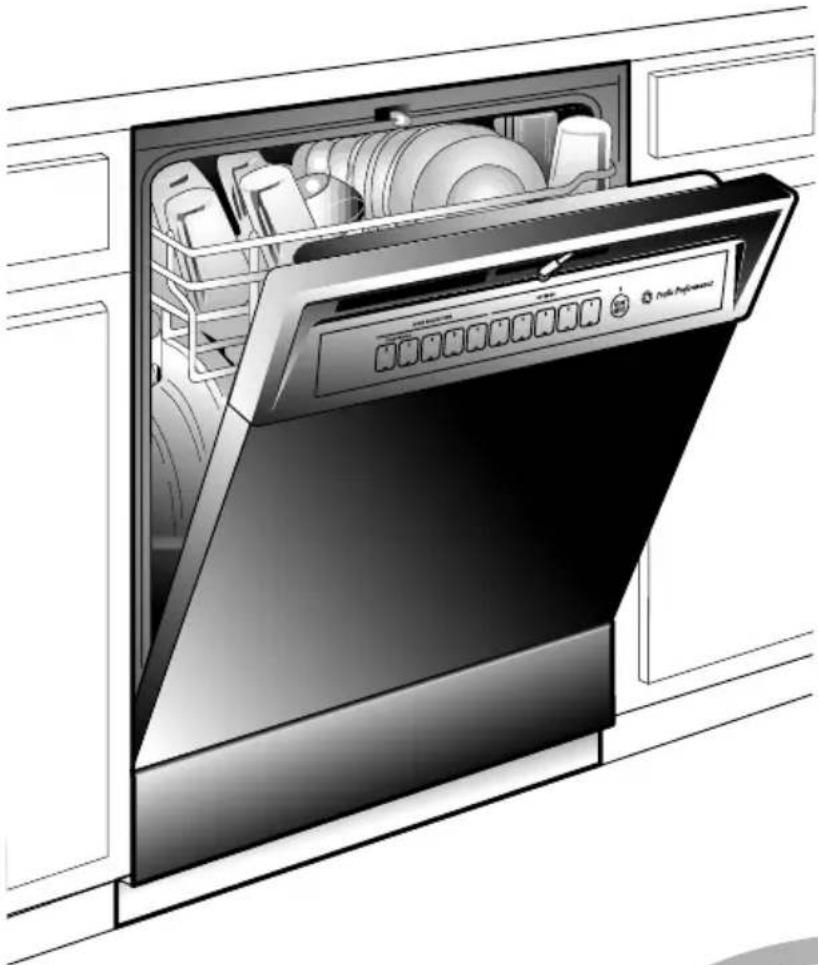
Dishwashers Profile™
Owner's Manual
natural_image
Illustration of a large kitchen appliance with multiple wheels and a front-mounted dish, enclosed in a cabinet (no text or symbols visible)EDW2020 EDW2030 EDW2050 EDW2060 GSD5110 GSD5112 GSD5120 GSD5122 GSD5130 GSD5132 GSD5114 GSD5124 GSD5134 GSD5310 GSD5320 GSD5330 GSD5350 GSD5360
GE Answer Center® 800.626.2000
Congratulations! You Are Now Part of the GE Family.
Welcome to the GE family. We're proud of our quality products and we are committed to providing dependable service. You'll see it in this easy-to-use Owner's Manual and you'll hear it in the friendly voices of our customer service department.
Best of all, you'll experience these values each time you use your dishwasher. That's important, because your new dishwasher will be part of your family for many years. And we hope you will be part of ours for a long time to come.
We thank you for buying GE. We appreciate your purchase, and hope you will continue to rely on us whenever you need quality appliances for your home.
natural_image
Black-and-white photo of children interacting with a washing machine in a kitchen (no visible text or symbols)
natural_image
Simple icon of a light bulb with radiating lines, no text or symbols presentImportant!
Fill out and return the Consumer Product Registration Card. There are two easy ways to register your appliance.
■ Through the Internet at www.geappliances.com.
■ Complete and mail the enclosed card.
natural_image
Illustration of a pencil writing on a black background (no text or symbols)Write the model and serial numbers here.
#
#
You can find them on the tub wall just inside the door.
Staple sales slip or cancelled check here.
Proof of the original purchase date is needed to obtain service under the warranty.
GE & You, A Service Partnership.
Ask any GE appliance owner and they will tell you we stand behind our products with unmatched quality service. However, did you know that most questions result from simple problems that you can easily fix yourself in just a few minutes? This Owner's Manual can tell you how.

natural_image
Simple line drawing of a pair of eyeglasses on a black background (no text or symbols)Read this Manual
Inside you will find many helpful hints on how to use and maintain your dishwasher properly. Just a little preventive care on your part can save you a great deal of time and money over the life of your dishwasher.

Review the Section on Troubleshooting Tips
You'll find many answers to common problems here. If you review our chart of Troubleshooting Tips first, you may not need to call for service at all.

natural_image
Simple line drawing of a classic telephone handset with keypad (no text or symbols)If You Need Service
If you do need service, you can relax knowing help is only a phone call away. A list of toll-free customer service numbers is included in the back section. Or you can always call the GE Answer Center ^® at 800.626.2000, 24 hours a day, 7 days a week.
Safety Information .....4–7
Operating Instructions
Control Panel and Settings ....8–11 Using the Dishwasher ...12–13 Loading the Racks ....14–16 Optional Accessories ....17 Care and Cleaning ....18
Troubleshooting Tips
Before You Call For Service ..... 19–23
Customer Service
Product Registration .....29–30 Warranty .....31 Service Telephone Numbers .....Back Cover
IMPORTANT SAFETY INFORMATION. READ ALL INSTRUCTIONS BEFORE USING.
WARNING!
For your safety, the information in this manual must be followed to minimize the risk of fire, explosion, electric shock, or to prevent property damage, personal injury, or loss of life.

natural_image
Black and white graphic with a central exclamation mark surrounded by radiating lines (no text or symbols)WATER HEATER SAFETY
Under certain conditions hydrogen gas may be produced in a water heater that has not been used for two weeks or more. HYDROGEN GAS IS EXPLOSIVE.
If the hot water has not been used for two weeks or more, prevent the possibility of damage or injury by turning on all hot water faucets and allow them to run for several minutes. Do this before using any electrical appliance which is connected to the hot water system. This simple procedure will allow any built-up hydrogen gas to escape. Since the gas is flammable, do not smoke or use an open flame or appliance during this process.
Use this appliance only for its intended purpose as described in this Owner's Manual.
natural_image
Simple icon of a wrench inside a square frame (no text or symbols)PROPER INSTALLATION AND MAINTENANCE
This dishwasher must be properly installed and located in accordance with the Installation Instructions before it is used. If you did not receive an Installation Instructions sheet with your dishwasher, you can receive one by calling us toll-free at the GE Answer Center ^® , 800.626.2000.
■ Connect to a grounded metal, permanent wiring system; or run an equipment-grounding conductor with the circuit conductors and connect to the equipment-grounding terminal or lead of the appliance.
■ Improper connection of the equipment-grounding conductor can result in a risk of electric shock. Check with a qualified electrician or service representative if you are in doubt whether the appliance is properly grounded.
■ Dispose of discarded appliances and shipping or packing material properly.
- Do not attempt to repair or replace any part of your dishwasher unless it is specifically recommended in this manual. All other servicing should be referred to a qualified technician.
■ To minimize the possibility of electric shock, disconnect this appliance from the power supply before attempting any maintenance. NOTE: Turning the dishwasher off does not disconnect the appliance from the power supply. We recommend having a qualified technician service your appliance.
IMPORTANT SAFETY INFORMATION. READ ALL INSTRUCTIONS BEFORE USING.
WARNING!

natural_image
Abstract geometric symbol with a diagonal line inside a circle, no text or symbols present.DO NOT...
■ Do not tamper with controls.
- Do not abuse, sit on, or stand on the door or dish rack of the dishwasher.
■ Do not discard a dishwasher without first removing the door of the washing compartment.
■ Do not store or use combustible materials, gasoline or other flammable vapors and liquids in the vicinity of this or any other appliance.
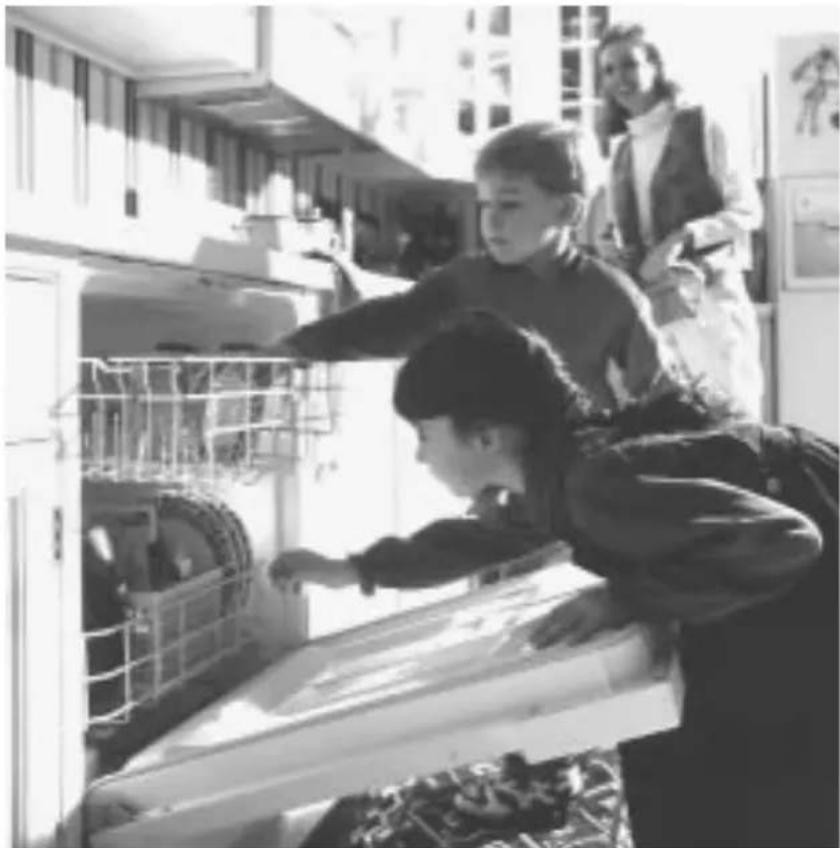
- Do not allow children to play inside, on or with this appliance or any discarded appliance.

WHEN USING YOUR DISHWASHER
- Use only powder, tabs, liquid detergents or rinse agents recommended for use in a dishwasher and keep them out of the reach of children. Cascade® Automatic Dishwashing Detergent has been approved for use in all GE dishwashers.
- Locate sharp items so that they are not likely to damage the door seal.
- Load sharp knives with the handles up to reduce the risk of cut-type injuries.
- Do not wash plastic items unless marked dishwasher safe or the equivalent. For plastic items not so marked, check the manufacturer's recommendations.
■ Non-Dishware Items: Do not wash items such as electronic air cleaner filters, furnace filters and paint brushes in your dishwasher. Damage to dishwasher and discoloration or staining of dishwasher may result.
■ Do not touch the heating element during or immediately after use.
- Do not operate your dishwasher unless all enclosure panels are properly in place.
■ Close supervision is necessary if this appliance is used by or near children.
- Load light, plastic items so they will not become dislodged and drop to the bottom of the dishwasher—they might come into contact with the heating element and be damaged.

natural_image
Simple black-and-white icon of an exclamation mark with radiating lines, no text or symbols present.Read and follow this Safety Information carefully.
SAVE THESE INSTRUCTIONS
About the dishwasher control panel.
You can locate your model number on the tub wall just inside the door. Throughout this manual, features and appearance may vary from your model.

flowchart
graph LR
    A["POTS & PANS"] --> B["NORMAL"]
    B --> C["LIGHT WASH"]
    C --> D["CHINA CRYSTAL"]
    D --> E["RINSE ONLY"]
    E --> F["HI TEMP RINSE"]
    F --> G["HI TEMP WASH"]
    G --> H["HEATED DRY"]
    H --> I["LOCK (2 TIMES)"]
    I --> J["2 4 8 DELAY START"]
    J --> K["START RESET"]
    style A fill:#f9f,stroke:#333
    style K fill:#ccf,stroke:#333
Control Settings
1 Load Selections
The light above the selected pad will be ON to indicate which LOAD SELECTION has been selected.
POTS & PANS For heavily soiled dishes or cookware with dried-on or baked-on soils. Everyday dishes may be included. This cycle will not remove burned-on foods.
NORMAL For loads of everyday dishes and glassware with medium soils.
LIGHT WASH For dishes with light soils.
CHINA CRYSTAL For lightly soiled china and crystal.
RINSE ONLY For rinsing partial loads that will be washed later. Do not use detergent with this cycle.
2 Options
The light above the selected pad will be ON to indicate which OPTION has been selected.
| HI TEMPRINSE | Turns on the heater in all postrinse and final rinse cycles to help prevent spotting on dishware. This option may be turned ON or OFF during the wash cycle. |
| HI TEMPWASH | Energizes the heater to boost water temperature in all prewash and main wash fill cycles. Recommended for use with heavily soiled dishes. Option may be turned ON or OFF during the wash cycle. |
| HEATED DRYOFF | Shuts off the drying heat option. Dishes air dry naturally and energy is saved. You can prop the door open after the CLEAN light illuminates. |
| HEATED DRYON | Turns the heater on for fast drying. This cycle will extend the time to your wash cycle by 30 minutes. NOTE: Cannot be selected with RINSE ONLYcycle. |
| LOCK | When the LOCK pad is touched twice within 3 seconds, all pads become inoperative.You can lock the controls to prevent any selections from being made. Or you can lock the controls after you have started a cycle or selected DELAY START so the cycle or DELAY START is not interrupted.Children cannot accidentally start dishwasher by touching pads with this option selected.To unlock the dishwasher after it has been locked, touch the LOCK pad twice within 3 seconds. The light above the LOCK pad will turn off. |
| DELAY START | You can delay the start of a wash cycle for up to 8 hours. Press the DELAY START pad to choose the number of hours you want to delay the start of the cycle. The machine will count down and start automatically at the correct time. Pressing the START/RESET button will cancel the DELAY START selection.NOTE: If you forget to latch the door a reminder signal will beep until you do so. |
| RESET | To change a cycle after washing starts, touch the START/RESET pad to cancel the cycle. After water is pumped out and the motor stops, you can reprogram and restart the dishwasher. This will take approximately 90 seconds. |
3 Start
Close and latch the door. Touch the START/RESET pad to begin the cycle. Water fill begins and approximately 40 seconds later the wash action begins.
NOTE: The dishwasher remembers your last cycle so you don't have to reprogram each time. When the dishwasher is loaded and the door latch is in the locked position, the control panel lights will be ON and display the last settings you selected.
If you don't want to change any of the settings, simply touch the START/RESET pad to begin the cycle.
Also, if a power failure occurs, NORMAL and HEATED DRY will automatically be programmed. Make any new selections and touch the START/RESET pad to begin the cycle.
4 Clean
This light is illuminated when a wash cycle is complete. The light will stay ON until the door is opened.
Flashing display lights.
Lights What It Means What To Do

This is normal. Allow the dishwasher to drain and The START/RESET pad reset before you start a new wash has been pressed. cycle.

CI Control Error Press the
START/RESET pad to turn off the beeper. If the CLEAN light continues to flash, call for service.
PLUS A BEEPING SOUND
PLUS A BEEPING SOUND
Control Error Press the
START/RESET pad to turn off the beeper and the dishwasher will attempt to reset. Then restart the wash cycle. If this error continues, call for service.
About the dishwasher cycle sequence.
You can locate your model number on the tub wall just inside the door. Throughout this manual, features and appearance may vary from your model.

Cycle Sequence
Water Time Cycles (approx.) (approx.) Cycle Sequence
| POTS & PANS | 11.5 gal. | 66 min. | Prewash Prewash Prewash Main wash Postrinse Postrinse Final rinse |
| NORMAL | 9.9 gal. | 58 min. | Prewash Prewash Main wash Postrinse Postrinse Final rinse |
| LIGHT WASH | 8.3 gal. | 52 min. | Prewash Main wash Postrinse Postrinse Final rinse |
| CHINA CRYSTAL | 8.3 gal. | 36 min. | Prewash Main wash Postrinse Postrinse Final rinse |
| RINSE ONLY 1.6 gal. 4 min. Rinse | |||
Drying Options:
HEATED DRY ON. Available on all wash cycles except RINSE ONLY. Add approximately 30 minutes to the cycle.
HEATED DRY OFF. Drying heater is turned off. Dishes dry naturally.
Using the dishwasher.
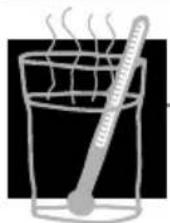
Check the Water Temperature
The entering water must be at least 120^ F. and not more than 150^ F., for effective cleaning and to prevent dish damage. Check the water temperature with a candy or meat thermometer. Turn on the hot water faucet nearest the dishwasher, place the thermometer in a glass and let the water run continuously into the glass until the temperature stops rising.

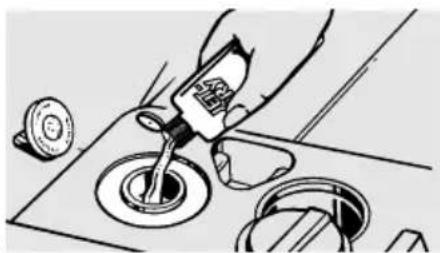
Use Jet-Dry ^® Rinse Agent
Jet-Dry ^® rinse agent removes spots and prevents new film build-up on your dishes, glasses, flatware, cookware and plastic.
Fill the rinse agent dispenser until it reaches the bottom of lip inside the opening. Do not overfill the dispenser. Replace cap.
To check if rinse agent is needed, press the clear center of the fill cap 2 or 3 times. If rinse agent fills the center of the fill cap, you have enough.
A full dispenser should last about one month.
If rinse agent is spilled, wipe up the excess.
natural_image
Illustration of a hand pouring liquid into a container with a valve, no text or symbols presentDish Preparation Prior to Loading
■ No pre-rinsing of normal food soil is required.
■ Scrape off hard soils, including bones, toothpicks, skins, and seeds.
■ Remove large quantities of any remaining food.
■ Remove leafy vegetables, meat trimmings, and excessive amounts of grease or oil.
■ Remove acidic food soils that can discolor stainless steel.
Using the Dishwasher Door
1 The door must be closed and locked into place to select a LOAD SELECTION or an OPTION.
2 If the door is opened during a cycle and left open, the dishwasher will beep once every minute until the door is closed and latched into place.
natural_image
Abstract composition of white spheres on a black square background (no text or symbols)Proper Use of Detergent
Use only detergent specifically made for use in dishwashers. Cascade® Automatic Dishwashing Detergent has been approved for use in all GE dishwashers. Keep your detergent fresh and dry. Don't put detergent into the dispenser until you're ready to wash dishes.
You'll find two detergent dispensers on the inside door of your dishwasher. All wash cycles require detergent in the main cup. Wash cycles with a pre-wash and a main wash will also use the open cup. The amount of detergent to use depends on whether your water is hard or soft. With hard water, fill the main cup and open cup completely. With soft water, fill both cups halfway. When using automatic dishwashing dete place one tab in the main cup and close.

text_image
Open cup Main cupProtect your dishes and dishwasher by contacting your water department and asking how hard your water is. Twelve or more grains is extremely hard water. A water softener is recommended. Without it, lime can build up in the water valve, which could stick while open and cause flooding. Too much detergent with soft water can cause a permanent cloudiness of glassware, called etching.
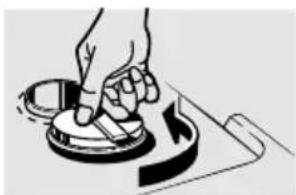
NOTE: To open detergent cup after it has been closed, unlatch the door. Press the START/RESETpad three times within two seconds and the detergent cup will release. You may also turn the detergent cup handle
natural_image
Illustration of a hand using a tool to press or adjust a circular component, with no visible text or symbols.counter-clockwise until it releases. A snapping sound may be heard.

natural_image
Simple black-and-white icon of an exclamation mark with radiating lines, no text or symbols present.Forget to Add a Dish?
A forgotten dish can be added any time before the main wash.
1 Push the door latch to the left.
2 Do not open the door until the water spray action stops. Steam may rise out of the dishwasher.
3 Add forgotten dishes.
4 Close the door and push the latch to the far right.
Loading the dishwasher racks.
For best dishwashing results, follow these loading guidelines. Features and appearance of racks and silverware baskets may vary from your model.
natural_image
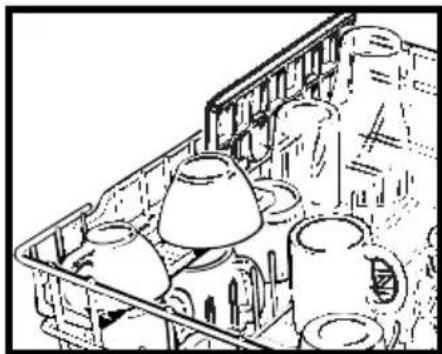
Line drawing of a storage tray with various mugs and containers (no text or symbols)Upper Rack
The upper rack is for glasses, cups and saucers. Cups and glasses fit best along the sides. This is also a secure place for dishwasher-safe plastics.
The cup shelf (on some models) may be placed in the up or down position to add flexibility. A wine glass holder (on some models) secures wine glasses at an angle for best washability. Because wine glasses come in various sizes, after loading, slowly push in the rack to make sure they will clear the top of the dishwasher.

natural_image
Illustration of a mechanical assembly with gears and rods (no text or symbols)The upper rack is good for all kinds of odd-shaped utensils. Saucepans, mixing bowls and other items should be placed face down. Fold-down fingers (on some models) provide flexibility for extra-large and hard-to-fit items.
Secure larger dishwasher-safe plastics over two fingers when possible.
Make sure small plastic items are secure so they can't fall onto the heater.
Be sure that items do not protrude through the bottom of the rack and block rotation of the middle spray arm. This could result in poor wash performance for items in the upper rack.
Check to make sure that tall items will not block rotation of the top wash arm.

natural_image
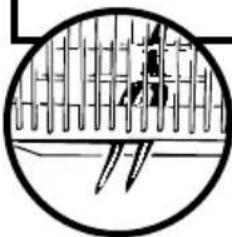
Technical line drawing of an air conditioner unit with internal components and fan assembly (no text or labels)The Wash Tower
Keep the center area clear in the lower rack.
The wash tower rises through the center of the lower rack during the wash and rinse portions of the cycle. The wash tower shoots water into the mid-level wash arm located under the upper rack. Blocking the wash tower could result in poor wash performance for items in the upper rack.

Don't block or load tall things next to the Wash Tower.
natural_image
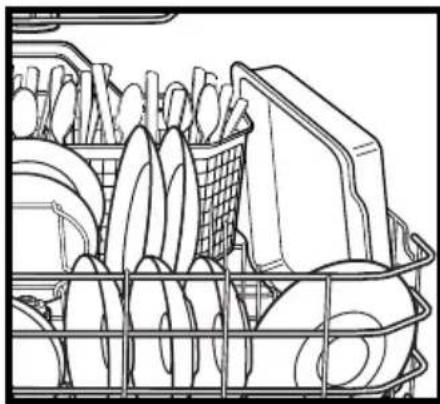
Line drawing of a supermarket shelf with shelves, refrigerators, and a basket (no text or symbols)Lower Rack
When loading the lower rack, do not load large platters or trays in the front right corner. They may prevent detergent from circulating during the wash cycle.
The lower rack is best used for plates, saucers, and cookware. Large items such as broiler pans and racks should go along the right-hand side. Load platters, pots and bowls along the sides, in corners, or in the back. The soiled side of items should face the center of the rack.
Also, be careful not to let a portion of an item such as a pot or dish handle extend through the bottom rack. This could block the wash arm and result in poor wash performance.
Fold-down fingers (on some models) provide flexibility for extra-large and hard-to-fit items. The fingers may be left in the up position or folded down to customize the lower rack.

natural_image
Illustration of a woven basket filled with various kitchen utensils (no text or symbols)Silverware Basket
Put flatware in the removable basket with knife handles up to protect your hands. Place spoons in the basket with handles down. Mix knives, forks and spoons so they don't nest together. Distribute evenly. Small plastic items, such as measuring spoons and lids from small containers, should go in the bottom of the silverware basket with silverware on top.
natural_image
Abstract circular diagram with vertical lines and a central figure, no text or symbols presentDon't let any item extend through bottom.
Lids can be assembled to either end of the silverware basket to contain small items. To assemble an end lid, place the outer lid stud into the hole on the outside of the silverware basket. Then place the inside lid stud into the inner hole in the silverware basket. Repeat for other side if desired. Long items can be placed on the cupshelf in the upper rack.
The silverware basket can be placed in the front, side or back of the lower rack.
Loading place settings...
Follow these guidelines for loading 10 place settings. Features and appearance of racks and silverware baskets may vary from your model.

natural_image
Line drawing of a multi-tiered storage tray with various items arranged in rows (no text or symbols)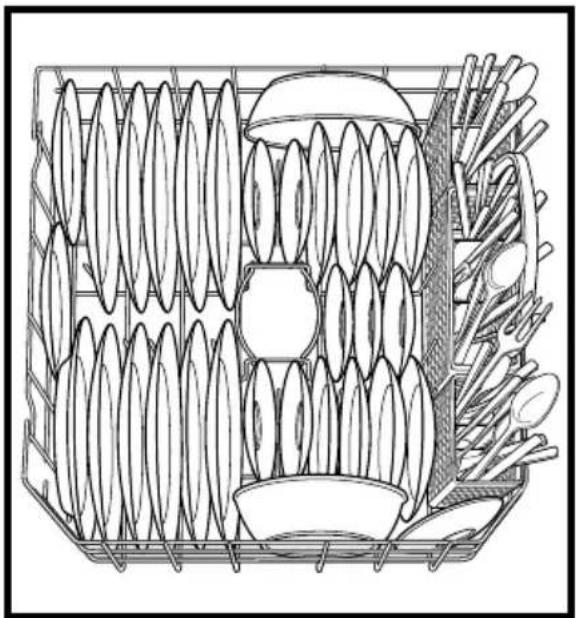
natural_image
Line drawing of a basket filled with various oval-shaped objects, including a bowl, spoon, and fork (no text or symbols)Upper Rack—10 place settings Lower Rack—10 place settings
Follow these guidelines for loading 12 place settings. Features and appearance of racks and silverware baskets may vary from your model.
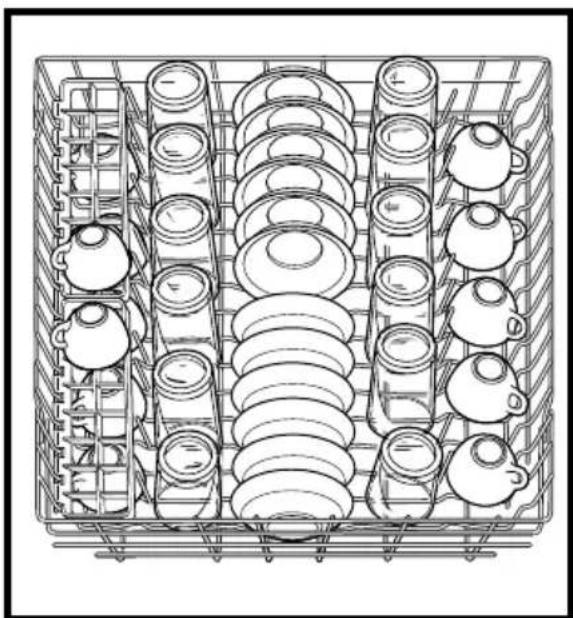
natural_image
Technical line drawing of a multi-tiered storage unit with circular components and metal racks (no text or symbols)
natural_image
Technical line drawing of a multi-layered mechanical component with internal blades and a separate bracket (no text or symbols)Upper Rack—12 place settings Lower Rack—12 place settings
About optional accessories.
You can change the door and lower access panel appearance of your dishwasher by ordering one of these optional accessories:
Color Panels
■ 1/4" Wood Panel Trim Kit
■ 3/4" Trimless Panel Kit
These accessories are available at extra cost (VISA, MasterCard, or Discover cards accepted) by calling 800-626-2002.
Specify accessory number when ordering.

Descriptions of Optional Accessories
Color panels—Replacement door panels and lower access panels are available in the following colors:
■ GPF400A (Almond)
■ GPF400B (Black)
■ GPF400W (White)
■ GPF400S (Stainless Steel)
■ GPF400C (Bisque)
NOTE: The GPF100 dishwasher door spring kit is included with the stainless steel color panel kit and must be installed with it (GPF400S).
Wood panel trim kit—This accessory contains trim and instructions for you to supply and install a 1/4" thick decorative wood door and lower access panel:
■ GPF425A (Almond)
■ GPF425B (Black)
■ GPF425W (White)
■ GPF425C (Bisque)
NOTE: The GPF100 dishwasher door spring kit must also be ordered and installed when the door panel weighs four lbs. or more.
Trimless panel kit—This accessory contains parts and instructions for you to supply and install a 3/4" thick decorative wood door and lower access panel:
GPF475
NOTE: The GPF100 dishwasher door spring kit is included with the trimless panel kit and must be installed with it.
Caring for the dishwasher.
To clean the control panel use a lightly dampened cloth then dry thoroughly. To clean the exterior use a good appliance polish wax.
Never use sharp objects, scouring pads or harsh cleaners on any part of the dishwasher.
Protect Against Freezing
If your dishwasher is left in an unheated place during the winter, ask a service technician to:
1 Cut off electrical power to the dishwasher. Remove fuses or trip circuit breaker.
2 Turn off the water supply and disconnect the water inlet line from the water valve.
3 Drain water from the water inlet line and water valve. (Use a pan to catch the water.)
4 Reconnect the water inlet line to the water valve.
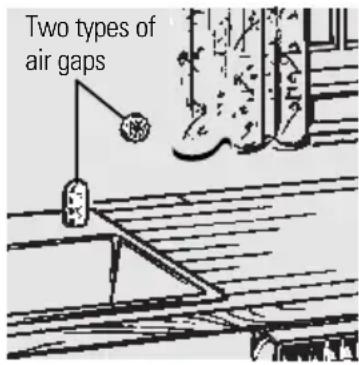
text_image
Two types of air gapsCheck the air gap any time your dishwasher isn't draining well.
Does Your Dishwasher Have an Air Gap?
An air gap protects your dishwasher against water backing up into it if a drain clogs. The air gap is not a part of the dishwasher. It is not covered by your warranty. Not all plumbing codes require air gaps, so you may not have one.
The air gap is easy to clean.
1 Turn off the dishwasher and lift off the chrome cover.
2 Remove the plastic cap and clean with a toothpick.
The Stainless Steel Panels
The stainless steel panels can be cleaned with Stainless Steel Magic or a similar product using a clean, soft cloth.
You can order Stainless Steel Magic # WX10X15 through GE Parts by calling 800-626-2002.

Troubleshooting Tips
Review the charts on the following pages first and you may not need to call for service.
| Problem Possible Causes What To Do | ||
| Control panel lights go off when you're setting controls | Time too long between touching of selected pads | Each pad must be touched within 30 seconds of the others. To relight, touch any pad again, or unlock and relatch door. |
| Noise | Some of the sounds you'll hear are normal shredding action. | Hard food disposal |
| Drain valve opening to pump water out. | ||
| Timer control as cycle progresses. | ||
| Detergent cup opening. | ||
| The motor stopping during the drying period. | ||
| Water draining out of the tub immediately after you touch START/RESET pad. | ||
| Utensils are not secure in the rack or something secure in dishwasher. small has dropped into the rack | Make sure everything is | |
| Motor hums | Dishwasher has not been used on a regular basis. If you do not use your dishwasher often, set it to fill and pump out once every week. This will help keep the seal moist and the garbage disposer clear. | |
| Detergent left in dispenser cups | Dishes are blocking the detergent cups | Reposition the dishes. |
| Detergent cup lid latched accidentally by user | Unlatch the door. Press the START/RESET pad three times within two seconds. The detergent cup will trip. | |
Before you call for service...
| Problem Possible Causes What To Do | ||
| Water standing in the bottom of the tub | This is normal • A small amount of clean water around the outlet on the tub bottom at the back of the tub keeps the water seal lubricated. | |
| Water won't pump out of the tub | Drain is clogged • If you have an air gap, clean it.• Check to see if your kitchen sink is draining well. If not, you may need a plumber.• If the dishwasher drains into a disposer, run disposer clear. | |
| Suds in the tub | Correct detergent• wasn't used detergents to avoid sudsing.Cascade® AutomaticDishwashing Detergent has been approved for use in all GE dishwashers.• To remove suds from the tub, open the dishwasher and let suds dissipate. Add 1 gallon of cold water to the tub. Close the door until it locks into place. Pump out water by pressing START/RESET, then immediately press START/RESET again. Repeat if necessary. | |
| Rinse agent • Always wipe up rinse agent was spilled spills immediately. | ||
| Stained tub interior | Detergent with • Some detergents contain colorant was used colorant (pigment or dyes)that will discolor the tub interior with extended use. Check the detergent cup for signs of any discoloration. If cup is discolored, change to detergent without any colorant. Cascade® AutomaticDishwashing Detergent has been approved for use in all GE dishwashers. | |
| Some tomato-based • Use of the RINSE ONLYcycle foods can stain (on some models) after adding the dish to the load can decrease the level of staining. | ||
| Dishes and flatware not clean | Low inlet water temperature temperature is correct (see page 12). Use HI TEMP WASH. | |
| Water pressure is temporarily low coming out more slowly than usual? If so, wait until pressure is normal before using your dishwasher. | ||
| Air gap is clogged Clean the air gap. | ||
| Improper rack loading | Make sure large dishware does not block the detergent dispenser or the wash arms. | |
| Spots and filming on glasses and flatware | Extremely hard water Low inlet water temperature Overloading the dishwasher Improper loading Old or damp powder detergent Rinse agent dispenser empty Too little detergent | Use Jet-Dry® rinse agent to remove spots and prevent new film build-up. To remove stubborn spots and pre-existing film from glassware: Remove all metal utensils from the dishwasher. Do not add detergent. Select the longest cycle. Start the dishwasher and allow to run for 18 to 22 minutes. Dishwasher will now be in the main wash. Open the door and pour 2 cups (500 ml) of white vinegar into the bottom of the dishwasher. Close the door and allow to complete the cycle. If vinegar rinse doesn’t work: Repeat as above, except use 1/4 cup (60 ml) of citric acid crystals instead of vinegar. |
Before you call for service...
| Problem Possible Causes What To Do | ||
| Cloudiness on glassware | Combination of soft water and too much is permanent. To prevent detergent this from happening, useless detergent if you have soft water. Wash glassware in the shortest cycle that will get them clean. | |
| Water temperature entering the dishwasher temperature. exceeds 150°F. | Lower the water heater | |
| Black or gray marks on dishes | Aluminum utensils have rubbed against dishes abrasive cleaner. | Remove marks with a mild, using a solution of 1/2 cup bleach and 3 cups warm water. ▲ WARNINGBefore cleaning interior wait at least 20 minutes after a cycle for the heating element to cool down. Failure to do so can result in burns. |
| Yellow or brown film on inside surfaces | Tea or coffee stains | A special filter in the water supply line is the only way by iron deposits in water to correct this problem.Contact a water softener company. |
| An overall yellow or brown film can be caused by iron deposits in water to correct this problem. | ||
| White film on inside surfaces | Hard water minerals | To clean the interior, apply dishwasher detergent to a damp sponge. Wear rubber gloves.Do notuse any type of cleanser other than dishwasher detergent because it may cause foaming or sudsing. Cascade® Automatic Dishwashing Detergent has been approved for use in all GE dishwashers. |
| Dishes don't dry | Low inlet water temperature temperature is correct (see page 12). | Make sure inlet water |
| Select HI TEMP RINSE and/or HEATED DRY. | ||
| Rinse agent dispenser is empty dispenser. | Check the rinse agent | |
| Control panel responded to inputs but dishwasher never filled with water | Door latch may not be properly seated | Call for service. |
| Dishwasher won't run | Fuse is blown, or the circuit breaker tripped | Replace fuse or reset circuit breaker. Remove any other appliances from the circuit. Try resetting the START/RESET pad. |
| Steam | This is normal | Steam comes through the vent by the door latch during drying and when water is being pumped out. |
Notes
Notes
Notes
GE Service Protection Plus™
GE, a name recognized worldwide for quality and dependability, offers you Service Protection Plus™—comprehensive protection on all your appliances—No Matter What Brand!
Benefits Include:
- Backed by GE
• All brands covered
• Unlimited service calls
• All parts and labor costs included
• No out-of-pocket expenses - No hidden deductibles
• One 800 number to call
We'll Cover Any Appliance. Anywhere. Anytime.\*
You will be completely satisfied with our service protection or you may request your money back on the remaining value of your contract. No questions asked. It's that simple.
Protect your refrigerator, dishwasher, washer and dryer, range, TV, VCR and much more—any brand! Plus there’s no extra charge for emergency service and low monthly financing is available. Even icemaker coverage and food spoilage protection is offered. You can rest easy, knowing that all your valuable household products are protected against expensive repairs.
Place your confidence in GE and call us in the U.S. toll-free at 800-626-2224 for more information.
*All brands covered, up to 20 years old, in the continental U.S.
Cut here
Please place in envelope and mail to:
General Electric Company
Warranty Registration Department
P.O. Box 32150
Louisville, KY 40232-2150
Consumer Product Ownership Registration
Dear Customer:
Thank you for purchasing our product and thank you for placing your confidence in us.
We are proud to have you as a customer!
Follow these three steps to protect your new appliance investment:
1
Complete and mail your Consumer Product Ownership Registration today. Have the peace of mind of knowing we can contact you in the unlikely event of a safety modification.
2
After mailing the registration below, store this document in a safe place. It con- tains information you will need should you require service. Our service number is 800 GE CARES (800-432-2737).
3
Read your Owner's Manual carefully. It will help you operate your new appliance properly. If you have questions, or need more information, call the GE Answer Center® 800.626.2000.
Model Number
Serial Number

natural_image
Two identical horizontal lines with tick marks, no text or symbols presentImportant: If you did not get a registration card with your product, detach and return the form below to ensure that your product is registered, or register online at www.geappliances.com.
Cut here
Consumer Product Ownership Registration

text_image
Important Mail Today!Model Number

Serial Number

Mr. □ Ms. □ Mrs. □ Miss □

text_image
First Name Last Name
text_image
Street Address
text_image
Apt. # E-mail Address_
text_image
City Zip Code State
text_image
Date Placed In Use Month Day Year Phone NumberOccasionally, we may allow selected companies to send you information.
□ Check here if you do not want this information.

GE Appliances
General Electric Company Louisville, Kentucky www.geappliances.com
All warranty service provided by our Factory Service Centers, or an authorized Customer Care® technician. For service, call 800-GE-CARES.
For The Period Of: GE Will Replace:
| One Year Any partFrom the date of the original purchase warranty, | of the dishwasher which fails due to a defect in materials or workmanship. During thisfull one-yearGE will also provide,free of charge, all labor and in-home service to replace the defective part. |
| Second Year Any partFrom the date of the original purchaselimited warranty, | of the dishwasher which fails due to a defect in materials or workmanship. During thissecond-yearyou will be responsible for any labor or in-home service costs. |
| Five Years The dishwasher rack,From the date of thecontrol moduleoriginal purchase | if it should rust, orthe electronicif it should fail due to a defect in materials or workmanship. During thisfive-year limited warranty, you will be responsible for any labor or in-home service costs. |
| Lifetime of Product The PermaTuf | ^® tub or door liner, if it fails to contain water due to a defect in materials or workmanship. During thisfull warranty, GE will also provide,free of charge, all labor and in-home service to replace the defective part. |
What GE Will Not Cover:
■ Service trips to your home to teach you how to use the product.
■ Improper installation.
■ Replacement of house fuses or resetting of circuit breakers.
■ Failure of the product if it is abused, misused, or used for other than the intended purpose or used commercially.
■ Damage to the product caused by accident, fire, floods or acts of God.
■ Incidental or consequential damage to personal property caused by possible defects with this appliance.
■ Cleaning or servicing of the air gap device in the drain line.
This warranty is extended to the original purchaser and any succeeding owner for products purchased for home use within the USA. Proof of original purchase date is needed to obtain service under the warranty. In Alaska, the warranty excludes the cost of shipping or service calls to your home.
Some states do not allow the exclusion or limitation of incidental or consequential damages. This warranty gives you specific legal rights, and you may also have other rights which vary from state to state. To know what your legal rights are, consult your local or state consumer affairs office or your state's Attorney General.
Service Telephone Numbers.

GE Answer Center ^® 800.626.2000
The GE Answer Center ^® is open 24 hours a day, 7 days a week.

natural_image
Simple line drawing of a house with windows and cloud-like shapes (no text or symbols)In-Home Repair Service 800-GE-CARES (800-432-2737)
Expert GE repair service is only a phone call away.
Special Needs Service 800.626.2000
TDD 800-TDD-GEAC (800-833-4322)
GE offers, free of charge, a brochure to assist in planning a barrier-free kitchen for persons with limited mobility.

text_image
Illustration of a rolled parchment or scroll with visible text lines and a small circular mark at the bottom right.Service Contracts 800-626-2224
Purchase a GE service contract while your warranty is still in effect and you'll receive a substantial discount. GE Consumer Service will still be there after your warranty expires.

Parts and Accessories 800-626-2002
Individuals qualified to service their own appliances can have parts or accessories sent directly to their homes (VISA, MasterCard and Discover cards are accepted).
Instructions contained in this manual cover procedures to be performed by any user. Other servicing generally should be referred to qualified service personnel. Caution must be exercised, since improper servicing may cause unsafe operation.

natural_image
Simple hand-drawn sketch of a smiling heart shape on black background (no text or symbols)Service Satisfaction
If you are not satisfied with the service you receive from GE, follow these steps. First, contact the people who serviced your appliance.
Next, if you are still not pleased, write all the details—including your phone number—to: Manager, Customer Relations, GE Appliances, Appliance Park, Louisville, KY 40225.