ZISW420DM - Washing machine GE - Free user manual and instructions
Find the device manual for free ZISW420DM GE in PDF.

User questions about ZISW420DM GE
0 question about this device. Answer the ones you know or ask your own.
Ask a new question about this device
Download the instructions for your Washing machine in PDF format for free! Find your manual ZISW420DM - GE and take your electronic device back in hand. On this page are published all the documents necessary for the use of your device. ZISW420DM by GE.
USER MANUAL ZISW420DM GE
Side-by-Side Built-In Refrigerators
Introduction
Your new Monogram refrigerator makes an eloquent statement of style, convenience and kitchen planning flexibility. Whether you chose it for its purity of design, practical storage arrangements or assiduous attention to detail—or for all of these reasons—you'll find that your Monogram refrigerator's superior blend of form and function will delight you for years to come.
The Monogram refrigerator was designed to provide the flexibility to blend in with your kitchen cabinetry. Decorative door insert panels allow it to match your kitchen cabinets or blend with your kitchen decor. Through a series of product choices, the Monogram refrigerator can be beautifully integrated into the kitchen.
Since this is designed to be a built-in product, custom panels may be required on the front of the Monogram refrigerator. Consult your kitchen designer or cabinetmaker for your customized look.
The information on the following pages will help you operate and maintain your refrigerator properly.
If you have any questions, visit our website at: www.monogram.com
Contents
Consumer Services
Safety Instructions 3,4
Care and Cleaning
Cleaning—Outside and Inside .....17
Light Bulb Replacement ..... 18-21
Moving and Vacation .....22
Operating Instructions
Automatic Icemaker .....9
Climate Control Drawer .....10, 11, 13
Control Lock ....11
Freezer Compartment .....16
Ice and Water Dispenser .....7, 8
Shelves and Bins .....14, 15
Storage Pans .....12, 13
Temperature Controls ....5
Water Filter Cartridge ....6
READ AND SAVE THESE INSTRUCTIONS
⚠ WARNING: When using electrical appliances, basic safety precautions should be followed, including the following:
- Use this appliance only for its intended purpose as described in this Owner's Manual.
- This refrigerator must be properly installed in accordance with the Installation Instructions before it is used. Also see the How to Connect Electricity section.
- Do not allow children to climb, stand or hang on the shelves in the refrigerator. They could damage the refrigerator and seriously injure themselves.
• After your refrigerator is in operation, do not touch the cold surfaces in the freezer compartment, particularly when hands are damp or wet. Skin may adhere to these extremely cold surfaces. - Do not store or use gasoline or other flammable vapors and liquids in the vicinity of this or any other appliance.
- Do not attempt to stand on top of the refrigerator. Doing so may result in bodily injury or damage to the refrigerator.
- Do not allow children to play with the refrigerator or tamper with the controls.
• Installation of the icemaker must be done by a qualified service technician.
- In refrigerators with an automatic icemaker, avoid contact with the moving parts of the ejector mechanism, or with the heating element located on the bottom of the icemaker. Do not place fingers or hands on the automatic icemaking mechanism while the refrigerator is plugged in.
- Keep fingers out of the “pinch point” areas: clearances between the doors and between the doors and cabinet are necessarily small. Be careful closing doors when children are in the area.
- Unplug your refrigerator before cleaning and making repairs. NOTE: We strongly recommend that any servicing be performed by a qualified individual.
- Before replacing a burned-out light bulb, the refrigerator should be unplugged in order to avoid contact with a live wire filament. (A burned-out light bulb may break when being replaced.) NOTE: Setting the refrigerator temperature controls to OFF does not remove power to the light circuit.
- Do not refreeze frozen foods which have thawed completely.
• Always clean the Climate Control Tray after thawing food.
▲DANGER: RISK OF CHILD ENTRAPMENT
Child entrapment and suffocation are not problems of the past. Junked or abandoned refrigeration products are still dangerous... even if they will sit for “just a few days.” If you are getting rid of your old appliance, please follow these instructions to help prevent accidents.
Before You Throw Away Your Old Refrigeration Product:
• Take off the doors and discard separately.
- Leave the shelves in place so that children may not easily climb inside.
- If the refrigerator has a lock, make it unusable.
REFRIGERANTS
All refrigeration products contain refrigerants, which under federal law must be removed prior to product disposal. If you are getting rid of an
old refrigeration product, check with the company handling the disposal about what to do.
HOW TO CONNECT ELECTRICITY
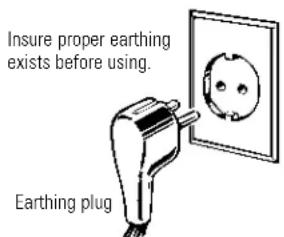
The power cord of this appliance is equipped with an earthing plug which mates with a standard earthed wall outlet to minimize the possibility of electric shock hazard from this appliance.
Have the wall outlet and circuit checked by a qualified electrician to make sure the outlet is properly earthed.
Where an unearthed wall outlet is encountered, it is your personal responsibility and obligation to have it replaced with a properly carthed wall outlet.
The refrigerator should always be plugged into its own individual electrical outlet. This provides the best performance and also prevents overloading house wiring circuits which could cause
a fire hazard from overheated wires. Please refer to the rating plate on the refrigerator for the correct voltage, wattage and frequency. If the product plug does not fit your outlet, the product should be fitted with a new plug.
text_image
Insure proper earthing exists before using. Earthing plugIMPORTANT: The refitting of electric plugs and cables should be done by a qualified technician or service agent. In some countries the refitting of electric plugs and cables is only permitted when the work is completed by a qualified technician.
If the power supply cord becomes damaged, it must be replaced by a qualified service agent in order to avoid a safety hazard.
Never unplug your refrigerator by pulling on the power cord. Always grip plug firmly and pull straight out from the outlet.
Repair or replace immediately all power cords that have become frayed or otherwise damaged. Do not use a cord that shows cracks or abrasion damage along its length or at either end.
When moving the refrigerator away from the wall, be careful not to roll over or damage the power cord.
Mains lead replacement
If the mains lead on your refrigerator needs replacing at any time, it must be replaced by a special lead which is obtainable from your local dealer. A charge will be made for the replacement of the mains lead if you have damaged the lead.
The refrigerator must be positioned so that the plug is accessible.
SAVE THESE INSTRUCTIONS

text_image
ACTIVE DOOR ALARM FREEZER FRESH FOOD TEMP DISPLAY °C / °F WATER FILTER STATUS RESETPreset Settings:
Allow 24 hours to reach these preset temperatures.
Temperature controls
The temperature display shows the actual temperature of the freezer and fresh food compartments. The actual temperature may vary slightly from the set temperature based on factors such as door opening, amount of food, defrost cycling and room temperature.
To turn off the cooling system in both the freezer and fresh food compartments, press either pad until both displays show OFF.
To turn the cooling system on, press either pad. The preset temperatures of -18^ and 3^ will appear in the display.
Ambient Room Temperature Limits
This refrigerator is designed to operate in ambient temperatures specified by its Temperature Class, which is marked on the rating plate.
| Temperature Symbol Ambient Temperature | |||
| Class Maximum | Minimum | ||
| Extended- | |||
| Temperate SN 32°C 10°C | |||
| Temperate | N | 32°C 16°C | |
| Subtropical | ST | 38°C 18°C | |
| Tropical | T | 43°C 18°C | |
NOTE: Internal temperature may be affected by such factors as the location of the refrigerator, ambient temperature and frequency of door openings. Adjust temperature controls as required to compensate for these factors.
To check the current temperature setting for the fresh food or freezer compartment, press the 🔒 portion. After 5 seconds, the display will return to the actual temperature.
To change the temperature settings, press the ⓞ pack. Allow 24 hours for the refrigerator to reach the temperature you have set.
Temperature Ranges
| Low High | ||
| Fresh Food | 1°C | 7°C |
| Freezer | -21°C | -14°C |
NOTE: Setting the controls to OFF stops cooling, but does not shut off electrical power to the refrigerator.
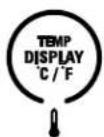
Changing display temperatures from °C to °F
To change the temperature display from Celsius to Fahrenheit, press Temp Display °C/°F.
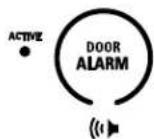
Door alarm
To turn the Door Alarm feature on, press DOOR ALARM once. The ACTIVE light will come on. To turn it off, press it again.
On models with a dispenser, the Door Alarm feature is located on the dispenser panel on the front of the freezer door.
When the DOOR ALARM is active, the alarm will flash and beep if you keep the door open for more than 2 minutes.
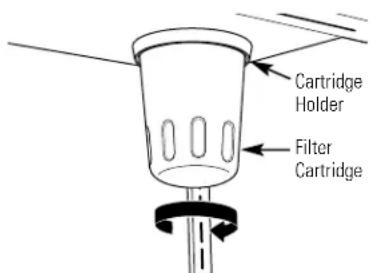
Water filter cartridge
The water filter cartridge is located in the back upper right corner of the refrigerator compartment.
To Replace the Filter:
The filter cartridge is designed to last approximately 12 months.

It should be replaced when the status light turns red or if you notice the ice cubes getting hollow or small.
Installing the Filter Cartridge:
- Remove the old cartridge by slowly turning it to the left. A small amount of water may drip down. Do not pull down on the cartridge.
- Fill the new cartridge with water from the tap to allow for better flow immediately after installation.
- Line up the arrow on the cartridge with the center of the holder. Do not push it up into the holder.
- Slowly turn it to the right until the cartridge stops. It will rotate about 1/4 turn. DO NOT OVERTIGHTEN.
text_image
Cartridge Holder Filter CartridgeSlowly turn it to the right. Do not overtighten.
To Reset the Filter Status Light:
Press and hold the RESET pad for 3 seconds.
Filter Bypass Plug:
You must use the filter bypass plug:
a) if you have a household reverse osmosis water system
b) if a replacement filter is not available.

The icemaker and dispenser will not operate without the filter or filter bypass plug installed.
Replacement Filters:
To order additional filters, contact your local distributor.
Dispenser with glass-touch controls
How it Works
The electronic controls on the dispenser are truly interactive. The control panel is equipped with a proximity sensor that causes the panel to light up as you approach the dispenser (approx. 50 mm). To make a selection, simply touch the graphic for the feature you want, and the halo for that feature will light up. When you walk away from the refrigerator, the lighted graphics switch off automatically.
NOTE: Fluctuations in the power line voltage may activate the dispenser controls, turning the lights on. The lights will switch off automatically after a few seconds. This does not indicate a malfunction and will not affect the operation of the controls.
text_image
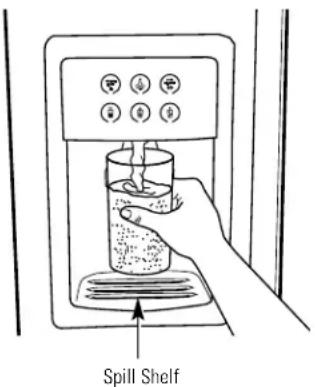
Spill ShelfHow to Use
To dispense water or ice: select WATER 🎨, CUBED ICE 🎨 or CRUSHED ICE 🎨.
Then press the glass gently against the top of the dispenser cradle.
The spill shelf is not self-draining. To reduce water spotting, the shelf and its grille should be cleaned regularly.
If no water is dispensed when the refrigerator is first installed, there may be air in the water line system. Press the dispenser cradle for at least two minutes to remove trapped air from the water line and to fill the water system. To flush out impurities in the water line, throw away the first gallon of water.
CAUTION: Never put fingers or any other objects into the ice crusher discharge opening.
Locking the Dispenser:
Touch CONTROL LOCK for 3 seconds to lock the dispenser and control pad. To unlock, touch it again for 3 seconds.

Dispenser Light:
This feature turns the night light on and off. The light also comes on when the dispenser cradle is pressed. If this light burns out, it should be replaced with a 6 wa 12V maximum bulb. To order re bulbs, contact your local distribu

Door Alarm:
To turn the Door Alarm feature on, touch DOOR ALARM once. To turn it off, press it again.
When the DOOR ALARM
is active, the alarm will flash and beep if you keep the door open for more than 2 minutes.
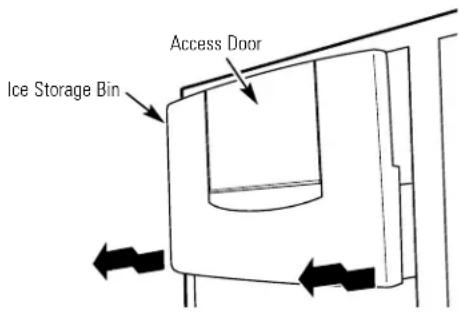
Ice storage bin
To remove:
Lift up the access door to reach the icemaker. Set the icemaker power switch to the O (off) position. With the access door closed, support the storage bin at the bottom while slightly lifting. Pull bin straight out.
text_image
Access Door Ice Storage BinTo replace:
Slide the bin back until the tab on the bin locks into the slot on the shelf. If the bin does not go all the way back, remove it and rotate the drive mechanism 1/4 turn. Then push the bin back again.
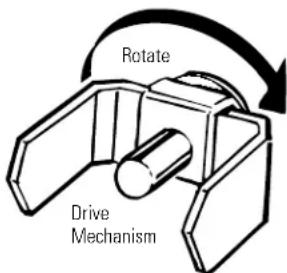
text_image
Rotate Drive MechanismImportant facts about your ice & water dispenser
- Do not add ice from trays or bags to the storage bin. It may not crush or dispense well.
- Avoid overfilling glass with ice and use of narrow or extra-tall glasses. Backed-up ice can jam the chute or cause the door in the chute to freeze shut. If ice is blocking the chute, poke it through with a wooden spoon.
- Beverages and foods should not be quick-chilled in the ice storage bin. Cans, bottles or food packages in the storage bin may cause the icemaker or auger to jam.
- To keep dispensed ice from missing the glass, put the glass close to, but not touching, the dispenser opening.
- Some crushed ice may be dispensed even though you selected CUBES. This happens occasionally when a few cubes accidentally get directed to the crusher.
• After crushed ice is dispensed, some water may drip from the chute.
- Sometimes a mound of snow will form on the door in the ice chute. This condition is normal and usually occurs when you have dispensed crushed ice repeatedly. The snow will eventually evaporate.
- Dispensed water is not ice cold. For colder water, simply add crushed ice or cubes before dispensing water.
- The first glass of water dispensed may be warmer than the following ones. This is normal.
- To eliminate drips on the spill shelf, tilt the glass in slightly when dispensing water.
Automatic icemaker
A newly-installed refrigerator may take 12–24 hours to begin making ice.
The icemaker will produce seven cubes per cycle—approximately 15 cycles in a 24-hour period, depending on freezer compartment temperature, room temperature, number of door openings and other use conditions.
If the refrigerator is operated before the water connection is made to the icemaker, set the power switch to O (off).
When the refrigerator has been connected to the water supply, set the power switch to 1 (on). The green light will come on.
Throw away the first full bucket of ice.
Be sure nothing interferes with the sweep of the feeler arm.
When the bin fills to the level of the feeler arm, the icemaker will stop producing ice.
It is normal for several cubes to be joined together.
If ice is not used frequently, old ice cubes will become cloudy, taste stale and shrink.

text_image
Power Switch Icemaker Green Power Light Feeler ArmAfter the icemaker has been turned on again, there will be a delay of about 45 minutes before the icemaker resumes operations.
NOTE: In homes with lower-than-average water pressure, you may hear the icemaker water valve cycle on several times when making one batch of ice.
Climate Control drawer
How it Works
The Climate Control feature is a system of dampers, a fan, a temperature thermistor, a heater and a specially designed tray.
The Climate Control drawer can be used to chill items quickly, thaw foods quickly or store items at their optimum temperatures.
The drawer is tightly sealed to prevent the drawer's temperature from causing temperature fluctuations in the rest of the refrigerator.
SELECT TEMP—Use this feature to store items at their optimum temperatures. The CITRUS setting will maintain a drawer temperature of 6^ C by cycling a small heater off and on as needed. The PRODUCE setting will maintain the drawer temperature at 1^ C by drawing in additional cold air as needed. The MEAT setting will maintain the drawer temperature at 0^ C by drawing in additional cold air as needed.
EXPRESS CHILL—This feature can be used to cool items in minutes, rather than hours. Extra cool air is circulated throughout the drawer. Once the cycle is complete, the drawer will revert to the pre-set fresh food temperature.
EXPRESS THAW—This feature thaws items in hours rather than days. Food is gently thawed in a cool environment by circulating
air throughout the drawer. Temperature is maintained in the drawer by cycling a small heater off and on as needed. Once the thaw cycle is complete, the pan will automatically adjust to a temperature of 0^ C to store the food at its optimum temperature.
Climate Control Tray—Besides using the specially designed Climate Control tray when using the drawer, it can also be used as a chilled serving tray to keep foods cold.
NOTE: By turning the controls on the Climate Control drawer off, the drawer can be used as a standard sealed produce pan. The temperature inside the drawer will be the same as the fresh food compartment.

text_image
CLIMATE CONTROL DRAWER CONTROL LOCK CITRUS PRODUCE MEAT SELECT TEMP 6 °C 15 MIN 30 MIN 45 MIN EXPRESS CHILL 6.5 LBS 1.5 LBS 3.0 LBS EXPRESS THAWHow to Use
1 Empty the drawer. Place the tray in the drawer. Place the items on the tray and close the drawer completely.
2 Select the Express Thaw,™ Express Chill™ or Select Temp™ pad. The display will come on. Press the pad until the light appears next to the desired setting. Use the chart on the next page to determine the best setting.
- To stop a feature before it is finished, press that feature's pad until no options are selected and the display is off.
- During Express Thaw™ and Express Chill,™ the display on the controls will count down the time remaining in the cycle.
- After the Express Thaw™ cycle is complete, the drawer will reset to the MEAT setting (0°C) to help preserve thawed items until they are used.
- The displayed actual temperature of the Climate Control drawer may vary slightly from the SET temperature based on usage and operation environment.
NOTE: For food safety reasons, it is recommended that foods be wrapped in plastic wrap when using Express Thaw. ^™ This will help contain meat juices and improve thawing performance.
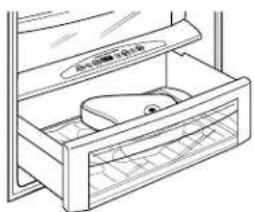
natural_image
Line drawing of a refrigerator drawer with a sink and lid (no text or symbols)Express Thaw™

Climate Control chart
NOTE: Results may vary depending on packaging, starting temperature and other food traits.
| CITRUS ● PRODUCE ● MEAT ● | SELECT TEMP | 15 MIN ● 30 MIN ● 45 MIN ● | EXPRESS CHILL | 0.5 LBS ● 1.5 LBS ● 3.0 LBS ● | EXPRESS THAW |
Citrus Setting (6°C)
- Oranges, Lemons, Limes, Pineapple, Cantaloupe
- Beans, Cucumbers, Tomatoes, Peppers, Aubergine, Squash
Produce Setting (1°C)
- Strawberries, Raspberries, Kiwifruit, Pears, Cherries, Blackberries, Grapes, Plums, Nectarines, Apples
• Asparagus, Broccoli, Corn, Mushrooms, Spinach, Cauliflower, Kale, Green Onions, Beetroot, Onions
Meat Setting (0°C)
- Raw Meat, Fish and Poultry
15 Minutes
• 1 Beverage Can (355 ml)
• 2 Small Juice Boxes (175–240 ml each)
30 Minutes
• Wine (750 ml bottle)
• 2 to 6 Beverage Cans (355 ml each)
• 2 Plastic 590 ml Bottles of Beverage
• 4 to 6 Small Juice Boxes (175–240 ml each)
- 3 Foil Juice Packets
45 Minutes
0.5 Lbs. (0.25 kg) (4 hours)
- Individually Wrapped Filet Mignon (0.5 lb/0.25 kg)
• Hamburger Patties (0.5 lb/0.25 kg)
1.5 Lbs. (0.75 kg) (8 hours)
• Chicken Breasts (1.5 lbs/0.75 kg)
• Minced Beef (1.5 lbs/0.75 kg)
- Steak (1.5 lbs/0.75 kg)
3.0 Lbs. (1.5 kg) (12 hours)
• Chicken Breasts (3.0 lbs/1.5 kg)
• Minced Beef (3.0 lbs/1.5 kg)
- Steak (3.0 lbs/1.5 kg)
Control lock
Control Lock
Press and hold this pad for 3 seconds to lock the settings for the Climate Control drawer. To unlock, press and hold for another 3 seconds.


Storage Pans
| Built-In Refrigerators | ||||||
| Sealed deli pan | Use the Sealed Deli Pan for the convenient storage of lunch meats and cheese, hors d'ocuvres, spreads and snacks. The pan and shelf to which it is attached can be adjusted to any height. | 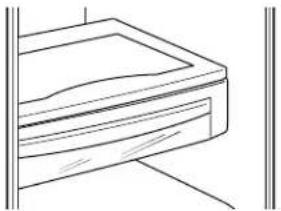 | ||||
| Sealed produce pans | The top pan has adjustable humidity levels for the higher humidity levels required by most vegetables and lower humidity levels required for most fruits.The second pan is designed to provide constant high humidity levels.Make sure the drawers are closed completely to maintain the correct humidity level.NOTE: The Climate Control drawer can be used as another sealed produce pan by turning the controls on the Climate Control drawer off. The temperature inside the drawer will be the same as the fresh food compartment.How long produce can be stored will depend upon the type of food and its condition when placed in the pans. | 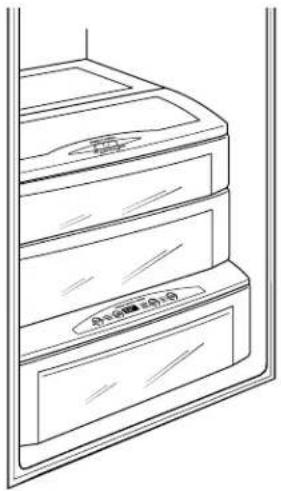 | ||||
| Adjustable humidity control | Slide the control all the way to the VEG (HI) setting to provide high humidity. Slide the control all the way to the FRUIT (LO) setting to provide lower humidity levels. |  | ||||
| High humidity storage | Storing unwrapped foods in a high humidity environment keeps foods fresh by retaining the natural moisture content of foods such as:ArtichokesAsparagusBeetroot, toppedBlueberriesCarrotsCelery | CherriesCornCucumbersCurrantsGreens, leafyLettuceParsley | Peas, greenRadishesRhubarbSpinachTomatoes, ripe | As in any refrigerated storage area, it is recommended that foods with strong odors be stored wrapped—foods such as:BroccoliBrussels sprouts | CabbageCauliflowerGreen onions | ParsnipsTurnips |
| Low humidity storage | Lower humidity storage should be used for items such as: | ApplesApricotsGrapesMushroomsNectarines | OrangesPeachesPearsRaspberries | Squash, summerStrawberriesTangerines | ||
Drawer and pan removal
To remove a drawer or pan:
-
Pull the pan out to the stop position.
-
Lift the front of the pan up and out of the wire holder.
-
Lift the back of the pan up and out.
To replace a pan:
-
Place the back of the pan in the wire holder, making sure the wire holder fits into the grooves on the back of the pan.
-
Lower the front of the pan into the wire holder.
-
Press firmly on the top of the pan to snap it into the wire holder.

natural_image
Line drawing of a refrigerator drawer with a control panel and door (no text or symbols)Shelves and Bins
Built-In Refrigerators
How to rearrange your shelves
Tempered glass shelves in the fresh food compartment and wire shelves in the freezer compartment are adjustable, enabling you to make efficient shelf arrangements to fit your family's food storage needs.
To remove shelves:
Tilt shelf up at front, then lift it up and out of tracks on rear wall of refrigerator.
To replace shelves:
Select desired shelf height. With shelf front raised slightly, engage top lugs in tracks at rear of cabinet. Then lower front of shelf until it locks into position.

natural_image
Diagram of hands holding a rectangular object with arrows indicating direction (no text or symbols)Door bins
All door bins, except for the deep gallon door bin, are adjustable and can be moved up and down to meet your storage needs. The deep gallon door bin can be removed for cleaning.
To remove any bin:
Lift the bin up and slide it toward you.
natural_image
Line drawing of a three-tiered shelf shelf with no text or symbolsRemovable wine rack
The rack can be attached to the left or right side of any shelf. It is designed to hold a bottle, including a 2 litre bottle, on its side.

natural_image
Simple line drawing of a wine bottle suspended from a container (no text or symbols)Freezer baskets
Wire slide-out freezer baskets can be pulled out for easy access to frozen foods.
To remove:
Pull basket out. Lift the front of the basket up and then take it out.
natural_image
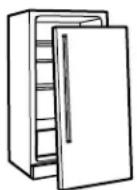
Line drawing of a cabinet or rack with a ladder and frame, no text or symbols presentFreezer juice rack
This slide-out rack can be used to easily access frozen juices or foods.

natural_image
Line drawing of a multi-tiered storage cabinet or rack system (no text or symbols)Loading the freezer compartment
Load so that at least 15 mm of space remains clear between stacks of packages and 15 mm to 25 mm of space between the top of any stack and any shelf or basket above it. Packages may hang over the front of shelves but must remain 15 mm from doors.
- Food to be frozen must not be placed in direct contact with food in storage. If food is to be frozen every day, it may be necessary to reduce the quantity to be frozen.
- If a large quantity of food needs to be frozen, set the freezer control to its coldest setting. After the food is frozen, reset the freezer control to its initial position.
-
Food is most quickly frozen on the middle three shelves of the freezer compartment and most slowly in the freezer door shelves.
-
Do not store commercially quick-frozen food longer than the time recommended by the food manufacturers.
- If the power to the appliance is shut off for an extended time or if the refrigerating system fails, do not open the doors unless absolutely necessary. When it is necessary, close them as quickly as possible so the frozen food will stay frozen as long as possible.
- The freezer door storage shelves marked with a two-star label are only appropriate for the storage of previously frozen food.
Effervescent drinks should not be stored in the freezer compartment.
Freezer performance
This Refrigerator/Freezer has an overall "Four Star" rating.
Freezer performance is classified by star ratings defined by ISO 8561 STANDARD AND SUMMARY BELOW:
| CODE | FREEZING-LOAD TEMP.(FOOD TEMPERATURE) |
| Below -6°C. | |
| Below -12°C. | |
| Below -18°C. |
However, all freezer door modules have a two star rating as permitted by the standard.
Cleaning outside
The spill shelf and the area beneath it should be cleaned periodically with a mild liquid dish detergent.

Dispenser cradle—Before cleaning, lock the dispenser by touching CONTROL LOCK for 3 seconds to prevent activating the dispenser. Clean with warm water and a mild liquid dish detergent. Rinse thoroughly and wipe dry. Unlock the dispenser by touching CONTROL LOCK for 3 seconds.
Door handles and trim—Clean with a cloth dampened with soapy water. Dry with a soft cloth.
Keep the outside clean. Wipe with a clean cloth lightly dampened with mild liquid dish detergent. Dry with a clean, soft cloth.
Do not wipe the refrigerator with a soiled dish cloth or wet towel. These may leave a residue that can damage the finish. Do not use scouring pads, powdered cleaners, bleach or cleaners containing bleach because these products can scratch and damage the finish.
Stainless steel—Regularly clean and polish the Stainless Steel Door Panels and Handles (on some models) with a commercially available stainless steel cleaner.
Do not use appliance wax or polish on the stainless steel.
Cleaning inside
Turn off power at the circuit breaker or fuse box before cleaning. If this is not practical, wring excess moisture out of sponge or cloth when cleaning around switches, lights or controls.
Use warm water and baking soda solution—about 15 ml of baking soda to 1 litre of water. This both cleans and neutralizes odors. Thoroughly rinse and wipe dry.
Other parts of the refrigerator—including door gaskets, meat and vegetable drawers, ice storage bin and all plastic parts—can be cleaned the same way.
Do not wash any plastic refrigerator parts in the dishwasher.
Do not wash the aluminum Climate Control tray in the dishwasher. The aluminum will discolor in the dishwasher.
Avoid cleaning cold glass shelves with hot water because the extreme temperature difference may cause them to break. Handle glass shelves carefully. Bumping tempered glass can cause it to shatter.
Light bulb replacement
WARNING: Halogen lights
generate intense heat. Be certain power is off and lamps have sufficient time to cool before attempting to replace.
Power to the lamps can be turned off at the fuse box or circuit breaker.
Turning the temperature control to OFF does NOT remove power to the light circuits.
The refrigerator uses two types of halogen bulbs:
Type 1 The columns along the back wall of the fresh food and freezer compartments are lit up by lamps located behind the top pan in the fresh food compartment and the bottom basket in the freezer compartment.
Type 2 These lamps are located inside the light shield at the top of the fresh food compartment and on top of the Climate Control drawer at the bottom of the fresh food compartment.
Type 1 bulbs have a life expectancy of about 2000 hours. Type 2 bulbs have a life expectancy of about 2000 hours. However, if the bulbs do need to be replaced, they can be purchased from your appliance dealer.

text_image
Type 2 Type 1 Type 2
natural_image
Simple line drawing of a bulb with grid pattern and base (no text or symbols)Type 1
This is a 35 watt, 12 volt, Type MR11 bulb.

Type 2
This is a 20 watt, 12 volt, Type T bulb.
Type 1 bulb replacement
NOTE: Before replacing the bulbs, review the light bulb information and WARNING on page 18.
Replacing Type 1 bulbs located in lamps behind the top pan in the fresh food compartment and the bottom freezer basket in the freezer compartment:
-
Disconnect power at the circuit breaker or fuse box and allow the lamps to cool.
-
To access the lamps in the fresh food compartment, remove the top pan. See Drawer and Pan Removal section.
To access the lamps in the freezer compartment, remove the bottom freezer basket. See Freezer Baskets section.
-
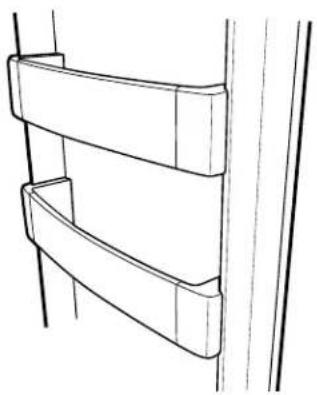
On the back wall there is a curved light shield. Grasp each end of the light shield. Pull the shield toward you and the tabs on the shield will release from the slots in the housing.
-
Remove the glass above the bulbs by pulling it straight out.
NOTE: Always follow bulb manufacturer's directions for handling and replacing bulbs.
-
Remove the bulb by holding the base and pulling straight up. Replace with a new bulb.
-
Replace the glass by sliding it into place. Then replace the light shield by resting the top lip of the shield on top of the light housing. Then press the sides until the tabs pop into the slots in the housing.
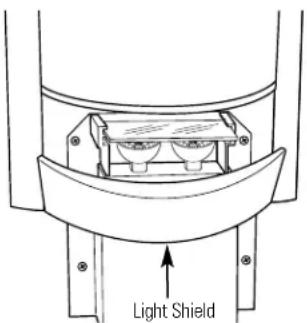
text_image
Light ShieldWARNING: The light shield must be replaced or the heat from the bulb could damage the refrigerator.
- Reset the circuit breaker or fuse box.
Type 2 bulb replacement
NOTE: Before replacing the bulbs, review the light bulb information and WARNING on page 18.
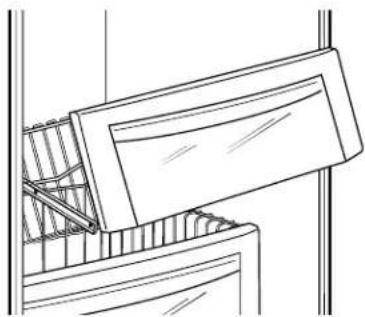
Replacing Type 2 bulbs in lamps located inside the light shield at the top of the fresh food compartment:
- Disconnect power at the circuit breaker or fuse box and allow the lamps to cool.
- If the Water Filter Cartridge is installed, remove it and replace with the filter bypass plug.
- Holding the light shield with one hand, rotate the support tabs until they clear the front of the light shield. Then push back on the light shield, lower the shield at the front and take out.
- Remove the 4 screws securing the light housing to the ceiling. There are two screws at the front and two at the back.
-
Lower the light housing at the front, then pull it toward you so the tabs at the back of the light housing come out of the slots on the back wall. The lamp assemblies will release from the holders.
-
Turn the lamp protector to access the bulb.

natural_image
Diagram of a mechanical or electrical component with concentric rings and directional arrows, no text or symbols present.NOTE: Always follow bulb manufacturer's directions for handling and replacing bulbs.
- Remove the bulb by holding the base and pulling straight out. Replace with a new bulb and replace the lamp protector.
WARNING: Lamp protectors must be replaced or the heat from the bulb could damage the refrigerator.

- Holding up the light housing, place each lamp assembly in its holder. Feed the attached wires through the slots and tuck the wires outside the side of the light housing.

- Insert the tabs on the back of the light housing in the slots on the back wall. Raise the light housing into position and secure with the four screws.
- Replace the light shield and rotate the support tabs back out so they support the front of the shield.
- Remove the filter bypass plug and replace with the Water Filter Cartridge. Reset the circuit breaker or fuse box.
Type 2 bulb replacement
NOTE: Before replacing the bulbs, review the light bulb information and WARNING on page 18.
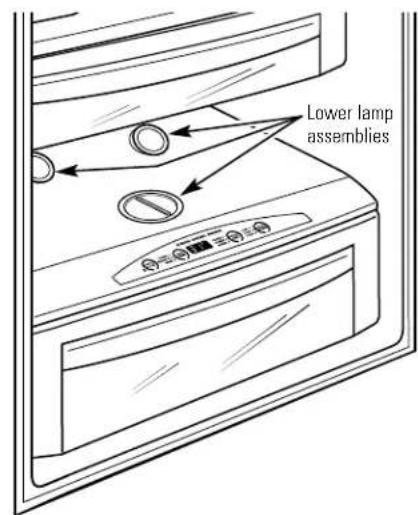
Replacing Type 2 bulbs in lamps located in the top of the Climate Control drawer:
- Disconnect power at the circuit breaker or fuse box and allow the lamps to cool.
- To access the lamps, remove the second produce pan. See Drawer and Pan Removal section.
-
The lamps at the back, that face up, can be lifted out. To access the lamp that shines into the Climate Control drawer, twist the holder until the arrow points towards the back of the refrigerator, then lift up.
-
Turn the lamp protector to access the bulb.

natural_image
Diagram of a circular mechanical or electrical component with directional arrows indicating rotation (no text or symbols)NOTE: Always follow bulb manufacturer's directions for handling and replacing bulbs.
- Remove the bulb by holding the base and pulling straight out. Replace with a new bulb and replace the lamp protector.
WARNING: Lamp protectors must be replaced or the heat from the bulb could damage the refrigerator.
- Reset the circuit breaker or fuse box.
text_image
Lower lamp assemblies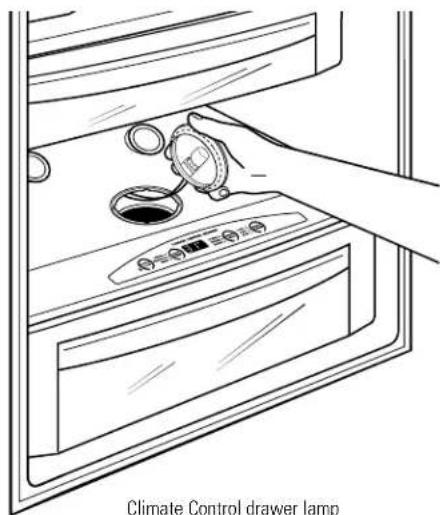
text_image
Climate Control drawer lampCare and Cleaning
Built-In Refrigerators
Preparing for vacation
For long vacations or absences, remove food and shut off power to the refrigerator at the fuse box or circuit breaker. Clean the interior (see Cleaning Inside). Leave doors open.
For shorter vacations, remove perishable foods and leave controls at regular settings. However, if the room temperature is expected to drop below 16^ C, follow the same instructions as for long vacations.
Set the icemaker power switch to the O (off) position and be sure to shut off the water supply to the refrigerator.
Preparing to move
Secure all loose items such as grille, shelves and drawers by taping them securely in place to prevent damage.
Be sure the refrigerator stays in an upright position during moving.
Questions? Use this problem solver!
PROBLEM POSSIBLE CAUSE
| REFRIGERATOR • May DOES NOT OPERATE | be in defrost cycle when compressor does not operate for about 30 minutes.Temperature control set at OFF.If interior light is not on, refrigerator may not be plugged in at wall outlet.The fuse is blown/circuit breaker is tripped. Replace fuse or reset the breaker. |
| MOTOR OPERATES • FOR LONG PERIODS OR CYCLES ON AND OFF FREQUENTLY (Modern refrigerators with more storage space and a larger freezer require more operating time. They start and stop often to maintain even temperatures.) | Normal when refrigerator is first plugged in. Wait 24 hours for the refrigerator to completely cool down.Often occurs when large amounts of food are placed in refrigerator. This is normal.Door left open or package holding door open.Hot weather or frequent door openings. This is normal.Temperature controls set at the coldest setting. See Temperature Controls. |
| ACTUAL • Refrigerator j TEMPERATURE NOT EQUAL TO SET TEMPERATURE | just plugged in. Allow 24 hours for system to stabilize.Door open for too long. Allow 24 hours for system to stabilize.Warm food added to refrigerator. Allow 24 hours for system to stabilize.Defrost cycle is in process. Allow 24 hours for system to stabilize. |
| VIBRATION OR RATTLING (Slight vibration is normal.) | • Refrigerator is not level. See Installation Instructions. |
| OPERATING • Normal SOUNDS fresh food and | fan air flow—one fan blows cold air through the freezer compartments—another fan cools the compressor motor.These NORMAL sounds will also be heard from time to time:Defrost water dripping.Refrigerant boiling or gurgling.Cracking or popping of cooling coils caused by expansion and contraction during defrost and refrigeration following defrost.Ice cubes dropping into the bin and water running in pipes as icemaker refills.The icemaker water valve will buzz when the icemaker fills with water. |
| DOOR NOT CLOSING PROPERLY | • Refrigerator is not level. See Installation Instructions. |
Questions? Use this problem solver!
PROBLEM POSSIBLE CAUSE
| FRESH FOOD OR FREEZER COMPARTMENT TOO WARM | ·Temperature controls not set cold enough. See Temperature Controls.·Warm weather or frequent door openings.·Door left open for long time.·Package may be holding door open. |
| FROST OR ICE ·Door CRYSTALS ON FROZEN FOOD (Frost within package is normal.) | left open or package holding door open.·Too frequent or too long door openings. |
| SLOW ICE CUBE ·Door FREEZING | may have been left open.·Freezer compartment is too warm. Set the freezer to a colder temperature. |
| ICE HAS ·Old cubes need to be discarded.ODOR/TASTE | ·Ice storage bin needs to be emptied and washed.·Unsealed packages in fresh food and/or freezer compartments may be transmitting odor/taste to ice.·Poor-tasting incoming water. Replace water filter. |
| AUTOMATIC ICEMAKER DOES NOT WORK | ·Icemaker power switch is in the O (off) position.·Water supply turned off or not connected.·Freezer compartment too warm.·Piled up cubes in storage bin may cause icemaker to shut off too soon. Level cubes in bin. |
| MOISTURE FORMS ·Not unusual during periods of high humidity. Wipe surface dry.ON CABINET SURFACE BETWEEN THE DOORS | |
| MOISTURE ·Too frequent COLLECTS INSIDE | or long door openings.·In humid weather, air carries moisture into refrigerator when doors are opened. |
| REFRIGERATOR ·Foods with strong odors should be tightly covered.HAS ODOR |
PROBLEM POSSIBLE CAUSE
| INTERIOR LIGHT • No DOES NOT WORK | power at outlet. • Light bulb needs replacing. See Care and Cleaning. • The refrigerator is equipped with a safety feature that turns off the refrigerator lights when the doors have been opened for an extended period. Once the refrigerator doors are closed and the lights have had time to cool, they will again come on automatically when the doors are opened. |
| SMALL OR HOLLOW CUBES | • Water filter clogged. Replace the filter or use the filter bypass plug. |
| WATER ON • If you use THE FLOOR you may be | an extra tall glass or pitcher, or overfill a glass or pitcher, jamming the cubes in the funnel chute. They can fuse inside the chute and drop out later, leaving water or ice on the floor. |
| UNEVEN SPACING OR GAPS BETWEEN DOORS AND KITCHEN CABINET | • Kitchen cabinets are not level or square. Call the installer or cabinetmaker. |
| POOR DOOR ALIGNMENT OR ONE DOOR HIGHER THAN THE OTHER | • Fresh food door needs adjusting. See Installation Instructions. • Refrigerator is not level. See Attention Installer Instructions. |
| ICE DISPENSER DOES NOT WORK or w | • Icemaker turned off or water supply turned off. Turn on icemaker water supply. • Ice cubes are frozen to the icemaker feeler arm. Remove cubes. • Irregular ice clumps in storage bin. Break up with fingertip pressure and discard remaining clumps. • Freezer may be too warm. Adjust freezer control to a colder setting, one position at a time, until clumps do not form. |
| WATER HAS POOR TASTE OR ODOR | • Water dispenser has not been used for a long time. Dispense water until all water in system is replenished. |
| WATER IN FIRST GLASS IS WARM | • Normal when refrigerator is first installed. Wait 24 hours for the refrigerator to completely cool down. • Water dispenser has not been used for a long time. Dispense water until all water in system is replenished. • Water system has been drained. Allow several hours for replenished supply to chill. |
Questions? Use this problem solver!
PROBLEM POSSIBLE CAUSE
| WATER DISPENSER • WDOES NOT WORK | Water supply line turned off or not connected.Water filter clogged. Replace the filter or use the filter bypass plug.TheCONTROL LOCKon the dispenser has been activated.To unlock the dispenser, touchCONTROL LOCKfor 3 seconds.Air may be trapped in system. Press the dispenser arm for at least 2 minutes. |
| WATER SPURTINGFROM DISPENSER 3 min | Newly installed filter cartridge. Run water from the dispenser for minutes (about 6 litres). |
| NO WATER OR ICEPRODUCTION | Supply line or shutoff valve is clogged. Call a plumber.Water filter clogged. Replace the filter or use the filter bypass plug. |
| CUBED ICE WASSELECTED BUT from theCRUSHED ICEWAS DISPENSED | Last setting wasCRUSHED ICE. A few cubes were left in the crusher the previous setting. This is normal. |
| FOOD IS NOT • PackagingTHAWING/CHILLING | Increase time or re-package in plastic.Wrong weight selected. Select a larger weight.Item with high fat content. Select a larger weight.Not using the Climate Control tray. Place items on tray and allow space in between items for better air flow. |
| SELECT TEMPFREATURE ON This is normalCLIMATE CONTROLDRAWER IS NOTWORKING | Food temperature control is set at warmest setting. In order to minimize energy usage, the Select Temp feature is disabled when the Fresh Food control is set at the warmest setting. |
| CLIMATE CONTROLDRAWER CONTROLSDO NOT WORK | Control Lock feature is active. Press and hold theCONTROL LOCKpad on the Climate Control drawer for 3 seconds. |

Monogram.®
197D5884P001
49-60303
12007-00
12-03 JR
Printed in the United States
GE Consumer Products
General Electric Company
Louisville, KY 40225
©2003 General Electric Company