JGGR24LPDBB - Stove GE - Free user manual and instructions
Find the device manual for free JGGR24LPDBB GE in PDF.

User questions about JGGR24LPDBB GE
0 question about this device. Answer the ones you know or ask your own.
Ask a new question about this device
Download the instructions for your Stove in PDF format for free! Find your manual JGGR24LPDBB - GE and take your electronic device back in hand. On this page are published all the documents necessary for the use of your device. JGGR24LPDBB by GE.
USER MANUAL JGGR24LPDBB GE
Safety Instructions 2-5
Operating Instructions
Cooking with Your Gas Grill ..11-13
Convection/Roasting Tips .....14
Cooking Temperatures .....11
Grid Lifter....13
Grid Positions....13
Rotisserie Cooking Tips .....14-16
Features of Your Gas Grill .....6,7
Lighting the Grill .....8-10
Lighting the Main Burners .....8
Lighting the Rotisserie Burners ..10
Lighting the Side Burner .....9
Using a Meat Thermometer .....16
Care and Cleaning
Annual Maintenance ..... 19
Leak Testing....22
LP Gas Tank 20-23
Regular Cleaning .... 17
Venturi Tubes ....18
Troubleshooting Tips .....24
Consumer Support
Consumer Support ..... Back Cover
Product Registration .....25, 26
Warranty....27
Write the model and serial numbers here:
Model # ____
Serial #
You can find these numbers on the rating plate located on the lower side base of your grill.
Owner's Manual
JGGN24
JGGR24
JGGB27
JGGN27
JGGR27

natural_image
Abstract decorative swirl design with no text or symbols164D4290P033 49-80075 05-01 JR

WARNING!
For your safety, the information in this manual must be followed to minimize the risk of fire or explosion, electric shock, or to prevent property damage, personal injury, or loss of life.
FOR YOUR SAFETY
If you smell gas:
- Shut off gas to the grill.
- Extinguish any open flame.
- Open lid.
- If odor continues, immediately call your gas supplier or your fire department.
FOR YOUR SAFETY
- Do not store or use gasoline or other flammable vapors and liquids in the vicinity of this or any other grill.
- An LP tank not connected for use shall not be stored in the vicinity of this or any other grill.
WARNING!
Do not try lighting this grill without reading the lighting instructions contained in this Owner's Manual.
WARNING!
Follow all leak test procedures carefully in this Owner's Manual prior to operation. Do this even if the grill was dealer-assembled.
WARNING!
Do not use an open flame to check for gas leaks. Be sure there are no sparks or open flames in the area while you check for leaks. Sparks or flames will result in a fire or explosion, which can cause serious bodily injury or death, and damage to property.

text_image
DESIGN CERTIFIEDTESTED IN ACCORDANCE WITH ANSI Z21.58, LATEST EDITION STANDARD FOR OUTDOOR COOKING GAS GRILLS. THIS COOKING CENTER IS FOR OUTDOOR USE ONLY.
Check your local building codes for acceptable outdoor grill locations. In the absence of local codes, this unit should be located in accordance with the National Fuel Gas Code No. Z223.1, Latest Edition and the National Electric Code ANSI/NFPA No. 70, Latest Edition.

IMPORTANT SAFETY NOTICE
■ The California Safe Drinking Water and Toxic Enforcement Act requires the Governor of California to publish a list of substances known to the state to cause cancer, birth defects or other reproductive harm, and requires businesses to warn customers of potential exposure to such substances.
■ Gas grills can cause minor exposure to four of these substances, namely benzene, carbon monoxide, formaldehyde and soot, caused primarily by the incomplete combustion of natural gas or LP fuels.
Properly adjusted burners, indicated by a bluish rather than a yellow flame, will minimize incomplete combustion. Exposure to these substances is minimized because this is an outdoor unit.

SAFETY PRECAUTIONS
When using your grill, follow basic safety precautions, including the following:
■ Be sure your grill is properly assembled and grounded in accordance with the provided Assembly Instructions. Failure to follow these safety precautions may result in damage or injury.
■ Do not attempt to repair or replace any part of your cooking center unless it is specifically recommended in this manual. All other servicing should be referred to a GE Authorized Service Center.
■ If you smell gas, the assembler has not done a proper job of checking for leaks. You can have a small leak and therefore a faint gas smell if the connections are not completely tight.
Some leaks can only be found with the burner control in the ON position and for your protection it must be done in accordance with leak test procedures. See the Leak testing section. Never use an open flame to locate a leak.
■ Check your local building codes for acceptable outdoor grill locations. In the absence of local codes, this unit should be located in accordance with the National Fuel Gas Code No. Z223.1, Latest Edition and the National Electrical Code ANSI-NFPA No. 70, Latest Edition.
■ Do not try lighting this grill without reading the lighting instructions in this manual.
- Read this manual carefully and completely before using your outdoor cooking center to reduce the risk of fire, burn hazard or other injury. Please retain this manual for future reference.
■ This gas outdoor cooking center is not intended to be located in or on recreational vehicles and/or boats.
■ Never allow anyone to sit, stand or play on or around the outdoor cooking center at any time. When in use, portions of the outdoor cooking center get hot enough to cause severe burns.
■ Do not store items of interest to children around or below the grill.
■ Never allow children to crawl inside the cart.
■ Never let clothing, pot holders or other flammable materials come in contact with or too close to any grate, burner or hot surface until it has cooled. Fabric may ignite and result in personal injury.

WARNING!
SAFETY PRECAUTIONS
When using your grill, follow basic safety precautions, including the following:
- Do not use water on grease fires. Never pick up a flaming pan. Turn the controls off. Smother a flaming pan on a burner by covering the pan completely with a well-fitting lid, cookie sheet or flat tray. Use a multi-purpose dry chemical or foam-type fire extinguisher.
Flaming grease outside a pan can be put out by covering it with baking soda or, if available, by using a multi-purpose dry chemical or foam-type fire extinguisher.
■ Use this grill only for its intended use as described in this manual.
■ Children should not be left alone or unattended in an area where the grill is being used.
■ Do not leave the grill unattended while cooking.
■ For personal safety, wear proper apparel. Loose fitting garments or sleeves should never be worn while using this grill. Some synthetic fabrics are highly flammable and should not be worn while grilling. - Only certain types of glass, heat-proof glass ceramic, earthenware, or other glazed utensils are suitable for grill use. Unsuitable types of materials may break with sudden temperature changes. Use only on low or medium heat settings according to the manufacturer's directions.
■ Do not heat unopened food containers as a build-up of pressure may cause the container to burst.
■ Never lean over an open grill.
■ Pay close attention when lighting a burner. Be certain you are rotating the control knob labeled for the burner you intend to use.
■ When using the grill, do not touch the grill rack, burner grate or immediate surrounding areas as these areas become extremely hot and could cause burns. Keep children away!
■ Do not operate main burners simultaneously with the rear burner. This may result in a grease fire or damage to the grill.
■ Do not use aluminum foil to line grill racks. This can severely upset combustion air flow or trap excessive heat in the control area. The result of this can be melted knobs or igniters.
■ When using the side burner always use flat-bottomed pans which are large enough to cover the burner. Adjust the flame so that it heats only the bottom of the pan to avoid ignition of clothing. Position handles inward away from open edges of the unit to avoid burns associated with spillovers. Hold the handle of the pan with a pot holder when turning or stirring food.
■ Never grill without the drip pan in place. Without it, hot grease could leak downward and produce a fire or explosion hazard.
■ Grease is flammable. Let hot grease cool before attempting to handle it. Avoid letting grease deposits collect in the drip pans. Clean the drip pans often.
■ Never rotisserie cook without a drip pan in place and placed on top of the Flav-R-Wave ^®* and beneath the center of the food. Without it, hot grease could leak downward and produce a fire or explosion hazard.
■ For proper lighting and performance of the burners it is necessary to keep the ports clean.
■ Clean the grill with caution. To avoid steam burns, do not use a wet sponge or cloth to clean the grill while it is hot. Some cleaners produce noxious fumes or can ignite if applied to a hot surface.
■ Do not operate the grill under combustible construction. Use only in well ventilated areas. Do not use in buildings, garages, sheds, breezeways or other such enclosed areas. This unit is for outdoor use only.
■ Do not locate the grill where the grill exhaust is directed at combustible materials, windows (open or closed), doorways, etc., as the grill vents combustion gases and smoke.
- Keep the area surrounding the grill free from combustible materials, trash, or combustible fluids and vapors such as gasoline or charcoal lighter fluid. Do not obstruct the flow of combustion and ventilation air.
■ Minimum horizontal clearance from side and back of unit to adjacent vertical combustible construction and extending above the top, from sides, and back is 30".
■ At least once a year, the grill should be inspected for the presence of spiders, spider webs or other insects. The burner area is a common and desired spider haven and can present a dangerous condition which can damage the cooking center and render it unsafe for use. The presence of spiders, spider webs or other insects can cause the gas to flow from the front of the burner. This is a very dangerous condition which can cause a fire to occur behind the valve panel. See the Venturi tubes section. Check the cooking center immediately if any of the following conditions exist:
- The smell of gas in conjunction with extreme yellow tipping of the burner flames.
- The grill or side burner do not reach temperature.
- The grill or side burner heat unevenly.
- The burners make popping noises.
■ Do not use charcoal on the grill.
■ Cook meat and poultry thoroughly—meat to at least an INTERNAL temperature of 160^ F. and poultry to at least an INTERNAL temperature of 180^ F. Cooking to these temperatures usually protects against foodborne illness.
- Keep any electrical supply cord, or the rotisserie motor away from the heated areas of the outdoor cooking center.
■ Never use the outdoor cooking center in windy conditions. If located in a consistently windy area (oceanfront, mountaintop, etc.), a wind break will be required. Always adhere to the specified clearances listed in the assembly instructions.
- The grills utilize a Flav-R-Wave ^ tray to evenly distribute heat and to minimize cooking flare-ups. Do not place lava rocks on top of the Flav-R-Wave. ^ This can damage the knobs and ignition components and void the warranty.
■ LP gas models: Be sure to CLOSE the LP tank mounted valve after every use of the grill.
■ If a grill is stored indoors ensure that it is cool before attempting to move it. The LP tank must be unhooked and stored outside in a well ventilated area, out of the reach of children.
■ Never use a dented or rusty LP tank. See the requirements in the Assembly Instructions.
■ Never use more than one LP tank and mount in accordance with the Assembly Instructions. Never modify the cart to house a larger tank or more than one tank at a time. Do not store spare tanks in a built-in enclosure. - Keep the ventilation openings of the LP tank enclosure free and clear from debris.
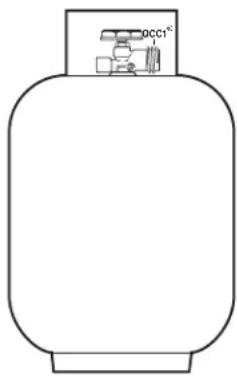
■ All models require an LP tank equipped with a QCC-1 ^® quick close coupling system*. If you use a tank exchange system, be sure to exchange the tank for a similarly equipped tank.
* per ANSI Z21.58, Latest Edition
natural_image
Simple line drawing of a gas cylinder with a small component on top (no text or symbols)
READ AND FOLLOW THIS SAFETY INFORMATION CAREFULLY.
READ AND SAVE THESE INSTRUCTIONS
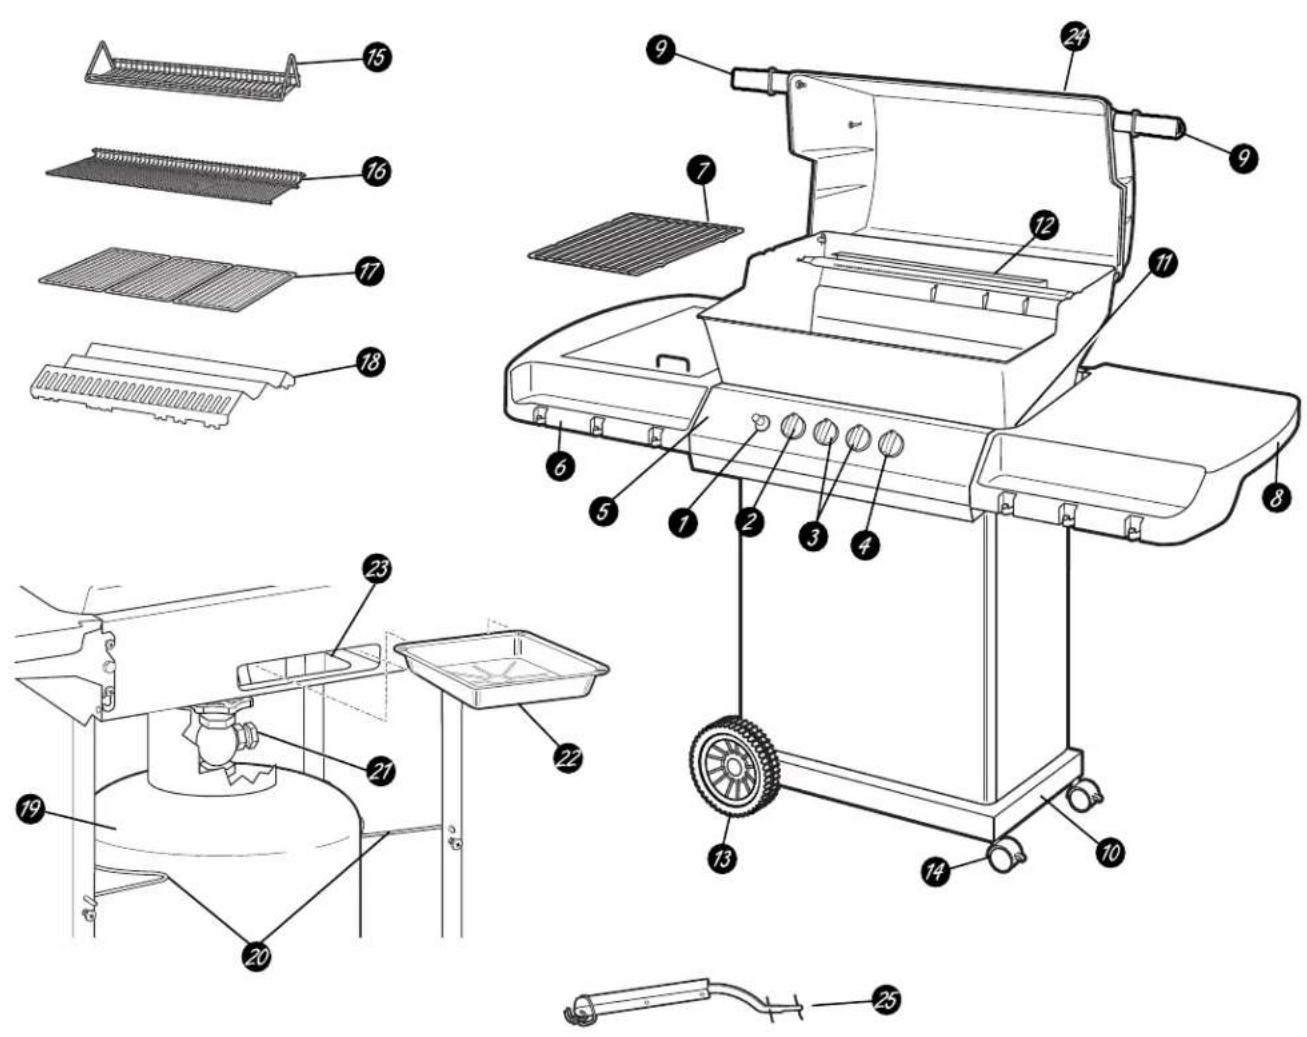
Features of your gas grill.
Throughout this manual, features and appearance may vary from your model.

text_image
Technical diagram of a gas stove with numbered components and exploded views of the engine and gas cylinder.Feature Index for 24" Models (features and appearance may vary)
1 Ignitor Button
2 Left Side (shelf) Burner Control
3 Main Grill Burner Controls
4 Rotisserie Burner Control
5 Lighting Instructions
6 Left Side Burner or Shelf
7 Side Burner Grid
8 Side Shelf
9 Lid Handle
10 Model/Serial Numbers
11 Match Lighting Hole
12 Rotisserie Burner
13 Wheels
14 Swivel Casters
15 Warming Rack (Upper Grid)
16 Side-by-side Grids
17 Flav-R-Wave®
18 Front Bin
19 LP Tank (not included—obtain locally)
20 LP Tank Bracket
21 LP Tank (QCC-1) Connector
22 Grease Cup Holder
23 Heat Indicator
text_image
Technical diagram of a portable grill with numbered parts for identification and assembly reference.Feature Index for 27" Models (features and appearance may vary)
① Ignitor Button
2 Left Side (shelf) Burner Control
3 Main Burner Controls
4 Rotisserie Burner Control
⑤ Lighting Instructions
6 Left Side Burner or Shelf
7 Side Burner Grid
8 Side Shelf
9 Lid Handle
10 Model/Serial Numbers
11 Match Lighting Hole
12 Rotisserie Burner
13 Wheels
14 Swiyel Casters
15 Swing Basket
16 Warming Rack (Upper Grid)
17 Cast Iron Cooking Grids
18 Flav-R-Wave®
19 LP Tank (not included—obtain locally)
20 LP Tank Retainers
21 LP Tank (QCC-1) Connector
22 Disposable Aluminum Drip Pan
23 Drip Pan Holder
24 Heat Indicator
25 Grid Lifter
Lighting the grill.

text_image
Check Flame Burner Burner PortBefore Lighting the Grill
■ The grill must be assembled in accordance with the Assembly Instructions.
■ Check that your LP tank is full and properly connected to the regulator.
■ Check that there are no gas leaks in the gas supply system. See the Leak Testing section.
■ Check that the venturi tubes are properly located over the gas valve orifices.
■ Check that both Main Burner and Side Burner ignition wires are connected.
- Read carefully all instructions contained on the rating plate.
CAUTION: Check your grill after lighting. All the ports on the burner should show a 1" (2.5 cm) flame on HI setting.
If any of the following symptoms occur, there is probably a blockage in the venturi tubes. Shut off gas at once and clean the venturi tubes. See the Venturi tubes section.
- You smell gas.
- If a flashback fire occurs.
- Your grill heats unevenly.
- The burners make popping noises.

text_image
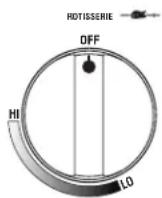
OFF RIGHT OFF HI LO HI LO
Lighting the Main Burners
WARNING: Open lid before lighting.
TO LIGHT WITH THE IGNITOR:
- Make sure control knobs are set to OFF and turn on the gas supply by opening the LP tank valve.
- Push and turn right control knob to HI.
- Push the ignitor button 3 or 4 times. The burner should ignite within 4 seconds.
After the right burner is lit, push and turn left control knob to HI. Left burner will ignite automatically.
TO LIGHT WITH A MATCH:
- Make sure control knobs are set to OFF and turn on the gas supply by opening the LP tank valve.
- Insert lighted match through lighting hole located at the bottom right of the grill housing.
- Push and turn right control knob to HI. The burner should ignite within 4 seconds.
After the right burner is lit, push and turn left control knob to HI. Left burner will ignite automatically.
If the Main Burner Will Not Light
- Turn control knobs to OFF.
Wait 5 minutes, then try again.
- If any burner will not light, consult the Troubleshooting Tips section at the back of this manual. If problem cannot be resolved, do not attempt to operate the grill. Contact a GE Authorized Service Center.
Shutting Down
- Turn off the gas supply by closing the LP tank valve.
- Turn control knobs to OFF.


Lighting the Side Burner (on some models)
WARNING: Open lid before lighting.
TO LIGHT WITH THE IGNITOR:
- Make sure control knobs are set to OFF and turn on the gas supply by opening the LP tank valve.
- Push in and turn the control knob to HI.
- Push the ignitor button 3 or 4 times. The burner should ignite within 4 seconds.
TO LIGHT WITH A MATCH:
- Make sure control knobs are set to OFF and turn on the gas supply by opening the LP tank valve.
- Apply lighted match to the side burner ports. It is important to have lighted match near burner ports BEFORE turning the control knob.
- Push in and turn the control knob to HI. The burner should ignite within 4 seconds.
If the Side Burner Will Not Light
-
Turn control knobs to OFF.
Wait 5 minutes, then try again. -
If any burner will not light, consult the Troubleshooting Tips section at the back of this manual. If problem cannot be resolved, do not attempt to operate the grill. Contact a GE Authorized Service Center.
Shutting Down
- Turn off the gas supply by closing the LP tank valve.
- Turn control knobs to OFF.
Lighting the grill.
WARNING: Do not operate the main burner simultaneously with the rotisserie burner as this may result in a grease fire and/or damage to the grill.
CAUTION: The rotisserie burner must be in place before operating the control knob.
Lighting the Rotisserie Burners (on some models)
WARNING: Open lid before lighting.
LIGHT WITH A MATCH:
- Remove the warming rack and swing basket (on some models) before lighting.
-
Make sure control knobs are set to OFF and turn on the gas supply by opening the LP tank valve.
-
Place lighted match near rotisserie burner ports. It is important to have the lighted match near burner ports BEFORE turning the control knob.
- Push in and turn the control knob to HI. The burner should ignite within 4 seconds.
If the Rotisserie Burner Will Not Light
-
Turn control knobs to OFF. Wait 5 minutes, then try again.
-
If any burner will not light, consult the Troubleshooting Tips section at the back of this manual. If problem cannot be resolved, do not attempt to operate the grill. Contact a GE Authorized Service Center.
Shutting Down
- Turn off the gas supply by closing the LP tank valve.
- Turn control knobs to OFF.
Before Cooking for the First Time with Your New Grill
Before cooking on your gas grill for the first time, "burn off" the grill to rid it of any odors or foreign matter as follows:
- Remove cooking grids and warming rack and wash in mild soap and water. Ignite the burner.
-
Close the lid and operate the grill for 20 minutes with the control knobs set at medium.
-
Turn the gas off by closing the LP tank valve. Turn the control knobs to OFF.
- Let the grill cool down, then replace the grids.
The grill is now ready for cooking.
Preheating
It is necessary to preheat the grill with the lid closed for a short time before cooking certain foods. Foods that require a HIGH cooking temperature need a preheat period of 6–10 minutes;
foods that require a lower cooking temperature need only a period of 2–5 minutes. There is no need to preheat for casseroles or other foods that require slow cooking.
Lid Position
The position of the lid during cooking is a matter of personal preference, but the grill cooks fastest, uses less gas, and controls the temperature best with the
lid closed. A closed lid also imparts a smoker flavor to meat cooked directly on the grid, and is essential for smoke, rotisserie and convection cooking.

text_image
F° 20 50 100 200 300 400 500 600 700 100 200 300 400 500 600 700Cooking Temperatures
HIGH
Use this setting only for fast warm-up, for searing steaks and chops, and for burning food residue from the cooking grids and Flav-R-Wave ^® after the cookout is over. Rarely, if ever, do you use the HIGH setting for extended cooking.
MEDIUM
Use this setting for most grilling, roasting, and baking, and for cooking hamburgers and vegetables.
LOW
Use this setting for all smoke cooking, rotisserie cooking, and when cooking very lean food such as fish.
These temperatures are approximate only and vary with the outside temperature and the amount of wind.
NOTE: When cooking by the convection or rotisserie method, use a meat thermometer for best results.
Cooking with your gas grill.
Preparing to Grill
- Prepare food in advance to avoid delay and timing problems. If using marinade or spices, they should be applied before placing meat on the cooking grid.
- Organize the area around the grill to include forks, tongs, oven mitts, sauces and seasonings, to allow you to stay in the vicinity of the grill while cooking.
-
Trim excess fat from meat to minimize the "flare-ups" that are caused by dripping grease.
-
To avoid the problem of food sticking to the cooking grid, coat the grids with vegetable oil or non-stick spray before lighting the burners.
- Pre-heat the grill to the desired temperature with the cover closed, before starting to cook.
- Vegetables are best done in aluminum foil with enough moisture to create steam. Cooking time for vegetables will be similar to baking or steaming on the electric range.
- Check the gas supply before starting the grill.
Grilling Tips
- Do not add salt to meats while they are cooking on the grill. The meat will stay juicier if the salt is added after cooking.
- Don't baste meats until they are 1/3 to 1/2 cooked. Sauces with tomato, sugar and oil burn easily and can produce unappetizing results if allowed to burn.
-
To prevent steaks from "drying out", use tongs rather than a fork and start on HI to sear the meat and seal the juices in. Reduce the heat when the meat is well browned. Generally, thicker cuts of meat will stay moist better on a grill.
-
To test when the meat is done, make a small cut at the thickest section or near the bone to check color.
- For best results, don't let the flames reach the food. If "flare-ups" occur, remove the food. This will eliminate the "burned taste", particularly for chicken and pork.
- Grilling with the cover closed on low heat will enhance the "smoked" flavor.
- After cooking, close the cover and turn burners to HI for approximately 10 minutes to burn off any residue on the grids and Flav-R-Wave. ^®
- For additional heat adjustment, use the two position cooking grid to raise and lower cooking surface.
Meat Grilling Guide
| Meat Size/Weight Temp. Rare Well Done | Cooking Time | |||
| Hamburger Patties Low-Med 12 min. 14 min. | ||||
| Steaks | 1" thick | Med | 8 min. | 12 min. |
| Steaks | 1" - 2" thick | Med | 16 min. | 24 min. |
| Lamb Chops | 2" thick | Low-Med | 15 min. | 25 min. |
| Pork Chops | 1" thick | Low-Med | 25 min. | 30 min. |
| Spare Ribs | Whole | Low | 40 min. 60 min. | |
| Chicken Wings | Whole | Low | 25 min. 35 min. | |
| Chicken Breast | Whole | Low | 30 min. | 45 min. |
| Fish Fillet | 1 12 " thick | Low-Med | 15 min. | 20 min. |
| Lobster (Split) | Whole/Tails | Low | 15 min. | 20 min. |
natural_image
Line drawing of a grating machine with cooling fins and a downward arrow indicating airflow (no text or symbols)Low position
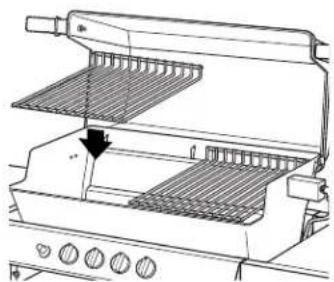
Two-Position Grids – For 24" models only
LOW POSITION
The low position is best for grilling/searing hamburgers, hotdogs, steaks and chicken. It also provides more room in the grill for roasting large meats such as whole turkeys or chicken.
Place the grids in the low position by placing them in the grill with the leg side to the back and facing up.
HIGH POSITION
The high position is best for slow grilling delicate foods such as fish or vegetables.

natural_image
Line drawing of a grating machine with cooling fins and a downward arrow indicating airflow (no text or symbols)High position
Place the grids in the high position by placing them in the grill with the leg side to the front and facing down.

natural_image
Line drawing of a grating machine with open lid and control panel (no text or symbols)Low position
Three-Position Grids – For 27" models only
LOW POSITION
The low position is best for grilling/scaring hamburgers, hotdogs, steaks and chicken. It also provides more room in the grill for roasting large meats such as whole turkeys or chicken.
Place the grids in the low position by placing them in the grill with the leg side to the back and facing up. Rest the front of the grid on the front lower supports and lower the back of the grid until the legs rest on the back inner lower supports.
SLOPED POSITION
The sloped position drains away grease and is best for fatty foods such as chicken with skin and some hamburger.
Place the grids in the sloped position by placing them in the grill with the leg side to the back and facing down. Rest the front of the grid on the front lower supports and lower the back of the grid until the legs rest on the back inner lower supports.
natural_image
Line drawing of a grating machine with a side panel open, showing no text or symbolsHigh position
HIGH POSITION
The high position is best for slow grilling delicate foods such as fish or vegetables.
Place the grids in the high position by placing them in the grill with the leg side to the back and facing down. Rest the front of the grid on the front upper edge supports and lower the back of the grid until the legs rest on the back inner lower supports.
natural_image
Line drawing of a grating machine with a lid removed, showing internal grating and control knobs (no text or symbols)Sloped position

natural_image
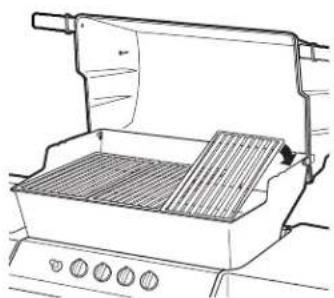
Diagram of a tool interacting with a textured surface, no text or symbols presentGrid Lifter - For 27" models only
Use the grid lifter to remove and replace grids after they are cool.
-
Insert the grid lifter in the grid slot in front of grid lift brace.
-
Turn the grid lifter to lock it under the lift brace and remove or replace the grid as needed.

text_image
Grid lift braceUse two hands on the grid lifter if necessary.
Rotisserie cooking tips.

natural_image
Line drawing of a rectangular container with internal components and arrows indicating flow or movement (no text or symbols)Rotisserie Cooking Tips (on some models)
- The rotisserie can accommodate up to 15 lb (7 kg) of meat with the limiting factor of rotating clearance. For best results, the meat should be centered on the center line of the spit to eliminate an out-of-balance condition.
Remove the warming rack or swing basket (on some models) and the grids if additional room is needed.
- The rotisserie can be used with a cooking grid if space allows. Place the meat closest to the handle on the spit to make handling easier.
- Fasten the meat securely on the spit prior to placing it on the grill. For poultry, tie the wings and legs in tightly to avoid contact with drip pan.
- In most cases, rotisserie cooking is best with the cover closed and the heat reduced.
-
Prior to placing the meat on the grill, baste the meat with vegetable oil. This will enhance the browning on the outside of the meat.
-
For most applications of rotisserie cooking, a drip pan is recommended to catch the drippings. Place drip pan on top of Flav-R-Wave, ^® beneath center of food. Put half to one inch of water in the drip pan. Fruit juice, wine or a marinade may also be added to enhance the flavor. Do not let the drip pan run dry. For cooking without a drip pan, close attention must be paid to avoid the risk of grease fire.
- To avoid injury, use oven mitts when handling the spit or working around the grill.
- Turn grill off and allow it to cool before removing drip pan. The fat drippings are highly flammable and must be handled carefully to avoid injury.
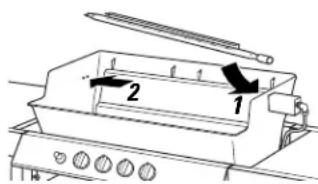
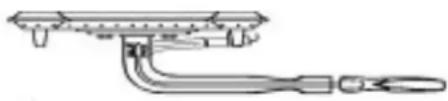
text_image
Technical diagram of a portable stove with labeled parts 1 and 2, showing internal components and a tool.The spring-loaded rotisserie burner may be easily removed when not in use.
Rear Burner Rotisserie (on some models)
Certain models have a rotisserie burner. The rotisserie method is the best for cooking roasts and fowl. With the heat source located behind the food, there is no chance of a flare up caused by fat drippings to burn or spoil your dinner. A dish or drip pan placed below the spit will collect the juices for basting or for preparing a sauce.
Convection Cooking Tips
This method is ideal for roasting large cuts of meat with or without a rotisserie.
- Set up the grill before lighting. Place drip pan on top of Flav-R-Wave, ^® beneath center of food. Put half to one inch of water in the drip pan. Fruit juice, wine or a marinade may also be added to enhance the flavor. Do not let the drip pan run dry.
-
For roasting without a rotisserie, place meat on a roasting rack directly on the grids.
-
In most cases, convection cooking is best with the cover closed and the heat reduced.
- Turn grill off and allow it to cool before removing drip pan. The fat drippings are highly flammable and must be handled carefully to avoid injury.


Cooking with a Spit
LEG OF LAMB
- Have 3" of bone sawed from small end of leg.
- Leave meat around bone intact to form a flap.
- Put a spit fork on rod.
- Fold flap up and run rod through flap and leg.
- Put second fork on rod and insert forks in each end of leg. Test for balance. Tighten screws.
POULTRY
- With breast down, bring neck skin up over cavity.
- Turn under edges of skin; skewer to back skin.
- Loop twine around skewer and tie.
- Turn breast side up; tie or skewer wings to body.
-
Put a spit fork on rod. Insert rod in neck skin parallel to backbone; bring it out just above tail.
-
Put second fork on rod and insert forks in breast and tail. Test for balance. Tighten screws.
- Tie tail to rod with twine. Cross legs; tie to tail.
THREE CHICKENS ON A SPIT

- Tie or skewer wings to body.
- Put a spit fork on rod. Dovetail chickens on rod.
- Loop twine around tails and legs; tie to rod.
- Put second fork on rod and insert forks in chicken.
- Tighten screws.
Convection/Rotisserie Cooking Guide
| Meat Weight Temp. Cooking Time |
| Beef Roast 3–6 lbs. MED/LOW 2–4 hrs. |
| Beef Roast 6–10 lbs. MED/LOW 3–5 hrs. |
| Pork Roast 2–5 lbs. MED/LOW 2–4 hrs. |
| Pork Roast 6–10 lbs. MED/LOW 3–5 hrs. |
| Turkey or Chicken 2–5 lbs. MED/LOW 2–4 hrs. |
| Turkey or Chicken 5–10 lbs. MED/LOW 3–5 hrs. |
natural_image
Line drawing of a person inside a rectangular basin with tools and legs (no text or symbols)Spit Balancer
Using the Spit Balancer
-
Loosen the rod handle to allow the balancer to turn freely. Set the rotisserie rod in the slots of the grill casting. Let the heaviest side of the meat rotate to the bottom.
-
Adjust the balancer to the top of the rod, opposite the heaviest side of the meat. Tighten the rod handle. Periodically, check to see if the meat turns smoothly while cooking. Adjust the balancer as necessary.
Using a meat thermometer (not included).
For poultry: insert the tip of the thermometer in the thickest part of the thigh close to the body.
For ham or roasts: insert the tip of the thermometer in the center of the heaviest section of the meat.
Rotisserie Cooking Tips (on some models)
-
The accurate way to determine when a large piece of meat is done is to use a meat thermometer. Insert the thermometer at an angle so the sturdy pointed metal tip rests in the center of the thickest part of the meat. Be careful that it doesn't touch the spit or the bone, and that the point is not resting in fat.
-
Leave the thermometer in place while the meat revolves. When the thermometer reaches the desired temperature, the meat is done. Add your sauces during the last few minutes of cooking time, then take the meat off the spit and let it stand about 15 minutes to firm up. Carve and serve.
Meat Thermometer Guide
| Beef/Lamb Rare 130°F (55°C) |
| Beef/Lamb Medium 150°F (65°C) |
| Beef/Lamb Well Done 160°F (71°C) |
| Veal Well Done 150°F (65°C) |
| Pork Well Done 170°F (77°C) |
| Poultry Well Done 170°F (77°C) |
After you have finished cooking, prepare for the next cookout by burning off any food residue from the grid and Flav-R-Wave ^® in the following manner.
Cooking Grids
-
Remove all food from the grids, turn the control knobs to HI, and operate the grill with the lid closed for 5-10 minutes or until smoking stops.
-
Use a long-handled brass wire brush to clean the grids. Remember that the grill is hot, so wear kitchen mitts or use a pot-holder to handle the brush.
-
Turn the control knobs to OFF, then turn the gas OFF by closing the LP tank valve.
You do not have to wash the grids and upper cooking rack after each cookout, but if you wish to do so, use a mild soap and water solution, then rinse them thoroughly. Never use a commercial oven cleaner.
Porcelain Coating on Grids
Most cooking grids are coated with a durable porcelain enamel to assist in cleaning and reducing the tendency of food to stick to the grid. This is essentially a glass coating.
Some chipping may occur if the grids are mishandled. This will not affect the use or performance of the grids. If some rust appears, remove the rust with a scrub pad and coat the grid with cooking oil.

Flav-R-Wave®
The Flav-R-Wave ^® is made from stainless steel and can be removed from the grill when cool.
Clean by hand using warm sudsy water and a Scotch Brite ^® pad. A brass bristle grill brush may also be used.
natural_image
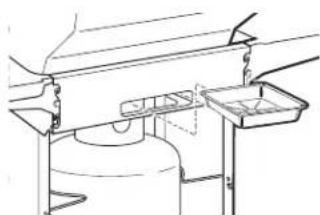
Technical line drawing of a mechanical assembly with a piston and pump component (no text or symbols)Grease Cup Holder (on some models)
The grease cup holder is located on the grill bottom immediately below the hole through which grease will drain. The grease cup is not provided. The clip, however, has been designed to hold a standard soup can or jar. Simply snap the can or jar into place. The grease cup should be checked and replaced regularly to prevent grease from overflowing onto your patio.
natural_image
Line drawing of a mechanical setup with a container and lever (no text or symbols)Disposable Drip Pan (on some models)
The drip pan should be removed and cleaned out or replaced after cooking with the rotisserie. Allow the grill to cool, then carefully pull the drip pan out of the opening in the grill bottom. Replace with a clean drip pan.
Venturi tubes.
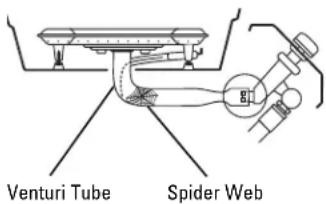
text_image
Venturi Tube Spider WebKeep the Venturi Tubes Clean
■ Blockages caused by spiders, insects and nests can cause a flashback fire.
■ Although the grill may still light, the backed up gas may also ignite and cause a fire around the venturi tubes at the control panel or side burner.
■ If a flashback fire occurs, turn the gas off immediately by closing the LP tank valve.
Inspect and clean the venturi tubes (main burners, side burner, rotisserie burner) if any of the following symptoms occur:
- You smell gas.
- Your grill does not reach temperature.
- Your grill heats unevenly.
- The burners make popping noises.
Inspecting and Cleaning the Venturi Tubes
- Turn the gas off by closing the LP tank valve.
- When grill is cool, remove main burner fasteners from grill bottom; lift the main burner from the grill housing.
- Clean the venturi tubes with a pipe cleaner or venturi cleaning tool.
natural_image
Pure mechanical diagram showing a lever and handle without any text, numbers, or symbols- Lower the burner into position in the grill housing, making sure that the venturi tubes are correctly aligned and fitted on the orifices.
- Secure the main burner with the burner fasteners.

text_image
Make sure correctly fitted.To ensure safe and efficient performance, this grill should be inspected and cleaned at least once a year or after any period of storage exceeding one month.
| Burners1. Remove burner and inspect for cracks and deterioration.2. Clean venturi tubes using a pipe cleaner or venturi brush to eliminate any blockages caused by spiders or insects. SeeCare and Cleaning-Venturi tubes. | 3. While burner is removed, clean interior of bottom casting. Hard deposits can be removed with a wire brush and surfaces washed with soap and water. | |
| HosesInspect the hoses before each use for excessive abrasion, wear and/or cuts. | Also see theAbout the Hose and Regulator section. | |
| Replacement PartsIf a problem is found with the regulator, hoses, burner or control valves, they must be replaced. Contact a GE Authorized Service Center for replacement parts. | For optimum performance, use only original manufacturer replacement parts. | |
| Side ShelvesWash with soap and water. | ||
| Exterior Finish – Grill Lid and BottomIf white oxidation spots appear, wash the outside of the housing with a mild soap and water solution. Rinse the surfaces thoroughly, then wipe them with a cloth dipped in cooking oil to restore the shine. | For repair of paint scratches and scuffs, use a good quality high temperature (600°F) spray paint for touch-up. | |
| Leak TestWhenever reconnecting the gas tank, be sure to check for leaks. See theLeaktestingsection. | ||
| Stainless Steel Surfaces (on some models)Do not use a steel-wool pad; it will scratch the surface.To clean the stainless steel surface, use a hot, damp cloth with a mild detergent suitable for stainless steel surfaces. Use a clean, hot, damp cloth to remove soap. Dry with a dry, clean cloth.If food soil remains, try a general kitchen cleaner, such as Fantastik®, Simple Green®, or Formula 409®.For hard-to-clean soil, use a standard stainless steel cleaner, such as Bon-Ami®or Cameo®. | Apply cleaner with a damp sponge. Use a clean, hot, damp cloth to remove cleaner. Dry with a dry, clean cloth. Always scrub lightly in the direction of the grain.After cleaning, use a stainless steel polish, such as Stainless Steel Magic®, Revere Copper and Stainless Steel Cleaner®, or Wenol All Purpose Metal Polish®. Follow the product instructions for cleaning the stainless steel surface. |
About the LP gas tank (not included - obtain locally).
LP Gas Tank Safety
CAUTION:
-
NEVER connect your gas grill to an LP gas tank without the regulator provided, and NEVER TO AN UNREGULATED LP GAS SUPPLY. The gas regulator supplied with the grill must be used.
-
ALWAYS leak test the LP gas tank to regulator connection when connecting the LP gas tank to the grill. See the Leak Testing section.
-
DO NOT operate the grill if the smell of LP gas is present. Extinguish all flame and determine source of LP gas before proceeding. See the Leak Testing section. DO NOT ignite the grill until the LP gas leak has been found and sealed.
-
ALWAYS turn the gas off by closing the LP tank valve when the grill is not in use.
text_image
NEW OPD HANDWHEEL acc1LP Gas Tank Requirements
CAUTION:
- All LP gas tanks used with this grill must be constructed and marked with the specifications for LP Gas Tanks in accordance with the U.S. Department of Transportation (DOT) for use in the USA.
- The LP gas tank used for this grill must not have a capacity larger than 20 lb. (9 kg).
Approximately: 18" (46 cm) high 12" (31 cm) diameter
-
All LP gas tanks used with this grill should be inspected at every filling and re-qualified by a licensed service outlet at the expiration date (10 years), in accordance with the DOT (USA) codes for LP Gas Tanks.
-
All LP gas tanks used with this grill must be provided with a shutoff valve terminating in a tank valve outlet No. 510, specified in the Standard for Compressed Gas Tank Valve Outlet and Inlet Connection (USA) ANSI.
■ The tank supply system must be arranged for vapor withdrawal.
■ The tank must include a collar to protect the tank valve.
■ The tank valve must include a safety relief device having direct communication with the vapor space of the tank.
Handling and Storing the LP Gas Tank
HANDLING:
- Government regulations prohibit shipping full LP gas tanks. You must take your new tank to a LP gas dealer for filling.
- A filled LP gas tank is under very high pressure. Always handle carefully and transport in the upright position. Protect the valve from accidental damage.
- Do not tip the LP gas tank while connecting it to the regulator. Fasten the tank securely during transport, use and storage.
- If the tank is tipped after it is connected to the regulator, turn the gas off by closing the LP tank valve, disconnect the regulator and have it checked before using again.
STORING:
- Store the LP gas tank outdoors in a well ventilated place.
- Do not store the LP gas tank in direct sunlight, or near a source of heat or combustion.
- If you intend to store the grill indoors, disconnect and remove the LP gas tank first. Disconnected tanks must have plugs installed and must not be stored in a building, garage or any other enclosed area.
- Keep out of the reach of children.
- When the LP gas tank is connected to the gas grill, the gas grill and LP gas tank must be stored outside in a well ventilated place.
- Do not store a disconnected or spare LP gas tank under or near the grill.
Filling/Refilling the LP gas tank
It is recommended that you refill the LP gas tank before it is completely empty.
To Remove LP Gas Tank:
- Close the LP tank valve by turning it clockwise.
-
Unscrew the regulator coupling by turning it counterclockwise (by hand only-do not use tools).
-
Depending on the model of your grill, loosen the LP tank retainer.
-
Carefully remove the LP tank from the grill.
To refill, take the LP tank to an authorized propane gas dealer.
■ Do not overfill the LP tank. See the Overfill Prevention Device section.
text_image
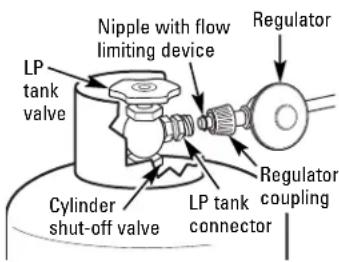
Nipple with flow limiting device Regulator LP tank valve Cylinder shut-off valve LP tank connector Regulator couplingConnecting the LP Tank to the Regulator
- Make sure the LP tank valve is closed and the grill controls are turned to OFF.
- Place the full LP tank on the grill base as shown in the Assembly Instructions.
-
Center the nipple in the regulator coupling into the LP tank connector and hold in place. Using other hand, turn the regulator coupling clockwise until there is a positive stop. Do not use tools. Hand tighten only. When making the connection, hold the regulator coupling squarely on the LP tank connector, so as not to cross thread the connection.
-
Leak test connections. See the Leak Testing section.
- Refer to the lighting instructions on the control panel. To avoid activating the Flow Limiting Device when lighting, open the LP tank valve slowly with the grill controls OFF.
If the Flow Limiting Device is accidentally activated, close the LP tank valve and turn the grill controls to OFF. Wait 10 seconds to allow the device to reset, open the LP tank valve slowly, then turn the grill controls on.
About the LP gas tank (not included - obtain locally).
Wet connections to check
natural_image
Simple line drawing of a mechanical device with a handle and base, no text or symbols present
natural_image
Mechanical assembly diagram showing two shafts with directional arrows indicating motion (no text or labels)
natural_image
Pure mechanical diagram showing a lever and lever assembly without any text, numbers, or symbolsLeak Testing
All factory-made connections have been thoroughly tested for gas leaks. However, shipping and handling may have loosened a gas fitting.
WARNING!
Do not use an open flame to check for gas leaks. Be sure there are no sparks or open flames in the area while you check for leaks. Sparks or flames will result in a fire or explosion, which can cause serious bodily injury or death, and damage to property.
AS A SAFETY PRECAUTION:
■ TEST ALL FITTINGS FOR LEAKS BEFORE USING YOUR GAS GRILL.
■ TEST THE LP TANK VALVE FOR LEAKS EACH TIME THE TANK IS FILLED.
■ TEST FOR LEAKS EVERY TIME YOU CONNECT A GAS FITTING.
■ DO NOT SMOKE.
■ NEVER TEST FOR LEAKS WITH A LIGHTED MATCH OR OPEN FLAME.
■ TEST FOR LEAKS OUTDOORS.
TO TEST FOR LEAKS:
Prepare a soap solution of one part water, one part liquid detergent.
- Extinguish any open flame or cigarettes in the area.
- Make sure the LP tank valve is closed and the grill controls are turned to OFF.
- Connect LP gas tank. See Connecting the LP Tank to the Regulator.
-
With a full LP tank, open tank slowly.
-
Wet each connection with the soap solution.
-
A leak is identified by a flow of bubbles from the area of the leak.
-
If a leak is detected, close the LP tank valve, tighten the connection and retest (Steps 4–6).
-
If the leak persists, contact your grill dealer for assistance. Do not attempt to operate grill if a leak is present.
text_image
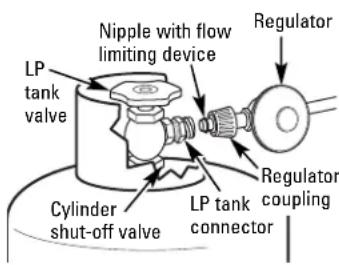
Nipple with flow limiting device Regulator LP tank valve Cylinder shut-off valve LP tank connector Regulator couplingQCC®-1 Quick Closing Coupling
Your grill is designed to be used with an LP gas tank equipped with the new OCC-1 Quick Closing Coupling system.
The QCC-1 system incorporates new safety features required by the American National Standards Institute (ANSI).
■ Gas will not flow until a positive connection has been made.
■ A thermal element will shut off the flow of gas between 240^ and 300^ F.
■ When activated, a Flow Limiting Device will limit the flow of gas to 10 cubic feet per hour.
When you obtain, replace or exchange an LP tank, be sure to purchase one with the QCC valve. This valve is recognized by the external threads on the inlet port of the valve. QCC equipped tanks are available from your gas grill dealer.
text_image
NEW OPD HANDWHEEL OCC1 OPDAny attempt to connect the regulator, by use of adapters or any other means, to any other valve could result in damage, fire or injury and may negate the important safety features designed into the OCC-1 system.
About the Hose and Regulator
Your grill is equipped with a hose and regulator with a QCC ^® -1 Quick Closing Coupling.
- The QCC coupling contains a magnetic Flow Limiting Device which will limit the flow of gas should there be a leak between the regulator and the grill valve. This device will activate if the tank valve is opened while the grill valves are open. Be sure the grill valves are off before the tank valve is opened to prevent accidental activation.
-
The QCC coupling incorporates a heat sensitive hand wheel that will cause the back check module in the QCC tank valve to close when exposed to temperatures between 240^ and 300^ F. Should this occur, do not attempt to reconnect the nut. Remove the hose/regulator assembly and replace it with a new one.
-
The pressure regulator is set at 11" WC (water column) and is for use with LP gas only. No modifications or substitutions should be attempted.
- Protect the hose from dripping grease and do not allow the hose to touch any hot surface, including the base casting of the grill.
- Inspect the seal in the QCC tank valve when replacing the LP gas tank or once per year, whichever is more frequent. Replace the seal if there is any indication of cracks, creases or abrasion.
- Inspect the hose before each use of the grill. If the hose is cracked, cut, abraded or damaged in any way, the grill must not be operated.
- For repair or replacement of the hose/regulator assembly, contact your approved service center.

text_image
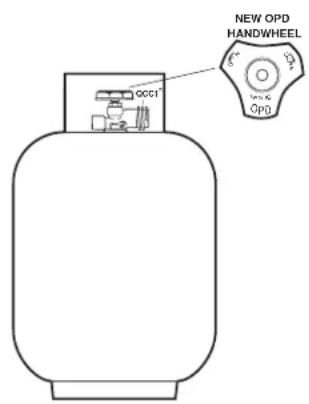
NEW OPD HANDWHEEL LP tank valve POLLING STOPPER AT SPIN PALL FUEL SPDOverfill Prevention Device
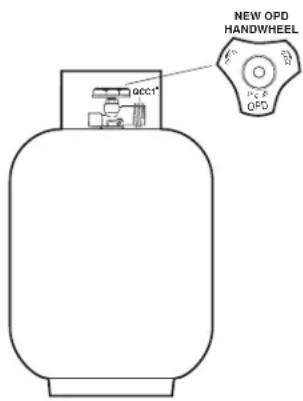
Effective January 1, 1998, the standard for outdoor gas grills, ANSI Z21.58, requires that grills are to be used with LP tanks equipped with an Overfill Prevention Device (OPD).
The OPD is designed to reduce the potential for the overfilling of LP/propane tanks, thus reducing the possibility of relief valve discharges of raw propane. The new OPD causes a slower purge/fill operation. Some consumers have been advised by filling stations that these tanks are “defective”. This is not a defect. This LP tank is designed to be filled by weight or volume. Some propane filling stations may not be aware of the new OPD and its effect on the purge/fill operation. Ask your filling station to read the purging and filling instructions on the LP tank before attempting to fill.
New OPDs coming onto the market have new technology that allows for much greater BTU outputs which will decrease the amount of time it takes to purge a tank.
Identifying LP tanks with an OPD:
To identify these tanks, the new OPD handwheel has been standardized to the shape shown.
WARNING!
Do not obtain, replace or exchange an LP tank unless it is equipped with an OPD.
Before You Call For Service...
Troubleshooting Tips – Save time and money! Review the tips below and you may not need to call for service.
Problem Possible Causes What To Do
| Smell of gas | LP gas leak. | • Immediately turn the gas off by closing the LP tank valve. See the Leak Testing section. Do not use the grill until the leak is sealed. |
| Leak detected at tank, regulator or other connection | Gas leak in hose/regulator or control valves. See the | • Immediately turn the gas off by closing the LP tank valve. Leak Testing section. Do not use the grill until the leak is sealed.• Replace any hoses or parts that have become damaged. |
| Flame flashback beneath control panel | Venturi tube(s) blocked. | • Remove burner, clean venturi tubes. See the Venturi tubes section. |
| Burner will not light | Out of LP Gas. • Refill LP Tank. | |
| Ignitor wire(s) not connected. | • Connect both main burner and side burner electrode wires. | |
| Ignitor electrode misaligned • Realign electrode. on burner. | ||
| Ignitor malfunction. | • Use the To light with a match procedure. | |
| Regulator is not fully connected to the tank valve. | • Hand tighten the regulator coupling. | |
| Controls left on while the LP tank valve was opened causing excess flow device to activate. | • Turn the control knobs to OFF, then turn the gas off by closing the LP tank valve. Open the LP tank valve slowly, then turn the control knob on. | |
| A leak in the system causing the excess flow device to activate. | • Immediately turn the gas off by closing the LP tank valve. See the Leak Testing section. Do not use the grill until the leak is sealed. | |
| Venturi tube(s) blocked. | • Remove burner, clean venturi tube(s). See the Venturi tubes section. | |
| Venturi tube not aligned with valve orifice. | • Realign venturi tube(s) to orifice(s). See the Venturi tubes section. | |
| Orifice blocked. | • Remove main burner, clean orifice with a pin or fine wire. Do not attempt to drill orifice. | |
| Hose is twisted. | • Straighten hose. Keep away from bottom casting. | |
| Burners have low flame or low heat | Controls left on while the LP tank valve was opened causing excess flow device to activate. | • Turn the control knobs of OFF, then turn the gas off by closing the LP tank valve. Open the LP tank valve slowly, then turn the control knob on. |
| Decreasing heat, "popping sound" | Out of LP Gas. • Rcfill LP Gas Tank. | |
| Venturi tube(s) blocked. | • Remove burner, clean venturi tube(s). See the Venturi tubes section. | |
| Cold spots on cooking surface | Venturi tube(s) blocked. | • Remove burner, clean venturi tube(s). See the Venturi tubes section. |
| "Flare-ups" or grease fires | Excessive grease buildup on Flav-R-Wave.® | • Clean Flav-R-Wave.® See the Regular cleaning section. |
| Excessive heat. | • Turn burner controls to a lower setting or raise cooking grid to upper position (2-position grids only). | |
| Humming noise from regulator | LP Tank valve turned on too quickly. | • Turn the LP tank valve on slowly. |
| Yellow flame | Some yellow flame is normal. If it becomes excessive, the venturi tube(s) may be blocked. | • Remove the main burner and clean the venturi tube(s). See the Venturi tubes section. |
| Burner ports blocked. | • Remove the main burner and clean with soft bristle brush. | |
| Inside of lid appears to be peeling | This is a build up of grease, not faulty paint. | • Clean with a stiff bristle brush or scraper. |

Cut here
Please place in envelope and mail to:
General Electric Company
Warranty Registration Department
P.O. Box 34980
Louisville, KY 40232-4980
Consumer Product Ownership Registration
Dear Customer:
Thank you for purchasing our product and thank you for placing your confidence in us.
We are proud to have you as a customer!
Follow these three steps to protect your new grill investment:
1
Complete and mail
your Consumer
Product Ownership
Registration today.
Have the peace of
mind of knowing we
can contact you in the
unlikely event of a
safety modification.
2
After mailing the
registration below,
store this document
in a safe place. It contains
information you will need
should you require
replacement parts.
Our parts number is
866.GE.GRILL
(866.434.7455).
3
Read your Owner's
Manual carefully.
It will help you
operate your new grill
properly.
Model Number Serial Number

natural_image
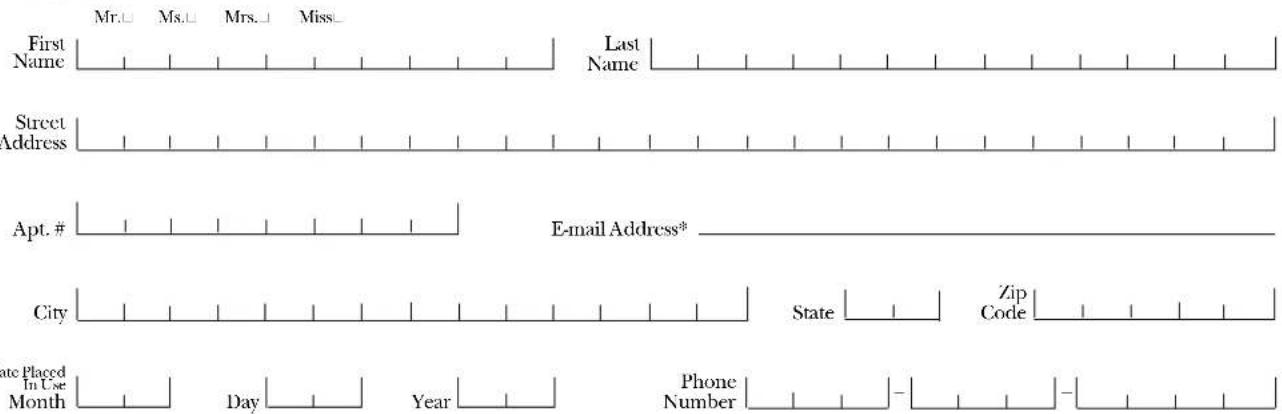
Two identical horizontal line segments with tick marks, no text or symbols presentImportant: If you did not get a registration card with your product, detach and return the form below to ensure that your product is registered, or register online at www.GEAppliances.com.
Consumer Product Ownership Registration

text_image
First Name Mr.□ Ms.□ Mrs.□ Miss_ Last Name Street Address Apt. # E-mail Address* City State Zip Code Date Placed In Use Month Day Year Phone Number -* Please provide your e-mail address to receive, via e-mail, discounts, special offers and other important communications from GE Appliances (GEA).
- Check here if you do not want to receive communications from GEA's carefully selected partners.

GE Appliances
General Electric Company
Louisville, Kentucky
www.GEAppliances.com
GE Gas Grill Warranty.

All warranty parts provided by our GE Authorized Service Center. To order parts, call during normal business hours: 866.GE.GRILL (866.434.7455).
Staple your receipt here. Proof of the original purchase date is needed to obtain parts under the warranty.
For The Period Of: GE Will Provide the Original Purchaser:
| Two Years Any partFrom the date of theoriginal purchase | of the grill which fails due to a defect in materials or workmanship.During this limited two-year warranty, GE will provide replacement parts free of charge. | |
| Five Years A replacement main grill burnerFrom the date of theoriginal purchase free of charge | which fails due to a defect in materials or workmanship.During this limited additional four-year warranty, GE will provide replacement parts | |
| Lifetime A replacement grill bodyFrom the date of theoriginal purchase | (excluding defects with paint where GE will provide replacement only for the first 120 days) which fails due to a defect in materials or workmanship.During this limited lifetime warranty, GE will provide replacement castings free of charge. | |
What GE Will Not Cover:
| ■ Service trips to your home.■ Improper assembly.■ Failure of the product if it is abused, misused, or used for other than the intended purpose or used commercially.■ Liquid Propane (LP) tank■ Shipping or transportation costs. | ■ Chipping of porcelain enamel grates or grids.■ Damage to the product caused by accident, fire, floods or acts of God.■ Incidental or consequential damage caused by possible defects with this grill. |
Warranty Claims:
Parts must be returned to a GE Authorized Service Center, shipping charges prepaid, accompanied by Model Number, Serial Number and, if your grill is not registered, proof of original purchase (copy of receipt). Return authorization must be provided by the GE Authorized Service Center by letter, fax or e-mail. If inspection confirms a manufacturing defect, we will repair or replace such part in accordance with the terms of the warranty. GE may, at its option, not require that the part or parts be returned.
| Name Model Number | ||
| Address Date of Purchase | ||
| City, State Name of Dealer | ||
| Zip Code Part Number (see parts list) | ||
| Phone Number | ||
| Fax Number | ||
| Problem | ||
This warranty is extended to the original purchaser for products purchased for domestic use within the USA. Some states do not allow the exclusion or limitation of incidental or consequential damages. This warranty gives you specific legal rights, and you may also have other rights which vary from state to state. To know what your legal rights are, consult your local or state consumer affairs office or your state's Attorney General.
Warrantor: General Electric Company. Louisville, KY 40225
GE Appliances Website
www.GEAppliances.com
Have a question or need assistance with your grill? Try the GE Appliances Website 24 hours a day, any day of the year! For greater convenience and faster service, you can now download Owner's Manuals, order parts, catalogs, or even schedule service on-line. You can also "Ask Our Team of Experts" your questions, and so much more...

Real Life Design Studio
www.GEAppliances.com
GE supports the Universal Design concept—products, services and environments that can be used by people of all ages, sizes and capabilities. We recognize the need to design for a wide range of physical and mental abilities and impairments. For details of GE's Universal Design applications, including kitchen design ideas for people with disabilities, check out our Website today. For the hearing impaired, please call 800.TDD.GEAC (800.833.4322).
Parts and Accessories
www.GEAppliances.com
Individuals qualified to service their own grills can have parts or accessories sent directly to their homes (VISA, MasterCard and Discover cards are accepted). Order on-line today, 24 hours every day or by phone at 866.GE.GRILL (866.434.7455) during normal business hours.

Contact Us
www.GEAppliances.com
If you are not satisfied with the service you receive from GE, contact us on our Website with all the details including your phone number, or write to: General Manager, Customer Relations GE Appliances, Appliance Park Louisville, KY 40225

Register Your Grill
www.GEAppliances.com
Register your new grill on-line—at your convenience! Timely product registration will allow for enhanced communication and prompt service under the terms of your warranty, should the need arise. You may also mail in the pre-printed registration card included in the packing material, or detach and use the form in this Owner's Manual.