
WSE6970PA - Cooker WESTINGHOUSE - Free user manual and instructions
Find the device manual for free WSE6970PA WESTINGHOUSE in PDF.


| Product Type | Freestanding Cooker |
| Brand | Westinghouse |
| Model | WSE6970PA |
| Energy Type | Electric |
| Dimensions (H x W x D) | 900 mm x 600 mm x 600 mm |
| Weight | 65 kg |
| Oven Capacity | 72 L |
| Oven Functions | Bake, Grill, Fan Forced, Defrost |
| Hob Type | Ceramic |
| Number of Hob Zones | 4 |
| Power Supply | 230 V / 50 Hz, 13.5 kW |
| Control Type | Touch Controls |
| Safety Features | Child Lock, Auto Shut-off, Overheat Protection |
| Cleaning | Catalytic Liners, Easy-Clean Enamel |
| Installation Requirements | Freestanding, Requires Suitable Electrical Connection |
| Warranty | 2 Years |
| Energy Efficiency Class | A+ |
| Noise Level | < 55 dB |
| Accessories Included | Grill Tray, Baking Tray, Oven Rack |
| Color | Stainless Steel / Silver |
Frequently Asked Questions - WSE6970PA WESTINGHOUSE
User questions about WSE6970PA WESTINGHOUSE
0 question about this device. Answer the ones you know or ask your own.
Ask a new question about this device
Download the instructions for your Cooker in PDF format for free! Find your manual WSE6970PA - WESTINGHOUSE and take your electronic device back in hand. On this page are published all the documents necessary for the use of your device. WSE6970PA by WESTINGHOUSE.
USER MANUAL WSE6970PA WESTINGHOUSE
Side by Side Refrigeration
Congratulations and thank you for choosing our refrigerator
We are sure you will find your new appliance a pleasure to use. Before you use the appliance, we recommend that you read through the entire user manual, which provides the description of the appliance and its functions.
To avoid the risks that are always present when you use an electric appliance, it is important that the appliance is installed correctly and that you read the safety instructions carefully to avoid misuse and hazards.
We recommend that you keep this instruction booklet for future reference and pass it on to any future owners.
After unpacking the appliance, please check it is not damaged. If in doubt, do not use the appliance but contact your local customer care centre.
coNditioNS of USE
This appliance is intended to be used in household and similar applications such as:
- Staff kitchen areas in shops, offices and other working environments
- Farm houses
- By clients in hotels, motels, and other residential type environments
• Bed and Breakfast type environments

TIPS & INFORMATION
iMpoRtANt - cHEcK foR ANY dAMAGES oR MARKS
If you find the refrigerator is damaged or marked, you must report it within 7 days if you wish to claim for damage/marks under the manufacturers warranty. This does not affect your statutory rights.

ENVIRONMENTAL TIPS
iNfoRMAtion oN diSpoSAL foR USERS
- Most of the packing materials are recyclable. Please dispose of those materials through your local recycling depot or by placing them in appropriate collection containers.
• If you wish to discard this product, please contact your local authorities and ask for the correct method of disposal.

BEFORE YOU CALL
Please ensure you read the instruction manual fully before you call for service, or a full service fee could be applicable.
Important safety instructions 3
Large side by side with standard features. 4
Compact side by side with ice & water features. 5
General installation 6 Clearances around your refrigerator 6
Installation 6
Adjusting door alignment 7
Internal packaging 8
Ice maker start up. 8
Initial start up 9
Refrigerator freezer operation 9
Temperature sensors 9
Using your refrigerator 10
Electronic display panel. 10
Setting the clock 10
Controlling the temperature 11
Quick freeze function 11
Freezer temperature alarm 11
Door alarm 12
Drinks chill timer 12
Child lock.... 12
Energy efficiency 12
Other electronic features 13
Food compartment features. 13
Ice & water features. 15
Twist ice & serve 15
Ice & water dispenser features 15
How the water dispenser works. 15
How the ice dispenser works....16
Cleaning the ice dispenser 17
Ice & water installation 18
The external water filter kit 18
Before beginning installation please read.... 18
Installing your ice and water filter. 19
Changing the water filter 22
Changing the light bulb 22
Cleaning your refrigerator. 23
Cleaning the exterior 23
Cleaning the interior 24
Helpful hints 24
Energy consumption (electricity costs) 24
Switching off your refrigerator 24
Power failure 24
Safety 25
Helpful hints for storing food. 25
Helpful hints for freezing food 25
Trouble shooting 26
Ice + water trouble shooting. 27
Automatic ice-maker 27
Ice dispenser 27
Notes 28
Warranty. 31
IMPORTANT SAFETY INSTRUCTIONS
Please read the user manual carefully and store in a handy place for later reference. Pass the user manual on to possible new owners of the refrigerator.
The symbols you will see in this booklet have these meanings:

WARNING
This symbol indicates information concerning your personal safety

CAUTION
This symbol indicates information on how to avoid damaging the appliance

TIPS & INFORMATION
This symbol indicates tips and information about use of the appliance

ENVIRONMENTAL TIPS
This symbol indicates tips and information about economical and ecological use of the appliance
Meanings of symbols used in this manual are shown below:

This symbol indicates never to do this

This symbol indicates always do this

WARNING
- If pressurised aerosol containers bear the word 'flammable' and/or a small flame symbol, do not store them inside any refrigerator or freezer. If you do so you may cause an explosion

- When you dispose of your old refrigerators and freezers, remove any doors. Children can suffocate if they get trapped inside.
- This appliance contains insulation formed with flammable blowing gases. Avoid safety hazards by carefully disposing of this appliance.
- This appliance is not intended for use by persons (including children) with reduced physical, sensory or mental capabilities, or lack of experience and knowledge, unless they have been given supervision or instruction concerning use of the appliance by a person responsible for their safety. Children should be supervised to ensure that they do not play with the appliance.

WARNING
√ The appliance must be plugged into its own dedicated 220-240V, 50Hz AC electrical outlet.
√ Ensure that the electric outlet is properly earthed to ground. Consult a qualified electrician if you are unsure.
Don't use an extension cord or adapter plug.
Don't plug your refrigerator into a timer fitted to the power point.
If the power cord is damaged, it should be replaced by a service technician or a qualified person.
√ Unplug the appliance before cleaning and before changing the light bulb to avoid electric shock.
Never unplug the appliance by pulling on the power cord. Always grip the plug firmly, and pull straight out of the receptacle to prevent damaging the power cord.
√ Choose a location that is not too cold – the temperature should be above 10°C.
√ Put the appliance in a dry place, avoiding areas of high moisture or humidity.
Don't put the appliance in frosty or unprotected areas, for example in a garage or on a verandah.
Don't put the appliance in direct sunlight.
Don't put the appliance near stoves, fires or heaters.
Don't put the refrigerator on an uneven surface.
Never let children play with the refrigerator.
Never store fizzy drinks in the freezer compartment.
Never try to repair the refrigerator yourself.
Never use electric heaters or dryers to defrost the freezer because you can receive an electric shock.
Never use electrical appliances inside the refrigerator or freezer.
R600A REFRIGERANT WARNING
This appliance contains a small quantity of environmentally friendly, but flammable, non-synthetic R600a refrigerant:
- Ensure that the tubing of the refrigerant circuit is not damaged during transportation and installation.
• Leaking refrigerant may cause eye injuries or ignite. - The room for installing appliance must be at least 1 m ^3 per 8g of refrigerant. The amount of refrigerant in the appliance can be found on the rating plate inside the appliance.
LARGE SidE bY SidE with StANdARd fEAtURES
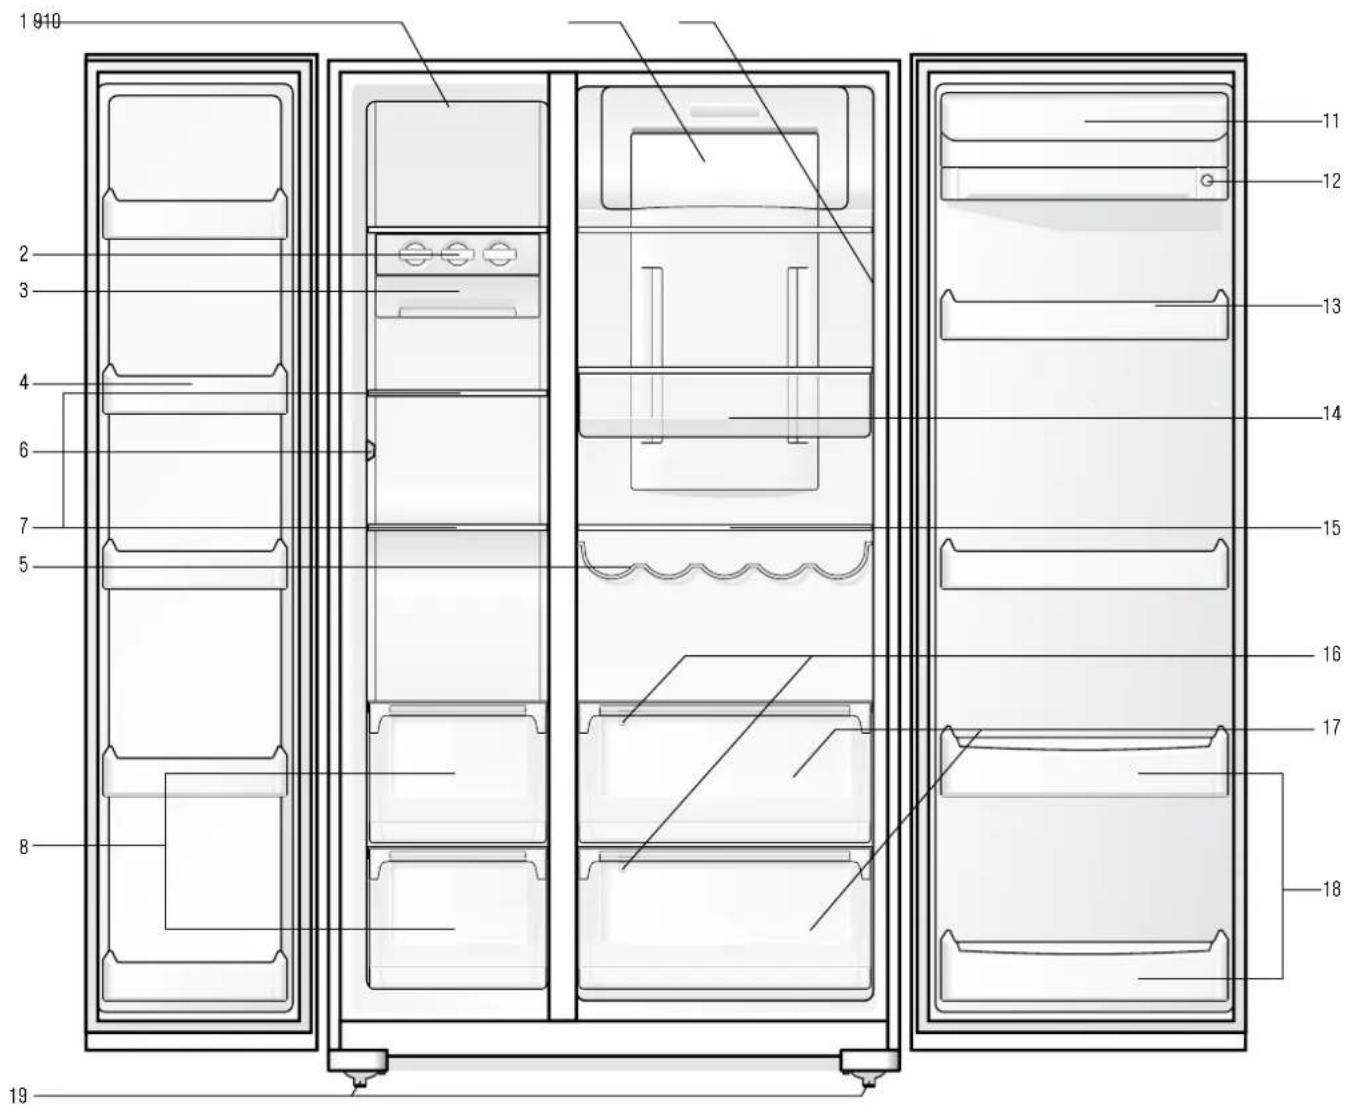
1 Freezer light
2 Twist ice & serve
3 Ice cube storage bin
4 Freezer door bins
5 Wine rack
6 Sensors
7 Glass shelves
8 Telescopic freezer bins
9 Fridge & freezer temperature control
10 Light lens
11 Dairy compartment
12 Storesafe™ bin (lockable)
13 Door bins
14 Deli bins
15 Adjustable glass shelves
16 Humidity controls
17 Telescopic crisper bins
18 Bottle bins
19 Adjustable rollers
Features may vary depending on model. Not all models will have features listed.
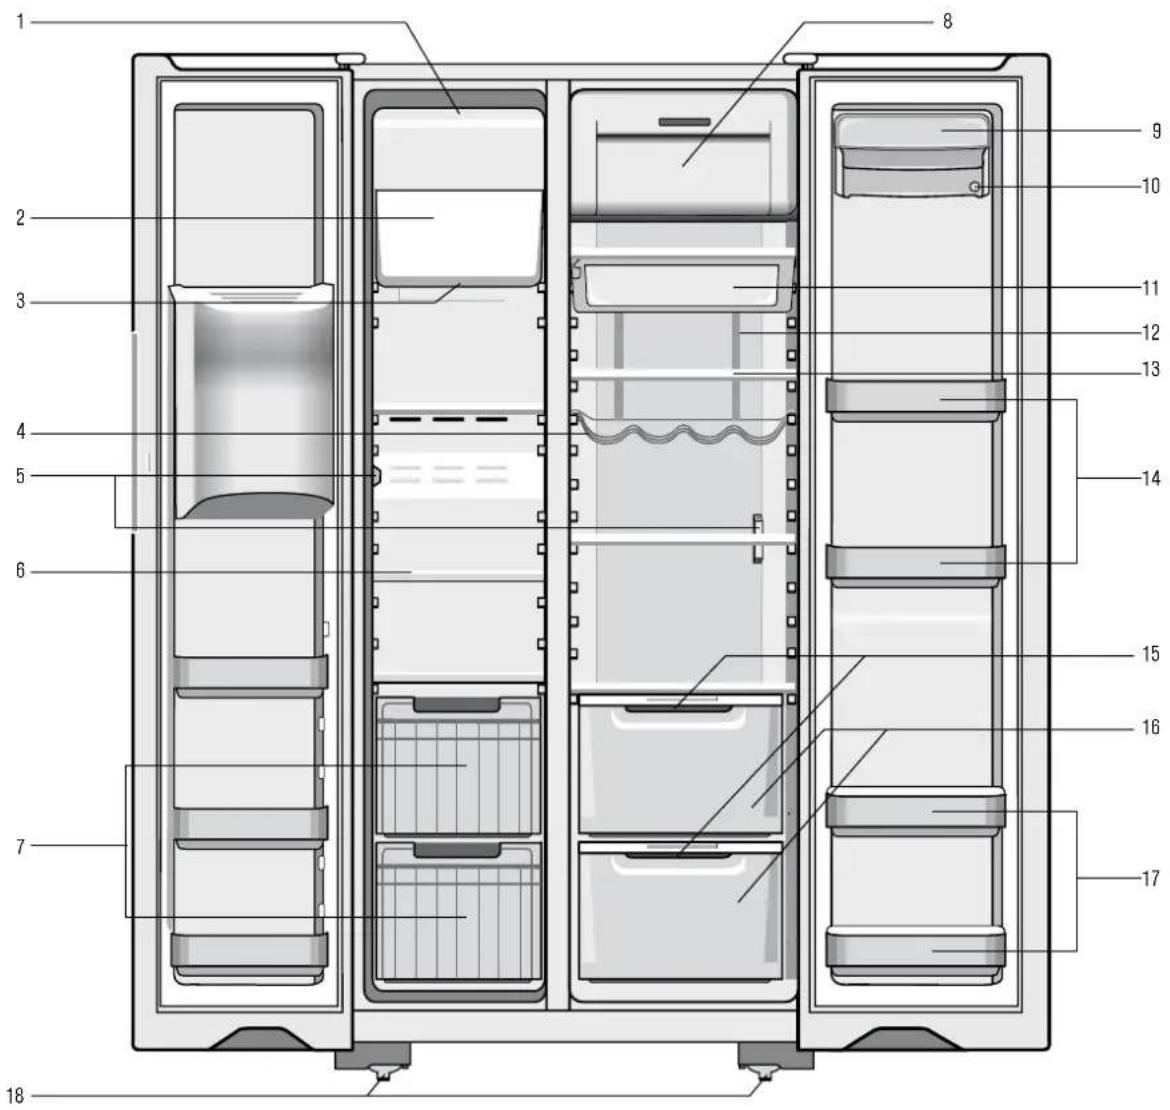
Ice & Water Door Dispenser
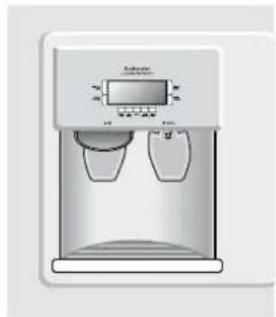
natural_image
Illustration of a water dispenser with two cups and a control panel (no text or symbols)1 Ice cream shelf
2 Ice maker unit
3 Lighting
4 Wine rack
5 Sensors
6 Glass shelves
7 Roll out baskets
8 Light lens
9 Dairy compartment
10 Storesafe™ bin (lockable)
11 Deli bin
12 Multiflow duct (with blue feature lighting)
13 Adjustable glass shelves
14 Adjustable door bins
15 Humidity controls
16 Crisper bins
17 Bottle bins
18 Adjustable rollers
Features may vary depending on model. Not all models will have features listed.
GENERAL iNStALLAtioN
When correctly installed, your refrigerator should:
• Have adequate clearance to the back, sides and top for air circulation
• Be aligned to the surrounding cupboards
• Have doors that will self close from a partially open position
CLEARANcES ARoUND YoUR REfRIGERAtoR
Your Side by Side refrigerator can be installed between cupboards or fixtures but you must allow for the following spaces around the cabinet.
- Allow a minimum of 5 millimetres clearance on both sides (see diagram 1)
- Allow a minimum of 10 millimetres clearance above hinge covers (see diagram 1)
- Allow 10 millimetres clearance at the back of the refrigerator (see diagram 1)
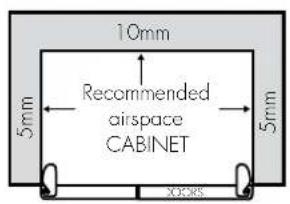
Diagram 1
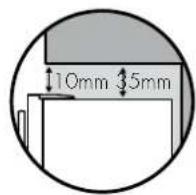
- Allow a 250 to 350 millimetres clearance on the hinge side of the doors, if you place the refrigerator next to the wall. This will make cleaning easier (refer to diagram 2).
• Make sure that cupboards or fixtures do not stick out further than the refrigerator cabinet (refer to diagram 2).
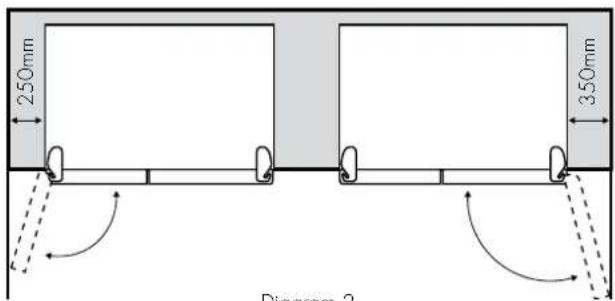
Diagram 2
iNSTALLatioN
The refrigerator should arrive with the front rollers wound down. We recommend that the appliance be tilted backwards by about 10 to 15 millimetres, this will allow the doors to self close providing a consistent door seal. To do this follow the instructions below.
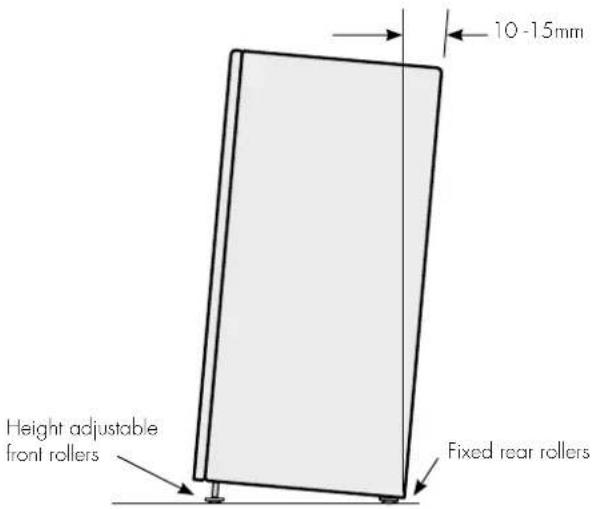
When you want to install your appliance, take the following steps.
- Roll the refrigerator into it's final position.
WARNING
The rollers are designed for forward or backward movement only. They are not castors. Moving the refrigerator sideways may damage your floor and the rollers.
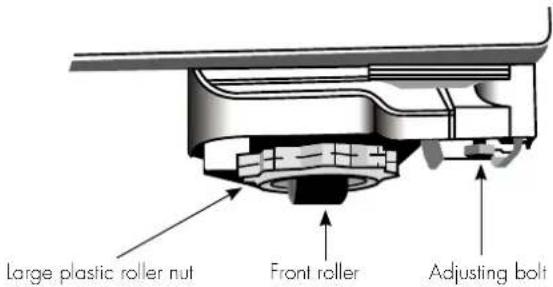
- If the refrigerator is not tilted back you can adjust the two front rollers by adjusting the large plastic roller nut (refer page 7). You may need two people, one to adjust rollers and one to tilt the refrigerator slightly back to take the weight of the appliance off the front rollers. This will increase or decrease the height of the rollers. One turn of the nut will change the tilt of the refrigerator by approximately 10mm.
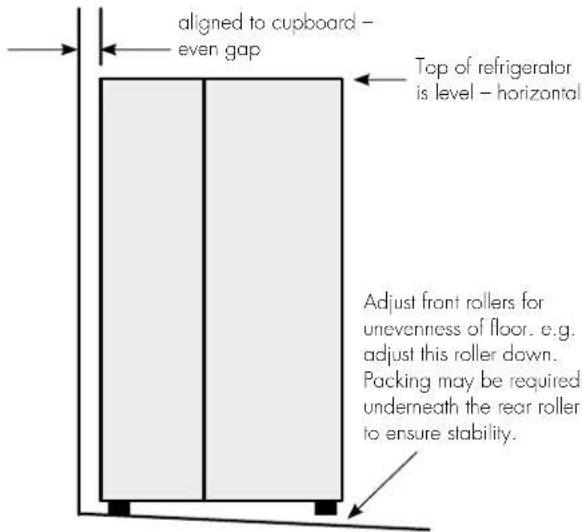
- If the cabinet is level, then the side walls should be plumb or vertical. If the cabinet is built in or partly built in check the alignment of the cabinet side against the cupboard.
-
If the appliance now rocks from one corner to the opposite rear corner, this means that the floor is uneven; you will need to put some packing under one of the rear rollers.
-
You may now need to fine-tune the installation by adjusting the front rollers once again.
AdJUSTiNG dooR ALIGNMENT
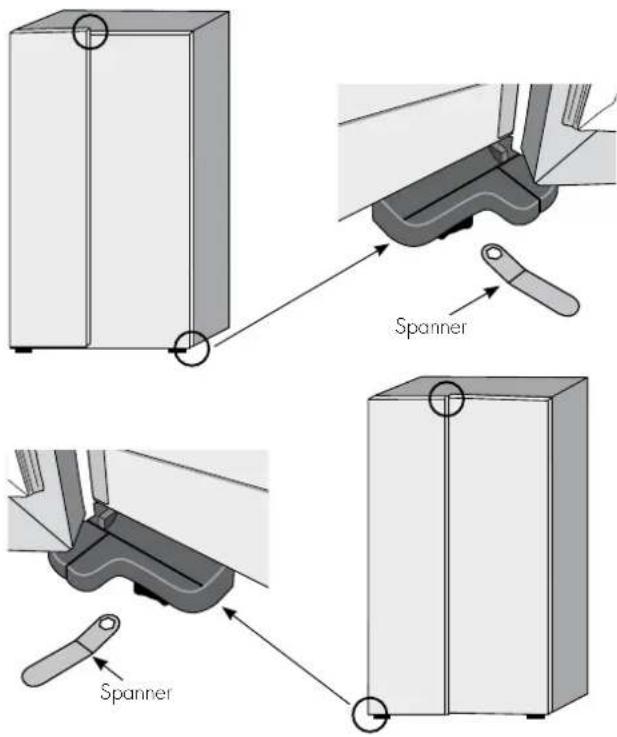
Each door is independently adjustable in the vertical direction by turning the adjustable bolts under the hinges using the spanner provided.
The doors can be adjusted up or down. Depending on the amount of adjustment required it may be sufficient to adjust only one door (see diagrams below).
NOTE: When the height of the rollers and adjusting bolts are correctly adjusted the refrigerator will stand firmly on the floor and the doors will be in line with one another.
GENERAL iNStALLAtioN
iNtERNAL pAcKAGiNG
-
Please remove all internal packaging material before use. Any glue or tape residue or the like should be removed with a solution of mild detergent and water.
-
Clean your appliance thoroughly following the instructions on page 19 and wipe off any dust that has accumulated during shipping.

WARNING
Before cleaning: Remove the power cord from the power socket. This will make sure there is no chance of getting an electric shock.
-
Install accessories such as the ice cube storage bin. The accessories are packed together to prevent damage during delivery.
-
Plug your appliance into the power point.
-
We recommend that you let your refrigerator run for two to three hours before you put any food in it. This will allow you to check that it is operating properly and that enough cool air is circulating.
icE AND wAtER ModELS

CAUTION
The water connection to your ice and water product should only be done by a licensed refrigeration mechanic, plumber or electrician.
All relevant information regarding the water connection is detailed in the water kit provided with your product for use by the professional installer only.
The automatic ice and water dispenser needs a drinkable water supply with a pressure of:
• Minimum 206 kPa (30 psi, 2.11 kgf/cm²)
• Maximum 689 kPa (100 psi, 7.04 kgf/cm²)
In some areas water pressure is significantly higher due to local conditions. In such areas a pressure reducing valve must be used. Ensure your plumber or installer checks your water pressure when installing your refrigerator.
If you are using your refrigerator for the first time, or if you have not used the dispenser for some time:
- Discard the first seven or eight cups of water - Discard any ice that the ice maker produces in the first 24 hours (contaminants could have settled in the water pipes)
It is not recommended that the tubing be extended as this can adversely affect the flow of water to the ice maker or water dispenser, however, some points to note are:
-
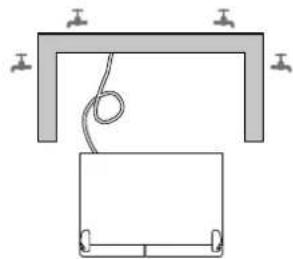
It is better to have the tap accessible without having to roll the refrigerator forward, so we recommend putting it outside the cavity as shown by the taps in the diagram below.
-
It is recommended, but not essential that the height of the tap should be 400mm from the ground.
-
If the refrigerator is required to be pulled forward for cleaning, the water pipe may need to be removed from the tap.
natural_image
Simple line drawing of a mechanical setup with a bracket and a rectangular block, no text or symbols present.icE MAKER START Up
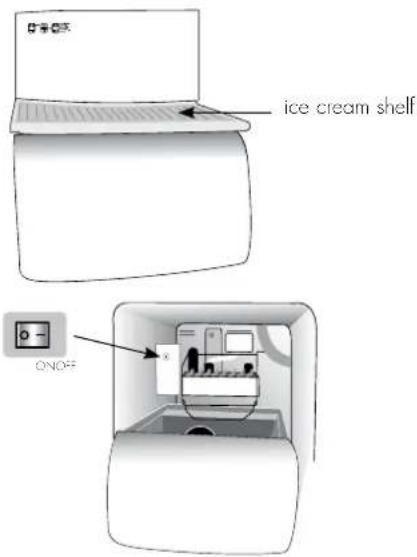
If the ice maker is not connected to a water supply, check that the ice maker is turned off. To do this remove the ice cream shelf and put the switch in the 'OFF' position. If you don't do this a loud buzzing noise will be heard intermittently if the icemaker is on but no water is being supplied. If the ice maker is connected to a water supply, check that the ice maker is turned on. To do this put the switch in the 'ON' position.

WARNING
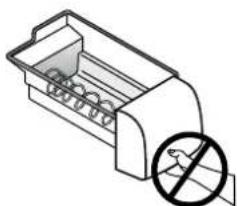
Connect to potable water supply only. Do not use the ice chute as a handle when removing or replacing the ice storage bin. Do not put fingers up the ice chute. Surfaces there may be sharp.
natural_image
Diagram of a device with internal components and a prohibition symbol (no text or labels)iNitiAL StARt-Up
REfRiGERAtoR/fREEzER opERAtioN
It is normal for the rear, sides and centre mullion of the appliance to feel warm. These areas are warm because the appliance transfers heat from the food placed inside to the outside air.
There is a cooling coil located behind the rear wall of the freezer section. This coil cools and removes moisture from the air. A fan at the rear of the freezer section then circulates cold, dry air throughout the refrigerator. The air circulation means that foods are refrigerated far more quickly than in refrigerators where there is less air circulation. Avoid placing food against air outlets as this will affect air circulation. A light frosting will occasionally occur on the interior of the freezer when the door is opened frequently. This is normal and will disappear after a few days in most climates. Make sure you fully close the freezer door after you load or remove food. If the door is left partly open, a heavy frost will coat the inside of the freezer. If a frost develops, remove it. Take care to properly close the door and the frost will not reoccur.
Your new energy efficient appliance uses a high-speed compressor and other energy efficient components which may produce different noises to your old appliance.
These sounds are normal and include:
• Compressor running noise.
• Air movement noise from the small fan motor.
• Occasional gurgling, similar to water boiling.
• A popping noise, heard during automatic defrosting.
• A clicking noise, just prior to the compressor starting up.
• A motorised air baffle used to adjust airflow.
These noises are normal and not cause for alarm.
tEMpERA tURE SENSoRS
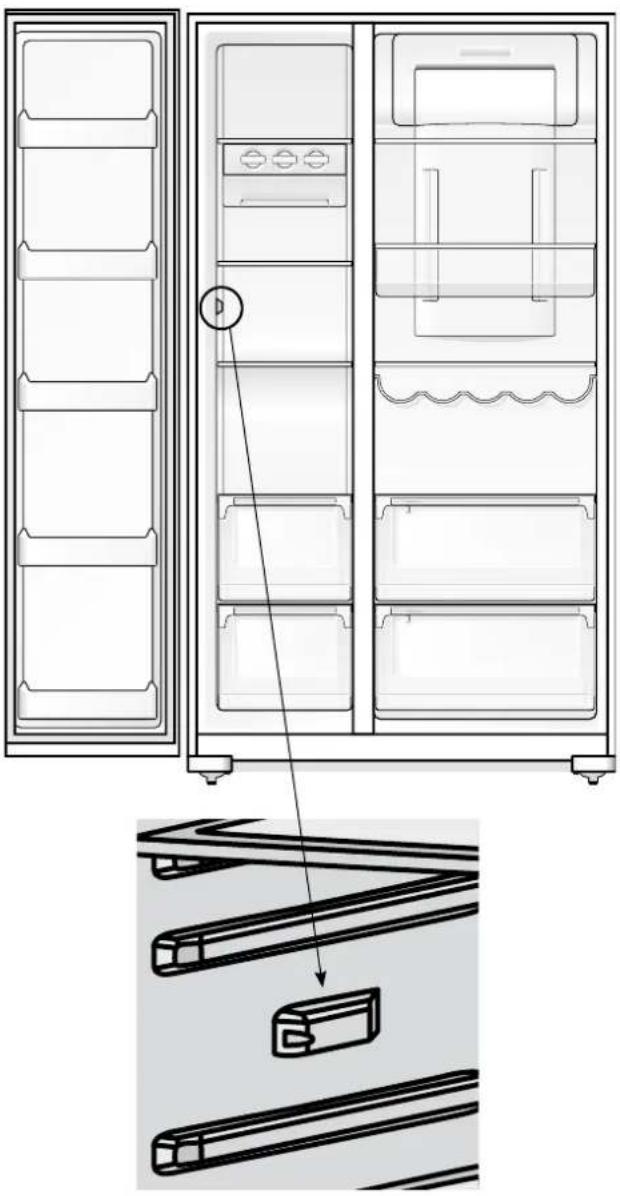
Avoid loading food against your freezer temperature sensor. Doing so may adversely affect freezer temperatures. If warm food is inadvertently loaded against the sensor, it may also set off the freezer temperature alarm up to 50 minutes after the food is loaded against the sensor.
natural_image
Diagram of a refrigerator interior showing front and side views with a close-up of the door panel (no text or symbols present)NOTE: Product illustrations demonstrate features that may not be completely in line with all current products.
USING YOUR REFRIGERATOR
ELECTRONIC DISPLAY PANEL
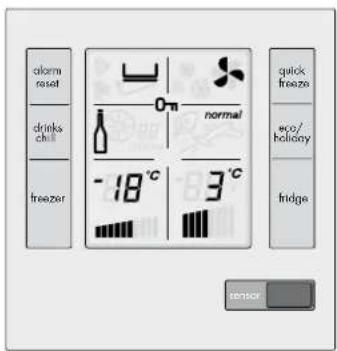
The internal electronic display panel is located on the inside front right of the fridge liner in side by sides and at the top rear in the fridges compartment of compact side by sides. It consists of an LCD display with blue lighting and buttons.
Electronic Display Panel – Side by Side WSE7000
Electronic Display Panel – Compact Side by Side WSE6100
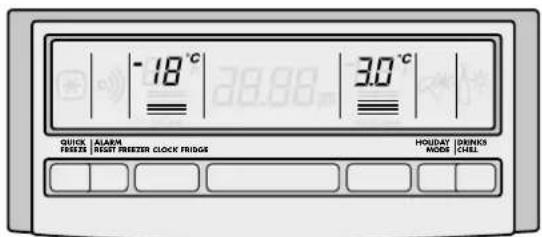
Electronic Display Panel – Ice & Water Display
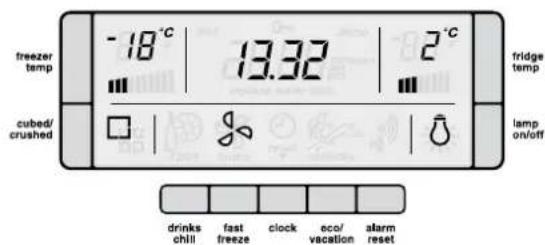
NOTE: The Electronic Display Panel varies according to the model of refrigerator purchased. The above and following diagrams are only representative of the different types of panels available. Not all models will have all features listed.
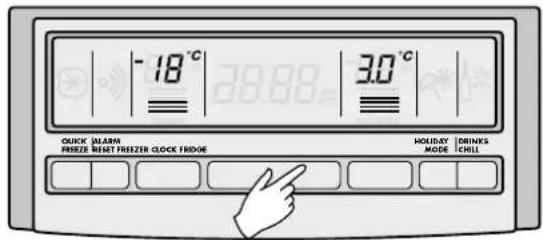
Turning the clock on and off - WSE6100
Press the clock button to turn the clock display on or off. NOTE: The clock still works while the display is off.
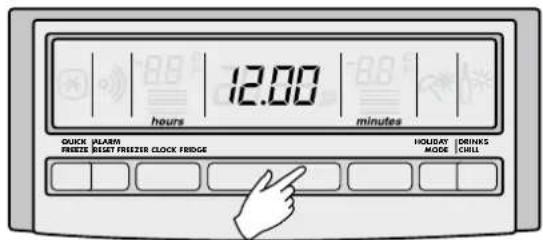
SETTING THE CLOCK
- Press and hold the clock button for two seconds. Hours and minutes will then appear on the display.
- While holding down the clock button, press the freezer button to advance the hours. Hold the freezer button down for continuous and fast advance. After the first 12 hours the pm indicator will appear.
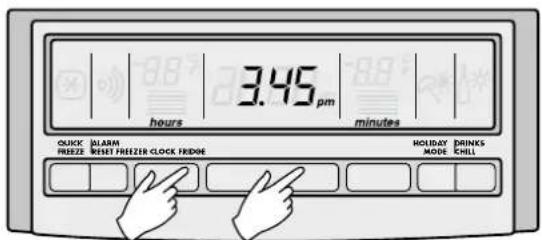
- While holding down the clock button, press the fridge button to advance the minutes. Hold the fridge button down for continuous and fast advance.
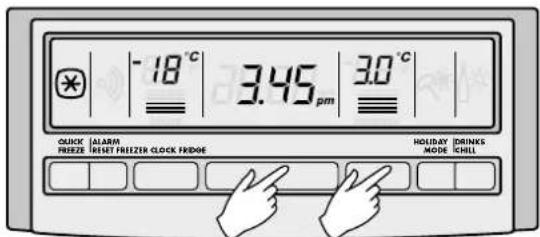
- When the correct time is displayed release the clock button.
CONTROLLING THE TEMPERATURE
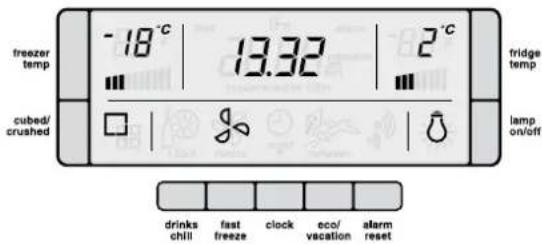
We recommend that when you start your refrigerator for the first time, the temperature for the refrigerator is set to 3°C and the freezer to -18°C. If you want to change the temperatures, use the instructions below. You should make only small adjustments and wait 24 hours to see whether further changes are required.
NOTE: The set temperature for the refrigerator is an average temperature for the whole refrigerator cabinet. Temperatures inside each compartment may vary depending on how much food you store and where you place it. High or low room temperature may also affect the actual temperature inside the refrigerator.
Changing the freezer temperature
Press the freezer button to make the freezer colder in 1°C steps. Once -23°C is reached the display will return to -14°C with the next button press. You'll notice that the bar graph gets smaller with colder freezer settings. If you set -14°C, the bar graph will flash continuously to warn that it is not cold enough for long term storage of frozen food.
Changing the refrigerator temperature
Press the fridge button to make the fridge colder in 1°C steps. Once 0.0°C is reached the display will return to 7°C with the next button press. The bar graph gets smaller with colder freezer settings.
NOTE: Testing ice cream is a good way to check the freezer. Testing drinking water is a good way to check the refrigerator compartment temperature.
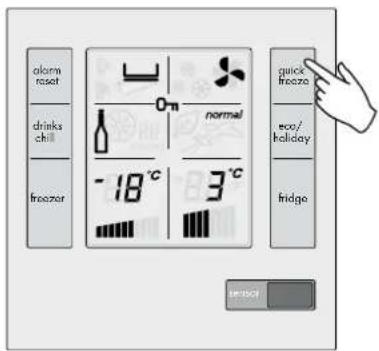
Use the quick freeze function when you add a large amount of food to the freezer compartment. This freezes the food quickly but does not affect the temperature in the refrigerator compartment.
To use this function, press the quick freeze button once. An animated icon above the button will light up. The quick freeze function will now operate for 90 minutes. If you want to turn the quick freeze function off before 90 minutes have passed, simply press the quick freeze button again. The icon will disappear and the refrigerator will return to normal operation.
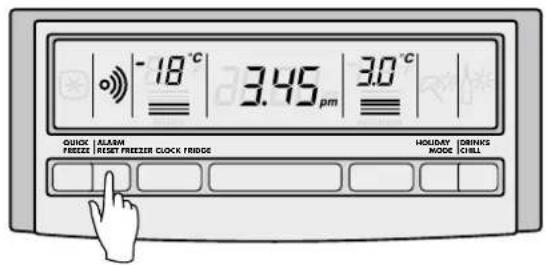
FREEZER TEMPERATURE ALARM
If the freezer becomes too warm, a buzzer will sound and the icon above the Alarm Reset button, the freezer temperature and the bar graph will flash until the Alarm Reset button is pressed. After the Alarm Reset button has been pressed the freezer temperature setting and the bar graph will flash until normal operating temperatures are reached.
Check that the freezer door has not been left open or warm food has not been placed too close to the temperature sensor in the freezer. See diagram on page 9 for the sensor location. If the freezer is still too warm the alarm will sound again in 50 minutes, indicating that something may be wrong with your refrigerator.
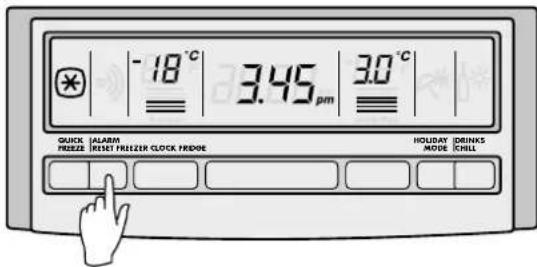
NOTE: The freezer temperature alarm can be reset for 12 hours by pressing the alarm reset button continuously for 10 seconds.
USING YOUR REFRIGERATOR
DOOR ALARM
If the refrigerator door is left open for longer than 2 minutes a buzzer will sound and the icon above the alarm reset button will flash. The refrigerator temperature settings and bar graph will also flash. If you want to leave the door open while you load the fridge, you can turn the alarm off for 8 minutes by pressing the alarm reset button. If the alarm is sounding for no apparent reason, check whether anything is holding the door open. Closing the door resets the alarm for a further 2 minutes.
DRINKS CHILL TIMER
If you set the drinks chill timer it will sound an alarm to remind you that you have left drinks in your freezer for quick chilling. Suggested chilling times:
• 10 minutes for cans of drinks
• 20 minutes for bottles of wine
• 30 minutes for bottles of soft drink
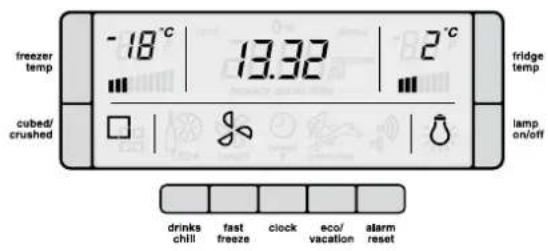
To use the timer, press the drinks chill button. An animated icon appears above the drinks chill button and the clock display is replaced by the countdown timer. Press the button once to set a 10 minute time limit, twice for 20 minutes and three times for 30 minutes. Press four times to turn the timer off. The timer will count down in 1 minute increments; you can change the timer or turn the timer off even after the countdown has started. When the countdown has finished a buzzer will sound and the icon above the alarm will flash until the alarm reset button is pressed. To stop the alarm and turn off the drinks chill timer, press the Alarm Reset button. If your drink is chilled, take it out of the freezer. If it is not cold enough, reset the drink chill function bearing in mind that the drink is already partially chilled.
CHILD LOCK
To activate the child lock on ice & water models, press and hold the lamp on/off and cubed/crushed buttons together. This will disable the display to prevent accidental changes to settings. The key icon will appear on the electronic display when child lock is activated. To turn off the child lock press and hold the lamp on/off and cubed/crushed buttons together.
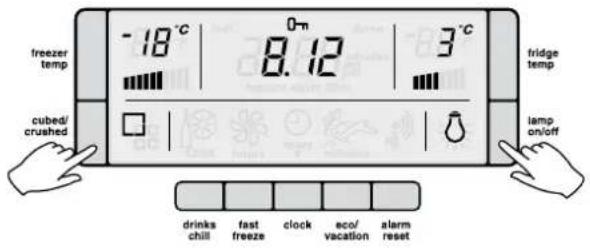
For standard models activate the child lock by pressing the fridge and freezer buttons at the same time for 3 seconds. Repeat to unlock.
ENERGY EFFICIENCY
Your appliance has been designed with energy efficiency in mind and can operate in any of three modes (normal, eco, vacation), depending on the level of efficiency sought.
- Normal mode
This is the mode which is entered automatically when the appliance is first turned on. Normal mode is the mode most suitable when the refrigerator door is opened often.
- Eco mode
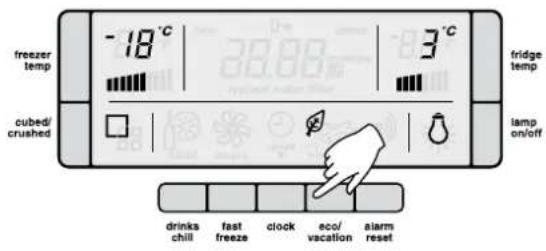
Eco mode is a more efficient mode than normal mode and can be entered in two ways. Either by manually pressing the eco/vacation button once when in normal mode, or automatically after 30 hours if the refrigerator door has not been opened. The leaf icon will appear on the electronic display when eco mode is activated. If eco mode is entered automatically, the appliance will revert to normal mode once the refrigerator door is opened. If eco mode is entered manually, door openings will not cause the display to revert to normal mode. To exit eco mode, press the eco/vacation button twice (or until there are no icons displayed).

CAUTION
Eco mode is designed to operate with minimum door opening (e.g. if used as a long term storage fridge). If turned on manually, it won't switch off automatically and frequent door opening in eco mode could lead to food spoilage. If frequent door opening is likely to occur switch back to normal mode.
• Vacation (holiday) mode
Vacation mode is suitable if you will be away from your appliance for an extended period. To take advantage of maximum efficiency press the eco/vacation button twice in succession just before you leave – do this while in normal mode. The appliance will then enter vacation mode, as indicated by the aeroplane symbol. Press eco/vacation button again to cycle between 'normal', 'eco' and 'vacation' modes. If in eco mode a single button press is all that is required to enter vacation mode.
Vacation mode is exited automatically once the refrigerator door is opened and normal mode resumes.

ENVIRONMENTAL TIPS
Eco and vacation modes minimise defrosting to save energy, while maintaining your temperature settings.
NOTE: Opening the freezer door has no effect on the operation of Eco and Vacation Modes
OTHER ELECTRONIC FEATURES
Your refrigerator:
• Controls the compressor and fan independently to provide the best performance
• Provides extra cooling depending on the number of door openings
• Automatically defrosts during periods when the door is not being opened frequently

TIPS & INFORMATION
If you find that the display malfunctions, this may be due to brief power supply interruptions. If this is the problem, you simply need to turn the refrigerator off at the power point and wait 5 minutes, then turn the refrigerator on again at the power point.
FOOD COMPARTMENT FEATURES
Door storage bins
Both the refrigerator and freezer have door storage bins. You can adjust the door bins to meet different storage needs. All the door bins are completely removable for cleaning. If you want to remove or adjust a bin in all freezers and in the fridge of the compact side by side, lift it over the support lugs on the inner door panel. Push the bin down over the support lugs to lock it in place.
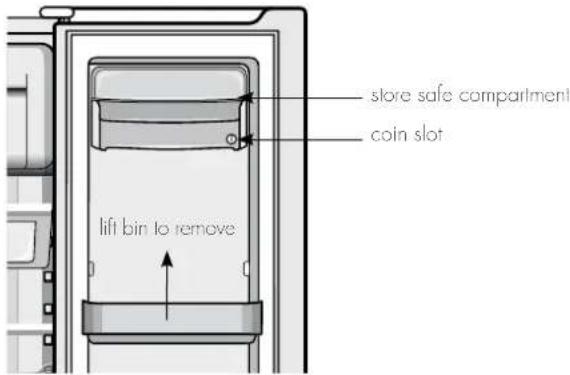
Dairy compartment
Use the dairy compartment to store foods like butter, margarine and cheeses. The compartment is slightly warmer than the rest of the refrigerator compartment, while the lid provides protection against odours.
Store safe compartment (see top diagram)
The store safe compartment is a coin-lockable compartment. To lock, rotate the coin slot anti-clockwise until the slot is horizontal. To unlock, turn the coin slot clockwise until the slot is vertical.
To open the drawer, push the tab down with your thumb and pull the drawer forward.
USING YOUR REFRIGERATOR
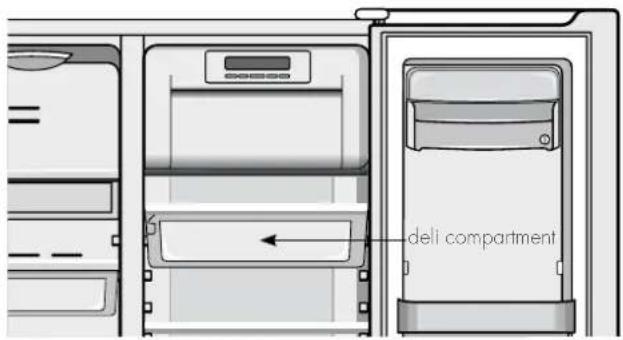
Deli compartment
The deli compartment is an ideal place to keep deli items, such as cold meats. Additional cold air is directed into the deli compartment, keeping the contents fresher for longer. It can also be used for faster chilling of food or drinks. To remove the deli compartment, pull forward, then up and forward.
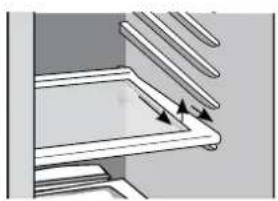
Slide out glass shelves
To make access to your food easier, both the refrigerator and freezer compartments are fitted with glass shelves.
To remove the shelves
- Gently pull them forward until the shelf comes to a stop.
- Lift the shelf slightly to clear the stop.
- Continue pulling the shelf forward.
To return the shelf, make sure there is nothing behind it that may obstruct movement and gently push the shelf into the cabinet. It should slide back over the stops into its original position.
natural_image
Pure mechanical assembly diagram showing layered components with no text or symbolsFreezer baskets
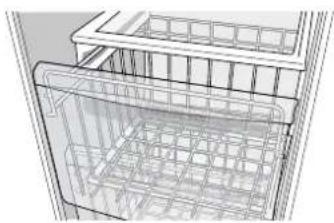
Freezer baskets and freezer shelves are fitted to 600/610L freezer compartments. Wire baskets are used to provide easy visibility of the contents in the compact side by side. All the baskets and the shelves pull out for easy access and have a stop to prevent the baskets and shelves being pulled out too far.
natural_image
Architectural wireframe diagram of a multi-level storage unit or enclosure (no text or symbols)To remove the basket, pull it out until it hits the stop then lift the front to unhook the stop while continuing to pull forward, until the basket is free of the runners under the shelf.
Telescopic freezer bins and crispers
For 690/700L side by sides with telescopic freezer bins and crispers you can replace the draw as follows:
- With the telescopic slides pushed in all the way.
- Slide the drawer into place over the slides and push the bin in until it stops. The bin will not be closed all the way.
- Open the bin to access the finger tabs at the ends of the telescopic slides, on each side of the bin. Using your thumb and forefinger, lift the bin over the end of the slide and clip in place. If the drawer is not fully engaged on the slide, it's possible the drawer won't stay on the slide if fully extended.
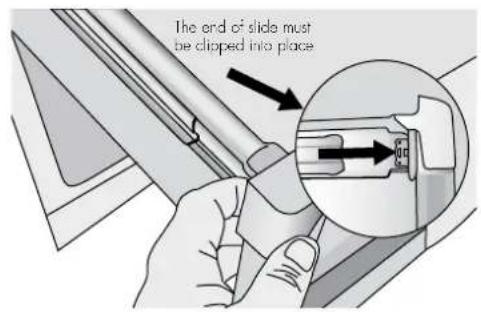
4. Fully close the bin.
When replacing the drawers after cleaning, we recommend fitting the lower drawer first.
Crisper bin(s)
- Storing vegetables You can use the crisper bin to store vegetables, fruit or smallgoods. You can change the humidity inside the bin by sliding the humidity control.
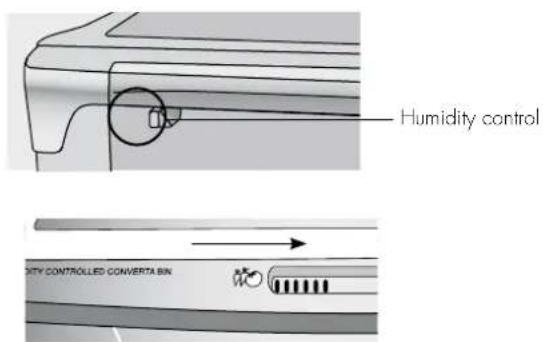
• Storing fruit & smallgoods
You can also store fruit & smallgoods in the crisper bin remembering to set the humidity control to less humid (open).

CAUTION
Never close the door while the telescopic slides are extended. It may damage the slide and/or the refrigerator or cause the slide to become disengaged from the refrigerator.

CAUTION
To clean a crisper cover with telescopic extension slides, simply wipe with a damp cloth and warm soapy water. Never immerse the cover in water, as this could affect the operation of the slide.
ICE & WATER FEATURES\*
TWIST ICE & SERVE
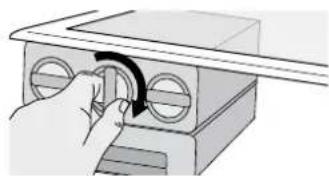
To use, remove the tray, fill with water and place back in the freezer. Once ice has formed (approximately 3 hours) simply twist the knob at the front clockwise until the ice drops into the bin below.
natural_image
Illustration of a hand adjusting a device with circular ports and a handle (no text or symbols)ICE & WATER DISPENSER FEATURES
The ice and water dispenser conveniently dispenses cool, filtered water and ice cubes or crushed ice. To operate the ice dispenser, select an ice option using the electronic display.
natural_image
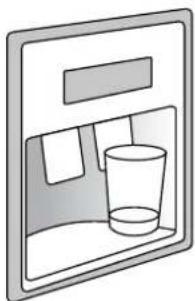
Simple line drawing of a refrigerator with a glass inside (no text or symbols)Press a glass against the dispensing paddle. Hold the top of the glass as close as possible to the ice outlet, so that you will catch all the ice. To stop dispensing ice, pull the glass away from the dispensing paddle. Do not remove the glass until the ice has finished coming out.
To operate the water dispenser, press a glass against the dispensing paddle. To stop dispensing water, pull the glass away from the dispensing paddle. A drip tray located at the base of the dispenser (see diagram above) will catch small spills and allow them to evaporate. The drip tray is removable and dishwasher safe.

CAUTION
Do not pour water or excess cubes into the drip tray because it is not connected to a drain.
Dispenser lamp
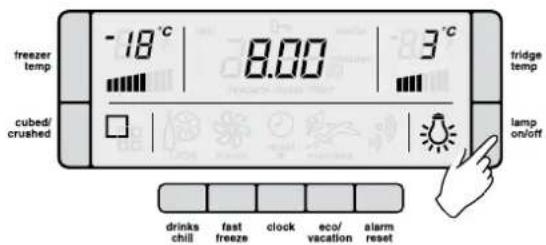
The dispenser has a light which can be turned on and off by pressing the Lamp button on the electronic display (see diagram below). The lamp is also activated for 6 seconds whenever a dispensing paddle is pressed. The light comes from 6 ultra bright LEDs (light emitting diodes), which are part of the electronic display. These are not customer replaceable. The same technology is used in the interior multiflow duct (blue strip lights).
HOW THE WATER DISPENSER WORKS
After the refrigerator is connected to the water supply, fill the water tank by holding a glass against the dispenser paddle. You may need to hold the glass against the paddle for up to 2 minutes before water begins to flow. Continue to draw water for a further 3 minutes to rid the tank and plumbing connections of any impurities, the tank will automatically refill as you dispense water.

CAUTION
Remember, do not drink this water as it may have impurities in it!

TIPS & INFORMATION
The water connection to your ice and water product should only be done by a licensed refrigeration mechanic, plumber or electrician.
The water dispenser water tank is located behind the upper crisper bin in the refrigerator compartment.
Normal Operation — For cool water, add ice.
To provide the convenience of filtered water in the same location as the ice dispenser, it is necessary to route the tubes from the refrigerator compartment. This means the first half glass of water will not be quite as cold as the following 3 or 4 glasses. If you require cool water from the first glass, we recommend that you first add crushed or cubed ice to your glass then the water. In times of high use, water may be dispensed before it has time to cool. Once this occurs, the dispensed water temperature will be similar to that of your normal tap water until the tank has had a chance to re-cool. The addition of cubed or crushed ice will allow you to still enjoy cool water should this occur.

CAUTION
Chemicals from a malfunctioning softener can damage the ice maker. If the ice maker is connected to soft water, ensure that the softener is maintained and working properly.
HOW THE ICE DISPENSER WORKS
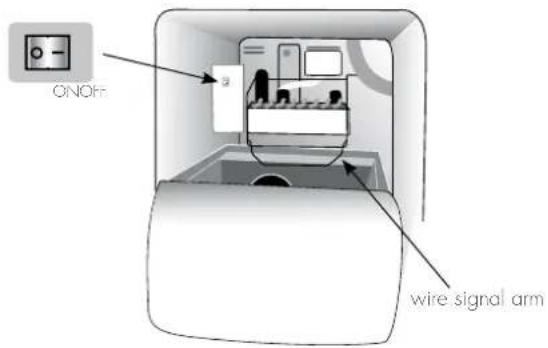
The ice maker and ice container are located in the top of the freezer compartment. After the refrigerator is installed properly and has cooled for several hours, the ice maker can begin making ice and the first batch will be ready within 24 hours. A full tray of ice may not be created for the first few batches, due to air in the refrigerator's new plumbing lines. To begin ice production, switch the switch to the ON position. If no ice is dispensed it will take about 2 days to fill the storage container. The ice maker turns off automatically when the ice container is full. To stop ice production, turn the switch to the OFF position (see diagram on page 8). The first batches of ice cubes may be discoloured or have an odd flavour, due to the refrigerator's new plumbing connections. Discard this ice until batches are free of discolouration or taste problems.

TIPS & INFORMATION
- Ice cubes stored too long may develop an odd flavour. Remove the ice container and discard the ice cubes. When replacing the tray, ensure that the wire signal arm (see diagram below left) sits within the ice cube container. The ice maker will then start producing ice.
• Occasionally shake the ice container to keep ice separated. - After you take delivery of the refrigerator, keep the ice maker switch in the OFF position until the refrigerator is connected to the water supply. The switch should also be kept in the OFF position whenever the water supply is turned off.

CAUTION
If the dispensing paddle is pushed for more than 4 minutes, the dispenser motor may overload and stop. The overload protector will reset automatically after 3 or 4 minutes.
• If a large quantity of ice is needed at one time, it is best to remove cubes directly from the ice cube container
- When the ice maker is operating, it is normal to hear the sound of:
- The motor running.
- Ice dropping into the ice container.
- The water valve opening or closing.
- Ice loosening in the tray.
- Running water.
CLEANING THE ICE DISPENSER
Clean the dispenser and ice container at regular intervals, particularly before you take a vacation or move, also clean the dispenser if it sticks.
To clean the dispenser:
- Switch the ice maker off by putting the wire signal arm in the horizontal position.
- Remove the ice container by lifting it up and out. Empty and carefully clean the container with mild detergent. Rinse carefully ensuring no traces of detergent remain. Do not use harsh or abrasive cleaners. Allow the ice container to dry completely before replacing it in the freezer.
- Remove ice chips from the shelf and chute that support the ice container; clean these areas.
- Replace the ice container.
- Turn the ice maker on by moving the wire signal arm.

WARNING
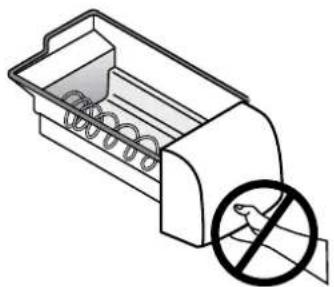
Do not use the ice chute as a handle when removing or replacing the ice storage bin. Do not put fingers up the ice chute. Surfaces there may be sharp.
natural_image
Illustration of a mechanical device with a prohibition symbol (no text or labels)
CAUTION
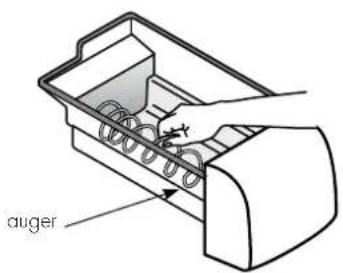
When removing or replacing the ice bin do not rotate the auger in the ice bin. If the auger is accidentally turned, you must realign the auger by turning it in 90° turns until the ice bin fits into place with the drive mechanism.
Remove and empty the ice storage bin if:
- An extended power failure (one hour or longer) causes ice cubes in the ice storage bin to melt and freeze together and jam the dispenser mechanism.
- If the ice dispenser is not used frequently, ice cubes will freeze together in the bin and jam the dispenser mechanism. If this happens remove the ice storage bin and shake it to loosen the cubes.

CAUTION
NEVER use an ice pick or similar sharp instrument to break up the ice. This could damage the ice storage bin and dispenser mechanism.
Other electronic features of your standard and ice & water refrigerator Your refrigerator:
• Controls the compressor and fan independently to provide the best performance
- Provides extra cooling depending on the number of door openings
• Automatically defrosts during periods when the door is not being opened frequently
- Has blue feature lighting activated by opening the refrigerator door (ice and water models only)
NOTE: If you find that the display malfunctions, this may be due to brief power supply interruptions. If this occurs you simply need to turn the refrigerator off at the power point and wait 5 minutes for the refrigerator pressure to equalise then turn the refrigerator on again at the power point.
icE AND wAtER iNStALLAtioN
THE EXTERNAL wAtER filtER Kit
An external water filter and connection kit has been supplied for use with your Ice & Water refrigerator. The external filter design allows more space within the refrigerator and provides double the life of previous filters reducing the cost of replacement.
Contents of the kit are:
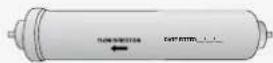 | 1 x water filter with push fit connections |
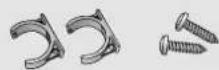 | 2 x mounting brackets and screws |
 | 4 + 1 metres of water tubing |
 | 1 x 1/2" tap fitting |
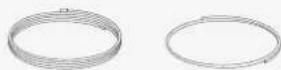
 | 2 x cirdips |
The filter is designed to significantly reduce chlorine, taste, odour, heavy metals, turbidity (cloudiness) and scale build up. The included plastic water tube allows quick connection to the filter and is designed for high durability and kink resistance.
This filter is designed only to be used with a potable water supply. It should not be used on water that is micro biologically unsafe or with water of unknown quality. The filter should be replaced every 12 months. The service life of the filter may be reduced in water supplies that contain an excess of particles or other impurities. Reduced flow rate is an indication that a new filter is required. Failure to replace the filter when required can affect the function of the ice maker. Service calls caused by a failure to replace the filter are not covered by warranty.
The water connection to your ice and water product can be self-installed. It is recommended that you seek advice from a licensed plumber (if necessary) before commencing the installation.

CAUTION
Your warranty may be voided by an incorrect installation
bEfoRE bEGiNNiNG iNStALLAtioN pLEASE READ:
Water Supply and Plumbing
A drinkable water supply to suit a 12 " tap fitting is required adjacent to the refrigerator. It is recommended that a licensed plumber install a new water supply outlet nearer to the appliance should the tubing supplied not be long enough. It is not recommended that the tubing be extended as this could adversely affect the flow of water to the ice maker or water dispenser. This will reduce water hammer and its effects from quick action household taps and fast acting valves on appliances.
Where the tap connection is other than 1/2", adapters can be purchased from plumbing supply stores or good hardware stores.
Water Filter
Locate the water filter within 1 metre from the water supply tap, in a vertical position where possible. The filter will need to be replaced every 12 months to prevent excess filtered micro-organism build-up, and thus ensure continuous purified water and ice supply for you and your family. Replacement water filters are available from Electrolux Home Products Spare Parts Centres and can be posted to you for your convenience (refer to back page for contact details).

WARNING
If the appliance is not connected to a water supply ensure that the ice maker is switched off (refer to STEP 1 overleaf). If you don't do this a loud buzzing noise will be heard intermittently.
The new hose-sets supplied with the appliance must be used and old hose-sets should not be reused. Do not use with water that is microbiologically unsafe or with water of unknown quality without adequate disinfection.

WARNING
Never connect the appliance to a hot water supply. Never install the water filter in an area of the wall where there may be electrical wires and / or water supply pipes.
iNStALLiNG YoUR icE AND wAtER fiLtER
Never install the water filter in an area of direct sunlight. Check for water leaks at all water connection points in the first 2 to 3 hours after installation, and correct it in case of any water leak. Recheck after 24 hours; if leak still occurs, it is recommended to contact a licensed plumber for advice.
iNSTALLatioN
Water is to be connected as per diagram below.
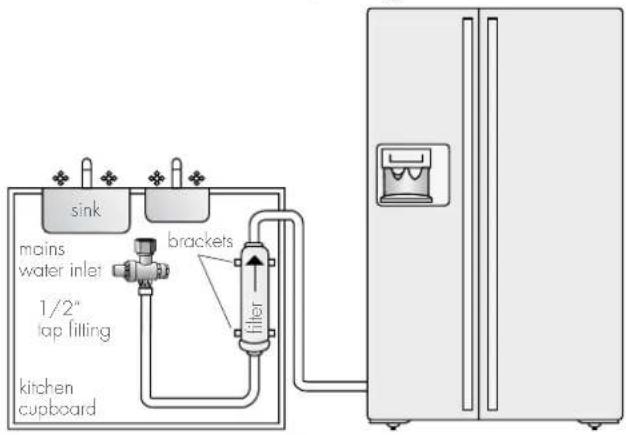
flowchart
graph TD
    A["sink"] --> B["mains water inlet"]
    B --> C["1/2" tap filling"]
    C --> D["kitchen cupboard"]
    D --> E["brackets"]
    E --> F["filter"]
    F --> G["water tank"]
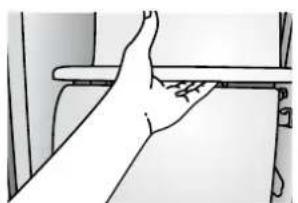
Step 1
Remove ice cream shelf (in freezer) and ensure that the ice maker is switched OFF
natural_image
Line drawing of a hand pressing down on a chair (no text or symbols)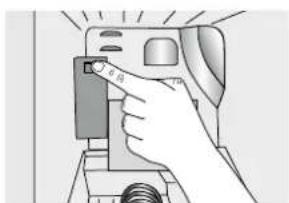
natural_image
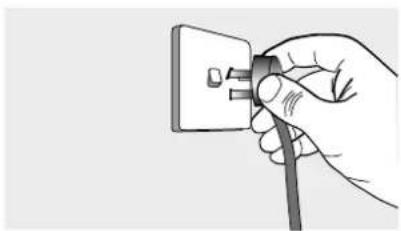
Illustration of a hand pressing a button on a device (no text or symbols visible)Step 2
Disconnect the refrigerator from the power supply.
natural_image
Hand holding a plug with two pins, no text or symbols visibleStep 3
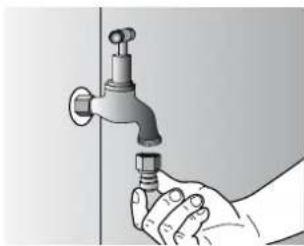
Connect tap fitting to water supply tap. Tap must be close to the refrigerator.
natural_image
Hand holding a faucet with a valve, no text or symbols visibleStep 4
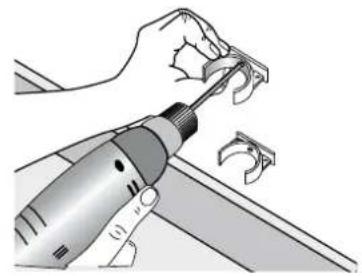
Install the brackets within 1 metre from the water supply tap, in a vertical orientation where possible, using the screws provided.

WARNING
Do not screw the brackets into the refrigerator as this may void your warranty and permanently damage the refrigerator.
natural_image
Illustration of a hand using a power tool to clean or repair a component (no text or symbols visible)Step 5
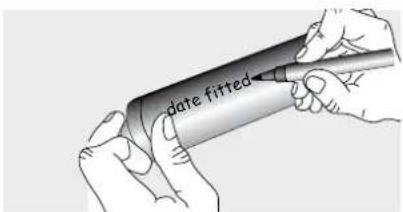
Write date on filter. The filter will need to be replaced every 12 months.
Step 6
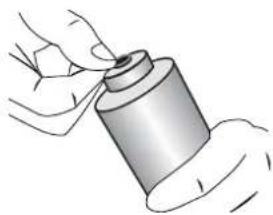
Extend the red collar and clip a circlip around the collar at both ends of the filter.
natural_image
Illustration of hands holding a cylindrical object with a lid (no text or symbols)Step 7
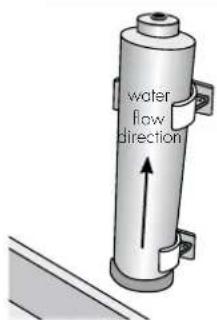
Fit filter to brackets with water flow arrow pointing up.
iNStALLiNG YoUR icE AND wAtER fiLtER
Step 8
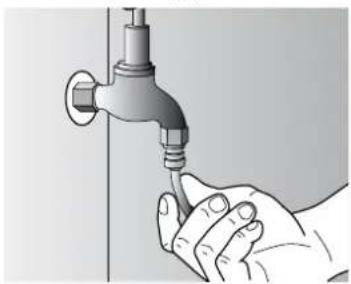
Push shorter tube into tap fitting past insertion mark.
natural_image
Illustration of a hand holding a faucet with a valve, no text or symbols presentStep 9
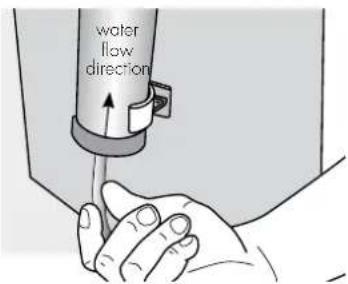
Push other end into filter INLET.
Step10
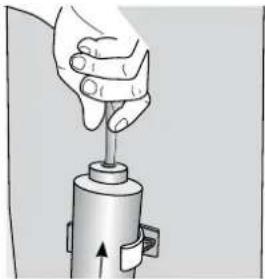
Connect remaining tube length to filter OUTLET.
natural_image
Illustration of a hand using a tool to press or install a mechanical component (no text or symbols visible)Step 11
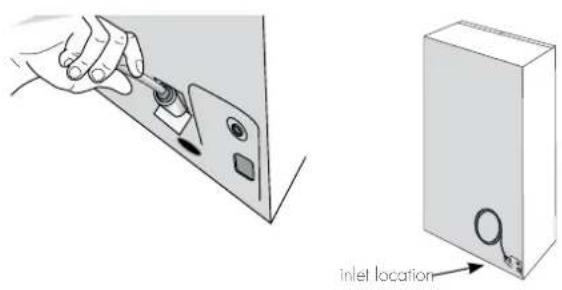
Connect other end of remaining tube length to inlet on bottom right hand side of refrigerator back. inlet location
Step 12
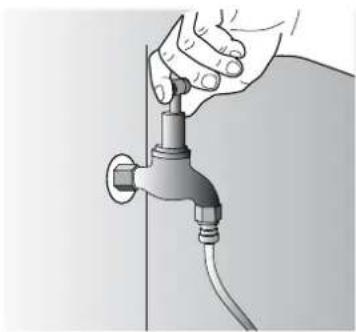
Turn on water and check all joints and tubes for leaks.
natural_image
Hand holding a faucet with a pipe, no text or symbols visibleStep 13
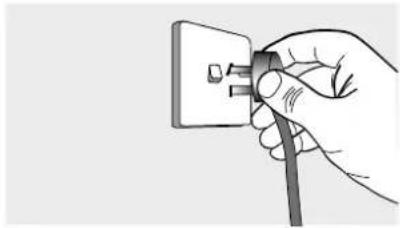
Reconnect the power.
natural_image
Hand holding a plug with a cable, no text or symbols visibleStep 14
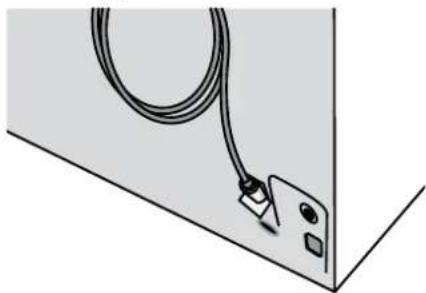
Move the refrigerator back into place being careful not to kink or split the tubing.
natural_image
Simple line drawing of a cable inserted into a corner socket (no text or symbols)Step 15
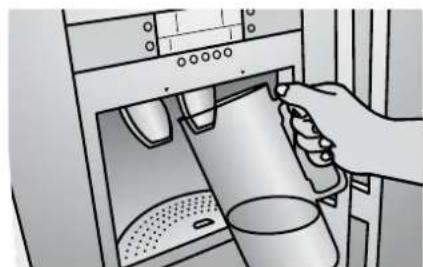
Using a large container run the water dispenser to clear air from lines. This may take a few minutes. Purge and dispense a minimum of 2 litres of water. Initial water may be black in colour. This is residual carbon dust from the filter and is non-toxic. If the water is slow to shut off or the dispenser is dripping, air may still be in the lines. Either purge more water through the system to remove this air or allow some time for the air to be removed over subsequent dispensing.
natural_image
Illustration of a hand pouring liquid into a washing machine with a cup (no text or symbols visible)iNStALLiNG YoUR icE AND wAtER fiLtER
Step 16
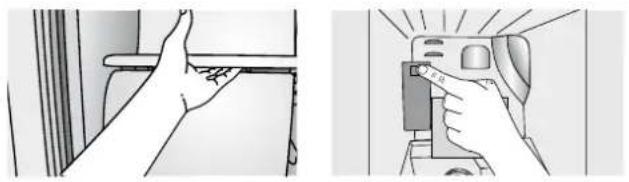
Remove ice cream shelf (in freezer) to access and switch on ice maker
natural_image
Illustration showing a hand inserting a component into a door panel and a close-up of the handle (no text or symbols present)Step 17
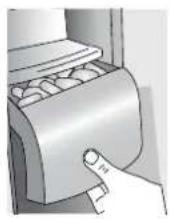
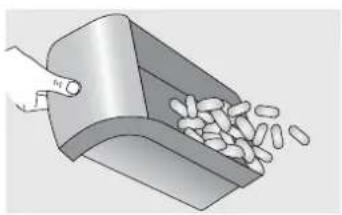
After 24 hours remove ice bin and dispose of first few batches of ice to ensure that impurities have been flushed from the system.
natural_image
Illustration of a hand pouring granular material into a container (no text or symbols)tipS AND USEfUL iNfoRMAtion
☑ Ensure that taps are turned off when replacing and fitting filters. Remember to turn the taps back on when filter fitting is complete.
☑ Ensure that the water pressure has been checked prior to installation as high or low water pressure can cause problems with the Ice & Water dispenser. Water pressure problems can be easily rectified by your qualified installer.
Always fit filter as per manufacturer's instructions, paying special attention to water flow direction.
If you need to replace water tube, only use approved water quality piping that meets the pressure requirements.
Do not allow the water tubing to become kinked or wrapped under the refrigerator when moving the refrigerator back into position.
√ Make sure your refrigerator is level to avoid uneven ice cubes.
After installation, run the water dispenser for a few minutes to ensure that all air bubbles have been purged from the tubing. Dripping may occur if air bubbles remain in the tube.
Replace filter at suggested intervals to avoid water/ice reduction and irregularities in taste.
Remove and clean ice bin once a month, discarding unused ice cubes. This will ensure fresh, clean ice and smooth operation of your ice maker.
√ Clean and empty the dispenser drip tray regularly to avoid overflow.
√ As the water/ice cut off is not instant, leave glass under dispenser briefly until water or ice has stopped flowing to avoid spills.
√ Always place ice in glass before filling with water to avoid splashing.
CHANGING tHE wAtER filTER
tHE ExTERNAL wAtER fiLtER Kit
An external water filter and connection kit has been supplied for use with your ice & Water refrigerator. The external filter design allows more space within the refrigerator and provides double the life of previous filters reducing the cost of replacement. The filter is designed to significantly reduce chlorine, taste, odour, heavy metals, turbidity (cloudiness) and scale build up. The included plastic (LLDPE) water tube allows quick connection to the filter and is designed for high durability and kink resistance. This filter is designed only to be used with a potable water supply. It should not be used on water that is micro biologically unsafe or with water of unknown quality. The filter should be replaced every 12 months. The service life of the filter may be reduced in water supplies that contain an excess of particles or other impurities. Reduced flow rate is an indication that a new filter is required. Failure to replace the filter when required can affect the function of the ice maker. Service calls caused by a failure to replace the filter are not covered by warranty.
to REpLAcE tHE wAtER fiLtER
The water filter is fitted with Super Speed fit Fittings for ease of installation and replacement. To replace the filter;
- Turn off the water supply.
- Release the pressure in the water lines by holding a container against the water dispenser paddle on the refrigerator until the pressure has been released.
- Turn off the refrigerator at the power point and remove the plug from the socket or turn off the icemaker.
- Depress the collet (see diagram below) and pull the tube out of each end of the filter.
- Refit the tubes into the new filter to the stops (about 1.5mm). Ensure that you observe the flow direction. Write the fitment date in the space provided on the filter.
- Gently pull back on the tube to ensure that it is secure.
- Turn the water supply back on and check for leaks.
- Plug the unit back in and turn the power supply back on to the refrigerator and ensure that the icemaker is turned back on.
- Purge and dispose of approximately 5 litres of water through the water dispenser to condition the filter and clear the water lines of air and impurities. It may take up to a minute to get a full flow of water from the dispenser. Do not be alarmed if there is an initial black colour to the water. This is residual carbon dust from the filter and is non-toxic.
- Once the lines have been purged, dispose of the first few batches of ice to ensure that impurities have been flushed from this part of the system.
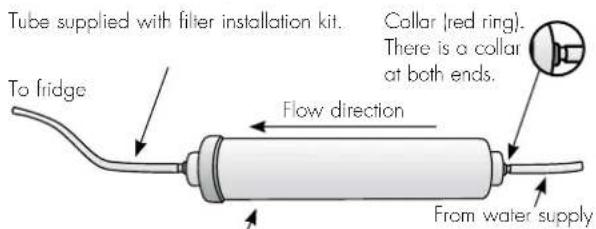
External water filter – installed between fridge and water supply. (Usually situated within kitchen cupboard under sink or surrounds).
Note: If the water is slow to shut off or the dispenser is dripping, this indicates that there may still be air in the lines. Either purge more water through the system to remove this air or allow some time for the air to be removed over subsequent dispensing.
CHANGiNG tHE LiGht bULb
REFRIGERAtoR LiGHT
- Switch off the power at the power point and remove the refrigerator's power cord from the power point.
- Check the temperature settings and write them down.
natural_image
Diagram of a printer or scanner device with a paper airplane, showing no text or symbols.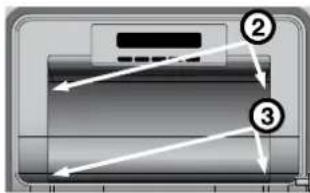
diagram A diagram B
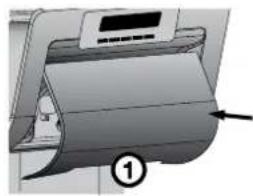
- Unclip the light lens by inserting your fingers at point 1 in diagram A.
- Lift the light lens until it is clear of the housing and unscrew the light bulb.
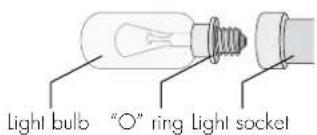
- Unscrew the light bulb and replace it with a bulb that is the same as the original. If, when you remove the light bulb the small rubber "O" ring comes out with the bulb, fit the "O" ring over the new bulb and screw bulb into the socket (see diagram on next page).
Never insert your finger into the light bulb socket to check for the presence of the "O" ring. - Replace the light lens by inserting the tab on the lens at point 2 and pushing in the lens with both hands at point 3, see diagram B.
- Turn the refrigerator back on and reset your temperature to the previous settings.
CHANGING THE LIGHT BULB
- Switch off the power at the power point and remove the cord by pulling the plug.
- Carefully unclip the light cover by pulling the light cover tab at the rear, towards you.
natural_image
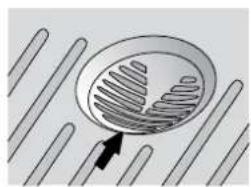
Diagram showing a circular object with internal structures and directional arrows, surrounded by parallel lines (no text or symbols)- Unscrew the light bulb and replace it with a new bulb of the same type and wattage. If, when you remove the light bulb the small rubber "O" ring comes out with the bulb, fit the "O" ring over the new bulb and screw bulb into the socket (see diagram at bottom of page).

Never insert your finger into the light bulb socket to check for the presence of the "O" ring.
-
Replace the light cover by hooking the light cover lugs into the front of the housing and pressing the rear of the cover up until it clips in.
-
Wait 5 minutes to ensure pressures in the refrigeration system are equalised before turning the refrigerator on at the power point.

TIPS & INFORMATION
Ensure the 'O' ring is in place before replacing the bulb.
FREEZER LIGHT ICE & WATER
- Switch off power.
- Remove cover located at the rear under the icemaker.
- Unscrew 2 bulbs and replace.
- Replace light cover.
- Wait 5 minutes and turn power back on.
CLEANING YOUR REFRIGERATOR
CLEANING THE EXTERIOR
WARNING
BEFORE CLEANING: Turn the refrigerator off at the power point and unplug the cord to prevent any chance of electrocuting yourself.
An occasional wipe over with a clean, damp cloth will help remove finger marks. You should only clean the doors with lukewarm, soapy water and a soft cloth. Rinse with clean water and then wipe the surface with a soft, clean cloth to remove any soapy residue.
Note: Only wash plastic parts or decorative trim with warm (not hot) water using an unscented detergent.
Doors - Painted
Clean as described above for the cabinet.
Doors – Stainless Steel
Your stainless steel appliance is manufactured from a mark resistant stainless steel. This stainless steel has a special advanced protective coating that helps ease the removal of marks such as finger prints or water spots. To keep your stainless steel refrigerator looking its best, you should clean it regularly. You should only clean the stainless steel doors with lukewarm soapy water and a soft cloth. Rinse with clean water and then wipe the surface with clean water and a soft, clean cloth to remove any soap residue.

Do not use abrasive pads or other cleaners as they are likely to scratch the surface. Damage to this product after installation is not covered by your warranty.
Note: It is important to wipe in the direction of the grain of the stainless steel to avoid any undue marking of the surface.
CLEANING YOUR REFRIGERATOR HELPFUL HINTS
Drip tray
Water may accumulate in the sump located under the drip tray. If this occurs the sump can be sponged out to prevent water overflowing down the front of the door.
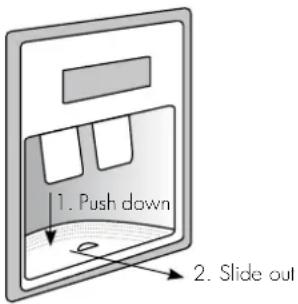
For cleaning, remove the tray as described below:
- Press down at the back of the drip tray with the tips of your fingers.
- Pull the tray forward.
- To refit, slide the drip tray back into position and push into place (see Diagram below).
CLEANING THE INTERIOR
You should clean the refrigerator interior regularly. It will be easiest to clean when the food supply is low. Wash the interior with a soft cloth and use an unscented mild soap with lukewarm water. Thoroughly dry all surfaces and removable parts. Avoid getting water on refrigerator controls. If you have taken out any removable parts, replace them and switch the power on before restocking the refrigerator with food. You should keep the interior of your refrigerator hygienic by promptly and thoroughly wiping up any food spills.
Keep door seals clean
Take care to keep door seals clean. Sticky food and drink can cause seals to stick to the cabinet and tear when you open the door. Wash the seal with a mild detergent and warm water. Rinse thoroughly with clean water and dry.

CAUTION
Never use hot water, solvents, commercial kitchen cleaners, aerosol cleaners, metal polishes, caustic or abrasive cleaners, or scourers to clean your refrigerator. Many commercially available cleaning products and detergents contain solvents that will damage your refrigerator. Use only a soft cloth with an unscented mild soap and lukewarm water. If your refrigerator has telescopic extension slides, simply wipe them with a damp cloth to clean them and never immerse them in water.
ENERGY CONSUMPTION (ELECTRICITY COSTS)
The following guide will help you reduce the running cost of your new refrigerator. This will save you money and help conserve our valuable energy resources.
- If you keep your old refrigerator, save power by switching it off when not in use.
- Do not set your freezer temperature too low. After 24 hours, ice cream should be firm but able to be scooped out with a spoon without bending the handle. If ice cream is firmer than this (or too soft), adjust the freezer temperature controls (see 'Adjusting Temperatures', page 11).
- Ensure that the refrigerator doors seal properly as you close them.
- Before you open the refrigerator doors, decide what you want to put in or take out. This will minimize the time you have the doors open.
- It is best to have the refrigerator in a place that is out of direct sunlight and away from heating appliances of any kind. For example, do not place the refrigerator next to a cooker, stove or dishwasher.
- Allow hot foods to cool to room temperature before you put them in your freezer.
• Thaw frozen food in the refrigerator section. - If you keep the freezer compartment filled to capacity, your food mass will help maintain the freezer temperature when you open the door.
- Do not block air vents. Doing so may cause the refrigerator to run longer and use more energy.
SWITCHING OFF YOUR REFRIGERATOR
If you switch your refrigerator off for an extended period, follow these steps to reduce the chances of mould:
- Take all the food out of the refrigerator and freezer compartments.
- Switch off the refrigerator and remove the electric cord from the power point.
- Clean the inside.
- Leave the doors open. This prevents bacteria from growing and causing smells in the refrigerator.
POWER FAILURE
If there is a power failure in your area, keep the door to the freezer closed. Most foods in your freezer will stay frozen for 24 hours.
HELpfUL HiNtS
SAfEtY
It is important to use your appliance safely. This means you need to supervise young children and infirm persons when they use it. You need to make sure that young children do not play with the appliance. Follow the tips below.
ALWAYS do this
| √ Check the power point is properly earthed – if you are not sure get an electrician to check it. |
| √ Switch off and unplug the refrigerator at the power point before you clean or move it. |
| √ If the power supply cord is damaged, have it replaced by the manufacturer, service agent or similarly qualified person. |
NEVER do this
| ☒ Never let children play with the refrigerator. |
| ☒ Never store spray cans, explosive fluids or flammable liquids in the refrigerator. |
| ☒ Never store fizzy drinks in the freezer compartment. |
| ☒ Never lick icy foods when they first come out of the freezer. This can burn your lips and mouth. |
| ☒ Never try to repair the refrigerator yourself. |
| ☒ Never use electric heaters or dryers to defrost the freezer because you can receive an electric shock. |
| ☒ Never use electrical appliances inside the food storage areas. |
| ☒ This appliance contains insulation formed with flammable blowing gases. For safety reasons, take care when you dispose of it. |
| ☒ Do not damage the appliance circuit. |
| ☒ Do not use mechanical devices or other means to accelerate the defrosting process, other than those recommended by the manufacturer. |

WARNING
When you dispose of your old refrigerator or freezer remove any doors. Children can suffocate if they get trapped inside.
HELpfUL HiNtS foR StoRiNG food
ALWAYS do tHiS
| Buy the freshest, best quality food and put it in the refrigerator as soon as possible. |
| Cover food with plastic wrap or foil to stop it drying out and to help prevent bad smells. |
| Rinse and wrap fish and poultry before you put them in the refrigerator. |
| Minimise bacteria by removing stuffing from poultry before you put it in the refrigerator. |
| When you store eggs in the refrigerator compartment, store them with the pointed end down. |
NEVER do tHiS
| Store bananas, avocados or mangoes in the refrigerator.This can cause them to go black or to go soft. |
| Put hot or warm food in the refrigerator. Allow it to cool first. |
HELpfUL HiNtS foR fREEziNG food
You can use the freezer to store food which you buy in bulk when prices are low. You can also cook extra food and freeze it for later use.
ALWAYS do tHiS
| Buy the freshest, best quality food and put it in the freezer as soon as possible. |
| Place food in plastic bags or plastic wrap before you put it in the freezer. |
| Squeeze the air out of plastic bags as this prevents frost. |
| When you buy frozen foods in the supermarket, keep them in their packaging when you store them. |
| Defrost food, especially chicken and fish, in the refrigerator compartment. This stops bacteria from growing. |
| Leave food in its wrapping while it defrosts. |
| Use defrosted food immediately. |
NEVER do tHiS
| ∅ | Never refreeze defrosted food. |
tRoUbLESHootiNG
If you think something may be wrong with your refrigerator, you can carry out some easy checks before calling for service. You may locate the problem, sparing yourself from inconvenience and saving time and money.
| pRobLEMSoLUtionN | pRobLEMSoLUtionN | ||
| When your appliance is not operating | Check that the power cord is plugged into the power outlet properly and that the outlet is switched 'ON'.Try running another appliance from the power outlet. If no power is coming from the outlet you may have blown a fuse or tripped a circuit of your household power supply.Try adjusting the temperature control to a slightly "colder" position.It is normal for the freezer fan NOT to operate during the automatic defrost cycle, or for a short time after the appliance is switched on. | When the motor seems to run more than expected | Your new appliance provides you with large capacities in both the refrigerator section and the separate freezer. It is normal for the motor to operate frequently. However, to keep operation to a minimum, check the following:Are doors kept open too long or too often?Are controls set too cold?See 'Adjusting temperature' in your relevant model section.Have large amounts of warm food just recently been stored?Summer, festive seasons and holidays usually mean a lot more work for your appliance. |
| When there is refrigerator/freezer noise | Modern refrigerators/freezers with increased storage capacity use high speed compressors. These can provide a seemingly high level of sound which is quite normal. Normal operational sounds include:Occasional gurgling, similar to water boiling.Air flow noise (air circulates because of a small fan).A popping noise heard during automatic defrost.A clicking noise heard just before the compressor starts (this is merely the automatic switching action of the temperature control, turning the compressor on or off). | If the temperature in the refrigerator is too warm | If the day is hot or the room is very warm, the appliance will need to run more than normal.The appliance will run more that normal just after you install it or when it has been turned off for a long time. |
| Check that the appliance has enough clearance at the sides, back and top. Refer to the installation Instructions at the front of this booklet.Refer to 'Adjusting temperature' in your relevant model section.You may have kept the door open too long or too frequently.Food containers or packaging may be holding a door open. | |||
| Other strange sounds may mean that you need to check and take action. For example, noises may mean that:The cabinet is not level.The floor is uneven or weak.Bottles are badly placed and rattling.There are vibrations from an object on top of or behind or beside the refrigerator.The back of the refrigerator cabinet is touching the wall. | If the temperature in the refrigerator is too cold | Refer to 'Adjusting temperature' in your relevant model section.Increase the temperature to avoid high energy consumption. | |
| If heavy frosting occurs in the freezer | Make sure you fully close the freezer and fridge doors. If the doors are left partly open a heavy frost will coat the inside of the freezer. If a frost develops, remove it. Take care to properly close the doors and the frost will not reoccur. | ||
| Remember it is quite normal for noise to seem louder just after the refrigerator starts operating. | If water drips on the floor | The defrost water tray, (located at the back or underneath of the cabinet) may not be properly positioned, or the drain tube may not be properly positioned to direct water into this tray. You may need to pull the refrigerator away from the wall to check the tray and tube. | |
| If there are odours inside the appliance | The interior may need cleaning.Some foods produce odours.Some containers and wrapping can cause odours.Ask yourself if the odour started about the same time you started storing something unusual. | Fridge does not exit vacation mode | Turn appliance off at the powerpoint.Leave off for three (3) minutes for the memory to clear, then turn back on. |
| pRobLEM poSSibLE cAU | SES SolUtion | |
| AUtoMAtic ice-MAKER | ||
| The ice maker is not making any ice | Ice maker is in the OFF positionPut switch in the ON positionWater tap is turned offTurn on the water tapThe freezer is not cold enoughSee the Troubleshooting section: 'If the temperature in the refrigerator is too warm' on page10The water dispenser may not be dispensing waterFilter may be blockedCheck and/or change filter | If it isn't, the ice & water filter cartridge may be clogged or restricted by foreign material, and will need to be replaced |
| The ice-maker is not making enough ice | The ice maker is producing less ice than you expectThe freezer is not cold enoughRefer to 'Adjusting Temperature' in your relevant model sectionHousehold water line valve is not openOpen the household water line valveThe water dispenser is dispensing slower than normal | The ice maker should produce approximately 2–3 kilograms of ice every 24 hoursReplace the water filter cartridgeReplace the filter cartridge, as the water filter cartridge may be clogged |
| Ice cubes are hollow or smaller than normal | Restricted water flow to the ice maker | Replace the filter cartridge, as the water filter cartridge may be clogged |
| The ice has a bad odour and taste | The ice has picked up odour or flavour from strongly flavoured food stored in the refrigerator or freezerThe water running into the ice maker has poor taste or colourIce not used frequently enoughDiscard stale ice monthly | Cover foods tightly. Discard stale ice. The ice maker will produce a fresh supplyChange ice monthlyAdd a filter to water supply line. Consult a water purifying company |
| ice diSpENSER | ||
| The dispenser will not dispense ice | The ice storage container is emptyHousehold water tap is not openThe wire signal arm is either held or jammedIce maker switch is in OFF position | When the first supply of ice drops into the container, the dispenser should operate.Open the household water tap. Allow sufficient time for the ice to be made. When ice is made the dispenser should operateRemove jam or free armSee ice maker section in user manual. Turn switch to ON position |
| The ice dispenser is jammed | Ice has melted and frozen around the auger due to infrequent use, temperature fluctuations, and/or power outagesIce cubes are jammed between the ice maker and back of ice containerIce cubes are frozen togetherIce cubes are hollow or smaller than normal | Remove the ice container and empty it's contents. Clean and dry the container and replace to its proper position. When new ice is made, the dispenser should operateRemove ice cubes that are jamming dispenserUse the dispenser often so that cubes do not freeze togetherDiscard ice monthlyThe water filter cartridge could be clogged. Cartridge may need replacing |
If you have a problem, and the problem persists after you have made the checks mentioned above, contact your nearest Electrolux approved Service Centre or the dealer you bought the refrigerator from. Be ready to quote the model number and 8-digit serial number, which is stated on the label inside the refrigerator compartment.
NotES
NotES
NotES
Electrolux Warranty
FOR SALES IN AUSTRALIA AND NEW ZEALAND APPLIANCE: REFRIGERATION
This document sets out the terms and conditions of the product warranties for Electrolux Appliances. It is an important document. Please keep it with your proof of purchase documents in a safe place for future reference should you require service for your Appliance.
1. In this warranty
(a) ‘acceptable quality’ as referred to in clause 10 of this warranty has the same meaning referred to in the ACL;
(b) ‘ACL’ means Trade Practices Amendment (Australian Consumer Law) Act (No.2) 2010;
(c) 'Appliance' means any Electrolux product purchased by you accompanied by this document;
(d) 'ASC' means Electrolux' authorised serviced centres;
(e) 'Electrolux' means Electrolux Home Products Pty Ltd of 163 O'Riordan Street, Mascot, NSW 2020, ABN 51 004 762 341 in respect of Appliances purchased in Australia and Electrolux (NZ) Limited of 3-5 Niall Burgess Road, Mount Wellington, in respect of Appliances purchased in New Zealand;
(f) ‘major failure’ as referred to in clause 10 of this warranty has the same meaning referred to in the ACL and includes a situation when an Appliance cannot be repaired or it is uneconomic for Electrolux, at its discretion, to repair an Appliance during the Warranty Period;
(g) 'Warranty Period' means:
(i) where the Appliance is used for personal, domestic or household use (i.e. normal single family use) as set out in the instruction manual, the Appliance is warranted against manufacturing defects in Australia and New Zealand for 24 months and for the Appliance's compressor, condenser, evaporator and drier, an additional 36 months parts only warranty applies, following the date of original purchase of the Appliance;
(ii) where the Appliance is used for commercial purposes (including being used to directly assist a business or where the Appliance is used in a multi-family communal or share type environment), the Appliance will then be warranted against manufacturing defects in Australia for 3 months and in New Zealand for 3 months, following the date of original purchase of the Appliance.
(h) 'you' means the purchaser of the Appliance not having purchased the Appliance for re-sale, and 'your' has a corresponding meaning.
- This warranty only applies to Appliances purchased and used in Australia or New Zealand and is in addition to (and does not exclude, restrict, or modify in any way) any non-excludable statutory warranties in Australia or New Zealand.
- During the Warranty Period Electrolux or its ASC will, at no extra charge if your Appliance is readily accessible for service, without special equipment and subject to these terms and conditions, repair or replace any parts which it considers to be defective. Electrolux or its ASC may use remanufactured parts to repair your Appliance. You agree that any replaced Appliances or parts become the property of Electrolux. This warranty does not apply to light globes, batteries, filters or similar perishable parts.
- Parts and Appliances not supplied by Electrolux are not covered by this warranty.
- You will bear the cost of transportation, travel and delivery of the Appliance to and from Electrolux or its ASC. If you reside outside of the service area, you will bear the cost of:
(a) travel of an authorised representative;
(b) transportation and delivery of the Appliance to and from Electrolux or its ASC,
In all instances, unless the Appliance is transported by Electrolux or an
Electrolux authorised representative, the Appliance is transported at the owner's cost and risk while in transit to and from Electrolux or its ASC.
- Proof of purchase is required before you can make a claim under this warranty.
- You may not make a claim under this warranty unless the defect claimed is due to faulty or defective parts or workmanship. Electrolux is not liable in the following situations (which are not exhaustive):
(a) the Appliance is damaged by:
(i) accident
(ii) misuse or abuse, including failure to properly maintain or service
(iii) normal wear and tear
(iv) power surges, electrical storm damage or incorrect power supply
(v) incomplete or improper installation
(vi) incorrect, improper or inappropriate operation
(vii) insect or vermin infestation
(viii) failure to comply with any additional instructions supplied with the Appliance;
(b) the Appliance is modified without authority from Electrolux in writing;
(c) the Appliance's serial number or warranty seal has been removed or defaced;
(d) the Appliance was serviced or repaired by anyone other than Electrolux, an authorised repairer or ASC.
- This warranty, the contract to which it relates and the relationship between you and Electrolux are governed by the law applicable where the Appliance was purchased. Where the Appliance was purchased in New Zealand for business purposes the Consumer Guarantee Act does not apply.
- To the extent permitted by law, Electrolux excludes all warranties and liabilities (other than as contained in this document) including liability for any loss or damage whether direct or indirect arising from your purchase, use or non use of the Appliance.
- For Appliances and services provided by Electrolux in Australia, the Appliances come with a guarantee by Electrolux that cannot be excluded under the Australian Consumer Law. You are entitled to a replacement or refund for a major failure and for compensation for any other reasonably foreseeable loss or damage. You are also entitled to have the Appliance repaired or replaced if the Appliance fails to be of acceptable quality and the failure does not amount to a major failure. The benefits to you given by this warranty are in addition to your other rights and remedies under a law in relation to the Appliances or services to which the warranty relates.
- At all times during the Warranty Period, Electrolux shall, at its discretion, determine whether repair, replacement or refund will apply if an Appliance has a valid warranty claim applicable to it.
- For Appliances and services provided by Electrolux in New Zealand, the Appliances come with a guarantee by Electrolux pursuant to the provisions of the Consumer Guarantees Act, the Sale of Goods Act and the Fair Trading Act.
- To enquire about claiming under this warranty, please follow these steps:
(a) carefully check the operating instructions, user manual and the terms of this warranty;
(b) have the model and serial number of the Appliance available;
(c) have the proof of purchase (eg an invoice) available;
(d) telephone the numbers shown below.
- You accept that if you make a warranty claim, Electrolux and its ASC may exchange information in relation to you to enable Electrolux to meet its obligations under this warranty.
Important Notice
Before calling for service, please ensure that the steps listed in point 13 above have been followed.
| FOR SERVICEor to find the address of your nearest state service centre in AustraliaPLEASE CALL 13 13 49For the cost of a local call (Australia only) | SERVICE AUSTRALIAElectroluxELECTROLUX HOME PRODUCTSwww.electrolux.com.au | FOR SPARE PARTSor to find the address of your nearest state spare parts centre in AustraliaPLEASE CALL 13 13 50For the cost of a local call (Australia only) |
| FOR SERVICEor to find the address of your nearest authorised service centre in New ZealandFREE CALL 0800 10 66 10(New Zealand only) | SERVICE NEW ZEALANDElectroluxELECTROLUX HOME PRODUCTSwww.electrolux.co.nz | FOR SPARE PARTSor to find the address of your nearest state spare parts centre in New ZealandFREE CALL 0800 10 66 20(New Zealand only) |
For more information on all Westinghouse appliances, or for dimension and installation information, call into your retailer, phone or email our customer care team or visit our website:
AUSTRALIA
phone: 1300 363 640
fax: 1800 350 067
email: customercare@electrolux.com.au
web: www.westinghouse.com.au
NEW ZEALAND
phone: 09 573 2384
fax: 0800 363 600
email: customercare@electrolux.co.nz
web: www.westinghouse.co.nz
Electrolux

TOP SERVICE
Top Service encompasses the after sales service provided by The Electrolux Group to consumers including delivery, home service and spare parts.
Westinghouse. We are part of the Electrolux family.
Share more of our thinking at www.electrolux.com
© 2011 Electrolux Home Products Pty Ltd ABN 51 004 762 341
Print code: WMANREFRIGSXS_Jul11
Part number: 1458529
- coNditioNS of USE
- TIPS & INFORMATION
- iMpoRtANt - cHEcK foR ANY dAMAGES oR MARKS
- ENVIRONMENTAL TIPS
- iNfoRMAtion oN diSpoSAL foR USERS
- BEFORE YOU CALL
- IMPORTANT SAFETY INSTRUCTIONS
- WARNING
- CAUTION
- R600A REFRIGERANT WARNING
- LARGE SidE bY SidE with StANdARd fEAtURES
- GENERAL iNStALLAtioN
- CLEARANcES ARoUND YoUR REfRIGERAtoR
- iNSTALLatioN
- AdJUSTiNG dooR ALIGNMENT
- iNtERNAL pAcKAGiNG
- icE AND wAtER ModELS
- icE MAKER START Up
- iNitiAL StARt-Up
- REfRiGERAtoR/fREEzER opERAtioN
- tEMpERA tURE SENSoRS
- USING YOUR REFRIGERATOR
- ELECTRONIC DISPLAY PANEL
- Turning the clock on and off - WSE6100
- SETTING THE CLOCK
- CONTROLLING THE TEMPERATURE
- Changing the freezer temperature
- Changing the refrigerator temperature
- FREEZER TEMPERATURE ALARM
- DOOR ALARM
- DRINKS CHILL TIMER
- CHILD LOCK
- ENERGY EFFICIENCY
- - Normal mode
- - Eco mode
- • Vacation (holiday) mode
- OTHER ELECTRONIC FEATURES
- FOOD COMPARTMENT FEATURES
- Door storage bins
- Dairy compartment
- Store safe compartment (see top diagram)
- Deli compartment
- Slide out glass shelves
- Freezer baskets
- Telescopic freezer bins and crispers
- Fully close the bin.
- Crisper bin(s)
- • Storing fruit & smallgoods
- ICE & WATER FEATURES\*
- TWIST ICE & SERVE
- ICE & WATER DISPENSER FEATURES
- Dispenser lamp
- HOW THE WATER DISPENSER WORKS
- Normal Operation — For cool water, add ice.
- HOW THE ICE DISPENSER WORKS
- CLEANING THE ICE DISPENSER
- Remove and empty the ice storage bin if:
- Other electronic features of your standard and ice & water refrigerator Your refrigerator:
- icE AND wAtER iNStALLAtioN
- THE EXTERNAL wAtER filtER Kit
- bEfoRE bEGiNNiNG iNStALLAtioN pLEASE READ:
- Water Filter
- iNStALLiNG YoUR icE AND wAtER fiLtER
- tipS AND USEfUL iNfoRMAtion
- CHANGING tHE wAtER filTER
- to REpLAcE tHE wAtER fiLtER
- CHANGiNG tHE LiGht bULb
- REFRIGERAtoR LiGHT
- FREEZER LIGHT ICE & WATER
- CLEANING YOUR REFRIGERATOR
- CLEANING THE EXTERIOR
- Doors - Painted
- Doors – Stainless Steel
- CLEANING YOUR REFRIGERATOR HELPFUL HINTS
- Drip tray
- CLEANING THE INTERIOR
- Keep door seals clean
- ENERGY CONSUMPTION (ELECTRICITY COSTS)
- SWITCHING OFF YOUR REFRIGERATOR
- POWER FAILURE
- HELpfUL HiNtS
- SAfEtY
- HELpfUL HiNtS foR StoRiNG food
- HELpfUL HiNtS foR fREEziNG food
- tRoUbLESHootiNG
- NotES
- Electrolux Warranty
- FOR SALES IN AUSTRALIA AND NEW ZEALAND APPLIANCE: REFRIGERATION
- This document sets out the terms and conditions of the product warranties for Electrolux Appliances. It is an important document. Please keep it with your proof of purchase documents in a safe place for future reference should you require service for your Appliance.
- In this warranty
- AUSTRALIA
- NEW ZEALAND
- TOP SERVICE
Brand : WESTINGHOUSE
Model : WSE6970PA
Category : Cooker