
Pressito Bivolt - Compressor EINHELL - Free user manual and instructions
Find the device manual for free Pressito Bivolt EINHELL in PDF.


| Product Type | Compressor |
| Brand | Einhell |
| Model | Pressito Bivolt |
| Power Supply (Mains) | 230 V AC, 50/60 Hz |
| Power Supply (Battery) | 18 V DC (Power X-Change system) |
| Power Consumption (Mains) | 90 W |
| Modes | Compressed air mode, low-pressure blower mode, OFF |
| Display | Digital pressure display with selectable units (bar, PSI, kPa) |
| Pressure Adjustment | Increase button, decrease button, unit selection button, reduce pressure button |
| Battery Indicator | 3-LED charge level indicator on battery pack |
| Charging Time | Approx. 30–140 min depending on battery capacity (1.5–5.2 Ah) |
| Compatible Batteries | Einhell Power X-Change 18 V (1.5, 2.0, 3.0, 4.0, 5.2 Ah) |
| Air Hose | Included with valve adapter |
| Accessories Included | Bicycle adapter, conical adapter, ball valve adapter |
| Storage | Compartment for power cable and storage for accessories |
| Noise Level | Requires ear protection (noise can cause hearing damage) |
| Protection | Overheating protection, automatic shut-off when preset pressure reached |
| Maintenance | No user-serviceable parts; clean with moist cloth |
| Safety Class | Class II (double insulation) |
| Proper Use | Inflating car, motorcycle, bicycle tires, sports balls, air mattresses; low-pressure suction |
| Improper Use | Not for commercial/industrial use; not for truck/tractor tires |
Frequently Asked Questions - Pressito Bivolt EINHELL
User questions about Pressito Bivolt EINHELL
0 question about this device. Answer the ones you know or ask your own.
Ask a new question about this device
Download the instructions for your Compressor in PDF format for free! Find your manual Pressito Bivolt - EINHELL and take your electronic device back in hand. On this page are published all the documents necessary for the use of your device. Pressito Bivolt by EINHELL.
USER MANUAL Pressito Bivolt EINHELL
natural_image
Front view of a handheld device with visible internal components and a labeled dimension line (13), no text or symbols present.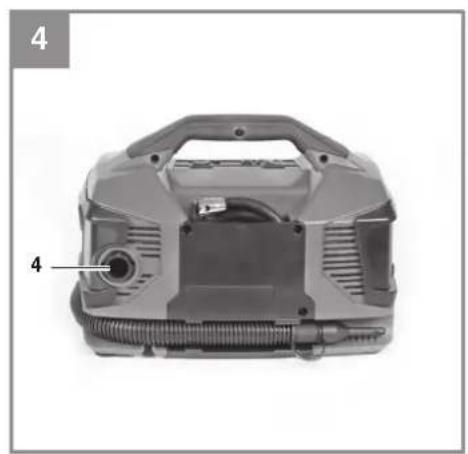
natural_image
Exterior view of a mechanical device housing with visible internal components and a labeled component (no text or symbols beyond part numbers)
natural_image
Close-up of a mechanical device with labeled component '2' (no visible text or symbols beyond label)

natural_image
Interior view of a device with labeled parts (8 and 17), showing internal components and wiring (no readable text or symbols beyond labels)
BR
Índice
Acendem 2 ou 1 LED(s):
- Safety regulations
- Layout and items supplied
- Proper use
- Technical data
- Before using the equipment
- Operation
- Replacing the power cable
- Disposal and recycling
- Storage
-
Charger indicator
-
Cleaning, maintenance and ordering of spare parts
GB

Danger! - Read the operating instructions to reduce the risk of injury

Caution! Wear ear-muffs. The impact of noise can cause damage to hearing.
Beware of electrical voltage!

Beware of hot parts!

Store the batteries only in dry rooms with an ambient temperature of +10°C to +40°C. Place only fully charged batteries in storage (charged at least 40%).

Class II
GB
Danger!
When using the equipment, a few safety precautions must be observed to avoid injuries and damage. Please read the complete operating instructions and safety regulations with due care. Keep this manual in a safe place, so that the information is available at all times. If you give the equipment to any other person, hand over these operating instructions and safety regulations as well. We cannot accept any liability for damage or accidents which arise due to a failure to follow these instructions and the safety instructions.
1. Safety regulations
Danger!
Read all safety regulations and instructions.
Any errors made in following the safety regulations and instructions may result in an electric shock, fire and/or serious injury.
Keep all safety regulations and instructions in a safe place for future use.
General safety instructions for electric tools
Danger!
Read all safety regulations and instructions. Any errors made in following the safety regulations and instructions may result in an electric shock, fire and/or serious injury.
Keep all safety regulations and instructions in a safe place for future use.
The term “electric tool” used in the safety instructions refers to electric tools operated from the mains power supply (with a power cable) and to battery operated electric tools (without a power cable).
1. Workplace safety
a) Keep your work area clean and well illuminated. Untidy or unlit work areas can result in accidents.
b) Do not operate the electric tool in an environment where there is a risk of explosions and where there are infl ammable liquids, gases or dust. Electric tools produce sparks which could set the dust or vapours alight.
c) Keep the electric tool out of the reach of children and other persons. If there is a distraction, you may lose control of the appliance.
2. Electrical safety
a) The connector plug from this electric tool must fit into the socket. The plug should never be altered in any way. Never use adapter plugs together with earthed electric tools. Unaltered plugs and correct sockets reduce the risk of an electric shock.
b) Avoid bodily contact with earthed surfaces such as pipes, heating, ovens and fridges. The risk of electric shock is increased if your body is earthed.
c) Keep the tool out of the rain and away from moisture. The ingress of water into an electric tool increases the risk of an electric shock.
d) Do not use the cable to carry the electric tool, to hang it up or to pull it out of the socket. Keep the cable away from heat, oil, sharp edges and moving parts of the appliance. Damaged or entangled cables increase the risk of an electric shock.
e) If you are working outdoors with an electric tool, only use extension cables which are designed specifically for this purpose. Using specially designed outdoor extension cables, the risk of electric shock is reduced.
f) If operation of the electric tool in a damp environment can not be avoided, use a earth-leakage circuit-breaker. The earth-leakage circuit-breaker reduces the risk of an electric shock.
3. Safety of persons
a) Be careful, watch what you are doing and use an electric tool sensibly. Do not use the tool if you are tired or under the influence of drugs, alcohol or medication. A moment of inattention when using the electric tool can result in serious injuries.
b) Wear personal protection equipment and always wear safety goggles. Wearing personal protection (such as dust masks, non-slip safety shoes, safety helmet or ear protection, depending upon the type and use of the electric tool) reduces the risk of injury.
c) Make sure that the appliance cannot start up accidentally. Ensure that the electric tool is switched off before you connect it to the power supply and/or insert the battery, or pick up or carry the tool. If your fi nger is on the switch whilst carrying the elec- tric tool or if you connect the appliance to the mains when it is switched on, this can lead to accidents.
d) Remove keys and wrenches before swit-
GB
ching on the electric tool. A tool or key which comes into contact with rotating parts of the appliance can lead to injuries.
e) Avoid abnormal working postures. Make sure you stand squarely and keep your balance at all times. In this way, you can control the electric tool better in unexpected circumstances.
f) Wear suitable work clothes. Do not wear loose clothing or jewellery. Keep hair, clothes and gloves away from moving parts. Loose clothing, jewellery or long hair can get trapped in moving parts.
g) If vacuuming devices and draining devices can be fi tted, make sure that these are correctly attached and correctly used. The use of a dust extraction system can reduce the danger posed by dust.
- Usage and treatment of the electric tool
a) Do not overload the appliance. Use the correct tool for your work. You will be able to work better and more safely within the given performance boundaries.
b) Do not use an electric tool with a defective switch. An electric tool that cannot be switched on or off is dangerous and must be repaired.
c) Pull the plug out of the socket and/or remove the battery before making any adjustments to the appliance, changing accessories or put the appliance down. This safety measure prevents starting the electric tool unintentionally.
d) Keep unused electric tools out of the reach of children. Do not allow people who are not familiar with the appliance or who have not read these instructions to use the appliance. Electric tools are dangerous if they are used by inexperienced people.
e) Clean your electric tool carefully. Check whether moving parts are functioning properly and not jamming, whether parts are broken or damaged enough that the functioning of this electric tool is affected. Have damaged parts repaired before using the appliance. Many accidents are caused by badly maintained electric tools.
f) Keep your cutting tools sharp and clean. Carefully maintained cutting tools with sharp cutting edges will jam less and are easier to control.
g) Make sure to use electric tools, accessories, attachments, etc. in accordance with these instructions. Take the conditions in
your work area and the job in hand into account. Using electric tools for any purpose other than the one for which they are intended can lead to dangerous situations.
- Using and handling the cordless tool
a) Only charge the batteries in chargers that are recommended by the manufacturer. A charger that is designed for a certain type of battery may pose a fi re risk if it is used with other types of battery.
b) Use only the correct batteries in the electric tools. The use of other batteries may result in injuries and a fire risk.
c) Keep unused batteries away from paper clips, coins, keys, nails, screws and other metallic objects that could cause a short circuit between the contacts. A short circuit between the battery contacts may cause burns or a fi re.
d) In case of incorrect use, fl uid may escape from the battery. Avoid contact with it. If you touch it by accident, rinse the affected area with water. If you get the fl uid in your eyes, also seek medical advice. Leaking battery fl uid can cause skin irritation or burns.
- Service
a) Have your electric tool repaired only by trained personnel using only genuine spare parts. This will ensure that your electric tool remains safe to use.
Hold the equipment by the insulated handles when carrying out work during which the screw or the plug-in tool could strike concealed power cables. Contact with a live cable may also make the metal parts of the equipment live and cause an electric shock.
Additional safety instructions
We pay a great deal of attention to the design of every battery pack to ensure that we supply you with batteries which feature maximum power density, durability and safety. The battery cells have a wide range of safety devices. Each individual cell is initially formatted and its electrical characteristic curves are recorded. These data are then used exclusively to be able to assemble the best possible battery packs. Despite all the safety precautions, caution must always be exercised when handling batteries. The following points must be obeyed at all times to ensure safe use.
GB
Safe use can only be guaranteed if undamaged cells are used. Incorrect handling can cause cell damage.
Important: Analyses confirm that incorrect use and poor care are the main causes of the damage caused by high performance batteries.
Information about the battery
-
The battery pack supplied with your cordless tool is not charged. The battery pack has to be charged before you use the tool for the first time.
-
For optimum battery performance avoid low discharge cycles. Charge the battery pack frequently.
-
Store the battery pack in a cool place, ideally at 15°C and charged to at least 40%.
-
Lithium-ion batteries are subject to a natural ageing process. The battery pack must be replaced at the latest when its capacity falls to just 80% of its capacity when new. Weakened cells in an aged battery pack are no longer capable of meeting the high power requirements and therefore pose a safety risk.
-
Do not throw battery packs into an open fire. There is a risk of explosion!
-
Do not ignite the battery pack or expose it to fire.
-
Do not exhaustively discharge batteries. Exhaustive discharge will damage the battery cells. The most common cause of exhaustive discharge is lengthy storage or non-use of partly discharged batteries. Stop working as soon as the performance of the battery falls noticeably or the electronic protection system triggers. Place the battery pack in storage only after it has been fully charged.
-
Protect batteries and the tool from overloads. Overloads will quickly result in overheating and cell damage inside the battery housing without this overheating actually being apparent externally.
-
Avoid damage and shocks. Replace batteries which have been dropped from a height of more than one meter or which have been exposed to violent shocks without delay, even if the housing of the battery pack appears to be undamaged. The battery cells inside the battery may have suff ered serious damage. In this respect, please also read the waste disposal information.
-
If the battery pack suffers overloading and overheating, the integrated protective cut-off will switch off the equipment for safety rea-
sons. Important. Do not press the ON/OFF switch any more if the protective cut-off has actuated. This may damage the battery pack.
- Use only original battery packs. The use of other batteries may result in injuries, explosion and a fire risk.
Information on chargers and the charging process
-
Please check the data marked on the rating plate of the battery charger. Be sure to connect the battery charger to a power supply with the voltage marked on the rating plate. Never connect it to a different mains voltage.
-
Protect the battery charger and its cable from damage and sharp edges. Have damaged cables repaired without delay by a qualified electrician.
-
Keep the battery charger, batteries and the cordless tool out of children's reach.
-
Do not use damaged battery chargers.
-
Do not use the supplied battery charger to charge other cordless tools.
-
In heavy use the battery pack will become warm. Allow the battery pack to cool to room temperature before commencing with the charging.
-
Do not over-charge batteries. Do not exceed the maximum charging times. These charging times only apply to discharged batteries. Frequent insertion of a charged or partly charged battery pack will result in over-charging and cell damage. Do not leave batteries in the charger for days on end.
-
Never use or charge batteries if you suspect that the last time they were charged was more than 12 months previously. There is a high probability that the battery pack has already suff ered dangerous damage (exhaustive discharge).
-
Charging batteries at a temperature below 10^ C will cause chemical damage to the cell and may cause a fire.
-
Do not use batteries which have heated during the charging process, as the battery cells may have suffered dangerous damage.
-
Do not use batteries which have suff ered curvature or deformation during the charging process or which show other non-typical symptoms (gassing, hissing, cracking,...)
-
Never fully discharge the battery pack (recommended depth of discharge max. 80%) A complete discharge of the battery pack will lead to premature ageing of the battery cells.
-
Never charge the batteries unsupervised.
GB
Protection from environmental influences
- Wear suitable work clothes. Wear safety goggles.
- Protect your cordless tool and the battery charger from moisture and rain. Moisture and rain can cause dangerous cell damage.
- Do not use the cordless tool or the battery charger near vapors and infl ammable liquids.
- Use the battery charger and cordless tools only in dry conditions and an ambient temperature of 10-40°C.
- Do not keep the battery charger in places where the temperature is liable to reach over 40^ C. In particular, do not leave the battery charger in a car that is parked in the sunshine.
- Protect batteries from overheating. Overloads, over-charging and exposure to direct sunlight will result in overheating and cell damage. Never charge or work with batteries which have been overheated – replace them immediately if possible.
- Storage of batteries, battery chargers and cordless tools. Store the charger and your cordless tool only in dry places with an ambient temperature of 10-40°C. Store your lithium-ion battery pack in a cool, dry place at a temperature of 10-20°C. Protect them from humidity and direct sunlight. Only place fully charged batteries in storage (charged at least 40%).
- Prevent the lithium-ion battery pack from freezing. Battery packs which were stored below 0^ C for more than 60 minutes must be disposed of.
- When handling batteries beware of electrostatic charge: Electrostatic discharges cause damage of the electronic protection system and the battery cells. Avoid electrostatic charging and never touch the battery poles.

Rechargeable batteries and cordless electric machines and tools contain materials that are potentially harmful to the environment.
Never place any cordless electric machines or tools in your household refuse. When cordless electric machines or tools become defective or worn, remove the rechargeable batteries according to your local environment protection laws.
Safety information for the compressor Danger! The following basic safety actions must be taken when using this compressor in order to protect the user from electric shocks and the risk of injury and fi re. Read and follow these instructions before using the equipment.
- Check the ambient conditions Do not expose the compressor to rain. Never use the compressor in damp or wet locations. There is a risk of electric shock! Provide good lighting. Do not use the compressor near flammable liquids or gases. There is a risk of explosion!
- Protect yourself against electric shocks Avoid bodily contact with earthed parts, e.g. pipes, radiators, cookers and refrigerators.
- Keep children away! Do not allow other persons to touch the compressor or cable, keep them away from your work area.
- Do not use the cable for purposes other than that for which it is designed
Do not carry the compressor by its cable and do not use the cable to pull the plug out of the socket. Protect the cable from heat, oil and sharp edges. The cable/plug could become damaged.
Take care of your compressor Keep your compressor clean in order to work well and safely. Follow the maintenance instructions. Check the power plug and cable on a regular basis and have them replaced by an authorized specialist if they are damaged. Check the extension cable regularly and replace it if damaged. - Avoid unintentional starting Make sure that the switch is turned off when connecting to the power supply.
- Check your compressor for damage Before using the compressor again, carefully check the safety devices and any slightly damaged parts to ensure that they are in good working order. Check that the moving parts are working correctly, that they do not jam, and that no parts are damaged. Make sure that all parts are fitted correctly to ensure that the equipment remains safe to use. Unless otherwise stated in the operating instruc-
GB
tions, damaged guards and parts have to be repaired or replaced by a customer service workshop. Damaged switches have to be replaced by a customer service workshop. Never use an electric power tool with a switch that cannot be turned on and off.
- Leave all repairs to a qualified electrician Repairs must be left strictly to qualified electricians or the user might suffer an accident.
- Noise
Wear ear muffs when you use the compressor. - Replacing the power cable To prevent hazards, leave the replacement of damaged power cables strictly to the manufacturer or a qualified electrician. There is a risk of electric shock!
- Inflating tires Directly after inflating tires, check the pressure with a suitable pressure gauge, for example at your filling station.
- Place of installation Set up the compressor on an even surface.
Safety instructions for working with compressed air and blow-out pistols
- The air, which is sucked in by the compressor, must be kept free of impurities that could cause fires or explosions in the compressor pump.
- Wear safety goggles. Foreign bodies or blown off parts can easily cause injuries.
- Do not blow at people and do not clean clothes while being worn. Risk of injury!
2. Layout and items supplied
2.1 Layout (Fig. 1-8)
1 Handle
2 Accessory storage compartment
3 Air hose
4 Air hose connection (blowing)
5 Compressed air hose with valve adapter
6 Battery pack (not supplied)
7 Bicycle adapter
8 Conical adapter
9 Adapter for ball valves
10 Selector switch for mains-powered mode/battery-powered mode
11 Display
12 Selector switch for compressed air mode/OFF/low-pressure blower mode
13 Air hose connection (suction)
14 "Reduce pressure" button
15 "Unit overpressure" button
16 "Increase pressure" button
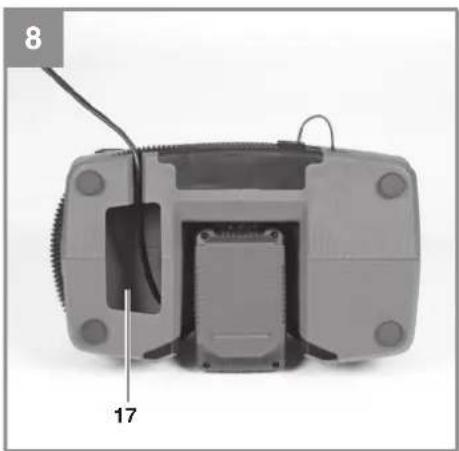
17 Storage compartment for the power cable
2.2 Items supplied
Please check that the article is complete as specified in the scope of delivery. If parts are missing, please contact our service center or the sales outlet where you made your purchase at the latest within 5 working days after purchasing the product and upon presentation of a valid bill of purchase. Also, refer to the warranty table in the service information at the end of the operating instructions.
- Open the packaging and take out the equipment with care.
- Remove the packaging material and any packaging and/or transportation braces (if available).
- Check to see if all items are supplied.
- Inspect the equipment and accessories for transport damage.
- If possible, please keep the packaging until the end of the guarantee period.
Danger!
The equipment and packaging material are not toys. Do not let children play with plastic bags, foils or small parts. There is a danger of swallowing or suff ocating!
- Compressor
Air hose - Bicycleadapter
- Conicaladapter
• Adapter for ball valves
• Original operating instructions
3. Proper use
This device is intended for inflating car, motorcycle and bicycle tires as well as sports balls, water balls, air mattresses and other similar items.
In addition the device is also intended for suctioning volumes of air from objects with low pressure, such as water balls, air mattresses and other similar items.
This device is not suitable for tires with very large volumes, such as truck or tractor tires for example.
The equipment can be operated from the mains power supply using the power cable or alterna-
GB
tively in battery-powered mode using a suitable rechargeable battery. The equipment does not have a charging functionality for the rechargeable battery.
The equipment is to be used only for its prescribed purpose. Any other use is deemed to be a case of misuse. The user / operator and not the manufacturer will be liable for any damage or injuries of any kind caused as a result of this. Please note that our equipment has not been designed for use in commercial, trade or industrial applications. Our warranty will be voided if the machine is used in commercial, trade or industrial businesses or for equivalent purposes.
4. Technical data
See warranty card of your country.
Wear ear-muff s.
The impact of noise can cause damage to hearing.
Keep the noise emissions and vibrations to a minimum.
- Only use appliances which are in perfect working order.
• Service and clean the appliance regularly.
• Adapt your working style to suit the appliance.
• Do not overload the appliance. - Have the appliance serviced whenever necessary.
- Switch the appliance off when it is not in use.
Caution!
Residual risks
Even if you use this electric power tool in accordance with instructions, certain residual risks cannot be rules out. The following hazards may arise in connection with the equipment's construction and layout:
- Damage to hearing if no suitable ear protection is used.
Danger!
The electric power tool generates an electro-magnetic fi eld during operation. Under certain circumstances this fi eld may actively or passively impede medical implants. To reduce the risk of serious or fatal injuries, we recommend persons with medical implants to consult their doctor and
the manufacturer of the medical implant prior to using the equipment.
5. Before using the equipment
Before you connect the equipment to the power supply make sure that the data on the rating plate are identical to the supply voltage (if operating from the mains power supply).
Before you connect the equipment to the power supply make sure that the data on the rating plate are identical to the data for the rechargeable battery (if using a rechargeable battery for operation).
- Check the equipment for damage which may have occurred in transit. Report any damage immediately to the transport company which was used to deliver the compressor.
• Make sure that the intake air is dry and dust-free. - Do not install the compressor in a damp or wet room.
- The compressor may only be used in suitable rooms (with good ventilation and an ambient temperature from +5 °C to 40 °C). There must be no dust, acids, vapors, explosive gases or inflammable gases in the room.
- The compressor is designed to be used in dry rooms. It is prohibited to use the compressor in areas where work is conducted with sprayed water.
- Operate the equipment only on a firm, level surface.
Warning! When using the equipment to inflate objects, check the information and safety instructions provided by the manufacturer.
5.1 Charging the LI battery pack (Fig. 2, 9)
- Remove the battery pack (6) from the handle, pressing the pushlock button (a) downwards to do so.
- Check that your mains voltage is the same as that marked on the rating plate of the battery charger. Insert the power plug of the charger (d) into the socket outlet. The green LED will then begin to flash.
- Push the battery pack (6) onto the battery charger (d).
GB
In section 10 (Charger indicator) you will find a table with an explanation of the LED indicator on the charger.
If the battery pack fails to charge, check for the following:
• voltage at the power socket
- whether there is good contact at the charging contacts of the charging unit.
If the battery pack still fails to charge, send
• the charger and charging adapter
• and the battery pack
to our customer service center.
5.2 Battery capacity indicator (Fig. 2)
Press the button for the battery capacity indicator (b). The battery capacity indicator (c) will indicate the charge status of the battery by means of 3 LEDs.
All 3 LEDs are lit:
The battery is fully charged.
2 or 1 LED(s) are lit:
The battery has an adequate remaining charge.
1 LED blinks:
The battery is empty, recharge the battery.
All LEDs flash:
The battery pack has undergone exhaustive discharge and is defective. Do not use or charge a defective battery pack.
6. Operation
6.1 Changing between mains/battery operation and compressor compressed air/low-pressure blower operation (Fig. 7)
To change over between mains-powered and battery-powered operation, press the selector switch (10):
• DC/switch to the right:
- The equipment will be supplied with power from the rechargeable battery.
• AC/switch to the left:
- The equipment will be supplied with power from the power cable.
- To change over between compressed air and low-pressure operation, press the selector switch (12):
- Switch to the left: Compressed air operation
• Switch in the middle: OFF
- Switch to the right: Low-pressure operation
6.2 Compressor compressed air operation (Fig. 1a, 1b, 2, 7)
- To inflate objects with compressed air, use the compressed air hose (5).
- Connect the adapter of the compressed air hose to the object you wish to inflate.
- Depending on what you are inflating, also use the adapters (7, 8, 9) or other adapters available from retail stores.
- The pressure at the compressed air hose will be displayed in the display (11).
- The unit of the displayed pressure can be selected with the button (15). The pressure can be displayed in units of [bar], [PSI] or [kPa].
- The button (14) allows the desired pressure to be reduced.
- The button (16) allows the desired pressure to be increased.
- Switch on the equipment by moving the selector switch (12) to the compressed air operation position (see 6.1.).
- The compressor will then pump until the pre-set pressure on the display is reached, then it will switch off.
- Warning! Observe the information supplied by the tire manufacturer and the vehicle manufacturer relating to the recommended tire pressure.
- Warning! This equipment is not calibrated! For a calibrated measurement value, check the actual tire pressure using a calibrated meter after you have inflated the tires yourself, e.g. at a petrol station.
- Just before it is switched off, the pressure which is shown in the display can be 0.05 – 0.2 bar higher than the preselected pressure, because of overpressure in the air hose.
- Allow the compressor to cool down for about 5 minutes after every 5 minutes of operation in order to prevent overheating.
6.3 Low-pressure blower operation (Fig. 1a, 3, 4)
6.3.1 Suctioning air (Fig. 3, 7)
- To suction out objects with a large volume until they are empty (e.g. deflating an air mattress, etc.), connect the air hose (3) to the extractor connection (13).
- Connect the air hose to the object you wish to deflate.
- Switch on the equipment by moving the se-
GB
lector switch (15) to the low-pressure operation position (see 6.1.).
- Switch off the equipment once the object has been sufficiently deflated.
6.3.2 Inflating (Fig. 4, 7)
Warning! When using the equipment to inflate objects, check the information and safety instructions provided by the manufacturer.
- To inflate objects with a large volume (e.g. inflating an air mattress, etc.), connect the air hose (3) to the inflating connection (4).
- Connect the air hose to the object you wish to inflate.
- Switch on the equipment by moving the selector switch (12) to the low-pressure operation position (see 6.1.).
- Switch off the equipment once the object has been sufficiently inflated.
7. Replacing the power cable
Danger!
If the power cable for this equipment is damaged, it must be replaced by the manufacturer or its after-sales service or similarly trained personnel to avoid danger.
8. Cleaning, maintenance and ordering of spare parts
Danger!
Always take the battery out of the equipment and pull out the power plug before starting any cleaning work.
8.1 Cleaning
- Keep all safety devices, air vents and the motor housing free of dirt and dust as far as possible. Wipe the equipment with a clean cloth or blow it with compressed air at low pressure.
We recommend that you clean the device immediately each time you have finished using it. - Clean the equipment regularly with a moist cloth and some soft soap. Do not use cleaning agents or solvents; these could attack the plastic parts of the equipment. Ensure that no water can seep into the device. The ingress of water into an electric tool increases the risk of an electric shock.
8.2 Maintenance
There are no parts inside the equipment which require additional maintenance.
8.3 Ordering spare parts and accessories
Please provide the following information when ordering spare parts:
- Type of unit
• Article number of the unit
• ID number of the unit
- Spare part number of the required spare part
GB
9. Disposal and recycling
The equipment is supplied in packaging to prevent it from being damaged in transit. The raw materials in this packaging can be reused or recycled. The equipment and its accessories are made of various types of material, such as metal and plastic. Never place defective equipment in your household refuse. The equipment should be taken to a suitable collection center for proper disposal. If you do not know the whereabouts of such a collection point, you should ask in your local council offices.
10. Storage
Store the equipment and accessories in a dark and dry place at above freezing temperature. The ideal storage temperature is between 5 and 30°C. Store the electric tool in its original packaging.
11. Charger indicator
| Indicator status | Explanations and actions | |
| Red LED Green LED | ||
| Off | Flashing | Ready for useThe charger is connected to the mains and is ready for use; there is no battery pack in the charger |
| On Off Charging | The charger is charging the battery pack in quick charge mode. | |
| Off On The battery is 85% charged and ready for use.(Charging time for 1.5 Ah battery: 30 min)(Charging time for 2.0 Ah battery: 40 min)(Charging time for 3.0 Ah battery: 60 min)(Charging time for 4.0 Ah battery: 80 min)(Charging time for 5.2 Ah battery: 130 min)The unit then changes over to gentle charging mode until the battery is fully charged.(Total charging time for 1.5 Ah battery: approx. 40 min)(Total charging time for 2.0 Ah battery: approx. 50 min)(Total charging time for 3.0 Ah battery: approx. 75 min)(Total charging time for 4.0 Ah battery: approx. 100 min)(Total charging time for 5.2 Ah battery: approx. 140 min)Action:Take the battery pack out of the charger. Disconnect the charger from the mains supply. | ||
| Flashing Off | Adapted charging | The charger is in gentle charging mode.For safety reasons the charging is performed less quickly and takes more than 1 hour. The reasons can be:- The battery pack has not been used for a very long time or an already fl at battery was further discharged (exhaustive discharge).- The battery pack temperature is outside the ideal range (between 25^ and 45^ ).Action:Wait for the charging to be completed; you can still continue to charge the battery pack. |
| Flashing Flashing Fault | Charging is no longer possible. The battery pack is defective.Action:Never charge a defective battery pack.Take the battery pack out of the charger. | |
| On On Temperature fault | The battery pack is too hot (e.g. due to direct sunshine) or too cold (below 0^ ).Action:Remove the battery pack and keep it at room temperature (approx. 20^ ) for one day . | |
BR
(Modo red) 230 Vca 50 Hz
Potencia (compresor-aire comprimido) ..... 90 W
(Modo red) 230V \~ 50 Hz
Potencia (compresor-aire comprimido) ..... 90 W
(Modo red) 220V \~ 60 Hz
Potencia (compresor-aire comprimido) ..... 90 W


- BR
- Índice
- Acendem 2 ou 1 LED(s):
- GB
- Danger!
- Safety regulations
- Workplace safety
- Electrical safety
- Safety of persons
- Additional safety instructions
- Safe use can only be guaranteed if undamaged cells are used. Incorrect handling can cause cell damage.
- Information about the battery
- Information on chargers and the charging process
- Protection from environmental influences
- Safety information for the compressor Danger! The following basic safety actions must be taken when using this compressor in order to protect the user from electric shocks and the risk of injury and fi re. Read and follow these instructions before using the equipment.
- Layout and items supplied
- Layout (Fig. 1-8)
- Items supplied
- Proper use
- Technical data
- Wear ear-muff s.
- Keep the noise emissions and vibrations to a minimum.
- Caution!
- Residual risks
- Before using the equipment
- Charging the LI battery pack (Fig. 2, 9)
- Battery capacity indicator (Fig. 2)
- All 3 LEDs are lit:
- or 1 LED(s) are lit:
- LED blinks:
- All LEDs flash:
- Operation
- Changing between mains/battery operation and compressor compressed air/low-pressure blower operation (Fig. 7)
- Compressor compressed air operation (Fig. 1a, 1b, 2, 7)
- Low-pressure blower operation (Fig. 1a, 3, 4)
- Suctioning air (Fig. 3, 7)
- Inflating (Fig. 4, 7)
- Replacing the power cable
- Cleaning, maintenance and ordering of spare parts
- Cleaning
- Maintenance
- Ordering spare parts and accessories
- Disposal and recycling
- Storage
- Charger indicator
Brand : EINHELL
Model : Pressito Bivolt
Category : Compressor