VZ-43HX - Surveillance ViewZ - Free user manual and instructions
Find the device manual for free VZ-43HX ViewZ in PDF.

User questions about VZ-43HX ViewZ
0 question about this device. Answer the ones you know or ask your own.
Ask a new question about this device
Download the instructions for your Surveillance in PDF format for free! Find your manual VZ-43HX - ViewZ and take your electronic device back in hand. On this page are published all the documents necessary for the use of your device. VZ-43HX by ViewZ.
USER MANUAL VZ-43HX ViewZ
text_image
ViewZ® DRIVING VISUAL INNOVATION ViewZViewZ®
www.viewzusa.com
Please read this manual thoroughly before use, and keep it handy for future reference.
CONTENTS
Safety Instruction 3
- Mark Indication & Substance 4
- Warning 4
- Caution 5
- Operational Temperature & Humidity 5
- Dot Defect (dead pixel) of TFT 5
- FCC RF INTERFERENCE STATEMENT 6
Installation 7
- Package 7
- Interface 8
- Remote Control Function 9
Function 10
- Monitor Button Function 10
- OSD Control and Function.... 11
- Media Card Control and Function 16
Mounting Guide 19
Specification 20
Trouble Shooting 21
RMA 22
Warranty 24
SAFETY INSTRUCTION
Important Safety Instruction
- Read all warnings.
- Follow all instructions to ensure longevity of monitor.
- Do not place the monitor near water.
- Clean only with dry cloth.
- Do not block any ventilation openings. Install in accordance with the manufacturer's instructions.
- Do not install near any heat sources such as radiators, heat registers, stoves, or other heat generating devices.
- Do not override the safety purpose of the polarized or grounding-type plug.
- A polarized plug has two blades with one wider than the other.
- A grounding type plug has two blades and a third grounding prong.
- The wide blade or the third prong are provided for your safety.
- If the provided plug does not fit into your outlet, consult with electrician for replacement of the outlet.
- Protect the power cord from being walked on or pinched particularly at plugs, convenience receptacles and the point where it connects to the monitor.
- Only use attachment/accessories specified by the manufacturer.
- Use only with the cart, stand, tripod, bracket or table specified by the manufacturer or sold with the monitor. When a cart is used, use caution when moving the cart & monitor in combination to avoid injuries.
- Unplug the monitor during lightning storms or when unused for long periods of time.
- Refer all servicing to qualified service personnel. Servicing is required when the monitor has been damaged in any way.
The monitor shall not be exposed to dripping or splashing and objects containing liquids, such as vases shall be placed near the monitor.
The monitor should have ample distance (e.g. 10cm) from the wall for sufficient ventilation.

SAFETY INSTRUCTION
Important Safety Instruction
Mark Indication and Substance


CAUTION : TO REDUCE THE RISK OF ELECTRICAL SHOCK, DO NOT REMOVE COVER (OR BACK). NO USER SERVICEABLE PARTS INSIDE. REFER SERVICING TO QUALIFIED SERVICE PERSONNEL

This symbol is intended to alert the user to the presence of uninsulated & dangerous voltage within the monitor's enclosure that may be of sufficient magnitude to constitute a risk of electric shock to persons.

This symbol is intended to alert the user to the presence of important operating and maintenance (servicing) instructions in the literature accompanying the monitor.
Warning
- Do not use damaged or loose cables and plug.
- Do not pull the plug out by the wire nor touch the plug with wet hands.
- Use only a properly grounded plug and receptacle.
- Do not connect too many extension cords or plugs to one outlet.
- Do not excessively bend the plug and wire.
- Do not disconnect the power cord while it's still plugged into the monitor.
- Do not place any heavy objects on the power cord. Damage to the cord may cause shock or fire.
- Never open the monitor. There are no user-serviceable parts inside and opening will void warranty.
- Removing covers may expose you to dangerous shock hazards or other risks.
- Keep any heating devices away from the power cable and monitor.
- Do not place the monitor near water.
- Do not insert objects of any kind into the monitor's open slots, as they may touch dangerous voltage points.
- Please follow the laws and regulations of your municipality to dispose of the tube properly.
- Do not use the monitor in high temperature, humid, dusty or oily areas.
- Do not install the monitor where it will be exposed to continual vibration.
- Keep the plastic packaging out of children's reach.
• If any damage is defected upon first opening the box, contact agency from which you bought the monitor directly.
- If your monitor does not operate normally – in particular, if there is any unusual sound or smell coming from the monitor – unplug it immediately and contact an authorized dealer or the service center.
SAFETY INSTRUCTION
Important Safety Instruction

Caution
- If the connector between the plug and the pin is dusty or dirty, clean it properly using a dry cloth.
- Make sure to unplug the power cord before cleaning the monitor.
- Make sure to leave a gap between monitor and wall.
- Do not drop the monitor when moving it.
- Place your monitor in a location with low humidity and a minimum dust.
• Install the monitor base on a showcase or shelf so that the end of the base does not protrude from the showcase or shelf. - Do not place the monitor on an unstable or small surface area.
- Do not install inside a vehicle.
- Disconnect the plug from the outlet during storms or lightning or if it has not been used for a long time.
- Do not try to move the monitor by pulling on the power cord.
- Do not cover the vents on the monitor.
- When moving the monitor, turn off and unplug the power cord. Make sure that all cables, including HDMI cable and cables connected to other devices, are disconnected before moving it.
- Place the monitor out of children's reach, as they could damage it by hanging onto it.

Available Temperature & Humidity
• Operating Temperature : 14°F \~ 122°F / -10°C \~ 50°C
• Operating Humidity : 20 \~ 70% RH
Dot Defect (dead pixel) of TFT
ViewZ monitors are manufactured using high-end semiconductor technology with precision ratings of 99.9% and above. However, it may be the case that certain RGB and white pixels seem darker (or entirely unlit i.e. black).
Modern production methods cannot guarantee an absolute fault-free monitor. To this effect, no LED manufacturer can guarantee a defect free panel. A few isolated pixel or sub-pixel faults are considered tolerable and different policies exist that govern the amount of these tolerable values.
While most pixel faults occur in isolated regions, a cluster of dead pixels or sub-pixels can sometimes form for which a separate ruling applies. A cluster is defined as an area of 5x5 pixels. ViewZ's policy on pixel failure: either as an isolated fault or in the form of a cluster is outlined on the website: www.viewzusa.com
FCC RF INTERFERENCE STATEMENT
Note
This equipment has been tested and found to comply with the limits for a Class A digital device, pursuant to part 15 of the FCC Rules. These limits are designed to provide reasonable protection against harmful interference when the equipment is operated in a commercial environment.
This equipment generates, uses, and can radiate radio frequency energy and, if not installed and used in accordance with the instruction manual, may cause harmful interference to radio communications. Operation of this equipment in a residential area is likely to cause harmful interference in which case the user will be required to correct the interference at his own expense.
- Reorient or relocate the receiving antenna.
- Increase the separation between the equipment and receiver.
- Connect the equipment into an outlet on a circuit different from that to which the receiver is connected.
- Consult the dealer or an experienced radio, TV technician for help.
- Only shielded interface cable should be used.
Finally, any changes or modifications to the equipment by the user not expressly approved by the grantee or manufacturer could void the users authority to operate such equipment.
▶ DOC COMPLIANCE NOTICE
This digital apparatus does not exceed the Class A limits for radio noise emissions from digital apparatus set out in the radio interference regulation of Canadian Department of communications.
INSTALLATION
Installation Tools
The following tools may be required depending on your installation.

Assembly Components - provided
Your ViewZ monitor is shipped with all proper installation hardware and components. If there are parts missing and/or damaged, please stop the installation and contact ViewZ USA at (888)-998-4399.

text_image
ViewZTFT-LED Monitor (Qty 1) Monitor Stand (Qty 1)
natural_image
Black cable with two metal pins, isolated on white background (no text or symbols)110V Power Cable (Qty 1) HDMI Cable (Qty 1) User Manual (Qty 1)

text_image
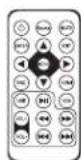
TV-ON SERIES 24th 27th 30th and 6th PROVINCIPAL View 1 View 2Remote Controller (Qty 1)
Mounting Option
Your ViewZ monitor is compatible with ViewZ monitor mounts. For more information, please contact ViewZ USA at (888)-998-4399.
Wall Mount
- Part# - PAM50
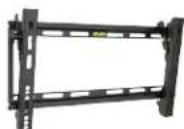
- Tilting -15^ 0^
- Universal Mount
- Compatible with 27HX, 32HX

natural_image
Mechanical assembly frame with two vertical supports and a red label 'WM71' (no other text or symbols)- Tilting -15^ 0^
- Universal Mount
- Compatible with 43HX
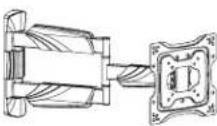
- Tilting -15^ 15^
- Swivel 180^
- VESA 75 \~ 200
• Compatible with 24HX, 27HX, 32HX
Ceiling Mount
- Part#

CMKiT-02
- Tilting -12^ +5^
- Rotation 360^
- 35" \~ 70"
• Compatible with 24HX,27HX,32HX,43HX
- Part #
CMKiT-04
- Tilting -12^ +5^
- Universal Mount
- 35" \~ 70"
- Compatible with 43HX
CONNECT EXTERNAL EQUIPMENTS
Interface Input Ports
The following image is the description of interface input ports of BNC Monitor

text_image
① ④② ③ ⑤ ⑥ ⑦ ⑧⑨ ⑩- AC 110V IN
- HDMI IN
- VGA IN
- AV (CVBS) IN
- AV (CVBS) OUT
- AV (AHD/TVI/CVI) IN
- AV (AHD/TVI/CVI) OUT
- PC STEREO IN
- AV AUDIO IN
- USB
REMOTE FUNCTION
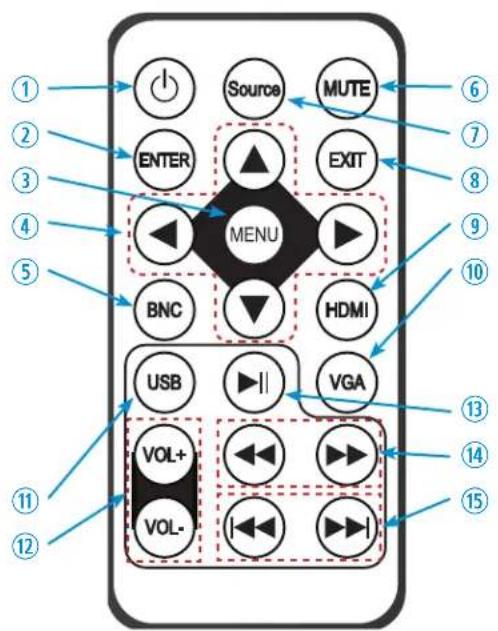
Remote Controller
- Power
- Enter - Select current setting value on Input source
- Menu - Enter / Exit OSD
- Left & Right ◀▶, Up & Down ▼▲
- AV Input Select - CVBS
- Mute - Turn off the sound
- Source - Select Input Source
- Exit - Exit OSD with saving current value
- HDMI Input Select
- VGA Input Select
Media Player
-
USB - Enter / Exit Media OSD
-
Volume Up & Down
-
Stop & Play - Freeze the media play
-
FWD & RWD ◀◀ ▶▶ Fast Forward & Rewind
-
NEXT & PREV | ◀◀ ▶▶ Select next & previous file
text_image
① ② ③ ④ ⑤ ⑥ ⑦ ⑧ ⑨ ⑩ ⑪ ⑫ ⑬ ⑭ ⑮ ⑯ ⑰ ⑱ ⑲ ⑳ ⑴ ⑵ ⑶ ENTER MUTE ENTER MENU BNC HDMI USB VGA VOL+ VOL- ⑰ ⑱ ⑲Display image, sound and custom settings can be adjusted in OSD (On Screen Display) menu by remote controller. To adjust monitor setting value :
- Press the 'MENU' button to enter the OSD menu
- Press the 'INPUT' button to select input source
- Press the ▲ / ▼ buttons to select the desired sub-menu. The selected submenu will be highlighted
- Press the 'MENU' button to enter the sub-menu for adjusting items
- Change the value you wish to adjust by using the ◀ / ▶ buttons
- Press the 'MENU' button to confirm / exit for saving adjustment value on sub-menu
- Without entering OSD MENU, press VOL+ / VOL- buttons to adjust the audio volume
- Without entering OSD MENU, press HDMI, AV & VGA buttons to select desired input source
- Press the 'MUTE' button to on / off audio
CONTROL AND FUNCTION
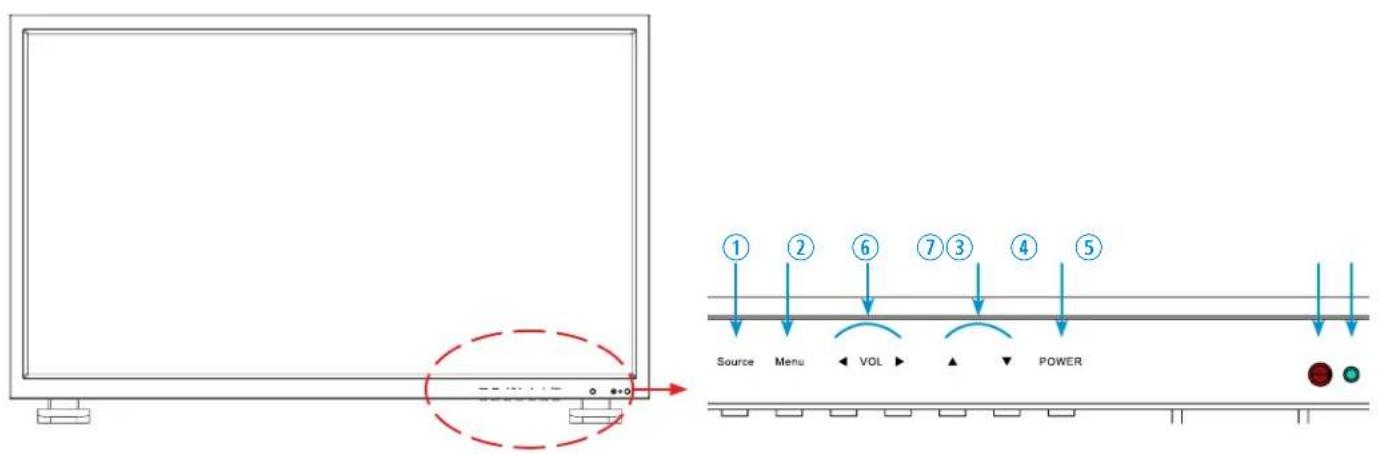
On Monitor, Button Control
text_image
① ② ⑥ ⑦ ③ ④ ⑤ Source Menu VOL POWER- Source
Select an input source
- Menu
Enter the MENU, save the adjustment of sub-menu and exit the OSD
- Left & Right
◀ (VOL) ▶
Change the value on selected menu
- Up & Down
▲ ▼
Switch a menu on OSD
- Power
Monitor power on / off
- LED Indicator
Blue color: monitor on Red color : monitor off
- IR Receiver
Monitor Button Function
All picture, sound settings and setup can be adjusted in OSD (On Screen Display) menu.
To adjust the OSD screen:
-
Press the MENU button to enter the OSD MENU
-
Press the ◀ / ▶ buttons to select the desired main-MENU. The selected main-MENU is highlighted
-
Press the ▲ / ▼ buttons to select the desired sub-MENU. The selected sub-MENU is highlighted
-
Change the value you wish to adjust by using the ◀ / ▶ buttons
-
Press the MENU button to confirm the adjustment on sub-MENU
-
Press the MENU button to exit the sub-MENU and go back to the main-MENU
-
Press the MENU button to exit the OSD MENU
CONTROL AND FUNCTION
Select Input Source
Input Source
PC-RGB
HDMI
AHD/TVI/CVI
CVBS
USB
∧ ∨ OK
Press 'SOURCE' button on monitor or 'INPUT' button on remote controller
Press ▲ / ▼ button to change input source and then press ▶ button to select input source on monitor
Press ▲ / ▼ button to change input source and then press 'INPUT' / ▶ buttons to select input source on remote controller
Volume
22

Press ◀ / ▶ buttons to adjust volume on monitor
Press ◀ / ▶ buttons to adjust volume on remote controller
Detect Source Signal Message
If you connect any input source, monitor will display current input source resolution and frequency.
CONTROL AND FUNCTION
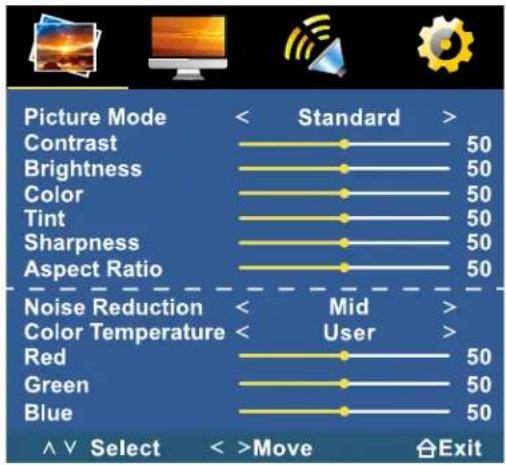
Picture
text_image
Picture Mode Contrast Brightness Color Tint Sharpness Aspect Ratio Noise Reduction Color Temperature Red Green Blue Standard > 50 50 50 50 50 50 Mid User > 50 50 50 50 Select Move 合Exit▲/▼ MOVE ◀/▶ SELECT(ADJUST) MENU RETURN
| FUNCTION | VALUE | |
| PICTURE MODE | Adjust the image color setting | See table below |
| CONTRAST | Adjust the contrast | 0 ~ 100 |
| BRIGHTNESS | Adjust the brightness | 0 ~ 100 |
| COLOR | Adjust the color saturation | 0 ~ 100 |
| TINT ^1) | Adjust the tint | 0 ~ 100 |
| SHARPNESS ^2) | Adjust the sharpness | 0 ~ 100 |
| ASPECT RATIO | Adjust the video format | See table below |
| NOISE REDUCTION | Adjust the noise reduction value | See table below |
| COLOR TEMP | Adjust the color setting | See table below |
1) Only available in AV(CVBS) input
2) Only available in AV(CVBS / AHD, TVI, CVI) & HDMI input
PICTURE MODE
| MILD | Reduce contrast and sharpness |
| USER | Apply user selected values - brightness, contrast, color and hue |
| DYNAMIC | Provide enhanced contrast and sharpness |
| STANDARD | Provide standard contrast and sharpness |
ASPECT RATIO
| 16 : 9 | Set the image size to 16 : 9 |
| 4 : 3 | Set the image size to 4 : 3 |
COLOR TEMP.
| WARM | Give the white color a reddish tint |
| NORMAL | Give the white color a neutral tint |
| COOL | Give the white color a blue-ish tint |
| USER^1) | Set custom color temperature |
1) To set custom color temperature (R,G,B values), select "USER" to set color temperature. Keep pushing 'Down' button on the monitor or the remote controller, then you will see Red, Green and Blue option
FUNCTION VALUE
NOISE REDUCTION ^1) Reduce noise of the display image LOW / MID / HIGH / DEFAULT / OFF
1) Only available in AV(CVBS / AHD, TVI, CVI) & HDMI input
CONTROL AND FUNCTION
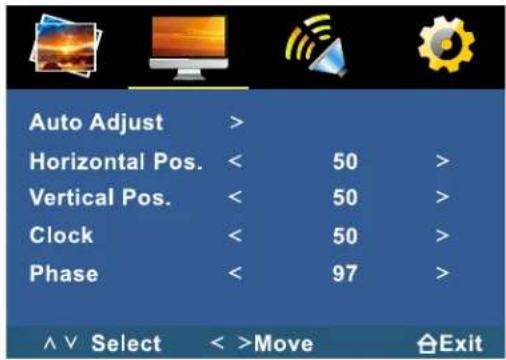
PC (available on VGA input)
text_image
Auto Adjust > Horizontal Pos. < 50 > Vertical Pos. < 50 > Clock < 50 > Phase < 97 > ^ V Select < >Move Exit▲/▼ MOVE ◀/▶ SELECT(ADJUST) MENU RETURN
| FUNCTION VALUE | ||
| AUTO ADJUST1) | Fit the image size automatically | |
| H-POSITION 1) | Adjust the horizontal position of picture 0 ~ 100 | |
| V-POSITION 1) | Adjust the vertical position of picture | 0 ~ 100 |
| CLOCK 1) | Adjust the number of horizontal picture elements | 0 ~ 100 |
| PHASE 1) | Adjust the vertical noise of screen image | 0 ~ 100 |
1) Only available in VGA input
CONTROL AND FUNCTION
Sound

text_image
Sound Mode < Standard > Treble 50 Bass 50 Balance < 0 > ^ ∨ Select < >Move Exit▲/▼ MOVE ◀/▶ SELECT(ADJUST) MENU RETURN
| FUNCTION VALUE | ||
| SOUND MODE | Select one of the presets | STANDARD / MUSIC / MOVIE / SPORTS / USER |
| TREBLE | Adjust the treble level | 0 ~ 100 |
| BASS | Adjust the bass level | 0 ~ 100 |
| BALANCE Adjust the balance -50 ~ +50 | ||
CONTROL AND FUNCTION
OSD

text_image
OSD Language Restore User Default No Signal Screen No Signal Standby Prevent Burn-in < English > < Blue > < on > < on > ^ > Select < >Move Exit▲/▼ MOVE ◀/▶ SELECT(ADJUST) MENU RETURN
| FUNCTION VALUE | ||
| OSD LANGUAGE | Set the language of the OSD menu | English, German, French Spanish, Italian, Denmark Poland, Netherland |
| RESTORE USER DEFAULT | Reset the monitor settings to the factory default | |
| NO SIGNAL SCREEN | Set the standby mode screen as blue or black (default) color | Blue, Black |
| NO SIGNAL STANDBY | Monitor will go into a standby mode when no input source is detected | ON / OFF |
| PREVENT BURN-IN | Set periodic image retention | ON / OFF |
CONTROL AND FUNCTION
Media Card Interface
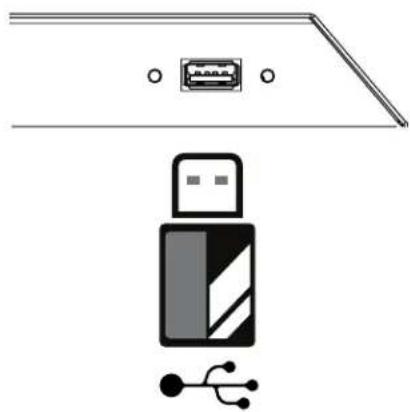
natural_image
Diagram of a device rear panel with a USB port and a USB flash drive symbol below (no text or labels)USB
- Connect USB
- Connect USB device to USB slot located at the back of the HX
- Remove USB
- Return to the main menu and press exit
- Remove the USB from the slot
- Caution - when media player activated, the priority of playing media type is;
- Movie
- Photo
- Caution - The media file should be located in the root location. If the media file is located in the sub folder, media file will not automatically play
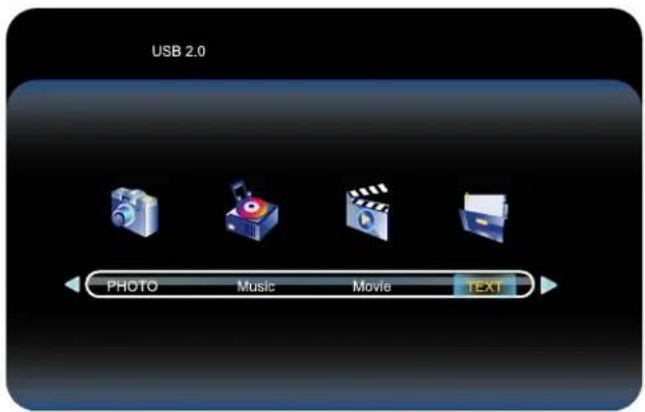
Media Player OSD
text_image
USB 2.0 PHOTO Music Movie TEXT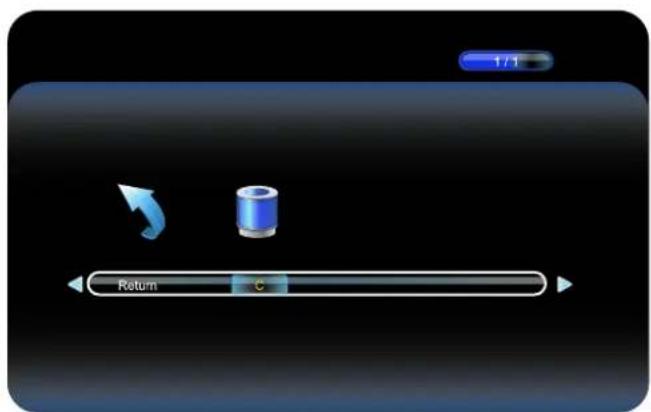
text_image
1/1 Return CFUNCTION
| PHOTO | Displays image files from the USB |
| MUSIC | Plays music files from the USB |
| MOVIE | Plays video files from the USB |
| TEXT | Plays text files from the USB |
CONTROL AND FUNCTION
Photo
text_image
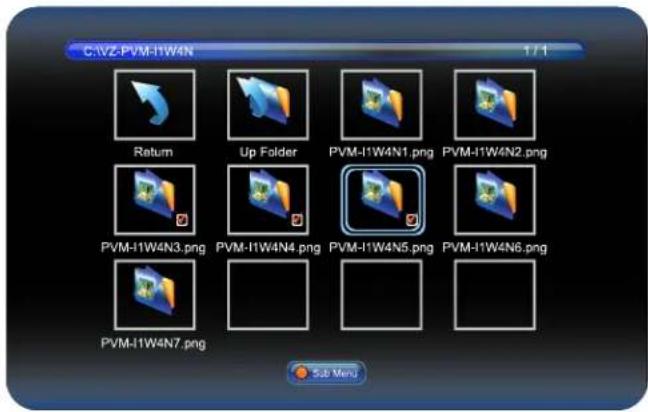
C:\VZ-PVM-IW4N 1 / 1 Return Up Folder PVM-I1W4N1.png PVM-I1W4N2.png PVM-I1W4N3.png PVM-I1W4N4.png PVM-I1W4N5.png PVM-I1W4N6.png PVM-I1W4N7.png Sub MenuWhen you select PHOTO on the entry menu of Media play:
- Press the ENTER button and then press ◀ / ▶ / ▲ / ▼ buttons to select a image file to display.
- Press the ENTER button to select photo files to play and then press ▶ || button to display the image or slide-show. *Note: If you have more than one video file, selected video files will display one by one.
- Press ▶ || button to pause the slide-show and show only one image file in a non "slide-show" mode.
- Press the EXIT / ■ button to return to the Media OSD MENU
Music
text_image
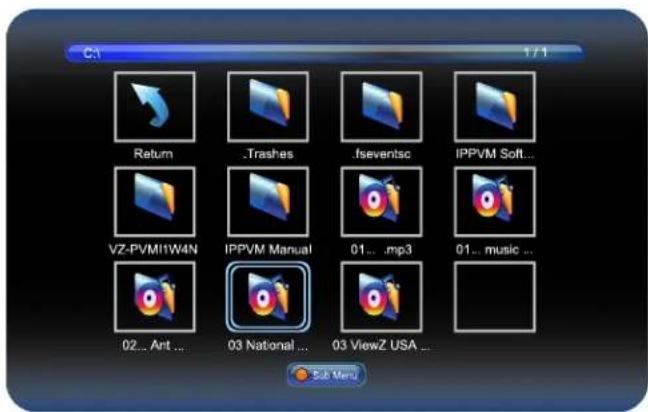
C1 1 / 1 Return .Trashes .fseventsc IPPVM Soft... VZ-PVMI1W4N IPPVM Manual 01... .mp3 01... music ... 02... Ant ... 03 National ... 03 ViewZ USA ... Sub MenuWhen you select MUSIC on the entry menu of Media play:
text_image
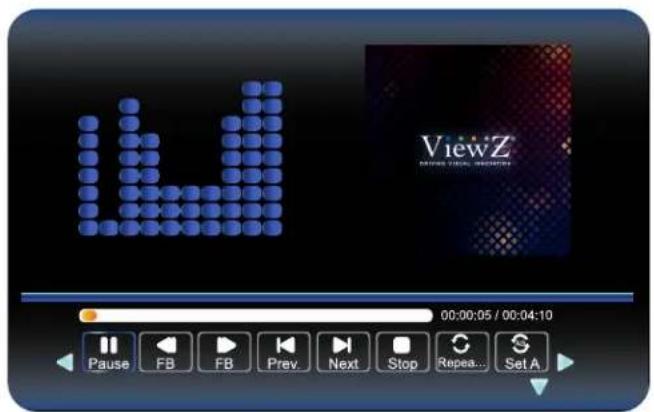
ViewZ 00:00:05 / 00:04:10 Pause FB FB Prev Next Stop Repeat... Set A- Press the ENTER button and then press ◀ / ▶ / ▲ / ▼ buttons to select a music file to play.
- Press the ENTER button to select music files to play and then press ▶ || button to play the music files. *Note: If you have more than one music file, selected music files will play one by one.
- Press ▶ || button to pause playing music.
- Press the EXIT / ■ button to return to the Media OSD MENU.
CONTROL AND FUNCTION
Movie
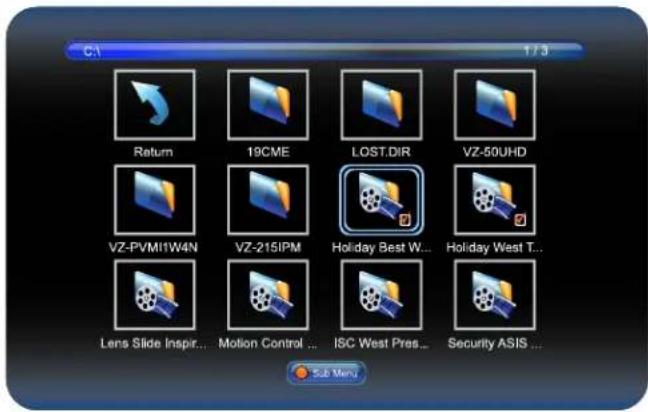
text_image
C1 1 / 3 Return 19CME LOST.DIR VZ-50UHD VZ-PVMI1W4N VZ-215IPM Holiday Best W... Holiday West T... Lens Slide Inspir... Motion Control ... ISC West Pres... Security ASIS ... Sub MenuWhen you select MOVIE on the entry menu of Media play:
- Press the ENTER button and then press ◀ / ▶ / ▲ / ▼ buttons to select a video file to play.
- Press the ENTER button to select video files to play and then press ▶|| button to play the video files. *Note: If you have more than one movie file, selected movie files will display one by one.
- Press ▶ || button to pause the video file.
- Press the EXIT / ■ button to return to the Media OSD MENU
Text
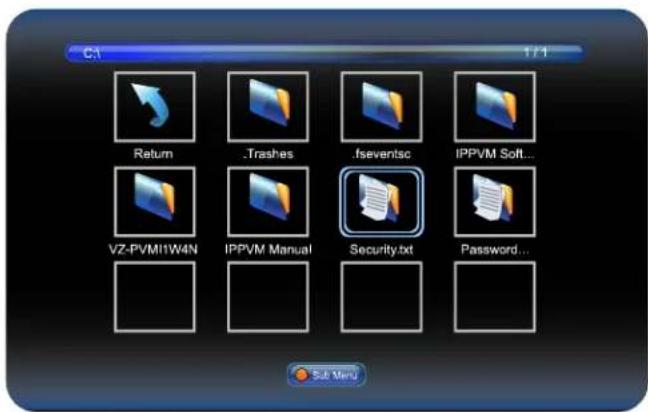
text_image
C1 1 / 1 Return .Trashes .fseventsc IPPVM Soft... VZ-PVMI1W4N IPPVM Manual Security.txt Password... Sub MenuWhen you select TEXT on the entry menu of Media play:
- Press the ENTER button and then press ◀ / ▶ / ▲ / ▼ buttons to select a text file to play.
- Press the ENTER button to select text files to play and then press ▶ || button to play the text file. *Note: If you have more than one text file, selected text files will display one by one.
- Press ▶ || button to pause the text file.
- Press the EXIT / ■ button to return to the Media OSD MENU
MOUNTING GUIDE
Wall Mounting (Optional)
VZ-CMX monitors are suitable for VESA wall mount (not included in the delivery).
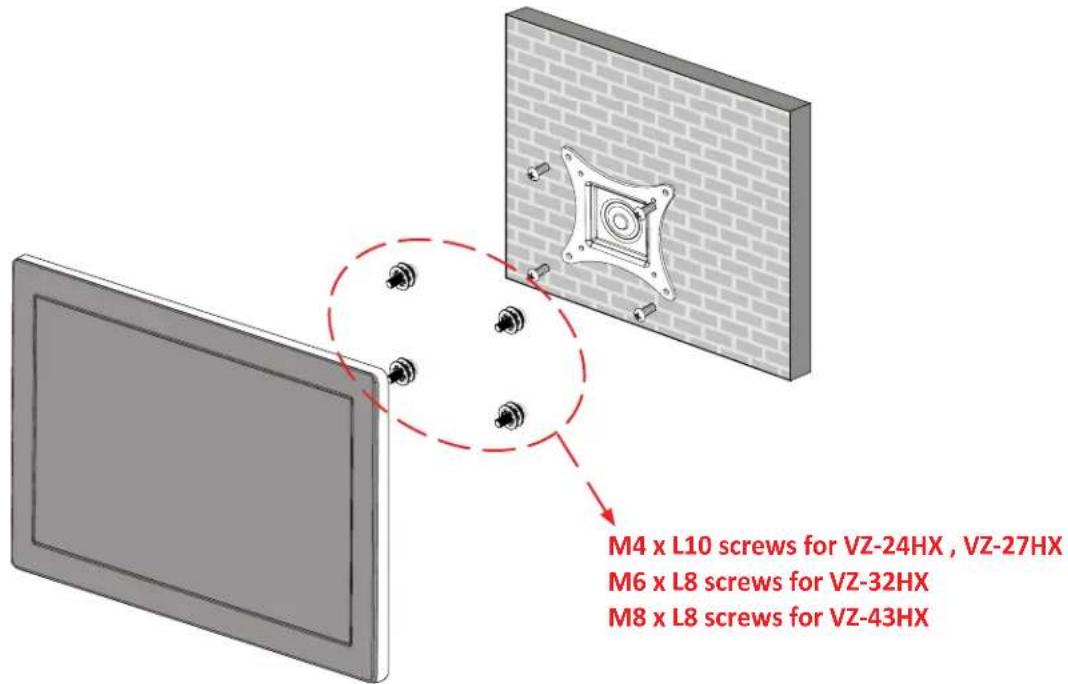
text_image
M4 x L10 screws for VZ-24HX , VZ-27HX M6 x L8 screws for VZ-32HX M8 x L8 screws for VZ-43HX- VZ-24HX, VZ-27HX : VESA WALL MOUNT 75mm x 75mm, 100mm x 100mm
- VZ-32HX : VESA WALL MOUNT 200mm x 200mm
- VZ-43HX : VESA WALL MOUNT 300mm x 300mm
Attention!
VZ-24HX, VZ-27HX : You must use 4 * M4 x L10 screws to assemble this monitor and the wall mount bracket. VZ-32HX : You must use 4 * M6 x L8 screws to assemble this monitor and the wall mount bracket. VZ-43HX : You must use 4 * M8 x L8 screws to assemble this monitor and the wall mount bracket.
WARNING!
If user uses screws longer than
M4 x L10 mm for VZ-24HX, VZ-27HX,
M6 x L8 mm for VZ-32HX,
M8 x L8 mm for VZ-43HX,
it may cause damage to the unit. Please use bolt of correct size and length as instructed.
Mounting Safety!
At least two people are recommended to safely install the mount.
SPECIFICATION
Model No. VZ-27HXVZ-24HX VZ-32HX VZ-43HX
| Size & Type 27"24" | 32" | 43" | |||
| LCD | Panel Type | 24" LED Backlit Monitor | 27" LED Backlit Monitor | 32" LED Backlit Monitor | 43" LED Backlit Monitor |
| Pixel Pitch (mm) | 0.2715 (H) x 0.2715 (V) | 0.3114 (H) x 0.3114 (V) | 0.36375 (H) x 0.36375(V) | 0.4902 (H) x 0.4902 (V) | |
| Brightness | 300 cd/m2 | 300 cd/m2 | 250 cd/m2 | 250 cd/m2 | |
| Contrast Ratio | 1000 : 1 | 3000 : 1 | 4000 : 1 | 1200 : 1 | |
| Viewing Angle | H : 170° V : 160° (CR > 10) | H : 178° V : 178° (CR > 10) | |||
| Display Color | 16.7 Million Colors | ||||
| Response Time | 5 ms (Gray to Gray) 21 | ms (Gray to Gray) 6.5 ms | (Gray to Gray) | 8 ms (Gray to Gray) | |
| Resolution | 1920 (H) x 1080 (V) | ||||
| Active Display Area | 521.28 (H) x 293.22 (V) | 597.8(H) x 336.31(V) | 698.4 (H) x 392.85 (V) | 941.184(H) x 529.416(V) | |
| Aspect Ratio | 16 : 9 | ||||
| Case Type | Black Metal | ||||
| Color Temperature | Warm / Normal / Cool / User | ||||
| Speaker | 2 x 5W (8Ω) | ||||
| Operating Temperature | 14°F ~ 122°F / -10°C ~ 50°C | ||||
| Operating Humidity | 20 ~ 70% RH | ||||
| Weight | Net : 17.63 lb / 8.0 kgGross : 25.35 lb / 11.5 kg | Net : 20.65 lb / 9.37 kgGross : 29.80 lb / 13.52 kg | Net : 27.62 lb / 12.53 kgGross : 34.43 lb / 15.62 kg | Net : 34.54 lb / 15.67 kgGross : 43.05 lb / 19.53 kg | |
| INTERFACE | (AHD 2.0/HD-TVI/HD-CVI) AV 1ch Input, 1ch Output loop-through(CVBS) AV 1ch input 1.0Vp-p, 75Ω terminated, 1ch Input, 1ch Output loop-throughHDMI (High Definition Multimedia Interface), VGA (RGB-PC), PC Stereo In / AV Audio In, USB In | ||||
| Safety & EMC Certification | CE / FCC / RoHS | ||||
| Electrical Ratings | AC 100-240V, 50/60Hz | ||||
| Power Consumption | ≤ 40 W | ≤ 45 W | ≤ 48 W | ≤ 70 W | |
| Accessories | HDMI cable, Power Supply & Cable, User's Manual, Remote controller | ||||
TROUBLESHOOTING GUIDE
- Check the following before calling for service.
- If the same problems continue after checking, contact the reseller you purchased the monitor from.
| At start | We recommend that you test with different input sources when you have trouble with the current input source. If symptom persists, follow the instructions below. After following the instructions below, please contact us at 1-888-99-VIEWZ. |
| No image or Noise on the screen | - Make sure the cable is correctly plugged into the outlet- Make sure the power cable is correctly plugged into the monitor- Make sure the cable is correctly connected between monitor & source- Check brightness and see if brightness is set to '∅' - Check video source |
| Incorrect display or Half display | - Check your video source- Reset video source : connection, cable replacement, setting & more |
| Flickering and shadow image | - Check your input source setting for resolution and phase (Hz) |
| The audio function is not working | - Check the volume and make sure MUTE is not on- Check HDMI / Audio port cable connection |
| LED is flickering or no image | - Check the interface cable connection and make sure it's plugged in correctly- Check the input source |
TERMS OF WARRANTY / RMA
- The warranty period for this monitor is 3 years. The warranty will be voided for the scenarios listed below.
- You can also download the manual and information of VIEWZ web site: VIEWZUSA.COM
| Cases of Non-Warranty Coverage | When power feed to the monitor exceeds capacity and causes damage |
| Accident, Abuse, Misuse, Neglect, Fire, Water/liquids, Lightning or any act of nature | |
| Damaged by dropping, throwing and hitting the monitor | |
| Failure caused by users attempt to modify the product | |
| Failure by limited life of parts such as LED Lamps and any other consumables | |
| Damaged by using third party power cable, unstable power input and electric shock |
* Above information can be changed without notification - please check our website or contact ViewZ representative for latest RMA service policy.
* When shipping the monitor for RMA, make sure to pack safely to ensure the monitor is not damaged during shipping.
NOTE
WARRANTY
ViewZ USA
LIMITED 3 YEAR WARRANTY
What and Who is Covered by this Limited Warranty and for How Long
ViewZ USA warrants this product to be free from defects in material and workmanship for 3 years to the original owner of this product. The limited warranty is valid only for the original purchaser of the product.
What ViewZ USA Will Do
At the sole discretion of ViewZ USA, ViewZ USA will repair or replace any product or product part that is defective. If ViewZ USA chooses to replace a defective product or part, a replacement product or part will be shipped to you at no charge, but you must pay any labor costs.
What is Not Covered; Limitations
ViewZ USA disclaims any liability for damage to mounts, adapters, displays, projectors, other property, or personal injury resulting, in whole or in part, from improper installation, modification, use or misuse of its products.
ViewZ USA disclaims all other warranties, express or implied, including warranties of merchantability and fitness for a particular purpose. ViewZ USA is not responsible for incidental or consequential damages, including but not limited to, inability to use its products or labor costs for removing and replacing defective products or parts. Some states do not allow the exclusion or limitation of incidental or consequential damage, so the above limitation or exclusion many not apply to you.
What Customers Must Do for Limited Warranty Service
If you discover a problem that you think may be covered by the warranty you MUST REPORT it in writing to the address below within thirty (30) days. Proof of purchase (an original sales receipt) from the original consumer purchaser must accompany all warranty claims. Warranty claims must also include a description of the problem, the purchaser's name, address, and telephone number. General inquiries can be addressed to ViewZ USA Customer Service at 1-888-998-4399. Warranty claims will not be accepted over the phone or by fax.
ViewZ USA
Attn: Warranty Claim
177 W. Orangethorpe Ave.
Placentia, CA 92870
How State Law Applies
This warranty gives you specific legal rights, and you may also have other rights which vary from state to state.
Disclaimer
ViewZ USA intends to make this manual accurate and complete. However, ViewZ USA makes no claim that the information contained herein covers all details, conditions or variations, nor does it provide for every possible contingency in connection with the installation or use of this monitor. The information contained in this document is subject to change without notice or obligation of any kind. ViewZ USA makes no representation of warranty, expressed or implied, regarding the information contained herein. ViewZ USA assumes no responsibility for accuracy, completeness or sufficiency of the information contained in this document.
Contact Us
NORTH AMERICA
177 W. Orangethorpe Ave.
Placentia, CA 92870
USA and Canada
Phone: 1-888-998-4399
Fax: 1-714-996-1138
Other Locations
Phone: (001) 888-998-4399
Fax: (001) 714-996-1138
© ViewZ USA