
PCWA-C150S - Computer accessory SONY - Free user manual and instructions
Find the device manual for free PCWA-C150S SONY in PDF.

| Product Type | Wireless LAN PC Card (PCMCIA Type II) |
| Standard | IEEE 802.11b / IEEE 802.11 |
| Frequency | 2.4 GHz |
| Modulation | DS-SS (IEEE 802.11 compliant) |
| Protocol Support | TCP/IP compliant |
| Dimensions (W x H x D) | Approx. 2.2 x 0.2 x 3.6 inches (54 x 5 x 90 mm); Antenna height: 0.5 inches (12 mm) |
| Weight | Approx. 1.3 oz (35 g) |
| Power Requirements | 3.3 V / 5 V (supplied from computer via PC card slot) |
| Current Consumption | Peak transmit: 330 mA; Peak receive: 240 mA |
| Connector | PC Card Type II |
| Operating Temperature | 41°F to 95°F (5°C to 35°C) |
| Storage Temperature | -4°F to 140°F (-20°C to 60°C) |
| System Requirements (CPU) | MMX® Pentium® 233 MHz or higher |
| System Requirements (RAM) | Windows Me/2000: 64 MB or more; Windows XP: 128 MB or more |
| System Requirements (Drive) | CD-ROM drive |
| System Requirements (Slot) | Preinstalled built-in PCMCIA Type II slot |
| Supported Operating Systems | Microsoft Windows Millennium Edition, Windows 2000 Professional, Windows XP Home Edition, Windows XP Professional |
| Supplied Software | Client Manager utility; Wireless LAN PC Card Driver |
| Supplied Accessories | Wireless LAN PC Card, CD-ROM (Setup disc), Read This First, Quick Start Guide, Troubleshooting Guide, Warranty card, other printed materials |
| Compliance | FCC Part 15 Class B; Canada ICES-003; Indoor use only |
| Encryption | 64-bit and 128-bit WEP (Wired Equivalent Privacy) |
| Network Modes | Infrastructure (via Access Point) and Peer-to-Peer (Ad Hoc) |
| Range | Up to approx. 330 feet (100 m) line of sight |
| Indoor Use Only | Yes (to prevent radio interference to licensed services) |
Frequently Asked Questions - PCWA-C150S SONY
User questions about PCWA-C150S SONY
0 question about this device. Answer the ones you know or ask your own.
Ask a new question about this device
Download the instructions for your Computer accessory in PDF format for free! Find your manual PCWA-C150S - SONY and take your electronic device back in hand. On this page are published all the documents necessary for the use of your device. PCWA-C150S by SONY.
USER MANUAL PCWA-C150S SONY
Operating Instructions
2.4GHz
Wireless LAN PC Card
PCWA-C150S
WARNING
To prevent fire or shock hazard, do not expose the unit to rain or moisture.
Owner's Record
The model and serial numbers are located on the back of the unit. Record the serial number in the space provided below. Refer to them whenever you call upon your Sony dealer regarding this product.
Model No. PCWA-C150S
Serial No. ____
CAUTION
Any changes or modifications not expressly approved in this manual could void your warranty.
FCC ID: AK8PCWAC150S
Exposure to Radio Frequency Radiation.
The radiated output power of the Wireless LAN PC Card is far below the FCC radio frequency exposure limits.
Nevertheless, the Wireless LAN PC Card shall be used in such a manner that the potential for human contact during normal operation is minimized.
NOTE:
This equipment has been tested and found to comply with the limits for a Class B digital device, pursuant to Part 15 of the FCC Rules. These limits are designed to provide reasonable protection against harmful interference in a residential installation. This equipment generates, uses, and can radiate radio frequency energy and, if not installed and used in accordance with the instructions, may cause harmful interference to radio or communications. However, there is no guarantee that interference will not occur in a particular installation. If this equipment does cause harmful interference to television reception, which can be determined by turning the equipment off and on, the user is encouraged to try to correct the interference by one or more of the following measures:
- Reorient or relocate the receiving antenna.
– Increase the separation between the equipment and receiver.
- Connect the equipment into an outlet on a circuit different from that to which the receiver is connected.
- Consult the dealer or an experienced radio/TV technician for help.
You are cautioned that any changes or modifications not expressly approved in this manual could void your authority to operate this equipment.
Only peripherals (computer input/output devices, terminals, printers, etc.) that comply with FCC Class B limits may be attached to this computer product. Operation with non-compliant peripherals is likely to result in interference to radio and television reception.
All cables used to connect peripherals must be shielded and grounded. Operation with cables, connected to peripherals, that are not shielded and grounded, may result in interference to radio and television reception.
If you have questions about this product, call the Sony Customer Information Service Center at 1-888-476-6972; or write to the Sony Customer Information Service Center at 12451 Gateway Boulevard, Fort Myers, FL 33913. The number below is for FCC-related matters only.
Declaration of Conformity
Trade Name: Sony
Model No: PCWA-C150S
Responsible Party: Sony Electronics Inc.
Address: 680 Kinderkamack Road, Oradell, NJ 07649 USA
Telephone: 201-930-6972
This phone number is for FCC-related matters only.
This device complies with part 15 of the FCC Rules.
Operation is subject to the following two conditions:
(1) This device may not cause harmful interference, and
(2) this device must accept any interference received, including interference that may cause undesired operation.
Safety Information WARNING
- Opening the unit, for whatever reason, could lead to damage that is not covered by the warranty.
- Do not use this equipment on hospital premises. Doing so may cause medical devices to malfunction.
- If using the equipment near a pacemaker, make sure it is at least 9 inches (22 cm) away from the pacemaker.
- Do not use this equipment in an aircraft, as doing so could cause the aircraft's equipment to malfunction. Make sure you remove the equipment from the PC card slot before carrying your computer onto an aircraft.
- Do not use this equipment outdoors.
• Install and connect this product by following descriptions in its Operating Instructions and Quick Start Guide before using it. - To comply with the FCC RF exposure compliance requirements, a separation distance of at least 2.5cm must be maintained between the antenna of this device and all persons. This card may be used in portable or mobile devices such as laptops or handheld PDA's. The device should not operate in a body worn device or configuration. Users are not permitted to make changes or modify the system in any way.
- Indoor use only.
- This device is made for use in the USA and Canada only.
For the customers in Canada
- This class B digital apparatus complies with Canadian ICES-003.
- Operation is subject to the following two conditions; (1) this device may not cause interference, and (2) this device must accept any interference, including interference that may cause undesired operation of the device.
- To prevent radio interference to the lisenced service, this device is intended to be operated indoors and away from windows to provide maximum shielding. Equipment (or its transmit antenna) that is installed outdoors is subject to licensing.
- The term "IC" before the equipment certification number only signifies that Industry Canada technical specifications were met.
About the supplied software
THE SUPPLIED SOFTWARE IS SUPPLIED PURSUANT TO THE APPLICABLE END-USER LICENSE AGREEMENT.
• Copyright laws prohibit reproducing the software or the software manual in whole or in part, or renting the software without the permission of the copyright holder.
- In no event will SONY be liable for any financial damage or loss of profits, including claims made by third parties, arising out of the use of the software supplied with this product.
- In the event a problem occurs with this software as a result of defective manufacturing, SONY will replace it at SONY's option or issue a refund; however, SONY bears no other responsibility.
- The software provided with this product cannot be used with equipment other than that which is designated for use with.
- Please note that, due to continuing efforts to improve quality, the software specifications may be changed without notice.
Program © 2002 Sony Corporation, Copyright
Documentation © 2002 Sony Corporation
Sony, VAIO, the VAIO logo, Memory Stick, and the Memory Stick logo are trademarks of Sony Corporation.
Microsoft and Windows are registered trademarks of Microsoft Corporation in the United States of America and other countries.
MMX and Pentium are registered trademarks of Intel Corporation.
Adobe and Adobe Acrobat are trademarks of Adobe Systems Incorporated.
All other name of systems, products and services are trademarks of their respective owners. In this manual, the ^TM or ^ marks are not specified.
Notes:
- The user interface of the Sony supplied software may differ slightly from that shown in this manual.
- This manual assumes that you are familiar with basic operations of the Windows operating system. For computer operations, refer to the manuals that come with your computer.
- In this manual, Microsoft ^ Windows ^ Millennium Edition is referred to as Windows Me.
- In this manual, Microsoft ^ Windows ^ 2000 Professional is referred to as Windows 2000.
- In this manual, Microsoft ^ Windows ^ XP Professional and Microsoft ^ Windows ^ XP Home Edition are referred to as Windows XP.
Table of contents
Overview 5
What you can do with your Wireless LAN PC Card .... 5
About the supplied software...... 7
System requirements .... 8
About this manual....9
Opening the Help files ...... 9
Getting started
Unpacking.... 10
Installing the software 11
Installing the driver software.... 13
Installing the driver software ..... 13
Verifying the installation...... 18
Inserting the Wireless LAN PC Card .. 25
Starting Client Manager ...... 26
To remove the Wireless LAN PC Card ...... 27
Uninstalling the software and driver ... 28
Uninstalling the software ..... 28
Uninstalling the Wireless LAN PC Card driver .... 30
Software setup
Setting up the connection environment .. 34
Windows Me or Windows 2000 .... 34
Windows XP 44
Checking the communication status .... 47
Checking the wireless signal strength 47
Client Manager menus...... 48
Precautions 50
Specifications 51
Getting help 51
Additional information
Glossary 53
Troubleshooting.... 54
Overview
What you can do with your Wireless LAN PC Card
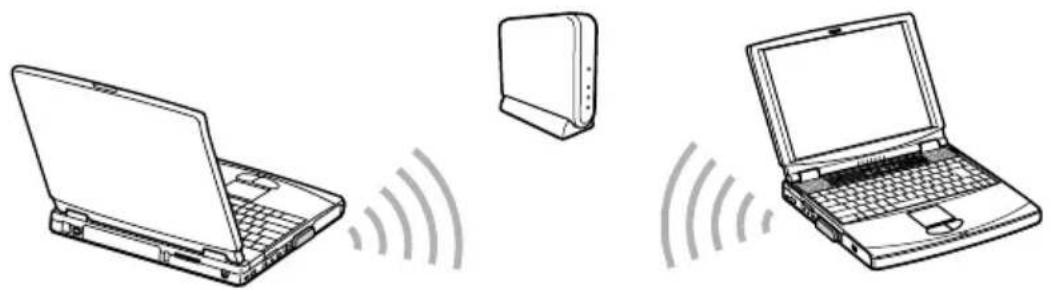
You can build a wireless LAN using the Wireless LAN PC Card PCWA-C150S (subsequently referred to as “Wireless LAN PC Card”). Equipping multiple computers with Wireless LAN PC Cards and installing the supplied software enables the computers to communicate and exchange data without a physical connection.
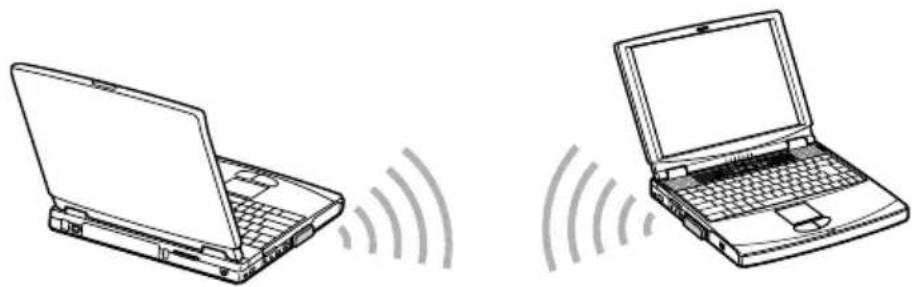
There are two basic configuration modes for a wireless LAN. In “Infrastructure Mode”, communication is routed through a separately available 2.4 GHz Wireless LAN Access Point (subsequently referred to as “Access Point”). In “Peer-to-Peer Mode”, no Access Point is used and the computers communicate directly with each other. If you connect your Access Point to a communication device (such as a cable modem, DSL modem, broadband router or ISDN router) or wired Ethernet LAN with an Internet connection, the computers in the wireless LAN can access the Internet.
Note
This product is a 2.4 GHz Wireless LAN PC Card conforming to the IEEE 802.11b standard. It is not compatible with products conforming to other standards (such as the IEEE 802.11a standard for 5 GHz wireless LANs).

Tips
- For details regarding functions and operation of the Access Point, please refer to its documentation.
- For information about file and printer sharing in a network environment, see Windows Help.
Communication through Access Point (Infrastructure Mode)
natural_image
Illustration of three laptops with wireless signal waves, no text or symbols presentDirect communication between computers (Peer-to-Peer Mode)
natural_image
Line drawing of two laptops with wireless signal waves, no text or symbols present
Tip
For details about peer-to-peer connections with Windows XP, see Windows XP Help.
About the supplied software
The Wireless LAN PC Card comes with the following software.
Client Manager
Client Manager is utility software for displaying the communication status of the Wireless LAN PC Card.
Usually, the software operates in the background and shows the communication status using an icon in the system tray (notification area in Windows XP). In operating systems other than Windows XP, the Client Manager allows you to change network settings of the computer and to switch networks.
Basic procedures for using Client Manager are explained in this manual.
PCWA-C150S Wireless LAN PC Card Driver
This is required for operation of the Wireless LAN PC Card.
System requirements
□Computer Hardware Requirements
CPU: MMX ^® Pentium ^® 233 MHz and above
RAM: With Windows Me/Windows 2000: 64 MB or more
With Windows XP: 128 MB or more
CD-ROM drive
Preinstalled built-in PCMCIA Type II slot
□Operating system
Microsoft® Windows® Millennium Edition
Microsoft® Windows® 2000 Professional Edition
Microsoft® Windows® XP Home Edition
Microsoft® Windows® XP Professional Edition
Note
Correct operation in an OS upgrade environment is not assured, except for factory provided Windows XP upgrade packages for Sony VAIO ^® series computers.
□Display
High color (16 bit color) and above, 800 × 600 pixels and above
Notes
- Trouble-free operation for all computers satisfying the above requirements is not assured.
- For Internet access via the wireless LAN, an IEEE 802.11b compliant 2.4 GHz Wireless LAN Access Point (available separately) is required.
- An Internet Service Provider (ISP) is required for Internet access.
About this manual
Note
When using an Access Point, first connect and configure the Access Point as explained in its documentation.
This manual explains the operation of the Wireless LAN PC Card and the installation and setup of the supplied Client Manager software. For details on using the Client Manager, refer to the online Help within the software.
Opening the Help files
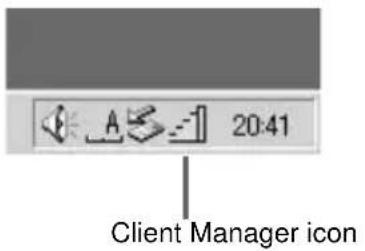
To use the Client Manager Help, proceed as follows.
1 While Client Manager is running, right-click the Client Manager icon -in the system tray (notification area in Windows XP).
Tip
The appearance of the icon changes according to the wireless signal strength. For details, see “Checking the communication status” on page 47.
2 In the shortcut menu that appears, point to "Help", and click "Contents".
Selecting a topic from the contents
From the contents list, click the desired topic.
Searching using a Keyword
1 Select the "Index" tab from the Help dialog box.
The keyword list appears.
2 Enter a keyword or scroll down the keyword list.
3 Select a topic, and click "Display". Topics related to the keyword appear.
Unpacking
Your Wireless LAN PC Card comes with the following items.
- Wireless LAN PC Card

natural_image
Simple line drawing of a rectangular electronic component with a recessed top and side slot (no text or symbols)- CD-ROM (Setup disc)
- Read This First
- Quick Start Guide
- Troubleshooting Guide
- Warranty card
- Other printed materials
Installing the software
Before installing the software:
- Configure and connect the Access Point.
- Quit all Windows programs.
Note
In Windows 2000 and Windows XP operating systems, only users with administrator privileges can install the software. If you have logged on to Windows 2000 with a user account not listed in “Administrator” or on to Windows XP with a user account not defined as “computer administrator”, you will be asked to type a user account name and password for an account with administrator privileges when you attempt to install the software. In this situation, enter the required information before proceeding.
1 In Windows Explorer or My Computer, double-click the installer file for Client Manager.
- If your computer has an internal CD-ROM drive or you can use an external CD-ROM drive while the Wireless LAN PC Card is inserted: Click on "Setup.exe" on the CD-ROM.
- If you copied the “Wireless LAN” folder from the supplied CD-ROM to your hard disk as described on page 13: Click “Setup.exe” in the folder on the hard disk.
Note
Depending on your computer settings, “Setup.exe” may be displayed as just “Setup”. If several files with the same name appear in the folder, double-click the one with the following icon.

2 Click "Next".
The License Agreement dialog box appears.
3 Read the agreement and click "Yes" to accept.
The Choose Destination Location dialog box appears.
4 Check that the displayed folder is the one where you want to install the software, and click "Next".
The Select Program Folder dialog box appears.
Tip
If you want to install the software into a different folder, click “Browse” and select the folder or directly enter the folder name.
5 Click "Next".
Tip
If you want to change the program folder, select a folder from the Existing Folders list or directly enter the folder name into the “Program Folder” field.
6 Without placing a check mark in the check box, click "Finish".
Proceed to “Installing the driver software” (page 13).
Installing the driver software
Note
Before installing the driver software, install the supplied utility software. For details on installing the supplied utility software, see “Installing the software” on page 11.
Installing the driver software
The installation procedure varies depending upon whether the CD-ROM drive is available when the Wireless LAN PC Card is inserted.
Note
If your computer has only one PC card slot, and your CD-ROM drive must be connected through it, copy the “Wireless LAN” folder from the supplied CD-ROM onto the hard disk before inserting the Wireless LAN PC Card. The following steps use the “Temp” folder in the C drive as an example.
If you can use the CD-ROM drive while the Wireless LAN PC Card is inserted, the following steps are not required. Begin installation starting from step 1 on page 14, 15 or 17.
1 Connect the CD-ROM drive to the computer, and insert the supplied CD-ROM into the drive.
2 Copy the "Wireless LAN" folder on the CD-ROM to the "Temp" folder on your hard disk using Windows Explorer.
3 Remove the CD-ROM drive from the PC card slot.
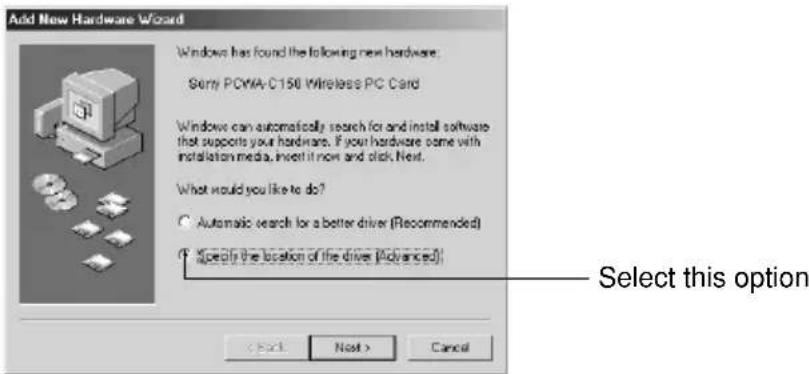
Windows Me
1 Insert the supplied CD-ROM into the CD-ROM drive.
Note
If your computer has two PC card slots and your CD-ROM drive must be connected through one of them, connect the CD-ROM drive to the bottom slot.
2 Insert the Wireless LAN PC Card into the PC card slot.
The Add New Hardware Wizard appears.
Tip
See “Inserting the Wireless LAN PC Card” on page 25 for information about inserting the Wireless LAN PC Card into your computer.
3 Select "Specify the location of the driver", and click "Next".
4 Select "Specify a location", and click "Browse".
5 Select the folder containing the driver, and click "OK".
- When installing from the supplied CD-ROM in a CD-ROM drive connected to the computer:
Select the "1WinMe" folder on the CD-ROM. - When installing after copying the contents of the supplied CD-ROM to a hard disk:
Select the "1WinMe" folder in the folder into which you copied the CD-ROM contents.
6 Click "Next" to begin the search.
7 Click "Next" to begin driver installation.
Wait for installation to complete. The Add/Edit Configuration Profile dialog box appears when installation is complete.
8 Click "Cancel" on the Add/Edit Configuration Profile dialog box.
9 Click "Finish".
10 Restart the computer.
Windows 2000
Note
In Windows 2000, only users with administrator privileges can install drivers. Log on to Windows 2000 with a user account listed in “Administrator”.
1 Insert the supplied CD-ROM into the CD-ROM drive.
Note
If your computer has two PC card slots and your CD-ROM drive must be connected through one of them, connect the CD-ROM drive to the bottom slot.
2 Insert the Wireless LAN PC Card into the PC card slot.
The Found New Hardware Wizard appears.

See “Inserting the Wireless LAN PC Card” on page 25 for information about inserting the Wireless LAN PC Card into your computer.
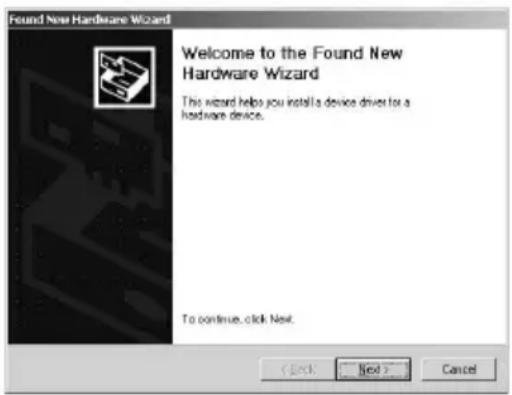
3 Click "Next".
4 Confirm that "Search for a suitable driver for my device" is selected, and click "Next".
5 Select Specify a location, and click "Next".
6 Click "Browse".
7 Select the folder containing the driver, and click "Open".
- When installing from the supplied CD-ROM in a CD-ROM drive connected to the computer:
Select the “2Win2k” folder on the CD-ROM.
- When installing after copying the contents of the supplied CD-ROM to a hard disk:
Select the “2Win2k” folder in the folder into which you copied the CD-ROM contents.
8 Click "OK" to begin the search.
9 Click "Next" to begin the driver installation.
The Add/Edit Configuration Profile dialog box appears.
10 Click "Cancel" on the Add/Edit Configuration Profile dialog box.
11 Click "Finish".
12 Restart the computer.
Windows XP
Note
In Windows XP, only users with administrator privileges can install drivers. If you have logged on to Windows XP with a user account not defined as “computer administrator”, you will be asked to type a user account name and password for an account with administrator privileges when you attempt to install the driver. In this situation, enter the required information before proceeding.
1 Insert the supplied CD-ROM into the CD-ROM drive.
Note
If your computer has two PC Card slots and your CD-ROM drive must be connected through one of them, connect the CD-ROM drive to the bottom slot.
2 Insert the Wireless LAN PC Card.
The "Find New Hardware Wizard" appears.
Tip
See “Inserting the Wireless LAN PC Card” on page 25 for information about inserting the Wireless LAN PC Card into your computer.
3 Select "Install from a list or specific location (Advanced)", and click "Next".
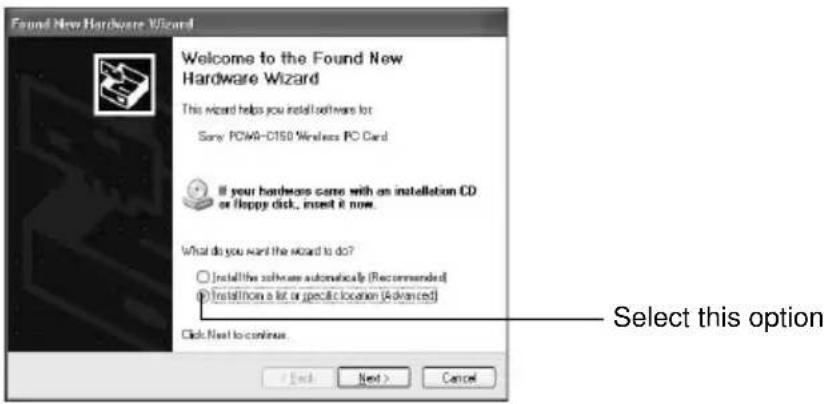
4 Check "Include this location in the search", and click "Browse".
5 Select the folder that contains the driver and click "OK".
- When installing from the supplied CD-ROM in a CD-ROM drive connected to the computer:
Select the “3WinXP” folder on the CD-ROM.
- When installing after copying the contents of the supplied CD-ROM to a hard disk:
Select the “3WinXP” folder in the folder into which you copied the CD-ROM contents.
6 Click "Next" to begin the search.
7 Click "Finish".
Verifying the installation
To verify that the Wireless LAN PC Card driver software has been installed, perform the following steps.
Windows Me:
1 From the "Start" menu, point to "Settings", and click "Control Panel".
Control Panel appears.
2 Double-click the System icon.
The System Properties dialog box appears.

If System is not displayed, click "view all Control Panel options".
3 Click the "Device Manager" tab.
4 Select "View Devices by type".
5 Double-click "Network adapters".
6 Double-click "Sony PCWA-C150 Wireless PC Card".
The Sony PCWA-C150 Wireless PC Card Properties dialog box appears.
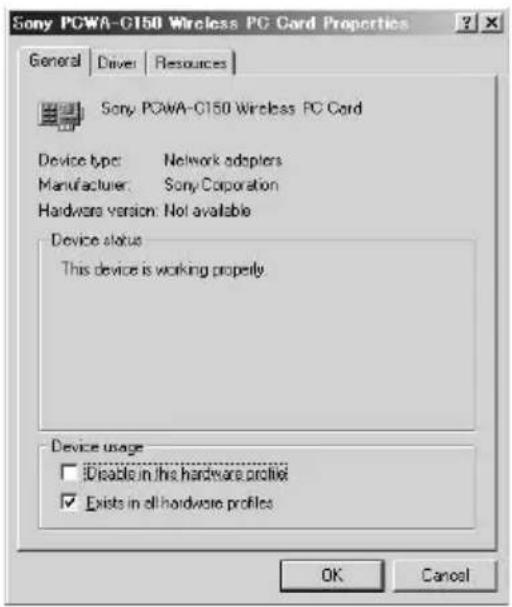
Note
The Wireless LAN PC Card is not working properly if the following occurs:
- “Sony PCWA-C150 Wireless PC Card” is represented in the Device Manager list by a yellow question mark or exclamation point.
→Click "Sony PCWA-C150 Wireless PC Card", and click "Remove" to uninstall the Wireless LAN PC Card driver. Then, reinstall the Wireless LAN PC Card driver.
- Double-clicking “Network adapters” does not display “Sony PCWA-C150 Wireless PC Card”.
→Remove the Wireless LAN PC Card from the computer, and reinsert it. Then, reinstall the Wireless LAN PC Card driver.
- Double-clicking “Other devices” displays “Sony PCWA-C150 Wireless PC Card”.
→Click “Sony PCWA-C150 Wireless PC Card”, and click “Remove” to uninstall the Wireless LAN PC Card driver. Then, reinstall the Wireless LAN PC Card driver.
7 Confirm that the message "This device is working properly" is displayed under "Device status".
Note
If the message “This device is working properly” is not displayed, the Wireless LAN PC Card is not working properly. In this case, click “OK” to close the Sony PCWA-C150 Wireless PC Card Properties dialog box, and then click “Remove”. When the Confirm Device Removal dialog box appears, click “OK” to remove the driver. Next, click “Yes” to restart the computer. When the computer restarts, repeat the steps from step 2 on page 14.
8 Click "OK".
You are returned to the System Properties dialog box.
9 Click "OK".
You are returned to Control Panel.
10 Double-click the PC Card (PCMCIA) icon.
The PC Card (PCMCIA) dialog box appears.
![PC Card (PCMCIA) Properties Socket Status | Global Settings | To remove a PC card, select it from the list, and then click Stop. Sony PCwA-C150 Wireless PC Card [Empty] - Socket 2 Stop Show control on taskbar Display warning if card is removed before it is stopped OK Cancel Apply](/content/2026/06/1204416/images/8ab1d527e9d42d46f0ea73af65bdef60fac9119a0a7e17c3b451494a19028ed0.jpg)
11 Confirm that "Sony PCWA-C150 Wireless PC Card" is displayed under Socket Status.
Note
If "Sony PCWA-C150 Wireless PC Card" is not displayed in the PC Card (PCMCIA) Properties dialog box, the Wireless LAN PC Card is not working properly. Repeat steps 1 through 4. Click "Sony PCWA-C150 Wireless PC Card" then click "Remove" to remove the driver. Click "Yes" to restart the computer. When the computer restarts, repeat from step 2 in "Installing the driver software" on page 14.
12 Click "OK".
The PC Card (PCMCIA) Properties dialog box closes.
13 Click ✗ close Control Panel.
Windows 2000:
1 From the "Start" menu, point to "Settings", then click "Control Panel".
Control Panel appears.
2 Double-click the System icon.
The System Properties dialog box appears.
3 Click the "Hardware" tab, then click "Device Manager".
The Device Manager window appears.
4 Double-click "Network adapters".
5 Double-click "Sony PCWA-C150 Wireless PC Card".
The Sony PCWA-C150 Wireless PC Card Properties dialog box appears.
Note
The Wireless LAN PC Card is not working properly if the following occurs:
- “Sony PCWA-C150 Wireless PC Card” is represented in the Device Manager list by a yellow question mark or exclamation point.
→Right-click “Sony PCWA-C150 Wireless PC Card”, and click “Remove” to uninstall the Wireless LAN PC Card driver. Then, reinstall the Wireless LAN PC Card driver. - Double-clicking “Network adapters” does not display “Sony PCWA-C150 Wireless PC Card”.
→Remove the Wireless LAN PC Card from the computer, and reinsert it. Then, reinstall the Wireless LAN PC Card driver. - Double-clicking “Other devices” displays “Sony PCWA-C150 Wireless PC Card”.
→Right-click “Sony PCWA-C150 Wireless PC Card”, and click “Remove” to delete the Wireless LAN PC Card driver. Then, reinstall the Wireless LAN PC Card driver.
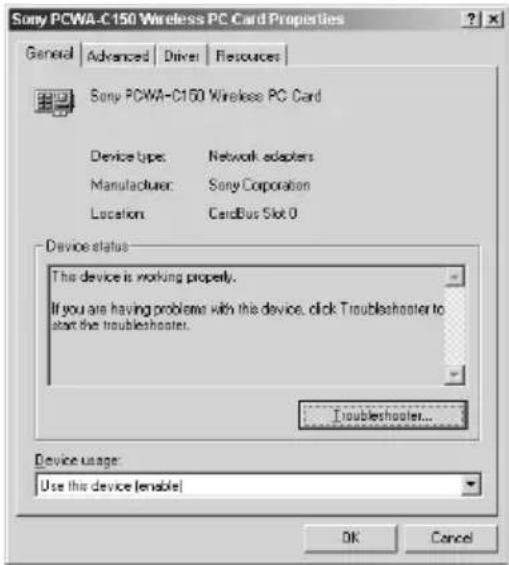
6 Confirm that the message “This device is working properly” is displayed under “Device status”.
Note
If the message “This device is working properly” is not displayed, the Wireless LAN PC Card is not working properly. In this case, click “OK” to close the Sony PCWA-C150 Wireless PC Card Properties dialog box, and then click “Uninstall” on the “Action” menu to remove the driver. When the Confirm Device Removal dialog box appears, click “OK”. After removing the driver, repeat the steps from step 2 on page 15.
7 Click "OK".
You are returned to the Device Manager window.
8 Click to close the Device Manager window.
You are returned to the System Properties dialog box.
9 Click "OK".
You are returned to Control Panel.
10 Click ✗ close Control Panel.
Windows XP:
1 From the "start" menu, click "Control Panel". Control Panel appears.
2 Double-click "System".
The System Properties dialog box appears.

Hint
If the System icon is not displayed, click "Switch to Classic View".
3 Click the "Hardware" tab, and click "Device Manager". The Device Manager window appears.
4 Double-click "Network adapters".
5 Double-click "Sony PCWA-C150 Wireless PC Card".
The Sony PCWA-C150 Wireless PC Card Properties dialog box appears.
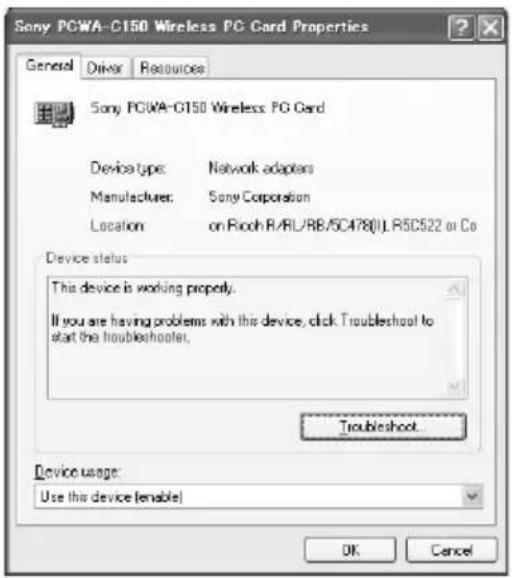
Note
The Wireless LAN PC Card is not working properly if the following occurs:
- “Sony PCWA-C150 Wireless PC Card” is represented in the Device Manager list by a yellow question mark or exclamation point.
→Right-click “Sony PCWA-C150 Wireless PC Card”, and click “Uninstall” to delete the Wireless LAN PC Card driver. After removing the driver, repeat the steps from step 2 on page 17. - Double-clicking “Network adapters” does not display “Sony PCWA-C150 Wireless PC Card”.
→Remove the Wireless LAN PC Card from the computer, and reinsert it. Then, repeat the steps from step 2 on page 17. - Double-clicking “Other devices” displays “Sony PCWA-C150 Wireless PC Card”.
→Right-click “Sony PCWA-C150 Wireless PC Card”, and click “Uninstall” to delete the Wireless LAN PC Card driver. Then, repeat the steps from step 2 on page 17.
6 Confirm that the message “This device is working properly” is displayed under “Device status”.
Note
If the message “This device is working properly” is not displayed, the Wireless LAN PC Card is not working properly. In this case, click “OK” to close the Sony PCWA-C150 Wireless PC Card Properties dialog box, right-click “Sony PCWA-C150 Wireless PC Card”, and then click “Uninstall” to remove the driver. After removing the driver, restart the computer. When the computer restarts, repeat the steps from step 2 on page 17.
7 Click "OK".
You are returned to the Device Manager window.
8 Click to close Device Manager windows.
You are returned to the System Properties dialog box.
9 Click "OK".
You are returned to Control Panel.
10 Click to close Control Panel.
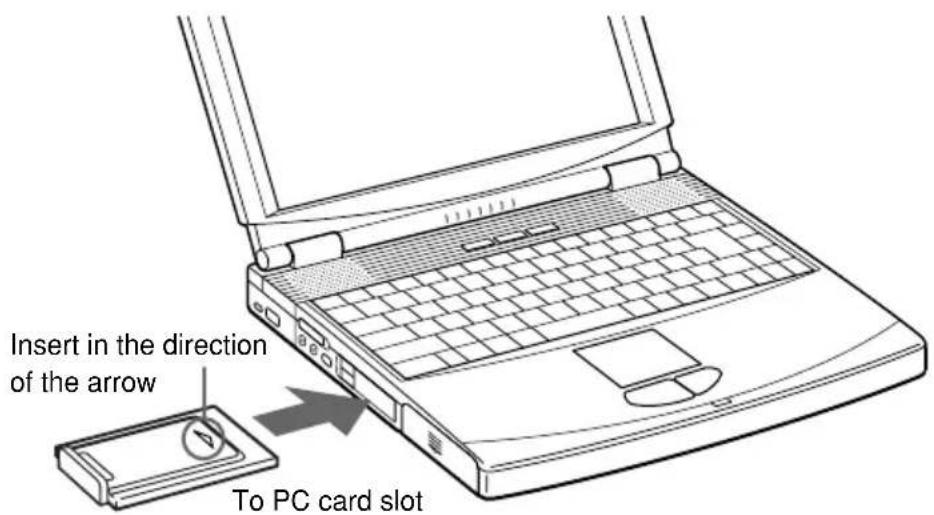
Inserting the Wireless LAN PC Card
This section explains how to insert the Wireless LAN PC Card into your computer and how to remove it.
You do not need to turn off your computer when inserting the Wireless LAN PC Card.
Insert the Wireless LAN PC card into the PC card slot of the computer.
Push the Wireless LAN PC Card into the slot until it is firmly seated.
Warning
When inserting the Wireless LAN PC Card, grasp it at the antenna base or both sides. If you hold the card by the protruding part of the antenna, the card may be damaged.
Notes
- If the card does not fit easily, do not force it in. Take the card out and try reinserting it.
- You may not be able to insert the Wireless LAN PC Card into some computers, due to insufficient depth or irregular shape above the PC card slot.
Notes
- If your computer has two PC card slots, insert the Wireless LAN PC Card into the top slot. If the card is inserted into the bottom slot, the antenna of the Wireless LAN PC Card will block the top slot.
- In some computer models, the Memory Stick slot may be blocked while the Wireless LAN PC Card is inserted.
- Set up your computer so that it does not go into System Suspend mode or System Hibernation mode while the Wireless LAN PC Card is in use.
- If the Wireless LAN PC Card is removed during System Suspend mode or System Hibernation mode, it may not be recognized properly when reinserted. Do not remove or insert the Wireless LAN PC Card during System Suspend mode, System Hibernation mode, or while the computer is idle.
Starting Client Manager
Note
Do not start the Client Manager before installing the driver software.
From the “Start” menu, point to “Programs” (“All Programs” in Windows XP), “Wireless LAN”, “PCWA-C150S”, and then click “Client Manager”.

Tip
The Client Manager is also included in the “Startup” folder, so it will start automatically when Windows starts up.
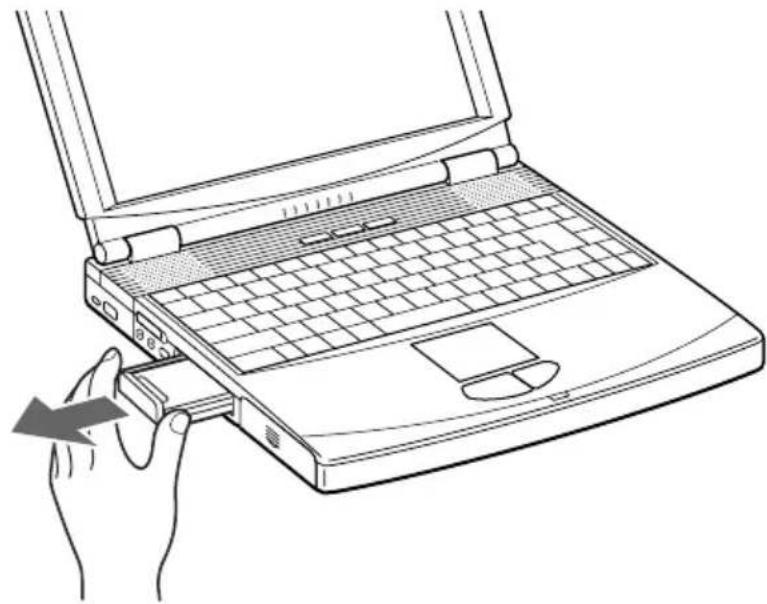
To remove the Wireless LAN PC Card
1 Close any running software that uses the wireless LAN for example, Client Manager.
2 Stop the Wireless LAN PC Card according to the manuals provided with your computer.
3 Remove the Wireless LAN PC Card according to the documentation of your computer.
Grasp the card at both sides and carefully pull it out of the slot.
natural_image
Line drawing of a hand inserting a laptop into a rack (no text or symbols)Uninstalling the software and driver
Uninstalling the software
Windows Me
1 From the "Start" menu, point to "Settings", and click "Control Panel".
Control Panel appears.
2 Double-click the "Add/Remove Programs" icon.
The Add/Remove Programs Properties dialog box appears.

If the Add/Remove Programs icon is not shown, select “view all Control Panel options”.
3 Select "Sony Wireless LAN Client Manager" from the list of automatically removable software, and click "Add/Remove". The Confirm File Deletion dialog box appears.
4 Click "OK".
The software uninstall process is carried out.
5 Click "OK" to close the Add/Remove Programs Properties dialog box.
Control Panel is shown again.
6 Click to close Control Panel.
Windows 2000
In Windows 2000 operating system, only users with administrator privileges can uninstall software. If you have logged on to Windows 2000 with a user account not listed in “Administrator”, you will be asked to enter a user account name and password for an account with administrator privileges when you attempt to uninstall the software. In such a case, enter the required information before proceeding.
1 From the "Start" menu, point to "Settings", and click "Control Panel".
Control Panel appears.
2 Double-click the Add/Remove Programs icon.
The Add/Remove Programs dialog box appears.
3 From the "Currently installed programs" list, select "Sony Wireless LAN Client Manager", then click "Change/Remove".
The Confirm File Deletion dialog box appears.
4 Click "OK".
The software uninstall process is carried out.
5 Click "Close" to close the Add/Remove Programs dialog box.
Control Panel is shown again.
6 Click to close Control Panel.
Windows XP
Note
In Windows XP operating system, only users with administrator privileges can uninstall software. If you have logged on to Windows XP with a user account not defined as “computer administrator”, you will be asked to enter a user account name and password for an account with administrator privileges when you attempt to uninstall the software. In such a case, enter the required information before proceeding.
1 From the "Start" menu, click "Control Panel".
Control Panel appears.
2 Click "Add or Remove Programs" (double-click if the Control Panel "Classic View" is selected).
The Add or Remove Programs dialog box appears.
3 From the "Currently installed programs" list, select "Sony Wireless LAN Client Manager", and click Change/Remove.
The Confirm File Deletion dialog box appears.
4 Click "OK".
The software uninstall process is performed.
5 Click "Close" to close the Add or Remove Programs dialog box.
Control Panel is shown again.
6 Click to close Control Panel.
Uninstalling the Wireless LAN PC Card driver
To uninstall the Wireless LAN PC Card driver, perform the following steps.

Hint
Refer to the Quick Start Guide for instructions on installing the Wireless LAN PC Card driver.
Windows Me:
1 From the "Start" menu, point to "Settings", and click "Control Panel".
Control Panel appears.
2 Double-click the "System" icon.
The System Properties dialog box appears.

Hint
If System is not displayed, click "view all Control Panel options".
3 Click the "Device Manager" tab.
4 Select "Devices by type".
5 Double-click "Network adapters", then click "Sony PCWA-C150 Wireless PC Card", and click "Remove".
The Confirm Device Removal dialog box appears.
6 Click "OK".
The message “To finish removing your hardware, you must restart your computer. Do you want to restart your computer now?” appears.
7 Remove the Wireless LAN PC Card from its slot, and click "Yes".
The system restarts. This completes removal of the driver.
Windows 2000:
Note
Log on to Windows 2000 as Administrator.
1 From the "Start" menu, point to "Settings", and click "Control Panel".
Control Panel appears.
2 Double-click the "System" icon.
The System Properties dialog box appears.
3 Click the "Hardware" tab, and click "Device Manager".
The Device Manager window appears.
4 Double-click "Network adapters".
5 Double-click "Sony PCWA-C150 Wireless PC Card".
The Sony PCWA-C150 Wireless PC Card Properties dialog box appears.
6 Click the "Driver" tab, and click "Uninstall".
The Confirm Device Removal dialog box appears.
7 Click "OK".
You are returned to the Device Manager window.
8 Click to close Device Manager window.
You are returned to the System Properties dialog box.
9 Click "OK".
You are returned to Control Panel.
10 Click ✗ close Control Panel.
Windows XP:
Note
Log on to Windows XP using an account with computer administrator privileges.
1 From the "Start" menu, click "Control Panel". Control Panel appears.
2 Double-click "System". The System Properties dialog box appears.

Hint
If the System icon is not displayed, select "Switch to Classic View".
3 Click the "Hardware" tab, and click "Device Manager". The Device Manager window appears.
4 Double-click "Network adapters".
5 Double-click "Sony PCWA-C150 Wireless PC Card". The Sony PCWA-C150 Wireless PC Card Properties dialog box appears.
6 Click the "Driver" tab, and click "Uninstall". The Confirm Device Removal dialog box appears.
7 Click "OK". You are returned to the Device Manager window.
8 Click to close the Device Manager window. You are returned to the System Properties dialog box.
9 Click "OK". You are returned to the Control Panel.
10 Click to close Control Panel.
Setting up the connection environment
Windows Me or Windows 2000
Establishing communication with the Access Point
This section describes how to configure settings for communication with an Access Point. When not using an Access Point, see “Configuring communication settings for Peer-to-Peer Mode” on page 40.
Before configuring the settings, the following tasks must be completed:
- The Wireless LAN PC Card must be inserted into the computer.
- The Access Point and the computer with the Wireless LAN PC Card must be located within the communication limits of the Access Point (approx. 330 feet), and the Access Point must be turned on. For details, see the Access Point documentation.
- Check the Network Name (also called SSID) and the Data Security (also called WEP or Encryption) settings of the Access Point. For details about these settings, consult your network administrator. The factory-settings for the Access Point are listed in the Access Point documentation.
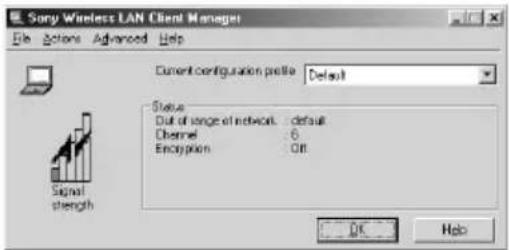
1 Click the Client Manager icon on the taskbar.
The Client Manager window appears.
![Sony Wireless LAN Client Manager File Options Advanced Help Current configuration profile: Default Status Connected to network: default Radio connection: Excellent Access Point name: [18.00.46.88-534.7] Channel: C Encryption: OR Signal strength OK Help](/content/2026/06/1204416/images/df5037ad7add8e492e97bf72d07273cbd43886e0f40f60f78b18c90fda59ac17.jpg)
2 From the "Actions" menu, select "Add/Edit Configuration Profile".
The Add/Edit Configuration Profile dialog box appears.
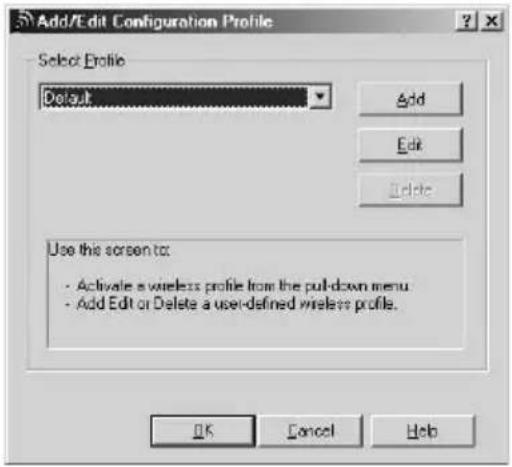
3 Click "Add".
The Edit Configuration dialog box appears.
Tip
To edit an existing profile, click "Edit".
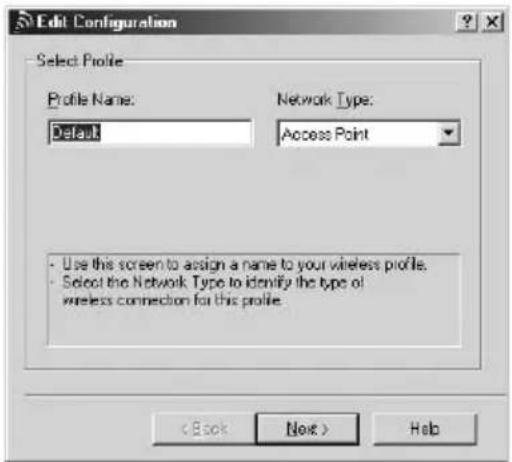
4 Enter an alphanumeric name for the profile in the "Profile Name" field (letters, numbers, and symbols are allowed). Verify that Access Point is selected in the "Network Type" list, and click "Next".
The Identify Your Network window shown below appears.
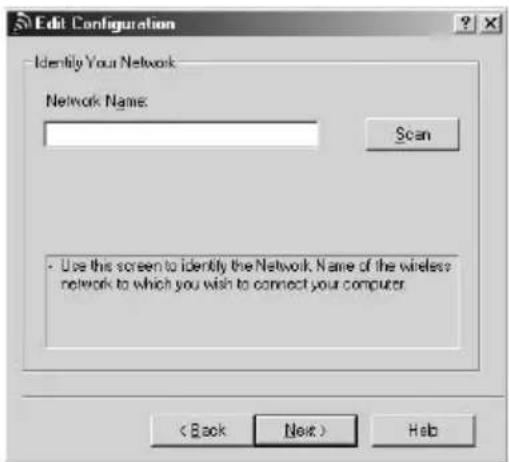
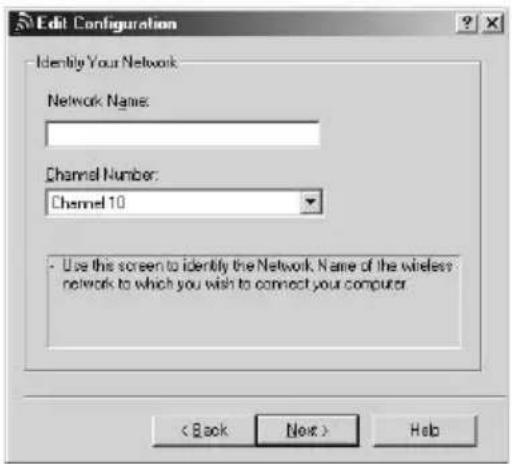
5 In the "Network Name" field, enter the same Network Name as set for the Access Point. You can also click "Scan" to search for Access Points within communication range.
Note
The Network Name is case sensitive. Be sure to use the same uppercase/lowercase spelling as at the Access Point.
Tips
- If you leave the Network Name field blank, the computer will attempt to connect to an arbitrary Access Point within range. If you enter “ANY” (all in uppercase) in the Network Name field, the computer will attempt to connect to all Access Points within range.
- If the “Scan” button is dimmed, an Access Point search cannot be performed. Enter the Network Name set for the Access Point.
6 If you clicked "Scan" in step 5, from the Scan for Network Name dialog box, select the Access Point to which you want to connect, and click "OK".
7 Click "Next".
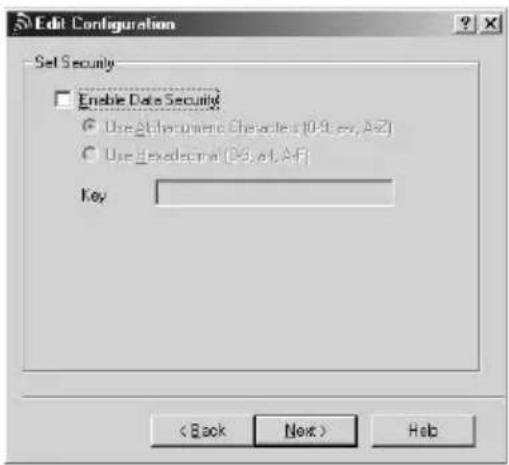
The Set Security window shown below appears.
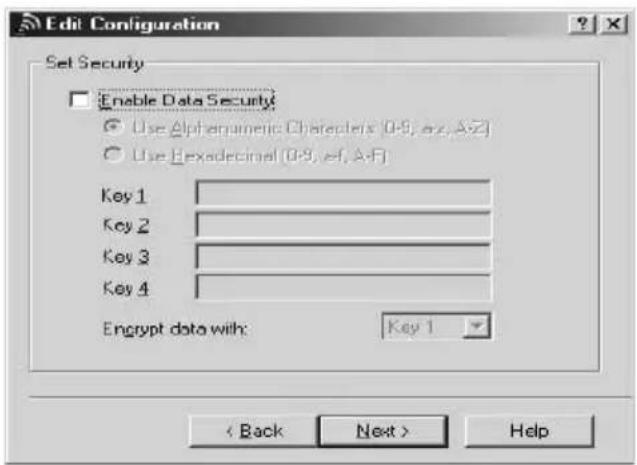
8 If Data Security (also called WEP or Encryption) is enabled at the Access Point, enter matching setting values for the Wireless LAN PC Card, as described below.
Notes
- Input is case sensitive. Be sure to use the same uppercase/lowercase spelling as at the Access Point.
-
The Data Security function serves to prevent unauthorized access to your network. It is strongly recommended that you enable Data Security after having checked that communication can be established. For details about changing the settings of the Access Point, see the documentation of the Access Point. After changing the settings of the Access Point, use Client Manager to change the settings for the Wireless LAN PC Card accordingly.
-
Select the "Enable Data Security" check box.
-
Select the input method for the key (the key is a password for connecting to an Access Point with Data Security enabled): "Use Alphanumeric Characters (0 - 9, a - z, A - Z)" or "Use Hexadecimal (0 - 9, a - f, A - F)". Symbols are also available when you select "Alphanumeric Characters (0-9, a-z, A-Z)".
Note
If the Access Point still uses the factory default key, it is strongly recommended that you change it after having checked that communication can be established. After changing the settings of the Access Point, use Client Manager to change the settings for the Wireless LAN PC Card accordingly. For details about changing the settings of the Access Point, see the documentation of your Access Point.
- In the field "Key 1", "Key 2", "Key 3", or "Key 4", type the encryption key set at the Access Point.
Notes
- Type the number of characters or digits as indicated below.
| Alphanumeric Characters Hexadecimal |
| Access Point is encrypted 13 characters 26 digits with a 128-bit WEP |
| Access Point is encrypted 5 characters 10 digits with a 64-bit WEP |
• Alphanumeric characters are case sensitive.
- Alphanumeric characters may include symbols.
- Select the field where you have input the key from the "Encrypt data with" drop-down list.
9 Click "Next".
The Power Management window shown below appears.
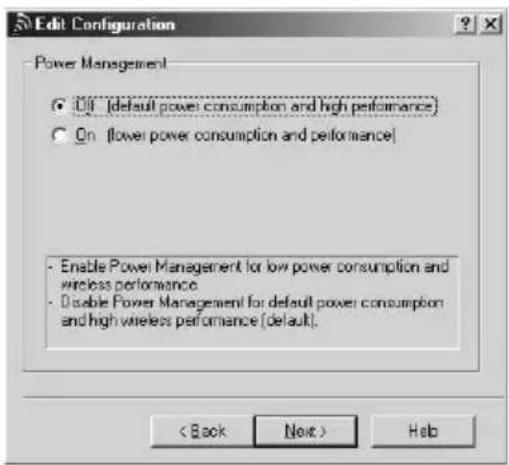
10 Set Power Management to "Off (default power consumption and high performance)" or "On (lower power consumption and performance)", and click "Next".
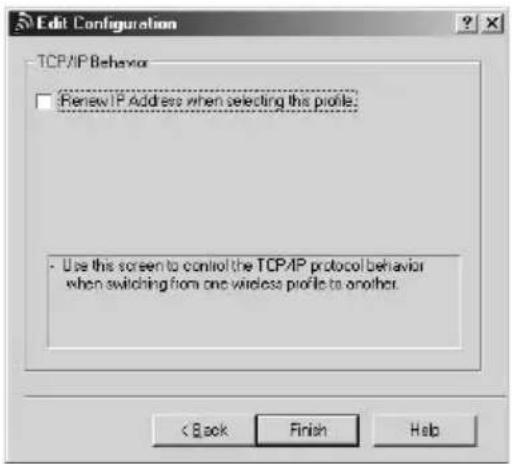
The TCP/IP Behavior window shown below appears.

11 When using one Wireless LAN PC Card for multiple networks, select the "Renew IP Address when selecting this profile" check box, and click "Finish".
The Add/Edit Configuration Profile dialog box reappears.
12 Click "OK" to close the Add/Edit Configuration Profile dialog box.
The Client Manager window reappears.
13 Click "OK" to close the Client Manager window.
14 With Windows Me, follow the procedure below to renew the IP address allocated to your Wireless LAN PC Card.
- From the "Start menu", click "Run".
- Type "winipcfg" (without quotation marks), and click "OK". The IP Configuration dialog box appears.
- Select "Sony Wireless PC Card" from the drop-down list, and click "Renew".
- Confirm the IP address shown in "Adapter Address".
- Click "OK" to close the IP Configuration dialog box.
Configuring communication settings for Peer-to-Peer Mode
1 Click the Client Manager icon on the taskbar.
The Client Manager window appears.
2 From the "Actions" menu, select "Add/Edit Configuration Profile".
The Add/Edit Configuration Profile dialog box appears.

3 Click "Add".
The Edit Configuration dialog box appears.

To edit an existing profile, click "Edit".

4 Enter a desired alphanumeric name into the "Profile Name" field (letters, numbers, and symbols are allowed).
5 In the "Network Type" drop-down list, select "Peer-to-Peer Group", and click "Next".
The Identify Your Network window shown below appears.
6 To create a new network, enter a desired alphanumeric name into the "Network Name" field (letters, numbers, and symbols are allowed). To connect to an existing network, enter the name of that network.
Note
The Network Name is case sensitive. Be sure to use the correct uppercase/lowercase spelling.
7 Select the channel number from the "Channel Number" drop-down list.
Note
When creating a new network, you can select any channel number.
Tip
When connecting to an existing network, the channel number is selected automatically.
8 Click "Next".
The Set Security window shown below appears.
9 When creating a new network or when connecting to an existing network where Data Security (also called WEP or Encryption) is enabled, use the following settings.
Note
The Data Security function serves to prevent unauthorized access to the network. It is strongly recommended that you enable Data Security.
- Select the "Enable Data Security" check box.
- Select the input method for the key (the key is a password for connecting to a network with Data Security enabled): "Use Alphanumeric Characters (0 - 9, a - z, A - Z)" or "Use Hexadecimal (0 - 9, a - f, A - F)". Symbols are also available when you select "Alphanumeric Characters (0-9, a-z, A-Z)".
3. Type the encryption key in the "Key" field.
Notes
- Type the number of characters or digits indicated below.
Alphanumeric Characters Hexadecimal
With a 128-bit WEP 13 characters 26 digits
With a 64-bit WEP 5 characters 10 digits
- Alphanumeric characters are case sensitive.
- Alphanumeric characters may include symbols.
10 Click "Next".
The TCP/IP Behavior window shown below appears.
11 When using one Wireless LAN PC Card for multiple networks, select the "Renew IP Address when selecting this profile" check box, and click "Finish".
The Add/Edit Configuration Profile dialog box reappears.
12 Click "OK" to close the Add/Edit Configuration Profile dialog box.
13 Click "OK" to close the Client Manager window.
14 With Windows Me, follow the procedure below to renew the IP address allocated to your Wireless LAN PC Card. (With Windows 2000 this procedure is not necessary. Proceed to step 15.)
- From the "Start menu", click "Run".
- Type "winipcfg" (without quotation marks), and click "OK". The IP Configuration dialog box appears.
- Select "Sony Wireless PC Card" from the drop-down list, and click "Renew".
- Confirm the IP address shown in "Adapter Address".
- Click "OK" to close the IP Configuration dialog box.
15 Verify if the connection is established with your peers.
- Double click My Network places icon on Desktop.
- Go to Entire Network.
- Check if your peer exists in your network.
Windows XP
Establishing communication with the Access Point
This section describes how to configure settings for communication with an Access Point. For information on settings when not using an Access Point, see Windows XP Help.
Before configuring the settings, the following tasks must be completed:
- The Wireless LAN PC Card must be inserted into the computer.
- The Access Point and the computer with the Wireless LAN PC Card must be located within the communication limits of the Access Point, and the Access Point must be turned on. For details, see the Access Point documentation.
- Check the Network Name (also called SSID) and the Data Security (also called WEP or Encryption) settings of the Access Point. For details about these settings, consult your network administrator. The factory-default configuration settings for the Access Point are listed in the Access Point documentation.
Note
Before configuring the Wireless LAN PC Card, perform the following steps to confirm that the “Use Windows to configure my wireless network settings” check box is selected. This option is selected as the default setting.
To confirm that the "Use Windows to configure my wireless network settings" check box is selected:
- From the "Start" menu, select "Control Panel", and double-click "Network Connections".
- Right-click "Wireless Network Connection", and click "Properties".
- Click the "Wireless Network" tab.
- Confirm that the "Use Windows to configure my wireless network settings" check box is selected. If it is not selected, select the check box.
1 Right-click the Wireless Network Connection icon

notification area of the taskbar. In the shortcut menu that appears, select "View Available Wireless Networks".
The Connect to Wireless Network dialog box appears.
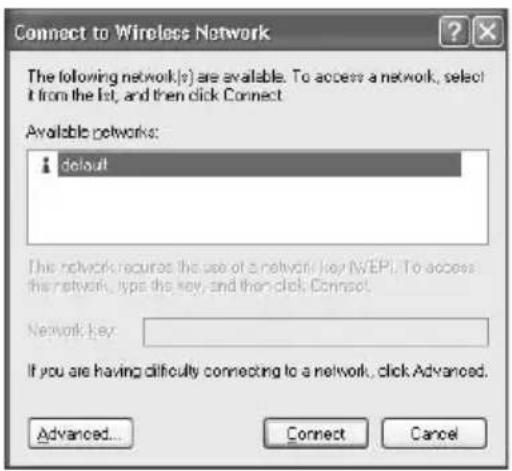
2 Click the Access Point to which you want to connect.
3 If Data Security (also called WEP or Encryption) is enabled at the Access Point, type the encryption key in the “Network key field”.
Notes
- Input is case sensitive. Be sure to use the same uppercase/lowercase spelling as at the Access Point.
- The Data Security function serves to prevent unauthorized access to your network. It is strongly recommended that you enable Data security after having checked that communication can be established. For details about changing the settings of the Access Point, see the documentation of the Access Point.
- After changing the settings of the Access Point, change the settings for the Wireless LAN PC Card accordingly.
4 Click "Connect".
The computer connects to the Access Point.
Tip
For details on making the connection, see Windows XP Help.
Checking the communication status
Checking the wireless signal strength
The communication status is shown by the Client Manager icon in the system tray (notification area in Windows XP).
Meaning of icon appearance

(Green) = Excellent

(Green) = Good

(Yellow) = Fair

(Yellow) = Weak signal

(Red) = Out of range

(No color) = Operating in Peer-to-Peer Mode
(Signal strength is not indicated in Peer-to-Peer Mode.)
Client Manager menus
![Sony Wireless LAN Client Manager File Actions Advanced Help Current configuration profile: Default Status Connected to network: default Radio connection: Excellent Access Point name: [08.00.46.88-53.47] Channel: Encryption: Off Signal strength OK Help](/content/2026/06/1204416/images/0dcb055771478d63a8107b8f8a492b94e026236cac9574db27003bd585c81896.jpg)
File menu
Enable Radio/Disable Radio
Enables or disables wireless communication.
Close Window
Closes the Client Manager window.
Actions menu
Add/Edit Configuration Profile
Creates a new profile or edits an existing profile. In Windows XP, the connection function built into Windows XP is used, and this function is not available.
Select Configuration Profile
Selects an existing profile from a submenu. The selected profile is indicated by a preceding (●). In Windows XP, the connection function built into Windows XP is used, and this function is not available.
Advanced menu
Card Diagnostics
Performs a test of the software and hardware.
Link Test
Tests the communication status of the connected network. If the other link components (Access Point or other computer in Peer-to-Peer Mode) do not support this capability, the function is not available.
Site Monitor
Displays a site monitor screen which shows the communication status for all networks within range.
Help menu
Contents
Opens the Client Manager Help.
Version Info
Displays the versions of Client Manager, Wireless LAN PC Card driver, Wireless LAN PC Card hardware, and Wireless LAN PC Card firmware.
Precautions
Safety
Do not drop or cause a mechanical shock to the 2.4 GHz Wireless LAN PC Card PCWA-C150S, as this may damage the unit.
Installation
Do not expose the Wireless LAN PC Card to the following conditions:
- Unstable surfaces
• High humidity or poor ventilation - Excessive dust
- Direct sunlight or extreme heat
- Closed cars
- Magnetic fields (near magnets, speakers, or televisions)
- Frequent vibration
- Locations where the transmission of radio waves may be obstructed by metal plates or concrete walls
Operation
If the Wireless LAN PC Card is moved directly from a cold location to a warm locations, or if it is placed in a very damp environment, moisture may condense on the parts inside. The Wireless LAN PC Card may not operate properly if moisture condensation occurs.
Cleaning
Clean the case with a soft cloth, lightly moistened with water or a mild detergent solution. Do not use any type of abrasive pad, scouring powder, or solvent such as alcohol or benzene as it may damage the finish of the case.
Specifications
Protocol support
TCP/IP compliant
Standard
IEEE 802.11b/IEEE 802.11
Radio frequency
2.4 GHz
Modulation method
DS-SS (IEEE 802.11 compliant)
General
Power requirements
3.3 V/5 V (supplied from the computer through the PC card adapter)
Current
Peak current at transmission: 330 mA
Peak current at reception: 240 mA
Connector
PC Card Card Type II
Dimensions
Approx. 2.2 · 0.2 · 3.6 inches
(Approx. 54 · 5 · 90 mm) (w/h/d)
(Antenna height: 0.5 inches (Approx. 12 mm))
Mass
Approx. 1.3 oz (Approx. 35 g)
Operating temperature
41^ to 95^ (5°C to 35°C) (not condensed)
Storage temperature
-4°F to 140°F (-20°C to 60°C) (not
condensed)
Supplied accessories
See "Unpacking" on page 10.
Design and specifications are subject to change without notice.
Getting help
This section describes how to get help and support from Sony, as well as troubleshooting tips for your Wireless LAN PC Card.
About Sony's Support Options
Sony provides several support options for your Wireless LAN PC Card. When you have questions about your Wireless LAN PC Card and its related software, check these options for answers:
☐ The Troubleshooting Guide
contains the FAQs about troubles that you may encounter when using the Wireless LAN PC Card.
☐ The Quick Start Guide contains information on how to install the Wireless LAN PC Card, how to install the driver and utility software, and how to make basic settings.
☐ The Operating Instructions manual contains detailed information on all aspects of the Wireless LAN PC Card.
☐ The Sony Wireless LAN PC Card support Web site http://www.ita.sel.sony.com/support/wirelesslan/ provides the latest information on your Wireless LAN PC Card. On this Web site, you will find:
- Answers to Frequently Asked Questions (FAQs)
- An electronic version of the Operating Instructions
- Help files
• Installation information
- Software upgrades
☐ The Sony e-mail support service
answers your questions by electronic mail. Just send your question in an e-mail message and a customer service representative will reply. To send a question to Sony e-mail support, fill out the e-mail form at
http://www.ita.sel.sony.com/support/wirelesslan/
☐ The Sony fax-back service provides
answers to commonly asked questions. You can use this automated service to request a list of available topics and then select the topics you want to receive. To contact the Sony fax-back service, call 1-877-760-7669.
□ The Sony Customer Information
Services Center offers information about your Access Point, Wireless LAN PC Card, and other Sony products that work with your computer. To contact the Sony Customer Information Services Center, call 1-877-760-7669.
Open 24 hours/day, 7 days/week.
Glossary
Channel number
The frequency used for wireless communications. Wireless communications are possible only among client computers and Access Points that use the same channel.
Data Security
IEEE 802.11 compliant security system (also called WEP or Encryption). Using the encryption key as the password, only client computers and Access Points that have the same key may log onto the same wireless LAN.
Encryption key
See Data Security
LAN (Local Area Network)
A network which is accessible only to its members, unlike the Internet, which is open to an unlimited number of people. A LAN may be built for different purposes. For example, you can build an office LAN that is accessible only to members of the same department or a home LAN that is accessible only to family members.
TCP/IP (Transmission Control Protocol/Internet Protocol)
TCP/IP is a networking protocol, a common set of communications standards that allow computers to communicate with each other. Because the Internet uses TCP/IP, a computer can only connect to the Internet when the TCP/IP protocol is installed on it.
Troubleshooting
If you have difficulty with your Wireless LAN PC Card, try the suggestions listed below. If you still cannot resolve the problem, contact Sony Customer Information Services.
| Symptom Cause/Remedy | |
| The computer does not detect the Wireless LAN PC Card. | The Wireless LAN PC Card may not be properly inserted into the PC Card slot of the computer.→Check that the Wireless LAN PC Card is inserted in the proper direction, then push it in as far as it will go. |
| Other computers on the wireless LAN are not displayed. | You did not enter the password when Windows started.→Enter the user name and the password requested on Windows startup, then log onto the LAN.The Windows network environment is not properly set up.→Check the Windows network settings. For details, see Windows Help.No other computers are logged onto the wireless LAN. |
| Cannot access the Internet. | The Access Point is not connected to the Internet.→Connect the Access Point to the Internet, as described in the documentation of the Access Point.The Wireless LAN PC Card is not inserted into the computer.→Insert the card as described in “Inserting the Wireless LAN PC Card” on page 25.Communication between the Access Point and the computer is not established.→Use Client Manager to check the communication status.The Access Point is not properly configured.→Configure the Access Point according to its documentation.The Access Point and the computer are too far apart.→Reposition the computer within 100 m (330 feet) of the Access Point, in direct line of sight. |
| Data transfer speed is slow. | There is radio interference with another Access Point.→Try assigning another channel number to the Access Point.There are too many clients logging on to the Access Point.→Try later. |
| Forgot the encryption key. | →Return Access Point to factory default settings and then reconfigure it. For details, see the documentation of the Access Point. |
| Transfer rate is 11 Mbps, but MPEG2 data does not transfer without interruption. | 11 Mbps is a theoretical value. Under real-world conditions, transfer rate will normally be in the range of 4 - 5 Mbps. This is true for all IEEE 802.11b compliant systems. The bandwidth available with wireless communications may not be sufficient for high-volume streaming data such as MPEG2. |
| Communication fails although the computer is located within 100 m (330 feet) of the Access Point. | The actual communication distance depends on various factors such as installation site conditions, presence of obstacles, and so on.→Move the computer closer to the Access Point. |
| Link test results in many dropped messages. | The Access Point and the computer are too far apart.→Move the computer closer to the Access Point.File transfer is in progress on the network.→During transfer of large files, performance may temporarily drop. Repeat the test when the network is not being used for file transfer.There is radio interference.→If there is another wireless station nearby using the same channel, try changing the channel number.→If a Bluetooth-enabled wireless device is being used nearby, stop using it at the same time.A microwave oven is being used nearby.→A microwave oven may also have an adverse effect on communication performance. Do not use it at the same time.NotesWhen more than 2% of messages are dropped, communication performance will be seriously affected. At 5% and higher, most network applications will have trouble functioning.Perform the link test for at least 1 minute continuously (minimum 200 messages) to ensure meaningful results. |
Symptom Cause/Remedy
| Cannot connect to the network. | The Access Point and the computer are too far apart.→Move the computer closer to the Access Point.Communication settings are incorrect.→Check the settings for Network Name, Data Security, Profile, and so on. |
| An error message indicating a conflict between network components is displayed. | Check the versions of related software and hardware (such as Client Manager, Wireless LAN PC Card, Access Point, and so on), and obtain updates if required. To check the version, right-click the Client Manager icon on the taskbar, and select Help — Version Info from the submenu. |
☐ The Sony e-mail support service answers your questions by electronic mail. Just send your question in an e-mail message and a customer service representative will reply. To send a question to Sony e-mail support, fill out the e-mail form at http://www.ita.sel.sony.com/support/wirelesslan/
☐ The Sony fax-back service provides you with answers to commonly asked questions. You can use this automated service to request a list of available topics and then select the topics you want to receive. To contact the Sony fax-back service, call 1-877-760-7669.
☐ The Sony Customer Information Services Center offers information about your Access Point, Wireless LAN PC Card, and other Sony products that work with your computer. To contact the Sony Customer Information Services Center, call 1-877-760-7669.
Open 24 hours/day, 7 days/week.
- Operating Instructions
- 2.4GHz
- Wireless LAN PC Card
- PCWA-C150S
- WARNING
- To prevent fire or shock hazard, do not expose the unit to rain or moisture.
- Owner's Record
- CAUTION
- NOTE:
- Declaration of Conformity
- Safety Information WARNING
- For the customers in Canada
- About the supplied software
- THE SUPPLIED SOFTWARE IS SUPPLIED PURSUANT TO THE APPLICABLE END-USER LICENSE AGREEMENT.
- Notes:
- Table of contents
- Getting started
- Software setup
- Additional information
- Overview
- What you can do with your Wireless LAN PC Card
- Note
- Tips
- Communication through Access Point (Infrastructure Mode)
- Direct communication between computers (Peer-to-Peer Mode)
- Tip
- Client Manager
- PCWA-C150S Wireless LAN PC Card Driver
- System requirements
- Notes
- About this manual
- Opening the Help files
- Selecting a topic from the contents
- Searching using a Keyword
- Unpacking
- Installing the software
- Before installing the software:
- In Windows Explorer or My Computer, double-click the installer file for Client Manager.
- Click "Next".
- Read the agreement and click "Yes" to accept.
- Installing the driver software
- Windows Me
- Windows 2000
- Windows XP
- Verifying the installation
- Windows Me:
- Double-click "Sony PCWA-C150 Wireless PC Card".
- Confirm that the message "This device is working properly" is displayed under "Device status".
- Click "OK".
- Click "OK".
- Double-click the PC Card (PCMCIA) icon.
- Confirm that "Sony PCWA-C150 Wireless PC Card" is displayed under Socket Status.
- Click "OK".
- Click ✗ close Control Panel.
- Windows 2000:
- Confirm that the message “This device is working properly” is displayed under “Device status”.
- Click "OK".
- Click to close the Device Manager window.
- Click ✗ close Control Panel.
- Windows XP:
- Hint
- Click to close Device Manager windows.
- Click to close Control Panel.
- Inserting the Wireless LAN PC Card
- Starting Client Manager
- To remove the Wireless LAN PC Card
- Uninstalling the software and driver
- Uninstalling the software
- Uninstalling the Wireless LAN PC Card driver
- Setting up the connection environment
- Establishing communication with the Access Point
- Before configuring the settings, the following tasks must be completed:
- Click the Client Manager icon on the taskbar.
- From the "Actions" menu, select "Add/Edit Configuration Profile".
- Click "Add".
- Click "Next".
- If Data Security (also called WEP or Encryption) is enabled at the Access Point, enter matching setting values for the Wireless LAN PC Card, as described below.
- Click "Next".
- Configuring communication settings for Peer-to-Peer Mode
- Select the channel number from the "Channel Number" drop-down list.
- Click "Next".
- When creating a new network or when connecting to an existing network where Data Security (also called WEP or Encryption) is enabled, use the following settings.
- Type the encryption key in the "Key" field.
- Click "Next".
- To confirm that the "Use Windows to configure my wireless network settings" check box is selected:
- Checking the communication status
- Checking the wireless signal strength
- Meaning of icon appearance
- Client Manager menus
- File menu
- Enable Radio/Disable Radio
- Close Window
- Actions menu
- Add/Edit Configuration Profile
- Select Configuration Profile
- Advanced menu
- Card Diagnostics
- Link Test
- Site Monitor
- Help menu
- Contents
- Version Info
- Precautions
- Safety
- Installation
- Operation
- Cleaning
- Specifications
- Protocol support
- Standard
- Radio frequency
- Modulation method
- General
- Supplied accessories
- Getting help
- About Sony's Support Options
- ☐ The Sony e-mail support service
- ☐ The Sony fax-back service provides
- □ The Sony Customer Information
- Glossary
- Channel number
- Data Security
- Encryption key
- LAN (Local Area Network)
- TCP/IP (Transmission Control Protocol/Internet Protocol)
- Troubleshooting
Brand : SONY
Model : PCWA-C150S
Category : Computer accessory