522 - Audio Equipment CISCO - Free user manual and instructions
Find the device manual for free 522 CISCO in PDF.

User questions about 522 CISCO
0 question about this device. Answer the ones you know or ask your own.
Ask a new question about this device
Download the instructions for your Audio Equipment in PDF format for free! Find your manual 522 - CISCO and take your electronic device back in hand. On this page are published all the documents necessary for the use of your device. 522 by CISCO.
USER MANUAL 522 CISCO
natural_image
Rooftop solar panel array in front of a modern city skyline at sunset, with no visible text or symbols.CiscoHeadset500SeriesUserGuide
FirstPublished:2019-01-23
LastModified:2020-12-08
AmericasHeadquarters
CiscoSystems, Inc.
170WestTasmanDrive
SanJose, CA95134-1706
USA
http://www.cisco.com
Tel:408526-4000
800553-NETS(6387)
Fax:408527-0883
THE SPECIFICATIONS AND INFORMATION REGARDING THE PRODUCTS IN THIS MANUAL ARE SUBJECT TO CHANGE WITHOUT NOTICE. ALL STATEMENTS, INFORMATION, AND RECOMMENDATIONS IN THIS MANUAL ARE BELIEVED TO BE ACCURATE BUT ARE PRESENTED WITHOUT WARRANTY OF ANY KIND, EXPRESS OR IMPLIED. USERS MUST TAKE FULL RESPONSIBILITY FOR THEIR APPLICATION OF ANY PRODUCTS.
THE SOFTWARE LICENSE AND LIMITED WARRANTY FOR THE ACCOMPANYING PRODUCT ARE SET FORTH IN THE INFORMATION PACKET THAT SHIPPED WITH THE PRODUCT AND ARE INCORPORATED HEREIN BY THIS REFERENCE. IF YOU ARE UNABLE TO LOCATE THE SOFTWARE LICENSE OR LIMITED WARRANTY, CONTACT YOUR CISCO REPRESENTATIVE FOR A COPY.
The following information is for FCC compliance of Class A devices: This equipment has been tested and found to comply with the limits for a Class A digital device, pursuant to part 15 of the FCC rules. These limits are designed to provide reasonable protection against harmful interference when the equipment is operated in a commercial environment. This equipment generates, uses, and can radiate radio-frequency energy and, if not installed and used in accordance with the instruction manual, may cause harmful interference to radio communications. Operation of this equipment in a residential area is likely to cause harmful interference, in which case users will be required to correct the interference at their own expense.
The following information is for FCC compliance of Class B devices: This equipment has been tested and found to comply with the limits for a Class B digital device, pursuant to part 15 of the FCC rules. These limits are designed to provide reasonable protection against harmful interference in a residential installation. This equipment generates, uses and can radiate radio frequency energy and, if not installed and used in accordance with the instructions, may cause harmful interference to radio communications. However, there is no guarantee that interference will not occur in a particular installation. If the equipment causes interference to radio or television reception, which can be determined by turning the equipment off and on, users are encouraged to try to correct the interference by using one or more of the following measures:
• Reorient or relocate the receiving antenna.
- Increase the separation between the equipment and receiver.
- Connect the equipment into an outlet on a circuit different from that to which the receiver is connected.
- Consult the dealer or an experienced radio/TV technician for help.
Modifications to this product not authorized by Cisco could void the FCC approval and negate your authority to operate the product.
The Cisco implementation of TCP header compression is an adaptation of a program developed by the University of California, Berkeley (UCB) as part of UCB's public domain version of the UNIX operating system. All rights reserved. © Copyright Regents of the University of California.
NOTWITHSTANDING ANY OTHER WARRANTY HEREIN, ALL DOCUMENT FILES AND SOFTWARE OF THESE SUPPLIERS ARE PROVIDED "AS IS" WITH ALL FAULTS. CISCO AND THE ABOVE-NAMED SUPPLIERS DISCLAIM ALL WARRANTIES, EXPRESSED OR IMPLIED, INCLUDING, WITHOUT LIMITATION, THOSE OF MERCHANTABILITY, FITNESS FOR A PARTICULAR PURPOSE AND NONINFRINGEMENT OR ARISING FROM A COURSE OF DEALING, USAGE, OR TRADE PRACTICE.
IN NO EVENT SHALL CISCO OR ITS SUPPLIERS BE LIABLE FOR ANY INDIRECT, SPECIAL, CONSEQUENTIAL, OR INCIDENTAL DAMAGES, INCLUDING, WITHOUT LIMITATION, LOST PROFITS OR LOSS OR DAMAGE TO DATA ARISING OUT OF THE USE OR INABILITY TO USE THIS MANUAL, EVEN IF CISCO OR ITS SUPPLIERS HAVE BEEN ADVISED OF THE POSSIBILITY OF SUCH DAMAGES.
Any Internet Protocol (IP) addresses and phone numbers used in this document are not intended to be actual addresses and phone numbers. Any examples, command display output, network topology diagrams, and other figures included in the document are shown for illustrative purposes only. Any use of actual IP addresses or phone numbers in illustrative content is unintentional and coincidental.
All printed copies and duplicate soft copies of this document are considered uncontrolled. See the current online version for the latest version.
Cisco has more than 200 offices worldwide. Addresses and phone numbers are listed on the Cisco website at www.cisco.com/go/offices.
Cisco and the Cisco logo are trademarks or registered trademarks of Cisco and/or its affiliates in the U.S. and other countries. To view a list of Cisco trademarks, go to this URL: https://www.cisco.com/c/en/us/about/legal/trademarks.html. Third-party trademarks mentioned are the property of their respective owners. The use of the word partner does not imply a partnership relationship between Cisco and any other company. (1721R)
© 2020 Cisco Systems, Inc. All rights reserved.

natural_image
City skyline with modern skyscrapers under a bright sky, foreground shows solar panels and distant construction cranes (no visible text or symbols)CONTENTS
CHAPTER 1
YourHeadset1
Cisco Headset 520 Series 1
Cisco Headset 530 Series 2
Connect and Use the Cisco Headset 530 Series Y Trainer Cable 4
Cisco Headset 560 Series 4
Cisco Headset 561 and 562 Standard Base 7
Cisco Headset 561 and 562 with Multibase 8
Connect the Multibase to a Bluetooth Device 11
Turn Bluetooth On and Off with the Multibase 11
Erase All Bluetooth Pairings 12
Cisco Headset 560 Series Conferencing 12
Change the Primary Paired Headset 15
Unpair Your Primary Headset From Your Base 15
New and Changed Information 16
New Information for Firmware Release 2.2(1) 16
New Information for Firmware Release 2.1(1) 16
New Information for Firmware Release 2.0(1) 17
New Information for Firmware Release 1.5(1) 17
Related Documentation 18
Cisco Headset Documentation 18
Cisco Webex Help Center 18
Cisco IP Phone 6800 Series Documentation 18
Cisco IP Phone 7800 Series Documentation 19
Cisco IP Phone 7800 Series Multiplatform Phones Documentation 19
CiscoHeadset500SeriesUserGuide
Cisco IP Phone 8800 Series Documentation 19 Cisco IP Phone 8800 Series Multiplatform Phones Documentation 19 Cisco Unified Communications Manager Documentation 19 Cisco Webex Desk Series Documentation 19
CHAPTER 2
CiscoHeadset500SeriesCallControls21
Cisco Headset 520 Series and Cisco Headset 530 Series Call Controls 21
Make and Answer Calls 21
Adjust Your Volume 21
Mute Yourself on a Call 22
Place a Call on Hold 22
End a Call 22
Reject a Call 22
Place a Call on Hold and Resume a Held Call 22
End a Call and Answer an Incoming Call 23
End a Call and Resume a Held Call 23
Cisco Headset 560 Series Call Controls 23
Turn Your Headset On and Off 23
Make and Answer Calls 24
Adjust Your Volume 24
Mute Yourself on a Call 24
Place a Call on Hold 24
End a Call 25
Reject a Call 25
Put a Call on Hold and Resume a Call 25
End a Call and Resume a Held Call 25
End an Active Call and Answer an Incoming Call 26
Answer a Call From a Different Source 26
CHAPTER 3
HeadsetSettings27
On-Premises Phone Headset Customization 27
Adjust Your Bass and Treble 27
Adjust Your Speaker Feedback 27
Adjust Your Microphone Volume 28
Test Your Microphone 28
Enable Electronic Hookswitch Control on Your Phone 29
Change Your Headset Ringer Settings 29
Reset Cisco Headset Settings from Your Phone 29
Multiplatform Phone Headset Customization 30
Adjust Your Bass and Treble (USB only) 30
Adjust Your Speaker Feedback (USB Only) 30
Adjust Your Microphone Volume (USB Only) 31
Test Your Microphone (USB Only) 31
Cisco Webex Desk Series Headset Customization 32
Change Audio Sources on Your Cisco Webex Desk Series 32
Jabber Headset Customization 32
Change the Audio Device in Cisco Jabber for Windows 32
Change the Audio Device in Cisco Jabber for Mac 32
Adjust Your Equalizer Settings in Cisco Jabber 33
Adjust Your Sidetone in Cisco Jabber 33
Webex Headset Customization 34
Change the Audio Device in Cisco Webex for Windows and Mac 34
Webex Meetings Headset Customization 34
Change the Audio Device in Cisco Webex Meetings Desktop App for Windows and Mac 34
CHAPTER 4
TroubleshootingandMaintenance35
Troubleshoot Your Cisco Headset 500 Series 35
What to Do First 35
Problems With Your Headset Audio 36
You Hear Garbled or Inconsistent Sound in Your Wired Headset 36
You Hear Garbled or Inconsistent Sound in Your Wireless Headset 36
You Can't Hear Sound Through Your Cisco Headset 520 Series and Cisco Headset 37
You Can't Hear Sound Through Your Wireless Headset 37
Other People Can't Hear You on Your Cisco Headset 520 Series or Cisco Headse 38
Other People Can't Hear You on Your Cisco Headset 560 Series 39
Your Headset Does Not Alert You to Incoming Calls on a Cisco IP Phone 39
CiscoHeadset500SeriesUserGuide
Your Headset and Base Won't Pair 40
Base with Y-Cable Doesn't Work 40
Conference Feature Issues on Your Cisco Headset 560 Series 40
Problems with Your Bluetooth Connection 41
Bluetooth Docs Not Turn On 41
Bluetooth LED Pulses White 41
There is No Audio With Bluetooth Turned On 41
Wireless Battery Issues 42
Headset Doesn't Charge 42
Headset Does Not Hold a Charge 42
Report Headset Issues Through Your Cisco IP Phone 42
Report Headset Issues Through Your Multiplatform Phone 43
Report Issues in Cisco Jabber 43
Report Headset Issues Through Your Cisco Webex Desk Series 43
Maintain Your Cisco Headset 500 Series 44
Update Your Headset Firmware With a Cisco IP Phone 44
Update Your Headset Firmware on Cisco Jabber 44
Upgrade Your Cisco Headset to the Latest Release on Webex 45
Upgrade Your Headset with the Cisco Headsets Web Tool 45
Check Your Headset Firmware on On-Premises Phones 46
Check Your Headset Firmware on Multiplatform Phones 46
Check Your Headset Firmware on Cisco Jabber 46
Locate Your Headset Serial Number 47
Find Your Headset Serial Number on a Cisco IP Phone 47
Clean Your Cisco Headset 500 Series 47
Replace Your Cisco Headset 500 Series Ear Pads 47
CHAPTER 5
ProductSafety49
Important Headset Safety Information 49
Compliance Statements 49
Compliance Statements for the European Union 49
CE Marking 49
RF Exposure Statement for the European Union 50
Compliance Statements for the USA 50
General RF Exposure Compliance 50
Part 15 Radio Device 50
Compliance Statements for Canada 50
Canadian RF Exposure Statement 50
Compliance Statement for Singapore 51
Contents

text_image
CHAPTER 1YourHeadset
• Cisco Headset 520 Series, on page 1
• Cisco Headset 530 Series, on page 2
• Cisco Headset 560 Series, on page 4
• New and Changed Information, on page 16
• Related Documentation, on page 18
CiscoHeadset520Series
Cisco Headsets 521 and 522 are two wired headsets that have been developed for use on devices. The Cisco Headset 521 features a single earpiece for extended wear and comfort v Headset 522 features two earpieces for use in a noisy workplace.
Both headsets feature a 3.5 mm connector for use on personal computers and mobile devic mm connector, the headset works like other headsets that plug into audio jacks.
The headsets also come with an inline USB controller that provides easy access to call co including answer, end call, reject call, hold and resume, mute, and volume control. The inh also available with a USB-C connector.
See the Cisco Headset 500 Series Data Sheet for complete information on compatibility with other Cisco devices and call clients.
Your controller buttons are used for basic call features.
Figure1:CiscoHeadset520SeriesController

text_image
1 2 3The following table describes the Cisco Headset 521 and 522 controller buttons.
Table1:CiscoHeadset520SeriesControllerButtons
| DescriptionNameNumber | ||
| Toggle the microphone on and off.Mute button1 | ||
| Adjust the volume on your headset.Volume button2 | ||
| Call3 | Manage calls:Press once to place a call (Cisco IP Phone only)Press once to answer an incoming call.Press and hold to end a call.Press twice to reject an incoming call.Press once to put an active call on hold. Press again a call from hold. |
CiscoHeadset530Series
The Cisco Headset 531 and 532 are two wired headsets that have been developed for use of and other call devices. The Cisco Headset 531 features a single carpiece for extended wear a Cisco Headset 532 features two earpieces for use in a noisy workplace.
Both headsets feature an RJ9 connector for use on most Cisco IP Phones. With the RJ9 con works like other headsets that plug into the headset port on the phone.
An inline USB adapter is also available with a built-in controller that provides easy access to capabilities, including answer, end call, reject call, hold and resume, mute, and volume control. the quick disconnect on the USB controller cable to move your headset from one device to
The inline controller is also available with a USB-C connector.
You can connect a second headset to the Cisco Headset 530 Series with the Cisco Heads Trainer Cable. See Connect and Use the Cisco Headset 530 Series Y Trainer Cable, on page 4 for more information.
See the Cisco Headset 500 Series Data Sheet for complete information on compatibility with other Cisco devices and call clients.
Your adapter is used for basic call features.
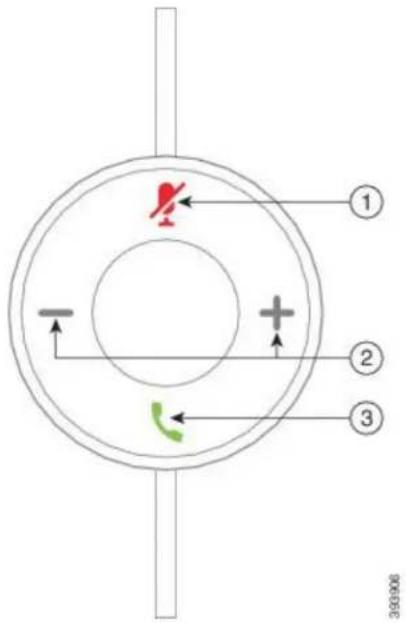
Figure2:CiscoHeadset530SeriesController
text_image
① ② ③ 393906The following table describes the Cisco Headset USB Adapter buttons.
Table2:CiscoUSBAdapterButtons
| DescriptionNameNumber | ||
| Toggle the microphone on and off.Mute button1 | ||
| Adjust the volume on your headset.Volume button2 | ||
| Call button3 | Place, answer, and manage your calls:Press once to place a call. (Cisco IP PhonePress once to answer an incoming call.Press twice to reject an incoming call.Press once to put an active call on hold.Press and hold to end a call. |
only)
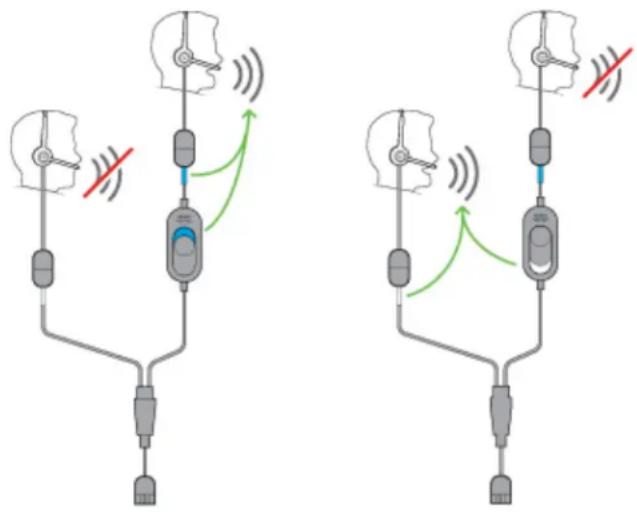
ConnectandUsetheCiscoHeadset530SeriesYTrainerCable
You can connect a second headset to the Cisco Headset 530 Series with the Y Trainer Cab Cable enables a trainer to listen in to a trainee's call and join if necessary. The switch on alternates voice control between the headsets so that a trainer or supervisor can quickly join The color on each arm of the cable corresponds to the colors on the switch. When the sw blue-banded arm of the headset is active. When the switch shows light grey, the light grey is active.
text_image
Diagram showing two identical mechanical or electrical setups with labeled components and directional arrows indicating signal flow.Procedure
Step1Connect the trainer cable to the Cisco Headset 530 Series USB controller.
Step2Connect the trainee headset to the arm of the trainer cable without the control switch.
Step3Connect the trainer headset to the arm of the Y cable with the switch.
Step4 Use the switch on the trainer cable to alternate voice feedback between the headsets.
CiscoHeadset560Series
The Cisco Headset 560 Series includes two wireless headset models designed for use in a mode. The Cisco Headset 561 features a single earpiece for lightweight comfort and support. The Cisco 562 offers dual ear cups for rich sound and comfort in a noisy office space. To use this the standard base or the multibase. The bases plug into the call device and facilitate community headset
Each headset base has a default range of approximately 145 feet (45 meters) unless there are such as walls and doors or outside interference from other DECT radio sources. Your adminis increase your headset range up to approximately 330 feet (100 meters). A headset will unpair if it's taken too far away. The base light turns solid white when it's paired to the headset, and flashes when it isn't.

Note
As of Firmware Release 2.1(1) or later, your headset powers down if it is unpaired to a minutes. This feature conserves the battery.
Your Cisco Headset 560 Series is can hold its charge for up to 10 hours of continuous in the base when the battery is low. It takes 3 hours for a battery to complete a full If you have Headset Firmware Release 2.1(1) or later, you can maintain call control through Headset 560 Series when you switch bentween soft clients. For example, you can mute a Skype for Business and still maintain call control in Cisco Webex Meetings.
See the Cisco Headset 500 Series Data Sheet for complete information on compatibility with other Cisco devices and call clients.
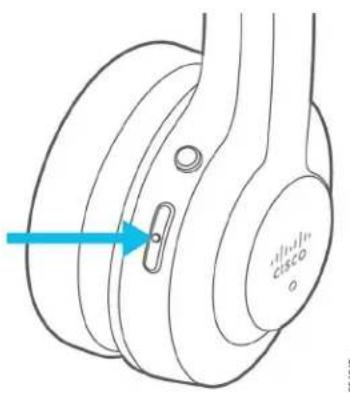
Your headset buttons are used for basic call features.
Figure3:CiscoHeadset561and562Buttons

text_image
① ② ③ ④ CISCO 332925The following table describes the Cisco Headset 561 and 562 Headset buttons.
Table3:CiscoHeadset561and562Buttons
| DescriptionNameButtonNumber | |||
| ○ | Power and Call button | Use to power the headset on and off.Press and hold for 4 seconds to power the headset off and oIncoming and active call management depends upon if you have call or multiple calls.One call:Press once to answer incoming calls.Press once to put an active call on hold. Press again to call from hold.Press twice to reject an incoming call.Press and hold to end a call.Multiple calls:Press once to put an active call on hold, and to answer incoming call.Press once to put a call on hold. Press again to resume press and hold until you hear a tone to end the current to resume a held call.Press and hold until you hear a tone to end an active answer another incoming call.Press twice to stay on a current call, and to reject a current coming call. | |
| ● | Toggle the microphone on and off.Mute button2 | ||
| —— | Adjust the volume on your headset.Volume buttons3 | ||
| LEDN/A4 | Shows the headset status:Blinking red-Incoming call.Steady red-Active call.Blinking white-Firmware upgrade is in process or the head is pairing with the base station.Steady white-Headset is paired and properly seated on theSteady pulse-Headset is paired, in an idle state, and is a base. |
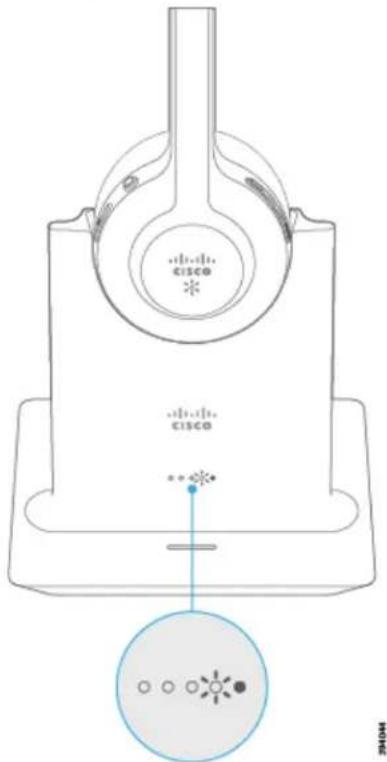
CiscoHeadset561and562StandardBase
The standard base charges your headset and has LEDs that shows your headset's battery level. You can also answer and end calls when you lift or place your headset on the base.
The standard base comes with the following connector cables:
• USB to USB Cable: for devices with USB connectivity
• USB Y-Cable: for Cisco IP Phones without a USB port
• USB-A to USB-C Cable: available separately for PC or Mac devices
Figure4:StandardBaseLEDs

text_image
CISCO ① ② 36:25/05The following table describes the standard base
Table4:StandardBaseLEDs
| DescriptionNameNumber | ||
| Battery Status LED1 | Indicates the headset battery charge and base staHeadset battery strength—LEDs blink and ch solid as the battery chargesHeadset update in progress—LEDs blink in left to rightHeadset and base not paired—All LEDs blPower save mode—Middle LED shows solidThe base enters power save mode when there in connectivity after 10 minutes. | |
| Call Status LED2 | Alerts you to the call state:Incoming call—Blinking greenActive call—Steady greenMuted call—Steady red |
CiscoHeadset561and562withMultibase
The multibase can connect up to three call sources through Bluetooth, the USB connector, or The multibase can save up to four Bluetooth devices. You can switch between call sources u on the multibase. You use the call control buttons on the headset to answer and end calls. is in the base, you automatically answer the call when you remove the headset from the ba the headset to the base to end the call.
The multibase comes with the following connector cables:
• USB to USB Cable: for Cisco IP Phones with USB connectivity
• USB Y-Cable: for Cisco IP Phones without a USB port
- Mini USB Cable: for PC or Mac.
- Mini USB to USB-C cable: available separately for PC or Mac devices.
Figure5: MultibaseLEDs

text_image
CISCO ① ② ③ ④ ⑤The following table describes the Cisco Headset 560 Series Multibase multibase LEDs.
Table5: MultibaseLEDs
| DescriptionNameNumber | ||
| Battery Status LED1 | Indicates the headset battery charge and base status:Headset battery strength—LEDs blink and change to solid as the battery chargesHeadset update in progress—LEDs blink in sequence left to rightHeadset and base not paired—All LEDs blinkPower save mode—Middle LED shows solidThe base enters power save mode when there is no connectivity after 10 minutes. | |
| Call Status LEDs2 | Alerts you to the call state of each source:Active Source—Steady whiteIncoming call on a selected source—Blinks greenIncoming call on an unselected source—Blinks greenActive call—Steady greenCall on an inactive source—Pulses green | |
| Alerts you when your headset is muted.Mute Status LE | ||
| Bluetooth Status LED4 | Alerts you to the Bluetooth status:Paired with a call source—Steady whitePairing mode—Blinking whiteSearching for a call source—Pulse whiteBluetooth is Off—LED is off |
You use the source control buttons on the base to control the active source. Each source with a specific connection on the multibase.
Even if you are connected to a source, the LED may not be lit. The source LED only is selected or has an active call. For example, you may be properly connected to a Cise and your mobile phone through Bluetooth. However, the respective source LED is only lit has an active call, or has an incoming call. Press the source button to check if a source The source LED flashes three times if there is no connection.
You can alternate between active call sources.

Note
Place an active call on hold before you change to a different call source. Calls on one call automatically put on hold when you switch to a different call source.
The following table illustrates the multibase source icons and their corresponding connections.
Table6: MultibaseSourceConsole
| ConnectionBaselconSource | ||
| Desk Phone |  | 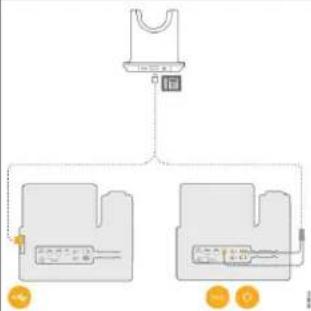 USB to USB cord or Y-CableThe desk phone icon corresponds with the middle USB port at the back of the multibase. It is intended for connecting to Cisco IP Phones but it will function properly with any compatible call device. USB to USB cord or Y-CableThe desk phone icon corresponds with the middle USB port at the back of the multibase. It is intended for connecting to Cisco IP Phones but it will function properly with any compatible call device. |
| Laptop |  Micro-USB cordThe laptop icon corresponds with the micro-USB port found on the back of the multibase. The micro-USB port is intended for connections with a laptop or desktop computer. Micro-USB cordThe laptop icon corresponds with the micro-USB port found on the back of the multibase. The micro-USB port is intended for connections with a laptop or desktop computer. | |
| Mobile | The mobile phone icon corresponds with the Bluetooth connection found at the back of the base. With the icon is of a mobile phone, the base will connect with any compatible Bluetooth call device.The multibase can save and remember up to four Bluetooth call devices.If you are listening to music through the Bluetooth source, the music pauses when you place the headset on the base. |
RelatedTopics
Connect the Multibase to a Bluetooth Device, on page 11
ConnecttheMultibasetoaBluetoothDevice
The Cisco Headset 560 Series Multibase can connect to Bluetooth devices such as a mobile. The headset base appears on your call device as Cisco Headset followed by the last three digits on your headset serial number.

Note
You can find your headset serial number in the lower right corner on the underside of y
The multibase can store up to four different paired Bluetooth devices. If you already have the base will replace the device which has not been used in the longest time.
Procedure
Step 1 Press the Bluetooth button on the back of the base twice to start pairing.
Step2Select your headset from the Settingsmenu on your device.
The Bluetooth LED lights white when pairing is successful.
TurnBluetoothOnandOffwiththeMultibase
Your multibase remembers the last-connected device. When you turn Bluetooth off on the m connection to the device stops. When you turn Bluetooth on again, the base tries to recon
Procedure
Press the Bluetooth button on the back of the base once to turn in on or off.
EraseAllBluetoothPairings
You can erase all saved Bluetooth device pairings.
Procedure
Press and hold the Bluetooth button on the back of the multibase for four seconds to clear the memory.
CiscoHeadset560SeriesConferencing
If your administrator has enabled headset conferencing, you can pair up to three guest Cisco Series headsets to either the standard base or the multibase. With this feature, people that sit connect to each other and to the same call with one base. You can conference headsets but active call. If the call source or the multibase is muted, conferred headsets can interact with won't interfere with the active call.
If you are on a call and need a coworker to join the call, the coworker's headset can pair the call ends, you and your coworker are still connected to each other. Decide on a base to primary base and pair your coworker's headsets to that base. When you no longer need people your base, they can pair their headsets back to their own bases.
Headset Firmware Release 1.5(1) or later is required for a headset to enter conferencing mode.
Headset Firmware Release 2.1(1) or later enables headset conferencing capabilities by default.
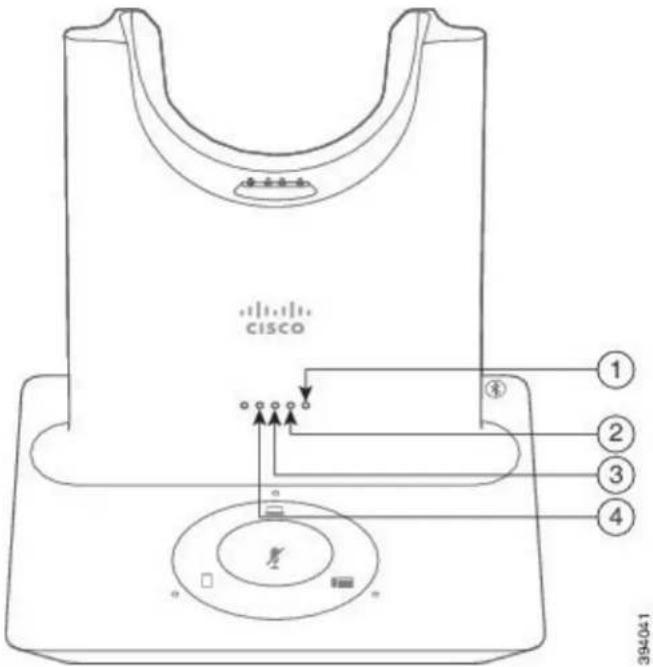
When the base is in conferencing mode, the battery status LEDs display number of connected each headset's status. The far-right LED shows the primary headset status while the middle LED the status of each guest headset. The LEDs light in order as headsets connect. When a head newer headsets keep their position on the base. The following figure and table show the corr conference mode LEDs.
Figure6: Multibase Conferencing LEDs
text_image
CISCO ① ② ③ ④ 394041Table7: Conferencing LEDs
| HeadsetNumber | |
| Primary Headset1 | |
| Guest Headset #12 | |
| Guest Headset #23 | |
| Guest Headset #34 |
The following table describes LED behavior when a base is in conferencing mode.
Table8: Conferencing LED States
| HeadsetStatusLEDState | |
| Headset is connected and not mutedLED is solid pairLED blinks every two | |
| Guest headset is waiting to | |
| seconds | Headset is mutedLED flashes |
| Headset is unable to pair with the baseLED blinks rapidly | |
| Headset is disconnected from the baseLED is off |
Guest headsets use their own tuning settings while in conferencing mode. Users can mute and volume in their headsets without changing the settings on any other paired headsets.
PairaGuestHeadset
You can pair up to three guest headsets to a base. Guest headsets retain any tuning or vol headsets are muted by default when they pair. The primary headset plays a tone indication w headset is trying to pair. The primary headset must confirm the guest headset within 10 seco tone plays when the primary headset accepts the guest for conferencing. The guest headset's or LED's flash white to show that there is no paired headset.

Note
When the guest headset tries to pair, the primary headset can't accept any incoming calls unt rejects the guest headset to the base.
Beforeyoubegin
The primary headset must be already paired with the base.
Procedure
Step1Place the guest headset on the base.
text_image
cisco cisco 2404HStep 2 Press Call ☐ on the primary headset to enable the guest headset to join.
text_image
CISCOStep3Press the Muteon the guest headset to join the conversation.
UnpairaGuestHeadset
You can unpair guest headsets from the primary base.
Procedure
Do one of these actions.
- Press and hold Callon the guest headset until you hear a tone.
- Place the primary headset on the base. All guest headsets will disconnect.
ChangethePrimaryPairedHeadset
You can change the primary headset on your standard base or multibase. When the new 1 previous primary headset plays a tone and unpairs from the base.
Procedure
Step 1 On the new headset, hold Mute Ⓞ for five seconds until the headset LED rapidly alternates red and white.
Step2Place the new headset on the base.
Note You can skip step one if you power cycle the base with the new headset seated
UnpairYourPrimaryHeadsetFromYourBase
You can designate a new primary headset and force the old headset to unpair from your in case you can't locate the primary headset and turn it off.

Note
You can't unpair the primary headset if you have an active call or are in conferencing mod
Procedure
Step 1 On your new headset, hold Mute ● for five seconds. The headset LED alternates red and white.
Step 2 Place the headset on the base. The base designates the new headset as the primary headset and un-pairs with the old headset.
The old primary headset plays a tone indication when it unpairs from the base.
NewandChangedInformation
NewInformationforFirmwareRelease2.2(1)
Table9:CiscoHeadset500SeriesUserGuideRevisionsforFirmwareRelease2.2(1)
| UpdatedSectionFeature | |
| Customize your headset ringer setting on the Cisco IP Phone | Change Your Headset Ringer Settings, on page 29 |
| The Cisco Headset 560 Series can maintain call control in Cisco Webex Meetings with multiple open call clients on computer. | Cisco Headset 560 Series, on page 4the same |
| Cisco Webex Teams shows your headest upgrade status | Upgrade Your Cisco Headset to the Latest Release page 45 |
| Enhancements to the Cisco Headsets Web Tool | Upgrade Your Headset with the Cisco Headsets Webpage 45 |
NewInformationforFirmwareRelease2.1(1)
Table10:CiscoHeadset500SeriesUserGuideRevisionsforFirmwareRelease2.1(1)
| UpdatedSectionFeature | |
| minutes to conserve battery power. | Cisco Headset 560 SeriesThe Cisco Headset 560 Ser |
| multiple open call clients on the same computer. | Cisco Headsct 560 SeriesThe Cisco Headset 560 Ser |
| Headset upgrade progress displays on the Cisco Jabber UI (Cisco Jabber version 12.9 or later). | Update Your Headset Firmware on Cisco Jabber, on page 44 |
| Enhancement to the Cisco Headset 560 Series Multibase auto-switch feature. | Answer a Call From a Different Source, on page 26 |
| Upgrade Your Cisco Headset to the Latest Release | |
| Upgrade through the Cisco Headsets Web Tool | Upgrade Your Headset with the Cisco Headsets Web page 45 |
| The Cisco Headset 560 Series conferencing feature is enabled by default. | Cisco Headset 560 Series Conferencing, on page 12 |
NewInformationforFirmwareRelease2.0(1)
Table11:CiscoHeadset500SeriesUserGuideRevisionsforFirmwareRelease2.0(1)
| UpdatedSectionFeature | |
| Answer calls from a different source with the Cisco Headset 560 Series with Multibase | Answer a Call From a Different Source, on page 26 |
| Report headset issues through Cisco Webex DX70 | oRepDX80Headset Issues Through Your Cisco Webex I on page 43 |
| Enable electronic hookswitch from your Cisco IP Ph | Enable Electronic Hookswitch Control on Your Phone 29 |
| Cisco Headset 530 Series Y Trainer Cable | Connect and Use the Cisco Headset 530 Series Y on page 4 |
NewInformationforFirmwareRelease1.5(1)
Table12:CiscoHeadset500SeriesUserGuideRevisionsforFirmwareRelease1.5(1)
| UpdatedSectionFeature | |
| Headset Conferencing | Cisco Headset 560 Series Conferencing, on page 12Pair a Guest Headsct, on page 14Unpair a Guest Headset, on page 15Change the Primary Paired Headset, on page 15Unpair Your Primary Headset From Your Base, on |
| Updated for added ringtones on incoming calls when connected to a Cisco IP Phone | Make and Answer Calls, on page 21Make and Answer Calls, on page 24Answer a Call From a Different Source, on page 26 |
| Updated for enhanced multibase Bluetooth capability | Connect the Multibase to a Bluetooth Device, on page 11Erase All Bluetooth Pairings, on page 12 |
| Updated for new headset settings in Cisco Jabber | Adjust Your Equalizer Settings in Cisco Jabber, on page 33Adjust Your Sidetone in Cisco Jabber, on page 33 |
| Reset Cisco Headset Settings to the Administration settings | Reset Cisco Headset Settings from Your Phone, on page 29 |
| Webex Teams Call Support | Cisco Headset 520 Series, on page 1Cisco Headset 530 Series, on page 2Cisco Headset 560 Series, on page 4Webex Headset Customization, on page 34 |
RelatedDocumentation
Use the following sections to obtain related information.
CiscoHeadsetDocumentation
Refer to publications that are specific to your language, headset model, and call control system from the following documentation links:
https://www.cisco.com/c/en/us/support/collaboration-endpoints/headset-500-series/tsd-products-support-series-home.html
https://www.cisco.com/c/en/us/support/collaboration-endpoints/headset-700-series/tsd-products-support-series-home.html
CiscoWebexHelpCenter
For support articles for Cisco Webex products, go to the following URL:
https://help.webex.com/
CiscoIPPhone6800SeriesDocumentation
See the publications that are specific to your language, phone model, and multiplatform firmware Navigate from the following Uniform Resource Locator (URL):
https://www.cisco.com/c/cn/us/support/collaboration-endpoints/ip-phone-6800-series-multiplatform-firmware/tsd-products-support-series-home.html
CiscoIPPhone7800SeriesDocumentation
Refer to publications that are specific to your language, phone model, and call control system the following documentation URL:
https://www.cisco.com/c/en/us/products/collaboration-endpoints/unified-ip-phone-7800-series/index.html
CiscoIPPhone7800SeriesMultiplatformPhonesDocumentation
Refer to publications that are specific to your language and phone model. Navigate from the documentation URL:
http://www.cisco.com/c/en/us/support/collaboration-endpoints/ip-phone-7800-series-multiplatform-firmware/tsd-products-support-series-home.html
CiscoIPPhone8800SeriesDocumentation
Refer to publications that are specific to your language, phone model, and call control system the following documentation URL:
https://www.cisco.com/c/cn/us/products/collaboration-Endpoints/unified-ip-phone-8800-series/index.html
The Deployment Guide is located at the following URL:
https://www.cisco.com/c/en/us/support/collaboration-endpoints/unified-ip-phone-8800-series/products-implementation-design-guides-list.html
CiscoIPPhone8800SeriesMultiplatformPhonesDocumentation
Refer to publications that are specific to your language and phone model. Navigate from the documentation URL:
http://www.cisco.com/c/en/us/support/collaboration-endpoints/ip-phone-8800-series-multiplatform-firmware/tsd-products-support-series-home.html
CiscoUnifiedCommunicationsManagerDocumentation
See the Cisco Unified Communications Manager Documentation Guide and other publications that are specific to your Cisco Unified Communications Manager release. Navigate from the following document
https://www.cisco.com/c/cn/us/support/unified-communications/unified-communications-manager-callmanager/tsd-products-support-series-home.html
CiscoWebexDeskSeriesDocumentation
Refer to publications that are specific to your language, model, and firmware release. Navigation following documentation URL:
https://www.cisco.com/c/cn/us/support/collaboration-endpoints/desktop-collaboration-experience-dx600-series/tsd-products-support-series-home.html

text_image
CHAPTER 2CiscoHeadset500SeriesCallControls
- Cisco Headsct 520 Serics and Cisco Headsct 530 Serics Call Controls, on page 21
• Cisco Headset 560 Series Call Controls, on page 23
CiscoHeadset520SeriesandCiscoHeadset530SeriesCall Controls
While the button layouts differ, the inline controllers on Cisco Headset 521, 522, 531, and call controls.
RelatedTopics
Cisco Headset 520 Series, on page 1
Cisco Headset 530 Series, on page 2
MakeandAnswerCalls
When you have an incoming call, you hear the ringtone in your headset.
Procedure
On the inline controller, press Call.
AdjustYourVolume
Procedure
Press Upor Downon the inline controller.
MuteYourselfonaCall
Procedure
Press Muteon the inline controller.
PlaceaCallonHold
Procedure
Press Callonce on the inline controller.
If you have an incoming call, the headset answers automatically.
EndaCall
Procedure
Hold Callon the inline controller until you hear a tone.
RejectaCall
Procedure
Press Calltwice on the inline controller.
PlaceaCallonHoldandResumeaHeldCall
Procedure
Step1Press Callon the inline controller.
Step2Select the call you want to resume.
Step3Press Call.
EndaCallandAnsweranIncomingCall
Procedure
Step1Hold Calluntil you hear a tone.
Step2Press Callonce.
EndaCallandResumeaHeldCall
Procedure
Step1Hold Calluntil you hear a tone.
Step2On your phone, select the call that you want to resume.
Step3Press Callonce.
CiscoHeadset560SeriesCallControls
Cisco Headset 561 and 562 with Standard Base and Cisco Headset 561 and 562 with Mu call controls to the wired headset models with a few important differences. The call control on the headset ear cup and call status feedback is provided on the Standard Base and M
RelatedTopics
Cisco Headset 560 Series, on page 4
TurnYourHeadsetOnandOff
Procedure
Step 1 Hold Call ☐ on your headset for 4 seconds. You hear a tone indicating headset status.
Step2Do one of these actions.
- Hold Callfor 1 second to turn the headset back on.
- Place the headset on the base.
MakeandAnswerCalls
Procedure
Press Callon your headset.
AdjustYourVolume
Procedure
Use Volumeon your headset.
MuteYourselfonaCall
Procedure
Do one of these actions.
- Press Muleon your headset.
- You can also mute yourself with on the multibase.
PlaceaCallonHold
Procedure
While on a call, press Callon your headset.
- If you have an incoming call, the headset answers automatically.
EndaCall
Procedure
Do one of these actions.
- Hold Callon your headset until you hear a tone.
- Place your headset on its base.
RejectaCall
Procedure
Press Callon your headset twice.
PutaCallonHoldandResumeaCall
Procedure
Step1Press Callon your headset.
Step2Select the call that you want to resume.
Step3Press Call.
EndaCallandResumeaHeldCall
Procedure
Step1Hold Callon your headset until you hear a tone.
Step2Select the call that you want to resume.
Step3Press Call.
EndanActiveCallandAnsweranIncomingCall
Procedure
Step1Hold Calluntil you hear a tone.
Step2Press Callonce.
AnsweraCallFromaDifferentSource
Make sure you place on hold or end any active calls before your switch sources. Active call automatically placed on hold when you change sources on the multibase.
Procedure
Do one of these actions:
- Press Callon your headset.
- On the multibase, press the source button for the incoming call.
Note Active calls don't automatically go on hold when you change sources on the multibase you place on hold or end any active calls before you switch sources. Active calls d hold when you press Callon your headset.

text_image
CHAPTER 3HeadsetSettings
• On-Premises Phone Headset Customization, on page 27
• Multiplatform Phone Headset Customization, on page 30
• Cisco Webex Desk Series Headset Customization, on page 32
- Jabber Headset Customization, on page 32
• Webex Headset Customization, on page 34
• Webex Meetings Headset Customization, on page 34
On-PremisesPhoneHeadsetCustomization
After you personalize your headset settings, the phone saves the settings and applies them to headset model.
AdjustYourBassandTreble
You can adjust how much bass or treble your hear through your headset.
Procedure
Step1Press Applications.

Step2Select Accessories> CiscoHeadset.
Step 3 Press Setup and select Speaker > Equalizer.
Step4Press the Navigation cluster, left or right, to adjust the tuning.
AdjustYourSpeakerFeedback
You can adjust how much of your own voice you want to hear through your headset sp
Procedure
Step1Press Applications.

Step2Select Accessories> CiscoHeadset.
Step3Select Speaker> Sidetone.
Step4Press the Navigation cluster, up or down, to adjust the sidetone.
Step5Select Setto apply your settings.
AdjustYourMicrophoneVolume
You can adjust how loud you sound through your headset microphone. You may wish to adj depending your surrounding ambient noise level.
Procedure
Step1Press Applications.

Step2Select Accessories> CiscoHeadset.
Step 3 Press Setup and select Microphone > Gain.
Step4Press the Navigation cluster, left or right, to adjust the gain.
TestYourMicrophone
You can test your microphone to hear how you sound through your headset on a Cisco IP
Procedure
Step1Press Applications.

Step2Select Accessories> CiscoHeadset.
Step 3 Press Setup and select Microphone > Test.
Step4Press Recordand speak into the microphone.
Step5Press Stoprecwhen you finish speaking.
Step6Press Playto review your test recording.
EnableElectronicHookswitchControlonYourPhone
If your administrator has enabled Admin settings on your Cisco IP Phone, you can enable or disable electronic hookswitch control to connect with a Cisco Headset 560 Series base. Electronic hookswitch by default.

Note
This feature is available on Cisco IP Phone Firmware Release 12.7(1) and later.
Procedure
Step1On your phone, press Applications

Step 2 Navigate Admin settings > Aux port.
Step 3 Select Connect e-hook headset to enable electronic hookswitch control.
ChangeYourHeadsetRingerSettings
You can change your headset ringtone behavior on Cisco IP Phones with Phone Firmware setting is saved on the phone and will apply to any Cisco headset that connects.
Procedure
Step1Press Applications.

Step 2 Select Preferences > Headset ringer.
Step3Select a ringer setting.
By default, your phone follows the behavior of the phone ringer settings. Select On if you want to always hear the phone ring when you have an incoming call. If you select Off, you won't hear any ring through your headset when there is an incoming call.
Step4Select Setto apply your settings.
ResetCiscoHeadsetSettingsfromYourPhone
You can reset your Cisco headset to remove your custom settings. This action returns the configuration set by your administrator.
Your phone must be running Firmware Release 12.5(1)SR3 or later for this feature to func
Beforeyoubegin
Connect your headset to the phone:
CiscoHeadset500SeriesUserGuide
- Cisco Headset 520 Series: Connect with the USB adapter
- Cisco Headset 530 Series: Connect with the USB cable
- Cisco Headset 560 Series: Connect the standard base or multibase with the USB or Y-c
Procedure
Step1On the phone, press Applications
Step 2 Select Accessories > Setup > Reset settings.
Step3At the warning window, select Reset.
MultiplatformPhoneHeadsetCustomization
After you personalize your headset settings, your phone saves your tuning selections and applies any future Cisco headset model you use.
AdjustYourBassandTreble(USBonly)
You can adjust how much bass or treble your hear through your headset when you use a
Procedure
Step1Press Applications.

Step2Select Status> Accessories.
Step 3 Highlight Cisco Headset and press Setup.
Step 4 Select Speaker > Tuning.
Step5Press the Navigation cluster, left or right, to adjust the tuning.
Step 6 Press Save to apply and retain your setting.
AdjustYourSpeakerFeedback(USBOnly)
You can adjust how much of your own voice you want to hear through your headset speak USB connection.
Procedure
Step1Press Applications.

Step2Select Status> Accessories.
CiscoHeadset500SeriesUserGuide
Step 3 Highlight Cisco Headset and press Setup.
Step4Select Speaker> Sidetone.
Step5Press the Navigation cluster, up or down, to adjust the sidetone.
Step6Press Saveto apply your setting.
AdjustYourMicrophoneVolume(USBOnly)
You can adjust how loud you sound through your headset microphone when you use a U may wish to adjust this setting depending your surrounding ambient noise level.
Procedure
Step1Press Applications.

Step2Select Status> Accessories.
Step 3 Highlight Cisco Headset and press Setup.
Step4Select Microphone> Gain.
Step5Press the Navigation cluster, left or right, to adjust the gain.
Step6Press Saveto apply your setting.
TestYourMicrophone(USBOnly)
You can test your microphone to hear how you sound through your headset when you us
Procedure
Step1Press Applications.

Step2Select Status> Accessories.
Step 3 Highlight Cisco Headset and press Setup.
Step 4 Select Microphone > Test.
Step5Press Record and speak into the microphone.
Step 6 Press Play when you finish speaking and listen to the test recording. The maximum recording time is 20 seconds.
CiscoWebexDeskSeriesHeadsetCustomization
ChangeAudioSourcesonYourCiscoWebexDeskSeries
Your Webex Desk Series device can connect to multiple audio devices.
Procedure
Step 1 Select the icon in the upper right corner of your Webex Desk Series device and choose from the available audio devices. The icon in the status bar displays which audio output your device is currently Step2Select CiscoHeadset.
JabberHeadsetCustomization
ChangetheAudioDeviceinCiscoJabberforWindows
You can specify which audio device you wish to use in Cisco Jabber for Windows.
Procedure
Step1Plug in your headset or other audio device to the appropriate USB port.
Step 2 Click the phone control menu and select Use my computer for calls. You'll also see any audio devices that are currently in use.
Step 3 To change your audio device, click Audio Options and select your headset in the speaker and microphone categories, then click OK.
ChangetheAudioDeviceinCiscoJabberforMac
You can specify which audio device you wish to use in Cisco Jabber for Mac.
Procedure
Step1Plug in your headset or other audio device to the appropriate USB port.
Step 2 Click the phone control menu and select Use my computer for calls. You'll also see any audio devices that are currently in use.
Step 3 To change your audio device, click Audio/Video Preferences and select your headset in the speaker and microphone categories, then click OK.
AdjustYourEqualizerSettingsinCiscoJabber
You can adjust your equalizer settings in Cisco Jabber for Mac or Windows. A setting of Warmer means you will hear more bass in your headset. A setting of Brighter means you will hear more treble in your headset.
Procedure
Step 1 In Cisco Jabber, click the gear icon ⚙️ and select Settings > Audio.
Step2Do one of these actions:
- On Cisco Jabber version 12.6 or earlier, select your headset.
- On Cisco Jabber version 12.7 or later, select AdvancedSettings.
Step3Do one of these actions:
- On Cisco Jabber version 12.6 or earlier, move the Adjust audio tune slider left or right to adjust the equalizer settings.
- On Cisco Jabber version 12.7 or later, adjust the Equalizerleft or right.
AdjustYourSidetoneinCiscoJabber
You can adjust how much of your own voice you want to hear through your headset sp
Procedure
Step 1 In Cisco Jabber, click the gear icon ⚙️ and select Options > Audio.
Step2Do one of these things:
- On Cisco Jabber version 12.6 or earlier, select your headset.
- On Cisco Jabber version 12.7 or later, select AdvancedSettings.
Step3In the Sidetonepulldown menu, select Off, Low, Med, or High.
WebexHeadsetCustomization
ChangetheAudioDeviceinCiscoWebexforWindowsandMac
Procedure
Step1Click on your profile picture and select Settings.
Step 2 Click Audio and select Cisco Headset for each audio field.
Step3Click Ok.
WebexMeetingsHeadsetCustomization
ChangetheAudioDeviceinCiscoWebexMeetingsDesktopAppforWindows andMac
You can select your audio device settings both before and during a call.
Procedure
Step 1 In a meeting room, select Call Using Computer and Cisco Headset for each audio field.
Step 2 Optional: Select Audio in the menu bar and select Computer Audio Settings.
Step3Select CiscoHeadset for each audio field.
Step 4 Optional: Click Test to hear the volume at its current setting.
You can use the volume and mic sensitivity sliders to adjust your speaker volume and mic
Step5Click Ok.

natural_image
City skyline with modern skyscrapers under a bright sky, no visible text or symbolsCHAPTER 4
TroubleshootingandMaintenance
- Troubleshoot Your Cisco Headset 500 Series, on page 35
- Maintain Your Cisco Headset 500 Series, on page 44
TroubleshootYourCiscoHeadset500Series
You may experience issues related to the following scenarios:
- Your headset cannot communicate with your selected call device.
• The sound in your headset speakers is poor. - You cannot be understood when you speak into the headset microphone.
If you experience problems, your administrator can help troubleshoot the root cause of the
RelatedTopics
Report Headset Issues Through Your Cisco IP Phone, on page 42
WhattoDoFirst
Try these actions first if you have trouble with your Cisco Headset 500 Series.
• If you are using the Cisco Headset 520 Series or Cisco Headset 530 Series:
- Unplug and replug your headset into your call device
• If you are using the Cisco Headset 560 Series:
- Unplug your headset base from its power source, wait a moment, and plug the j in.
- Restart your wireless headset. Press and hold for 4 seconds to power your headset and place your headset in the cradle on the base.
- Check the connection between your headset base and your call device. Make sure properly plugged in.
- Check your device settings to see if your headset is detected.
- On a Cisco IP Phone connected to Cisco Unified Communications Manager: Press Ap
and select Accessories.
- On a Cisco IP Phone with Multiplatform Phone Firmware: Pre Applications and select
Status> Accessories. - On a Cisco Webex Desk Series: Tap on the screen and select from the available; the upper right corner.
- On Cisco Jabber: Click Menu > Options > Audio.
- On Cisco Webex: Click on your profile picture and select Settings > Audio > Cisco Headset.
-
On Cisco Webex Meetings: Click Audio > Computer Audio Settings.
-
Test a different headset with your device to determine if the problem is with your wind your device.
- If you are using your headset with a Cisco IP Phone, make sure that your headset so firmware version is up-to-date.
- If you are using your headset with Jabber or Webex on a Windows or Mac device, c clients.
RelatedTopics
Update Your Headset Firmware With a Cisco IP Phone, on page 44
ProblemsWithYourHeadsetAudio
YouHearGarbledorInconsistentSoundinYourWiredHeadset
Problem
There is sound coming through the headset but it is inconsistent or full of static.
Solution
Using Cisco Headset 521, 522, 531, and 532:
- Unplug your headset from the call source. Reconnect the headset.
- Check the connectivity of your call source.
YouHearGarbledorInconsistentSoundinYourWirelessHeadset
Problem
There is sound coming through the headset but it is inconsistent or full of static.
Solution
- Test you call device to see if the problem is in your headset or with your device.
- Try a different headset or audio source with your call device.
- On a Cisco IP Phone, use the handset to make a call.
- Try these steps if you decide your headset is the source of the poor audio quality.
• Make sure you have the most recent firmware versions on both your headset and
- Unplug and plug in the headset cables.
- Press and hold the Press and hold the Call button for 4 seconds to turn off the headset. Place the headset on to the base to pair with the headset.
- Make sure that your base is not receiving interference from other DECT sources. quality, make sure that your headset base is at least 3 feet (1 meter) away from base.
• Make sure that you are not taking your headset too far from the base.
RelatedTopics
Cisco Headset 560 Series, on page 4
YouCan'tHearSoundThroughYourCiscoHeadset520SeriesandCiscoHeadset530Series
Problem
There is little or no sound coming through your Cisco Headset 520 Series or Cisco Head:
Solution
- Check the volume level on your headset. Press the volume controls on your inline of headset to adjust the sound level.
- Ensure that the audio output on your device is set to CiscoHeadset.
- On a Cisco IP Phone connected to Cisco Unified Communications Manager: Press
and select Accessories.
- On a Cisco IP Phone with Multiplatform Phone firmware: P Applications and sel Status> Accessories.
- On Cisco Jabber: Click Menu > Options > Audio.
- In Cisco Webex: Click on your profile picture and select Settings > Audio > Cisco Headset.
- In Cisco Webex Meetings: From the Select Audio Connection drop-down list, select Cisco Headset.
- Close any other calling soft clients.
YouCan'tHearSoundThroughYourWirelessHeadset
Problem
There is little or no sound coming through your wireless headset.
CiscoHeadset500SeriesUserGuide
Solution
- Check the volume level on your headset.
- Ensure that the audio output on your device is set to CiscoHeadset.
- On a Cisco IP Phone connected to Cisco Unified Communications Manager: Press Ap and select Accessories.
- On a Cisco IP Phone with Multiplatform firmware: Press Applications ⚙️ and select Status > Accessories.
- On Cisco Jabber: Click Menu > Options > Audio.
- In Cisco Webex: Click on your profile picture and select Settings > Audio > Cisco Headset.
-
In Cisco Webex Meetings: From the Select Audio Connection drop-down list, select Cisco Headset.
-
Ensure that the headset base is plugged into a power source. The headset cannot function base.
- Close any other calling soft clients.
- Make sure that your wireless headset is paired with its base. Place the headset into the headset and base. Make sure that the headset is properly seated. When joined, the headset automatically.
- Check that the headset base is properly connected to your desired call device.
- If you use your headset with a multibase, make sure that your desired call source is
- Check the battery level on your wireless headset.
OtherPeopleCan'tHearYouonYourCiscoHeadset520SeriesorCiscoHeadset530Series
Problem
You cannot be heard when using your Cisco Headset 520 Series or Cisco Headset 530 Series
Solutions
- Check to make sure your microphone is not muted. Press Mute on your controller or to mute and unmute your microphone. When you are muted on a call, Mute on your inline controller or call indicator LED on your base shows solid red.

text_image
- + +- Make sure that the microphone boom has been lowered. For optimal sound, the heads should be no further than 1 in (2.5 cm) from your mouth.
- Make sure that your headset is properly plugged into your preferred call device.
- Check that your desired call device detects your headset.
OtherPeopleCan'tHearYouonYourCiscoHeadset560Series
Problem
You cannot be heard when using your Cisco Headset 560 Series.
Solutions
- Check to make sure your microphone is not muted. Press Mute on your wireless headset to mute and unmute your microphone. When you are muted on a call, the call indicator LED on solid red.

natural_image
Line drawing of a CD or HCD headphones with a microphone and ear connector (no text or symbols)- Make sure that the microphone boom has been lowered. For optimal sound, the heads should be no further than 1 in (2.5 cm) from your mouth.
- Make sure that your base is properly plugged into your preferred call device. Ensure to and from the base is secure.
• Make sure that you don't take your headset too far from the base. - Make sure that your desired call device detects your headset.
- Move your base away from potential sources of radio interference such as DECT, Wi-devices.
RelatedTopics
Cisco Headset 560 Series, on page 4
YourHeadsetDoesNotAlertYoutoIncomingCallsonaCiscoIPPhone
Problem
Your Cisco Headset 500 Series does not play a tone when you have an incoming call.
Solution
This is a known limitation in the Cisco Headset 500 Series with Firmware Release 1.0(2) or your headset firmware to the latest firmware release.
YourHeadsetandBaseWon'tPair
Problem
Your headset is seated in the wireless base but they have not paired. The headset and batte on the base flash rapidly. It should take no longer than 10–12 seconds for the headset and
Solution
Power cycle the headset.
- With the headset off the base, press and hold the Call button ☐ for 4 seconds until the LED on the headset is off.
- Seat the headset back on to the base. The headset automatically turns on and pairs with the headset base.

Note
If the headset does not have the most recent software load, the headset will begin to update
BasewithY-CableDoesn'tWork
Problem
The Cisco Headset 560 Series with standard base or multibase does not work when plugged Phone with the Y-cable.
Solution
- Check that all Y-cable connectors are plugged into the appropriate ports on the phone.
• Phone: AUX port and headset port
- Base: USB port
- For on-premises phones, check that Connect e-hook headset is selected in Applications > Admin settings> Auxport.
ConferenceFeatureIssuesonYourCiscoHeadset560Series
Problem
Your headset or base doesn't enter conferencing mode when you try to add a guest headset.
Solution
- Check each headset's firmware to make sure that they have headset Firmware Release Any headset that tries to start or join conferencing mode must have Firmware Release
- Check with your administrator to make sure that conferencing mode is enabled.
ProblemswithYourBluetoothConnection
The Cisco Headset 560 Series Multibase enables you to connect a call device through Blue
BluetoothDoesNotTurnOn
Problem
Bluetooth doesn't turn on when you press the Bluetooth button on the back of your multibase.
Solution
Contact your headset administrator to see if Bluetooth functionality has been disabled remotely
BluetoothLEDPulsesWhite
Problem
The Bluetooth LED pulses white.
Solution
- Check that Bluetooth is activated on your desired call device.
- If you have already paired your device, make sure that you select Cisco Headset XXX from the Bluetooth menu and attempt to reconnect.

Note
The Multibase appears on your desired call device as CiscoHeadsetfollowed by the last three digits of the base serial number. Your base serial number found on the underside of your base.
- Put the base in pairing mode and pair the call device to the base. To put your b the Bluetooth button on the back of the base twice.
RelatedTopics
Connect the Multibase to a Bluetooth Device, on page 11
ThereisNoAudioWithBluetoothTurnedOn
Problem
The Bluetooth LED shows solid white but you cannot hear any audio.
CiscoHeadset500SeriesUserGuide
Solution
- Make sure the audio on your intended call device is turned up.
- Make sure that the Mobile source is selected on the base. The source LED shows solid white when it is selected.
- Try re-pairing the multibase to your call device. Press and hold the Bluetooth button at the back of the base for four seconds. Press the Bluetooth button twice to put the base into pairing mode and select CiscoHeadset from your call device settings menu.
WirelessBatteryIssues
HeadsetDoesn'tCharge
Problem
Your Cisco Headset 560 Series doesn't charge when placed on the base.
Solution
- Make sure that your headset is properly seated on the base. When the headset is proper shows solid white. When charging, the LEDs on the base light up in sequence from left the headset is fully charged, all five battery indicator LEDs show solid white.
- Check that your base is plugged into a reliable power source.
HeadsetDoesNotHoldaCharge
Problem
The wireless headset is not holding a full charge.
Solution
Your Cisco Headset 560 Series is designed to hold its charge for up to 8 hours of continuous headset battery seems weak or defective, contact your IT department.
ReportHeadsetIssuesThroughYourCiscoPPhone
You can use the Cisco Collaboration Problem Report Tool (PRT) to collect and send phone problems to your administrator. The PRT also logs information about your headset. If you see the PRT upload has failed, the problem report is saved on the phone and you should alert
Procedure
Step1Press Applications.

Step 2 Select Phone information > Report problem.
CiscoHeadset500SeriesUserGuide
Step 3 Enter the date and time that you experienced the problem in the Date of problem and Time of problem fields.
Step4Select Problemdescription.
Step 5 Select a description from the displayed list, then press Submit.
ReportHeadsetIssuesThroughYourMultiplatformPhone
You can use the Problem Reporting Tool (PRT) to collect and send phone logs, and to your administrator. The PRT also logs information about your headset. If you see a message upload has failed, the problem report is saved on the phone and you should alert your a
Procedure
Step1Press Applications.

Step2Select Status> Reportproblem.
Step 3 Enter the date and time that you experienced the problem in the Date of problem field. The current date appears in this field by default.
Step 4 Enter the time that you experienced the problem in the Time of problem field. The current time appears in this field by default.
Step5Select Problemdescription.
Step6Select a description from the displayed list.
Step7Press Submit.
ReportIssuesinCiscoJabber
To report headset-related issues with Cisco Jabber, make sure to send call logs, which prov audio information to our engineers.
Procedure
Step 1 In Cisco Jabber, click the gear icon ⚙ and select Help > Report a problem.
Step 2 In the window, select the area of the problem you had and describe the problem in as much detail as you can.
Step3Include any relevant files or screen shots that may be useful.
Step4Click Send.
ReportHeadsetIssuesThroughYourCiscoWebexDeskSeries
You can send device logs to your Cisco Webex Desk Series device administrator. The devi information about your headset.
Procedure
Step 1 Tap the device name in the upper left corner of your device and select the Settings application.
Step2Select Issuesanddiagnostics.
Step3Press Sendlogs.
MaintainYourCiscoHeadset500Series
Many headset-related issues may stem from using out-of-date firmware. You can check and upd headset firmware on any supported Cisco IP Phone or with the latest version of Cisco Jabbei
UpdateYourHeadsetFirmwareWithaCiscoIPPhone
You can update your headset software on any supported Cisco IP Phone.
During the update, the LEDs on the Cisco Headset 560 Series base blink in sequence from the software upgrade completes successfully, the LEDs return to their idle state.
Procedure
Step1Connect your headset to a Cisco IP Phone.
Step 2 If the headset does not automatically begin to update, restart the phone. The phone downloads the latest headset version file when the phone restarts and uploads it to the headset.
UpdateYourHeadsetFirmwareonCiscoJabber
You can update your headset software on any computer running Cisco Jabber version 12.5 or automatically begins the update process if a new firmware release is available.
Jabber version 12.9 or later displays the headset update progress.
During the upgrade, the LEDs on the Cisco Headset 560 Series base blink in sequence from the software upgrade completes successfully, the LEDs return to their idle state.
Procedure
Step1Connect your headset via the USB cable to a computer running Cisco Jabber.
Step2Follow the on-screen instructions.
UpgradeYourCiscoHeadsettotheLatestReleaseonWebex
Webex only supports the most recent Cisco Headset firmware version. When you connect you checks the firmware version and notifies you if there is a new firmware version to install Webex notifies you that the upgrade is complete. If you experience any issues, make sure your headset to the latest version before you contact support.

Note
Webex won't begin the upgrade process if your headset is already upgrading through another
Procedure
Step1Open Webex.
Step2Connect your headset to your computer with the included USB cable.
Step3Click Upgrade. The Webex window shows your upgrade progress.
UpgradeYourHeadsetwiththeCiscoHeadsetsWebTool
You can upgrade your Cisco Headset 560 Series, Cisco Headset 730, or Cisco Headset 730 with the Cisco Headsets web tool. This tool enables you to upgrade and check your head: your web browser. It automatically checks your headset model and current firmware version. option to upgrade your headset when there is a newer firmware version available.
You can also upload an older firmware version from your PC desktop. Download the zipper from the Cisco Software Download page and extract the .ptc firmware files. Headset models match to each .ptc file by name. Use the following table as a guide:
Table13:HeadsetFirmwareFiles
| HeadsetModelTerm | |
| md | Cisco Headsct 560 Series |
| sunkist | Cisco Headset 730 |
| dongle | Cisco Headset 730 USB Adapter |
Beforeyoubegin
You need Google Chrome version 86 or later to access this feature.
Procedure
Step1Connect your headset to a USB port on your computer.
Step2In Google Chrome, go to https://upgrade.cisco.com/accessories.
Step3Click Nextand select your headset in the pop-up window.
Step4Do one of the following:
- Select the most recent firmware version from the cloud.
- Upload an older firmware version from your PC desktop.
Step5Click StartUpgrade.
CheckYourHeadsetFirmwareonOn-PremisesPhones
You can check your headset software on any supported Cisco IP Phone.
Procedure
Step1Press Applications.
Step2Select Accessories.
Step 3 Highlight Cisco Headset and press Show detail.

CheckYourHeadsetFirmwareonMultiplatformPhones
You can check your headset software on any supported Cisco IP Phone.
Procedure
Step1Press Applications.
Step2Select Status> Accessories.
Step 3 Highlight Cisco Headset and press Show detail.

CheckYourHeadsetFirmwareonCiscoJabber
You can check your Cisco headset firmware on Cisco Jabber version 12.8 or later.
Procedure
Step 1 In Cisco Jabber, click the gear icon ⚙️ and select Settings > Audio.
Step 2 Under the Speaker slider, click Advanced Settings.
Your headset model, serial number, and current firmware version displays at the top of the w
LocateYourHeadsetSerialNumber
You can find your Cisco Headset 500 Series serial number in the following places.
- On the outside of the box your headset shipped in.
- Underneath the Cisco Headset 520 Series or Cisco Headset 530 Series inline controller. code to see the headset serial number.
- On the bottom of the Cisco Headset 560 Series standard base or multibase.
- On a connected Cisco IP Phone.
See Find Your Headset Serial Number on a Cisco IP Phone, on page 47
FindYourHeadsetSerialNumberonaCiscoIPPhone
You can find your headset serial number on any Cisco IP Phone.
Procedure
Step1Press Applications.

Step2Select Accessories.
Step 3 Highlight Cisco Headset and press Show detail.
CleanYourCiscoHeadset500Series
To clean your headset, use only a dry soft cloth to gently wipe the ear pads, microphon. Do not apply liquids or powders directly to the headset. As with all non-weatherproof elect powders can damage the components, cause failures, and will void the headset warranty.
ReplaceYourCiscoHeadset500SeriesEarPads
Your headset's car pads are an important part of its performance. They provide comfort, gr enhancement. With time, it's natural for car pads to wear out, but you can replace them

Note
Cisco Headset 560 Series ear pads are not compatible with the Cisco Headset 520 Series 530 Series.
Procedure
Step1 Rotate the old ear pad counterclockwise.
CiscoHeadset500SeriesUserGuide

Step2Pull the old car pad away from the speaker.
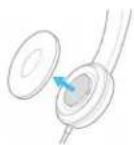
Step3Push the new ear pad toward the speaker.
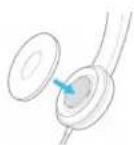
Step4Rotate the new ear pad clockwise.


natural_image
City skyline with modern skyscrapers under a bright sky, no visible text or symbolsCHAPTER 5
ProductSafety
• Important Headset Safety Information, on page 49
• Compliance Statements, on page 49
ImportantHeadsetSafetyInformation

High Sound Pressure—Avoid listening to high volume levels for long periods to possible hearing damage.
When you plug in your headset, lower the volume of the headset speaker before you put you remember to lower the volume before you take the headset off, the volume will start plug in your headset again.
Be aware of your surroundings. When you use your headset, it may block out important in particularly in emergencies or in noisy environments. Don't use the headset while driving. D headset or headset cables in an area where people or pets can trip over them. Always su are near your headset or headset cables.
ComplianceStatements
ComplianceStatementsfortheEuropeanUnion
CEMarking
The following CE mark is affixed to the equipment and packaging.

RFExposureStatementfortheEuropeanUnion
This device has been evaluated and found compliant in accordance with EU EMF Directive 20
ComplianceStatementsfortheUSA
GeneralRFExposureCompliance
This device has been evaluated and found compliant to the ICNIRP (International Committee on Radiation Protection) limits for Human Exposure of RF Exposure.
Part15RadioDevice

Caution
The Part 15 radio device operates on a non-interference basis with other devices operating at Any changes or modification to said product not expressly approved by Cisco, including the u antennas, could void the user's authority to operate this device.
ComplianceStatementsforCanada
This device complies with Industry Canada license-exempt RSS standard(s). Operation is subject to following two conditions: (1) this device may not cause interference, and (2) this device must interfere, including interference that may cause undesired operation of the device. Privacy of co may not be ensured when using this phone.
This product meets the applicable Innovation, Science and Economic Development Canada technical specifications.
Your device includes a radio transmitter and receiver. It is designed not to exceed the General (uncontrolled) limits for exposure to radio waves (radio frequency electromagnetic fields) as refer RSS-102 which references Health Canada Safety Code 6 and include a substantial safety margin assure the safety of all persons, regardless of age and health.
As such the systems are designed to be operated as to avoid contact with the antennas by recommended to set the system in a location where the antennas can remain at least a mini
specified from the user in accordance to the regulatory guidelines which are designed to re-exposure of the user or operator.
The device has been tested and found compliant with the applicable regulations as part of process.