PDU3VS6L2130 - Power strip Tripp Lite - Free user manual and instructions
Find the device manual for free PDU3VS6L2130 Tripp Lite in PDF.

User questions about PDU3VS6L2130 Tripp Lite
0 question about this device. Answer the ones you know or ask your own.
Ask a new question about this device
Download the instructions for your Power strip in PDF format for free! Find your manual PDU3VS6L2130 - Tripp Lite and take your electronic device back in hand. On this page are published all the documents necessary for the use of your device. PDU3VS6L2130 by Tripp Lite.
USER MANUAL PDU3VS6L2130 Tripp Lite
1.1 System Requirements 2
- Installation and Configuration
2.1 Saving Configuration Changes 2
2.2 Default UPS System
Shutdown Settings 2
2.3 Other Default Settings 3
2.4 SNMP Configuration 3
- Web Console
3.1 Opening the Web Console 4
3.1.1 Alternate to Web Launch 4
3.2 Web Console Interface
3.3 Device Summary
3.4 Status Menu
3.4.1 Status > Overview 5
3.4.2 Status > Details 6
3.4.3 Status > Alarms 7
3.5 Device Menu
3.5.1 Device > Controls 7
3.5.2 Device > Loads
3.5.3 Device > Load Groups 8
3.5.4 Device > Events
3.5.5 Device > Device Discovery 9
3.6 Actions Menu
3.6.1 Actions 10
3.6.1.1 Actions > Event Actions >
Device Actions 10
3.6.1.2 Actions > Event Actions >
General Actions 13
3.6.2 Actions > Scheduling 14
3.6.3 Actions > Address Book 15
3.7 Logs 15
3.7.1 Logs > Event Logs 15
3.7.2 Logs > Data 15
3.8 Preferences
3.8.1 Preferences > Network 16
3.8.2 Preferences > DNS 18
3.8.3 Preferences > Security 18
3.8.4 Preferences > System 22
3.8.5 Preferences > Restart 24
3.9 RSS Support
3.10 Help 25
- Telnet/SSH Console
4.1 Device Menu
4.1.1 Status 28
4.1.2 Identification 29
4.1.3 Controls 30
4.1.3.1 Control Data 31
4.1.4 Events 32
4.1.5 Loads 35
4.1.5.1 Load Configuration 35
4.1.5.2 Load Groups 36
4.1.5.3 Ramp/Shed Settings 37
4.1.6 Preferences and Thresholds 38
4.1.7 Device Alarms 39
4.1.8 Logs 39
4.2 System Configuration
4.2.1 Address Book 39
4.2.1.1 Email Contacts 40
4.2.1.2 SNMP Contacts 41
4.2.1.3 HTTP Contacts 42
4.2.2 Global Actions 43
4.2.2.1 Action Profiles 43
4.2.2.2 Schedules 55
4.2.3 Security 59
4.2.3.1 Authentication Method 59
4.2.3.2 Local Users 60
4.2.3.3 RADIUS Servers 63
4.2.3.4 Change Password 64
4.2.4 Date/Time 64
4.2.4.1 Time Source Data
Entry Menu 64
4.2.4.2 Time Settings 65
4.2.4.3 SNTP Settings 66
4.2.4.4 RTC Settings 66
4.2.5 Local Device Discovery 67
4.2.6 Restart PowerAlert 68
4.3 Network Configuration
69
4.3.1 IP Configuration 69
4.3.1.1 Host Name 70
4.3.1.2 Domain Data Entry Menu 70
4.3.1.3 IPV4 Settings 70
4.3.1.4 IPV6 Settings 71
4.3.1.5 DNS Settings 72
4.3.2 Remote Services 73
4.3.2.1 Email Settings 73
4.3.2.2 Remote Syslog 75
4.3.2.3 Watchdog Settings 78
4.3.3 User Interfaces 79
4.3.3.1 Telnet/SSH 79
4.3.3.2 Web Console 79
4.3.3.3 SNMP Settings 80
4.3.3.4 FTP 80
4.3.3.5 Remote View Access Port 80
4.4 Alarms and Logging
4.4.1 Alarms 81
4.4.1.1 Alarm Details 82
4.4.2 View Logs 82
4.4.2.1 Data Log 83
4.4.2.2 Event Log 85
4.4.3 Logging Settings 88
4.4.3.1 Accounting Log Settings 88
4.4.3.2 Application Log Settings 88
4.4.3.3 Data Log Settings 89
4.4.3.4 Event Log Settings 90
4.4.3.5 Format Settings 91
4.5 About 92
- Command Line Interface 93
5.1 Syntax Conventions 93
5.2 Manual Pages 94
5.3 Output Conventions 94
5.4 Getting Started with the PowerAlert CLI 94
-
Troubleshooting 96
-
Technical Support 96
-
Appendix 97
Documentation Notice: This User's Guide is a supplement to the printed manual that came with your SNMPWEBCARD or network-enabled Tripp Lite device. Refer to the printed manual for instructions on hardware installation and basic configuration, including IP address assignment. If you have misplaced your printed manual, refer to the electronic version included on the bundled CD-ROM or download it at www.triplite.com/support/manuals/.

text_image
TRIPP·LITE
Manufacturing
Excellence.
1. Introduction
SNMPWEBCARD is an optional network card that you can install in the accessory slot of a compatible UPS system, PDU* or cooling unit. SNMPWEBCARD connects your Tripp Lite device to your Ethernet network as a manageable device that supports remote monitoring, remote control and remote condition reporting. You can manage the device from PowerAlert Network Management System, an SNMP Network Management Station, a Web browser or telnet. Remote access capability allows you to reboot, control outlets, shed nonessential loads, monitor load levels and more. The SNMPWEBCARD can also send SNMP traps or email messages to the addresses you specify, alerting you automatically to events such as power failures.
* SNMPWEBCARD is preinstalled in Tripp Lite Monitored and Switched PDUs, which can be identified by the presence of "MN" or "NET" in the model name. SNMPWECARD is also preinstalled in SRCOOLNET.
1.1 System Requirements
- Tripp Lite UPS system, PDU, or cooling unit with compatible accessory slot or preinstalled SNMPWEBCARD.
- Ethernet network that supports the TCP/IP protocol. Firewall ports 3664 and 3665 must be open.
• One of the following options for remote monitoring and control:
• PowerAlert Network Management System
- SNMP-based Network Management Station (such as HP® OpenView®)
- Web browser that supports frames, forms and Java™ (such as Microsoft® Internet Explorer® 8.0 or later) (if launching vid browser)
• VT-100 Telnet and/or SSH Client
- For "Terminal Mode" configuration only:
• Terminal emulation software program (such as TeraTerm Pro by Ayera Technologies)
• Computer with available DB9 serial port
Warning: Use of this equipment in life support applications where failure of this equipment can reasonably be expected to cause the failure of the life support equipment or to significantly affect its safety or effectiveness is not recommended. Do not use this equipment in the presence of a flammable anesthetic mixture with air, oxygen or nitrous oxide.
2. Installation and Configuration
For instructions on hardware installation and basic configuration, refer to the printed manual that came with your SNMPWEBCARD or Tripp Lite device. For instructions on loading a firmware or device driver upgrade on the SNMPWEBCARD, refer to the PowerAlert software release notes. The manual and release notes can be found on the bundled CD-ROM or downloaded from www.triplite.com/manuals/.
2.1 Saving Configuration Changes
While using PowerAlert, most of your configuration changes will take effect immediately so you can try out your configuration before committing to it. The Web and Telnet Menu user interfaces will typically advise you if your configuration requires a restart to take effect.
In general, the configuration is not persisted permanently until you restart PowerAlert (or 'reboot' the SNMPWEBCARD). You should restart PowerAlert when your configuration is complete and before testing configurations that simulate or nearly simulate a power outage. For your convenience, most changes will auto-save after about 30 minutes of idle time. Changes to the network settings will not.
Restarting PowerAlert cannot cause equipment powered through your UPS or PDU to experience an outage and has no effect on the general operation of your Tripp Lite device.
2.2 Default UPS System Shutdown Settings
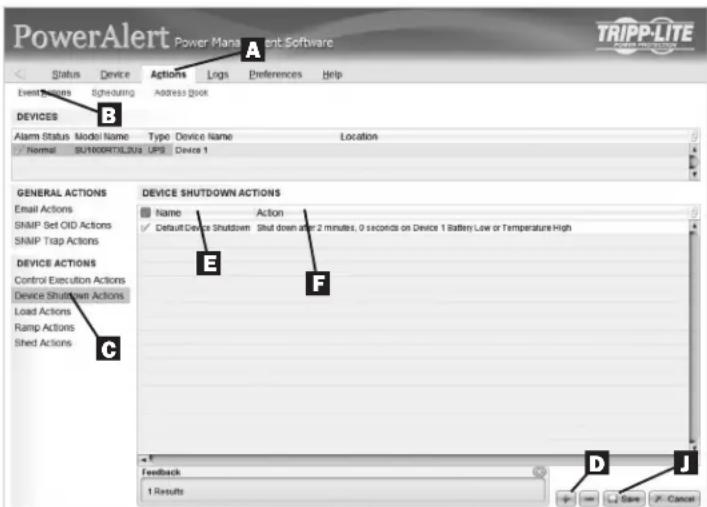
When used with a Tripp Lite UPS, during a power failure, SNMPWEBCARD is pre-configured to shut down the UPS system two minutes after receiving a low battery signal. This allows the UPS system to provide the maximum available runtime to connected equipment. If you want to change the default setting, follow these instructions and refer to Figure 2-1 and Figure 2-2:
- Use a Web browser to open the PowerAlert console window for your SNMPWEBCARD (see 3.1 Opening the Web Console for instructions).
- Click the Actions menu A and access the Event Actions submenu B.
- Select Device Shutdown in the Device Shutdown Actions C section.
- Click the button on the bottom of the screen to add a new action.
- In the Name field E, type a name for the new action.
text_image
PowerAlert Power Management Software Status Device Actions Logs Preferences Help Event Status Scheduling Address Block DEVICES Alarm Status Model Name Type Device Name Location Normal SU100RTXL2J4 UPS Device 1 GENERAL ACTIONS Email Actions SNMP Set OID Actions SNMP Trap Actions DEVICE ACTIONS Control Execution Actions Device Shutdown Actions Load Actions Ramp Actions Shed Actions DEVICE SHUTDOWN ACTIONS Name Action Default Device Shutdown Shut down after 2 minutes, 0 seconds on Device 1 Battery Low or Temperature High E F C Feedback 1 Results D J CancelFigure 2-1: UPS System Shutdown Settings
2. Installation and Configuration continued
- Click the Action field F to access its submenu. Select the device to shut down in the Select Trigger Device section G.
- Set how long the delay should be before the action will take place H.
- Select the Event(s) that will trigger the action 1.
- Click the button on the bottom of the screen
Note: Whenever changes are made, the button must be pressed to submit the changes before moving off of the page. This also includes deleting fields using the button. After selecting an item and clicking the button press the button to commit the change.

text_image
Shut down Device 3 after 1 minutes, 0 seconds on Device 3 On Battery Select trigger devices Device 2 Probe 01:00 G H I Device Shutdown Delay Select events to trigger this action. Event (Set) Battery Age Above Threshold:3 Battery Bad:3 Battery Capacity Below Warning:3 Battery Low:3 Communications Lost:3 General Fault:3 Load Level Above Threshold:3 On Battery:3 Output Off:3 Output Source On Bypass:3Figure 2-2: UPS System Shutdown Settings
2.3 Other Default Settings
| Setting Default Value Additional Information | ||
| IP address | Obtain from DHCP | Section 3.8.1 |
| Telnet Access | Enabled | Section 3.8.1 |
| SSH Access | Enabled | Section 3.8.1 |
| HTTP Access | Enabled | Section 3.8.1 |
| HTTP Access | Enabled | Section 3.8.1 |
| SNMPv1 Access | Enabled—Read-Only Community—public | Section 3.8.2 |
| SNMPv2 Access | Enabled—Read-Write Community—tripplite | Section 3.8.2 |
| SNMPv3 Access | EnabledlocaladminlocalmanagerlocalguestSee table below | Section 3.8.2 |
| Default users and passwords | localadmin/localadminlocalmanager/localmangerlocalguest/localguest | Section 3.8.2 |
| Radius | Disabled | Section 3.8.2 |
| Email Notification | Default email action profile setup to trigger 30 seconds after an alarm. Add email destinations to the address book. | Section 3.6 |
| SNMP Trap Notification | Default SNMP Trap action profile setup to trigger 30 seconds after an alarm. Add trap destinations to the address book. | Section 3.6 |
| Event Logging | Enabled | Section 3.7 |
| Data Logging | Enabled | Section 3.7 |
2.4 SNMP Configuration
SNMPWEBCARD allows a compatible Tripp Lite device to function as an SNMP-managed device on your network, using the SNMP agent and Management Information Base (MIB). The SNMP agent resides in the SNMPWEBCARD firmware and responds to standard SNMP commands (Get, Get Next and Set). It can also generate SNMP traps (messages). The MIB determines which parameters can be monitored and controlled. Two MIB files—Tripplite.mib and RFC1628.mib—must be loaded on each Network Management Station that will monitor the managed device. (The files are provided on the CD-ROM included with the SNMPWEBCARD or network-enabled Tripp Lite device. Consult your Network Management Station software documentation for instructions on how to import MIB files.)
SNMPv3 Definitions
User Name
Authentication Passphrase
Privacy Passphrase
Authentication Protocol
Privacy Protocol
Public Value
The identifier of the user profile. SNMP version 3 maps Gets, Sets and Traps to a user profile by matching the user name of the profile to the user name in the data packet being transmitted. A user name can have up to 32 ASCII characters.
A phrase of 8 to 32 ASCII characters that verifies that the Network Management System (NMS) communicating with this device through SNMPv3 is the NMS it claims to be, that the message has not been changed during transmission, and that the message was communicated in a timely manner, indicating that it was not delayed and that it was not copied and sent again later at an inappropriate time.
A phrase of 8 to 32 ASCII characters that ensures the privacy of the data (by means of encryption) that a Network Management System (NMS) is sending to this device or receiving from this device through SNMPv3.
The Tripp Lite implementation of SNMPv3 supports only MD5 authentication.
The Tripp Lite implementation of SNMPv3 supports only DES as the protocol for encrypting and decrypting data.
A field provided to enter a username/password hint for SNMPv3 Admin users. This SNMPv3 value is part of the SNMPv3 USM User Table.
3. Web Console
The Web console is the primary graphical user interface for the SNMPWEBCARD.
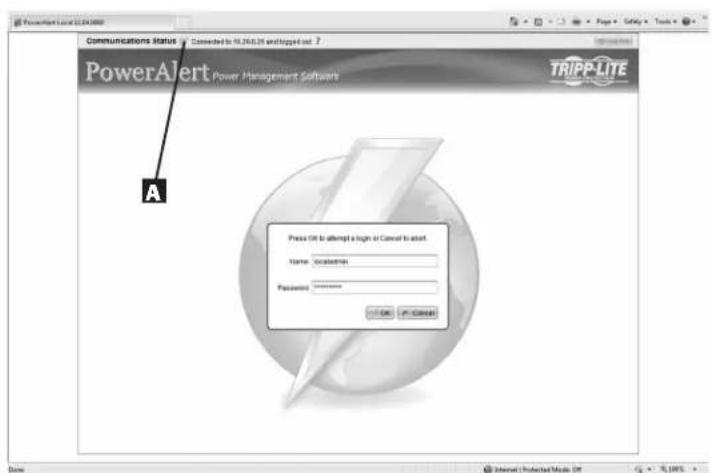
3.1 Opening the Web Console
text_image
PowerAlert Local 12.04.000 Communications Status Connected to 10.36.01.09 and logged out 7 PowerAlert Power Management Software TRIPP-LITE Press OK to attempt a sign or Cancel to addt. Name: Location Password: ******** OK CancelFigure 3-1: Web Console Login
- Open a Web browser that supports frames, forms and Java. PowerAlert versions 12.06.0061+ are compatible with Java 1.7. Older versions may require Java 1.6.
- Type the IP address assigned to the Tripp Lite device into the address field and press the enter key to download the Java applet. (Refer to the printed manual for IP address assignment instructions.)
- After the applet is downloaded and connected, you should be prompted for a username and password (Figure 3-1). The default administrator username is localadmin and the default password is localadmin.
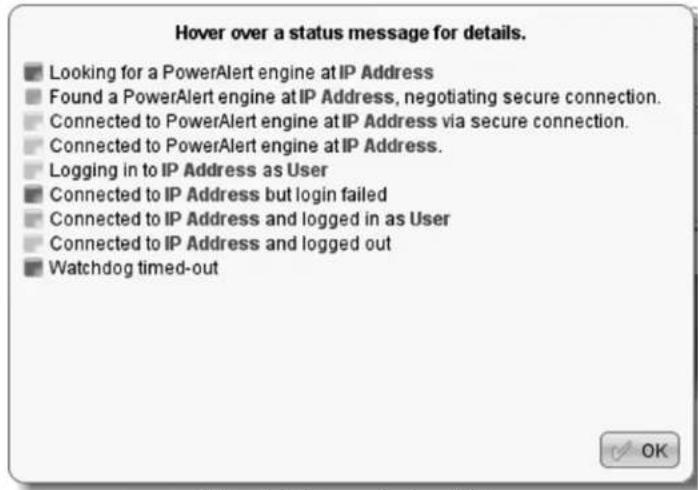
The application screen includes a communication status message A that indicates the progress of the application in finding a device, making a connection and completing the login attempt successfully.
text_image
Hover over a status message for details. Looking for a PowerAlert engine at IP Address Found a PowerAlert engine at IP Address, negotiating secure connection. Connected to PowerAlert engine at IP Address via secure connection. Connected to PowerAlert engine at IP Address. Logging in to IP Address as User Connected to IP Address but login failed Connected to IP Address and logged in as User Connected to IP Address and logged out Watchdog timed-outFigure 3-2: Communications Status
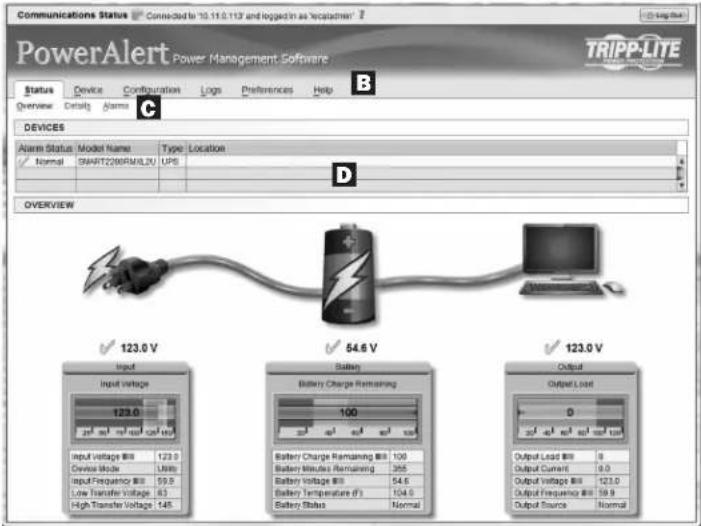
- After you log in, the device status page (Figure 3-3) will load in the browser window.
3.1.1 Alternate to Web Launch
If you have installed the PowerAlert Console Launcher included in the SNMPWEBCARD documentation and firmware distribution, you can launch the Web Console directly without requiring a web browser by double clicking on the PAL-Launcher icon located in the installation directory you selected at installation. You will be asked for the host name or IP address of the SNMPWEBCARD you wish to view.
3. Web Console continued
3.2 Web Console Interface 3.3 Device Summary
text_image
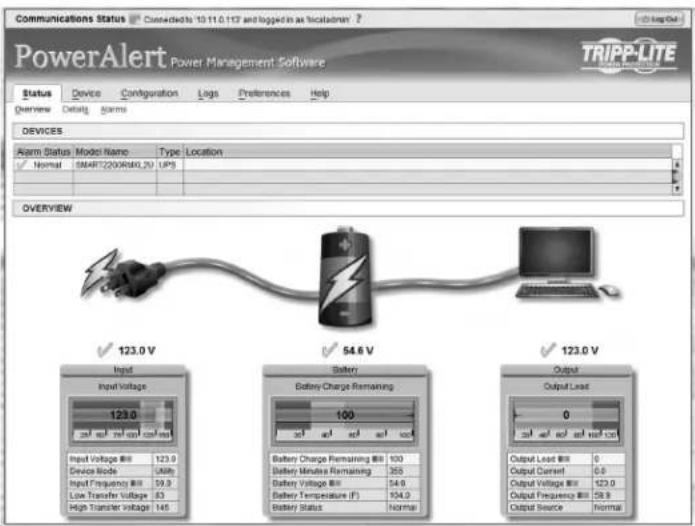
Communications Status Connected to 10.11.0.113 and logged in as "etcancer" PowerAlert Power Management Software TRIPP-LITE Status Device Configuration Logs Preferences Help Overview Details Alarms C BEVICES Alarm Status Model Name Type Location Normal SMART208R/MJU UPS D OVERVIEW ✓ 123.0 V ✓ 54.6 V ✓ 123.0 V Input Input Voltage 123.0 100 250 mV 500 mV 250 mV Input Voltage B/S 123.0 Device Mode 1MHz Input Frequency B/S 59.0 Low Transfer Voltage 8.5 High Transfer Voltage 145 Battery Charge Remaining Battery Charge Remaining B/S 100 Battery Minutes Remaining 355 Battery Voltage B/S 54.6 Battery Temperature (F) 104.0 Battery Status Normal Output Load B/S 0 Output Current 0.0 Output Voltage B/S 123.0 Output Frequency B/S 59.9 Output Source Normal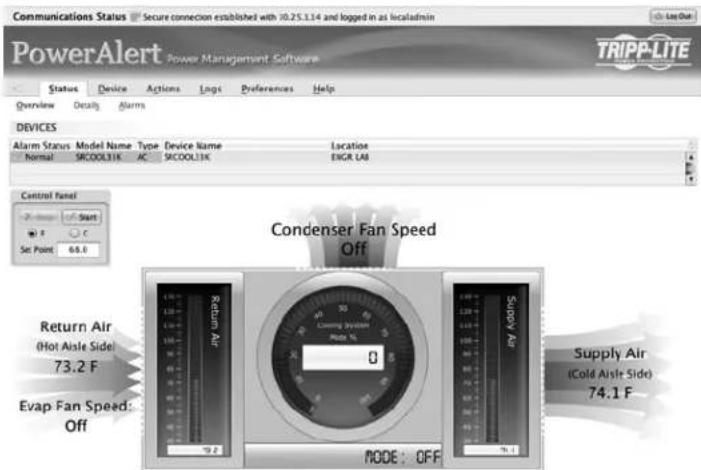
text_image
Communications Status Secure connection established with 30.25.1.14 and logged in as localadmin PowerAlert Power Management Software TRIPP-LITE Status Device Actions Logs Preferences Help Overview Details Alarms DEVICES Alarm Status Model Name Type Device Name Location Normal SICOLISTK AC SICOLISTK ENGR LAB Control Panel Start F C Set Point 68.0 Condenser Fan Speed Off Return Air (Hot Aisle Side) 73.2 F Evap Fan Speed: Off Supply Air (Cold Aisle Side) 74.1 F NODE : OFF
text_image
Communications States Secure connection established with 10.22.0.69 and logged in as localadmin PowerAlert Power Management Software TRIPP-LITE Status Device Actions Log Preferences Help Overview Details alarms DEVICES Alarm Status Model Name Type Device Name Location Normal MC00112K AC Senor Cool 12K Software Area Normal Enclosure Enrolsense Remote Probe Software Area Control Panel Start 0.0 Start Points Remote Auto Fan High Fan Medium Fan Low Fan Maxim On DefaultOff OFF FAM: OFFFigure 3-3: Status Pages
The header B contains the menu buttons, which are the main navigational icons of the console.
After clicking a menu button, the submenu options for the menu C will appear below the header.
The Device Summary D is always displayed at the top of the screen, while the bottom portion of the screen changes as different options are chosen.
| DEVICES | |||
| Alarm Status | Model Name | Type | Location |
| ✓ Normal | SMART2200RMXL2U | UPS | |
Figure 3-4: Devices
The Device Summary displays the current Alarm Status, Model Name, Device Type and user-defined location of a device.
Valid Alarm Status values include:
• NORMAL
• INFORMATION
- WARNING
- STATUS
• CRITICAL
- OFFLINE
Model Name is detected automatically and is not editable by the user.
Valid Device Type values include
- UPS
• PDU
• ENVIROSENSE
• AC
Location is user-defined. There is no default value for location.
3.4 Status Menu
3.4.1 Status > Overview
text_image
Communications Status Connected to 10.11.6.137 and logged in an location? PowerAlert Power Management Software TRIPP-LITE Status Device Configuration Logs Preferences Help Overview Detail Terms DEVICES Alarm Status Model Name Type Location ✓ Normal SMART2200R80.20 UPS OVERVIEW ✓ 123.0 V ✓ 54.6 V ✓ 123.0 V Input Voltage 123.0 Device Mode 149k Input Voltage (Hz) 123.0 Device Mode 149k Input Frequency (Hz) 59.0 Low Transfer Voltage 83 High Transfer voltage 145 Battery Charge Remaining 100 Battery Minutes Remaining 355 Battery Voltage (Hz) 54.6 Battery Temperature (F) 104.0 Battery Status Normal Output Lead 0 Output Current 6.0 Output Voltage (Hz) 123.0 Output Frequency (Hz) 59.0 Output Source NormalFigure 3-5: Status Page
This is the default screen of information and will the first screen to be displayed. It is a pictorial representation of the state of the system. The values on this screen are not editable.
Note: The graphic symbols used are not intended to be a representation of the actual equipment connected.
3. Web Console continued
3.4 Status Menu continued
3.4.2 Status > Details
text_image
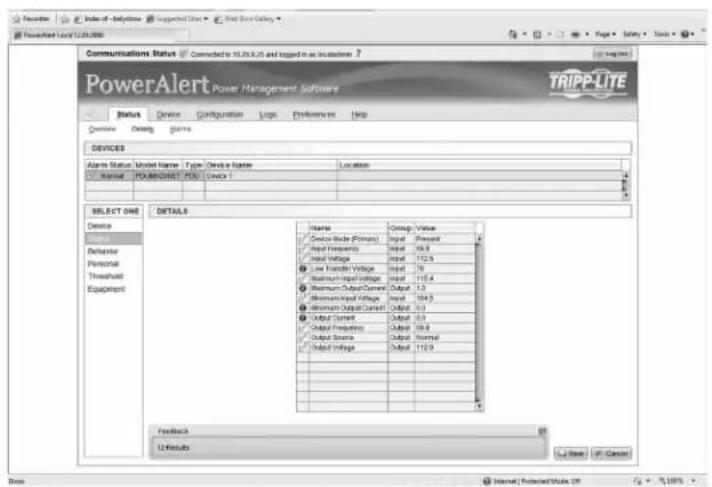
Communications Status Connected to 10.78.8.25 and tagged in as locations PowerAlert Power Management Software TRIPP-LITE Status Device Configuration Logo Preferences Help Overview Detail Goals DEVICES Alarm Status Model Name Type Device Name Location Model POWERLIGHT INFO Device 1 SELECT ONE DETAILS Device Device Defensor Personal Thermal Equipment Name Group Value Device Side (Primary) Input Present Input Frequency Input 10.9 Load Voltage Input 112.6 Low Transfer Voltage Input 70 Transmission Signal Input 110.4 Maximum Output Current Output 1.0 Maximum Signal Voltage Input 104.5 Maximum Output Current Output 10.9 Output Current Output 10.9 Output Frequency Output 10.9 Output Source Output Normal Output Voltage Output 112.3 Feedback 12 Results State Cancel Time Internet Restricted Mode Off 5.10%Figure 3-6: Device Status
text_image
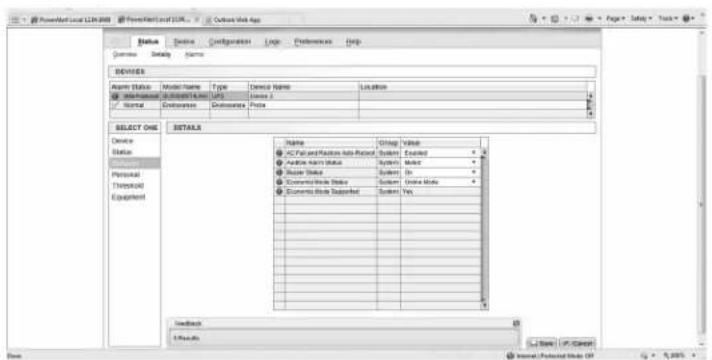
Powered by LILAR Powered by LILAR Output Web App Status Name Configuration Logic Preferences Help Details Form Name Device Name Type Device Name Location Name Description Type1 Description Price SELECT ONE DETAILS Device Status Status Personal Technical Equipment Name Group Value AC Field and Platform Info Wizard System: Extended Audio Path Status System: Make Audio Style System: On Electronic Audio Mode System: Unid Mode Electronic Audio Supporter System: Yes Feedback Results Start / Print/ControlFigure 3-7: Device Behavior
The content of this screen will vary based upon the protocol of the device. This screen contains the device variable data. Any editable variables will be displayed at the top of the list. The editable variables have a white value box. This section of variables is sorted by purpose and within each purpose, by variable name.
Customizing the device functionality can be done through Behavior, Personal, and Threshold menus on the left side of the screen. These menus allow settings and threshold information to be changed to meet individual needs. Some options are modified by clicking on a cell and the then selecting the appropriate value, and some will require a typed value in the cell. Click [Save] when you have finished making changes.
Device Name
Purpose
• The valid values for Purpose are:
o Behavior – configuration information that defines device behavior
o Equipment – information describing the device
o Personal – configurable identifying information
o Status – device status information
o Threshold – a threshold for a device event
Group
- Each device has a group to categorize the variable. Device: general will not have variables in all groups but will have variables in multiple groups. The following are the valid group values:
o Battery – the variable is associated with the device's battery
o Bypass – the variable is associated with the device's bypass
o Contact – the variable is associated with a contact closure sensor input
o Device
o Environment
o Input
o Load
o Output
o System
o Watchdog
Value
- This is the current value of the variable. Values include EI Disabled and numeric values depending on the device.
3. Web Console continued
3.4 Status Menu continued
3.4.3 Status > Alarms
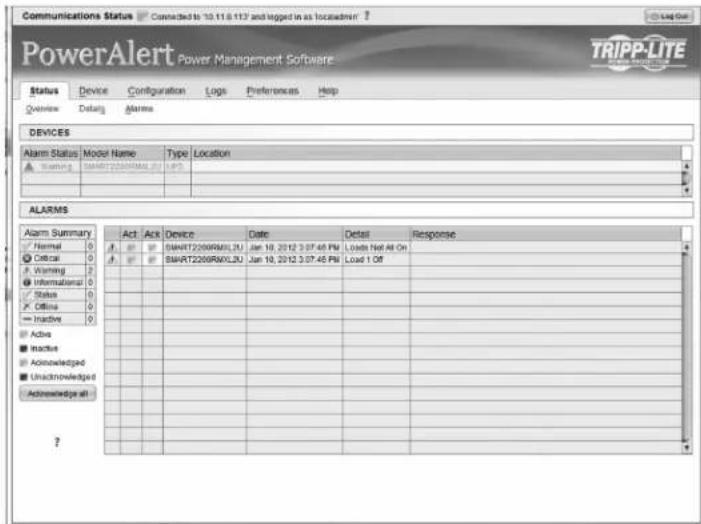
text_image
Communications Status Connected to 10.11.6.112 and logged in as localadmin PowerAlert Power Management Software TRIPP-LITE Status Device Configuration Logo Preferences Help Overview Detail Alarms DEVICES Alarm Status Model Name Type Location WARNING SMART2200RMLJU APP ALARMS Alarm Summary Act Act Device Date Detail Response Normal 0 SMART2200RMLJU Jan 10, 2012 3:07:45 PM Load Net At On Critical 0 SMART2200RMLJU Jan 10, 2012 3:07:45 PM Load 1 Off Warning 2 Informational 0 Status 0 Offline 0 Inactive 0 Active Inactive Acknowledged Unacknowledged Acknowledges all ?Figure 3-8: Alarms
This submenu provides a listing of all active and/or unacknowledged alarms.
By default, only active alarms will be displayed on this page, as the software will automatically mark the alarm acknowledged upon receipt of the matching clear alarm. To change this, deselect the option to auto acknowledge alarms. Upon de-selection of this option, alarms will remain in this list until they are acknowledged individually by clicking on the 'Ack' column for the alarm, or clicking the [Acknowledge all] button.
Note: An alarm must be inactive in order for it to be acknowledged and disappear from the alarm list.
3.5 Device Menu
The device menu is used to enact different commands or configurations for individual devices.
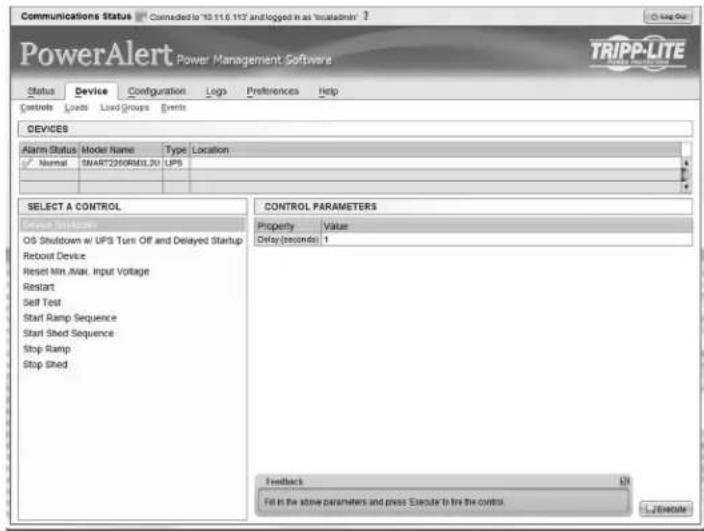
3.5.1 Device > Controls
text_image
Communications Status Connected to '10.11.6.117' and logged in as 'Inicialder' PowerAlert Power Management Software Status Device Configuration Logs Preferences Help Controls Loads Load Groups Events DEVICES Alarm Status Model Name Type Location Normal SMART2200RMSL30 UPS SELECT A CONTROL Device Shutdown OS Shutdown at UPS Turn Off and Delayed Startup Reboot Device Reset Min.AMax. Input Voltage Restart Self Test Start Ramp Sequence Start Shed Sequence Stop Ramp Stop Shed CONTROL PARAMETERS Property Value Delay(seconds) 1 Feedbacks Fill in the above parameters and press Execute to fix the control ↓ExecuteFigure 3-9: Controls
Controls available on the selected device in the device list appear in the 'Select A Control' section of the page.
Click on a control and, if parameters are necessary to execute the control, the parameters required will appear to right of the selected control. Enter the data in the value field and the click the [Execute] button on the bottom of the page.
Available commands include "Reboot Device," "Initiate Self-Test," "Operating System Restart," "Start Ramp Sequence," "Start Shed Sequence," etc. For a complete list of commands available for your device, refer to the 'Select A Control' menu.
3. Web Console continued
3.5 Device Menu continued
3.5.2 Device > Loads
text_image
Communications Status Connected to '10.11.9.112' and logged in as location: ? PowerAlert Power Management Software TRIPP-LITE Status Device Configuration Logs Preferences Help Controls Loads Load Groups Events DEVICES Alarms Status Model Name Type Location Normal SMART2200RMLJU UPS MAIN LOAD Status On Off Cycle Load Amps RampShed Support HARDWARE LOADS Load State Group Description Ramp Shed 1 On Turn load 1 on after 00:00 Turn load 2 off after 00:00 2 On Turn load 3 on after 00:00 Turn load 4 off after 00:00 3 On Turn load 5 on after 00:00 Turn load 6 off after 00:00 4 On Remain off Remain on - - - - - - - - - - - - - - - - - - - - - - - - - - - - - - - - - - - - - - - - - - - - - - - - - - - - - - - - - - - - - - - - - - - - - - - - - - - - - - - - - - - - - - - - - - - - - - - - - - - - - - - - - - - - - - - - - - - - - - - - - - - - - - - - - - - Load State Group Description Turn load 1 on after 00:00 Turn load 2 off after 00:00 Turn load 3 on after 00:00 Turn load 4 off after 00:00 Remain off Remain on - - - - - - - - - - - - - - - - - - - - - - - - - - - - - - - - - - - - - - - + - - - - - - - - - - - - - - - - - - - - - - - - - - - - - - - - - - - - - - - - - - - - - - - - - - - - - - - - - - - - - - - - - - - - - - - - - - - - - - - - - - - - - - - - - - - - - - - - -Figure 3-10: Loads
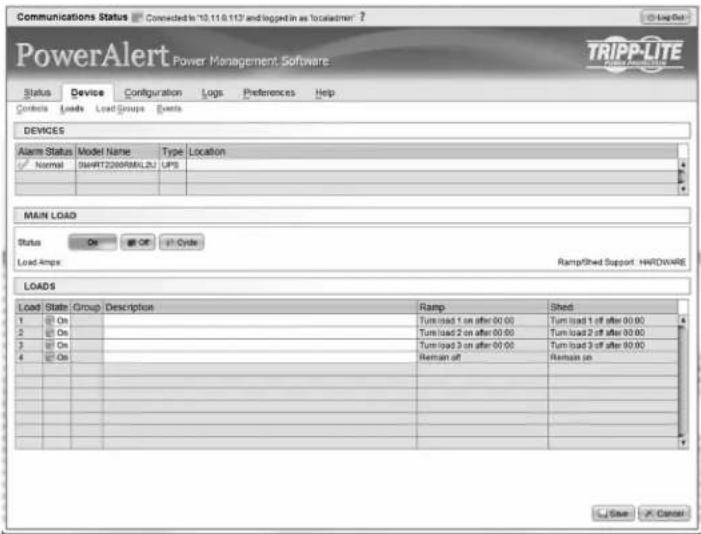
The Loads menu option will only appear if the device supports loads. The description field is an editable value. In order to save any changes made on this page, you must click the [Save] button at the bottom of the page.
You can control the outlets of the managed device by selecting the load and then clicking the appropriate [On], [Off] or [Cycle] button.
The load of connected equipment is displayed in amps, allowing you to see whether additional equipment can be added safely. (Load fluctuates with the power demands of connected equipment. It is prudent to limit the load to approximately 80% of maximum capacity in order to accommodate higher startup power demands and other increased power needs.)
If your device has controllable load banks, additional buttons allow you to control each load bank. (Each load bank consists of one or more outlets.) You can use the "Description" field to label the banks for easy reference. The main control buttons affect all outlets at once. Note: If the control buttons remain grayed out when a load is selected, this condition indicates the outlet is non-controllable.
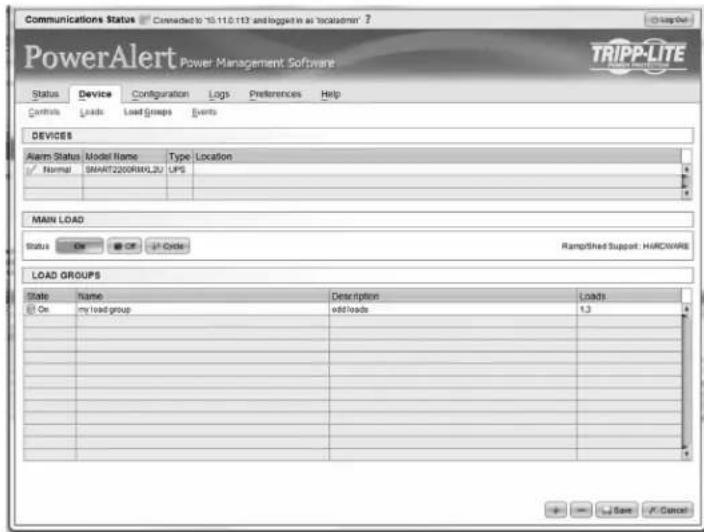
3.5.3 Device > Load Groups
text_image
Communications Status Connected to 15.11.0.113 and logged in an 'localadmin' ? PowerAlert Power Management Software Status Device Configuration Logs Preferences Help Control Loads Load Groups Events DEVICES Alarm Status Model Name Type Location Normal SMART2200R0XL20 UPS MAIN LOAD Status On Off Up Order Rampified Support: HARDWARE LOAD GROUPS State Name Description Loads On my load group add/loads 1.3 Save CancelFigure 3-11: Load Groups
The Load Groups menu option will only appear if the device has two (2) or more controllable loads.
To create a load group click the [+] button on the bottom of the screen to add a group row to the table. Then, enter a name and description and click on the Loads cell to expose available loads that can be added to a group. Click on the select loads and then click the [Save] button on the bottom of the screen
The description is an editable field. Once changes are made to any, or all, descriptions, click the [Save] button to save the changes.
To delete a load group, click on the load group row to delete, click the [-] button and confirm the delete.
3. Web Console continued
3.5 Device Menu continued
3.5.4 Device > Events
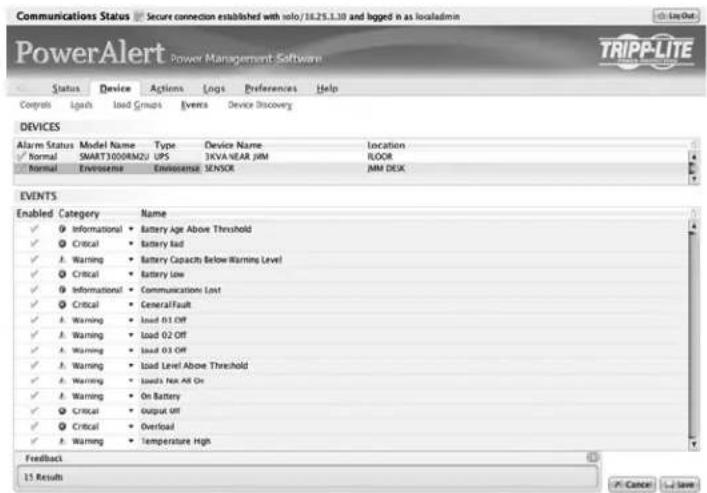
text_image
Communications Status Secure connection established with solo/18.25.1.10 and logged in as localadmin PowerAlert Power Management Software TRIPP-LITE Status Device Actions Logs Preferences Help Controls Logs Load Groups Events Device Discovery DEVICES Alarm Status Model Name Type Device Name Location Normal SMART3000RMZU UPS 3KVA NEAR JIM FLOOR Normal Enclosure Enclosure SENSOR JIM DEX EVENTS Enabled Category Name ✓ Informational Battery Age Above Threshold ✓ Critical Battery Iod ✓ Warning Battery Capacity Below Warning Level ✓ Critical Battery Low ✓ Informational Communication Lost ✓ Critical GeneralFault ✓ Warning Load 01 Off ✓ Warning Load 02 Off ✓ Warning Load 03 Off ✓ Warning Load Level Above Threshold ✓ Warning Load's Next All On ✓ Warning On Battery ✓ Critical Output Off ✓ Critical Overload ✓ Warning Temperature High Feedback 15 Results P-Cancel <->SaveFigure 3-12: Events
The 'Events' page displays all of the available events associated with a device.
Event Category
This specifies the severity level for the event. The user may choose to give the event a different severity level. The valid values for category are:
- CRITICAL
- WARNING
• INFORMATION
Enable/Disable Event
This allows the user to no longer consider this event an alarm event. Disabling the event will cause this event to no longer create an alarm and the actions will no longer fire when this event occurs. The default is for all events to be enabled.
3.5.5 Device > Device Discovery

text_image
Communications Status Secure connection established with 10.4.0.88 and logged in as localities PowerAlert Power Management Software Status Device Actions Logs Preferences Help Contracts Links Events Device Discovery DEVICES Alarm Status Model Name Type Device Name Location ✓ Namibia BUTTERTH2L2US UPS Device 1 DEVICE DISCOVERY Feedback Press Execute to find devices connected to this web cardFigure 3-13: Device Discovery
To search for additional devices, click [Execute] at the bottom of the page. This feature can be used when adding a Tripp Lite ENVIROSENSE temperature and humidity probe. Once the probe is connected to the SNMPWEBCARD, press the [Execute] button and the probe will appear as a device in the device list.
3. Web Console continued
3.6 Actions Menu
The Actions menu allows for detailed configuration of event responses, scheduled actions, and the contact information in the address book. At this time, the Web interface does not support scheduled actions. Please refer to the Telnet or SSH menu interface to create scheduled actions (Section 4.2.2.2).
Note: The Actions menu in the Web interface was formerly called the Configuration menu. A few of the screen shots in this manual still depict the content under the former name.
3.6.1 Actions

text_image
Communications Status Secure connection established with 10.4.0.86 and logged in as localeadmin PowerAlert Power Management Software Status Device Actions Logs Preferences help Event Actions Scheduling Address Back DEVICES Alarm Status Model Name Type Device Name Location Name DATAFLDLJL UPS Device 1 GENERAL ACTIONS Email Actions SNMP Set OID Actions SNMP Trap Actions DEVICE ACTIONS Control Execution Actions Device Shutdown Actions Load Actions Ramp Actions Shed Actions CONTROL EXECUTION ACTIONS Name Action Test After 3 Years Execute Device 1 Initiate Self Test immediately on Device 1 Battery Age Above Threshold Feedback Saving ChangesFigure 3-14: Actions
Action profiles define responses to events and alarm conditions. The action profile allows the response to be defined once and applied to multiple alarm events. An action may be a response to the alarm condition or a response to the condition clearing. Where appropriate, the two actions may be the same.
You can configure action settings for several event types, including "On Battery" and "Battery Low." (Events vary by device.) You can configure several settings categories that specify actions to be executed when the selected event takes place.
3.6.1.1 Actions > Event Actions > Device Actions
Control Execution Actions
A control action is a device specific action that can be executed when an alarm trigger occurs. An example of a control action could be that when the battery age crosses the user defined threshold, a self test is automatically executed to see if the battery in a UPS is still in good condition. Since these are device specific, the control actions available on devices will vary from device to device.
To add an action, click the [+] button to activate a row and enter the appropriate data. To delete an action, click on the action that is to be deleted and then click the [-] button and confirm the deletion and then the [Save] button to commit the changes.
text_image
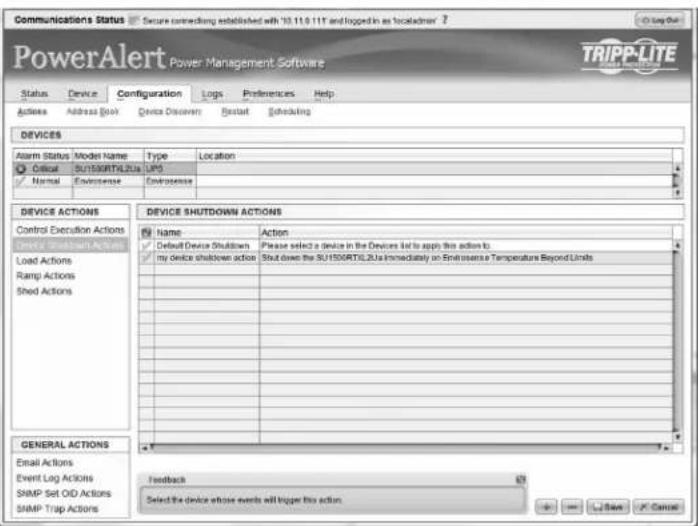
Communications Status Secure connecting established with '10.11.9.11T and logged in as local server ? Log Out PowerAlert Power Management Software Status Device Configuration Logs Preferences Help Actions Address Book Device Discover Restart Scheduling DEVICES Alarm Status Model Name Type Location Critical SU150RTIL2Ua UPG Normal Environment Environment DEVICE ACTIONS Control Execution Actions Device Shutdown Actions Load Actions Ramp Actions Shed Actions DEVICE SHUTDOWN ACTIONS Name Action Default Device Shutdown Please select a device in the Devices list to apply this action to. my device shutdown action Shut down the SU150RTIL2Ua immediately on Endurance Temperature Beyond Limits GENERAL ACTIONS Email Actions Event Log Actions SNMP Set OID Actions SNMP Trap Actions Feedback Select the device whose events will trigger this action.Figure 3-15: Device Actions
3. Web Console continued
3.6 Actions Menu continued
3.6.1.1 Actions > Event Actions > Device Actions continued
Device Shutdown Actions
Device shutdown actions allow you to shutdown a device when a user-defined trigger occurs. Triggers include various alarms and even ENVIROSENSE readings. Device shutdown also includes the option to be put on a delay.
To add an action, click the [+] button to activate a row and enter the appropriate data. To delete an action, click on the action that is to be deleted and then click the [-] button and confirm the deletion and then the [Save] button to commit the changes.
text_image
Communications Status Secure connecting established with '10.11.0.11' and logged in as 'localadmin' PowerAlert Power Management Software Status Device Configuration Logs Preferences Help Actions Address Book Device Discovery Start Scheduling DEVICES Alarm Status Model Name Type Location Critical RUN50ORTIL2Us UPS Normal Encapsulation Encosence DEVICE ACTIONS Control Execution Actions Device Shutdown Actions Load Actions Ramp Actions Shed Actions GENERAL ACTIONS Email Actions Event Log Actions SNMP Set OID Actions SNMP Trap Actions DEVICE SHUTDOWN ACTIONS Name Action Default Device Shutdown Please select a device in the Devices list to apply this action to. my device shutdown action Shut down the SU150ORTIL2Us immediately on Encosence Temperature Beyond Limits Feedback Select the device whose events will trigger this action.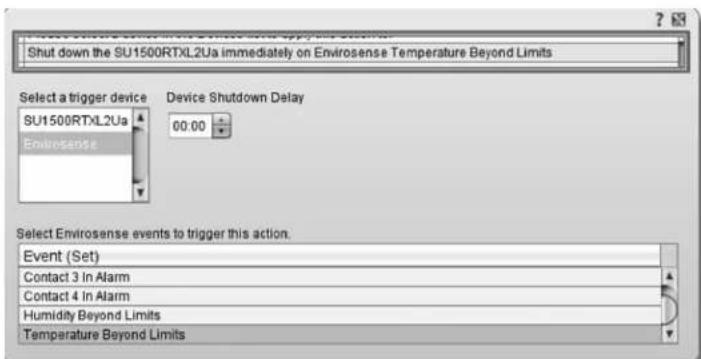
text_image
Shut down the SU1500RTXL2Ua immediately on EnviroSense Temperature Beyond Limits Select a trigger device Device Shutdown Delay SU1500RTXL2Ua 00:00 EnviroSense Select EnviroSense events to trigger this action. Event (Set) Contact 3 In Alarm Contact 4 In Alarm Humidity Beyond Limits Temperature Beyond LimitsFigure 3-16: Device Shutdown
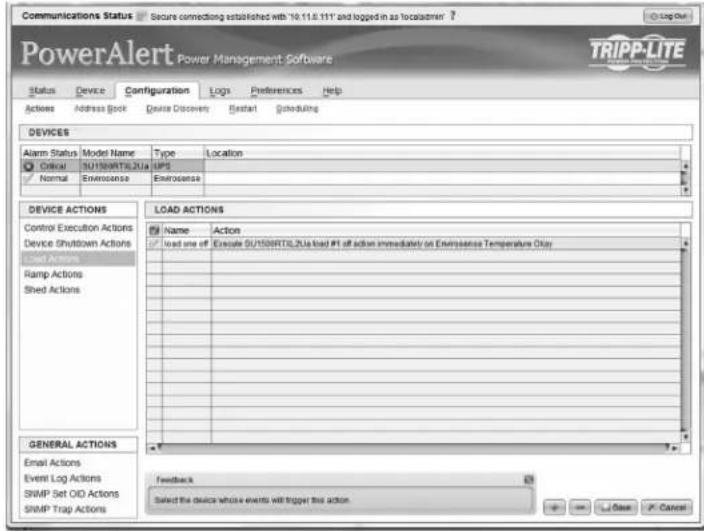
Load Actions
A load action is a device specific action that can be executed when an alarm trigger occurs. An example of a load action could be that when the device load goes above the user defined threshold and triggers a 'Load Level Above Threshold Event,' a specific load is turned off to reduce the load. The amount of controllable loads available on devices will vary from device to device.
To add an action, click the [+] button to activate a row and enter the appropriate data. To delete an action, click on the action that is to be deleted and then click the [-] button and confirm the deletion and then the [Save] button to commit the changes.
text_image
Communications Status Secure connecting established with '10.11.8.11' and logged in as localadmin PowerAlert Power Management Software Status Device Configuration Logs Preferences Help Actions Address Book Device Discovery Restart Scheduling DEVICES Alarm Status Model Name Type Location Critical SU150BRTTL2Ua UPS Normal Envrosence Envrosence DEVICE ACTIONS LOAD ACTIONS Control Execution Actions Device Shutdown Actions Load Actions Ramp Actions Shed Actions GENERAL ACTIONS Feedback Email Actions Select the device whose events will trigger the action Event Log Actions SNMP Set OID Actions SNMP Trap Actions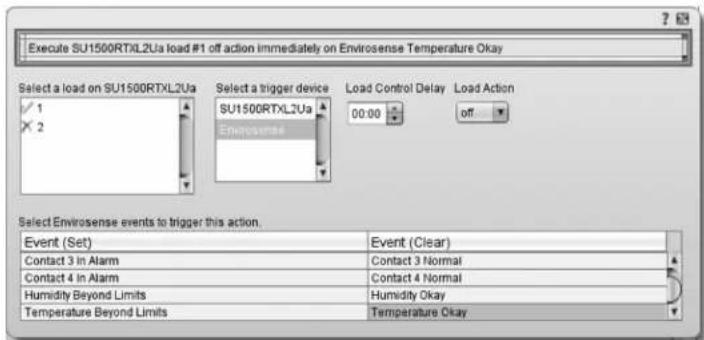
text_image
Execute SU1500RTXL2Ua load #1 off action immediately on EnviroSense Temperature Okay Select a load on SU1500RTXL2Ua 1 × 2 Select a trigger device SU1500RTXL2Ua EnviroSense Load Control Delay Load Action 00:00 off... Select EnviroSense events to trigger this action. Event (Set) Event (Clear) Contact 3 in Alarm Contact 3 Normal Contact 4 in Alarm Contact 4 Normal Humidity Beyond Limits Humidity Okay Temperature Beyond Limits Temperature OkayFigure 3-17: Load Actions
3. Web Console continued
3.6 Actions Menu continued
3.6.1.1 Actions > Event Actions > Device Actions continued
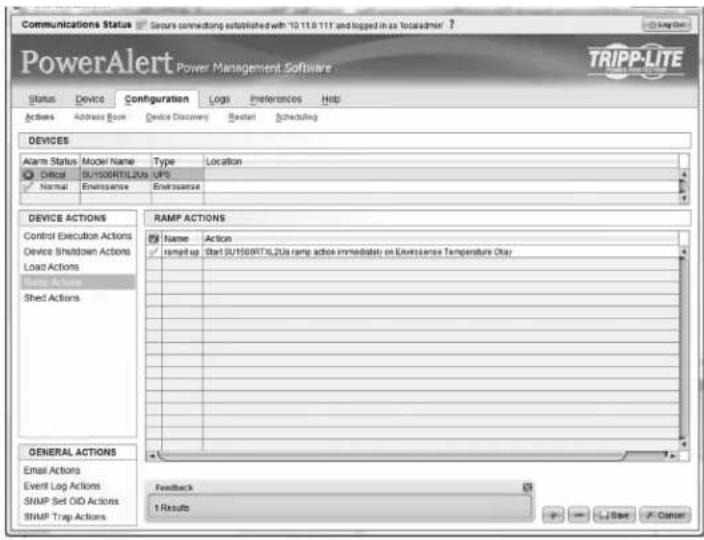
Ramp Actions
A ramp action is a device specific action that can be executed when an alarm trigger occurs. An example of a ramp action could be that when a UPS returns from an on battery event, the event trigger would be 'On Utility Power,' to execute the ramp settings set on the controllable loads. Ramp settings are defined on the Device-Loads page. The amount of controllable loads available on devices will vary from device to device.
To add an action, click the [+] button to activate a row and enter the appropriate data. To delete an action, click on the action that is to be deleted and then click the [-] button and confirm the deletion and then the [Save] button to commit the changes.
text_image
Communications Status Secures connecting established with '10.11.0.11' and logged in as 'localadmin' PowerAlert Power Management Software Status Device Configuration Logs Preferences Help Actions Address From Device Discovery Start Scheduling DEVICES Alarm Status Model Name Type Location Drip SU150RT7L2Us UPC Normal Enrolssence Enrolssence DEVICE ACTIONS Control Execution Actions Device Shutdown Actions Load Actions Base Actions Shed Actions RAMP ACTIONS Name Action ramp-up Start SU150RT7L2Us ramp action immediately on Enrolssence Temperature Clay GENERAL ACTIONS Email Actions Event Log Actions SNMP Set OID Actions SNMP Trap Actions Feedback Results + - < Date > Cancer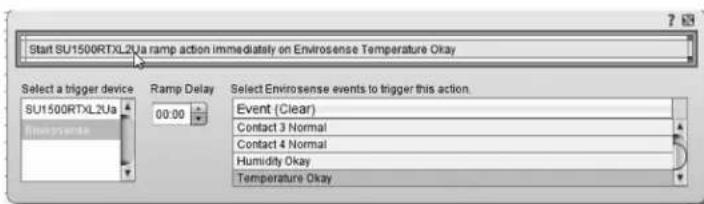
text_image
Start SU1500RTXL2Ua ramp action immediately on Enviro sense Temperature Okay Select a trigger device Ramp Delay Select Enviro sense events to trigger this action. SU1500RTXL2Ua 00:00 Event (Clear) Imipransate Contact 3 Normal Humidity Okay Temperature OkayFigure 3-18: Ramp Actions
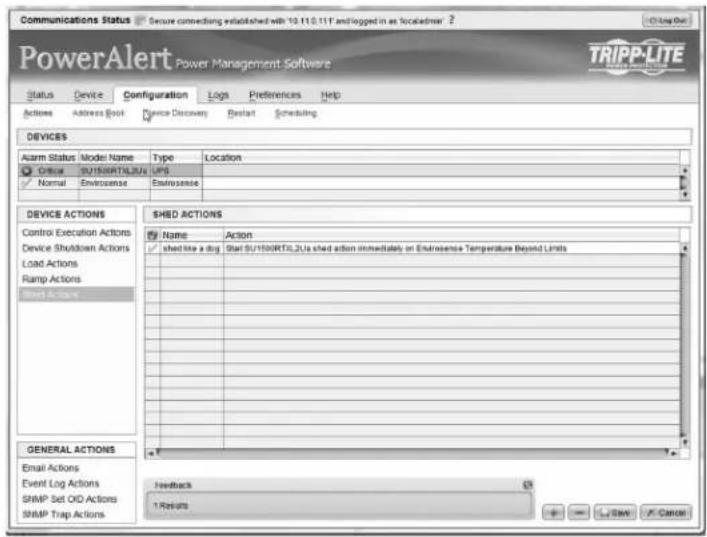
Shed Actions
A shed action is a device specific action that can be executed when an alarm trigger occurs. An example of a shed action could be that when a UPS goes to battery, the event trigger would be 'UPS on Battery,' to execute the shed settings set on the controllable loads. Shed settings are defined on the Device-Loads page. The amount of controllable loads available on devices will vary from device to device.
To add an action, click the [+] button to activate a row and enter the appropriate data. To delete an action, click on the action that is to be deleted and then click the [-] button and confirm the deletion and then the [Save] button to commit the changes.
text_image
Communications Status Secure connecting established with 10.11.0.11T and logged in as local server 2 PowerAlert Power Management Software Status Device Configuration Logs Preferences Help Actions Address Back Device Discovery Restart Scheduling DEVICES Alarm Status Model Name Type Location ✓ Critical SU150RTIL2JUs URS ✓ Normal Envrosence Envrosence DEVICE ACTIONS SHED ACTIONS Control Execution Actions Device Shutdown Actions Load Actions Ramp Actions Short Actions Name Action ✓ shed like a dig Start SU150RTIL2JUs shed action immediately on Envrosence Temperature Beyond Limits GENERAL ACTIONS Feedback Email Actions Event Log Actions SHMP Set OID Actions SHMP Trap Actions 1 Results Save Cancel
text_image
Start SU1500RTXL2Ua shed action immediately on EnviroSense Temperature Beyond Limits Select a trigger device SU1500RTXL2Ua EnviroSense Shed Delay 00:00 Select EnviroSense events to trigger this action. Event (Set) Contact 3 In Alarm Contact 4 In Alarm Humidity Beyond Limits Temperature Beyond LimitsFigure 3-19: Shed Actions
3. Web Console continued
3.6 Actions Menu continued
3.6.1.2 Actions > Event Actions > General Actions
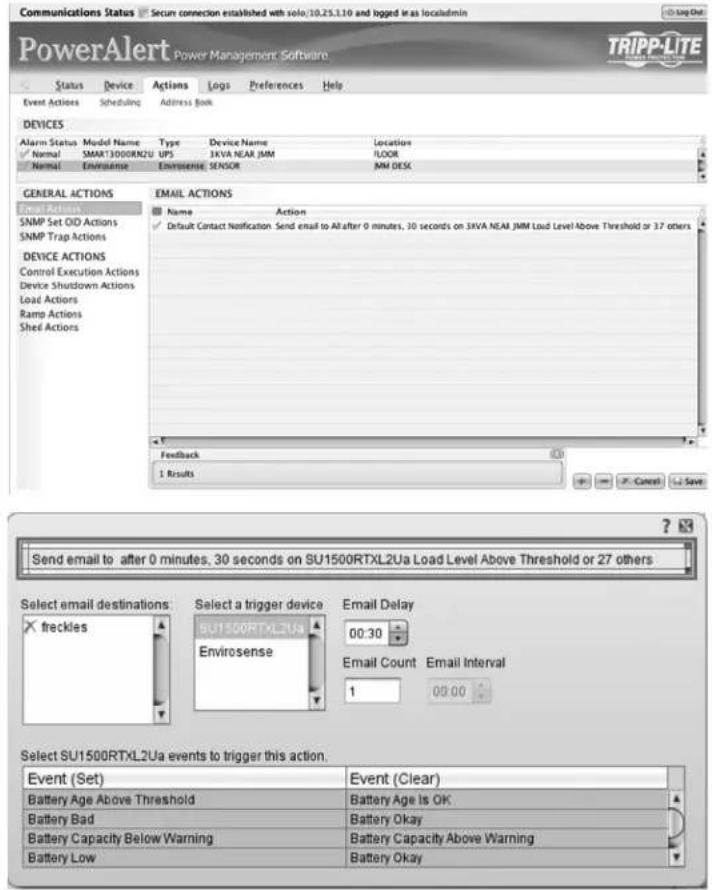
Email Actions
An Email action is an action that will send emails to selected people in the address book when user-defined events are detected. It is possible to define multiple email actions so that different people are notified when different alarms are detected or different people are notified if the triggering event lasts longer than expected.
By default, an email action is set up to notify all email contacts in the address book 30 seconds after an event trigger.
The delay setting defines when the first email should be sent, while the count defines the number of emails to be sent. The interval is the delay between the sending of additional emails. If the count is set to 1, the interval time is ignored as only one email will be sent.
To add an action, click the [+] button to activate a row and enter the appropriate data. To delete an action, click on the action that is to be deleted and then click the [-] button and confirm the deletion and then the [Save] button to commit the changes.
text_image
Communications Status Secure connection established with selo/10.25.1.10 and logged in as localadmin PowerAlert Power Management Software TRIPP-LITE Status Device Actions Logs Preferences Help Event Actions Scheduling Address Book DEVICES Alarm Status Model Name Type Device Name Locations ✓ Normal SMART3000R2U UPS JAVA NEAR JMM ILOOR Normal EnviroSense EnviroSense SENSOR MM DESK GENERAL ACTIONS Email ACTIONS SNMP Set OID Actions SNMP Trap Actions DEVICE ACTIONS Control Execution Actions Device Shutdown Actions Load Actions Ramp Actions Shed Actions Email ACTIONS Name Action ✓ Default Contact Notification Send email to All after 0 minutes, 30 seconds on SWA NEAR JMM Load Level Above Threshold or 37 others Feedback 1 Results Cancel Save Send email to after 0 minutes, 30 seconds on SU1500RTXL2Ua Load Level Above Threshold or 27 others Select email destinations: × freckles Select a trigger device SU1500RTXL2Ua EnviroSense Email Delay 00:30 Email Count Email Interval 1 00:00 Select SU1500RTXL2Ua events to trigger this action. Event (Set) Event (Clear) Battery Age Above Threshold Battery Age Is OK Battery Bad Battery Okay Battery Capacity Below Warning Battery Capacity Above Warning Battery Low Battery OkayFigure 3-20: Email Actions
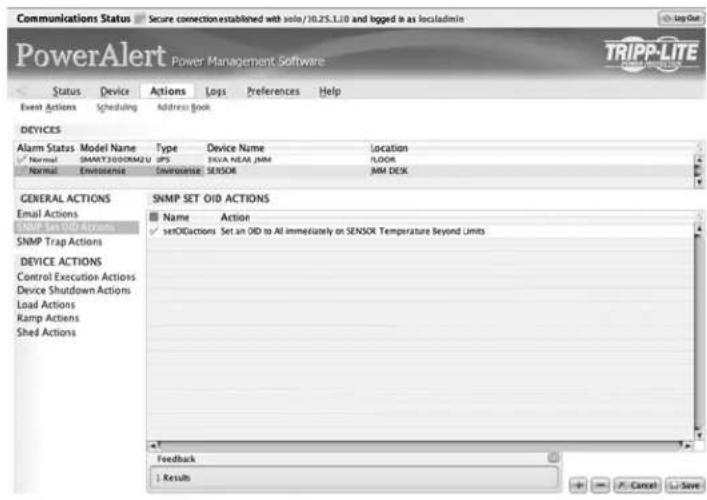
SNMP Set OID Actions
An SNMP Set OID action allows for the SNMPWEBCARD to set an SNMP value on another device on the network that will do something or set a value that the other network device will recognize and take some action based upon that SNMP value being set. An example of an application of this action is to have an SNMPWEBCARD in a UPS notify the network PDU that the UPS is power that the PDU is running on battery power. If utilizing a Tripp Lite PDU it is possible to execute the shed setting stored on the PDU to shed (turn off) equipment that is not necessary to extend the runtime of the UPS.
The OID to set on Tripp Lite PDU for shedding is
OID .1.3.6.1.4.1.850.100.1.8.3.3.0 - type integer and a value of 1
The OID to set on Tripp Lite PDU for ramping is
Clear OID .1.3.6.1.4.1.850.100.1.8.3.2.0 -type integer value of 1
To add an action, click the [+] button to activate a row and enter the appropriate data. To delete an action, click on the action that is to be deleted and then click the [-] button and confirm the deletion and then the [Save] button to commit the changes.
text_image
Communications Status Secure connection established with solo/10.25.1.10 and logged in as localadmin PowerAlert Power Management Software Status Device Actions Logs Preferences Help Event Actions Scheduling Address Book DEVICES Alarm Status Model Name Type Device Name Location Normal SNMP300ORMU UPS ENVA NEAL JMM FLOOR Normal Envolence Envolence SENSOR JMM DECK GENERAL ACTIONS SNMP SET OID ACTIONS Email Actions Name Action SNMP SET OID ACTIONS setOEActions Set an OID to All immediately on SENSOR Temperature Beyond Limits SNMP Trap Actions DEVICE ACTIONS Control Execution Actions Device Shutdown Actions Load Actions Ramp Actions Shed Actions Feedback Results Cancel Save
text_image
Set an OID at a snmp destination immediately on EnviroSense Temperature Beyond Limits Select one or more SNMP addresses to be notified. a snmp destination 10.20.0.14 Select trigger devices SU1500RTXL2Ua EnviroSense Set-OID Delay OID value. 00:00 1 Data type OID Integer 1.3.6.1.4.1.850.100.1.8.3.1.0 Select events to trigger this action. Event (Set) Event (Clear) Contact 1 In Alarm:2 Contact 1 Normal:2 Contact 2 In Alarm:2 Contact 2 Normal:2 Contact 3 In Alarm:2 Contact 3 Normal:2 Contact 4 In Alarm:2 Contact 4 Normal:2 Humidity Beyond Limits:2 Humidity Okay:2 Temperature Beyond Limits:2 Temperature Okay:2Figure 3-21: Set Actions
3. Web Console continued
3.6 Actions Menu continued
3.6.1.2 Actions > Event Actions > General Actions continued
SNMP Trap Actions
An SNMP Trap action is an action that will send SNMPv1 traps to selected destinations in the address book when selected events are detected. It is possible to define multiple email actions so that different people are notified when different alarms are detected or if the requirement is notify different people if the triggering event last longer then expected.
By default there is an SNMP Trap action set up to notify all SNMP contacts in the address book after 30 seconds.
The delay settings define when the first email should be sent and the number of emails to be sent. If set to 1 the interval time is ignored as it will only send one email, and the interval is the delay between additional emails being sent out.
To add an action, click the [+] button to activate a row and enter the appropriate data. To delete an action, click on the action that is to be deleted and then click the [-] button and confirm the deletion and then the [Save] button to commit the changes.
text_image
Communications Status Score connection established with selo/10.25.1.10 and logged in as iscaadmin PowerAlert Power Management Software TRIPP-LITE Status Device Actions Logs Preferences Help Event Actions Scheduling Address Goal DEVICES Alarm Status Model Name Type Device Name Location Normal SMART3000M2U UPS SKVA NEAR JIM FLOOR Normal EnviroSense EnviroSense JIMI-DEC GENERAL ACTIONS SNMP TRAP ACTIONS Email Actions Name Action SNMP Set OID Actions Default Trap Notification Send an SNMP trap to AI after 0 minutes, 10 seconds on JKVA NAR JIMLoad Level Above Threshold or 17 SNMP TRAP ACTIONS DEVICE ACTIONS Control Execution Actions Device Shutdown Actions Load Actions Ramp Actions Shed Actions Feedback 1 Results Cancel Save Send an SNMP trap to after 0 minutes, 30 seconds on SU1500RTXL2Ua Load Level Above Threshold or 39 others Select one or more SNMP addresses to be notified. a snmp destintaion 10.20.0.14 Select trigger devices SU1500RTXL2Ua EnviroSense Trap Delay 00:30 Trap Count Retransmit Interval 1 00:00 Select events to trigger this action. Event (Set) Event (Clear) Battery Age Above Threshold:1 Battery Age Is OK:1 Battery Bad:1 Battery Okay:1 Battery Capacity Below Warning :1 Battery Capacity Above Warning :1 Battery Low:1 Battery Okay:1 Communications Lost:1 Communications Established:1 General Fault:1 Fault Okay:1Figure 3-22: Trap Actions
3.6.2 Actions > Scheduling
To perform actions according to a predefined schedule, select the Actions > Scheduling.
text_image
Communications States Secure connection established with solo/10.25.1.10 and logged in as localadmin PowerAlert Power Management Software TRIPP-LITE Status Device Actions Logs Preferences Help Event Actions Scheduling Address Book DEVICES Alarm Status Model Name Type Device Name Location Normal SMART3008M2E UPS ECVA NEAR JMN FLOOR Normal Envrosense Envrosense SENSOR JMM DISK SCHEDULING Device Scheduled Action Execution Date Until Frequency Count Count limit Feedback OKFigure 3-23: Scheduled Actions
To add a scheduled action, click the [+] button on the bottom of the screen. You will be prompted to select the Task (action type) and its start and stop times.
text_image
Schedule Task on device: 3KVA NEAR JMM Task: Start: 12:00 AM Local time Repeat Pattern OS Shutdown w/ UPS Turn Off and Reboot Device Shut Down Device Initiate Self Test Reboot SNMP Card Start Ramp Sequence Start Shed Sequence Range of Repetition Start: No end date End after occurrences End by: ... Save CancelFigure 3-24: Action Details
3. Web Console continued
3.6.3 Actions > Address Book
text_image
Communications States Secure connection established with sole/10.25.1.10 and logged in as localadmin PowerAlert Power Management Software TRIPP-LITE Status Device Actions Logs Preferences Help Event Actions Scheduling Address Book DEVICES Alarm Status Model Name Type Device Name Location Normal SMART 3000RKM2U UPS IICVA NEAR JIM FLOOR Normal Environment Environment SENSOR JIMM-DECK CONTACTS EMAIL CONTACTS Linker Name Email Address SNMP v1 fred fro@newco.com SNMP v2c SNMP v3 HTTP HTTPS Feedback Right-click on an e-mail to send a test message + Cancel < SaveFigure 3-25: Address Book
To modify Address Book settings for each type of notification method, locate it in the 'Contacts' box on the left side of the page and edit the variable fields.
The "Email" tab shows a table of email contacts. Before your SNMPWEBCARD can send email notifications, you must add at least one email contact.
If you do not know the correct settings, contact your network administrator. To add an email contact, click the [+] button on the bottom of the screen to activate the next available row.
The "SNMP" tab shows a table of SNMP contacts. Before your SNMPWEBCARD can send an SNMP trap or SNMP set to an IP address, you must add at least one SNMP contact. To add an email contact, click the [+] button on the bottom of the screen to activate the next available row. (The standard port for SNMP set destinations is port 161. The standard port for SNMP trap recipients is port 162.)
Note: If adding an SNMP contact to be used with a SNMP Set Notification, use port 161 or the port number that the remote SNMP device can be accessed on. After adding Email and SNMP contacts, the user must set contacts for trap sending during events.
Note: You also need to configure and enable each event setting through the Configuration>Actions window before notifications can be sent to your contacts.
3.7 Logs
This menu allows for in-depth viewing, configuration and acknowledgement of logs that come across the system. Selecting Rotate Log on any log page will forward that log to any configured recipients and then clear the log in the SNMPWEBCARD.
3.7.1 Logs > Event Logs

text_image
Communications Status Secure connection established with sale/10.25.1.30 and logged in as localities PowerAlert Power Management Software TRIPPLITE Status Device Actions Logs Preferences Help Event Logs Accounting DEVICES Alarm Status Model Name Type Device Name Location Normal (AMT3008MUEU UPS) EVA NEAR JMR BLOOR Normal Unipress Envotress SENSOR JMM DESC EVENT LOGS Date / Time Type Device Category Name 2011-01-12 06:35:15-0600 system Informational PowerAlert cardred 2011-01-12 07:39:01-0600 system Informational PowerAlert clocked 2011-01-12 09:13:35-0600 Event SENSOR Informational Humidity Okay 2011-01-12 09:13:33-0600 Event SENSOR Critical Humidity Beyond Limits 2011-01-12 09:12:39-0600 Event SENSOR Critical Humidity Okay 2011-01-12 09:12:37-0600 Event SENSOR Critical Humidity Beyond Limits 2011-01-12 06:12:32-0600 Event SENSOR Informational Humidity Okay 2011-01-12 06:12:30-0600 Event SENSOR Critical Humidity Beyond Limits 2011-01-12 06:12:28-0600 Event SENSOR Informational Humidity Okay 2011-01-12 06:12:26-0600 Event SENSOR Critical Humidity Beyond Limits FILTERS Starting Date/Time Feb 05, 2011 02:52:30 PM Ending Date/Time Feb 12, 2011 04:15:15 AM Name Device Type Category Humidity Beyond Limits Sensor System Event Event System Critical International Humidity Okay PowerAlert cardred System Event System PowerAlert stopped Feedback The entire log is loaded actually. Press Refresh Log to check for and load additional entries. Press fristure Log to rotate the log.Figure 3-26: Event Logs
This menu allows the user to view the event log entries for the entire system.
Events are listed in order of the time and date they occurred. Information on the type of event that occurred, the device it occurred on, the severity category and a description of the event is also displayed. To view more events, simply continue scrolling down through the log.
Logs can be filtered by using the menus at the bottom of the page. Logs can be filtered and viewed by time frame, type of event, device on which it occurred, severity category and description. In order to apply filters to the event log, click the 'Apply' button at the bottom of the page.
Filters can be cleared within a session by clicking the 'Reset Filters' button at the bottom of the page. Filters do not persist from session to session.
3.7.2 Logs > Data
text_image
Communications Status Connected to 18.11.0.117 and logged as local server PowerAlert Power Management Software Status Device Configuration Logs Preferences Help Event Data DEVICES Alarm Status Model Name Type Location ✓ Sample SMART220R06LZU TYPE DATA LOGS Date & Time Type Device Variable Value Jan 10, 2012 4:21:47 PM Variable SMART220R06LZU Output Load 0 Jan 10, 2012 4:21:51 PM Variable SMART220R06LZU Battery Charge Remaining 100 Jan 10, 2012 4:21:52 PM Variable SMART220R06LZU Input Voltage 121.9 Jan 10, 2012 4:21:53 PM Variable SMART220R06LZU Battery Voltage 54.6 Jan 10, 2012 4:21:56 PM Variable SMART220R06LZU Battery Temperature (C) 39.0 Jan 10, 2012 4:21:56 PM Variable SMART220R06LZU Battery Temperature (F) 102.2 Jan 10, 2012 4:22:01 PM Variable SMART220R06LZU Battery Minutes Remaining 355 Jan 10, 2012 4:22:02 PM Variable SMART220R06LZU Output Current 0.0 Jan 10, 2012 4:22:03 PM Variable SMART220R06LZU Self Test Date 2012-01-10 Jan 10, 2012 4:22:03 PM Variable SMART220R06LZU Battery Minutes Remaining 355 Jan 10, 2012 4:22:03 PM Variable SMART220R06LZU Battery Charge Remaining 100 Jan 10, 2012 4:22:03 PM Variable SMART220R06LZU Battery Voltage 54.6 Jan 10, 2012 4:22:03 PM Variable SMART220R06LZU Battery Temperature (C) 39.0 Jan 10, 2012 4:22:03 PM Variable SMART220R06LZU Battery Temperature (F) 102.2 Jan 10, 2012 4:22:04 PM Variable SMART220R06LZU Input Voltage 121.9 Jan 10, 2012 4:22:04 PM Variable SMART220R06LZU Output Current 0.0 Jan 10, 2012 4:22:04 PM Variable SMART220R06LZU Output Load 0 Jan 10, 2012 4:22:38 PM Variable SMART220R06LZU Input Voltage 123.0 FILTERS Starting Date/Time Jan 18, 2012 Ending Date/Time Jan 18, 2012 Value Variable Battery Charge Remaining Device Battery Minutes Remaining Battery Temperature (C) Battery Temperature (F) Battery Voltage Input Voltage Output Current Output Load Self Test Date Type Variable Feedback 18 Results ? Clear Log Apply Filters Reset FiltersFigure 3-27: Data Logs
This menu allows the user to view the data log entries for the entire system.
3. Web Console continued
3.7.2 Logs > Data continued
Data points are listed in order of the time and date they occurred. Information on the type of data point that occurred, the device it occurred on, which variable it occurred on and the numeric value is also displayed. To view more data points, simply continue scrolling down through the log.
Logs can be filtered by using the menus at the bottom of the page. Logs can be filtered and viewed by time frame, reporting device, device variables and variable value. Device variable filters can either be all of the variables for all devices (default), all variables on one device or up to three specific variables across all devices. In order to apply filters to the event log, click the [Apply] button at the bottom of the page.
Filters can be cleared within a session by clicking the [Reset Filters] button at the bottom of the page. Filters do not persist from session to session.
3.8 Preferences
This menu is used to alter user-defined preferences for the network, security and overall system settings.
3.8.1 Preferences > Network
text_image
Communications Status Connected to 16.116.117 and logged in as localhost PowerAlert Power Management Software Status Device Configuration Logs Preferences Help Network Security System DEVICES Alarm Status Model Name Type Location ✓ Remote SMART20/SPRML-20 UPS NETWORK PREFERENCES SERVICES SMTP SMTP InfoNet SNMP Auto-Start ✓ SNMP Port 161 SNMP v1 ✗ SNMP v2 ✗ SNMP v3 ✗ HTTP / HTTPS HTTP Auto-Start ✓ HTTP Port 80 HTTPS Auto-Start ✗ HTTPS Port 443 SSH Auto-Start ✓ SSH Port 2112 SSH Auto-Start ✓ SSH Menu Port 22 Target Target Auto-Start ✓ Target Port 5214 Target Menu Auto-Start ✓ Target Menu Port 23 Save CancelFigure 3-28: Services
This menu is used to define the network preferences for remote service interfaces, SMTP and Internet.
Services
This menu is available in the 'Network Preferences' box at the left side of the page in the Preferences > Network submenu. Any changes to these settings will require a system restart.
Automatically Start SNMP
This indicates if SNMP should automatically be started when the system is initialized.
SNMP Port
This is the port to use when starting SNMP during system initialization. This is the same port to use for set and get requests. The default is 161.
Enable SNMP V1
This indicates if SNMPv1 should be enabled on startup. The default is that SNMP V1 is enabled.
Enable SNMP V2c
This indicates if SNMPV2c should be enabled on startup. The default is that SNMP V2c is enabled.
Enable SNMP V3
This indicates if SNMPV3 should be enabled on startup. The default is that SNMPV3 is enabled. Note: The SNMP enable flags will not change the default local users created.
Automatically Start HTTPS
This indicates if HTTPS should be automatically started as part of system initialization.
HTTPS Port
If the application is to be started, then this is the listening port to use. The default is 443.
Automatically Start HTTP
This indicates if HTTP should be automatically started as part of system initialization.
HTTP Port
If the application is to be started, then this is the listening port to use. The default is 80
Automatically Start Telnet Menu
This indicates if the Telnet Menu application be automatically started as part of system initialization.
Telnet Menu Port
This is the listening port to user for the Telnet Menu application. The default is 23.
Automatically Start Telnet CLI
This indicates if the Command Line Interface application should be automatically started as part of system initialization.
Telnet CLI Port
This is the listening port to use for the Telnet CLI Application. The default is 5214.
Automatically Start SSH Menu
This indicates if the SSH Menu application should be automatically started as part of system initialization. The default is Yes.
SSH Menu Port
This is the listening port to use when starting the SSH Menu application. The default is 22.
Automatically Start SSH CLI
This indicates if the SSH Command Line Interface application should be automatically started as part of system initialization. The default value is Yes.
SSH CLI Port
This is the listening port to use when starting the SSH CLI application. The default is 2112.
3. Web Console continued
3.8 Preferences continued
3.8.1 Preferences > Network continued
SMTP
The email settings are used to define a remote email relay server to use to send emails from the system. These settings also indicate what items to include in email notifications.
text_image
Communications Status Secure connection established with selo/13.25.1.10 and logged in as localadmin PowerAlert Power Management Software Status Device Actions Logs Preferences Help Network Security System Restart DEVICES Alarm Status Model Name Type Device Name Location Normal SMART38008RZU IPS SAVA NEAR JIM FLOOR Normal EnviroSense EnviroSense SENSOR JIM DESK NETWORK PREFERENCES Services SMTP Server Settings Login Settings Data Relay Address Relay User None Defined From Email Address powerAtrn@trippito.com Relay Port 25 Relay Password Subject PowerAlert Notification Internet DNS Authentication Method CRM-MSI ✓ DIGEST-MDS ✓ Login ✓ Plan ✓ Feedback This panel enables and configures the Email server settings. Cancel SaveFigure 3-29: SMTP Preferences
Server Name
This defines the email relay server address information used for sending out email messages. If this is blank, email messages can still be sent, but will use a direct connection to the recipients' email server.
If using direct connection, there must be a valid DNS server defined and the DNS server must have a valid entry that points back to the card and is visible from the contacts destination server.
Port
This defines the port of the email relay server. This only is used if the Server Name is also specified. The default is 25.
Authentication Login Name
This is the login to use if authentication is required by the email relay server. It is not used if direct email is being used.
Authentication Password
If authentication is required by the email relay server, this is the password for the authentication login name. If an Authentication Login Name is specified, then the Authentication Password must also be provided.
Digest MD5 Authentication Supported
This indicates if PowerAlert should authenticate with the email relay server using Digest MD5 Authentication.
CRAM MD5 Authentication Supported
This indicates if PowerAlert should authenticate with the email relay server using CRAM MD5 Authentication.
Login Authentication Supported
This indicates if PowerAlert should authenticate with the email relay server using Login Authentication.
Plain Authentication Supported
This indicates if PowerAlert should authenticate with the email relay server using Plain Authentication.
From Address
This is the address that the email will be sent from. The default is poweralert@tripplite.com.
Subject
This is the information to be used as the "Subject" line in the message. The default is "PowerAlert Notification".
Include Triggering Event
This is a flag to indicate if information about the triggering event should be included in the email message if it is available. Values are:
- Yes
Include the data in the email message.
- No
Do not include the data in the email message.
Include Device
This is a flag to indicate if the device that the event occurred on should be included in the email message if it is available. Values are:
- Yes
Include the data in the email message.
• No
Do not include the data in the email message.
Include Host
This is a flag to indicate if the host address for the event that occurred should be included in the email if it is available. Values are:
- Yes
Include the data in the email message.
- No
Do not include the data in the email message.
Include Location
This is a flag to indicate if the device location for the event that occurred should be included in the email if it is available. Values are:
- Yes
Include the data in the email message.
- No
Do not include the data in the email message.
3. Web Console continued
3.8 Preferences continued
3.8.1 Preferences > Network continued
Internet
This menu can be used to monitor and alter IPv4 and IPv6 settings such as the addresses in use and the settings on system restart.
Changes made in this menu will require a system reboot.

text_image
Communications Status Secure connecting established to 2901.08.0.1.58.4K3.4K49.5A6C and logged in as localadmin ? PowerAlert Power Management Software Status Device Configuration Logs Preferences Help Network Security System DEVICES Alarm Status Model Name Type Location ✓ Normal PDUM-ONET PDU NETWORK PREFERENCES INTERNET Changes made on this panel will take effect after the card is installed. Services SMTP Internet P v4 Addresses In Use Method Home Active Address net mask STATIC exit 10.20.6.34 255.224.0.0 P v5 Addresses In Use Method Home Active Address v6 prefix STATIC exit 1 2001 DB8: 1.58.4F43.4B49.5A6C 54 AUTO exit 3 FE89: 200.67FF FE22 D08B 54 AUTO exit 4 2001 DB8: 1.206.67FF FE22 D88B 54 NONE exit 5 : 0 NONE exit 6 : 0 NONE exit 7 : 0 P v4 Settings On Restart Method Gateway Static Address net mask Static: * 10.6.3.1 10.20.6.34 255.224.0.0 P v5 Settings On Restart DHCP Static Static Address v5 prefs ✓ ✓ 2001 DB8: 1.58.4F43.4B49.5A6C 54 Feedback The first 2 grids are read-only summaries of current parameters. Changes made in the other grids will take effect after you restart the card, at which time they will appear in the summary grids. CancelFigure 3-30: Internet Preferences
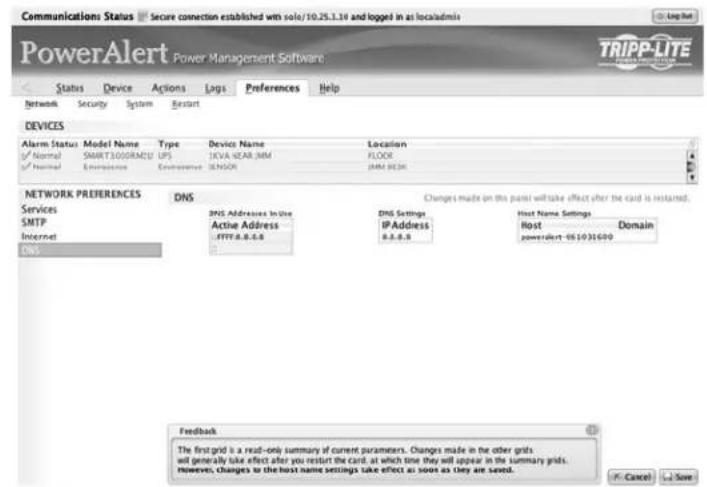
3.8.2 Preferences > DNS
This menu is used to configure information for DNS services. If you are using hostnames instead of IP addresses for ANY communications, you MUST specify a valid DNS server IP address here. Failure to do so will result delayed or missed emails or other alerts, and generally slow performance of SNMPWEBCARD.
text_image
Communications Status Secure connection established with sole/10.25.1.19 and logged in as localadmin PowerAlert Power Management Software TRIPP-LITE Status Device Actions Logs Preferences Help Network Security System Restart DEVICES Alarm Status: Model Name Type Device Name LocationNormal SMART3.05GRCU UPS IKEA NEAR.NIM FLOOR
Normal Environment Environment SENSOR JMM BEACH
NETWORK PREFERENCES DNS Changes made on this panel will take effect after the card is installed. Services DNS Addresses In-line DNS Settings Host Name Settings SMTP Active Address IPAddress Host Domain Internet .STTT-8.8.8 8.8.8.8 poweralert: 061031600 DNS Feedback The first grid is a read-only summary of current parameters. Changes made in the other grids will generally take effect after you restart the card at which time they will appear in the summary grids. however, Changes or the host name settings take effect as soon as they are saved. Cancel <+SaveFigure 3-31: DNS Preferences
DNS Settings In Use
This list shows the DNS servers currently used by SNMPWEBCARD.
DNS Settings
Enter the IP address of the DNS server that will be providing lookup services for SNMPWEBCARD. If you omit this a default publicly-available DNS server will be provided.
Host
Enter the Host name you wish to identify this card by. The default is generated at manufacturing time and need not be changed.
Domain
Enter your domain name or leave blank.
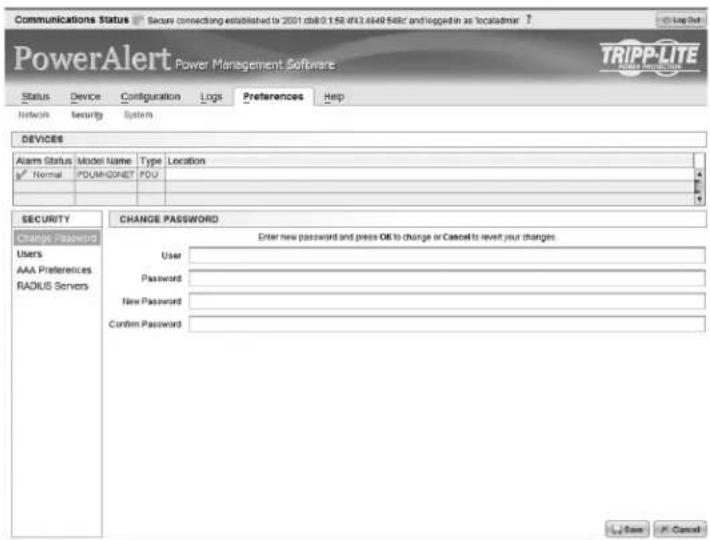
3.8.3 Preferences > Security
This menu is used to define user-supplied Security preferences for individual logins, authentication methods, Radius servers, SSL and more.
Change Password
This menu allows individual users to change their password for security reasons. The user must enter their username, current password, new password and then confirm the new password.
You must press [Save] in order for the changes to take effect.
text_image
Communications Status Secure connecting established to 2001 db#0.158.4f3.6i49.5dfc and logged in as localadmin PowerAlert Power Management Software TRIPP-LITE Status Device Configuration Logs Preferences Help Network Security System DEVICES Alarm Status Model Name Type Location Normal PDUM-ONET PDU SECURITY CHANGE PASSWORD User Password New Password Confirm Password Enter new password and press OK to change or Cancel to revert your changes. Lower Password CancelFigure 3-32: Change Password
3. Web Console continued
3.8 Preferences continued
3.8.3 Preferences > Security continued
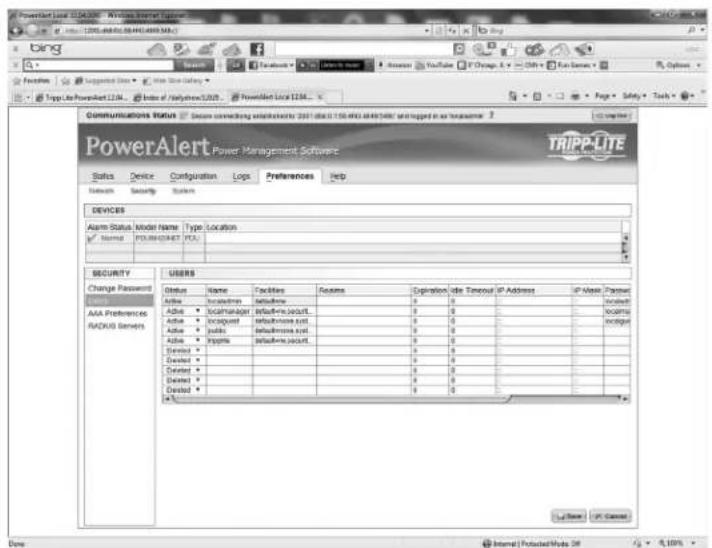
Users
This menu allows for the definition and management of various users allowed to access various aspects of the network. There are a total of 12 available user slots.
text_image
PowerAlert Power Management Software TRIPP-LITE Solds Device Configuration Logs Preferences Help Network Security Tools DEVICES Alarm Status Model Name Type Location ✓ Normal PDLR043487 PCU SECURITY US$99 Change Password Status AAA Preferences RADIUS Servers Status Name Transactions Accounts Operation Date/ Timeout IP Address IP Name Password Active Inpatient Inpatient Active Inpatient Inpatient Active Inpatient Inpatient Active Inpatient Inpatient Active Inpatient Inpatient Center Center Center Center Center A1 Source IP Cancel Date Internet Products Date 24.10%Figure 3-33: User Menu
There are three levels of user access
- Read Only - The user may read the data but make no changes.
- Read/Write - The user may not only read the data but make changes as well.
• None - The user has no access to the data in the facility
There are five pre-defined users on the SNMPWEBCARD:
localadmin
This is the administrator account and has Read/Write access to all program areas. This user cannot be deleted or its facility access permission be modified, but the username and password may be changed from its default settings. The default password is same as the username. This user has SNMPv3 access.
localmanager
This account has default access as Read/Write to all areas except to the security area of the program. The default password is same as the username. This user has SNMPv3 access.
localguest
This account has read-only access to Device Status, Logging and Info areas of the program. The default password is same as the username. This user has SNMPv3 access.
public
This account is not a program user. It is a SNMPv1 Read-Only community
tripplite
This account is not a program user; it is a SNMPv2c Read/Write community. This is the default community string that Tripp Lite's PowerAlert Network Shutdown Agent uses to discover Tripp Lite SNMP devices on the network.
Users 6-12 are not defined.
User Definition Menu Data
The following is the data that is used to define the local users. Not all data applies to all user types and will be identified accordingly.
SNMP Protocol
The SNMP Protocol is the first attribute to be defined for a user since it will need to determine what data items will be populated for the user. The valid values are:
- None
This user does not have any SNMP access.
- SNMP v1
This user is a SNMPv1 community definition. Only access through SNMP is allowed for this user.
- SNMPv2c
This user is a SNMPv2c community definition. Only access through SNMP is allowed for this user.
• SNMPV3
This user has SNMPv3 access as well as access through any of the other view interfaces.
User Name
For users with no SNMP and SNMPv3 access, the username is a string value 8 to 32 characters in length with no spaces.
Community
For SNMPv1 and SNMPv2c users, the community name is a string value 6 to 32 characters in length with no spaces. The only exception to the minimum length rule is the default community name "public." If the public community is deleted, it can be re-added and will not need to follow the 6 character minimum rule.
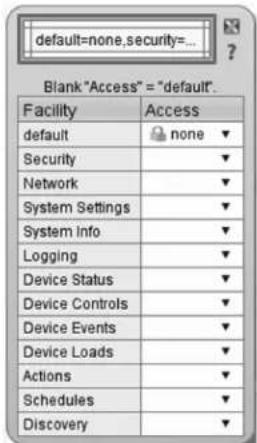
Facility permissions
This defines the access permissions for the user. A pop-up box will be presented to choose the facilities. The facilities are ways of grouping permission for related pieces of data. A user may have access to all or only a subset of the data.
Default- This is used to provide the default access for program access for each user. When adding a new user the default, permissions are set to No Access.
The individual areas listed below override the default setting for that program area.
text_image
default=none,security=... Blank "Access" = "default" Facility Access default none Security Network System Settings System info Logging Device Status Device Controls Device Events Device Loads Actions Schedules DiscoveryFigure 3-34: Permissions
Security- This is the security data such as local user, RADIUS hosts definitions and authentication method. By default, security access is given to only the localadmin user.
Network Settings- This is all the network data.
System Settings- This includes all of the system settings. By default, access is given to localadmin and localmanager.
System Info- Provides Read Only access to the about, help, and system IP address
3. Web Console continued
3.8 Preferences continued
3.8.3 Preferences > Security continued
Logging- This facility allows access to logs and log rotation actions. Log rotation actions will only be available if the user has at least Read Only access to the Contacts facility.
Device Status- The facility provides access to all device variable information. These would include device status variables, personalization variables and threshold variables. By default, the localadmin and localmanager have 'Read/Write' access and localguest has 'Read Only' access. Any user that will have any access to any other device data should have at least 'Read Only' permissions for this facility.
Device Control- This facility configures whether a user has access to device controls. Since this is a subset of devices, it is required that the user has 'Read Only' access to device status to either view or control loads. Configuring this to no access will restrict a user from seeing the controls area of the program.
Device Events- This facility configures whether a user has access to device events. Since this is a subset of devices it is required that the user has 'Read Only' access to the device status and contacts facility to properly view or modify events. Configuring this to No Access will restrict a user from seeing events program area.
Device Loads- This facility configures whether a user has access to device loads. Since this is a subset of devices it is required that the user has "Read Only" access to device status to either view or control loads. Configuring this to No Access will restrict a user from seeing loads.
Actions- This facility is the program area that defines what will happen when an event/alarm is detected. Data used for actions is also included in this facility. This includes Email Recipients, SNMP Destinations and HTTP Contacts.
Schedules- To allow a user to add scheduled tasks requires that the user have Read/Write access to the device controls facilities.
Discovery- This facility is the program area that allows execution of a device discovery. This program area is most commonly used for detecting an Enviro sense temp/humidity probe that has been connected to the SNMPWEBCARD after initial startup.
Any changes applied to a user or multiple users must be confirmed by pressing the [Save] button at the bottom of the page.
Facility Choice Examples
Administrative Permissions
The permissions for a user with administrator level clearance should have access to all of the data in the system. The only facility permission needed would be Default facility with Read/Write access. These are the permissions given to the “localadmin” user created upon initial startup.
Manager Permissions
The permissions for a user with manager level clearance should have access to all of the data except for the security related data. The permissions set for this should be Default facility with Read/Write access and Security facility with no access. These are the permissions given to the “localmanager” user created upon initial startup.
Guest Permissions
The permissions for a user with guest level permissions should be very limited. This type of user would only have read only access to Status and very basic system level information. The facility settings for this type of user would be:
- Default Facility – No Access
- Info Facility – Read Only
- Logging Facility – Read Only
• Device Status Facility – Read Only
These are the permissions given to the “localguest” user created upon initial startup.
Limited Outlet Access Permissions
A user may be given permission to read limited data and to be given update access to control only a subset of the outlets. The facility settings to give that kind of access would be the following permissions:
- Default Facility – No Access
• Device Status Facility – Read Only
• Device Loads Facility – Read Only
In addition to these facility settings, the user would need to assign a set of outlet realms to specify the loads the user may control.
Outlet Realms
This is a comma-separated list of integers, or range of integers, indicating which outlet realms this user may access. The access level to the realms indicated is Read/Write. Each load may optionally be assigned to a realm. Whatever loads belong to the realms indicated here, the user may access. In order to correctly access the data, a user should have at least Read Only permission for Device Status and Device Loads to be able to user the realms.
ACL IP Address (Users with SNMP Access Only)
This defines the IP Address (or Addresses when used with the ACL IP Mask) from which this user may access the data via SNMP.
3. Web Console continued
3.8 Preferences continued
3.8.3 Preferences > Security continued
ACL IP Mask (Users with SNMP Access Only)
This defines the Subnet Mask to use with the ACL IP Address to determine if an address is one from which the user is allowed to access the data via SNMP.
192.168.1.1 (single) 255.255.255.255
192.168.1.0 (range) 255.255.255.0
192.168.0.0 255.255.0.0
192.0.0.0 255.0.0.0
* (everyone) □.□.□.□
Password (N/A for SNMPv1 or SNMPv2c)
This is the user password for logging in. For SNMPv3 users, this is also the Priv Password.
Auth Password (N/A for SNMPv1 or SNMPv2c)
For SNMPv3 Users only, this is the Auth Password.
Idle Timeout in Minutes (N/A for SNMPv1 or SNMPv2c)
This applies to data access other than SNMP which does not use the concept of a logged in session. This is the amount of time that the session can be idle before it will time out and no longer have access to the data. When the value is 0, an idle session will not time out.
Session Expiration Minutes (N/A for SNMPv1 or SNMPv2c)
This applies to data access other than SNMP which does not use the concept of a logged in session. This is the amount of total time that a session may last whether or not the session is idle or active. When the value is 0, the session will not expire.
AAA Preferences
Authorization Scheme
The authorization scheme defines how user authentication will be done. The authorization can be done with locally defined users only, RADIUS server defined users only or a combination of the two. The valid values are:
- Local Only
The system only uses locally defined user definitions.
- RADIUS Only
The system uses RADIUS only for authentication.
- Local Then RADIUS
The system uses locally defined user definitions first.
If the user data is not found, it uses RADIUS for authentication.
- RADIUS Then Local
The system uses RADIUS for authentication first, if not authorized via the RADIUS server, the locally defined users will be used for authentication.

text_image
Communications Status Connectable: 10.153.117 and logged in as transaction: PowerAlert Power Management Software Status Device Configuration Logs Preferences Help Network Security System DEVICES Alarm Status Mode Name Type Location Normal SEV472208964L2U/UPS SECURITY PREFERENCES AAA PREFERENCES Change Password Users Authorization Scheme Accounting Scheme Use local authentication, authentication or accounting only Use local authentication, authentication or accounting only. Add Preferences RADIUS Servers Lower OK CancelFigure 3-35: AAA Preferences
Accounting Scheme
This defines where the user session accounting data will be recorded. Like the authorization, the data can be recorded locally or on the RADIUS server or a combination of the two. The valid values are:
- Local Only
Use only the local system to record the session accounting data.
- RADIUS Only
Uses only the RADIUS servers defined to record the session accounting data.
- Local Then RADIUS
Try to record the session accounting data locally and if not able to, then try to record to RADIUS.
- RADIUS Then Local
Try to record the session accounting data on RADIUS first and if fails, then record locally.
RADIUS Servers
Address
This defines the internet address of the RADIUS server.
Priority
This is a number that defines the priority of this RADIUS server
Shared Secret
This is the shared secret value to be used with this RADIUS server.
Authentication Port
This defines the port on the server to be used for authentication.
Accounting Port
This defines the port on the server to be used for accounting.
3. Web Console continued
3.8 Preferences continued
3.8.4 Preferences > System
This menu allows you to view and modify preferences throughout the system, including:
Accounting Logging
text_image
Communications Status Cerebuities 15.110.12 and lognormal installants PowerAlert Power Management Software Status Grave Configuration Logs Preferences Help Network Security System DEVICES Alarm Status Model name Type: Location Normal SERITIZATION.LWS SYSTEM PREFERENCES ACCOUNTING LOGS PREFERENCES Application Logging Data Logging Event Logging Remote Sylog Data & Time Watchdog Miscellaneous Maximum Size 24bit Response Address Format Protocol Contact - - - - - - - - - - - - - - - - - - - - - - - - - - - - - - - - - - - - - - - - - - - - - - - - - - - - - - - - - - - - - - - - - - - - - - - - - - - - - - - - - - - - - - - - - - - - - - - - + -Figure 3-36: Accounting Logging
Application Logging
text_image
Communications Status Connected to "10.11.3.11F" and logged in as 'localadmin 7 PowerAlert Power Management Software Status Device Configuration Logs Preferences Help Network Security System DEVICES Alarm Status Model Name Type Location ✓ Normal BUSTOPSTC-2.1M EPS ✓ Normal Dismissense Indisense SYSTEM PREFERENCES APPLICATION LOGGING PREFERENCES Accounting Logging Accounting Windows Data Logging Event Logging Remote Syslog Date & Time Watchdog Miscellaneous Console Log Severity File Log Severity Local System Log Severity Maximum Size info disabled disabled 131672 Solution Actions Format Protocol Contact ControlFigure 3-37: Application Logging
Data Logging
text_image
Communications Status: CP Convebrates 10.11.117 and ### in a0 lacaster 7 PowerAlert Power Management Software TRIPP-LITE Status Device Configuration Logo Preferences Help Network Security System DEVICES Alert Status Model Name Type Location #* Name Design/Analysis Status SYSTEM PREFERENCES DATA LOGGING PREFERENCES Accounting Logging Application Logging Event Logging Event Logging Event Logging Date & Time Watchdog Miscellaneous Maximum Base 2nd Default Logging Format/Profession Contact Feedback Saving Changes OK CancelFigure 3-38: Data Logging
Event Logging
text_image
Communications Status Connects 10.11.9.112 and loggate as local server PowerAlert Power Management Software Status Devices Configuration Logs Preferences MSD Network Security System DEVICES Alarm State Model Name Type Location ✓ Design Install/Control User SYSTEM PREFERENCES EVENT LOGGING PREFERENCES Accounting Logging Application Logging Data Logging Sample Syring Data & Time Mockdog Miscellaneous Maximum Data Local Action Format: Printset Contact Maximum Data Maximum Data Maximum Data Maximum Data Maximum Data Maximum Data Maximum Data Maximum Data Maximum Data Maximum Data Maximum Data Maximum Data Maximum Data Maximum Data Maximum Data Maximum Data Maximum Data Maximum Data Maximum Data Maximum Data Maximum Data Maximum Data Maximum Data Maximum Data Maximum Data Maximum Data Maximum Data Maximum Data Maximum Data Maximum Data Maximum Data Maximum Data Maximum Data Maximum DataFigure 3-39: Event Logging
The Accounting, Data and Event log settings allow you to define the number of records to be stored and persisted across a reboot of the SNMPWEBCARD. Once the maximum number of records is reached, the data is cleared; however, logs can be either emailed or posted to an HTTP or HTTPS server when the log rotates (clears) so that an ongoing history of data can be kept.
The maximum number of entries that can be in the log before it is rotated is 2048. The valid values are integers between 64 and 2048. The default is 2048.
The action to take when the log is rotated can be specifically defined via the menus. The log data may be archived to a single destination using email or HTTP.
3. Web Console continued
3.8 Preferences continued
3.8.4 Preferences > System continued
Remote Syslog
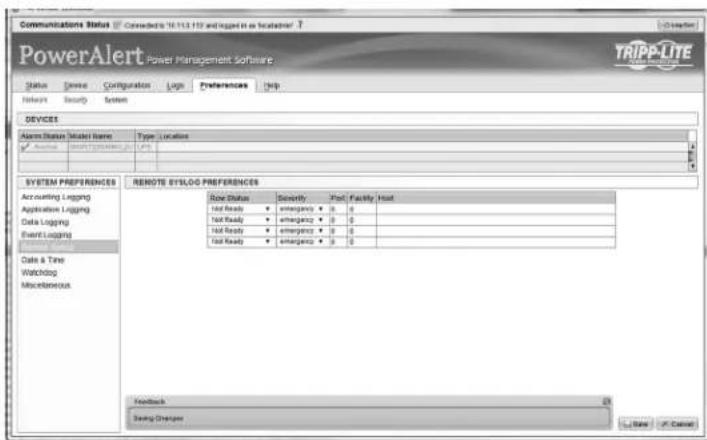
text_image
Communications Status Corrected's 16.113.112 and logged in as location? PowerAlert Power Management Software Status Device Configuration Logs Preferences Help Network Security System DEVICES Alarm Status Model Name Type Location ✓ Active NOT FOR WORKING OK SYSTEM PREFERENCES Accounting Logging Application Logging Data Logging Event Logging Monitoring Date & Time Watchdog Miscellaneous REMOTE EYSLOG PREFERENCES Base Status Severity Port Facility Host Not Ready ▼ emergency ▼ 0 Not Ready ▼ emergency ▼ 0 Not Ready ▼ emergency ▼ 0 Not Ready ▼ emergency ▼ 0 Feedback Switch Changes Start ✓ CancelFigure 3-40: Remote Syslog
Date and Time
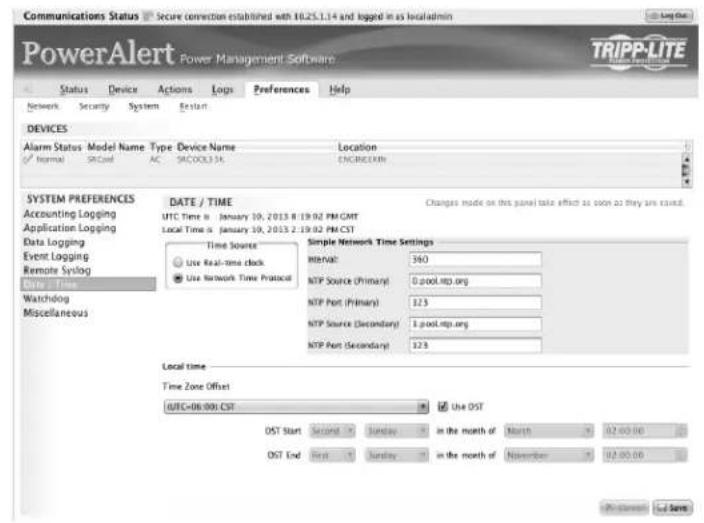
text_image
Communications Status Secure connection established with 10.25.1.14 and logged in as localadmin PowerAlert Power Management Software TRIPP-LITE Status Device Actions Logs Preferences Help Network Security System Restart DEVICES Alarm Status Model Name Type Device Name Location Normal SICool AC SICOL3 SK ENGINEERN SYSTEM PREFERENCES DATE / TIME Changes mode on this panel take effect as soon as they are saved. Accounting Logging UTC Time in January 10, 2013 8:19:02 PM GMT Application Logging Local Time in January 10, 2013 2:19:02 PM CST Data Logging Time Source Simple Network Time Settings Use Real-time clock HKEY: 360 Use Network Time Protocol NTP Source (Primary) 0.pool.mtp.org NTP Port (Primary) 123 NTP Source (Secondary) 1.pool.mtp.org NTP Port (Secondary) 123 Local time Time Zone Offset Use OST UTC=08:00: CST DST Start Second Sunday in the month of March 32:00:00 DST End First Sunday in the month of November 32:00:00 Palestine < Back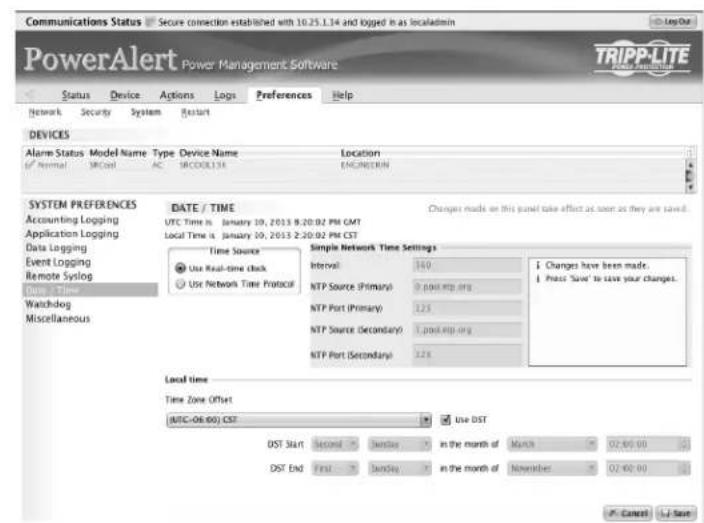
text_image
Communications Status Secure connection established with 10.25.1.14 and logged in as localadmin PowerAlert Power Management Software Status Device Actions Logs Preferences Help Network Security System Restart DEVICES Alarm Status Model Name Type Device Name Location (7 Normal) MCOat AC MCOOL13X ENGINEERIN SYSTEM PREFERENCES DATE / TIME Changes made on this panel take effect as soon as they are saved. Accounting Logging UTC Time is January 10, 2013 8:20:02 PM GMT Application Logging Local Time is January 10, 2013 2:20:02 PM CST Data Logging Simple Network Time Settings Event Logging Use Real-time clock Interval 160 Remote Syslog Use Network Time Protocol NTP Source (Primary) 9 post.mcp.org Watchdog NTP Port (Primary) 1.25 Miscellaneous NTP Source (Secondary) 1 post.mcp.org NTP Port (Secondary) 1.25 Local time Time Zone Offset (MTC-06.60) CST Use DST DST Start Second Sunday in the month of March 02:00:00 DST End First Sunday in the month of November 02:00:00 Previous Save Changes have been made. Press 'Save' to save your changes.Figure 3-41: Date and Time
The SNMPWEBCARD supports a date and time configuration via Simple Network Time Protocol (SNTP) or the on-board Real-Time Clock (RTC). Both the SNTP and RTC time are able to utilize the local time configuration. Refer to Section 4.2.4.2 Time Settings for additional details on local time configuration.
Changes on the Date and Time menus require a restart to take effect. Please use the Preferences > Restart menu if you are not prompted to restart after making changes. Refer to the Telnet or SSH Menu interface if you experience any issues configuring date and time.
Watchdog
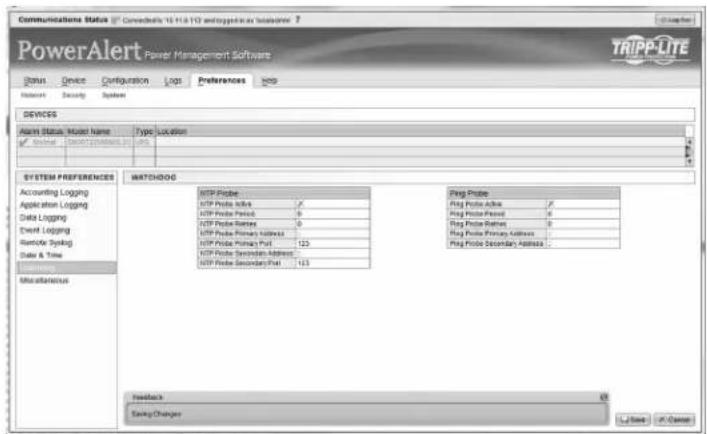
text_image
Communications Status (C) Conneeds 16 H-10 AND gatepath or location: 7 PowerAlert Power Management Software TRIPP-LITE Status Device Configuration Logs Preferences Help Network Security System DEVICES Alarm Status Model Name Type Location ✓ Normal Desimpositions in info SYSTEM PREFERENCES WATCHDOG Accounting Logging Application Logging Data Logging Event Logging Remote Syslog Data & Time Monitoring Miscellaneous TCP Provider TCP Provider Active ✓ TCP Provider Period 0 TCP Provider Retired 0 TCP Provider Primary Address TCP Provider Primary Part 125 TCP Provider Secondary Address TCP Provider Secondary Part 123 Prog Provider Prog Provider Active ✓ Prog Provider Period 0 Prog Provider Retired 0 Prog Provider Primary Address Prog Provider Secondary Address Feedback Saving Changes Last New On ChangeFigure 3-42: Watchdog
The Watchdog settings provide the user with the ability to set up timers that will reboot the card automatically if the Watchdog trigger is reached. This provides a mechanism to maximize the uptime/accessibility of the SNMPWEBCARD. The Watchdog tab allows enabling/disabling of either the Ping probe or NTP probe.
Primary Ping Target: Address/hostname (requires DNS settings to be configured).
Secondary Ping Target: Address/hostname (requires DNS settings to be configured) (optional).
Ping Probe Interval: Time in minutes before retry.
Probe Tries Before Fail: The number of attempts to ping the primary and secondary IP addresses before the SNMPWEBCARD assumes there is a problem and reboots itself.
The SNMPWEBCARD will continue to reboot until it is successfully able to ping the primary or secondary IP address.
Primary NTP Target: Address/hostname (requires DNS settings to be configured).
Secondary NTP Target: Address/hostname (requires DNS settings to be configured) (optional).
NTP Probe Interval: Time in minutes before retry.
Probe Tries Before Fail: The number of attempts to get time from the primary and secondary NTP addresses before the SNMPWEBCARD assumes there is a problem and reboots itself.
3. Web Console continued
3.8 Preferences continued
3.8.4 Preferences > System continued
Miscellaneous
text_image
Communications Status Connecticut 10.10.8.112 and logged in all operators PowerAlert Power Management Software Status Device Configuration Logs Preferences Help Network Security System DEVICES Name Status Model Name Type Location ✓ Available < img src="box12345232123452321234523212345232123452321234523212345232123452321234523212345232123452321234523212345232123 SYSTEM PREFERENCES MISCELLANEOUS Accounting Logging Application Logging Data Logging Event Logging Remote Logging Date & Time Working Functional Setting Changes AutoAce Send to OK CancelFigure 3-43: Miscellaneous
The Auto Ack setting allows for alarms that clear to be automatically removed from the Status-Alarms page. This is enabled by default. Disabling this feature will require that the alarms be manually acknowledged on the Status-Alarms page. This setting must be enabled if utilizing the PowerAlert Network Shutdown Agent.
3.8.5 Preferences > Restart
The restart menu provides the user with an interface to restart the SNMPWEBCARD.
If there has been a setting that requires a system restart, the message "Changes have been made that require a restart to take effect" will be displayed on this menu. This message can only be cleared with a restart. Changing the settings back to their original values cannot clear this condition.
A user can reset their PowerAlert (and SNMPWEBCARD) configuration back to the factory defaults using this menu.
Press [Execute] at the bottom of the page in order for the restart to take place.
Resets affect the following settings:
Factory Reset Settings
Reset all settings to the original factory defaults except for the SNMPWEBCARD network settings. Resetting those settings would potentially disable desired connections to the system. If necessary, the SNMPWEBCARD network settings can be reset by clearing the Advanced Settings following a factory reset using the serial CLI boot dialog, which is accessible as described in the SNMPWEBCARD Installation Manual.
The changes made for this request are:
- Reset NVRAM to hard-coded defaults, resets everything except
o - IPv4 choice of DHCP or Static
- IPv4 saved static Address, IPv4 Subnet Mask, IPv4 Gateway
- IPv6 DHCPv6 Enable / Disable setting
- IPv6 Static Enable / Disable setting
- IPv6 saved Static Address & Prefix Length
-
User-configured DNS server.
-
Erase the user configuration and system log database
- Reset the Root password back to TrippLite
Reset the default user settings, including clearing any RADIUS settings. The following are cleared by this option: - Authorization Settings for authorization and accounting both reset to LOCAL ONLY
- Removes all RADIUS Server definitions
- Resets the local users to the 5 default users, localadmin, localmanager, localguest, tripplite, and public
- Reset the Root password back to TrippLite
Reset Users
text_image
Communications Status Secure connection established with 10.4.0.88 and logged in as locale PowerAlert Power Management Software Status Device Actions Logs Preferences Help Network Security System Console Time Data Restart DEVICES Alarm Status Model Name Type Device Name Location Name SUSTOSORTELLUX UPS Device 1 RESTART Changes ready on this panel will take effect after the card is installed. Factory Reset Reset Users Restart X X XFigure 3-44: Reset Users
3.9 RSS Support
Dynamic logs are available via RSS feed when web interfaces are enabled. They are available at http(s)://
datalog.txt
datalog.csv
datalog.xml
eventlog.txt
eventlog.csv
eventlog.xml
The format of the log file is indicated in the last 3 characters of the address.
3. Web Console continued
3.10 Help
text_image
Communications Status Secure connection established with 10.25.1.14 and logged in as localadmin PowerAlert Power Management Software TRIPP-LITE Status Device Actions Logs Preferences Help About PowerAlert Console DEVICES Alarms Status Model Name Type Device Name Location Normal SRCod AC SRC00L33K ENGINEERN ABOUT POWERALERT CONSOLE Operating System NetOS 7.5.2f Flash: 167772168 sdram: 33554432B processor: N592108-0-075 Copy to clathboard Agent Type PAL NetOS 7 MAC Address 00:06.67:22.2C.CF Serial Number 9912AYBAC732600321 PowerAlert Console Version 12.06.0062, built on Jan 10, 2013 01:53:00 PM PowerAlert Driver Version 12.06.0711 PowerAlert Engine Version 12.006.062.0947.0942 Driver File Status Normal Java Version: 1.6.0_37 This PowerAlert Console requires a PowerAlert Engine version 12.06.0062 or later. PowerAlert is Copyright (C) 1995 - 2012 by Trippe Manufacturing, Inc. All rights reserved. Read the documentation Open the Trippe support pageFigure 3-45: Help Menu
4. Telnet/SSH Console
Most of the monitoring and control features available in the Web console (see Section 3 – Web Console) are also available in the telnet and/or SSH console. Accessing the SNMPWEBCARD through the telnet console is ideal for mobile or resource-limited platforms.
Configuring Energywise
If you intend to use the SNMPWEBCARD's Energywise facility, refer to the Energywise instruction manual for details on how to configure this interface. This manual is included in the documentation package for the SNMPWEBCARD.
Accessing the Telnet Console
Open a telnet client and connect to the IP number of the SNMPWEBCARD. At the login prompt, enter a valid user name and password. (A valid user is any user defined locally via RADIUS server. Users defined as SNMP communities with SNMP version V1 or V2 will not be allowed telnet access.) After a successful login, you'll see the telnet console's main menu (Figure 4-1).
The Telnet Console Interface
The telnet console uses a menu-driven, text-based interface. It has most of the same menus and submenus as the Web console, but they are arranged differently.
text_image
Telnet 172.16.3.100 PowerAlert TelNet Console: 12.04.0040 Serial Number: login: admin Password: ****** Tripp Lite PowerAlert 12.04.0040 (c) Copyright 2005.2006 All Rights Reserved No Active Alarms Main Menu 1- Devices 2- Contacts 3- Network 4- System X- LogoutFigure 4-1: Telnet Console Main Menu
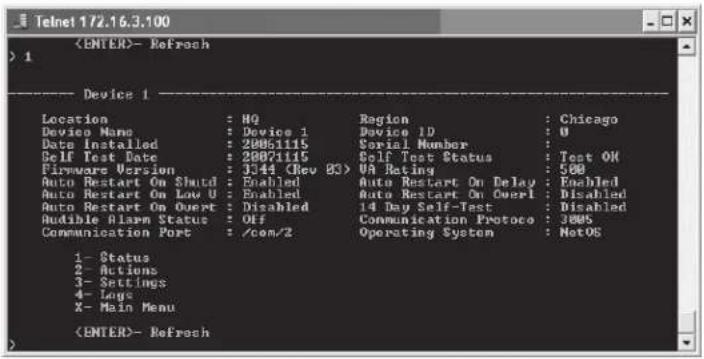
text_image
Figure 4-2: Telnet Console Device Submenu
Each menu can be thought of as one of four types: navigation, summary, detail and data collection.
Navigation Menus
Navigational Menus allow a user to choose a path down the menu structure. Any data presented on these navigational menus are for information only and will require continuing down into a submenu to make any modifications.
Summary Menus
Data items that can have multiple instances will also have a summary menu. For example, the Email Recipients will have a summary menu. The summary will display a row for each member with a subset of the data for that object.
From the summary, a user may enter an ID number from the list to view/modify the detail menu for that item. If insert is allowed for the data, the user will be presented with the option to enter '0' as well. When '0' is chosen, the user is then automatically prompted to enter the individual detail menu items. Once all items have been entered, the user will be prompted to save the information, view the information, or abort the insert.
Detail Menus
The detail menus display the information about a collection of related individual data items. An example of a detail menu would the menu for a single Email Recipient. From the detail menu, a user will be given the option to choose to modify the individual data items. When allowed, deletes will be done from the detail menus.
Some detail menus will immediately update the data as entered and others will collect all the data changes and require the user to explicitly save the data in one operation. Those that require an explicit save will present an 'A' option to apply the changes. If a user has pending changes and attempts to leave the menu, an indication that the changes have not been saved will be presented and give the user the option to save or abort the changes.
Data Collection Menus
Data collection menus allow a user to enter values for an individual data item. For example, the menu to update an Email Recipient's email address would be a data collection menu. These menus do not have any submenus.
Menu Permissions
The menu descriptions in this documentation will assume that the user has Read/Write permissions to all of the data. Not all users will have this level of authorization.
The data displayed and the options presented to a given user will be dependent upon that user's permissions. A user will only be presented with data and options to the data that he or she is allowed to access. A more detailed discussion of user permissions can be found in the discussion on Local User definitions later in the document.
Note: The menu examples were generated using one specific device model. Because the content of many of the device specific menus will vary based upon the device and protocol, these are simply examples to give an idea of the type of data displayed here and how it is formatted. The contents of these menus should not necessarily be expected to be displayed unless it is explicitly stated that the setting apply for all device types.
4. Telnet/SSH Console continued
Menus
Main Menu
The main menu is the starting menu when a user accesses the Telnet interface. It contains the entry point for all of the pieces of the system data. All other menus are accessible from the main menu.
To help keep the user informed about active alarms, the current list of active alarms is always displayed as part of the main menu.
Tripp Lite (c) Copyright 2005-2012
PowerAlert 12.06.0062 All Rights Reserved
ALARMS
No active alarms present
Main Menu
1- Devices
2- System Configuration
3- Network Configuration
4- Alarms and Logging
5- About
6- Logout
<ENTER> Refresh Menu
4.1 Device Menu
If there is more than one device, the first menu displayed for "Device" is a choice of which device's data you would like to present. The data on all of descendant menus will refer to the device chosen. If there is only one device, this choice is skipped and all descendant menus will obviously apply to the sole device.
In order to access the device menu structure the user must have at least read permission for the DEVICE STATUS facility. Any additional permissions needed in the submenus of this structure will be indicated for that menu.
Device List Menu
Device List
1- Device 1 (SMART75ORM1U)
2- Probe (Envirosense)
X/M- Return to Main Menu
<ENTER> Refresh Menu
Device Main Menu
Device 1
Device Name : Device 1
Location : Region :
Vendor : TRIPPLITE Product : SMART750RM1U
Protocol : 3003 Date Installed : 2011-07-31
State : CRITICAL Type : UPS
Port Mode : RS232 Port Name : /com/1
Firmware Version : 2264 (Rev A) Serial Number :
Device ID : 1280 Self Test Date :
Self Test Status : Done and Pass

1- Status
2- Identification
3- Controls
4- Events
5- Loads
6- Preferences and Thresholds
7- Device Alarms
8- Logs
X- Device List Menu
M- Return to Main Menu
<ENTER> Refresh Menu
4. Telnet/SSH Console continued
4.1 Device Menu continued
4.1.1 Status
This menu displays the status variables for the device. The values in this menu are not editable. The exact data shown on this menu will be device dependent.
Device Status Menu
Device
======
Self Test Date : 2011-12-08
Self Test Status : Bad Battery - Replace

Battery
======
Battery Charge Remaining : 100 %
Battery Voltage : 27.4 V
Battery Temperature (C) : 33.9 C
Battery Temperature (F) : 93.0 F
Nominal Battery Voltage : 24 V
Battery Age : 0.0 Years
Battery Voltage Condition : OK

Input
======
Input Frequency : 59.9 Hz
Input Voltage : 0.0 V
Device Mode : Utility System
Nominal Input Voltage : 0 V
Tap State : Normal
Minimum Input : Voltage : 0.0 V
Maximum Input Voltage : 0.0 V
Nominal Input Frequency : 60 Hz

Output
======
Output Source : Normal
Output Load : 0 %
Load State :

X- Device Main Menu
M- Return to Main Menu
<ENTER> Refresh Menu
4. Telnet/SSH Console continued
4.1 Device Menu continued
4.1.2 Identification
This is the section of the device menus that will contain the information about the device. This information will be both user-defined settings such as device name or location and equipment specific information like vendor, product and protocol. There are data items on this menu which will be displayed for all devices and some data displayed based upon the type and protocol for the device. Any data that is modifiable by the user will have a prompt option displayed on the menu.
Device Identification Menu
---- Identification ----
Device Name : Device 1
Location :
Region :
Vendor : TRIPPLITE
Product : SMART75ORM1U
Protocol : 3003
Date Installed : 2011-07-31
State : CRITICAL
Type : UPS
Port Mode : RS232
Port Name : /com/1
VA Rating : 750 VA
Firmware Version : 2264 (Rev A)
Input Line Count : 1
Load Banks Total : 3
Load Banks Controllable : 2
Serial Number :
Device ID : 1280
1- Name
2- Location
3- Region
4- Date Installed
5- Serial Number
6- Device ID
X- Device Main Menu
M- Return to Main Menu
Menu Data
The following is the data that should be displayed for all devices.
Device Name
This is the user modifiable device name. The system will give the device a default name. The default for a UPS or PDU is "Device X" where X is the device ID number. The default for an ENVIROSENSE is "Probe." The default for SRCOOLNET is "AC."
Location
The user-defined device location. There is no default for location.
Region
The user-defined device region. There is no default for region.
Vendor
This is the manufacturer of the device.
Product
This is the device model.
Protocol
This is the protocol used by the device.
Date Installed
This is the date that the device was installed. For a UPS, this will be used for the battery installed date and is therefore modifiable.
State
This is the current alarm state of the device. The valid values are:
NORMAL
INFORMATION
- WARNING
- STATUS
• CRITICAL
- OFFLINE
Type
This is the device type. The valid values are:
- UPS
- PDU
• ENVIROSENSE
• AC
4. Telnet/SSH Console continued
4.1 Device Menu continued
4.1.2 Identification continued
Port Mode
This is the connection mode of this device. The valid values are:
RS232
- USB
- HID
Port Name
Name of the port this device is on.
4.1.3 Controls
This section of the menu is used to present the controls that are available for the device. When a control is chosen and it does not have any control data associated, the user will be prompted for verification that they really wish to execute the control. Upon verification, the control will be executed. If the control does have control data parameters associated with it, then that data will be presented when the control is chosen.
Note: To access the controls menu, the user must also have at least Read permission for the DEVICE STATUS and DEVICE CONTROLS facilities.
Device Controls Menu
Device Controls
1 Set Unit ID
2 Reboot SNMP Card
3 Shut Down Device
4 Reboot Device
5 Immediate Device Reboot
6 Initiate Self Test
7 Disable Watchdog
8 Enable Watchdog
X- Device Main Menu
M- Main Menu
4. Telnet/SSH Console continued
4.1 Device Menu continued
4.1.3.1 Control Data
This menu displays the list of data items associated with the control. The options from this menu are to choose the number associated with the data item or to execute ("E") the control. If "E" is chosen, the user will be prompted to verify that they wish to execute the control. If verified, the control is executed. If they choose one of the data items, they will be prompted to enter the new value.
---- Control Data ----
DESCRIPTION VALUE TYPE MIN MAX
Delay before reboot (seconds) 15 Integer 1 65535
Delay before restarting UPS (seconds) 60 Integer 10 16777215
1- Delay before reboot (seconds)
2- Delay before restarting UPS (seconds)
E- Execute
X- Device Control Menu
M- Return to Main Menu
<ENTER> Refresh Menu
Example of choice '1' for above example
Description : Delay before reboot (seconds)
Value : 15
Enter Integer between 1 and 65535
X- Leave value unchanged
M- Return to Main Menu
Example of choice 'E' for above example
Do you wish to execute this control?
Y- Yes, continue and perform operation
N- Do Not Make Change
4. Telnet/SSH Console continued
4.1 Device Menu continued
4.1.4 Events
Events
To access the events menu, the user must have at least Read access to the DEVICE EVENTS, ACTIONS and CONTACTS facilities in addition to the DEVICE STATUS facility.
Events Summary Menu
| Device Events Menu | |||
| # | CATEGORY | DESCRIPTION | ENABLED | |||
| 1 | WARNING | Load Level Above Threshold | Yes |
| 2 | CRITICAL | General Fault | Yes |
| 3 | WARNING | On Battery | Yes |
| 4 | CRITICAL | Output Source On Bypass | Yes |
| 5 | CRITICAL | Battery Bad | Yes |
| 6 | CRITICAL | Battery Low | Yes |
| 7 | CRITICAL | Overload | Yes |
| 8 | WARNING | Temperature High | Yes |
| 9 | WARNING | Battery Capacity Below Warning | Yes |
| 10 | CRITICAL | Output Off | Yes |
| 11 | WARNING | Self Test Failed | Yes |
| 12 | INFORMATION | Battery Age Above Threshold | Yes |
| 13 | OFFLINE | Communications Lost | Yes |
| 14 | WARNING | Loads Not All On | Yes |
| 15 | WARNING | Load 1 Off | Yes |
| 16 | WARNING | Load 2 Off | Yes |
Event Details Menu
| Device Event Menu | |
| Event Set Name : Load Level Above Threshold | |
| Event Clear Name : Load Level Below Threshold | |
| Event Category : WARNING | |
| Event Enabled : Yes | |
| Event Logging : On | |
| Set Action | Clear Action |
| Default Contact Notificat Default Contact Notificat | |
| Default Trap Notification Default Trap Notification | |
| Email to Admin Email to Admin | |
| 1- Manage Actions | |
| 2- Modify Event Category | |
| 3- Disable Event | |
| 4- Disable Logging for Event | |
| X- Device Events Menu | |
| M- Return to Main Menu | |
4. Telnet/SSH Console continued
4.1 Device Menu continued
4.1.4 Events
Menu Data
Event Category
This specifies the severity level for the event. The user may choose to give different events different severity levels. The valid values for category are:
• CRITICAL
- WARNING
• INFORMATION
Enable/Disable Event
This allows the user to no longer consider the event an alarm event. Disabling it causes the event to no longer create an alarm, and the assigned actions will no longer fire when this event occurs. The default is for all events to be enabled.
Enable/Disable Logging
The user may enable and disable logging for the event. The default is that all events are logged.
Device Event Actions
This will display all of the actions to occur when this event occurs and subsequently clears. The user will also be allowed to add new actions from this menu.
Device Event Actions Summary Menu
Device Event Actions
<h1 id="set-action-clear-action">Set Action    Clear Action</h1>
1 Default Contact Notificat    Default Contact Notificat
2 Default Trap Notification    Default Trap Notification
3 Email to Admin    Email to Admin
#- Modify Event Set/Clear Actions
O- Add new Event Set/Clear Actions
X- Device Events
M- Return to Main Menu
<ENTER> Refresh Menu
Device Event Action Detail Menu
Device Event Action Menu
Event : Load Level Above Threshold
Event Clear : Load Level Below Threshold
Event Action : Default Contact Notification
Event Clear Action : Default Contact Notification
1- Choose Set Action
2- Choose Clear Action
3- Choose Action For Both Set and Clear
A- Apply Changes
D- Delete the Event Action
X- Device Event Menu
M- Return to Main Menu
<ENTER> Refresh Menu
4. Telnet/SSH Console continued
4.1 Device Menu continued
4.1.4 Events
Menu Data
Event
This is the label of the event to which actions will be assigned. This is a display only value.
Event Clear
This is the clear label of the event to which the actions are being assigned. This is a display only value.
Event Action
This is also called the set action. It is the action to be taken when this event occurs.
Event Clear Action
This is the action to be taken when this event clears.
Options
- Choose Set Action
This allows the user to choose the set action and then be prompted to choose the clear action. - Choose Clear Action
This choice allows the user to choose the clear action and then be prompted to choose the set action. - Choose Action for Both Set and Clear
This option allows the user to choose a single action to be used for both the set and the clear actions.
For all of the above choices, if there are no actions that match the action that the user would like to assign, the user will be allowed to create a new action from this menu. For more information on the action menus please refer to that section.
4. Telnet/SSH Console continued
4.1 Device Menu continued
4.1.5 Loads
To access the load menus, the user must have at least Read access to the DEVICE LOADS and DEVICE STATUS facilities. Additionally, a user may be able to update Loads options by accessing outlet realms.
You can control the outlets of a managed device by selecting the load plugged into it and clicking the desired [On], [Off] or [Cycle] control. Each load bank consists of one or more outlets.
You can use the "Description" field to label the banks for easy reference. The main control buttons affect all outlets at once.
Warning! The load controls start or stop the flow of electricity to your device's outlets. Make sure you know what equipment is connected to each load bank before attempting to use these controls! Check the outlet labels and/or test the load banks by plugging a circuit tester or small light into each outlet and observing the effects of the controls.
4.1.5.1 Load Configuration
Menu Data
Edit Description
Use this menu to enter custom labels for load banks. This can be used to help identify equipment quickly and easily before using the controls to cycle the bank ON or OFF.
Change Realm
Assigning a realm to an individual outlet or group of outlets creates a logical grouping that can be used to assign user access.
Turn Load On/Off
This menu controls the state of the outlet.
Cycle Load
This command can be used to turn the load OFF and back ON in a single command.
Load Group:
Ramp Settings
Action: Turn On After Delay
Delay: 2
Shed Settings
Action: Turn Off After Delay
Delay: 3
1- Edit Description
2- Change Realm
3- Turn Load Off
4- Cycle Load
5- Change Ramp Action
6- Change Ramp Delay
7- Change Shed Action
8- Change Shed Delay
X- Load Menu
M- Return to Main Menu
<ENTER> Refresh Menu
>> x
--------Loads Menu
Change Ramp Action
Select if the outlet should stay OFF or turn ON when ramp actions are triggered.
Change Ramp Delay
If setting the ramp action to turn ON, this command sets the delay before the action occurs.
Change Shed Action
Select if the outlet should stay ON or turn OFF when shed actions are triggered.
Change Shed Delay
If setting the shed action to turn OFF, this command sets the delay before the action to occur.
4. Telnet/SSH Console continued
4.1 Device Menu continued
4.1.5.2 Load Groups
The Load Groups menu is not available for all devices. Devices that support loads groups must have 2 or more loads and provide a mechanism for updating multiple loads with a single command. If the device does not support load groups, then this menu will not be available.
Load Groups Summary Menu
Device Load Groups Menu
| State | Name | Outlets |
On load group one 1 3 5 7
- Load Group
O- New Load Group
X- Device Main Menu
M- Return to Main Menu
Load Group Detail Menu
---- Load Group Detail Menu ----
Load Group Name : load group one
Description : odd loads
State : On
Load : 1,3,5,7
1- Load Group Name
2- Description
3- Select Loads
4- Turn Group Loads Off
5- Cycle Group Loads
A- Apply Changes
D- Delete
X- Load Groups Menu
M- Return to Main Menu
x
Menu Data Descriptions
Load Group Name
This is the name of the load group.
Description
This is the description of the load group.
State
This is the state of the load group. The valid values are:
- On – all of the loads in the group are on
- Off – all of the loads in the group are off
- Mixed – some loads in the group are on and some are off
Load
This is a comma-separated list of loads in the group. The loads in the group must be controllable, belong to only one group and must all be from the same device.
4. Telnet/SSH Console continued
4.1 Device Menu continued
4.1.5.3 Ramp/Shed Settings
This menu allows the user to modify the ramp and shed settings for the entire device in one operation. This is to ensure that the user can make all of the changes necessary before a ramp/shed synchronization is started. The menu will prompt the user to make sure that all of the changes have been made before saving. A message will be displayed that indicates if a ramp/shed synchronization is in progress and further updates will not be allowed. Updates of other variables will also be blocked when synchronization is in progress. This will be indicated on the menus impacted.
Ramp/Shed Settings Summary Menu
| Load Description Ramp Shed | |||||
| Action After Delay | Delay Action | After Delay | Delay | ||
| 1 | Remain Off | ☐ | Remain On | ☐ | |
| 2 | Remain Off | ☐ | Remain On | ☐ | |
| 3 | Remain Off | ☐ | Remain On | ☐ | |
| #- Ramp/Shed SettingsA- Apply ChangesX- LoadsM- Return to Main Menu<ENTER> Refresh Menu | |||||
The following shows the sequence of automatic data prompts when '1' is entered from the above summary menu and the resulting summary menu when done.
>> 1
---- Ramp/Shed Settings ----
---- Ramp Action Selection ----
Current Value: Remain Off
1- Remain Off
2- Turn On After Delay
>> 2
---- Ramp Delay ----
Current Ramp Delay = 0
Enter an integer less than 65536 for Ramp Delay
>> 10
---- Shed Action Selection ----
Current Value: Remain On
1- Remain On
2- Turn Off After Delay
>> 2
---- Shed Delay ----
Current Shed Delay = 0
Enter an integer less than 65536 for Shed Delay
>> 20
---- Ramp/Shed Settings ----
| Load Description Ramp Shed | ||||
| Action After Delay | Delay Action | After Delay | Delay | |
| 1 | Turn On | 10 | Turn Off | 20 |
| 2 | Remain Off | 0 | Remain On | 0 |
| 3 | Remain Off | 0 | Remain On | 0 |
4. Telnet/SSH Console continued
4.1 Device Menu continued
4.1.5.3 Ramp/Shed Settings continued
Menu Data
Ramp Action
This is the action to take when a ramp is initiated. The valid values are:
- Remain Off
- Turn On After Delay
Ramp Delay
This is the delay before taking the ramp action.
Shed Action
This is the action to take when a shed is initiated. The valid values are:
- Remain On
- Turn Off After Delay
Shed Delay
This is the delay before taking the shed action.
4.1.6 Preferences and Thresholds
This menu contains the device and protocol specific data that defines the user's preferred behavior settings and thresholds. Since this menu is used to define the user's preferences, the values here should be editable.
Preferences and Thresholds Menu
---- Preferences and Thresholds
Auto Restart On Shutdown : Enabled
Auto Restart On Delayed W : Enabled
Auto Restart On Low Volta : Enabled
Auto Restart On Overload : Disabled
Auto Restart On Overtemp : Disabled
14 Day Self-Test : Disabled
Watchdog Status : Disabled
Watchdog Time : Disabled
Low Battery Warning : %
Low Battery Warning : 0.0 Years
1- Auto Restart On Shutdown
2- Auto Restart On Delayed Wakeup
3- Auto Restart On Low Voltage
4- Auto Restart On Overload
5- Auto Restart On Overtemp
6-14 Day Self-Test
7- Low Battery Warning
&- Battery Age Alarm Threshold
X- Device Main Menu
M- Return to Main Menu
4. Telnet/SSH Console continued
4.1 Device Menu continued
4.1.7 Device Alarms
This view is similar to the alarm view except the alarms displayed here are for the selected device only. The option to allow or disallow auto acknowledge alarms is not available at the device level. It must be done system wide from the system alarms menu.
4.1.8 Logs
Display the logs that apply to the selected device only. The menus here are similar to the system-wide logging menus but show only the logs for the selected device.
4.2 System Configuration
This section of the menu is used to define system wide configuration data.
System Configuration Menu
-- Configuration
-- System Configuration
1- Address Book
2- Global Actions
3- Security
4- Date/Time
5- Local Device Discovery
6- Restart PowerAlert
X/M- Return to Main Menu
<ENTER> Refresh Menu
4.2.1 Address Book
This section of the menu is used to define various recipients of data from the system. These include email recipients, SNMP trap and set OID recipients and HTTP destinations used for log rotation.
To access to the address book menu, the user must have at least Read access to the CONTACTS facility.
Address Book Menu
---- Address Book Menu ----
1- Email Contacts
2- SNMP Contacts
3- HTTP Contacts
X/M- Return to Main Menu
<ENTER> Refresh Menu
4. Telnet/SSH Console continued
4.2 System Configuration continued
4.2.1.1 Email Contacts
This section of the menus is used to define the email contacts.
Summary Menu
Email Contacts
<h1 id="name-email-address">Name Email Address</h1>
1 John John@mail.com
2 Nancy Nancy@mail.com
#- Email Contact
0- Add New Email Contact
X- Contacts Menu
M- Return to Main Menu <ENTER> Refresh Menu
Email Contact Detail Menu
---- Email Contact Detail Menu
Name : Nancy
Email : Nancy@mail.com

1- Name
2- Email
A- Apply Changes
D- Delete
X- Email Contacts Menu
M- Return to Main Menu
<ENTER> Refresh Menu
Menu Data
Name
This is the Name of the email recipient.
This is the email address of the recipient in the form mailbox@emailserver. An example of an email address in its proper form would be user1234@yahoo.com.
4. Telnet/SSH Console continued
4.2 System Configuration continued
4.2.1.2 SNMP Contacts
The destinations defined that can be used to send SNMP traps or perform SNMP set OID operations.
SNMP Contacts Summary Menu
---- SNMP Contacts Menu ----
<h1 id="name-host-address-port-version">Name Host Address Port Version</h1>
1 mycommunity 10.10.10.10 200 SNMPV1
2 snmpv3 destination 10.11.12.13 162 SNMPV3
#- Edit Snmp Contact
0- Add New Snmp Contact
X- Address Book
M- Return to Main Menu
<ENTER> Refresh Menu
SNMP V1/V2 Contact Detail
---- SNMP Contact Detail Menu ----
SNMP Version : SNMPV2c
Name : snmpv2 destination
Host Address : 10.10.10.11
Port : 200
Community : sss
1- SNMP Version
2- Name
3- Host Address
4- Port
5- Community
A- Apply Changes
D- Delete
X- Contacts Menu
M- Return to Main Menu
<ENTER> Refresh Menu
>>
SNMP V3 Contact Detail Menu
---- SNMP Contact Detail Menu ----
SNMP Version : SNMPV3
Name : snmpv3 destination
Host Address : 10.11.12.13
Port : 162
User : someusername
Priv Password : somepassword
Auth Password : somepassword
1- SNMP Version
2- Name
3- Host Address
4- Port
5- User
6- Priv Password
7- Auth Password
A- Apply Changes
D- Delete
X- Contacts Menu
M- Return to Main Menu
<ENTER> Refresh Menu
4. Telnet/SSH Console continued
4.2 System Configuration continued
4.2.1.2 SNMP Contacts continued
Menu Data
SNMP Version
This defines a valid SNMP Version supported on the SNMP destination. The valid values are SNMPV1, SNMPV2c, and SNMPV3. This setting will determine which of the other values that need to be entered.
SNMPv3 users may only be used as a destination for SET OID actions, only sending SNMPv1 traps are supported at this time.
Name
The name is the character string which contains a unique identifying name for the SNMP destination.
Host Address
This defines the IP Address used to send SNMP Traps or SNMP Set OID requests.
Port
This defines the Host Address Port used to send SNMP Trap or SNMP Set OID requests.
Community (SNMPV1 and SNMPV2c only)
For SNMPv1 or SNMPv2 recipients, this must be a valid community for the receiving agent.
SNMPV3 User (SNMPV3 only)
This must specify a valid SNMPV3 User name defined in the VACM tables. This is the user name specified in the Set OID requests.
SNMPV3 PRIV Password (SNMPV3 only)
The PRIV Password of the SNMPV3 user used for sending Set OID requests.
SNMPV3 AUTH Password (SNMPV3 only)
The AUTH password of the SNMPV3 user used for sending Set OID requests.
4.2.1.3 HTTP Contacts
HTTP destinations to be used for sending log files when rotating logs.
HTTP Destination Summary
---- HTTP Contacts Menu
# Name
1 http destination
- Edit HTTP Contact
D- Add New HTTP Contact
X- Address Book
M- Return to Main Menu
HTTP Contact Detail
---- HTTP Contact Detail Menu
Name : http destination
Protocol : https
Contact URI : someuri. here. com
Authentication Login Name: name
Authentication Password : password
1 - Name
2- Protocol
3- Contact URI
4- Authentication Login Name
5- Authentication Password
A- Apply Changes
D- Delete
X- Contacts Menu
M- Return to Main Menu
4. Telnet/SSH Console continued
4.2 System Configuration continued
4.2.1.3 HTTP Contacts continued
Menu Data
Name
The name is the character string which contains a unique identifying name for the HTTP destination.
Protocol
Choose "http" for non-secured HTTP and "https" for secured HTTP.
URI
Uniform Resource Identifier (URI) is a character string used to identify the destination on the internet.
Authentication Login Name
This is an optional login name used for authentication. The string must have a length between 8 and 32 characters.
Authentication Password
This is an optional password used for authentication. It must be a string between 8 and 32 characters. If the authentication login is entered then the authentication password should be entered as well.
4.2.2 Global Actions
4.2.2.1 Action Profiles
Action profiles define responses to events and alarm conditions. The action profile allows the response to be defined once and applied to multiple alarm events. An action may be a response to the alarm condition or a response to the condition clearing. Where appropriate, the two actions may be the same.
Action Profiles Menu
1- Email Notification Profiles
2- Device Shutdown Profiles
3- SNMP Set OID Profiles
4- SNMP Trap Notification Profiles
5- Load Control Action Profiles
6- Ramp Action Profiles
7- Shed Action Profiles
8- Control Execution Action Profiles
X/M- Return to Main Menu
Common Action Data
All action profiles, unless otherwise noted, have the data described in this section.
Name
All actions have a unique identifying name.
Delay
All actions have a delay in seconds. This is the amount of time before the action fires after the event occurs. When an action is the response to the action clearing, the delay is ignored and is done immediately.
Common Data
In addition to the common values for name and delay, the notification actions also allow the notifications to be sent multiple times until the event condition has been cleared. The additional data to support that is an interval and count.
Interval
This data applies to only Email and SNMP Trap Notifications. The interval allows the notification to be sent multiple times while the alarm condition is present. The interval is the amount of time in seconds before sending the next notification. The valid values are:
- 0 – the notification is sent only once
- Integer greater than or equal to 15 – the notification will be sent after this interval has elapsed and the alarm condition is still present
Count
This data applies to only Email and SNMP Trap Notifications. The count determines the number of times that the notification will be sent. The valid values are:
- 0 – valid only if interval is not 0. This implies that the notification should be sent until the alarm condition is cleared.
- 1 – valid only if interval is 0. The notification is sent only once.
- Integer greater than 1. This is a finite number of times that the notification will be sent while the alarm condition is still present.
4. Telnet/SSH Console continued
4.2 System Configuration continued
4.2.2.1.1 Email Notification Action Menus
Summary Menu
---- Email Notification Profiles ----
| Name | DELAY | INTERVAL | INTERVAL COUNT | TO ALL
1 Default Contact Notification 30 0 1 Yes 2 Email to Admin 0 0 1 No
- Edit Profile
0- Add New Profile
X- Action Profile Menu
M- Return to Main Menu
4. Telnet/SSH Console continued
4.2 System Configuration continued
4.2.2.1.1 Email Notification Action Menus continued
Menu Data
Email Contacts Chosen
The email notification action requires the user to define a list of contacts that will receive email notification when an event occurs. When the option is set to ALL, every email contact in the system will receive the notification and any new users added will automatically be included in the list without any further changes to the action. Alternately, the option can be set to only notify a specific list of email contacts defined in the system.
Choosing Email Contact Example Menus
---- Email Action Contacts Menu ----
Email Contacts Chosen: None
1- Select All Contacts
2- Clear Contact List
3- Assign Contact To List
4- Delete Contact From List
X- Return to Email Action Profile Menu
>> 3
---- Add Email Action Contact Menu ----
Email Contacts Chosen: None
<h1 id="name-email-address-2">| Name | Email Address</h1>
1 Admin John Doe admin_jdoe@example.com
- Assign Contact To List
X- Return to Email Action Contacts Menu
1
---- Add Email Action Contact Menu ----
Email Contacts Chosen: Admin John Doe
<h1 id="name-email-address-3">| Name | Email Address</h1>
1 Admin John Doe admin_jdoe@example.com
- Assign Contact To List
X- Return to Email Action Contacts Menu
x
---- Email Action Contacts Menu ----
Email Contacts Chosen: Admin John Doe
1- Select All Contacts
2- Clear Contact List
3- Assign Contact To List
4- Delete Contact From List
X- Email Action Profile Menu
M- Return to Main Menu
<ENTER> Refresh Menu
4. Telnet/SSH Console continued
4.2 System Configuration continued
4.2.2.1.2 SNMP Trap Notification Menus
Summary Menu
| SNMP Trap Notification Profiles | |||||
| # | Name | DELAY | INTERVAL | COUNT | TOALL |
| 1 | Default Trap Notification | 30 | 0 | 1 | Yes |
| #- Edit Profile | |||||
| 0- Add New Profile | |||||
| X- Device Action Profile Menu | |||||
| M- Return to Main Menu | |||||
| <ENTER> Refresh Menu | |||||
Detail Menu
| Name: Default Trap NotificationDelay: 30Interval: 0Count: 1SNMP Contacts Chosen: All |
| 1- Modify Profile Name2- Modify Delay3- Modify Interval4- Modify Count5- Manage SNMP Trap Contacts6- Apply To Device EventsA- Apply ChangesD- DeleteX- Script Execution Action Profiles MenuM- Return to Main Menu<ENTER> Refresh Menu |
| >> x |
Menu Data
SNMP Contacts Chosen
This is the list of contacts that the SNMP trap will be sent to when the action is fired. The trap may be sent to all SNMP Contacts or to a specific list of SNMP Contacts defined in the system. When the option is set to ALL, any new contacts will automatically be sent the set request without making any further changes to the action.
4. Telnet/SSH Console continued
4.2 System Configuration continued
4.2.2.1.3 SNMP Set OID Action Menus
SNMP Set OID actions will make an SNMP Set request to a list of SNMP Contact Destinations.
Summary Menu
| SNMP Set OID Profiles | ||||
| # | Name | DELAY | INTERVAL | INTERVALCOUNT |
| 1 | shed on alarm | 0 | 0 | 1 |
| 2 | ramp on clear | 0 | 0 | 1 |
| #- Edit Profile | ||||
| 0- Add New Profile | ||||
| X- Device Action Profile Menu | ||||
| M- Return to Main Menu | ||||
| <ENTER> Refresh Menu | ||||
Detail Menu
| Name: shed on alarmDelay: 0Interval: 0Count: 1SNMP Contacts Chosen: AllSet OID: 1.3.6.1.4.1.850.100.1.8.3.3.0Set OID Data Type: IntegerSet OID Value: 1 |
| 1- Modify Profile Name2- Modify Delay3- Modify Interval4- Modify Count5- Update OID6- Update Data Type7- Update Value8- Manage SNMP Set OID Contacts9- Apply To Device EventsA- Apply ChangesD- DeleteX- Script Execution Action Profiles MenuM- Return to Main Menu<ENTER> Refresh Menu |
Menu Data
OID
This is the OID to be used in the SNMP Set request sent for the action.
Data Type
This is the data type used in the SNMP Set request sent for the action.
Value
This is the value used in the SNMP Set request sent for the action.
SNMP Contacts Chosen
This is the list of contacts that the SNMP Set request will be sent to when the action is fired. The set request may be sent to all SNMP Contacts or to a specific list of SNMP Contacts defined in the system. When the option is set to ALL, any new contacts will automatically be sent the set request without making any further changes to the action.
4. Telnet/SSH Console continued
4.2 System Configuration continued
4.2.2.1.4 Device Specific Menus
The device specific menus are actions that occur on a specific device. They may be applied to any device event.
Common Data
Device ID
Since all of these actions will occur on a specific device, they require the user to specify the device.
Device Shutdown Action Menus
Summary Menu
Device Shutdown Profiles
| Name | DELAY
1 Default Device Shutdown 120
- Edit Profile
0- Add New Profile
X- Device Action Profile Menu
M- Return to Main Menu
Detail Menu
Device Shutdown Action Profile Detail Menu
Name: Default Device Shutdown
Delay: 120
Device: 0
1- Modify Profile Name
2- Modify Delay
3- Apply To Device Events
A- Apply Changes
D- Delete
X- Email Action Profiles Menu
M- Return to Main Menu
Load Control Action Menus
Summary Menu
Device 1 Load Control Action Profile
| Name | DELAY
load 1 off 120
- Edit Profile
0- Add New Profile
X- Device Action Profile Menu
M- Return to Main Menu
4. Telnet/SSH Console continued
4.2 System Configuration continued
4.2.2.1.4 Device Specific Menus continued
Detail Menu
Device 1 Load Control Action Profile Detail
Name: load 1 off
Delay: 120
Device: 1
Load Control: Turn Off
Loads Chosen: 1
1- Modify Profile Name
2- Modify Delay
3- Select Load Control
4- Select Loads To Control
5- Apply To Device Events
A- Apply Changes
D- Delete
X- SNMP Trap Action Profiles Menu
M- Return to Main Menu
<ENTER> Refresh Menu
Menu Data
Load Control
This setting dictates what the load will do when the action is fired. The valid options are:
- Turn Off
- Turn On
Load Selection
This is the list of loads that will be controlled by the action. The display will always be a comma separated list of loads. For data entry, the loads may be entered as a comma separated, a range or a comma separated list that contains ranges.
The lists (1, 2, 3, 5, 6, 7) and (1-3, 5-7) would both be accepted and result in the same selection.
Ramp Action Menus
Summary Menu
Device 1 Ramp Action Profile
<h1 id="name-delay-3">| Name    | DELAY</h1>
1 ramp it up    0
#- Edit Profile
0- Add New Profile
X- Device Action Profile Menu
M- Return to Main Menu
<ENTER> Refresh Menu
4. Telnet/SSH Console continued
4.2 System Configuration continued
4.2.2.1.4 Device Specific Menus continued
Detail Menu
Device 1 Ramp Action Profile Detail
Name: ramp device loads
Delay: 0
Device: 1
1- Modify Profile Name
2- Modify Delay
A- Apply Changes
D- Delete
X- Device Ramp Action Profiles Menu
M- Return to Main Menu
<ENTER> Refresh Menu
Shed Action Menus
Summary Menu
Only one device available for this action type. Using device 1.
---- Device 1 Shed Action Profile ----
<h1 id="name-delay-4">| Name | DELAY</h1>
L shed device loads 0
#- Edit Profile
0- Add New Profile
X- Device Action Profile Menu
M- Return to Main Menu
<ENTER> Refresh Menu
Detail Menu
Device 1 Shed Action Profile Detail
Name: shed device loads
Delay: 0
Device: 1

1- Modify Profile Name
2- Modify Delay
3- Apply To Device Events
A- Apply Changes
D- Delete
X- Device Shed Action Profiles Menu
M- Return to Main Menu
<ENTER> Refresh Menu
4. Telnet/SSH Console continued
4.2 System Configuration continued
4.2.2.1.4 Device Specific Menus continued
Control Execution Action Menus
Summary Menu
Only one device available for this action type. Using device 1.
Device 1 Control Execute Action Profile
<h1 id="name-delay-5">| Name | DELAY</h1>
1 exec control action 0
2 exec another control action 0
*- Edit Profile
- Add New Profile
<- Device Action Profile Menu
- Return to Main Menu
<ENTER> Refresh Menu
Detail Menu
Control with no control data
---- Device 1 Control Execute Action Profile Detail ----
Name: exec control action
Delay: 0
Device: 1
Control Executed: Initiate Self Test
1- Modify Profile Name
2- Modify Delay
3- Apply To Device Events
A- Apply Changes
D- Delete
X- Device Control Execute Action Profiles Menu
M- Return to Main Menu
<ENTER> Refresh Menu
Control with Control Data
---- Device 1 Control Execute Action Profile Detail
Name: exec another control action
Delay: 0
Device: 1
Control Executed: Reboot Device
Control Data:
Description Value
Delay before shutdown (seconds) 1
Delay before restart (minutes) 1
1- Modify Profile Name
2- Modify Delay
3- Control Data
4- Apply To Device Events
A- Apply Changes
D- Delete
X- Device Control Execute Action Profiles Menu
M- Return to Main Menu
<ENTER> Refresh Menu
4. Telnet/SSH Console continued
4.2 System Configuration continued
4.2.2.1.4 Device Specific Menus continued
Menu Data
Control
This is the control to be executed by the action.
Control Data
Some controls have additional data. For those controls, the data settings may be changed.
4.2.2.1.5 Applying Actions to Events
Choosing this option begins the process of assigning the action to events. Each event has both a "Set" and a "Clear" action associated with it. The action being updated must be used for the "Set" action or both "Set" and "Clear" actions, as appropriate. Ramp actions are only allowed to be used for the "Clear" action and will not be present this option. The steps necessary to assign the actions to events are as follows:
- Choose "Set" and "Clear" action pair.
- Choose events that the use "Set" and "Clear" actions.
Choosing the Set and Clear Actions
Once all of the data for an action profile has been saved, the user will have the option to apply the action to events. The next step presented depends upon the type of action profile being updated. The action profile being updated will at least be the "Set" action, unless the action type is not allowed to be used for the set action. At this time, the only type of action that cannot be used for the set action is Ramp action.
Actions to Using Both Set and Clear
For Email and SNMP Trap notifications, the same action is automatically used for both “Set” and “Clear” responses. The menu will proceed directly to choosing the events to correspond to these actions.
Actions Types Allowed for Set Only
Shed action profiles are only allowed to be used as the "Set" action on events. In the menu, only the option to use the action for "Set" will be given. The following is an example of the menu displayed for this action profile type.
---- Actions Set/Clear ----
Using Action For Alarm Condition
S- Continue to Apply to Device Events
X- None
M- Return to Main Menu
<ENTER> Refresh Menu
Action Types Allowed for Clear Only
Ramp Action profiles are only allowed to be used in conjunction with Shed Action profiles and, therefore, must be a “Clear” action on events. Since the “Set” action must be chosen before the “Clear” action, the Ramp action will not be present in the “Set” menu and cannot be the first action applied to an event.
Action Types Allowed for Both Set and Clear
The action types not already covered are allowed to be used for both the event "Set" and "Clear" actions. Unlike the notification actions, where it is desirable for the "Set" and "Clear" action to be the same, the preference for these actions is that the "Set" and "Clear" actions be of the same type but not the same action. The types covered here are Load Control Actions, Control Execution and SNMP Set OID. The following is an example of the menu presented for these action types.
4. Telnet/SSH Console continued
4.2 System Configuration continued
4.2.2.1.5 Applying Actions to Events continued
Menu Data
Using Action for Set Action
The action will be used for the "Set" action only. The user will be given the option to choose the "Clear" action before continuing on to select events.
Using Action for Both Set and Clear Action
The action will be used for both "Set" and "Clear" and the user can immediately continue on to choose events.
Choosing Clear Action
This is skipped if action is to be used for both “Set” and “Clear” action, or the user chose not to include a “Clear” action. The action chosen for the “Clear” action must be the same type as the “Set” action. The list of available actions will be presented. If none of the actions match what the user would like to happen on the clear, the user may choose to insert a new action.
Choosing an existing action
The number of the existing action is chosen and the user moves on to select events.
Choosing to create a new action
The user is placed into insert mode and prompted for the settings for the new actions. Once the insert of the new action is completed, it is chosen as the "Clear" action and the user is moved on to select events.
Choosing Events
---- Apply To Device Events
Set Action : shed device loads
Clear Action : ramp device loads
1- Apply To All Device Events
2- Apply To Events On Device 1 (SU1500RTXL2Ua)
3- Apply To Events On Probe (Envirosense)
X- None
M- Return to Main Menu
<ENTER> Refresh Menu
Apply To All Events
This option will apply the “Set” and “Clear” actions chosen to all of the events on all devices. If the “Set” and “Clear” actions are already assigned but are not paired with the same “Set” and “Clear” action, the user will be prompted to leave those assignments alone or to clear those assignments and assign the chosen actions in their place.
Apply to Events of a Selected Device
-------- Action Events
Set Action : shed device loads
Clear Action : ramp device loads
Events Chosen : None
1- Apply To All Events
2- Clear Event List
3- Add Event To List
4- Delete Event From List
X- Apply To Device Events
M- Return to Main Menu
<ENTER> Refresh Menu
4. Telnet/SSH Console continued
4.2 System Configuration continued
4.2.2.1.5 Applying Actions to Events continued
Menu Data
Apply To All Events
This option will apply the “Set” and “Clear” actions chosen to all of the events on the selected devices. If the “Set” and “Clear” actions are already assigned but are not paired with the same “Set” and “Clear” action, the user will be prompted to leave those assignments alone or to clear those assignments and assign the chosen actions in their place.
Clear Event List
This will clear the "Set" and "Clear" action assignments from all of the events for the selected device only.
Add Event to List
This choice will allow the user to select an event from the list of events for the device selected. Only the events that do not currently have actions assigned will be presented.
Add Event To List
1- Contact 1 In Alarm
2- Contact 2 In Alarm
3- Contact 3 In Alarm
4- Contact 4 In Alarm
5- Temperature Beyond Limits
6- Humidity Beyond Limits
X- Action Events
M- Return to Main Menu
<ENTER> Refresh Menu
Delete Event From List
Delete a chosen event from the list. The user will be presented with a list of all events that are currently using the "Set" and "Clear" action. Choosing an event will remove the actions from that event only. The following is an example of the delete event menu.
Delete Event From List
1- Temperature Beyond Limits
2- Humidity Beyond Limits
X- Action Events
M- Return to Main Menu
<ENTER> Refresh Menu
Note: To have access to the action profiles menus, the user must have at least Read access to the ACTIONS and DEVICE EVENTS facilities. In addition, to be able to have access to control execution actions, the user must also have at least Read permission to the DEVICE CONTROLS as well. Similarly, to have access to load control, ramp and shed actions, the user must also have access to DEVICE LOAD. To be able to create Email notification, SNMP Trap and SNMP Set OID actions, the user must also have at least Read permission for CONTACTS.
4. Telnet/SSH Console continued
4.2 System Configuration continued
4.2.2.2 Schedules
To have access to the schedules menu, the user must have at least Read access to the SCHEDULES facility. Because controls and loads can be scheduled, the user should have at least read access to the DEVICE CONTROLS and DEVICE LOADS facilities as well.
Once a schedule has been created, it cannot be modified. To change a schedule, the original schedule has to be removed and a new schedule created.
Schedules Menu
# Pending Action Next Fire Time Frequency
| 1 | Initiate Self Test | 2011-12-08 | 16:10:00-06:00 | Daily |
| 2 | Initiate Self Test | 2011-12-07 | 16:12:00-06:00 | Once |
| 3 | Initiate Self Test | 2011-12-07 | 16:13:00-06:00 | Weekly |
| 4 | Initiate Self Test | 2012-01-15 | 16:15:00-06:00 | Yearly |
| 5 | Initiate Self Test | 2011-12-15 | 16:17:00-06:00 | Monthly |
| 6 | Initiate Self Test | 2012-02-01 | 16:18:00-06:00 | Monthly |
| 7 | Initiate Self Test | 2012-11-24 | 16:19:00-06:00 | Yearly |
- View Schedule
D- Add New Schedule
X/M- Return to Main Menu
Execute Once Schedule
Schedule Detail Menu
| Pending Action | : Initiate Self Test |
| Device Id | : 1 |
| Frequency | : Once |
| Next Fire Time | : 2011-12-07 16:12:00-06:00 |
D- Delete Schedule
X- Schedules Menu
M- Return to Main Menu
Execute Daily Schedule
Schedule Detail Menu
| Pending Action | : Initiate Self Test |
| Device Id | : 1 |
| Frequency | : Daily |
| Interval | : Every Day |
| Next Fire Time | : 2011-12-08 16:10:00-06:00 |
| Until | : Forever |
D- Delete Schedule
X- Schedules Menu
M- Return to Main Menu
4. Telnet/SSH Console continued
4.2 System Configuration continued
4.2.2.2 Schedules continued
Execute Weekly Schedule
| Schedule Detail Menu | |
| Pending Action | : Initiate Self Test |
| Device Id | : 1 |
| Frequency | : Weekly |
| Day Of Week | : Sunday, Wednesday, Friday |
| Interval | : Every 2 Weeks |
| Next Fire Time | : 2011-12-07 16:13:00-06:00 |
| Until | : 2011-12-31 |
| D- Delete Schedule | |
| X- Schedules Menu | |
| M- Return to Main Menu | |
| <ENTER> Refresh Menu | |
Execute Monthly Schedule
Day of Month
| ---- Schedule Detail Menu ---- | |
| Pending Action | : Initiate Self Test |
| Device Id | : 1 |
| Frequency | : Monthly |
| On | : 15th |
| Of | : Every Month |
| Next Fire Time | : 2011-12-15 16:17:00-06:00 |
| Number Of Repetitions: | 5 |
| D- Delete Schedule | |
| X- Schedules Menu | |
| M- Return to Main Menu | |
| <ENTER> Refresh Menu | |
Relative Day of Month
| ---- Schedule Detail Menu ---- | |
| Pending Action | : Initiate Self Test |
| Device Id | : 1 |
| Frequency | : Monthly |
| On | : Third Wednesday |
| Of | : Every 2 Months |
| Next Fire Time | : 2011-12-21 16:52:00-06:00 |
| Until | : Forever |
| D- Delete Schedule | |
| X- Schedules Menu | |
| M- Return to Main Menu | |
| <ENTER> Refresh Menu | |
4. Telnet/SSH Console continued
4.2 System Configuration continued
4.2.2.2 Schedules continued
Execute Yearly Schedule
Day of Month
Schedule Detail Menu
Pending Action : Initiate Self Test
Device Id : 1
Frequency : Yearly
On : 15th
Month : January
Next Fire Time : 2012-01-15 16:15:00-06:00
Number Of Repetitions: 5
D- Delete Schedule
X- Schedules Menu
M- Return to Main Menu
<ENTER> Refresh Menu
Relative Day of Month
Schedule Detail Menu
Pending Action : Initiate Self Test
Device Id : 1
Frequency : Yearly
On : Last Saturday
Month : November
Next Fire Time : 2012-11-24 16:19:00-06:00
Until : Forever
D- Delete Schedule
X- Schedules Menu
M- Return to Main Menu
<ENTER> Refresh Menu
4. Telnet/SSH Console continued
4.2 System Configuration continued
4.2.2.2 Schedules continued
Menu Data
Device ID
This field selects the device to which the schedule is to be applied.
Pending Action
This field indicates the action to be fired according to the schedule.
Time
This setting controls the time that the scheduled action will be fired. The time and date chosen must be in the future. The default setting is 10 minutes from the current time.
Date/Start Date
For schedules that will only fire once, this is the date that the scheduled control will be executed.
For all other schedules, this is the start date for scheduling the control to be executed. The date and time chosen must be in the future. The default setting is the current date.
Interval
The interval is valid only for daily, weekly and monthly schedules. This is the number of days, weeks or months between executions of the chosen control. For example, an interval of 2 for a daily schedule means that it would happen every other day. The default for interval is 1.
Day of Week
This is the day of the week that the scheduled control should be executed. It is used for weekly schedules and for monthly/yearly schedules using a relative day selection such as "first Thursday."
Day of Month
This setting is used for monthly and yearly schedules. It specifies the day of the month that the schedule should be executed.
Month
This setting is used for yearly schedules only. This is the month that the yearly scheduled control should be executed.
Relative Days
This setting is used for monthly and yearly schedules. It allows a relative day of a month to be specified. The valid relative day selection are:
- First
- Second
- Third
- Fourth
- Last
It is used in combination with the day of the week to choose a relative day of the month like “last Friday” for a monthly schedule or “third Thursday of July” for a yearly schedule.
Until
For daily, weekly, monthly and yearly schedules, the user also needs to specify how long the schedule is in effect. The valid choices are:
- Forever – the schedule will executed until it is deleted
- End Date – the schedule will be executed until the specified date.
- Number of Repetitions – the schedule will be executed for the specified number of times.
Automatic Removal of Schedule
A schedule will be automatically removed when it has fired for the last time. The conditions that will cause the schedule to be removed are:
- One time schedule has been executed.
• The Until End Date has been reached. - The Until Number of Repetitions has been reached.
Note: To have access to the schedules menus, the user must have at least Read access to the SCHEDULES facility. Because controls and loads can be scheduled, the user should have at least read access to the DEVICE CONTROLS and DEVICE LOADS facilities as well.
4. Telnet/SSH Console continued
4.2 System Configuration continued
4.2.3 Security
Security Menu
Security Menu
1- Authentication Method
2- Local Users
3- Radius Servers
4- Change Password
X/M- Return to Main Menu
<ENTER> Refresh Menu
4.2.3.1 Authentication Method
Authorization Detail Menu
Authorization Menu
Authorization Scheme : Local Only
Accounting Scheme : Local Only

1- Authentication Scheme
2- Accounting Scheme
X- Security Menu
M- Return to Main Menu
<ENTER> Refresh Menu
>> 1
Authentication Scheme Data Entry Menu
Authentication Scheme Menu
Authentication Scheme: Local Only
1- Local Only
2- Radius Only
3- Local Then Radius
4- Radius Then Local
X- Authorization Menu
M- Return to Main Menu
Accounting Scheme Data Entry Menu
Accounting Scheme Menu
Accounting Scheme: Local Only
1- Local Only
2- Radius Only
3- Local Then Radius
4- Radius Then Local
X- Authorization Menu
M- Return to Main Menu
Authorization Scheme
The authorization scheme defines how user authentication will be done. The authorization can be done with locally defined users only, RADIUS server defined users only or a combination of the two. The valid values are:
- Local Only
The system only uses locally defined user definitions.
- RADIUS Only
The system uses RADIUS only for authentication.
- Local Then RADIUS
The system uses locally defined user definitions first. If the user data is not found, it uses RADIUS for authentication.
- RADIUS Then Local
The system uses RADIUS for authentication first. If not authorized via the RADIUS server, the locally defined users will be used for authentication.
Accounting Scheme
This defines where the user session accounting data will be recorded. Like the authorization, the data can be recorded locally or on the RADIUS server or a combination of the two. The valid values are:
- Local Only
Uses only the local system to record the session accounting data.
- RADIUS Only
Uses only the RADIUS servers defined to record the session accounting data.
- Local Then RADIUS
Tries to record the session accounting data locally and if not able to, then tries to record to RADIUS.
- RADIUS Then Local
Tries to record the session accounting data on RADIUS first and if fails, then records locally
4.2 System Configuration continued
4.2.3.2 Local Users
This menu is used to define the local users. Local users include SNMP v3 users and SNMP v1/v2c communities which must be defined locally. RADIUS authentication may not be used for SNMP access. There are a total of 12 users that may be defined with 5 default users being created initially. Available slots will be identified in the user summary table with the name/community of "User Not Defined."
The following is the data that is used to define the users. Not all data applies to all user types and will be identified accordingly.
User Detail Menu
SNMP Protocol : SNMPV3
User Name : localadmin
Facility Permissions : DEFAULT FACILITY = Read Write
Outlet Realms :
ACL IP Address : : :
ACL IP Mask : : :
Password : localadmin
Auth Password : localadmin
Idle Timeout in Minutes : 0
Session Expiration in Min : 0
1- Name
2- Outlet Realm Permissions
3- SNMP Protocol
4- ACL IP Address
5- ACL IP Mask
6- Password
7- Auth Password
8- Idle Timeout in Minutes
9- Session Expiration in Minutes
A- Apply Changes
X- Security
M- Return to Main Menu
Menu Data
SNMP Protocol
The SNMP Protocol is the first attribute to be defined for a user since it will need to be used to determine what data items need to be populated for the user. The valid values are:
- None
This user does not have any SNMP access allowed.
- SNMP v1
This user is a SNMPv1 community definition. Only access through SNMP is allowed for this user.
- SNMPv2c
This user is a SNMPv2c community definition. Only access through SNMP is allowed for this user.
• SNMPV3
This user has SNMPv3 access as well as access through any of the other view interfaces.
Username (SNMPv3 and No SNMP Access Users)
This is the username. It is a string value which is 8 to 32 characters long with no spaces.
Community (SNMPv1 and SNMPv2c Users)
This is the SNMP community name. It is a string value which is 8 to 32 characters long with no spaces.
Permission
This defines the access permissions for the user.
Facilities
The facilities are ways of grouping permission for related pieces of data. A user may have access to all or only a subset of the data. The options for each facility are Read Only, Read/Write and No Access.
Default
The default facility setting defines the data access that a user has for any data that does not have another explicit facility assignment. When adding a new user, the default permissions are set to No Access.
Security
This is the security data such as local user and RADIUS hosts definitions, and authentication method. By default, security access is given to only the localadmin user.
Contacts
This facility allows users to view or add contacts in the address book.
System Settings
This includes all of the system and network settings. By default, access is given to localadmin and localmanager.
Info
This is additional system wide information. Currently this facility covers the IPV4 and IPV6 Address definitions. This facility provides Read Only access.
4. Telnet/SSH Console continued
4.2 System Configuration continued
4.2.3.2 Local Users continued
Logging
This facility allows access to logs and log rotation actions. Log rotation actions will only be available if the user has at least Read Only access to the Contacts facility.
Device Status
The facility provides access to all device variable information. These would include device status variables, personalization variables and threshold variables. By default, the localadmin and localmanager have Read/Write access and localguest has only Read Only access.
Device Controls
This facility configures whether a user has access to device controls. Since this is a subset of devices, it is required that the user has Read Only access to device status to either view or control loads. Configuring this to No Access will restrict a user from seeing the controls area of the program.
Device Events
This facility configures whether a user has access to device events. Since this is a subset of devices it is required that the user has Read Only access to the device status and contacts facility to properly view or modify events. Configuring this to No Access will restrict a user from seeing events program area.
Device Loads
This facility configures whether a user has access to device loads. Since this is a subset of devices it is required that the user has Read Only access to device status to either view or control loads. Configuring this to No Access will restrict a user from seeing loads.
Actions
This facility is the program area that defines what will happen when an event/alarm is detected. For a user to be able to setup any action requires that the user have Read/Write access to the facilities, device loads, device controls and at least Read Only access to the contacts facility.
Schedules
To allow a user to add scheduled tasks requires that the user have Read/Write access to the device controls facilities.
Discovery
This facility is the program area that allows execution of a device discovery. This program area is most commonly used for detecting an ENVIROSENSE temp/humidity probe that has been connected to the SNMPWEBCARD after initial startup.
Access Levels
- Read Only
The user may read the data but make no changes.
- Read Write
The user may not only read the data but make changes as well.
- None
The user has no access to the data in the facility
Facility Rules and Dependencies
Outlet Realms
Outlet realms are an integer between 1 and 32 used to identify a logical grouping of outlets to be used to limit a user's access to a subset of outlets. In the user definition, it is a comma separated list of realms or range of realms that the user may access. Each load may be assigned a single realm and multiple outlets may use the same realm.
For example, a PDU may be powering devices at a co-hosting facility where Customer One has all of his equipment connected to Circuit 1 of a 3-phase PDU, Customer Two is on Circuit 2, and Customer Three is on Circuit 3. This PDU may have outlets 1, 4, 7, 10, 13, 16, 19 and 22 on Circuit 1, outlets 2, 5, 8, 11, 14, 17, 20 and 24 on Circuit 2 and outlets 3, 6, 9, 12, 15, 18, 21, and 23 on Circuit 3. The outlets on Circuit 1 could be assigned to Realm 5. The outlets on Circuit 2 could be assigned to Realm 7 and the outlets on Circuit 3 could be assigned to Realm 9. The user realm mapping would be Realm 5 for Customer One, Realm 7 for Customer Two and Realm 9 for Customer Three. Assigning the realm to the user gives Read/Write access only for the outlets assigned to the users' realms, meaning they will be able to turn On or Off outlets only in the same realm.
Although the concept of realms may seem similar to outlet groups, it provides no other grouping functionality other than permissions.
The access level to the realms indicated is Read/Write. Each load may optionally be assigned to a realm. Whatever loads belong to the realms indicated here, the user may access. In order to correctly access the data, a user should have at least Read Only permission for Device Status and Device Loads to be able to user the realms.
| 192.168.1.1 (single) | 255.255.255.255 |
| 192.168.1.0 (range) | 255.255.255.0 |
| 192.168.0.0 255.255 | .0.0 |
| 192.0.0.0 255.0.0.0 | |
| 0.0.0.0 (everyone) | 0.0.0.0 |
ACL IP Address (Users with SNMP Access Only) This defines what IP Address (or Addresses when used with the ACL IP Mask) from which this user may access the data via SNMP.
ACL IP Mask (Users with SNMP Access Only)
This defines the Subnet Mask to user with the ACL IP Address to determine if an address is one from which the user is allowed to access the data via SNMP.
Password (N/A for SNMPv1 or SNMPv2c)
This is the user password for logging in. For SNMP V3 users, this is the Priv Password.
Auth Password (N/A for SNMPv1 or SNMPv2c)
For SNMP v3 Users only, this is the Auth Password.
Idle Timeout in Minutes (N/A for SNMPv1 or SNMPv2c)
This applies to data access other than SNMP which does not use the concept of a logged in session. This is the amount of time that the session can be idle before it will time out and no longer have access to the data. When the value is 0, that means that idle sessions will not time out.
Session Expiration Minutes (N/A for SNMPv1 or SNMPv2c)
This applies to data access other than SNMP which does not use the concept of a logged in session. This is the amount of total time that a session may last whether or not the session is idle or active. When the value is 0, the session will not expire.
4. Telnet/SSH Console continued
4.2 System Configuration continued
4.2.3.2 Local Users continued
Local User Summary Menu
Local Users
<h1 id="name-community-snmp">| NAME / COMMUNITY | SNMP</h1>
1 localadmin SNMPV3
2 localmanager SNMPV3
3 localguest SNMPV3
4 public SNMPV1
5 tripplite SNMPV2c
6 mikemike None
7 User Not Defined
8 User Not Defined
9 User Not Defined
10 User Not Defined
11 User Not Defined
12 User Not Defined
#- User
X- Security Menu
M- Return to Main Menu
<ENTER> Refresh Menu
>> 1
Local User Detail Menu
---- User Detail Menu
SNMP Protocol : SNMPV3
User Name : localadmin
Facility Permissions : DEFAULT FACILITY = Read Write
Outlet Realms :
ACL IP Address : ::
ACL IP Mask : ::
Password : localadmin
Auth Password : localadmin
Idle Timeout in Minutes : 0
Session Expiration in Min: 0
1- Name
2- Outlet Permissions
3- SNMP Protocol
4- ACL IP Address
5- ACL IP Mask
6- Password
7- Auth Password
8- Idle Timeout in Minutes
9- Session Expiration in Minutes
A- Apply Changes
X- Security Menu
M- Return to Main Menu
<ENTER> Refresh Menu
>> x
Default Users: Program users must have a minimum username length and password of 8 characters.
4. Telnet/SSH Console continued
4.2 System Configuration continued
4.2.3.2 Local Users continued
Menu Data
Localadmin
This is the administrator account and has Read/Write access to all program areas. This user cannot be deleted or its facility access permission be modified, but the username and password may be changed from its default settings. The default password is same as the username.
Localmanager
This account has default access as Read/Write to all areas except to the security area of the program. The default password is same as the username.
Localguest
This account has read-only access to Device Status, Logging, and Info areas of the program. The default password is same as the username.
Public
This account is not a program user. It is a SNMPv1 Read-Only community.
Tripplite
This account is not a program user; it is a SNMPv2c Read/Write community. This the default community string that Tripp Lite's PowerAlert Network Shutdown Agent uses to discover Tripp Lite SNMP devices on the network.
Users 6-12 are not defined.
4.2.3.3 RADIUS Servers
This is the section of the menu used to define the RADIUS Servers. There is a maximum of 2 RADIUS Servers that can be defined. If a slot is available to create another server, the address value will be "Server Not Defined".
Radius Servers Summary Menu
---- Radius Servers Menu ----
<h1 id="address-priority-auth-port-acct-port">| Address | Priority | AUTH PORT | ACCT PORT</h1>
1 10.0.0.11 1 1812 1813
2 Server Not Defined
#- Radius Server
X- Security Menu
M- Return to Main Menu
<ENTER> Refresh Menu
>> 1
Radius Server Detail Menu
---- Radius Server Detail Menu ----
Address : 10.0.0.11
Priority : 1
Shared Secret : tripplite
Authentication Port : 1812
Accounting Port : 1813
1- Address
2- Priority
3- Shared Secret
4- Authentication Port
5- Accounting Port
A- Apply Changes
C- Delete Radius Host
X- Radius Servers Menu
M- Return to Main Menu
<ENTER> Refresh Menu
>> x
---- Radius Servers Menu ----
<h1 id="address-priority-auth-port-acct-port-2">| Address | Priority | AUTH PORT | ACCT PORT</h1>
1 10.0.0.11 1 1812 1813
2 Server Not Defined
<h1 id="radius-server">- Radius Server</h1>
X- Security Menu
M- Return to Main Menu
<ENTER> Refresh Menu
4. Telnet/SSH Console continued
4.2 System Configuration continued
4.2.3.3 RADIUS Servers continued
Menu Data
Address
This defines the internet address of the RADIUS server.
Priority
This is a number that defines the priority of this RADIUS server.
Shared Secret
This is the shared secret value to be used with this RADIUS server.
Authentication Port
This defines the port on the server to be used for authentication.
Accounting Port
This defines the port on the server to be used for accounting.
4.2.3.4 Change Password
This menu is used to allow a user to change his or her user password. The user will be prompted for the old password, then the new password and then finally asked to verify the new password again. The new password will take effect for the next login.
4.2.4 Date/Time
---- Date/Time ----
Current Date/Time : 2011-08-12 16:27:50-05:00
Time Source : Network Time Protocol
1- Time Source
2- Time Settings
3- NTP Settings
4- RTC Settings
X/M- Return to Main Menu
<ENTER> Refresh Menu
4.2.4.1 Time Source Data Entry Menu
This menu will allow the user to switch between using Network Time Protocol (NTP) or Real Time Clock (RTC) for the time. Using NTP, the system will poll an NTP server for the time. Using RTC, the values will be determined from local RTC settings.
---- Time Source ----
Time Source : Network Time Protocol
R- Switch To RTC
X- None
M- Return to Main Menu
<ENTER> Refresh Menu
4. Telnet/SSH Console continued
4.2 System Configuration continued
4.2.4.2 Time Settings
This menu allows the user to enter specific settings on how time is to be handled by the system.
Time Settings
Timezone Offset : 6:00
Using Daylight Saving Time : Yes
Daylight Saving Time Start : Second Sunday of March at 02:00:00
Daylight Saving Time End : First Sunday of November at 02:00:00
1- Timezone Offset
2- Enable/Disable DST
3- DST Start
4- DST End
A- Apply Changes
X- Date/Time
M- Return to Main Menu
<ENTER> Refresh Menu
Menu Data
Time Zone Offset
The time zone offset from UTC. All times are entered as UTC and will be adjusted by the selected offset. Time zone offsets west of UTC are entered as positive numbers, and time zone offsets east of UTC are entered as negative numbers.
Enable/Disable Daylight Saving Time (DST)
Indicate if daylight saving time is used.
DST Start
Start date and time for daylight saving time – defaults to the second Sunday of March at 2am. When changing the DST Start date and time, the user will be prompted for the following:
- Relative Position
Week in the month that DST should start (First, Second, Third, or Fourth)
- Day Of Week
Day of the week DST should start (Sunday, Monday, Tuesday, Wednesday, Thursday, Friday, or Saturday)
- Month
The month DST should start
• Time
The local 24-hour clock time that DST should start
DST End
End date and time for daylight saving time – defaults to the first Sunday of November at 2am. When changing the DST End date and time, the user will be prompted for the following:
- Relative Position
Week in the month that DST should end (First, Second, Third, or Fourth)
- Day Of Week
Day of the week DST should end (Sunday, Monday, Tuesday, Wednesday, Thursday, Friday, or Saturday)
- Month
The month DST should end
- Time
The local 24-hour clock time that DST should end
4. Telnet/SSH Console continued
4.2 System Configuration continued
4.2.4.3 SNTP Settings
This menu allows the user to control the various aspects of using NTP for setting the time and date.
SNTP Settings
Update Interval : 360
Primary Address : 0.pool.ntp.org
Primary Port : 125
Secondary Address : 1.pool.ntp.org
Secondary Port : 125

1- Update Interval
2- Primary Address
3- Primary Port
4- Secondary Address
5- Secondary Port
A- Apply Changes
X- Date/Time
M- Return to Main Menu
<ENTER> Refresh Menu
Menu Data
Update Interval
How often, in minutes, the NTP server will be polled for a time update. The value is an integer between 2 and 1440 (1 day).
Primary Address
This is the address for the primary NTP server. The default is 0.pool.ntp.org.
Primary Port
This is the port for the primary NTP server. The default is 125.
Secondary Address
This is the address of the secondary NTP server. The default is 1.pool.ntp.org.
Secondary Port
This is the port of the secondary NTP server. The default is 125.
4.2.4.4 RTC Settings
This menu allows the user to control the various aspects of using RTC for setting the time and date.
RTC Settings
Date : 2011-08-12
Day Of Week : Friday
Time : 16:26:01
1- Date
2- Day Of Week
3- Time
A- Apply Changes
X- Date/Time
M- Return to Main Menu
<ENTER> Refresh Menu
Menu Data
Date
This is the current date. The date must be entered in the format YYYY-MM-DD.
Day of Week
This is the current day of the week (Sunday through Saturday).
Time
This is the current time specified in 24-hour clock value for the current local time.
4. Telnet/SSH Console continued
4.2 System Configuration continued
4.2.5 Local Device Discovery
This menu is used to tell the system to attempt to discover any new device connections.
To be able to effectively use this menu, the user should have Write access to the SYSTEM SETTINGS facility.
Local Device Discovery
Discover Serial Devices : Yes
L- Discover Devices Now
A- Apply Changes
X- System Menu
M- Return to Main Menu
<ENTER> Refresh Menu
Menu Data
Discover Serial Devices
This is a display only data item that indicates that devices on serial ports will be discovered.
Discover Devices Now
Start local device discovery.
4. Telnet/SSH Console continued
4.2 System Configuration continued
4.2.6 Restart PowerAlert
The restart menu provides the end user with an interface to restart the SNMPWEBCARD.
If there has been a setting in the data that requires a system restart, the message “Changes have been made to require a restart to take effect” will be displayed on this menu. This message can only be cleared with a restart. Changing setting back to the original value cannot reset this condition.
Note: Not all settings that require a restart to take effect display the indicator message.
Restart
Reset To Factory Settings On Restart : No
Reset To Default Users On Restart : No

1- Reset To Factory Settings On Restart
2- Reset To Default Users On Restart
3- Restart Now
X- System Menu
M- Return to Main Menu
<ENTER> Refresh Menu

>> 3
Are you sure that you want to restart now
Y- Yes, continue and perform operation
N- Do Not Make Change

>> y
Thank you for using PowerAlert. Goodbye.
Connection to host lost.
Menu Data
Reset to Factory Settings on Restart
Reset all settings to the original factory defaults except for the network settings. Since the SNMPWEBCARD has a functioning network connection with the current configuration, the network settings are not cleared. Resetting network settings would potentially disable desired connections to the system. If necessary, the SNMPWEBCARD network settings can be reset by clearing the Advanced Settings following a factory reset using the serial CLI boot dialog, which is accessible as described in the SNMPWEBCARD Installation Manual.
Reset Default Users on Restart
Reset the default user settings including clearing any RADIUS settings as well. The following are cleared by this option:
- Authorization Settings for authorization and accounting both reset to LOCAL ONLY
- Removes all RADIUS Server definitions
- Resets the local users to the 5 default users, localadmin, localmanager, localguest, tripplite and public.
- Resets the Root password back to TrippLite
Restart Now
Once the request has been accepted, the card will restart after a 10-second delay.
4. Telnet/SSH Console continued
4.3 Network Configuration
The Network Configuration menu is used to configure the network-related items such as the IP Configuration of IPV4 and IPV6 Addresses, Remote Services such as Email Settings and the User Access Information, which defines what user service should be run (HTTP, SSH or Telnet).
All changes to the Network Configuration will be enacted upon the next restart of the web card.
---- Network Configuration
1- IP Configuration
2- User Access Interfaces
3- Remote Services
X/M- Return to Main Menu
<ENTER> Refresh Menu
4.3.1 IP Configuration
This menu allows the user to have full control over the IP settings of the SNMPWEBCARD and how it interacts with the network. Both IPV4 and IPV6 addresses are supported.
---- IP Configuration
| Host Name : mypoweralertcard |
| Domain Name : tlsoftwaredev.local |
IPV4 Address Information
[EMPTY]
| Home eth0 | |
| Method STATIC | |
| IPV4 Address 10.11.0 | 111 |
| Subnet Mask 255.0.0.0 |
IPVB Address Information
[EMPTY]
Home Method IPVB Address Prefix Length
| eth0:1 | STATIC | 2001:DB8::1:58:4F43:4849:544C | 64 |
| eth0:3 AUTO | FE80::240:9DFF:FE43:3597 | 64 | |
| eth0:4 AUTO | 2001:DB8::1:240:9DFF:FE43:3597 | 64 | |
| eth0:5 NONE | :: | 0 | |
| eth0:6 NONE | :: | 0 | |
| eth0:7 NONE | :: | 0 |
1- Host Name
2- Domain Name
3- IPV4 Settings
4- IPVB Settings
5- DNS Settings
X- Network Configuration
M- Return to Main Menu
<ENTER> Refresh Menu
4. Telnet/SSH Console continued
4.3 Network Configuration continued
4.3.1.1 Host Name
This is a character string up to 63 characters to be used as the host name for the SNMPWEBCARD.
---- Host Name ----
Current Host Name = poweralert_0641576753151
Enter a string between 1 and 63 characters for Host Name
X- Leave value unchanged
M- Return to Main Menu
4.3.1.2 Domain Data Entry Menu
This menu is used for setting the domain name associated with the SNMPWEBCARD.
---- Domain Name ----
Current Domain Name = tlsoftwaredev.local
Enter a string between 1 and 67 characters for Domain Name
X- Leave value unchanged
M- Return to Main Menu
4.3.1.3 IPV4 Settings
This menu displays current IPV4 settings and allows a user to reconfigure the method, address, subnet mask and gateway of the protocol.
---- IPV4 Settings ----
Current IPV4 Address Information
====================Home : eth0
Method : STATIC
IPV4 Address : 10.11.0.111
Subnet Mask : 255.0.0.0
Settings On Restart
====================Method : STATIC
Address : 10.11.0.111
Subnet Mask : 255.0.0.0
Gateway : 10.0.0.1
1- Method
2- Address
3- Subnet Mask
4- Gateway
A- Apply Changes
X- IP Configuration
M- Return to Main Menu
<ENTER> Refresh Menu
Menu Data
Method
The method used to determine the IPV4 Address associated with the SNMPWEBCARD. The valid values are STATIC and DHCP.
The value STATIC means that a user defined fixed IPV4 address will be used by the card. When this option is chosen, the user must also supply the subnet mask and gateway.
The value DHCP (Dynamic Host Configuration Protocol) is used to dynamically assign the IPV4 address at initialization. When DHCP option is chosen, the user cannot change the subnet mask or the gateway.
Address
Only applies when method is STATIC. This is the user-defined fixed IPV4 address.
Subnet Mask
Only applies when method is STATIC. This is user-defined subnet mask.
Gateway
Only applies when method is STATIC. This is the user-defined gateway address.
4. Telnet/SSH Console continued
4.3 Network Configuration continued
4.3.1.4 IPV6 Settings
This menu displays current IPV6 settings and allows a user to toggle the dynamic host configuration protocol and method. There can be up to six IPV6 addresses for the card. Only two of these are impacted by this menu. A user may choose to have one IPV6 Address determined through DHCP and one set statically. Any others that appear in the list have been automatically assigned by the card's software. They are shown here because they are valid IP addresses and can be used to route to the card. These addresses will have a method of AUTO.
IPVB Settings
Current IPVB Address Information
| Home | Method | IPV6 Address | Prefix Length | |
| eth0:1 | STATIC | 2001:DB8::1:58:4F43:4849:544C | 64 | |
| eth0:3 | AUTO | FE80::240:9DFF:FE43:3597 | 64 | |
| eth0:4 | AUTO | 2001:DB8::1:240:9DFF:FE43:3597 | 64 | |
| eth0:5 | NONE | :: | 0 | |
| eth0:6 | NONE | :: | 0 | |
| eth0:7 | NONE | :: | 0 | |
Settings On Restart
| DHCP : Yes |
| Static : Yes |
| Address : 2001:DB8::1:58:4F43:4849:544C |
| Prefix Length : 64 |
L - DHCP
2- Static
3- Address
4- Prefix Length
A- Apply Changes
X- IP Configuration
M- Return to Main Menu
Menu Data
DHCP
This setting determines if an IPV6 address should be obtained through DHCP.
Static
This setting determines if the user wishes to assign a static IPV6 address.
Address
If "Static" is Yes, then the address must be specified. If No, the address will not be displayed.
Prefix Length
If "Static" is Yes, then the prefix length must be specified. If No, then the prefix length will not be displayed.
4. Telnet/SSH Console continued
4.3 Network Configuration continued
4.3.1.5 DNS Settings
This menu allows the user to define only one DNS server, though there may be up to two DNS servers on the system. If DHCP is used for either the IPV4 or IPV6 address, a DNS server will be defined by DHCP. The user-defined DNS server will always be in the list.
---- DNS Settings ----
Current DNS Address Information
====================

<h1 id="address-3">|    Address</h1>
----
1    ::FFFF:8.8.8.8
2    2001:DB8::2:0:0:0:2
Settings On Restart
====================

DNS Address    : 8.8.8.8
    1- DNS Address
    X- IP Configuration
    M- Return to Main Menu
    <ENTER> Refresh Menu
Note: The user-defined DNS address may be entered in IPV4 or IPV6 format, but will be resolved to an IPV6 address format and will be displayed as such. In the above menu example, the address 8.8.8.8 was entered, but is displayed in its IPV6 format of ::FFFF:8.8.8.8.
4. Telnet/SSH Console continued
4.3 Network Configuration continued
4.3.2 Remote Services
This menu provides access to the configuration of the Remote Services provided by the SNMPWEBCARD including distributing notification emails and logs.
Remote Services
1- Email Settings
2- Syslog Settings
3- Watchdog Settings
X- Network Configuration
M- Return to Main Menu
<ENTER> Refresh Menu
4.3.2.1 Email Settings
Email Settings
Server Name : Port : 25
Authentication Login Name : Authentication Password : Digest MD5 Authentication Supported : Yes CRAM MD5 Authentication Supported : Yes Login Authentication Supported : Yes Plain Authentication Supported : Yes From Address : poweralert@tripplite.com Subject : PowerAlert Notification Include In Message Triggering Event : Yes Device : Yes Host : Yes Location : Yes
1- Server Name
2- Port
3- Authentication Login Name
4- Authentication Password
5- Digest MD5 Authentication Supported
6- CRAM MD5 Authentication Supported
7- Login Authentication Supported
8- Plain Authentication Supported
9- From Address
10- Subject
11- Include Triggering Event
12- Include Device
13- Include Host
14- Include Location
A- Apply Changes
X- Remote Services
M- Return to Main Menu
<ENTER> Refresh Menu
4. Telnet/SSH Console continued
4.3 Network Configuration continued
4.3.2.1 Email Settings continued
Menu Data
Server Name
This defines the email server address information used for sending out email messages.
Port
This defines the port on the email server used for sending out email messages.
Authentication Login Name
If authentication is required by the email server, this is the login name to use. This is optional.
Authentication Password
If authentication is required by the email server, this is the password for the authentication login name. If a Authentication Login Name is specified, then the Authentication Password must also be provided.
Digest MD5 Authentication Supported
This indicates if the email server supports Digest MD5 Authentication.
CRAM MD5 Authentication Supported
This indicates if the email server supports CRAM MD5 Authentication.
Login Authentication Supported
This indicates if the email server supports Login Authentication.
Plain Authentication Supported
This indicates if the email server supports Plain Authentication.
From Address
This is the information to be used as the "From" address in the message.
Subject
This is the information to be used as the "Subject" line in the message.
Include Triggering Event
This is a flag to indicate if information about the triggering event should be included in the email message if it is available. Values are:
- Yes
Include the data in the email message.
- No
Do not include the data in the email message.
Include Device
This is a flag to indicate if the device that the event occurred on should be included in the email message if it is available. Values are:
- Yes
Include the data in the email message.
- No
Do not include the data in the email message.
Include Host
This is a flag to indicate if the host address for the event that occurred should be included in the email if it is available. Values are:
- Yes
Include the data in the email message.
- No
Do not include the data in the email message.
Include Location
This is a flag to indicate if the device location for the event that occurred should be included in the email if it is available. Values are:
- Yes
Include the data in the email message.
- No
Do not include the data in the email message.
4. Telnet/SSH Console continued
4.3 Network Configuration continued
4.3.2.2 Remote Syslog
These settings are used to define the remote syslog servers to send log entries. There are a maximum of 4 remote syslog servers that can be defined. To enforce this maximum, there are 4 predefined slots for the servers. An available slot will have a blank Host value and default values for Port, Log Level and Facility. Once all of those slots are used, no more may be defined. To add a new server to a slot, the user will select the number for the slot and then will be prompted for all of the values for that server. When a slot is chosen for a defined remote server, the detail menu for that server will be displayed.
Syslog Settings
<h1 id="host-port-log-level-facility">Host Port Log Level Facility</h1>
1 514 EMERGENCY 0
2 514 EMERGENCY 0
3 514 EMERGENCY 0
4 514 EMERGENCY 0
- Syslog Server
X- Remote Services
M- Return to Main Menu
Remote Syslog Server
Host : remotesysloghost
Port : 514
Log Level : info
Facility : 23
1- Host
2- Port
3- Remote Syslog Severity Level
4- Facility
A- Apply Changes
C- Clear Syslog Server
X- Remote Syslog Servers
M- Return to Main Menu
<ENTER> Refresh Menu
>> a
4. Telnet/SSH Console continued
4.3 Network Configuration continued
4.3.2.2 Remote Syslog continued
Menu Data
Host
Host Name or IP address for the Remote Syslog server.
Port
This defines the port for the Remote Syslog server. The default is 514.
Log Level
The supported values are:
- Disabled – no logging to this server
- Emergency
- Alert
- Critical
- Error
- Warning
- Notice
- Info
- Debug
- Trace
The values in this list are equivalent to the Severity values as defined in RFC 4524. The two values that do not match our choices are "Disabled," which is used to turn off logging to the server without removing the definition, and "Trace" which is a more detailed severity level for debug. This will be mapped to the Debug Syslog Severity level. The default log level is "Disabled."
Facility
The logging facility values are the Syslog facilities as defined in RFC 5424.
Numerical Code Facility
| 0 | kernel | messages | ||
| 1 | user-level | messages | ||
| 2 | system | |||
| 3 | system | daemons | ||
| 4 | security/authorization | messages | ||
| 5 | messages generated internally by syslogd | |||
| 6 | line printer subsystem | |||
| 7 | network news subsystem | |||
| 8 | UUCP | subsystem | ||
| 9 | clock | daemon | ||
| 10 | security/authorization | messages | ||
| 11 | FTP | daemon | ||
| 12 | NTP | subsystem | ||
| 13 | log | audit | ||
| 14 | log | alert | ||
| 15 | clock | daemon | ||
| 16 | local use 0 (local0) | |||
| 17 | local use 1 (local1) | |||
| 18 | local use 2 (local2) | |||
| 19 | local use 3 (local3) | |||
| 20 | local use 4 (local4) | |||
| 21 | local use 5 (local5) | |||
| 22 | local use 6 (local6) | |||
| 23 | local use 7 (local7) | |||
The default logging facility is 23.
4. Telnet/SSH Console continued
4.3 Network Configuration continued
4.3.2.2 Remote Syslog continued
Example of assigning a new Remote Syslog Server
>> 1
---- Remote Syslog Server ----
---- Host ----
Current Host =
Enter a string between 1 and 128 characters for Host
>> remotesysloghost
---- Port ----
Current Port = 514
Enter an integer value for Port
>>
Entering an empty string will clear the value. Do you wish to clear this value?
Y- Yes, continue and perform operation
N- Do Not Make Change
>> n
---- Remote Syslog Severity Level ----
Current Remote Syslog Severity Level = Disabled
1- Disabled
2- Emergency
3- Alert
4- Critical
5- Error
6- Warning
7- Notice
8- Info
9- Debug
10- Trace
X- Remote Syslog Servers
>> 8
---- Facility ----
Current Facility = 23
Enter an integer between 1 and 23 for Facility
>>
Entering an empty string will clear the value. Do you wish to clear this value?
Y- Yes, continue and perform operation
N- Do Not Make Change
>> n
4. Telnet/SSH Console continued
4.3 Network Configuration continued
4.3.2.3 Watchdog Settings
The values in this menu are optional Watchdog settings that can be defined to verify the availability and accessibility of the network.
-------- Watchdog Settings
Ping Probe Settings
Enabled : No
Interval : 3
Tries Before Fail : 3
Primary Address :
Secondary Address :
NTP Probe Settings Active : No Interval : 3 Tries Before Fail : 3 Primary Address : Primary Port : 125 Secondary Address : Secondary Port : 0
1- Ping Probe Active
2- Ping Probe Interval
3- Ping Probe Tries Before Fail
4- Ping Probe Primary Address
5- Ping Probe Primary Address
6- NTP Probe Enabled
7- NTP Probe Interval
8- NTP Probe Tries Before Fail
9- NTP Probe Primary Address
10- NTP Probe Primary Port
11- NTP Probe Secondary Address
12- NTP Probe Secondary Port
A- Apply Changes
X- Remote Services
M- Return to Main Menu
Menu Data
Ping Probe Settings
Up to two addresses may be defined to periodically ping to determine the health of the network.
- Enabled
If yes, the Ping Probe is active.
- Interval
This setting is used to define how often, in minutes, a ping will be performed.
- Tries Before Fail
This is the number of times that the ping will be attempted before it is considered to be a failed ping attempt.
- Primary Address
This is the primary address that will be pinged.
• Secondary Address
This is the secondary address that will be pinged.
NTP Probe Settings
This defines up to two addresses that can be sent an NTP request to determine the health of the network.
- Enabled
If yes, the NTP Probe is active.
- Interval
This setting is used to define how often, in minutes, an NTP request will be sent.
- Tries Before Fail
This is the number of times that the NTP request fails before considering the test to be a failure.
- Primary Address
This is the primary address to send the NTP request.
- Primary Port
This is the port for the primary address.
• Secondary Address
This is the secondary address to send the NTP request.
- Secondary Port
This is the port for the secondary address.
4. Telnet/SSH Console continued
4.3 Network Configuration continued
4.3.3 User Interfaces
These menus control how the various available SNMPWEBCARD interfaces are started.
4.3.3.1 Telnet/SSH
This menu provides configuration access to the way the user and system interact with the Telnet/SSH interface.
Menu Data
Automatically Start SSH Menu
This menu asks if when the card is started, should the SSH Menu application be automatically started as well. Valid Values:
- Yes
Start the application. The default is Yes.
- No
Do not start the application.
SSH Menu Port
If the application is to be started, then this is the listening port to use. The default is 22.
Automatically Start Telnet Menu
This menu asks if when the card is started, should the Telnet Menu application be automatically started as well. Valid Values:
- Yes
Start the application. The default value is Yes.
- No
Do not start the application.
Telnet Menu Port
If the application is to be started, then this is the listening port to use. The default is 23.
Automatically Start SSH CLI
This asks if when the card is started, should the Telnet Menu application be automatically started as well. Valid Values:
- Yes
Start the application. The default value is Yes.
- No
Do not start the application.
SSH CLI Port
If the application is to be started, then this is the listening port to use. The default is 2112.
Automatically Start Telnet CLI
This asks if when the card is started, should the Telnet Menu application be automatically started. Valid Values:
- Yes
Start the application. The default value is Yes.
- No
Do not start the application.
Telnet CLI Port
If the application is to be started, then this is the listening port to use. The default is 5214.
4.3.3.2 Web Console
Menu Data
Automatically Start HTTPS
This menu asks if when the card is started, the HTTPS Web access should be started as well. Valid Values:
- Yes
Start the application.
- No
Do not start the application.
HTTPS Port
If the application is to be started, then this is the listening port to use. The default is 443.
Automatically Start HTTP
This menu asks if when the card is started, the HTTP Web access should be started as well. Valid Values:
- Yes
Start the application.
- No
Do not start the application.
HTTP Port
If the application is to be started, then this is the listening port to use. The default is 80.
4. Telnet/SSH Console continued
4.3 Network Configuration continued
4.3.3.3 SNMP Settings
This menu allows the user to configure SNMP set and get settings.
Menu Data
Automatically Start SNMP
This menu asks if when the card is started, the SNMP application should be started as well. Valid Values:
- Yes
Start the application.
- No
Do not start the application.
SNMP Port
If the application is to be started, then this is the port to use for SNMP set and get requests.
Enable SNMP V1
This indicates if SNMPv1 should be enabled on card startup.
Enable SNMP V2c
This indicates if SNMPV2c should be enabled on card startup.
Enable SNMP V3
This indicates if SNMPV3 should be enabled on card startup.
Note: The SNMP enable flags will not change the default local users created.
4.3.3.4 FTP
This menu allows the user to configure the FTP client settings.
Menu Data
Automatically Start FTP
This menu asks if when the card is started, the FTP application should be started as well. Valid Values:
- Yes
Start the application.
• No
Do not start the application.
FTP Port
If the application is to be started, then this is the port to use for FTP transfers.
4.3.3.5 Remote View Access Port
This menu allows the user to configure the specific port with which they will remotely access and view the SNMPWEBCARD.
4. Telnet/SSH Console continued
4.4 Alarms and Logging
This menu allows for in-depth viewing, configuration and acknowledgement of logs and alarms that come across the system.
Alarms and Logging
---- Alarms and Logging ----
1- Alarms
2- View Logs
3- Logging Settings
X/M- Return to Main Menu
<ENTER> Refresh Menu
4.4.1 Alarms
This menu provides a summary of all alarm conditions, where they have occurred and whether they have been acknowledged.
Alarm Summary
---- Alarm List ----
Auto Acknowledge Alarms: Off
<h1 id="device-alarm-detail-act-ack">Device Alarm Detail ACT ACK</h1>
--- ---- ---- ---- ---- ---- ---- ---- ---- ---- ---- ---- ---- ---- ---- ---- ---- ---- ---- ---- ---- ---- ---- ---- ---- ---- ---- ---- ---- ---- ---- ---- ---- ---- ---- ---- ---- ---- ---- ---- ---- ---- ---- ---- ---- ---- ---- ---- ---- ---- ---- ---- ---- ---- ---- ---- ---- ---- ---- ---- ---- ---- ---- ---- ---- ---- ---- ---- ---- ---- ---- ---- ---- ---- ---- ---- ---- ---- ---- ---- ---- ---- ---- ---- ---- ---- ---- ---- ---- ---- ---- ---- ---- ---- ---- ---- ---- ---- ---- ---- ---- ----- |
1 2 Temperature Beyond Limits No No
2 2 Humidity Beyond Limits No No
3 1 Output Off No No No No No No No No No No No No No No No No No No No No No No No No No No No No No No No No No No No No No No No No No No No No No No No No No No No No No No No No No No No No No No No No No No No No No No No No No No No No No No No No No No No No No No No No No No No No No No No No No No No No Yes
4 1 Battery Age Above Threshold No No
5 2 Temperature Beyond Limits No No
6 2 Humidity Beyond Limits Limits No No
7 1 Output Off Yes Yes Yes Yes Yes Yes Yes Yes Yes Yes Yes Yes Yes Yes Yes Yes Yes Yes Yes Yes Yes Yes Yes Yes Yes Yes Yes Yes Yes Yes Yes Yes Yes Yes Yes Yes Yes Yes Yes Yes Yes Yes Yes Yes Yes Yes Yes Yes Yes Yes Yes Yes Yes Yes Yes Yes Yes Yes Yes Yes Yes Yes Yes Yes Yes Yes Yes Yes Yes Yes Yes Yes Yes Yes Yes Yes Yes Yes Yes Yes Yes Yes Yes Yes Yes Yes Yes Yes Yes Yes Yes Yes Yes Yes Yes Yes Yes Yes Yes Yes
8 1 Battery Age Above Threshold No No
9 2 Temperature Beyond Limits No No
10 2 Humidity Beyond Limits No No
11 1 Output Off No No No
12 1 Battery Age Above Threshold No No
13 2 Temperature Beyond Limits Yes No
14 2 Humidity Beyond Limits Yes No
15 1 Output Off Yes Yes Yes Yes Yes Yes Yes Yes Yes Yes Yes Yes Yes Yes Yes Yes Yes Yes Yes Yes Yes Yes Yes Yes Yes Yes Yes Yes Yes
16 1 Battery Age Above Threshold Yes No
#- Alarm Id
A- Acknowledge All Alarms
E- Enable Alarm Auto Acknowledgement
X/M- Return to Main Menu
<ENTER> Refresh Menu
Menu Data
Auto-Acknowledge Alarms
This is a system-wide setting that will automatically acknowledge every alarm on the system. This will force alarm entries to be removed as soon as the alarm condition clears. This setting should be enabled if using with PowerAlert Network Management System (PAMS) or the PowerAlert Shutdown Agent (PANSA).
Acknowledge All Alarms
This option gives the user the ability to acknowledge all of the active alarms. Any inactive, unacknowledged alarms will be deleted when this is done. The alarms acknowledged will be marked as such and as when the alarm condition clears, it will be removed.
4. Telnet/SSH Console continued
4.4 Alarms and Logging continued
4.4.1.1 Alarm Details
The detail for each alarm can be displayed by choosing its ID. Once it is displayed the user has the option to acknowledge that alarm only.
Alarm ID
This is a number that uniquely identifies the alarm.
Device ID
This is the numeric device ID with the alarm condition. This value will be 0 if the alarm does not apply to a specific device but is associated with the system as a whole.
Detail
This is the text description of the alarm condition.
Category
This is the severity level category. Alarm categories are:
- CRITICAL
- WARNING
INFORMATION - STATUS
- OFFLINE
Active
This indicates if the alarm condition is still present
Time
This is the time that the alarm event occurred.
Time Cleared
This is only displayed for inactive alarms. It is the time that the alarm condition cleared.
Acknowledged
This indicates if the alarm has already been acknowledged.
4.4.2 View Logs
This section of the document allows the user to view the event and data log for the entire system.
To access to the log viewing menus the user must have Read access to the LOGGING facility.
View Logs
1- Data Log
2- Event Log
3- Accounting Log
X- Alarms and Logging
M- Return to Main Menu
4. Telnet/SSH Console continued
4.4 Alarms and Logging continued
4.4.2.1 Data Log
View the data logs for the system. The data log will log only variables marked in the system to be logged.
Data Log
Order : Descending
Filter : None
Time Range : Display All Entries
V- Start Viewing Log
O- Change Viewing Options
C- Clear Log
X- Logs Menu
M- Return to Main Menu
<ENTER> Refresh Menu
Data Log Viewing Options
Log Viewing Options
Order : Descending
Filter : None
Time Range : Display All Entries
1- Display Order
2- Filter
3- Choose Time Range
R- Reset To Defaults
X- Data Log
M- Return to Main Menu
<ENTER> Refresh Menu
Menu Data
View Data Log
Choosing this option will begin the data log display using the various viewing options chosen. A maximum of 10 entries will be displayed at a time. Once viewing is started, the user has the option to display the next set of entries or reverse the viewing order to go back. The next option will be offered until there are no more entries to be displayed.
Order
The logs may be displayed in ascending or descending order by time. The default is to view the log in descending order with the newest entries displayed first.
Data Log Filter
The log entries displayed may be limited by applying a filter. Only entries that match the filter criteria will be displayed. The data log can be filtered on device variables. The variables may be all of the variables for all devices (default), all variables on one specific device or up to three specific variables that are either across all devices or applied to a single device.
Data Log Filter Menu Example
Data Log Filter
Filter : None
1- Device Variable
C- Clear Filter
X- Log Viewing Options
M- Return to Main Menu
<ENTER> Refresh Menu
>> 1
4. Telnet/SSH Console continued
4.4 Alarms and Logging continued
4.4.2.1 Data Log continued
Device Selection Menu
1- Choose from All Device Variables
2- Choose Variables From Device 1 (SU1500RTXL2Ua)
3- Choose Variables From Probe (Envirosense)
X- Data Log Filter
M- Return to Main Menu
<ENTER> Refresh Menu

>> 2
Data Log Filter Device Variable Selection Menu Example
Device Variable
Filter on a maximum of 3 variables.
Filter On : Only Variables for Device 1
1- Battery Charge Remaining
2- Battery Minutes Remaining
3- Battery Temperature (C)
4- Battery Temperature (F)
5- Battery Voltage
6- Input Voltage
7- Input Voltage 1
8- Input Voltage 12
9- Input Voltage 2
10- Input Voltage 3
11- Output Current
12- Output Current 1
13- Output Current 2
14- Output Current 3
15- Output Load
16- Output Load 1
17- Output Load 2
18- Output Load 3
19- Self Test Date
X- Data Log Filter
M- Return to Main Menu
<ENTER> Refresh Menu
Time Ranges
The valid values are "Display All Entries" or "Choose Time Range."
Display All Entries
All of the entries in the log will be displayed.
Choose Time Range
The display will be limited to the chosen time range.
Oldest Entry Display Date and Time
No entries in the log that occurred before this date and time will be displayed. The default is the date and time of the first entry recorded in the log.
Oldest Entry Date
The oldest entry date is specified in the format YYYY-MM-DD.
Oldest Entry Time
The oldest entry time is specified in 24-hour clock format of HH:MM[:SS].
Newest Entry Display Date and Time
No entries in the log that occurred after this date and time will be displayed. The default is the current time.
Newest Entry Date
The newest entry date is specified in the format YYYY-MM-DD.
Newest Entry Time
The newest entry time is specified in 24-hour clock format of HH:MM[:SS].
Clear Log
This option will clear all of the entries in the data log.
4. Telnet/SSH Console continued
4.4 Alarms and Logging continued
4.4.2.2 Event Log
This menu allows the user to view the event log entries for the entire system.
Event Log
Order : Descending
Category : All
Time Range : Display All Entries
V- Start Viewing Log
0- Change Viewing Options
C- Clear Log
X- Logs Menu
M- Return to Main Menu
<ENTER> Refresh Menu
>>
Start Viewing Log
Choosing this option will begin the data log display. Only 10 entries will be displayed at a time using the various viewing options chosen. Once viewing is started the user has the option to display the next set of entries or reverse the viewing order to go back. The next option will be offered until there are no more entries to be displayed.
---- Display Event Log ----
Display Order: Descending
Date: 2011-08-12
<h1 id="category-time-device-description">Category Time Device Description</h1>
19 WARNING 15:01:00 1 Self Test Failed
18 CRITICAL 15:00:56 1 Output Off
13 INFO 14:54:41 1 Battery Age Above Threshold
12 WARNING 14:54:41 1 Self Test Failed
11 CRITICAL 14:54:37 1 Output Off
Date: 2011-08-11
<h1 id="category-time-device-description-2">Category Time Device Description</h1>
6 INFO 19:00:01 1 Battery Age Above Threshold
5 WARNING 13:26:09 1 Self Test Failed
4 CRITICAL 13:26:04 1 Output Off
X- Event Log
M- Return to Main Menu
<ENTER> Refresh Menu
>>
Menu Data
The event entries are grouped by the date the events occurred. When the date changes a new date heading is printed.
Event ID
This is the ID of the event.
Category
This is the severity category of the event. The possible values for the event category are:
• NORMAL
• CRITICAL
- WARNING
• INFORMATION
- STATUS
- OFFLINE
Time
This is the time that the event occurred.
Device ID
For an event that occurs on a specific device, this is the ID of that device.
Description
This is a text description of the event that occurred.
4. Telnet/SSH Console continued
4.4 Alarms and Logging continued
4.4.2.2 Event Log continued
Change Viewing Options
Changing the viewing options will allow the user to decide the order to view the log as well as define filters to limit that logs to be viewed. These options are active only for the single instance of viewing the log and are not persisted.
---- Log Viewing Options ----
Order : Descending
Category : All
Time Range : Display All Entries
1- Display Order
2- Category
3- Choose Time Range
R- Reset To Defaults
X- Event Log
M- Return to Main Menu
<ENTER> Refresh Menu
>>
Menu Data
Display Order
This is the order, by date and time, that the events will be displayed. The valid values are Ascending and Descending. The default value is Descending.
Category
The Category field allows the user to limit which event logs display by limiting the severity categories. Multiple categories may be chosen to be displayed.
Example Menus for Choosing Multiple Event Categories
Device Event Category
1- NORMAL
2- CRITICAL
3- WARNING
4- INFORMATION
5- STATUS
6- OFFLINE
X- Device Event Menu
M- Return to Main Menu
<ENTER> Refresh Menu
>> 2
Device Event Category
Current Selected Categories: CRITICAL
1- NORMAL
2- WARNING
3- INFORMATION
4- STATUS
5- OFFLINE
C- Clear Selection
X- Device Event Menu
M- Return to Main Menu
<ENTER> Refresh Menu
>> 2
Device Event Category
Current Selected Categories: CRITICAL, WARNING
1- NORMAL
2- INFORMATION
3- STATUS
4- OFFLINE
C- Clear Selection
X- Device Event Menu
M- Return to Main Menu
<ENTER> Refresh Menu
>> 2
4. Telnet/SSH Console continued
4.4 Alarms and Logging continued
4.4.2.2 Event Log continued
Device Event Category
Current Selected Categories: CRITICAL, WARNING, INFORMATION
1-NORMAL
2-STATUS
3-OFFLINE
C-Clear Selection
X-Device Event Menu
M-Return to Main Menu
<ENTER>Refresh Menu
>> 2
Device Event Category
Current Selected Categories: CRITICAL, WARNING, INFORMATION, STATUS
1-NORMAL
2-OFFLINE
C-Clear Selection
X-Device Event Menu
M-Return to Main Menu
<ENTER>Refresh Menu
>> 2
Device Event Category
Current Selected Categories: CRITICAL, WARNING, INFORMATION, STATUS, OFFLINE
Maximum Number Of Categories Selected
C-Clear Selection
X-Device Event Menu
M-Return to Main Menu
<ENTER>Refresh Menu
>>
Time Ranges
The valid values are "Display All Entries" or "Choose Time Range."
Display All Entries
All of the entries in the log will be displayed. This is the default setting.
Choose Time Range
The display will be limited to the chosen time range.
Oldest Entry Display Date and Time
No entries in the log that occurred before this date and time will be displayed. The default is the date and time of the first entry recorded in the log.
Oldest Entry Date
The oldest entry date is specified in the format YYYY-MM-DD.
Oldest Entry Time
The oldest entry time is specified in 24-hour clock format of HH:MM[:SS].
Newest Entry Display Date and Time
No entries in the log the occurred after this data and time will be displayed. The default is the current time.
Newest Entry Date
The newest entry date is specified in the format YYYY-MM-DD.
Newest Entry Time
The newest entry time is specified in 24-hour clock format of HH:MM[:SS].
Clear Log
This option will clear all of the entries in the event log.
4. Telnet/SSH Console continued
4.4 Alarms and Logging continued
4.4.3 Logging Settings
This section defines the preference settings for the various types of logs. These setting include things like maximum log file sizes, logging severity levels and actions to take when the log is rotated.
---- Logging Settings ----
1- Accounting Log
2- Application Log
3- Data Log
4- Event Log
5- Logging Report Format
X- Alarms and Logging
M- Return to Main Menu
<ENTER> Refresh Menu
>>
4.4.3.1 Accounting Log Settings
---- Accounting Log
Maximum Entries : 1024
Actions On Rotate : No Actions Defined
1- Maximum Entries
2- Actions On Rotate
X- Logging Settings
M- Return to Main Menu
<ENTER> Refresh Menu
>>
Menu Data
Maximum Entries
This is the maximum number of entries that can be in the log before it is rotated. Valid values are integers between 64 and 2048. The default value is 2048.
Actions on Rotate
This defines the actions to take when the log is rotated. The accounting log may be archived by sending to a single destination using email or HTTP. The log may be sent to multiple destinations by creating multiple actions.
4.4.3.2 Application Log Settings
---- Application Log
Console Log Severity Level : Info

1- Console Log Severity Level
X- Logging Settings
M- Return to Main Menu
<ENTER> Refresh Menu

>> 1
Menu Data
Console Log Severity Level
This is the minimum level of severity that is logged. For example, if “Error” level is chosen, then “Error,” “Critical,” “Alert” and “Emergency” logs will be displayed on the console log.
The valid logging levels for the console log are:
- Disabled
- Warning
- Emergency
- Notice
- Alert
- Info(default)
- Critical
- Debug
- Error
- Trace
4. Telnet/SSH Console continued
4.4 Alarms and Logging continued
4.4.3.3 Data Log Settings
The data log settings are used to define the maximum data log size and actions to take when the log is rotated.
Data Log
Maximum Entries : 2048
Actions On Rotate :
Format Protocol Delivery Target
log smtp Admin John Doe
1- Maximum Entries
2- Actions On Rotate
X/M- Return to Main Menu
Menu Data
Maximum Entries
The maximum number of entries that can be in the log before it is rotated. The valid values are an integer between 64 and 2048. The default value is 2048.
Actions On Rotate
This defines the actions to take when the log is rotated. The log data may be archived by sending to a single destination using email or HTTP. The log may be sent to multiple destinations by creating multiple actions.
Actions On Rotate
Format Protocol Delivery Target
1 log smtp Admin John Doe
- Edit Rotate Action
O- Add New Rotate Action
X- Data Log
M- Return to Main Menu
Rotate Action
Format : log Protocol : smtp Delivery Target : Admin John Doe
1- Protocol
2- Delivery Target
A- Apply Changes
D- Delete
X- Actions On Rotate
M- Return to Main Menu
4. Telnet/SSH Console continued
4.4 Alarms and Logging continued
4.4.3.3 Data Log Settings continued
Menu Data
Protocol
This defines the protocol to use when sending the data log file. The valid values are:
- smtp – email to destination
- http – use http or https to send to destination
Destination
This field is used to select the destination for the data log file. When the protocol is SMTP, the destination will be an email contact. When the protocol is HTTP, the destination will be an HTTP contact.
If no contacts have been created, or the desired destination has not already been created, the user may create a new destination from this menu. The contacts added here are then also available for use on other menus using the contacts, i.e., the email notification actions.
4.4.3.4 Event Log Settings
The event log settings are used to define the maximum event log size and actions to take when the log is rotated.
Event Log
Maximum Entries : 2048
Actions On Rotate :
Format Protocol Delivery Target
xml http httpupload
1- Maximum Entries
2- Actions On Rotate
X- Logging Settings
M- Return to Main Menu
<ENTER> Refresh Menu
Menu Data
Maximum Entries
The maximum number of entries that can be in the log before it is rotated. The valid values are an integer between 64 and 2048. The default value is 2048.
Actions On Rotate
This defines the actions to take when the log is rotated. The log data may be archived by sending to a single destination using email or HTTP. The log may be sent to multiple destinations by creating multiple actions.
Actions On Rotate Delivery Target
<h1 id="format-protocol">Format Protocol</h1>
1 xml http httpupload
#- Edit Rotate Action
O- Add New Rotate Action
X- Event Log
M- Return to Main Menu
<ENTER> Refresh Menu
----- Rotate Action
Format : xml
Protocol : http
Delivery Target : httpupload
1- Protocol
2- Delivery Target
A- Apply Changes
D- Delete
X- Actions On Rotate
M- Return to Main Menu
<ENTER> Refresh Menu
4. Telnet/SSH Console continued
4.4 Alarms and Logging continued
4.4.3.4 Event Log Settings continued
Menu Data
Protocol
This defines the protocol to use when sending the event log file. The valid values are:
- smtp – email to destination
- http – use http or https to send to destination
Destination
This field is used to select the destination for the data log file. When the protocol is SMTP, the destination will be an email contact. When the protocol is HTTP, the destination will be an HTTP contact.
If no contacts have been created, or the desired destination has not already been created, the user may create a new destination from this menu. The contacts added here are then also available for use on other menus using the contacts, i.e., the email notification actions.
4.4.3.5 Format Settings
---- Format
Format=xml
1- csv
2- log
3- xml
X- Rotate Action
M- Return to Main Menu
<ENTER> Refresh Menu
>>
Menu Data
Format
This defines the format of the log file to be sent on rotation. The valid values are:
- csv – comma separated values
- log - log text file
- xml – xml format file
4. Telnet/SSH Console continued
4.5 About
This menu contains information about PowerAlert. The data on this menu is read-only. The data on this menu is:
About PowerAlert
OS : NetOS 7.5.2t1 flash: 16777216B sdram: 33554432B processor: NS9210B-0-I75
Agent Type : NETOS7
MAC Address : 00:06:67:22:7D:D2
Card Serial Number : 9936AYOAC732600001
Driver Version : 12.06.0062.0999.0999
Engine Version : 12.06.0062.0999.0999
Driver File Status : Normal
X/M- Return to Main Menu
<ENTER> Refresh Menu
5. Command Line Interface
The SNMPWEBCARD 12.06.006X firmware adds support for new features on the command line interface (CLI). Many of the functional controls available in the Web console and Telnet interface are now available on the command line interface. The CLI allows for the use of user-created scripts and easier integration with third party systems.
The CLI can be accessed on the SNMPWEBCARD via the management serial port, via SSH on the default port 2112, and via Telnet on the default port 5214. For security purposes, some features are only enabled on the serial and SSH interfaces. (Refer to section 4.3.2 for more information on starting the CLI from the Telnet or SSH menu.)
This section of the user manual will familiarize you with the way the CLI interprets your input and the meaning of the CLI output.
5.1 Syntax Conventions
The PowerAlert CLI uses its own standard syntax to interpret your input. The syntax defines standard conventions which are used to describe any problems with the input. The next definitions are important for understanding the rest of this document and the CLI error messages.
- Program - The 'program' refers to the software module that will interpret the user input and perform the work.
- Program Name - The command keyword that is typed to invoke the program.
- Directive - The entire phrase entered, including the program name and any arguments. The directive is broken down into several parts of grammar, like a sentence.
- Mode - The mode tells the program what to do with your arguments. A program can usually perform several different operations on the same data. Program modes are: List, Add, Update, Delete, and Test. In some programs, the mode can be inferred without your specification; in other programs, entering the mode will be required.
- Mode Modifier - If the mode alone can't describe your request, the program will have a mode modifier list. The mode modifier usually specifies 'what' to list and 'where' and 'what' to add, update, or delete.
- Identifier - The update and delete modes support entering a numeric identifier to choose what data your new input will affect. The list mode often allows an optional identifier to display more information about a single set of data.
- Option - The option precedes your input parameter and specifies which value you are updating. An option will always begin with a dash followed by a letter or double dash followed by a number or word.
- Parameter - If an option requires a parameter, the parameter will follow the option or be appended to the option (for example when choosing SNMPv3: '--v3').
The directive syntax breaks down along the grammatical boundaries shown below.

text_image
----Directive---- ----Preamble-----|------Predicate---- -Program--|-Mode-|-Mode Modifier-|-Identifier-|----Option List---- |-Subject--|-Verb-|-Direct Object-----|----Indirect Object (List)---- addrbook -u email 4 --name santa --email santa@morthpole.orgAll pieces of syntax are separated with single spaces. The interface does not support input containing spaces at this time, and the input cannot include a single quote character.
5. Command Line Interface continued
5.2 Manual Pages
Each program has its own man page (short for 'manual page') built right into the software. You will not have to remember long lists of directives. The information you need is available any time by typing 'man' followed by the program name.
The program synopsis in each program manual page describes the format of the directive and the valid modes and options for the program. The synopsis uses a familiar format to indicate when you should enter your own data and when you should type exactly what you see. The typical synopsis format interpretation is show in the next table.
| Synopsis Format Interpretation of the Format | |
| < > Angle brackets mean the argument is required. | |
| [ ] Square brackets mean the argument is optional. | |
| | The vertical bar is used to separate mutually exclusive choices. | |
| ... A list of space-separated parameters can be entered here. | |
| You must enter a value. The value is chosen by you. The ‘word’ loosely describes what the value is supposed to mean. | |
| You must enter a value. The value is exactly either ‘a’ or ‘b’. | |
| [--word] The ‘--word’ option is optional, but if used then ‘value’ is required. | |
| --word | The ‘--word’ option supports a list of parameters separated by spaces. The values are chosen by you. You do not append a ‘1’ or ‘N’ onto your input. Usually the values in a list are data identifiers, but they are sometimes preceded by a ‘+’ or ‘-’ indicating your choice to add or remove the identifier within the directive’s context. |
5.3 Output Conventions
Additions, updates and deletions usually result in simple output messages prefixed with either an error code or a data identifier return code followed by a colon and a short result string. The prefixes are described in the next table.
| Result Prefix Interpretation of the Result Prefix | |
| X00: | The ‘X’ indicates that program is responding with an error. If available, the error code will follow the ‘X’, and the result string will contain an error message. |
| 00: | The program is indicating a success message if no ‘X’ is preceding the return value. If the number is non-zero, the return value is the data identifier of the last piece of data used. For example, in add mode, the return value will be the data identifier of the new data. To update this data later, provide the same identifier to the update mode. |
| YN: The program is requesting a Yes or No confirmation before taking action. | |
| QQ: The program is requesting additional input that is not a simple Yes or No. | |
| ...: The program has dispatched your request and it should happen in a few moments. | |
5.4 Getting Started with the PowerAlert CLI
Remember, most of your configuration changes will take effect immediately so you can try out your configuration before committing to it. However, the changes are not saved permanently until you 'reboot' the SNMPWEBCARD. You should reboot when your configuration is complete and prior to testing configurations that simulate a power outage. Refer to Section 2 for additional information.
When you first log in to the CLI, you can type 'help' to invoke the 'help' program and see a list of all programs. Each program does only a small amount of the work, and programs can be used in succession to accomplish a task. The next paragraphs describe example goals and which programs can be used together to accomplish them.
Note: Most programs are available only after the system has fully booted.
5. Command Line Interface continued
How Do I ...
See the list of available programs?
- Use the 'help' program to display all available programs.
See the manual for any program?
- Use the 'man' program to display the manual for any program. It is invoked by typing 'man
' without the angle brackets and the 'program name' replaced by the name of the program you are interested in.
See my devices?
- Use the program 'devmgr' to view the list of devices and individual device details.
- Use the program 'devselect' to choose a device to work with.
See my device status?
- Use the program 'devstatus' to view the device status (called 'variables').
- Use the program 'alarm' to view the active alarms.
Set the time?
- Use either 'hwclock' to change the Real-Time Clock (RTC) or 'ntpcfg' to change the network time settings.
- Use either 'hwclock' to synchronize the system clock or skip ahead and use 'reboot' to persist the changes and synchronize automatically on the next restart.
Set up email?
- Use the program 'addrbook' to add your email addresses.
- Use the program 'emailcfg' to configure outgoing email.
- [Optional] Use the 'action' program to create an email action. Do this if you want to add only a few of the email addresses or if you want to make the system delay before emailing.
- [Optional] Use the 'actcfg' program to assign the email action to alarm triggers. By default an email action is already assigned to all alarms, but if you made a new action you will assign it yourself.
Control my power protection device loads?
- [Optional] Use the program 'loadcfg' to configure ramp and shed settings and create load groups.
- Use the program 'loadctl' to control loads and load groups, the main load, and execute ramp or shed sequences.
Add a user or SNMP Community?
- Use the program 'user' to add or modify local user accounts & SNMP communities.
- Use the program 'passwd' to set the password for any new non-SNMP account, which will cause the account to activate.
- [Optional] Use the 'snmpcfg' program to modify SNMP protocol access.
Reset PowerAlert to factory default settings?
- Use the program 'freset' to reset all user data to factory default.
- Use the 'reboot' program to bring the system down and back up with factory default settings.
6. Troubleshooting
If you encounter a problem:
- Confirm that the SNMPWEBCARD is turned on.
-
Check all connections and confirm that they are secure.
-
Refer to the following list of problems and implement any recommended solutions.
- If the problem persists after trying the recommended steps, contact Tripp Lite Technical Support.
| Problem Possible Solution | |
| The IP address of the SNMPWEBCARD is unknown. | If your network’s DHCP server assigned an IP address to the SNMPWEBCARD, contact your network administrator to discover the IP address assigned to the card or view it during terminal session at boot-up. You’ll need to know the MAC address of the SNMPWEBCARD. If your network does not use DHCP, or if you need to assign a static IP address for another reason, follow the instructions for assigning a static IP address via terminal mode configuration. Refer to the printed manual that came with your SNMPWEBCARD or Tripp Lite device for more information. |
| Unable to perform SNMP get operations. | Check the SNMP settings of the SNMPWEBCARD (See Section 3.8.2). The IP address and community name of the device or application trying to perform the SNMP get operation must be entered in “NMS Access Settings” with “Read Only” or “Read/Write” permission. |
| Unable to perform SNMP set operations. | Check the SNMP settings of the SNMPWEBCARD (See Section 3.8.2). The IP address and community name of the device or application trying to perform the SNMP set operation must be entered in “NMS Access Settings” with “Read/Write” permission. |
| Unable to receive traps at your management station. | Check the SNMP settings of the SNMPWEBCARD (See Section 3.8.2). Verify that you have added an SNMP trap action profile to send traps to the IP address of the management station of choice. See Section 3.6 for configuring actions. |
| Unable to use autodiscovery to find the agent from your management station. | Check the SNMP settings of the SNMPWEBCARD (See Section 3.8.2). The IP address and community name of the management station must be entered in “NMS Access Settings” with “Read/Write” permission. Versions below 12.04.0040 are not supported. |
| SNMPWEBCARD email notifications are not working. | Verify that you have added an email action profile to send emails to the appropriate destination entered in the address book. See Section 3.6 for configuring actions. |
7. Technical Support
Before contacting Tripp Lite Technical Support, refer to Section 6 – Troubleshooting for possible solutions. If you are still unable to resolve the problem, you can reach Tripp Lite Technical Support here:
www.tripplite.com/support
Email: techsupport@tripplite.com
Tripp Lite has a policy of continuous improvement. Specifications are subject to change without notice.
8. Appendix
Configuring RADIUS Authentication in PowerAlert
PowerAlert 062 supports RADIUS authentication, authorization and accounting. In addition to configuring PowerAlert to use RADIUS, one or more RADIUS servers must be configured to provide the appropriate exchange of information. This document assumes the following:
- The user understands the steps necessary to configure one or more RADIUS hosts in PowerAlert
- The user understands the steps necessary to configure PowerAlert to use RADIUS for authentication and/or accounting either as a sole option or in relationship to local authentication and/or accounting
- Some flavor of RADIUS server has been installed and configured and is accessible by PowerAlert
For the rest of this document, when we reference a specific RADIUS server type, we will be using FreeRadius (www.freeradius.org) as our default. Your specific configuration may vary.
Configuring the Dictionary
This refers to the definition of the attributes that can be exchanged between a RADIUS server and a RADIUS client, in this case PowerAlert. Sample A of this document shows a sample 'dictionary.triplite' configuration for use with a FreeRadius server.
The first thing that needs to be configured is a Vendor ID for TrippLite; the assigned code is 850. This is necessary so that the vendor-specific attributes that PowerAlert will send to the RADIUS server are understood and accepted. Likewise, it allows the server to respond with vendor-specific information. The configuration requires and defines three string attributes.
TrippLite-Authorization
This string contains the authorization definition for a defined user. It is how PowerAlert determines what facilities within PowerAlert may be accessed or modified by a given user.
TrippLite-Outlet-Realms
This string contains the individual outlet realms for which a user is granted access. This is how PowerAlert has implemented user-controlled outlets.
TrippLite-Message
This is a simple string containing a textual message that will be sent from PowerAlert to the RADIUS server during the accounting process.
Once the dictionary has been configured, the RADIUS server should now understand how to handle information exchange with PowerAlert.
Configuring the Users
Each user requires a unique configuration. For the sample FreeRadius server, those entries go into a single file called "users." A sample of the configuration file is given in Sample B.
Sample Administrative User
This entry in the user table defines a sample administrative user for PowerAlert:
radiusadmin Cleartext-Password := "radiusadmin"
Reply-Message = "Hello, %{User-Name}",
TrippLite-Authorization = "default=rw",
Session-Timeout = 2400,
Idle-Timeout = 1200
This entry defines a user with the name of 'radiusadmin' and a password of 'radiusadmin'. It is important to note that PowerAlert will only generate authentication requests with a Cleartext-Password; no other exchange mechanism is supported at this time.
The Reply-Message line simply indicates a textual response sent back if the user authenticates successfully. It is not required by PowerAlert but is a standard component of a response to an authentication request.
The TrippLite-Authorization string is required in all successful authentication responses. Failure to return said string will default the user to no authorization. In this case, as described in the dictionary, this user has default Read-Write access to all of the facilities within PowerAlert.
The Session-Timeout and Idle-Timeout strings are not defined in the dictionary. They are not vendor-specific attributes but are instead part of the standard RADIUS configuration defined by RFC 2865.
Session-Timeout “sets the maximum number of seconds of service to be provided to the user before termination of the session or prompt. This Attribute is available to be sent by the server to the client in an Access-Accept or Access-Challenge.” In the case of PowerAlert, if this value is not sent, a user’s session will never timeout.
Idle-Timeout “sets the maximum number of consecutive seconds of idle connection allowed to the user before termination of the session or prompt. This Attribute is available to be sent by the server to the client in an Access-Accept or Access-Challenge.” In the cause of PowerAlert, if this value is not sent, a user’s session will never expire due to inactivity.
Sample Managerial User
This entry in the user table defines a sample managerial user for PowerAlert:
radiusmanager Cleartext-Password := "radiusmanager"
Reply-Message = "Hello, %{User-Name}",
TrippLite-Authorization =
"default=rw,security=ro",
Session-Timeout = 1200,
Idle-Timeout = 600
For the most part, this is identical to the administrative account above: A user name and password on the first line, a Reply-Message on the second line, and a Tripplite-Authorization string on the third line. We end the entry with slightly shorter Session-Timeout and Idle-Timeout entries. The only major difference between the default manager and the default administrator is that the manager is explicitly denied Write access to the security facility, meaning they can view security resources, such as user accounts and authentication schemes, but not change them.
8. Appendix
Sample Guest User
This entry in the user table defines a sample guest user for PowerAlert:
radiusguest Cleartext-Password := "radiusguest"
Reply-Message = "Hello, %{User-Name}",
TrippLite-Authorization = "default=ro,security=none",
TrippLite-Outlet-Realms = "1-10,31",
Session-Timeout = 600,
Idle-Timeout = 300
Once again, the format remains fairly standard in terms of username, password, Reply-Message and timeout parameters. The shorter idle and session timeout values reflect the limited scope of access. The two major changes are in the TrippLite-Authorization and TrippLite-Outlet-Realm definitions. The guest user has read-only access to all facilities by default and explicitly has no access to the security realm. This gives the guest the ability to monitor PowerAlert but not change any of the configuration.
This is also the only entry with a TrippLite-Outlet-Realm definition. In this case, while the guest can monitor the rest of the system, they have been provided the ability to control individual outlets on devices that support them that fall within the realms of 1, 2, 3, 4, 5, 6, 7, 8, 9, 10 and 31. In this manner, an account can be restricted to only be able to change the state of those specific outlets.
Configuring Client Access
Once the dictionary and user configurations are in place, the RADIUS server must be configured to allow PowerAlert to send requests and receive responses. This is very specific to the particular RADIUS server involved, so check your documentation carefully. For the FreeRadius server, entries would be added to the clients.conf file following the instructions provided with the sample entries.
8. Appendix
Sample A
Sample 'dictionary.tripplite' FreeRadius Configuration File
<h1 id="section"># # # # # # # # # # # # # # # # # # # # # # # # # # # # # # # # # # # # # # # # # # # # # # # # # # # # # # # # # # # # # # # # # # # # # # # # #</h1>
VENDOR TrippLite
BEGIN-VENDOR TrippLite
#
<h1 id="access-is-granted-to-the-various-facilities-within-the-poweralert-software">Access is granted to the various facilities within the PowerAlert software</h1>
<h1 id="by-means-of-the-tripplite-authorization-attribute-which-is-a-comma-delimited">by means of the TrippLite-Authorization attribute, which is a comma-delimited</h1>
<h1 id="string-of-facility-code-to-access-level-pairs">string of facility-code to access-level pairs.</h1>
<h1 id="facility-codes-default-security-networksettings-systemsettings-systreminfo">Facility Codes: default, security, networksettings, systemsettings, systreminfo,</h1>
#
logging, devicestatus, devicecontrols, deviceevents,
#
deviceloads, actions, schedules, discovery
<h1 id="access-levels-none-or-0-ro-or-1-rw-or-2">Access Levels: none (or 0), ro (or 1), rw (or 2)</h1>
<h1 id="example-defaultrwsecuritynonesystemsettingsro">Example: default=rw,security=none,systemsettings=ro</h1>
- The default access for all non-specified facilities is read/write
- The user has no access to the security facility
- The user has read-only access to the system settings
ATTRIBUTE TrippLite-Authorization 1 string
#
<h1 id="comma-delimited-string-of-outlet-security-realms-from-1-through-32-to-which">Comma-delimited string of outlet security realms from 1 through 32 to which</h1>
<h1 id="an-otherwise-restricted-user-has-read-write-access">an otherwise restricted user has read-write access.</h1>
<h1 id="example-1-51015">Example: 1-5,10,15</h1>
<h1 id="user-has-read-write-access-to-realms-1-2-3-4-and-5">- User has read-write access to realms 1, 2, 3, 4 and 5</h1>
<h1 id="user-has-read-write-access-to-realms-10-and-15">- User has read-write access to realms 10 and 15</h1>
ATTRIBUTE TrippLite-Outlet-Realms 2 string
#
<h1 id="simple-message-usually-sent-as-part-of-accounting">Simple message, usually sent as part of accounting</h1>
ATTRIBUTE TrippLite-Message 3 string
END-VENDOR TrippLite
8. Appendix
Sample B
Sample 'users' FreeRadius Configuration File Snippet
The following snippet defines simple sample of an administrative, managerial and guest account for PowerAlert.
<h1 id="poweralert-entries">PowerAlert Entries</h1>
#
radiusadmin    Cleartext-Password := "radiusadmin"
Reply-Message = "Hello, %{User-Name}"
TrippLite-Authorization = "default=rw",
Session-Timeout = 2400,
Idle-Timeout = 1200
radiusmanager Cleartext-Password := "radiusmanager"
Reply-Message = "Hello, %{User-Name}",
TrippLite-Authorization = "default=rw,security=ro",
Session-Timeout = 1200,
Idle-Timeout = 600
radiusguest    Cleartext-Password := "radiusguest"
Reply-Message = "Hello, %{User-Name}",
TrippLite-Authorization = "default=no,security=none",
TrippLite-Outlet-Realms = "1-10,31",
Session-Timeout = 600,
Idle-Timeout = 300

text_image
TRIPP·LITE