Healthy Care H7182 - Kit de soins Fisher Price - Free user manual and instructions
Find the device manual for free Healthy Care H7182 Fisher Price in PDF.

| Product Type | Baby Care Kit |
| Model | Healthy Care H7182 |
| Brand | Fisher Price |
| Package Dimensions | 25 x 15 x 5 cm (9.8 x 5.9 x 2 in) |
| Package Weight | 0.3 kg (0.66 lb) |
| Power Source | 2x AAA batteries (for thermometer) |
| Battery Life | Approximately 300 readings |
| Main Functions | Digital thermometer (ear/forehead), nasal aspirator, nail clipper, hair brush, comb |
| Thermometer Type | Infrared ear and forehead thermometer |
| Temperature Range | 34.0°C – 42.2°C (93.2°F – 108.0°F) |
| Accuracy | ±0.2°C (±0.4°F) between 35.5°C – 42°C |
| Measurement Time | 1 second |
| Memory | Last reading |
| Nasal Aspirator Type | Bulb syringe with soft silicone tip |
| Nail Clipper Features | Safety rounded blades, no sharp edges |
| Materials | BPA-free plastics, silicone, stainless steel |
| Cleaning and Maintenance | Wipe with a soft, damp cloth; do not immerse in water. Clean thermometer probe with alcohol wipe after each use. |
| Safety Features | Automatic shut-off after 1 minute; low battery indicator; soft, flexible tips on aspirator and clipper |
| Recommended Age | Newborn and up |
| Replaceable Parts | Batteries; thermometer probe covers (if applicable) |
| Repairability | Not user-serviceable; contact Fisher Price support for issues |
| Warranty | 1 year limited |
Frequently Asked Questions - Healthy Care H7182 Fisher Price
User questions about Healthy Care H7182 Fisher Price
0 question about this device. Answer the ones you know or ask your own.
Ask a new question about this device
Download the instructions for your Kit de soins in PDF format for free! Find your manual Healthy Care H7182 - Fisher Price and take your electronic device back in hand. On this page are published all the documents necessary for the use of your device. Healthy Care H7182 by Fisher Price.
USER MANUAL Healthy Care H7182 Fisher Price
natural_image
Illustration of a woman feeding a baby in a stroller, both seated at a table (no text or symbols present)IMPORTANT!
KEEP INSTRUCTIONS FOR FUTURE REFERENCE.

WARNING
Prevent serious injury or death from falls or sliding out:
- The child should at all times wear a safety harness correctly fitted and adjusted. The tray is not designed to hold the child in the chair.
- It is recommended that only children capable of sitting upright unassisted use the high chair in the upright position.
• Always keep child in view while in the high chair. - Never leave child unattended.
- Do not use the high chair unless all components are correctly fitted and adjusted.
• Always leave wheels locked. - Never use near steps.
Prevent injury from burns: Do not place this high chair near open fires or any hot surfaces.
IMPORTANT! Place the high chair on a level, stable surface away from electrical flexes. Be sure to keep electrical flexes out of child's reach.
- Please read these instructions before assembly and use of this product.
• Adult assembly is required. - Tool needed for assembly: Phillips screwdriver (not included).
- Requires three "AA" (LR6) alkaline batteries for electronic toy operation (not included).
- Product features and decorations may vary from illustrations.
• GREAT BRITAIN
Mattel UK Ltd, Vanwall Business Park, Maidenhead SL6 4UB. Helpline: 01628 500303; www.service.mattel.com/uk.
• AUSTRALIA: Mattel Australia Pty. Ltd., 658 Church Street, Locked Bag #870, Richmond, Victoria 3121 Australia. Consumer Advisory Service 1300 135 312.
- NEW ZEALAND: 16-18 William Pickering Drive, Albany 1331, Auckland.
• ASIA: Mattel East Asia Ltd, Room 1106, South Tower, World Finance Centre, Harbour City, Tsimshatsui, HK, China.
- MALAYSIA: Diimport & Diedarkan Oleh: Mattel SEA Ptd Ltd. (993532-P) Lot 13.5, 13th Floor, Menara Lien Hoe, Persiaran Tropicana Golf Country Resort, 47410 PJ. Tel: 03-78803817, Fax: 03-78803867.

CAUTION
This package contains small parts in its unassembled state. Adult assembly is required.
Parts
natural_image
Technical line drawing of a mechanical component with flared top and side cutouts (no text or symbols)Pad
natural_image
Line drawing of a helmet with two arms and a seat, no text or symbols presentSeat Back
natural_image
Top-down line drawing of a car rear bumper with no text or symbolsSeat Bottom

2 Frames

natural_image
Simple line drawing of a U-shaped mechanical component (no text or symbols)Front Base
natural_image
Diagram of a back base structure with two vertical supports and four wheels (no text or symbols)Back Base
natural_image
Simple line drawing of a car rear bumper (no text or symbols)Footrest

2 Seat Bottom Tubes
Hinge Rod
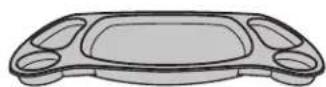
Food Tray
natural_image
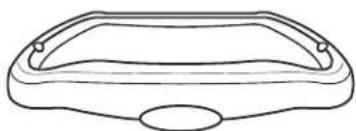
Simple line drawing of a rectangular object with rounded edges and a central oval base (no text or symbols)Base Tray

natural_image
Simple line drawing of a cartoon character with a smiley face and two connected devices (no text or symbols)2 Teether Toys
Electronic Toy
Note: Tighten or loosen all screws with a Phillips screwdriver. Do not over-tighten the screws.

8 x 1,9 cm Screws - 8 #10 x 2,2 cm Black Screw - 7
Shown Actual Size
Assembly
IMPORTANT! Before assembly and each use, inspect this product for damaged hardware, loose joints, missing parts or sharp edges. DO NOT use if any parts are missing or broken. Contact Mattel for replacement parts and instructions if needed. Never substitute parts.
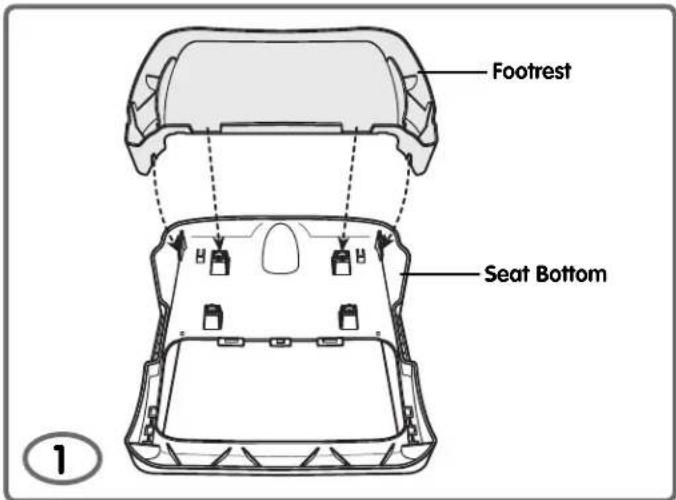
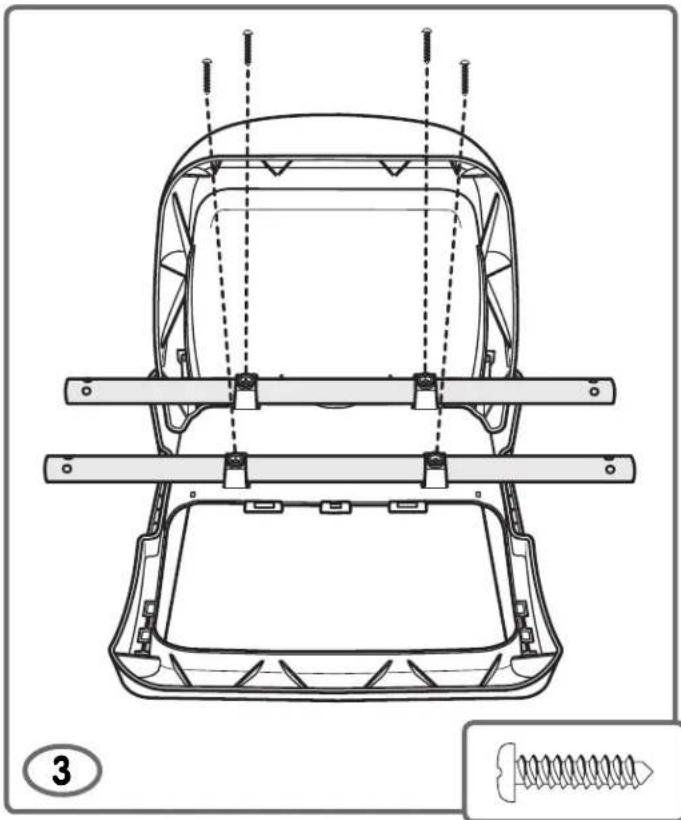
- Place the seat bottom face down on a flat surface.
- At an angle, fit the footrest on the seat bottom, as shown.
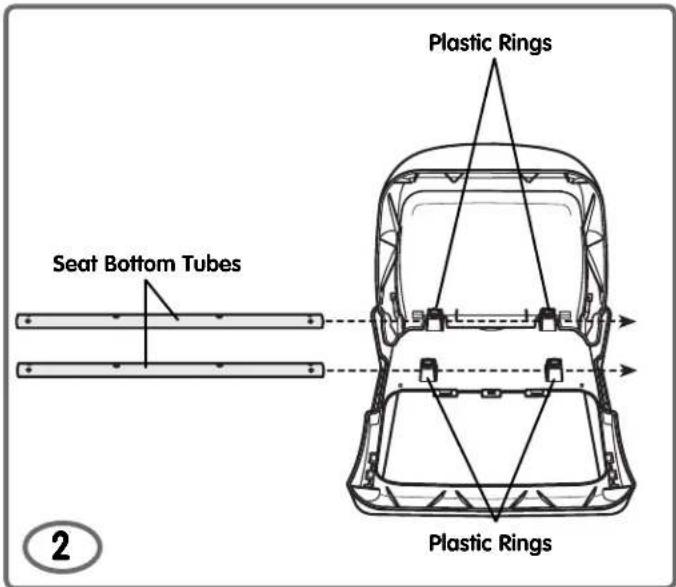
- Slide a seat bottom tube through each set of plastic rings on the seat bottom.
natural_image
Technical line drawing of a car chassis frame with mounting brackets and structural supports (no text or symbols)- Align the holes in the plastic rings and the seat bottom tubes.
- Insert a #8 x 1,9 cm screw through each plastic ring and into the seat bottom tubes, as shown. Tighten the screws. This may require extra force.
- Push the seat bottom tubes back and forth to be sure they are secured to the seat bottom. If the seat bottom tubes move, you have probably not fastened them properly. Remove the screws and check to be sure the screw holes in the seat bottom tubes and seat bottom plastic rings are aligned. Replace and tighten the screws.
Assembly
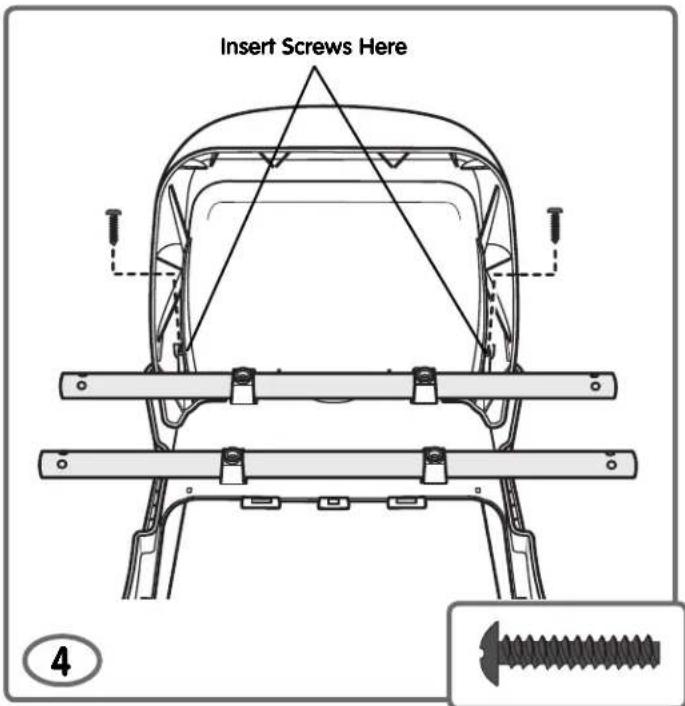
- Insert two 10 × 2,2 cm black screws through the footrest and into the seat bottom. Tighten the screws. This may require extra force.
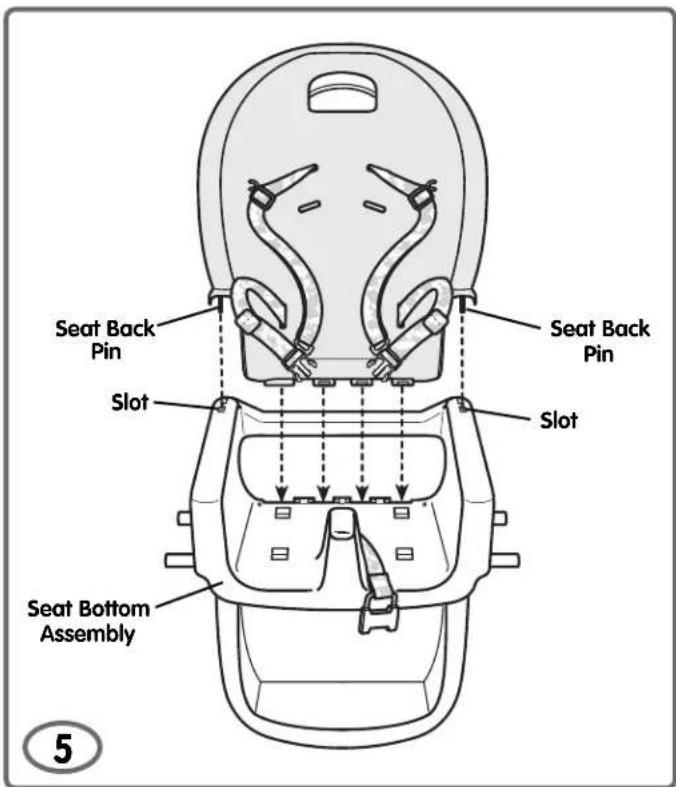
- Turn the seat assembly face down.
- Insert the hinge rod through the hinge on the seat back and seat bottom, as shown.
- Insert a #10 x 2,2 cm black screw into the hinge rod. Tighten the screw.
- Set the seat assembly aside for Assembly step 9.
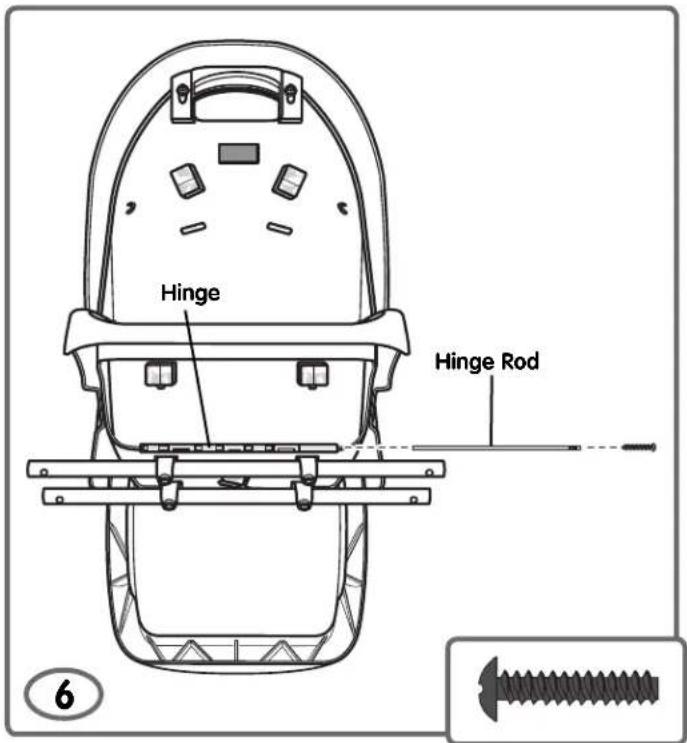
- Turn the seat bottom assembly upright.
- Fit the seat back pins into the slots in the top side of the seat bottom assembly.
Assembly
Frame Leg
Seat Height Adjusters

Position 4
Frame Decorated Side
Frame Back Legs
Press Lever
8
- While pressing the levers on the seat height adjusters, lift them to position 4 on the frame front legs, as shown.
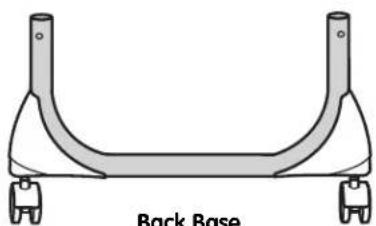
Back Base
Seat Assembly
Screw Retainers
7
- Pull the frame leg out on each frame to open. Make sure it "clicks" into place.
- Position a frame so that the decorated side is outward.
- Fit the end of the back base into the back leg of a frame.
- Fit a screw retainer over the hole in the back leg, as shown.
- Insert a #10 x 2,2 cm black screw through the screw retainer and back leg. Tighten the screw.
- Repeat this procedure to fasten the other frame back leg to the other side of the back base.
Hint: The #10 x 2,2 cm black screws may have been assembled to the screw retainers.
Sockets
Sockets
Seat Bottom Tubes
9
- Fit the seat assembly between the frames.
- Insert the seat bottom tubes into the sockets in each seat height adjuster.
- Be sure the seat height adjusters are in the same position (position 4).
- You may need to push the frames apart slightly to fit the seat bottom tubes into the seat height adjuster sockets.
Hints:
Assembly
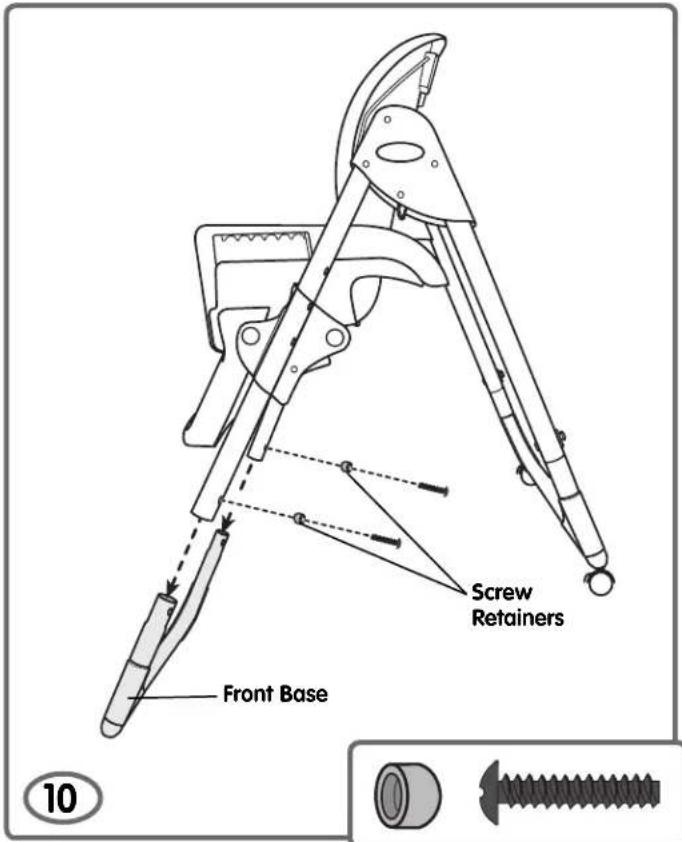
- Insert the frame front legs onto the front base.
• Fit a screw retainer over a hole in the front leg. - Insert a #10 x 2.2 cm black screw through the screw retainer and front leg. Tighten the screw.
- Repeat this procedure to secure the other end of the front base with the remaining screw retainer and #10 x 2,2 cm black screw.
Hint: The #10 x 2,2 cm black screws may have been assembled to the screw retainers.
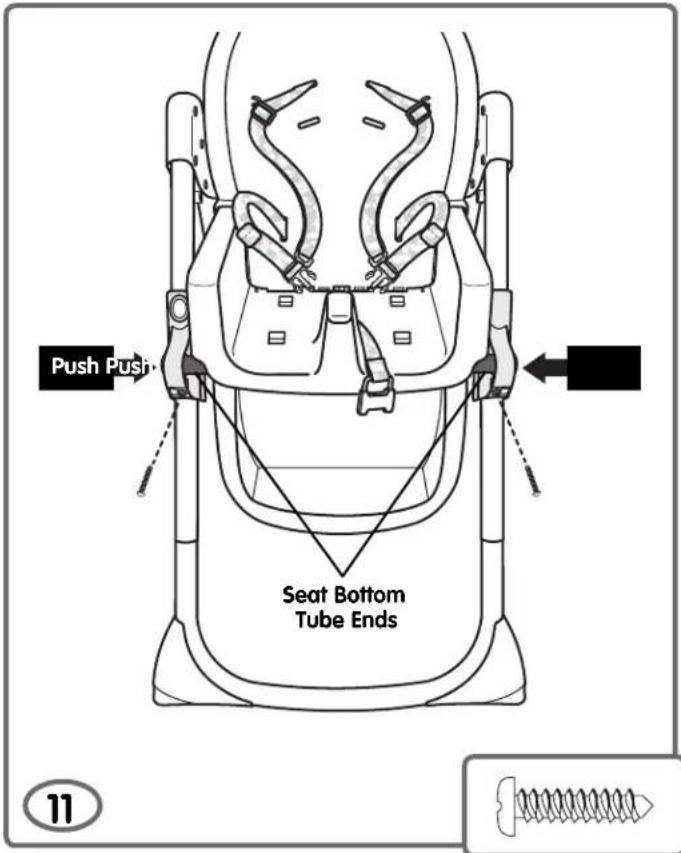
- Push each seat height adjuster to be sure they are completely on the seat bottom tubes.
- Insert a #8 x 1,9 cm screw through each seat height adjuster and the ends of the seat bottom tube. Tighten the screws. This may require extra force.
Assembly
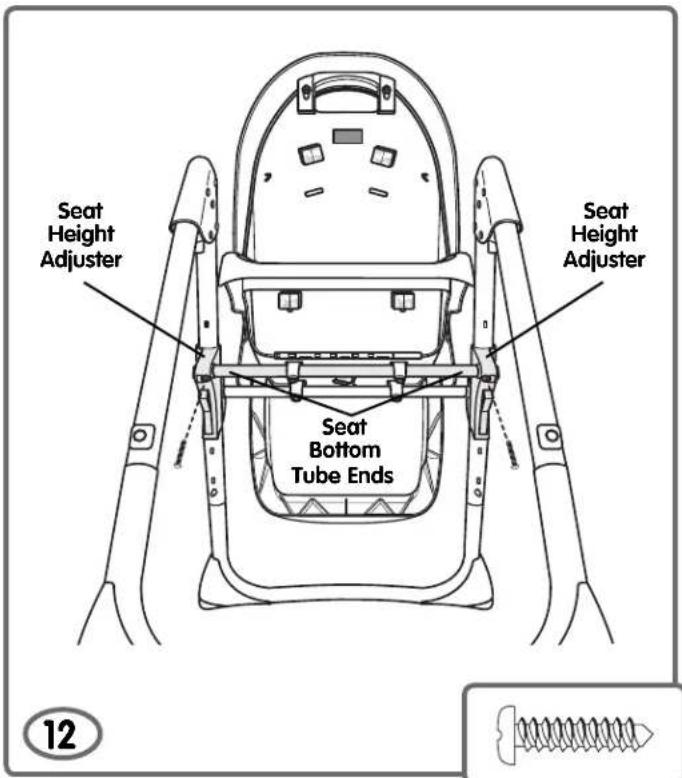
- Push each seat height adjuster to be sure they are completely on the seat bottom tubes.
- Insert a #8 x 1.9 cm screw through each seat height adjuster and the ends of the seat bottom tube. Tighten the screws. This may require extra force.
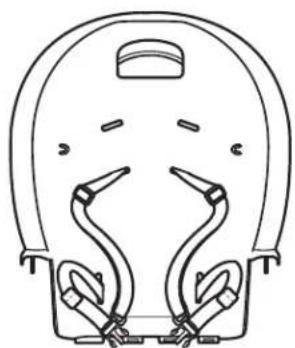
- Lift the assembly upright.
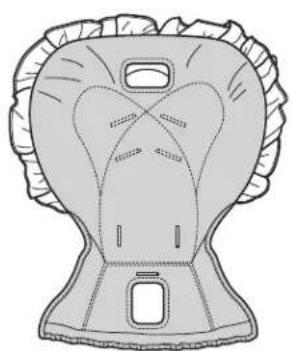
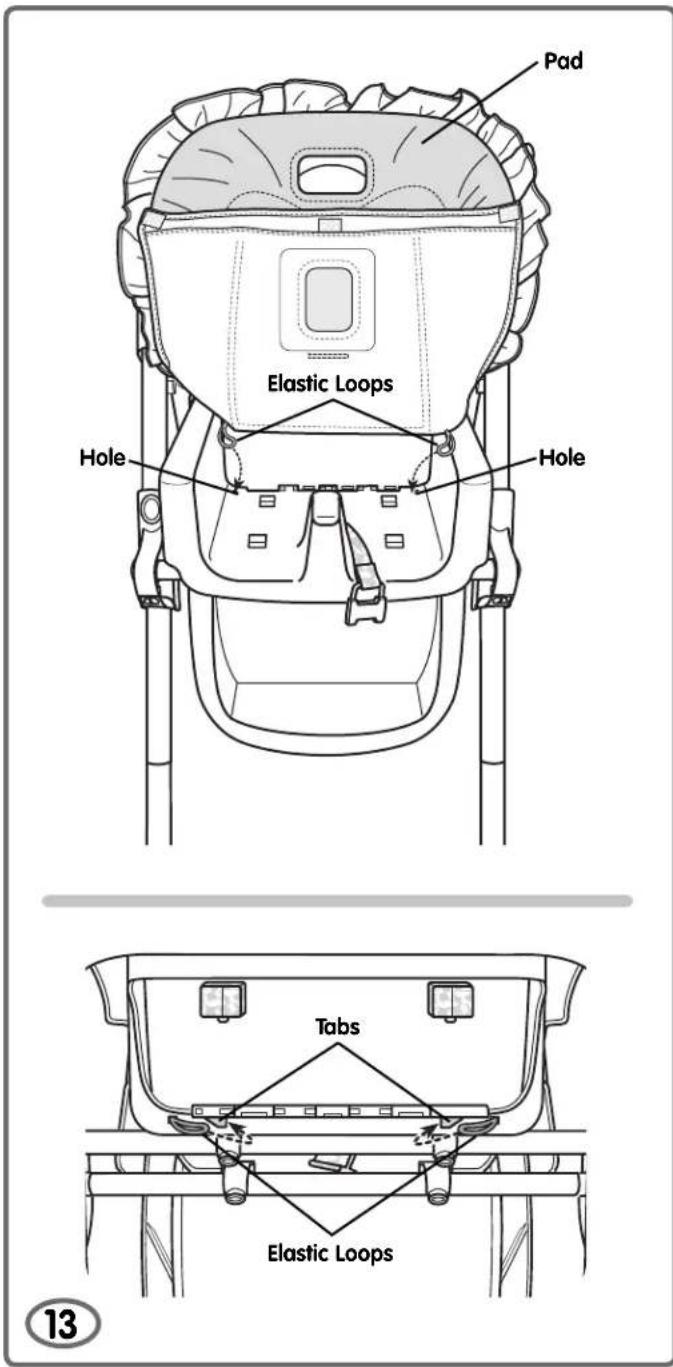
- From the front of the assembly, place the pad onto the seat.
- Lift the bottom of the pad. Insert the two elastic loops on the pad through the holes in the seat bottom.
- From the back and bottom of the seat, hook the elastic loops to the tabs on the seat.
Assembly
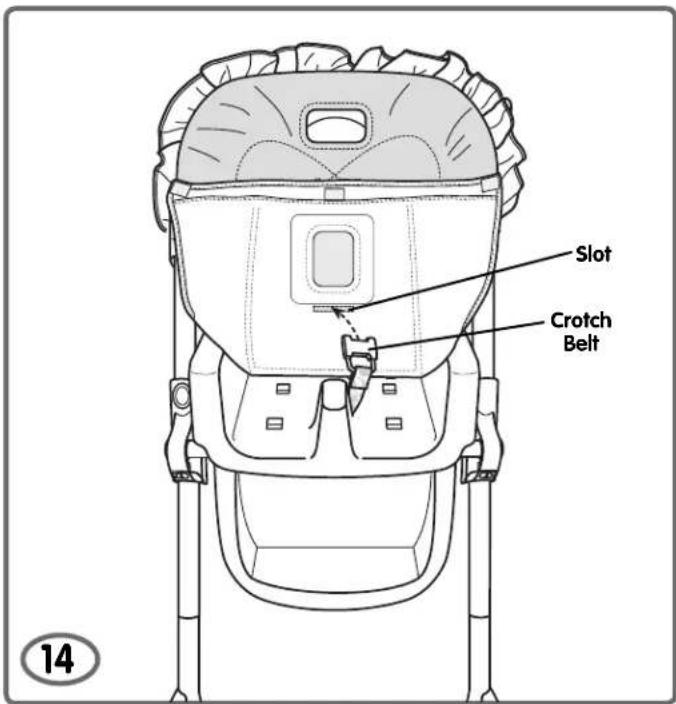
- Insert the crotch belt through the slot in the pad. Make sure the crotch belt is not twisted.
- Fold the top of the pad down.
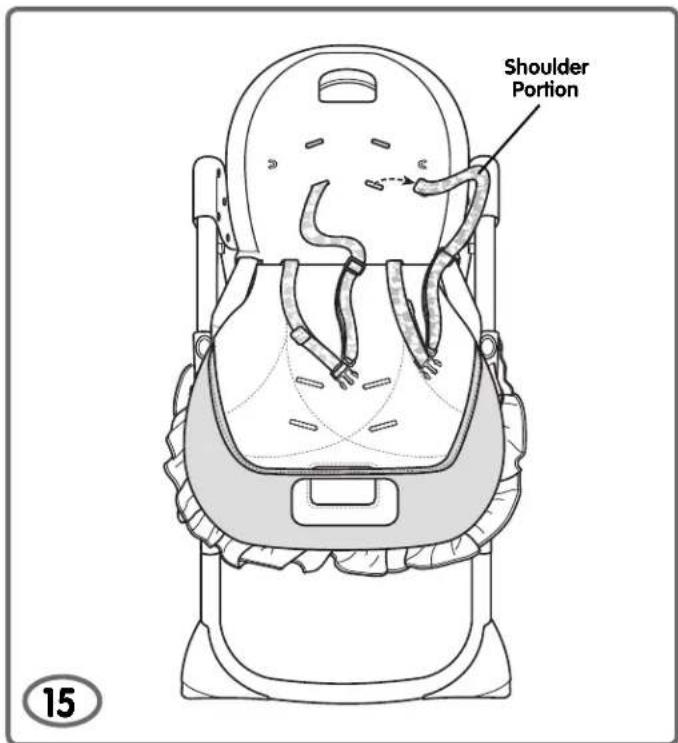
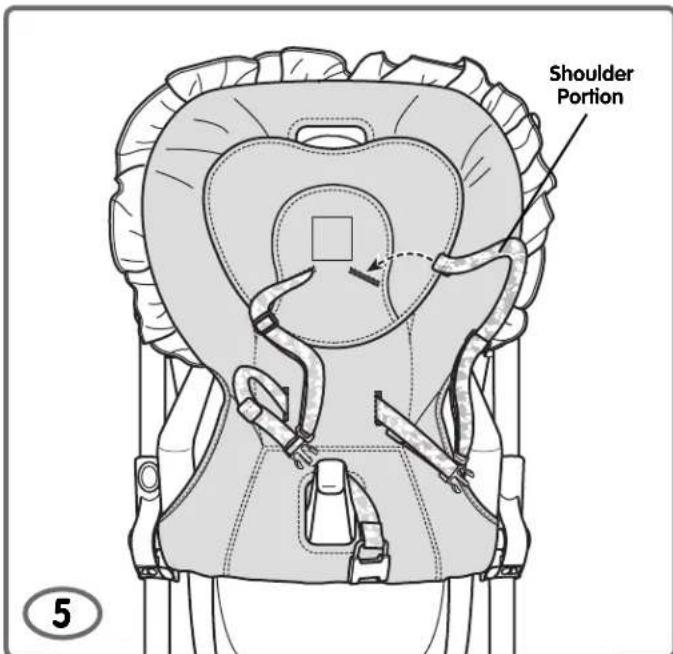
- Remove the shoulder portion of the waist/shoulder belts by feeding them through the slots in the seat back.
- Lift the top of the pad.
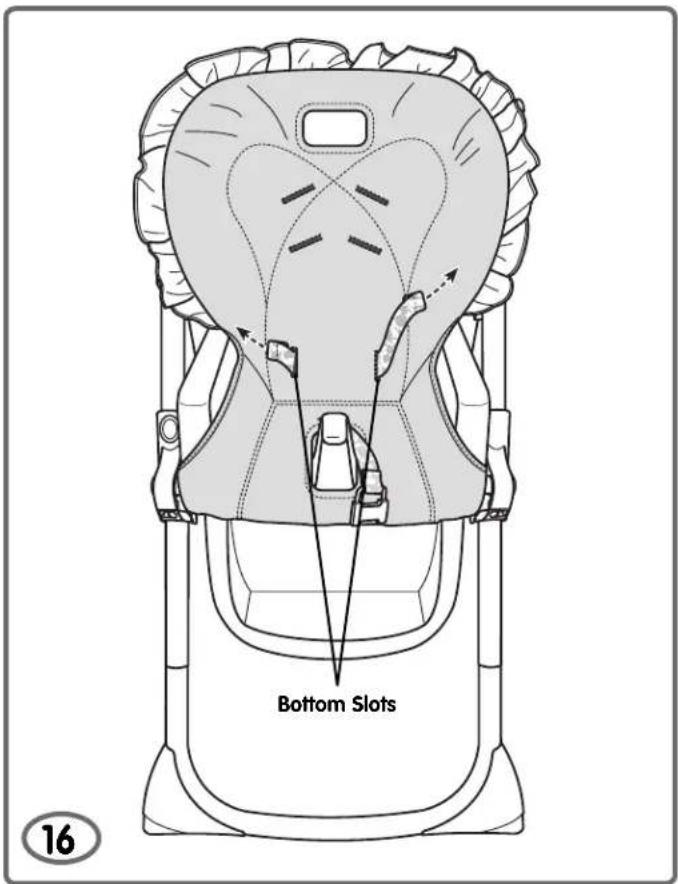
- Thread the waist/shoulder belts through the bottom slots in the back of the seat pad.
Assembly
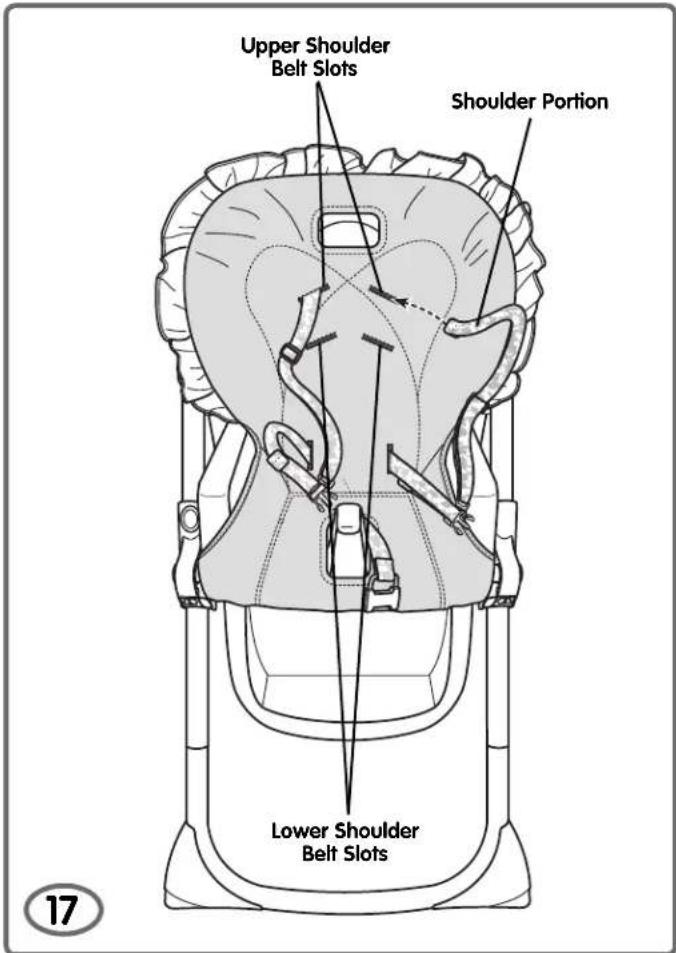
- Insert the shoulder portion of the shoulder/waist belt through the slots in the pad and seat back.
- Use the lower shoulder belt slots for a smaller baby.
- Use the upper shoulder belt slots for a larger baby.
- Fit the top of the pad over the seat back.
-
Fold the bottom edge of the pad under the edge of the seat bottom to fasten.
-
From behind the seat, be sure the shoulder portion of the waist/shoulder belts are secure in the seat back slots.
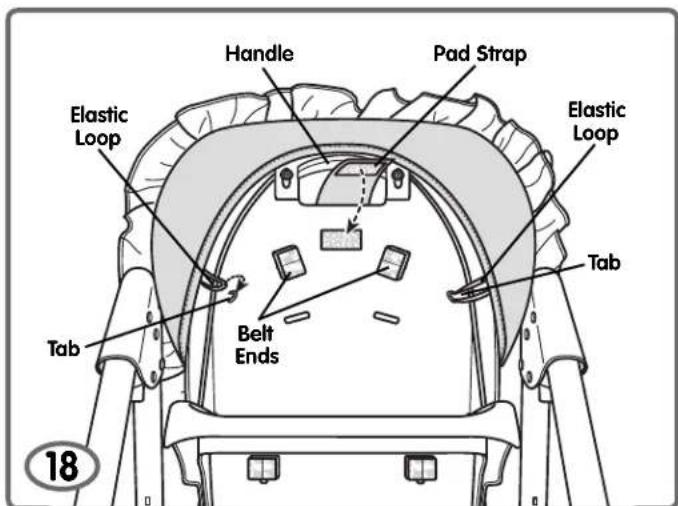
- Fit the pad strap through the handle and press it to the fastener on the back of the seat.
- Hook the elastic loops on each side of the pad onto the tabs in the seat back.
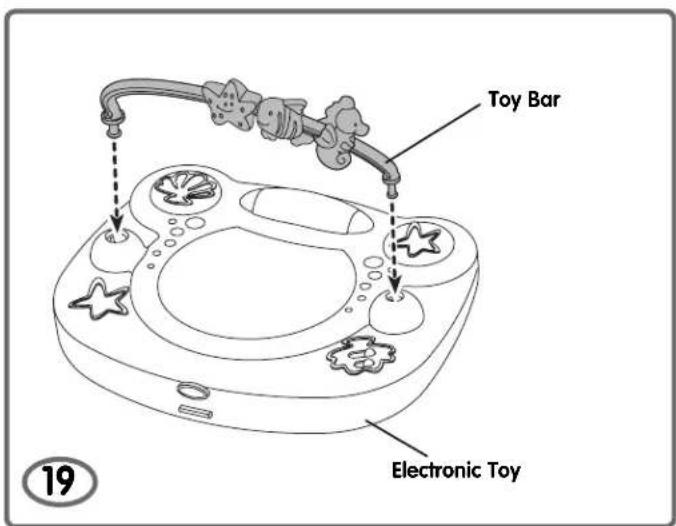
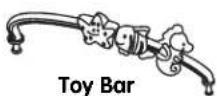
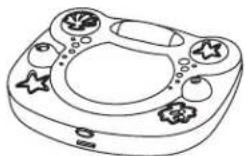
- Insert and "snap" the toy bar into the electronic toy, as shown.
Battery Installation
Secure Child

WARNING
Prevent serious injury or death from falls or sliding out. The child should at all times wear a safety harness correctly fitted and adjusted. The tray is not designed to hold the child in the chair.
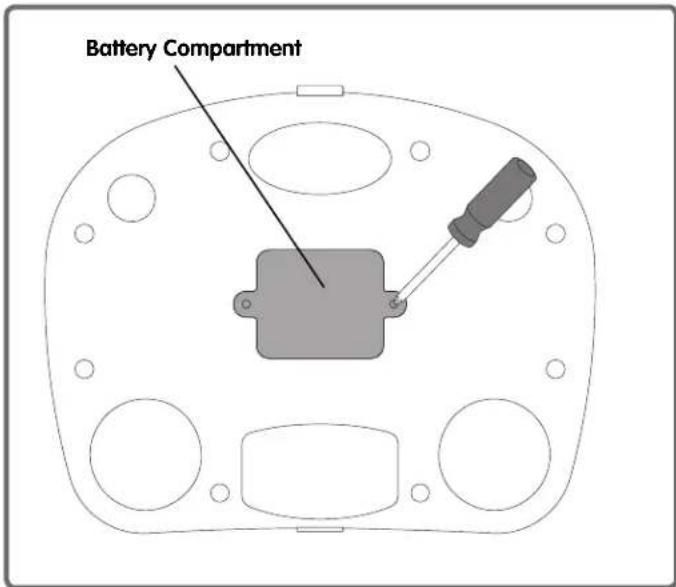
- Loosen the screws in the battery compartment. Remove the battery compartment door.
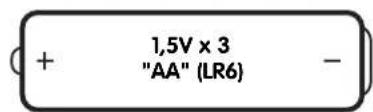
- Insert three "AA" (LR6) alkaline batteries.
- Replace the battery compartment door and tighten the screws.
Hint: We recommend using alkaline batteries for longer battery life.

- Protect the environment by not disposing of this product with household waste (2002/96/EC). Check your local authority for recycling advice and facilities (Europe only).
Battery Safety Information
In exceptional circumstances, batteries may leak fluids that can cause a chemical burn injury or ruin your product. To avoid battery leakage:
- Do not mix old and new batteries or batteries of different types: alkaline, standard (carbon-zinc) or rechargeable (nickel-cadmium).
- Insert batteries as indicated inside the battery compartment.
-
Remove batteries during long periods of non-use. Always remove exhausted batteries from the product. Dispose of batteries safely. Do not dispose of this product in a fire. The batteries inside may explode or leak.
-
Never short-circuit the battery terminals.
- Use only batteries of the same or equivalent type, as recommended.
- Do not charge non-rechargeable batteries.
- Remove rechargeable batteries from the product before charging.
- If removable, rechargeable batteries are used, they are only to be charged under adult supervision.
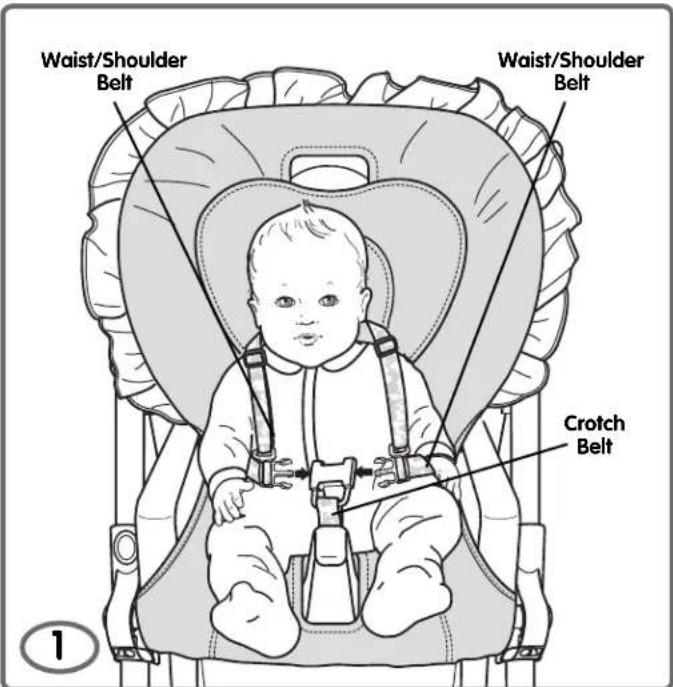
- Place your child in the seat. Position the crotch belt between your child's legs.
- Fasten both waist/shoulder belts to each side of the crotch belt. Make sure you hear a "click" on both sides.
- Check to be sure the restraint system is securely attached by pulling it away from your child. The restraint system should remain attached.
Secure Child
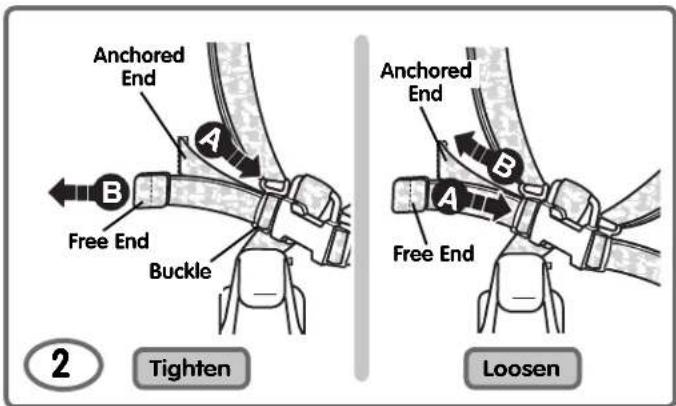
To tighten the waist belts:
- Feed the anchored end of the waist belt up through the buckle to form a loop A.
- Pull the free end of the waist belt B.
- Repeat this procedure to tighten the other waist belt.
To loosen the waist belts:
- Feed the free end of the waist belt up through the buckle to form a loop A.
- Enlarge the loop by pulling on the end of the loop toward the buckle.
- Pull the anchored end of the waist belt to shorten the free end of the waist belt B.
- Repeat this procedure to loosen the other waist belt.
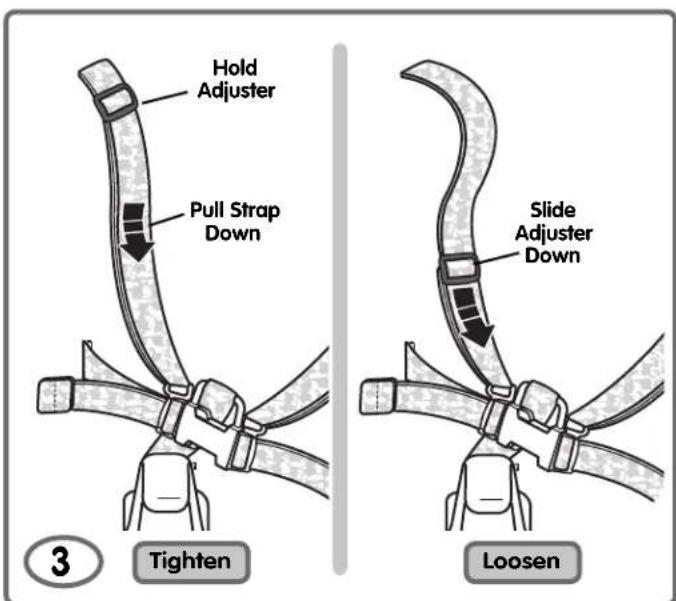
To tighten the shoulder belts: Hold the adjuster and pull the front shoulder strap down.
To loosen the shoulder belts: Slide the adjuster down.
Note: After adjusting the restraint system to fit your child, make sure you pull on it to be sure it is securely fastened.
natural_image
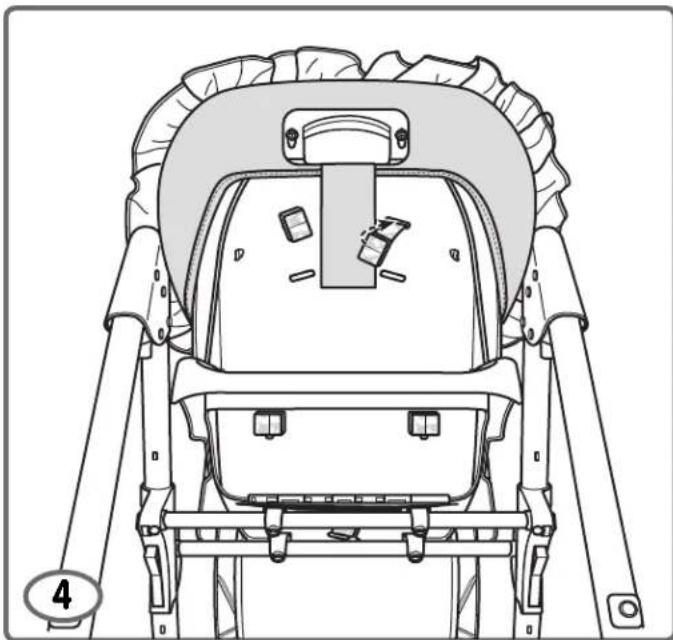
Technical line drawing of a vehicle backrest assembly (no text or symbols)To change shoulder belt slots:
- From the back of the high chair, push the shoulder portion of the waist/shoulder belts through the seat back slots.
- From the front of the high chair, pull the shoulder portion of the waist/shoulder belts out and then fit them back through the desired shoulder belt slots in the headrest pad, seat pad and the seat back. Pull on the belts to be sure they are secure in the seat back.
Using the Trays and Toys
WARNING
Prevent serious injury or death from falls or sliding out. The child should at all times wear a safety harness correctly fitted and adjusted. The tray is not designed to hold the child in the chair.
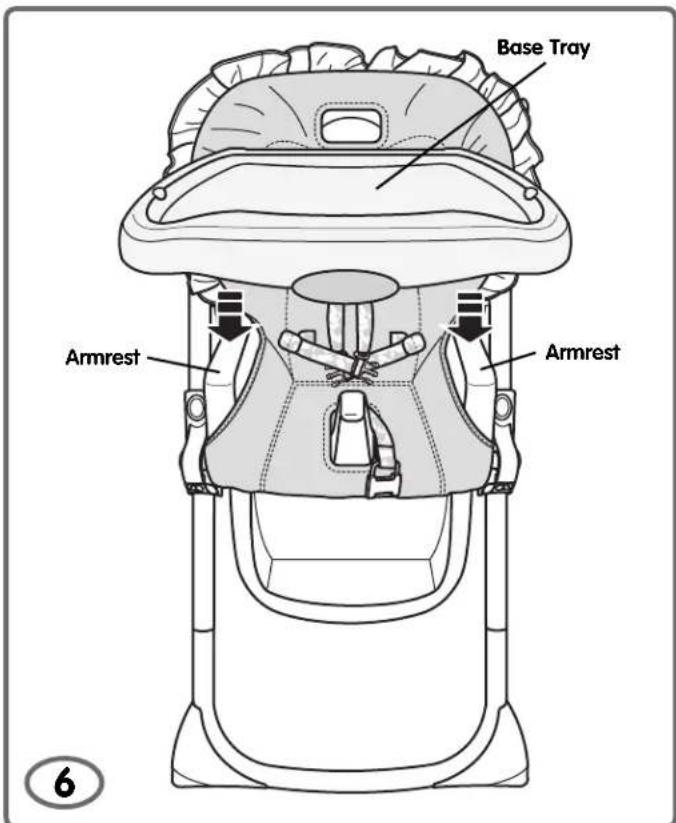
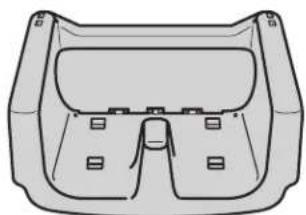
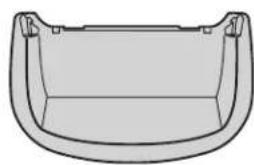
- Fit the base tray onto the seat armrests. Push down until the base tray "snaps" into place.
Hint: Before use, thoroughly wash all parts (the trays) that may contact food. The base tray is not dishwasher safe.
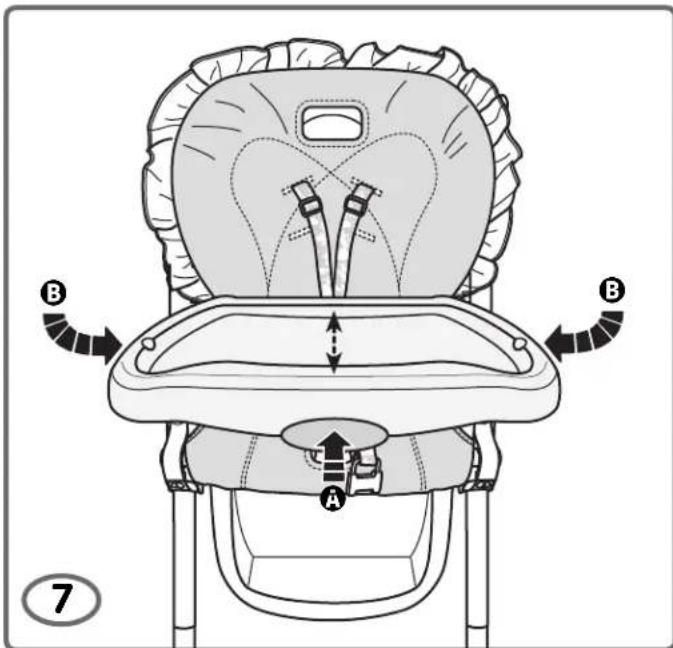
- While pushing the release bar on the front of the base tray, adjust the base tray forward or backward Ⓐ.
- While squeezing the latches underneath the base tray, adjust the base tray forward or backward Ⓑ.
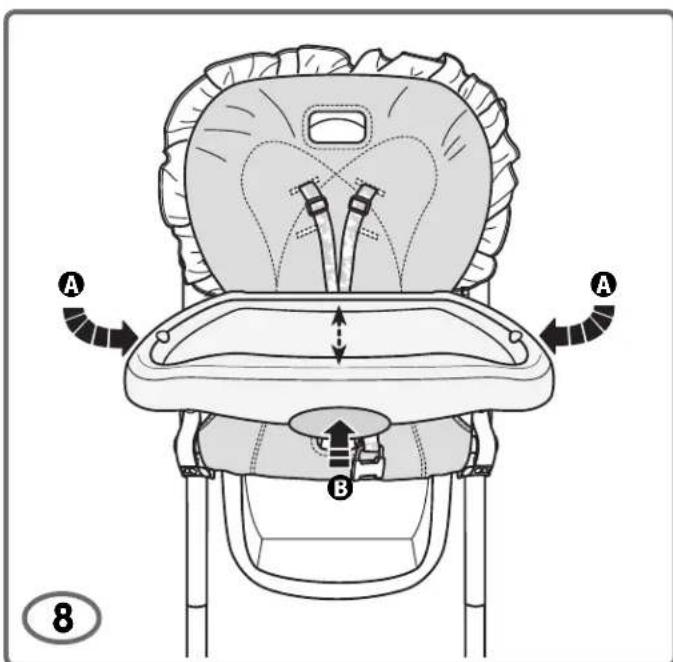
- Squeeze one or both of the latches underneath the base tray and lift Ⓐ.
- While pushing the release bar on the front of the base tray, pull the tray base towards you and remove Ⓑ.
Using the Trays and Toys
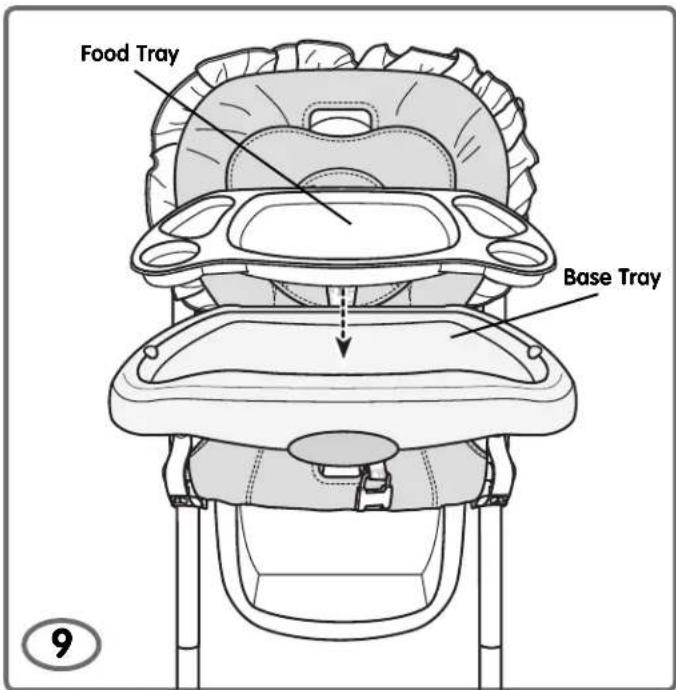
- Fit the food tray into the base tray, as shown.
Hint: Before use, thoroughly wash all parts (the trays) that may contact food. The food tray is not microwave safe.
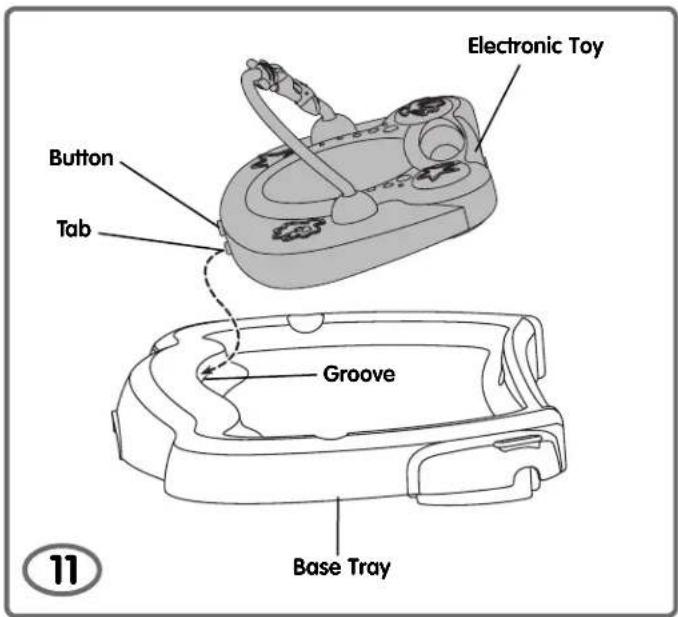
- Insert the tab on the edge of the electronic toy into the groove in the front of the base tray.
- Push the electronic toy down to secure in place.
Hint: The electronic toy does not fit into the food tray.
- To remove the electronic toy, press the button on the front of the electronic toy. Remove the electronic toy.
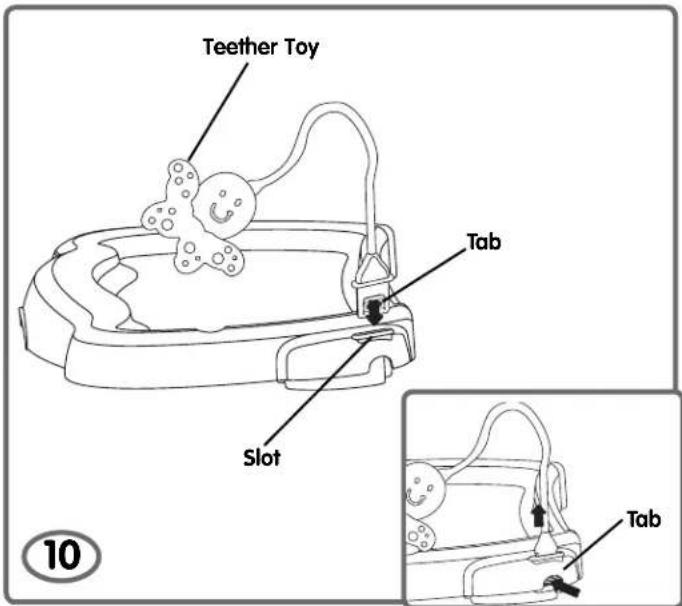
- Insert and "snap" the teether toy tab into either slot in the tray.
Hint: To remove the teether toy, press the tab and lift the toy.
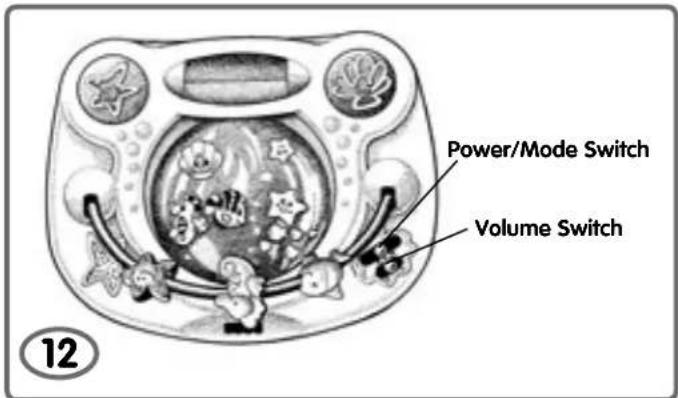
- Slide the power/mode switch to:
■ Short Play (6 - 10 seconds)
Long Play (6 minutes)
○ Off
- Slide the volume switch to:
Low Volume
High volume
Hint: If sound becomes faint, remove the batteries from the toy and dispose of properly. Replace the batteries with three, new "AA" (LR6) alkaline batteries.
- Press the buttons or turn roller for sounds and songs!
Adjusting the Seat
Brakes

WARNING
Prevent serious injury or death from falls or sliding out. It is recommended that only children capable of sitting upright unassisted use the high chair in the upright position.
Hint: Adjust the seat angle to any of three positions: Upright, Semi-Recline or Recline.

To adjust the seat angle:
- Squeeze the seat back handle and push the seat back forward or, pull it backwards to the desired position.
- Push the seat back to be sure it is latched in position.
Hint: Adjust the seat height to any of seven positions!
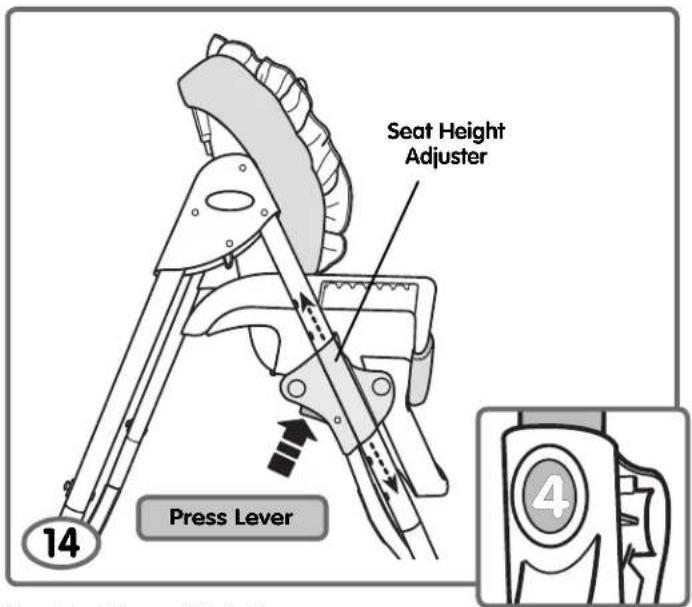
To adjust the seat height:
- Press the levers on both seat height adjusters and lift or lower the seat to the desired height.
- Make sure both sides of the seat are adjusted to the same height. Push the seat bottom to be sure the seat is locked in place.

WARNING
Prevent serious injury or death from falls or sliding out.
• Always leave wheels locked.
- Never use near steps.
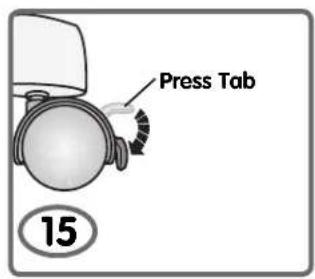
TO LOCK: Press the tab down until you hear a "snap".
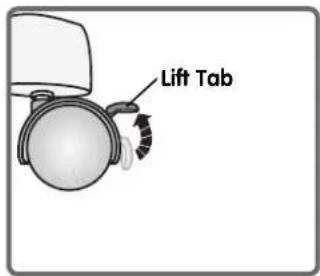
TO UNLOCK: Lift the tab up.
Storage
Care
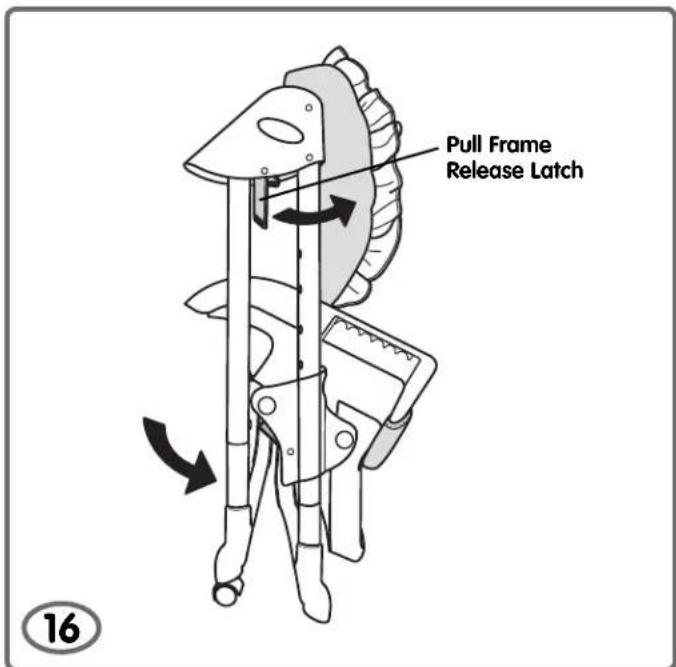
- With the legs all the way open, lower the seat to position 7 the lowest position).
-
Pull the frame release latches forward and push the rear legs toward the front legs.
-
The pad, restraint system, frame base tray and electronic toy may be wiped clean using a mild cleaning solution and a damp cloth. Do not immerse the electronic toy.
- The food tray and teether toy are also top rack dishwasher safe (or use bottom rack - without using the drying cycle).
To remove the pad:
- Remove the elastic loops from the pegs on the back of the seat.
- From behind the product, squeeze the restraint release tabs and remove the restraint system from the peg.
- From the front of the product, pull to remove the restraint system.
- Unfasten the pad hooks from the front edge of the seat. Lift the top of the pad off of the seat back.
• To replace the pad: refer to Assembly steps 13-18.
IMPORTANT! Never use this product without the restraint system. Replace the waist/shoulder belts and crotch belt.
- The electronic toy has no consumer serviceable parts. Please do not take this toy apart.
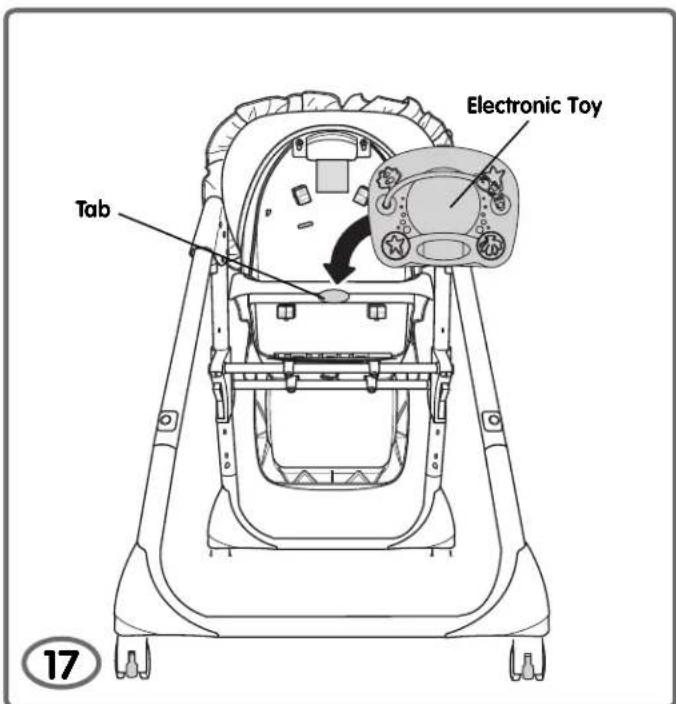
- Fit the electronic toy to the tab on the back of the high chair, as shown.