Pan-1 - Unspecified Chief - Free user manual and instructions
Find the device manual for free Pan-1 Chief in PDF.


| Product Type | Lens Support for Projectors |
| Compatibility | Compatible with any RPA projector mount |
| Pitch Adjustment Range | 20° down and 10° up |
| Extension Adjustment Range | Up to 3 inches from projector mount |
| Lateral Shift Range | 6-1/4 inches |
| Height Adjustment Range | 3-5/8 inches up and down on front lens plate |
| Color | Black/Unspecified (typical for mount accessories) |
| Material | Metal (steel or aluminum) |
| Weight Capacity | Supports projector lens weight; designed for redundant weight factor of 5 times total equipment weight |
| Mounting Type | Ceiling mount (attaches to RPA) |
| Tools Required | Phillips screwdriver, 9/64" Allen wrench or hex wrench |
| Installation Steps | Remove projector from ceiling mount, attach PAN-1 to RPA, install and adjust lens |
| Safety Precautions | Ensure mounting surface can support 5x weight; inspect for damage; use assistant for heavy items |
| Adjustment Notes | Fine-tuning after power restoration; may need slight angle for keystone correction |
| Warranty | Factory warranty may be affected by improper installation |
Frequently Asked Questions - Pan-1 Chief
User questions about Pan-1 Chief
0 question about this device. Answer the ones you know or ask your own.
Ask a new question about this device
Download the instructions for your Unspecified in PDF format for free! Find your manual Pan-1 - Chief and take your electronic device back in hand. On this page are published all the documents necessary for the use of your device. Pan-1 by Chief.
USER MANUAL Pan-1 Chief
INSTALLATION INSTRUCTIONS
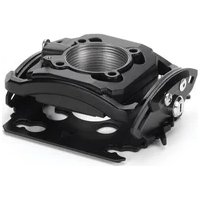
PAN-1 Lens Support
The PAN-1 Lens Support is compatible with any RPA projector mount.

natural_image
Technical line drawing of a mechanical bracket assembly (no text or symbols)PAN-1 LENS SUPPORT
BEFORE YOU BEGIN
- CAUTION: To prevent damage to the mount, which could affect or void the Factory warranty, thoroughly study all instructions and illustrations before you begin to install the mount brackets. Pay particular attention to the "Important Warnings and Cautions" on Page 2.
• If you have any questions about this installation, contact Chief Manufacturing at 1-800-582-6480 or 952-582-6480.

IMPORTANT WARNINGS and CAUTIONS!
WARNING A WARNING alerts you to the possibility of serious injury or death if you do not follow the instructions.
CAUTION A CAUTION alerts you to the possibility of damage or destruction of equipment if you do not follow the corresponding instructions.
- WARNING Improper installation can result in serious personal injury! Make sure that the mounting surface can support a redundant weight factor five times the total weight of the equipment: if not, reinforce the structure before installing the PAN-1 on the projector.
- WARNING Be aware of the potential for personal injury or damage to the unit if it is not adequately mounted.
- CAUTION Inspect the unit for shipping damage.
CONTENTS
TOOLS REQUIRED FOR INSTALLATION.... 2
INSPECT PARTS BEFORE ASSEMBLY 3
Remove and Inspect the PAN-1....3
PAN-1 INSTALLATION PROCEDURES......4
Removing Projector from Ceiling Mount......4
Attaching PAN-1 to RPA....5
Installing and Adjusting Lens....6
Adjusting PAN-1 to Projector Lens 7
Pitch Adjustment 7
Extension Adjustment 7
Lateral Shift Adjustment....7
Height Adjustment....7
Adjustment Notes......7
TOOLS REQUIRED FOR INSTALLATION
• Phillips screwdriver
- 9/64" Allen wrench or Hex wrench
NOTE: Other tools may be required depending on the method of installation.
INSPECT PARTS BEFORE ASSEMBLY
Remove and Inspect the PAN-1
- Open the shipping container and remove the PAN-1 from the container.
- Carefully inspect the PAN-1 for shipping damage. If any damage is apparent, call your carrier claims agent and do not continue with the assembly procedure until the carrier has reviewed the damage.
NOTE: Read all assembly instructions before starting assembly. - Carefully inspect all components for damage. See Table 1, Figure 1, and Figure 2 for details.

Figure 1. PAN-1 Lens Support
Table 1. PAN-1 Parts
| ITEM | PART NAME QTY | |
| 10 | MAIN PLATE | 1 |
| 20 | FRONT ADJUSTABLE PLATE | 1 |
| 30 | SEMS SCREW, PAN, SELF-TAPPING, PHILLIPS | 4 |
| 40 | FRONT PLATE | 1 |
| 50 | 1/4-20 x 3/4" CARRIAGE BOLT | 1 |
| 60 | KNOB | 1 |
| 70 | 10-24 x 1-1/4" PHILLIPS HEAD MACHINE SCREW BZ | 2 |
| 80 | 10-24 x 5/8" PHILLIPS HEAD MACHINE SCREW BZ (NOT SHOWN) | 4 |
| 90 | #10 SAE FLAT WASHER BZ | 4 |
| 100 | NYLON SPACER | 2 |
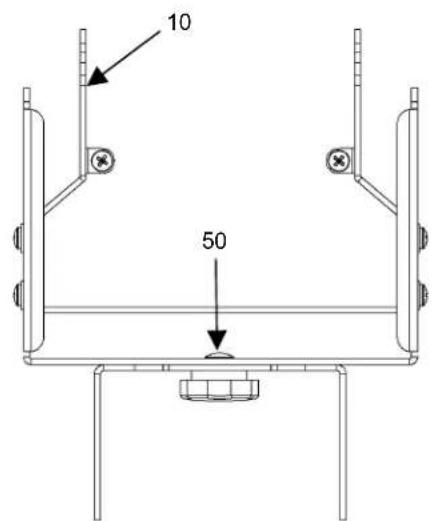
Figure 2. PAN-1 Lens Support (Top View)
PAN-1 INSTALLATION PROCEDURES
To install the PAN-1 Lens Support (hereinafter called the PAN-1), perform the following procedures:
- Removing Projector from Ceiling Mount
- Attaching PAN-1 to RPA
• Installing and Adjusting Lens - Adjusting PAN-1 to Projector Lens

Removing Projector from Ceiling Mount
The projector must be removed from the mount before installing this accessory. With an assistant, remove projector from RPA ceiling mount as follows:
NOTE: If your projector is not installed on the RPA ceiling mount, proceed to the next procedure.
- Power-off the projector (see Figure 4).
- Disconnect the power cord that supplies electric power to the projector.
- Disconnect the audio/video cables from the projector.
- Loosen the thumbscrews securing the projector to the RPA ceiling mount (see Figure 3).
- Carefully slide the projector forward until the projector releases from the RPA ceiling mount.
- Remove the projector.
Figure 3. Completely Installed PAN-1 — Example
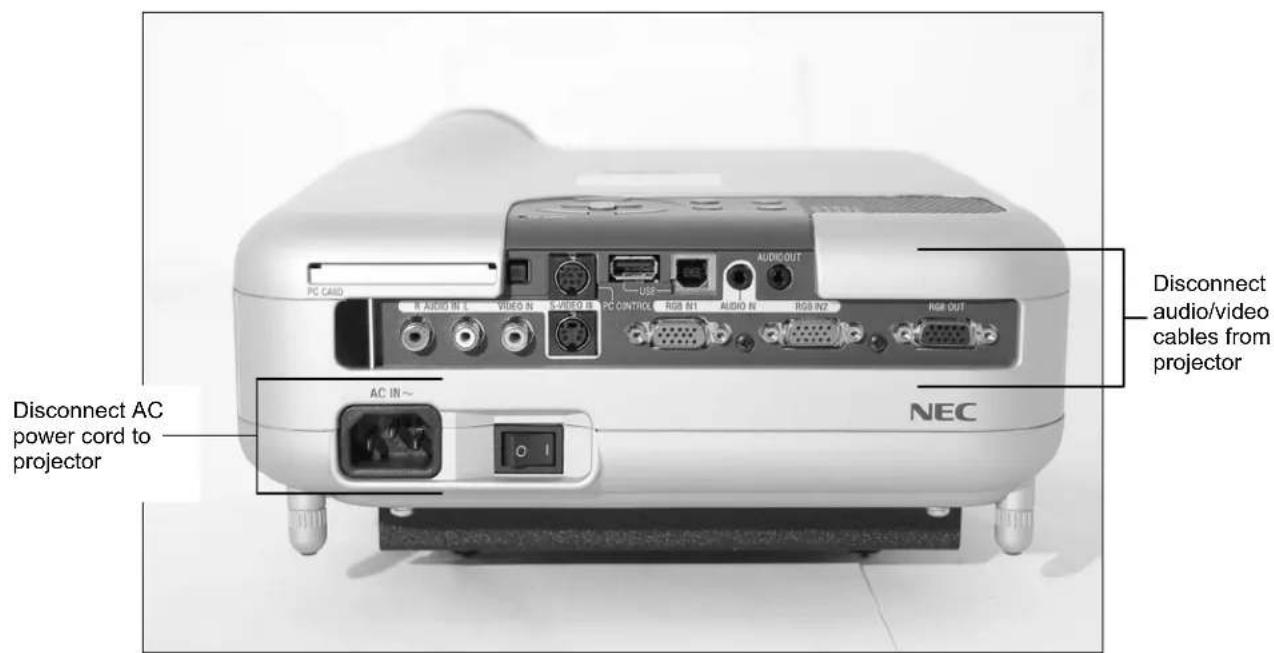
Figure 4. Video Projector — Typical
Attaching PAN-1 to RPA
Attach the PAN-1 to the RPA projector mount, as follows:
NOTE: The four screws and washers removed from the RPA are located closest to the projector lens. Do not remove the screws and washers from the second set of slotted holes on the RPA.
- On the RPA, remove two screws from the first set of slotted holes on the RPA (see Figure 5).
- Remove the two center screws from the RPA.
- On the PAN-1, loosen the two screws on each side to allow the bracket to extend backward and forward.
- Slide the PAN-1 over the RPA projector mount, as shown in Figure 6.
- Align the slotted holes on the PAN-1 with the slotted holes on the RPA. For reference, see step 1.
- Locate the parts bag supplied with the PAN-1. Find four 5/8" screws (80) and four #10 washers (90).
NOTE: Leave the four screws (80) loose. These screws will be adjusted and tightened later. - Attach the PAN-1 to the RPA by installing four screws (80) and washers (90) into the threaded holes on the RPA (see Figure 6).
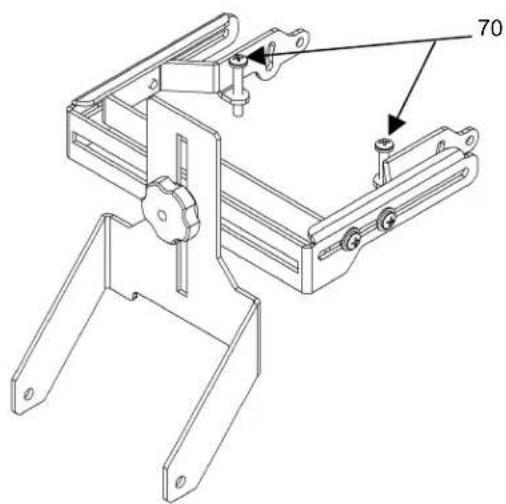
- Find two 1-1/4" Phillips screws (70) in the parts bag.
NOTE: Stop threading each screw (70) when the end protrudes through the bracket hole approximately 14 " as shown in Figure 7. - Install two screws (70) in the threaded tabs on the PAN-1 (see Figure 7).

Figure 5. Remove front screw pair from RPA

Figure 6. Attach PAN-1 to RPA
natural_image
Technical line drawing of a mechanical bracket assembly (no text or symbols)Figure 7. Install Angle Adjustment Screws
Installing and Adjusting Lens
Install and adjust the PAN-1 lens, as follows:
-
With an assistant, install your projector back on the ceiling mount at this time. Secure all thumbnails and audio/video cables. Do not restore power to the projector at this time. See Figure 8.
-
Install the PAN-1 lens at this time, as follows:
a. Align the threaded holes in the PAN-1 lens with the holes in the front plate (40).
b. Attach the PAN-1 lens using two nylon spacers (100) and two thumb knobs (supplied).
c. Place the PAN-1 lens in the desired position and tighten the thumb knobs (see Figure 9.

Figure 8. Install Projector on Ceiling Mount
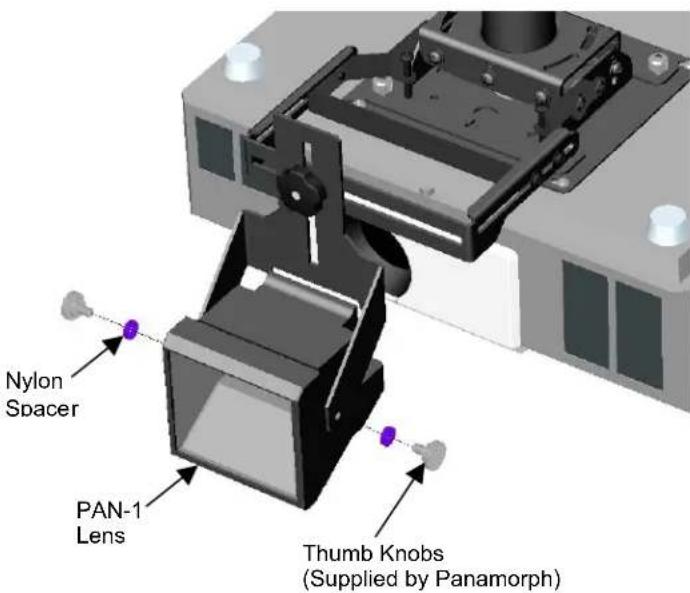
Figure 9. Install PAN-1 Lens
Adjusting PAN-1 to Projector Lens
The PAN-1 lens support can be adjusted to accommodate different projector models and lens placement. See Table 2.
Table 2. PAN-1 Specification Chart
| Pitch: | 20° down and 10° up |
| Extension: | 3 inches from projector mount |
| Lateral Shift: | 6-1/4 inches |
| Height Adjustment: | 3-5/8 inches up and down on front lens plate. |
Refer to Figure 10 and adjust the PAN-1 lens to the RPA projector lens, as follows:
Pitch Adjustment
- To adjust lens pitch, adjust the two angle screws to raise or lower the lens. This adjustment aligns the conversion lens with the projector lens.
Extension Adjustment
- To adjust lens extension (raise or lower the lens), do the following:
a. Loosen four screws (30) and washers (90) on the side of the front adjustable plate (20).
b. Slide the front adjustable plate (20) back so the lens is approximately 1/8" to 1/4" from the projector lens.
c. Tighten the four screws (30) and washers (90).
Lateral Shift Adjustment
- To adjust lateral shift, do the following:
a. Loosen the knob (60) and slide the lens left or right to the center of the projector lens.
b. Tighten the knob (60).
Height Adjustment
- For height adjustment, do the following:
a. Loosen the knob (60) and slide the PAN-1 lens up or down.
b. Tighten the knob (60).
Adjustment Notes
NOTE: Except for fine-tuning, the PAN-1 is adjusted after completing the adjustment process. However, after restoring power to the projector, you may want to repeat a particular adjustment procedure in order to make minor changes.
NOTE: Depending on your projector model, it may be necessary to adjust the lens at a slight angle to the projector lens, which helps to correct keystone. Or, loosen the lens knobs and tilt the PAN-1 lens as needed.

Figure 10. Adjust PAN-1 Lens
THIS PAGE INTENTIONALLY LEFT BLANK


- INSTALLATION INSTRUCTIONS
- PAN-1 Lens Support
- BEFORE YOU BEGIN
- IMPORTANT WARNINGS and CAUTIONS!
- CONTENTS
- TOOLS REQUIRED FOR INSTALLATION
- INSPECT PARTS BEFORE ASSEMBLY
- Remove and Inspect the PAN-1
- PAN-1 INSTALLATION PROCEDURES
- Removing Projector from Ceiling Mount
- Attaching PAN-1 to RPA
- Installing and Adjusting Lens
- Adjusting PAN-1 to Projector Lens
- Pitch Adjustment
- Extension Adjustment
- Lateral Shift Adjustment
- Height Adjustment
- Adjustment Notes
- THIS PAGE INTENTIONALLY LEFT BLANK
Brand : Chief
Model : Pan-1
Category : Unspecified