VZ-35SM - Surveillance ViewZ - Free user manual and instructions
Find the device manual for free VZ-35SM ViewZ in PDF.

User questions about VZ-35SM ViewZ
0 question about this device. Answer the ones you know or ask your own.
Ask a new question about this device
Download the instructions for your Surveillance in PDF format for free! Find your manual VZ-35SM - ViewZ and take your electronic device back in hand. On this page are published all the documents necessary for the use of your device. VZ-35SM by ViewZ.
USER MANUAL VZ-35SM ViewZ
natural_image
Black digital camera with visible lens and control buttons (MENU and ESC), no text or symbols on device bodyINSTRUCTION MANUAL
Specially made for Surveillance system
Please read the following items before use.
- Dear customers, thanks for using this product, we sincerely hope our products can bring you convenience, and before start to use it, please pay attention to the following items.
And please keep it after reading the safety notice.
1) Forbidden to use in the high temperature environment especially not allowed in hi-temperature bathroom, the most suitable working temperature for this product is approximate 0-60°C
If something breaks down, please turn off the monitor, and take out the batteries, or pull out the plug of the charger.
When product leaks smoke , exception smell or other exception matter . If continue using, it may cause fire disaster or suffer shock
Don't redo or knock down the machine (Do not open the case), if the machine breaks down or the case gets broken.
Please don't continue using, otherwise it may cause the fire disaster or suffer shock.
2) Don't redo, heat up, over-tweak or drag the connection wire, and please don't put heavy object on the connection wire, otherwise it may damage the wire, and cause fire disaster or suffer shock. when wire damaged, please contact the local wholesaler to change.
3) Please don't place the product in disbalance place, otherwise it may make the machine drop to get damage.
4) Please use the dominated batteries, and when fixing the batteries, please do in accordance with demonstration. Please don't heat up 、 redo or knock down the battery, please don't drop the battery or make it get hit, please don't place the battery in the metal container. Use the dominated charger to charge the battery. any fails from the above case may cause battery explosion or leak, thereby cause the fire disaster or body harmness.
5) Please use the dominated battery or AC charger. Please don't use it at the voltage beyond the fixed range.
6) If battery leaks, and the liquid comes into your eyes, skin or clothes, please wash the position touched, if necessary, please contact the doctor or dial the emergent number.
7) When plug get damaged or it's loosen when inserted into the socket, please don't use the AC charger, otherwise it may cause fire disaster or suffer shock.
8) Clean the monitor. and when not used for a long time, please take out the batteries, or pull out the plug, otherwise it may cause fire disaster or suffer shock.
9) When charging finished, please pull out the plug from the socket, otherwise fire disaster may happen.
10) Keep the product away from water or other liquid, otherwise there may be danger of fire disaster or shock. In order to keep your safety, please use the adapter we supplied (Regarding the damages caused by using adapters from other supplier, we are not responsible to it).
11) Don't set the machine in the place of bared sunshine.
12) In order to keep it away from damage by dropping or bumping at sharp object, Please place the machine in the place where the children can not reach,
When the battery's working time is apparently shorter than new one, please change the battery.
13) The machine will get heat after long time working, it belongs to normal phenomenon.
14) Please don't place the charger in the place of much dust or intensity vibration, extreme humidity or high temperature (for example: under the bare sunshine or beside the heater)
15) The available voltage for the charger is AC 110\~240 V / 50/60 Hz. Plug standard is various from different environment; when purchase this product, please consult relevant department to confirm the suitable plug standard.
16) During charging, the batteries and charger will get heat, it belongs to normal phenomenon, but not malfunction. If possible, please charge the battery in aeration area.
Battery and power supply
The following items state the right way to use batteries and the way to extend its lifespan Using the batteries in incorrect way will shorten its lifespan or cause to leak, overheat, fire or explode.
- Battery comes out from factory with no power. Please charge it before use. and put it into the battery box when don't use it.
Battery usage notice
-If leaving the battery to be idle, it will lose electricity gradually. Please charge it at 1-2 day early before use
- When battery in idle status, turn off the monitor, it's a way to extend the lifespan.
- The performance will reduce when battery in low temperature environment; battery can't work normally in cold condition. place a fully charged battery in warm place. Don't place battery close to heater or hand-warming articles.
Charging Notice
- Please put the batteries into the machine, and then connect the charger well. This product adopts IC to conduct electrical source management. When fit on the battery, it will conduct auto-inspection (the red light flash 2 times), if battery goes working, the red light flash quickly; if working normally, the LED indicator light keep red. If fully charged, the red light will go out.
10 minutes more charging again it's a way to check if the charged battery is full or not. The charge time will extend if the surrounding temperature lower than 10^ or higher than 35^ , please don't charge the battery in the place where temperature is higher than 40^ ; it stops charging when temperature under 0^ . It's not allowed to charge the fully charged battery again, and you don't have to wait to charge until the electricity totally runs out.
- It'a normal phenomenon that battery gets heat when charge over or after use.
Battery's lifespan
In normal temperature, users can charge battery for 300 times. when the working time of consuming its full capacity apparently decrease, users need to change the battery.
Storage
- If long time no use after fully charged, the battery's performance will weaken.
- If don't use this machine for a long time, please take the batteries out, and store them in a dry place, moreover the store temperature should between 15^ and 25^ . Please don't place it in extremely high or low temperature area.
Attention:battery usage notice
-Don't transport or store the battery together with necklace, barrette and other metal object.
- Don't throw the battery into fire to heat up.
- Don't knock down or redo the battery.
- Please use the dominated charger to charge.
- Deal with the batteries discarded.
- Don't drop the battery or make it suffer intense vibration.
- Please keep it away from water.
- Please keep its connection terminal clean.
- It's the normal phenomenon that the battery and machine get heat after long time working.
Alternating Current Adapter
- Please just use the adapter dominated for this machine, if use other kind of adapter may cause matters to the machine.
- AC adapter for indoor use.
- Make sure that DC plug connect to the monitor firmly.
- Please turn off the monitor before pull out the plug.
- Don't use it in other devices.
- Don't knock it down yourself.
- Don't place it in high temperature or humidity area.
- Please don't let it suffer intense shake
- It's a normal phenomenon that the adapter buzzs or get heat when using.
- If adapter cause wireless interference, please reset the antenna.
Product Use
In order to make sure of the normal working, please don't let the machine get hit or shake.
Electric interference
This product may cause interference to the medical and aviatic devices. before you use it in the hospital or airport, please consult the hospital the airline company.
Liquid crystal
If screen suffered damage, please avoid to touch the liquid crystal. If any case of the following happens, please do as we show.
- If liquid crystal gets to your skin, please clean the position with cloth, then daub some soap and then wash it.
· If liquid crystal comes into your eyes, please flush the eye with water more than 15 minutes, and then ask for help from doctor. - If drink the liquid crystal by mistake, please gargle with water, and drink much water to help throw up, and then consult the doctor.
Debug The Machine
Before start to monitor the important spot, please adjust the machine to make sure of its normal working. we are not responsible to any damage or benefit loss caused by product's malfunction.
Claim
Specification subject to change without notice, we have the final explanation right to do a explanation to this manual.
- The screen is made from high precise technology, still there would be brightness dot or color abnormality on screen sometimes. it's the normal phenomenon to this kind of LCD, but not failure.
- When fall across wireless interference( such as magnetic field, static or circuit noise), the abnormality display may happen.
Accessory
Power Charger 1pc
Wall mount bracket 1pc
1.2V AA nickel-hydrogen battery 4pcs
AV cable #1( video input) : 1pc
Av cable #2 (video output): 1pc
Wrist strap 1 pc
Users'manual 1pc
Warranty card 1pc
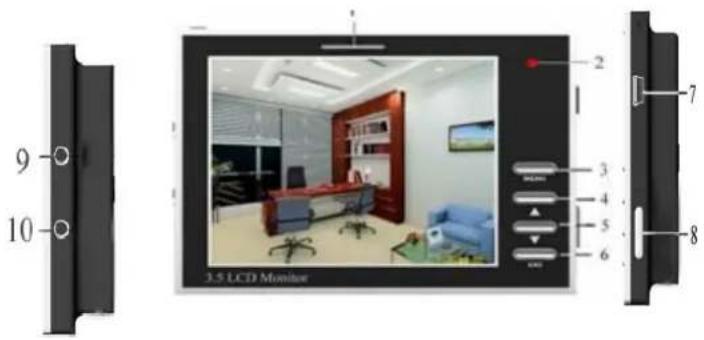
Appearance and function illustration
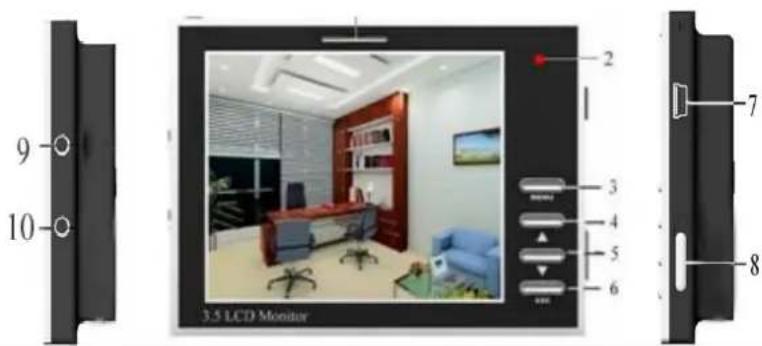
text_image
9 10 2 3 4 5 6 7 8 3.5 LCD Monitor| S/N | External function instruction |
| 1 | Built-in 1w speaker |
| 2 | LED indicator light: shows green in normal working and orange in charge state |
| 3 | MENU: Main menu key, after the main menu shows,it's the selection key to select the submenu upwards/downwards |
| 4 | ▲ Volume up, it's also can be the adjustment key to submenu parameter. |
| 5 | ▼ Volume down, it's also can be the adjustment key to submenu parameter. |
| 6 | ESC: Exit key |
| 7 | Power In : 9VDC input |
| 8 | Power ON/OFF :Switch |
| 9 | Camera Audio &Video In and DC 5V Power Out |
| 10 | AV Out |
Menu adjustment

text_image
Brightness 39 Contrast 50 Saturation 50 Sharpness 50 Volume 50 Language EnglishBrightness Brightness adjustment: Users can change the brightness and darkness of image by adjusting the parameter according to his personal requirement. Firstly, press MENU key to enter main menu interface, and then press “▲”key or “▼”key to confirm this submenu, then press “▲”or “▼”to adjust the brightness and darkness of image. Press ESC key to exist main menu.
Contrast Contrast adjustment: Users can change the contrast of image by adjusting the parameter according to his personal requirement. Firstly, press MENU key to enter main menu interface, press MENU key to select downwards(moving the yellow cursor to this submenu), and then press “▲”key or “▼”key to confirm this submenu, in the end press “▲”or “▼”to adjust the contrast of image. Press ESC key to exist main menu.
Saturation Saturation adjustment: Users can change the saturation of image by adjusting the parameter according to his personal requirement. Firstly, press MENU key to enter main menu interface, press MENU key to select downwards(moving the yellow cursor to this submenu), and then press “▲”key or “▼”key to confirm this submenu, in the end, press “▲”or “▼”to adjust the saturation of image. Press ESC key to exist main menu.
Sharpness Sharpness: Users can change the sharpness of image by adjusting the parameter according to his personal requirement. Firstly, press MENU key to enter main menu interface, press MENU key to select downwards(moving the yellow cursor to this submenu), and then press “▲”key or “▼”key to confirm this submenu, in the end, press “▲”or “▼”to adjust the sharpness of image. Press ESC key to exist main menu.
Volume Volume adjustment: Users can change the volume of image by adjusting the parameter according to his personal requirement. Firstly, press MENU key to enter main menu interface, press MENU key to select downwards(moving the yellow cursor to this submenu), and then press “▲”key or “▼”key to confirm this submenu, then press “▲”or “▼”to adjust the volume of image. Press ESC key to exist main menu.
Language English / Italian / Chinese
Installation Illustration
Battery fixing
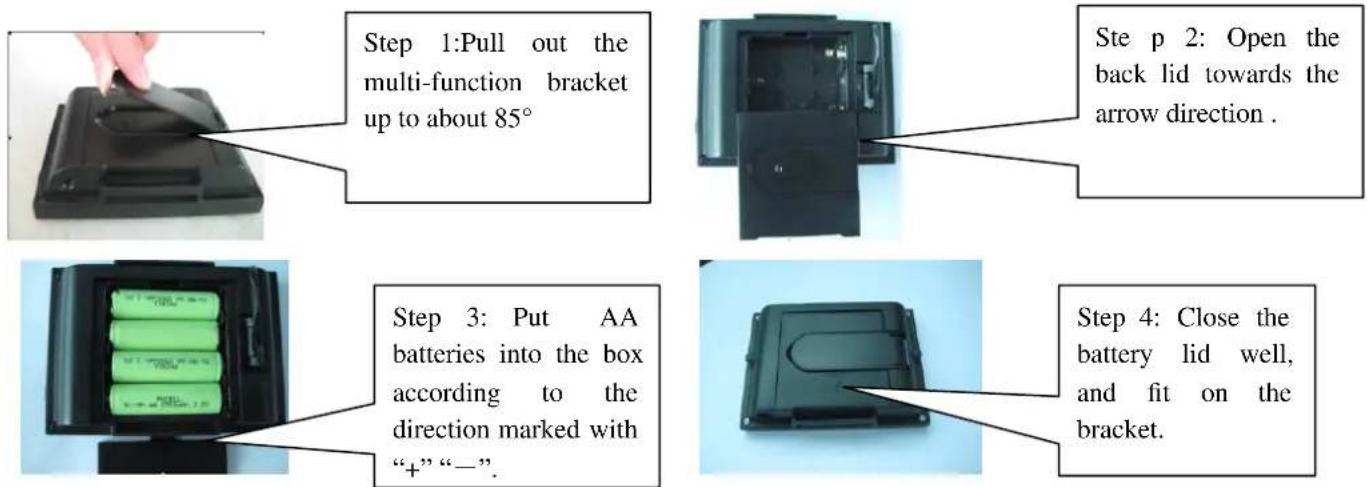
1.Product fixing method
Users have four methods to fix this product, you can choose the accessories supplied to fix according to the various situation.
(1)Portable: A
Put it on your arms by using the wrist strap.(this method is usually suitable to outdoor working or or indoor camera lens adjustment in construction field)
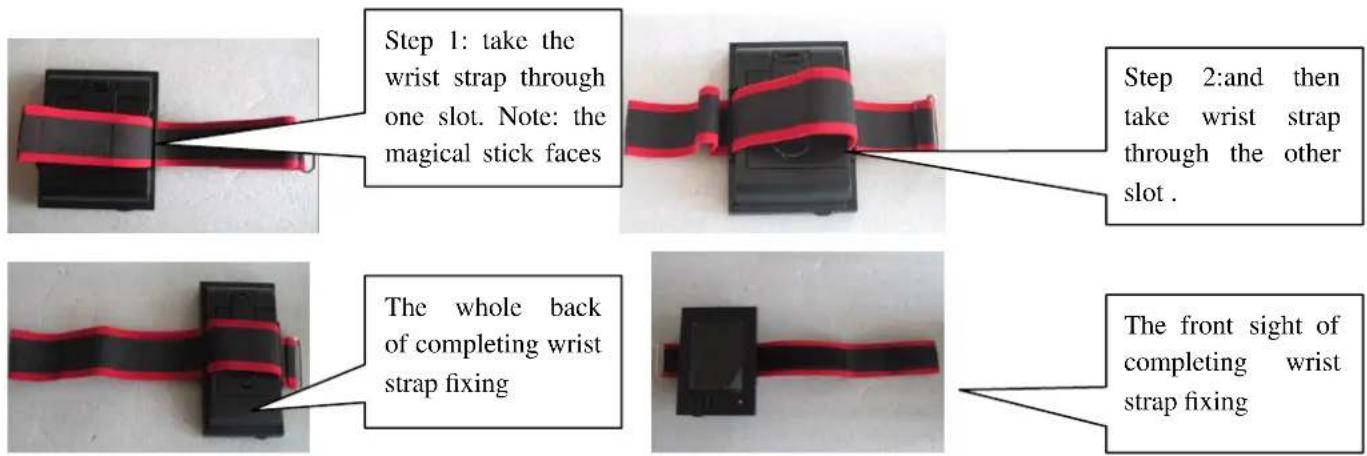
text_image
Step 1: take the wrist strap through one slot. Note: the magical stick faces Step 2: and then take wrist strap through the other slot. The whole back of completing wrist strap fixing The front sight of completing wrist strap fixing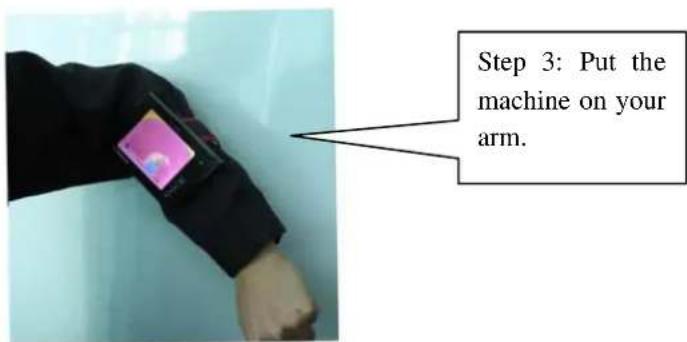
text_image
Step 3: Put the machine on your arm.(2) Portable: B
Hanging the machine at your waist.

text_image
Step 1:pull out the multi-function up to 85° Step 2 : put the machine of step 1 at your waist strap. pull out(3) Fixing on wall: Fix the machine on wall by using the wall bracket.

text_image
Wall bracket Step 1: Tweak the screw thread part of the bracket into the screw in machine. Step 2 :Fix the machine with completing bracket onto the wall or flat object.(4) Normal Method
Open the multi-function bracket to stand the machine on the table-board.

text_image
Step1: Firstly, open the multi-function bracket up to about 85°.
text_image
Pulling upwards! Step2: Draw the bracket of step 1. by 6mm around.
text_image
To be the right site! Step3 : Rotate the multi-function bracket of step 2. to left by 90° Step 4 : Put the monitor of step 3 on table-board. Standing up !2. OPERATION
text_image
9 10 3.5 LCD Monitor 2 7 3 4 5 6 81、Put the batteries into machine according to the direction marked with “+” “-”.
2、Insert the AV cable 1 (including power output cable) to the jack in position 9 of the illustration. And then connect the red RCA connector to video signal port, and the white one to audio port.
3、Switch the power switch to "ON" side.
4、If you need to output AV signal, insert AV cable 2 to the jack in position 10 of the illustration. Yellow cable for video output, white one for audio output.
5、If powerless, you can charge it as it's working. Connect the charger to position 7 of the illustration.
6、When the image comes to be normal, you can adjust it by key 3、4、5 and 6. showed in the illustration.
Specification
| Product name | 3.5” CCTV monitor |
| System of signal | PAL/NTSC |
| Resolution | 320(RGB)*240 |
| Visual angle | (up/down/left/right): (40/60/60/60) |
| Brightness | 250cd/m2 |
| Contrast | 350: 1 |
| Response time | 25ms |
| Video input/output | 1.0Vp-p 75ohm |
| Audio input/output | 20Hz~20KHz 1W |
| OSD digital menu | Simplified Chinese/ English |
| working power | DC 4V-9V |
| Power input/output | Input 110~240V-50/60Hz-0.30A--Output 12VDC/1.5A |
| Max./Min. power consumption | 4.05W/3.15W |
| Working tem. range | 0~60°C |
| Storage tem. range | -20~60°C |
| Relative humidity | 5~95%RH |
| Product dimension | L 118* W 83.5* D 27mm |
| Package size | (L)262*(W)145*(H)62mm |
| N.G. | 250g |
Trouble shooting
Before calling for repair, please refer to this section to see whether you can solve it by yourself; if you need help, please contact our after sale service centre or our wholesaler.
| Problem | Reason | Solution |
| Can’t start the machine | No power in battery | Charge battery or change battery. |
| fix at wrong polarity direction of battery | Change the polarity direction of battery and fix again | |
| The connection of AC charger and DC output connector fail | Check the connection situation | |
| The conduct between battery and Battery slice fail | Clean the battery terminals and battery slice | |
| Power switch is close | Switch to “ON” side | |
| No video signal input | Make sure of video input | |
| Machine lays off | No power | Charge battery or fit on fully charged battery |
| Connection fail | Make sure of correct connection | |
| Battery runs out too fast | battery is too cold | Warm it in pocket or other warm place (don’t close to fire) and then fit it on |
| There is unknown object on battery’s terminals | Use soft dry cloth to clean off | |
| Battery has been charged too many times | Battery comes to its lifespan; need to buy new one. | |
| Battery charge fail | Fitting on battery incorrectly | Fit on battery according to correct direction |
| Charging too slow | Temperature is too low | Charge battery at indoor temperature |
| Indicator light show normal but battery charge fail | There is unknown object on battery’s terminals | Use soft dry cloth to clean off |
| Battery has been charged too many times | Battery comes to its lifespan; need to buy the new one. | |
| No signal displays | No video input | To check if the front video device works Normally |
| Incorrect connection on signal cable | Check the connection on the input port and refer to the operation in users’ manual | |
| AV cable 1 doesn’t conduct well | Check the connection | |
| Interference in image | Suffer interference in video signal transmission | Fix a signal amplifier at video input terminal or shorten the transmission cable |