
FS146F4 - Water pump BLACK & DECKER - Free user manual and instructions
Find the device manual for free FS146F4 BLACK & DECKER in PDF.


| Product Type | Cordless Drill/Screwdriver |
| Model | FS146F4 |
| Brand | Black & Decker |
| Voltage | 14.4 V DC |
| No-Load Speed | 0-420 / 0-1,300 / 0-2,000 min⁻¹ (3 gears) |
| Impact Rate | 0-6,300 / 0-19,500 / 0-30,000 min⁻¹ (3 gears) |
| Max Torque | 48 Nm |
| Chuck Capacity | 13 mm (keyless) |
| Max Drilling Capacity (Steel/Wood/Masonry) | 13 / 30 / 13 mm |
| Sound Pressure Level (Lₚₐ) | 96 dB(A) |
| Acoustic Power Level (Lₜₐ) | 107 dB(A) |
| Vibration (Hand/Arm) | 13.0 m/s² |
| Weight (without battery) | 1.7 kg |
| Battery Type | NiCd / NiMH (Cat. No. A1714) |
| Battery Voltage | 14.4 V DC |
| Battery Capacity | 1.7 Ah |
| Charger Model | 30 min charger (230 V AC) |
| Charging Time | Approx. 30 minutes |
| Intended Use | Drilling in wood, metal, plastics, soft masonry; screwdriving |
| Key Features | Variable speed switch, forward/reverse, keyless chuck, 3-gear selector, torque adjustment, side handle, bit holder |
| Safety Features | Double insulated charger, lock-off switch, overload protection |
| Maintenance | Clean ventilation slots regularly; wipe with damp cloth; no abrasive cleaners |
| Warranty | 4-year repair guarantee (Australia/New Zealand) |
Frequently Asked Questions - FS146F4 BLACK & DECKER
User questions about FS146F4 BLACK & DECKER
0 question about this device. Answer the ones you know or ask your own.
Ask a new question about this device
Download the instructions for your Water pump in PDF format for free! Find your manual FS146F4 - BLACK & DECKER and take your electronic device back in hand. On this page are published all the documents necessary for the use of your device. FS146F4 by BLACK & DECKER.
USER MANUAL FS146F4 BLACK & DECKER
Australia
New Zealand




Intended use
Your Black & Decker drill/screwdriver has been designed for screwdriving applications and for drilling in wood, metal, plastics and soft masonry.
This tool is intended for consumer use only.
General safety rules
Warning! Read all instructions. Failure to follow all instructions listed below may result in electric shock, fire and/or serious injury. The term "power tool" in all of the warnings listed below refers to your mains operated (corded) power tool or battery operated (cordless) power tool.
SAVE THESE INSTRUCTIONS.
1. Work area
a. Keep work area clean and well lit. Cluttered and dark areas invite accidents.
b. Do not operate power tools in explosive atmospheres, such as in the presence of flammable liquids, gases or dust. Power tools create sparks which may ignite the dust or fumes.
c. Keep children and bystanders away while operating a power tool. Distractions can cause you to lose control.
2. Electrical safety
a. Power tool plugs must match the outlet. Never modify the plug in any way. Do not use any adapter plugs with earthed (grounded) power tools. Unmodified plugs and matching outlets will reduce risk of electric shock.
b. Avoid body contact with earthed or grounded surfaces such as pipes, radiators, ranges and refrigerators. There is an increased risk of electric shock if your body is earthed or grounded.
c. Do not expose power tools to rain or wet conditions. Water entering a power tool will increase the risk of electric shock.
d. Do not abuse the cord. Never use the cord for carrying, pulling or unplugging the power tool. Keep cord away from heat, oil, sharp edges or moving parts. Damaged or entangled cords increase the risk of electric shock.
e. When operating a power tool outdoors, use an extension cord suitable for outdoor use. Use of a cord suitable for outdoor use reduces the risk of electric shock
3. Personal safety
a. Stay alert, watch what you are doing and use common sense when operating a power tool. Do not use a power tool while you are tired or under the influence of drugs, alcohol or medication. A moment of inattention while operating power tools may result in serious personal injury.
b. Use safety equipment. Always wear eye protection. Safety equipment such as dust mask, non-skid safety shoes, hard hat, or hearing protection used for appropriate conditions will reduce personal injuries.
c. Avoid accidental starting. Ensure the switch is in the off position before plugging in. Carrying power tools with your finger on the switch or plugging in power tools that have the switch on invites accidents.
d. Remove any adjusting key or wrench before turning the power tool on. A wrench or a key left attached to a rotating part of the power tool may result in personal injury
e. Do not overreach. Keep proper footing and balance at all times. This enables better control of the power tool in unexpected situations.
f. Dress properly. Do not wear loose clothing or jewellery. Keep your hair, clothing and gloves away from moving parts. Loose clothes, jewellery or long hair can be caught in moving parts.
g. If devices are provided for the connection of dust extraction and collection facilities, ensure these are connected and properly used. Use of these devices can reduce dust related hazards.
4. Power tool use and care
a. Do not force the power tool. Use the correct power tool for your application. The correct power tool will do the job better and safer at the rate for which it was designed
b. Do not use the power tool if the switch does not turn it on and off. Any power tool that cannot be controlled with the switch is dangerous and must be repaired
c. Disconnect the plug from the power source before making any adjustments, changing accessories, or storing power tools. Such preventive safety measures reduce the risk of starting the power tool accidentally.
d. Store idle power tools out of the reach of children and do not allow persons unfamiliar with the power tool or these instructions to operate the power tool. Power tools are dangerous in the hands of untrained users
e. Maintain power tools. Check for misalignment or binding of moving parts, breakage of parts and any other condition that may affect the power tools operation. If damaged, have the power tool repaired before use. Many accidents are caused by poorly maintained power tools.
f. Keep cutting tools sharp and clean. Properly maintained cutting tools with sharp cutting edges are less likely to bind and are easier to control.
g. Use the power tool, accessories and tool bits etc., in accordance with these instructions and in the manner intended for the particular type of power tool, taking into account the working conditions and the work to be performed.
Use of the power tool for operations different from those intended could result in a hazardous situation.
5. Battery tool use and care
a. Ensure the switch is in the off position before inserting battery pack. Inserting the battery pack into power tools that have the switch on invites accidents.
b. Recharge only with the charger specified by the manufacturer. A charger that is suitable for one type of battery pack may create a risk of fire when used with another battery pack.
c. Use power tools only with specifically designated battery packs. Use of any other battery packs may create a risk of injury and fire.
d. When battery pack is not in use, keep it away from other metal objects like paper clips, coins, keys, nails, screws, or other small metal objects that can make a connection from one terminal to another. Shorting the battery terminals together may cause burns or a fire.
e. Under abusive conditions, liquid may be ejected from the battery; avoid contact. If contact accidentally occurs, flush with water. If liquid contacts eyes, additionally seek medical help. Liquid ejected from the battery may cause irritation or burns.
6. Service
a. Have your power tool serviced by a qualified repair person using only identical replacement parts. This will ensure that the safety of the power tool is maintained
Additional safety instructions for impact drills
- Wear ear protectors with impact drills. Exposure to noise can cause hearing loss.
Use auxiliary handles supplied with the tool. Loss of control can cause personal injury.
Before drilling into walls, floors or ceilings, check for the location of wiring and pipes.
- Avoid touching the tip of a drill bit just after drilling, as it may be hot.
Additional safety instructions for batteries and chargers
Batteries
◆ Never attempt to open for any reason.
Do not expose the battery to water.
Do not store in locations where the temperature may exceed 40 °C.
◆ Charge only at ambient temperatures between 10 °C and 40 °C.
◆ Charge only using the charger provided with the tool.
When disposing of batteries, follow the instructions given in the section "Protecting the environment".
Chargers
Use your Black & Decker charger only to charge the battery in the tool with which it was supplied. Other batteries could burst, causing personal injury and damage.
- Never attempt to charge non-rechargeable batteries.
◆ Have defective cords replaced immediately.
Do not expose the charger to water.
Do not open the charger.
Do not probe the charger.


The charger is intended for indoor use only.
Read the instruction manual before use.

The charger automatically shuts off if the ambient temperature becomes too high. As soon as the ambient temperature has cooled down, the charger will resume operating.

Charge only at ambient temperatures between 10 °C and 40 °C.

Charging process completed

Charging
Electrical safety

Your charger is double insulated; therefore no earth wire is required. Always check that the mains voltage corresponds to the voltage on the rating plate. Never attempt to replace the charger unit with a regular mains plug.
- This appliance is not intended for use by young or infirm persons without supervision. Children must be supervised to ensure they do not play with the appliance.
If the supply cord is damaged, it must be replaced by the manufacturer or an authorised Black & Decker Service Centre in order to avoid a hazard.
Features
This tool includes some or all of the following features.
-
Variable speed switch
-
Forward/reverse slider
-
Chuck
- Mode selector / torque adjustment collar
- Three-gear selector
- Bit holder
- Battery
- Side handle
Fig. A
-
Charger
-
Charging indicator
-
End of charge indicator
Assembly
Warning! Before assembly, remove the battery from the tool.
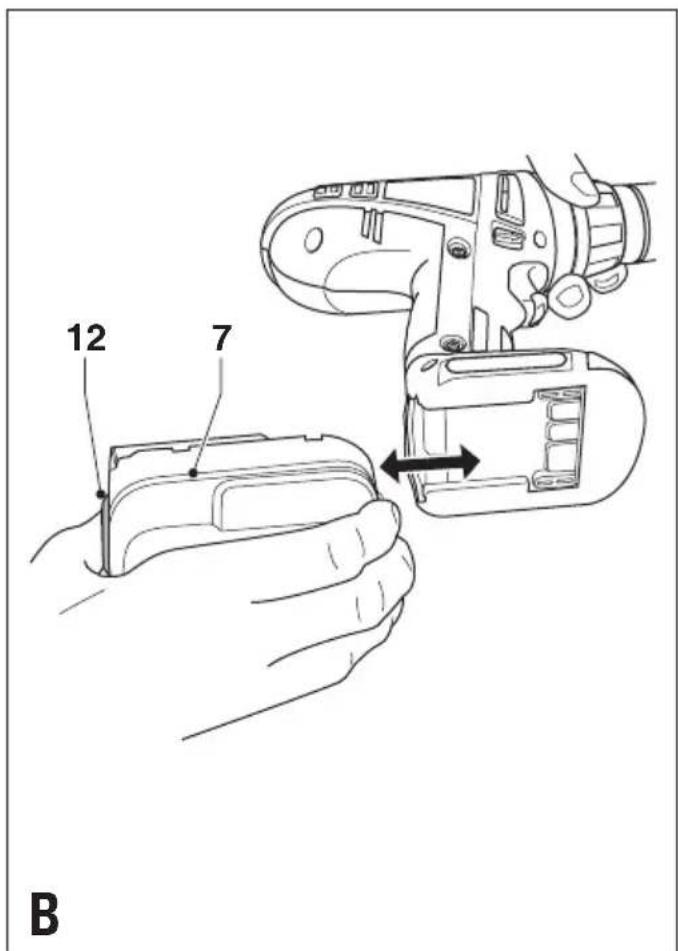
Fitting and removing the battery (fig. B)
- To fit the battery (7), line it up with the receptacle on the tool. Slide the battery into the receptacle and push until the battery snaps into place.
- To remove the battery, push the release button (12) while at the same time pulling the battery out of the receptacle.
Fitting the battery cap (fig. C)
Warning! Fit the cap (13) to the battery (7) for transportation and storage.
Fitting the side handle
- Loosen the side handle (8) by turning it counterclockwise.
- Slide the side handle over the chuck and onto the housing.
◆ Tighten the side handle by turning it clockwise.
Fitting and removing a drill bit or screwdriver bit (fig. D)
This tool is fitted with a keyless chuck to allow for an easy exchange of bits.
- Lock the tool by setting the forward/reverse slider (2) to the centre position.
- Open the chuck by turning the sleeve (14) with one hand while holding the tool with the other.
◆ Insert the bit shaft (15) into the chuck. - Firmly tighten the chuck by turning sleeve (14) with one hand while holding the tool with the other.
This tool is supplied with a double-ended screwdriver bit in the bit holder (6).
- To remove the screwdriver bit from the bit holder, lift the bit from the recess.
- To store the screwdriver bit, firmly push it into the holder.
Use
Warning! Let the tool work at its own pace. Do not overload.
Charging the battery (fig. A)
The battery needs to be charged before first use and whenever it fails to produce sufficient power on jobs that were easily done before. When charging the battery for the first time, or after prolonged storage, it will only accept an 80% charge. After several charge and discharge cycles, the battery will attain full capacity. The battery may become warm while charging; this is normal and does not indicate a problem.
Warning! Do not charge the battery at ambient temperatures below 4 °C or above 40 °C. Recommended charging temperature: approx. 24 °C.
- To charge the battery (7), remove it from the tool and insert it into the charger (9). The battery will only fit into the charger in one way. Do not force. Be sure that the battery is fully seated in the charger.
◆ Plug in the charger.
Check if the red charging indicator (10) lights up. If the green end of charge indicator (11) lights up now instead, the battery is too hot and cannot be charged. If this happens, remove the battery from the charger, let the battery cool down for approx. 1 hour and re-insert it.
After approx. 30 minutes of charging, the red charging indicator (10) will stop lighting and the green end of charge indicator (11) will light up. The battery is now fully charged.
◆ Remove the battery from the charger.
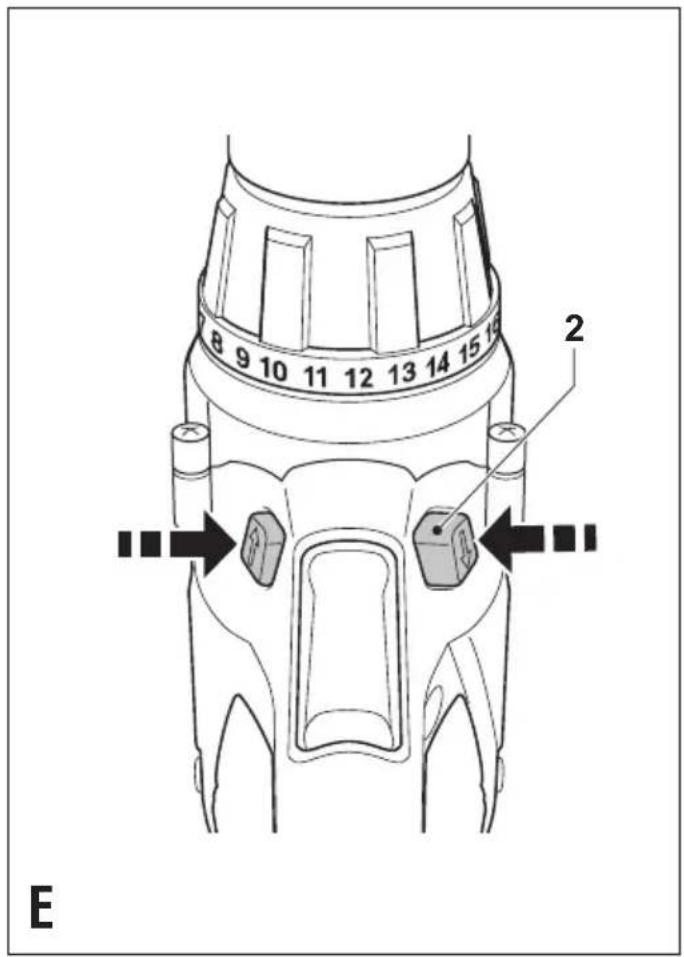
Selecting the direction of rotation (fig. E)
For drilling and for tightening screws, use forward (clockwise) rotation. For loosening screws or removing a jammed drill bit, use reverse (counterclockwise) rotation.
- To select forward rotation, push the forward/reverse slider (2) to the left.
- To select reverse rotation, push the forward/reverse slider to the right.
- To lock the tool, set the forward/reverse slider into the centre position.
Selecting the operating mode or torque (fig. F)
This tool is fitted with a collar to select the operating mode and to set the torque for tightening screws. Large screws and hard workpiece materials require a higher torque setting than small screws and soft workpiece materials. The collar has a wide range of settings to suit your application.
- For drilling in wood, metal and plastics, set the collar (4) to the drilling position by aligning the symbol with the marking (16).
-
For screwdriving, set the collar to the desired setting. If you do not yet know the appropriate setting, proceed as follows:
-
Set the collar (4) to the lowest torque setting.
◆ Tighten the first screw.
If the clutch ratchets before the desired result is achieved, increase the collar setting and continue tightening the screw. Repeat until you reach the correct setting. Use this setting for the remaining screws.
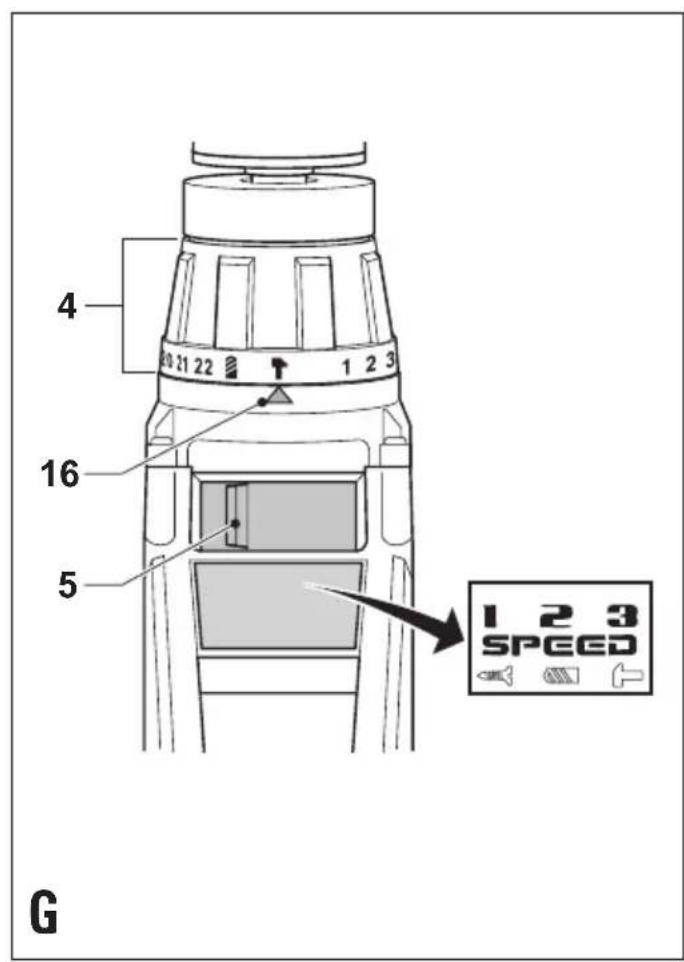
Three-gear selector (fig. G)
- For drilling in steel and for screwdriving applications, slide the three-gear selector (5) into the left position (1st gear).
For drilling in materials other than steel (except masonry), slide the three-gear selector (5) into the centre position (2nd gear).
For drilling in masonry, set the collar (4) to the hammer drilling position by aligning the symbol with the marking (16). Slide the three-gear selector (5) into the right position (3rd gear).
Drilling/screwdriving
- Select forward or reverse rotation using the forward/ reverse slider (2).
To switch the tool on, press the switch (1). The tool speed depends on how far you press the switch. - To switch the tool off, release the switch.
Hints for optimum use
Drilling
- Always apply a light pressure in a straight line with the drill bit.
Just before the drill tip breaks through the other side of the workpiece, decrease pressure on the tool.
Use a block of wood to back up workpieces that may splinter.
◆ Use spade bits when drilling large diameter holes in wood.
◆ Use HSS drill bits when drilling in metal.
◆ Use masonry bits when drilling in soft masonry.
Use a lubricant when drilling metals other than cast iron and brass.
Make an indentation using a centre punch at the centre of the hole to be drilled in order to improve accuracy.
Screwdriving
◆ Always use the correct type and size of screwdriver bit.
If screws are difficult to tighten, try applying a small amount of washing liquid or soap as a lubricant.
◆ Always hold the tool and screwdriver bit in a straight line with the screw.
Maintenance
Your Black & Decker tool has been designed to operate over a long period of time with a minimum of maintenance.
Continuous satisfactory operation depends upon proper tool care and regular cleaning.
Your charger does not require any maintenance apart from regular cleaning.
Warning! Before performing any maintenance on the tool, remove the battery from the tool. Unplug the charger before cleaning it.
- Regularly clean the ventilation slots in your tool and charger using a soft brush or dry cloth.
- Regularly clean the motor housing using a damp cloth. Do not use any abrasive or solvent-based cleaner.
- Regularly open the chuck and tap it to remove any dust from the interior.
Protecting the environment
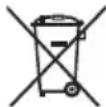
Separate collection. This product must not be disposed of with normal household waste.
Should you find one day that your Black & Decker product needs replacement, or if it is of no further use to you, do not dispose of it with household waste. Make this product available for separate collection.

Separate collection of used products and packaging allows materials to be recycled and used again. Re-use of recycled materials helps prevent environmental pollution and reduces the demand for raw materials.
Local regulations may provide for separate collection of electrical products from the household, at municipal waste sites or by the retailer when you purchase a new product.
Black & Decker provides a facility for the collection and recycling of Black & Decker products once they have reached the end of their working life. To take advantage of this service please return your product to any authorised repair agent who will collect them on our behalf.
You can check the location of your nearest authorised repair agent by contacting your local Black & Decker office at the address indicated in this manual. Alternatively, a list of authorised Black & Decker repair agents and full details of our after-sales service and contacts are available on the Internet at: www.blackanddecker.com.au
Batteries

Black & Decker batteries can be recharged many times. At the end of their useful life, discard batteries with due care for our environment:
- Run the battery down completely, then remove it from the tool.
NiCd and NiMH batteries are recyclable. Take them to any authorised repair agent or a local recycling station.
EC declaration of conformity
FS146F4/FS188F4/FS244F4
Black & Decker declares that these products conform to: 98/37/EC, 89/336/EEC, 73/23/EEC, EN 60745, EN 60335, EN 55014, EN 61000

Kevin Hewitt
Director of Consumer Engineering
Spennymoor, County Durham DL16 6JG,
United Kingdom
1-10-2005
AUSTRALIA / NEW ZEALAND
4 YEAR REPAIR GUARANTEE
Black & Decker welcomes you as a purchaser of this product from our range of Home Workshop, Garden Tools and Accessories. All our products are engineered and manufactured to ensure the highest standards of reliability and performance during use, and are supported in After Sales Service by a wide network of Black & Decker Authorised Service Centres.
Black & Decker Supplementary Guarantee Subject to the conditions stated below, Black & Decker guarantees that it will correct by repair or parts replacement, without charge, any defect (in the product which this Guarantee Statement accompanies) arising from faulty workmanship or materials where such defect arises within four years from the date of purchase of the product. A product subject to claim under this guarantee should be returned as a complete unit to the most convenient Black& Decker Authorised Service Centre or Agent.
CONDITIONS
The Black & Decker Supplementary Guarantee does not apply in the following cases:
WHERE THE PRODUCT HAS BEEN USED FOR TRADE OR INDUSTRIAL PURPOSES.
where any defect or failure is attributed to accident, misuse, abuse, negligence or non-observance of local regulations on the part of the owner or user: or
where the product has been serviced by a person not authorised by Black& Decker to do so, or with non-approved parts: or
to loose accessories
In order to enforce the Supplementary Guarantee, proof of purchase is required (Guarantee Card and or store receipt). The period of the Black& Decker Supplementary Guarantee begins from the original date of purchase not withstanding any subsequent repair or parts replacement. No Guarantees other than contained in this document, wether written or verbal, are authorised to be made on behalf of Black & Decker. All other conditions and guarantees wether expressed or implied by law, are, to the extent permitted by law, hereby excluded.
The Black & Decker Supplementary does not apply outside Australia and New Zealand.
PURCHASERS STATUTORY RIGHTS
The Black & Dceker Supplementary Guarantee set out above does not exclude any conditions or conditions that maybe mandatorilyimplied by law, and your attention is drawn to the provisions of the Consumer Guarantee Act1993 (New Zealand only), Trade Practices Act 1774 and State legislation (Australia only), which confers rights upon consumers. The Black & Decker Supplementary Guarantee is in addition to any right conferred on a consumer under the Act, where applicable, and any other rights provided under applicable legislation.
Technical data
| FS146F4 | FS188F4 | FS244F4 | |||||
| Voltage | V | DC ^-1 | 14.4 | 18 | 24 | ||
| No-load speed | min | 0-420/0-1,300/0-2,000 | 0-420/0-1,300/0-2,000 | 0-420/0-1,300/0-2,000 | |||
| Impact rate | min ^-1 | 0-6,300/0-19,500/0-30,000 | 0-6,300/0-19,500/0-30,000 | 0-6,300/0-19,500/0-30,000 | |||
| Max. torque Nm | 48 | 58 | 60 | ||||
| Chuck capacity | mm | 13 | 13 | 13 | |||
| Max. drilling capacity in steel/wood/masonry | mm | 13/30/13 | 13/30/13 | 13/30/13 | |||
| L_pA (sound pressure) | dB(A) | 96 | 96 | 98 | |||
| L_WA (acoustic power) | dB(A) | 107 | 107 | 109 | |||
| K_pA (sound pressure uncertainty) | dB(A) | 3 | 3 | 3 | |||
| K_WA (acoustic power uncertainty) | dB(A) | 3 | 3 | 3 | |||
| Hand/arm weighted vibration | m/ ^2/_3 | 13.0 | 14.5 | 12.0 | |||
| Battery cat. no. | A1714 | A1718 | A24 | ||||
| Weight (without battery) | kg | 1.7 | 1.7 | 1.7 | |||
| Battery | A1714 | A1718 | A24 | |
| Voltage | V_DC | 14.4 | 18 | 24 |
| Capacity | Ah | 1.7 | 1.7 | 1.2 |
| Weight | kg | 0.7 | 0.9 | 1.0 |
| Charger | 30 min | |
| Input voltage | V_AC | 230 |
| Approx. charging time | min | 30 |
| Weight | kg 0.5 | |
Australia
Black & Decker (Australia) Pty. Ltd. Tel. 03-8720 5100
20 Fletcher Road, Mooroolbark, Fax 03-9727 5940
Victoria, 3138
New Zealand
Black & Decker New Zealand Tel: (64 9) 259 1111
5 Te Apunga Place
Mt. Wellington Auckland NZ
- Intended use
- General safety rules
- SAVE THESE INSTRUCTIONS.
- Work area
- Electrical safety
- Personal safety
- Power tool use and care
- Battery tool use and care
- Service
- Additional safety instructions for impact drills
- Additional safety instructions for batteries and chargers
- Batteries
- Chargers
- Electrical safety
- Features
- Fig. A
- Assembly
- Fitting and removing the battery (fig. B)
- Fitting the side handle
- Fitting and removing a drill bit or screwdriver bit (fig. D)
- Use
- Charging the battery (fig. A)
- Selecting the direction of rotation (fig. E)
- Selecting the operating mode or torque (fig. F)
- Three-gear selector (fig. G)
- Drilling/screwdriving
- Hints for optimum use
- Drilling
- Screwdriving
- Maintenance
- Protecting the environment
- EC declaration of conformity
- AUSTRALIA / NEW ZEALAND
- YEAR REPAIR GUARANTEE
- CONDITIONS
- PURCHASERS STATUTORY RIGHTS
- Australia
- New Zealand
Brand : BLACK & DECKER
Model : FS146F4
Category : Water pump