
CV150-CSB - Security Camera MARSHALL - Free user manual and instructions
Find the device manual for free CV150-CSB MARSHALL in PDF.


| Product Type | Security Camera |
| Brand | Marshall |
| Model | CV150-CSB |
| Sensor | 1/3" CMOS 2.1 Megapixel Progressive Scan |
| Video Output | 3G/HD-SDI, CVBS (1.0Vp-p, NTSC/PAL) |
| Resolution | 1920 x 1080p (Full HD) |
| Frame Rates | 1080p: 25/29.97/30/50/59.94/60 fps; 1080i: 50/59.94/60 fps; 720p: 50/59.94/60 fps |
| Minimum Illumination | 0.1 lux (F1.2, 50IRE AGC MAX); DSS 4X: 0.01 lux |
| OSD Control | Joystick |
| White Balance Modes | AUTO, AUTOEXT, PRESET, MANUAL (R-Gain, B-Gain) |
| Backlight Compensation | BLC, WDR, HLC |
| Digital Noise Reduction (DNR) | OFF, LOW, MIDDLE, HIGH |
| Day & Night Modes | AUTO, COLOR, B/W, EXTERN |
| Privacy Masking | BOX (up to 16 zones) or POLYGON (up to 8 zones) |
| Motion Detection | Yes, 4 zones, adjustable sensitivity, tracking, quick zoom |
| Digital Zoom | 1.0x – 16.0x |
| Digital Image Stabilizer (DIS) | Yes, with RANGE, FILTER, AUTO C modes |
| Genlock | Disable, Master, Slave |
| Image Settings | Sharpness, Gamma, Mirror, Flip, ACE, Defog, Shading |
| Operating Temperature | -5°C to 50°C |
| Cleaning | Turn off, wipe with dry cloth; use lens blower for lens |
| Power Supply | Use only specified power supply (not detailed in manual) |
| Warranty | Contact manufacturer for repair; damage from misuse may incur charges |
Frequently Asked Questions - CV150-CSB MARSHALL
User questions about CV150-CSB MARSHALL
0 question about this device. Answer the ones you know or ask your own.
Ask a new question about this device
Download the instructions for your Security Camera in PDF format for free! Find your manual CV150-CSB - MARSHALL and take your electronic device back in hand. On this page are published all the documents necessary for the use of your device. CV150-CSB by MARSHALL.
USER MANUAL CV150-CSB MARSHALL
Marshall Electronics
CV200-MB/M, CV150-MB/M, CV150-CSB/CS Operation Manual
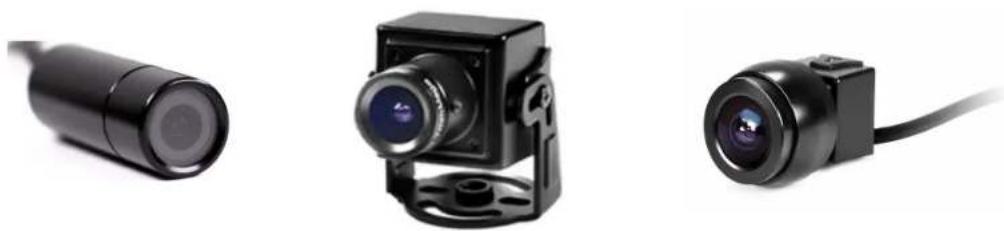
2015.01.29 VER.
Please keep this manual
CAUTION
Please read complete manual before using this product.
This manual is created to prevent damage to camera and protect user safety.
The following symbols explain the damage or lose that can be experienced if proper operation parameters are not followed.
| WARNING | Indicates that activity may result in injury or lose if the user violates the notice. |
| CAUTION | Indicates that activity may result in death or critical injury if the user violates the notice. |

Precautions
1. Moisture
Do not install the product in areas of high humidity or where rain can penetrate. This may cause camera malfunction, and even fire in certain circumstances if water enters the camera's internal circuits.
2. Repair
Do not modify or disassemble. There may be risk of electric shock, etc. In case of a fault, please don't fix it directly, please contact manufacturer.
3. Power
Do not use other power supplies not specified by Marshall Electornics. There may be the electrical shock or cause damage to camera.
4. Conditions
Do not install this camera in extreme temperature conditions where temperature is too hot or too cold. (Recommended use temperature : -5 °C\~ 50 °C)
5. Sun Light
If the camera lens is exposed to direct sun or strong light for long periods of time damage can be done to the sensor, lens, and other internal components.
6. Shock or Vibration
Be careful not to drop the camera or expose it to strong shock.
7. Installation in unstable places
Do not install the camera on the unstable place, tripod, bracket, table. If camera is dropped or falls damage may be caused to the camera or cause injury to people nearby.
8. If the camera is not working properly
If the camera is not working properly (for example, a strange noise, Sm ell or smoke), please stop using it and unplug power source immediately. Then contact Marshall Electronics for further instruction.
9. Cleaning
Turn off the camera during cleaning and wipe with a dry cloth. If stained part is not cleaned, please use furniture cleaner. In case of lens, please use lens blower or lens cleaning tissue. Supplies can be found in camera shops or CE retailers.
10. Exposure to the light source
Extreme light sources can cause Horizontal or Vertical lines in monitor or viewing device. This 'smear' is feature of the semiconductor device itself, not a breakdown.
11. How to ask for Repair Service
Please contact us for repair in the following cases after the camera's power is turned off.
A. If the connector of the power supply is broken, B. If you get the camera to rain or water,
C. If liquid or strange subject has been spilled into the camera,
D. If it is not activating described in the documentation for this camera Control adjustment of the camera described in this manual. (The camera to be operated in a manner not described in the documentation there is a larger danger of damage.)
E. If the camera has been dropped and damaged
F. If there is a distinct change in performance
Even if camera is outside of the warranty period, damage of product caused by Natural disasters such as lightning strike or inadvertent installation will be repaired at MEI rates.
Contents
- Features 5
- OSD operation 7
- Precautions of Installment---- 11
Thank you for using this product. If you want to get a better product's functions, please read the user manual carefully when you use the product. Keep the User's Guide. If a problem occurs during the use, please contact our manufacturer.
1. features
This product contains a 1/3" CMOS 2.1 Megapixel Progressive Scan 3G/HD-SDI/CVBS High sensitivity color camera for Broadcasting a variety of frame-rates and resolutions.
Full HD SDI: 1920 X 1080p - 25, 29.97, 30, 50, 59.94, 60fps, 1920 x 1080i - 50, 59.94, 60fps, and 1280 X 720p - 50, 59.94, 60fps Model # of the camera determines which resolutions it supports, MB or CSB would indicate 59.94fps or 29.97 - M or CS would indicate 60/50fps or 30/25fps.
SDI signal Standardization: SMPTE292M (SMPTE274M)
High sensitivity: High sensitivity at 0.1lux low luminance (F1.2, 50IRE AGC MAX, DSS 4X:0.01 Lux)
OSD control :
Automatic gain control, Electronic Level control or Auto level control, level of maximum accumulation level adjustment, WDR, BLC, HLC, Default title and camera ID settings, OSD arbitrary adjustments.
- White balance mode (WB): AUTO / AUTOEXT / PRESET / MANUAL (R-Gain, B-Gain)
- Back light compensation: BLC / WDR
- High light Back light compensation: HLC
- Noise remove (DNR): OFF / LOW / MIDDLE / HIGH
- Accumulation mode (SENS-UP): OFF / 2X / 3X / 4X / 8X / 16X / 32X
- Day & night setting (DAY &NIGHT): AUTO / B/W / COLOR / EXTERN
- Privacy masking: BOX / POLYGON
- Motion detect: OFF / ON
- Zoom(D-ZOOM): 1.0x\~16.0x
- Analog video output: CVBS 1.0Vp-p, NTSC, PAL
- Digital Image Stabilizer function (DIS): RANGE / FILTER / AUTO C
- GENLOCK Function: Disable / Master / Slave
- IMAGE RANGE: FULL / COMP / USER
2. OSD explanation
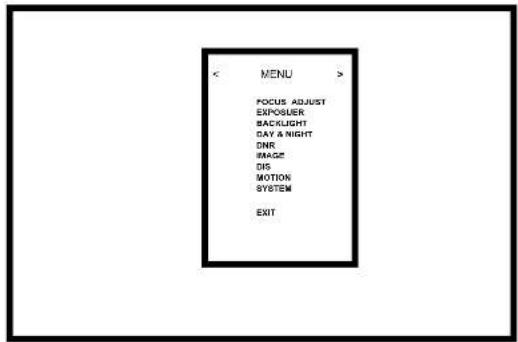
After Pressing OSD Joystick button for 3 seconds, OSD Menu will start.
Press "set button" to move into the "SUB menu" in OSD "" menu.
Press the button for more than 3 seconds to activate "ENTER menu".
2.1 How to display activation of OSD
a. User can check the current activation of OSD when you press "set button".
If Joystick is not pressed for several seconds, the OSD will disappear.
b. The activation of OSD disappear without camera title. If you don't want to show camera title, please change inner OSD in camera. (Camera ID is used in the optional RS-232
communication control function.)
c. User can change camera title's location and ID.
2.2 Activate "OSD MENU"
a. Press "set button" to Move to the Menu setting display
b. Press "Up button" to move upper menu or "Down button" to move bottom menu. Selected menu is changed in yellow color.
c. Press "right button" to increase data value "or "left button" to decrease it.
d. Press right button in "OSD < MENU>" to move into the sub menu bar right away. User can choose 1\~12 menu. And vise versa when you press "left button."
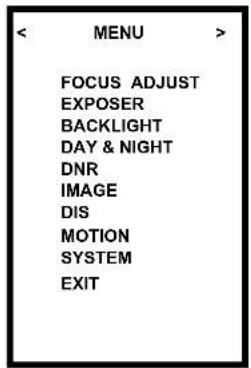
<2-2. Setting start menu display>
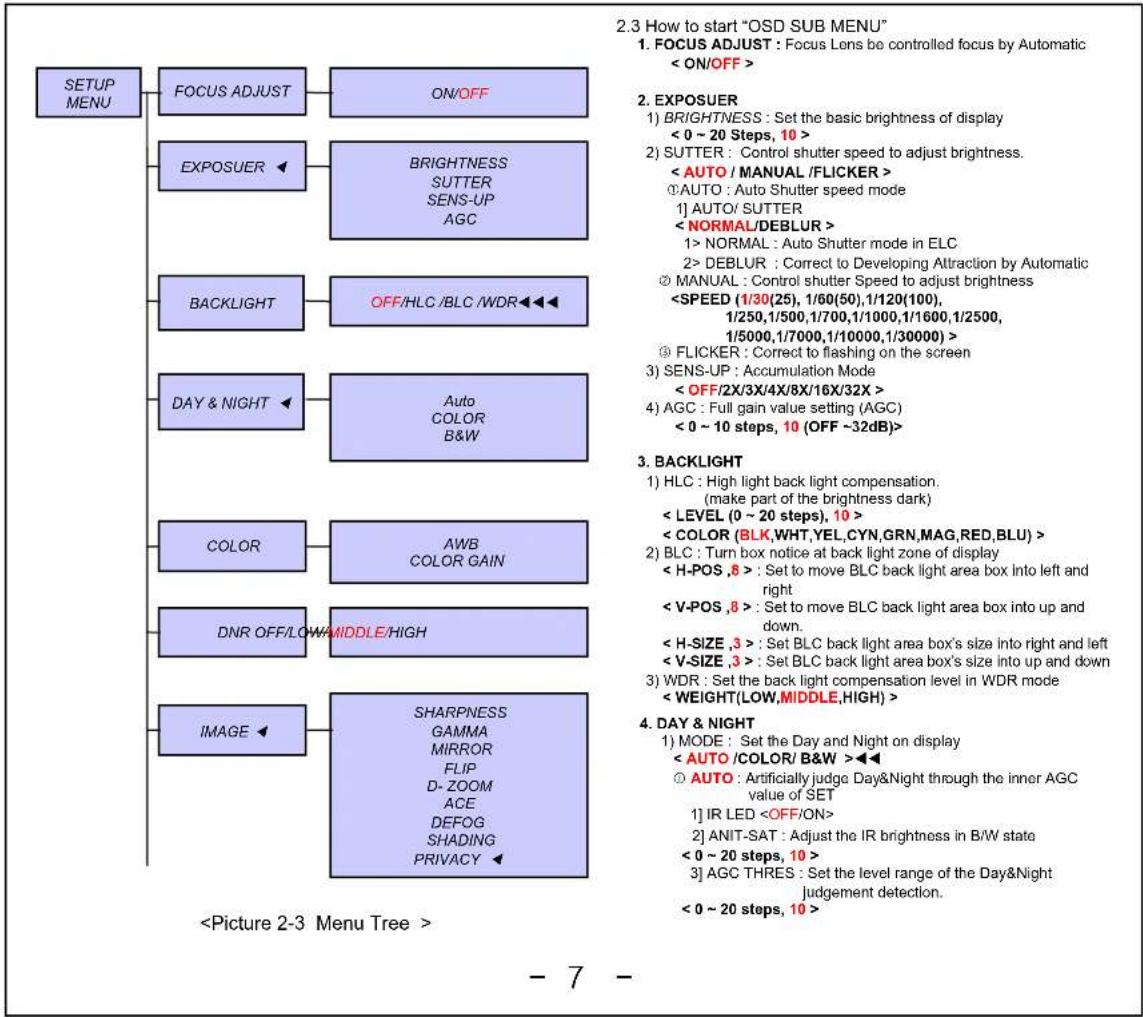
flowchart
graph TD
    A["SETUP MENU"] --> B["FOCUS ADJUST"]
    B --> C["ON/OFF"]
    A --> D["EXPOSUER"]
    D --> E["BRIGHTNESS SUTTER SENS-UP AGC"]
    A --> F["BACKLIGHT"]
    F --> G["OFF/HLC/BLC/WDR"]
    A --> H["DAY & NIGHT"]
    H --> I["Auto COLOR B&W"]
    A --> J["COLOR"]
    J --> K["AWB COLOR GAIN"]
    A --> L["DNR OFF/LOW/MIDDLE/HIGH"]
    A --> M["IMAGE"]
    M --> N["SHARPNESS GAMMA MIRROR FLIP D-ZOOM ACE DEFOG SHADING PRIVACY"]
2] ZONE DISP : Set the position and size that User want to value < OFF/ON >
3] H-POS : The Select box move to the right and left
< 0\~60 steps, 12 >
4] V-POS : The Select box move to the up and down
< 0\~34 steps, 2 >
5] H-SIZE : The size of the selected box is adjusted to the right and left
< 0\~60 steps, 3 >
6] V-SIZE : The size of the selected box is adjusted to the up and down
< 0\~34 steps, 3 >
7] Y LEVEL : The value of the box is between black and white ("0" is black and "20" is white)
< 0\~20 steps, 10 >
8] CB LEVEL: The value of the box is between green and blue ("0" is green and "20" is blue)
<0\~20 steps, 10>
9] CR LEVEL : The value of the box is between green and red ("0" is green and "20" is red)
< 0\~20 steps, 10 >
10] TRANS : Set the transparency
< 0\~3 steps, 2 >
② POLYGON : The use of the privacy function to the customer mode
1] ZONE NUM : Select to the desired box
<0\~7 steps, 0 >
2] ZONE DISP : Set the position and size that User want to value < OFF/ON >
3] POS0-X: Adjust the left and right of the top left corner
< 0\~120 steps, 80 >
41 POS0-Y: Adjust the up and down of the top left corner
< 0\~68 steps, 5 >
5] POS1-X: Adjust the left and right of the top right corner
< 0\~120 steps, 88 >
6] POS1-Y: Adjust the up and down of the top right corner
< 0\~68 steps, 5 >
7] POS2-X : Adjust the left and right of the bottom right corner < 0\~120 steps, 88 >
6] POS2-Y : Adjust the up and down of the bottom right corner < 0\~68 steps, 13 >
8] POS3-X: Adjust the left and right of the bottom left corner <0\~120 steps, 80>
9] POS3-Y: Adjust the up and down of the bottom left corner < 0\~68 steps, 13 >
10] Y LEVEL : The value of the box is between black and white ("0" is black and "20" is white)
< 0\~20 steps, 10 >
11] CB LEVEL: The value of the box is between yellow and blue ("0" is yellow and "20" is blue)
< 0\~20 steps, 10 >
12] CR LEVEL : The value of the box is between blue and pink ("0" is blue and "20" is pink)
< 0\~20 steps, 10 >
13] TRANS : Set the transparency
< 0\~3 steps, 2 >
- DIS : Digital Image Stabilizer function
< OFF/ON >
1) RANGE : Maximum stabilizer Range
(Up to 30% is a range of the input Image in accordance with the digital zoom is set up to 1.4 times the required use.)
< 10%,20%,30% >
2) FILTER : Select "High" is more sensitive (Correction is not good)
< LOW/MIDDLE/HIGH >
3) AUTO C: Such as vibration like High Frequency is be Correction, Such as vibration like Low Frequency is be the screen functions to be move naturally.
① FULL : During movement, it is always corrected to be positioned at the center of image direction
② HALF : The Center Correction region Full Compensation is fixed and Periphery only compensation
- IMOTION : Select On to activate motion detection, surveillance box on/off < OFF/ON >
①DET WINDOW
1) WINDOW USE : setting for motion detection Area. (It is possible to 4 ares, the motion detects only in Area)
< 0\~3 steps, 0 >
2) WINDOW ZONE : When you want to use to motion detection area.
3) DET H-POS : Set to move Detection area box into left and right
< 0\~60 steps, 1 >
4) DET V-POS : Set to move Detection area box into up and down.
< 0\~34 steps, 1 >
5) DET H-SIZE: Set Detection area box's size into right and left
< 0\~60 steps, 58 >
6) DET V-SIZE: Set Detection area box's size into up and down
< 0\~34 steps, 32 >
② SENSITIVITY: Select the level of sensitivity detected in surveillance
< 0\~10 steps, 5 >
③ ESTIMATE: Estimate function is predict feature. (Example, when the motion has hidden by the something, this function guess that it was appeared area and Check for the any motion detection)
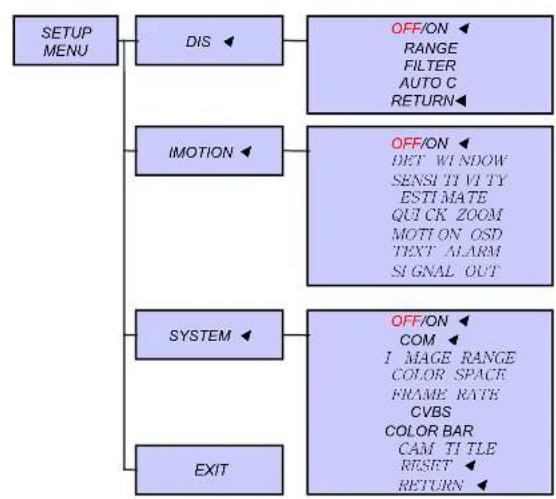
flowchart
graph TD
    A["SETUP MENU"] --> B["DIS"]
    B --> C["OFF/ON RANGE FILTER AUTO C RETURN"]
    A --> D["IMOTION"]
    D --> E["OFF/ON DET WINDOW SENSIT VI TY ESTI MATE QUICK ZOOM MOTION OSD TEXT ALARM SIGNAL OUT"]
    A --> F["SYSTEM"]
    F --> G["OFF/ON COM I MAGE RANGE COLOR SPACE FRAME RATE CVBS COLOR BAR CAM TI TLE RESET RETURN"]
    A --> H["EXIT"]
4] AGC MARGIN : Set the level range of the Day&Night judgment detection(margin)
<0\~20 steps,10>
5] DELEY : delay the time from day to night
② COLOR: keep the display in color regardless of Day&Night
① B/W: keep the display in black regardless of Day&Night
1] IR LED
2] ANIT-SAT : Adjust the IR brightness in B/W state
< 0 \~ 20 steps, 10 >
5. COLOR : < AWB/COLOR GAIN >
) AWB
1]AUTO: auto accumulation mode
Automatically adjust the color in environmental change of
2,300 K - 2,800 K
2] AUTOext: Outdoor and special lighting tracking mode,
White detection for special lighting such as mercury Operating range of 2,300 K \~ 2,800 K
3] PRESET : It is for finding the best WB in current surveillance area
Hold " SET button" to activate, or fixed
4] MANUAL : Adjust color in manual
① C-TEMP : normal color temperature value
<3000K,5000K,8000K>
② R-GAIN < 0 \~ 20 steps. 10 >
③ B-GAIN < 0 \~ 20 steps, 10 >
2) COLOR GAIN : Set the color value of display
< 0 \~ 20 steps,10 >
6. DNR : < OFF/LOW/MIDDLE/HIGH >
Set the display noise remove condition (AGC) at low luminance
7. IMAGE
1) SHARPNESS: Set the basic brightness of display
< 0 \~ 10 steps, 5 >
2) GAMMA : Set the gamma value of display
< 0.45, 0.55, 0.65, 0.75 / 0.55 >
3) MIRROR: Change the left and right position
4) FLIP : Change the up and down position
5) D-ZOOM: Set the magnification of display
< 1.0X\~16.0X, 1.0X >
6) ACE : Auto adjust brightness mode
8) SHADING : Correct the differences between the display
brightness in lens curve
① WEIGHT(0\~100%), 100%
9) PRIVACY : Set the range of privacy protection zone
①BOX: The use of the privacy function to the Box mode
1] ZONE NUM : Select to the desired box
< 0\~15 steps, 0 >
④ QUICK ZOOM: it cab be checking for motion detection at the same time it can be doing at Zoom In/Out.
1) ZOOM SPEED: Zoom Speed Function.
< LOW/MIDDLE/HIGH >
2) TRACKING: Tracking function is trace feature. When "tracking function is On", it is tracing something to the motion detection with Zoom in state.
3) REPEAT: When you set for "Repeat On", it will be doing Zoom in again before the motion detection has operating. On the other hand, When you setting for "Repeat OFF", it will not be doing Zoom in again before the motion detection has operating.
⑤ MOTION OSD : it has chose to use or not to use the motion detection Box.
©TEXT ALARM: when the motion detects, it be shown Text Alarm
⑦ SIGNAL OUT: setting for GPIO Signal's On/OFF
10. SYSTEM : OFF/ON
1) COM.
①CAM ID: Set to Camera's ID
< 0\~255 steps, 0 >
②BAUDRATE: A measure of the Data transmission speed
< (2400,4800,9600,57600,115200),115200 >
2) IMAGE RANGE: Setting a range of screen
①FULL: SDI FULL Range output
②COMP: SDI compression Range output
③ USER: OFFSET(0\~32 steps, 16)
3) COLOR SPACE: HD-CrCb, YUV, HD-CrCb
4) FRAME RATE: Select the SDI output resolution and frame
- 59.94fps Camera
① 59.9HZ: < 1080-29.97P,1080-59.94P,1080-59.94i>
< 720-29.97P, 720-59.94P >
- 60fps Camera
① 60HZ: <1080-30P,1080-60P,1080-60i>
<720-60P>
5) CVBS : ON/OFF for Composite Video Signal
6) COLOR BAR: Print out COLOR BAR pattern.
SDI and CVBS output simultaneously
7) LANGUAGE: Supported < ENG,KOR,JAN,CHN(S),CHN >
8) CAM TITLE : Make a Camera's name
0000000:0\~9,A\~Z
U, D-CHAR SELECT
L, R-POSITION
9) RESET: it will be making the setting value to default
- EXIT
3. Precaution of Installment
- Shows Blue or Black through HD-SDI & HDMI outputs.
If the SDI OUT & HDMI connection is bad or wrong.
If the resolution setting is not suited for device.
Or it cable is not rated high enough for HD signal and may limit transmission distance.
◆ Check SDI OUT & BNC JACK connection & HDMI connection.
◆ Check the resolution of Camera and device.
- HD-SDI display shows not properly.
There will be defect on display because of the mismatched Impedance, if user doesn't use 75Ω BNC cable for HD-SDI
Please check Camera output's BNC CABLE and both connected jack and also Monitor or Recording device's Input, also Check that connected device's BNC is 75Ω with all of products
◆ Change the cable and the HD-SDI connections
◆ Please use 75Ω in BNC adapter for extension cable.
◆ HD-SDI cable's limited range.
5C-HFBT(Maximum up to 100m)
- There is cross line, breaking and disconnection On HD-SDI display.
If HD-SDI (BNC) connection is bad, Cause is that the short circuit of cable, not proper cable or excess the limited range.
◆ Please check for proper cable for HD-SDI, and cable distance is within range.
◆ Please check the connection of BNC between HD-SDI and BNC (bad connection, connected condition)
- If the HD-SDI display's output is not on the correct location right of left.
If the resolution mode setting is not proper, when user connects it to the receiver directly or monitor's resolution setting is not correct.
◆ Please check the resolution output value of camera
◆ Please check the monitor, recording device, or display resolution setting value.
♦ Some monitors can't support 1080p/60 or 1080i/60 resolution.
- Marshall Electronics
- CV200-MB/M, CV150-MB/M, CV150-CSB/CS Operation Manual
- CAUTION
- Please read complete manual before using this product.
- Precautions
- Moisture
- Repair
- Power
- Conditions
- Sun Light
- Shock or Vibration
- Installation in unstable places
- If the camera is not working properly
- Cleaning
- Exposure to the light source
- How to ask for Repair Service
- Contents
- features
- OSD explanation
- COLOR : < AWB/COLOR GAIN >
- DNR : < OFF/LOW/MIDDLE/HIGH >
- IMAGE
- SYSTEM : OFF/ON
- Precaution of Installment
Brand : MARSHALL
Model : CV150-CSB
Category : Security Camera