
iLux CLSI-C6MRFB - Lighting Crestron - Free user manual and instructions
Find the device manual for free iLux CLSI-C6MRFB Crestron in PDF.

| Product Type | Wall-Mounted Integrated Lighting and Shade Control System |
| Brand | Crestron |
| Model | iLux CLSI-C6MRFB |
| Dimensions (Height x Width x Depth) | 4.48 in (114 mm) x 8.89 in (226 mm) x 2.47 in (63 mm) (without motion detector); 2.60 in (66 mm) with motion detector |
| Weight | 1.5 lbs (0.7 kg) |
| Power Requirements | 220-240 Vac, 50/60 Hz |
| Load Ratings | 6 dimmer channels, 800 W per channel, 2300 W total at 230 Vac |
| Load Types Supported | Incandescent, Magnetic Low-Voltage, Neon/Cold Cathode, 2-Wire Dimmable Fluorescent, Non-Dim Lighting; expansion modules for additional types |
| Shade Control | 6 shade groups, supports up to 16 shade controllers |
| Scenes | Up to 16 user-settable scenes (15 regular + On scene) |
| Control Interfaces | Front panel rocker buttons, IR receiver (36 kHz), RS-232 programming port, Cresnet for local devices and control system |
| Built-in Motion Detector (CLSI-C6M models) | Infrared, range 20-30 ft (6-9 m) at 4 ft (1.2 m) elevation |
| Energy Management | Daylight harvesting (via external photocell), occupancy sensing, load shedding, ASHRAE 90.1/LEED compliant |
| Room Combining | Up to 9 rooms, 36 partitions, supports GLS-SIM sensors |
| Keypad Support | Up to 16 keypads via Cresnet |
| Touch Screen Support | Up to 2 touch screens |
| Multi-Unit Expansion | Up to 8 additional units (54 lighting zones, 54 shade groups) |
| RS-232 Control | Via optional C2N-IO module |
| Maintenance | Wipe the front panel with a soft, dry cloth. Do not use abrasive cleaners or solvents. |
| Safety Compliance | UL Listed, CE, FCC Part 15 Class B, ICES-3(B)/NMB-3(B) |
| Warranty | 3 years limited warranty from date of purchase (except moving parts, power supply, etc.) |
| Available Colors | Almond, Black, White |
Frequently Asked Questions - iLux CLSI-C6MRFB Crestron
User questions about iLux CLSI-C6MRFB Crestron
0 question about this device. Answer the ones you know or ask your own.
Ask a new question about this device
Download the instructions for your Lighting in PDF format for free! Find your manual iLux CLSI-C6MRFB - Crestron and take your electronic device back in hand. On this page are published all the documents necessary for the use of your device. iLux CLSI-C6MRFB by Crestron.
USER MANUAL iLux CLSI-C6MRFB Crestron
Crestron CLS/CLSI-C6 & CLS/CLSI-C6M
iLux® Integrated Lighting System
Operations Guide
Regulatory Compliance
This product is Listed to applicable UL Standards and requirements by Underwriters Laboratories Inc.

As of the date of manufacture, the CLS-C6, CLS-C6M, CLSI-C6, and CLS-C6M have been tested and found to comply with specifications for CE marking and standards per EMC and Radiocommunications Compliance Labelling.

Federal Communications Commission (FCC) Compliance Statement
This device complies with part 15 of the FCC Rules. Operation is subject to the following conditions:
(1) This device may not cause harmful interference and (2) this device must accept any interference received, including interference that may cause undesired operation.
CAUTION: Changes or modifications not expressly approved by the manufacturer responsible for compliance could void the user's authority to operate the equipment.
NOTE: This equipment has been tested and found to comply with the limits for a Class B digital device, pursuant to part 15 of the FCC Rules. These limits are designed to provide reasonable protection against harmful interference in a residential installation. This equipment generates, uses and can radiate radio frequency energy and, if not installed and used in accordance with the instructions, may cause harmful interference to radio communications. However, there is no guarantee that interference will not occur in a particular installation. If this equipment does cause harmful interference to radio or television reception, which can be determined by turning the equipment off and on, the user is encouraged to try to correct the interference by one or more of the following measures:
• Reorient or relocate the receiving antenna
- Increase the separation between the equipment and receiver
- Connect the equipment into an outlet on a circuit different from that to which the receiver is connected
- Consult the dealer or an experienced radio/TV technician for help
Industry Canada (IC) Compliance Statement
CAN ICES-3(B)/NMB-3(B)
The specific patents that cover Crestron products are listed at patents.crestron.com.
Crestron, the Crestron logo, Cameo, Cresnet, Crestron Green Light, Crestron RoomView, Crestron Studio, Crestron Toolbox, iLux, and Isys are either trademarks or registered trademarks of Crestron Electronics, Inc. in the United States and/or other countries. Somfy is either a trademark or registered trademark of Somfy SAS in the United States and/or other countries. UL and the UL logo are either trademarks or registered trademarks of Underwriters Laboratories, Inc. in the United States and/or other countries. Other trademarks, registered trademarks and trade names may be used in this document to refer to either the entities claiming the marks and names or their products. Crestron disclaims any proprietary interest in the marks and names of others. Crestron is not responsible for errors in typography or photography.
This document was written by the Technical Publications department at Crestron.
©2013 Crestron Electronics, Inc.
Contents
iLux Integrated Lighting System: CLS/CLSI-C6 & CLS/CLSI-C6M 1
Introduction 1
Features and Functions....1
Specifications 4
Physical Description....6
Setup 11
Network Wiring....11
Net ID 11
Installation....11
Configuring the CLS-C6....12
Configuring With Front Panel Controls 12
Configuring with iLux Designer....24
Console Command Settings 26
Replacing the Function Button Label 27
Uploading and Upgrading....29
Establishing Communication....29
Programs and Firmware 30
Operation 31
Standard Mode 31
Button Types 32
IR Receiver....34
Occupancy Sensing 34
Override Mode 34
Load Shedding (Demand Response) 35
Building Management System Interface 35
Lights Mode 36
Shades Mode 37
Problem Solving 39
Troubleshooting....39
Check Network Wiring....39
Reference Documents....40
Further Inquiries 40
Future Updates ....41
Appendix A: Supported Devices 42
Keypads....42
Shade Controllers 44
Touch Screens 44
Joins....45
Appendix B: Console Commands....52
Appendix C: RS-232 Commands 56
Command Format....56
Adding C2N-IO Device to CLS-C6 60
Echo Control Command 60
Light Zone Commands 60
Shade Group Commands....63
Scene Commands 64
Room Combining Commands....67
Override Commands....67
Load Shed Commands....68
Occupancy Commands....68
Photocell Commands....69
Version Command....69
Appendix D: Factory Default Values 70
Appendix E: Button Functions 72
Appendix F: Room Combining....81
Appendix G: RC5 Code Expansion....84
Return and Warranty Policies 86
Merchandise Returns / Repair Service 86
Crestron Limited Warranty....86
iLux Integrated Lighting System: CLS/CLSI-C6 & CLS/CLSI-C6M
Introduction
The CLS/CLSI-C6 and CLS/CLSI-C6M iLux ^® units are complete, integrated wall-mounted lighting systems that can function as standalone devices or as part of a Crestron ^® solution total control system network. The units are intended for installation in boardrooms, auditoriums, home theaters, or anywhere versatile and cost-effective control of lighting and shades are required. The CLS-C6 and CLS-C6M are designed for 120 Vac installations; the CLSI-C6 and CLSI-C6M are designed for 230 Vac installations. All units are identical, except that the CLS-C6M and CLSI-C6M units include a built-in motion sensor. For simplicity within this guide, the term "CLS-C6" is used except where noted.
Features and Functions
• Wall-mounted integrated lighting and shade control
• Six channels of dimming or switching
• Six groups of shade or drapery control
- Linkable for up to 54 lighting channels and 54 shade groups
• Up to 16 user-settable scenes
- Seven configurable rocker buttons with customizable label strip
• Large ON and OFF buttons
- Flip-up front cover reveals setup controls and programming port
• Six bar graphs show lighting levels and shade positions
- Easy setup from front panel or iLux Designer software
• Built-in motion sensor (CLS/CLSI-C6M)
- Optional IR remote
• Supports multipoint control using up to 16 keypads
• Supports touch screen control using up to two touch screens
• Supports external occupancy sensors
• Supports room combining of up to 36 partitions
• Supports integration with building management systems (BMS)
• Master air-gap relay | 230 Vac version available
- Integrates with 2-Series control systems via Cresnet®
(Continued on following page)
Features and Functions
(Continued)
• Energy saving ASHRAE 90.1/LEEDS compliant
• Available in almond, black, or white
• Supports daylight harvesting
• RS-232 interface via C2N-IO (sold separately)
Six Channel Dimming
The CLS-C6 features six channels of dimming for LED*, incandescent, magnetic low-voltage, neon/cold cathode, and 2-wire dimmable fluorescent loads. On/off switching of many non-dimmable lighting loads is also possible. Each channel handles up to 800 watts individually, with a total rating of 1920 watts at 120 Vac for CLS-C6/C6M (2300 watts at 230 Vac for CLSI-C6/C6M). Larger loads and additional load types can also be supported using Crestron CLS-EXP Series expansion modules (sold separately).
Six Group Shade Control
Using Crestron's networked shade and drapery controllers, the CLS-C6 enables versatile control of a roomful of motorized window treatments, screens, and lifts in up to six shade groups.
Energy Management
Using Crestron Green Light ^® technology, the iLux line of integrated lighting systems allows for the management of demand response for load shedding and room occupancy sensing for maximum energy efficiency and cost savings.
Versatile Front Panel Controls
The deceptively clean front panel actually affords an extensive amount of control and customization to suit each unique room application. Large ON and OFF buttons provide instant access to the On and All Off scenes, while the six main buttons can be set up to recall additional scene presets, adjust shades, or perform a host of other functions. The buttons' rocker action enables intuitive, tactile control for adjusting lighting levels and shade positions. An additional up/down button is configurable for a variety of functions, including use as a master lighting control, shade control, or shift button to expand the capabilities of the six main buttons.
With each new scene selection, window shades reposition and lights fade elegantly to their new settings. The selected scene is indicated by a white LED beside each button and the customizable label strip allows each button to be clearly labeled using Crestron Engraver software or standard 3/8 inches tape labels. Dimming levels and shade positions are displayed graphically on six green LED bar graphs accessible behind the flip-up front cover. Additional controls and a numeric display hidden beneath the cover enable setup without requiring a PC. Enhanced customization is provided via the PC programming port using iLux Designer software.
Built-in Motion Detector (CLS-C6M and CLSI-C6M)
The CLS-C6M and CLSI-C6M models provide the addition of a built-in infrared motion detector, enabling automated control based on room occupancy. Lights can be programmed to turn on and shades open automatically when someone enters the room or turn off and close when the room is left empty. Remote motion detectors are also available to expand the coverage of the CLS-C6M and CLSI-C6M or add occupancy sensing capability to the CLS-C6M and CLSI-C6M.
Daylight Harvesting
When used with an optional GLS-LOL photocell (sold separately), the CLS-C6 is capable of reducing energy usage by employing daylight harvesting. This technique allows the electric light levels to be reduced based on the amount of natural light available in the space.
The GLS-LOL may be connected to the CLS-C6 through either a GLS-SIM or the available input on a Cameo® Pro keypad (all sold separately). For detailed installation procedures, refer to the CLS-C6/C6M iLux Lighting Systems Installation Guide (Doc. 6394) and CLSI-C6/C6M iLux Lighting Systems Installation Guide (Doc. 6413) at www.crestron.com/manuals.
IR Remote Control
The CLS-C6 units are equipped with an onboard IR receiver to allow for wireless remote control using Crestron's optional infrared remote control (sold separately).
Multipoint Keypad Control
Up to 16 Crestron keypads may be connected to a single CLS-C6, providing versatile multipoint control for rooms with multiple entrances or work areas. Individual keypad buttons can be programmed to work through the master unit or can target specific slave units for maximum control and room management.
Touch Screen Support
The CLS-C6 can support up to two touch screens without the need of a centralized processor. Using the iLux Designer software, add touch screens to a standalone system with hard and soft button programming including 2-way zone status feedback.
Multi-Unit Expansion
A single CLS-C6 master supports up to eight additional units, enabling systems of up to 54 lighting zones and 54 shade groups. Scene recall, master dimming, and occupancy status are shared between the units. Each individual unit can still support a complete assortment of local devices including keypads, shade controllers, touch screens, and sensors.
Room Combining Support
When the application includes divisible rooms, the CLS-C6 has advanced room-combining features capable of supporting even the most complex layouts. When additional CLS-C6 slave units are linked to a master CLS-C6, advanced room combining of up to nine rooms becomes possible. The iLux Lighting System supports up to 36 room partitions, allowing for all possible room combinations. Room combining status (combined or separate) can be controlled via external partition sensors, keypad or touch screen buttons, or an external command from a Crestron control processor.
Building Management System Integration
Crestron CLS-C6 includes BMS integration capabilities for straightforward inclusion of building management systems as a component of managing energy demands.
Control System Integration
The CLS-C6 actually features two separate Cresnet control networks, one for local devices and one for connection to a 2-Series control system.
Connecting the CLS-C6 to a control system allows its functions to be controlled from touch screens, RF wireless remotes, and even computers, supporting extensive flexibility for remote control and integration with other devices and systems.
Additional functions such as on-the-fly room combining and activating operations based on a real-time clock are also made possible by connecting the CLS-C6 to a control system.
Connecting to an Ethernet-networked control system provides a gateway to larger applications such as integration with facility-wide lighting, HVAC, security, and remote monitoring via Crestron RoomView® Help Desk software as well as third-party SNMP software.
RS-232 Interface via C2N-IO
The CLS-C6 can be controlled from a third party controller or a PC program via the ASCII command set. The Crestron serial converter module, C2N-IO (sold separately), is used to route packets between the CLS-C6 and the third party controller. The serial converter module translates ASCII strings to Cresnet serial packets and Cresnet serial packets to ASCII strings.
Specifications
Specifications for the CLS-C6 are listed in the following table.
CLS-C6 Specifications
| SPECIFICATION DETAILS | |
| Load RatingsCLS-C6/C6MDimmer channelsMax load per channelMin load per channelMax load per unit:CLSI-C6/C6MDimmer ChannelsMax load per channelMin load per channelMax load per unit: | 6800 W/VA (6.7 amps @ 120 Vac)15 W/VA (0.125 amps @ 120 Vac)1920 W/VA (16 amps @ 120 Vac)6800 W/VA (3.5 amps @ 230 Vac)25 W/VA (0.108 amps @ 230 Vac)2200 W/VA (10 amps @ 220 Vac)2300 W/VA (10 amps @ 230 Vac)2400 W/VA (10 amps @ 240 Vac) |
| Load Types LED | ^1 , Incandescent, Magnetic Low-voltage,Neon/Cold Cathode, 2-Wire DimmableFluorescent, and Non-dim Lighting (Also:Electronic Low-voltage, 3 and 4-WireFluorescent, High-Inrush Switching, and277 V via CLS-EXP Series ExpansionModules ^2 ) |
| Power Requirements | CLS-C6/C6M Line Power, 100–127 Vac, 50/60 HzCLSI-C6/C6M Line Power, 220–240 Vac, 50/60 Hz |
| Default Net ID | 1F |
| IR Receiver Reception Frequency | 36 kHzRequires CLS-IRHT8 IR remote (sold separately). |
| Built-In Motion Detector (CLS/CLSI-C6M only)Type Range | Infrared20 to 30 feet at 4 foot elevation(6 to 9 meters at 1.2 meter elevation) |
| Firmware v2.01.01 or later | |
| Environmental Temperature Humidity | 32° to 104° F (0° to 40° C)10% to 90% RH (nonNon-condensing) |
| Overall Dimensions:Height Width Depth | 4.48 in (114 mm)8.89 in (226 mm)2.47 in (63 mm) for CLS/CLSI-C62.60 in (66 mm) for CLS/CLSI-C6M |
| Weight | 1.5 lbs (0.7 kg) |
| Available Models:C2N-CBD-P/-CBF-P/-CBD-EC2N-CBD-TS/CBF-TC2N-DBC2N-IOC2N-MNETGWC2N-MNETRPTC2N-SDCC2N-SDC-DCC2N-SSC-2C2NI-CBC2NX-BCLS/CLSI-C6ACLCS/CLSI-C6BCLS/CLSI-C6WCLS/CLSI-C6MACLS/CLSI-C6MBCLS/CLSI-C6MW | Cameo Keypad, Standard Mount/Flush MountCameo Keypad, Standard Mount/Flush MountDecorator Series KeypadControl Port Expansion ModuleinfiNET GatewayinfiNET RepeaterShade and Drape Controller, 120 VacShade and Drape Controller, 24 VdcSomfy® Shade ControllerInternational Keypad (230 Vac)Designer Series KeypadiLux Integrated Lighting System, AlmondiLux Integrated Lighting System, BlackiLux Integrated Lighting System, WhiteiLux Integrated Lighting System with Motion Detector, AlmondiLux Integrated Lighting System with Motion Detector, BlackiLux Integrated Lighting System with Motion Detector, White |
| Available Accessories(Continued) | |
| CLS-EXP-DIM | iLux Dimmer Expansion Module |
| CLS-EXP-DIMFDB | iLux 3-Wire Fluorescent Dimmer Expansion Module |
| CLS-EXP-DIMFLV | iLux 0–10 V Fluorescent Dimmer Expansion Module |
| CLS-EXP-DIMU | iLux Universal Dimmer Expansion Module |
| CLS-IRHT8 | iLux IR Handheld Remote |
| CNPWS-75 | Cresnet Power Supply |
| GLS-LOL | Crestron Green Light Photocell , Open-Loop |
| GLS-SIM | Sensor Integration Module |
| TPS-6L Isys | ^® 5.7 in Wall Mount Touch Screen |
- For a list of compatible ballasts, visit www.crestron.com/lightingcompatibility.
- Larger loads and additional load types can also be supported using Crestron CLS-EXP Series expansion modules (sold separately).
Physical Description
All controls and indicators for the CLS-C6RF are located on the front of the unit. The front panel also contains a mini phone jack under the flip-up cover, used for programming functions, and an IR port for control via an IR remote device. All other ports and connectors are located on the rear panel. Refer to the “Connectors, Controls, and Indicators” table on page 8 for details.
CLS-C6 Physical View

CLS-C6M Overall Dimensions

CLS-C6M Front Panel

CLS-C6 Rear Panel

Connectors, Controls, and Indicators
| # CONNECTORS*, CONTROLS, AND INDICATORS | DESCRIPTION | |
| 1 | Bar Graphs | In Standard mode and Lights mode, the bar graphs, each a series of seven LEDs, indicate the current light intensity for the six lighting loads. When under photocell control, the top bar graph LED for a controlled load blinks. In Shades mode, they indicate the shade position for each of the shade groups. The bar graphs have other functions in Setup mode. |
| 2 | Label Strip | Customizable label for the six scenes. |
| 3 | Function Buttons and LEDs | In Standard mode, these buttons are typically used to select/recall scenes. In Lights mode, they are used to make temporary adjustments to the six lighting loads. In Shades mode they are used to make temporary adjustments to the shade groups. They can also be programmed to perform other functions. |
| 4 | IR Detector | The IR detector responds to commands from the optional Crestron remote control. The remote control can be used to recall Scenes 1 through 4 and the On and Off scenes, as well as perform master raise and lower of the lighting loads. |
| 5 | Motion Detector (CLS/CLSI-C6M only) | The built-in motion detector can be used to activate a particular scene when there is activity in the room and/or to activate a particular scene (typically Off) when there is no activity for a specified period. A limited number of actions are available when programmed locally; more are available using the iLux Designer software program. |
| 6 | Mini Phone Jack | Use this 3.5 mm TRS mini-phone jack, located on the front panel, as an RS-232 programming port to communicate with the iLux Designer and Crestron ToolboxTM to configure the unit and to upgrade the unit's firmware. |
| # | CONNECTORS, CONTROLS, AND INDICATORS | DESCRIPTION |
| 7 2-Digit Display | In Standard mode, the display is normally blank, except when showing scene fade time. The Min and Sec LEDs illuminate when the display is indicating time in minutes or in seconds, respectively. In Setup mode, the display uses a 2-character mnemonic to indicate which specific aspect of the CLS-C6 that is being changed. As these are being adjusted, the display may indicate values. Refer to “Setup Mode” on page 13 for details. | |
| 8 Lights Button and LED | Use this to select the Lights mode. The LED illuminates when the mode is selected. Refer to “Lights Mode” on page 36 for details. | |
| 9 Shades Button and LED | Use this to select the Shades mode. The LED illuminates when the mode is selected. Refer to “Shades Mode” on page 37 for details. | |
| 10 , Save, and Cancel Buttons | Use these push buttons to navigate and execute setup functions. The Save and Cancel LEDs indicate when these functions are active. Refer to “Setup Mode” on page 13 for details. | |
| 11 | Reset Button | If the unit stops functioning and does not respond to button pushes, use a thin object such as a paperclip to activate this switch. The unit reboots (all lighting loads go off, the 2-digit display shows “— –”, and all lighting loads go to their previous state). |
| 12 | Shift LEDs | These LEDs are covered by the label strip, but are easily visible through the strip when they are illuminated. When the Shift mode is enabled via programming, there can be two functions defined for each of the six function buttons. The unit must always be in “upper” or “lower” Shift mode as indicated by the state of the LEDs. |
| 13 | Up/Down Button | This three position rocker switch is programmable for master lights control (all lights or last scene), master shade control, or as a shift button to allow a second set of functions for the six function buttons. |
| 14 ON Button | The ON button always acts as a recall scene button for the On scene. Refer to “Standard Mode” on page 31 for details. | |
| 15 OFF Button | The OFF button always acts as a recall scene button for the Off scene, which always turns all lighting loads off and opens the air-gap relay. Refer to “Standard Mode” on page 31 for details. | |
| # CONNECTORS*, CONTROLS, AND INDICATORS | DESCRIPTION | |
| 16 | LOAD1-LOAD6 | Use these terminals to connect the CLS-C6 dimmer channel outputs to the appropriate lighting loads. |
| 17 | HOT, NEUTRAL,(Ground) [IMAGE] | Use these terminals to connect the unit to the 120 V (CLS-C6/M) or 230 V (CLSI-C6/M) power source. |
| 18 | CONTROL SYSTEMG Z Y 24 | Use this 4-pin terminal block to connect the CLS-C6, using standard Cresnet wiring, to a 2-Series control system network. In this configuration, the CLS-C6 acts as a standard Cresnet slave device. (The CLS-C6 does not draw power from Cresnet.). |
| 19 | LOCAL DEVICESG Z Y 24 | Use this 4-pin terminal block to connect the CLS-C6, using standard Cresnet wiring, to local devices. In this configuration, the CLS-C6 acts as the Cresnet Master. |
* Interface connectors for CONTROL SYSTEM and LOCAL DEVICES ports are provided with the unit.
Setup
Network Wiring
When wiring the Cresnet network, consider the following:
- Use Crestron Certified Wire.
• Use Crestron power supplies for Crestron equipment. - Provide sufficient power to the system.
CAUTION: Insufficient power can lead to unpredictable results or damage to the equipment. Use the Crestron Power Calculator to help calculate how much power is needed for the system (www.crestron.com/calculators).
For Cresnet networks with 20 or more devices, use a Cresnet Hub/Repeater (CNXHUB) to maintain signal quality.
For more details, refer to "Check Network Wiring" on page 39.
Net ID
NOTE: The latest software can be downloaded at www.crestron.com/software.
The Net ID of the CLS-C6 has been factory set to 1F. The Net IDs of multiple CLS-C6 devices in the same system must be unique. Net IDs are changed from a personal computer (PC) via Crestron Toolbox™ (refer to “Establishing Communication” on page 29).
When setting the Net ID, consider the following:
- The Net ID of each unit must match an ID code specified in the Crestron Studio™ or SIMPL Windows program.
• Each network device must have a unique Net ID.
For more details, refer to the Crestron Toolbox help file.
Installation
For detailed installation procedures, refer to the CLS-C6/C6M iLux Lighting Systems Installation Guide (Doc. 6394) and CLSI-C6/C6M iLux Lighting Systems Installation Guide (Doc. 6413).
Configuring the CLS-C6
The overall configuration of the CLS-C6 can be accomplished in two ways: using the front panel controls or using the supplied iLux Designer application software, which can be downloaded from the Crestron Web site.
Configuring via the front panel controls is not as extensive as what can be done using the iLux Designer but permits basic functional setup without having to use a PC.
In addition, some aspects of the CLS-C6's operation can be modified only via certain Crestron Toolbox console commands. Refer to "Console Command Settings" on page 26 for details. Refer also to "Appendix B: Console Commands" on page 52 for details on all applicable console commands.
NOTE: Toolbox does not distinguish between the CLS-C6/C6M and CLSI-C6/C6M devices. All report as CLS units.
Configuring With Front Panel Controls
Temporary changes can be made to accommodate a particular circumstance or change scene presets and replace the originals, as described below. To make more extensive changes in the configuration of the CLS-C6 without using the iLux Designer software, refer to "Setup Mode" on page 13.
Temporary Changes and Adjustments
Temporary changes and adjustments to the lighting levels or shade presets can be accomplished as discussed in “Lights Mode” on page 36 and “Shades Mode” on page 37.
Changing Scene Presets
The CLS-C6 scene settings can be modified via the front panel controls without having to use a PC. Changes to the lighting load levels and shade presets for one or more scenes can be accomplished as follows:
Scene Presets with Daylight Harvesting
If a photocell is present, Scenes 1 through 8 (plus the On scene) automatically utilize daylight harvesting. When this automatic behavior is enabled, the top bar graph LED for that load blinks.
NOTE: When editing scenes with photocell-controlled loads, photocell output is temporarily disabled. When the scene is recalled, photocell control resumes and light levels may change. To reduce the possibility of unintended scene behavior caused by photocell reaction to sunlight, edit scenes at night.
NOTE: The iLux Designer or SIMPL Windows programs can lock a scene to prevent it from being changed using the front panel controls. If an adjustment is made to a scene that is incorrect, “Er” is displayed for 3 seconds. The scene remains in its existing state.
- In Standard mode, press the function button of the scene to be modified and hold it for 5 seconds. Make sure to press the center of the button so both sides make contact.
- The 2-digit display first counts down as the lighting loads fade to their preset levels for that scene; it then begins flashing between "Sc." and the scene number; the Lights LED illuminates and the Save and Cancel LEDs flash.
- Use the six function buttons to adjust the levels of the lighting loads for that scene. Press the left side of the buttons to lower the lighting loads; press the right side of the buttons to raise the lighting loads.
- If there should be a certain lighting load to be unaffected by that scene recall, press and hold the center of the button (so both sides make contact) for 3 seconds. The top and bottom two LEDs of the associated bar graph
light (and the display shows “—”) to indicate that the level of the lighting load does not change when that scene is recalled.
- To change the shade presets for that scene press the Shades button; the Shades LED lights.
- Use the six function buttons to adjust the levels of the shade groups for that scene. Press the right side to raise the shades; press the left side to lower them. While the shades are moving, press any part of the button to stop. Note that for shades that are not capable of being preset, only full open or full closed positions can be recalled as part of a scene.
- If there should be a certain shade group to be unaffected by that scene recall, press and hold the center of the button (so both sides make contact) for 3 seconds. The top and bottom two LEDs of the associated bar graph light (and the display shows “--”) to indicate that the level of that shade group does not change when that scene is recalled.
- To adjust the fade time, press the and buttons. When increasing the time, the value goes from 0 seconds to 59 seconds, and then 1 minute to 99 minutes. When decreasing the time, the value goes from 99 minutes to 1 minute, and then 59 seconds to 0 seconds. The Min and Sec LEDs light as appropriate. Adjustment to fade time can be made when either Lights mode or Shades mode is active.
- When all the lighting loads are at the desired level and shades are at the desired position, press Save to save these settings as the new preset for that scene. If a mistake is made while changing a setting, press Cancel to discard changes and return to Standard mode before pressing Save.
- Repeat the above procedures for all scenes that require changes.
Setup Mode
Setup mode is used to change internal settings on the CLS-C6, including the scene presets as discussed in the previous paragraph.
- To enter Setup mode, press and hold the Save and Cancel buttons for 5 seconds. The Cancel LED blinks and the first setup option (“Sc”) displays to indicate that the unit is now in Setup mode.
NOTE: While scrolling through the list of setup options, before an option is locked, the Save button is not functional and its LED is off. However, the Cancel LED blinks since the button can be pressed to return the unit to Standard mode.
- If the unit is connected to a Cresnet control system, Setup mode cannot be entered to adjust scene settings. The 2-digit display indicates “Er” (error).
- When the unit is in Setup mode, the 2-digit display uses a 2-character mnemonic to indicate which specific aspect of the CLS-C6 is changed. As these are being adjusted, the display may indicate values. The following is a list of the different setup options and the corresponding mnemonic codes.
Setup Option Mnemonics
| 2-DIGIT DISPLAY | DESCRIPTION |
| Sc | Scene Programming |
| Ld | Setup lighting Load types |
| LE | Setup lighting load Low-End limits |
| HE | Setup lighting load High-End limits |
| Lo | Setup Lockout mode |
| bF | button Functions (i.e., recall scene, toggle scene, shades control, etc.) |
| ud | Set function of up/down button |
| oc | Setup occupancy sensing |
| Ad | Run Auto-discovery |
| AS | Assign Shade groups |
| id | Set the Cresnet id of this unit |
| Ph | Photocell test |
| Pc | Photocell Calibration |
| PL | Setup Photocell lower Limit |
| Pr | Setup Photocell response time |
| Fd | Restore Factory default |
| Er | Error |
- Press the ▲ or ▼ buttons to scroll through this list of available setup options. Once the desired setup option appears in the display, use the various buttons on the CLS-C6 to make adjustments, as described on the following pages.
- Once any adjustment is made, Setup mode is locked into that particular option (this is indicated by lighting the period at the end of the mnemonic). Once locked in an option, the ▲ and ▼ buttons no longer scroll through the options; setup must be exited before choosing another option.
When the adjustments are complete, press Save to store the changes permanently and exit Setup mode or press Cancel to exit Setup mode without saving the changes. The unit reverts to Standard mode.
Scene Programming (Sc)
This setup option allows the user to adjust the scene parameters. This is another way to accomplish scene changes as discussed in “Changing Scene Presets” on page 12. This method also allows settings to be changed for scenes greater than Scene 6.
Note that scenes can be turned off in addition to being recalled. When a scene is turned off, only the lighting loads are turned off. If the scene contains any shades, they are not affected. The fade time for turning the scene lights off is the same as for recalling the scene. Therefore, no additional parameters need to be set to define the off behavior.
Select the scene to be changed using the up/down button. While cycling through the list of scenes, the lights and shades do not change and the bar graphs are off.
Set the lighting loads and shade positions for the scenes as discussed in “Changing Scene Presets” on page 12. As the scenes are set, note the following:
- When a lighting load reaches the HE (high-end) limit, the lights stop. The 2-digit display continues to rise. If lights reach the LE (low-end) limit, the 2-digit display continues to go down but lights stay at the LE limit until they reach Off—at which point they turn off. If the scene setting is saved
Scene Presets with Daylight Harvesting
If a photocell is present, Scenes 1 through 8 (plus the On scene) automatically utilize daylight harvesting. When this automatic behavior is enabled, the top bar graph LED for that load blinks.
NOTE: When editing scenes with photocell-controlled loads, photocell output is temporarily disabled. When the scene is recalled, photocell control resumes and light levels may change. To reduce the possibility of unintended scene behavior caused by photocell reaction to sunlight, edit scenes at night.
while the display is at a level below the LE limit or above the HE limit, the displayed value is saved but the light level is limited to the programmed limits.
- If a lighting load is defined as an unused load type, the bar graph for that lighting load has all LEDs off. If the lighting load is adjusted, the 2-digit display shows “Er.”
- To mark a lighting load as not affected (i.e., the lighting load's current state is not changed by recalling the scene), press and hold the center of the corresponding button for 3 seconds. Adjustments made to such lighting loads cancel the not affected condition and start adjusting from the current light level.
- While adjustments are being made to the lights or shades, the 2-digit display shows the level, just like in Manual mode. The level for loads that are not affected is shown as “- -”. In Manual mode, the display goes blank after 3 seconds; in scene programming, the display returns to “Sc. ##”.
- For shades, when the left or right side of the button is pressed, the 2-digit display immediately shows full open or full closed as soon as the shade starts moving. The preset is set to this full open or full closed position even if the shade is stopped before reaching the full open or full close position.
- The iLux Designer or SIMPL Windows programs can lock a scene to prevent it from being changed using the front panel controls. If the selected scene is locked in the configuration when an adjustment is made, “Er” is displayed for 3 seconds and the scene remains in its existing state.
- To adjust the fade time, while "Sc. ##" is displayed, press the and buttons to adjust the time. The first time a button is pressed current fade time is shown but not changed. Subsequent presses change the displayed value. Adjustment to fade time can be made when either Lights mode or Shades mode is active.
When increasing the time, the value goes from 0 seconds to 59 seconds, and then 1 minute to 99 minutes. When decreasing the time, the value goes from 99 minutes to 1 minute, and then 59 seconds to 0 seconds. - To save or cancel levels, press the Save button to save the new values and return to Standard mode. Press the Cancel button to return to Standard mode without saving; previously saved scene parameters are remembered.
Setup Lighting Load Types (Ld)
To set the load types for each lighting load, first enter Setup mode and scroll to the "Ld" option. The bar graphs immediately indicate the currently selected load type for each lighting load. Use the function buttons to change the load type. Each load type is indicated by a pattern of bar graph segments and a number on the 2-digit display, as shown in the following table. Press the right and left side of the buttons to cycle through the available load types.
Lighting Load Type Setup
| Load Type | Number | LEDs | Default Low-End/ High-End |
| Unused | 0 | all off | 0 / 100 |
| Incandescent – default | 1 | top 1 on | 0 / 100 |
| MLV | 2 | top 2 on | 0 / 100 |
| NCC | 3 | top 3 on | 0 / 100 |
| Fluorescent (2-wire) | 4 | top 4 on | 10 / 100 |
| Non-dim (On at start/Off at start) ^1 | 5 | top 5 on | 0 / 100 |
| Non-dim (On at end/Off at start) ^2 | 6 | top 6 on | 0 / 100 |
-
Whether going on or off, this load type switches at the start of the fade.
-
If going off, this load type switches at the start of the fade; if going on, it switches at the end.
-
When changing the load type using the rocker buttons, the 2-digit display changes to reflect the current load type. It shows "L#." where "#" is the number from the table above. Whenever the 2-digit display shows a load type, the corresponding front panel LED is lit.
- During adjustment of this value, the lights do not change. If setup is exited without pressing the Save button, the original values are retained. When the Save button is pressed, Setup mode is exited, the new values are saved, and the lights are updated to reflect the new curve type.
If the load type was changed, the LE and HE limits are automatically changed to the default value for the new load type, listed in the above table.
Setup Low-End Levels (LE)
Some lights can flicker at very low levels. To avoid this, specify the low-end limit accordingly. When adjusting lights to a level below this value, they stay at the low-end limit until they are turned off. Set the low-end levels for the six lighting loads as follows:
- First enter Setup mode and scroll to the "LE" option (using the and buttons). At this point the lights do not change, but the bar graphs should immediately indicate the low-end levels for each lighting load. (In most cases this is 0% , which is indicated by all bar graph segments being off.) To set the low-end level, use the rocker button corresponding to that lighting load to adjust the level up or down. When the first adjustment is made, the light being adjusted jumps to the current low-end level; start adjusting from there.
• The low-end level cannot be adjusted above 33%.
NOTE: For non-dim and unused lighting loads, the low-end level cannot be adjusted (always at 0%). If adjusting this, the light and the bar graph do not change and the 2-digit display shows “Er.” to indicate an error.
If setup is exited without pressing the Save button, the original values are retained. For lighting loads where adjustment has been made, lights jump to the original low-end level. Light levels are not changed on lighting loads where no adjustment was made. When the Save button is pressed, Setup mode is exited, the new values are saved, and the lights do not change.
Setup High-End Levels (HE)
This option allows setting of the full on level of the lighting loads below their maximum brightness. To set the high-end levels for the six lighting loads, see below:
- Enter Setup mode and scroll to the "HE" option (using the and buttons). At this point the lights do not change but the bar graphs immediately indicate the high-end levels for each lighting load. (In most cases this is 100% , which is indicated by all bar graph segments being on.)
- To set the high-end level, use the rocker button corresponding to that lighting load to adjust it up or down. When the first adjustment is made, the light being adjusted jumps to the current high-end level; start adjusting from there. As adjustments are made, the current light level for the lighting load being adjusted should appear in the bar graph and the 2-digit display.
• The high-end level cannot be adjusted below 67%.
NOTE: For non-dim and unused lighting loads, the high-end level cannot be adjusted (always at 100%). If adjusting this, the light and bar graph do not change, and the 2-digit display shows “Er” to indicate an error.
If setup is exited without pressing the Save button, the original values are retained. For lighting loads where adjustments have been made, lights jump to the original high-end level. Light levels are not changed on lighting loads where no adjustment was made. When the Save button is pressed, Setup mode is exited, the new values are saved, and the lights do not change.
Setup Button Functions (bF)
This setup option is used to define the behavior of the buttons on the CLS-C6 unit and on remote keypads if operation is desired other than the default. (Remote keypads must be ID'd, using auto-discovery, prior to this, which sets them to their default functions.) To enter this mode, do the following:
- First enter Setup mode and scroll to the "bF" option (using the and buttons). Then use the up/down button to scroll through the available button functions and values. This scrolls through all values for each function before proceeding to the next function.
- Press and hold the button to auto-repeat. During auto-repeat, when the minimum or maximum value for that function is reached, it stops. The next button push then increments/decrements to the next function.
Available functions and values are as shown in the following table. (Other functions require a PC with iLux Designer software to configure them.)
| BUTTON FUNCTION | CODE | POSSIBLE VALUES |
| Recall Scene | F1 | oF,on,1–15 |
| Toggle Scene | F2 | on,1–15 |
| Control Shade(open/stop/close/stop) | F3 AL, 1–6 | |
| Master Raise/Lower (last scene) | F4 | uP, dn, ud (rockers only) |
- To assign a function to a certain button or buttons, first scroll to the desired function and value. Then, press each appropriate function button or remote button to assign the displayed function and value to
that button. When the button is released, the LED for that button should flash once to indicate that programming took place.
- Next, use the up/down button to scroll to the next function and value to be assigned, and assign the desired buttons. Repeat this procedure for each function and value to be assigned.
- After assigning all button functions, press Save to save the button function information. If Cancel is pressed or the "Setup Button Functions" option is exited by some other mechanism (e.g., timeout), the state returns to what it was before Setup mode was entered.
NOTE: The ON and OFF buttons on the CLS-C6 cannot be programmed. The operation of the up/down button is programmed using the "ud" setup function.
- If an illegal button is programmed (e.g., the ON button or the remote keypad is programmed as master raise/lower-up/down), LED flashes three times to indicate that setting did not take place and the 2-digit display shows "Er."
NOTE: Other button functions, including shifted functions, can be defined using the iLux Designer configuration program.
Setup Up/Down Button Function (ud)
To define operation of the up/down button, enter Setup mode and scroll to the "ud" option (using the ▲ and ▼ buttons).
- Use the up/down button to select the desired mode. The display flips between “ud.” and “#” where “#” is the mode, as defined in the following table.
| FUNCTION MODE | |
| Lights (Last Scene) Master Up/Down L | |
| Shades Master Up/Down S |
- The first function to be displayed is the current function. Since there are other functions that can be programmed via the iLux Designer, if the current function is not one of these, the display should show "ud. --". Pressing the up/down button then goes to mode L.
- Press Save to save the new setting or Cancel to retain the original setting.
Setup Occupancy Sensing (oc)
To define operation of the occupancy sensing feature, enter Setup mode and scroll to the "oc" option (using the and buttons).
- Use the up/down button to select the desired mode. The display alternates between "oc." and the mode number, as defined in the following table.
| MODE CODE | |
| Do nothing on either exit or entry 0 | |
| Recall specified scene on exit, do nothing on entry 1 | |
| Recall specified scene on entry, do nothing on exit 2 | |
| Recall specified scenes on entry and exit 3 |
• The first mode to be displayed is the current mode.
- When programming from the front panel, exit time cannot be adjusted or displayed. If exit time has not been changed with iLux Designer or SIMPL Windows the default is 30 minutes. Scenes to be recalled also cannot be changed from the front panel. If they have not been changed with iLux Designer, the Off scene is recalled on exit (if enabled) and On scene is recalled on entry (if enabled).
- Even if these items are changed with iLux Designer, they can still be enabled and disabled from the front panel without modifying the specified scenes or exit time.
- If Cancel is pressed, or Setup mode times out, the previous occupancy setting is restored. To have the new setting take effect, Save must be pressed.
NOTE: In mode 0, even though nothing happens locally when occupancy state changes, the occupancy status is still reported to Cresnet.
This mode can also be used to test the range of the occupancy sensor. While locked in the “oc.” option, each time motion is sensed, the middle LEDs on all six bar graphs blink.
Run Auto-Discovery (Ad)
This setup option is used to find which remote devices are on the network, assign Cresnet IDs to new devices, and assign default functions to new panels and devices.
- To enter this mode, first enter Setup mode and scroll to the "Ad" option (using the ▲ and ▼ buttons). Then press the up/down button (top, bottom, or both) and hold for 5 seconds. The auto-discovery process then starts. (If the button is released before 5 seconds are up, nothing happens, but "Ad." option is locked in.) Once "Ad." option is locked in, the Cancel button flashes.
- During auto-discovery, the “Ad.” display flashes. When auto-discovery is done, the 2-digit display flashes between “Ad.” and “##” where “##” is the number of devices discovered on the network. The Save button also starts flashing. Press Save or Cancel.
NOTE: If a C2N-IO (sold separately) is connected to the system, set the rotary DIP switches to 00 or D5 before auto-discovery is performed. If the C2N-IO is not configured properly, the CLS-C6 cannot recognize that the C2N-IO is connected and may result in an error.
- The CLS-C6 keeps a list of all devices on its local network. If the auto-discovery finds devices that match the list, it does not change anything about those.
- In addition to initially configuring the system, auto discovery can be used to add or replace keypads or shade controllers. If adding a device, all previously assigned devices are not changed. The new device is added and assigned default functionality, if desired.
- To replace a device (because of defect or color choice), remove the device and replace with another device of the same type. When executing auto-discovery, the new device takes on the functionality of the original device. Use the "bF" option to change functionality, if desired.
- All shade controllers of a given type are assigned to a single shade group. Use the "AS" option to change them.
CAUTION: If there are SSC shade controllers on the network that do not have a functional shade connected to channel 1, shade control may not operate properly. Therefore, any SSC shade controllers without any shades attached should be removed from the network before running auto-discover. Also, if any SSC shade controllers have only one shade attached, it must be attached to channel 1.
- There are a number of possible error conditions that can occur during the auto-discovery process (before Save is pressed). They are the following:
⇒ Corrupt data on network.
Two or more devices with same TSID number.
⇒ Invalid device type found on network. (CLS-C6 modules only support a limited number of device types.) Refer to “Appendix A: Supported Devices” on page 42 for details.
⇒ Too many keypads found on network. (A maximum of 16 are supported.)
Too many shade controllers found on network. (A maximum of 16 are supported.)
Too many slave CLSI units found on network. (A maximum of 8 are supported.)
- If any of these errors occur, when the auto-discovery process is done, the 2-digit display flashes between “Ad.”, “##”, and “E#” where “##” is the total number of devices discovered on the network (including invalid devices) and “E#” is E1 through E7, per the seven error types listed above. If more than one error is present, all error codes are displayed in sequence.
- In such case, the Save LED does not light (the Cancel LED remains flashing). The user must press Cancel, correct the error, and try again.
- In the case where there were no errors during the auto-discover process, and the user presses Save, the CLSI updates the Network IDs for any devices that require it.
NOTE: Duplicate TSIDs cannot always be accurately detected. If a corrupt data error is displayed or the program reports fewer devices than actually exist on the network, this may also be a result of duplicate TSIDs. Troubleshooting for these errors is essentially the same.
Assign Shade Groups (AS)
This setup option is used to define which channels on each shade controller are assigned to which shade group.
- To enter this option, first enter Setup mode and scroll to the "AS" option (using the and buttons). Then use the up/down button to scroll through the shade groups. The display flashes between "AS." and "#" where "#" is the shade group to be assigned. The shade group number range is 0 through 6. Enter "0" to unassign a channel. (Alternatively, press any of the six function front panel buttons to jump to a specific shade group.) The front panel LED corresponding to the selected shade group lights.
NOTE: Crestron drapery track controllers are also configured during the "Assign Shade Groups" process. Drapery track controller setup and functionality is identical to the setup of shades.
- While in the “AS” option, the bar graphs indicate the status of each of the six shade groups:
No controllers are assigned, all LEDs remain off
C2N-SDC controller(s) are assigned, the bottom two LEDs light
⇒ C2N-SDC-DC controller(s) are assigned, the bottom three LEDs light
⇒ C2N-SSC-2 controller(s) are assigned, the top two LEDs light
CSC-DCCN controller(s) are assigned, the top three LEDs light
CSC-ACCN controller(s) are assigned, the top four LEDs light
CSC-DRPCN controller(s) are assigned, the top five LEDs light
CSM-QMT50 controller(s) are assigned, the top three LEDs light
- When a given "AS / #" is displayed, press the channel 1 or channel 2 up or down button on a shade controller to assign that channel of the shade controller to the current group. When the button is pressed, the Setup LED on that device flashes for 1 second to confirm that it has been assigned. The bar graph for that group also blinks off for 1 second.
- Go to a shade group and assign all channels. Then go to the next shade group and assign those channels. Repeat for all shade groups.
NOTE: A given shade group can only have one type of shade controller (C2N-SDC, C2N-SDC-DC, C2N-SSC-2, CSC-DCCN, CSC-ACCN, CSC-DRPCN, or CSM-QMT50). If a shade controller of a given type is assigned to a group that already contains shade controllers of the other type, the other controllers are removed from that group. Also, a given channel on a shade controller can only belong to a single group. So if a shade controller that belongs to one group is assigned to a new group, it is removed from the first group. Therefore, if a shade controller is accidentally configured to the wrong group go to the correct group and reassign it.
Once all shade controllers are assigned, press Save to save the assignments and return to Standard mode or press Cancel to discard the assignments.
Set Cresnet ID of This Unit (id)
If this unit is to be connected to a Cresnet control system network, the Cresnet ID may have to be changed. (When connected to another CLS-C6 unit's local network, do not set the ID; running auto-discovery on the master device performs this automatically, as will the Set ID process of the iLux Designer.)
- Enter Setup mode and scroll to the "id" option, using the and buttons.
- The display alternates between "id" and the current Cresnet ID. Use the up/down button to adjust the ID up or down (03-FE).
- Press the Save button to save the new value and return to Standard mode. Press the Cancel button to return to Standard mode without saving; the current Cresnet ID is retained.
Photocell Test (Ph)
This setup option is used to test photocell output.
NOTE: Auto-discovery must be performed before the CLS-C6 recognizes a GLS-LOL photocell. The photocell must also be installed and wired to a GLS-SIM or C2N-CBD-P keypad.
To test photocell output, see below:
- Enter Setup mode and scroll to the "Ph" option (using the ▲ and ▼ buttons). Press and hold either the top or bottom portion of the raise/lower button. The 2-digit display indicates the real-time output of the photocell in a percentage (0 to 99).
- Press the Cancel button to return to Standard mode.
NOTE: When in the "Ph" option, daylight harvesting is disabled.
Photocell Calibration (Pc)
This setup option is used to calibrate the photocell response when daylight harvesting is enabled. Photocell calibration is required to customize the lighting response to changes in daylight. The CLS-C6 allows each load to be calibrated independently for maximum performance. Typically, loads that are closest to sources of natural light are made more sensitive to daylight and those that are furthest from daylight are made less sensitive. Loads that receive little or no daylight can be disregarded by the photocell.
NOTE: Photocell calibration is best performed on a sunny day when all loads are above their minimum dim level but below 80%. Performing photocell calibration when there is insufficient daylight may cause undesired operation on a bright day. Conversely, performing photocell calibration when there is excessive daylight may prematurely trigger loads to reach their minimum dim level (refer to “Photocell Lower Limit (PL),” on the following page), making calibration impossible.
NOTE: Loads configured with high sensitivity change more in response to changes in daylight. On a bright day, these loads are lower. Loads configured with low sensitivity respond less to changes in daylight. On a bright day, these loads are higher.
NOTE: Internal scene levels for all loads increase to 100% for calibration purposes while in this mode.
NOTE: Non-dim loads cannot be used with daylight harvesting.
To calibrate a photocell, see below:
- Enter Setup mode and scroll to the "PC" option (using the and buttons). Press either the top or bottom portion of the raise/lower button. A period appears in the 2-digit display, indicating the mode has been selected.
- If a photocell is present, Scenes 1 through 8 (plus the On scene) are automatically under photocell control. Scenes 9 through 16 ignore the photocell at all times.
-
To enable/disable photocell control for a given load, press and hold both sides of its rocker button for 5 seconds. Loads that are not controlled by a photocell display a bar graph with only the top and bottom two LEDs lit.
-
Use the rocker buttons below each load to adjust each individual sensitivity level. Pressing the right half of the rocker button lowers the sensitivity, increasing light output level. Pressing the left half of the rocker button raises sensitivity, decreasing light output level. The 2-digit display indicates the current photocell level and the selected sensitivity. Light levels adjust automatically when the photocell reading changes.
- The following diagram illustrates the relationship between sensitivity, light output, and photocell level.

line
| Photocell Level (%) | Light Output (%) | | ------------------- | ---------------- | | 0 | 100 | | 100 | 0 |NOTE: It is not possible for loads to be adjusted from 0 to 100%. The range of actual light output is governed by the current photocell level, sensitivity, and minimum dim level.
NOTE: Attempting to adjust the sensitivity for loads not controlled by a photocell causes the 2-digit display to flash “Er”.
- Press Save to save the new settings or Cancel to retain the original setting.
Photocell Lower Limit (PL)
This setup option is used to adjust the lower limit for the photocell when daylight harvesting is enabled. This setting prevents the load from dimming below a specified level, regardless of the amount of available light. Valid values are 0 to 30%. The default value is 10%.
To adjust the lower limit for each load, see below:
- Enter Setup mode and scroll to the "PL" option (using the and buttons). A period appears in the 2-digit display, indicating the mode has been selected. All lighting loads lower to the minimum dim level.
- Use the rocker buttons below each load to adjust each individual minimum dim level.
- Press Save to save the new setting or Cancel to retain the original setting.
NOTE: Attempting to adjust the lower limit for a non-dim or non-photocell controlled load produces no results and causes the 2-digit display to flash “Er”.
Photocell Response Time (Pr)
This setup option is used to adjust the lights' response time to a change in the photocell reading. Valid values are 10 seconds, 30 seconds, 1 minute, 2 minutes, and 5 minutes. The default value is 1 minute.
To adjust the response time of the photocell, see below:
- Enter Setup mode and scroll to the "Pr" option (using the and buttons). Press either the top or bottom portion of the raise/lower button. The 2-digit display indicates the response time.
- Use the and buttons (located next to Save/Cancel) to increase or decrease the response time.
- Press Save to save the new setting or Cancel to retain the original setting.
NOTE: The CLS-C6 temporarily utilizes a faster response time when there are rapid changes in light (such as when shades or blinds are opened or closed). If daylight in the room has increased, the response time is increased to 10 seconds. If daylight in the room has decreased, the response time is 2 seconds. Under normal operation, the CLS-C6 implements a gradual response time.
Restore Factory Defaults (Fd)
This procedure is used to restore all settings to their factory defaults.
- First enter Setup mode and then scroll to the "Fd" option (using the and buttons). Then press the up/down button (top, bottom, or both) and hold for 5 seconds.
- This procedure is locked in and the Save LED flashes. (If the button is released before 5 seconds are up, nothing happens.) Press Save and all configuration items are set to their factory default values. (Press Cancel and the unit exits Setup mode without changes.) The factory default configuration does not include any remote devices. To re-initialize remote devices, run auto-discover after this function. Running the factory default function does modify the Cresnet ID of the CLS-C6.
- The save process may take a few seconds. During this time, the Save LED is lit steadily and the 2-digit display shows “--”. When the process is complete, the LEDs extinguish.
Refer to "Appendix C: RS-232 Commands" on page 56 for default values.
Configuring with iLux Designer
The Crestron iLux Designer program software, supplied with all of the CLS-C6 series units, configures the CLS-C6 as an independent, standalone device or as a network device in a Crestron network control system (Cresnet system).
To configure the CLS-C6 using the iLux Designer, use a direct serial connection as described in “Establishing Communication” on page 29.
NOTE: Connecting the serial cable to the front panel of the CLS-C6 disconnects the control system network.
Configuring the CLS-C6 consists of setting the load schedule definition, the shade group configuration, the scene definitions, the CLS-C6 panel configuration, and keypad configuration for each CLS-C6 device.
NOTE: Only one CLS-C6 can be configured at a time. If there are multiple CLS-C6 units in a system, each one must be individually configured.
Below are minimum software versions required to use the iLux Designer program:
iLux Designer version 1.02.05 or later
Crestron Toolbox version 1.01.11 or later
Crestron Engraver version 2.5.0 or later*
Crestron Database version 17.3.0 or later*
The following sections provide a brief description of the iLux Designer functions. Refer to the iLux Designer online help for detailed explanations.
Load Schedule
The "Load Schedule" screen allows identification of up to six lighting loads (circuits) and addition of lighting load types for each channel. The screen also allows specification of load type fixture wattage and quantity, breaker size, expected loss factor from magnetic transformers (magnetic low voltage and neon/cold-cathode types only), upper and lower dimmer levels, and non-dimmer behavior.
The software issues warnings if the individual loads or total system wattage exceeds specified limits: 800 watts per load (1920 watts system maximum with a 20 A breaker, 1440 watts maximum with a 15 A breaker, and 1000 watts maximum with an arc fault breaker) for a 120 Vac installation and 800 watts per load (2200 watts system maximum for a 220 Vac installation, 2,300 watts system maximum for a 230 Vac installation, and 2400 watts system maximum) for a 240 Vac installation.
Shades
The "Shades" screen allows up to 16 shade controllers to be assigned and six shade groups to be defined. The screen also allows value entry for jog time, maximum time, lockout time, and shade controller channel assignment to each shade group.
With C2N-SDC and C2N-SDC-DC shade controllers, the system cannot recognize when the shade has reached the limits of travel and stopped. If the shade is commanded to go to full open or full close, the system assumes it is moving until the maximum time is reached. To set the maximum time effectively, measure the time it takes the shade to travel from full close to full open and the time to travel from full open to full close. Take the longer of these two times and set maximum time slightly more than that. Actual experience may require that a longer time is set.
Scenes
The "Scenes" screen allows 15 regular scenes to be defined (lighting levels and shade positions) in addition to the standard Off and On scenes. For all scenes, enter a fade time in seconds or minutes and the desired level for each lighting load. (Select “- -” if a given load should not be affected by that scene.) Similarly, set the desired position for any shade group. To prevent changing settings from the front panel, check the Front Panel Lockout box.
CLS-C6
The "CLS-C6" screen allows entry of the manual ramp rate used by the CLS-C6 when manually raising/ lowering light levels, defines the functionality of the six function buttons, defines the behavior of the up/down button, specifies if scene raise/lower is enabled, and defines the entry action, the exit action, and motion sensor timeout when the motion sensor function is enabled. Crestron Engraver software can also be launched to create an engraver project for the CLS-C6RF label.
NOTE: In systems with multiple CLS-C6 units that have the motion sensor function enabled, it is important to set the motion sensor timeout of each unit to the same value.
Keypads
The "Keypads" screen allows up to 16 remote keypads to be added, specifies the remote keypad type, and defines the action type, action, and target of each button on that keypad. Crestron Engraver can also be launched to create an engraver project for each remote keypad.
NOTE: All keypads defined in the project must be installed and present on the CLS-C6 network before setting Network IDs via the "Finish" screen.
Touchpanel
The "Touchpanel" screen allows up to two touch screens to be added. Unique names for the touch screen and buttons can be added and the action type, action, and target of each button on that touch screen can be defined.
NOTE: All touch screens defined in the project must be installed and present on the CLS-C6 network before sending touch screen projects or setting Network IDs via the "Finish" screen.
Finish
From the “Finish” screen, projects can be sent from the iLux Designer to the CLS-C6; Net IDs can be set for network devices; configuration information can be retrieved from the current CLS-C6 module; and reports that give the spreadsheet data from each of the configuration screens can be printed.
Console Command Settings
Enabling/disabling IR reception, resetting the brightness level for the white and green LEDs, and resetting the Glow mode level can be done only via console commands.
By default, IR reception is enabled, the white and green LED brightness levels are set to 70 and 63, respectively, the white shift LED brightness level is set to 70, and the white LED Glow mode level is set to 7. If the settings are acceptable, continue with the configuring procedures. If these settings are not satisfactory, open the Crestron Toolbox and click Tools | Text Console to display the “Text Console” window and follow the instructions given on the following page.
IR Reception
- At the "iLux>" prompt, type IR and press Return to display the current setting. The system displays the following:
- To disable IR reception, type IR disable and press Return. The system displays the following:
- To enable IR reception, type IR enable and press Return. The system displays the following:
IR reception is enabled (or disabled)
iLux>
IR reception is disabled iLux>
IR reception is enabled iLux>
LED Brightness
These settings are for the white LEDs next to the function buttons, the ON button, the shift LEDs, and the green bar graph LEDs.
- At the prompt, type WHITELEDLEVEL or GREENLEDLEVEL and press Return. For example, the system displays the following:
White led brightness level = 70
iLux>
- To change the brightness, type WHITELEDLEVEL ## or GREENLEDLEVEL ## where “##” is any number from 1 to 100.
- Press Return; the respective LEDs go to their new level.
Glow Mode Brightness
Glow mode is enabled when all lighting loads are turned off. In Glow mode, all the white LEDs turn on at a very low level to make it possible to find the unit in a darkened room.
- Press the OFF button to select the Off scene (all lights off).
- At the prompt, type WHITELEDGLOWLEVEL and press Return. The system displays the following:
- To change the brightness, type WHITELEDGLOWLEVEL ## where “##” is any number from 1 to 100. (The glow level should be much lower than the normal LED brightness.)
- Press Return; the white LEDs go to their new level.
White led glow level = 7
iLux>
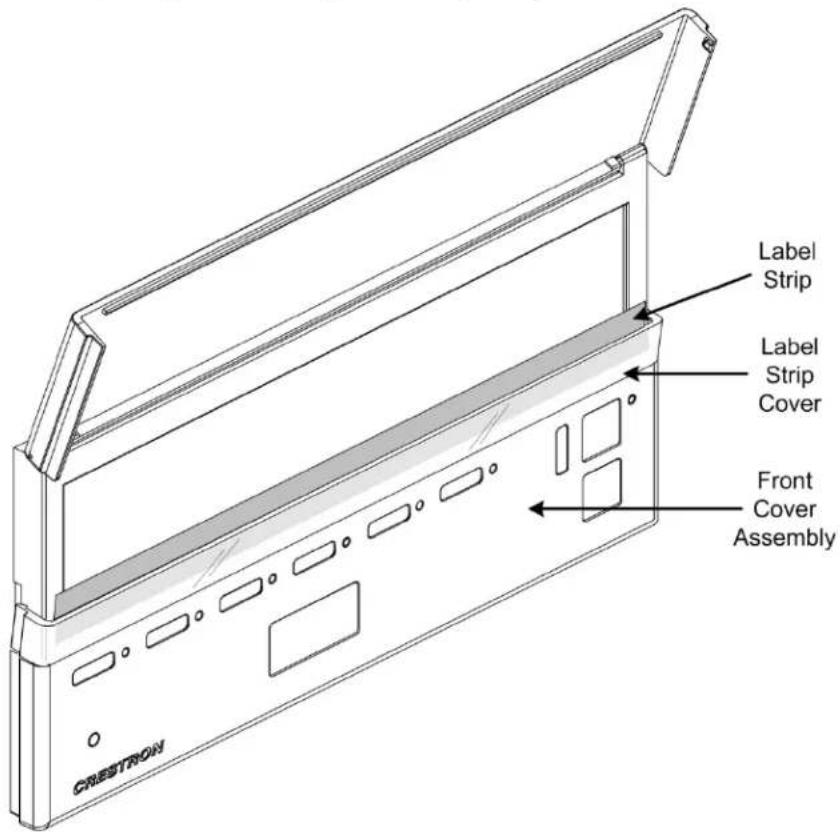
Replacing the Function Button Label
Each CLS-C6 is supplied with a pre-printed label sheet in white, almond, or black to match the unit's color. The sheet contains two labels showing the standard Scene 1 through Scene 6 button labels, three labels with clear spaces that permit writing in single line button names, and three labels with clear spaces that permit writing in 2-line button names to accommodate shift functions. The label sheet is
micro-perforated to make it easy to separate the desired label from the sheet. Carefully fold the sheet along the perforations to snap them apart.
To replace the label on the unit, follow the procedure below:
- Remove the front panel assembly by carefully pulling out and up from the bottom edge.
- Carefully pull the label cover from the top edge at each side of the unit. Refer to the following illustration.
- Remove the original label and replace it with the new label.
- Replace the label cover, make sure the small tabs on the bottom edge are inserted in the slots on the unit cover, and snap into position.
- Install the front cover assembly on the unit by lining it up at the top and pressing the bottom edge until it snaps into position.
Uploading and Upgrading
Crestron recommends using the latest programming software and that each device contains the latest firmware to take advantage of the most recently released features. However, before attempting to upload or upgrade it is necessary to establish communication. Once communication has been established, files (for example, programs or firmware) can be transferred to the control system (or device). Finally, program checks can be performed (such as changing the device ID or creating an IP table) to ensure proper functioning.
NOTE: Crestron software and any files on the Web site are for authorized Crestron dealers and Crestron Service Providers (CSPs) only. New users must register to obtain access to certain areas of the site (including the FTP site).
Establishing Communication
Use Crestron Toolbox for communicating with the CLS-C6; refer to the Crestron Toolbox help file for details. There are two methods of communication: direct serial and indirect.
Direct Serial
Direct Serial Communication

Serial via Crestron STCP-502
or Equivalent
PC Running Crestron Toolbox
The RS-232 (or COMPUTER) port on the CLS-C6 connects to the serial port on the PC via a serial cable (Crestron STCP-502 or equivalent):
- Click Tools | System Info.
- Click the icon.
- For Connection Type, select RS-232.
- Enter the following parameters: Port: COM, Baud Rate: Auto-detect, Parity: None, Data Bits: Eight, Stop Bits: One. The XON/XOFF checkbox should not be checked. The RTS/CTS checkbox should be checked.
- Click OK. Communications are confirmed when the device information is displayed.
Indirect
Indirect Communication

flowchart
graph LR
    A["PC Running Crestron Toolbox"] -->|Serial, LAN or USB| B["Control System"]
    B -->|Cresnet| C["CLS-C6"]
CLS-C6 connects to control system via Cresnet:
- Click Tools | System Info.
- Click the icon.
- For Connection Type, select Cresnet ID. In the Through drop-down menu, select the control system.
- Click OK. Communications are confirmed when the device information is displayed.
Programs and Firmware
Program or firmware files may be distributed from programmers to installers or from Crestron to dealers. Firmware upgrades are available from the Crestron Web site as new features are developed after product releases. One has the option to upload programs via the programming software or to upload and upgrade via the Crestron Toolbox. For details on uploading and upgrading, refer to the Crestron Studio help file, SIMPL Windows help file, or the Crestron Toolbox help file.
Crestron Studio / SIMPL Windows
If a Crestron Studio (or SIMPL Windows) program is provided, it can be uploaded to the control system using Crestron Studio (or SIMPL Windows) or Crestron Toolbox.
Firmware
Check the Crestron Web site to find the latest firmware. (New users may be required to register to obtain access to certain areas of the site, including the FTP site.)
Upgrade CLS-C6 firmware via Crestron Toolbox.
- Establish communication with the CLS-C6 and display the "System Info" window.
- Select Functions | Firmware... to upgrade the CLS-C6 firmware.
Operation
The CLS-C6 always operates in one of four modes. Setup mode is used to redefine many of the CLS-C6 settings. Details regarding Setup mode are given in “Setup Mode” on page 13.
The following sections provide detailed descriptions of Standard mode, Lights mode, and Shades mode. It is important to have a good understanding of these operating modes before attempting to take advantage of the extensive features available through the CLS-C6. Refer also to “Appendix E: Button Functions” on page 72 for details on button functions.
Standard Mode
Daylight Harvesting
The CLS-C6 supports use of a photocell to automatically reduce light levels when natural light is present (daylight harvesting). Each load can be set for a custom response to daylight levels or set to not respond at all.
If a photocell is present, Scenes 1 through 8 (plus the On scene) automatically utilize daylight harvesting. Scenes 9 through 16 ignore daylight harvesting at all times.
When under photocell control, the load level can change automatically based on the current photocell level and the scene setting. When this automatic behavior is enabled, the top bar graph LED for that load blinks.
Standard mode is the default mode; buttons are typically used to recall scenes, although they can be redefined to serve other functions.
- By default, the six function buttons across the front panel are simple scene recall buttons. The buttons can be reprogrammed in Setup mode, or via the iLux Designer program, to perform different actions.
- The ON button function always recalls the On scene. The typical On scene is all lights at 100%; however, other values can be set just like any other scene.
- The OFF button function always recalls the Off scene. The Off scene always sets all lights to 0%; however, fade time and shade motor behavior is programmable.
- Whenever all the lighting loads are off (irrespective of how they are turned off), the air-gap relay opens (after a 2-second delay) to allow servicing of the lighting loads.
- The up/down button can be defined to be either lights master or shades master.
If defined to be lights master, the up/down button ramps the lighting loads included in the most recently recalled scene up and down. Non-dim loads are not affected.
If defined to be shades master, all shade groups are affected. Refer to "Shades Mode" on page 37 for operating details.
⇒ Using the iLux Designer program, this button may be assigned to activate the shift function rather than being a lights or shades master. Pressing the button toggles between upper and lower function sets.
Using the iLux Designer software, it is also possible to assign this button as "all lights master," instead of "last scene master."
- The six bar graphs indicate current intensity for each of the six lighting loads.
- The 2-digit display is normally blank, except when a scene recall is in progress. It then shows the time remaining for lights to reach their target values.
Button Types
The six function buttons can be programmed in Setup mode to be one of the following types. Using the iLux Designer software, other button functions may be specified. Refer to “Configuring With iLux Designer” on page 24 for details.
- Recall-scene (specify scene number Off, On, 1–15). Refer to “Recall-Scene Buttons” below.
- Toggle-scene (specify scene number On, 1–15). Refer to “Toggle-Scene Buttons” on page 33.
- Lighting master raise/lower (last scene). Refer to “Master (Last Scene) Raise/Lower Buttons” on page 33.
- Lighting master raise (last scene). Refer to “Lighting Master (Last Scene) Raise Buttons” on page 33.
- Lighting master lower (last scene). Refer to “Lighting Master (Last Scene) Lower Buttons” on page 33.
- Shade control (open/stop/close/stop) (specify shade group: AL, 1–6). Refer to “Shade Control (Open/Stop/Close/Stop) Buttons” on page 33.
Recall-Scene Buttons
Scene Presets with Daylight Harvesting
If a photocell is present, Scenes 1 through 8 (plus the On scene) automatically utilize daylight harvesting. When this automatic behavior is enabled, the top bar graph LED for that load blinks.
NOTE: When editing scenes with photocell-controlled loads, photocell output is temporarily disabled. When the scene is recalled, photocell control resumes and light levels may change. To reduce the possibility of unintended scene behavior caused by photocell reaction to sunlight, edit scenes at night.
Recall-scene buttons are used to recall a scene (i.e., have the specified lighting loads and/or shade groups go to their specified levels in the specified time). Time only affects lighting loads; shade time is a function of the shade motor.
- During scene recall, the scene LED flashes until all affected lighting loads reach their target levels. After this, the LED remains on steady.
- Pressing a scene button while its LED is flashing performs a scene cut (lights immediately go to target levels).
- When a scene is recalled, the 2-digit display initially shows the fade time of the scene and then counts down to zero (0) as the scene progresses.
- For the six dual buttons, if the raise/lower function is enabled on recall-scene buttons via the iLux Designer software and a scene is selected (LED on steady), the right and left sides of the function button can be used to raise and lower all dimmable lighting loads contained in that scene.
- The ON button always acts as a recall-scene button for the On scene, operating identically to other recall-scene buttons except that items specific to dual buttons do not apply.
- The OFF button always acts as a recall-scene button for the Off scene, operating identically to other recall-scene buttons, except in the following cases:
⇒ There is no LED associated with this button. Note that cut during fade still functions. Note also that a feedback LED for an OFF button on remote keypads acts as all other scene recall LEDs—it flashes while the off scene is being recalled and is lit when the unit is on the Off scene.
⇒ Items specific to dual buttons do not apply.
⇒ Note that if the last scene recalled was the Off scene, the last scene master affects all dimmable lighting channels (since they are all included in the last scene).
Any time all six lighting loads are off, all seven of these LEDs glow at a low intensity (to allow finding the CLS-C6 unit in the dark).
Toggle-Scene Buttons
- Used to alternately recall a scene or turn scene lights off (i.e., have the specified lighting loads go to off, in the specified time).
- The toggle scene function should not be assigned to any scene that includes shades.
- Note that the ON and OFF buttons are fixed recall-scene buttons and cannot be defined to toggle. (However, a remote keypad button can be defined to toggle the On scene, but not the Off scene.)
- The LED is on only if any lighting load in the scene is above 0% (ignores state of shades).
- Pressing the button while all lights are off (LED off) recalls a scene. Pressing it while any lights are on (LED on) turns that scene's lights off.
- During scene recall, the scene LED flashes until all affected lighting loads reach their target levels. After this the LED remains on steady until all affected lights go off.
- During scene turn off, the LED flashes until all affected lighting loads reach 0%. After this, the LED is off until any affected light turns on.
- Pressing a scene button while its LED is flashing performs a scene cut (during either recall or turn off).
• Behavior of the 2-digit display is the same as for scene recall.
Master (Last Scene) Raise/Lower Buttons
- Press the right side to raise lights, the left side to lower, and release to stop.
- All dimmable lighting loads ramp up or down at a fixed rate, which is the same rate as used for individual up/down operation in Lights mode.
• Non-dim lighting loads are not affected.
• The feedback LED lights while the button is being pressed.
Lighting Master (Last Scene) Raise Buttons
- Same as master raise/lower button, except that pressing any part of the button raises the lights.
Lighting Master (Last Scene) Lower Buttons
- Same as master raise button, except that pressing the button lowers lights instead of raising them.
Shade Control (Open/Stop/Close/Stop) Buttons
• Used to control the specified shade group or all shade groups.
- Press the right side of the function buttons to open the shades; press the left side to close them. Press the button while the shade is moving to stop it.
• The feedback LED is on only while a button is pressed.
IR Receiver
Functions can also be triggered through the built-in RC5 IR receiver using the optional CLS-IRHT8 remote or a third-party remote. Refer to “Appendix G: RC5 Code Expansion” on page 84 for details.
Occupancy Sensing
Occupancy sensing utilizing the built-in sensors (CLS-C6) may have specific actions specified for entry and exit. Either or both of these may be disabled. A limited number of actions are available when programmed locally; more options are available when programmed using the iLux Designer program.
If motion is detected, or some other activity takes place, a room is considered occupied. If no activity takes place for a specified time (default is 30 minutes), the room is considered unoccupied.
When the state of the room changes from occupied to unoccupied, the exit function (if enabled) is executed. When the state of the room changes from unoccupied to occupied, due to motion detection, the entry function (if enabled) is executed. When the state of the room changes from unoccupied to occupied, due to a button press or the receipt of a command, no function is executed.
NOTE: In systems with multiple CLS-C6 units that have the motion sensor function enabled on any of the units, it is important to set the motion sensor timeout of each unit to the same value. Otherwise, operation may not be as expected.
External partition sensors (provided by others) connected via the GLS-SIM product enable additional actions such as room combining. Refer to “Appendix F: Room Combining” on page 81 for additional details.
Setting a GLS-SIM to the designated Cresnet ID (0xC0 or 0xC1) causes this GLS-SIM to behave like an external occupancy sensor. Both inputs on the GLS-SIM are treated identically, allowing a total of up to six occupancy sensors (three wired in parallel on each input). Refer to the GLS-SIM Operations & Installation Guide (Doc. 6768) at www.crestron.com/manuals for detailed information.
Any external sensors are internally OR'd together with the internal motion sensor, if present.
The timeout property, which is defined in iLux Designer, does not affect external sensors in any way. This property applies only to the internal sensor in the iLux, when present. External sensors are responsible for providing their own timeout.
Override Mode
CLS-C6 supports an Override mode, which can be triggered by a GLS-SIM or DIN-IO8. When Override mode is engaged, a special Override scene is recalled and all local functionality of the iLux, and associated keypads, are locked out. By default, the Override scene is all lights at 100% and supports a fade time of only 0 seconds.
The Override scene can be programmed locally on the iLux by entering scene programming (Sc) option and then cycling through the available scenes until "Or" appears on the display.
The Override scene cannot be set so that all loads are off.
When Override mode is disengaged, all loads revert to their previous values. While in Override mode, all slave units are placed into Override mode as well, regardless of the room combining status.
While in Override mode, all Cresnet commands (whether sent by a control processor or by a master iLux to a slave) are ignored except for load level commands, which cause the new final value to be stored and thus recalled when the unit exits Override mode.
Override mode levels take precedence over any limits set by Load Shed mode.
Load Shedding (Demand Response)
The CLS-C6 can enter a Load Shed mode via an external input (such as a DIN-IO8 or GLS-SIM).
When entering Load Shed mode, any loads that must have their levels reduced do so with a 1/2-second fade.
While in Load Shed mode, all loads must always be kept at or below their load shed level (the only exception being Override mode).
When exiting Load Shed mode, loads that were commanded to go to a level below their load shed level shall fade to the originally desired level in 1/2 seconds.
While in Load Shed mode, the 7-segment display shall flash "LS" at a rate of 1 second on, 1 second off, unless the display is actively showing something else.
Using iLux Designer, any value can be entered into the Load Shed Max field (0–100%). The default Load Shed Max value in iLux Designer is 80% for all loads.
Building Management System Interface
A DIN-IO8 unit is supported for the purpose of providing a contact-closure interface to a BMS. A GLS-SIM is supported for the purpose of a very basic contact-closure interface to a BMS.
The DIN-IO8 is required to have a designated Cresnet ID in order to work properly in this capacity. The designated addresses are 0xD0 for normally open and 0xD1 for normally closed DIN-IO8 types.
The functionality of the DIN-IO8 and/or GLS-SIM is fixed and cannot be changed via Setup mode or iLux Designer.
The functionality provided by the DIN-IO8 is as shown in the following table:
DIN-IO8 BMS Functionality
| PORT FUNCTION | |
| 1 | Recall On Scene (edge-triggered) |
| 2 | Recall Off Scene (edge-triggered) |
| 3 | Recall Scene 14 (edge-triggered) |
| 4 | Recall Scene 15 (edge-triggered) |
| 5 | Override Mode (level-triggered) |
| 6 | Load Shed Mode (level-triggered) |
| 7 Defeat Occupancy Sensors (level-triggered) | |
| 8 | Lockout Front Controls (level-triggered) |
Four unique Cresnet IDs are defined for the GLS-SIM to allow this unit access to the following functions (two per ID):
• Unit 1 (Cresnet ID 0xC5): Recall On/Off scene
• Unit 2 (Cresnet ID 0xC6): Defeat Occ Sensors/lockout front panel controls
• Unit 3 (Cresnet ID 0xC7): Recall scenes 14/15
• Unit 4 (Cresnet ID 0xC8): Override mode/load shed
For these units, DIP switches 0, 1, 2, and 3 determine whether the inputs are normally open, normally closed, active high, or active low.
In order for the DIN-IO8 to be compatible with any model of BMS, one Cresnet ID treats the inputs as normally open. That is, a closure activates the function. Another Cresnet ID treats the inputs as normally closed.
When inputs are treated as normally open, port 8 causes a short to ground when the room is considered occupied.
When inputs are treated as normally closed, port 8 causes a short to ground when room is considered unoccupied.
Lights Mode
Manual Load Adjustment with Daylight Harvesting
When a load is under photocell control, the top bar graph LED for that load blinks slowly. Manual adjustment of the load is still possible using the raise and lower buttons.
NOTE: Manual adjustment of the load does not disable the photocell. The load changes in response to the photocell, but the level is shifted up or down according to an internal calculation that compensates for the amount of manual adjustment.
Lights mode is used to manually adjust any of the six lighting loads. To enter Lights mode, raise the cover and press the Lights button. The corresponding LED lights and the six function buttons can now be used to adjust lighting loads 1 through 6. Any scenes that are currently in the middle of a fade immediately go to their target value. The seven white front panel LEDs go out. In this mode, these LEDs do not reflect the feedback status of the associated scenes. When returning to Standard mode, the LEDs return to their standard feedback indication.
Pressing the right side of one of the six function buttons raises the corresponding lighting load at the ramp rate. Pressing the left side of the button lowers the corresponding load at the ramp rate. When the button is released, the lights stop.
- The ramp rate is normally 5 seconds for going from full off to full on. This can be adjusted using the iLux Designer software. Non-dim lighting loads go immediately to full on or full off.
• The bar graphs indicate current light level. - The 2-digit display indicates the current percentage level of the lighting load being adjusted (oF, 01 to 99, on). This display goes blank 3 seconds after the last adjustment. While the front panel button is being pressed, the LED under the corresponding bar graph lights solid to indicate which light level is being reflected.
- The up/down button acts as an “all lights master” when in Lights mode, no matter what function is programmed for it. The top button performs a master raise (all dimmable lighting loads) and the bottom button performs a master lower (all dimmable lighting loads).
- The ON and OFF buttons on the CLS-C6 unit operate normally while in Lights mode as does any Scene Recall, Scene Toggle, and SceneLts_Off commands from remote panels and Cresnet. However, during the fade, the 2-digit display does not show the fade time on the unit that is in Lights mode.
- All other inputs and commands from any remote devices, motion detector, and Cresnet control system are processed as usual while in Lights mode. If they affect the lighting load (or loads) being adjusted, the manual adjustment of that lighting load is terminated and the new command takes precedence. To manually adjust this channel after that, release and re-press the button. The unit remains in Lights mode.
To exit Lights mode, press the Lights button again (or press Cancel) and the LED goes off. The unit returns to Standard mode. (Also, if no adjustments are made within 1 minute, the unit reverts to Standard mode.)
Pressing the Shades button automatically exits Lights mode and enters Shades mode.
Shades Mode
Shades mode allows manual control any of the six shade groups. To enter Shades mode, raise the cover and press the Shades button. The corresponding LED lights and the six function buttons can be used to adjust shade groups 1 through 6. Any scenes that are currently in the middle of a fade immediately go to their target value. The seven white front panel LEDs go out. In this mode, these LEDs do not reflect the feedback status of the associated scenes. When the unit is returned to Standard mode, these LEDs return to their standard feedback indication.
- The six function buttons act as open/stop/close/stop (rocker type) for each of the corresponding six shade groups.
- Operation is as described for the Shade Control button type in Standard mode. Refer to "Button Types" on page 32 for more information.
• For shade groups with C2N-SSC-2 controllers see below:
While in Shades mode, the bar graphs indicate the current shade position.
The 2-digit display indicates the current percentage level of the shade group being adjusted (CL, 01 to 99, OP).
⇒ The 2-digit display disappears (goes blank) 3 seconds after the shade stops moving (due to either a stop command or reaching a limit of travel).
NOTE: The 2-digit display only shows the shade level when being adjusted from front panel buttons in Shades mode or scene programming. It does not display when adjusting levels from a remote panel or Cresnet.
- For shade groups with C2N-SDC or C2N-SDC-DC controllers see below:
⇒ Bar graphs initially display nothing while a shade is not moving. While the shade is moving open, the bar graph LEDs scroll in an upward direction. While moving closed, the bar graph LEDs scroll in a downward direction. When the shade is stopped or the maximum time is reached, the bar graph turns off.
⇒ The 2-digit display shows “OP” or “CL” accordingly.
⇒ The up/down button acts as a shades master when in Shades mode, no matter what function is programmed for it. Pressing the top while the shade is stopped sends it to full open; pressing the bottom while the shade is stopped sends it to full close; pressing anything while the shade is moving stops it; and pressing both while the shade is stopped causes the shade to move in the opposite direction.
⇒ The ON and OFF buttons on the CLS-C6 unit operate normally while in Shades mode. The same is true for all scene recall or scene toggle functions triggered by remote panel or Cresnet command.
Inputs/commands from any remote devices, motion detector, and Cresnet control system are processed as usual while in Shades mode. If
they affect the group (or groups) being adjusted, the manual adjustment of that shade group terminates and the new command takes precedence. To manually adjust this channel after that, release and re-press the button. The unit remains in Shades mode.
To exit Shades mode, press the Shades button again (or press the Cancel button); the LED extinguishes and the unit returns to Standard mode. Also, pressing the Lights button automatically exits Shades mode and enters Lights mode.
If no adjustments are made for 1 minute, the unit automatically reverts to Standard mode.
Problem Solving
Troubleshooting
The following table provides corrective action for possible trouble situations. If further assistance is required, please contact a Crestron customer service representative.
CLS-C6 Troubleshooting
| TROUBLE | POSSIBLE CAUSE(S) | CORRECTIVE ACTION |
| Device does not function. | Unit is not receiving line power. | Verify that the unit is properly connected to the power line and that the circuit breaker is closed. |
| Loads are not | connected. | Verify that the loads are operational and that they are connected to the CLS-C6 unit. |
| Loads turn on and off, but do not dim. | Wrong load type settings. | Correct load type settings. |
| Lights flicker at low levels. | Incorrect low-end limit setting. | Change low-end limit setting. |
| In a multi-unit room configuration, commands from a remote IR controller cause loads to cut to their settings rather than fade. | More than one iLux unit picking up IR command. | Disable IR function on all but one unit. |
| Motion detector does not function. | Occupancy sensor function is not enabled. | Use iLux Designer or front panel setup function to enable occupancy sensor. |
Check Network Wiring
Use the Right Wire
To ensure optimum performance over the full range of the installation topology, use Crestron Certified Wire only. Failure to do so may incur additional charges if support is required to identify performance deficiencies because of using improper wire.
Calculate Power
CAUTION: Use only Crestron power supplies for Crestron equipment. Failure to do so could cause equipment damage or void the Crestron warranty.
CAUTION: Provide sufficient power to the system. Insufficient power can lead to unpredictable results or damage to the equipment. Use the Crestron Power Calculator to help calculate how much power is needed for the system (www.crestron.com/calculators).
When calculating the length of wire for a particular Cresnet run, the wire gauge and the Cresnet power usage of each network unit to be connected must be taken into consideration. Use Crestron Certified Wire only. If Cresnet units are to be daisy
chained on the run, the Cresnet power usage of each network unit to be daisy chained must be added together to determine the Cresnet power usage of the entire chain. If the unit is run from a Crestron system power supply network port, the Cresnet power usage of that unit is the Cresnet power usage of the entire run. The wire gauge and the Cresnet power usage of the run should be used in the following equation to calculate the cable length value on the equation's left side.
Cable Length Equation
$$ \begin{array}{l} L < \frac {4 0 , 0 0 0}{R \times P} \ R = 6 \text { Ohms (Crestron Certified Wire: } 1 8 \text { AWG } (0. 7 5 \text { mm } ^ {2})) \ \text { or } 1. 6 \text { Ohms (Cresnet HP: } 1 2 \text { AWG } (4 \mathrm{mm} ^ {2})) \ P = \text { Cresnet power usage of entire run (or chain) } \ \end{array} $$
Where: L = Length of run (or chain) in feet
Make sure the cable length value is less than the value calculated on the right side of the equation. For example, a Cresnet run using 18 AWG Crestron Certified Wire and drawing 20 watts should not have a length of run more than 333 feet (101 meters). If Cresnet HP is used for the same run, its length could extend to 1250 feet (381 meters).
NOTE: All Crestron certified Cresnet wiring must consist of two twisted pairs. One twisted pair is the 24 and G pair and the other twisted pair is the Y and Z pair.
Strip and Tin Wire
When daisy chaining Cresnet units, strip the ends of the wires carefully to avoid nicking the conductors. Twist together the ends of the wires that share a pin on the network connector and tin the twisted connection. Apply solder only to the ends of the twisted wires. Avoid tinning too far up the wires or the end becomes brittle. Insert the tinned connection into the Cresnet connector and tighten the retaining screw. Repeat the procedure for the other three conductors.
Add Hubs
Use of a Cresnet Hub/Repeater (CNXHUB) is advised whenever the number of Cresnet devices on a network exceeds 20 or when the combined total length of Cresnet cable exceeds 3000 feet (914 meters).
Reference Documents
All documents mentioned in this guide are available at www.crestron.com/manuals.
List of Related Reference Documents
DOCUMENT TITLE
2-Series Control Systems Reference Guide
GLS-SIM Operations & Installation Guide
iLux Lighting Systems Installation Guide
Further Inquiries
To locate specific information or resolve questions after reviewing this guide, contact Crestron's True Blue Support at 1-888-CRESTRON [1-888-273-7876] or, for assistance within a particular geographic region, refer to the listing of Crestron worldwide offices at www.crestron.com/offices.
To post a question about Crestron products, log onto Crestron's Online Help at www.crestron.com/onlinehelp. First-time users must establish a user account to fully benefit from all available features.
Future Updates
As Crestron improves functions, adds new features, and extends the capabilities of the CLS-C6, CLS-C6M, CLSI-C6, and CLSI-C6M, additional information may be made available as manual updates. These updates are solely electronic and serve as intermediary supplements prior to the release of a complete technical documentation revision.
Check the Crestron Web site periodically for manual update availability and its relevance. Updates are identified as an “Addendum” in the Download column.
Appendix A: Supported Devices
The CLS-C6 local devices network supports up to 16 remote devices consisting of keypads, shade controllers, touch screens, and additional CLS-C6 units.
Keypads
Up to 16 keypads can be added on the local devices network. The following table lists default button functions for the keypad types currently supported. These settings can be changed using the front panel Setup mode or via iLux Designer.
Supported Keypads
| KEYPAD TYPE | BUTTON LAYOUT | BUTTON NUMBER | DEFAULT FUNCTION |
| CNX-B2 | 1 Recall | On Scene | |
| 2 | Recall Off Scene | ||
| CNX-B4 | 1 Recall | On Scene | |
| 2 | Recall Off Scene | ||
| 3 Last Scene Up | |||
| 4 Last Scene Down | |||
| CNX-B6 / C2N-DB6 | 1 Recall | Scene 1 | |
| 2 Recall | Scene 2 | ||
| 3 Recall | Scene 3 | ||
| 4 Recall | Scene 4 | ||
| 5 | Recall Off Scene | ||
| 6 Recall | On Scene | ||
| CNX-B8 / C2N-DB8 | 1 Recall | Scene 1 | |
| 2 Recall | Scene 2 | ||
| 3 Recall | Scene 3 | ||
| 4 Recall | Scene 4 | ||
| 5 Last Scene Down | |||
| 6 Last Scene Up | |||
| 7 | Recall Off Scene | ||
| 8 Recall | On Scene | ||
| CNX-B12 / C2N-DB12 | 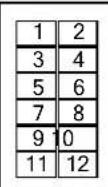 | 1 Recall Scene 12 Recall Scene 23 Recall Scene 34 Recall Scene 45 Recall Scene 56 Recall Scene 67 Recall Scene 78 Recall Scene 89 Last Scene Down10 Last Scene Up11 Recall Off Scene12 Recall On Scene | |
| C2N-CBD / C2N-CBF | 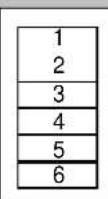 | 1 Recall On Scene2 Recall Scene 13 Recall Scene 24 Recall Off Scene5 Master Raise (last scene)6 Master Lower (last scene) | |
| C2N-CBD-P / C2N-CBD-E / C2N-CBF-P | 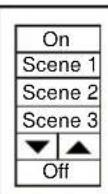 | 1 On2 Scene 13 Scene 24 Scene 35L Last Scene Down5R Last Scene Up6 Off | |
| C2NI-CB / INETI-CB | 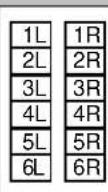 | 1L Recall Scene 12L Recall Scene 33L Recall Scene 54L Recall Scene 75L Last Scene Up6L Last Scene Down1R Recall Scene 22R Recall Scene 43R Recall Scene 64R Recall Scene 85R Recall On Scene6R Recall Off Scene | |
Shade Controllers
A maximum of 16 shade controllers can be added to the local devices network. The following shade controllers are currently supported (all sold separately):
C2N-SSC-2*
C2N-SDC
C2N-SDC-DC
• CSM-QMT50-DCCN
CSC-DCCN
CSC-ACCN
CSC-DRPCN
NOTE: The two channels on these shade controllers are labeled 1 and 2. SIMPL Windows cannot address the individual shade controllers. Only shade groups can be addressed.
Touch Screens
A maximum of two touch screens can be added to the local devices network. The following touch screens are currently supported (both sold separately):
- TPS-4L
- TPS-6L
The iLux auto-assigns the Cresnet ID for the touch screens if they are not already assigned to one of the designated IDs reserved for the touch screens.
Analog ramps are sent to the touch screens as Ramp Control Blocks, as opposed to discrete analogs. (In order to properly display analog levels, touch screen firmware supports Ramp Control Blocks natively.)
Touch screen display lists can be transferred to the touch screen via the programming jack on the iLux.
Through the use of the join map shown in the tables on the following pages, in conjunction with D-Nav on the touch screen itself, a touch screen connected directly to an iLux provides the following functionality:
- Showing bar graphs indicating the current state of all loads on the master iLux
- Adjusting the level of each load via up/down buttons
- Recalling scenes on the master iLux (room combining determines if additional units are affected)
• Programming scenes on the master iLux
• Adjusting shades on the master iLux
A button link to the engraver software is provided in iLux Designer for any touch screen that is engravable.
Using iLux Designer, only the hard buttons for the selected touch screen can be programmed. The command list is identical to that for keypads. All soft buttons on the display shall use dedicated join numbers for various functions.
The iLux Designer help file includes a table indicating all the reserved joins supported by the touch screens.
NOTE: These are not the standard reserved joins, but are the join numbers understood by the CLS-C6 for performing various actions.
Joins
Digital Command Joins
External functions and their feedbacks are only supported by the master iLux. The slave CLS-C6(s) does not support external functions.
Programmable joins 1 through 20 and partition joins and their feedback are only supported for the master CLS-C6.
Digital Command Joins (from Touch Screen to CLS-C6)
| JOIN DESCRIPTION | |
| 1–20 | Programmable via iLux Designer (no feedback) |
| 100/101/102–116 | Recall for Off Scene/On Scene/ Scene 1–15 |
| 133/134–148 | Turn off loads in On Scene/ Scene 1–15 |
| 198/199–213 | Toggle On Scene/Scene 1–15 |
| 232–243 | Raise/Lower load 1–6 (z1 up, z1 dn, z2 up...) |
| 244 Shade group 1 full open | |
| 245 Shade group 1 full close | |
| 246 | Shade group 1 full stop |
| 247 Shade group 1 open momentary | |
| 248 Shade group 1 close momentary | |
| 249 Shade group 1 open jog | |
| 250 Shade group 1 close jog | |
| 251 | Shade group 1 full open /momentary open |
| 252 | Shade group 1 full close /momentary close |
| 253 | Shade group 1 full open/stop/close/stop |
| 254–263 | Shade group 2 control |
| 264–273 | Shade group 3 control |
| 274–283 | Shade group 4 control |
| 284–293 | Shade group 5 control |
| 294–303 | Shade group 6 control |
| 304 Last Scene Master Raise | |
| 305 Last Scene Master Lower | |
| 306/307 | All Lights Master Raise/Master Lower |
| 308/309 | On Scene Master Raise/Master Lower |
| 310/311...338/339 | Scene 1 Raise/Lower ... Scene 15 Raise/Lower |
| 344 | Quick save current light levels to scene specified in analog join 32 (no change to unaffected loads). |
| 348/349 | Program On Scene/Off Scene |
| 351 Save Edit Scene | |
| 352 Cancel Scene Programming | |
| 353-358 | Remove load 1–6 from Edit Scene |
| 359-364 | Remove shade group 1–6 from Edit Scene |
| 365 Lock Edit Scene | |
| 366 Unlock Edit Scene | |
| 367 Fade time up for Edit Scene | |
| 368 Fade time down for Edit Scene | |
| 370 Enable occupancy reporting | |
| 374 Enable entry scene | |
| 375 Disable entry scene | |
| 378 Enable exit scene | |
| 379 Disable exit scene | |
| 384 | Internal sensor timeout minute up |
| 385 | Internal sensor timeout minute down |
| 390–421 | External Functions 1..32 |
| 423 | Enter Override mode |
| 424 | Exit Override mode |
| 426 | Enter Load Shed mode |
| 427 | Exit Load Shed mode |
| 430–566 | Set partition 1–36 open |
| 470–505 | Set partition 1–36 closed |
| 506 Photocell enable light zone 1 | |
| 507 Photocell enable light zone 2 | |
| 508 Photocell enable light zone 3 | |
| 509 Photocell enable light zone 4 | |
| 510 Photocell enable light zone 5 | |
| 511 Photocell enable light zone 6 | |
| 512 Photocell disable light zone 1 | |
| 513 Photocell disable light zone 2 | |
| 514 Photocell disable light zone 3 | |
| 515 Photocell disable light zone 4 | |
| 516 Photocell disable light zone 5 | |
| 517 Photocell disable light zone 6 | |
| 518 | Photocell sensitivity level up light zone 1 |
| 519 | Photocell sensitivity level up light zone 2 |
| 520 | Photocell sensitivity level up light zone 3 |
| 521 | Photocell sensitivity level up light zone 4 |
| 522 | Photocell sensitivity level up light zone 5 |
| 523 | Photocell sensitivity level up light zone 6 |
| 524 | Photocell sensitivity level down light zone 1 |
| 525 | Photocell sensitivity level down light zone 2 |
| 526 | Photocell sensitivity level down light zone 3 |
| 527 | Photocell sensitivity level down light zone 4 |
| 528 | Photocell sensitivity level down light zone 5 |
| 529 | Photocell sensitivity level down light zone 6 |
| 530 | Photocell dim min level up light zone 1 |
| 531 | Photocell dim min level up light zone 2 |
| 532 | Photocell dim min level up light zone 3 |
| 533 | Photocell dim min level up light zone 4 |
| 534 | Photocell dim min level up light zone 5 |
| 535 | Photocell dim min level up light zone 6 |
| 536 | Photocell dim min level down light zone 1 |
| 537 | Photocell dim min level down light zone 2 |
| 538 | Photocell dim min level down light zone 3 |
| 539 | Photocell dim min level down light zone 4 |
| 540 | Photocell dim min level down light zone 5 |
| 541 | Photocell dim min level down light zone 6 |
| 542 Photocell response time up | |
| 543 | Photocell response time down |
| 544 Get Photocell level | |
| 550–1099 | Same as joins 100–499 and 506–541 but for CLS-C6 Slave 1 |
| 1100–1649 | Same as joins 100–499 and 506–541 but for CLS-C6 Slave 2 |
| 1650–2199 | Same as joins 100–499 and 506–541 but for CLS-C6 Slave 3 |
| 2200–2749 | Same as joins 100–499 and 506–541 but for CLS-C6 Slave 4 |
| 2750–3299 | Same as joins 100–499 and 506–541 but for CLS-C6 Slave 5 |
| 3300–3840 | Same as joins 100–499 and 506–541 but for CLS-C6 Slave 6 |
| 3850–4391 | Same as joins 100–499 and 506–541 but for CLS-C6 Slave 7 |
| 4400–4941 | Same as joins 100–499 and 506–541 but for CLS-C6 Slave 8 |
Digital Feedback Joins
Digital Feedback Joins (from CLS-C6 to Touch Screen)
| JOIN DESCRIPTION | |
| 6000/6001/6002–6017 | Recalling Off Scene/On Scene/Scene 1–15 |
| 6033/6034–6049 | Turning off all loads in On Scene/Scene 1–15 |
| 6065/6066/6067–6082 | Scene selected feedback for Off Sc./On Sc./Scene 1–15 |
| 6098/6099–6114 | Any light on for On Scene/Scene 1–15 |
| 6132 Load 1 is on | |
| 6134 Load 2 is on | |
| 6136 Load 3 is on | |
| 6138 Load 4 is on | |
| 6140 Load 5 is on | |
| 6142 Load 6 is on | |
| 6144-6149 | Load 1-6 is set to be non-dim |
| 6150/6151/6152 | Shade group 1 moving/last dir. Open/last dir. Close |
| 6160/6161/6162 | Shade group 2 moving/last dir. Open/last dir. Close |
| 6170/6171/6172 | Shade group 3 moving/last dir. Open/last dir. Close |
| 6180/6181/6182 | Shade group 4 moving/last dir. Open/last dir. Close |
| 6190/6191/6192 | Shade group 5 moving/last dir. Open/last dir. Close |
| 6200/6201/6202 | Shade group 6 moving/last dir. Open/last dir. Close |
| 6205/6206 | Last Scene Master Raise/Lower feedback |
| 6207/6208 | All Lights Master Raise/Lower feedback |
| 6209/6210 | On Scene Master Raise/Lower feedback |
| 6211-6240 | Scene 1-15 Master Raise/Lower feedback |
| 6245 In Setup mode | |
| 6248 Programming the On Scene | |
| 6249 Programming the Off Scene | |
| 6250 Programming Scene by number | |
| 6254-3959 | Lighting load 1-6 is in Edit Scene |
| 6260-6265 | Shade group 1-6 is in Scene |
| 6266 Edit Scene is locked | |
| 6269 Fade time shown is in minutes | |
| 6270 Motion activity | |
| 6271 Function activity | |
| 6272 Current occupancy state | |
| 6274 Entry scene enabled | |
| 6278 Exit scene enabled | |
| 6280-6311 | Not supported (note: external button fb is sent at same join number) |
| 6312 | In Override mode |
| 6313 | In Load Shed mode |
| 6320-6355 | Partition 1-36 is open (rooms are combined) |
| 6358 | Photocell enable feedback light zone 1 |
| 6359 | Photocell enable feedback light zone 2 |
| 6360 | Photocell enable feedback light zone 3 |
| 6361 | Photocell enable feedback light zone 4 |
| 6362 | Photocell enable feedback light zone 5 |
| 6363 | Photocell enable feedback light zone 6 |
| 6364 | Photocell active feedback light zone 1 |
| 6365 | Photocell active feedback light zone 2 |
| 6366 | Photocell active feedback light zone 3 |
| 6367 | Photocell active feedback light zone 4 |
| 6368 | Photocell active feedback light zone 5 |
| 6369 | Photocell active feedback light zone 6 |
| 6400–6799 | Same as joins 6000–6355 but from Slave 1 --> touch screen |
| 6800–7199 | Same as joins 6000–6355 but from Slave 2 --> touch screen |
| 7200–7599 | Same as joins 6000–6355 but from Slave 3 --> touch screen |
| 7600–7999 | Same as joins 6000–6355 but from Slave 4 --> touch screen |
| 8000–8399 | Same as joins 6000–6355 but from Slave 5 --> touch screen |
| 8400–8799 | Same as joins 6000–6355 but from Slave 6 --> touch screen |
| 8800–8199 | Same as joins 6000–6355 but from Slave 7 --> touch screen |
| 9200–9599 | Same as joins 6000–6355 but from Slave 8 --> touch screen |
Analog Command Joins
Analog Command Joins (from Touch Screen to CLS-C6)
| JOIN DESCRIPTION | |
| 1 | Bitmask to subscribe to slave messages (bit1=slave 1, etc.) |
| 20–25 | Set level for lighting zone 1–6 |
| 26–31 | Set position for shade group 1–6 (Somfy shades only) |
| 32 | Set scene number for "Program Scene By Number" |
| 33 | Set occupancy timeout, hours (ignored?) |
| 34 Set occupancy timeout, minutes | |
| 40–59 | Same as joins 20–39 for slave 1 |
| 60–79 | Same as joins 20–39 for slave 2 |
| 80–99 | Same as joins 20–39 for slave 3 |
| 100–119 | Same as joins 20–39 for slave 4 |
| 120–139 | Same as joins 20–39 for slave 5 |
| 140–159 | Same as joins 20–39 for slave 6 |
| 160–179 | Same as joins 20–39 for slave 7 |
| 180–199 | Same as joins 20–39 for slave 8 |
Analog Feedback Joins
Analog Feedback Joins (from CLS-C6 to Touch Screen)
| JOIN DESCRIPTION | |
| 20–25 | Current light levels for loads 1–6 |
| 26–31 | Current position for shade group 1–6 (Somfy shades only) |
| 300 | Bitmask indicating which slaves are connected (b1=slave1...) |
| 332 | Fade time for Edit Scene when in Program mode |
| 333 | Edit Scene number when in Program mode |
| 334 | Occupancy timeout hours (should always be 0) |
| 335 Occupancy timeout minutes | |
| 40–59, 340–359 | Same as joins 20–39, 300–339 for slave 1 |
| 60–79, 360–379 | Same as joins 20–39, 300–339 for slave 2 |
| 80–99, 380–399 | Same as joins 20–39, 300–339 for slave 3 |
| 100–119, 400–419 | Same as joins 20–39, 300–339 for slave 4 |
| 100–119, 400–419 | Same as joins 20–39, 300–339 for slave 4 |
| 120–139, 420–439 | Same as joins 20–39, 300–339 for slave 5 |
| 140–159, 440–459 | Same as joins 20–39, 300–339 for slave 6 |
| 160–179, 460–479 | Same as joins 20–39, 300–339 for slave 7 |
| 180–199, 480–499 | Same as joins 20–39, 300–339 for slave 8 |
| 500 | Photocell sensitivity level feedback light zone 1 |
| 501 | Photocell sensitivity level feedback light zone 2 |
| 502 | Photocell sensitivity level feedback light zone 3 |
| 503 | Photocell sensitivity level feedback light zone 4 |
| 504 | Photocell sensitivity level feedback light zone 5 |
| 505 | Photocell sensitivity level feedback light zone 6 |
| 506 Photocell level feedback | |
| 507 | Photocell Dim min level feedback light zone 1 |
| 508 | Photocell Dim min level feedback light zone 2 |
| 509 | Photocell Dim min level feedback light zone 3 |
| 510 | Photocell Dim min level feedback light zone 4 |
| 511 | Photocell Dim min level feedback light zone 5 |
| 512 | Photocell Dim min level feedback light zone 6 |
| 513 | Photocell response time feedback |
| 520–539 | Same as joins 500–512, but for CLS-C6 slave 1 |
| 540–559 | Same as joins 500–512, but for CLS-C6 slave 2 |
| 560–579 | Same as joins 500–512, but for CLS-C6 slave 3 |
| 580–599 | Same as joins 500–512, but for CLS-C6 slave 4 |
| 600–619 | Same as joins 500–512, but for CLS-C6 slave 5 |
| 620–639 | Same as joins 500–512, but for CLS-C6 slave 6 |
| 640–659 | Same as joins 500–512, but for CLS-C6 slave 7 |
| 660–679 | Same as joins 500–512, but for CLS-C6 slave 8 |
Bidirectional Serial Joins
Bidirectional Serial Joins (to/from CLS-C6 and Touch Screen)
| JOIN DESCRIPTION | |
| 1–16 | Scene 1–16 name as defined in iLux Designer |
| 101–106 | Lighting load 1–6 names as defined in iLux Designer |
| 111–116 | Shade group 1–6 names as defined in iLux Designer |
| 121 | Password as defined in iLux Designer |
| 131 | Photocell response time feedback string |
| 331 | Photocell response time feedback string for slave 1 |
| 531 | Photocell response time feedback string for slave 2 |
| 731 | Photocell response time feedback string for slave 3 |
| 931 | Photocell response time feedback string for slave 4 |
| 1131 | Photocell response time feedback string for slave 5 |
| 1331 | Photocell response time feedback string for slave 6 |
| 1531 | Photocell response time feedback string for slave 7 |
| 1731 | Photocell response time feedback string for slave 8 |
| 200–220 | Same as 1–120 for slave 1 |
| 400–520 | Same as 1–120 for slave 2 |
| 600–720 | Same as 1–120 for slave 3 |
| 800–820 | Same as 1–120 for slave 4 |
| 1000–1020 | Same as 1–120 for slave 5 |
| 1200–1220 | Same as 1–120 for slave 6 |
| 1400–1420 | Same as 1–120 for slave 7 |
| 1600–1620 | Same as 1–120 for slave 8 |
Appendix B: Console Commands
Console commands are available through the Crestron Toolbox program.
- Select Text Console from the Tools menu.
- At the prompt, enter HELP ALL and press Return. The system displays the following:
iLux>HELP ALL
? display list of common commands
CNETID display or set the cresnet id
GETCONFIG get project file from iLux
GREENLEDLEVEL display or set the green leds brightness level
HELP display list of available categories
INFO display additional device information
IR display or enable/disable IR reception
MOTIONSENSORLEVEL display/change the internal motion sensor level threshold
PROJECTINFO display detailed project file information
PUTCONFIG load project file to iLux
REBOOT reboot the iLux
REPORTCRESNET show all devices on the local network
RESTORE set all parameters to factory default
SYSTEM load firmware to iLux
UPLOAD load firmware to cresnet device on the local network
VERSION display firmware version number
WHITELEDLEVEL display or set white leds brightness level
WHITELEDGLOWLEVEL display or set white leds glow brightness level
iLux>
The commands are presented alphabetically below. Details about each command include a description of the command, a list of help menus that contain the command, the proper syntax for entering the command, and definitions of parameters that may be included in the syntax. Note that console commands are case insensitive.
?
Description: This command produces a list of the most used common commands.
Help Menu(s): Main, Common
Syntax: ?
Parameters: None
CNETID
Description: Use this command to set or display the Cresnet ID of the CLS-C6 as a slave device.
Help Menu(s): System, Common
Syntax: CNETID [ID] CNETID
Parameters: [03...FE] to set the ID
None to display the current ID
GETCONFIG
| Description: | Use this command to get project file information from the CLS-C6. |
| Help Menu(s): File | |
| Syntax: | GETCONFIG PROJECT |
| Parameters: | PROJECT to get the project file from iLux |
GREENLEDLEVEL
| Description: | Use this command to display or set the green LED level on the CLS-C6. Refer to “LED Brightness” on page 27 for details. |
| Help Menu(s): Device | |
| Syntax: | GREENLEDLEVEL [0..100] set the green LED’s brightness to level [0..100]GREENLEDLEVEL display the green LED’s brightness level [0..100] |
| Parameters: | [0..000] to set the green LED brightness levelNone to display the current green LED brightness |
HELP
| Description: | Use this command to display a list of help categories. |
| Help Menu(s): | Main, Common |
| Syntax: | HELPHELP ALLHELP [CATEGORY] show list of commands in category |
| Parameters: | ALL to display a list of all commandsCATEGORY to show a list of commands in that categoryNone to display a list of all categories |
INFO
| Description: | Use this command to display additional device information. For example, this command would produce information similar to the following: |
| Application version : 1.01.02 | |
| Loader version : 1.16.00 | |
| Config data version : 1.1 | |
| User data version : 1.0 |
Help Menu(s): Common, System
Syntax: INFO
Parameters: None
IR
| Description: | Use this command to display or enable/disable IR reception. Refer to “IR Reception” on page 25 for details. |
Help Menu(s): Device
| Syntax: | IR [ENABLE...DISABLE] |
| Parameters: | ENABLE to enable the IR receiver DISABLE to disable the IR receiver None to display the current state |
MOTIONSENSORLEVEL
| Description: | Use this command to display and change the internal motion sensor sensitivitylevel.* |
| Help Menu(s): | Device |
| Syntax: | MOTIONSENSORLEVEL |
| Parameters: | Higher values make motion sensor less sensitive. Default is 78; valid range is [0...255] |
PROJECTINFO
| Description: Use this command to display the project file name, the date and time it was compiled, version and change flags. For example, this command would produce information similar to the following: Project file name : Conference Room.ilx Date : 9/9/05 Time : 3:13:21 PM Config data version : 1.1 User data version : 1.0 Change flags : 00000000 |
Help Menu(s): Device
Syntax: PROJECTINFO
Parameters: None
PUTCONFIG*
| Description: | Use this command to load the project file to the CLS-C6 |
| Help Menu(s): File | |
| Syntax: | PUTCONFIG PROJECT |
| Parameters: | PROJECT is the only valid parameter value |
REBOOT
| Description: | Use this command to reboot the CLS-C6 |
| Help Menu(s): | Common |
| Syntax: | REBOOT |
| Parameters: None | |
REPORTCRESNET
| Description: | Use this command to report devices on the local network |
| Help Menu(s): | Common |
| Syntax: | REPORTCRESNET [ID]REPORTCRESNET ALL |
| Parameters: | [03...FE] to identify a specific deviceALL to show all devices on the network |
RESTORE
| Description: | Use this command to set all project configuration and parameters to the factory default settings. |
| Help Menu(s): System | |
| Syntax: | RESTORE ALL |
| Parameters: | ALL is the only valid value for this parameter |
SYSTEM*
| Description: | Use this command to load firmware to the CLS-C6. |
| Help Menu(s): File | |
| Syntax: | SYSTEM |
| Parameters: None |
UPLOAD*
| Description: | Use this command to load firmware to the slave device on the local network. |
| Help Menu(s): File | |
| Syntax: | UPLOAD [ID] FIRMWARE |
| Parameters: | [03...FE]FIRMWARE is the only valid value for this parameter |
VERSION
| Description: | Use this command to display the firmware version number. For example, this command would produce information similar to the following:CLS-C6M Lighting Controller with Motion[v1.00.04, #FFFD6899] |
| Help Menu(s): | Common |
| Syntax: | VERSION |
| Parameters: None | |
WHITELEDLEVEL
| Description: | Use this command to display or set white LEDs brightness level. Refer to “LED Brightness” on page 26 for details. |
| Help Menu(s): | Device |
| Syntax: | WHITELEDLEVEL [nnn]WHITELEDLEVEL |
| Parameters: | [0...100] to set brightness levelNone to display current brightness level |
WHITELEDGLOWLEVEL
| Description: | Use this command to display or set white LEDs glow brightness level. Refer to “Glow Mode Brightness” on page 27 for details. |
| Help Menu(s): | Device |
| Syntax: | WHITELEDGLOWLEVEL [nnn]WHITELEDGLOWLEVEL |
| Parameters: | [0...100] to set glow levelNone to display current glow level |
Appendix C: RS-232 Commands
Connect the third party controller to the serial port of the C2N-IO. Connect the C2N-IO to the CLS-C6s Local Devices - G Z Y 24. ASCII commands received by the serial converter module are sent to the CLS-C6 slave Cresnet port. The CLS-C6 Cresnet serial packets are forwarded as ASCII strings to the third party controllers.
Only one C2N-IO device is allowed on the local Cresnet network. The Cresnet ID for the C2N-IO should be set to 00 so that the iLux can assign D5 when auto-discovery is run.
NOTE: When connecting the C2N-IO serially to the PC ensure proper wiring. The Tx pin of the C2N-IO serial connector must connect to the Rx pin of the serial connector on a PC. Additionally, the Rx pin of the C2N-IO serial connector must connect to the Tx pin of the serial connector on a PC, and then ground.
NOTE: If the PC is connected to the CLS-C6 and the C2N-IO (serially) at the same time, then choose a different port for the C2N-IO since the serial connection is not shared (COM1, COM2, ... COM6). This can be performed in the Crestron Toolbox Address Book when selecting the communications settings for the C2N-IO.
Command Format
All packets from the third party equipment shall be in ASCII character set range 0 to 127. Extended ASCII characters higher than 127 are not supported. All command and reply packets for the third party controller between the CLS-C6 and C2N-IO devices are in Cresnet serial packet type 0x12 format. The serial packet payload contains the ASCII command or reply strings from the third party controllers.
Serial Port Configuration Packet to C2N-IO
| CRESNET ID | LENGTH | CMD STRING | NUMBER | PAYLOAD DATA 0..X |
| 1-Byte | 1-Byte | 1-Byte | 1-Byte | x-Bytes |
| XX | 07 | 12 | 80 | 00 25 00 00 00 |
Refer to the “Cresnet II Packet” document for more information on this command.
Serial Packets Between CLS-C6 and C2N-IO
| CRESNET ID | LENGTH | CMD STRING | NUMBER | PAYLOAD DATA 0..X |
| 1-Byte | 1-Byte | 1-Byte | 1-Byte | x-Bytes |
| XX | LL | 0x12 | 0x80 | 00..XX |
Refer to the Cresnet protocol specifications for more details on this packet.
Serial Command String Format to Third Party Controllers.
| ILUX CONTROLLER | COMMAND | PAR1...X | CARRIAGE RETURN | LINE FEED |
| Refer to the “iLux Controller Code Table” below for a list of available options. | Refer to the “RS-232 Command Table” on the following page which provides a description of available commands and the required syntax. | A list of available variables that can be entered into the command. The brackets should be removed from the command.[Par1][......][Parx] | 0Dh 0Ah |
Serial Command String Format From Third Party Controllers.
| STATUS | NUM CARRIAGE | LINE FEED | |
| RETURN | |||
| Response packet type 1This response packet is returned if command fails or is invalid | |||
| ERROR X=ErrorCode | 0Dh 0Ah | ||
| Response Packet Type 2This response packet is returned if command requires status or reply packet from the controller | |||
| Response Par1-Parx 0Dh | 0Ah | ||
| Response Packet Type 3This response packet is returned if there was no packet error and a status or reply packet response is not required | |||
| OK | 0Dh 0Ah | ||
iLux Controller Code Table
| CONTROLLER CODES | DESCRIPTION |
| M | Commands the iLux Master Controller |
| S1S8 | Commands the iLux Slave Controller 1 through 8 |
When entering a command to control the iLux replace [ILUX] in the "RS-232 Command Table" with the specified controller code listed in the "iLux Controller Code Table" above. Possible entries are: M, S1, S2, S3, S4, S5, S6, S7, or S8.
Refer to the following "RS-232 Command Table" for a list of possible commands that can be sent to the CLS-C6. Information contained within braces (e.g. [ILUX] or [X|ALL]) should be replaced with the appropriate command minus the braces. To turn the echo command on for a master controller ([ILUX] ECHO ON|OFF) enter M ECHO ON.
When a lighting load is declared as unaffected in iLux Designer, the text console reports “--” as the value.
RS-232 Command Table
| COMMAND | SYNTAX | REPLY | |
| DESCRIPTION CATEGORY | |||
| Control Echo Cmd | [ILUX] ECHO ON|OFF | ||
| Light zone Control | Set Light zone Level | [ILUX] LZ [X|ALL] LVL [LEVEL] [FADETIME] | |
| Light zone Control | Get Light zone Level | [ILUX] LZ [X|ALL] LVL ? [ILUX] LZ [X|ALL] LVL [LEVEL1] [...] [LEVEL6] | |
| Light zone Control | Raise Light zone | [ILUX] LZ [X|ALL] UP [FADERATE] | |
| Light zone Control | Lower Light zone | [ILUX] LZ [X|ALL] DN [FADERATE] | |
| Light zone Control | Stop Light zone | [ILUX] LZ [X|ALL] STOP | |
| Light zone Control | Light zone toggle | [ILUX] LZ [X|ALL] TOG [FADERATE] | |
| Light zone programming | Read Light zone type | [ILUX] LZ [X|ALL] TYPE ? | |
| Light zone programming | Read Light zone min level | [ILUX] LZ [X|ALL] MIN ? | [ILUX] LZ [X|ALL] MIN [LIMIT1] [...] [LIMIT6] |
| Light zone programming | Read Light zone max level | [ILUX] LZ [X|ALL] MAX ? [ILUX] LZ [X|ALL] MAX [LIMIT1] [...] [LIMIT6] | |
| Light zone programming | Read Light zone names | [ILUX] LZ [X] NAME ? [ILUX] LZ [X] NAME [LABEL] | |
| Shade group Control | Set Shade group position | [ILUX] SZ [X|ALL] POS [LEVEL] | |
| Shade group Control | Get Shade group position | [ILUX] SZ [X|ALL] POS ? | [ILUX] SZ [X|ALL] POS [LEVEL1] [...] [LEVEL6] |
| Shade group Control | Shade group Open | [ILUX] SZ [X|ALL] OPEN | |
| Shade group Control | Shade group Close | [ILUX] SZ [X|ALL] CLOSE | |
| Shade group Control | Shade group Stop | [ILUX] SZ [X|ALL] STOP | |
| Shade group Control | Jog Shade open | [ILUX] SZ [X|ALL] JOPEN | |
| Shade group Control | Jog Shade Close | [ILUX] SZ [X|ALL] JCLOSE | |
| Shade group Control | Open/Stop/Close/Stop | [ILUX] SZ [X|ALL] OSCS | |
| Shade Group programming | Read Shade name | [ILUX] SZ [X] NAME ? | [ILUX] SZ [X] NAME [LABEL] |
| Shade Group programming | Read shade type | [ILUX] SZ [X|ALL] TYPE ? [ILUX] SZ [X] TYPE [CODE] | |
| Scene Control Scene recall | [ILUX] SC [XX] RECALL | ||
| Scene Control Scene Raise | [ILUX] SC [XX] UP | ||
| Scene Control Scene Lower | [ILUX] SC [XX] DN | ||
| Scene Control Stop | scene raise/lower | [ILUX] SC [XX] STOP | |
| Scene Control Toggle | scene | [ILUX] SC [XX] TOG | |
| Scene Control Turn | off lights in scene | [ILUX] SC [XX] OFF | |
| Scene Control Read | Scene state Active | [ILUX] SC [XX|ALL] STATE ? | [ILUX] SC [XX] [LZx] [LVL] [LEVEL] |
| Scene programming | Scene quick save | [ILUX] SC [XX] SAVE | |
| Scene programming | Read Scene light level | [ILUX] SC [XX] LZLVL ? | [ILUX] SC [XX] LZLVL [LEVEL1] [...] [LEVEL6] |
| Scene programming | Read Scene shade level | [ILUX] SC [XX] SZLVL ? [ILUX] SC [XX] SZLVL [LEVEL1] [...] [LEVEL6] | |
| Scene programming | Set scene light mask | [ILUX] SC [XX] LZMSK [VALUE] | |
| Scene programming | Read scene light mask | [ILUX] SC [XX] LZMSK ? | [ILUX] SC [XX] LZMSK [VALUE] |
| Scene programming | Set scene shade mask | [ILUX] SC [XX] SZMSK [VALUE] | |
| Scene programming | Read scene shade mask | [ILUX] SC [XX] SZMSK ? [ILUX] SC [XX] SZMSK [VALUE] | |
| Scene programming | Read scene name | [ILUX] SC [XX] NAME ? | [ILUX] SC [XX] NAME [LABEL] |
| Combine / Uncombined | Combine rooms | [ILUX] COM [ILUX1] [ILUX2] | |
| Combine / Uncombined | Uncombined rooms | [ILUX] UNCOM [ILUX1] [ILUX2] | |
| Combine / Uncombined | Combine room status | [ILUX] COM ? [ILUX] COM [ILUX1/ILUX2 [...] [ILUXx/ILUXy] | |
| Override control Set override | [ILUX] OV ON | ||
| Override control Clear override | [ILUX] OV OFF | ||
| Override control Read override state | [ILUX] OV ? [ILUX] [OV] [STATE] | ||
| Load shed control Set Load shed state | [ILUX] LS ON | ||
| Load shed control Clear Load shed state | [ILUX] LS OFF | ||
| Load shed control Get Load Shed state | [ILUX] LS ? | [ILUX] [LS] [STATE] | |
| Occupancy | Set occupancy | [ILUX] OC [SET|CLEAR] | |
| Occupancy | Clear occupancy | [ILUX] OC [SET|CLEAR] | |
| Occupancy Read | occupancy state | [ILUX] OC ? [ILUX] OC [STATE] | |
| Photocell Read | Photocell active state | [ILUX] PH [X|ALL] ACTIVE ? | [ILUX] PH [X] ACTIVE [STATE1] [...] [STATE6] |
| Version Read version number | [ILUX] VER ? [ILUX] VER [ID STRING] | ||
NOTE: Command and response parameters are separated by blank spaces.
Adding C2N-IO Device to CLS-C6
To add a C2N-IO module to CLS-C6, connect the module to the CLS-C6 Cresnet slave network port and run auto-discovery from CLS-C6 front panel. CLS-C6 adds the device to its network list. The CLS-C6 then polls and configures the C2N-IO serial port.
The C2N-IO serial port baud rate settings are 9600, 8 data bits, 1 stop bit, XON/XOFF disabled, and RTS/CTS disabled.
Echo Control Command
This command is used to enable/disable character echo.
Syntax: [ILUX] Echo [ON|OFF]
Light Zone Commands
Light Zone Operation Commands
Light Zone Level Command
The following command is used to set the light zone levels:
Syntax: [ILUX] LZ [X|ALL] LVL [LEVEL] [FADETIME]
X = 1-6 light zone
ALL = ALL light zones
FADETIME = 0–594000 in 0.01 second steps (e.g. 100=1 seconds)
Level:
| LEVEL IN PERCENT | DESCRIPTION |
| 0 Level off | |
| 1 to 100 Level On |
Light Zone Level Recall Command
The following command is used to get the light zones level:
Syntax: [ILUX] LZ [X|ALL] LVL?
X = 1-6 light zone
$$ \text { ALL } = \text { ALL Light zones } $$
Reply packet:
$$ [ \text { ILUX } ] \quad \text { LZ } [ \text { X } | \text { ALL } ] \quad \text { LVL } [ \text { LEVEL1 } ] \quad [ \dots ] \quad [ \text { LEVEL6 } ] $$
$$ \text { LEVEL } x = 0 - 1 0 0 \text {(for light zone 1 through 6)} $$
Light Zone Lower or Raise Command
The specified lighting load (or all loads) ramps up or down at the specified rate. The FADERATE is specified as the time it takes to raise or lower the full range (from full off to full on or full on to full off). For example, if 5 seconds are specified, it takes 5 seconds to ramp from off to full on and 2.5 seconds to ramp from 50% level to full on. If FADERATE is not specified, or if the specified zone is on a slave iLux unit, the internal fade rate is used.
Syntax: [ILUX] LZ [X|ALL] [UP|DN] [FADERATE]
$$ \mathrm{X} = 1 - 6 \text { light zone } $$
$$ \mathrm{ALL} = \text { All Light zones } $$
$$ \mathrm{UP} = \text { Raise light level } $$
$$ \mathrm{DN} = \text { Lower light level } $$
$$ \text { FADERATE } = 0 - 5 9 4 0 0 0 \text { in } 0. 0 1 \text { second steps (e.g. } 1 0 0 = 1 \text { seconds) } $$
Light Zone Stop Command
The following command is used to stop the light zone control:
Syntax: [ILUX] LZ [X|ALL] [STOP]
$$ \mathrm{X} = 1 - 6 \text { light zone } $$
$$ \mathrm{ALL} = \text { All Light zones } $$
$$ \text { STOP } = \text { Stop light level } $$
Light Zone Toggle Command
If the specified lighting load is on (or any zone is on, when “all” is specified), the lighting load ramps down at the specified rate. If the specified lighting load is off (or all zones are off, when “all” is specified), the lighting load ramps up at the specified rate. The FADERATE is specified as the time it takes to raise or lower the full range (from off to full on or from full on to off. For example, if 5 seconds are specified, it takes 5 seconds to ramp from off to full on and 2.5 seconds to ramp from 50% level to full on. If FADERATE is not specified, the internal fade rate will be used.
Syntax: [ILUX] LZ [X|ALL] TOG [FADERATE]
$$ X = 1 - 6 \text { light zone } $$
$$ \mathrm{ALL} = \text { All light zones } $$
$$ \text { FADERATE } = 0 - 5 9 4 0 0 0 \text { in } 0. 0 1 \text { second steps (e.g. } 1 0 0 = 1 \text { seconds) } $$
Light Zone Programming Commands
Light Zone Lower Limit Command
The following command is used to get light zone min limit. This command is not supported for slave CLS-C6 controllers:
Syntax: M LZ [X|ALL] MIN ?
$$ \mathrm{X} = 1 - 6 \text { light zone } $$
$$ \mathrm{ALL} = \text { All light zones } $$
Reply packet:
$$ [ \text { ILUX } ] \quad \text { LZ } \quad [ \text { XX } | \text { ALL } ] \quad \text { MIN } \quad [ \text { LIMIT1 } ] \quad [ \dots ] \quad [ \text { LIMIT6 } ] $$
$$ \text { LIMITx } = 0 - 1 0 0 \text {(for light zone 1 through 6)} $$
Light Zone Upper Limit Command
The following command is used to get light zone maximum limit. This command is not supported for slave CLS-C6 controllers:
$$ \text { Syntax: M LZ [X|ALL] MAX? } $$
$$ X = 1 - 6 \text { light zone } $$
Reply packet:
$$ \mathrm{M} \quad \mathrm{LZ} [ \mathrm{X} | \text {ALL} ] [ \text {MAX} ] [ \text {LIMIT1} ] [ \dots ] [ \text {LIMIT6} ] $$
$$ \text { LIMITx } = 0 - 1 0 0 \text {(for light zone 1 through 6)} $$
Light Zone Load Type Command
The following command is used to get load types. This command is not supported for slave CLS-C6 controllers:
$$ \text { Syntax: M LZ [X|ALL] TYPE ? } $$
$$ \mathrm{X} = 1 - 6 \text { light zone } $$
Reply packet:
$$ \text { M LZ } [ \text { X|ALL } ] \text { TYPE } [ \text { CODE1 } ] [ \dots ] [ \text { CODE6 } ] $$
$$ \text { CODEx } = \text { refer to table below (type code for light zone through 6): } $$
Light Zone Load Type Codes
| SUPPORTED TYPES CODE | DESCRIPTION |
| 0 Unused | |
| 1 Non-dim | |
| 2 Incandescent | |
| 3 Magnetic low voltage | |
| 4 Cold Cathode | |
| 5 Fluorescent 2 wire | |
| 6 Fluorescent 3 wire | |
| 7 Fluorescent 0-10 V | |
| 8 Electronic Low Voltage |
Light Zone Name Query Command
The following command is used to read light zone name:
$$ \text { Syntax: [ILUX] LZ [X|ALL] NAME? } $$
$$ \mathrm{X} = 1 - 6 \text { light zone } $$
Reply packet:
$$ [ \text { ILUX } ] \text { LZ } [ \text { X } ] \text { NAME } [ \text { LABEL } ] $$
$$ \text { LABEL } = \text { Light zone name } $$
[ILUX] LZ ALL NAME [LABEL1], [...], [LABEL6]
LABELx = Light zone names separated by comma
Shade Group Commands
Shade Group Operation Commands
Shade Group Position Command
The following command is used to set shade group position:
Syntax: [ILUX] SZ [X|ALL] POS [LEVEL]
X = 1–6 Shade group
ALL = All Shade groups
LEVEL = 0-100
Shade Group Position Query Command
The following command is used to get shade group position. This command is not supported for slave CLS-C6 controllers and is applicable for Somfy ^® shades only:
Syntax: M SZ [X|ALL] POS ?
Reply packet:
M SZ [X|ALL] POS [LEVEL1] [...] [LEVEL6]
LEVELx = 0–100 for shade group 1–6
Shade Group Open, Close, and Stop Command
The following command is used to open, close, or stop shade group(s):
Syntax: [ILUX] SZ [X|ALL] [OPEN|CLOSE|STOP]
X = 1-6 Shade group
ALL = All shade groups
Shade Group Jog Open and Close Command
The following command is used to jog open or jog close the shade group(s):
Syntax: [ILUX] SZ [X|ALL] [JOPEN|JCLOSE]
X = 1-6 Shade group
ALL = All shade groups
Shade Group Open/Stop/Close/Stop Command
The following command is used to stop shade if running, open shade if last operation was closing, and close if last time operation was opening:
Syntax: [ILUX] SZ [X|ALL] [OSCS]
X = 1-6 Shade group
ALL = All shade groups
Shade Group Programming Commands
Shade Group Name Query Command
The following command is used to query shade group name:
Syntax: [ILUX] SZ [X|ALL] NAME ?
X=1-6 Shade group
Reply packet:
[ILUX] SZ [X] NAME [LABEL]
LABEL = Shade zone name
[ILUX] SZ ALL NAME [LABEL1], [...], [LABEL6]
LABELx = Shade group names separated by comma
Shade Type Query Command
The following command is used to query shade type. Command is not supported for slave CLS-C6 devices.
Syntax: M SZ [X|ALL] TYPE ?
X = 1-6 Shade group
Reply packet:
M SZ [X|ALL] TYPE [CODE1] [...] [CODE6]
CODEx = Shade types codes for shade group 1–6
Shade Type Codes
| CODE SHADE TYPES | |
| 20 Somfy shade controller | |
| 21 | C2N-SDC 4 relay shade controller |
| 22 | C2N-SDC-DC shade controller |
Scene Commands
Scene Operating Commands
Scene Recall
The following command is used to recall a scene:
Syntax: [ILUX] SC [XX] RECALL
Recall Scene Commands
| SCENE NUMBER (XX) | DESCRIPTION |
| ON | On Scene |
| OFF | Off Scene |
| 1–15 | Scene 1–15 |
Scene Raise, Lower, and Stop Command
The following command is used to raise, lower, or stop the scene light zone levels which can use a scene fade time:
Syntax: [ILUX] SC [XX] [UP|DN|STOP]
XX = OFF, ON, 1–15 Scenes
UP = Raise, DN = Lower, STOP = Stop scene raise/lower
Scene Toggle Command
The following command is used to toggle scene lights. Command is not supported for Off scene:
Syntax: M SC [XX] [TOG]
XX = ON, 1–15 Scenes
Scene Turn Off Lights Command
The following command is used to turn off scene lights:
Syntax: [ILUX] SC [XX] OFF
XX = ON, 1–15 Scenes
Scene State Query Command
The following command is used to read scene states. This command is not supported for slave CLS-C6 devices.
Syntax: M SC [XX|ALL] STATE ?
XX = OFF, ON, 1–15 Scenes
Reply packet:
M SC [XX] STATE [S]
S = 1/0 Scene state (1 means scene selected, 0 means scene not selected)
M SC [ALL] STATE [MASK]
MASK = Bit mask Bit0-Bit16
(Bit0 = off scene state, Bit1 = On scene state,
Bit2-Bit16 = Scene1-Scene15)
Scene Programming Commands
Scene Quick Save Command
This command is used to save current light levels for selected scene:
Syntax: [ILUX] SC [XX] SAVE
XX = ON, 1–15 Scenes
Scene Query Light Zone Level Command
This command is used to read light level in scenes. This command is not supported for slave CLS-C6 devices.
Syntax: M SC [XX] LZLVL ?
XX = OFF, ON, 1–15 (Scenes)
Reply packet:
M SC [XX] LZLVL [LEVEL1] [...] [LEVEL6]
LEVELx = 0–100 for light zone1 through light zone6
Scene Query Shade Group Level Command
This command is used to read shade level in scenes. This command is not supported for slave CLS-C6 devices.
Syntax: M SC [XX] SZLVL ?
XX = OFF, ON, 1–15 (Scenes)
Reply packet:
M SC [XX] SZLVL [LEVEL1] [...] [LEVEL6]
LEVELx = 0–100 for shade zone1 through shade zone6
Scene Light Add/Remove Mask Command
This command is used to remove or add light zones to scenes. This command is not supported for slave CLS-C6 devices.
Syntax: M SC [XX] LZMSK [VALUE]
XX= OFF, ON, 1–15 (scene)
VALUE=0...63 (1=Add, 0=Remove)
(bit0-bit5=Light zone 1-Light Zone6)
Scene Light Mask Status Command
This command is used to read light mask in scenes. This command is not supported for slave CLS-C6 devices.
Syntax: M SC [XX] LZMSK ?
XX= OFF, ON, 1–15 (Scenes)
Reply packet:
M SC [XX] LZMSK [VALUE]
Scene Shade Mask Command
This command is used to remove or add shade group to scenes. This command is not supported for slave CLS-C6 devices.
Syntax: M SC [XX] SZMSK [VALUE]
XX=OFF, ON, 1–15 (scene)
VALUE=0-63 (1=Add, 0=Remove)
(bit0-bit5=Shade group 1-Shade group6)
Scene Shade Status Command
This command is used to read shade group mask in scenes. Command is not supported for slave iLux.
Syntax: M SC [XX] SZMSK ?
XX= OFF, ON, 1–15 (Scenes)
Reply packet:
M SC [XX] SZMSK [VALUE]
Scene Name Query Command
The following command is used to query scene name:
Syntax: [ILUX] SC [XX] NAME ?
XX = OFF, ON, 1–15 Scenes
Reply packet:
[ILUX] SC [XX] NAME [LABEL]
LABEL=Scene name
Room Combining Commands
Combine Rooms
This command is used to combine room controllers. This command is not supported for slave CLS-C6 devices.
Syntax: M COMBINE [ILUX1] [ILUX2]
ILUXx = M for master, S1–S8 for slaves
Un-combine Rooms
This command is used to un-combine room controllers. This command is not supported for slave CLS-C6 devices.
Syntax: M UNCOMBINE [ILUX1] [ILUX2]
ILUXx = M for master, S1–S8 for slaves
Query Combine Status
This command is used to query room combine status. This command is not supported for slave CLS-C6 devices.
Syntax: M COMBINE [ILUX1] [ILUX2]?
Reply packet:
M COMBINE [STATUS]
[STATUS] = YES/NO
Override Commands
Override On Command
The following command is used to turn on override:
Syntax: [ILUX] OV ON
Override Off Command
The following command is used to turn off override:
Syntax: [ILUX] OV OFF
Override Mode
Override Status Command
The following command reads the override status.
Syntax: [ILUX] OV ?
Reply packet:
[ILUX] [OV] [STATE]
STATE = ON/OFF Override On/Override Off
Load Shed Commands
Load Shed Mode
Load Shed On Command
The following command is used to turn on load shed:
Syntax: [ILUX] LS ON
Load Shed Off Command
The following command is used to turn off load shed:
Syntax: [ILUX] LS OFF
Load Shed Status Command
The following command reads the load shed status:
Syntax: [ILUX] LS ?
Reply packet:
[ILUX] [LS] [STATE]
STATE = ON/OFF Load shed on/Load shed off
Occupancy Commands
Occupancy Operation Commands
Occupancy State Set/Clear Command
The following command is used to set or clear occupancy state. All occupancy sources are ORED together. Command not supported for slave iLux. If master and slave iLux(es) are linked, the occupancy state is forwarded to all iLux units:
Syntax: M OC [SET|CLEAR]
Occupancy State Query Command
The following command is used to query occupancy state:
Syntax: [ILUX] OC ?
Reply packet:
[ILUX] OC [STATE]
STATE = OCCUPIED/UNOCCUPIED
Photocell Commands
Photocell Operation Commands
Photocell Enable Command
The following command is used to query photocell active state:
Syntax: [ILUX] PH [X|ALL] ACTIVE ?
X = 16 light zone
Reply packet:
[ILUX] PH [X] ACTIVE [STATE]
STATE = ON/OFF
[ILUX] PH [ALL] ACTIVE [STATE1] [...][STATE6]
Version Command
The following command is used to query version string. This command is not supported for slave CLS-C6 devices.
Syntax: M VER ?
Reply packet:
M VER CLS-C6M TEST VER [v2.01.02, #12345678]
Appendix D: Factory Default Values
Factory Default Values
| ITEM DEFAULT VALUE | |
| All lighting load types. | Incandescent |
| All Low-End limits | 0% |
| All High-End limits | 100% |
| Function buttons | Recall scenes 1–6 |
| Up/Down button | Lights (Last Scene Master). |
| Occupancy sensing | Off scene on exit - disabledOn scene on entry - disabledTimeout = 30 minutes |
| Photocell | Sensitivity = 50% (All loads)Minimum dim level = 10% (All loads)Response time = 1 min (All loads) |
| Off scene | 2 second fade, no shades. (lighting loads fixed at 0%) |
| On Scene | 2 seconds fade, all 6 lighting loads to 100%, no shades. |
| Scene 1 | 2 seconds fade, all 6 lighting loads to 15%, no shades. |
| Scene 2 | 2 seconds fade, all 6 lighting loads to 30%, no shades. |
| Scene 3 | 2 seconds fade, all 6 lighting loads to 45%, no shades. |
| Scene 4 | 2 seconds fade, all 6 lighting loads to 60%, no shades. |
| Scene 5 | 2 seconds fade, all 6 lighting loads to 75%, no shades. |
| Scene 6 | 2 seconds fade, all 6 lighting loads to 90%, no shades. |
| Scene 7 | 2 seconds fade, all 6 lighting loads to 15%, no shades. |
| Scene 8 | 2 seconds fade, all 6 lighting loads to 30%, no shades. |
| Scene 9 | 2 seconds fade, all 6 lighting loads to 45%, no shades. |
| Scene 10 | 2 seconds fade, all 6 lighting loads to 60%, no shades. |
| Scene 11 | 2 seconds fade, all 6 lighting loads to 75%, no shades. |
| Scene 12 | 2 seconds fade, all 6 lighting loads to 90%, no shades. |
| Scene 13 | 2 seconds fade, all 6 lighting loads to 15%, no shades. |
| Scene 14 | 2 seconds fade, all 6 lighting loads to 30%, no shades. |
| Scene 15 | 2 seconds fade, all 6 lighting loads to 45%, no shades. |
| Scene front panel lockout | All scenes not locked out |
| Raise/Lower on scene recall buttons | Disabled |
| Shade jog time | 0.05 sec |
| Shade max time | 1 minute |
| Shade lockout time 1 sec. | |
| Scene programming | Unlocked for all scenes. |
| Scene mastering | Disabled |
| Manual Fade Rate. | Set to 5 seconds (for full travel) |
| Green LED brightness level | 63 |
| White LED brightness level | 70 |
| White LED glow level | 7 |
The Cresnet ID (default=1F) in the configuration memory is not be affected by the Fd function (unless configuration data is corrupt).
Appendix E: Button Functions
Following is a list of button functions, in table format, one function per table. Each table lists "Behavior," "LED action," "Applies to," "Rocker behavior," and "Notes." Some topics may not apply to certain button types; this is defined in the "Applies to" row.
There are four classes of buttons to be considered:
- Standard Rocker - the six function buttons on the front panel of the CLS-C6, while the CLS-C6 is in Standard mode and the shift flag is not set.
- Shifted Rocker - the same physical buttons as the standard rocker, but are active when the shift flag is set.
- Up/Down Rocker - this is the vertical button on the face of the CLS-C6.
- Remote Button - the single-action (i.e., non-rocker) buttons located on remote keypads.
| FUNCTION NAME | RECALL SCENE (OFF, ON, 1–15) |
| Behavior | Fades specified lights to specified levels in the specified time. (Non-dim loads switch at the beginning or end of the specified time, as determined by the Load Type option for each load.)Also, sends specified shades to specified positions (the time is determined by the motor).Note that the off scene is special in that it cannot specify which lighting loads are affected or what their target levels should be—all lighting loads go to full off (definitely causing air-gap relay to open). Fade time and shade behavior can still be specified. |
| LED action | Flash while lights are actively fading, Scene-interlocked* afterwards. (Note that for Recall Off Scene, LED is on when all lights are off.)*LED goes on when scene is recalled. LED remains on until another scene is recalled (or Lights_in_Scenex_Off is executed) which has overlapping lighting load or shade group programming. That is, a scene which affects at least one common lighting load or shade group. |
| Applies to | Standard Rocker, Shifted Rocker, Remote Button |
| Rocker behavior If | the “Enable Raise/Lower on Scene Recall Buttons” option is set in iLux Designer, the right and left rockers perform “Scene Raise” and “Scene Lower” functions if, and only if, the scene feedback LED for that button is lit.If the “Enable Raise/Lower on Scene Recall Buttons” option is not set, then the right, left, and center press all perform the same function. |
| Notes | The ON and OFF buttons always recall the On and Off scenes, respectively. The assigned functions cannot be changed. |
| FUNCTION NAME | TURN OFF SCENE LIGHTS (ON, 1–15) |
| Behavior | Same as Recall Scene button, excepta) All lights affected by the scene go to off level.b) Shades are not affected.Note that the list of unaffected lighting loads and the fade time are the same as for the Recall Scene function. |
| LED Flash while lights are fading, off when fade is done. | |
| Applies To Remote Button | |
| Rocker Behavior N/A | |
| Notes N/A | |
| FUNCTION NAME | TOGGLE SCENE (ON, 1–15) |
| Behavior | Alternates between “Recall Scene” and “Turn Off Scene Lights” actions for the specified scene. In determining which action should be executed, the CLS-C6 checks the state of all lights programmed in the scene. If any light in the scene is on, this function causes the lights to go off. If all lights in the scene are off, this function recalls the scene. |
| LED Flash while lights are actively fading (either direction). On when any light in scene is on, while not fading. | |
| Applies To | Standard Rocker, Shifted Rocker, Remote Button |
| Rocker Behavior If the “Enable Raise/Lower on Scene Recall Buttons” option is set, then the right and left rockers perform “Scene Raise” and “Scene Lower” functions, whether or not scene feedback LED for that button is lit. To toggle the scene, center of button must be pressed.If the “Enable Raise/Lower on Scene Recall Buttons” option is not set, then the right, left, and center press all perform the same function. | |
| Notes | Toggle function intended only for scenes that do not affect shades. |
| FUNCTION NAME | RAISE LIGHTING LOAD (1-6) |
| Behavior | The specified lighting load raises as long as the button is held. It stops when button released. Rate is the global ramp rate.If they hit the high-end limit, the lights stop at that point, but the bar graph display continues to rise. If going up from OFF, lights immediately go to the low-end limit, and the bar graph display starts rising from 0. When the display (i.e.: the internal ramp value) reaches the low-end limit, the light start moving up in sync.For non-dim load, lights immediately go to full on. |
| LED On while button is pressed | |
| Applies To Remote | Button |
| Rocker Behavior N/A | |
| Notes | This is same as pressing the right side of front panel function button when in Lights Mode. |
| FUNCTION NAME | LOWER LIGHTING LOAD (1-6) |
| Behavior | Specified lighting load lower as long as button is held. It stops when button is released. Rate is the global ramp rate.If loads hit the low-end limit, the bar graph continues to go down, but lights stays at low-end limit level until reach OFF—at which point they turn off.If starting from above the high-end limit, the bar graph starts to go down, but lights stay at high-end limit level until display reaches the high-end limit. Then the light and bar graph start moving in sync.For non-dim load, lights immediately go to full off. |
| LED On while button is pressed | |
| Applies To Remote Button | |
| Rocker Behavior N/A | |
| Notes | This is same as pressing the left side of front panel function button when in Lights Mode. |
| FUNCTION NAME | RAISE/LOWER LIGHTING LOAD (1–6) |
| Behavior | Pressing left side of button acts the same as Lower Lighting Load. Pressing right side of button acts the same as Raise Lighting Load. |
| LED On while left or right button is pressed | |
| Applies To Shifted | Rocker |
| Rocker Behavior | Described in Behavior |
| Notes N/A | |
| FUNCTION NAME | MASTER RAISE LIGHTING LOADS (LAST SCENE, ALL LIGHTS, ON SCENE, SCENES 1–15) |
| Behavior | Same as Raise Lighting Load, except acts on all dimmable Lighting Loads affected by specified scene. All lights ramp at the same rate.Non-dim loads are not affected.Shades are not affected. |
| LED On while button is pressed | |
| Applies To | Standard Rocker, Shifted Rocker, Remote Button |
| Rocker Behavior | Left, right, and center all perform the same function. |
| Notes N/A | |
| FUNCTION NAME | MASTER LOWER LIGHTING LOADS (LAST SCENE, ALL LIGHTS, ON SCENE, SCENES 1–15) |
| Behavior | Same as Lower Lighting Load, except acts on all dimmable Lighting Loads affected by the specified scene. All lights ramp at the same rate.Non-dim loads are not affected.Shades are not affected. |
| LED On while button is pressed | |
| Applies To | Standard Rocker, Shifted Rocker, Remote Button |
| Rocker Behavior | Left, right, and center all perform the same function. |
| Notes N/A | |
| FUNCTION NAME | MASTER RAISE/LOWER LIGHTING LOADS (LAST SCENE, ALL LIGHTS, ON SCENE, SCENES 1–15) |
| Behavior | Pressing left side of button act same as Master Lower Lighting Loads. Pressing right side of button act same as Master Raise Lighting Loads.For up/down button: bottom button = left button => lower.top button = right button => raise. |
| LED On while button is pressed | |
| Applies To | Standard Rocker, Shifted Rocker, up/down (Last Scene and All Lights only) |
| Rocker Behavior As specified under “Behavior” | |
| Notes N/A | |
| FUNCTION NAME | TOGGLE-DIM SCENE (ON, 1–15) |
| Behavior | Similar to the “Toggle Scene” function, except that a maintained press of the button causes the lights to enter “cycle-dim” mode. That is, all lights programmed in the specified scene either raise or lower until the button is released. (Behavior is the same as Raise Scene function.) A subsequent maintained button press causes the lights to dim in the opposite direction.If the button is tapped instead of held down, it behaves identically to the “Toggle Scene” function. |
| LED On when any light in scene is on | |
| Applies To Remote | Button |
| Rocker Behavior N/A | |
| Notes This function | intended for use only on scenes that do not affect shades. |
| FUNCTION NAME | OPEN SHADES FULL (ALL, GROUP 1–6) |
| Behavior | Sends the specified shades to Full Open position. |
| LED On while button is pressed | |
| Applies To Remote Button | |
| Rocker Behavior N/A | |
| Notes Shade commands with “All” parameter only affect all the shade groups connected to the given CLS-C6 module. They do not pass from one CLS-C6 module to another (either when directly connected or when linked through a Cresnet system). If all shades are to open in a multi-unit system, define a scene to do that. | |
| FUNCTION NAME | CLOSE SHADES FULL (ALL, GROUP 1-6) |
| Behavior | Sends the specified shades to Full Closed position. |
| LED On while button is pressed | |
| Applies To Remote Button | |
| Rocker Behavior N/A | |
| Notes Shade commands with “All” parameter only affect all the shade groups connected to the given CLS-C6 module. They do not pass from one CLS-C6 module to the other (either when directly connected or when linked through Cresnet system). If all shades are to close in a multi-unit system, define a scene to do that. | |
| FUNCTION NAME | STOP SHADES (ALL, GROUP 1–6) |
| Behavior | Stops the specified shades at current position. |
| LED On while button is pressed | |
| Applies To Remote Button | |
| Rocker Behavior N/A | |
| Notes Shade commands with “All” parameter only affect all the shade groups connected to the given CLS-C6 module. They do not pass from one CLS-C6 module to the other (either when directly connected or when linked through Cresnet system). To accomplish this function for all shades in a multi-unit system, use SIMPL programming. | |
| FUNCTION NAME | OPEN SHADES MOMENTARY (ALL, GROUP 1-6) |
| Behavior | Specified shades move toward the Open position for as long as the button is pressed. Movement stops when button is released. |
| LED On while button is pressed | |
| Applies To Remote Button | |
| Rocker Behavior N/A | |
| Notes Shade commands with “All” parameter only affect all the shade groups connected to the given CLS-C6 module. They do not pass from one CLS-C6 module to the other (either when directly connected or when linked through Cresnet system). To accomplish this function for all shades in a multi-unit system, use SIMPL programming. | |
| FUNCTION NAME | CLOSE SHADES MOMENTARY (ALL, GROUP 1–6) |
| Behavior | Specified shades move toward the Closed position for as long as the button is pressed. Movement stops when button is released. |
| LED On while button is pressed | |
| Applies To Remote Button | |
| Rocker Behavior N/A | |
| Notes Shade commands with “All” parameter only affect all the shade groups connected to the given CLS-C6 module. They do not pass from one CLS-C6 module to the other (either when directly connected or when linked through Cresnet system). To accomplish this function for all shades in a multi-unit system, use SIMPL programming. | |
| FUNCTION NAME | JOG SHADES OPEN (ALL, GROUP 1–6) |
| Behavior | Specified shades move toward the Open position for the specified jog time, and then stop. |
| LED On while button is pressed | |
| Applies To Remote Button | |
| Rocker Behavior N/A | |
| Notes Jog time defaults to 0.05 sec. Other values can be set in iLux Designer.Shade commands with “All” parameter only affects all the shade groups connected to the given CLS-C6 module. They do not pass from one CLS-C6 module to the other (either when directly connected or when linked through Cresnet system). To accomplish this function for all shades in a multi-unit system, use SIMPL programming. | |
| FUNCTION NAME | JOG SHADES CLOSED (ALL, GROUP 1–6) |
| Behavior | Specified shades move toward the Closed position for the specified jog time, and then stop. |
| LED On while button is pressed | |
| Applies To Remote Button | |
| Rocker Behavior N/A | |
| Notes Jog time defaults to 0.05 sec. Other values can be set in iLux Designer.Shade commands with “All” parameter only affects all the shade groups connected to the given CLS-C6 module. They do not pass from one CLS-C6 module to the other (either when directly connected or when linked through Cresnet system). To accomplish this function for all shades in a multi-unit system, use SIMPL programming. | |
| FUNCTION NAME | OPEN MOMENTARY/OPEN FULL(ALL, GROUP 1–6) |
| Behavior | A quick tap of the button performs a “Full Open.” A maintained press performs a “Momentary Open” until the button is released.If the shade is already moving in the open direction, a tap stops it. If the button is tapped once, it starts moving to full open; then if tapped again, it stops.If the shade is moving in the close direction, a tap sends to full open. A longer press performs a “Momentary Open” until the button is released. |
| LED On while button is pressed | |
| Applies To Remote | Button |
| Rocker Behavior N/A | |
| Notes When changing | direction, there may be a short time when the shade is stopped before it starts moving in the opposite direction. This is the lockout time for the shade controllers. This time is fixed for the C2N-SSC shades; it can be changed for the C2N-SDC and C2N-SDC-DC controllers via iLux Designer.Shade commands with “All” parameter only affects all the shade groups connected to the given CLS-C6 module. They do not pass from one CLS-C6 module to the other (either when directly connected or when linked through Cresnet system). To accomplish this function for all shades in a multi-unit system, use SIMPL programming. |
| FUNCTION NAME | CLOSE MOMENTARY/CLOSE FULL(ALL, GROUP 1–6) |
| Behavior | Same as “Open Momentary/Open Full Shade Group 1–6” except Close. |
| LED On while button is pressed | |
| Applies To Remote Button | |
| Rocker Behavior N/A | |
| Notes | Same as “Open Momentary/Open Full Shade Group 1–6.” |
| FUNCTION NAME | OPEN/STOP/CLOSE/STOP (ALL, GROUP 1-6) |
| Behavior | Function alternates between the “Full Open,” “Stop,” and “Full Close” commands for the specified shade group(s) each time the button is pressed. |
| LED On while button is pressed | |
| Applies To | Standard Rocker, Shifted Rocker, Remote Button, up/down (All only) |
| Rocker Behavior | Pressing center of the button acts the same as non-rocker open/stop/close/stop. Pressing only one side of the button while stopped always send it in specified direction rather than in opposite of last direction. Pressing any part of the button while the shade is moving stops it. For up/down rocker button behavior, see below: bottom button = left button => close.top button = right button => open. |
| Notes Shade commands with “All” parameter only affects all the shade groups connected to the given CLS-C6 module. They do not pass from one CLS-C6 module to the other (either when directly connected or when linked through a Cresnet system). To accomplish this function for all shades in a multi-unit system, use SIMPL programming. | |
| FUNCTION NAME | EXTERNAL FUNCTION (1–32) |
| Behavior | Activates the corresponding “press” digital signal (press1– press32 on the External Functions slot) on the Cresnet system connected to theCONTROL SYSTEMport. Signal remains high for as long as the button is pressed. |
| LED | On when the corresponding “fb” digital signal (fb1–fb32 on the External Functions slot) from the control system is high. |
| Applies To | Shifted Rocker, Remote Button |
| Rocker Behavior Left, right, and both all do the same thing | |
| Notes | Note that these should only be assigned to a CLS-C6 unit that is directly connected to a Cresnet control system, or to keypads connected to that unit’s local devices network. |
| FUNCTION NAME | DUAL EXTERNAL FUNCTION (1/2 ...31/32) |
| Behavior | Activates the corresponding “press” digital signal (press1- press32 on the External Functions slot) on the Cresnet system connected to theCONTROL SYSTEMport. Signal remains high for as long as the button is pressed.The left button corresponds to the lower number. The right button corresponds to the higher number. |
| LED On if feedback | for either join number is high, off if feedback for both join numbers is low. |
| Applies To Shifted | Rocker |
| Rocker Behavior See “behavior” above | |
| Notes | Note that these should only be assigned to CLS-C6 unit that is directly connected to Cresnet control system. If assigned to unit that is connected to the local devices network of another CLS-C6 unit, they do not function. |
| FUNCTION NAME | SHIFT |
| Behavior | If shift function is assigned to the up/down button in iLux Designer, pressing this button alternates between lower and upper functions for the six front panel function buttons |
| LED N/A | |
| Applies To up/down | |
| Rocker Behavior | Top, bottom, and both all perform the same function |
| Notes N/A |
Appendix F: Room Combining
The CLS-C6 supports a room combining concept, whereby two adjacent rooms are considered separate when a partition is closed, and combined when the partition is open. Refer to the figures on the following page for examples of room combining.
In a system that can include a master CLS-C6 and up to eight slave CLS-C6 units, there are 36 possible partitions between rooms. These are:
- Master/Slave1
- Master/Slave2
• ... - Master/Slave8
- Slave1/Slave2
... - Slave1/Slave8
- Slave2/Slave3
• ... - Slave7/Slave8
Partition sensing is accomplished using the GLS-SIM device (one partition per device) and a third-party partition sensor.
In order to indicate which partition is being attached to a given GLS-SIM, each of the 36 possible partitions is given a specific Cresnet ID (for the GLS-SIM). Refer to the "Room Combining Possible Partition Combinations" on page 83.
The DIP switches on the GLS-SIM allow it to work with various partition sensors. Refer to the GLS-SIM Operations and Installation Guide (Doc 6768) for details on how to set the DIP switches appropriately. Keep the following in mind:
• Use only input channel 1 on the GLS-SIM when used for partition sensing
- When using normal polarity, the presence of a contact closure (or voltage below threshold) indicates that a partition is CLOSED (rooms are separated). Adjust the GLS-SIM's polarity DIP switch accordingly based on the partition sensor's behavior.
Two CLS-C6 units (either master/slave or slave/slave) that are in rooms separated by a closed partition have no effect on one another when functions are triggered on either unit.
In the absence of a partition separating two CLS-C6 units, (i.e., there is no GLS-SIM present at the appropriate Cresnet ID) the two CLS-C6 units are always combined.
If two CLS-C6 units are separated, and then become combined at some later time, there is no immediate change. A combinable function must first be triggered on either unit in order to see an effect on the other unit.
The following are combinable functions:
• Recall - Off Scene, On Scene, Scene1..15
- Raise/Lower - Master, scene1..15, last active scene
• Occupancy motion and activity joins
- Override is shared for all combined/uncombined rooms (when triggered from master CLS-C6)
A CLS-C6 that is combined with another CLS-C6 that is, in turn, combined with a third shall be considered combined with that third CLS-C6.
Example 1: Two Rooms
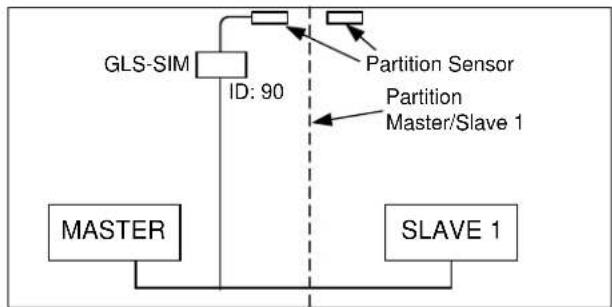
flowchart
graph TD
    A["MASTER"] --> B["GLS-SIM"]
    B --> C["ID: 90"]
    C --> D["SLAVE 1"]
    D --> E["Partition Sensor"]
    E --> F["Master/Slave 1"]
    F --> G["Splitter"]
    style A fill:#f9f,stroke:#333
    style B fill:#ccf,stroke:#333
    style C fill:#cfc,stroke:#333
    style D fill:#fcc,stroke:#333
    style E fill:#ffc,stroke:#333
    style F fill:#cff,stroke:#333
    style G fill:#ffc,stroke:#333
Example 2: Three Rooms
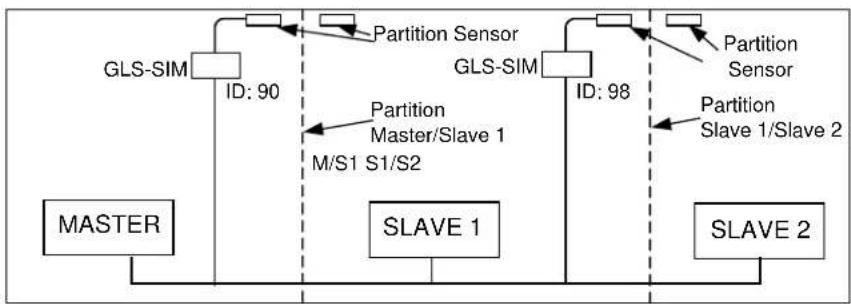
flowchart
graph TD
    A["MASTER"] --> B["GLS-SIM"]
    B --> C["ID: 90"]
    C --> D["SLAVE 1"]
    D --> E["SLAVE 2"]
    E --> F["ID: 98"]
    F --> G["GLS-SIM"]
    G --> H["ID: 98"]
    H --> I["SLAVE 1/Slave 1 M/S1 S1/S2"]
    I --> J["Partition Master/Slave 1"]
    J --> K["GLS-SIM"]
    K --> L["ID: 98"]
    L --> M["SLAVE 2"]
    M --> N["SLAVE 1"]
    N --> O["GLS-SIM"]
    O --> P["ID: 98"]
    P --> Q["SLAVE 2"]
    Q --> R["SLAVE 1/Slave 2"]
    R --> S["Partition Sensor"]
    S --> T["ID: 98"]
    T --> U["SLAVE 2"]
    U --> V["SLAVE 1/Slave 1 M/S1 S1/S2"]
    V --> W["Partition Sensor"]
    W --> X["ID: 98"]
Example 3: One Small and One Large Room
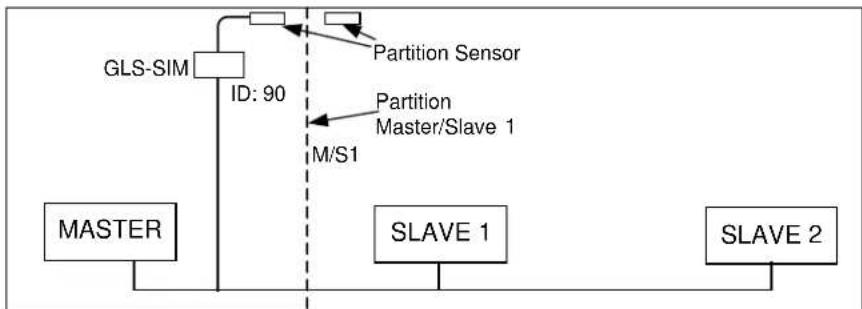
flowchart
graph TD
    A["MASTER"] --> B["GLS-SIM"]
    B --> C["ID: 90"]
    C --> D["Partition Sensor"]
    D --> E["M/S1"]
    E --> F["SLAVE 1"]
    F --> G["SLAVE 2"]
    G --> H["SLAVE 1"]
In example 3, above, since there are no partitions separating Slave 1 and Slave 2 or Master and Slave 2, iLux Designer software must be used to indicate the default status of these missing partitions. In this case, the following defaults should be set:
- Master/Slave 1 default can be set to either Open or Closed, as the physical partition sensor determines the actual state anyway
- Master/Slave 2 default must be set to Closed since they are not directly partitioned (we are assuming that Master and Slave 1 are separated by the partition)
- Slave 1/Slave 2 default must be set to Open since they are physically located in the same room and thus must always be combined
Refer to iLux Designer help for more details.
Room Combining Possible Partition Combinations
| PARTITION BETWEEN | GLS-SIM CRESNET ID |
| Master & Slave 1 0x90 | |
| Master & Slave 2 0x91 | |
| Master & Slave 3 0x92 | |
| Master & Slave 4 0x93 | |
| Master & Slave 5 0x94 | |
| Master & Slave 6 0x95 | |
| Master & Slave 7 0x96 | |
| Master & Slave 8 0x97 | |
| Slave 1 & Slave 2 0x98 | |
| Slave 1 & Slave 3 0x99 | |
| Slave 1 & Slave 4 0x9A | |
| Slave 1 & Slave 5 0x9B | |
| Slave 1 & Slave 6 0x9C | |
| Slave 1 & Slave 7 0x9D | |
| Slave 1 & Slave 8 0x9E | |
| Slave 2 & Slave 3 0x9F | |
| Slave 2 & Slave 4 0xA0 | |
| Slave 2 & Slave 5 0xA1 | |
| Slave 2 & Slave 6 0xA2 | |
| Slave 2 & Slave 7 0xA3 | |
| Slave 2 & Slave 8 0xA4 | |
| Slave 3 & Slave 4 0xA5 | |
| Slave 3 & Slave 5 0xA6 | |
| Slave 3 & Slave 6 0xA7 | |
| Slave 3 & Slave 7 0xA8 | |
| Slave 3 & Slave 8 0xA9 | |
| Slave 4 & Slave 5 0xAA | |
| Slave 4 & Slave 6 0xAB | |
| Slave 4 & Slave 7 0xAC | |
| Slave 4 & Slave 8 0xAD | |
| Slave 5 & Slave 6 0xAE | |
| Slave 5 & Slave 7 0xAF | |
| Slave 5 & Slave 8 0xB0 | |
| Slave 6 & Slave 7 0xB1 | |
| Slave 6 & Slave 8 0xB2 | |
| Slave 7 & Slave 8 0xB3 |
Appendix G: RC5 Code Expansion
RC5 codes are now assigned for all CLS-C6 functions that can be accessed via SIMPL Windows. Refer to the following table.
RC5 Codes Function Table
| CODE FUNCTION | |
| Key 1 Off Scene | |
| Key 2 On Scene | |
| Key 3 Scene 1 | |
| Key 4 Scene 2 | |
| Key 5 Scene 3 | |
| Key 6 Scene 4 | |
| Key 7 Scene 5 | |
| Key 8 Scene 6 | |
| Key 9 Scene 7 | |
| Key 10 Scene 8 | |
| Key 11 Scene 9 | |
| Key 12 Scene 10 | |
| Key 13 Scene 11 | |
| Key 14 Scene 12 | |
| Key 15 Scene 13 | |
| Key 16 Scene 14 | |
| Key 17 Scene 15 | |
| Key 18 Light zone 1 up | |
| Key 19 Light zone 1 down | |
| Key 20 Light zone 2 up | |
| Key 21 Light zone 2 down | |
| Key 22 Light zone 3 up | |
| Key 23 | Light zone 3 down |
| Key 24 Light zone 4 up | |
| Key 25 Light zone 4 down | |
| Key 26 Light zone 5 up | |
| Key 27 Light zone 5 down | |
| Key 28 Light zone 6 up | |
| Key 29 Light zone 6 down | |
| Key 30 N/A | |
| Key 31 N/A | |
| Key 32 N/A | |
| Key 33 N/A | |
| Key 34 Last | active scene up |
| Key 35 Last | active scene down |
| Key 36 All lights up | |
| Key 37 All lights down | |
| Key 38 N/A | |
| Key 39 N/A | |
| Key 40 N/A | |
| Key 41 | Slave 1 light zone 1 up |
| Key 42 | Slave 1 light zone 1 down |
| Key 43 | Slave 1 light zone 2 up |
| Key 44 | Slave 1 light zone 2 down |
| Key 45 | Slave 1 light zone 3 up |
| Key 46 | Slave 1 light zone 3 down |
| Key 47 | Slave 1 light zone 4 up |
| Key 48 | Slave 1 light zone 4 down |
| Key 49 | Slave 1 light zone 5 up |
| Key 50 | Slave 1 light zone 5 down |
| Key 51 | Slave 1 light zone 6 up |
| Key 52 | Slave 1 light zone 6 down |
| Key 53 | Slave 2 light zone 1 up |
| Key 54 | Slave 2 light zone 1 down |
| Key 55 | Slave 2 light zone 2 up |
| Key 56 | Slave 2 light zone 2 down |
| Key 57 | Slave 2 light zone 3 up |
| Key 58 | Slave 2 light zone 3 down |
| Key 59 | Slave 2 light zone 4 up |
| Key 60 | Slave 2 light zone 4 down |
| Key 61 | Slave 2 light zone 5 up |
| Key 62 | Slave 2 light zone 5 down |
| Key 63 | Slave 2 light zone 6 up |
| Key 64 | Slave 2 light zone 6 down |
Return and Warranty Policies
Merchandise Returns / Repair Service
- No merchandise may be returned for credit, exchange, or service without prior authorization from Crestron. To obtain warranty service for Crestron products, contact an authorized Crestron dealer. Only authorized Crestron dealers may contact the factory and request an RMA (Return Merchandise Authorization) number. Enclose a note specifying the nature of the problem, name and phone number of contact person, RMA number, and return address.
- Products may be returned for credit, exchange, or service with a Crestron Return Merchandise Authorization (RMA) number. Authorized returns must be shipped freight prepaid to Crestron, 6 Volvo Drive, Rockleigh, N.J. or its authorized subsidiaries, with RMA number clearly marked on the outside of all cartons. Shipments arriving freight collect or without an RMA number shall be subject to refusal. Crestron reserves the right in its sole and absolute discretion to charge a 15% restocking fee plus shipping costs on any products returned with an RMA.
- Return freight charges following repair of items under warranty shall be paid by Crestron, shipping by standard ground carrier. In the event repairs are found to be non-warranty, return freight costs shall be paid by the purchaser.
Crestron Limited Warranty
Crestron Electronics, Inc. warrants its products to be free from manufacturing defects in materials and workmanship under normal use for a period of three (3) years from the date of purchase from Crestron, with the following exceptions: disk drives and any other moving or rotating mechanical parts, pan/tilt heads and power supplies are covered for a period of one (1) year; touch screen display and overlay components are covered for 90 days; batteries and incandescent lamps are not covered.
This warranty extends to products purchased directly from Crestron or an authorized Crestron dealer. Purchasers should inquire of the dealer regarding the nature and extent of the dealer's warranty, if any.
Crestron shall not be liable to honor the terms of this warranty if the product has been used in any application other than that for which it was intended or if it has been subjected to misuse, accidental damage, modification, or improper installation procedures. Furthermore, this warranty does not cover any product that has had the serial number altered, defaced, or removed.
This warranty shall be the sole and exclusive remedy to the original purchaser. In no event shall Crestron be liable for incidental or consequential damages of any kind (property or economic damages inclusive) arising from the sale or use of this equipment. Crestron is not liable for any claim made by a third party or made by the purchaser for a third party.
Crestron shall, at its option, repair or replace any product found defective, without charge for parts or labor. Repaired or replaced equipment and parts supplied under this warranty shall be covered only by the unexpired portion of the warranty.
Except as expressly set forth in this warranty, Crestron makes no other warranties, expressed or implied, nor authorizes any other party to offer any warranty, including any implied warranties of merchantability or fitness for a particular purpose. Any implied warranties that may be imposed by law are limited to the terms of this limited warranty. This warranty statement supersedes all previous warranties.
Crestron software, including without limitation, product development software, and product operating system software is licensed to Crestron dealers and Crestron Service Providers (CSPs) under a limited non-exclusive, non-transferable license pursuant to a separate end-user license agreement. The terms of this end user license agreement can be found on the Crestron Web site at www.crestron.com/legal/software_license_agreement.
This page is intentionally left blank.

CRESTRON®
Crestron Electronics, Inc.
15 Volvo Drive Rockleigh, NJ 07647
Tel: 888.CRESTRON 09.13
Fax: 201.767.7576
www.crestron.com

Operations Guide - DOC. 6347G
(2012613)
Specifications subject to
change without notice.


- Crestron CLS/CLSI-C6 & CLS/CLSI-C6M
- iLux® Integrated Lighting System
- Operations Guide
- Regulatory Compliance
- Federal Communications Commission (FCC) Compliance Statement
- Industry Canada (IC) Compliance Statement
- Contents
- iLux Integrated Lighting System: CLS/CLSI-C6 & CLS/CLSI-C6M 1
- iLux Integrated Lighting System: CLS/CLSI-C6 & CLS/CLSI-C6M
- Introduction
- Features and Functions
- Six Channel Dimming
- Six Group Shade Control
- Energy Management
- Versatile Front Panel Controls
- Built-in Motion Detector (CLS-C6M and CLSI-C6M)
- Daylight Harvesting
- IR Remote Control
- Multipoint Keypad Control
- Touch Screen Support
- Multi-Unit Expansion
- Room Combining Support
- Building Management System Integration
- Control System Integration
- RS-232 Interface via C2N-IO
- Specifications
- Physical Description
- Setup
- Network Wiring
- Net ID
- Installation
- Configuring the CLS-C6
- Configuring With Front Panel Controls
- Temporary Changes and Adjustments
- Changing Scene Presets
- Scene Presets with Daylight Harvesting
- Setup Mode
- Scene Programming (Sc)
- Setup Lighting Load Types (Ld)
- Setup Low-End Levels (LE)
- Setup High-End Levels (HE)
- Setup Button Functions (bF)
- Setup Up/Down Button Function (ud)
- Setup Occupancy Sensing (oc)
- Run Auto-Discovery (Ad)
- Assign Shade Groups (AS)
- Set Cresnet ID of This Unit (id)
- Photocell Test (Ph)
- Photocell Calibration (Pc)
- Photocell Lower Limit (PL)
- Photocell Response Time (Pr)
- Restore Factory Defaults (Fd)
- Configuring with iLux Designer
- Load Schedule
- Shades
- Scenes
- CLS-C6
- Keypads
- Touchpanel
- Finish
- Console Command Settings
- IR Reception
- LED Brightness
- Glow Mode Brightness
- Replacing the Function Button Label
- Uploading and Upgrading
- Establishing Communication
- Indirect
- Programs and Firmware
- Crestron Studio / SIMPL Windows
- Firmware
- Operation
- Standard Mode
- Button Types
- Recall-Scene Buttons
- Toggle-Scene Buttons
- Master (Last Scene) Raise/Lower Buttons
- Lighting Master (Last Scene) Raise Buttons
- Lighting Master (Last Scene) Lower Buttons
- Shade Control (Open/Stop/Close/Stop) Buttons
- IR Receiver
- Occupancy Sensing
- Override Mode
- Load Shedding (Demand Response)
- Building Management System Interface
- Lights Mode
- Manual Load Adjustment with Daylight Harvesting
- Shades Mode
- Problem Solving
- Troubleshooting
- Check Network Wiring
- Cable Length Equation
- Reference Documents
- List of Related Reference Documents
- DOCUMENT TITLE
- Further Inquiries
- Future Updates
- Appendix A: Supported Devices
- Shade Controllers
- Touch Screens
- Joins
- Digital Command Joins
- Digital Feedback Joins
- Analog Command Joins
- Analog Feedback Joins
- Bidirectional Serial Joins
- Appendix B: Console Commands
- Appendix C: RS-232 Commands
- Command Format
- Adding C2N-IO Device to CLS-C6
- Echo Control Command
- Light Zone Commands
- Light Zone Level Command
- Light Zone Level Recall Command
- Light Zone Lower or Raise Command
- Light Zone Stop Command
- Light Zone Toggle Command
- Light Zone Lower Limit Command
- Light Zone Upper Limit Command
- Light Zone Load Type Command
- Light Zone Name Query Command
- Shade Group Commands
- Shade Group Position Command
- Shade Group Position Query Command
- Shade Group Open, Close, and Stop Command
- Shade Group Jog Open and Close Command
- Shade Group Open/Stop/Close/Stop Command
- Shade Group Name Query Command
- Shade Type Query Command
- Scene Commands
- Scene Recall
- Scene Raise, Lower, and Stop Command
- Scene Toggle Command
- Scene Turn Off Lights Command
- Scene State Query Command
- Scene Quick Save Command
- Scene Query Light Zone Level Command
- Scene Query Shade Group Level Command
- Scene Light Add/Remove Mask Command
- Scene Light Mask Status Command
- Scene Shade Mask Command
- Scene Shade Status Command
- Scene Name Query Command
- Room Combining Commands
- Combine Rooms
- Un-combine Rooms
- Query Combine Status
- Override Commands
- Override On Command
- Override Off Command
- Override Status Command
- Load Shed Commands
- Load Shed On Command
- Load Shed Off Command
- Load Shed Status Command
- Occupancy Commands
- Occupancy State Set/Clear Command
- Occupancy State Query Command
- Photocell Commands
- Photocell Enable Command
- Version Command
- Appendix D: Factory Default Values
- Appendix E: Button Functions
- Appendix F: Room Combining
- Appendix G: RC5 Code Expansion
- Return and Warranty Policies
- Merchandise Returns / Repair Service
- Crestron Limited Warranty
- CRESTRON®
Brand : Crestron
Model : iLux CLSI-C6MRFB
Category : Lighting