
AXIUM HD-D56B - TV SAGEM - Free user manual and instructions
Find the device manual for free AXIUM HD-D56B SAGEM in PDF.

| Product Type | LCD Television |
| Brand | SAGEM |
| Model | AXIUM HD-D56B |
| Screen Size | 82 cm (32 inches) |
| Resolution | 1366 x 768 pixels (HD Ready) |
| Connectivity | 2 x HDMI, 1 x VGA, 1 x SCART, 1 x S-Video, component input |
| Sound | 2 speakers of 10 W each |
| Power Supply | 220-240 V ~ 50/60 Hz |
| Power Consumption | 150 W (max) |
| Weight (with stand) | 15 kg |
| Dimensions (W x H x D) | 800 x 580 x 220 mm |
| Main Features | Teletext, programmable standby, parental lock, adjustable picture format |
| Maintenance and Cleaning | Clean with a soft, dry cloth. Do not use abrasive products or solvents. |
| Safety | Do not expose to humidity or rain. Ensure adequate ventilation. |
| Spare Parts and Repairability | Parts available via SAGEM after-sales service. Repair by an approved technician recommended. |
| General Information | Release year: 2005. Initial warranty: 2 years. |
Frequently Asked Questions - AXIUM HD-D56B SAGEM
User questions about AXIUM HD-D56B SAGEM
0 question about this device. Answer the ones you know or ask your own.
Ask a new question about this device
Download the instructions for your TV in PDF format for free! Find your manual AXIUM HD-D56B - SAGEM and take your electronic device back in hand. On this page are published all the documents necessary for the use of your device. AXIUM HD-D56B by SAGEM.
USER MANUAL AXIUM HD-D56B SAGEM
| 1. | Preculations | 2 |
| 1.1. | Safety | 2 |
| 1.2. | Maintenance | 3 |
| 2. | Set Up | 4 |
| 2.1. | Fitting and connecting the speakers (AXIUM HD-D45 only) | 4 |
| 2.2. | Aeral connection | 4 |
| 2.3. | Mains connection | 4 |
| 2.4. | Switching on your SAGEM AXIUMTM Home Cinema Screen | 5 |
| 2.5. | Switching of your SAGEM AXIUMTM Home Cinema Screen | 5 |
| 3. | First Rapid Installation | 5 |
| 3.1. | Bottles located within the righthand side door | 6 |
| 4.1. | Front panel indicator lights and remote control receiver | 6 |
| 4.2. | Return to initial configuration | 8 |
| 6.1. | Changting the security code | 8 |
| 6.2. | Return to initial configuration | 8 |
| 6.3. | Seachring TV programs | 8 |
| 6.4. | Selecting the MENU language | 10 |
| 6.5. | Setting for the economy mode | 10 |
| 6.6. | Setting for the SPDIF output | 11 |
| 6.7. | Adjusting the headphone output | 11 |
| 6.8. | Setting the speaker mode | 11 |
| 6.9. | Adjusting the Hi-Fi output | 12 |
| 7.1. | Contextion advance | 13 |
| 7.2. | Source configuration | 14 |
| 7.3. | Configuration of computer sources | 15 |
| 8. | Day-to-day use | 15 |
| 8.1. | Picture adjustment | 15 |
| 8.2. | Sound adjustment | 16 |
| 8.3. | Sleep timer | 17 |
| 8.4. | Choice of sources | 17 |
| 8.5. | Choice of format | 17 |
| 8.6. | Programme information | 18 |
| 8.7. | Double picture mode selection | 18 |
| 8.8. | Choosing a TV programme | 18 |
| 8.9. | Picture hold | 18 |
| 9. | Textext | 19 |
| 10. | NextView EPG (AXIUM HD-D45 only) | 20 |
| 10.1. | Installation | 20 |
| 10.2. | Navigation | 21 |
| 11. | Compatibility with High Definition Television | 21 |
| 12. | HDCP | 21 |
| 13. | Diagnosing problems and Trouble Shooting | 22 |
| 14. | Changing the lamp unit | 23 |
| 15. | Technical characteristics of AXIUM HD-D45 model | 24 |
| 15.1. | Overview of AXIUM HD-D45 model | 25 |
| 16. | Technical characteristics of AXIUM HD-D455 model | 26 |
| 16.1. | Overview of AXIUM HD-D45 model | 28 |
| 16.2. | Fitting and connecting additionally purchased external speakers | 28 |
| 17. | Technical characteristics of AXIUM HD-D55B model | 29 |
| 17.1. | Overview of AXIUM HD-D55B model | 30 |
| 17.2. | Fitting and connecting additionally purchased external speakers | 31 |
| 18. | Index | 31 |


| You are recommended to disconnect the appliance from the power supply and the rental: |
| - during thunder storms. |
| - when not used for long periods of time; |
| - when the appliance is malfunctioning (see chapter 13). |
| - when the appliance is malfunctioning (see chapter 13). |
| Before connecting or charging any conventions to an audio-video/computer source (DVD player, PC, etc.), disconnect the power cord from each appliance. |
| Before connecting or charging any conventions to an audio-video/computer source (DVD player, PC, etc.), disconnect the power cord from each appliance. |
| Make sure that ventilation grills are not obstructed by objects such as newspapers, table clothes, curtains etc. |
| To avoid electronic shocks, do not insert foreign bodies, such as needles or coins into the ventilation grills. |
| Before disconnecting the power lead, you are recommended to let the cooling fans of your life. |
| Leave a gap of at least 10 cm around the appliance to allow sufficient ventilation. |
| SAGEM AXIUMTM Home Cinema Screen work for a few minutes. This will increase its working time. |
| This SAGEM AXIUMTM Home Cinema Screen is a class I appliance; it MUST be connected to an electrical wall socket equipped with an earth. |
| Your SAGEM AXIUMTM Home Cinema Screen is designed to function: - with a 220-240 V~, 50 Hz. AC (at heating current) network. |
| - at an ambient temperature between +5°C and +35°C; |
| - in areas with humidity less than 85%. |
| (For more details, see chapter 15, 16, 17 according to the model). |
| Note: If your SAGEM AXIUMTM Home Cinema Screen has been in a damp or cold place, leave it for four hours in the room where it will normally be used before switching on. |
| under the appliance: - do not place objects filled with liquid, such as flower vases, on the appliance; - do not place objects filled with liquid, such as flower vases, on the appliance; - do not expose the appliance to very dusty environments; - avoid shocks and vibrations. |
• Safety regulations


• Definitions Respect all maintenance advice, safety precautions and instructions recommended in this user manual booklet are for your safety and to prolong the working life of the equipment.
1.1. Safety
- Precautions
ENGLISH
Concenting other audio/video or computer appliances is covered in chapter 7. Before looking at this, proceed to the rapid installation.
When you set up your SAGEM AXIUM™ Home Cinema Screen for the first time, you can take advantage of a rapid installation procedure after this warm-up phase (see chapter 3).
NB: The on/off indicator light located on the front panel of your SAGEM AXIUM™ Home Cinema Screen hases orange whilst the lamp is warning up, then goes out when the lamp is functioning.
Press the 📁 standby button on the remote control or right-hand side door.
Switching on your SAGEM AXIUM TM Home Cinema Screen:
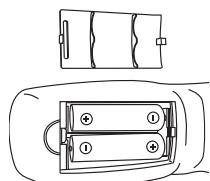
Do not use batteries of different types or rechargeable batteries
Open the battery compartment cover and insert the two RB-1.5V type batteries.
- 2017年1月1日
Switch the Home Cinema Screen on by pressing the ON/OFF switch on the lefthand side of your appliance (See § 15.1, 16.1, 17.1 according to the model).
2.4. Switching on your SAGEM AXIUM ^TM Home Cinema Screen
Insert the mains plug into a 220-240V\~50H zelecrtical wall socket.
2.3. Mains connection
Your SAGEM AXIUM TiM Home Cinema Screen has two internal tURNS (except model AXIUM HD-D455, which only has one tuner) and one cable is sufficient to feed them both.
Insert the end of the coaxial cable leading from your aerial into the aerial input socket at the back of your SAGEM AXIUM TA Home Cinema Screen.
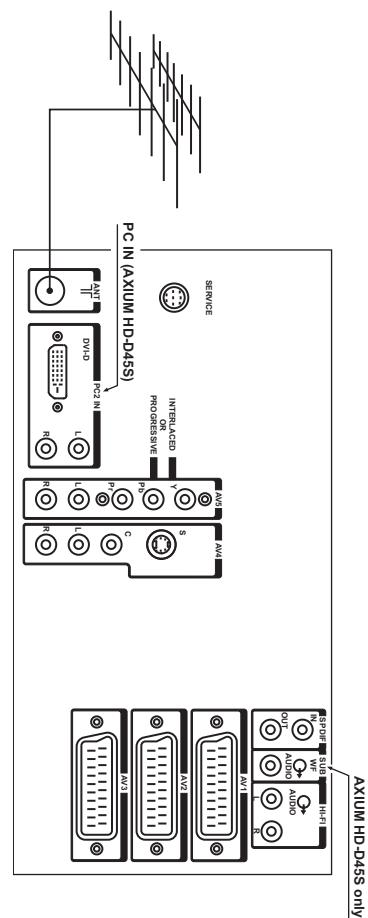
2.2. Aerial connection
Model AXIUM HD-D45 see § 15.2 Model AXIUM HD-D45 see § 16.2 Model AXIUM HD-D55 see § 17.2
According to the model of your SAGEM AXIUM™ Home Cinema Screen, refer to the following paragraphs:
2.1. Fitting and connecting the speakers (AXIUM HD-D45 only)
2. Set UP
Remote control receiver: the infrared receiver is located in the bottom/nighthand corner of your SAGEM AXIUM™ Home Cinema Screen. All you have to do is aim at this sport with the remote control.
Recuperion of the remote control
Intra-red receiver:

Interneal temperature light:
4.2. Front panel indicator lights and remote control receiver
When the menu is called up, the buttons ▲, ▲, and ◀ are used for moving within the screens.
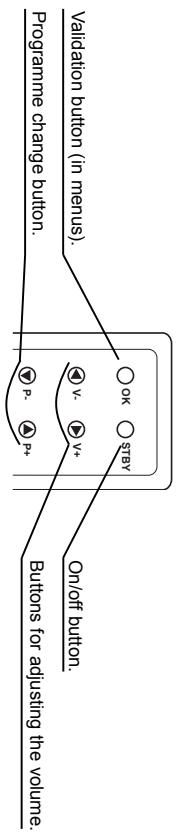
4.1. Buttons located within the righthand side door
- Description of the buttons and indicator lights
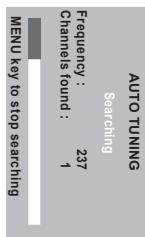
You can also interpret the search at any time by pressing the MENU button.
automatically put in order according to the country that you choose.
After accepting with the OK button, the automatic search begins and the channels
[Non-Text]
3. First Rapid Installation
if you want to switch on your television set again, wait at least 10 seconds before press-
.
unless the front panel E'D is red. NATL'S screen on your appearance using the maps screen or disconnect the wall play
NEW/EP switch offers young opportunities using the risks of a smart tool, the well profile, in order to prolong the lamps working life, do not interrupt the standby procedure.
The following table provides the information in English: (1) The English text is provided for the reference.
The state of real standby is only effective when this indicator light patches to red. During the standby phase (approximately 1 minute), the indicator light on the front panel starts flashing orange.
ton again on the remote control or the rhighthand side door. After this time, standby mode cannot be stopped.
You can cancel standby mode within 5 seconds (indicator light)
remote control or the standby button on the righthand side door.
To put your SAGEM AXIUM™ Home Cinema Screen into standby mode, press the 📋 standby button on the
2.5. Switching off your SAGEM AXIUM™ Home Cinema Screen
Angiáis IJU 45 A5.qkxd 27/04/2005 11:07 Page 5
ENGLISH
NB: AXIUM HD-D45S model has no 'EPC' function.
BACK button. Your selection will be saved when you exit this menu using the
Select the chosen country using buttons ▲ and ▼
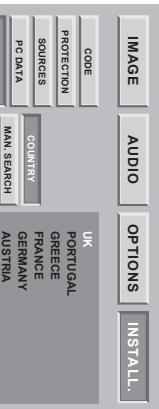
6.3.1. Choice of country
The programmes are installed at the initial setup. Nevertheless, the following functions are useful if you relocate to another region.
6.3. Searching TV programmes
NB: AXMLHD-P45S model has no, EFG., function
A confirmation screen will invite you to continue by pressing the OK button or cancel with the BACK button.
flowchart
graph TD
    A["BACK KEY TO CONTROL"] --> B["CONTINUE"]
    B --> C["WARNING"]
    C --> D["ALS"]
    D --> E["ACT Lock"]
    E --> F["OPTIONALS"]
    F --> G["INSTALL"]
    H["PROC DATA"] --> I["PC DATA"]
    I --> J["PHASES"]
    J --> K["FACE RESET"]
    K --> L["PROTECTION"]
    L --> M["CHANGE CODE"]
    M --> N["YES"]
    O["EPG"] --> P["CHANNEL MAX."]
    P --> Q["BACK KEY TO CONTROL"]
    R["DATA SET WITH SHUDIO"] --> S["Data Sets Will Be Lost"]
    S --> T["PROCES"]
    T --> U["FACE RESET"]
6.2. Return to initial configuration
NB: AXIUM HD-D455 model has no 'EPG' function.
The Ground Truth image displays a single, solid horizontal line. According to Rule 2 (UNDERSCORE & LINE RULES), if the GT contains lines used for stylistic emphasis or as background elements (like ruled paper), the OCR result must ignore them. The line in the GT is clearly a stylistic/background line, not a placeholder for text. Therefore, the OCR should not have output any underscores. Outputting `____` constitutes an error under Rule 2, as it hallucinates placeholder symbols where none are semantically intended. Hence, the OCR result is inconsistent with the Ground Truth.
Enter 0000 to unlock.
Always remember your new code.
NB: To lock these screens, enter a different code than 0000.
your SAGEM AXIUM in Home Cinema screen.
will then be asked for your personal code each time you switch on
this, select, GLLOCK, and choose, YES, with the button ◀. You
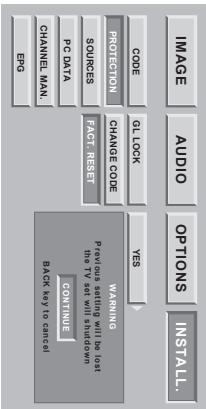
It is possible to extend protection to the whole television set. To do
: "HONG ZENWAN, HUAN YUNI, FING IN AREA TO EQUITY
screen according each time with the OK button, you can cancel
Excel your new code then comments the same code in the comments
es, e, a, spc, oas, eq, e, a, a, a, a, a, a, a, a, a, a, a, a, a
OK button.
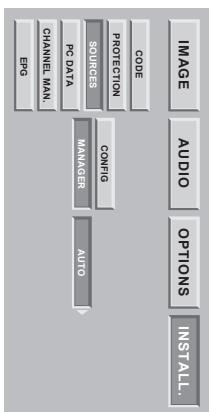
Choose, PROTECTION, then, CHANGE CODE. validate with the
then validate with the OK button.
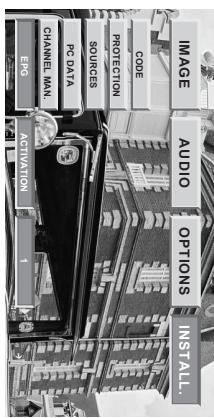
Press the MENU button, then choose, INSTALL, with the button
[Non-Text]
default code is 0000. This does not lock the installation screens.
All installation screens can be protected by a personal code. The
6.1. Changing the security code
-
Personallyed settings
-
Remote Control

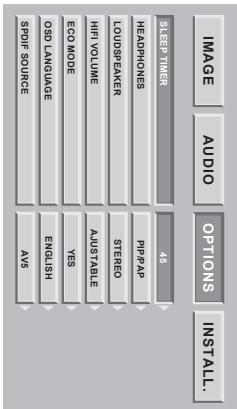
| IMAGE | AUDIO | OPTIONS | INSTALL. |
| STEP TIMER | OFF | ||
| HEADPHONES | MAIN | ||
| LOUDPEAFER | STUDIO | ||
| HIFVOLUME | FIXED | ||
| GEO MODE | YES | ||
| OSO LANGUAGE | ENGLISH | ||
| SPBIF SOURCE | OFF |
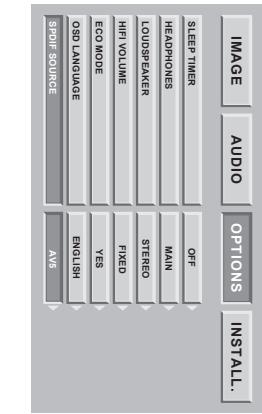
Go to ECO MODE, and choose the mode with buttons ▶ and ▶ Press the MENU button to exit.
Press the MENU button.
Select, OPTIONS, with the OK button.
Cinema Screen in a dark room.
You can decrease the power of the lamp to increase its working life and reduce its power consumption. This mode is particularly recommended if you watch your SAGEM AXIUM™ Home
6.5. Setting for the economy mode
| SLEEP TIMER | OFF |
| HEADPHONES | MAIN |
| LOUSPEAYER | STREO |
| HIGHVOLUME | FIXED |
| ECO MODE | NO |
| OSD LANGUAGE | ENGLISH |
| IMAGE | AUDIO | OPTIONS | INSTALL. |
You can select the menu and information display language.
Press the MENU button to exit or the BACK button to return to the previous screen.
Select the "OPTIONS", character using the OK button.
Select the "OSD LANGUAGE", character using the OK button.
Select the chosen language using the buttons ▶ and ▶.
Press the MENU button.
You can select the menu and information display language.
NB: AXIUM HD-D45S model has no EPG function.

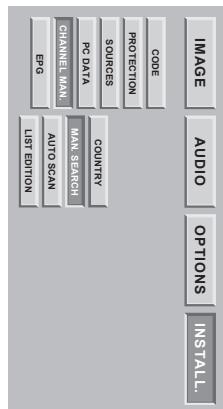
6.3.4. Modifying the programme list
NB: AXIUM HD-D455 model has no, EPG function.
You can modify the programme list that is a result of your search at
any time.
Press the MENU button.
Select the, INSTALL, menu then, CHANNEL MAX and finally
LIST EDITION, with the OK button.
6.3.4. Modifying the programme list
NB: AXIUM HD-D455 model has no 'EPG' function.


6.3.3. Automatic installation
NB: AXIUM HD-D455 model has no e
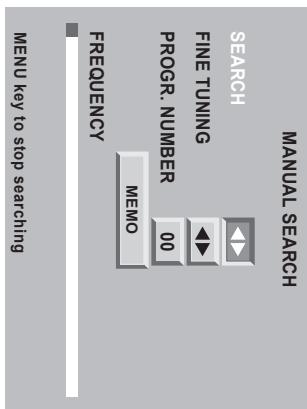
6.3.2. Manual installation
Press on the MENU button to exit.
Restart this manual procedure for all the programmes you wish to memorise.
- Move the cursor to, MEMO, and validate using OK button.
• You can decide not to save this channel selection: in this instance, restart the search.
Go to the 'FINE TUNING' line and adjust the cursor using
the butterflies ▶ and ▶
Move the cursor to IMEMO and validate using OK button.
GO to the ,PROGR. NUMBER, No line and enter the position ofthe desired programme using 0 to 9 buttons.
. You can decide to save your payroll selection.
When a picture is displaced on the screen.
Select, CHANNEL MAN. and start the search using or
Television programmes are searched and saved channel by channel.
in a course success to how applied awards you to school the programme found.
Select MANUAL, then validate using OK button.
[Non-Text]
| LIST EDITION | ||||
| PROG. | FREEQ. | NAME | N.R. | |
| 1 | 479,50 | TF1 | 0 | |
| 2 | 527,25 | F2 | 1 | |
| 3 | 599,25 | F3 | 2 | |
| 4 | 671,25 | C+ | 0 | |
| 5 | 735,25 | F5 | 3 | |
| DELETE | ♦ | MOVE | NAME | N.R. ⬤ VIEW |
new position with the green button
green button to select it (a ,' ) appears to the left of theprogramme). Move it with buttons ▲ or ▲ , then accept its
• Move a programme Go to the line of the programme to be moved and press the
GO to the line of the programme to be deleted and press the red button.
- Delete a programme. From this screen, you can:
ENGLISH
To use the internal speakers: Select mono or stereo in the MODE HP INT. option and select YES for the WOFFER option (see page 16). If you do this, you should not connect external speakers to the television set.
: AXIUM HD-0568 •
(See paragraph 16)
to enable and connect any external speakers not supplied.
The OFF mode disables the internal speakers and allows you
- AXIUM HD-P45S.
In the menu MODE HP INT., you can choose between mono, ste-
[Non-Text]
Press the MENU button to exit.
NB: The PIP and PAP functions are described in § 8.7.
the left-hand picture in PAP mode to the headphones.
, PIP/PAP, will restore the sound of the inset picture in PIP mode or
or the right-hand picture in PAP mode to the headphones.
,MAIN' will restore the sound of the full screen picture in RLP mode
buttons ▶ and ▶.
Go to, HEADPHONES', and choose the video source with the
Select, OPTIONS, with the OK button.
Press the MENU button.
You can choose the audio source of the headphone output
ind
The following section is
- SAGEM AXIUM IM Home Cinema Screen functions at 32, 44.1 and
AGEM AXIUM TM Home Cinema Screen. Therefore, these need an
outo deocado by your exterior home cinema s.i. apmiper).
(in which case the speaker and Hift outputs are cut, and the digital
with the picture on the SPDIF output and restored to the speakers
ma Sigma Screen functions equally well with SPBIE flow of RSM
- and - size with the buttons and
(1) 2017年1月1日
[Non-Text]
The digital input can be associated with one of your external sources (except aerial input). Use the OPTIONS menu to choose which SPDIF input video source is to be associated. However, make sure that you also connect your sources and logue audio if you want to have PIP/PAP sound mode in the headphones.
analogue-digital converter.
(geranyl-type induct, perinels, AV, AV4, AV5, PC1 IN, PC2 IN); it can be connected directly to your home cinema amplifier or an external
The digital output is always available, whatever the source displaced
• The person who is doing business with the place;
- Perfect synchronization of the Dolby Digital or DLS digital sound of your homo cinema system with the picture
conversion.
- Excellent quality sound thanks to the absence of analogue of your output giving you;
your SAGEM AXIUM™ Home Cinema Screen has an SPDIF
6.6. Setting for the SPDIF output
Anglabs IJU 45 A5.qxd 27/04/2005 11:07 Page 11
flowchart
graph TD
    A["Engine"] --> B["Action"]
    B --> C["Code"]
    C --> D["Protection"]
    D --> E["SOURCES"]
    E --> F["PC Data"]
    F --> G["Channel Manual"]
    G --> H["Chamber"]
    H --> I["Auto"]
    I --> J["Auto"]
6.10. Exit standby mode tuning
Press the MENU button to exit.
Go to ,HI-FI VOLUME, and choose the mode with the buttons and ▶.
Select, OPTIONS' with the OK button.
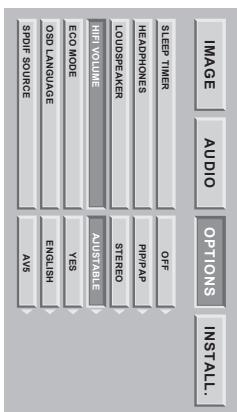
6.9. Adjusting the Hi-Fi output
Press the MENU button to exit.
Go to, LOUDSPREAKER, and choose the mode with the buttons and
Select, OPTIONS, with the OK button.
Press the MENU button.
(1) m = 311 ;
• Other modules: to use your personal audio system (in-ri-system or Home Cinema audio amplifier); Select OFF in the MODE HP INT. Option. If you do this, the integral and external speakers are disabled.
to cause your personal data of concern (in my focus on how these data is imprison) because it has the molecule. This option. If you do this, the internal and external speakers are disabled.
FOR OPTION (see page 16). See paragraph 17.2 for connecting external speakers. To use your personal audio system (b-) system of Home Cinema audio amplifier. Select OFF in the MODE HP INT
To use external speakers not supplied, select mono or stereo in the MODE HP INT. option and select NO for the WO-
• Continuation of page 11, AXIUM HD-DS6B:
Press the MENU button to exit.
automatically displayed.
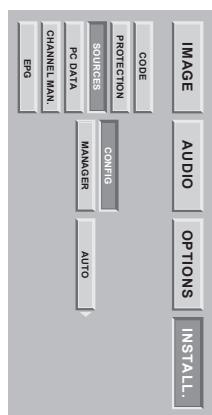
In this mode, new sources detected by the television set will be
, AUTO: Exit from standby or go to automatic standby controlled by the equipment plugged into, SGART connectors on the rear panel.
[Non-Text]
the standby button. On the remote control of inflational side door.
, MANUAL: Exit from standby and go to standby mode by pressing
• Select Sources than MANAGERS
• Press the MENU button then go into, INSTALL.
mode.
This setting allows you to choose active mode or go to standby
[Non-Text]
: Press and NEON edition of exi.
- 1, 2, 3, 4, 5, 6, 7, 8, 9, 10, 11, 12, 13, 14, 15, 16, 17, 18, 19, 20, 21, 22, 23, 24, 25, 26, 27, 28, 29, 30, 31, 32, 33, 34, 35, 36, 37, 38, 39, 40, 41, 42, 43, 44, 45, 46, 47, 48, 49, 50, 51, 52, 53, 54, 55, 56, 57, 58, 59, 60, 61, 62, 63, 64, 65, 66, 67, 68, 69, 70, 71, 72, 73, 74, 75, 76, 77, 78, 79, 80, 81, 82, 83, 84, 85, 86, 87, 88, 89, 90, 91, 92, 93, 94, 95, 96, 97, 98, 99, 100
GO TO. HI-FI VOLUME, and choose the mode with the buttons
Seal, of NOUS, with the NOUS
Soles, OPIONS, with the other
Press the MENU button.
buttons □ □ + and □ □ -
Hi-Fi output can be adjusted from the remote control using the
eq, cf, p, p, c, d, e, s, x, o, p, n, q, r, s, t, a, m, x, o, p, l, . T, i, b, v, t, h, i, d, v,
FIXED: the volume must be adjusted on the audio system connected to the Hi-Fi output.
You can choose between two ways or adjusting the volume of this output.
- 转子: 士利斯, 2005, 2006, 2007, 2008, 2009, 2010, 2011, 2012, 2013, 2014, 2015, 2016, 2017, 2018, 2019, 2020, 2021, 2022, 2023, 2024, 2025, 2026, 2027, 2028, 2029, 2030, 2031, 2032, 2033, 2034, 2035, 2036, 2037, 2038, 2039, 2040, 2041, 2042, 2043, 2044, 2045, 2046, 2047, 2048, 2049, 2050, 2051, 2052, 2053, 2054, 2055, 2056, 2057, 2058, 2059, 2060, 2061, 2062, 2063, 2064, 2065, 2066, 2067, 2068, 2069, 2070, 2071, 2072, 2073, 2074, 2075, 2076, 2077, 2078, 2079, 2080, 2081, 2082, 2083, 2084, 2085, 2086, 2087, 2088, 2089, 2090, 2091, 2092, 2093, 2094, 2095, 2096, 2097, 2098, 2099, 2100

| • You can display the selected channel at any time by pressing the OK button. |
| • AXIUM HD-D455 model does not have a PC1 input. |
| • AXIUM HD-D455 model does not have a PC1 output. |
| • PC2 is called PC on the screen of the model player by scrolling through them by pressing the blue button more than once (none 0, week 1, medium 2, strong 3).Press the MENU button to exit. |
| INPUT | SOURCE | No | NAME | N.R. | |
| SCART 1 | YES | ---- | 0 | ||
| SCART 2 | YES | -- | ---- | 0 | |
| SCART 3 | YES | ---- | 0 | ||
| AV4 | YES | ---- | 0 | ||
| AV5 | YES | ---- | 0 | ||
| AV6 | YES | ---- | 0 | ||
| PC 1 | YES | ---- | |||
| PC 2 | YES | ---- | |||
| Prc 1 | YES | ---- | |||
| Pres the green button seven MAC, GAMES). | |||||
Note: AXIUM HD-D45S model has no, EPG' function.
Choose the connector to be configured ( ▼ / ▲ )
7.2. Source configuration
| AV6 | Recommended when connecting a camcorder in VHS, S-VHS, 8 mm, H-8 or digital DVC format. |
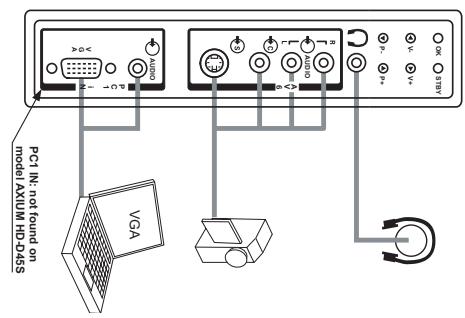
| PC1 IN | (except model AXIUM HD-D455)Recommended for connecting a PC computer equipped with a 'VGA' output. socket A: 3.5 mm audio jack socket allows you to connect sound. |

RIGHTHAND SIDE DOOR
ENGLISH
7.1. Connection advice
7. Connecting equipment and configurations
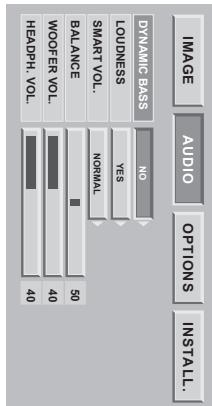
NB: Virtual Dobly Surround is a technology coming from Dobly laboratories. It creates a v%- press the MENU button to exit and the BACK button to return to the previous screen. Surround takes audio information from all the original channels and gives the listener the sensation of being surrounded by additional speakers.
(AXIUM HD-D455 only). Allows you to adjust the sound volume output on the right-hand side door. Allows you to adjust the sounds volume output on the right-hand side door. Aircraft speakers. Move the cursor with the buttons ▶ and ▶ to balance sound between the left and This option is not found on AXIUM HD-D455 model. Allows you to enable Viral Dolly Surround or not (except AXIUM HD-D455 model). Allows your external active wofter (AXIUM HD-D455) or the wofter (other models) can be ON or OFF. This internal speakers (AXIUM HD-D568) or the wofter (other models) can be ON or OFF. Allows you to adjust the sound control mode. Allows you to acquire the low frequencies of not. is an automatic equalization system designed to reinforce the bass and table at low volume. Allows you to accentuate the low frequencies of not.
InGS rameters, go to, NEXT;

Other models
NB: AXIUM HD-D45S model has no 'DOLY VIRTUAL' function.
Choose the setting that best suits the programme you are watching and validate with the OK button.
flowchart
graph TD
    A["IMAGE"] --> B["AUDIO"]
    B --> C["OPTIONS"]
    C --> D["INSTALL"]
    D --> E["PREISO"]
    E --> F["Next"]
    style A fill:#f9f,stroke:#333
    style B fill:#ccf,stroke:#333
    style C fill:#cfc,stroke:#333
    style D fill:#fcc,stroke:#333
    style E fill:#cff,stroke:#333
    style F fill:#ffc,stroke:#333
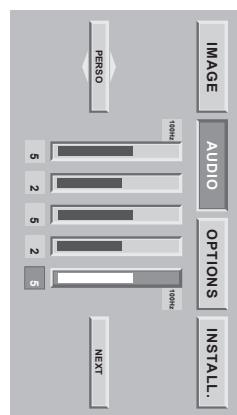
You can set and save your own audio balance using the ,PERSO.
Bilingual broadcast or sound selection: Press &? to choose between MONO or STEREO sound if the channel. In transmits sound in NICAM stereo mode. Choose between DUAL A and DUAL B if there is a bilingual broadcast. This adjustment is saved per channel.
Volume: Press D + or D - to adjust the volume. Mute: Press D X to mute or to switch on the sound.
ADJUSTMENTS POSSIBLE BY REMOTE CONTROL
8.2. Sound adjustment
SURROUND DOUBLE
BALANCE HEADPHONES VOL. WOOFER VOL.
SMART VOL DYNAMIC BASS LOUDNESS
ADVANCED SOUND SETTINGS
Model AXIUM HD-D45S
A ,function.
Choose the setting that best suits the programme you are watching and validate with the OK button.
You can choose a sound balance from among the preset parame- ters using the buttons ▲ and ▲ STANDARD, VOICE, MUSIC or
PRESET AUDIO BALANCE
▶ and ▶ then adjust the desired level using the buttons ▲ and ▲.
▶ and ▶ then adjust the desired level using the buttons ▲ and ▲.
Pres the MENU button then go to, AUDIO Choose, PERSO, with buttons ▲ and ▲.
mode.
PERSONAL SOUND SENTINGS
hoose between DUAL A and DUAL B if there is a bilingual broadcast.
Bilanzahl broadcast for sound selection: Press and to choose between MONO or STEBEO sound if the chan-
Volume: Press + or □ - to adjust the volume.
ADJUSTMENTS POSSIBLE BY REMOTE CONTROL
7.3. Configuration of computer sources
8.1. Picture adjustment
NB: Optimum stability is achieved with a frequency of 60 Hz (consult the documentation for your PC to configure it).
| Resolution (px) | Frequency (Hz) |
| 640 x 480 | 60 |
| 640 x 480 | 66 |
| 640 x 480 | 72 |
| 640 x 480 | 75 |
| 640 x 480 | 85 |
| 640 x 480 | 85 |
| 640 x 600 | 60 |
| 800 x 600 | 75 |
| 800 x 600 | 72 |
| 800 x 600 | 85 |
| 1024 x 768 | 60 |
| 1024 x 768 | 70 |
| 1152 x 864 | 60 |
| 1280 x 720 | 60 |
Dewill, 2016. The resolution accepted (DVI-D and VGA entries): To ensure that the prosecution displays is operating correctly with your computer make sure that you configure the display mode of your graphics card to a resolution lower than 1024 × 768 .
Automatic mode: This allows you to adjust everything automatically or not.
:SIN200
Phase: This allows finger synchronization with your computers' gra-
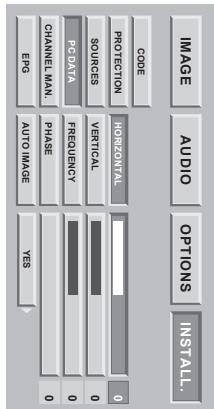
Frequency: This allows you to adjust the frequency to that of your computer's graphics card. When a flashing vertical bar appears, use this function to adjust the frequency.
Vertical position: Presses or to move the picture to the top or bottom.
Horizontal position: press ▶ to move the picture to the left and ▶ to move it to the right.
(PC1) (except model AXIUM HD-D45S). With this option, you can adjust the source from your PC into VGA
Choose, PC DATA, then validate with OK.
and validate with OK.
NB: AXIUM HD-D455 model has no ,EPG function.
AXIUM™ Home Cinema Screen before the computer.
If a personal computer is used (PC or MAC), switch on your SAGEM
Use the pause button ■ to freeze the picture or reactivate it.
8.9. Picture hold
nal video source to the TV channels.
Use the Black button to return to the scanned previously watched . BACK also allows you to return from an extra-
Use the 0/9 buttons to choose your channel. For a two-digit number, enter the second within 2 seconds.
8.8. Choosing a TV programme
The buttons ▶ and ▶ change the position of the PIP window if the PIP mode is activated. You can navigate through 4 possible positions in the order top-left, top-right, bottom-left, bottom-right.
• + to change the format.
Change the format on the screen by pressing the button to name the source to be changed. then
or AV5 sources
AXIUM HD-D455: The above warning only concerns antenna, PC
and MAXIMode (full screen). Same for PAP mode (picture on
(1) macrophages can be simulated by using a IP mode (inset picture) PC1, PC2 or AV5 simultaneously in pip mode.
(All except Altium HB-DATS modules). You cannot have sources WARNING:
• + to change the source.
• PR+ or PR- to change the wireless channel,
change source on the screen by pressing the button to name the source to be changed: then
■ We have the sources by passing the colon
WHAT ONE OF THE TWO MUNES (I) - ALL OR (I) IS IN USE, you can
which can go to the model (bit or BAP) is in use you.
Choose the video insert mode (PIP) or two videos side-by-side (PAP) by pressing the button. □ more than once
Switching on double picture mode
10
8.7 Double picture mode selection

natural_image
Snow-covered train carriage with visible snowflakes and a sign reading 'UPONOW CHIN' (no other text or symbols)source will be displayed.
When you are watching an external video source, the name of the
channel.
8.6. Programme information
only) and PC2 (PC on AXIUM HD-D45S).
This format allows you to display the picture as it is without any resizing. Only on sources PCI (AXIUM HD-D45
NATIVE FORMAT
I mis format allows you to watch strings in .2.35 (PAVAVISION) format, broadcast in 4.3 in maximum screen format without distortion at maximum belight but with picture loss at the right and left edges
SCOPE FORMAT
read.
THIS INTERVAL ALLOWS you to watch things in 1:05 (ROADELM 1 LAT) (FORMAT BROADCAST IN, 94; AT MAXIMUM SELEEN FORMAT WITHOUT PICTURE LOSS AND WITHOUT DISTRIION BY MOVING THE PICTURE TO THE TOP TO ENABLE ANY SUBSTITLES TO BE
SUBTITLE FORMAT This format allows you to work, split in 4.06 (AMDREX DTA), format broadcasted in 4.2 ct proxy access
It allows you to watch films in 2.0, 2.20, and 2.35 format.
for format without distortion with black bands at the top and bottom.
THIS format allows you to watch films in 185 (AGADEFY E1 AT) format broadcast in 4.3 to maximum screen
EXTRADE THEAT
[Non-Text]

Anglabs IJU 45 A5.qkxd 27/04/2005 11:07 Page 17
8.3. Sleep timer
8.4. Choice of sources
You can always stop the SAGEM AXIUM ^™ Home Cinema Screen before the programmed stop time or reprogramme the stop time.
sleep timer, if you want to.
will appear on the screen. This screen allows you to cancel the
180 min. One minute before entering standby mode, the last minute counter
You can set the sleep time at 15 min intervals up to a maximum of
and validate using OK.
Press the MENU button then choose, OPTIONS, using the button
of the following: for example, we have been a
ENGLISH
in backets, is the number of days of programmes consultable in EPG. The television channels are free to transmit the signal EPG NextView or not, therefore this list is not legally binding.
| Country | Channels transmitting NextView EPG |
| France | MG (3), Canali+ (7), TV5 (4), TSRI |
| Germany | RTL2 (3), Kabeli (4-9), SF1 |
| Austria | SF1 |
| Italy | TS1 |
| Belgium | VT4 (3) |
| Switzerland | SF1, TSRI, TSI |
| Turkey | TRT Family (5-6) |
List of channels transmitting NextView EPG on September 1, 2004:
Similarity, pressing the EP6 button on the remote control during acquisition will cancel the current procedure and will display the last EPG in memory, which is perhaps not up to date.
If you use the PIP or PAP functions when changing channel within ten minutes of coming out of standby, the EPG will be cancelled.
The EPG is acquired automatically each time you exit from standby on your SAGEM AXIOM "Home Cinema Screen.
In the, CHANNEL, menu choose the appropriate channel number (see list below).
The EPG NextView uses the signals from certain channels for transmission.
Figure 1: Example of the EPG menu accessed for the first time.
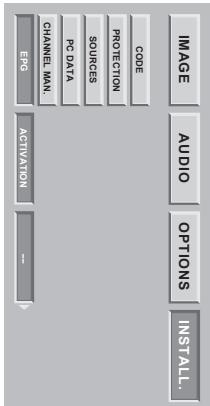
Figure 2: Example of the EPG menu contigu-red on the first channel.
To enable the EPG, you must enter a channel number.
in both these cases, you can enter or re-enter a channel number consisting of two digits (e.g.: 01 for the first channel, 02 for the second channel, 12 for the twelfth channel, etc.).
To enable the EPG, enter the INSTAL.; menu, go to line "EPG"; Using the arrow go on -; (if you are using the EPG for the first time, see figure 1) or on the channel number (if you have already used the EPG, see figure 2).
10.1. Installation
The, NextThink function is not available.
Nextview is an electronic programme guide (or EPG) for analogue television. It is a service giving information about current and future programmes. The programme information for all the channels is transmitted up to one week in advance.
10. NextView EPG (AXIUM HD-D45 only)
Anglabs IU 45 A5.qxd 27/04/2005 11:07 Page 19
9. Teltext
If there is no telект on the channel you are watching, a message will inform you of this. You can text from Telект mode by pressing again. Pressing the button again allows you to view telект imposed on the current video. Presses the button → to switch on telект without video. Tellect disputes vary according to television companies and are only available if the selections.
LIST or FASTEXT mode There are two telект modes:
LIST mode: in this mode, four pages numbers appear at the bottom of the screen, each in a different colour. FASTEXT mode: in this mode, four subjects appear at the bottom of the screen, each in a different colour. This function allows you to obtain information on the displayed subjects quickly. The required mode is selected by pressing the button (E).
Enter the number of the required page using the 0-9 buttons (Three are no pages starting with a 0 or 9). The page counter has already been saved. Number has already been saved. You can quickly scroll through teletext pages by using the P+P- or ▲▲ buttons (by skipping non-existent pages). To save another page in this mode, press the relevant coloured button and enter the page number. When in FASTEXT mode, you can select a chosen subject using the colour buttons corresponding to the options at the bottom of the screen.
Press the button Ⓤ to call up questions
Press the button ■ to hold a text page, whilst looking at information that is on several pages. Presses again to return to automatic update.
Press the MENU button then the green button.
Use the buttons ▶ to choose the next or the previous sub-page
Bottom of the screen.
The subtitle page continuously appears on the screen if the current program. Press the button and select the relevant subtitle page. The subtitles page continuously appears on the screen if the current program. TV channels with telект often transmit certain programmes with subtitles.
HDCP is a protocol for encouraging digital data to protect it from being copied. Your SAGEM AXIUM™ Home screen screen is equipped with a system compatible with HDCP, which also allows you to view this type of information. Toon, You can connect any high definition source on the PC2 (PC on AXIUM HD-D45S) if its type appears in the above list without worrying about the HDCP protection.
- HDCP
| Standards | Pixels per active line | Lines per picture | Pixels per complete line | Total number of lines per frame | Refresh rate | Sampling rate | Type of format |
| SMPTE 295M-1997 2 | 1920 | 1080 | 2376 | 1250 | 25,00 | 74,25 | interaced |
| SMPTE 274M-2003 4 | 1920 | 1080 | 2200 | 1125 | 30,00 | 74,25 | interaced |
| SMPTE 274M-2003 5 | 1920 | 1080 | 2200 | 1125 | 29,97 | 74,18 | interaced |
| SMPTE 274M-2003 6 | 1920 | 1080 | 2640 | 1125 | 25,00 | 74,25 | interaced |
| SMPTE 296M-2001 1 | 1280 | 720 | 1650 | 750 | 60,00 | 74,25 | progressive |
| SMPTE 296M-2001 2 | 1280 | 720 | 1650 | 750 | 59,94 | 74,18 | progressive |
| SMPTE 296M-2001 3 | 1280 | 720 | 1980 | 750 | 50,00 | 74,25 | progressive |
Standards compatible with your SAGEM AXIUM™ Home Cinema Screen
There are numerous standards for high definition television. SAGEM AXIUM™ Home Cinema Screen is compatible with the main HDTV standards. You can view TV programs as well as high definition DVD screen by using inputs PCI (except AXIUM HD-D455 model), PCI2 (PC on AXIUM HD-D455) and AV5.
The standards:
High Definition Television is a generic term applying to all the kinds of television signals offering resolution higher than the present standard pictures. NSTC consists of 720 points per line and 480 lines per picture. PAL consists of 720 points per line and 576 lines per picture. HDTV has a higher resolution both horizontally and veritically. Your SAGEM AXIUM "Home Cinema Screen has been designed for high definition television and has a resolution of 180 points per line and 720 lines per picture."
- Compatibility with High Definition Television
To exit from the EPG, press the EPG button on your remote control
Channel: Blue button: With buttons ▶ and ▶, select the channel of your choice
Topic: Yellow button: With buttons ▶ and ▶ choose the programme type from among: All, Films, News, Variety, Leisure, Sport, Children, Science, Music, Art, Series
Time: Red button: With buttons ▶ and ▶, select the time of your choice from 'Present to', Time T+24. Date: Green button: With buttons ▶ and ▶, select the date of your choice from 'Today' up to 'Day D+7'.
You can sort the programmes according to four criteria by using the coloured buttons A, B, C and D on the remo-
To obtain information about your choice of programme, use the buttons ▲ and ▲ then accept with OK.
NB: If this is the first time that you start EPG, you must wait a few minutes for your television set to recover theavailable information about programmes.
Press the EPG button on the remote control to start acquisition
10.2. Navigation
| Symptoms: | Recommended checks: |
| When first using your SAGEM AXIUMTM Home Cinema Screen, the red or/off indicator light is not illuminated. | Check that the mains cable to SAGEM AXIUMTM Home Cinema Screen is connected to the apparatus and the wallscope. Also check that the switch on the left side of the appliance is pressed in. |
| The appliance does not light up when the one/standby button is pressed on the righthand side door or remote control. | Check that the mains cable to SAGEM AXIUMTM Home Cinema Screen is connected to the apparatus and the mains socket. Also check that the switch on the left side of the appliance is pressed in. |
| There is no picture. | If the menus of your SAGEM AXIUMTM Home Cinema Screen are available. Check that your video appliances are correctly connected and are active. Also check that you have selected the correct video source see § 8.4. Check that your serial lead is correctly connected. Also check that you have saved search. Also check that the switch on the left side of the appliance is pressed in. |
| Black and white picture or picture interference. | Check that you have selected the correct video format e.g. RGB video source from a DVD player displaced in S-video on your SAGEM AXIUMTM Home Cinema Screen: check by pressing the picture source selection button if the type of source selected is compatible with the source emitted. Check that the colour adjustment is not at minimum. |
| No sound. | Check that the volume is not set at minimum and that mute has not been activated. Check that your appliances are correctly connected to your SAGEM AXIUMTM Home Cinema Screen. |
| Sound weak or discordant during terrestrial reception. | Set sound to mono. Check the SMART VOL setting (see § 8.2). |
| Frozen picture. | Check that you have not held the picture: press the, PICTURE of TELTEXT PAGE HELD button. |
| Your appliance does not start on leaving standby door or the standby button on your remote control. | The ON/STANDBY indicator light flashes orange for 20 seconds then turns to red or still flashesanging, switch off the appliance using the switch to the left of your mode using the button on the righthand side normal procedure. |
| No picture on PIP mode. | Check that you have selected sources that is active in PIP mode (see § 8.7). |
| The remote control is not working normally. | Change the batteries. |
| SAGEM AXIUMTM Home Cinema Screen makes a hissing noise when switched on. | This noise is normal when starting. It is not considered as malfunctioning. |
| Pixels on the screen do not light up. | In spite of the very high technological precision with which your SAGEM AXIUMTM Home Cinema Screen has been made, certain pixels may be faulty. This is not considered as malfunctioning. |
- Diagnosing problems and Trouble Shooting
| 14. Changing the lamp unit | |
| Only replace the old lamp unit with authorised model R1280A, reference number SAGEN 251691414 | |
| The old lamp unit must be recorded (contact your recording agency to obtain the address of the nearest depot). | |
| 1. You must only change the lamp unit when the appliance is switched off and mains cable disconnected from the wall socket. | |
| 2. Never try to replace the lamp unit immediately after the SAGEN AXUM "Home Cinema Screen has been switched off. Walt at least 1 hour to allow the lamp to completely cool down. | |
| 3. Only handle the lamp unit by the holes designed for this purpose. Never touch any ways or the bulb label. | |
| 4. Make sure that you tighten all the screws and do not leave any foreign bodies inside the appliance. | |
| (X999) | |
| Only replace the fuse of a worn-out lamp. | |
| 5. Never replace the fuse of a worn-out lamp. | |
| Any replace the old lamp unit with authorised model R1280A, reference number SAGEN 251691414 | |
| The old lamp unit must be recorded (contact your recording agency to obtain the address of the nearest depot). | |
| 1. You must only change the lamp unit when the appliance is switched off and mains cable disconnected from the wall socket. | |
| 2. Never try to replace the lamp unit immediately after the SASEN AXUM "Home Cinema Screen has been switched off. Walt at least 1 hour to allow the lamp to completely cool down. | |
| 3. Only handle the lamp unit by the holes designed for this purpose. Never touch any ways or the bulb label. | |
| 4. Make sure that you tighten all the screws and do not leave any foreign bodies inside the appliance. | |
| (X999) |
14. Changing the lamp unit
15. Technical characteristics of AXIUM HD-D45 model
↓

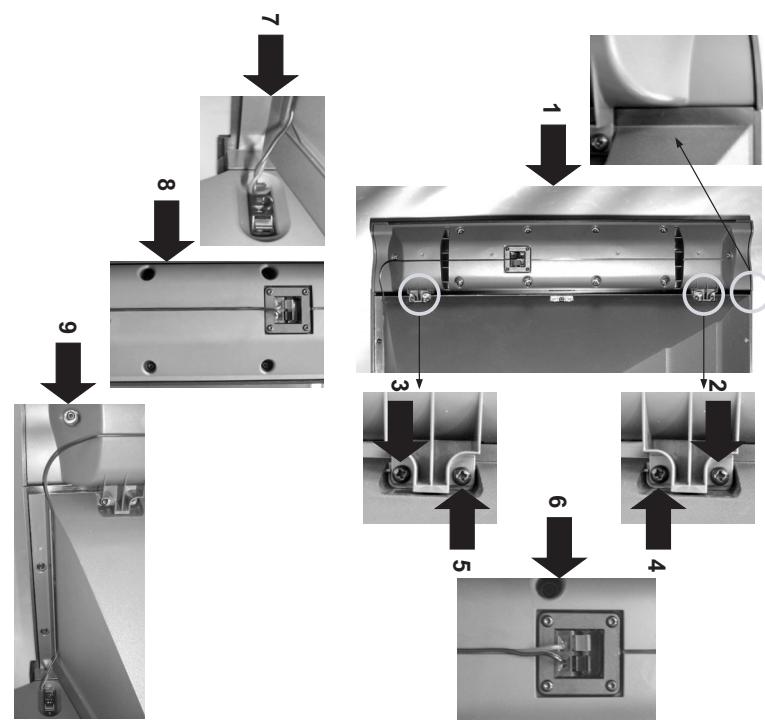
You have the ability to connect your own speakers to your SAGEM AXIUM™ Home Cinema Screen if these have important greater than or equal to 8 ohm. To do this, disconnect the speaker column, connect your spear to enable / disable the external speaker column, see § 8.2. To enable / disable the internal worker, see § 8.2. To enable / disable the internet worker, see § 8.2. Push the wires in the grooves.
• Do the same for the right-hand Connecting your own speakers
• I then ride the cable by plugging it in the groove, starting from the black and red terminals of the Speakee column, see step 8, then continue like this to the black and red terminals of the television set, see step 9.
• Connect the other end of the cabin in the same way on the left-hand terminal, viewed from the rear, of you SAGEM AXIUM™ Home Cinema Screen, see step 7.
- For the eight-inch spear column, viewed from the year, after the 10-inch colour and connect the red wire on the red terminal, the black wire on the black terminal to this column, see step 6.
Connect each column to your SAGEM AXIUM™ Home Cinema Screen with the audio cables supplied:
Connecting the speaker columns supplied
Do the same for the second speaker column.
Lugs of the column against the frame, see steps 2, 3, 4, 5
To take the fixing holes coincide with those of the frame. Using the screws and serverdriver provided, fix the two so that the fixing holes coincide with those of the frame. Using the screws and serverdriver provided, fix the two
Fitting the speaker columns supplied
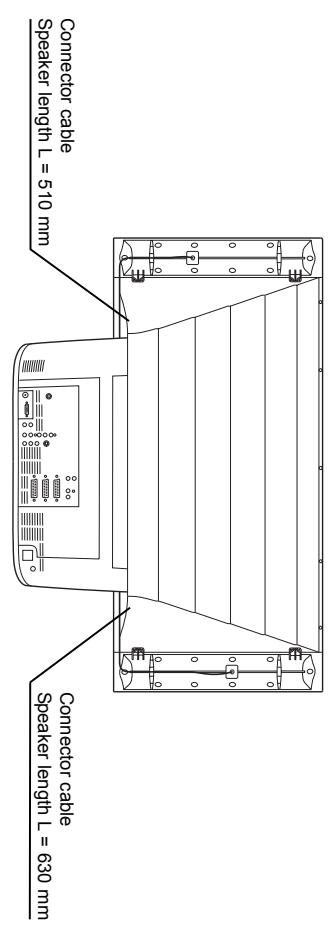
NB: The two speaker columns are interchangeable. This means that each one can be placed either on the right or left. Please note, the two audio cables provided have different lengths to allow for this.
15.2. Fitting and connecting speaker columns, SAGEM AXIUM HD-D45 model


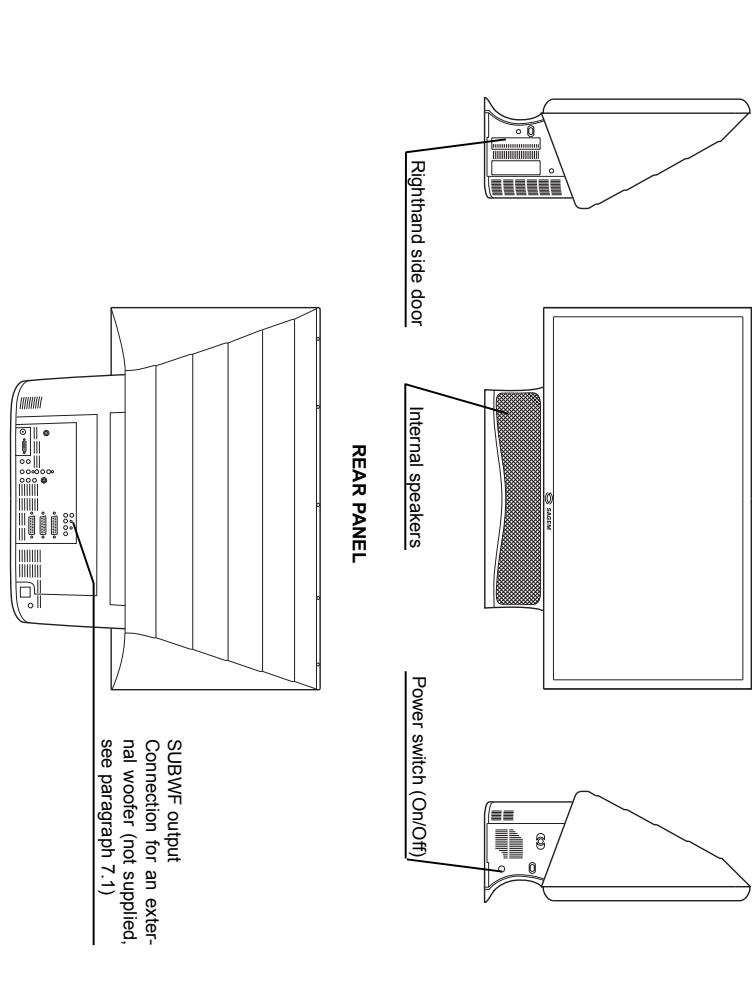
REAR PANEL
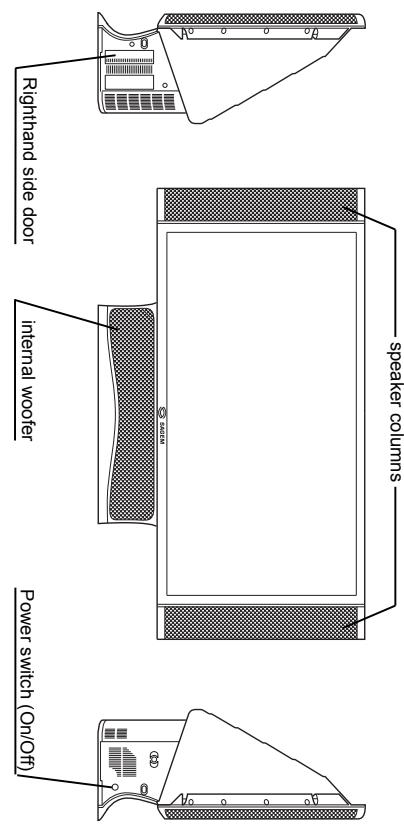
RIGHT-HAND VIEW
FRONT PANEL
LEFT-HAND VIEW
15.1. Overview of AXIUM HD-D45 model
ENGLISH
27
| Screen size: 114 cm | Audio output (2 x RC4) | PC IN |
| Aspect ratio: 16/9 | DVI D Computer Input | SERVICE (reserved for servicing personnel) |
| Number of programmes: 99 | Digital audio input (1 x RC4) | SUE WF (external woofer) |
| PAL B, G, H, I, D, K, SECAM B, G, D, K, L / L | Digital audio input (1 x RC4) | SUE WF (external woofer) |
| Number of programmes: 99 | Digital audio input (1 x RC4) | SUE WF (external woofer) |
| Input sensitivity: 20 - 100 dB/V | Digital audio input (1 x RC4) | SUE WF (external woofer) |
| Input frequencies: 45.5 - 862.25 MHz | Digital audio input (1 x RC4) | SUE WF (external woofer) |
| Input requesties: 45.5 - 862.25 MHz | Digital audio input (1 x RC4) | SUE WF (external woofer) |
| Input sensitivity: 20 - 100 dB/V | Digital audio input (1 x RC4) | SUE WF (external woofer) |
| Input frequency: 45.5 - 862.25 MHz | Digital audio input (1 x RC4) | SUE WF (external woofer) |
| Input regulator: 45.5 - 862.25 MHz | Digital audio input (1 x RC4) | SUE WF (external woofer) |
| Input regulator: 45.5 - 862.25 MHz | Digital audio input (1 x RC4) | SUE WF (external woofer) |
| Input regulator: 45.5 - 862.25 MHz | Digital audio input (1x RC4) | SUE WF (external woofer) |
| Input regulator: 45.5 - 862.25 MHz | Digital audio input (1x RC4) | SUE WF (external woofer) |
| Input regulator: 45.5 - 862.25 MHz | Digital audio input (1x RC4) | SUE WF (external woofer) |
| Input regulator: 45-5 - 862.25 MHz | Digital audio input (1x RC4) | SUE WF (external woofer) |
| Input regulator: 45-5 - 862.25 MHz | Digital audio input (1x RC4) | SUE WF (external woofer) |
| Input regulator: 45-5 - 862.25 MHz | Digital audio input (1x RC4) | SDUE WF (external woofer) |
| Input regulator: 45-5 - 862.25 MHz | Digital audio input (1x RC4) | SUE WF (external woofer) |
| Input regulator: 45-5 - 862.25 MHz | Digital audio input (1x RC4) | SUE WF (external woofer) |
| Input regulator: 45-5 - 872.25 MHz | Digital audio input (1x RC4) | SUE WF (external woofer) |
| Input regulator: 45-5 - 872.25 MHz | Digital audio input (1x RC4) | SUE WF (external woofer) |
| Input regulator: 45-5 - 872.25 MHz | Digital audio input (1x RC4) | SUE WF (external Woofer) |
| Input regulator: 45-5 - 872.25 MHz | Digital audio input (1x RC4) | SUE WF (external Woofer) |
| Input regulator: 45-5 - 872.25 MHz | Digital audio input (1x RC4) | SUE WF (external Woofer) |
| Input regulator: 45-5 - 872.25MHz | Digital audio input (1x RC4) | SUE WF (external Woofer) |
| Input regulator: 45-5 - 872.25MHz | Digital audio input (1x RC4) | SUE WF (external Woofer) |
| Input regulator: 45-5 - 872.25MHz | Digital audio input (1x RC4) | SUE WF (external Woofer) |
- Technical characteristics of AXIUM HD-D455 model
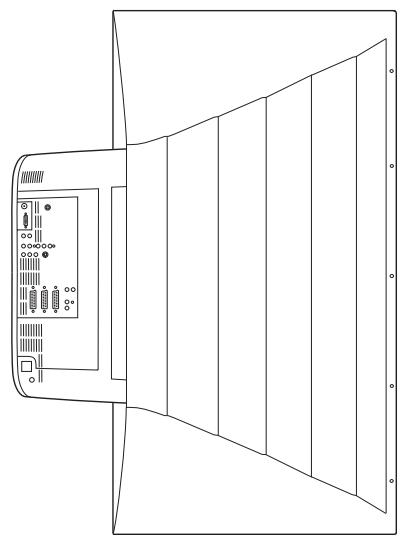
16.1. Overview of AXIUM HD-D45S model
RIGHT-HAND VIEW FRONT PANEL LEFT-HAND VIEW
[Non-Text]
Video
- Technical characteristics of AXIUM HD-D455 model
To enable / disable your own speakers, see § 6.8.
You can connect your own speakers to your SAGEM AXIUM in the Home Cinema Screen if they have an impedance greater than 15.2. Push the grooves, see step 9 in § 15.2. To do this, connect your speakers, see step 7 in § 15.2. Push the grooves, see step 9 in § 15.2.
17.2. Fitting and connecting additionally purchased external speakers
natural_image
Line drawing of a mechanical device with no visible text, numbers, or symbolsREAR PANEL
FRONT PANEL
LEFT-HAND VIEW
[Non-Text]
[Non-Text]
[Non-Text]
[Non-Text]
[Non-Text]
[Non-Text]
[Non-Text]
[Non-Text]
[Non-Text]
[Non-Text]
[Non-Text]
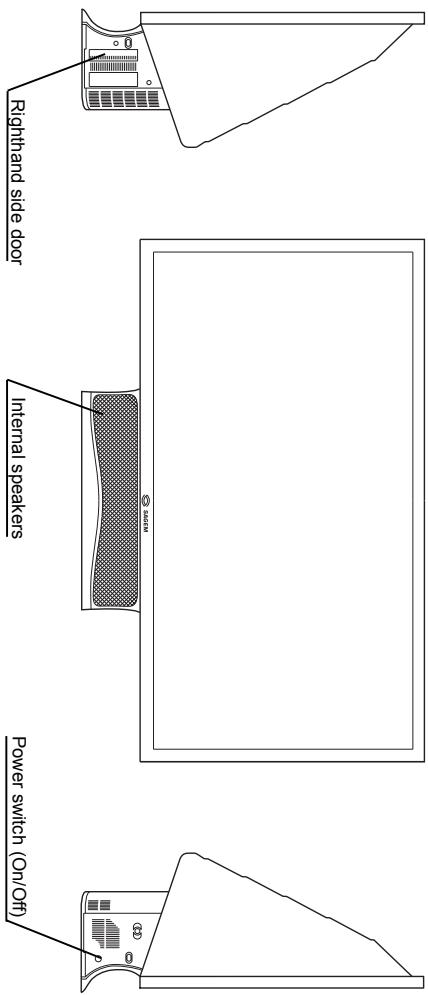
RIGHT-HAND VIEW
FRONT PANEL
RIGHT-HAND VIEW FRONT PANEL
| NOTES | A | M | N | O | D | F | G | S | I | L | T | V | 31 | 22 |
| A. | Atomic installation 9 | Maintenance 3 | Manual installation 9 | Bass, 16 | Bilingual programmes, 16 | Biss, 16 | Modifying the programme number 9, 10 | Mute, 16 | Bilingual programmes, 16 | C | Camcober, 14 | Country, 5, 8 | Bilingual programmes, 16 | |
| 18. Index | ||||||||||||||
- Switching on your SAGEM AXIUM TM Home Cinema Screen
- Mains connection
- Aerial connection
- Fitting and connecting the speakers (AXIUM HD-D45 only)
- Set UP
- First Rapid Installation
- Switching off your SAGEM AXIUM™ Home Cinema Screen
- Setting for the SPDIF output
- Exit standby mode tuning
- Adjusting the Hi-Fi output
- Note: AXIUM HD-D45S model has no, EPG' function.
- Source configuration
- RIGHTHAND SIDE DOOR
- ENGLISH
- Connection advice
- Connecting equipment and configurations
- Sound adjustment
- SURROUND DOUBLE
- BALANCE HEADPHONES VOL. WOOFER VOL.
- SMART VOL DYNAMIC BASS LOUDNESS
- ADVANCED SOUND SETTINGS
- PERSONAL SOUND SENTINGS
- Configuration of computer sources
- Picture adjustment
- Picture hold
- Choosing a TV programme
- Double picture mode selection
- Programme information
- Sleep timer
- Choice of sources
- Installation
- NextView EPG (AXIUM HD-D45 only)
- Teltext
- Navigation
- Changing the lamp unit
- Technical characteristics of AXIUM HD-D45 model
- ↓
- Overview of AXIUM HD-D45 model
Brand : SAGEM
Model : AXIUM HD-D56B
Category : TV