
62MX195 - Television TOSHIBA - Free user manual and instructions
Find the device manual for free 62MX195 TOSHIBA in PDF.

| Type | DLP Projection Television |
| Screen Size | 62 inches (diagonal) |
| Resolution | 1920 x 1080 (1080p) / 1280 x 720 (720p) / 480p/480i |
| Inputs | 2x HDMI, 2x ColorStream HD (component video), 2x Composite/S-Video, 2x IEEE1394, 1x PC (VGA), 1x Antenna/Cable (RF), 1x CableCARD slot |
| Outputs | Digital Audio Optical, Analog Audio Variable Out, A/V Out (composite), IR blaster (TheaterNet) |
| Audio | Dolby Digital, SRS WOW, Dolby Virtual TruSurround, Sub-bass system, StableSound |
| TV Guide On Screen | Built-in interactive program guide (no fee required) |
| Digital Tuner | Integrated ATSC (8VSB) and QAM tuner for digital over-the-air and cable |
| Lamp Type | Replaceable projection lamp (user-replaceable, rated for limited service life) |
| Power Supply | 120 VAC, 60 Hz |
| Power Consumption | Approx. 300W (typical) |
| Dimensions (W x H x D) | 56.5 x 39.4 x 19.3 inches (approx.) |
| Weight | 118 lbs (approx.) |
| Stand Model | Toshiba ST 6295 (optional, recommended for stability) |
| Special Features | Double-window POP, Favorite Channel Scan, Channel Browser, SurfLock, GameTimer, CableClear DNR, MPEG Noise Reduction, Dynamic Contrast, Quick Restart, THINC network (JPEG/MP3 sharing) |
| Memory Card Slots | SD/MMC, Memory Stick, CompactFlash, xD-Picture Card |
| Connectivity | Ethernet (RJ-45) for home network, G-LINK for VCR control, IR pass-through |
| Safety Certifications | FCC Class B, UL listed |
Frequently Asked Questions - 62MX195 TOSHIBA
User questions about 62MX195 TOSHIBA
0 question about this device. Answer the ones you know or ask your own.
Ask a new question about this device
Download the instructions for your Television in PDF format for free! Find your manual 62MX195 - TOSHIBA and take your electronic device back in hand. On this page are published all the documents necessary for the use of your device. 62MX195 by TOSHIBA.
USER MANUAL 62MX195 TOSHIBA
Integrated High Definition DLP™ Projection Television
COLORSTREAM ^ HD
CINEMA SERIES


Compatible with Toshiba's new
Symbio™
Audio/Video Hard Drive Recorder! See pages 26 and 55 for details.


HDMI
For an overview of steps for setting up your new TV, see page 9.
Note: A high definition tuner and programming are required to view High Definition TV broadcasts. Please contact your cable or satellite provider.
Note: It may take several minutes for the picture to appear on-screen if the TV is powered off and then on again quickly when the lamp unit is hot. This is a property of DLP TV lamp technology and is NOT a sign of malfunction. For details, see "IMPORTANT NOTICE ABOUT HOT LAMP RESTART" on page 5.
56MX195 62MX195 72MX195

Owner's Record
The model number and serial number are on the back of your TV. Record these numbers in the spaces below. Refer to these numbers whenever you communicate with your Toshiba dealer about this TV.
Model number:
Serial number:
Dear Customer,
Thank you for purchasing this Toshiba TV. This manual will help you use the many exciting features of your new TV. Before operating the TV, please read this manual completely, and keep it nearby for future reference.
Safety Precautions
WARNING: TO REDUCE THE RISK OF FIRE OR ELECTRIC SHOCK, DO NOT EXPOSE THIS APPLIANCE TO RAIN OR MOISTURE.

WARNING
RISK OF ELECTRIC SHOCK! DO NOT OPEN.

WARNING: TO REDUCE THE RISK OF ELECTRIC SHOCK, DO NOT REMOVE COVER (OR BACK). NO USER-SERVICEABLE PARTS INSIDE. REFER SERVICING TO QUALIFIED SERVICE PERSONNEL. (This does not apply to "Lamp unit replacement and care" on pages 128–130 of this manual.)
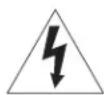
The lightning flash with arrowhead symbol, within an equilateral triangle, is intended to alert the user to the presence of uninsulated “dangerous voltage” within the product’s enclosure that may be of sufficient magnitude to constitute a risk of electric shock to persons.

The exclamation point within an equilateral triangle is intended to alert the user to the presence of important operating and maintenance (servicing) instructions in the literature accompanying the appliance.
Lamp Unit Replacement

CAUTION: HOT SURFACE!
The temperature of the lamp immediately after use exceeds 392°F (200°C). Touching the

lamp before it has cooled will result in severe burns. ALLOW THE LAMP TO COOL FOR AT LEAST ONE (1) HOUR BEFORE REPLACING IT.
The lamp in this product has a limited service life. The length of service life varies depending on product use and user settings. If you use the lamp beyond its service life:
- you may notice a reduction in the colors and/or brightness of the picture, at which time you should replace the lamp unit; and
- the strength of the quartz glass in the lamp will be reduced and the lamp may rupture. If the lamp ruptures, the TV will not operate until the lamp unit is replaced.
See "Lamp unit replacement and care" on pages 128–130.
Dispose of the used lamp unit by the approved method for your area.

Note: The lamp unit contains mercury.
Disposal of mercury may be regulated due to environmental considerations. For disposal or recycling information, contact your local authorities or the Electronic Industries Alliance (www.eiae.org).
NOTICE OF POSSIBLE TV STAND INSTABILITY

CAUTION: This television is for use only with the Toshiba stand listed below. Use with other carts or stands is capable of resulting in instability
causing possible injury.
Television Stand Model
56MX195 ST 5695
62MX195 ST 6295
72MX195 ST 7295
NOTE TO CATV INSTALLERS IN THE U.S.A.
This is a reminder to call the CATV system installer's attention to Article 820-40 of the U.S. NEC, which provides guidelines for proper grounding and, in particular, specifies that the cable ground shall be connected to the grounding system of the building, as close to the point of cable entry as practical. For additional antenna grounding information, see items 27 and 28 on page 4.
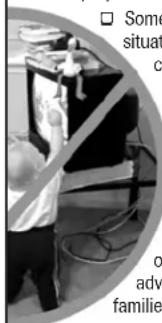
Child Safety
It Makes A Difference Where Your TV Stands
Congratulations on your purchase!

As you enjoy your new TV, keep these safety tips in mind:
The Issue
☐ If you are like most consumers, you have a TV in your home. Many homes, in fact, have more than one TV.
☐ The home theater entertainment experience is a growing trend, and larger TVs are popular purchases; however, they are not always supported on the proper TV stands.
Sometimes TVs are improperly secured or inappropriately situated on dressers, bookcases, shelves, desks, audio speakers, chests, or carts. As a result, TVs may fall over, causing unnecessary injury.
Toshiba Cares!
☐ The consumer electronics industry is committed to making home entertainment enjoyable and safe.
☐ The Consumer Electronics Association formed the Home Entertainment Support Safety Committee, comprised of TV and consumer electronics furniture manufacturers, to locate children's safety and educate consumers and their s about television safety.
Tune Into Safety
☐ One size does NOT fit all! Use appropriate furniture large enough to support the weight of your TV (and other electronic components).
☐ Use appropriate angle braces, straps, and anchors to secure your furniture to the wall (but never screw anything directly into the TV).
☐ Carefully read and understand the other enclosed instructions for proper use of this product.
☐ Do not allow children to climb on or play with furniture and TVs.
☐ Avoid placing any item on top of your TV (such as a VCR, remote control, or toy) that a curious child may reach for.
☐ Remember that children can become excited while watching a program and can potentially push or pull a TV over.
☐ Share our safety message about this hidden hazard of the home with your family and friends. Thank you!


Consumer Electronics Association
2500 Wilson Blvd. Arlington, VA 22201 U.S.A. Tel. 703-907-7600 Fax 703-907-7690 www.CE.org
CEA is the Sponsor, Producer and Manager of the International CES®
Important Safety Instructions
1) Read these instructions.
2) Keep these instructions.
3) Heed all warnings.
4) Follow all instructions.

5) Do not use this apparatus near water.
6) Clean only with a dry cloth.
7) Do not block any ventilation openings. Install in accordance with the manufacturer's instructions.
8) Do not install near any heat sources such as radiators, heat registers, stoves, or other apparatus (including amplifiers) that produce heat.
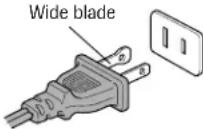
9) Do not defeat the safety purpose of the polarized or grounding type plug. A polarized plug has two blades with one wider than the other. A grounding type plug has
two blades and a third grounding prong. The wide blade or the third prong are provided for your safety. If the provided plug does not fit into your outlet, consult an electrician for replacement of the obsolete outlet.
10) Protect the power cord from being walked on or pinched, particularly at plugs, convenience receptacles, and the point where it exits the apparatus.
11) Only use attachments/accessories specified by the manufacturer.
12) Use only with the cart, stand, tripod, bracket, or table specified by the manufacturer, or sold with the apparatus. When a cart is used, use caution when moving the cart/apparatus combination to avoid injury from tip-over.

13) Unplug this apparatus during lightning storms or when unused for long periods of time.
14) Refer all servicing to qualified service personnel. Servicing is required when the apparatus has been damaged in any way, such as power-supply cord or plug is damaged, liquid has been spilled or objects have fallen into the apparatus, the apparatus has been exposed to rain or moisture, does not operate normally, or has been dropped.
14a) Item 14 does not apply to "Lamp unit replacement and care" on pages 128-130 of this manual.
14b) CAUTION: If the TV is dropped and the cabinet or enclosure surface has been damaged or the TV does not operate normally, take the following precautions:
- ALWAYS turn off the TV and unplug the power cord to avoid possible electric shock or fire.
•To prevent personal injury, never handle the damaged television. - ALWAYS contact a service technician to inspect the TV any time it has been damaged or dropped.
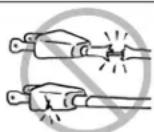
15) CAUTION: To reduce the risk of electric shock, do not use the polarized plug with an extension cord, receptacle, or other outlet unless the blades can be inserted completely to prevent blade exposure.
16) WARNING: This product contains a lamp to project the picture, and requires special safety precautions:
•See pages 128–130 for instructions on lamp unit replacement and care.
- DO NOT attempt to service this product except as specified on pages 128–130. The only user-serviceable item in this product is the lamp unit.
Installation, Care, and Service Installation
Follow these recommendations and precautions and heed all warnings when installing your TV:
17) Never modify this equipment. Changes or modifications may void: a) the warranty, and b) the user's authority to operate this equipment under the rules of the Federal Communications Commission.
18) DANGER: RISK OF SERIOUS PERSONAL INJURY, DEATH, OR EQUIPMENT
DAMAGE! Never place the TV on an unstable cart, stand, or table. The TV may fall, causing serious personal injury, death, or serious damage to the TV.

19) Never place or store the TV in direct sunlight; hot, humid areas; areas subject to excessive dust or vibration; or locations with temperatures at or below 41^ F ( 5^ C).
20) Always place the TV on the applicable optional TV stand(s) listed in the "Specifications" section (if available for this TV model) or on a sturdy, level, stable surface that can safely support the size and weight of the unit. See "Notice of possible TV stand instability" and "Child Safety" on page 2.
21) Never expose the apparatus to dripping or splashing or place items such as vases, aquariums, any other item filled with liquid, or candles on top of the TV.
22) Always place the back of the television at least one (1) inch away from any vertical surface (such as a wall) to allow proper ventilation.
23) Never block or cover the slots or openings in the TV cabinet back, bottom, and sides. Never place the TV:
• on a bed, sofa, rug, or similar surface;
•too close to drapes, curtains, or walls; or
- in a confined space such as a bookcase, built-in cabinet, or any other place with poor ventilation.
The slots and openings are provided to protect the TV from overheating and to help maintain reliable operation of the TV.
24) Never allow anything to rest on or roll over the power cord, and never place the TV where the power cord is subject to wear or abuse.
25) Never overload wall outlets and extension cords.
26) Always operate this equipment from a 120 VAC, 60 Hz power source only.
(continued on next page)
Installation (continued from previous page)
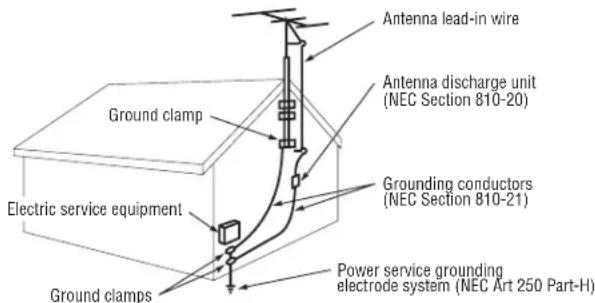
27) Always make sure the antenna system is properly grounded to provide adequate protection against voltage surges and built-up static charges (see Section 810 of the National Electric Code).
28) DANGER: RISK OF SERIOUS PERSONAL INJURY OR DEATH!
Use extreme care to make sure you are never in a position where your body (or any item you are in contact with, such as a ladder or screwdriver) can accidentally touch overhead power lines. Never locate the antenna near overhead power lines or other electrical circuits.
- Never attempt to install any of the following during lightning activity: a) an antenna system; or b) cables, wires, or any home theater component connected to an antenna or phone system.
Care
For better performance and safer operation of your TOSHIBA TV, follow these recommendations and precautions:
29) Always sit approximately 10–25 feet away from the TV and as directly in front of it as possible. The picture can appear dull if you sit too far to the left or right of the TV, or if sunlight or room lights reflect on the screen. Turn the TV off to check for reflections on the screen, and then remove the source of reflections while viewing the TV.
30) Always unplug the TV before cleaning. Never use liquid or aerosol cleaners. Clean only with a soft, dry cloth. Do not spray volatile compounds, such as insecticide, on the cabinet. This may discolor or damage the cabinet.
31) WARNING: RISK OF ELECTRIC SHOCK!
Never spill liquids or push objects of any kind into the TV cabinet slots.

32) If the air temperature rises suddenly (for example, when the TV is first delivered), condensation may form on the lenses. This can make the picture appear distorted or the color appear faded. If this happens, turn off the TV for 6 to 7 hours to allow the condensation to evaporate.
Care (continued from previous column)
33) For added protection of your TV from lightning and power surges, always unplug the power cord and disconnect the antenna from the TV if you leave the TV unattended or unused for long periods of time.
34) During normal use, the TV may make occasional snapping or popping sounds. This is normal, especially when the unit is being turned on or off. If these sounds become frequent or continuous, unplug the power cord and contact a Toshiba Authorized Service Center.
35) Special care for DLP™ (Digital Light Processing) units:
- The lamp unit in this product has a limited service life. The length of service life varies depending on product use or user settings. If you use the lamp beyond its service life:
- you may notice a reduction in the colors and/or brightness of the picture, at which time you should replace the lamp unit; and
- the strength of the quartz glass in the lamp will be reduced and the lamp may rupture. If the lamp ruptures, the TV will not operate until the lamp unit is replaced.
See "Lamp unit replacement and care" on pages 128-130.
- Dispose of the used lamp unit by the approved method for your area.
•The lamp unit contains mercury. Disposal of mercury may be regulated due to environmental considerations. For disposal or recycling
information, please contact your local authorities or the Electronic Industries Alliance (www.eiae.org).
Service
36) WARNING: RISK OF ELECTRIC SHOCK!
Never attempt to service the TV yourself, except as specified on pages 128–130.
Opening and removing the covers may expose you to dangerous voltage or other hazards. Failure to follow this WARNING may result in death or serious injury. Refer all servicing not specified in this manual to a Toshiba Authorized Service Center.
37) If you have the TV serviced:
- Ask the service technician to use only replacement parts specified by the manufacturer.
- Upon completion of service, ask the service technician to perform routine safety checks to determine that the TV is in safe operating condition.
38) When the TV reaches the end of its useful life, ask a qualified service technician to properly dispose of the TV.
Note: The lamp unit contains mercury. Disposal of mercury may be regulated due to environmental considerations. Dispose of the used lamp unit by the approved method for your area. For disposal or recycling information, please contact your local authorities or the Electronic Industries Alliance (www.eiae.org).
FCC Declaration of Conformity Compliance Statement (Part 15):
The Toshiba 56MX195, 62MX195, and 72MX195 DLP™ projection TVs comply with Part 15 of the FCC rules.
Operation is subject to the following two conditions: (1) this device may not cause harmful interference, and (2) this device must accept any interference that may cause undesired operation.
The party responsible for compliance to these rules is: Toshiba America Consumer Products, L.L.C. 82 Totowa Rd. Wayne, NJ 07470. Ph: (973) 628-8000
Note: This equipment has been tested and found to comply with the limits for a Class B digital device, pursuant to Part 15 of the FCC rules. These limits are designed to provide reasonable protection against harmful interference in a residential installation. This equipment generates, uses, and can radiate radio frequency energy and, if not installed and used in accordance with the instructions, may cause harmful interference to radio communications. However,
there is no guarantee that interference will not occur in a particular installation. If this equipment does cause harmful interference to radio or television reception, which can be determined by removing and applying power to the equipment, the user is encouraged to try to correct the interference by one or more of the following measures:
•Reorient or relocate the receiving antenna.
- Increase the separation between the equipment and the receiver.
- Connect the equipment into an outlet on a circuit different from that to which the receiver is connected.
- Consult the dealer or an experienced radio/TV technician for help.
CAUTION: Changes or modifications to this equipment not expressly approved by Toshiba could void the user's authority to operate this equipment.
Important notes about your DLP™ projection TV
1) The light source for this TV is a projection lamp unit with a limited service life. When the lamp wears out, the picture may become dark or black or the lamp may fail, at which time you must replace the lamp unit. See “Lamp unit replacement and care” on pages 128–130.
2) If you set the lamp mode to Low Power, each time you turn on the TV, the lamp will start out in High Bright mode but will switch to Low Power mode in approximately 1 minute. You will notice a change in screen brightness when this happens. This is normal and is not a sign of malfunction. (See page 80 for details.)
3) Every time you turn on the TV, it may take several minutes for the picture to obtain full brightness.
4) This TV's display is manufactured using an extremely high level of precision technology; however, an occasional pixel (dot of light) may show constantly on the screen. This is a structural property of DLP™ (Digital Light Processing™) technology in the TV and is not a sign of malfunction. Such pixels are not visible when the picture is viewed from a normal viewing distance (see item 29 on page 4).
5) Depending on the media you are viewing, it is possible, although unlikely, that a limited number of viewers may see a “rainbow effect” on the screen, which can, in rare instances, result in eye fatigue. This is a rare occurrence related to technology of this type and is not a sign of TV malfunction.
6) Always sit approximately 10–25 feet away from the TV and as directly in front of it as possible. The picture quality may be affected by your viewing position and length of viewing time. If you sit too closely to the TV for too long, you may suffer from eye fatigue. See item 29 on page 4.
7) This TV contains several cooling fans to moderate the internal temperature. You may be able to hear the fans for several minutes after the TV is turned off. This is a function of the Quick Restart™ feature and is not a sign of TV malfunction. You can set the Quick Restart™ feature to stop the fans as soon as the TV is turned off. See "Setting the Quick Restart™ feature" on page 56.
8) The yellow and blue LED lights at the bottom center of the TV front indicate your TV's current status. If either light flashes, see "LED indications" on page 124 for details.
9) If you unplug the power cord, when you plug the power cord in again the message "Now Booting..." will display on the screen until the picture appears or the yellow LED will blink until the TV enters standby mode (plugged in but not powered on). This is normal and is not a sign of malfunction.
10) When connecting an external A/V device, if you connect the device's video output to the TV and the device's audio output to a separate audio system, the picture and sound may not synchronize completely.
11) When playing a video game on this TV, there may be a slight delay between your command (e.g., joystick, keyboard) and the picture movement on the screen.
IMPORTANT NOTICE ABOUT "HOT LAMP RESTART"
When the TV has been powered on long enough for the lamp unit to get hot, it may take several minutes for the picture to appear on-screen in the following situations:
- When the Quick Restart™ feature is set to OFF and you turn the TV off and then on again within a few minutes.
- If the TV is on when a short-term power failure, power surge, or other similar power failure occurs, such that the TV loses and regains power within a few minutes.
This is a property of DLP TV lamp technology and is NOT a sign of malfunction.
If this occurs, the yellow LED on the TV front panel will blink (and the blue LED will be lit solid) until the TV is finished restarting the lamp and the normal picture appears. If BOTH yellow and blue LEDs are blinking at a one-second rate, you will need to turn the TV off and then on again to restart the lamp.
Contents
Important safety, care, and service information .... 2-4
FCC Declaration of Conformity Compliance
Statement (Part 15): 5
Important notes about your DLP™ projection TV .... 5
Chapter 1: Introduction ...... 8
Welcome to Toshiba 8
Features of your new TV 8
Overview of steps for installing, setting up, and using your new TV 9
Chapter 2: Connecting your TV 10
TV front and side panel controls and connections ...... 10
TV back panel connections 11
Overview of cable types 13
About the connection illustrations 14
Connecting a digital CableCARD ^TM 14
Connecting a VCR and antenna or Cable TV (no Cable box) 15
Connecting a camcorder 15
Connecting a VCR and Cable box 16
Connecting a VCR and satellite receiver 17
Connecting a DVD player with S-video, a VCR, and a Cable box 18
Connecting a DVD player with ColorStream® (component video) and a VCR .... 19
Connecting two VCRs 20
Connecting an HDMI ^™ or a DVI device to the HDMI input 21
Connecting a device to the IR blaster (IR pass-through) ..... 22
Connecting a digital audio system 24
Connecting an analog audio system 24
Connecting IEEE1394 video devices .... 25 Using analog-compatible IEEE1394 devices .... 25
Supported signals 25
Using TheaterNet™ on-screen device control 25
Connecting an AVHD (external hard drive) or D-VHS digital recorder 26
IEEE1394 device initialization 26
IEEE1394 device management 27
G-LINK ^™ connection 28
Connecting a personal computer (PC) 29
Connecting a home network 30
Chapter 3: Using the remote control .... 31
Learning about the remote control 31
Installing the remote control batteries.... 33
Using the remote control MODE button to control your other devices.... 33
Remote Control functional key chart 34
Programming the remote control to operate your other devices.... 36
Multi-brand remote control device codes.... 38
Chapter 4: Menu layout and navigation .... 40
Main menu layout 40
Setup/Installation menu layout 41
Navigating the menu system.... 41
Chapter 5: TV Guide On Screen™ setup....42
Setting up the TV Guide On Screen™ system 42
TV Guide On Screen ^™ Reminder 45
Turning off the TV Guide On Screen™ automatic display feature 45
Chapter 6: Setting up your TV 46
Selecting the menu language.... 46
Configuring the antenna input sources 46
Programming channels into the TV's channel memory ..... 47
Programming channels automatically 47
Manually adding and deleting channels in the channel memory 48
Programming your favorite channels 49
Setting up and using TheaterNet ^TM on-screen device control .... 50
Setting up TheaterNet 50
Using the TheaterNet control icons.... 51
TheaterNet IR device codes 52-54
Setting the AVHD device skip time 55
Setting the HDMI™ audio mode 55
Setting the time and date 55
Viewing the CableCARD™ menu 56
Setting the Quick Restart ^™ feature 56
Viewing the digital signal meter 57
Viewing the system status 57
Chapter 7: Using the TV Guide On Screen™
interactive program guide 58
Setting up the TV Guide On Screen™ system 58
Navigating the TV Guide On Screen™ system 59
TV Guide On Screen™ remote control functions ..... 59
Video Window 60
Panel Menus 60
Info Box 61
TV Guide On Screen™ Icons 61
TV Guide On Screen™ Services 62
LISTINGS screen 62
SEARCH screen....63
RECORDINGS screen 65
SCHEDULE screen 66
Record features 66
Remind features 68
SETUP screen 70
Change system settings 70
Change channel display 70
Change default options 71
Contents
Chapter 8: Using the TV's features ....72
Selecting the video input source to view 72
Labeling the video input sources 73
Tuning channels 74
Using the Channel Browser™ 74
Tuning your favorite channels 76
Tuning to the next programmed channel 76
Tuning to a specific channel (programmed or unprogrammed) 76
Switching between two channels using Channel Return 76
Switching between two channels using SurfLock ^™ 76
Selecting the picture size 77
Scrolling the TheaterWide® picture (TheaterWide 2 and 3 only) ....79
Using the auto aspect ratio feature 79
Selecting the cinema mode (480i signals only) 80
Selecting the lamp mode 80
Using the POP features .... 81 Using the POP double-window feature .... 81 Switching the speaker audio (main or POP) .... 82 POP double-window aspect ratio .... 82
Using the FREEZE feature 83
Using the favorite channel scan feature 83
Adjusting the picture .... 84 Selecting the picture mode .... 84 Adjusting the picture quality .... 84 Using CableClear®/DNR (digital noise reduction) .... 85 Selecting the color temperature .... 85 Using MPEG noise reduction .... 86 Using dynamic contrast .... 86
Using the closed caption mode .... 87 Advanced closed captions .... 87 Digital closed captions .... 88
Adjusting the audio ....89 Muting the sound ....89 Using the digital audio selector ....89 Selecting stereo/SAP broadcasts ....89 Adjusting the audio quality ....90 Using the sub-bass system (SBS) ....90 Using the StableSound® feature ....90 Using the SRS WOW™ surround sound feature ....91 Using the Dolby Virtual with SRS TruSurround sound feature ....91 Turning off the built-in speakers ....92 Selecting the optical audio output format ....92
Setting the On/Off Timer 93
Setting the sleep timer .... 93 Using the PC setting feature .... 94
Displaying TV setting information on-screen using RECALL ... 95
Understanding the auto power off feature....95
Understanding the last mode memory feature 95
Using the Gray Level feature 95
Chapter 9: Using the Locks menu .... 96 Entering the PIN code .... 96 If you cannot remember your PIN code .... 96 Changing your PIN code .... 96 Blocking TV programs and movies by rating (V-Chip) .... 97 Blocking channels.... 98 Unlocking programs temporarily .... 98
Locking video inputs 98
Using the GameTimer ^TM 99
Using the control panel lock feature 99
Chapter 10: Using the Picture Viewer and Audio Player .... 100
Media specifications .... 100 File/folder name specifications .... 100 Picture Viewer/JPEG file specifications .... 100 Audio Player/MP3 file specifications .... 100 PC network specifications .... 101 Memory card specifications .... 101
Using the Picture Viewer .... 102 Accessing JPEG files stored on a networked PC .... 102 Accessing JPEG files stored on a memory card .... 102 Viewing JPEG files on the TV .... 103
Using the Audio Player .... 103 Accessing MP3 files stored on a networked PC .... 104 Accessing MP3 files stored on a memory card .... 104 Playing MP3 audio files on the TV .... 105
Memory card care and handling 105
Chapter 11: Using the THINC™ home network feature .... 106
A. Connect the TV to your home network 106
B. Set up the network address ..... 106
Automatically setting up the network address ..... 106
Manually setting up the network address ..... 107
Resetting the network address ..... 108
C. Set up file sharing on your PC .... 109 Compatible operating systems .... 109 Setting up file sharing on a PC with Microsoft® Windows® XP Service Pack 1 or Service Pack 2 .... 109 Setting up file sharing on a PC with Microsoft® Windows® 2000 .... 110
D. Set up file sharing on the TV 111
E. Viewing/playing shared files on the TV 111
F. Set up e-mail scheduling .... 112 Required information and services .... 112 Setting up e-mail scheduling .... 112 Description of fields in the “E-mail Scheduling Setup” window .... 114
G. Using e-mail scheduling .... 116 E-mail parameters .... 116 Sending a request e-mail to the TV .... 116 Formatting a request e-mail .... 116 Recognized tags .... 116 Tag and data formats .... 116 Sample request e-mails .... 117 Receiving an e-mail from the TV .... 118 Modifying an existing recording or reminder .... 118
Chapter 12: Troubleshooting .... 119 General troubleshooting .... 119 Home network troubleshooting.... 122 LED indications .... 124 TV Guide On Screen™ FAQ .... 125–127
Chapter 13: Appendix ...... 128 Lamp unit replacement ...... 128–130 Specifications ...... 131 Limited United States Warranty ...... 132 Limited Canada Warranty ...... 133 Index ...... 135
1
Introduction
Welcome to Toshiba
Thank you for purchasing this Toshiba TV, one of the most innovative DLP™ projection TVs on the market. The goal of this manual is to guide you through setting up and operating your TV as quickly as possible.
See "Important notes about your DLP" projection TV" on page 5.
- This manual applies to models 56MX195, 62MX195, and 72MX195. Before you start reading, check the model number on the back of your TV.
- Instructions in this manual are based on using the remote control. You also can use the controls on the TV's front and side control panels if they have the same name as those referred to on the remote control. (MENU on the side panel functions as ENTER when a menu is on-screen or when the TV Guide On Screen™ system is open.)
- The side panel and back panel provide terminals for connecting other equipment to your TV. See page 10 for TV control panel and side panel details. See page 11 for back panel details. See pages 14–30 for instructions on connecting other devices to your TV.
- Please read all safety and operating instructions in this manual carefully and keep this manual for future reference.
Features of your new TV
The following are just a few of the many exciting features of your new Toshiba widescreen, integrated HD, DLP™ projection TV:
- Integrated digital tuning (8VSB ATSC and QAM) eliminates the need for a separate digital converter set-top box (in most cases).
- TV Guide On Screen™ no-fee interactive program guide (Chapters 5 and 7).
- Digital CableCARD™ slot for viewing encrypted digital Cable TV programs (page 14).
- Digital recording by connecting a Toshiba Symbio™ Audio/Video Hard Drive Recorder or a D-VHS digital recording device to one of the IEEE1394 jacks. You can record high definition and standard definition material from either tuner (page 25).
- Memory card slots [SD Memory Card, MultiMediaCard, Memory Stick, CompactFlash, xD-Picture Card™] for viewing JPEG files as a “slide show” (page 103) and playing MP3 files (page 104).
- TheaterNet™ icons for on-screen control of external IR and IEEE1394 devices (page 50).
- Two IEEE1394 ports for multi-device connection and control (page 25).
- Two HDMI (DVI) digital, high-definition multimedia interfaces (page 21).
- Two sets of ColorStream® HD high-resolution component video inputs (pages 17 and 19).
- Dolby Digital (page 24), SRS WOW™ (page 91), and Dolby Virtual TruSurround (page 91), audio technologies.
• Digital Audio Out optical audio connection (page 24).
- CableClear® DNR digital picture noise reduction (page 85).
- Double-window POP (page 81) and multi-window Favorites (page 83) features.
- PC IN (Analog RGB) for using the TV screen as the display for a PC (page 29).
- Internet (RJ-45) (THINC™) port for connecting the TV to a home network to enable file sharing (JPEG, MP3) and e-mail scheduling of recordings and reminders (page 30).
Note: After you set up the TV Guide On Screen™ system (Chapter 5), the program guide opens automatically by default when you turn on the TV. You can turn off the automatic program guide (page 45) and instead press the TV GUIDE button on the remote control to manually open the program guide.
Overview of steps for installing, setting up, and using your new TV
Follow these steps to set up your TV and begin using its many exciting features.
- Carefully read the important safety, installation, care, and service information on pages 2–5. Keep this manual for future reference.
- Observe the following when choosing a location for the TV:
- Read "Installation" on pages 3–4.
- Place the TV on the applicable optional TV stand listed in the "Specifications" section (if available for this TV model) or on a sturdy, level, stable surface that can safely support the size and weight of the unit.

NOTICE OF POSSIBLE TV STAND INSTABILITY
DANGER: RISK OF SERIOUS PERSONAL INJURY
OR DEATH! Use this TV only with the TOSHIBA TV
stand listed in the "Specifications" section. Use with other stands may result in instability, causing possible injury or death.
- Place the TV in a location where light does not reflect on the screen.
- Place the TV far enough from walls and other objects to allow proper ventilation. Inadequate ventilation may cause overheating, which will damage the TV. THIS TYPE OF DAMAGE IS NOT COVERED UNDER THE TOSHIBA WARRANTY.
-
Read "Important notes about your DLP™ TV" on page 5.
-
Do not plug in any power cords until AFTER you have connected all cables and devices to your TV.
- BEFORE connecting cables or devices to the TV, learn the functions of the TV's connections and controls (pages 10-12).
- Connect your other electronic device(s) to the TV (pages 14–30).
-
Connect the G-LINK™ cable (either one of the enclosed IR blaster cables) from your VCR and/or Cable box (if applicable) to the G-LINK™ terminal so you can use the TV Guide On Screen™ features (applies to VCRs and cable boxes only). See page 28.
-
Install the batteries in the remote control (page 33).
-
See "Learning about the remote control" (page 31) for an overview of the buttons on the remote control.
-
Program the remote control to operate your other device(s) (pages 33–39).
- AFTER connecting all cables and devices, plug in the power cords for your TV and other devices.
- After you plug in the TV power cord, the yellow LED (on the TV front) will blink while the TV is booting until the remote control is usable. When the yellow LED stops blinking, press POWER to turn on the TV.
See "LED indications" on page 124. - See "Menu layout and navigation" for a quick overview of navigating the TV's menu system (pages 40-41).
- See Chapter 5 for details on setting up the TV Guide On Screen™ system (if available in your area).
- See Chapter 7 for details on using the TV Guide On Screen™ program guide (if available in your area).
- Program channels into the TV's channel memory (page 47).
- Set up the TheaterNet™ on-screen device control feature (if applicable to your particular home theater system components) (page 50).
- For details on using the TV's features, see Chapters 8 and 9.
- For details on using the JPEG Picture Viewer and MP3 Audio Player to view/play files saved on either a memory card or networked PC, see Chapter 10.
- For details on connecting the TV to a home network to enable file sharing and e-mail scheduling of recordings, see Chapter 11.
- For help, refer to the Troubleshooting Guide (Chapter 12).
- For lamp unit replacement instructions, see Chapter 13.
- For technical specifications and warranty information, see Chapter 13.
- Enjoy your new TV!
2
Connecting your TV
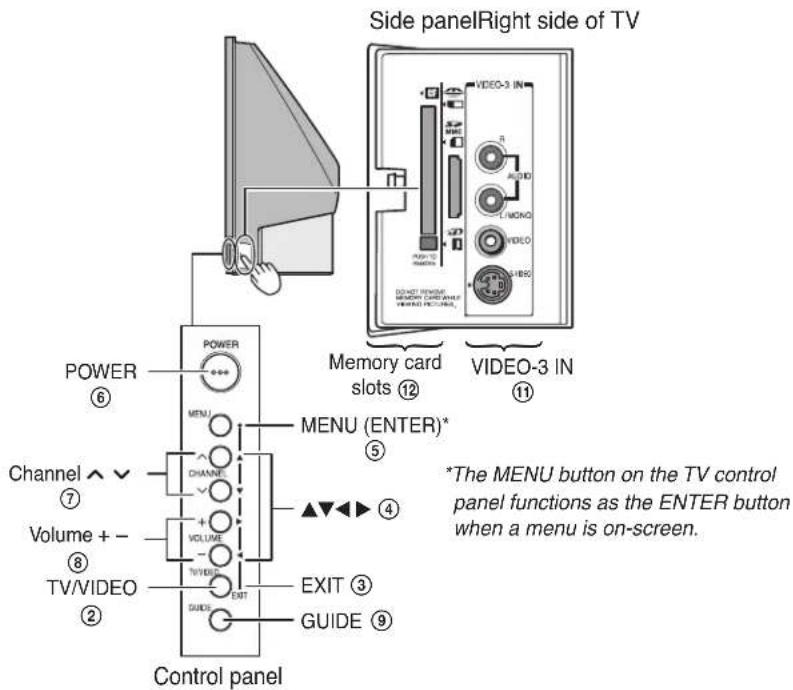
TV front and side panel controls and connections
Front of TV
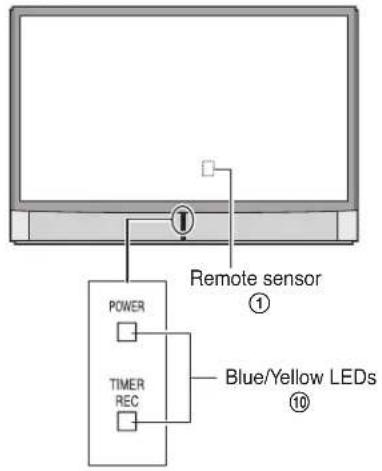
① Remote sensor (behind the screen) — Point the remote control toward this area of the TV screen. See “Remote control effective range” on page 32.
② TV/VIDEO — Repeatedly press to change the source you are viewing (ANT 1, ANT 2, VIDEO 1, VIDEO 2, VIDEO 3, HDMI 1, HDMI 2, ColorStream HD1, ColorStream HD2, PC).
③ EXIT — Press to close an on-screen menu instantly.
④ ARROWS ▲▼◀▶ — When a menu is on-screen, these buttons function as up/down/left/right menu navigation buttons.
⑤ MENU (ENTER) — Press to access the menu system (see pages 40–41). When a menu is on-screen or the TV Guide On Screen™ program guide is open, the MENU button on the TV's side control panel functions as the ENTER button.
⑥ POWER — Press to turn the TV on and off.
If the TV stops responding to the controls on the remote control or TV control panel and you cannot turn off the TV, press and hold the POWER button on the TV front panel for 5 or more seconds to reset the TV.
⑦ CHANNEL ∧∨ — When no menu is on-screen, these buttons change the channel (programmed channels only; see page 47). When a menu is on-screen, these buttons function as up/down menu navigation buttons.
⑧ VOLUME + - — When no menu is on-screen, these buttons adjust the volume level. When a menu is on-screen, these buttons function as left/right menu navigation buttons.
⑨ GUIDE—Press to access the TV Guide On Screen™ program guide. (See Chapter 7 for details on using the program guide.)
⑩ Blue and Yellow LEDs
When the blue LED lights solid (not blinking), it indicates that the TV power cord is plugged in.
When the yellow LED lights solid (not blinking), it indicates that recording is in progress.
See "LED indications" on page 124 for additional information.
⑪ VIDEO-3 — The side panel A/V connections are referred to as “VIDEO 3” and include standard A/V connections plus optional S-video. (The VIDEO 1 and VIDEO 2 A/V connections are on the TV’s back panel; see page 11.)
⑫ Memory card slots — Insert a memory card into one of the memory card slots to view JPEG files (such as photos) as a “slide show” on your TV or listen to MP3 audio files (see Chapter 10).
TV back panel connections
For an explanation of cable types, see page 13.
natural_image
Diagram of a computer monitor with an inset showing internal components (no text or symbols)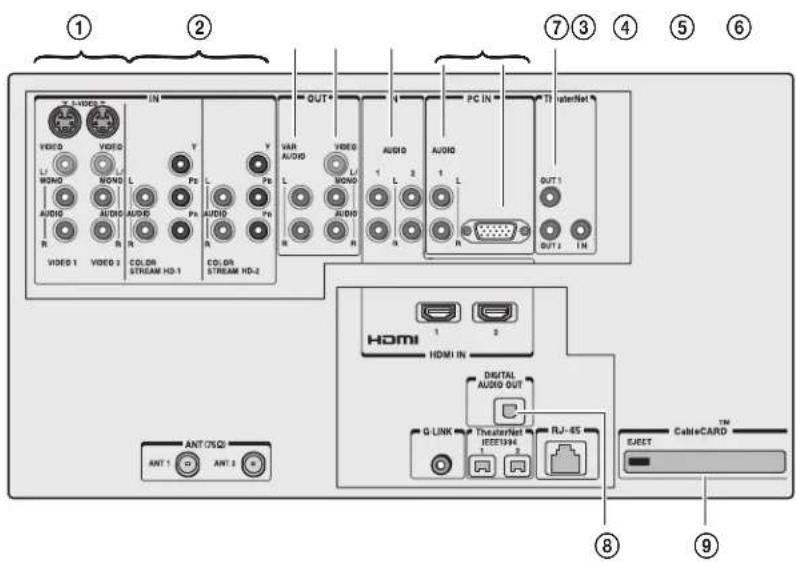
① VIDEO 1 IN and VIDEO 2 IN — Two sets of standard (composite) video and standard audio inputs plus optional S-video inputs for connecting devices with composite video or S-video output.
Note: Standard (composite) video and S-video cables carry only video information; separate audio cables are required for a complete connection.
②ColorStream ^® HD-1 and ColorStream ^® HD-2 — Two sets of ColorStream ^® high-definition component video inputs (with standard stereo audio inputs) for connecting devices with component video output, such as a Toshiba DVD player with ColorStream. ^® See pages 17 and 19.
Note: Component video cables carry only video information; separate audio cables are required for a complete connection.
③Variable Audio OUT — Standard analog audio outputs for connecting an analog amplifier with external speakers. See page 24.
④A/V OUT — Standard composite video and analog audio outputs for connecting a VCR for editing and dubbing. See page 20 for details.
⑤HDMI Audio IN — For use when connecting a DVI device with analog audio output to one of the HDMI inputs. See page 21. Also see item 11 on the next page.
⑥PC IN — For use when connecting audio and video from a personal computer to use the TV screen as the display for the PC. See page 29.
⑦TheaterNet ^™ (IR) OUT 1 and 2 — For controlling infrared remote-controlled devices through the TV. You can connect up to two devices with either one of the enclosed IR blaster cables, and then control the devices using the TV's IR pass-through or TheaterNet ^™ (on-screen device control) features. See pages 22 and 50.
TheaterNet™ (IR) IN — For connecting to IR OUT on other devices. See page 23.
⑧Digital Audio OUT — Optical audio output in Dolby Digital or PCM (pulse-code modulation) format for connecting an external Dolby Digital decoder, amplifier, A/V receiver, or home theater system with optical audio input. See page 24.
⑨CableCARD ™ slot — For use with a digital security card and digital cable TV service (provided by your local cable operator) to view encrypted digital programming. See pages 14 and 56.
(Continued on next page)
TV back panel connections (continued)
3
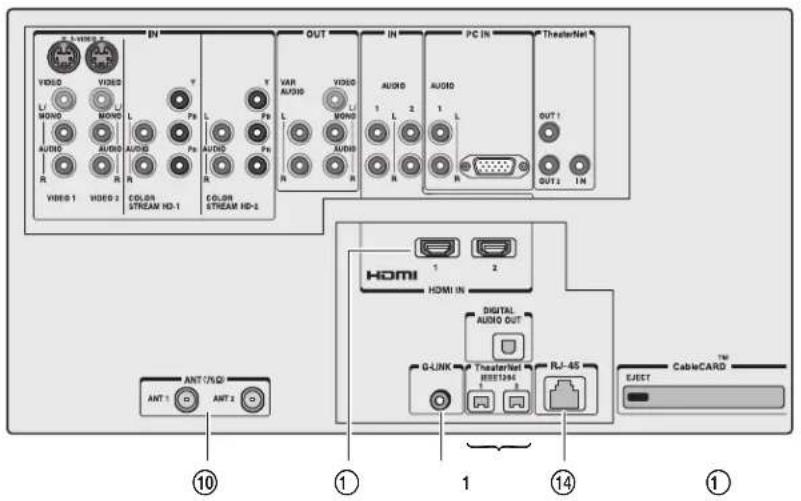
⑫
⑩ ANT-1 (CABLE) IN and ANT-2 IN — Two inputs that support analog (NTSC) and digital (ATSC) off-air antenna signals and analog and digital (QAM) Cable TV signals.
Note: If you have an antenna only, connect it to ANT-1. If you have both cable TV and an antenna, connect the cable TV to ANT-1 and the antenna to ANT-2.
⑪HDMI™ IN 1 and 2 — Two High-Definition Multimedia Interface inputs receive digital audio and uncompressed digital video from an HDMI device or uncompressed digital video from a DVI device. See page 21. Also see item 5 on the previous page.
⑫G-LINK™ — For use with one of the enclosed IR blaster/G-LINK™ cables to enable the TV Guide On Screen™ recording features. See page 28.
⑬IEEE1394 — Two bi-directional digital IEEE1394 ports for connecting multiple devices with compressed digital video. Because these ports are bi-directional, they can be used for playback and recording. You can control your IEEE1394 devices using the TV's TheaterNet on-screen device control icons. See pages 25–27 and 50.
Note:
- IEEE1394 cable carries both audio and video information; separate audio cables are not required.
⑭RJ-45 (Ethernet) (THINC™ system*) — Allows you to connect the TV to your home network. See boxed note below.
\*THINC™ system
(Toshiba Home Interactive Network Connection)
The RJ-45 (Ethernet) port allows your Toshiba Cinema Series TV to connect to your home network. This revolutionary home entertainment networking system lets you access MP3 audio files and JPEG picture files that are stored on a networked PC (as shared files) and play/display them on your TV.
You also can play your shared MP3 audio files through a connected audio system.
See pages 24 and 30 and Chapters 10 and 11 for details.
Overview of cable types
Note: Two dual-wand IR blaster/G-LINK™ cables are included with your TV. All other required cables, if not provided with your other devices, can be purchased at many electronics accessory suppliers.
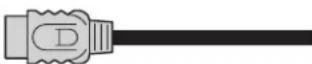
- Coaxial (F-type) cable is used for connecting your antenna, cable TV service, and/or cable converter box to the ANT-1 and/or ANT-2 RF inputs on your TV.
- Standard A/V cables (composite video) usually come in sets of three, and are for use with video devices with standard audio and standard (composite) video output. These cables (and the related inputs on your TV) are typically color-coded according to use: yellow for video, red for stereo right audio, and white for stereo left (or mono) audio.
- S-video cable is for use with video devices with S-video output. Separate audio cables are required for a complete connection.
Note: An S-video cable provides better picture performance than a composite video cable. If you connect an S-video cable, be sure to disconnect the standard (composite) video cable or the picture performance will be unacceptable.
- Component video cables come in sets of three and are for use with video devices with component video output. (ColorStream® is Toshiba's brand of component video.) These cables are typically color-coded red, green, and blue. Separate audio cables are required for a complete connection.
Note: Component video cables provide better picture performance than a standard (composite) video or S-video cable.
- HDMI cable is for use with devices with HDMI (High-Definition Multimedia Interface) output. HDMI cable delivers digital audio and video in its native format. This cable carries both video and audio information; therefore, separate audio cables are not required for a complete HDMI device connection. See page 21 for further details.
Note: HDMI cable provides better picture performance than a standard (composite) video or S-video cable.
- IEEE1394 cable is for use with video devices with compressed digital video output that meet CEA specifications for IEEE1394. This cable carries both video and audio information; therefore, no separate audio cables are required for a complete connection. See pages 25–27.
Note:
- The transmission capability of any IEEE1394 cable used with this TV must be S400 (400 Mbps maximum).
- IEEE1394 cable provides better picture performance than a standard (composite) video or S-video cable.
- Dual-wand IR blaster/G-LINK™ cable is for use with video devices with IR (infrared) remote control. Two of these cables are included with your TV. One is for connection to the G-LINK™ terminal (page 28) to enable TV Guide On Screen™ recording features (Chapters 5 and 7). The other can be used with the TV's IR pass-through feature (page 22) and TheaterNet™ on-screen device control feature (page 50).
Note: The two IR blaster/G-LINK™ cables included with your TV have specific characteristics that allow them to work properly with this TV's IR OUT and G-LINK™ ports. Never use other aftermarket IR blaster or G-LINK™ cables with this TV. Other cables may not function properly and can cause damage. THIS TYPE OF DAMAGE IS NOT COVERED BY YOUR TOSHIBA WARRANTY.
- Optical audio cable is for connecting receivers with Dolby Digital or PCM (pulse-code modulation) optical audio input to the TV's DIGITAL AUDIO OUT terminal. See page 24.
- Ethernet (RJ-45) cable is used to connect the TV to your home network. See page 30 and Chapter 11.


Coaxial (F-type) cable

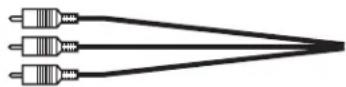
Standard A/V cables (red/white/yellow)


S-video cable

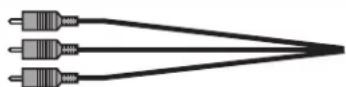
Component video cables (red/green/blue)

HDMI cable


IEEE1394 cable (4-pin)


Dual-wand IR blaster/G-LINK™ cable (2 included)


Optical audio cable


Ethernet (RJ-45) cable
Note: Although your TV includes both HDMI and IEEE1394 connections, it may not operate with another device you have that includes such a connection. For example, the IEEE1394 ports are not intended to operate with current model Mini DV camcorders, and the HDMI input is not intended for connection to a computer. Copyright protection requirements may also prohibit or limit connectivity. See page 21 for details about the HDMI input. See pages 25–27 for details about the IEEE1394 ports.
About the connection illustrations
You can connect different types and brands of devices to your TV in several different configurations. The connection illustrations in this manual are representative of typical device connections only. The input/output terminals on your devices may differ from those illustrated herein. For details on connecting and using your specific devices, refer to each device's owner's manual.
Connecting a digital CableCARD™
This digital television is capable of receiving analog basic, digital basic, and digital premium cable television programming by direct connection to a cable system providing such programming.
A security card (such as a digital CableCARD™), provided by your cable operator, is required to view encrypted digital programming.
Certain advanced and interactive digital cable services (such as video-on-demand, a cable operator's enhanced program guide, and data-enhanced television services) will not work with the use of a CableCARD ^™ and may require the use of a separate set-top box from your cable operator.
For more information, contact your local cable operator.
You will need:
▶ one digital CableCARD™ (contact your cable operator)
▶ digital cable subscription service (contact your cable operator)
TV back panel
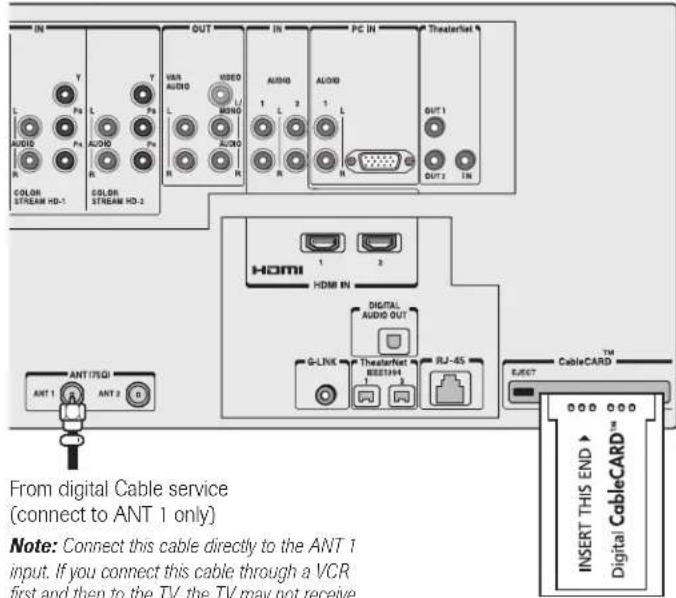
From digital Cable service (connect to ANT 1 only)
Note: Connect this cable directly to the ANT 1 input. If you connect this cable through a VCR first and then to the TV, the TV may not receive the signals correctly.
☐ To view encrypted digital channels:
- Connect your digital Cable TV cable to ANT-1.
- With the front of the CableCARD ^™ facing up, insert it into the CableCARD ^™ slot on the back of the TV (see illustration below left).
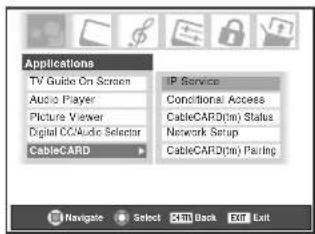
- After the CableCARD™ is inserted, a CableCARD™ option appears in the Applications menu, with informational screens provided by your digital CableCARD™ service. See page 56 for additional information.
Note:
- Connect the cable for your digital cable TV service to ANT-1 only.
- Always use the EJECT button to remove the CableCARD™. Never remove the CableCARD™ by hand.
- Never insert any object or card other than a CableCARD™ (including, without limitation, a PCMCIA card) into the CableCARD™ slot. Inserting anything other than a CableCARD™ can damage the TV. THIS DAMAGE IS NOT COVERED UNDER YOUR TOSHIBA WARRANTY.
- Always make sure the CableCARD™ is facing the correct direction.
- When using a CableCARD™, you do not need to program channels into the TV's memory. The CableCARD™ automatically loads the cable channel list into the TV's channel memory (page 47).
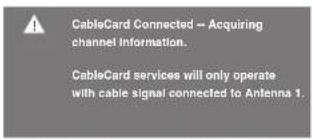
- The CableCARD™ may take up to 5 minutes to "pair" with the TV and download channel information. CableCARD™ information and channels will not be available until this process is finished.
CableCARD™ technology, like all new and emerging technology, may from time to time experience compatibility issues due to the different ways in which television manufacturers and cable system operators implement the CableCARD™ specifications. Most issues can be easily resolved. In the event that you experience any performance-related CableCARD™ issues with your Toshiba television, please contact the following:
• In the U.S., call TACP Consumer Solutions at (800) 631-3811 or visit http://www.tacp.com/customersupport/contact.asp.
• In Canada, call TCL Customer Service at 1-800-268-3404.
Connecting a VCR and antenna or Cable TV (no Cable box)
You will need:
▶ one signal splitter
▶ three coaxial cables
▶ two sets of standard A/V cables
- For better picture performance, if your VCR has S-video, use an S-video cable (plus the audio cables) instead of the standard video cable. Do not connect both types of video cables to VIDEO 1 (or VIDEO 2) at the same time or the picture performance will be unacceptable.
- If you have a mono VCR, connect L/MONO on the TV to your VCR's audio OUT terminal using the white audio cable only.
☐ To view the antenna or Cable signal:
Select the ANT 1 video input source on the TV.*
☐ To view the VCR:
Turn ON the VCR. Select the VIDEO 1 video input source on the TV.*
To use the TV Guide On Screen™ recording features:
- Connect the G-LINK ^™ cable according to the instructions on page 28.
- Make sure the VCR is connected to the A/V OUT terminals on the TV (see illustration).
- Set the VCR to the appropriate line input (refer to your VCR owner's manual for details), and then turn OFF the VCR.
- See Chapter 5 for details on setting up the TV Guide On Screen™ system.
- See Chapter 7 for details on using the TV Guide On Screen™ system.
Note: The VIDEO/AUDIO OUT terminals output signals from the ANT 1, ANT 2, VIDEO 1, VIDEO 2, and VIDEO 3 terminals when the applicable input mode is selected.
The unauthorized recording, use, distribution, or revision of television programs, videotapes, DVDs, and other materials is prohibited under the Copyright Laws of the United States and other countries, and may subject you to civil and criminal liability.
Connecting a camcorder
You will need:
▶ one set of standard A/V cables
- For better picture performance, if your camcorder has S-video, use an S-video cable (plus the audio cables) instead of the standard video cable. Do not connect both an S-video cable and a standard video cable to VIDEO 3 at the same time or the picture performance will be unacceptable.
☐ To view the camcorder video:
Select the VIDEO 3 video input source on the TV.*
VIDEO 3 inputs on TV right side panel
Connecting a VCR and Cable box
You will need:
▶ one signal splitter
- five coaxial cables
▶ two sets of standard A/V cables
- For better picture performance from your VCR: If your VCR has S-video, connect an S-video cable (plus the audio cables) instead of the standard video cable. Do not connect an S-video cable and a standard video cable to VIDEO 1 (or VIDEO 2) at the same time or the picture performance will be unacceptable.
- If you have a mono VCR, connect L/MONO on the TV to your VCR's audio out terminal using the white audio cable only.
- When you use a Cable box, you may not be able to use the remote control to program or access certain features on the TV.
☐ To view basic Cable channels and use the TV's features:
Select the ANT 1 video input source on the TV.* Use the TV controls (control panel or remote control) to change channels and access the TV's features.
☐ To view basic and premium Cable channels:
Turn OFF the VCR. Select the ANT 2 video input source on the TV.* Tune the TV to channel 3 or 4 (whichever channel the Cable box output is set to). Use the Cable box controls to change channels.
To view the VCR:
Turn ON the VCR. Select the VIDEO 1 video input source on the TV.*
Note: A VIDEO 1 connection with an S-Video cable (instead of a standard video cable) will provide better picture performance (as mentioned in the first bulleted item at the top of this page).
The unauthorized recording, use, distribution, or revision of television programs, videotapes, DVDs, and other materials is prohibited under the Copyright Laws of the United States and other countries, and may subject you to civil and criminal liability.
flowchart
graph TD
    A["Cable box"] -->|IN| B["Signal splitter"]
    B -->|OUT| C["Stereo VCR"]
    C --> D["TV"]
    D --> E["Home Device"]
    E --> F["Digital Audio OUT"]
    E --> G["G-LINK Theater/Net"]
    style A fill:#f9f,stroke:#333
    style B fill:#ccf,stroke:#333
    style C fill:#cfc,stroke:#333
    style D fill:#fcc,stroke:#333
    style E fill:#cff,stroke:#333
    style F fill:#ffc,stroke:#333
    style G fill:#cfc,stroke:#333
Note: The VIDEO/AUDIO OUT terminals output signals from the ANT 1, ANT 2, VIDEO 1, VIDEO 2, and VIDEO 3 terminals when the appropriate input mode is selected.
☐ To enable the TV Guide On Screen™ system to work with your cable box and to use the TV Guide On Screen™ recording features:
- Connect the G-LINK ^™ cable according to the instructions on page 28.
- Make sure the VCR is connected to the A/V OUT terminals on the TV (see illustration).
- Set the VCR to the appropriate line input (refer to your VCR owner's manual for details), and then turn OFF the VCR.
- See Chapter 5 for details on setting up the TV Guide On Screen™ system.
- See Chapter 7 for details on using the TV Guide On Screen ^™ system.
Connecting a VCR and satellite receiver
You will need:
▶ one signal splitter
▶ four coaxial cables
▶ one set of component video cables (if your satellite receiver does not have component video, connect the standard A/V cables only)
▶ one pair of standard audio cables
▶ three sets of standard A/V cables
- For better picture performance, if your satellite receiver and VCR have S-video, connect S-video cables (plus the audio cables) instead of the standard video cables. Do not connect both types of video cable to VIDEO 1 (or VIDEO 2) at the same time or the picture performance will be unacceptable.
- If you have a mono VCR, connect L/MONO on the TV (VIDEO 1) to your VCR's AUDIO OUT terminal using the white audio cable only.
☐ To view satellite programs using the component video connections:
Select the ColorStream HD-1 video input source on the TV.*
☐ To view satellite programs using the standard video connections or to record satellite programs:
Turn on all three devices. Set the VCR to the appropriate line input (refer to your VCR owner's manual for details). Select the VIDEO 2 video input source on the TV.*
☐ To view the VCR or view and record antenna channels:
Turn ON the VCR. Tune the VCR to the channel you want to watch. Select the VIDEO 1 video input source on the TV.*
flowchart
graph TD
    A["Signal splitter OUT"] --> B["In"]
    B --> C["Stereo VCR"]
    C --> D["IN from ANT"]
    C --> E["OUT to TV"]
    D --> F["CH 3"]
    D --> G["CH 4"]
    F --> H["VIDEO"]
    G --> I["AUDIO"]
    H --> J["IN"]
    I --> K["OUT"]
    J --> L["Ch 5"]
    K --> M["Ch 4"]
    L --> N["TV"]
    M --> N
    N --> O["Video"]
    N --> P["Audio"]
    O --> Q["IN"]
    P --> R["IN"]
    Q --> S["Video"]
    Q --> T["Video"]
    R --> U["Video"]
    S --> V["Video"]
    T --> W["Video"]
    U --> X["PC IN *"]
    V --> Y["PC IN *"]
    W --> Z["HDMI"]
    X --> AA["G-LINK"]
    Y --> AB["Theaterlet"]
    Z --> AC["ANT 7501"]
    AA --> AD["ANT 2"]
    AB --> AE["Ant 2"]
    AC --> AF["From satellite dish"]
    AD --> AG["Satellite receiver"]
    AE --> AH["Satellite IN"]
    AF --> AI["S-VIDEO OUT"]
    AH --> AJ["TY"]
    AI --> AK["Pb"]
    AJ --> AL["Pb"]
    AK --> AM["Pb"]
    AL --> AN["Pb"]
    AM --> AO["Pb"]
    AN --> AP["Pb"]
    AO --> AQ["Pb"]
    AP --> AR["Pb"]
    AQ --> AS["Pb"]
    AR --> AT["Pb"]
    AS --> AU["Pb"]
    AT --> AV["Pb"]
    AU --> AW["Pb"]
    AV --> AX["Pb"]
    AW --> AY["Pb"]
Note: The VIDEO/AUDIO OUT terminals output signals from the ANT 1, ANT 2, VIDEO 1, VIDEO 2, and VIDEO 3 terminals when the appropriate input mode is selected.
☐ To use the TV Guide On Screen™ recording features:
- Connect the G-LINK ^™ cable according to the instructions on page 28.
- Make sure the VCR is connected to the A/V OUT terminals on the TV (see illustration).
- Set the VCR to the appropriate line input (refer to your VCR owner's manual for details), and then turn OFF the VCR.
- See Chapter 5 for details on setting up the TV Guide On Screen ^™ system.
- See Chapter 7 for details on using the TV Guide On Screen™ system.
Note: The TV Guide On Screen™ system does not receive program listings from or for any satellite service.
Connecting a DVD player with S-video, a VCR, and a Cable box
You will need:
▶ one signal splitter
- five coaxial cables
▶ two sets of standard A/V cables
Note: If you have a mono VCR, connect L/MONO on the TV (VIDEO 1) to your VCR's audio out terminal using the white audio cable only.
▶ one S-video cable
▶ one pair of standard audio cables
Note:
- If your DVD player does not have S-video, use a standard video cable instead. Do not connect an S-video cable and a standard video cable to VIDEO 1 (or VIDEO 2) at the same time or the picture performance will be unacceptable.
• If your DVD player has component video, see page 19.
- Do not connect the DVD player and VCR to the same set of A/V inputs on the TV. (See the illustration, which shows the VCR connected to VIDEO 1 on the TV, and the DVD player connected to VIDEO 2.)
- If your DVD player does not have S-video, use a standard video cable instead. Do not connect an S-video cable and a standard video cable to VIDEO 1 (or VIDEO 2) at the same time or the picture performance will be unacceptable. - If your DVD player has component video, see page 19. - Do not connect the DVD player and VCR to the same set of A/V inputs on the TV. (See the illustration, which shows the VCR connected to VIDEO 1 on the TV, and the DVD player connected to VIDEO 2.)
To view basic channels and access the TV's features:
Select the ANT 1 video input source.* Use the TV controls to change channels and access the TV's features.
☐ To view premium Cable channels:
Turn OFF the VCR. Select the ANT 2 video input source on the TV.* Tune the TV to channel 3 or 4 (whichever channel the Cable box output is set to). Use the Cable box controls to change channels.
Note: When you use a Cable box, you may not be able to use the remote control to program or access certain features on the TV.
☐ To view the DVD player:
Turn ON the DVD player. Select the VIDEO 2 video input source on the TV.*
To view the VCR:
Turn ON the VCR. Select the VIDEO 1 video input source on the TV.*
Note: The VIDEO/AUDIO OUT terminals output signals from the ANT 1, ANT 2, VIDEO 1, VIDEO 2, and VIDEO 3 terminals when the appropriate input mode is selected.
☐ To enable the TV Guide On Screen ^™ system to work with your cable box and to use the TV Guide On Screen ^™ recording features:
- Connect the G-LINK ^TM cable according to the instructions on page 28.
- Make sure the VCR is connected to the A/V OUT terminals on the TV (see illustration).
- Set the VCR to the appropriate line input (refer to your VCR owner's manual for details), and then turn OFF the VCR.
- See Chapter 5 for details on setting up the TV Guide On Screen ^™ system.
- See Chapter 7 for details on using the TV Guide On Screen ^TM system.
Connecting a DVD player with ColorStream® (component video) and a VCR
Your TV has ColorStream ^® (component video) inputs.
You will need:
▶ one signal splitter
▶ three coaxial cables
▶ two sets of standard A/V cables
- For better picture performance, if your VCR has S-video, use an S-video cable (plus the audio cables) instead of the standard video cable. However, do not connect both types of video cable to VIDEO 1 (or VIDEO 2) at the same time or the picture performance will be unacceptable.
- If you have a mono VCR, connect L/MONO on the TV (VIDEO 1) to your VCR's audio out terminal using the white audio cable only.
▶ one pair of standard audio cables
▶ one set of component video cables
- You can connect the component video cables (plus audio cables) from the DVD player to either set of ColorStream terminals on the TV (HD-1 or HD-2). The ColorStream HD-1 and HD-2 terminals can be used with Progressive (480p, 720p) and Interlaced (480i, 1080i) scan systems. A 1080i signal will provide the best picture performance.
- If your DVD player does not have component video, see page 18. If your DVD player has HDMI video, see page 21.
☐ To view antenna or Cable channels:
Select the ANT 1 video input source on the TV.*
☐ To view the DVD player:
Turn ON the DVD player. Select the ColorStream HD-1 video input source on the TV.*
To view the VCR:
Turn ON the VCR. Select the VIDEO 1 video input source on the TV.*
☐ To record a TV program while watching a DVD:
Turn ON the VCR. Tune the VCR to the channel to record. Select the ColorStream HD-1 video input source on the TV* to view the DVD.
* To select the video input source, press INPUT on the remote control (see page 72). To program the TV remote control to operate other devices, see Chapter 3.
The unauthorized recording, use, distribution, or revision of television programs, videotapes, DVDs, and other materials is prohibited under the Copyright Laws of the United States and other countries, and may subject you to civil and criminal liability.
DVD player with component video
Note: The VIDEO/AUDIO OUT terminals output signals from the ANT 1, ANT 2, VIDEO 1, VIDEO 2, and VIDEO 3 terminals when the appropriate input mode is selected.
☐ To use the TV Guide On Screen™ recording features:
- Connect the G-LINK ^™ cable according to the instructions on page 28.
- Make sure the VCR is connected to the A/V OUT terminals on the TV (see illustration).
- Set the VCR to the appropriate line input (refer to your VCR owner's manual for details), and then turn OFF the VCR.
- See Chapter 5 for details on setting up the TV Guide On Screen™ system.
- See Chapter 7 for details on using the TV Guide On Screen ^™ system.
Connecting two VCRs
You will need:
▶ one signal splitter
▶ three coaxial cables
▶ two sets of standard A/V cables
- For better picture performance, if VCR 1 has S-video, use an S-video cable (plus the audio cables) instead of the standard video cable. However, do not connect both types of video cable to VIDEO 1 (or VIDEO 2) at the same time or the picture performance will be unacceptable.
- If VCR 1 has mono audio, connect L/MONO on the TV (VIDEO 1) to the audio out terminal on VCR 1 using the white audio cable only.
- Do not connect the same VCR to the output and input terminals on the TV at the same time.
☐ To view the antenna or Cable signal:
Select the ANT-1 video input source on the TV.*
To view VCR 1:
Turn ON VCR 1. Select the VIDEO 1 video input source on the TV.*
☐ To dub or edit from VCR 1 to VCR 2:
Turn ON both VCRs. Set VCR 2 to the appropriate line input (refer to your VCR owner's manual for details). Select the VIDEO 1 video input source on the TV.*
Note:
- If you have a Cable box, connect the Cable box and splitter to VCR1 as shown on page 16.
- The VIDEO OUT signal incorporates Macrovision ^* copyright protection technology, which may prevent you from recording certain copy-restricted video materials.***
* To select the video input source, press INPUT on the remote control (see page 72). To program the TV remote control to operate other devices, see Chapter 3.
** Do not connect the unit through a VCR. Video signals fed through VCRs may be affected by copyright protection systems and the picture will be distorted on the TV.
*** This product incorporates copyright protection technology that is protected by U.S. patents and other intellectual property rights. Use of this copyright protection technology must be authorized by Macrovision and is intended for home and other limited pay-per-view uses only, unless otherwise authorized by Macrovision. Reverse engineering or disassembly is prohibited. Macrovision is a registered trademark of Macrovision Corporation.
The unauthorized recording, use, distribution, or revision of television programs, videotapes, DVDs, and other materials is prohibited under the Copyright Laws of the United States and other countries, and may subject you to civil and criminal liability.
From antenna or Cable

a The VIDEO OUT terminal does not output the POP picture.
b When POP mode is active, the AUDIO OUT terminals output the sound of the active window (main or POP). For additional information, see "Notes about recording" on page 81.
Note: The VIDEO/AUDIO OUT terminals output signals from the ANT 1, ANT 2, VIDEO 1, VIDEO 2, and VIDEO 3 terminals when the appropriate input mode is selected.
☐ To use the TV Guide On Screen™ recording features:
- Connect the G-LINK ^™ cable according to the instructions on page 28.
- Make sure the VCR is connected to the A/V OUT terminals on the TV (see illustration).
- Set the VCR to the appropriate line input (refer to your VCR owner's manual for details), and then turn OFF the VCR.
- See Chapter 5 for details on setting up the TV Guide On Screen ^™ system.
- See Chapter 7 for details on using the TV Guide On Screen™ system.
Connecting an HDMI ^™ or a DVI device to the HDMI input
The HDMI ^[1] input on your TV receives digital audio and uncompressed digital video from an HDMI device or uncompressed digital video from a DVI ^[2] device.
This input is designed to accept HDCP ^[3] program material in digital form from EIA/CEA-861/861B-compliant ^[4] consumer electronic devices (such as a set-top box or DVD player with HDMI or DVI output).
The HDMI input is designed for best performance with 1080i signals but will also accept and display 480i, 480p and 720p signals.

NOTE: DO NOT CONNECT A PC USING THE HDMI PORT. ALWAYS use the VGA port provided to connect a PC.
To connect an HDMI device, you will need:
- one HDMI cable (type A connector) per HDMI device
For proper operation, it is recommended that you use as short an HDMI cable as possible. You should not encounter difficulty if you use an HDMI cable shorter than 16.4 ft (5m).
HDMI cable transfers both video and audio. Separate analog audio cables are not required (see illustration below). Some CDVs (video CDs) may not output digital audio signals. In that case, you may hear sound by connecting analog audio cables.
See "Setting the HDMI™ audio mode" on page 55.
HDMI device
[1] HDMI = High-Definition Multimedia Interface.
[2] DVI = Digital Video Interface.
[3] HDCP=High-bandwidth Digital Content Protection.
[4] EIA/CEA-861/861B compliance covers the transmission of uncompressed digital video with high-bandwidth digital content protection, which is being standardized for reception of high-definition video signals. Because this is an evolving technology, it is possible that some devices may not operate properly with the TV.
Note: To ensure that the HDMI or DVI device is reset properly, it is recommended that you follow these procedures:
- When turning on your electronic components, turn on the TV first, and then the HDMI or DVI device.
- When turning off your electronic components, turn off the HDMI or DVI device first, and then the TV.
To connect a DVI device, you will need:
- one HDMI-to-DVI adapter cable (HDMI type A connector) per DVI device
For proper operation, the length of an HDMI-to-DVI adapter cable should not exceed 9.8 ft (3m). The recommended length is 6.6 ft (2m).
• one pair of standard analog audio cables per DVI device
An HDMI-to-DVI adapter cable transfers video only.
Separate analog audio cables are required (see illustration below).
See "Setting the HDMI™ audio mode" on page 55.
DVI device

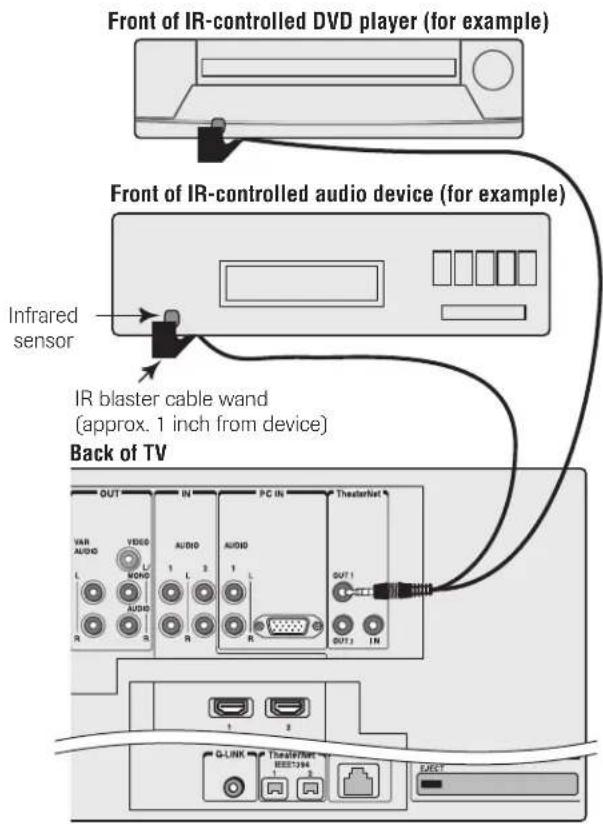
Connecting a device to the IR blaster (IR pass-through)
You can use the TV's IR OUT terminal (infrared pass-through) to remotely operate (through the TV) many infrared remote-controlled devices (such as a Toshiba infrared remote-controlled VCR or DVD player) enclosed within an entertainment center or similar cabinet. Without the IR OUT connection, the device typically would need to be visible to operate it remotely.
You will need:
▶ one dual-wand IR blaster cable (included with your TV)
▶ other audio/video cables as required to connect the device(s) to the TV (see pages 15–21)
To connect the IR blaster cable:
- Locate the infrared sensor on the front of your device. This sensor is marked on some devices.*
- Align one of the IR blaster cable's wands about 1 inch away from the infrared sensor on the front of the device and attach it using double-sided mounting tape. If you have a second device, attach the second wand in a similar manner. (See illustration at right.)
Note: If you do not have a second device, coil the second wand with a rubber band and leave it behind the TV. - Plug the IR blaster cable's plug into one of the TV's TheaterNet OUT terminals.
To control the device(s):
Point the TV remote control (programmed to operate the device; see Chapter 3) or the device's remote control at the front of the TV and press the button for the desired function. The signal passes from the remote control through the TV to the device via the IR blaster cable.
Note:
- If you use the device's remote control to operate the device, you also will need to use the TV's remote control to operate the TV.
- For additional control options, see "TheaterNet on-screen device control" on the next page.
\*If you cannot locate the device's infrared sensor:
- Turn OFF the device.
- Starting at the lower left corner of the device, place the end of the device's remote control (with the infrared emitter) so it touches the front of the device and press POWER. (Do not use the TV's remote control for this step.)
- If the device turns on, the point at which the remote control touched the device is the location of the sensor.
- If the device does not turn on, move the remote control slightly to the right and press POWER again.
- Repeat step 4 until you locate the device's infrared sensor.
Connecting a device to the IR blaster (continued)
Using the TheaterNet™ IN:
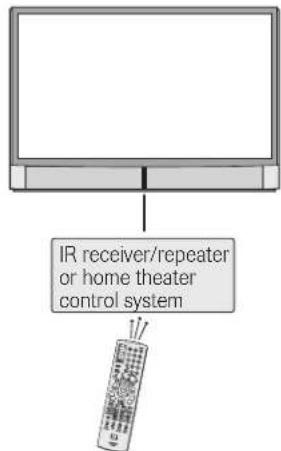
For additional control options for your home theater system, you can connect an IR receiver/repeater (not included) or a home theater control system (not included) to the TV's TheaterNet IN terminal.*
Contact your home theater electronics dealer for details about home theater control systems.
You will need:
▶ one IR cable
TV back panel
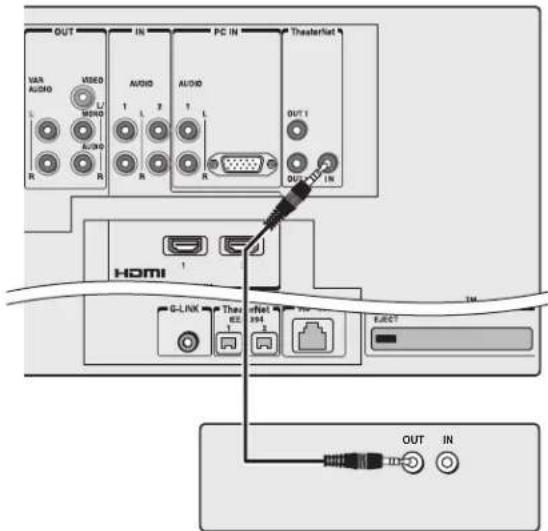
Back of IR receiver/repeater or home theater control system* (not included)
With this connection, point the Toshiba TV remote control at the front of the IR receiver/repeater or home theater control system to operate the TV.
* The TheaterNet OUT function has been verified for use with Toshiba infrared-controlled devices. The TheaterNet IN function has been verified for use with
CRESTRON SmarTouch™ STS/STS-C wireless RF control systems. Due to the wide variation in remote control operation among manufacturers, these functions may or may not operate with other brands.
SmarTouch is a trademark of Crestron Electronics, Inc. (www.crestron.com).
TheaterNet™ on-screen device control
For additional control options for your home theater system, set up the TheaterNet on-screen device control feature. You can use this feature to control many IR remote-controlled devices and IEEE1394 devices using the on-screen control icons.
See pages 50–54 for details on setting up and using TheaterNet.
See pages 25–27 for details on connecting IEEE1394 devices.
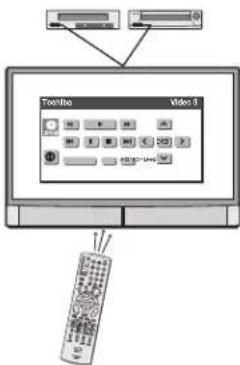
Note: The TheaterNet on-screen icons are the only device functions available when the icons are on-screen. To access other device functions, close the TheaterNet icon window.
Connecting a digital audio system
The TV's DIGITAL AUDIO OUT terminal outputs a Dolby* Digital DOLBY or 2-channel down-mixed PCM (pulse-code modulation) signal for use with an external Dolby Digital decoder or other external audio system with optical audio input.
You will need:
one optical audio cable (Use an optical audio cable that has the larger "TosLink" connector and not the smaller "mini-optical" connector.)
To control the audio:
Turn on the TV and the digital audio device.
Press MENU on the TV's remote control and open the AUDIO menu.
Highlight Audio Setup and press ENTER.
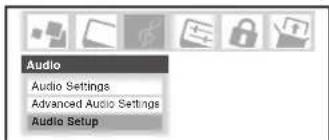
In the Optical Output Format field, select either Dolby Digital or PCM, depending on your device (see “Selecting the optical audio output format” on page 92).
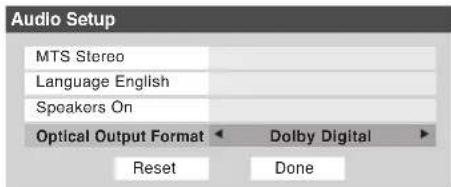
Turn off the TV's built-in speakers in the same Audio Setup menu (above). Also see "Turning off the built-in speakers" on page 92.
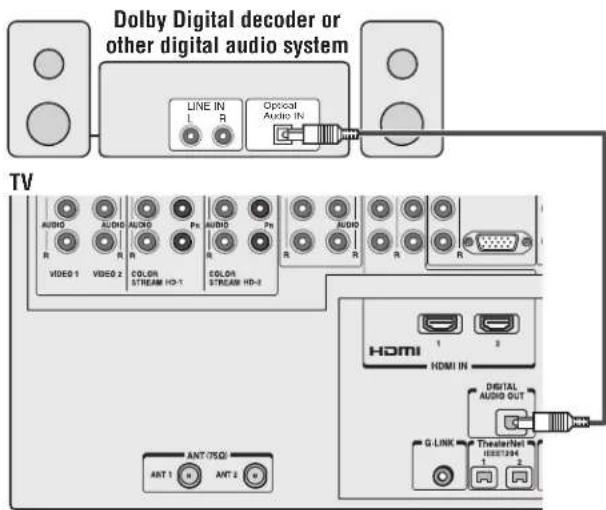
Note:
- Some audio systems may not be compatible with Dolby Digital bitstream signals. Older audio systems that are not compatible with standard optical out signals may not work properly, creating a high noise level that may damage speakers or headphones. THIS DAMAGE IS NOT COVERED BY YOUR WARRANTY.
- The DIGITAL AUDIO OUT terminal outputs signals only when receiving digital broadcasts with the TV in single-window mode.
- The DIGITAL AUDIO OUT terminal may not output some digital audio sources because of copy restrictions.
* Manufactured under license from Dolby Laboratories. "Dolby", "Pro Logic" and the double-D symbol are trademarks of Dolby Laboratories.
Connecting an analog audio system
This connection allows you to use external speakers with an external audio amplifier to adjust the sound level.
You will need:
▶ one pair of standard audio cables
To control the audio:
Turn on the TV and the stereo amplifier.
Turn off the TV's built-in speakers (see "Turning off the built-in speakers" on page 92).
Note: To hear sound when using an external audio amplifier, the volume of both the TV and the amplifier must be set to a reasonable listening level.

Connecting IEEE1394 video devices
You can use the two bi-directional IEEE1394 ports on the back of your TV to connect digital video devices that meet CEA specifications for IEEE1394.
Because these ports are bi-directional, they can be used for both playback and recording.
- Because IEEE1394 is an evolving technology, it is possible that some or all of the connectivity features of a device you connect to the TV through the IEEE1394 ports may not operate. You should confirm that the devices you want to use with the IEEE1394 ports will operate with those ports.
- This TV does not support all possible IEEE1394 signal types. For information on signals supported by the IEEE1394 ports, see "Supported signals" at right.
- IEEE1394 cable carries both audio and video information; separate audio cables are not required.
You will need:
▶ one (or two) IEEE1394 cables
Note: The transmission capability of IEEE1394 cable used with this TV must be S400 (400 Mbps maximum).
additional A/V cables if your device is analog-compatible (see "Using analog-compatible IEEE1394 devices" below).
TV back panel
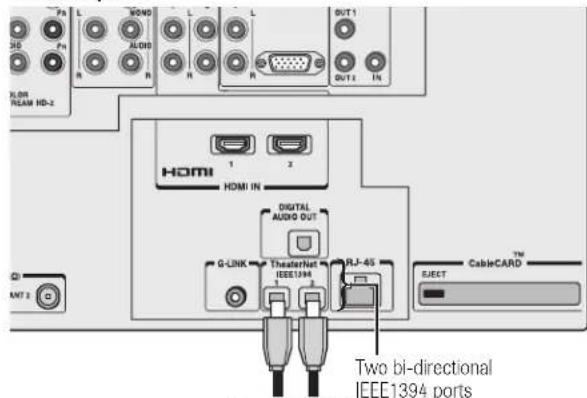
From IEEE1394 devices (such as AVHD or D-VHS)
Using analog-compatible IEEE1394 devices
Some digital IEEE1394 devices are compatible with analog signals. For example, some D-VHS VCRs can record and play VHS or S-VHS format videos. Such devices allow you to play analog tapes that you rented or recorded, or record analog programs from antenna or Cable TV systems. To use the IEEE1394 device's analog features, you need to connect the device to the TV using standard A/V cables (or S-video plus audio cables) in addition to connecting the IEEE1394 cable.
Note: If you have an IEEE1394 device connected to both digital and analog inputs on the TV, the TV automatically switches between digital and analog modes, as needed, when the initial device access is initiated using the TheaterNet button.
See page 50 for details on using the TheaterNet feature.
Supported signals
The IEEE1394 ports support only the signals listed below. Even though incompatible video, audio, and digital control signals cannot be decoded by the TV, these signals may be passed through the IEEE1394 cable to other compatible devices. Incompatible devices may not appear in the TheaterNet™ menu.
•MPEG-2 digital video signals
Other digital video signals—such as DV video—are incompatible and must be decoded by the source device and sent to the TV as analog video (composite or S-video).
•Dolby Digital and MPEG digital audio signals
Other digital audio signals (such as DPM, MP3, and DTS) are incompatible and cannot be decoded by the TV.
•EIA-775 and AV/C digital control
Your TV can serve as the control center for many devices that are compatible with EIA-775 or AV/C IEEE1394 control standards (described below).
The TV cannot control IEEE1394 devices that use any other control standards.
- EIA-775 digital control allows tuning devices (such as Cable boxes) to send simple graphics; however, this standard does not allow the TV to control the Cable box through IEEE1394.
- AV/C (audio/video control) provides basic control (such as power, play, stop rewind, fast-forward, pause, and record), as applicable to the specific device.
Using TheaterNet™ on-screen device control
You can use the TheaterNet feature to control some IEEE1394 devices using on-screen control icons. See page 50 for details on setting up and using the TheaterNet feature.
Note: If the TheaterNet feature does not control your IEEE1394 device, you can either use the device's remote control or try using IR pass-through with the TV's remote control (page 22).
Connecting IEEE1394 video devices (continued)
Connecting an AVHD (external hard drive) or D-VHS digital recorder
You can connect an IEEE1394 compatible D-VHS or AVHD (audio/video hard drive) digital recorder (such as Toshiba's Symbio™ AVHD Recorder) to record high definition and standard definition material from either tuner and control live TV (pause, rewind, etc.).
When you connect a D-VHS or AVHD device to the TV:
- The remote control keys (Live, REW, PAUSE, PLAY, FF, etc.) are automatically activated to allow control of live TV.
- The TV Guide On Screen™ system is automatically configured to allow recording to the device. See Chapters 5 and 7 for details. Also see page 55 for details on setting the AVHD device skip time.
- Some programs may not be recorded due to copy protection restrictions.
This TV is compatible with the new Toshiba
Symbio™
Audio/Video Hard Drive Recorder!
Toshiba's Symbio™ AVHD Recorder is designed specifically for high definition television (HDTV) and offers control over digital video recording and playback.
Think of it as a "tapeless VCR" for digital television. You can pause, rewind, or use instant replay, so you'll never miss a thing!
Symbio also offers one-touch recording* of both standard and High Definition programs through the no-fee TV Guide On Screen™ interactive program guide built in to this TV.
The unauthorized recording, use, distribution, or revision of television programs, videotapes, DVDs, and other materials is prohibited under the Copyright Laws of the United States and other countries, and may subject you to civil and criminal liability.
*Note: To enjoy the full benefits of your Symbio AVHD Recorder, you must first set up the TV Guide On Screen™ system (see Chapter 5). Full Symbio AVHD Recorder benefits, including Intelligent One Touch recording, will not be available unless the TV Guide On Screen™ system is fully operational. However, when the TV Guide On Screen™ system is not fully operational, manual recording is available as long as the TV Guide On Screen™ system has acquired the necessary date and time data. If you experience any issues with your Symbio AVHD Recorder, please contact the following:
• In the U.S., call TACP Consumer Solutions at (800) 631-3811 or visit http://www.tacp.com/customersupport/contact.asp.
• In Canada, call TCL Customer Service at 1-800-268-3404.
IEEE1394 device initialization
When you connect a new IEEE1394 device to the TV and turn it on, the device immediately announces its presence to the TV (and other networked IEEE1394 devices, if any), and the following device initialization screen automatically appears.
Note: With some devices, it may take up to one minute for this screen to appear.
- If you also connected your IEEE1394 device to an analog input, use the ▲▼◀▶ buttons to select the input in the Analog Input Used field; otherwise, leave it set to "None." (See "Using analog-compatible IEEE1394 devices" on page 25.)
- If you want to label the device, highlight Edit Label and press ENTER.

- Press the ▲▼◀▶ buttons to select a character for the first space and then press ENTER.
- Repeat step 3 to enter the rest of the characters.
- Highlight Done and press ENTER to save the information.
Note:
- The TV may not recognize incompatible or non-A/V IEEE1394 devices; however, these devices may still be available to other compatible IEEE1394 devices on the network.
- You may be able to use the TV's remote control to operate some compatible IEEE1394 devices. You must first program the remote control to recognize the device (see Chapter 3). If you have an IEEE1394 Cable box or satellite receiver, you may need to use the remote control that came with the device.
- Toshiba is not liable for the operation of any IEEE1394 device other than the Toshiba Symbio AVHD recorder.
Connecting IEEE1394 video devices (continued)
IEEE1394 device management
The IEEE1394 device information is saved in the TV's memory. You can edit this device information (for example, edit the device name, change the analog input information, or delete the device information from the TV's memory if you no longer use that device).
To edit the IEEE1394 device information:
- Press MENU and open the Setup menu.
- Highlight Installation and press ENTER. (A new set of Installation menu icons will appear on-screen, as shown in step 3 below).
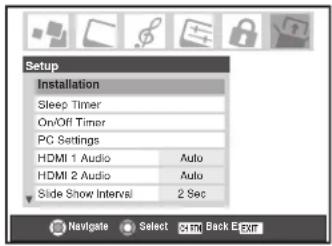
- Open the Devices menu, highlight IEEE1394 Devices, and press ENTER.
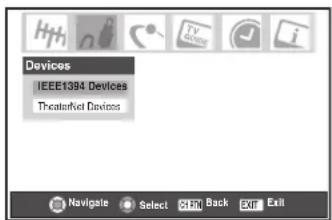
- Highlight the device you want to edit and press ENTER.
- Follow the on-screen prompts to modify the device information.
Important information regarding IEEE1394 device interconnection
- Never loop the last device in the chain back to the TV. If the device chain is looped, the TV may not work properly with the other devices in the chain.
- Always place devices with the slowest communication speed at the end of each chain. If a device with a slower communication speed is placed ahead of a faster device in the chain, the signal from the slower device will interfere with the signal from the faster device. To determine the communication speed of an IEEE1394 device, look for an "S" number near the device's IEEE1394 connector. The higher the "S" number, the faster the device. If your device is not marked with an "S" number, look in the device's user manual or call the device manufacturer's technical support number.
- If your IEEE1394 device has a two-position power switch, always place the device at the end of the chain and turn ON the power switch when any device is used. If the power switch is OFF, it will interfere with signals from devices behind it in the chain.
- The maximum length for an IEEE1394 cable between each device is 15 feet.
- This TV is an IEEE1394A device. The IEEE1394B protocol is faster and intended to allow for longer distances between devices and multi-room systems. IEEE1394A-to-IEEE1394B converters (available at some electronics suppliers) may allow compatibility of IEEE1394B devices with your existing IEEE1394A devices.
- The transmission capability of IEEE1394 cable used with this TV must be S400 (400 Mbps maximum).
G-LINK™ connection
- This connection is necessary for the TV Guide On Screen™ system to work with your cable box to receive program listings and to enable the TV Guide On Screen™ recording features with your VCR.
- This connection is not necessary for AVHD or D-VHS recording devices. See pages 26 and 55 for further details.
After you connect your devices to the TV, you will need to connect the G-LINK™ cable (either of the dual-wand IR blaster cables included with your TV) from your VCR and Cable box (if applicable) to the G-LINK™ terminal on the TV.
Note: TV Guide On Screen™ program data is available through the ANT-1 and ANT-2 antenna inputs and also through the VIDEO 1 inputs if you have a cable box connected to VIDEO 1. TV Guide On Screen™ program data is not available through any other inputs on this TV. See the connection information on pages 15–27.
The G-LINK ^™ connection is necessary to enable the following features of your TV Guide On Screen ^™ system:
- If you have a Cable box, you need to connect the G-LINK™ cable from the Cable box to the G-LINK™ terminal to receive the TV Guide On Screen™ program listings for your Cable service.
- If you have a VCR, you need to connect the G-LINK™ cable from the VCR to the G-LINK™ terminal to use the TV Guide On Screen™ recording features.
To connect to the G-LINK ^TM terminal:
- Locate the infrared sensor on the front of your VCR or Cable box. The sensor is marked on some devices.*
- Align one of the G-LINK™ (IR blaster) cable's wands about 1 inch away from the infrared sensor on the front of the VCR and attach it using double-sided mounting tape. If you have a Cable box, attach the other wand in a similar manner. (See illustration at right.)
Note: If you do not have a Cable box, coil the second wand with a rubber band and leave it behind the TV.
- Plug the G-LINK ^TM (IR blaster) cable's plug into the TV's G-LINK ^TM terminal.
For details on setting up the TV Guide On Screen™ system: See Chapter 5.
For details on using the TV Guide On Screen™ interactive program guide:
See Chapter 7.
\*If you cannot locate the device's infrared sensor:
- Turn OFF the device.
- Starting at the lower left corner of the device, place the end of the device's remote control (with the infrared emitter) so it touches the front of the device and press POWER. (Do not use the TV's remote control for this step.)
- If the device turns on, the point at which the remote control touched the device is the location of the sensor.
- If the device does not turn on, move the remote control slightly to the right and press POWER again.
- Repeat step 4 until you locate the device's infrared sensor.
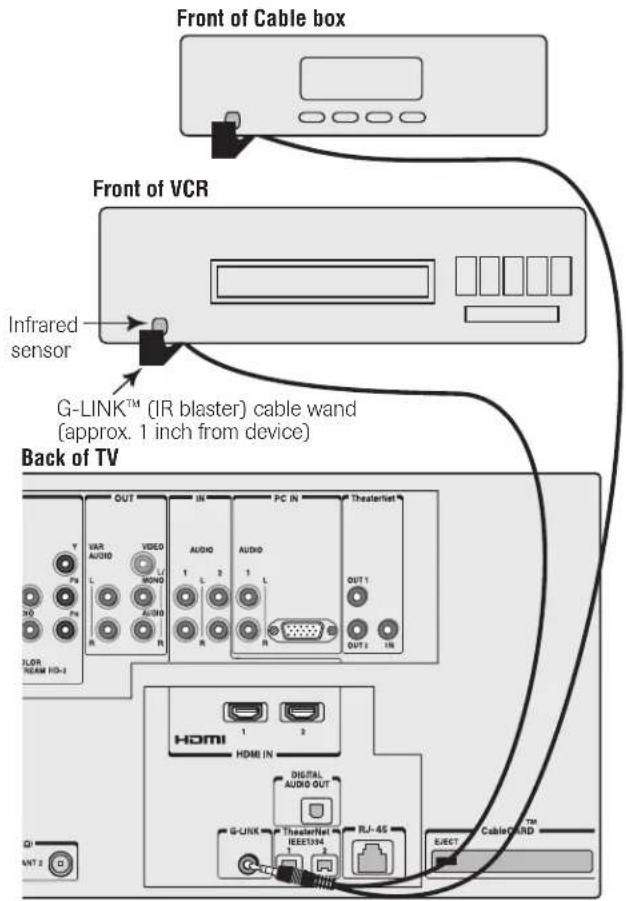
Connecting a personal computer (PC)
This connection allows you to view the image of a personal computer (PC) on the TV screen. When connecting a PC to the TV, use an analog RGB (15-pin) computer cable and a PC audio cable.
- To use a PC, set the monitor output resolution on the PC before connecting it to the TV. The following signals can be displayed.
• VGA: 640 × 480 @ 60Hz
• SVGA: 800 × 600 @ 60Hz
• XGA: 1024 × 768 @ 60Hz
Other formats or non-standard signals may not be displayed correctly.
- To display the optimum picture, use the PC setting feature. (see "Using the PC setting feature" on page 94).
Signal names for mini D-sub 15 pin connector
| Pin No. Signal name | |
| 1 | R |
| 2 | G |
| 3 | B |
| 4 NC (not connected) | |
| 5 | NC |
| 6 Ground | |
| 7 Ground | |
| 8 Ground | |
| 9 | NC |
| 10 Ground | |
| 11 NC | |
| 12 NC | |
| 13 H-sync | |
| 14 V-sync | |
| 15 NC | |
TV
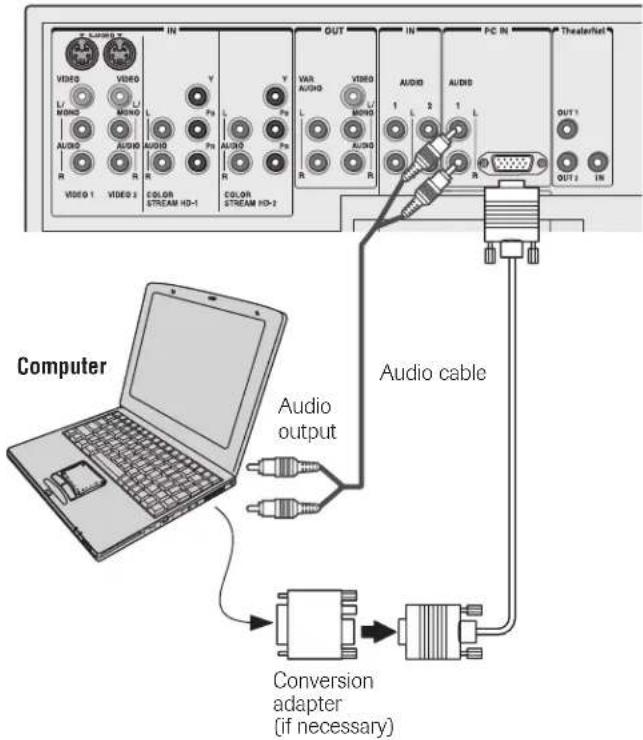
Note:
- Some PC models cannot be connected to this TV.
- An adapter is not needed for computers with a DOS/V compatible mini D-sub 15-pin terminal.
- Depending on the DVD's title and the specifications of the PC on which you are playing the DVD-Video, some scenes may be skipped or you may not be able to pause during multi-angle scenes.
Connecting a home network
The Toshiba Home Interactive Network Connection (THINC™) feature allows you to network the TV with your home PC (personal computer), which will enable access to the following features:
■ File sharing
You can access JPEG and MP3 files that are stored on your networked home PC and view/play them on the TV.
- Connect your TV to your PC /network according to either Example #1 or Example #2, below left.
- Does NOT require Internet/e-mail service.
■ E-mail scheduling of recordings and reminders
You can schedule recordings and reminders by sending an e-mail to the TV from any PC.
- Connect your TV to your home network according to Example #3, below right.
Note: This connection also enables file sharing. -
Requires the following:
-
Home Internet service.
- A dedicated e-mail address for the TV (different from your personal e-mail address).
- A compatible recording device.
- Contact your ISP (Internet Service Provider) to obtain and set up Internet/e-mail service.
• See Chapter 2 for recording device connection instructions.
See Chapters 10 and 11 for details on configuring and using e-mail scheduling, file sharing, the JPEG Picture Viewer, and the MP3 Audio Player.
Note:
- The TV's home network feature is compatible only with Microsoft ^ Windows ^ 2000 and the Home or Professional version of Microsoft ^ Windows ^ XP Service Pack 1 and Service Pack 2. See Chapter 11 for details.
- The TV's home network connection enables e-mail scheduling and file sharing only. You will NOT be able to use the TV to access the Internet.
Example #1: Connecting the TV to a home network without an Internet connection (for file sharing only)
You will need:
two or more standard Ethernet cables (the number of cables depends on the number of PCs you connect to your network)
▶ one hub or switch
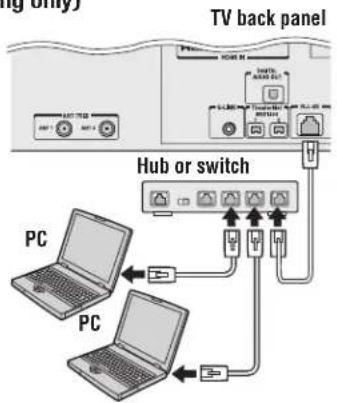
Example #2: Connecting the TV directly to a PC without an Internet connection (for file sharing only)
You will need:
▶ one Ethernet crossover cable
Note: You cannot use standard Ethernet cable with this connection.
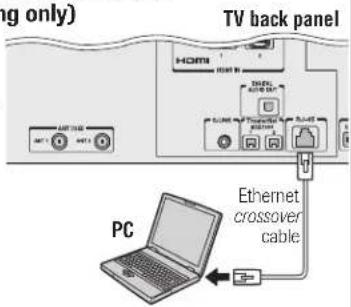
Example #3: Connecting the TV to a home network with an Internet connection (for e-mail scheduling and file sharing)
You will need:
▶ one coaxial or telephone cable (depending on your modem)
▶ three standard Ethernet cables
▶ one router/switch*
▶ one modem (DSL or cable)*
Do not connect the phone jack to the LAN port.
![TV back panel HDMI HDMI IN S-LINK [2] [2] [2] Router/switch* [2]](/content/2026/06/1198777/images/2da9173ab721fb0095a5bebdd95fb5a85e5c04bb8488c36d064bfa0cfe637413.jpg)
[1] = Coaxial or telephone cable (depending on your modem type)
[2] = Standard Ethernet cable
*Your router/switch may be part of your DSL or cable modem. Your switch may be separate from your router. For assistance, contact your ISP or an IT professional.

Using the remote control
Learning about the remote control
The buttons used for operating the TV only are described here. For a complete list of the remote control's functions, see the remote control functional key chart on pages 34–35.
For a list of the buttons that operate the TV Guide On Screen ^™ system, see page 59.
POWER turns the TV on and off. Press POWER to turn on the TV. The blue LED indicator on the TV front will be illuminated. Press POWER again to turn off the TV.
Note: The Quick Restart™ setting will affect the amount of time it takes for the picture to appear when you turn on the TV. See page 56 for details.
SLEEP accesses the sleep timer (page 93).
LIGHT The first press of the LIGHT button lights the keypad and turns on the Illumination mode. With the Illumination mode on, pressing any key lights the keypad for 5 seconds (10 seconds if you're in programming mode). Subsequent presses of the LIGHT button toggle between turning the Illumination mode on and off.
Channel Numbers (0–9, –/100) directly tune channels. The “-” button is used to tune digital channels (page 76) or to display the favorite channel list (page 49).
INPUT selects the video input source (page 72).
MODE cycles through the six remote control device modes: TV, CBL/SAT, VCR/PVR, DVD, AUDIO1, and AUDIO2. The mode indicator light will remain lit for a few seconds (page 33).
PIC SIZE cycles through the five pictures sizes: Natural, TheaterWide 1/2/3, and Full (page 77).
TheaterNet™ DEVICE displays a list of available TheaterNet devices (page 50).
TheaterNet™ CTRL accesses the on-screen IR device control icons (page 51).
MENU accesses the main TV menu system (pages 40 and 41) or opens a menu in the TV Guide On Screen ^™ system (Chapter 7).
TV GUIDE opens the TV Guide On Screen™ system (Chapter 7).
INFO provides detailed information on highlighted items in the TV Guide On Screen™ system (Chapter 7).
ENTER activates highlighted items in the main menu system and the TV Guide On Screen™ system.
Arrow buttons (▲▼ ◀▶) When a menu is on-screen, these buttons select or adjust programming menus. (Also see BACK ▶/NEXT ▶ on the next page.)
CH ▲▼ cycles through programmed channels when no menu is on-screen (page 47) and functions as page up/down when a menu is on-screen or when the TV Guide On Screen™ system is open (Chapter 7).
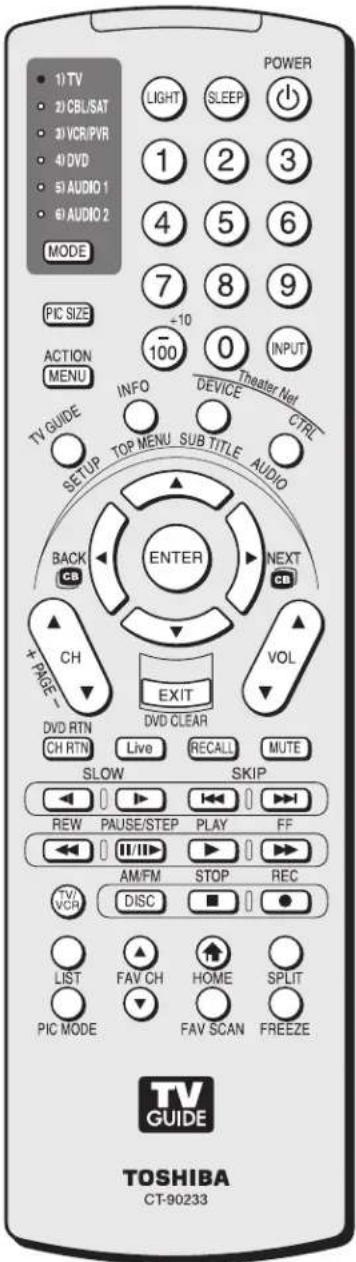
Note: The error message "Not Available" will appear if you press a key for a function that is not available
(Continued on next page)
Learning about the remote control (continued)
VOL ▲▼ adjusts the volume level.
EXIT closes on-screen menus and the TV Guide On Screen™ system.
CH RTN returns to the last viewed channel (page 76), or stops the picture viewer slide show (page 103).
Live returns viewing of the TV back to the live program, while continuing to record to the Toshiba Symbio™ AVHD recorder (pages 26 and 55).
RECALL displays TV setting information on-screen (page 95).
MUTE reduces or turns off the sound (page 89).
TV/VCR selects TV mode to view one program while recording another.
SKIP▶▶ and ◀◀ jump forward and backward one day in the TV Guide On Screen™ listings (Chapter 7).
LIST displays the Toshiba Symbio™ AVHD recorder play list (if available) (page 26).
FAV CH ▲▼ tunes to the next higher/lower favorite channel (page 49).
HOME (↑) accesses the home function of the Channel Browser™ feature (page 75)
While watching TV, these buttons open the Channel Browser banner and tune to the previous/next channel in the channel history (page 74). (Also see "Arrow buttons" on previous page.)
SPLIT turns the POP feature on and off (page 81) or locks/unlocks the TV Guide On Screen™ video window (page 60).
PIC MODE selects the picture mode (page 84).
FAV SCAN accesses the favorite channel search function (page 83).
FREEZE accesses the freeze feature (page 83).
Remote control effective range
For optimum performance, aim the remote control directly at the TV and make sure there is no obstruction between the remote control and the TV.
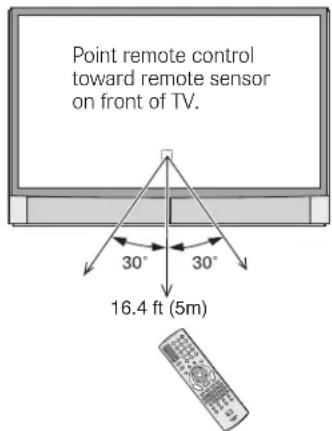
Installing the remote control batteries
To install the remote control batteries:
Caution: Always dispose of batteries in a designated disposal location. Never throw batteries into a fire.
- Slide the battery cover off the back of the remote control.
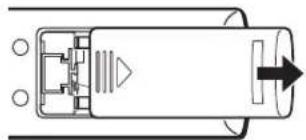
natural_image
Top-down schematic of a mechanical component with no visible text or symbols- Install two "AA" size alkaline batteries. Match the + and - symbols on the batteries to the symbols on the battery compartment.
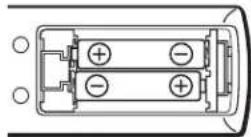
- Slide the battery cover on to the remote control until the lock snaps.
Caution:
Never throw batteries into a fire.
Note:
- Be sure to use AA size batteries.
- Dispose of batteries in a designated disposal area.
- Batteries should always be disposed of with the environment in mind. Always dispose of batteries in accordance with applicable laws and regulations.
- If the remote control does not operate correctly, or if the operating range becomes reduced, replace batteries with new ones.
- When necessary to replace batteries in the remote control, always replace both batteries with new ones. Never mix battery types or use new and used batteries in combination.
•Always remove batteries from remote control if they are dead or if the remote control is not to be used for an extended period of time. This will prevent battery acid from leaking into the battery compartment.
Using the remote control MODE button to control your other devices
Your TV remote control has one dedicated TV mode and five programmable multi-brand modes: CBL/SAT, VCR/PVR, DVD, AUDIO 1, and AUDIO 2. The default device modes and programmable device modes are listed below.
Note: The TV remote control is preprogrammed to operate most Toshiba devices. If you own a non-Toshiba device or a Toshiba device that the remote control is not preprogrammed to operate, you will need to program the remote control. See "Programming the remote control to operate your other devices" on page 36.
| MODE Default device mode control (before programming) |
| 1) TV Toshiba TV |
| 2) CBL/SAT Toshiba Satellite receiver |
| 3) VCR/PVR Toshiba VCR |
| 4) DVD Toshiba DVD |
| 5) AUDIO 1 Pioneer Audio receiver |
| 6) AUDIO 2 Pioneer LD |
| MODE Device mode control after programming | |
| 1) TV Toshiba | TV |
| 2) CBL/SAT | brand video/audio devices |
| 3) VCR/PVR | |
| 4) DVD Multi | |
| 5) AUDIO 1 | |
| 6) AUDIO 2 | |
You can directly select the device mode by pressing the corresponding number button (1-6) while pressing the MODE button.
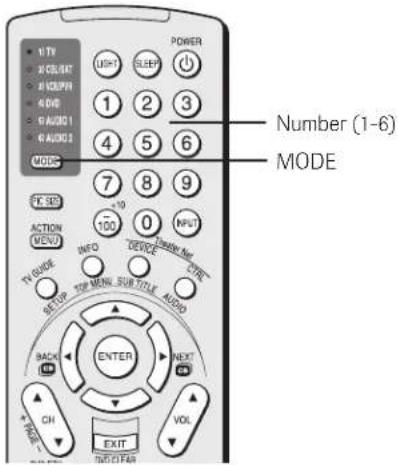
Note:
Although your new TV's remote control includes codes for many devices, it may not include codes for some or all of the features on certain devices you wish to control. If you are unable to program the TV's remote control to operate your device or some of the features on that device, use the device's remote control or the controls on the device.
Remote Control functional key chart
| Key Label | Toshiba TV (TV) (CBL/SAT) (CBL) | Cable Satellite (CBL/SAT) (CBL) | VCR DVD/LD (SAT) (AUDIO) | Receiver CD (AUDIO) | PVR (VCR) | ||||
| MODE Remote | control device mode selection | ||||||||
| LIGHT Lights the remote key, and toggles between enabled and disabled illumination mode.* | |||||||||
| SLEEP | Sleep timer | --- | --- | --- | --- | --- | --- | --- | |
| POWER | Power | Power | Power | Power | Power | Power | Power | Power | |
| 1 | Digit 1 | Digit 1 | Digit 1 | Digit 1 | Digit 1 | AV input 1 | Digit 1 | Digit 1 | |
| 2 | Digit 2 | Digit 2 | Digit 2 | Digit 2 | Digit 2 | AV input 2 | Digit 2 | Digit 2 | |
| 3 | Digit 3 | Digit 3 | Digit 3 | Digit 3 | Digit 3 | AV input 3 | Digit 3 | Digit 3 | |
| 4 | Digit 4 | Digit 4 | Digit 4 | Digit 4 | Digit 4 | AV input 4 | Digit 4 | Digit 4 | |
| 5 | Digit 5 | Digit 5 | Digit 5 | Digit 5 | Digit 5 | CD | Digit 5 | Digit 5 | |
| 6 | Digit 6 | Digit 6 | Digit 6 | Digit 6 | Digit 6 | Tuner | Digit 6 | Digit 6 | |
| 7 | Digit 7 | Digit 7 | Digit 7 | Digit 7 | Digit 7 | Phono | Digit 7 | Digit 7 | |
| 8 | Digit 8 | Digit 8 | Digit 8 | Digit 8 | Digit 8 | Cassette | Digit 8 | Digit 8 | |
| 9 | Digit 9 | Digit 9 | Digit 9 | Digit 9 | Digit 9 | Aux | Digit 9 | Digit 9 | |
| 0 | Digit 0 | Digit 0 | Digit 0 | Digit 0 | Digit 0 | --- | Digit 0, 10 | Digit 0 | |
| 100/- | -(digital separator) | --- | -(sub channel) | 100 | +10 | --- | --- | --- | |
| INPUT | TV/Video select | ← TV | ← TV | ← TV | ← TV | ← TV | ← TV | ← TV | |
| PIC SIZE | Selects the image shape. | ← TV | ← TV | ← TV | ← TV | ← TV | ← TV | ← TV | |
| MENU/ACTION | Menu/Guide Menu | --- | Action, Menu | --- | Menu | --- | --- | Menu | |
| TV GUIDE/SETUP | TV Guide | --- | Guide | --- | DVD setup | --- | --- | Guide | |
| INFO/TOP MENU | Guide Info | --- | INFO | --- | Top menu | --- | --- | INFO | |
| TheaterNet DEVICE/SUBTITLE | TheaterNet Device | --- | --- | --- | Subtitle | --- | --- | ADVANCE | |
| TheaterNet CTRL/AUDIO | TheaterNet Control | --- | --- | --- | Audio | --- | --- | --- | |
| ENTER | Enter | --- | Enter, Select | --- | Enter | --- | --- | Enter | |
| ▲ | Menu select up | --- | Menu select up | --- | Menu select up | --- | --- | Menu select up | |
| ▼ | Menu select down | --- | Menu select down | --- | Menu select down | --- | --- | Menu select down | |
| ◄► | Menu select left/right | --- | Menu select left/right | --- | Menu select left/right | --- | --- | Menu select left/right | |
| EXIT/DVD CLEAR | Exit | --- | Exit | --- | DVD clear | --- | --- | EXIT | |
| CH ▲▼PAGE +/- | Channel up/down, Page up/down | Channel up/down | Channel up/down | Channel up/down | --- | Channel up/down | --- | Channel up/down | |
| VOL ▲▼ | Volume up/down*2 | Volume up/down*2 | Volume up/down*2 | Volume up/down*2 | Volume up/down*2 | Volume up/down*2 | Volume up/down*2 | Volume up/down*2 | |
| CH RTN/DVD RTN | Previous channel | Previous channel | Previous channel | --- | DVD return | --- | --- | --- | |
| Live | Live | --- | --- | --- | --- | --- | --- | Live TV | |
| RECALL | On-screen display | --- | --- | --- | On-screen display | --- | --- | --- | |
| Key Label | Toshiba TV (TV) (CBL/SAT) (CBL) | Cable Satellite (SAT) (SCL/SAT) | VCR DVD/L (AudiO) (AUDIO) | D Receiver CD (AUDIO) | PVR (VCR) | ||||
| MUTE | Sound mute*2 | Sound mute*2 | Sound mute*2 | Sound mute*2 | Sound mute*2 | Sound mute*2 | Sound mute*2 | Sound mute*2 | |
| SLOW | ◀ | --- --- --- | Slow FWD--- Slow REW | Slow FWD--- | --- | --- | Slow FWD | ||
| SKIP | ◀◀ | Skip FWDSkip REW | --- --- --- | Skip FWDSkip REW | --- | Skip FWDSkip REW | --- | ||
| REW | Rewind | --- --- Rewind | Rewind | --- | Rewind | Rewind | |||
| PAUSE/STEP | Pause | --- --- Pause | Pause | --- | Pause | Pause | |||
| PLAY | Play | --- --- Play | Play | --- | Play | Play | |||
| FF | Fast FWD | --- | --- | Fast FWD | Fast FWD | --- | Fast FWD | Fast FWD | |
| TV/VCR | --- | --- | TV/SAT | TV/VCR | --- | --- | --- | Reverse | |
| DISC/AM/FM | --- --- --- --- | Disc shift | AM/FM | Disc shift | Replay | ||||
| STOP | Stop | --- | --- | Stop | Stop | --- Stop | Stop | ||
| REC | REC Menu(Single Click) | --- | --- | Record(Double Click) | --- | --- | --- | Record(Double Click) | |
| LIST | LIST | --- --- --- | --- | --- | --- --- | ||||
| FAV CH▲▼ | FAV channelup/down | --- | --- | --- | --- | --- | --- | --- | |
| HOME | HOME | --- | --- | --- | --- | --- | --- | --- | |
| SPLIT | Split | <—— TV | <—— TV | <—— TV | <—— TV | <—— TV | <—— TV | <—— TV | |
| PIC MODE | PIC MODE | <—— TV | <—— TV | <—— TV | <—— TV | <—— TV | <—— TV | <—— TV | |
| FAV SCAN | FAV SCAN | --- | --- | --- | --- | --- | --- | --- | |
| FREEZE | Freeze | <—— TV | <—— TV | <—— TV | <—— TV | <—— TV | <—— TV | <—— TV | |
Notes:
- “---” = key does not send a signal in that remote control mode.
- “← TV” = key will affect the TV, even though the remote control is not in TV mode.
*1 Backlight key is toggle. Does not send IR signal.
^*2 Volume will affect the TV by default. When the volume is unlocked, all the devices will have their own volume if their ID has volume data. The AUDIO modes (receiver, CD) will have their own volume if volume lock is set on TV, CBL/SAT, VCR/PVR, or DVD mode. See “Using the volume lock feature” on page 37.
Programming the remote control to operate your other devices
Device code setup
- Refer to the multi-brand remote control device code table on pages 38–39 to find the code for the brand of your device.
If more than one code is listed, try each one separately until you find one that works.
-
Press MODE until the Mode indicator for the device (CBL/SAT, VCR/PVR, DVD, AUDIO 1, AUDIO 2) lights up.
-
While holding down the RECALL button, press the Channel Number buttons to enter the four-digit code for your brand of device. If a valid code is entered, the mode indicator will blink twice. If an invalid code is entered, the mode indicator will blink one long blink.
-
Point the remote control at the device and press POWER to test the code.
If the device responds to the remote control:
You have entered the correct code.
If the device does not respond to the remote control:
You may have entered the wrong code. Repeat steps 3 and 4 using another code.
Note: In addition to POWER, confirm that all necessary keys on the TV remote control operate your device. If some keys are not operational, repeat the device code setup using another code (if other codes are listed for your device). If, after trying all listed codes, the necessary keys do not operate your device, use the device's original remote control.
- To control the TV, repeatedly press MODE to select "TV."
Note:
- Although the TV remote control includes codes for many devices, it may not include codes for some or all of the features on certain devices you want to control. If you are unable to program the TV remote control to operate your device or some of the features on that device, use the device's remote control or the controls on the device.
• Each time you change the batteries you will need to reprogram the remote control.
- Some newer VCRs respond to either of two codes. These VCRs have a switch labeled "VCR1/VCR2." If your VCR has this kind of switch and does not respond to the codes for your VCR brand, set the switch to the other position ("VCR1" or "VCR2") and reprogram the remote control.
Searching and sampling the code of a device (8500)
If you do not know the device code for a particular device, you can cycle the remote control through the available codes for that device mode and sample the functions to find the code that operates the target device. The keys available to be sampled, provided they are applicable to that mode, are POWER, 1, VOL ▲, CH ▲, and PLAY. Invalid keys will be ignored while in program mode.
To cycle through each available device code and sample its functions:
- Press MODE to select the mode you want to set up.
- While holding down RECALL, press 8 - 5 - 0 - 0. The remote control will enter program mode.
- Point the remote control at the target device and press POWER (or other function buttons that are available to be sampled).
- If the device responds to the remote control:
Press RECALL to store the device code. The mode indicator will blink twice and the remote control will exit the program mode.
If the device does not respond to the remote control:
Press ▲, and then press POWER. Repeat this step until the device responds to the remote control, and then press RECALL.
Note: When a search cycle is completed, the mode indicator will blink three times. The remote control will begin to cycle through the available codes again. If no key is pressed within 10 seconds while programming, the remote control will exit the program mode and return to the previous code.
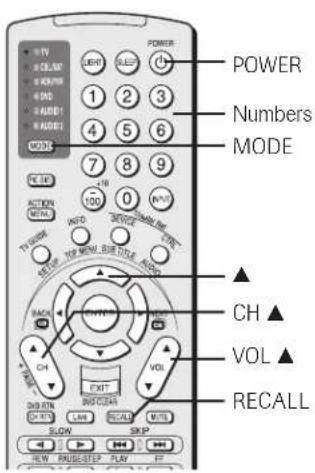
Programming the remote control to operate your other devices (continued)
Using the volume lock feature (8000)
For the TV, CABLE/SAT, VCR, and DVD modes, the volume controls (VOL ▲▼ and MUTE) can be locked to the selected device mode. This feature does not apply to the AUDIO 1 and AUDIO 2 modes.
To lock the volume controls to always control the CABLE/SAT device volume (for example):
- Repeatedly press MODE to select CABLE/SAT mode.
- While holding down the RECALL button, press 8 - 0 - 0 - 0.
- Press VOL ▲.
The CABLE/SAT mode light will blink two times (locked).
To reset the volume controls to the original device mode:
- While holding down RECALL, press 8 - 0 - 0 - 0.
- Press VOL ▼.
The mode light will blink four times (unlocked).
Operational feature reset (8900)
This feature clears all programmed remote control features not related to "Device code setup" and resets the Volume Lock to "TV."
To reset the features:
While holding down the RECALL button, press 8 -9 -0 -0. The Mode indicator will blink two times, and then pause and blink two more times.
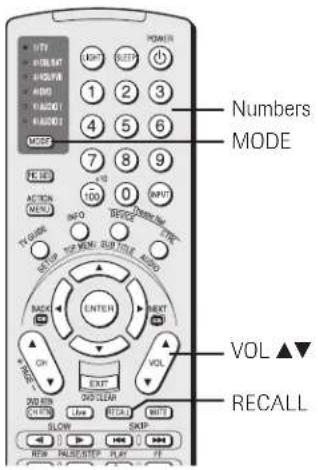
Multi-brand remote control device codes
VCRs/PVRs
Brand
Code
| ADMIRAL 0135 |
| AIWA 0127, 0132, 0181 |
| AKAI 0129, 0114, 0115,0116 |
| AUDIO DYNAMIC 0139, 0111 |
| BELL&HOWELL 0105, 0113 |
| BROKSONIC 0120, 0126, 0180 |
| CANON 0123, 0125 |
| CCE 0143 |
| CITIZEN 0106 |
| CRAIG 0105, 0129, 0106 |
| CURTIS MATHES 0145, 0124, 0127 |
| DAEWOO 0143, 0101, 0124,0175 |
DBX 0139, 0110, 0111
DIMENSIA 0145
| EMERSON 0143, 0126, 0119, | |
| 0103, 0125, 0142, | |
| 0120, 0118 | |
| FISHER | 0105, 0108, 0109, |
| 0107, 0113, 0165 | |
FUNAI 0127, 0126, 0120.
0134
| GE | 0133, 0145, 0124 |
| GO VIDEO | 0137, 0151, 0163, 0149, 0150, 0182 |
| GOLDSTAR | 0106 |
| GRADIENTE 0170, 0171, 0168, | |
| 0134, 0156 | |
| HITACHI | 0123, 0145, 0100, |
| 0127, 0168 | |
| INSTANT REPLAY | 0124, 0123 |
| JENSEN | 0139 |
| JVC | 0139, 0110, 0111, 0134, 0157, 0158, 0184, 0185, 7104 |
| KENWOOD | 0139, 0110, 0106, 0111 |
| LG | 0159 |
| LXI | 0127, 0106, 0100, 0107, 0108, 0105, 0109 |
| MAGNAVOX | 0131, 0123, 0124, 0173 |
| MARANTZ | 0139, 0110, 0111 |
| MARTA | 0106 |
| MEMOREX | 0124, 0109 |
| MGA 0138, 0140, 0147,0148, 0141, 0142 |
| MINOLTA 0100, 0145 | |
| MITSUBISHI | 0138, 0140, 0147,0148, 0141, 0142,0161, 0164 |
| MULTITECH | 0147, 0127, 0104 |
| NEC | 0139, 0110, 0111, 0134 |
OLYMPIC 0124,0123
| OPTIMUS 0128, 0121, 0135, 0106 |
| ORION | 0126, 0120, 0132 |
| PANASONIC | 0123, 0124, 0121, 0122 |
| PENNEY | 0124, 0100, 0145, 0105, 0139, 0110, 0111 |
PENTAX 0100, 0111, 0145
VCRs/PVRs (cont.)
| Brand | Code |
| PHILCO | 0131, 0124, 0127,0123, 0126, 0120,0143 |
| PHILIPS | 0131, 0123, 0124,0173 |
| PIONEER | 0123 |
| PROSCAN 0145, 0100, | 0123,0124, 0131, 0146,0101, 0102, 0133 |
| QUASAR | 0121, 0122, 0123,0124 |
| RADIO SHACK | 0133, 0124, 0105,0136, 0109, 0140,0127 |
| RCA | 0133, 0145, 0100,0123, 0124, 0131,0146, 0101, 0102,0170, 0172, 0174,0176, 0183 |
| REALISTIC | 0124, 0105, 0136,0109, 0140, 0127 |
| Replay TV | 7102 |
| SAMSUNG 0137, 0102, 0104, 0133 | |
| SAMTRON 0163 | |
| SANSUI | 0139, 0126, 0120, 0152 |
| SANYO | 0105, 0109, 0113 |
| SCOTT | 0101, 0102, 0104, 0109, 0138, 0140, 0147, 0148, 0126 |
| SEARS | 0105, 0106, 0107, 0108, 0100 |
| SHARP | 0135, 0136, 0167, 0162 |
| SHINTOM | 0117 |
| SIGNATURE 2000 | 0127, 0135 |
| SINGER | 0117 |
| SONY | 0128, 0129, 0130,0153, 0154, 0155,7101 |
| SV2000 | 0127 |
| SYLVANIA 0131, 0123, 0124, | |
| 0127, 0178 | |
| SYMPHONIC | 0127, 0168, 0177 |
| TASHIRO | 0106 |
| TATUNG 0139, 0110, 0111 | |
| TEAC | 0139, 0110, 0127, 0111 |
| TECHNICS | 0121, 0122, 0123, 0124 |
| TEKNICA | 0124, 0127, 0112 |
| THOMSON | 0179, 0183 |
| Tivo | 7100, 7101 |
| TOSHIBA | 0101, 0146, 0166, 0160 |
| VECTOR RESEARCH | 0111 |
| WARDS | 0135, 0136, 0109, 0144, 0106 |
| YAMAHA | 0105, 0139, 0110, 0111 |
| ZENITH | 0144, 0106, 0169, 0180 |
Cable boxes
| Brand | Code |
| ABC | 1124 |
| ARCHER | 1132, 1125 |
| CABLEVIEW | 1105, 1132 |
| CITIZEN 1122, 1105 | |
| CURTIS | 1112, 1113 |
| DIAMOND | 1124, 1132, 1125 |
| EAGLE | 1129 |
| EASTERN | 1134 |
| GCBRAND | 1132, 1105 |
| GEMINI 1122, 1143 | |
| G.I./JERROLD | 1119, 1124, 1125, 1126, 1127, 1120, 1121, 1122, 1111, 1123, 1152 |
HAMLIN 1140, 1141, 1142, 1145, 1118, 1112
| HITACHI | 1103, 1124 |
| MACOM | 1103, 1104, 1105, 1108 |
MAGNAVOX 1133 MEMOREX 1130
| MOVIETIME 1132, 1105 | |
| OAK | 1139, 1137, 1102 |
| PANASONIC | 1109, 1110, 1114, 1151, 1153 |
| PHILIPS | 1128, 1129, 1130, 1106, 1107, 1150, 1131 |
PIONEER 1101, 1116
PULSAR 1105, 1132 PUSER 1132
RCA 1115
REALISTIC 1132
| REGAL | 1112, 1118, 1140, 1141, 1142, 1145, 1149 |
REGENCY 1134
REMBRANT 1137, 1132, 1105, 1138
SAMSUNG 1105
S.A. 1111, 1112, 1113
SLMARK 1105, 1101 SPRUCER 1105, 1110
STARGATE 1132, 1105
TELECAPTION 1148
TELEVIEW 1101, 1105
TEXSCAN 1144
TOCOM 1135, 1136, 1147
TOSHIBA 1104, 1146
UNIKA 1132, 1125 UNIVERSAL 1122, 1132
VIDEOWAY 1106
VIEWSTAR 1129, 1130
ZENITH 1117, 1100 ZENITH/DRAKE 1100
SATELLITE
Multi-brand remote control device codes (continued)
CD players
Brand Code
| ADMIRAL | 6126 |
| AIWA | 6133, 6135 |
| CARVER | 6129 |
| DENON | 6142, 6151 |
| EMERSON | 6139 |
| FISHER | 6105, 6106 |
| GARRARD | 6117 |
| HARMAN/KARDON | 6120, 6121, 6123, 6119 |
HITACHI 6107
| JENSEN | 6134 |
| JVC | 6140, 6141, 6145, 6148, 6151 |
| KENWOOD 6100, 6101, 6111, 6145 |
| LXI | 6136 |
MAGNAVOX 6129, 6132
| MARANTZ | 6129 |
| MACINTOSH | 6121 |
| NAKAMICHI | 6110 |
ONKYO 6114, 6115
| OPTIMUS | 6108, 6118, 6120, 6122 |
| PANASONIC 6124, 6125, 6127, 6150 |
PHILIPS 6129, 6130, 6149
| PIONEER | 6108 |
| OUASAR | 6125, 6127, 6124 |
RCA 6147, 6137, 6138,
6131, 6152
| SANSUI | 6110, 6146, 6113 |
| SANYO | 6105 |
| SCOTT | 6110, 6146 |
| SHARP | 6142, 6143 |
| SHERWOOD 6120 | |
| SONY 6128 | |
| SOUNDE-SIGH | 6144 |
| TEAC | 6112, 6116, 6118 |
| TECHNICS | 6127, 6124, 6125 |
| VICTOR | 6140, 6141, 6145 |
| YAMAHA | 6102, 6103, 6104 |
Receivers
Brand Code
| ADMIRAL | 4120 |
| AIWA | 4125, 4126, 4146 |
| DENON | 4134, 4135, 4136, 4143 |
| FISHER | 4104 |
| GARRARD | 4113 |
| HARMAN KARDON | 4115, 4123, 4145 |
| JENSEN | 4129 |
| JVC | 4132, 4133, 4140, 4144 |
| KENWOOD 4100, 4108, 4141, 4142, 4147 |
MAGNAVOX 4127, 4128
| MARANTZ | 4124 |
| MCNTOSH | 4116 |
| MITSUBISHI 4148 | |
| NAKAMICHI | 4106, 4117 |
| ONKYO 4109, 4114 | |
| OPTIMUS | 4103, 4127, 4131, 4130 |
PANASONIC 4119, 4118, 4121
PHILIPS 4123
Receivers (cont.)
Brand Code
| PIONEER | 4105, 4107, 4150 |
| QUASAR | 4119, 4118, 4121 |
| RCA 4103, 4105, 4127, | |
| 4131, 4130, 4149 | |
| SANSUI | 4103, 4111, 4139 |
| SHARP | 4134, 4137 |
| SONY 4122 | |
| SOUNDE-SIGH | 4138 |
| TEAC | 4112, 4113, 4111, 4110 |
| TECHNICS | 4121, 4118, 4119 |
| VICTOR | 4132, 4133 |
| YAMAHA | 4101, 4102 |
Laser disks
Brand Code
| DENON | 5114 |
| HITACHI 5100 | |
| KENWOOD 5102, 5103 | |
| MAGNAVOX 5101 | |
| MARANTZ | 5114 |
| MITSUBISHI 5114, 5118, 5119 | |
| NEC | 5114 |
| PANASONIC 5104, 5105, 5106, 5115 |
PHILIPS 5111
| PIONEER | 5114 |
| PROSCAN 5114 | |
| QUASAR | 5104, 5105, 5106, 5115 |
RCA 5114
| SAMSUNG | 5112 |
| SANYO | 5114, 5117 |
| SHARP | 5113, 5116 |
| SONY 5107, 5108, 5109,5110 |
| TEAC | 5114 |
| TOSHIBA | 5114 |
| YAMAHA | 5101 |
DVD players
Brand Code
| AIWA | 3123 |
| APEX | 3120 |
| DENON | 3100, 3117 |
| FERGUSON 3101 | |
| HITACHI | 3111 |
| JVC | 3109 |
| KENWOOD 3115, 3129 | |
| KONKA | 3119 |
| MITSUBISHI 3105 | |
| NORDMENDE | 3101 |
| ONKYO 3121 | |
| ORITRON | 3124 |
| PANASONIC 3100 | |
| PHILIPS 3103, 3116 | |
| PIONEER | 3102 |
| RAITE | 3113 |
| RCA 3101, 3106 | |
| SABA | 3101 |
| SAMPO | 3114 |
| SAMSUNG | 3110 |
| SHARP | 3108 |
| SYLVANIA | 3132, 3118 |
| SMC | 3125 |
| SONY 3104, 3126, 3127, | |
| 3128 | |
| TECHNICS | 3100 |
| THOMSON 3101 | |
| TOSHIBA | 3103 |
| WAVE | 3122 |
| YAMAHA | 3100, 3130 |
| ZENITH | 3107, 3112 |
| VIALTA | 3131 |
| FUNAI | 3132, 3118 |
Satellite receivers
Brand Code
| DISH NETWORK 2105, 2115, 2116,(Echostar) 2117 | |
| ECHOSTAR 2105 | |
| EXPRESS VU 2105, 2115 | |
| G.E. 2106 | |
| G.I.(GENERAL 2108INSTRUMENT) | |
| GRADIENTE 2114 | |
| HITACHI 2103, 2111, 2112 | |
| HNS(Hughes) 2103 | |
| MAGNAVOX 2101, 2102 | |
| PANASONIC 2104 | |
| PHILIPS 2101, 2102, 2118 | |
| PRIMESTAR 2108 | |
| PROSCAN 2106, 2109, 2110,2113 | |
| RCA 2106, 2109, 2110,2113 | |
| SONY 2107 | |
| STAR CHOICE | 2103, 2108 |
| TOSHIBA | 2100, 2103, 22120, 2121, 22123, 2124, 2 |
| UNIDEN | 2101, 2102 |

Menu layout and navigation
The illustrations below and on the next page provide a quick overview of your TV's menu system.
Main menu layout
To open the main menus (illustrated below), press MENU on the remote control or TV control panel.
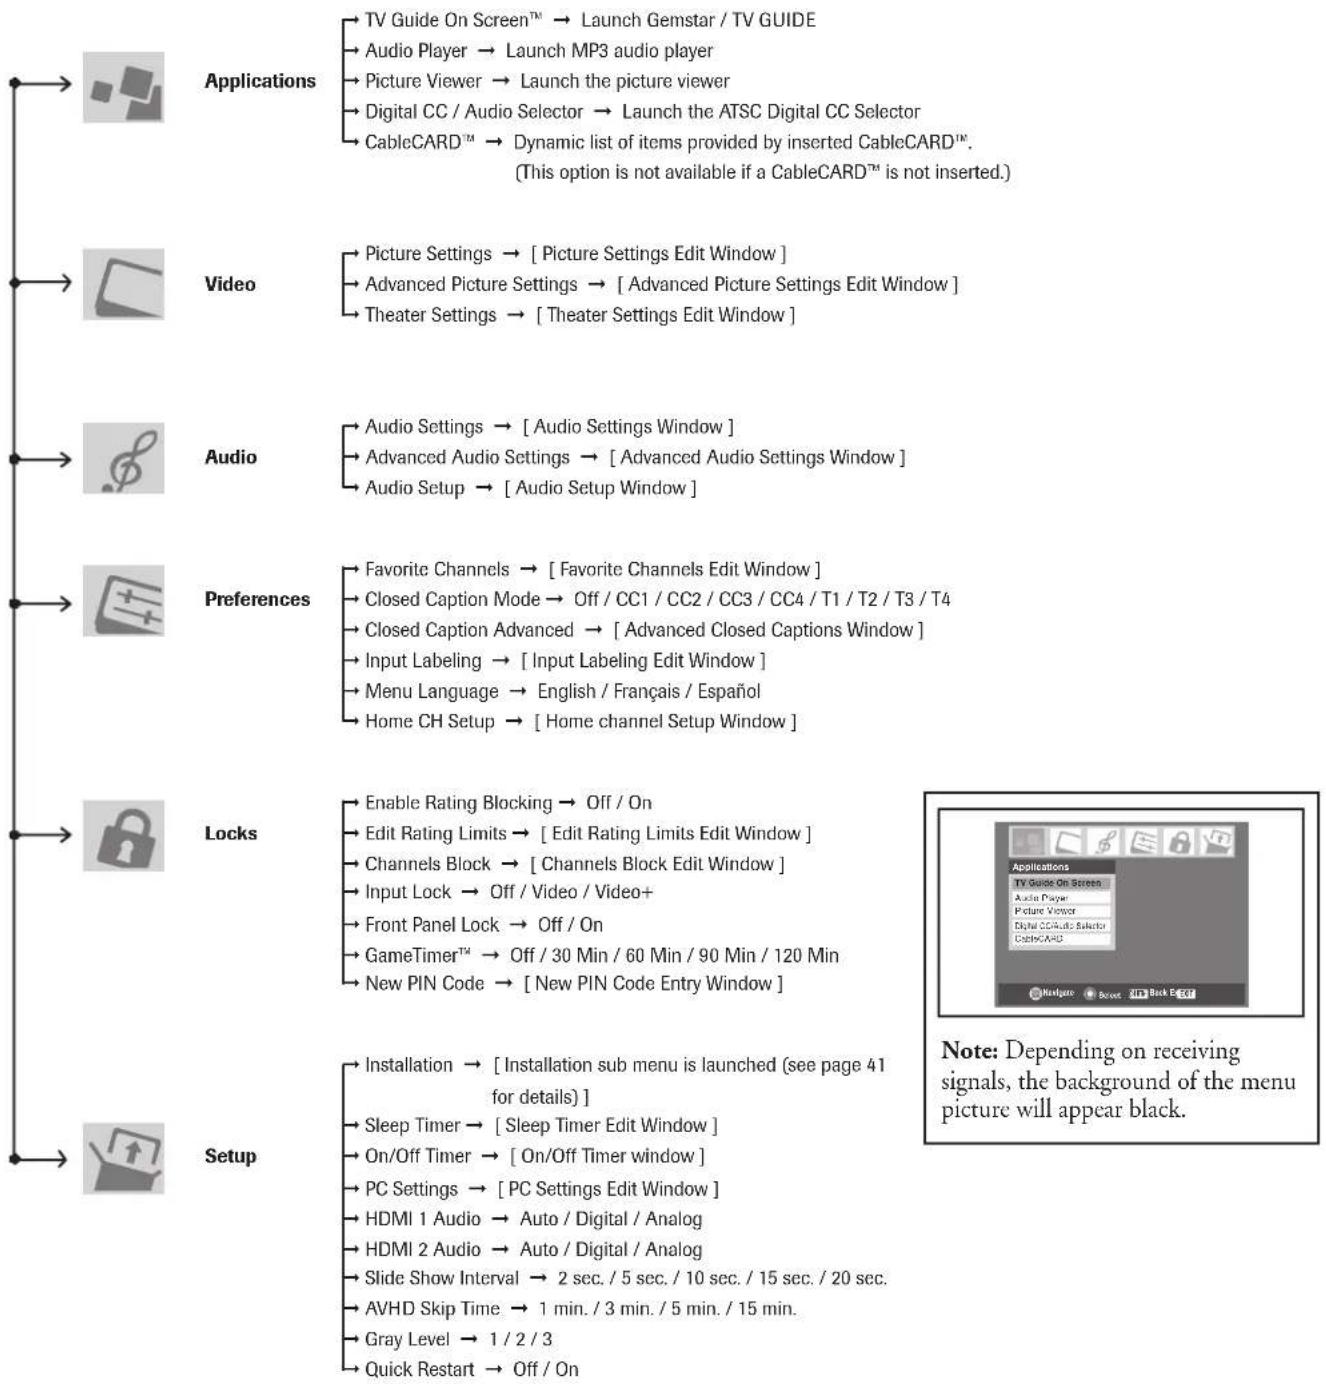
flowchart
graph TD
    A["Applications"] --> B["TV Guide On Screen™ → Launch Gemstar / TV GUIDE"]
    A --> C["Audio Player → Launch MP3 audio player"]
    A --> D["Picture Viewer → Launch the picture viewer"]
    A --> E["Digital CC / Audio Selector → Launch the ATSC Digital CC Selector"]
    A --> F["CableCARD™ → Dynamic list of items provided by inserted CableCARD™. (This option is not available if a CableCARD™ is not inserted)."]
    G["Video"] --> H["Picture Settings → [ Picture Settings Edit Window "]]
    G --> I["Advanced Picture Settings → [ Advanced Picture Settings Edit Window "]]
    G --> J["Theater Settings → [ Theater Settings Edit Window "]]
    K["Audio"] --> L["Audio Settings → [ Audio Settings Window "]]
    K --> M["Advanced Audio Settings → [ Advanced Audio Settings Window "]]
    K --> N["Audio Setup → [ Audio Setup Window "]]
    O["Preferences"] --> P["Favorite Channels → [ Favorite Channels Edit Window "]]
    O --> Q["Closed Caption Mode → Off / CC1 / CC2 / CC3 / CC4 / T1 / T2 / T3 / T4"]
    O --> R["Closed Caption Advanced → [ Advanced Closed Captions Window "]]
    O --> S["Input Labeling → [ Input Labeling Edit Window "]]
    O --> T["Menu Language → English / Français / Español"]
    O --> U["Home CH Setup → [ Home channel Setup Window "]]
    V["Locks"] --> W["Enable Rating Blocking → Off / On"]
    V --> X["Edit Rating Limits → [ Edit Rating Limits Edit Window "]]
    V --> Y["Channels Block → [ Channels Block Edit Window "]]
    V --> Z["Input Lock → Off / Video / Video+"]
    V --> AA["Front Panel Lock → Off / On"]
    V --> AB["GameTimer™ → Off / 30 Min / 60 Min / 90 Min / 120 Min"]
    V --> AC["New PIN Code → [ New PIN Code Entry Window "]]
    AD["Setup"] --> AE["Installation → [ Installation sub menu is launched (see page 41 for details) "]]
    AD --> AF["Sleep Timer → [ Sleep Timer Edit Window "]]
    AD --> AG["On/Off Timer → [ On/Off Timer window "]]
    AD --> AH["PC Settings → [ PC Settings Edit Window "]]
    AD --> AI["HDMI 1 Audio → Auto / Digital / Analog"]
    AD --> AJ["HDMI 2 Audio → Auto / Digital / Analog"]
    AD --> AK["Slide Show Interval → 2 sec. / 5 sec. / 10 sec. / 15 sec. / 20 sec."]
    AD --> AL["AVHD Skip Time → 1 min. / 3 min. / 5 min. / 15 min."]
    AD --> AM["Gray Level → 1 / 2 / 3"]
    AD --> AN["Quick Restart → Off / On"]
Setup / Installation menu layout
To open the Installation menu (illustrated below), press MENU on the remote control or TV control panel, open the Setup menu, select Installation, and press ENTER.
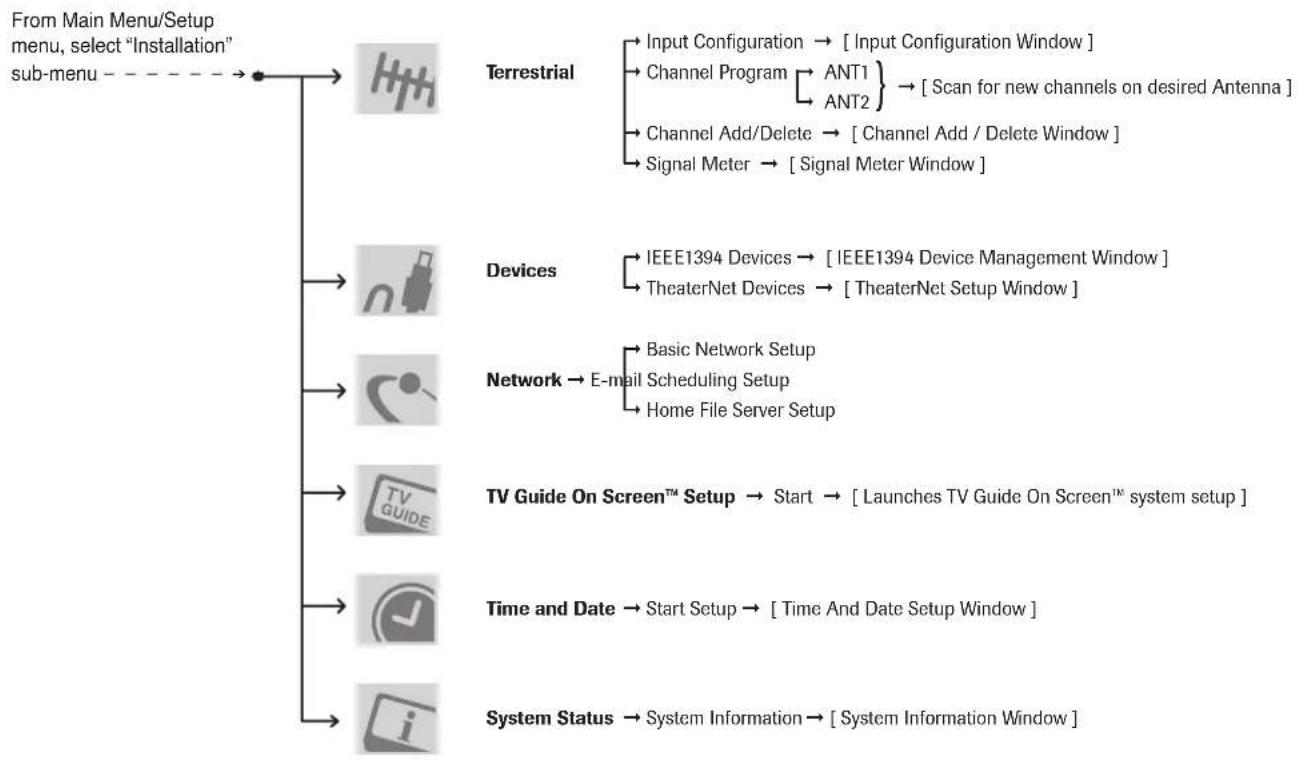
flowchart
graph TD
    A["From Main Menu/Setup menu, select "Installation" sub-menu"] --> B["To-Menu Icon"]
    B --> C["Terrestrial"]
    C --> D["Input Configuration → [ Input Configuration Window "]]
    C --> E["Channel Program ANT1 ANT2"] --> F["Scan for new channels on desired Antenna"]
    C --> G["Channel Add/Delete → [ Channel Add / Delete Window "]]
    C --> H["Signal Meter → [ Signal Meter Window "]]
    B --> I["Devices"]
    I --> J["IEEE1394 Devices → [ IEEE1394 Device Management Window "]]
    I --> K["TheaterNet Devices → [ TheaterNet Setup Window "]]
    B --> L["Network → E-mail Scheduling Setup"]
    L --> M["Basic Network Setup"]
    L --> N["Home File Server Setup"]
    B --> O["TV Guide On Screen™ Setup → Start → [ Launches TV Guide On Screen™ system setup "]]
    B --> P["Time and Date → Start Setup → [ Time And Date Setup Window "]]
    B --> Q["System Status → System Information → [ System Information Window "]]
Navigating the menu system
You can use the buttons on the remote control or TV control panel to access and navigate your TV's on-screen menu system.
- Press MENU to open the menu system.
- Use the up/down/left/right arrow buttons (▲▼◀▶) on the remote control or TV control panel to move in the corresponding direction in a menu.
- Press ENTER to save your menu settings or select a highlighted item. (A highlighted menu item appears in a different color in the menu.)
- All menus close automatically if you do not make a selection within 60 seconds, except the signal meter menu which closes automatically after 5 minutes.
• To close a menu instantly, press EXIT.
TV control panel
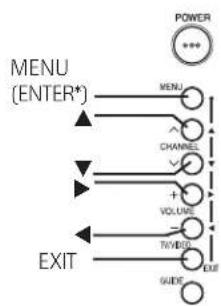
flowchart
graph TD
    A["MENU (ENTER*)"] --> B["MENU"]
    B --> C["CHANNEL"]
    C --> D["VOLUME"]
    D --> E["TW/WDG"]
    E --> F["EXIT"]
    F --> G["SUID"]
    G --> H["POWER"]
*The MENU button on the TV control panel functions as the ENTER button when a menu is on-screen.
Remote control
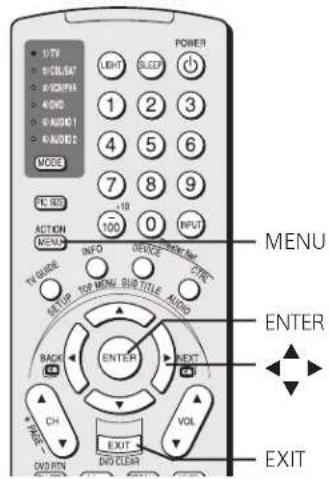
5
TV Guide On Screen™ setup
Setting up the TV Guide On Screen™ system
The TV Guide On Screen ^™ system in your TV is a no-fee interactive program guide that uses the information you enter during the following setup process to provide you with a channel lineup and program listings for your area. The listings are automatically updated several times a day.
Note:
- You must first set up your TV according to the applicable connection instructions in Chapter 2.
- If you connected a Toshiba AVHD Recorder, you must perform the following TV Guide On Screen™ system setup in order to use the Symbio's full functionality. See pages 26 and 55 for further details about AVHD digital recorders.
To set up the TV Guide On Screen™ system:
- Press MENU and open the Setup menu.
- Highlight Installation and press ENTER.
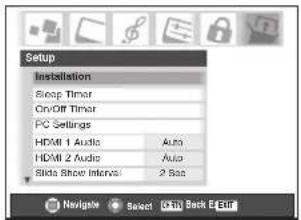
- A new set of Installation menu icons appears on-screen (see illustration at right). Open the TV Guide On Screen™ Setup menu, highlight Start, and press ENTER.
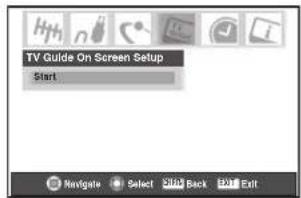
- The following screen appears. Highlight "Set up TV Guide On Screen™ now" and press ENTER to continue.
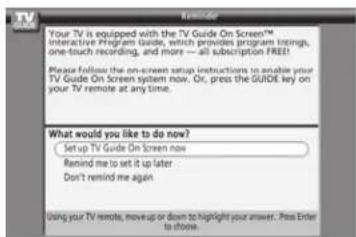
- The following screen appears. Press ENTER to continue.
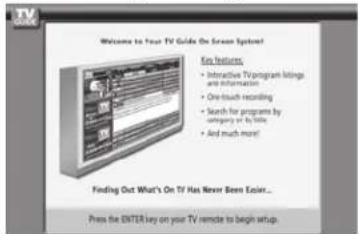
Configuring the location of your TV
Screen 1: Select the TV location (USA or Canada), and then press ENTER.
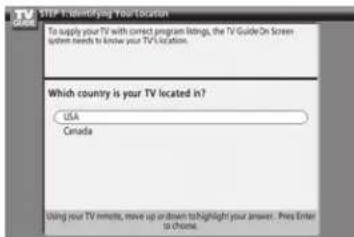
Screen 2: Enter the ZIP code (U.S.A.) or postal code (Canada) for your location (use the Number buttons on the remote control for numbers and the ▲▼ buttons for letters), and then press ENTER. Screen 3 appears.
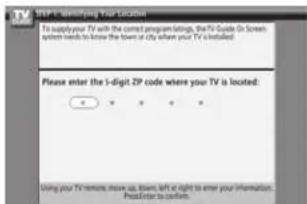
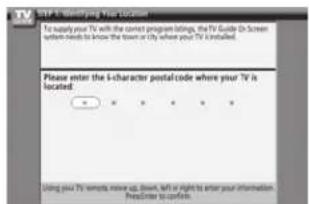
Screen 3: Do you have Cable service connected? If you select Yes (and press ENTER), screen 4 appears. If you select No (and press ENTER), screen 12 appears.
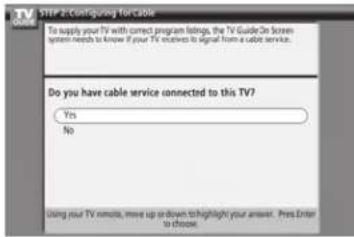
Screen 4: Do you have a Cable box connected? If you select Yes (and press ENTER), screen 5 appears. If you select No (and press ENTER), screen 13 appears.
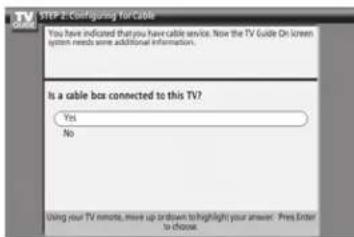
Setting up the TV Guide On Screen™ system (continued)
Screen 5: Which TV input is your cable box plugged into? If you select ANT 1, screen 6 appears. If you select Video 1, screen 7 appears.
Screen 6: Select the channel your TV is tuned to when using your cable box, and then press ENTER. Screen 7 appears.
Screen 7: The on-screen diagram shows the correct way to connect your Cable box to the G-LINK™ terminal on the TV. Make sure the G-LINK™ cable is installed properly. For additional details, see page 28. Press ENTER to display screen 8.
Screen 8: Highlight your Cable box brand, and then press ENTER to display screen 9.
Screen 9: To allow the TV Guide On Screen™ system to find the correct code for your brand of Cable box, tune your Cable box to channel 02, leave the Cable box and TV ON, and then press ENTER. Screen 10 appears.
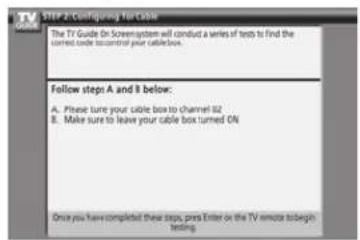
Screen 10: The TV Guide On Screen ^™ system will test the code for the brand of Cable box you selected. Do not press any keys on the TV, remote control, or Cable box until the testing process is completed. When testing is completed, screen 11 appears.
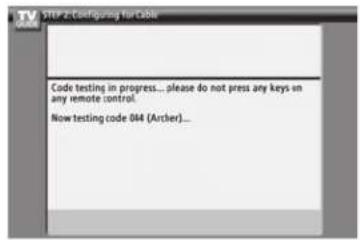
Screen 11: If your Cable box tuned itself to channel 09 after testing, select Yes and press ENTER. If you selected ANT 1 in screen 5, screen 13 appears. If you selected Video 1 in screen 5, screen 12 appears.
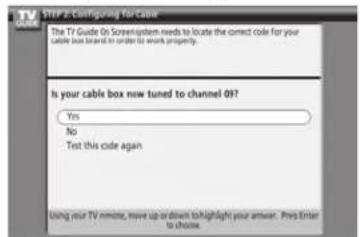
If your Cable box did not tune itself to channel 09 after testing and you want to test the same code again, select "Test this code again" and press ENTER.
If you want to test a different code, select No and press ENTER. Screen 10 appears.
Note: Many cable boxes require testing more than one code.
(Continued on next page)
Setting up the TV Guide On Screen™ system (continued)
Screen 12: Do you have an antenna connected?
Select either Yes or No, and then press ENTER. Screen 13 appears.
Note: If you selected NO in screen 3, you must select YES in this screen to receive a channel lineup and program listings.
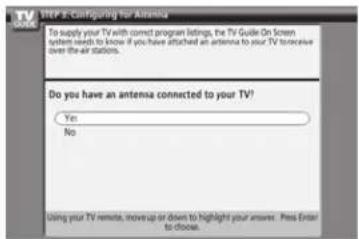
Screen 13: Are the settings correct?
If you select Yes, screen 14 appears. If you select No, screen 1 appears.

Screen 14: Congratulations! You have completed basic TV Guide On Screen ^™ system setup.
Note: Read the on-screen information regarding the amount of time it may take for listing information to download from the TV Guide On Screen™ service.
Press ENTER to display screen 15.
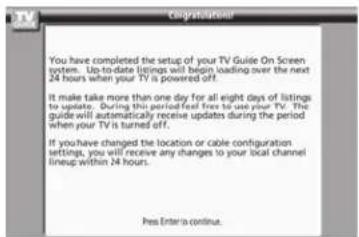
Screen 15: Is a VCR connected?
If you select Yes, screen 16 appears. If you select No, screen 21 appears.
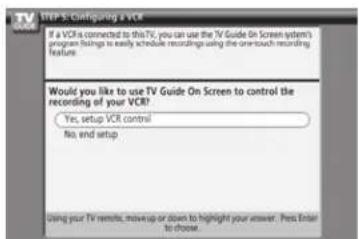
Screen 16: The on-screen diagram shows the correct way to connect your VCR to the G-LINK™ terminal on the TV. Make sure the G-LINK™ cable is installed properly. For additional details, see page 28. Press ENTER to display screen 17.
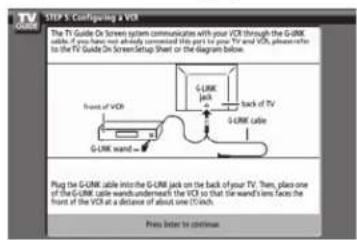
Screen 17: Select your VCR brand, and then press ENTER. Screen 18 appears.
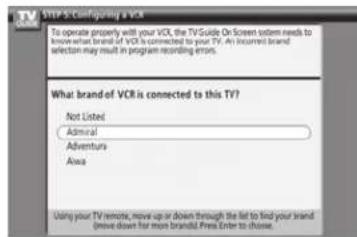
Screen 18: Turn on your VCR, insert a tape (either blank or previously recorded), and then press PLAY. Screen 19 appears.
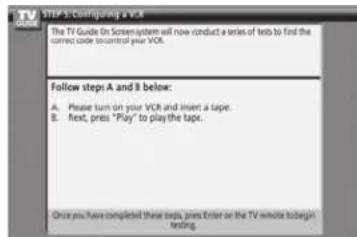
Screen 19: The TV Guide On Screen™ system will test the code for the brand of VCR you selected. Do not press any keys on the TV, remote control, or VCR until the testing process is completed. When testing is completed, screen 20 appears.
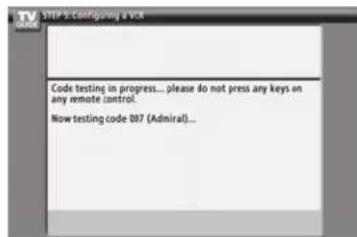
Setting up the TV Guide On Screen™ system (continued)
Screen 20: If your VCR stopped playing the tape after testing, select Yes and press ENTER. Screen 21 appears.
If your VCR did not stop playing the tape after testing and you want to test the same code again, select "Test this code again" and press ENTER.
If you want to test a different code, select No and press ENTER. Screen 19 appears.
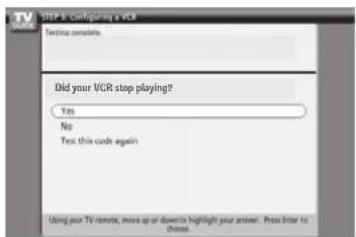
Note: Many VCRs require testing more than one code.
Screen 21: Review the setup information displayed on your TV screen (an example is shown below).
If the information on your TV screen is correct for your setup, select "Yes, end setup" and press ENTER. Screen 22 appears.
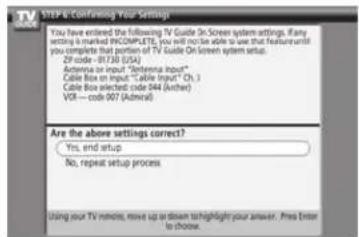
If the information is incorrect, select "No, repeat setup process" and press ENTER. Screen 1 appears.
Screen 22: Congratulations! You have successfully completed TV Guide On Screen™ system setup.
Press ENTER to display screen 23.
Screen 23: This screen provides helpful information on using your TV Guide On Screen ^TM system.
Press ENTER to exit the TV Guide On Screen™ setup and watch TV.
TV Guide On Screen™ Reminder
The TV Guide On Screen™ system receives program listing data through your Cable or over-the-air video signal. In order to receive regular program listing updates, remember to do the following:
- Leave the TV in standby mode when it is not in use by turning it OFF but leaving the power cord plugged in.
- If you have a Cable box connected, leave it ON.
- If you have a VCR connected, turn it OFF when not in use. (Do not unplug the power cord.) See pages 15-16 for VCR connection instructions.
- If you have more than one Cable system in your area, you may be prompted to select which Cable system's program data to download. If so prompted, follow the on-screen instructions.
Note: If the TV power cord is unplugged for an extended period of time, it may take up to 24 hours with the TV in standby mode (power cord plugged in and power OFF) to download the TV Guide On Screen™ program schedule. It may take up to a week before an entire program schedule is available.
Turning off the TV Guide On Screen™ automatic display feature
After you set up the TV Guide On Screen™ system, the program guide will display automatically (by default) when you turn on the TV. To turn off the automatic program guide:
- Press TV GUIDE on the remote control to open the TV Guide On Screen ^™ system (if it is not already open).
- Use the ◀▶ buttons to select the Setup menu.
- Use the ▲▼ buttons to select "Change Default Options," and then press ENTER.
- Use the ▲▼ buttons to select "General Defaults," and then press ENTER.
- Set the "Auto Guide" option to Off.
- Use the ▲▼ buttons to select Done, and then press ENTER.

Setting up your TV
For menu navigation instructions, see Chapter 4.
Selecting the menu language
You can choose from three different languages (English, French and Spanish) for the on-screen display of menus and messages. (The TV Guide On Screen™ menus are in English, regardless of the language selected in this menu.)
To select the menu language:
- Press MENU and open the Preferences menu.
- Highlight Menu Language and press ▶.
- Press ▲ or ▼ to select your preferred menu language and press ENTER.
- Press EXIT to close the Preferences menu.
Configuring the antenna input sources
To configure the ANT 1 and ANT 2 input sources:
- Press MENU and open the Setup menu.
- Highlight Installation and press ENTER. (A new set of Installation menu icons will appear on-screen, as shown in step 3 below.)
- Open the Terrestrial menu, highlight Input Configuration, and press ENTER.
Note: The Terrestrial menu may not be accessible (items will be "grayed out") in some instances (for example, if a cable box is connected to the ANT 1 input or if one of the VIDEO modes is the current input during TV Guide On Screen™ setup).
- Press ◀ or ▶ to select the input source (Cable or Antenna) for the ANT 1 input on the TV.
Note: If a cable box is connected to the ANT 1 input during TV Guide On Screen™ setup, the entire Terrestrial menu will not be accessible, including the input source for ANT 1, which will automatically display "Cable Box."
- Press ▼ and then ◀ or ▶ to select the input source (Cable or antenna) for the ANT 2 input on the TV, if applicable. If you have not connected anything to ANT 2, skip this step.
- To save your new settings, highlight Done and press ENTER. To revert to your original settings, highlight Cancel and press ENTER.
Programming channels into the TV's channel memory
When you press CHANNEL ▲ or ▼ on the remote control or TV control panel, your TV will stop only on the channels stored in the TV's channel memory.
Follow the steps below to program channels into the TV's channel memory.
Programming channels automatically
Your TV can automatically detect all active channels in your area and store them in its memory. After the channels are programmed automatically, you can manually add or erase individual channels.
Note:
- You must configure the antenna input sources before programming channels (see page 46).
- If the input signal type is set to CABLE for an antenna input, the automatic channel programming process erases channels that were previously programmed into the TV's memory.
- If the input signal type is set to ANTENNA, the automatic channel programming process does NOT erase channels that were previously programmed into the TV's memory, but adds newly found channels to the existing set of programmed channels. To remove a channel from the memory, you must manually delete it (see next page).
- To tune the TV to a channel not programmed in the channel memory, you must use the Channel Number buttons on the remote control.
- Programming channels for an antenna input configured for CABLE will take substantially longer than for an antenna input configured for ANTENNA. This is normal; however, once channel programming is completed, you should not have to repeat the programming process again unless your Cable TV service lineup changes significantly.
- If you have a CableCARD™ inserted (page 14), channel programming for ANT 1 is disabled because the CableCARD™ automatically loads the Cable channel list into the TV's channel memory.
To program channels automatically:
- Make sure you have configured the antenna input sources. See page 46 for details.
- Press MENU and open the Setup menu.
- Highlight Installation and press ENTER. (A new set of Installation menu icons will appear on-screen).
-
Open the Terrestrial menu, highlight Channel Program, and press ENTER.
-
Highlight ANT 1 or ANT 2, depending on which antenna input you want to program channels for, and then press ENTER to start automatic channel programming.
The TV will automatically cycle through all the channels for the antenna input you selected, and store all active channels in the channel memory. While the TV is cycling through the channels, the message "Scanning channels, please wait" appears (as shown above).
- To cancel channel programming, either press EXIT or highlight Abort in the on-screen display and press ENTER. When channel programming is done, press CHANNEL ▲ or ▼ to view the programmed channels.
flowchart
graph TD
    A["POWER"] --> B["MENU"]
    B --> C["CHANNEL"]
    C --> D["VOLUME"]
    D --> E["TVVIDEO"]
    E --> F["GUIDE"]
    style A fill:#fff,stroke:#000
    style B fill:#fff,stroke:#000
    style C fill:#fff,stroke:#000
    style D fill:#fff,stroke:#000
    style E fill:#fff,stroke:#000
    style F fill:#fff,stroke:#000
Programming channels into the TV's channel memory (continued)
Manually adding and deleting channels in the channel memory
After automatically programming channels into the channel memory, you can manually add or delete individual channels.
To add or delete channels in the channel memory:
- Press MENU and open the Setup menu.
- Highlight Installation and press ENTER. (A new set of Installation menu icons will appear on-screen, as shown in step 3).
- Open the Terrestrial menu, highlight Channel Add/Delete, and then press ENTER.
- The illustration below left shows channels programmed for the ANT 1 antenna input. To view the list of channels programmed for the ANT 2 or Cable box antenna input, press the ▲▼ buttons to highlight either "ANT 2" or "Cable Box" and press ENTER.
Note: "Cable Box" will appear only if you connected a cable box to your TV.
To add a channel to the channel memory:
Highlight the unchecked box next to the channel number you want to add, and then press ENTER to check the box.
To manually add digital subchannels on a physical channel:
Use the Channel Numbers and the Dash (-/100) on the remote control to enter the channel number (for example, 56–1).
If the channel is found, the number will be added to the list and the box will be checked.
If the channel is not found, a message will appear.
To remove a channel from the channel memory:
Highlight the checked box next to the channel number you want to remove, and then press ENTER to uncheck the box.
To save your new settings:
Highlight Done and press ENTER.
To revert to your original settings:
Highlight Cancel and press ENTER before saving.
To remove all channels from the channel memory:
Highlight Reset and press ENTER, and then highlight Done and press ENTER.
Note:
- This action applies to the current antenna input only. To delete/add channels on the other input, highlight the input you want (ANT1 or ANT 2) and press ENTER.
- This action cannot be cancelled unless you highlight Cancel and press ENTER before saving your changes.
| Channel Add/Delete | ANT 1 | ||
| 2 | -- | Analog ANT 1® | |
| 2 - 1 | -- | Digital | ○ ANT 2 |
| 2 - 2 | -- | Digital | ○ Cable Box |
| 3 | -- | Analog | |
| 4 | -- | Analog | |
| 5 | -- | Digital | |
| 6 | -- | Analog | |
| 7 | -- | Analog | Reset |
| 7 - 1 | -- | Digital | Cancel |
| 8 | -- | Analog | Done |
Programming your favorite channels
You can program up to 27 channels as favorite channels into three Favorite Channel sets (nine channels from the ANT 1 input, nine from the ANT 2 input, and nine from the Cable box input). You can then scan through your favorite channels only, skipping other channels you do not normally watch.
To add and delete channels in the Favorite Channels sets:
- Press MENU and open the Preferences menu.
- Highlight Favorite Channels and press ENTER.
- Use the ▲▼ buttons to select either ANT 1, ANT 2, or Cable box and press ENTER.
- Highlight Edit and press ENTER.

| Favorite Channels ANT 1 | ||
| Empty | Empty | Empty |
| Empty | Empty | Empty |
| Empty | Empty | Empty |
To add a channel to the selected Favorite Channel set: Use the ▲▼ buttons to highlight an unchecked box next to a channel you want to set as a favorite, and then press ENTER to check the box.
To delete the channel from the selected Favorite Channels set:
Highlight a checked box and press ENTER to uncheck it.
Note: If you try to add more than nine favorite channels per input, an error message will appear. You will need to delete (unchecked) a channel before you can add another.
When done, highlight Done and press ENTER.
To program favorite channels for another input:
Either... Highlight ANT 1, ANT 2, or Cable Box, which will change the favorite channel settings in the selected input. (This will not change the TV's current input.)
Or... Press INPUT to select ANT 1, ANT 2, or Cable Box and then repeat steps 1–4.
"Cable Box" will appear only if you connected a cable box to your TV.
To clear your favorite channel lists:
- Press MENU and open the Preferences menu.
- Highlight Favorite Channels and press ENTER.
- Highlight Edit and press ENTER.
- Highlight Reset and press ENTER.
- Highlight Done and press ENTER.
To tune your favorite channels for the current ANT input: Press FAV CH ▲▼.
To tune your favorite channels using the favorite channel list:
- Press 100 to display the favorite channel list.
- Press the corresponding number button (1-9) to select your desired channel.
Note: To tune your favorite channels for another input, you will need to change the Input Selection first.
To quickly scan through your favorite channels in a nine picture multi-window (for the current ANT input):
Press FAV SCAN. See page 83 for details.
Note:
- To tune to a channel from the FAV SCAN mode, highlight a window and press ENTER.
• To scan your favorite channels for another input, you will need to change the Input Selection first.
Setting up and using TheaterNet™ on-screen device control
The TheaterNet feature allows you to control many brands of IEEE1394 and/or infrared remote-controlled A/V devices through your TV using on-screen control icons and the TV's remote control.
Note:
- Although the TheaterNet on-screen device control feature includes codes for many devices, it may not include codes for some or all of the features on certain devices you wish to control. If you are unable to program the TheaterNet feature to operate your device or some of the features on that device, use the device's remote control or the controls on the device.
- For IR pass-through device control information, see "Connecting a device to the IR blaster (IR pass-through)" on page 22.
Setting up TheaterNet
All device types except IEEE1394 require the following setup process before you can control them using the TheaterNet on-screen icons.
All compatible IEEE1394 devices are automatically recognized by the TheaterNet feature and do not require setup.
Note: See page 25 for details about the IEEE1394 ports. If your IEEE1394 device is not recognized through the IEEE1394 port or through the TheaterNet feature, it may be possible to set it up for IR pass-through control as an infrared device (see page 22).
To set up TheaterNet device control:
- Make sure you have properly connected your infrared remote-controlled device(s). See page 22 for details.
- Press MENU and open the Setup menu.
- Highlight Installation and press ENTER. (A new set of Installation menu icons will appear on-screen, as shown in step 4).
- Open the Devices menu, highlight TheaterNet Devices, and then press ENTER.
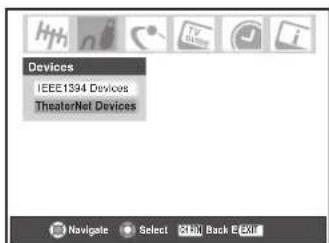
- The TheaterNet Setup menu opens.

Using the ◀▶ buttons, select the Input the device is connected to.
Note: When the input is changed, all unsaved settings will be lost.
- Press ▼ and then ◀▶ to select the device Type.
- Press ▼ and then ◀▶ to select the device Brand.
Note: When selecting a new brand, the IR code will be set to 0.
- Press ▼ and then ◀▶ to select the device's IR List.
- If the desired IR code is found, skip to step 10.
If the desired IR code is not in the list, press ▼ and use the Channel Number buttons to enter the device IR code.
Note: You can find the IR code for your device in the on-screen list or in the TheaterNet device code table on pages 52–54.
- Highlight Test and press ENTER to test whether the device responds to the code. If the device does not respond to the code, repeat steps 8 and 9 using another code for the same device.
When done, highlight Done and press ENTER or choose a different Input for which to setup TheaterNet device control.
To remove a device from TheaterNet:
- Follow steps 1–5 above.
- Highlight Reset and press ENTER.
Setting up and using TheaterNet™ on-screen device control (continued)
Using the TheaterNet control icons
- Set up your infrared devices in TheaterNet, if you have not already done so (see page 50).
Note: IEEE1394 devices do not need to be set up in TheaterNet because they appear automatically in the TheaterNet menu.
- Press DEVICE on the remote control to display the device control selection screen.
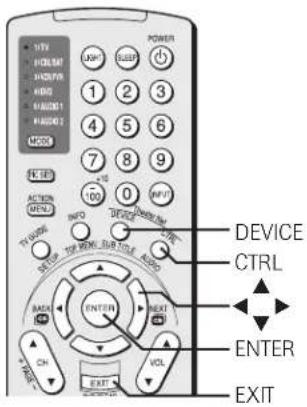
- Using the ▲▼◀▶ buttons, highlight the device you want to control and press ENTER.
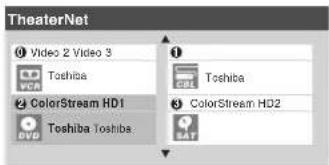
- The input automatically changes to the input for the selected device, and the device's control icons display on-screen.
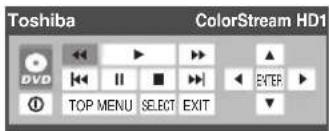
Highlight the icon for the function you want to control and press ENTER.
To select the device's control icons directly:
Press CTRL.
To close the on-screen control icons:
Press EXIT.
To view another source:
Press DEVICE and select the input source you want to view.
The following are examples of the TheaterNet on-screen control icons for various devices.
Toshiba Symbio™ AVHD Recorder control*
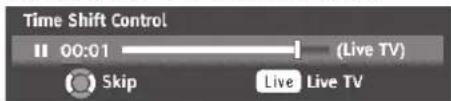
* If you connected a Toshiba Symbio® AVHD Recorder, you must set up the TV Guide On Screen™ system in order to use the Symbio's full functionality. See Chapter 5 for details on setting up the TV Guide On Screen™ system. See pages 26 and 55 for further details about AVHD digital recorders.
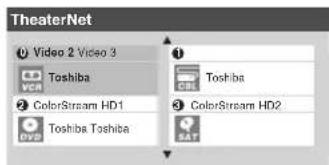
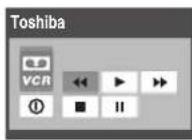
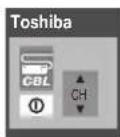
TheaterNet™ IR device codes
Amplifiers
Brand Code
Aiwa 0406
Bose 0674
Carver 0269
Curtis Mathes 0300
Denon 0160
GE 0078
Harman/Kardon 0892
JVC 0331
Left Coast 0892
Linn 0269
Luxman 0165
Magnavox 0269
Marantz 0892, 0321, 0269
NEC 0264
Nakamichi 0321
Optimus 0395, 0300
Panasonic 0308, 0521
Parasound 0246
Philips 0892, 0269
Pioneer 0013,0300
Polk Audio 0892, 0269
RCA 0300
Realistic 0395
Sansui 0321
Shure 0264
Sony 0689,0220
Soundesign 0078, 0211
Technics 0308, 0521
Victor 0331
Wards 0078, 0013, 0211
Yamaha 0354,0133
Cable boxes
Brand Code
ABC 0003,0008,0014,
0007, 0011, 0017
Americast 0899
Bell & Howell 0014
Bell South 0899
Contec 0019
Director 0476
Everquest 0015
Gemini 0015
General Instrument 0476, 0003, 0276,
0011, 0810
GoldStar 0144
Hamlin 0009, 0020, 0273
Hitachi 0011
Hytex 0007
Jasco 0015
Jerrold 0476, 0003, 0276,
0012, 0014, 0015,
0011, 0810
Memorex 0000
Motorola 0476, 1106, 0276,
0810
Oak 0019,0007
Pace 0237
Panasonic 0000, 0107
Paragon 0000
0305, 0317
Pioneer 0877, 0144, 0533,
1877
Pulsar 0000
Quasar 0000
Cable boxes (cont.)
Brand Code
RadioShack 0015
Regal 0020, 0273, 0279
Rembrandt 0011
Runco 0000
Samsung 0144
Scientific Atlanta 0877, 0008, 0017,
0477, 1877
Signal 0015
Signature 0011
Sony 1006
Starcom 0003, 0015
Stargate 0015
Starquest 0015
Supercable 0276
Tocom 0012
Torx 0003
Toshiba 0000
Tusa 0015
United Artists 0007
Zenith 0000, 0525, 0899
CD players
Brand Code
Aiwa 0157,0124
Burmester 0420
California Audio Labs 0029, 0303
Carver 0157, 0179, 0437
Classic 1297
DKK 0000
DMX Electronics 0157
Denon 0873,0003
Emerson 0305
Fisher 0174, 0179, 1325
GPX 1296
Garrard 0393, 0420
Genexxa 0032, 0305
Harman/Kardon 0157, 0173
Hitachi 0032
JVC 0072, 1294
KLH 1318, 1372, 1373
Kenwood 0681, 0826, 0626,
0028, 0037, 0190
Koss 1317
Krell 0157
LXI 0305
Linn 0157
MCS 0029
MTC 0420
Magnavox 0157, 0305
Marantz 0626, 0029, 0157,
0180
Miro 0000
Mission 0157
NSM 0157
Nikko 0174
Onkyo 0868,0101
1063, 0000, 0032,
0037, 0145, 0179,
0305, 0420, 0437,
0468
Panasonic 0029, 0303
Parasound 0420
Philips 0626, 0157
Pioneer 1063, 1062, 0032,
0305, 0468
Polk Audio 0157
CD players (cont.)
Brand Code
Proton 0157
QED 0157
Quasar 0029
RCA 1062,0032,0053,
0179, 0305, 0468,
0764
Realistic 0179, 0180, 0420
Rotel 0157,0420
SAE 0157
Sansui 0157,0305
Sanyo 0179
Scott 0305
Sears 0305
Sharp 0861, 0037, 0180
Sherwood 1067,0180
Sonic Frontiers 0157
Sony 0490,0000,0100,
0185, 0604, 1364
Sounddesign 0145
TDK 1208
Tascam 0420
Teac 0174, 0180, 0393,
0420
Technics 0029, 0303
Victor 0072
Wards 0157,0053
Yamaha 0888, 0036, 0187,
1292
Yorx 0461
Laser disk players
Brand Code
Aiwa 0203
Carver 0064, 0194, 0323
Denon 0059,0172
Disco Vision 0023
Funai 0203
Harman/Kardon 0194
Hitachi 0023
Magnavox 0194, 0217
Marantz 0064, 0194
Mitsubishi 0059
NAD 0059
Optimus 0059
Panasonic 0204
Philips 0064, 0194
Pioneer 0059,0023
Polk Audio 0194
Quasar 0204
Realistic 0203
Samsung 0323
Sega 0023
Sony 0193,0201
Technics 0204
Theta Digital 0194
Yamaha 0217
Miscellaneous audio devices
Brand Code
Aiwa 0010, 0159, 0404
Fisher 0052
JVC 0073
Jerrold 0520, 0459
Scientific Atlanta 0460
Sony 0010, 0159, 0576
Starcom 0459
TheaterNet™ IR device codes (continued)
Video accessory (HDTV decoder) Brand Code
Panasonic 1120
Pioneer 1010
Princeton 0113, 0295
Samsung 1190
Sensory Science 1126
Sharp 1010
Receivers
Brand Code
ADC 0531
| Aiwa 1089, 1405, 0121, |
| 0158, 0189, 0405, |
| 1388, 1641 |
Alco 1390
Anam 1609
Apex Digital 1257
Arcam 1120
Audiotronic 1189
Audiovox 1390
Bose 1229
Cambridge Soundworks 1370
Capetronic 0531
| Carver | 1089, 1189, 0042, 0189 |
Casio 0195
Clarinette 0195
Compaq 1136
Curtis Mathes 0080
Daewoo 1250
| Denon | 1104, 1160, 0004, 1360 |
Fisher 0042,1801
Garrard 0463
Harman/Kardon 0110, 0189, 0891
Hewlett Packard 1181
JBL 0110,1306
JVC 0074,1374
KLH 1390
Kenwood 1313, 1027, 1570,
| 1569, 0027, 0042, 0186 |
Koss 1366
LXI 0181
Lasonic 1798
Linn 0189
Lloyd's 0195
MCS 0039
Magnavox 1089, 1189, 0189,
0195,0391,0531
| Marantz | 1089, 1189, 0039, 0189 |
Modulaire 0195
Musicmagic 1089
Nakamichi 0097
Onkyo 0135, 0842, 1298
Optimus 1023, 0042, 0080,
0181, 0186, 0531,
0670, 0738, 0801
| Panasonic | 1518, 0039, 0309, 0367 |
Penney 0195
Philips 1089, 1189, 1269,
0189, 0391, 1120
Pioneer 1023,0014,0080,
0150, 0244, 0531,
0630, 1384
Polk Audio 0189
Receivers (cont.)
Brand Code
Proscan 1254
Quasar 0039
| RCA 1023, 1254, 0080,0531, 1390, 1609 |
Realistic 0181, 0195
Samsung 1295
Sansui 1089,0189
Sanyo 0801,1251
Sharp 0186,1286
Sherwood 0491, 0502, 1653
Sony 1058, 1258, 1158,
0158, 0474, 1367,
1558, 1658, 1758
Soundesign 0670
Stereophonics 1023
Sunfire 1313
Teac 0463
Technics 1308, 1309, 1518,
0039, 0309
Thorens 1189
Venturer 1390
Victor 0074
Wards 0014, 0080, 0158,
0189
Yamaha 0176, 0186, 1176
Yorx 0195
Zenith 0857
Satellite receivers
Brand Code
AlphaStar 0772
Chaparral 0216
Crossdigital 1109
DishPro 1005,0775
Echostar 1005,0775
Expressvu 0775
GE 0566
GOI 0775
General Instrument 0869
HTS 0775
Hitachi 0819
Hughes Network Systems 1142, 0749, 1749
JVC 0775
Magnavox 0724, 0722
Memorex 0724
Mitsubishi 0749
Motorola 0869
Next Level 0869
Panasonic 0247,0701
Paysat 0724
Philips 1142, 0749, 0724,
1076, 0722, 1749
Proscan 0392
RCA 0392, 0566, 0855,
0143
RadioShack 0869
SKY 0856
Samsung 1109
Sony 0639
Star Choice 0869
Toshiba 0749, 0790, 1052,
1053, 1054, 1285,
1286, 1287, 1289,
1749
Uniden 0724, 0722
Zenith 0856,1856
VCRs
Brand Code
Admiral 0048, 0209
Adventura 0000
Aiko 0278
Aiwa 0037,0000
Akai 0041
America Action 0278
American High 0035
Asha 0240
Audiovox 0037, 0278
Beaumark 0240
Bell & Howell 0104
Broksonic 0184, 0121, 0209,
0002, 0479, 1479
CCE 0072,0278
Calix 0037
Canon 0035
Carver 0081
Cincral 0278
Citizen 0037, 0278, 1278
Colt 0072
Craig 0037, 0047, 0240,
0072
Curtis Mathes 0060, 0035, 0162,
0041, 0760, 1035
Cybernex 0240
Daewoo 0045, 0278, 1278
Denon 0042
Dynatech
Electrohome 0037
Electrophonic 0037
Emerex 0032
Emerson 0037,0184,0000,
0121, 0043, 0209,
0002, 0278, 0479,
1278, 1479
Fisher 0047,0104
Fuji
Funai 0000
GE 0060,0035,0240,
0760, 0807, 1035,
1060
Garrard 0000
Go Video 0432
GoldStar 0037, 0038, 1237
Gradiente 0000
H1-Q 0047
Harley Davidson 0000
Harman/Kardon 0081, 0038
Harwood 0072
Headquarter 0046
Hitachi 0000, 0042, 0041
Hughes Network Systems 0042
JVC 0067,0041
Jensen 0041
KEC 0037,0278
KLH 0072
Keen 0693
Kenwood 0067,0041,0038
Kodak 0035,0037
LXI 0037
Lloyd's 0000
Logik 0072
MEI 0035
MGA 0240,0043
MGN Technology 0240
MTC 0240,0000
Magnasonic 1278
TheaterNet™ IR device codes (continued)
| VCRs (cont.) | VCRs (cont.) | DVD players (cont.) | |||
| Brand | Code | Brand | Code | Brand | Code |
| Magnavox 0035, 0039, 0081, | Scott | 0184, 0045, 0121, | Hitachi | 0573, 0664 | |
| 0000, 0149, 0563, | 0043 | Hiteker | 0672 | ||
| 1781 | Sears | 0035, 0037, 0047, | JBL | 0702 | |
| Magnin 0240 | 0000, 0042, 0104, | JVC | 0558, 0623, 0867 | ||
| Marantz 0035, 0081 | 0046, 1237 | KLH | 0717 | ||
| Marta 0037 | Semp | 0045 | Kenwood | 0490, 0534, 0682, | |
| Matsushita 0035, 0162, 0454 | Sharp | 0048, 0807, 0848 | 0737 | ||
| Memorex 0035, 0162, 0037, | Shintom | 0072 | Konka | 0711, 0719, 0720, | |
| 0048, 0039, 0047, | 0240 | 0721 | |||
| 0240, 0000, 0104, | 0072 | Koss | 0651 | ||
| 0209, 0046, 0454, | 0614, 0616 | Lasonic | 0798 | ||
| 0479, 1037, 1162, | 0035, 0032, 0000, | Magnavox | 0503, 0675 | ||
| 1237, 1262 | 0033, 0636, 1032, | Malata | 0782 | ||
| Minolta 0042 | 1232 | Marantz | 0539 | ||
| Mitsubishi 0067, 0043, 0807 | Sylvania | 0035, 0081, 0000, | Microsoft | 0522 | |
| Motorola 0035, 0048 | 0043, 1781 | Miutek | 0717 | ||
| Multitech 0000, 0072 | Symphonic | 0000 | Mitsubishi | 0521 | |
| NEC 0104, 0067, 0041, | TMK | 0240 | Nesa | 0717 | |
| 0038 | Tatung | 0041 | Next Base | 0826 | |
| Nikko 0037 | Teac | 0000, 0041 | Norcent | 0872 | |
| Noblex 0240 | Technics | 0035, 0162 | Onkyo | 0503, 0627 | |
| Olympus 0035 | Teknika | 0035, 0037, 0000 | Oritron | 0651 | |
| Optimus 1062, 0162, 0037, | Thomas | 0000 | Panasonic | 0490, 0632, 1362, | |
| 0048, 0104, 0432, | 0618, 0636 | 1462, 1490 | |||
| 0454, 1048, 1162, | 0045, 0043, 0845 | Philips | 0503, 0539, 0646, | ||
| 1262 | Tovision | 0037, 0240 | 0854 | ||
| Orion 0184, 0209, 0002, | Unitech 0240 | Pioneer | 0525, 0571, 0632 | ||
| 0479, 1479 | Vector 0045 | Polk Audio | 0539 | ||
| Panasonic | 1062, 0035, 0162, | 0045 | Princeton | 0674 | |
| 0225, 0454, 0616, | 0037 | Proscan | 0522 | ||
| 1035, 1162, 1262 | Video Concepts | RCA | 0522, 0571, 0717, | ||
| Penney | 0035, 0037, 0240, | 0240 | 0822 | ||
| 0042, 0038, 1035, | 0000 | Rotel | 0623 | ||
| 1237 | Wards 0060, 0035, 0048, | Rowa | 0823 | ||
| Pentax | 0042 | 0047, 0081, 0240, | Sampo | 0698 | |
| Philco | 0035, 0209, 0479 | 0000, 0042, 0072, | Samsung | 0573, 0820 | |
| Philips | 0035, 0081, 0618, | 0149, 0760 | Sansui 0695 | ||
| 1081, 1181 | White Westinghouse | 0209, 0072, 1278 | Sanyo 0670 | ||
| Pilot | 0037 | XR-1000 | 0035, 0000, 0072 | Sharp | 0630 |
| Pioneer | 0067 | Yamaha 0038 | Sherwood | 0633 | |
| Polk Audio | 0081 | Zenith | 0039, 0000, 0209, | Shinsonic | 0533 |
| Profitronic | 0240 | 0033, 0479, 1479 | Sony | 0533, 0864, 1533 | |
| Proscan | 0060, 0760, 1060 | Sylvania | 0675, 0821 | ||
| Protcc | 0072 | Technics | 0490 | ||
| Pulsar | 0039 | DVD players | Techwood | 0692 | |
| Quarter 0046 | Brand | Code | Theta Digital | 0571 | |
| Quartz | 0046 | Aiwa | 0641 | Toshiba | 0503, 0695, 1045 |
| Quasar | 0035, 0162, 0454, | 0672, 0717, 0755, | Tredex | 0800 | |
| 1035, 1162 | 0794, 0796, 0797, | Urban Concepts | 0503 | ||
| RCA | 0060, 0240, 0042, | 0830, 0856, 1100 | XBox | 0522 | |
| 0149, 0760, 0807, | |||||
| 1035, 1060 | Audiologic | 0736 | |||
| RadioShack | 0000, 1037 | B & K | 0655, 0662 | ||
| Radix | 0037 | Blue Parade | 0571 | ||
| Randex | 0037 | Broksonic | 0695 | ||
| Realistic | 0035, 0037, 0048, | 0521 | |||
| 0047, 0000, 0104, | 0784 | ||||
| 0046 | Denon | 0490, 0634 | |||
| Emerson | 0591 | ||||
| ReplayTV | 0614, 0616 | Enterprise | 0591 | ||
| Runco | 0039 | Fisher 0670 | |||
| S1S | 0042 | GE | 0522, 0717 | ||
| Samsung | 0240, 0045 | GPX | 0699, 0769 | ||
| Sanky | 0048, 0039 | Go Video | 0715 | ||
| Sansui | 0000, 0067, 0209, | 0651 | |||
| 0041, 0479, 1479 | Gradiente | ||||
| Sanyo | 0047, 0240, 0104, | Greenhill 0717 | |||
| 0046 | Harman/Kardon | 0582, 0702 | |||
Setting the AVHD device skip time
When you connect an external AVHD (audio/video hard drive) device—such as the Toshiba Symbio™ AVHD Recorder—to one of the TV's IEEE1394 ports, you can use the AVHD device skip time feature to set the number of minutes the device will skip forward or backward when you press the SKIP buttons.
Note:
• This TV will work best with the Toshiba AVHD
Recorder for recording high definition and standard definition material from either tuner and for controlling live TV (pause/rewind/etc.). When the Symbio AVHD Recorder is connected to the TV, the remote control keys (LIVE, STOP, REW, PAUSE, PLAY, etc.) are automatically activated to allow pausing of live TV.
- When you connect an AVHD (or D-VHS) device, the TV Guide On Screen™ system is automatically configured to allow recording. See page 26 for device connection information. See Chapters 5 and 7 for details about setting up and using the TV Guide On screen™ system.
To set the AVHD device skip time:
- Press MENU and open the Setup menu.
- Highlight AVHD Skip Time and press ▶.
- Press ▲ or ▼ to select the AVHD skip time (1, 3, 5, or 15 minutes) and press ENTER.
Setting the HDMI™ audio mode
To set the HDMI audio mode:
- Press MENU and open the Setup menu.
- Highlight HDMI 1 (or 2) Audio and press ▶.
- Press ▼ or ▲ to select the HDMI audio mode (Auto, Digital, or Analog) and press ENTER. (Auto is the
recommended mode). See “Connecting an HDMI or a DVI device to the HDMI input” on page 21.
Setting the time and date
Note: If you already set up the TV Guide On Screen™ system, the time and date were set automatically and you can skip this step.
To set the time and date:
- Press MENU and open the Setup menu.
- Highlight Installation and press ENTER. (A new set of Installation menu icons will appear on-screen, as shown in step 3 below.)
- Open the Time And Date menu, highlight Start Setup, and press ENTER.
If you have not set up the TV Guide On Screen ^™ system, the following screen will appear. To set the time, highlight TV Guide On Screen ^™ and press ENTER. The TV Guide On Screen ^™ setup sequence will start, and the time and date will be set automatically.
If you have already set up the TV Guide On Screen ^™ system, or if you have not set up the time, the time and date setting screen will appear and you will need to manually set the time and date.
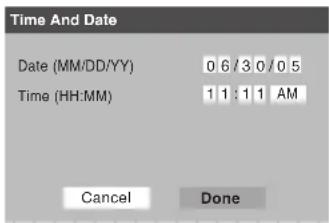
Note:
- If you highlight TV Guide On Screen™ (above) to set the time and date through the TV Guide On Screen™ system and a power outage occurs, the time and date will be updated automatically when the power is restored.
- If you highlight Manual (above) to set the time and date manually and a power outage occurs, you will lose the time and date settings when the power is restored.
- If you manually set the time and date and then perform TV Guide On Screen™ setup, the manual time and date settings will be overridden by the TV Guide On Screen™ settings.
Viewing the CableCARD™ menu
A CableCARD ^™ enables you to view encrypted digital channels. See page 14 for connection and subscription information.
After the CableCARD ^™ is inserted, a CableCARD ^™ option appears in the Applications menu, with informational screens provided by your digital CableCARD ^™ service (see illustrations below).

CableCard Connected -- Acquiring channel information.
CableCard services will only operate with cable signal connected to Antenna 1.
To view the CableCARD™ menu:
- Press MENU and open the Applications menu.
- Highlight CableCARD ^TM and press ▶.
- Press ▼ or ▲ to select one of the side menu items and press ENTER to display the information.
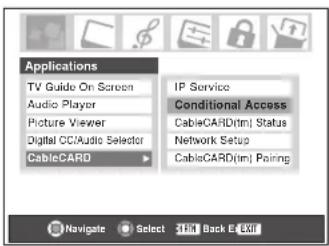
Note: The CableCARD™ menu is for informational purposes only and has no user-adjustable options.
Setting the Quick Restart™ feature
With the Quick Restart ^™ feature set to ON, the TV will stay in Shutdown mode for several minutes after the TV is turned off (see Notes below).
If the TV is turned on from Shutdown mode, the full picture appears immediately.
To set the Quick Restart ^™ feature:
- Press MENU, and then press ◀ or ▶ until the Setup menu appears.
- Highlight Quick Restart and press ▶.
- Press ▼ or ▲ to select either On or Off.
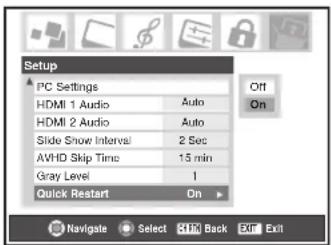
Note:
If Quick Restart is set to Off and you turn off the TV, it can take several seconds for the picture to appear when you turn on the TV again. See "IMPORTANT NOTICE ABOUT HOT LAMP RESTART," below.
If Quick Restart is set to On and you turn off the TV, the following will occur for a few minutes:
• The screen (lamp) lights dimly.
• The fans continue to run.
This is a function of the Quick Restart Shutdown mode and is not a TV malfunction. If you do not prefer this, set the Quick Restart feature to Off.
When the Quick Restart feature is set to Off, if you repeatedly turn the TV on and off in a short period of time, the useful service life of the lamp may be shorter than the average useful service life. See page 128.
IMPORTANT NOTICE ABOUT "HOT LAMP RESTART"
When the TV has been powered on long enough for the lamp unit to get hot, it may take several minutes for the picture to appear on-screen in the following situations:
- When the Quick Restart™ feature is set to OFF and you turn the TV off and then on again within a few minutes.
- If the TV is on when a short-term power failure, power surge, or other similar power failure occurs, such that the TV loses and regains power within a few minutes.
This is a property of DLP TV lamp technology and is NOT a sign of malfunction.
If this occurs, the yellow LED on the TV front panel will blink (and the blue LED will be lit solid) until the TV is finished restarting the lamp and the normal picture appears. If BOTH yellow and blue LEDs are blinking at a one-second rate, you will need to turn the TV off and then on again to restart the lamp.
Viewing the digital signal meter
You can view the digital signal meter for ANT 1 and ANT 2 digital TV input sources only.
To view the digital signal meter:
- Press MENU and open the Setup menu.
- Highlight Installation and press ENTER. (A new set of Installation menu icons will appear on-screen, as shown in step 3 below.)
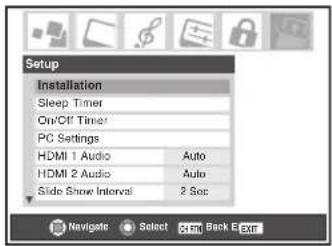
- Open the Terrestrial menu, highlight Signal Meter, and press ENTER.
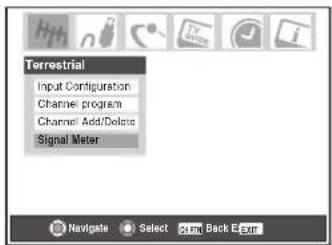
- Use the ▲▼◀▶ to select the antenna input and digital channel whose signal you want to check.
Note: The physical digital channel number listed in the Signal Meter screen may not correspond to a virtual TV channel number. Contact your local broadcasters to obtain the RF channel numbers for your local digital stations.

To close the screen and return to the Terrestrial menu: Highlight Done and press ENTER.
To return to normal viewing:
Press EXIT.
Viewing the system status
To view the system status:
- Press MENU and open the Setup menu.
- Highlight Installation and press ENTER. (A new set of Installation menu icons will appear on-screen, as shown below right).
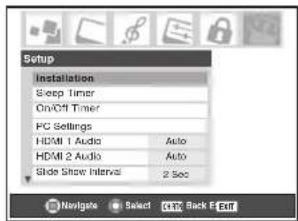
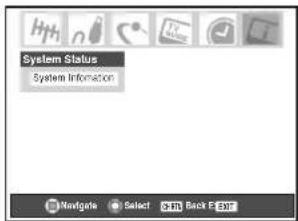
- Open the System Status menu, highlight System Information, and then press ENTER.
- Use the ◀▶ to scroll through the menu bar to check the Product Information and Software Version.
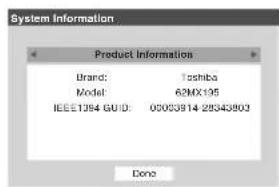
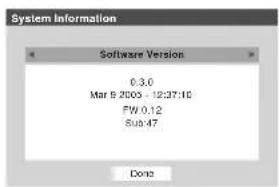
To close the screen and return to the Installation menu: Highlight Done and press ENTER.
To return to normal viewing: Press EXIT.
To restore all settings and channels to their factory default values:
- Follow steps 1–3 above.
- Use the ◀▶ to scroll through the menu bar to select Factory Defaults.
- Enter your PIN code (or 0000 if no PIN code has been set).
- Highlight Yes and press ENTER. The TV will turn off automatically after a few seconds. After the TV turns off, unplug the TV power cord and then plug it in again to complete the restore process.
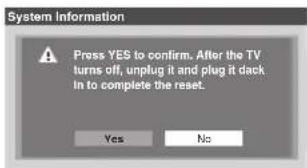
To cancel the reset:
Highlight No and press ENTER.
7 Using the TV Guide On Screen™ interactive program guide
The TV Guide On Screen™ system is a free, interactive, on-screen program guide built in to your Toshiba TV that lists schedules and information for TV programs in your area.
Note: Over-the-air or cable access to stations carrying TV Guide On Screen™ data is required for the TV Guide On Screen™ system to operate. TV Guide On Screen™ system does not work with satellite programming. Toshiba does not provide the TV Guide On Screen™ data; rather, such data is provided by a third party, which is responsible for its accuracy and availability. Additionally, occasional compatibility issues may exist between the TV Guide On Screen™ system contained in your TV and the data provided by the third party. If you experience any performance issues with your TV Guide On Screen™ system, please contact the following:
• In the U.S., call TACP Consumer Solutions at (800) 631-3811 or visit http://www.tacp.com/customersupport/contact.asp.
• In Canada, call TCL Customer Service at 1-800-268-3404
The TV Guide On Screen ^131 system includes the following features:
- Streamlined on-screen assisted setup—Quickly and easily set up your TV Guide On Screen™ system using the on-screen prompts (see "Setting up the TV Guide On Screen™ system" below).
- Program listings and INFO windows—Scroll through eight days of TV listings and view program information such as rating, stereo, HDTV, new episode.
- Watch TV and display TV Guide On Screen™ information simultaneously.
- Channel lineup customization—Customize your channel lineup so your favorite stations are listed first.
- Direct tuning—Directly tune the TV to a current program you want to watch by selecting it in the program guide.
- Reminders— Schedule show reminders that will either display an on-screen notification banner or automatically tune the TV to the channel of the show for which you set the reminder.
- Recording—Easily schedule recording of one or more programs.
Note: A VCR or IEEE1394 recording device is required for recording. It is recommended that you connect your devices according to the instructions in Chapter 2. - Search—Search for shows by category, keyword, or alphabetically.
- On-screen help—The TV Guide On Screen™ system contains on-screen feature definitions and navigation instructions.
To open the TV Guide On Screen™ system:
- While watching TV, press the TV GUIDE button on the remote control; —or—
- Press MENU, open the Applications menu, highlight TV Guide On Screen™, and press ENTER.
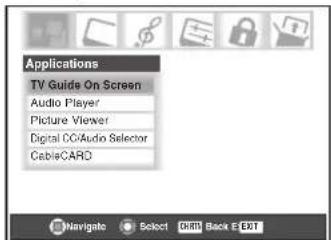
Note: After setting up the TV Guide On Screen™ system, the program guide opens automatically by default when you turn on the TV. To turn off this feature, see page 45.
Setting up the TV Guide On Screen™ system
Follow these instructions to set up the TV Guide On Screen ^™ system so it can receive current program data for your area.
Note: If you move the TV to a different ZIP/postal code, you will need to perform the TV Guide On Screen™ Setup process to reconfigure your TV Guide On Screen™ system.
If you have not already connected your antenna, cable box, and/or recording device, see Chapter 2 for connection instructions.
Note: You must connect a VCR or an IEEE1394 compatible recording device to use the TV Guide On Screen™ system's one-touch recording feature. It is recommended that you connect your devices according to the connection instructions in Chapter 2.
The unauthorized recording, use, distribution, or revision of television programs, videotapes, DVDs, and other materials is prohibited under the Copyright Laws of the United States and other countries, and may subject you to civil and criminal liability.
- Press MENU and open the Setup menu.
- Highlight Installation and then press ENTER to open the Installation menus. (A new set of menu icons will appear on-screen, as shown in step 3 below.)
- Open the TV Guide On Screen™ Setup menu, highlight Start, and then press ENTER.
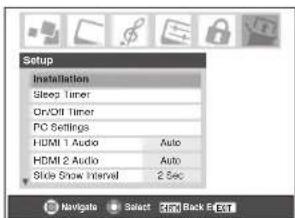
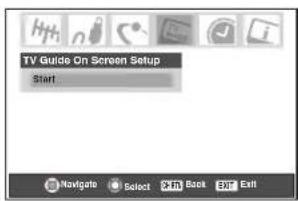
- Go to Chapter 5 for instructions on completing the setup. Read this chapter for details on using the TV Guide On Screen™ interactive program guide.
Navigating the TV Guide On Screen™ system
- While watching TV, press the TV GUIDE button to enter the TV Guide On Screen™ system. The LISTINGS screen will appear with the current show highlighted.
- When in the TV Guide On Screen™ system, if you press the TV GUIDE button from any screen, the TV will tune to the show displayed in the Video Window.
- Use the arrow keys on the remote control (▲▼▲) to highlight any show, and then press ENTER to tune to that show.
- Scroll left or right (◀▶) Panel Ad to view eight days of listings.
-
Press MENU to display a panel menu with options for the currently highlighted program or tile, including setting recordings and reminders.
• To access another Service screen: -
Press ▲ to highlight the Service Bar.
- Press ◀ or ▶ to highlight a different Service (LISTINGS, SEARCH, SETUP, SCHEDULE, or RECORDINGS).
- Press ▼ to use that Service.
Note: Helpful information about each Service appears in the Info Box.
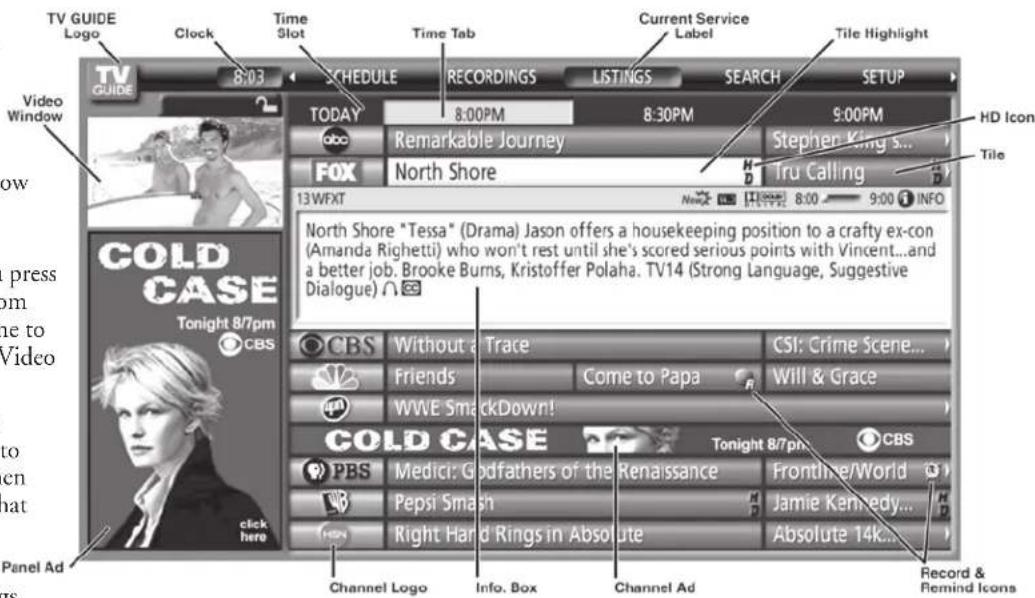
Note:
- The TV Guide On Screen™ menus shown in this manual are for illustration purposes only. The channels, programs, and TV Guide On Screen™ information as illustrated may not be available in your area. The options and features as illustrated are subject to change when updates are downloaded from the TV Guide On Screen™ service to your TV.
- The TV Guide On Screen™ interactive program guide supports cable-ready, cable box, and digital cable services, as well as over-the-air broadcasts. It does not provide listings for satellite services.
TV Guide On Screen™ remote control functions
BUTTON FUNCTION
| TV GUIDE • When watching TV, enters the TV Guide On ScreenTM system and highlights the current show listing. ·When in the TV Guide On ScreenTM system, returns to watching TV and displays the show in the Video Window. | |
| Numbers • For direct channel tuning, priority ordering, and channel editing. | |
| - (digital separator) • For entering digital channel numbers. | |
| MENU • Displays the panel menu, in which you can choose options (for example, record, remind, keyword). | |
| INFO • Cycles between levels of information, as available, in a Service screen or other type of screen. | |
| ENTER • Makes a selection or executes an action. ·With a currently airing show listing highlighted, returns to watching TV and tunes to the show channel. ·With a future airing show listing highlighted, displays a panel menu with viewing options. | |
| ▲▼◀▶ Provide directional control. ·When watching TV, ▲ and ▼ provide surfing through channels turned ON in the LISTINGS screen. | |
| PAGE UP/DOWN • When in the TV Guide On ScreenTM system, moves from one set of screen information to the next, when applicable. | |
| REC • When in the TV Guide On ScreenTM system or watching TV, initiates the recording process. | |
| SPLIT | ·When in the TV Guide On ScreenTM system, toggles between locking and unlocking the Video Window. |
| ▶▶ and ◀◀ | ·Jump forward and backward one day in the LISTINGS screen. |
Navigating the TV Guide On Screen™ system (continued)
Video Window
- When you open the TV Guide On Screen™ system, the current program appears in the Video Window.
• As you scroll through the listings, the Video Window will change to display the selected program. - The lock/unlock icon indicates the status of the Video Window.
- You can set the Video Window to remain on a single channel (locked) or to change channels (unlocked) as you navigate through listings.
To lock/unlock the Video Window:
Press the SPLIT button on the remote control to toggle between locking and unlocking the Video Window.
—Or—
Highlight a channel logo or the LISTINGS Service Bar Label and press MENU to display the option to lock/unlock the Video Window.
Panel Menus
• A panel menu appears:
- when you press MENU on a highlighted tile (if additional options are available); or
-
when you press ENTER on a show starting in the future.
-
When a panel menu appears, the highlighted tile changes color to indicate that the panel menu relates to the tile.
- Press INFO to display help for the current panel menu.
- Press ▲ and ▼ to move among the options.
- Press ◀ and ▶ to move to adjacent options or, if the highlight is on a odometer, to change the odometer choice.
- To move the highlight to the default command button, press ENTER from an odometer or entry box.
• To execute the action and close the panel menu, highlight the command button and press ENTER.
• To cancel any changes and close the panel menu:
- press MENU; or
– highlight Cancel and press ENTER.
- If a panel menu contains more options than can be displayed in one panel, the word "more" appears at the bottom of the menu. To access the additional options, either scroll down using the ▼ button or the PAGE UP/DOWN (CH ▲▼) button.
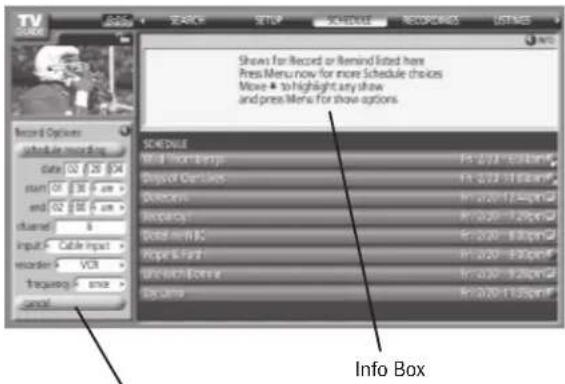
Panel Menu
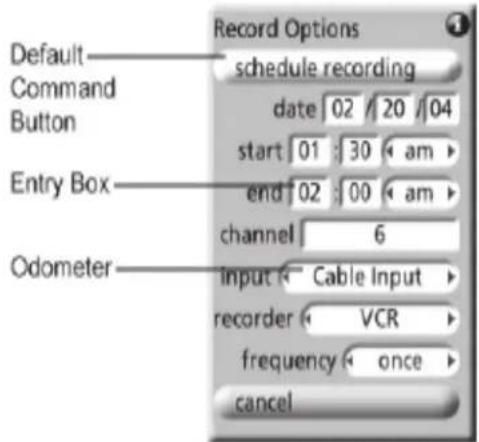
Navigating the TV Guide On Screen™ system (continued)
Info Box
- An Info Box contains information about a show, Service, or Panel Ad, or provides general help (for example, for a panel menu).
- An Info Box for a program in the LISTINGS screen can have up to three sizes: Small, Large, or "No."
- Press INFO on the remote control to cycle among the sizes.
- The default Info Box size is Small. To change the default size, open the SETUP Service screen (see page 70).
- The Info Button icon (INFO) appears on the Info Action Bar if the Info Box size can change and/or if there are additional Info screens. Press the INFO key on the remote control to change the size and/or to display additional Info screens.
- In some instances, the INFO button on the remote control is used to page forward (for example, if there are additional pages of information in a Panel Ad, a Channel Ad, or help text).
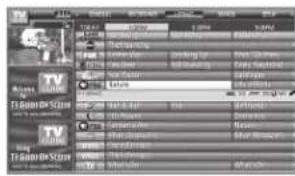
Info Action Bar
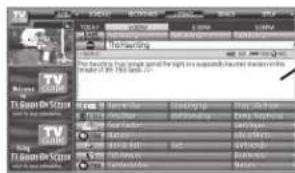
Small Info Box
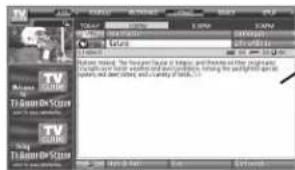
Large Info Box
TV Guide On Screen™ Icons
ICON NAME DESCRIPTION
| INFO | Info Button • Additional Info Box information is available, or the Info Box has additional sizes. |
| Progress Ban• | Elapsed time in current show.• Progress bar appears in LISTINGS and SEARCH and when the Info Button is pressed while watching TV. |
| HDTV • Show is presented in high-definition TV, if available. | |
| New* | New • Show is new (not a repeat). |
| Stereo • Show is available in stereo. | |
| DOLBY DIGITAL | Dolby Digital • Show is available with Dolby Digital 5.1 audio (digital channels only). |
| CC | CC • Closed captioning is available for the show. |
| TV Rating • TV rating for the show. | |
| Record Once • Show is set to record once.• Other frequencies are Daily (manual recording only), Regularly, and Weekly. | |
| Record Off • Show is set to record but recording is currently Off (show remains in schedule). | |
| Record • Recording is suspended due to a schedule conflict (show remains in schedule).Suspended • Recording resumes when the conflict no longer exists. | |
| Remind Once • Show is set to remind once.• Other frequencies are Daily (manual reminding only), Regularly, and Weekly. | |
| Remind Off • Show is set to remind but reminder is currently Off (show remains in schedule). | |
| Remind • Reminder is suspended due to a schedule conflict (show remains in schedule).Suspended • Reminder resumes when the conflict no longer exists. |
TV Guide On Screen™ Services
The TV Guide On Screen™ system consists of five main services: LISTINGS, SEARCH, RECORDINGS, SCHEDULE, and SETUP.
Note:
- For the RECORDINGS service to display, an IEEE1394 recording device must be connected to the television (see Chapter 2); otherwise, only four services display. Recording to other devices, such as a VCR, are possible from within the LISTINGS service.
- When using the TV Guide On Screen™ system to record a program for the first time, it is recommended that you perform a test recording to make sure your system is set up properly.
- If the power is cut or the plug becomes disconnected during timer recording, any recorded contents will be lost. It may take up to a week before an entire program schedule is available.
- If the TV power cord is unplugged for an extended period of time, it may take up to 24 hours with the TV in standby mode (power cord plugged in and power OFF) to download the entire TV Guide On Screen™ program schedule. It may take up to a week before an entire program schedule is available. Be sure to follow the instructions under "TV Guide On Screen™ Reminder" on page 45.
LISTINGS screen
- When you open the TV Guide On Screen ^TM system, LISTINGS is always the first service displayed.
- With LISTINGS highlighted in the Service Bar, press INFO to display a help screen. Press INFO again to close the screen.
- Use the arrow keys to move the highlight within LISTINGS to do the following:
- View eight days of show listings
- Read show descriptions
– Tune directly to a show currently airing
- Set a show to Remind (e.g., start time, frequency, automatic power ON, auto-tune TV)
- Set a show to Record (e.g, start/end time, frequency)
- Lock and unlock the Video Window
- Access panel ads and channel ads
- Use the Number keys on the remote control to jump to a specific channel's listings.
• To watch a show (if on now), highlight the show and press ENTER.
• To display the Episode Options panel menu for a particular show, highlight a show and press MENU.
Episode Options panel menu
From the Episode Options panel menu, you can choose to set a recording, set a reminder, or tune to the channel. The following are descriptions of the buttons.
GO TO SERVICE BAR: Closes the menu, changes no information, and returns to the Service Bar.
TUNE TO CHANNEL / WATCH NOW: Exits the TV Guide On Screen™ system and tunes to the channel of the highlighted show (if the show airs in the future) or tunes to the show (if the show is currently airing). The button label changes according to whether the show is currently airing or not.
SET RECORDING: Displays the Record Options panel menu, from which you can set the show to record. For additional information, see "SCHEDULE screen" and "Record features" on page 66.
SET REMINDER: Displays the Remind Options panel menu, from which you can set a reminder for the show. For additional information, see "SCHEDULE screen" on page 66 and "Remind features" on page 68.
CANCEL: Closes the menu, changes no information, and returns to the highlighted show.
TV Guide On Screen™ Services (continued)
SEARCH screen
- SEARCH allows you to find shows by keyword, alphabetically, or by category (HDTV, Movies, Sports, Children, Educational, News, Variety, Series).
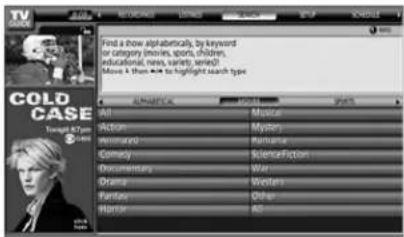
- With SEARCH highlighted in the Service Bar, press INFO to display a help screen. Press INFO again to close the screen.
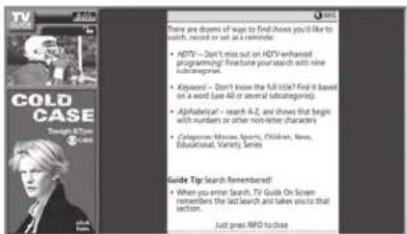
- Use the arrow keys to move the highlight within SEARCH.
Example: Category search
- From the SEARCH screen, press ▼ to highlight a category (in this example, MOVIES).
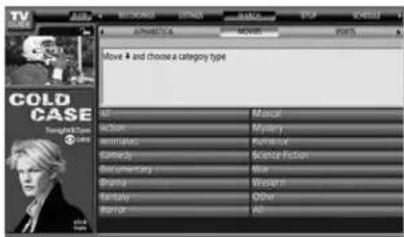
- Press ▼ to highlight a subcategory (in this example, ALL).
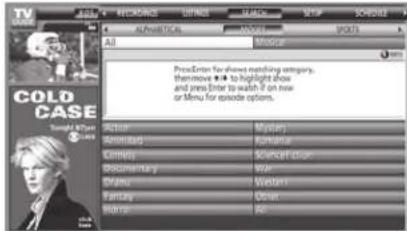
- Press ENTER to display a list of all movies, organized by date and time.
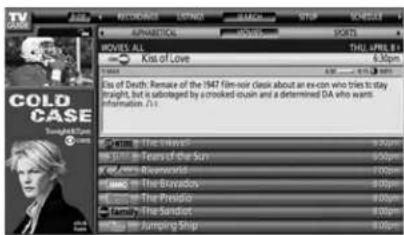
- Highlight a show and press ENTER to watch (if on now) or press MENU to display the Episode Options panel menu. (See "Episode Options panel menu" on page 62.)
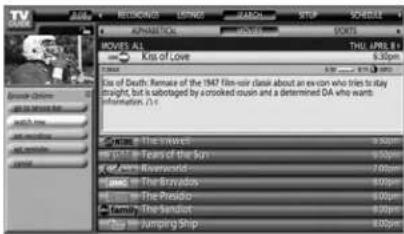
TV Guide On Screen™ Services (continued)
SEARCH screen (continued)
Example: Keyword search
Keyword search lets you enter a word(s) to find a particular show by category or for every show title that matches.
- From the SEARCH screen, highlight KEYWORD, and then press ENTER.
- Highlight NEW SEARCH in the panel menu, and then press ENTER.
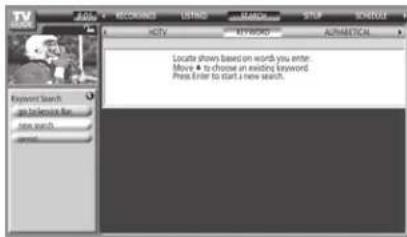
- The Search Options panel menu opens. Highlight CATEGORY, and then use the arrow keys to highlight a category to search (All, HDTV, Children, Sports, etc.).
- After highlighting a category, press ▼ to highlight ENTER KEYWORD, and then press ENTER.
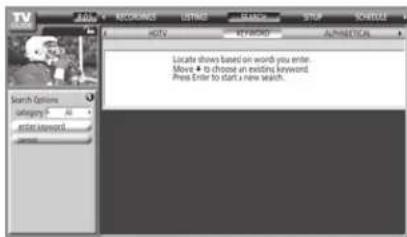
- The keyboard is displayed. Use the arrow keys to highlight a character and then press ENTER to display it. When finished entering all characters, highlight DONE and press ENTER.
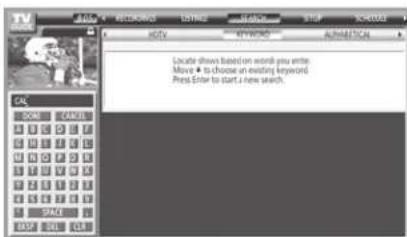
- A list of all matching shows for that keyword is displayed.
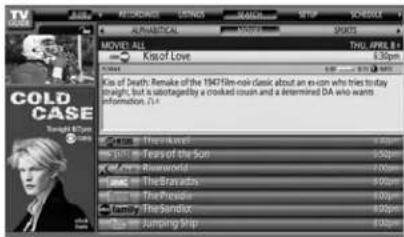
- Highlight a show and press ENTER to display all airings. Then highlight a specific listing and press ENTER to watch (if on now) or press MENU to display the Episode Options panel menu. From the Episode Options menu, you can choose to set a recording or reminder, or tune to the channel (see "Episode Options panel menu" on page 62.)
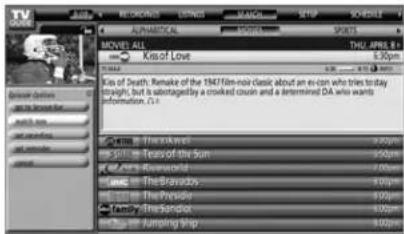
The TV Guide On Screen ^™ system stores all the keywords you create.
To edit or delete a keyword:
From the SEARCH/KEYWORD screen, highlight the keyword you want to edit or delete, and then press MENU to display the Search Options panel menu, with the following options:
- GO TO SERVICE BAR: Closes the menu, changes no information, and returns to the Service Bar.
- EDIT SEARCH: Displays the keyboard, from which you can change the keyword.
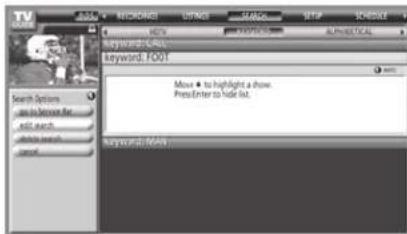
- DELETE SEARCH: Displays the Confirmation panel menu. Select YES to delete the search or NO to close the panel menu.
- CANCEL: Closes the panel menu, changes no information, and returns to the highlighted keyword.
TV Guide On Screen™ Services (continued)
RECORDINGS screen
The RECORDINGS service screen displays a list of previously recorded or currently recording shows on an IEEE1394 recording device connected to the TV (see Chapter 2).
Note: RECORDINGS will not appear in the Service Bar unless you have an IEEE1394 video recording device connected to one of the IEEE1394 ports on the TV. See Chapter 2 for details.
For additional details, see "Record features" on page 66.
- With RECORDINGS highlighted in the Service Bar, press INFO to display a help screen. Press INFO again to close the screen.
To choose the way recordings are displayed:
- Highlight RECORDINGS on the Service Bar, and press MENU to display the Recording Options panel menu.
- Press ▲▼ to choose between View As and Sort By, as described below.
View As: Press ◀▶ to choose between the following:
- List—Displays every recorded episode for a show (see example in Screen B, at right).
Note: In List view, highlight an episode to display an Info Box with show information. Press MENU to display the Episode Options panel menu (see "Episode Options panel menu" on page 62).
- Group—Displays recorded shows without listing every recorded episode (see example in Screen A, at right).
Note: In Group view, highlight a show and press ENTER to view all recorded episodes. Press ENTER again to collapse the episode list.
Sort By: Press ◀ and ▶ to choose between the following:
- Title—Displays recorded shows in alphabetical order (see example in Screen A, at right).
-
Date—Displays recorded shows by date and time, with most recent first (see example in Screen B, at right).
-
When finished, press ENTER to highlight DONE, and then press ENTER again to close the panel menu and display the recordings with the selected options.
To view a recording, you can do one of the following:
- Highlight an episode and press ENTER to view it now. The episode either starts from the beginning or from where it was last stopped (if viewed previously).
-
Highlight an episode and press MENU to display the Episode Options panel menu, with the following options:
-
GO TO SERVICE BAR: Closes the menu, changes no information, and returns to the Service Bar.
- RESUME: Starts from the beginning or from where it was last stopped (if viewed previously).
- PLAY FROM BEGINNING: Starts from the beginning, even if stopped previously.
- DELETE EPISODE: Deletes the episode from the RECORDINGS list and deletes the recording from the IEEE1394 recording device. A Confirm panel menu displays. Press YES to delete the episode or NO to close the panel menu.
- CANCEL: Closes the panel menu, changes no information, and returns to the highlighted show.
Screen A
Screen B
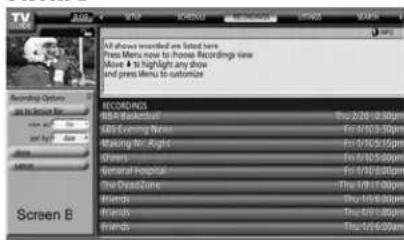
The unauthorized recording, use, distribution, or revision of television programs, videotapes, DVDs, and other materials is prohibited under the Copyright Laws of the United States and other countries, and may subject you to civil and criminal liability.
TV Guide On Screen™ Services (continued)
SCHEDULE screen
The SCHEDULE service screen allows you to review, edit, or delete Record and Remind events you set previously.

- With SCHEDULE highlighted in the Service Bar, press INFO to display a help screen. Press INFO again to close the screen.
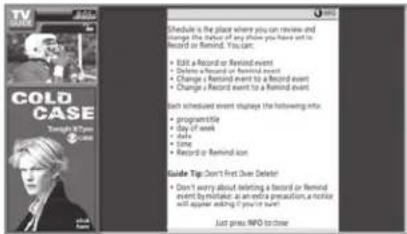
- Highlight an event and press MENU to display the Schedule Options panel menu, with the following options (as applicable):
- GO TO SERVICE BAR: Closes the menu, changes no information, and returns to the Service Bar.
- WATCH NOW: Exits the TV Guide On Screen™ system and tunes to the highlighted show.
- DELETE RECORDING: Removes the recording from the schedule. A Confirm panel menu displays. Press YES to delete the recording or NO to close the panel menu.
- EDIT RECORDING: Opens a menu in which you can change existing recording information.
- SET REMINDER: Opens a menu in which you can set a reminder for the show (Record is not cancelled).
- CANCEL: Closes the panel menu, changes no information, and returns to the highlighted show.
An icon identifies the event type. For more details, see "Record features," at right, and "Remind features" on page 68.
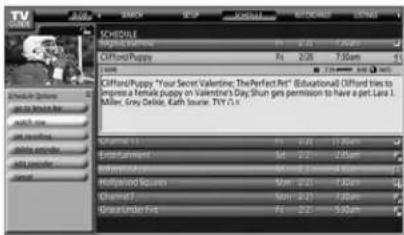
Record features
You can set a show to Record, or edit the record settings for a show, in LISTINGS, SEARCH, and SCHEDULE. There are three ways to set a show to Record, as described below.
1) Set a show to Record using the REC key on the remote control
Press the REC key on the remote control to record the show Once with current default settings (start and end recording on time). Each time you press REC, you change the Record frequency (but not the default settings) among Once (default), Regularly, Weekly, and Cancel.
Note: The related Record icon appears on the show tile each time you press REC. See "Record icons," on page 67.
2) Set a show to Record from a panel menu
- Highlight a show and press MENU to display the Episode Options panel menu.
- Highlight SET RECORDING and press ENTER to display the Record Options panel menu.
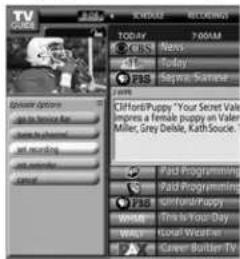
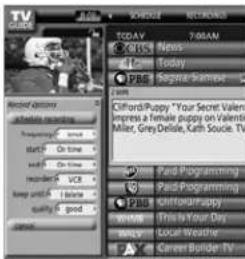
- Highlight the FREQUENCY field, and press ◀ or ▶ to choose among Once, Regularly, Weekly, or Off.
- Highlight the START field, and press ◀ or ▶ to choose in the range from 120 minutes early to 120 minutes late or On Time (default = On Time).
- Repeat step 4 for the END field.
- Highlight the RECORDER field and press ◀ or ▶ to choose the recording device.
Note: For connected IEEE1394 recording devices only.
- Highlight the KEEP UNTIL field and press ◀ or ▶ to choose how long you want to keep the Record event.
Note: For connected IEEE1394 recording devices only.
- Press ENTER to highlight SCHEDULE RECORDING, and press ENTER again to close the menu.
A Record icon for the selected frequency appears on the show tile. See "Record icons" on page 67.
Note: For connected IEEE1394 recording devices only.
Or highlight CANCEL and press ENTER to close the menu, change no information, and return to the highlighted show.
Note: You can change the default values of the Record Options panel menu fields. See "Change default options" on page 71.
TV Guide On Screen™ Services (continued)
Record features (continued)
3) Manually set a show to Record
- Highlight SCHEDULE in the Service Bar, and press MENU to display the Schedule Options panel menu.
- Highlight NEW MANUAL RECORDING and press ENTER to display the Record Options panel menu.
Press ▲▼◀▶ to move through the options.
Press the Number keys or ▲▼◀▶ to change the information, as necessary.
- Enter the information in the panel menu fields. You will need to set the start and end time for the recording. For details, see "Set a show to Record from a panel menu" on the previous page.
Note: When setting a Manual Recording, the frequency option "Daily" is available instead of "Regularly." See "Record icons," below right, for a description of Record icons.
- When finished entering the information in the fields, press ENTER to highlight SCHEDULE RECORDING, and press ENTER again to close the menu.
A Record icon for the selected frequency appears on the show tile. See "Record icons," below right.
Note: Manual recording is listed by channel number.
Or highlight CANCEL and press ENTER to close the menu, change no information, and return to the highlighted show.
When using the TV Guide On Screen™ system to record a program for the first time, it is recommended that you perform a test recording to make sure your system is set up properly.
Recording notification banner
- If the TV is not on, the recording occurs as scheduled.
- If the TV is on and you are watching the channel that is set to record, the recording occurs as scheduled.
- If the TV is on and you are watching a channel other than the one that is set to record, a notification banner (illustrated below) appears on-screen before recording starts. At that time you can choose to start or cancel recording.
The default highlighted item in the notification banner is "Change channel; start recording." If no change is made within 3 minutes, the notification banner will close automatically, the channel will change to the one set to record, and the recording will occur as scheduled. If you want to cancel the recording, select "Don't change; cancel recording" in the notification banner and press ENTER.

Record conflict
A conflict message appears for the following reasons:
- A show set to Record overlaps with any part of another show previously set to Record.
- A show set to Record overlaps with a show previously set to auto-tune. (For auto-tune details, see "Remind features" on page 68.)
Select one of these options:
- Record Anyway—This show will override an existing show set to Record or auto-tune.
- Don't Record This Show—Cancels the Recording.

Record icons
Following is a description of the Record icons that will appear on the tile for a show set to Record.
- Record Once —Records the show one time.
- Record Regularly —Records the show every time the show airs on the same channel and starts at the same time.
- Record Weekly —Records the show every time the show airs on the same day of the week and on the same channel, and starts at the same time.
- Record Daily 📁—Records on the same channel and at the same start time every weekday (Monday through Friday).
Note: This icon displays for manual recordings only.
- Record Suspend ☐—Recording is Suspended due to a schedule conflict (show remains in Schedule).
- Record Off —Keeps the Recording in the Schedule list but will not record this show until the frequency is changed.
The unauthorized recording, use, distribution, or revision of television programs, videotapes, DVDs, and other materials is prohibited under the Copyright Laws of the United States and other countries, and may subject you to civil and criminal liability.
TV Guide On Screen™ Services (continued)
Remind features
You can set a Reminder to perform the following functions:
• Automatically turn on the TV (if off) at the scheduled reminder time, and tune the TV to the channel of the show for which you set the reminder.
• Automatically tune the TV, at the scheduled reminder time, to the channel of the show for which you set the reminder.
- Display an on-screen notification banner (reminding you that the show is about to start), from which you can choose to tune the TV to the show's channel or cancel the reminder.
You can set a show reminder, or edit the reminder settings for a show, in LISTINGS, SEARCH, and SCHEDULE. There are two ways to set a show reminder, as described below.
1) Set a show Reminder from a panel menu
- Highlight a show and press MENU to display the Episode Options panel menu.
- Highlight SET REMINDER and press ENTER to display the Remind Options panel menu.
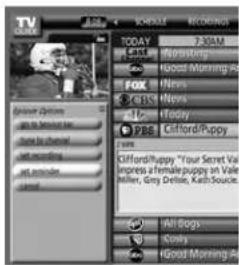
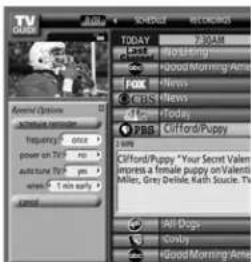
- Highlight the FREQUENCY field, and press ◀ or ▶ to choose among Once, Regularly, Weekly, or Off.
- Highlight the POWER ON TV field, and press ◀ or ▶ to choose either Yes (to turn on the TV automatically, if off, at the scheduled Reminder time) or No (default).
- Highlight the AUTO TUNE TV field, and press ◀ or ▶ to choose either Yes (to automatically tune the TV to the channel you are setting the Reminder for at the scheduled Reminder time; the TV must be on at the time) or No (default).
Note: You can change the default values of the Remind Options panel menu fields. See "Change default options" on page 71 for details.
- Highlight the WHEN field (to set a time for displaying the reminder screen), and press ◀ or ▶ to choose in the range from 15 minutes early to 15 minutes late or On Time (default = 1 minute early).
- Press ENTER to highlight SCHEDULE REMINDER, and press ENTER again to close the menu. A Remind icon for the selected frequency appears on the show tile. See "Remind icons" on page 69.
Or highlight CANCEL and press ENTER to close the menu, change no information, and return to the highlighted show.
2) Manually set a show Reminder
- Highlight SCHEDULE in the Service Bar, and press MENU to display the Schedule Options panel menu.
- Highlight NEW MANUAL REMINDER and press ENTER to display the Remind Options panel menu. Press ▲▼◀▶ to move through the options.
Press the Number keys or ▲▼◀▶ to change the information, as necessary.
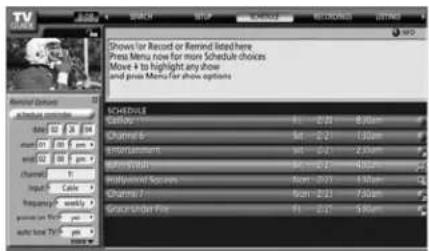
- Enter the information in the panel menu fields. You will need to set the start and end time for the reminder. For details, see "Set a show reminder from a panel menu," at left.
Note: When setting a Manual Reminder, the frequency option "Daily" is available instead of "Regularly." See "Remind icons," on the following page, for a description of Reminder icons.
- When finished entering the information in the fields, press ENTER to highlight SCHEDULE REMINDER, and press ENTER again to close the menu.
A Remind icon for the selected frequency appears on the show tile. See "Remind icons" on the following page.
Note: Manual reminders are listed by channel number.
Or highlight CANCEL and press ENTER to close the menu, change no information, and return to the highlighted show.
TV Guide On Screen™ Services (continued)
Remind features (continued)
Reminder notification banner
Based on your option settings, a notification banner will appear on-screen, if your TV is on at the scheduled Reminder time.
At that time you can either press ENTER to hide the Reminder banner, or highlight the show and press ENTER to tune to the show.
If no choice is made within 3 minutes, the notification banner closes automatically and completes the highlighted item (default is HIDE REMINDERS).
Note: If more than two reminders are set for the same time, arrows appear on the Reminder notification banner. Press ▲▼ to highlight the shows.

Remind conflict
A conflict message appears for the following reasons:
- A show set with an auto-tune Reminder has the same start time as an existing auto-tune Reminder.
- A show set with an auto-tune Reminder overlaps with a scheduled Recording.
Select one of these options:
- Auto-Tune Anyway—This show will override an existing show set to auto-tune.
- Proceed, No Auto-Tune—Set the show as a Reminder but do not auto-tune.
- Don't Set This Reminder—Cancels the Reminder.
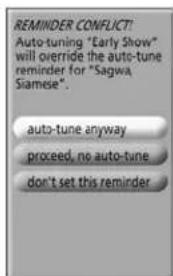
Remind icons
Following is a description of the Remind icons that will appear on the tile for a show set to Remind.
- Remind Once 📄 —Displays a show reminder one time.
- Remind Regularly 📄—Displays a show reminder every time the show airs on the same channel and starts at the same time.
- Remind Daily —Displays a show Reminder every weekday (Monday through Friday) for the same channel and start time.
Note: This icon displays for manual reminders only.
- Remind Suspend — Reminder is Suspended due to a schedule conflict (show remains in Schedule).
- Remind Off —Keeps the Reminder in the Schedule list but will not display a reminder until you change the frequency.
TV Guide On Screen™ Services (continued)
SETUP screen
After you complete the initial TV Guide On Screen ^™ setup (as described in Chapter 5), you can change the following settings:
- Change system settings
- Change channel display
- Change default options
Highlight a choice, press ENTER, and follow the on-screen instructions.
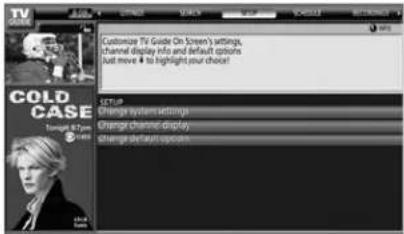
With SETUP highlighted in the Service Bar, press INFO to display a help screen. Press INFO again to close the screen.
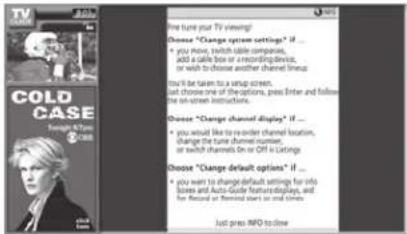
Change system settings
This option appears only after you have completed the initial TV Guide On Screen™ setup process (as described in Chapter 5).
- From the SETUP screen, highlight CHANGE SYSTEM SETTINGS and press ENTER.
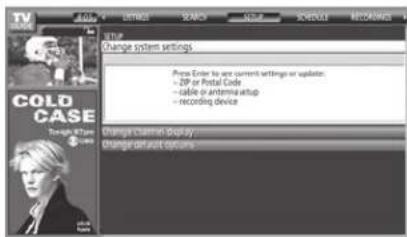
-
Press ENTER again to display the Confirming Your Settings screen.
-
Highlight one of the options, press ENTER, and follow the on-screen instructions.
Change channel display
This option allows you to edit channel information that appears in LISTINGS, including the following:
- Reorder the position the channels appear in LISTINGS.
- Change the "tune channel" number.
Note: The "tune channel" is the channel on which you receive a station. For example, two viewers in the same zip code may receive the same station on different channel numbers, depending on whether they have Cable service or are using a cable box.
- Switch a channel to one of the following settings:
- On (channel is always displayed in LISTINGS)
- Off (channel is never displayed in LISTINGS)
- Auto-Hide (channel is displayed in LISTINGS only when program information is available)
- From the SETUP screen, highlight CHANGE CHANNEL DISPLAY and press ENTER.
- Highlight the channel row you want to edit and press ENTER to display the Grid Options panel menu.
- To edit the options, press INFO and follow the on-screen instructions.
TV Guide On Screen™ Services (continued)
SETUP screen (continued)
Change default options
This option allows you to change default settings in the following categories:
- General Defaults
- Record Defaults
- Remind Defaults
General defaults
- From the SETUP screen, highlight CHANGE DEFAULT OPTIONS and press ENTER.
- Highlight GENERAL DEFAULTS and press MENU to display the General defaults panel menu.
-
Enter the following information in the panel menu fields:
-
BOX SIZE: The initial Info Box size when you open the TV Guide On Screen™ system. Choices are No, Small (default), Large, and Last Used.
- BOX CYCLE: The Info Box size rotation when you press INFO on the remote control when the TV Guide On Screen™ system is open. Choices are No Only, Small Only, Large Only, No & Small, No & Large, Small & Large, and All (default).
- AUTO GUIDE: Automatic entry into the TV Guide On Screen™ system when the TV is powered on. Choices are On (default) and Off.
Note: Set the AUTO GUIDE to Off if you do not want the TV Guide On Screen™ system to open every time you turn on the TV.
- When finished, press ENTER to highlight DONE, and press ENTER again to close the menu and accept the changes (or highlight CANCEL to close the menu with no changes).
Record defaults
- From the SETUP screen, highlight CHANGE DEFAULT OPTIONS and press ENTER.
- Highlight RECORD DEFAULTS and press MENU to display the Record Defaults panel menu.
- Enter the required information in the panel menu fields (start time, end time, recorder choice, how long to keep a Record event, the quality of the recording). See "Record features" on page 66 for details on entering values in these fields.
- When finished, press ENTER to highlight DONE, and press ENTER again to close the menu and accept the changes (or highlight CANCEL to close the menu with no changes).
Remind defaults
- From the SETUP screen, highlight CHANGE DEFAULT OPTIONS and press ENTER.
- Highlight REMIND DEFAULTS and press MENU to display the Remind Defaults panel menu.
- Enter the required information in the panel menu fields (power On TV, auto-tune, when to display the Remind screen). See "Remind features" on page 68 for details on entering values in these fields.
- When finished, press ENTER to highlight DONE, and press ENTER again to close the menu and accept the changes (or highlight CANCEL to close the menu with no changes).
8
Using the TV's features
Selecting the video input source to view
To select the video input source to view:
- Press INPUT on the remote control or TV/VIDEO on the TV control panel.
- Press 0–9 to select the input source you want to view, which will depend on the input terminals you used to connect your devices (see Chapter 2).
The current signal source displays in the top right corner of the Input Selection screen.
Note:
- When the Input Selection screen is open, you also can use the ▲▼ buttons on the remote control (or the Channel ▲▼ buttons on the control panel) to change the input.
- You can repeatedly press the INPUT button on the remote control or the TV/VIDEO button on the TV control panel to change the input.
- To select an IEEE1394 input source, press the TheaterNet DEVICE button on the remote control (see page 31 and 51).
- If an IEEE1394 device is the current input, it will appear at the bottom of the Input Selection list; however, it will not display in the list if you change the input source.
- You can label the video input sources according to the specific devices you have connected to the TV (see "Labeling the video input sources" on the next page).
- The source can be "hidden." See page 73 for details.
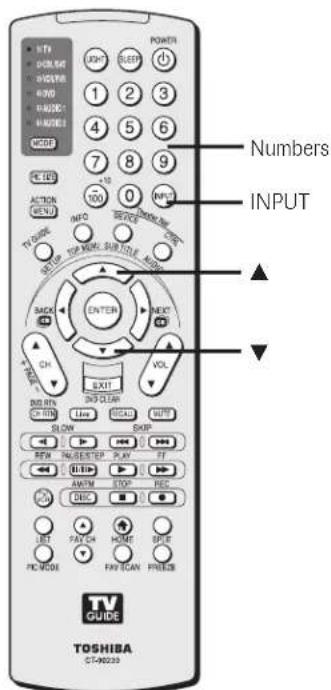
Remote control
TV control panel
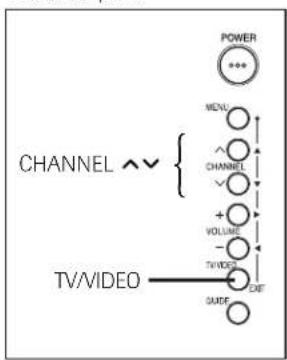
flowchart
graph TD
    A["CHANNEL ∧ ∨"] --> B["MENU"]
    A --> C["CHANNEL"]
    A --> D["VOLUME"]
    A --> E["TVVIDEO"]
    A --> F["CUT"]
    G["POWER"] --> H["..."]
    I["TV/VIDEO"] --> J["GUIDE"]
Labeling the video input sources
You can label each video input source according to the type of device you connected to each source, from the following preset list of labels:
-- (default label)
Hide (to hide an unused input in the Input Selection window)
Audio Receiver
VCR
Video Recorder
Laser Disk
Compact Disc
DVD
DTV
Satellite/DSS
Cable
Game Console
Note:
- If you set up devices in TheaterNet, ^TM the associated inputs are automatically labeled and cannot be relabeled until you remove the device from TheaterNet (see page 50).
- If you set up a cable box in VIDEO 1, that input will be labeled automatically and cannot be relabeled until you remove the device from the TV Guide On Screen™ setup.
- You cannot select IEEE1394 devices through the Input Selection window; however, you can select and control IEEE1394 devices through TheaterNet (see page 50).
To label the video input sources:
- Press MENU and open the Preferences menu.
- Highlight Input Labeling and press ENTER.
- Press ▲ or ▼ to highlight the video source you want to label.
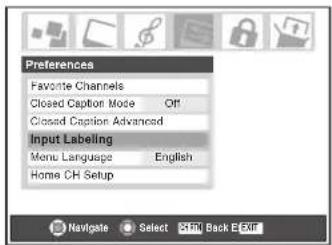
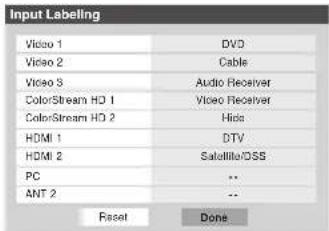
- Press ◀ or ▶ to select the desired label for that input source. If a particular input is not used, you can select "Hide" as the label, which will cause that input to be "grayed out" in the input list and skipped over when you press the INPUT button on the remote control.
Note: If you select "Hide" for all of the input labels, the POP feature will be disabled. If you then attempt to access the POP feature, the message "NOT AVAILABLE" will appear on-screen.
- To save the new input labels, highlight Done and press ENTER. To revert to the factory default labels, highlight Reset and press ENTER.
Input labeling example:
The screen below left shows the default Input Selection screen (with none of the inputs labeled). The screen below right is an example of how you could label the inputs if you had connected a DVD player to VIDEO 1, Cable TV to VIDEO 2, an audio receiver to VIDEO 3, a video recorder to ColorStream HD1, a DTV set-top box to HDMI 1, and a satellite/DSS set-top box to HDMI 2. Also note that the ColorStream HD2 input is labeled "Hidden," which means that the input will be skipped over when INPUT or TV/VIDEO is pressed.
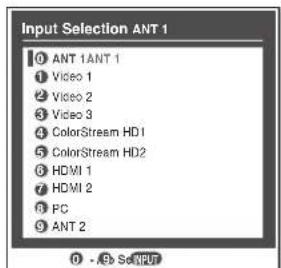
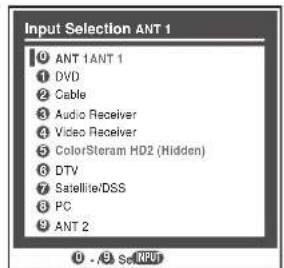
Input Selection screen Input Selection screen with with no inputs labeled all inputs labeled except input 5, which has been hidden.
To clear the input labels:
- Press MENU and open the Preferences menu.
- Highlight Input Labeling and press ENTER.
- Highlight Reset and press ENTER.
Note: If you set up a device in TheaterNet, its input label will not be cleared unless you remove the device from TheaterNet (see page 50).
Tuning channels
Using the Channel Browser™
The Channel Browser stores the most recently viewed channels (up to 32) in the channel history. This feature allows you to:
- Keep a separate, temporary* history of the last 32 channels tuned from each of three inputs: ANT 1, ANT 2, and Cable Box. *Note: Turning off the TV will clear the channel history for all three inputs.
- Quickly surf and tune your recently viewed channels from the Channel Browser banner (illustrated below).
- Surf via Browse mode (to immediately tune channels as you highlight them in the Channel Browser banner) or Select mode (to surf over channels in the browser banner before you select one to tune).
- Set a "HOME" channel for the ANT 1, ANT 2, and Cable Box inputs.
To open the Channel Browser banner: Press ◀(BACK), ▶(NEXT), or ENTER on the remote control.
- Press (BACK) to surf back from the most recently viewed channel through the last 32 channels that were tuned from the current input, which are automatically stored in the channel history for the current input (ANT 1, ANT 2, or Cable Box only).
- Press ▶ (NEXT) to surf forward from the previous channels in the channel history up to the most recently viewed channel.
Elements of the Channel Browser banner
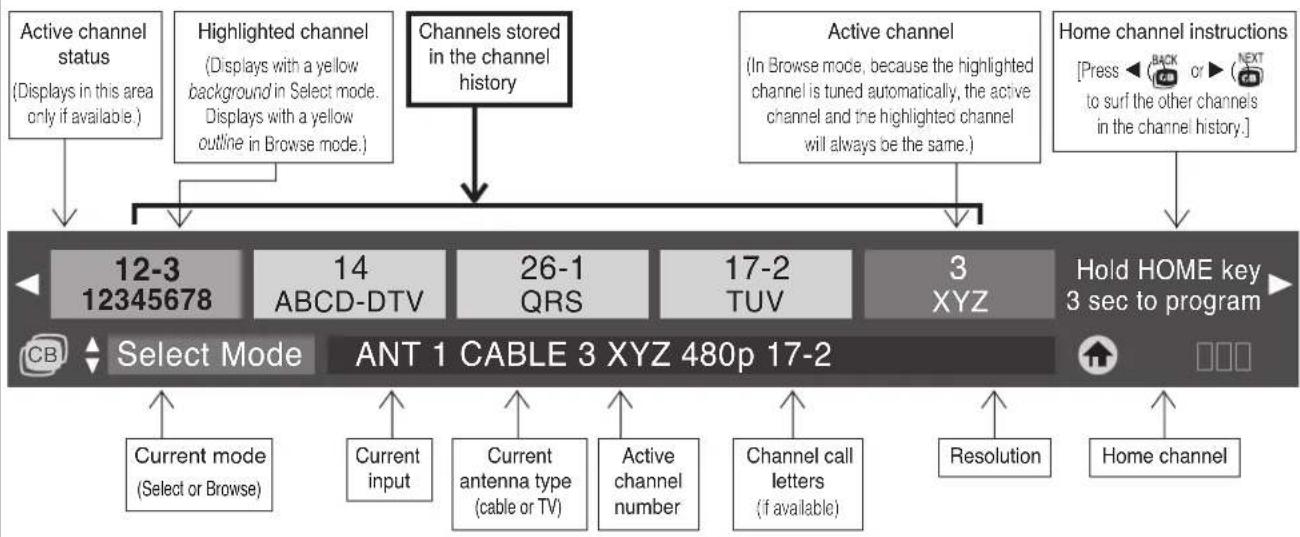
flowchart
graph TD
    A["Active channel status (Displays in this area only if available.)"] --> B["12-3 12345678"]
    C["Highlighted channel (Displays with a yellow background in Select mode. Displays with a yellow outline in Browse mode.)"] --> D["14 ABCD-DTV"]
    E["Channels stored in the channel history"] --> F["26-1 QRS"]
    G["Active channel (In Browse mode, because the highlighted channel is tuned automatically, the active channel and the highlighted channel will always be the same.)"] --> H["17-2 TUV"]
    I["Home channel instructions [Press ← BACK or ➤ NEXT to surf the other channels in the channel history."]] --> J["3 XYZ"]
    K["Hold HOME key 3 sec to program"] --> L["Select Mode ANT 1 CABLE 3 XYZ 480p 17-2"]
    M["Current mode (Select or Browse)"] --> N["Current input"]
    O["Current antenna type (cable or TV)"] --> P["Active channel number"]
    Q["Channel call letters (if available)"] --> R["Resolution"]
    S["Home channel"] --> T["Home channel"]
To toggle between Browse mode and Select mode:
After opening the Channel Browser banner, press ▲ or ▼ to toggle between Browse mode and Select mode. The "Current mode" field on the Channel Browser banner will flash green. Note: The Channel Browser banner opens in Browse mode by default.
To tune to a channel in Browse mode:
- While watching TV, press ▶(CB) or ▶NEXT to open the Channel Browser banner and surf back to a previous channel or forward to the next channel in the channel history. In Browse mode, when you stop on a channel number in the browser banner, it will be highlighted with a yellow outline and the TV will automatically tune to the channel.
- Press EXIT to close the Channel Browser banner.

In Browse mode, the highlighted channel number is outlined in yellow and the channel will be tuned to automatically.
Note: The Channel Browser banner will close automatically if you do not make a selection within 60 seconds.
To tune to a channel in Select mode:
- While watching TV, press ▶(CB) or ▶(CB) to open the Channel Browser banner and surf back to a previous channel or forward to the next channel in the channel history. In Select mode, when you stop on a channel number in the browser banner, it will be highlighted with a yellow background but the TV will not automatically tune to the channel.
- Press ENTER to tune the TV to the highlighted channel.
- Press EXIT to close the Channel Browser banner.

In Select mode, the highlighted channel number has a yellow background. Press ENTER to tune to the channel.
Tuning channels (continued)
Using the Channel Browser ^TM (continued)
Adding and clearing channels in the channel history
Adding channels to the channel history
The Channel Browser automatically creates a history of the last 32 channels that were tuned in the current input (ANT 1, ANT 2, and Cable Box inputs only). A separate history will be stored for each of these inputs.
If you change the input you are viewing:
a) you will begin a channel history for that input if one did not exist; or
b) you will return to the existing channel history for that input if one had already been started.
The Channel Browser will store the following channels:
- All channels that are tuned using the numeric buttons on the remote control.
- All channels that are tuned for at least 7 seconds using the CH ▲▼ buttons or the FAV CH ▲▼ buttons on the remote control.
Note:
- The Channel Browser banner will not appear when the POP double window is open; however, channels tuned while the POP double window is open will be added to the Channel Browser history for the current input.
- The Channel Browser banner will not appear in the FAV SCAN (favorite scan) multi-window. Channels that appear in the FAV SCAN multi-window will not be added to the Channel Browser history; however, the channel last selected from the multi-window will be added to the channel history.
Clearing channels from the channel history
- Turning off the TV will clear all three channel histories (ANT 1, ANT 2, and Cable Box).
- Removing the CableCARD ^™ will clear the channel history for the ANT 1 input.
- Reconfiguring the ANT 1, ANT 2, or Cable Box input will clear the channel history for the newly configured input(s).
Note: See page 46 for details on configuring the antenna inputs.
Setting a channel as the "Home" channel for an input
To set a channel as Home using the remote control:
- Tune the TV to the channel you would like to set as the Home channel for the current antenna input.
- Press and hold the HOME (▲) button on the remote control for 3 seconds. When the Home channel is saved, the Channel Browser banner will appear at the bottom of the screen with the home icon flashing green.
Note: You can set a different Home channel for each input (ANT 1, ANT 2, and Cable Box inputs only).
To set a channel as Home using the menus:
- Press MENU and open the Preferences menu.
- Highlight Home CH Setup and press ENTER. The Home CH Setup window will display.
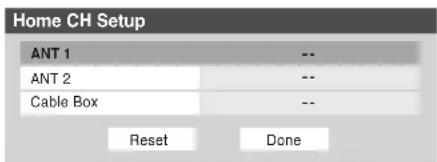
Note: "Cable Box" will appear in the Home CH Setup window only if you connected a cable box to your TV.
- Use the ▲▼ buttons to select the input for which you want to set the Home channel.
- Use the numeric and dash (−) buttons on the remote control to enter the desired Home channel for each input.
- To save your entries, highlight Done and press ENTER. To clear your entries, highlight Reset and press ENTER.
To tune to the Home channel:
While an input that has a set Home channel is active, press the HOME (▲) button on the remote control.
Note: If you press the HOME button while an input other than an antenna or Cable Box input is selected, the TV will tune to the most recently tuned Home channel and input.
Tuning channels (continued)
Tuning your favorite channels
To tune to the channels you programmed as Favorite Channels, see page 49.
Tuning to the next programmed channel
To tune to the next programmed channel:
Press CHANNEL ▲ or ▼ on the remote control or TV control panel.
Note:
- This feature will not work unless you program channels into the TV's channel memory (see page 47).
- If you are recording a digital channel, you will only be able to change analog channels while the recording is in progress. If you are recording an analog channel, you will only be able to change digital channels while the recording is in progress. This is because the TV tuner that is being recorded (digital or analog) will be locked on the channel that is currently recording.
Tuning to a specific channel (programmed or unprogrammed)
Tuning analog channels:
Press the Channel Number buttons (0–9) on the remote control. For example, to select channel 125, press 1, 2, 5.
Tuning digital channels:
Press the Channel Number buttons (0–9) on the remote control, followed by the – (dash) button and then the sub-channel number. For example, to select digital channel 125-1, press 1, 2, 5, –, 1.
Note: If a digital channel is not programmed—either through the automatic channel scan (page 47) or the channel add/delete function (page 48)—you will have to tune the RF channel using the Channel Number and Dash buttons on the remote control.
Switching between two channels using Channel Return
The Channel Return feature allows you to switch between two channels without entering an actual channel number each time.
- Select the first channel you want to view.
- Select a second channel using the Channel Number buttons (and the dash (-) button if selecting a digital channel).
- Press CH RTN on the remote control. The previous channel will display. Each time you press CH RTN, the TV will switch back and forth between the last two channels that were selected.
Note:
- If you press CH RTN from a non-antenna input, the TV will return to the last-viewed ANT input and channel.
- If you are currently recording a program, this feature will not be available.
Switching between two channels using SurfLock™
The SurfLock™ feature temporarily “memorizes” one channel in the CH RTN button, so you can return to that channel quickly from any other channel by pressing CH RTN. To memorize a channel in the CH RTN button:
- Select the channel you want to program into the CH RTN button.
- Press and hold CH RTN for about 2 seconds until the message "Channel Memorized" appears on the screen. The channel has been programmed into the CH RTN button.
- You can then change channels repeatedly, and when you press CH RTN, the memorized channel will be selected.
The TV will return to the memorized channel one time only. Once you press CH RTN and then change channels again, the CH RTN memory will be cleared and the button will function as Channel Return, by switching back and forth between the last two channels that were selected.
Selecting the picture size
You can view many program formats in a variety of picture sizes—Natural, TheaterWide 1, TheaterWide 2, TheaterWide 3, and Full—as described below and on the next page.
The way the image displays in any of the picture sizes will vary depending on the format of the program you are viewing. Select the picture size that displays the current program the way that looks best to you.
Your picture size preferences can be saved for each input on your TV.
To select the picture size:
- Press PIC SIZE on the remote control.
- While the Picture Size menu is on-screen, press the corresponding number button (0–4) to select the desired picture size.
Note:
- You also can repeatedly press PIC SIZE to select the desired picture size (or press the ▲▼ buttons on the remote control while the Picture Size screen is open).
- "Full" may not be available for some program formats (it will be "grayed out" in the Picture Size screen).
Natural picture size
- The image is displayed close to its originally formatted proportion. Some program formats will display with sidebars and/or bars at the top and bottom.
Conventional picture on a conventional TV screen
Conventional picture in Natural size on your wide-screen TV
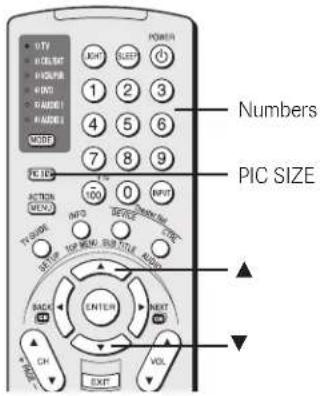
Note:
You also can select the picture size using the menu system. Select Picture Size in the Video/Theater Settings menu. Select the input for which you want to save your picture settings. To save your settings, highlight Done and press ENTER.
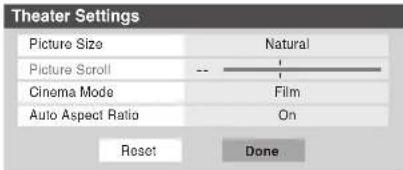
Selecting the picture size (continued)
TheaterWide 1 picture size (For 4:3 format program)
- The center of the picture remains close to its original proportion, but the left and right edges are stretched wider to fill the screen.
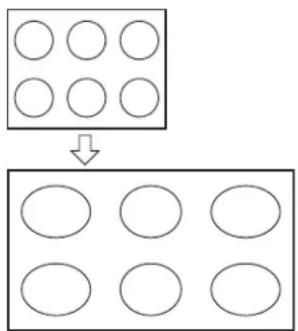
flowchart
graph TD
    A["Grid with 9 circles"] --> B["Grid with 3 circles"]
TheaterWide 1 picture size example
TheaterWide 2 picture size (for letter box programs)
- The picture is stretched wider to fill the width of the screen, but only slightly stretched taller.
- The top and bottom edges of the picture are hidden. To view the hidden areas, see “Scrolling the TheaterWide® picture” on page 79.
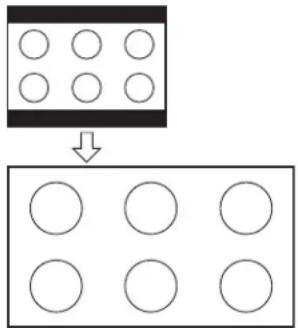
TheaterWide 2 picture size example
TheaterWide 3 picture size (for letter box programs with subtitles)
- The picture is stretched wider to fill the width of the screen, but only slightly stretched taller.
- The top and bottom edges are hidden. To view the hidden areas (such as subtitles or captions), see “Scrolling the TheaterWide® picture” on page 79.
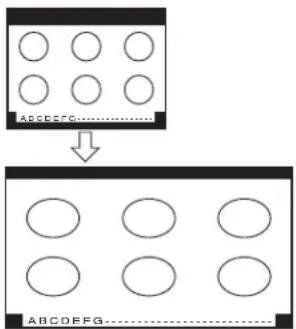
flowchart
graph TD
    A["Grid with circles"] --> B["Grid with circles"]
    style A fill:#fff,stroke:#000
    style B fill:#fff,stroke:#000
TheaterWide 3 picture size example
Full picture size (for 16:9 [480i, 480p] source programs only)
- If receiving a squeezed 4:3 format program, the picture is stretched wider to fill the width of the screen, but not stretched taller.
• None of the picture is hidden.
![TOSHIBA 62MX195 - Full picture size (for 16:9 [480i, 480p] source programs only) - 1](/content/2026/06/1198777/images/9562f141cd5cc5a133120126275fdf679e7d2ab32955929762e63c5e3af8ce8d.jpg)
flowchart
graph TD
    A["Grid with 9 circles"] --> B["Grid with 3 circles"]
Full picture size example
Note:
- If you select one of the TheaterWide® picture sizes, the top and bottom edges of the picture (including subtitles or captions) may be hidden. To view the hidden edges, either scroll the picture (TheaterWide 2 and 3 only) or try viewing the program in Full or Natural picture size.
- When selecting the picture size, the way the image displays will vary depending on the format of the program you are currently watching.
Using these functions to change the picture size (i.e., changing the height/width ratio) for any purpose other than your private viewing may be prohibited under the Copyright Laws of the United States and other countries, and may subject you to civil and criminal liability.
Scrolling the TheaterWide® picture (TheaterWide 2 and 3 only)
You can set separate scroll settings for the TheaterWide 2 and TheaterWide 3 modes for each input.
To set the scroll settings:
- Press INPUT on the remote control or TV/VIDEO on the TV to select the input for which you want to set the picture size and scroll settings.
- Press MENU and open the Video menu.
- Highlight Theater Settings and press ENTER.
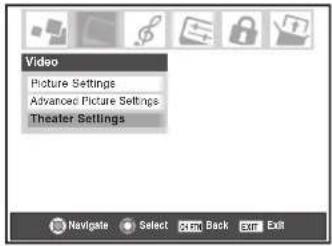
- In the Picture Size field, select either TheaterWide 2 or TheaterWide 3 (you cannot scroll in any other mode).
- Press ▼ to highlight the Picture Scroll field.
- Press ◀ or ▶ to scroll the picture up and down as needed, from -10 to +20.
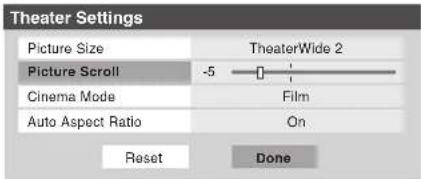
- To save the new settings, highlight Done and press ENTER. To revert to the factory defaults, highlight Reset and press ENTER.
Using the auto aspect ratio feature
When the auto aspect ratio feature is set to On, the picture size is automatically selected when one of the following input sources is received:
• A 480i signal from the VIDEO 1, VIDEO 2, VIDEO 3, ColorStream HD-1, or ColorStream HD-2 input.
• A 1080i, 480i, 480p, or 720p signal from the HDMI input.
| Aspect ratio of signal source | Automatic aspect size (automatically selected when Auto Aspect is On) |
| 4:3 normal Natural | (with sidebars) |
| 4:3 letter box | TheaterWide 2 |
| 16:9 full | Full |
| Not defined (no ID-1 data or HDMI aspect data) | User-selected picture size (see pages 77-78) |
Note:
- The auto aspect ratio feature is not applicable to antenna or Cable input sources.
- The auto aspect ratio feature is not available when the POP double-window is open, the Freeze mode is active, or the TV Guide On Screen™ system is open.
To turn on the auto aspect ratio feature:
- Press MENU and open the Video menu.
- Highlight Theater Settings and press ENTER.

- In the Auto Aspect Ratio field, select On.
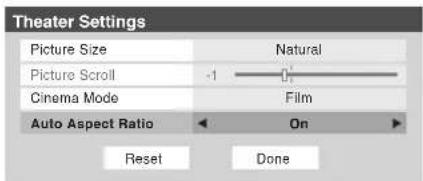
- To save the new settings, highlight Done and press ENTER. To revert to the factory defaults, highlight Reset and press ENTER.
To turn off the auto aspect ratio feature:
Select Off in step 3 above.
Selecting the cinema mode (480i signals only)
When you view a DVD (480i signal; 3:2 pulldown processed) from a DVD player connected to the VIDEO 1, VIDEO 2, ColorStream HD1/HD2 (component video), or HDMI inputs on the TV, smoother motion can be obtained by setting the Cinema Mode to Film.
To set the Cinema Mode to Film:
- Press MENU and open the Video menu.
- Highlight Theater Settings and press ENTER.
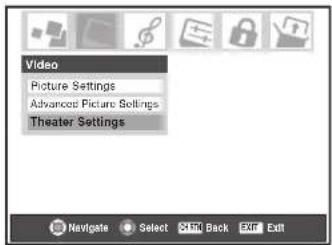
- In the Cinema Mode field, select Film.
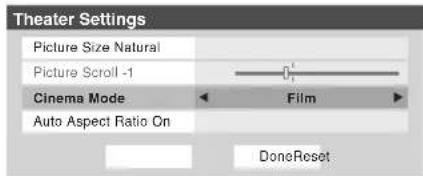
- To save the new settings, highlight Done and press ENTER. To revert to the factory defaults, highlight Reset and press ENTER.
To set the Cinema Mode to Video:
Select Video in step 3 above.
Selecting the lamp mode
You can select either the High Bright or Low Power lamp mode.
- The High Bright mode is useful when additional picture brightness is desired (such as in a bright room).
- The Low Power mode reduces wear on the projection lamp. Using this mode should result in longer lamp life.
See "Lamp unit replacement and care" on page 128-130.
To select the lamp mode:
- Press MENU and open the Video menu.
- Highlight Advanced Picture Settings and press ENTER.
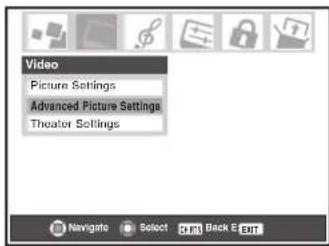
- In the Lamp Mode field, select High Bright or Low Power, whichever you prefer.

- To save the new settings, highlight Done and press ENTER. To revert to the factory defaults, highlight Reset and press ENTER.
Note:
If you set the lamp mode to Low Power, each time you turn on the TV, the lamp will start out in High Bright mode but will switch to Low Power mode in approximately 1 minute. You will notice a change in screen brightness when this happens. This is normal and is not a sign of malfunction.
Using the POP features
Using the POP double-window feature
The POP (picture-out-picture) double-window feature splits the screen into two windows so you can watch two programs at the same time.
To display a program in the POP window:
- Select the program you want to watch in the main window.
- Press SPLIT to open the POP double-window.

- Press▶ to highlight the POP (right) window. When highlighted, the window will have a green border.
- Press INPUT to open the POP Input Selection window. Select the input source for the POP window by pressing the corresponding Number button (0–9). The current source displays in purple in the POP Input Selection window.
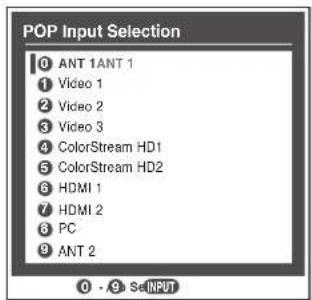
To close the POP window and tune to the highlighted window:
Press ENTER after highlighting the window you want to view as a normal picture.
To close the POP window:
Press SPLIT or EXIT.
Notes about recording:
- If the POP window is open and you attempt to start recording, the POP window will close and recording will start.
- If you use the TV's remote control to start recording, you will not be able to open the POP window and the message "Not Available" will appear on-screen.
- It is recommended that you use the TV's remote control to start recording. If you use a device other than the TV's remote control to start recording, you may be able to open the POP window during the recording process. If this happens, the recorded audio will reflect the audio of the active window (main or POP), which may not be the audio you intended to record.
Note:
- When the main window is in the ANT1 or ANT2 mode, the ANT1 and ANT2 inputs cannot be selected for the POP window.
- When the main window is in Video 1/2/3, ColorStream HD1/HD2, HDMI 1, or HDMI 2 mode, those inputs cannot be selected for the POP window.
- You cannot view IEEE1394 source programs in the POP window.
- You cannot view two video or two antenna sources in both the main and POP windows simultaneously. (You can view a video source in one window and an antenna source in the other.)
- The FREEZE feature is not available when the POP double-window is open. If you press FREEZE when the double-window is open, the message "Not available" will appear.
Using the POP features (continued)
Switching the speaker audio (main or POP)
While the POP window is open, press ◀ or ▶ to switch the sound (main or POP) that is output from the TV speakers (and from the VARIABLE AUDIO OUT terminals).
The window with the active sound is outlined with a green border.
Example: Press ◀ Example: Press ▶
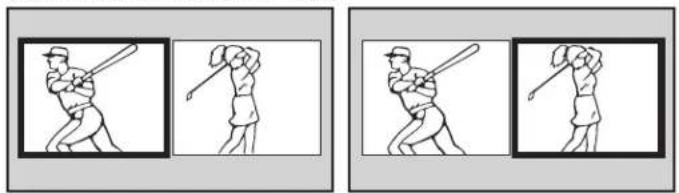
natural_image
Two identical line drawings of a baseball player in action, showing stance and posture (no text or symbols)POP double-window aspect ratio
The POP double-window feature displays each picture according to its input signal aspect ratio, as illustrated in the examples below.
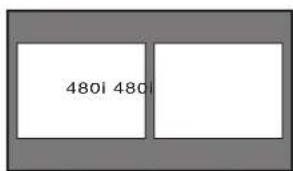
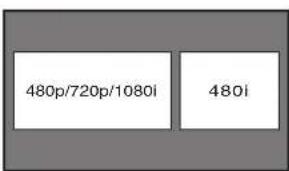
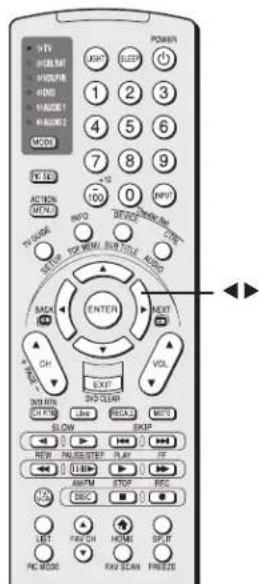
Note:
- The auto aspect ratio feature (page 79) does not operate in POP double-window mode.
- Aspect ratio is the ratio of width to height of the picture.
Using the FREEZE feature
- When viewing the TV, press FREEZE to make the picture a still picture.
- To return to the moving picture, either press FREEZE again, press EXIT, or press any other button.
Note:
- The FREEZE feature is not available when the POP double-window or FAV SCAN multi-window is open. If you press FREEZE when either window is open, the message "Not available" will appear.
- If the TV is left in FREEZE mode, after 15 minutes it will automatically release the FREEZE mode and return to the moving picture.
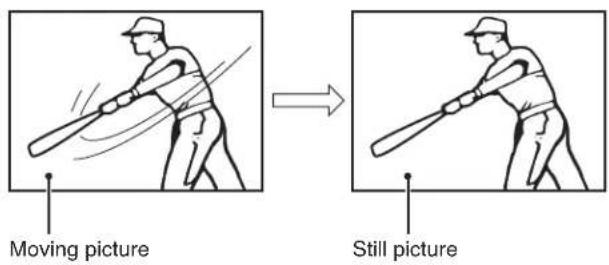
Using the FREEZE function for any purpose other than your private viewing may be prohibited under the Copyright Laws of the United States and other countries, and may subject you to civil and criminal liability.
Using the favorite channel scan feature
You can use this feature to quickly scan and tune the channels you programmed as favorite channels from a nine-picture multi-window.
Note: To use the favorite channel scan feature, you must first program channels into the favorite channel memory. See "Programming your favorite channels" on page 49.
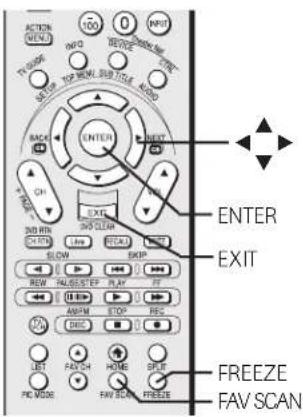
To scan and tune your favorite channels:
- Press FAV SCAN. The TV will display the channels you programmed as favorite channels for the current ANT input in a nine-picture multi-window. (To display the channels you programmed as favorite channels for the other input, you must change antenna inputs first (page 72), and then press FAV SCAN.)

-
Highlight the window for the channel you want to view:
-
Either... press the channel's multi-window position number (1-9, as illustrated above, and not the actual channel number) to highlight the window;
-
or... use the ▲▼◀▶ buttons to highlight the window. The highlighted window will display as a moving picture.
-
Press ENTER to tune the TV to the highlighted channel and close the multi-window.
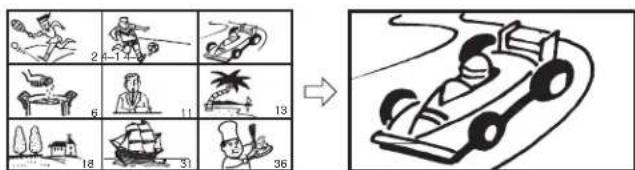
Adjusting the picture
Selecting the picture mode
You can select your desired picture settings from four picture modes, as described below.
| Mode | Picture Quality |
| Sports | Bright and dynamic picture (factory setting) |
| Standard | Standard picture settings (factory setting) |
| Movie | Lower contrast for darkened room (factory setting) |
| Preference | Your personal preferences |
To select the picture mode:
Press PIC MODE on the remote control. The following popup menu appears on-screen.

Repeatedly press PIC MODE to cycle among the modes or use ◀ or ▶ to select the modes.
PIC MODE
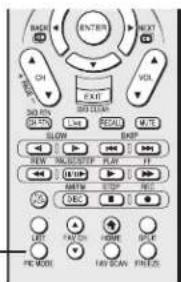
To select the picture mode using the menu system:
- Press MENU and open the Video menu.
- Highlight Picture Settings and press ENTER.
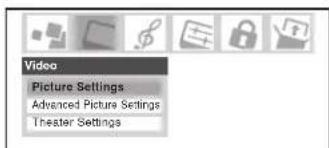
- In the Mode field, select the mode you prefer.
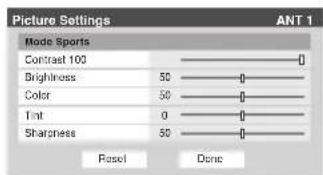

- To save the new settings, highlight Done and press ENTER. To revert to the factory defaults, highlight Reset and press ENTER.
Note:
- The picture mode you selected is for the current input selection only (ANT 1 in the example above). You can select a different picture mode for each input selection.
- If you select one of the factory-set picture modes (Sports, Standard, or Movie) and then change a picture quality setting (for example, increase the contrast or change the color temperature), the picture mode automatically changes to Preference in the Picture Settings menu.
Adjusting the picture quality
You can adjust the picture quality (contrast, brightness, color, tint, and sharpness) to your personal preferences.
| Selection | ◀ Pressing ▶ | |
| contrast | lower | higher |
| brightness | darker | lighter |
| color | paler | deeper |
| tint | reddish | greenish |
| sharpness | softer | sharper |
To adjust the picture quality:
- Press MENU and open the Video menu.
- Highlight Picture Settings and press ENTER.
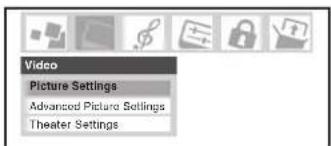
- Press ▲ or ▼ to select the picture quality you want to adjust (Contrast, Brightness, Color, Tint, or Sharpness), and then ◀ and ▶ to adjust the setting, as described in the table above.
- To save the new settings, highlight Done and press ENTER. To revert to the factory defaults, highlight Reset and press ENTER.
The picture qualities you adjusted are automatically saved in the Preference mode (see "Selecting the picture mode," above left).
Adjusting the picture (continued)
Using CableClear® /DNR (digital noise reduction)
The CableClear ^® digital noise reduction feature allows you to reduce visible interference in your TV picture. This may be useful when receiving a broadcast with a weak signal (especially a Cable channel) or playing a noisy video cassette or disc. This feature is enabled for 480i signals only.
Note: The CableClear DNR feature does not function in ColorStream, HDMI (DVI), ATSC, IEEE1394, and digital Cable modes.
To select CableClear/DNR preferences:
- Press MENU and open the Video menu.
- Highlight Advanced Picture Settings and press ENTER.
- In the CableClear/DNR field, select your desired setting.
Note:
- If the current input is Antenna, Video 1, Video 2, or Video 3, the menu will display the text CableClear. The available selections are Off, Low, Middle, High, and Auto.
- If the current input is ColorStream HD1, ColorStream HD2, or HDMI, and the video resolution is 480i, the menu will display the text "DNR." The available selections are Off, Low, Middle, High, and Auto. Auto will react proportionally to the strength of the noise. Low, Middle, and High, will reduce the noise in varying degrees from lowest to highest, respectively.
-
If the current input is ColorStream HD1, ColorStream HD2, or HDMI, and the video resolution is not 480i, the menu will display the text "DNR".
-
To save the new settings, highlight Done and press ENTER. To revert to the factory defaults, highlight Reset and press ENTER.
Selecting the color temperature
You can change the quality of the picture by selecting from three preset color temperatures (cool, medium, and warm), as described below.
To select the color temperature:
- Press MENU and open the Video menu.
- Highlight Advanced Picture Settings and press ENTER.
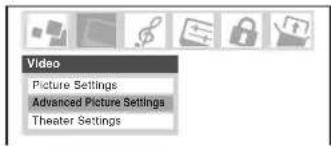
- In the Color Temperature field, select the mode you prefer (Cool, Medium, or Warm).
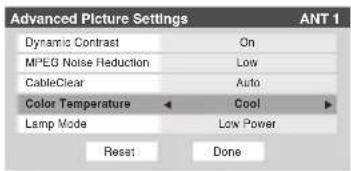
- To save the new settings, highlight Done and press ENTER. To revert to the factory defaults, highlight Reset and press ENTER.
Note:
If you select one of the factory-set picture modes (Sports, Standard, or Movie) and then change the color temperature mode, the picture mode automatically changes to Preference in the Picture Settings menu.
Adjusting the picture (continued)
Using MPEG noise reduction
The MPEG noise reduction feature allows you to reduce visible interference caused by MPEG compression. Choices for MPEG noise reduction are High, Medium, Low and Off. Off is automatically selected when this feature is disabled (“grayed out”). This feature is not available in the PC input mode.
To select the MPEG noise reduction level:
- Press MENU and open the Video menu.
- Highlight Advanced Picture Settings and press ENTER.
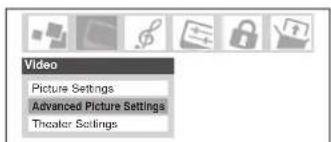
- In the MPEG Noise Reduction field, select either High, Medium, Low, or Off.
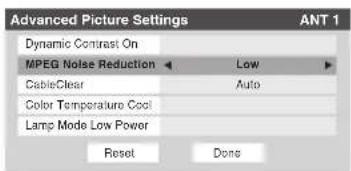
- To save the new settings, highlight Done and press ENTER. To revert to the factory defaults, highlight Reset and press ENTER.
Using dynamic contrast
When dynamic contrast is set to "On," the TV will detect changes in the picture quality that affect the appearance of your contrast settings and then automatically adjust the video.
When dynamic contrast is set to "Off," the settings selected in the Contrast field in Picture Settings will be used.
To select dynamic contrast preferences:
- Press MENU and open the Video menu.
- Highlight Advanced Picture Settings and press ENTER.
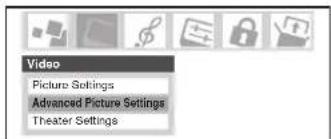
- In the Dynamic Contrast field, select either On or Off.

- To save the new settings, highlight Done and press ENTER. To revert to the factory defaults, highlight Reset and press ENTER.
Note:
If you select one of the factory-set picture modes (Sports, Standard, or Movie) and then set the dynamic contrast to "On," the picture mode automatically changes to Preference in the Picture Settings menu.
Using the closed caption mode
The closed caption mode has two options:
- Captions—An on-screen display of the dialogue, narration, and sound effects of TV programs and videos that are closed captioned (usually marked “CC” in program guides).
- Text—An on-screen display of information not related to the current program, such as weather or stock data (when provided by individual stations).
To view captions or text:
- Press MENU and open the Preferences menu.
- Highlight Closed Caption Mode and then press ▶.
- Press ▼ or ▲ to select the desired closed caption mode and press ENTER.
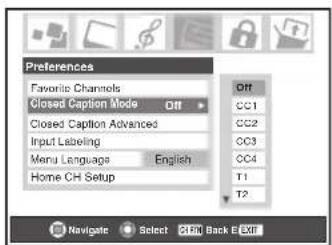
• To view captions:
Highlight CC1, CC2, CC3, or CC4. (CC1 displays translation of the primary language in your area.)

Note: If the
program or video
you selected is not closed captioned, no captions will display on-screen.
• To view text:
Highlight T1, T2, T3, or T4.
Note: If text is not available in your area, a black rectangle may appear on your screen. If this

happens, turn the Closed Caption Mode Off.
• To turn off the Closed Caption mode:
Select Off in step 3 above.
Note: A closed caption signal may not display in the following situations:
- When a videotape has been dubbed
- When the signal reception is weak
- When the signal reception is non-standard
Advanced closed captions
You can customize the closed caption display characteristics by changing the text size, type, edge, color, and the background color. You cannot set the Caption Text and Background as the same color.
Note: This feature is available for digital channels only.
To customize the closed captions:
- Press MENU and open the Preferences menu.
- Highlight Closed Caption Advanced and press ENTER.
- Press ▲ or ▼ to highlight the characteristic you want to change, and then
press ◀ or ▶ to select the format for that characteristic.
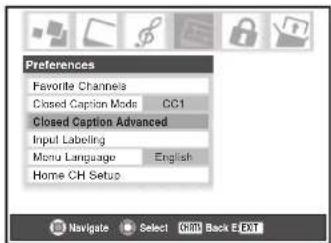
- To save the new settings, highlight Done and press ENTER. To revert to the factory
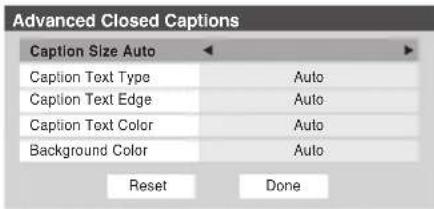
defaults, highlight Reset and press ENTER.
| Caption Size | Auto, Small, Standard, Large |
| Caption Text Type | Auto, Default, Mono w. Serif, Prof. w. Serif, Mono w/o Serif, Prop w/o Serif, Casual, Cursive, Small Capitals |
| Caption Text Edge | Auto, None, Raised, Depressed, Uniform, Left Drop Shadow, Right Drop shadow |
| Caption Text Color | Auto, Black, White, Red, Green, Blue, Yellow, Magenta, Cyan |
| Background Color | Auto, Black, White, Red, Green, Blue, Yellow, Magenta, Cyan |
Using the closed caption mode (continued)
Digital closed captions
You can use the Digital CC/Audio selector to select digital closed caption services (if available), which will temporarily override closed captions for digital channels only. When such services are not available, the Digital CC/Audio selector presents a default list of services. If the selected service is not available, the next best service will be used instead.
To select digital closed captions:
- Press MENU and open the Applications menu.
- Highlight Digital CC/Audio Selector and press ENTER.
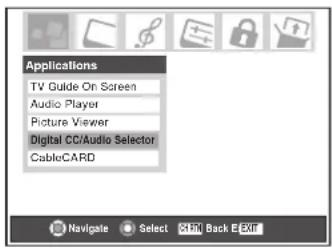
- Press ▲ or ▼ to select Closed Caption, and then press ◀ or ▶ to select the desired service.

Adjusting the audio
Muting the sound
Press MUTE to partially reduce (1/2 MUTE) or turn off (MUTE) the sound. Each time you press MUTE, the mute mode will change in the following order.

If the closed caption mode is set to Off when you select "MUTE" mode, the closed caption feature is automatically activated. To mute the audio without automatically activating the closed caption feature, use the VOL ▼ button to set the volume to 0. See "Using the closed caption mode" on page 87 for more information on closed caption modes.
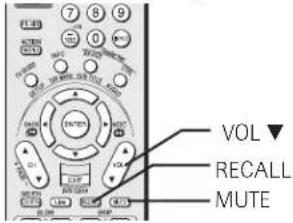
Using the digital audio selector
You can use the Digital CC/Audio selector to conveniently switch between audio tracks on a digital channel (for those channels that have multiple audio tracks). This temporarily overrides the audio track chosen by the language option under Audio Setup (see "Selecting stereo/SAP broadcasts," at right).
To use the digital audio selector:
-
Press MENU and open the Applications menu.
-
Highlight Digital CC/ Audio Selector and press ENTER.
-
Press ▲ or ▼ to select Audio, and then press ◀ or ▶ to select the desired service.
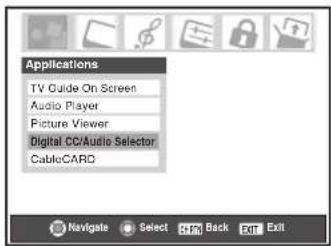

Selecting stereo/SAP broadcasts
The multi-channel TV sound (MTS) feature allows you to output high-fidelity stereo sound. MTS also can transmit a second audio program (SAP) containing a second language, music, or other audio information (when provided by individual stations).
The MTS feature is not available when the TV is in VIDEO mode. When the TV receives a stereo or SAP broadcast, the word "STEREO" or "SAP" appears on-screen when RECALL is pressed.
To listen to stereo sound:
-
Press MENU and open the Audio menu.
-
Highlight Audio Setup and press ENTER.
-
In the MTS field, select Stereo.
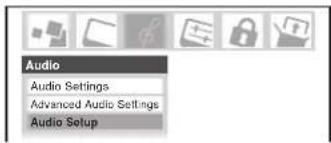
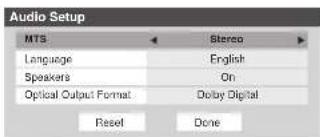
- To save the new settings, highlight Done and press ENTER. To reset the settings to the factory defaults, highlight Reset and press ENTER.
Note:
- You can leave the TV in Stereo mode because it automatically outputs the type of sound being broadcast (stereo or monaural).
- If the stereo sound is noisy, select MONO to reduce the noise.
To listen to an alternate language on an ATSC digital station (if available):
Highlight the Language field in step 3 above, and then press ◀ or ▶ to select the language you prefer.
To listen to a second audio program on an analog station (if available):
Select SAP in step 3 above.
Note:
- A second audio program (SAP) can be heard only on those TV stations that offer it. For example, a station might broadcast another language as a second audio program. If you have SAP on, you will see the current program on the screen but hear the other language instead of the program's normal audio.
- If you have SAP on and the station you are watching is not broadcasting a second audio program, the station's normal audio will be output. However, occasionally there is no sound at all in SAP mode. If this happens, set the MTS feature to Stereo mode.
Adjusting the audio (continued)
Adjusting the audio quality
You can adjust the audio quality by adjusting the bass, treble, and balance.
To adjust the audio quality:
- Press MENU and open the Audio menu.
- Highlight Audio Settings and press ENTER.
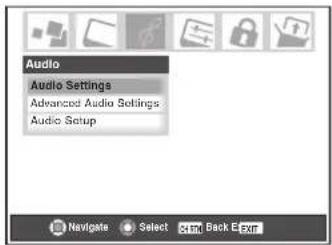
- Press ▼ or ▲ to highlight the item you want to adjust (Bass, Treble, or Balance).
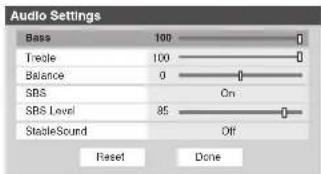
-
Press ◀ or ▶ to adjust the level.
-
◀ makes the bass or treble weaker or increases the balance in the left channel (depending on the item selected).
-
makes the bass or treble stronger or increases the balance in the right channel (depending on the item selected).
-
To save the new settings, highlight Done and press ENTER. To reset the settings to the factory defaults, highlight Reset and press ENTER.
Using the sub-bass system (SBS)
The sub-bass system allows you to enhance bass performance, even when the volume is low.
To turn on the SBS and adjust the level:
- Press MENU and open the Audio menu.
- Highlight Audio settings and press ENTER.
- In the SBS field, select On.
- Press ▲ or ▼ to highlight SBS Level, and then press ◀ or ▶ to adjust the sub-bass system.
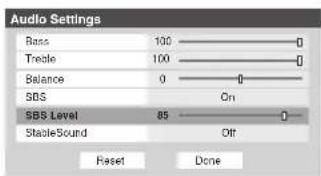
- To save the new settings, highlight Done and press ENTER. To reset the settings to the factory defaults, highlight Reset and press ENTER.
To turn off the SBS:
Select Off in step 3.
Using the StableSound® feature
The StableSound ^® feature limits the highest volume level to prevent extreme changes in volume when the signal source changes (for example, to prevent the sudden increase in volume that often happens when a TV program switches to a commercial).
To turn on the StableSound ^® feature:
- Press MENU and open the Audio menu.
- Highlight Audio Settings and press ENTER.
- In the StableSound field, select On.
- To save the new settings, highlight Done and press ENTER. To reset the settings to the factory defaults, highlight Reset and press ENTER.
Note: The RESET function returns your audio adjustments to the following factory settings:
Bass ...... center (50)
Treble ...... center (50)
Balance ...... center (0)
StableSound ... Off
To turn off the StableSound feature:
Select Off in step 3 above.
Adjusting the audio (continued)
Using the SRS WOW™ surround sound feature
WOW™ is a special combination of SRS Labs audio technologies (SRS 3D, FOCUS, and TruBass) that creates a thrilling surround sound experience with deep, rich bass from stereo sound sources. Your TV's audio will sound fuller, richer, and wider.
To adjust the WOW ^™ settings:
- Put the TV in STEREO mode (see "Selecting stereo/SAP broadcasts" on page 89).
- Press MENU and open the Audio menu.
- Highlight Advanced Audio Settings and press ENTER.
- Press ▼ or ▲ to highlight the WOW feature you want to adjust, and then press ◀ or ▶ to adjust the item.
- WOW: SRS 3D — To turn the surround sound effect On or Off.
Note: If the broadcast is monaural, the 3D effect does not work.
- WOW: Focus — To turn the vocal emphasis effect On or Off.
-
WOW: TruBass — To select the desired bass expansion level (High, Low, or Off).
-
To save the new settings, highlight Done and press ENTER. To revert to the factory defaults, highlight Reset and press ENTER.
Using the Dolby Virtual with SRS TruSurround sound feature
The Dolby Virtual surround sound feature allows you to enjoy virtual surround sound from the TV's speakers. The Dolby Virtual TruSurround feature is enabled only when receiving digital broadcasts.
To turn on the Dolby Virtual surround sound feature:
- Press MENU and open the Audio menu.
- Highlight Advanced Audio Settings and press ENTER.
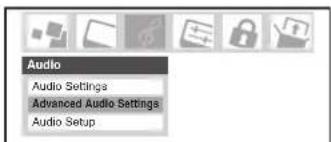
- In the Dolby Virtual TruSurround field, select On.
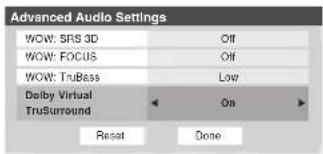
- To save the new settings, highlight Done and press ENTER. To revert to the factory defaults, highlight Reset and press ENTER.
To turn off the Dolby Virtual surround sound feature:
Select Off in step 3 above.
Note: The Dolby Virtual TruSurround and WOW SRS 3D features cannot be on at the same time. If you set one to On, the other will automatically be set to Off.
Adjusting the audio (continued)
Turning off the built-in speakers
Use this feature to turn off the TV speakers when you connect an audio system to your TV (see “Connecting a digital audio system” and “Connecting an analog audio system” on page 24).
To turn off the built-in speakers:
- Press MENU and open the Audio menu.
- Highlight Audio Setup and press ENTER.
- In the Speakers field, select Off.
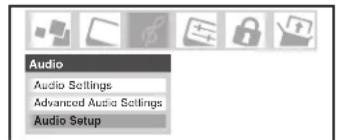
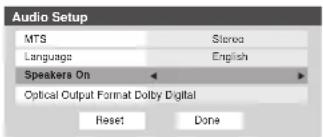
- To save the new settings, highlight Done and press ENTER. To revert to the factory defaults, highlight Reset and press ENTER.
To turn on the built-in speakers:
Select On in step 3 above.
Selecting the optical audio output format
Use this feature to select the optical audio output format when you connect a Dolby Digital decoder or other digital audio system to the Optical Audio Out terminal on the TV (see "Connecting a digital audio system" on page 24).
To select the optical audio output format:
-
Press MENU and open the Audio menu.
-
Highlight Audio Setup and press ENTER.
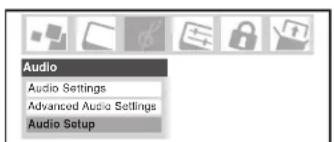
- In the Optical Output Format field, select either Dolby Digital or PCM, depending on your device.
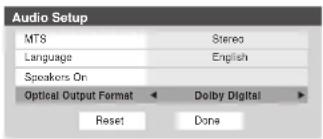
- To save the new settings, highlight Done and press ENTER. To revert to the factory defaults, highlight Reset and press ENTER.
Setting the On/Off Timer
You can use the On/Off Timer to turn the TV on and off at a preset time on a recurring basis.
Note: You must first set the time (see page 55).
To set the On/Off Timer:
- Press MENU and open the Setup menu.
- Highlight On/Off Timer and press ENTER.
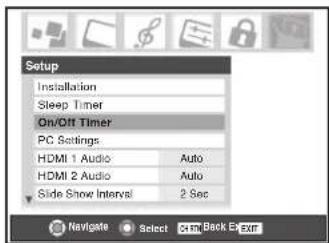
- In the DAY field, press ◀ or ▶ to select the recurrence (weekends, weekdays, Every day, etc).
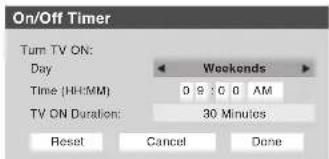
- Press ▼ to highlight the Time field, and then use the Number buttons to enter the time you want the TV to turn on.
- When the AM/PM field is highlighted, press ▶ to select AM or PM.
- Press ▼ to highlight the TV ON Duration field, and then press ◀ or ▶ to select the length of time until the TV turns off (30 Minutes, 12 Hours, 8 Hours, 4 Hours, 2 Hours, 1 Hour).
- Highlight Done and press ENTER.
- Turn off the TV. The TV will turn on automatically on the day(s) and at the time you set. The TV will then turn off automatically after the length of time you set in the TV ON Duration field.
Note:
- When a power failure occurs, the On/Off Timer settings may be cleared.
• To display the On/Off Timer setting, press RECALL.
To turn off the On/Off Timer:
Select Not Set in step 3 above.
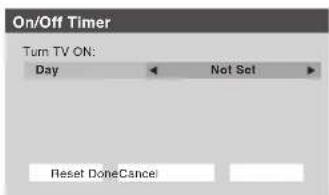
Setting the sleep timer
You can set the sleep timer to turn off the TV after a set length of time (maximum of 3 hours). The sleep timer turns off the TV one time only, as opposed to the On/Off Timer, which turns off the TV on a recurring basis.
To set the sleep timer:
Press SLEEP on the remote control to set the length of time until the TV turns off. Repeatedly press SLEEP to increase the time in 10-minute increments or press ▲ or ▼ to increase or decrease the time in 10-minute increments, to a maximum of 3 hours and 00 minutes.
To cancel the sleep timer:
Press SLEEP until it is set to 0.
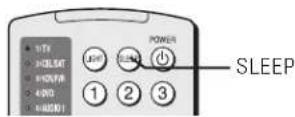
To set the sleep timer using the on-screen menus:
- Press MENU and open the Setup menu.
- Highlight Sleep Timer and press ENTER.
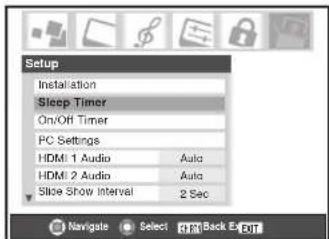
- Press the Number buttons to enter the length of time in 10-minute increments.
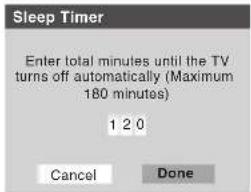
- Highlight Done and press ENTER.
Note:
- When a power failure occurs, the sleep timer setting may be cleared.
• To display the amount of time left on the sleep timer, press RECALL.
To display the remaining sleep time:
Press SLEEP.
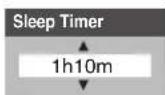
Note:
A message will display on-screen when there is one minute remaining on the sleep timer.
Using the PC setting feature
You can adjust the horizontal position/size, vertical position/size, clock phase, and sampling clock. This feature will be grayed out on the menu unless there is a PC connected to the TV (See "Connecting a personal computer (PC)" on page 29.)
To set the PC setting:
- Confirm a PC is connected (see "Connecting a personal computer (PC)" on page 29).
- Repeatedly press INPUT to select PC input mode. (See Selecting the video input source to view " on page 72.)
- Press MENU and open the Setup menu.
- Highlight PC Settings and press ENTER.

- Press ▲ or ▼ to highlight the item you want to adjust.
- Press ◀ or ▶ to make the appropriate adjustments.

• Horizontal Position/Vertical Position:
Adjusts picture left/right and up/down. The adjustment range is within ±5 from center. (The adjustable range may vary depending on the input mode.)
• Horizontal Width/Vertical Hegiht:
Adjusts picture width of Horizontal and picture height of Vertical. The adjustment range is within ±5 from center.
- Clock Phase:
This function is to reduce noise and sharpen the picture. The adjustment range is within ±15 from center.
- Sampling Clock:
This function is to minimize periodic vertical stripes on the screen. The adjustment range is within ±15 from center.
Displaying TV setting information on-screen using RECALL
To display TV setting information on-screen:
Press RECALL on the remote control.
The following information will display on-screen (if applicable):
- Current input (ANT 1, ANT 2, VIDEO 1, etc.)
- If ANT 1 or ANT 2 is the current input, whether it is
Cable TV ("CABLE") or off-air ("TV")
- Channel number (if in ANT 1 or ANT 2 mode)
• Signal strength indicator (bar graph in lower right corner of screen; for ATSC signal only)
| STEREO | Tuner Hold: On | |
| NC-17 | ||
| On Timer: Weekdays 12:00pm | ||
| Slop Timer: 18 min. | ||
| Game Timer: 28 min. | ANT 1 | |
| Natural | ||
| 1080i | 5:32pm | CABLE 81-1 Tall |
Sample RECALL screen
Note: The signal strength indicator will react to fading and increasing signals.
- Time (if set)
- On/Off timer settings (if set)
- Remaining time on sleep timer (if set)
- Remaining time on game timer (if set)
- Stereo or SAP audio status
• V-Chip rating status - Picture size
- Tuner hold* (if applicable)
*If you are recording on one tuner (for example, the digital tuner), you will be able to change channels on the other tuner only (the analog tuner in this example). The tuner from which you are recording is “on hold” (i.e., locked) so your recordings will not be affected by channel changes.
- Video resolution
- Lamp mode (appears only if the TV is in Hi Bright mode)
To close TV setting information on-screen:
Press RECALL again.
Understanding the auto power off feature
The TV will automatically turn itself off after approximately 15 minutes if it is tuned to a vacant channel or a station that completes its broadcast for the day. This feature functions in ANT 1 and ANT 2 modes only.
Understanding the last mode memory feature
If the power is cut off while you are viewing the TV, the Last Mode Memory feature automatically turns on the TV when the power is resupplied.
Note: You should unplug the TV's power cord if it is possible that you will be away from the TV for an extended period of time after the power is restored.
Using the Gray Level feature
The gray level feature will set the sidebars to three different levels of darkness. Sidebars are the blanks spaces on either side of a 4:3 viewing area.
To set the gray level of the sidebars:
- Press MENU and open the Setup menu.
- Highlight Gray Level and press ▶.
- Press ▲ or ▼ to select your desired level of darkness (1 – Black, 2 – Dark Gray or 3 – Gray).
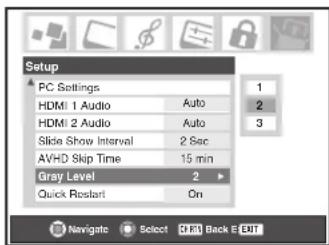
Note:
- The gray level feature does not affect video being viewed in 16:9 aspect ratio.
- When receiving a signal that has sidebars (e.g., 4:3 aspect ratio video over a 1080i or 720p signal), the gray level feature will not be applied to the sidebars.
9
Using the Locks menu
The Locks menu includes the Enable Rating Blocking, Edit Rating Limits, Channels Block, Input Lock, Panel Lock, Game Timer, and New PIN Code features. You can use these features after entering the correct PIN code.
Entering the PIN code
- Press MENU and highlight the Locks menu icon.

- Press ▼, which displays the PIN code entry screen.
- The Lock System screen (below) appears if a PIN code has not been stored. Press the Channel Number buttons to enter a new four-digit code, enter the code a second time to confirm, and press ENTER.
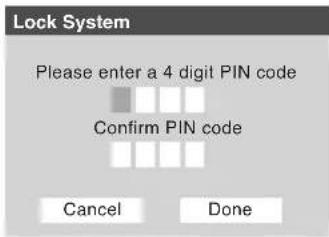
- The Locks/Active screen (below) appears if the PIN code is already stored. Press the Channel Number buttons to enter your four-digit code and press ENTER.

If the wrong PIN code is entered, the message "Incorrect PIN code, please try again!" appears. Highlight Retry and press ENTER. Enter the code again and press ENTER.
When the correct PIN code is entered, the Locks menu opens.
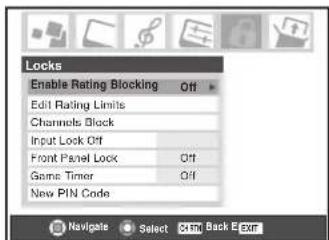
If you cannot remember your PIN code
While the PIN code entering screen is displayed, press RECALL four times within five seconds. The PIN code will be cleared and you can enter a new PIN code.
Changing your PIN code
- Press MENU and highlight the Locks menu icon.
- Press ▼ to display the PIN code entering screen.
- Enter your four-digit PIN code and press ENTER.
- Press ▼ to highlight New PIN Code and press ENTER.
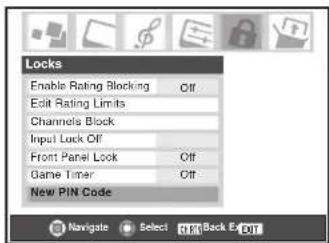
- Press the Number buttons to enter a new four-digit code. Retype the numbers to confirm the PIN code you entered.
- Press ENTER. The new PIN code is now active.
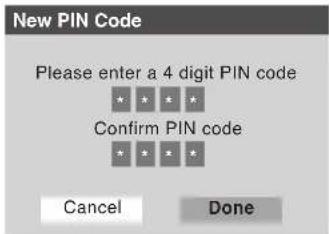
Blocking TV programs and movies by rating (V-Chip)
Some TV programs and movies include signals that classify the content of the program (violence, sex, dialog, language). The V-Chip feature in this TV detects the signals and blocks the programs according to the ratings you select. (See the tables at right for rating descriptions.)
Note: Rating blocking is a function of the V-Chip feature in this TV, which supports the U.S. V-Chip system only.
To block and unblock TV programs and movies:
- Press MENU and highlight the Locks menu icon.
- Press ▼ to display the PIN code entering screen.
- Enter your four-digit PIN code and press ENTER.
- Press ▼ to highlight Enable Rating Blocking.
- Press ▶ and then ▼ to select On, and then press ENTER.

- Press ▼ to highlight Edit Rating Limits and press ENTER.
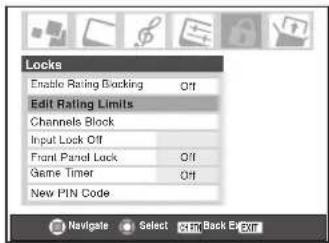
The Edit Rating Limits screen (below) appears.
- Press ▲▼◀▶ and then press ENTER to select the level of blocking you prefer. A box with an “×” is a rating that will be blocked. As you highlight a rating, a definition for the rating appears at the bottom of the screen.
- When done selecting the ratings you want to block, highlight Done and press ENTER.
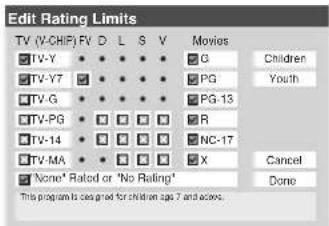
| Independent rating system for broadcasters | |
| Ratings D | Description and Content themes |
| TV-MA | Mature Audience Only (This program is specifically designed to be viewed by adults and therefore may be unsuitable for children under 17.)L) Crude or indecent language S) Explicit sexual activityV) Graphic violence |
| TV-14 | Parents Strongly Cautioned (This program contains some material that many parents would find unsuitable for children under 14 years of age.)D) Intensely suggestive dialog L) Strong, coarse languageS) Intense sexual situations V) Intense violence |
| TV-PG | Parental Guidance Suggested (This program contains material parents may find unsuitable for younger children.)D) Some suggestive dialog L) Infrequent coarse languageS) Some sexual situations V) Moderate violence |
| TV-G | General Audience (Most parents would find this program suitable for all ages.) |
| TV-Y7, TV-Y7FV | Directed to Older Children (This program is designed for children age 7 and above. Note: Programs in which fantasy violence may be more intense or more combative than other programs in this category are designated Y7FV.) |
| TV-Y | All Children (This program is designed to be appropriate for all children.) |
| Independent rating system for movies | |
| Rating | Description and content themes |
| X | X-rated (For adults only) |
| NC-17 | Not intended for anyone 17 and under |
| R | Restricted (Under 17 requires accompanying parent or adult) |
| PG-13 | Parents Strongly Cautioned (Some material may be inappropriate for children under 13) |
| PG | Parental Guidance Suggested (Some material may not be suitable for children) |
| G | General Audience (Appropriate for all ages) |
Note:
- If you place an “×” in the box next to “None” Rated or “No Rating,” programs rated “None” or “No Rating” will be blocked. However, if the program does not provide any rating information, nothing will be displayed in the RECALL screen and ratings blocking will not take effect.
- To display the rating of the program you are watching, press RECALL on the remote control. If it is not rated, the word "NONE" appears.
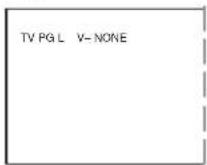
Blocking channels
With the Channels Block feature, you can block specific channels. You will not be able to tune blocked channels unless you clear the setting first.
To block channels:
- Press MENU and highlight the Locks menu icon.
- Press ▼ to display the PIN code entering screen.
- Enter your four-digit PIN code and press ENTER (see page 96 for details).
- Press ▼ to highlight Channels Block and then press ENTER.
- Using the ▲▼◀▶ buttons, select the input for which you want to change the rating limits (ANT1, ANT2, or Cable Box, if connected) and press ENTER.
A list of the channels available for that input will be displayed along with the call letters for each channel, if available.
- Press ▲▼ to highlight the channel you want to block, then press ENTER, which puts an “×” in the box next to that channel.
- Repeat step 6 for other channels you want to block.
- Highlight Done and press ENTER.
To unblock individual channels:
In step 6 above, press ▲▼ to highlight the channel you want to unblock, and then press ENTER to remove the “×” from the box, and highlight Done, and then press ENTER.
To block all channels at once:
Highlight Block All in step 6 above, and then highlight Done, and press ENTER.
To unblock all locked channels at once:
Highlight Allow All in step 6 above, and then highlight Done, and press ENTER.

Note: Channel blocking may not take effect if you have a cable box connected and use the cable box controls to change channels.
Unlocking programs temporarily
If you try to watch a TV program that exceeds the rating limits you set, the TV enters program lock mode. You can either unlock the program temporarily or select a non-locked program to watch.
This program exceeds the rating limit you set. Push 'mute' to enter PIN.
To temporarily unlock the program:
- Press MUTE.
- Enter your four-digit PIN code and press ENTER. If the
correct code is entered, the program lock mode is released and the normal picture appears. All locking is disabled until the TV is turned off, and will be enabled when the TV is turned off.
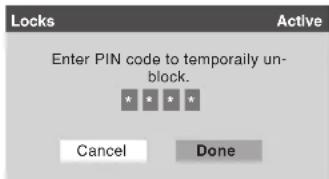
Locking video inputs
You can use the Input Lock feature to lock the video input sources (VIDEO 1, VIDEO 2, VIDEO 3, ColorStream HD-1, ColorStream HD-2, HDMI 1/HDMI 2, PC) and channels 3 and 4. You will not be able to view the input sources or channels until you turn off the input lock.
To lock the video inputs:
- Press MENU and highlight the Locks menu icon.
- Press ▼ to display the PIN code entering screen.
- Enter your four-digit PIN code and press ENTER.
- Press ▼ to highlight Input Lock and press ▶.
- Press ▲ or ▼ to select the level of video input locking you prefer, as described below:
Video: Locks VIDEO 1,
VIDEO 2, VIDEO 3,
ColorStream HD1/
HD2, HDMI 1/
HDMI 2, and PC.
Video+: Locks VIDEO 1, VIDEO 2, VIDEO 3, ColorStream HD1/ HD2, HDMI 1/
HDMI 2, PC and channels 3 and 4. Select Video+ if you use the antenna terminal to play a video tape.
Note: Make sure the POP is not on channel 3 or 4.
Off: Unlocks all video input sources.
- Press ENTER.
Note: When a CableCARD™ is inserted, Video+ will behave the same as Video lock.

Using the GameTimer™
You can use the GameTimer to set a time limit for playing a video game (30–120 minutes). When the GameTimer is activated, the TV enters VIDEO LOCK mode and locks out the input source for the video game device.
To set the GameTimer ^TM :
- Press MENU and highlight the Locks menu icon.
- Press ▼ to display the PIN code entering screen.
- Enter your four-digit PIN code and press ENTER.
- Press ▼ to highlight Game Timer and press ▶.
- Press ▲ or ▼ to select the length of time until the Video Lock is activated (30, 60, 90, or 120 minutes) and press ENTER.
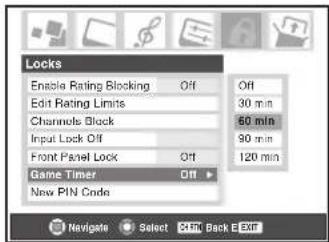
To cancel the GameTimer™:
Select Off in step 5 above.
To deactivate the video lock once the GameTimer has activated it:
Set the VIDEO LOCK to Off (see "Locking video inputs" on page 98).
Note:
• A message will appear on-screen when 10 minutes, 3 minutes, and 1 minute remain on the GameTimer.
- If the TV loses power with time remaining on the GameTimer, when power is restored the TV will enter VIDEO LOCK mode (as if the GameTimer had expired) and you will have to deactivate the video lock (as described above).
Using the control panel lock feature
You can lock the control panel to prevent your settings from being changed accidentally (by children, for example). When the control panel lock is On, none of the controls on the TV control panel will operate except POWER.
To lock the control panel:
- Press MENU and highlight the Locks menu icon.
- Press ▼ to display the PIN code entering screen.
- Enter your four-digit PIN code and press ENTER.
- Press ▼ to highlight Front Panel Lock.
- Press ▶ to highlight On and press ENTER. When the control panel is locked and a button on the control panel except POWER button is pressed, the message "Not Available" appears.
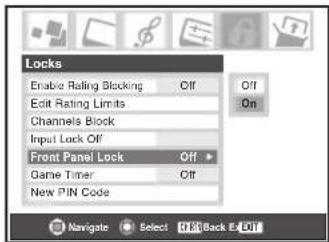
To unlock the control panel:
Highlight Off in step 5 above, or press and hold the VOLUME – button on the TV control panel for about 10 seconds until the volume icon appears on-screen.
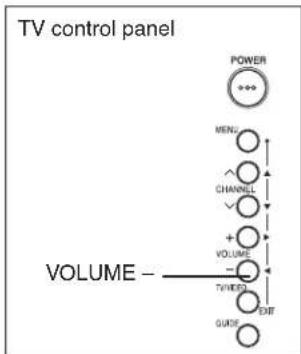
flowchart
graph TD
    A["POWER"] --> B["MENU"]
    B --> C["CHANNEL"]
    C --> D["+"]
    D --> E["VOLUME"]
    E --> F["TIVER"]
    F --> G["EXIT"]
    G --> H["GUIDE"]
    H --> I["VOLUME"]
    style A fill:#f9f,stroke:#333
    style I fill:#f9f,stroke:#333
10 Using the Picture Viewer and Audio Player
You can use the Picture Viewer to view compatible JPEG-format photos on your TV's screen.
You can use the Audio Player to play compatible MP3 files on the TV.
The TV can access JPEG and/or MP3 files that are stored on either a memory card (as described in this chapter) or a networked PC (as described in this chapter, in Chapter 11, and on page 30).
Note:
- Never remove a memory card or turn off the TV while viewing/playing files from a memory card. Doing so may result in loss of data and/or damage to the memory card and/or TV. SUCH DAMAGE IS NOT COVERED BY YOUR TOSHIBA WARRANTY.
- If you are viewing/playing files stored on a memory card or networked PC, IT IS RECOMMENDED THAT YOU BACK UP YOUR DATA. Toshiba is not liable for any damage caused by the use of any memory card, networked PC, or shared files with this TV. Toshiba will not compensate for any lost data or recording(s) caused by the use of such cards, PCs, or data.
- Failure to take proper care of a memory card may prevent display of pictures or playback of MP3 files from the card or result in damage to the memory card and/or TV. SUCH DAMAGE IS NOT COVERED BY YOUR TOSHIBA WARRANTY. See "Memory card care and handling" on page 105.
- The technical criteria set out in this owner's manual are meant as a guide only.
- You must obtain any required permission from copyright owners to download or use copyrighted content. Toshiba cannot and does not grant such permission.
Media specifications
File/folder name specifications
– Maximum file name length: 255 characters.
- Maximum shared folder* name length: 12 characters.
- File names must contain US-ASCII characters only.
- File and folder names cannot contain any special characters, such as \ / : ? “ ” <> | .
Picture Viewer/JPEG file specifications
- Maximum JPEG file size: 8 MB
• JPEG files larger than 8 MB will not display. - Maximum JPEG image resolution: 6000 x 4000 pixels
- Images with a resolution higher than 6000 x 4000 pixels will not display.
- The Picture Viewer is designed to display only pictures stored in compatible JPEG formats with a file extension of ".jpg."
- JPEG images processed and/or edited on a personal computer (PC) may not display properly or at all.
- Some digital cameras may store images in a format that is not compatible with the TV.
- JPEG files stored on a memory card or networked PC that are not in a file and folder format compatible with the TV will not display on the TV.
Media specifications (continued)
Audio Player/MP3 file specifications
- Maximum MP3 file size: 50 MB
- MP3 files larger than 50 MB will not play.
- The Audio Player is designed to play only music files stored in compatible MP3 formats with a file extension of ".mp3."
- MP3 files processed and/or edited on a PC may not play properly or at all. Some MP3 files may be in a format that is not compatible with the TV.
- MP3 files must be in the following format:
• MPEG1 (ISO/IEC 11172-3) Layer3.
- Sampling frequency—MPEG1: 32 kHz, 44.1 kHz, 48 kHz.
- Bitrate—MPEG1: 32–320 kbps.
- Channels—Stereo, Joint stereo, Dual channel, Single channel.
• ID3 Ver. 1, Ver. 2.
- The meta-data for MP3 files (e.g., artist name, album name, song title, etc.) must be in the following format: ISO-8859-1 (US-ASCII/ Western European) character sets
- MP3 files stored on a memory card or networked PC that are not in a file and folder format compatible with the TV will not play on the TV.
Networked PC specifications
Maximum number of files per shared folder:
-JPEG = 1,000
- All JPEG files over the 1,000th in a shared folder will not display.
-MP3 = 200
- All MP3 files over the 200th in a shared folder will not play.
Maximum number of nested folder levels: 10 levels
- Files in folders more than 10 levels down from the top level folder will not display/play.
• See Chapter 11, pages 109–111, for details on networking your TV and PC for file sharing.
Memory card specifications
The TV is designed to read the following memory cards:
- SD Memory Card (ver. 1.0)
- MMC (MultiMediaCard™)
- Memory Stick ^TM (Pro)
-xD-Picture Card ^TM (16MB-512MB) - CompactFlash® memory card (Type1)
Memory card format: FAT16
- Other memory card formats (including but not limited to FAT32 and NTFS) are not compatible.
Maximum memory card capacity: 512 MB
Maximum number of files per memory card:
-JPEG = 1,000
- All JPEG files over the 1,000th on a single memory card will not display.
-MP3 = 200
- All MP3 files over the 200th on a single memory card will not play.
Using the Picture Viewer
You can use the TV's Picture Viewer to display your digital photos (JPEG files) on your TV's screen in thumbnail mode or as a slide show.
Note:
- You cannot use the Picture Viewer and Audio Player at the same time.
- You must obtain any required permission from copyright owners to download or use copyrighted content. Toshiba cannot and does not grant such permission.
Accessing JPEG files stored on a networked PC
- Make sure you have correctly set up your home network and file sharing (see page 30 and Chapter 11).
- If a memory card is inserted in the TV, you must first close the Picture Viewer or Audio player and then remove the memory card or you will not be able to view any JPEG files shared over your home network.

NOTE: ALWAYS CLOSE THE PICTURE VIEWER OR AUDIO PLAYER BEFORE REMOVING THE MEMORY CARD.
If you remove the memory card while viewing pictures or playing audio files, the card and/or saved data may be damaged. THIS TYPE OF DAMAGE IS NOT COVERED UNDER YOUR TOSHIBA WARRANTY.
To remove the memory card (if applicable):
a) Press EXIT to close the Picture Viewer, Audio Player, or any other application that may be running.
b) For a CompactFlash memory card, press the ejector button and then pull the card straight out from the TV.
For all other memory cards, pull the card straight out from the TV.
- Press MENU and open the Applications menu.
- Highlight Picture Viewer and press ENTER.
- Go to "Viewing JPEG files on the TV" on the next page.
Accessing JPEG files stored on a memory card
- Insert a memory card into the appropriate card slot on the side of your TV.
Note:
- If you are using a memory card on which you stored both JPEG and MP3 files, the Picture Viewer will start automatically when you insert the memory card into the TV.
- Never insert more than one memory card at time.
- Be sure to insert the card correctly—label side facing left and the end with the notched corner (if applicable) inserted into the memory card slot.
-
When a CompactFlash memory card is inserted correctly, the ejector button pops out (see illustration below).
-
Go to "Viewing JPEG files on the TV" on the next page.
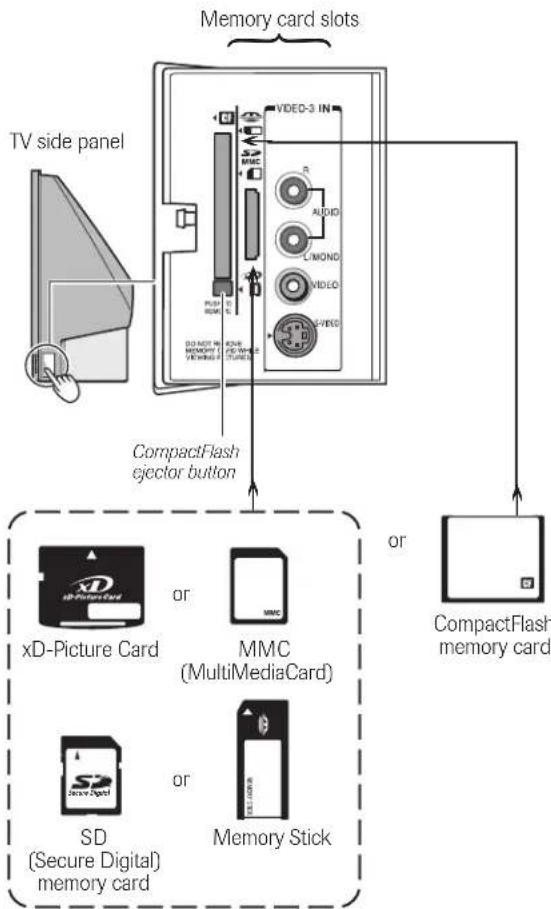
flowchart
graph TD
    A["TV side panel"] --> B["CompactFlash ejector button"]
    B --> C["VDEO-3 IN"]
    C --> D["Memory card slots"]
    D --> E["CompactFlash memory card"]
    F["xD-Picture Card"] --> G["or"]
    H["MMC (MultiMediaCard)"] --> I["or"]
    J["SD (Secure Digital) memory card"] --> K["or"]
    L["Memory Stick"] --> M["or"]
Using the Picture Viewer (continued)
Viewing JPEG files on the TV
- After accessing your JPEG files from your memory card or networked PC (see previous page), the images automatically display on-screen, with one as a large picture and six in thumbnail format.
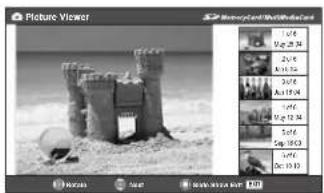
- Press ◀ to rotate the large picture 90° counterclockwise.
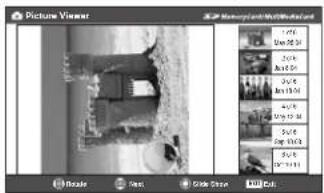
- Press▶ to rotate the large picture 90° clockwise.
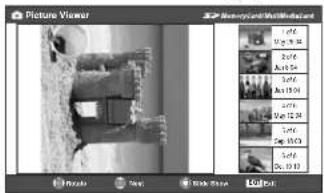
-
Press ▲ or ▼ to select another picture as the large picture.
-
Press ENTER to view your pictures in a slide show.

natural_image
Black-and-white photo of a castle with a ball resting on sandy shore (no text or symbols visible)During the slide show:
- To stop on an image during the slide show, press ENTER. To resume the slide show, press ENTER again.
• To rotate the picture, press ◀ or ▶, and then press ENTER.
• To select another image, press ▲ or ▼, and then press ENTER.
• To stop the slide show and return to the picture viewer, press CH RTN.
- To stop the slide show and return to the regular TV screen, press EXIT.
To set the slide show interval:
- Press EXIT to close the Picture Viewer (if it is open).
- Press MENU and open the Setup menu.
- Highlight Slide Show Interval and press ENTER.
- Select the interval from the menu sidebar (2, 5, 10, 15, or 20 seconds).
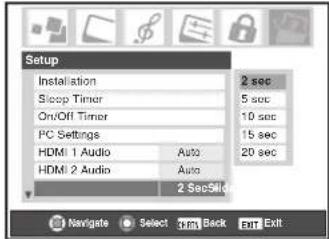
To close the Picture Viewer:
Press EXIT to close the Picture Viewer and return to the regular TV screen.
To restart the Picture Viewer while the memory card is still inserted:
- Press MENU and open the Applications menu.
- Highlight Picture Viewer and press ENTER.
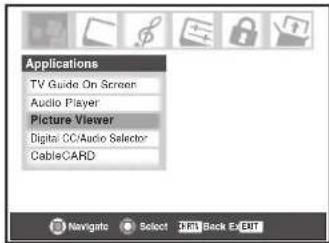
- Follow the steps under "Viewing JPEG files on the TV," above.
To close the Picture Viewer and remove the memory card:
- Press EXIT to close the Picture Viewer and return to the regular TV screen.

NOTE: ALWAYS CLOSE THE PICTURE VIEWER BEFORE REMOVING THE MEMORY CARD.
If you remove the memory card while viewing pictures, the card and/or saved data may be damaged. THIS TYPE OF DAMAGE IS NOT COVERED UNDER YOUR TOSHIBA WARRANTY.
- For a CompactFlash memory card, press the ejector button and then pull the card straight out from the TV. For all other memory cards, pull the card straight out from the TV.
Using the Audio Player
You can use the TV's Audio Player to listen to MP3 files on the TV.
Note:
- Make all desired adjustments to the TV's audio features (e.g., surround, bass, treble, balance) before starting the Audio Player.
- You cannot use the Picture Viewer and Audio Player at the same time.
- You must obtain any required permission from copyright owners to download or use copyrighted content. Toshiba cannot and does not grant such permission.
Accessing MP3 files stored on a networked PC
- Make sure you have correctly set up your home network and file sharing (see page 30 and Chapter 11).
- If a memory card is inserted in the TV, you must first close the Audio Player or Picture Viewer and then remove the memory card or you will not be able to view any networked MP3 files.

NOTE: ALWAYS CLOSE THE PICTURE VIEWER OR AUDIO PLAYER BEFORE REMOVING THE MEMORY CARD.
If you remove the memory card while viewing pictures or playing audio files, the card and/or saved data may be damaged. THIS TYPE OF DAMAGE IS NOT COVERED UNDER YOUR TOSHIBA WARRANTY.
To remove the memory card (if applicable):
a) Press EXIT to close the Audio Player, Picture Viewer, or any other application that may be running.
b) For a CompactFlash memory card, press the ejector button and then pull the card straight out from the TV.
For all other memory cards, pull the card straight out from the TV.
-
Press MENU and open the Applications menu.
-
Highlight Audio Player and press ENTER.
-
Go to "Playing MP3 audio files on the TV" on the next page.
Accessing MP3 files stored on a memory card
Note:
- Never insert more than one memory card at a time.
- Be sure to insert the card correctly—label side facing left and the end with the notched corner (if applicable) inserted into the memory card slot.
- When a CompactFlash memory card is inserted correctly, the ejector button will pop out (see page 102).
For a memory card that is already inserted in the TV:
- Press MENU and open the Applications menu.
- Highlight Audio Player and press ENTER.

- Go to "Playing MP3 audio files on the TV" on the next page.
For a memory card that contains both MP3 files and JPEG files when no memory card is inserted in the TV:
- Insert the memory card into the applicable memory card slot on the side of your TV (see page 102 for details).
- The Picture Viewer will start automatically (by default).
Press EXIT to close the Picture Viewer.
- Press MENU and open the Applications menu.
- Highlight Audio Player and press ENTER.
- Go to "Playing MP3 audio files on the TV" on the next page.
For a memory card that contains only MP3 files when no memory card is inserted in the TV:
- Insert the memory card into the applicable memory card slot on the side of your TV (see page 102 for details).
- Go to "Playing MP3 audio files on the TV" on the next page.
Using the Audio Player (continued)
Playing MP3 audio files on the TV
- After accessing your MP3 files from your memory card or networked PC (see previous page), the Audio Player will begin playing the first MP3 file in the list.
- Press ▲▼◀▶ to navigate to the rewind, pause, fast forward, skip backward, skip forward, volume, and mute buttons—or to select another MP3 file—and then press ENTER.
Note: After 30 seconds of inactivity, a screen saver will appear. To start the screen saver immediately, press any button on the remote control.
To use the mute function:
Press ▲▼ ◀▶ to select the ☐ (mute) button, and then press ENTER. See page 89 for details on muting the sound.
To start the MP3 audio player when a memory card is already inserted:
- Press MENU and open the Applications menu.
- Highlight Audio Player and press ENTER.
- Press ▲▼◀▶ to navigate to the rewind, pause, fast forward, skip backward, skip forward, volume, and mute buttons, and then press ENTER.
To close the Audio Player:
Press EXIT to close the audio player and return to the regular TV screen.
To close the Audio Player and remove the memory card:
- Press EXIT to close the audio player and return to the regular TV screen.

NOTE: ALWAYS CLOSE THE PICTURE VIEWER OR AUDIO PLAYER BEFORE REMOVING THE MEMORY CARD.
If you remove the memory card while viewing pictures or playing audio files, the card and/or saved data may be damaged. THIS TYPE OF DAMAGE IS NOT COVERED UNDER YOUR TOSHIBA WARRANTY.
- For a CompactFlash memory card, press the ejector button and then pull the card straight out from the TV.
For all other memory cards, pull the card straight out from the TV.
Memory card care and handling
- Use index labels made exclusively for your specific brand of memory card. Do not use commercially sold labels, which can cause a malfunction when the card is inserted or ejected.
- If the image does not appear correctly, or the audio file does not play correctly, clean the metallic area of the memory card using a soft, dry, lint-free, anti-static cloth and then reinsert the card.
- Prevent the metallic area on the memory card from coming in contact with dust, dirt, or other foreign particles. Do not touch the metallic area of the memory card with your hands or otherwise handle it with anything other than a soft, dry, lint-free, anti-static cloth.
Note: Toshiba is not liable for any damage caused by the use of any memory card with this TV. Toshiba will not compensate for any lost data or recordings caused by the use of such cards.
11 Using the THINC™ home network feature
The Toshiba Home Interactive Network Connection (THINC™) feature allows you to connect the TV to your home network, which will enable access to the following features:
- File sharing
You can access JPEG and MP3 files that are stored on your networked home PC and view/play them on the TV. Note: Requires a home network* (see page 30). Does NOT require Internet/e-mail service.
• E-mail scheduling of recordings and reminders
You can schedule recordings and reminders by sending an e-mail to the TV from any PC (personal computer). Note:
- Requires a compatible recording device (see chapter 2); a home network* (see page 30); and home Internet service with a dedicated POP3 e-mail address for the TV (different from your personal e-mail address). Contact your Internet Service Provider (ISP) to obtain and set up Internet/e-mail service.
- You will NOT be able to access or browse the Internet through the TV.
* The THINC ^TM home network feature is compatible only with Microsoft ^ Windows ^ 2000 and the Home and Professional versions of Microsoft ^ Windows ^ XP Service Pack 1 and Service Pack 2.
Follow the steps in sections A through D (below through page 111) to set up and use the TV's home network features.
A. Connect the TV to your home network
- Connect the TV to your home network via the TV's RJ45 port. See page 30 for connection instructions.
- If you want to use file sharing only and do not have Internet service in your home:
Skip to section B, "Set up the network address," at right.
Note: If you do not have Internet service, you will not be able to use the e-mail scheduling feature.
If you want to use file sharing and e-mail scheduling:
a) You must have Internet service in your home and a dedicated e-mail address for the TV (different from your personal e-mail address). Contact your ISP to obtain and set up Internet/e-mail service in your home.
b) After you have obtained Internet/e-mail service in your home (from your ISP), go to section B, "Set up the network address," at right.
For home network troubleshooting tips, see pages 122-123.
The unauthorized recording, use, distribution, or revision of television programs, videotapes, DVDs, and other materials is prohibited under the Copyright Laws of the United States and other countries, and may subject you to civil and criminal liability.
B. Set up the network address
To set up the network address:
- First, try automatically setting up the network address (below).
- If the automatic setup is not successful, you can either retry the automatic setup (below) or try manually setting up the network address (page 107).
Automatically setting up the network address
- Press MENU and open the Setup menu.
-
Highlight Installation and press ENTER. The Installation menu appears.
-
Open the Network menu.
-
Highlight Basic Network Setup and press ENTER.
Note: Like all new and emerging technology, router technology may from time to time cause compatibility issues because of the differences in router systems implemented by the various router manufacturers; however, most issues can be easily resolved. If you think you might have router compatibility problems with your Toshiba TV, please contact Toshiba Consumer Solutions by calling 1-800-631-3811 or visiting www.tacp.com/customersupport.contact.asp.
B. Set up the network address (continued)
- The message "Obtain network address automatically?" will display. Highlight Yes and press ENTER.
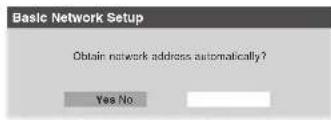
- The message "Please wait..." will display while the TV is attempting to load the network address information from the DHCP server.

If the automatic network address setup is successful, go to step 7.
If the automatic network address setup is not successful, go to step 8.
- If the automatic network address setup is successful, the following screen will appear:
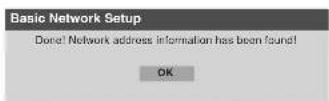
a) Press ENTER to close the screen and return to the Network menu.
b) Skip to section C, "Set up file sharing on your PC," on page 110.
- If the automatic network address setup is not successful, the following screen will appear:
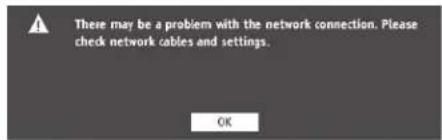
a) Make sure all cables for your home network are securely connected.
b) Make sure your home network is set up properly. See page 30 for TV connection information. Also consult the owner's manuals for your other components.
c) Make sure the DHCP and security settings on your home router are correct. Consult the owner's manual for your router.
d) Retry the automatic network address setup by following these steps:
(1) Highlight OK and press ENTER.
(2) Repeat steps 1–6. (If you have already repeated this setup process, go to step 9.)
- If, after repeating steps 1–6, you receive the error message shown in step 8:
Either...
a) Highlight "OK" and press ENTER.
b) Go to "Manually setting up the network address" on page 108.
Or...
a) Highlight "OK" and press ENTER.
b) Continue to sections C, D, and E on pages 110–112 (to set up and use file sharing) and/or to sections F and G on pages 113 (to set up and use e-mail scheduling).
If the file sharing and/or e-mail scheduling features work correctly, then the automatic network address setup was successful (even though the TV displayed the error message).
If the file sharing and/or e-mail scheduling features do not work correctly, go to "Manually setting up the network address" on page 108.
Manually setting up the network address
- This setup requires the data listed below. You can get this data from either your ISP or the configuration utility for your DSL/cable modem or router.
IP address:
Subnet mask:
Gateway (Router) address:
DNS (Domain Name Server) address: - Press MENU and open the Setup menu.
- Highlight Installation and press ENTER. The Installation menu appears.
- Open the Network menu.
- Highlight Basic Network Setup and press ENTER.
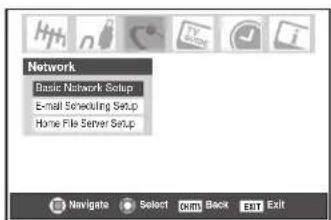
(Continued on next page)
B. Set up the network address (continued)
Manually setting up the network address (continued)
- The message "Obtain network address automatically?" appears.
Highlight No and press ENTER.
- The Basic Network Setup menu appears.
Press ▲ or ▼ to highlight the IP address field, and then use the Number buttons on the remote control to input the IP address.
- Press ▼ to highlight the Subnet Mask field, and then use the Number buttons to input the Subnet Mask.
- Press ▼ to highlight the Gateway (Router) field, and then use the Number buttons to input the Gateway (Router) address.
- Press ▼ to highlight the DNS (Domain Name Server) field, and then use the Number buttons to input the DNS address.
- When finished, highlight Done and press ENTER. The Basic Network Setup menu closes and the Network menu appears.
- Go to section C, "Set up file sharing on your PC," on page 109.
Note:
- If you used an Ethernet crossover cable to connect your PC directly to the TV, you will not be able to use the automatic setup. You will have to manually set up the network address.
- If you used a hub or switch to connect the TV to your home network, you will not be able to use the automatic setup. You will have to manually set up the network address.
- If you used a router with built-in DHCP functionality, use the automatic setup. Manual setup may not work.
Resetting the network address
- Press MENU and open the Setup menu.
- Highlight Installation and press ENTER. The Installation menu appears.
- Open the Network menu.
- Highlight Basic Network Setup and press ENTER.
- The message "Your Basic Network Setup is complete. Would you like to start over?" will appear.
To continue, highlight Yes and press ENTER.
To return to the Network menu, highlight No and press ENTER.

- If you selected Yes in step 5, the message "Obtain network address automatically?" will appear.
To obtain the network address automatically, go to step 5 under “Automatically setting up the network address” on page 106.
To manually enter the network address, go to step 6 under "Manually setting up the network address" at left.
For home network troubleshooting tips, see pages 122-123.
C. Set up file sharing on your PC
Compatible operating systems
The following operating systems are compatible for file sharing with the TV:
- Microsoft ^ Windows ^ XP Service Pack 2 (Home Edition and Professional) [Setup details at right]
- Microsoft ^ Windows ^ XP Service Pack 1 (Home Edition and Professional) [Setup details at right]
- Microsoft ^ Windows ^ 2000 [Setup details on next page] No other operating systems are compatible with the TV.
Note:
• The name of any directory/folder on your PC that you are setting up for file sharing with the TV can have a maximum of 12 characters and cannot contain any special characters.
- See "Media specifications" on page is 100-101 for details on compatible JPEG and MP3 files.
To determine which operating system and service pack (if applicable) are on your PC:
- On your PC, click the "Start" button.
- Click "Settings | Control Panel."
- In the Control Panel, double-click "System."
- Select the "General" tab, which will display your PC's current operating system and service pack.
Setting up file sharing on a PC with Microsoft® Windows® XP Service Pack 1 or Service Pack 2
- On your PC:
- In the Properties window for the selected folder:
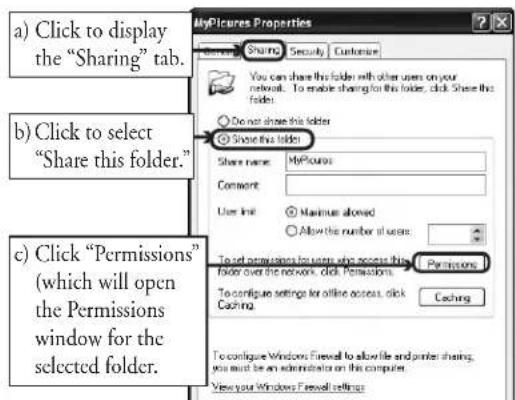
Note: If the "Sharing" tab on your specific PC looks like the one illustrated below (with no "Permissions" button), follow the steps below. When you click "OK," you are finished setting up file sharing on your PC and can proceed to section D.
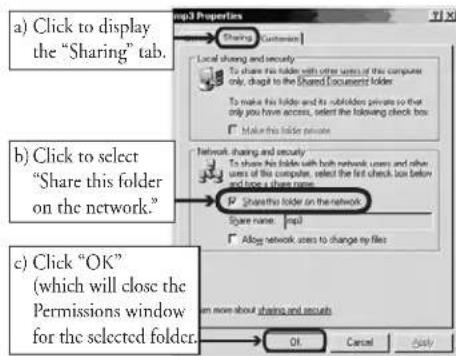
- In the Permissions window for the selected folder:
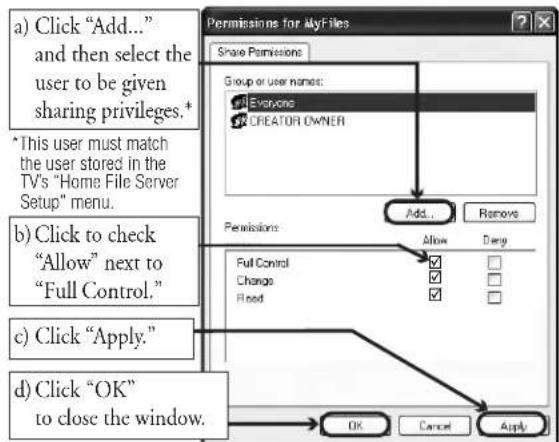
- Go to section D, "Set up file sharing on the TV."
C. Set up file sharing on your PC (continued)
Setting up file sharing on a PC with Microsoft® Windows® 2000
1. On your PC:

2. In the Properties window for the selected folder:
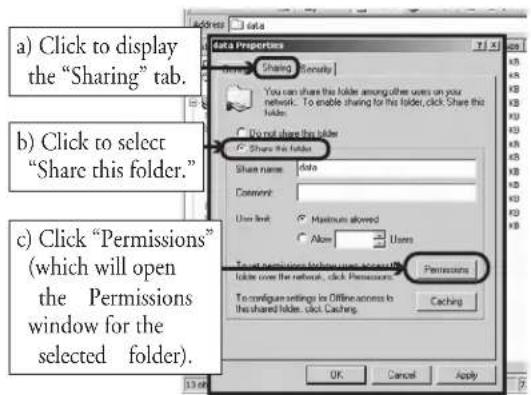
3. In the Permissions window for the selected folder:

4. In the Properties window:
5. The shared folder will display with a "shared folder" icon (a hand holding a folder).
6. Go to section D, "Set up file sharing on the TV" on page 111.
For home network troubleshooting tips, see pages 122-123.
D. Set up file sharing on the TV
- Press MENU and open the Setup menu.
- Highlight Installation and press ENTER. The Installation menu will appear.
Open the Network menu.
- Highlight Home File Server Setup and press ENTER. The Home File Server Setup window will appear.
After a few moments, the message "Please Wait..." will appear until the network finds your networked PC.
The networked PC will act as the "Home Server" for file sharing with the TV.
- Press ▲▼ to highlight Home Server Name, and then press ◀▶ to select the name of the PC you set up for file sharing.
If you have multiple PCs on your home network that have shared folders, press ◀▶ to select the PC (home server) from which you want to access files.
- a. Press ▲▼ to highlight User Name and then press ENTER to open the on-screen keyboard for that field.
b. Enter the User Name for your PC using the on-screen keyboard. See "Using the on-screen keyboards," at right.
Note: The User Name is case sensitive.
c. When finished entering all characters, highlight Done and press ENTER.
- Repeat step 5 for the Password field.
Note: The Password is case sensitive.
- Press ▲▼ to highlight either JPEG Picture Directory or MP3 Music Directory.
Note: The first time you highlight either of these fields, the message "Please Wait..." will appear on-screen until the field is populated with the files in your PC's shared folder(s).
- Press ◀▶ to select the shared folder (on your PC) that contains the JPEG and/or MP3 files you want to view/play on the TV.
Note: Make sure you select the correct folder in this step.
- To exit the window and save your settings, highlight Done and press ENTER.
To exit the window without saving your settings, highlight Cancel and press ENTER.
E. Viewing/playing shared files on the TV
See Chapter 10, "Using the Picture Viewer and Audio Player," for details on viewing/playing your shared JPEG and MP3 files on the TV.
USING THE ON-SCREEN KEYBOARD
a. Press ▲▼◀▶ to highlight the desired letter, number, or character, and then press ENTER.
b. Repeat step "a" until you have finished entering all characters for the selected field.
Note:
• To toggle between uppercase and lowercase letters and between numbers and symbols, highlight Shift and press ENTER.
• To erase the last entered character, highlight BS (backspace) and press ENTER.
• To clear your entered characters, highlight Clear and press ENTER.
c. When you are finished entering all characters for the selected field, highlight Done and press ENTER.
You will return to the previous Setup window.
![XXXXXX.XX 1 2 3 4 5 6 7 B B D - C W G R I Y U I a p [ ] a s d f g h j k l : / z x c v b e m , / Shift BS Done Clear Cancel](/content/2026/06/1198777/images/deca626df04a6398e1bf884a57bd6744a2eabcea056aa569e90dec7ef473b730.jpg)
F. Set up e-mail scheduling
You can remotely schedule and delete recordings and reminders via e-mail to the TV from any PC.
Note:
- If you have not already done so, follow the instructions in sections A and B, pages 106–108, before proceeding.
- Before you can schedule recordings, the time and date in the TV Guide On Screen feature must be set. See "Setting the time and date" on page 55.
Required information and services
Before you can set up the e-mail scheduling feature, you must have the following information and related services:
a) A valid POP3 e-mail address dedicated for use by the TV only.
Note: The e-mail address assigned to the TV must be a dedicated POP3 address, different from your personal e-mail address. Assigning your personal e-mail address to the TV will eventually lead to the deletion of all of your personal e-mails (including attachments). This is NOT covered under the Toshiba warranty.
b) A personal e-mail address (different from the TV's dedicated e-mail address) from which you can send e-mails to the TV.
c) Login and password settings for the TV's POP3 e-mail account.
d) Name or IP address of the incoming (POP3) mail server.
e) Name or IP address of the outgoing (SMTP) mail server.
To obtain the required e-mail services listed above, contact your ISP.
To obtain the required addresses and settings listed above, either contact your ISP or use the configuration utility for your DSL/cable modem or router.
Note:
•Toshiba is not responsible for any damage or loss caused directly or indirectly by the failure of the e-mail scheduling feature to record content intended to be recorded.
- Toshiba is not responsible for, nor has any control over, any content recorded and/or viewed using the e-mail scheduling feature. Further, the e-mail scheduling feature is not meant to be used for unauthorized recording and/or viewing of copyrighted works.
•The unauthorized recording, use, distribution, or revision of television programs, videotapes, DVDs, and other materials is prohibited under the Copyright Laws of the United States and other countries, and may subject you to civil and criminal liability.
For home network troubleshooting tips, see pages 122-123.
Setting up e-mail scheduling
- Press MENU and open the Setup menu.
- Highlight Installation and press ENTER. The Installation menu appears.
- Open the Network menu.
- Highlight E-mail Scheduling Setup and press ENTER. The E-mail Scheduling Setup window opens.
| E-mail Scheduling Setup | |
| Please enter your E-mail Setup Information | |
| E-mail Scheduling | On |
| ID Required | On |
| ID | XXXXXXXXXX |
| E-mail Address | |
| Account | |
| Password | |
| Incoming Mail Server | |
| Outgoing Mail Server | |
| E-mail Authorization | On |
| Authorized E-mail | Enter YOUR E-mail here |
| Test cancel | Done |
- Enter the required data in the fields.
See "Description of fields in the E-mail Scheduling Setup window" on page 114 for details on the settings for these fields.
- For the fields listed below, press ▲ or ▼ to highlight the field, and then press ◀ or ▶ to select On or Off:
- E-mail Scheduling
- ID Required
- E-mail Authorization
- For the fields listed below, press ▲ or ▼ to highlight the
field, press ENTER to open the keyboard window for the selected field, and then enter the required information using the on-screen keyboard:
- ID
- E-mail Address
- Account
- Password
- Incoming Mail Server
- Outgoing Mail Server
- Authorized E-mail
See "USING THE ON-SCREEN KEYBOARD" on page 111 for instructions on entering data in the fields using the on-screen keyboard.
![E-mail Address XXXX@XXXXXX.XX 1 2 3 4 5 6 7 8 9 0 - = w: c = t y u i d p [ ] a s d f g h | k l : : z x c v b n m - / Shift BS Done Clear Cancel](/content/2026/06/1198777/images/b124ef57d1d1571cefff4f1e60a08084d64fb27fc729fc64d5bdc9d5495fb8ec.jpg)
F. Set up e-mail scheduling (continued)
- When you are finished entering all characters for the selected field, highlight Done and press ENTER.
You will return to the E-mail Scheduling Setup window.
| E-mail Scheduling Setup | ||
| Please enter your E-mail Setup Information. | ||
| E-mail Scheduling | On | |
| ID Required | On | |
| ID | XXXXXXXXXXXXX | |
| E-mail Address | ||
| Account | ||
| Password | ||
| Incoming Mail Server | ||
| Outgoing Mail Server | ||
| E-mail Authorization | On | |
| Authorized E-mail | Enter YOUR E-mail here | |
| Test | cancel | Done |
- Highlight Test and press ENTER to test the e-mail setup.
During testing, the TV will display the message "Testing E-mail."
Note: Depending on your configuration, the e-mail test can take several minutes. Do not press EXIT during this time.
- When testing is finished, a message will appear indicating whether the e-mail test passed or not.
If the e-mail test passes:
a. The "Test Passes" message (shown at right) will appear.
b. Go to step 9.
For additional home network troubleshooting tips, see pages 122–124.
If the e-mail test does not pass:
a. An error message and code will appear on-screen (similar to the example at right).
Note: The first number in the error code denotes an error that occurs when the TV is receiving an e-mail;
the second number denotes an error that occurs when the TV is sending an e-mail.
b. Locate the error code in the “TESTING E-MAIL” ERROR CODES” table (below) and try the solutions.
c. Repeat steps 1–8.
- To exit the E-mail Scheduling Setup window and save your settings, highlight Done and press ENTER.
To exit the E-mail Scheduling Setup window without saving your settings, highlight Cancel and press ENTER.
(Continued on next page)
IMPORTANT NOTE
To use e-mail scheduling, you must first set up the TV Guide On Screen ^® system. E-mail scheduling will not be available unless the TV Guide On Screen ^® system is fully operational. See Chapter 5 for details on setting up the TV Guide On Screen system.
If you experience any issues with e-mail scheduling, please contact Toshiba Consumer Solutions by calling 1-800-631-3811 or by visiting http://www.tacp.com/customersupport/contact.asp.
"TESTING E-MAIL" ERROR CODES
| Code Description Solutions | |
| -1 | The TV was able to connect to the e-mail server(s) but not log on.· If you receive the message “Error Sending Mail (-1),” the TV may not have received the test e-mail. Send another test e-mail to the TV using the "HELP request e-mail" format (see page 118).· Make sure the TV Guide On Screen ^3 system was set up properly. See “IMPORTANT NOTE,” above.· Make sure you entered the correct information for the following fields in the TV’s “E-mail Scheduling Setup” window (confirm this information with your ISP):- “Incoming Mail Server” and “Outgoing Mail Server” names (or IP addresses).- “Account” (user name) and “Password” for the TV’s e-mail account.- “E-mail Address” for the TV.· Check with your ISP to make sure your TV’s e-mail account has been activated.· Check with your ISP to make sure their servers support POP3 and SMTP protocols without secure password authentication or secure connections. |
| 27 | The TV could not resolve the e-mail server name(s)/address(es). window (confirm this information with your ISP):- “Incoming Mail Server” and “Outgoing Mail Server” names (or IP addresses).- “IP,” “Netmask,” “Gateway,” and “DNS” settings (applicable if you manually set up the network address).· Make sure all cables are connected properly and securely.· Check your router hardware/settings to make sure your Internet service is currently available (especially if the e-mail test takes several minutes to complete). |
| 30 | The e-mail server name(s)/address(es) were resolved but the TV could not connect to the server(s).· Make sure you entered the correct information for the following fields in the TV’s “E-mail Scheduling Setup” window (confirm this information with your ISP):- “Incoming Mail Server” and “Outgoing Mail Server” names (or IP addresses).- “IP,” “Netmask,” “Gateway,” and “DNS” settings (applicable if you manually set up the network address).· Make sure all cables are connected properly and securely.· Check your router hardware/settings to make sure your Internet service is currently available. |
F. Set up e-mail scheduling (continued)
Description of fields in the "E-mail Scheduling Setup" window
For instructions on entering data in these fields, see step 5 under "Setting up e-mail scheduling" on page 112.
■ "E-mail Scheduling" field
You can select On or Off for the "E-mail Scheduling" field.
- When this field is set to On, it will be possible for the TV to receive e-mails from any PC to remotely schedule and modify recordings and reminders.
- When this field is set to Off, it will not be possible for the TV to receive any e-mail, the other fields in this window will be disabled ("grayed out"), and it will not be possible to remotely schedule recordings or reminders via e-mail.
Also see the "Security settings" table, below.
■“ID Required” field
You can select On or Off for the "ID Required" field.
- When this field is set to On (recommended), you must include the ID that you enter in the "ID" field in all e-mails you send to the TV. This is a security feature to protect your TV from unauthorized e-mail access.
- When this field is set to Off, you do not need to include the ID in e-mails you send to the TV.
Also see the "Security settings" table, below.
■ "ID" field
Use the on-screen keyboard to enter six to 16 numbers and/or letters to create your ID (spaces and punctuation are not allowed).
Also see the "Security settings" table, below.
Note: To help protect your privacy, you may want to choose an ID that is different from any of your usual passwords or security PINs (e.g., different from your personal e-mail password, banking login code, social security number, etc.).
■ "E-mail Address" field
Use the on-screen keyboard to enter the TV's dedicated e-mail address (different from your personal e-mail address). You will send e-mails to this address to add, modify, or delete schedules and reminders.
| Security settings(Results of various setting combinations when the “E-mail Scheduling” field is set to ON in the “E-mail Scheduling Setup” window) | ||||||
| Level of Scheduling Authority security field field | “E-mail “E-mail “Authorization” E-mail” field | “ID Required” “ID” Result field | field | |||
| High*[default settings](recommended) | ON | ON | Enter single E-mail address | ON | Enter ID | The TV will only accept e-mails from the one e-mail address specified in the “Authorized E-mail” field that also include the “ID” in the body of the e-mail. All other e-mails received by the TV (except GET and HELP commands) will be deleted. |
| Medium | ON | ON | Enter single E-mail address | OFF | - | The TV will only accept e-mails from the one e-mail address specified in the “Authorized E-mail” field. All other e-mails received by the TV will be deleted. |
| Low | ON | OFF | - | ON | Enter ID | The TV will accept e-mails from any e-mail address that includes the “ID” in the body of the e-mail. All other e-mails received by the TV will be deleted. |
| None(Not recommended) | ON | OFF | - | OFF | - | The TV will accept e-mails from any e-mail address (including unwanted e-mails, such as spam) and will reply to those e-mails with a failure acknowledgment. |
*The "High" settings are the default settings. To help prevent the TV from receiving or sending unwanted e-mails (including e-mails that contain information about the programs the TV is set to record), it is recommended that you not change these settings unless you need to diagnose a problem or deal with a unique user situation.
F. Set up e-mail scheduling (continued)
Description of fields in the "E-mail Scheduling Setup" window (continued)
■ "Account" field
Use the on-screen keyboard to enter the TV's e-mail account login. Depending on your ISP, this may be the entire e-mail address or just the characters in the e-mail address before the "@" sign.
■ "Password" field
Use the on-screen keyboard to enter the password for the TV's e-mail account.
Note: To help protect your other personal Internet or e-mail accounts, create a password that is significantly different from any of your usual passwords and security PINs (e.g., different from your e-mail password, banking log-ons, social security code etc.).
■ "Incoming Mail Server" field
Use the on-screen keyboard to enter the incoming (POP3) mail server that hosts the TV's e-mail account.
Note: The TV does not support encrypted e-mail.
■ "Outgoing Mail Server" field
Use the on-screen keyboard to enter the outgoing (SMTP) mail server associated with the TV's e-mail account. (The TV will use this server for sending reply e-mails to your personal e-mail account.)
■ "E-mail Authorization" field
You can select On or Off for the "E-mail Authorization" field.
- When this field is set to On (recommended), the TV will only accept e-mails from the e-mail address you specify in the “Authorized E-mail” field (e.g., your personal e-mail address). The TV will delete any e-mails not sent from this authorized e-mail address.
This is a security feature to protect the TV from unauthorized e-mail access and from replying to unwanted e-mail, such as spam.
- When this field is set to Off, it will be possible for the TV to accept e-mails from any e-mail address (depending on the other settings in the “E-mail Scheduling Setup” window).
Also see the "Security settings" table on page 114.
■ "Authorized E-mail" field
Enter the single e-mail address that is authorized to send e-mails to the TV (e.g., your personal e-mail address).
- To enable this field, you must set the "E-mail Authorization" field to On.
- This field can be left blank if you have the "E-mail Authorization" field set to Off.
Also see the "Security settings" table on page 114.
For home network troubleshooting tips, see pages 122-123.
G. Using e-mail scheduling
You can use the e-mail scheduling feature to schedule and delete recordings and reminders by sending an e-mail to the TV's e-mail address from any PC.
The four commands the TV will accept are ADD, DELETE, GET, and HELP, as described in this section.
If you have not already done so, follow the instructions in sections A and B, pages 106–108, and in section F, pages 112–115, before proceeding.
When a recording is scheduled via e-mail, the recording device used will be the first of the following attached devices found by the network (in this order):
1) an AVHD recorder connected via IEEE1394
2) a D-VHS recorder connected via IEEE1394
3) a VCR connected via the analog RECORD OUT (VIDEO OUT) terminal.
E-mail parameters
- The maximum allowable e-mail size is 16 KB. E-mails over 16 KB will be automatically deleted.
- E-mails sent to the TV cannot contain any attachments. The TV will automatically delete any e-mail with an attached file.
- E-mails can be formatted either Plain Text or Rich Text Format (HTML style).
- E-mails sent to the TV that are not properly formatted, are from the wrong e-mail address, or have the wrong ID (if specified) will be deleted.
- All e-mails sent to the TV will eventually be deleted.
Note:
• Toshiba is not responsible for any damage or loss caused directly or indirectly by the failure of the e-mail scheduling feature to record content intended to be recorded.
- Toshiba is not responsible for, nor has any control over, any content recorded and/or viewed using the e-mail scheduling feature. Further, the e-mail scheduling feature is not meant to be used for unauthorized recording and/or viewing of copyrighted works.
•The unauthorized recording, use, distribution, or revision of television programs, videotapes, DVDs, and other materials is prohibited under the Copyright Laws of the United States and other countries, and may subject you to civil and criminal liability.
Sending a request e-mail to the TV
To send a request e-mail to the TV:
- Format the e-mail following according to the instructions under "Formatting a request e-mail" below.
- Send the e-mail to the TV.
- After the TV receives and processes the e-mail, the TV will send a reply e-mail indicating whether the e-mailed request succeeded or failed. See "Receiving an e-mail from the TV," on page 118.
Formatting a request e-mail
Recognized tags
When you send an ADD, DELETE, GET, or HELP request e-mail to the TV, the TV will recognize only the tags listed below. These tags (and their accompanying data) must be listed in the body of the request e-mail in the following order:
ID* Your ID (required only if you set the "ID Required" field to On*)
COMMAND ADD-or-DELETE-or-GET-or-HELP
INPUT ANT-1-or-ANT-2-or-CABLE BOX
CHANNEL Channel number of the recording or reminder
DATE Date of the recording or reminder
START TIME Start time of the recording or reminder
DURATION Length of time of the recording or reminder
TYPE RECORD-or-REMIND
Tag and data formats
The data for each tag can be formatted in various ways, as described in the following table
Tag formats Data formats
| ID* [6- to 16-character alphanumeric code] | |
| MyID1234 ... MYID1234 ... myid1234 | |
| COMMAND ADD | |
| CMD DELETE ... DEL | |
| GET | |
| HELP | |
| INPUT ANT1 ... ANT-1 ... Antenna-1 | |
| INP ANT2 ... ANT-2 ... Antenna-2 | |
| CABLE BOX ... cablebox ... CB | |
| SET-TOP BOX ... settopbox ... STB | |
| CHANNEL For cable channels: 4 ... 38 ... 100 | |
| CH | For digital channels, use a hyphen: 5-1 ... 102-2 |
| DATE | [If the year is not specified, the current year is assumed.] |
| 7-4 ... 7/23 ... 7-16-05 ... 12/4/05 ... 12/19/2005 | |
| START TIME | 8am ... 4:45pm ... 8:30AM ... 9PM |
| START | Noon: 12:00pm ... Midnight: 12:00am |
| DURATION | 15m ... 15min ... 15minutes ... 2h ... 2hr ... |
| DUR | 2h15m ... 2hr15min ... 2:15 |
| TYPE | RECORD ... REC ... Rec ... recording |
| REMIND ... REM ... Rem ... reminder | |
G. Using e-mail scheduling (continued)
Formatting a request e-mail (continued)
Sample request e-mails
• The examples shown below are for illustration purposes only.
- Styles applied to the sample e-mail text (such as bold, italic, and underline) are for illustration purposes only. The text you use in your request e-mails does not need to be styled.
- The text is not case sensitive (except for the ID). You can type in uppercase and/or lowercase letters.
■ ADD request e-mail
The ADD request allows you to schedule a new recording or reminder.
The required tags for an ADD request e-mail are (in this order):
ID [This tag is not required if the "ID Required" field is set to Off] COMMAND ADD
INPUT
CHANNEL
DATE
START TIME
DURATION
TYPE
Sample ADD request e-mail to schedule a new recording:
Sample ADD request e-mail to schedule a new reminder:
To: [TV's email address]
Subject: [this can be left blank]
ID MYID1234*
COMMAND ADD
INPUT ANT-1
CHANNEL 102-1
DATE 06/10/2005
START TIME 7 PM
DURATION 2H15M
TYPE RECORD
To: [TV's email address]
Subject: [this can be left blank]
id myid1234*
cmd add
input cb
ch 4
date 7-4
start 8:30pm
dur 1hr
type rem
■ GET request e-mail
When you send a GET request e-mail to the TV, you will receive a reply e-mail that lists all currently scheduled recordings and/or reminders.
The only required tag for a GET request e-mail is GET.
Sample GET request e-mail:
To: [TV's email address]
Subject: [this can be blank]
GET
■ DELETE request e-mail
The DELETE request allows you to cancel an existing scheduled recording or reminder.
The required tags for a DELETE request e-mail are (in this order):
ID [This tag is not required if the "ID Required" field is set to Off] COMMAND DELETE
INPUT
CHANNEL
DATE
START TIME
DURATION
TYPE
Sample DELETE request e-mail to delete an existing recording:
Sample DELETE request e-mail to delete an existing reminder:
To: [TV's email address]
Subject: [this can be left blank]
ID MYID1234*
COMMAND DELETE
INPUT ANT-1
CHANNEL 102-1
DATE 06/10/2005
START TIME 7 PM
DURATION 2H15M
TYPE RECORD
To: [TV's email address]
Subject: [this can be left blank]
id myid1234*
cmd del
input cb
ch 4
date 7-4
start 8:30pm
dur 1hr
type rem
■ HELP request e-mail
When you send a HELP request e-mail to the TV, you will receive a reply e-mail that contains helpful information about formatting a request e-mail (syntax, definition of the various commands, etc.).
The only required tag for a HELP request e-mail is HELP.
Sample HELP request e-mail:
To: [TV's email address]
Subject: [this can be blank]
HELP
G. Using e-mail scheduling (continued)
Receiving an e-mail from the TV
If the e-mailed request was successful, the reply e-mail from the TV will contain one of the following (or similar) messages, depending on the command you sent to the 'TV:
- ADD SUCCESS
- DELETE SUCCESS
- GET SUCCESS
- HELP SUCCESS
If the e-mailed request was not successful, the reply e-mail from the TV will contain one of the following (or similar) messages, depending on the command you sent to the TV:
• FAILED – SCHEDULE CONFLICT
The new recording or reminder you attempted to schedule conflicts with an existing one that was previously scheduled.
If you want to schedule the new recording or reminder, you will have to DELETE the existing one first, and then ADD the new one.
- FAILED – COULD NOT UNDERSTAND "Line x"
The e-mailed request has an error in the line of text referenced in the error message. Correct the text and send the e-mail.
- FAILED – NO DEVICE AVAILABLE
Make sure you have a recording device connected to the TV and that all cables are properly connected.
- FAILED – MISC ERROR
Make sure all devices and cables are properly connected and that the text in the body of your e-mail is correct, and then send the corrected e-mail to the TV.
Modifying an existing recording or reminder
If you want to modify an existing scheduled recording or reminder.
- Send a DELETE request e-mail to cancel the existing recording or reminder.
- Send an ADD request e-mail to schedule the modified recording or reminder.
For home network troubleshooting tips, see pages 122-123.
12 Troubleshooting
General troubleshooting
Before calling a service technician, please check the following table for a possible cause of the symptom and some solutions you can try.
TV will not turn on
- Make sure the power cord is plugged in, and then press POWER.
- The remote control batteries may be dead. Replace the batteries or try the control panel buttons.
- If you have recently replaced the lamp unit, make sure the lamp unit and lamp unit door are installed properly (pages 128–130).
- The lamp unit may need to be replaced (pages 128–130). Also see "LED indications" on page 124.
- It may take several minutes for the picture to appear on-screen if the TV is powered off and then on again quickly when the lamp unit is hot. This is a property of DLP TV lamp technology and is NOT a sign of malfunction. For details, see “IMPORTANT NOTICE ABOUT HOT LAMP RESTART” on page 5.
Picture problems
General picture problems
- Check the antenna/cable connections (Chapter 2).
- Press INPUT on the remote control or TV/VIDEO on the TV control panel and select a valid video input source (page 72). If no device is connected to any of the inputs on the TV, no picture will display when you select that particular input source. For device connection details, see Chapter 2.
- Antenna reception may be poor. Use a highly directional outdoor antenna (if applicable).
• The station may have broadcast difficulties. Try another channel. - Adjust the picture qualities (page 84).
- If you are using a VCR, make sure the TV/VCR button on the remote control is set correctly (page 32).
- If you have two VCRs connected to your TV, do not connect the same VCR to the TV's output and input connections at the same time (page 20).
- Do not connect a standard video cable and an S-video cable to VIDEO-1 or VIDEO-2 on the TV back (or VIDEO-3 on the TV side) at the same time (Chapter 2).
Noisy picture
- If you are watching a tuned analog channel (off-air broadcast or Cable TV), set the CableClear®/DNR feature to AUTO to reduce visible interference in the TV picture (page 85).
Video Input Selection problems
- If the Input Selection window does not appear when you press INPUT on the remote control or TV/VIDEO on the TV control panel, press INPUT or TV/VIDEO a second time, which will change to the next video input source and display the Input Selection window.
Cannot view external signals or channel 3 or 4
- If you cannot view signals from external devices connected to VIDEO 1, VIDEO 2, VIDEO 3, or ColorStream, ^ or from channels 3 or 4, make sure the Input Lock is set to Off (page 97).
Black box on screen
- Set the Closed Caption feature to Off (page 87).
Poor color or no color
- The station may have broadcast difficulties. Try another channel.
- Adjust the Tint and/or Color (page 84).
- When the ColorStream ^ signal source is active, the VIDEO OUT terminal outputs blank video. To receive video from the VIDEO OUT signal, a standard video or S-video IN terminal must be used instead of the ColorStream ^ connections.
POP problems
- The VIDEO OUT terminal will not output the POP picture (pages 20 and 81).
- If you label all of the inputs as "Hide," the POP feature will be disabled. If you then attempt to access the POP feature, the message "NOT AVAILABLE" will appear on-screen (page 81).
Picture brightness changes soon after turning on TV
- If you set the lamp mode to Low Power, each time you turn on the TV, the lamp will start out in High Bright mode but will switch to Low Power mode in approximately 1 minute. You will notice a change in screen brightness when this happens. This is normal and is not a sign of malfunction. (See page 80.)
Poor composite or S-video picture
- If the TV is connected to an external A/V device (e.g., DVD player, video game system, set-top box, etc.) always try to use the ColorStream video jacks (and corresponding audio jacks) or the HDMI input (if available) for connection to such external A/V device. This will reduce the amount of video processing to be performed by the television.
General troubleshooting (continued)
Picture problems (continued)
Picture and sound are out of sync
- As with all products that contain a digital display, in rare instances, when viewing certain content (e.g., television broadcasts, video games, DVD), you may notice that the sound and picture are slightly out of sync. This phenomenon can be caused by various factors including, without limitation, video processing within the TV, video processing in an attached gaming system, and video processing/different compression rates used by broadcasters in their programming. You may want to try one or more of the following suggestions, which may help to reduce the effect of this phenomenon:
- If the TV is connected to an A/V receiver that has a programmable audio delay feature, use this feature to help synchronize the sound to the picture.
- If you notice this phenomenon only on certain TV channels, please contact your local broadcast, cable, or satellite provider to inform them of this issue.
"Now Booting" message appears on-screen
- If you unplug the power cord, when you plug the power cord in again the message "Now Booting..." will displayed on the screen until the picture appears or the yellow LED will blink until the TV enters standby mode. This is normal and is not a sign of malfunction.
Sound problems
- Check the antenna/cable connections (see Chapter 2).
- The station may have broadcast difficulties. Try another channel.
• The sound may be muted. Press VOLUME. - If you hear no sound, try setting the MTS feature to stereo mode (page 89).
- Make sure the Speakers function in the Audio Setup menu is set correctly (page 92).
- If you are not receiving a second audio program from a known SAP source, make sure the MTS feature is set to SAP mode (page 89).
- If you hear audio that seems “incorrect” for the program you are watching (such as music or a foreign language), the SAP mode may be on. Set the MTS feature to stereo mode [page 89].
- When using an external audio amplifier, if you connect the amplifier to the VAR. AUDIO OUT terminals, the volume of the TV and amplifier must be set above 0 or you will not hear any sound (page 24).
Remote control problems
- Make sure the remote control is set to the correct device mode (page 33).
- Remove all obstructions between the remote control and the TV.
- The remote control batteries may be dead. Replace the batteries (page 33).
- Your TV remote control may not operate certain features on your external device. Refer to the owner's manual for your other device to determine its available features. If your TV remote control does not operate a specific feature on another device, use the remote control that came with the device (page 33).
- If the TV still does not act as expected, use the Restore Factory Defaults procedure as described on page 57.
Channel tuning problems
- Make sure the remote control is set to the correct device mode (page 33).
- The channel may have been erased from the channel memory by the Channel Add/Delete feature. Add the channel to the channel memory (page 48).
- The channel may be blocked by the Channels Block feature. Unblock the channel (page 97).
- If you are unable to tune digital channels, check the antenna configuration (page 46). If you are still unable to tune digital channels, clear all channels from the channel list (page 48) and reprogram channels into the channel memory (page 47). If you are still unable to tune digital channels, use the Restore Factory Defaults procedure as described on page 57. Also see “TV stops responding to controls” and “Other problems” on the next page.
Closed caption problems
- If the program or video you selected is not closed-captioned, no captions will display on-screen (page 87).
- If text is not available, a black rectangle may appear on-screen. If this happens, turn off the closed caption feature (page 87).
- A closed caption signal may not display correctly in the following situations: a) when a videotape has been dubbed; b) when the signal reception is weak; or c) when the signal reception is nonstandard (page 87).
Rating blocking (V-Chip) problems
- If you forget your PIN code: While the PIN code entering screen is displayed, press RECALL four times within 5 seconds. The PIN code you previously stored will be cleared (page 96).
- The V-Chip feature is available for the U.S. V-Chip system only (page 97).
General troubleshooting (continued)
TV stops responding to controls
- If the TV stops responding to the controls on the remote control or TV control panel and you cannot turn off the TV, press and hold the POWER button on the TV control panel for 5 or more seconds to reset the TV.
Other problems
- If your TV's problem is not addressed in this Troubleshooting section or the recommended solution has not worked, use the Restore Factory Defaults procedure as described on page 57.
Recording problems
- If you use the TV's remote control to start recording, you will not be able to change inputs (page 72), open the POP window (page 81), or open the FAV SCAN multi-window (page 83). If you attempt to do so, the message "Not Available While Recording" will appear on-screen.
- If you are recording a digital channel, you will only be able to change analog channels while the recording is in progress. If you are recording an analog channel, you will only be able to change digital channels while the recording is in progress. This is because the TV tuner that is being recorded (digital or analog) will be locked on the channel that is currently recording.
- It is recommended that you use the TV's remote control to start recording. If you use a device other than the TV's remote control to start recording and then attempt to access a feature that is normally denied during recording (POP mode, FAV SCAN mode, changing inputs,) the recorded audio and/or video may not be what you intended to record. See pages 72 and 76.
- If you connected a Symbio™ AVHD recorder, in order to use its full functionality, you must first set up the TV Guide On Screen® system (page 26 and Chapter 5).
Memory card problems
- Make sure you are using a supported or valid memory card format (page 101).
- Make sure you have saved the picture files and/or MP3 files in the correct file format (page 101).
- The memory card may be inserted improperly. Remove the card and reinsert it (page 101).
• The memory card may be empty.
• The memory card may be damaged.
Audio player problems
The Audio player stutters / stops when playing files over the network
- The sharing computer is not available, or removed from the network or in "hibernation."
- The Ethernet (RJ-45) cables are not connected. Make sure all cables are connected properly.
- Sufficient network band-width is not available. Turn off any other file sharing programs, network-based games, or other network-intensive operations while the Audio Player is playing.
"No media found" message is displayed
• Media card is not inserted or does not contain valid MP3 files. Insert media card containing valid MP3 files.
• Network MP3 file sharing is not set up correctly. Check PC and TV network settings. Ensure Home Server Setup is completed successfully.
- Media card and network share do not contain any file with ".mp3" extension.
- MP3 files exceed limits specified.
Title or artist name is not displayed
- MP3 file does not contain valid meta-data or does not meet supported specifications.
Audio player takes a long time (about a minute) to start
- Sufficient network band-width is not available. Please turn off any other file-sharing programs, network based games or other network intensive operations while the mp3 player is playing.
- Too many files or sub-folders need to be searched. If the network share or media card contains a lot of files or nested directories your TV may take some time to find all playable files.
File is displayed but is always skipped
- The file is not a valid or supported mp3 file.
All files in shared folder or media card are not played
- Only first 200 mp3 files found will be played. Folders nested 10 or more levels below the shared folder are not searched.
Audio Player plays (progress bar and animation change) but audio is not heard
• Volume level is not high enough or TV is muted.
General troubleshooting (continued)
Picture Viewer problems
"No pictures found" message is displayed.
• Media card is not inserted or does not contain valid jpg. Please insert media card containing valid jpg files.
• Network jpg share is not correctly setup. Check PC share and security settings. Ensure Home server setup is complete and correct.
- Media card and network share do not contain any file with ".jpg" extension
• Jpg files exceed limits specified
Picture viewer option in menu is disabled.
- No media card containing pictures is inserted.
- Basic network setup and Home server setup are not performed.
Picture is not displayed. Rectangle containing "X" is displayed instead.
• Picture file does not meet specifications for Picture Viewer.
Picture is not listed at all.
- No pictures on media card or network drive.
• The number of pictures found is more than the TV can display. - Picture does not have valid extension (e.g. ".jpg" or ".jpeg")
- File is too large or is otherwise not compatible with TV for display. Please check Audio Player requirements for filesize and other restrictions.
Home network troubleshooting
Basic network setup problems
Cannot connect to network
- Check modem and splitter connections.
- Make sure the splitter is connected to the modem or TEL.
- Confirm modem's operation with this manual.
- Make sure your network address or E-mail account are set correctly (pages 108-112).
No network connection
- Check the Ethernet (RJ-45) cable connections.
- Check that the modem's power cord is plugged in.
- Make sure your network address or E-mail account are set correctly (pages 108-112).
Automatic setup fails
- The Ethernet (RJ-45) cables are not connected properly. Connect all cables as shown on page 30.
- DHCP service is not enabled on router, or no router is present. Please refer to router's documentation on how to enable DHCP. If no router is present, please use manual setup (pages 107-108).
- Internet service is not available. Check cable/ DSL modem or contact your ISP for Internet service.
Manual setup fails
- The Ethernet (RJ-45) cables are not connected properly. Connect all cables as shown on page 30.
- TV IP address is same as PC. TV IP address must be different from PC address.
- TV IP address is not on same subnet as PC. (For example, if the PC has IP = 192.168.0.100 with netmask = 255.255.255.0, and the TV has IP = 192.168.0.200 with netmask = 255.255.255.0, then they are both on the same subnet. Conversely, if the the PC has IP = 192.168.1.100 with netmask = 255.255.255.0, with the TV set as above, then they are on DIFFERENT subnets.)
Unstable network connection
- Unplug the Ethernet (RJ-45) cables, and then connect again.
Home network troubleshooting (continued)
Home server setup problems
PC (Home Server) name is not displayed
- The Ethernet (RJ-45) cables are not connected properly. Connect all cables as shown on page 30.
• Network setup on PC is incorrect. Ensure both PC and TV are using same network type (DHCP / manual) and compatible network settings. - PC does not have shared folders set up correctly. Please refer to pages 109-110 on how to set up shares on your PC.
- No master browsers on the network. To configure your PC to be master browser of its subnet, refer to your operating system user guide or consult an IT professional.
• More than 16 sharing devices are connected
PC (Home Server) name is displayed, but desired shares (JPEG directory and MP3 directory) are not displayed.
- PC does not have shared folders set up correctly. Please refer to pages 109-110 on how to set up shares on your PC.
- User-name and password set in TV are incorrect. Ensure that user-name and password settings in TV match the settings in PC. Username and passwords are generally case-sensitive.
E-mail scheduling problems
Cannot schedule a recording by e-mail
- Select "Test" to confirm the setup( page 113).
- Select "Done" after setting up( page 113).
• See Chapter 11 in this manual.
Test fails after waiting a long time
- The Ethernet (RJ-45) cables are not connected properly.
- The DNS is not set up correctly. Please check Network settings.
- SMTP and POP3 server settings are incorrect.
- "E-mail Address", "Account", or "Password" settings are incorrect. User-names and passwords are generally case-sensitive.
Receiving succeeds but sending fails, or vice-versa
- SMTP and POP3 server settings are incorrect.
- "E-mail Address", "Account", or "Password" settings are incorrect.
- ISP may not support SMTP or POP3 protocols. Please check with your ISP for details on what protocols it supports.
Test passes, but TV never responds to e-mails
- Email scheduling is turned OFF.
- Sender's e-mail address is different from "Authorized Email Address". Ensure that the email address you are using to send e-mails to the TV is the same as "Authorized Email Address" in the TV.
Note: Responses from the TV may be delayed by a few mintues depending on e-mail/Internet service
ADD/ DELETE e-mail results in INVALID MAIL VERIFICATION ID reply
- Mail verification ID is not specified or is different from the TV settings.
Command succeeded but recording or reminder did not work.
- The time and date in the TV Guide On Screen™ system are not set.
LED indications
The yellow and blue LED lights on the TV (at the bottom center of the TV) indicate the TV's status, as described below:
- Blue ON (solid) and Yellow OFF = The TV power cord is plugged in.
- Yellow ON (solid) and Blue OFF = A recording is in progress while the TV is OFF.
- Blue ON (solid) and Yellow ON (solid) = A recording is in progress while the TV is ON.
- Yellow and/or Blue blinking (see table below).
Note: If the TV loses A/C power (e.g., a power outage occurs or the power cord is unplugged), when power is restored, the yellow LED will blink while the TV is booting until the remote control is usable. This is normal and is not a sign of malfunction.
| LED Indication Condition Solution | ||
| 1) Yellow blinks continuously at 3-second intervals. Blue blinks continuously at 0.5-second intervals. | The lamp unit door is not seated properly. | Turn OFF the TV and unplug the power cord. Review “How to replace the lamp unit” on pages 128-130 to ensure that the lamp door is installed securely. If the problem persists, contact a Toshiba Authorized Service Center. |
| 2) Yellow blinks continuously at 0.5-second intervals; Blue is ON (solid). | The lamp is not working properly. | The TV will automatically try to restart itself eight times (see item #3). |
| 3) Yellow and Blue blink continuously at 1-second intervals. | The lamp is not working properly after the eighth automatic restart (see item #2). | Turn the TV OFF and then ON again. If the problem persists, replace the lamp unit (see pages 128-130). If the problem still exists, contact a Toshiba Authorized Service Center. |
| 4) Yellow is OFF; Blue blinks at 0.2-second intervals 4 times (repeat). | An abnormal temperature increase has occurred. | Turn OFF the TV. Check to make sure all slots and openings in the TV cabinet are not covered, blocked, or dusty. Turn ON the TV again. If the problem persists, contact a Toshiba Authorized Service Center. |
| 5) Yellow is OFF; Blue blinks continuously at 0.5-second intervals. | Abnormal operation (including cooling fan stop). | Turn OFF the TV and unplug the power cord. Plug the power cord in again and turn ON the TV. If the problem persists, contact a Toshiba Authorized Service Center. |
| 6) Yellow is OFF; Blue blinks continuously at 1-second intervals. | Abnormal operation of BUS line. | Turn OFF the TV and unplug the power cord. Plug the power cord in again and turn ON the TV. If the problem persists, contact a Toshiba Authorized Service Center. |
| 7) Yellow is OFF; Blue blinks at 0.2-second intervals 3 times (repeat). | The color wheel has stopped. | Turn OFF the TV and unplug the power cord. Plug the power cord in again and turn ON the TV. If the problem persists, contact a Toshiba Authorized Service Center. |
TV Guide On Screen™ FAQ
The following are frequently asked questions about the TV Guide On Screen ^™ system. The answers represent the most likely solutions to the problem.
After you set up the TV Guide On Screen™ system (Chapter 5), the program guide opens automatically by default when you turn on the TV. You can turn off the automatic program guide (see page 45) and instead press the TV GUIDE button on the remote control to manually open the TV Guide On Screen™ program guide.
SETUP
- Q: What if I move and my ZIP code or postal code changes?
A: Highlight Setup in the Service Bar. Press ▼ to highlight Change System Settings (page 70), and then press ENTER. Follow the on-screen prompts to enter new information (see Chapter 5 for details). It can take up to 24 hours to receive new data.
- Q: What if I change my cable hook-up to antenna or vice versa?
A: Highlight Setup in the Service Bar. Press ▼ to highlight Change System Settings (page 70), and then press ENTER. Follow the on-screen prompts to enter new input information and rescan channels for the new input (see Chapter 5 for details).
- Q: What if I change cable boxes?
A: Highlight Setup in the Service Bar. Press ▼ to highlight Change System Settings (page 70), and then press ENTER. Follow the on-screen prompts to enter new input information and rescan channels for the new input (see Chapter 5 for details).
- Q: I used to have a cable box, but now I get direct cable. What do I do?
A: Highlight Setup in the Service Bar. Press ▼ to highlight Change System Settings (page 70), and then press ENTER. Follow the on-screen prompts to enter new input information and rescan channels for the new input (see Chapter 5 for details).
- Q: If I add a recorder or change my cable service, how do I change my Setup information?
A: Highlight Setup in the Service Bar. Press ▼ to highlight Change System Settings (page 70), and then press ENTER. Follow the on-screen prompts to enter new information (see Chapter 5 for details). It can take up to 24 hours to receive new data.
- Q: Why does it take up to 24 hours for the TV Guide On Screen™ system to be ready for use?
A: The initial setup process consists of finding the stations in your area that carry the TV Guide On Screen ^™ system data and tuning to those stations to receive the setup and listings data.
- Q: I had a power outage. Do I need to go through initial setup of the TV Guide On Screen™ system again?
A: No. The information you entered is stored in the TV Guide On Screen ^™ system memory.
Note: For Cable box users, the TV must be OFF and the Cable box must be left ON for the TV Guide On Screen™ system to receive channel line-up information.
- Q: How do I connect the G-LINK ^TM (IR blaster) cable to the G-LINK ^TM input on the TV?
A: See Chapter 2: Connecting your TV in this manual. You also can refer to the TV Guide On Screen™ prompts during VCR or Cable box setup.
- Q: When will I be able to view my TV program listings and use other TV Guide On Screen™ system features?
A: You will be able to use initial program listings within 24 hours of initial setup. It may take up to one week to receive the full eight days of program listings.
- Q: What should I do if I cannot complete initial setup?
A: If you are unable to complete initial setup using the owner's manual and the on-screen prompts, please call Toshiba's National Service Division at 1-800-631-3811.
- Q: If I make a mistake during setup, how do I go back to the previous step?
A: Complete the remaining setup steps. When “Confirming Your Settings” appears, select “No, repeat setup process.” Follow the on-screen prompts and input the correct information.
- Q: What if the channel number is not visible on my cable box?
A: Your cable box may be defaulting to a clock or time display once the channel changes. Watch the box carefully when testing the cable box brand code to see if the channel changes to 09.
- Q: Why won't my VCR turn on?
A: There are several possibilities:
a) An incorrect or “no VCR” code was entered during the TV Guide On Screen™ initial setup. Press the TV GUIDE button on the remote control, and then press ▶ to highlight SETUP. Press ▼ to highlight “Change system settings,” and then press ENTER. Follow the on-screen prompts to select the correct VCR information.
b) Make sure the G-LINK ^™ (IR blaster) cable is connected correctly (see page 28).
c) The VCR record timer is on. Turn off the timer.
d) The wired remote VCR is incompatible.
TV Guide On Screen™ FAQ (continued)
CHANNEL LINEUPS & LISTINGS
- Q: Why aren't all my channels initially displayed?
A: After initial setup, approximately 120 channels are automatically displayed. The user may use the “Change channel display” feature to turn ON or OFF additional channels.
Note: Even though you have the option of enabling many more channels, the system may not have the memory capacity to hold detailed program descriptions for all of them.
- Q: When I opened the TV Guide On Screen™ system, I was asked to choose from more than one channel lineup. What should I do?
A: Select the lineup that most closely matches the one for your area. If after you choose the lineup, you want to make changes to it, highlight Setup in the Service Bar. Press ▼ to select Change Channel Display. Follow the on-screen instructions.
- Q: Why do all my channels display "No Listing?"
A: The TV Guide On Screen ^™ system has not yet received its data download. The phrase “No Listing” will be replaced with program information during the next download cycle, which will occur within the next 24-hour period.
- Q: Why do some of my channels display "No Listing?"
A: There are several possibilities:
a) The channels in question were recently turned ON (in Change channel display) and TV Guide On Screen™ has yet to receive its next data download.
b) After completing the initial setup, the first data download of the day was interrupted by a VCR recording.
c) The TV power cord was left unplugged for an extended period of time and the TV Guide On Screen ^™ system was unable to receive program listings during the scheduled download cycle.
d) Poor reception caused some of the data to be missed.
e) The cable box was turned OFF. The TV power cord must be plugged in and the cable box must be ON.
g) A/V Cable: The VCR was turned OFF. If the connection includes stereo cables with cable box to VCR and stereo connection from VCR to television, the VCR must be ON.
- Q: A show entry in the TV Guide On Screen™ system reads "No Listing." What does that mean?
A: Show information for that entry was not available during the last TV Guide On Screen™ system information update (download). Show information is updated on a daily basis.
- Q: I have seen the word "download" in reference to the TV Guide On Screen™ system. What does that mean?
A: "Download" refers to the times throughout the day when the TV Guide On Screen™ system is receiving channel and listings information from your Cable or over-the-air antenna transmission.
- Q: After some show titles, I have noticed from 1 to 4 stars (****). What does that mean?
A: These stars are a broadcast-industry ratings system used to inform you of a show's quality. The more stars, the better the rating.
- Q: What do the colors for shows in the Listings and Search screens indicate?
A: Green = Sports; Dark Blue = Children's; Purple = Movies; Teal = Other Show.
- Q: How do I add, delete, or change the assigned number of channels on the TV Guide On Screen™ system?
A: See the "Change channel display" section in the TV Guide On Screen ^™ owner's manual (see page 70).
- Q: Why are some of my channels listed on the wrong number?
A: There are several possibilities (see page 70 for details):
a) Incorrect channel lineup was selected. Access “Change system settings” and choose “Yes, but my channel lineup is incorrect,” and then reselect the correct lineup.
b) Channel lineup changes have not yet been processed. Use the "Change channel display" feature to make adjustments.
c) Initial setup was done incorrectly (that is, the wrong ZIP/postal code was entered.) Redo the initial setup.
- Q: Why doesn't the program highlighted match up with the video window on my TV screen?
A: There are several possibilities (see page 70 for details):
a) The station in question made a late change to its scheduled program listing and the TV Guide On Screen ^™ system has not yet been updated.
b) The TV is receiving broadcasts through a modified or boosted antenna system or a satellite dish (not supported by the TV Guide On Screen ^™ system).
c) Initial setup was done incorrectly. (i.e., the wrong ZIP/postal code was entered.) Redo the initial setup.
d) Incorrect channel lineup was selected. Access “Change system settings” and choose “Yes, but my channel lineup is incorrect,” and then reselect the correct lineup (see page 65 for details).
c) The video window may be locked. Press SPLIT to unlock.
- Q: Can I move my favorite stations to the top of the TV Guide On Screen™ display screen?
A: Yes. Use the “Change channel display” feature to make adjustments (see page 70). Highlight the station call letters to be moved, then use the up/down arrows, and/or Number buttons to reassign the position of the station.
TV Guide On Screen™ FAQ (continued)
OPERATIONS
- Q: How can I look for a specific show in the TV Guide On Screen™ system?
A: SEARCH lets you find shows by keyword, alphabetically, or by category (HDTV, Movies, Sports, Children, Educational, News, Variety, Series).
- Q: My cable box will not change channels with the TV Guide On Screen™ system. What's wrong?
A: There are several possibilities:
a) The incorrect cable box code was entered during TV Guide On Screen ^™ initial setup. Redo initial setup.
b) The G-LINK ^™ (IR blaster) cable may not be connected properly (see page 28).
c) The cable box has no remote capability and is incompatible.
- Q: How do I resize or close the Info window?
A: Press the INFO button on the remote control to resize the Info window. Press the INFO button again to close the Info window.
- Q: Is there a way to go directly to the next day's listings without scrolling through each time slot?
A: Yes. In LISTINGS, highlight the station for which you want to look ahead and use the Channel Number buttons on the remote control to enter "24." In the resulting menu, press two times to scroll down to select the HOURS AHEAD option, and then press ENTER. You also can use the SKIP button on the remote control.
- Q: Why can't I record a show? All I get is snow or a blue screen.
A: There are several possibilities (without a cable box):
a) The recording unit was not connected or set up correctly.
b) The incorrect channel lineup was selected. Press TV GUIDE and then ▶ to highlight SETUP. Press ▼ to highlight “Change system settings,” and then press ENTER. Follow the on-screen prompts to select the correct channel lineup.
- Q: Why won't my VCR change channels and why does it change to the wrong channel?
A: There are two possibilities (with a cable box):
a) The VCR is not set on the correct output channel. Set the VCR to 03, 04, or whichever output channel is set by your cable system.
b) The VCR and/or cable box are hooked up incorrectly. Refer to your VCR owner's manual or contact your Cable TV company for proper wiring procedures.
- Q: Is Help available in the TV Guide On Screen™ system? If so, how do I find it?
A: Yes. Highlight any of the five main Services (Listings, Schedule, Recordings, Setup, Search) and press the INFO key on the remote control. An expanded Info Box displays additional help information. Press INFO again to close the box.
Help is also available in a panel menu. Press INFO to display an expanded Info Box. Press INFO again to close the box.
RECORD/REMIND
- Q: Can I tune to a different channel while recording a program?
A: No.
- Q: How many programs can be scheduled for RECORD in the GUIDE?
A: There is no limit to the number of shows that can be programmed into the schedule memory.
- Q: If a program is scheduled to RECORD on a Regular basis, does it count as five?
A: No, whether a program is scheduled ONCE, REGULARLY, or WEEKLY, it only counts as one show in the RECORD stack memory.
- Q: If I have a power failure, will I need to reset the recorded shows I have already programmed?
A: The start times and channel numbers of shows that have been programmed will be retained in the memory of the TV Guide On Screen ^™ system. Titles will appear once listings are restored.
- Q: Can I set a Record or Remind event without highlighting a show title in the TV Guide On Screen™ system?
A: Yes. TV Guide On Screen ^™ has a Manual Record and Remind feature. Highlight SCHEDULE in the Service Bar, and press MENU. Choose the event type, press ENTER, and then enter the date, start and stop time, channel number, and so forth.
- Q: What do the frequencies for Record and Remind mean?
A: Once—records/reminds the show one time.
Daily (manual only)—records the time, channel, input, recorder combination Monday through Friday.
Regularly—records/reminds the show every time the show airs on the same channel and starts at the same time.
Weekly—records/reminds the show each time the show airs on the same day of the week, on the same channel and starts at the same time.
Off (not cancel)—keeps the show in the schedule list but will not record/remind the show until the frequency is changed.
13
Appendix
Lamp unit replacement and care
Replacing the lamp unit (User-replaceable component)

WARNING: RISK OF ELECTRIC SHOCK!

TO REDUCE THE RISK OF ELECTRIC SHOCK, NEVER REMOVE TV COVERS, EXCEPT AS SPECIFIED HEREIN. REFER ALL SERVICING NOT SPECIFIED IN THIS MANUAL TO QUALIFIED SERVICE PERSONNEL. Failure to follow this WARNING may result in death or serious injury.
The light source for this TV is a mercury lamp with internal atmospheric pressure that increases during use. The lamp has a limited service life that varies depending on product use and user settings.
As is generally the case with all projection TVs that use projection lamps as a light source, the brightness of the lamp in this TV may vary somewhat over the expected service life and will generally decrease over time. The average useful service life for the lamp is approximately 8,000 hours in Low Power mode or 6,000 hours in High Bright mode. See “Selecting the Lamp mode” on page 80 for information on switching the lamp mode. Because these are averages, some lamps will require earlier replacement.
Note : The lamp is warranted only for the periods and to the extent set forth in the Limited Warranty applicable to this set, which is a substantially shorter period of time than the average useful service period. See “Limited United States Warranty” on page 132 or “Limited Canada Warranty” on page 133, as applicable.
If you use the lamp beyond its service life:
- you may notice a reduction in the colors and/or brightness of the picture; and
- the strength of the quartz glass in the lamp will be reduced and the lamp may rupture (often making a loud noise when this happens). If the lamp ruptures, the TV will not operate until the lamp unit is replaced.

CAUTION: Always handle the lamp unit with care.
The lamp unit in this TV was designed for safe replacement by consumers; however, if the lamp unit is subjected to intentional abuse (such as excessive mechanical abuse or handling by children or pets), the unit may break, exposing sharp edges or pinch points.
When to replace the lamp unit
You should replace the lamp unit:
- if the picture darkens and/or colors fade;
- if the screen (lamp) does not light (LED indication #3, page 124); or
- if you hear a loud noise and the picture goes black, which may indicate a lamp rupture (LED indication #3, page 124).
To obtain a replacement lamp unit:
In the U.S.
In warranty: Visit www.tacp.toshiba.com/service or call toll-free 1-800-631-3811.
Out of warranty: Visit www.ceaccessories.toshiba.com or consult your consumer electronics dealer.
In Canada
Locate a Toshiba parts distributor by visiting www.toshiba.ca. Click "Home Entertainment" and then click "Support."
Use only the replacement lamp unit model listed below. Using any other lamp may damage the TV and/or lamp. SUCH DAMAGE IS NOT COVERED UNDER YOUR TOSHIBA WARRANTY.

CAUTION: Always replace with same type lamp unit: Model No. D95-LMP (Stock no. 23311153)
Lamp unit replacement and care (continued)
How to replace the lamp unit
WARNING: RISK OF ELECTRIC SHOCK!

TO REDUCE THE RISK OF ELECTRIC SHOCK, NEVER REMOVE TV COVERS, EXCEPT AS SPECIFIED HEREIN. REFER ALL SERVICING NOT SPECIFIED IN THIS MANUAL TO QUALIFIED SERVICE PERSONNEL. Failure to follow this WARNING may result in death or serious injury.
Required tools: Lint-free gloves; manual screwdrivers (Phillips and slotted).
Optional tool: 5/16" nut driver
- Turn off the TV and unplug the power cord.

WARNING: Eye damage may result from directly viewing the light produced by this lamp. Always turn off the TV and unplug the
power cord
before opening the lamp unit door.
- STOP! Allow the lamp to cool for at least one (1) hour before replacing it.

CAUTION: HOT SURFACE!
The temperature of the lamp immediately after use exceeds 392°F (200°C).

Touching the lamp before it has cooled will result in severe burns. ALLOW THE LAMP TO COOL FOR AT LEAST ONE (1) HOUR BEFORE REPLACING IT.
- On the lamp unit door on the side of the TV, loosen the screw using a manual screwdriver, and then remove the lamp unit door.
- Using a manual screwdriver, loosen the two screws on the lamp unit.

WARNING: RISK OF ELECTRIC SHOCK!

The lamp unit door is provided with an interlock to reduce the risk of electric shock and excessive ultraviolet radiation. Never defeat its purpose or attempt to service without removing the lamp unit door completely. Failure to follow this WARNING may result in death or serious injury.
- Grasp the lamp unit handle and gently pull the lamp unit straight out of the TV. Set the old lamp unit aside (see "Disposing of the used lamp unit" on page 130).
natural_image
Illustration of a hand using a tool to press inside a microwave oven (no text or symbols visible)
Note: Wear soft, lint-free gloves when replacing the lamp unit.
(continued on next page)
Lamp unit replacement and care (continued)
How to replace the lamp unit (continued)
- Carefully insert the new lamp unit straight into the TV until it is fully seated.
natural_image
Illustration of a hand inserting a paper into a microwave oven with a tool, no text or symbols presentNote :
- Never subject the lamp unit to excessive shock.
- Never touch the lamp unit glass or otherwise get it dirty. Doing so may affect the image quality and reduce the service life of the lamp. See "Cleaning the lamp unit glass" below.
CLEANING THE LAMP UNIT GLASS
If you accidentally touch the lamp unit glass or otherwise get it dirty, wipe it with a lint-free lens cleaning cloth (such as a cloth for cleaning camera lenses or eyeglasses).

CAUTION: NEVER clean a hot lamp with any type of flammable liquid or aerosol cleaning agent. Many ordinary cleaning agents
(such as glass cleaners) contain chemicals that may be flammable at certain temperatures. If the lamp unit is not allowed to cool for at least one (1) hour, such chemicals may ignite.
- Using a manual screwdriver, tighten the two lamp unit screws.
Note: Hand-tighten only. Do not use an electric screwdriver.

NOTE : Make sure the lamp unit and screws are installed securely; otherwise, the TV may not turn on and the lamp life may be shortened.
- Reattach the lamp unit door, making sure to insert the hooks on the left side of the lamp unit door inside the opening in the TV cabinet.
Insert the hooks inside the TV cabinet opening.
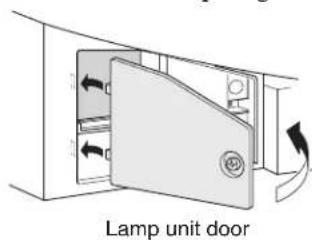
- Replace the screw and hand-tighten using a manual screwdriver.
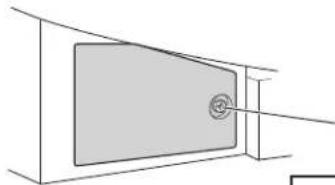
natural_image
Pure diagram of a rectangular object with a circular symbol inside, no text or labels presentLamp unit door
Hand tighten using manual screwdriver

NOTE: Make sure the lamp unit door is securely; otherwise, may not turn on.
- Plug in the power cord and turn on the TV. After the initial warmup period (which may take several seconds for full picture brightness), the TV should operate normally. If any of the following conditions exist, turn off the TV, unplug the power cord, and repeat steps 1–9 to ensure that the lamp unit and lamp unit door are installed correctly:
- No picture • Dark picture • TV will not turn on If, after repeating steps 1–9, the problem still exists:
• In the U.S., call TACP consumer solutions at 1-800-631-3811.
- In Canada, locate the nearest Toshiba authorized service depot by directing your web browser to www.toshiba.ca; click "Home Entertainment," and then click "Support."
Disposing of the used lamp unit
- Place the used lamp unit in the empty box from the new unit.
- Keep the lamp unit out of reach of children and pets.

CAUTION: Always handle the lamp unit with care.
The lamp unit in this TV was designed for safe replacement by consumers; however, if the lamp unit is subjected to intentional or accidental abuse (such as excessive mechanical abuse or handling by children or pets), the unit may break, exposing sharp edges or pinch points.
- Dispose of the used lamp unit by the approved method for your area.

NOTE : The lamp unit contains mercury. Disposal of mercury may be regulated due to environmental considerations. For disposal or
recycling information, contact your local authorities or the Electronic Industries Alliance (www.eiae.org).
Specifications
NOTE:
- This model complies with the specifications listed below.
- Designs and specifications are subject to change without notice.
- This model may not be compatible with features and/or specifications that may be added in the future.
Television System
NTSC standard
ATSC standard (8VSB)
Digital Cable (64 QAM, 256 QAM; in-the-clear, unencrypted*)
*Encrypted channels can be viewed on this TV
using a CableCARD. ^™ See page 14 for details.
Channel Coverage
VHF: 2 through 13
UHF: 14 through 69
Cable TV: Mid band (A-8 through A-1, A through I)
Super band (J through W)
Hyper band (AA through ZZ, AAA, BBB)
Ultra band (65 through 94, 100 through 135)
Power Source
120 V AC, 60 Hz
Power Consumption
265 W (average)
38 W in standby mode (using a CableCARD ^™ )
34 W in standby mode (without a CableCARD ^™ )
Audio Power
15 W + 15 W
Speaker Type
56MX195: Main: Two 4-3/4-inch (12cm) round
Tweeter: Two 1-inch (2.5cm) round
62MX195: Main: Four 4-3/4-inch (12cm) round
Tweeter: Two 1-inch (2.5cm) round
72MX195: Main: Four 4-3/4-inch (12cm) round
Tweeter: Two 1-inch (2.5cm) round
Video/Audio Terminals
S-VIDEO INPUT:
Y : 1 V(p-p), 75 ohm, negative sync.
C: 0.286 V(p-p) (burst signal), 75 ohm
VIDEO/AUDIO INPUT:
VIDEO: 1 V(p-p), 75 ohm, negative sync.
AUDIO: 150 mV(rms) (30% modulation equivalent,
22 k ohm or greater)
ColorStream® (component video) HD INPUT:
VIDEO: Y: 1V(p-p), 75 ohm
Pr: 0.7 V(p-p), 75 ohm
P_B : 0.7 V(p-p), 75 ohm
Suggested formats: 1080i, 480p, 480i, 720p
AUDIO: 150 mV(rms), 22 k ohm or greater
Video/Audio Terminals (continued)
HDMI™ INPUT:
HDMI compliant (type A connector)
HDCP compliant
E-EDID** compliant
Suggested formats: 1080i, 480p, 480i, 720p
HDMI Audio: 2-channel PCM; 32/44.1/48 kHz sampling
frequency; 16/20/24 bits per sample
VIDEO/AUDIO OUTPUT (also for recording):
VIDEO: 1 V(p-p), 75 ohm, negative sync.
AUDIO: 150 mV(rms) (30% modulation equivalent,
2.2 k ohm or less)
VARIABLE AUDIO OUTPUT:
0–300 mV(rms) (30% modulation equivalent,
2.2 k ohm or less)
G-LINK™:
3 V(p-p), 3.5 mm mono socket (IR blaster cables supplied)
IEEE1394 INPUT/OUTPUT:
IEEE1394 compliant 4-pin
DIGITAL AUDIO OUTPUT:
Optical type
PC IN:
Mini D-sub 15 pin Analog RGB
PC AUDIO IN: 150 mV(rms), 22 k ohm or greater
RJ-45 port: Standard Ethernet (RJ-45)
Dimensions
56MX195: Width: 51-11/16 inches (1,313 mm)
Height: 36-3/16 inches (919 mm)
Depth: 16-15/16 inches (430 mm)
62MX195: Width: 57-1/16 inches (1,450 mm)
Height: 39-1/4 inches (997 mm)
Depth: 18-3/4 inches (476 mm)
72MX195: Width: 65-13/16 inches (1,672 mm)
Height: 44-1/16 inches (1,119 mm)
Depth: 21-11/16 inches (551 mm)
Weight
56MX195: 90 lbs (40.8 kg)
62MX195: 103 lbs (46.7 kg)
72MX195: 122 lbs (55.3 kg)
Supplied Accessories
- Two dual-wand IR blaster cables
- Remote control with two size "AA" alkaline batteries
- Owner's Manual (this book)
Optional Stands
56MX195: ST 5695
62MX195; ST 6295
72MX195: ST 7295
Limited United States Warranty
for DLP™ Television Models
Toshiba America Consumer Products, L.L.C. ("TACP") makes the following limited warranties to original consumers in the United States.
THESE LIMITED WARRANTIES EXTEND TO THE ORIGINAL CONSUMER PURCHASER OR ANY PERSON RECEIVING THIS DLP™ TELEVISION AS A GIFT FROM THE ORIGINAL CONSUMER PURCHASER AND TO NO OTHER PURCHASER OR TRANSFEREE.
DLP™ TELEVISIONS PURCHASED IN THE U.S.A. AND USED ANYWHERE OUTSIDE OF THE U.S.A., INCLUDING, WITHOUT LIMITATION, CANADA AND MEXICO, ARE NOT COVERED BY THESE WARRANTIES.
DLP™ TELEVISIONS PURCHASED ANYWHERE OUTSIDE OF THE U.S.A., INCLUDING, WITHOUT LIMITATION, CANADA AND MEXICO, AND USED IN THE U.S.A., ARE NOT COVERED BY THESE WARRANTIES.
Limited One (1) Year Warranty on Parts and Labor
TACP warrants this DLP™ Television and its parts against defects in materials or workmanship for a period of one (1) year after the date of original retail purchase. DURING THIS PERIOD, TACP WILL, AT TACP'S OPTION, REPAIR OR REPLACE A DEFECTIVE PART WITH A NEW OR REFURBISHED PART WITHOUT CHARGE TO YOU FOR PARTS OR LABOR. During this period, TACP Authorized Service Station personnel will come to your home when warranty service is required. Depending on the type of repair required, the service will either be performed in your home or the DLP™ Television will be taken to a TACP Authorized Service Station for repair and returned to your home at no cost to you.
Limited One (1) Year Warranty on Lamp Unit
TACP warrants the original lamp unit contained in this DLP™ Television against defects in materials or workmanship for a period of one (1) year after the date of original retail purchase. DURING THIS PERIOD, TACP WILL, AT TACP'S OPTION, EXCHANGE A DEFECTIVE LAMP UNIT WITH A NEW OR REFURBISHED LAMP UNIT WITHOUT CHARGE TO YOU. LABOR CHARGES FOR LAMP UNIT REPLACEMENT ARE YOUR RESPONSIBILITY AND ARE NOT COVERED UNDER THIS WARRANTY. The lamp unit is a user-replaceable component.
Rental Units
The warranty for DLP™ Television rental units begins on the date of the first rental or thirty (30) days after the date of shipment to the rental firm, whichever comes first.
Limited Warranty for Commercial Units
TACP warrants DLP™ Televisions, including the lamp units contained therein, that are sold and used for commercial purposes as follows: all parts are warranted against defects in materials or workmanship for a period of ninety (90) days after the date of original retail purchase. DURING THIS PERIOD, TACP WILL, AT TACP'S OPTION, REPAIR OR REPLACE A DEFECTIVE PART WITH A NEW OR REFURBISHED PART WITHOUT CHARGE TO YOU.
Owner's Manual and Product Registration
Read this owner's manual thoroughly before operating this DLP™ television.
Complete and mail the enclosed product registration card or register your DLP™ Television online at www.tacp.toshiba.com/service as soon as possible. By registering your DLP™ Television you will enable TACP to bring you new products specifically designed to meet your needs and help us to contact you in the unlikely event a safety notification is required under the Consumer Product Safety Act. Failure to register your product does not diminish your warranty rights.
Your Responsibility
THE ABOVE WARRANTIES ARE SUBJECT TO THE FOLLOWING CONDITIONS:
(1) You must retain your original bill of sale or provide other proof of purchase..
(2) All warranty servicing of this DLP™ Television must be performed by an Authorized TACP Service Station.
(3) The warranties from TACP are effective only if this DLP™ Television is purchased and operated in the Continental U.S.A. or Puerto Rico.
(4) Labor service charges for set installation, setup, adjustment of customer controls, and installation or repair of antenna systems are not covered by this warranty. Reception problems caused by inadequate antenna systems, misaligned satellite dishes, cable television distribution, VCRs, DVD players/recorders, personal computer level IEEE1394 devices, and any other connected signal source device are your responsibility..
(5) Warranties extend only to defects in materials or workmanship as limited above, and do not extend to any DLP™ Television or parts that have been lost or discarded by you or to damage to the DLP™ Television or parts caused by fires, misuse, accident, Acts of God (such as lightning or fluctuations in electric power), improper installation, improper maintenance, or use in violation of instructions furnished by TACP; use or malfunction through simultaneous use of this DLP™ Television and connected equipment; or to units that have been modified or had the serial number removed, altered, defaced, or rendered illegible.
How to Obtain Warranty Service
If, after following all of the operating instructions in this manual and reviewing the section titled "Troubleshooting," you find that service is needed:
(1) To find the nearest TACP Authorized Service Station, visit TACP's website at www.tacp.toshiba.com/service or contact TACP's Consumer Solution Center toll free at 1-800-631-3811.
(2) You must present your original bill of sale or other proof of purchase to the TACP Authorized Service Station.
For additional information, visit TACP's web site: www.tacp.toshiba.com.
ALL WARRANTIES IMPLIED BY THE LAW OF ANY STATE OF THE U.S.A., INCLUDING THE IMPLIED WARRANTIES OF MERCHANTABILITY AND FITNESS FOR A PARTICULAR PURPOSE, ARE EXPRESSLY LIMITED TO THE DURATION OF THE LIMITED WARRANTIES SET FORTH ABOVE. WITH THE EXCEPTION OF ANY WARRANTIES IMPLIED BY THE LAW OF ANY STATE OF THE U.S.A. AS HEREBY LIMITED, THE FOREGOING WARRANTY IS EXCLUSIVE AND IN LIEU OF ALL OTHER WARRANTIES, GUARANTEES, AGREEMENTS, AND SIMILAR OBLIGATIONS OF TACP WITH RESPECT TO THE REPAIR OR REPLACEMENT OF ANY PARTS. IN NO EVENT SHALL TACP BE LIABLE FOR CONSEQUENTIAL OR INCIDENTAL DAMAGES (INCLUDING, BUT NOT LIMITED TO, LOST PROFITS, BUSINESS INTERRUPTION, OR MODIFICATION OR ERASURE OF RECORDED DATA CAUSED BY USE, MISUSE OR INABILITY TO USE THIS DLP™ TELEVISION).
No person, agent, distributor, dealer, or company is authorized to change, modify, or extend the terms of these warranties in any manner whatsoever. The time within which an action must be commenced to enforce any obligation of TACP arising under the warranty or under any statute or law of the United States or any state thereof is hereby limited to ninety (90) days from the date you discover, or should have discovered, the defect. This limitation does not apply to implied warranties arising under the law of any state of the U.S.A.
THIS WARRANTY GIVES YOU SPECIFIC LEGAL RIGHTS AND YOU MAY ALSO HAVE OTHER RIGHTS WHICH MAY VARY FROM STATE TO STATE IN THE U.S.A. SOME STATES OF THE U.S.A. DO NOT ALLOW LIMITATIONS ON THE DURATION OF AN IMPLIED WARRANTY, WHEN AN ACTION MAY BE BROUGHT, OR THE EXCLUSION OR LIMITATION OF INCIDENTAL OR CONSEQUENTIAL DAMAGES. THEREFORE, THE ABOVE PROVISIONS MAY NOT APPLY TO YOU UNDER SUCH CIRCUMSTANCES. 05
Limited Canada Warranty
for DLP™ Television Models
Toshiba of Canada Limited ("TCL") makes the following limited warranties to original consumers in Canada.
THESE LIMITED WARRANTIES EXTEND TO THE ORIGINAL CONSUMER PURCHASER OR ANY PERSON RECEIVING THIS DLP™ TELEVISION AS A GIFT FROM THE ORIGINAL CONSUMER PURCHASER AND TO NO OTHER PURCHASER OR TRANSFEREE.
PRODUCTS PURCHASED IN THE U.S.A. AND USED IN CANADA ARE NOT COVERED BY THESE WARRANTIES.
PRODUCTS PURCHASED IN CANADA AND USED IN THE U.S.A. ARE NOT COVERED BY THESE WARRANTIES.
Limited One (1) Year Warranty on Parts and Labor\*
TCL warrants this DLP™ television television and its parts against defects in materials or workmanship for a period of one (1) year after the date of original retail purchase. DURING THIS PERIOD, TCL WILL, AT TCL'S OPTION, REPAIR OR REPLACE A DEFECTIVE PART WITH A NEW OR REFURBISHED PART WITHOUT CHARGE TO YOU FOR PARTS OR LABOR. TCL Authorized Service Depot personnel will come to your home when warranty service is required. Depending on the type of repair required, either the service will be performed in your home or the set will be taken to the TCL Authorized Service Depot for repair and returned to your home at no cost to you. IN-HOME SERVICE ONLY APPLIES WITHIN 100 KILOMETERS OF AN AUTHORIZED TCL SERVICE DEPOT.
Limited One (1) Year Warranty on Lamp Unit\*
TCL warrants the lamp unit in this DLP™ television against defects in materials or workmanship for a period of one (1) year after the date of original retail purchase. DURING THIS PERIOD, TCL WILL, AT TCL'S OPTION, EXCHANGE A DEFECTIVE LAMP UNIT WITH A NEW OR REFURBISHED LAMP UNIT WITHOUT CHARGE TO YOU. LABOR CHARGES FOR LAMP UNIT REPLACEMENT ARE NOT COVERED UNDER WARRANTY. The lamp unit is a user-replaceable component.
Rental Units
The warranty for rental units, including the lamp units contained therein, begins with the date of first rental or thirty (30) days from the date of shipment to the rental firm, whichever comes first.
\*Limited Warranty for Commercial Units
TCL warrants DLP™ televisions, including the lamp units contained therein, sold and used for commercial purposes as follows: all parts are warranted against defects in materials or workmanship for a period of ninety (90) days after the date of original purchase. DURING THIS PERIOD, TCL WILL, AT TCL'S OPTION, REPAIR OR REPLACE A DEFECTIVE PART WITH A NEW OR REFURBISHED PART WITHOUT CHARGE TO YOU. ON-SITE SERVICE ONLY APPLIES WITHIN 100 KILOMETERS OF AN AUTHORIZED TCL SERVICE DEPOT.
Owner's Manual and Product Registration
Read this owner's manual thoroughly before operating this DLP™ television.
Register your product online at www.toshiba.ca as soon as possible. By registering your product you will enable TCL bring you new products specifically designed to meet your needs and help us to contact you in the unlikely event a safety notification is required under the Consumer Product Safety Act. Failure to register your product does not diminish your warranty rights.
Your Responsibility
THE ABOVE WARRANTIES ARE SUBJECT TO THE FOLLOWING CONDITIONS:
(1) You must provide your bill of sale or other proof of purchase.
(2) All warranty servicing of this DLP™ television must be performed by an Authorized TCL Service Depot.
(3) These warranties from TCL are effective only if the DLP™ television is purchased in Canada from an authorized TCL dealer and operated in Canada.
(4) Labor charges for installation, setup, adjustment of customer controls, and installation or repair of antenna systems are not covered by these warranties. Reception problems caused by inadequate antenna systems are your responsibility.
(5) Warranties extend only to defects in materials or workmanship as limited above, and do not extend to any DLP ^™ television or parts that have been lost or discarded by you or to damage to the television or parts caused by fires, misuse, accident, Acts of God (such as lightning or fluctuations in electric power), improper installation, improper maintenance, or use in violation of instructions furnished by TCL; use or malfunction through simultaneous use of this product and connected equipment; or to units that have been modified or had the serial number removed, altered, defaced, or rendered illegible.
How to Obtain Warranty Services
If, after following all of the operating instructions in this manual and checking the "Troubleshooting" section, you find that service is needed:
(1) To find the nearest TCL Authorized Service Depot, visit TCL's web site at www.toshiba.ca.
(2) Present your bill of sale or other proof of purchase to the Authorized Service Depot.
For additional information, visit TCL's web site: www.toshiba.ca
ALL WARRANTIES IMPLIED BY THE LAW OF ANY PROVINCE OF CANADA, INCLUDING THE IMPLIED WARRANTIES OF MERCHANTABILITY AND FITNESS FOR A PARTICULAR PURPOSE, ARE EXPRESSLY LIMITED TO THE DURATION OF THE LIMITED WARRANTIES SET FORTH ABOVE. WITH THE EXCEPTION OF ANY WARRANTIES IMPLIED BY THE LAW OF ANY PROVINCE OF CANADA AS HEREBY LIMITED, THE FOREGOING WARRANTY IS EXCLUSIVE AND IN LIEU OF ALL OTHER WARRANTIES, GUARANTEES, AGREEMENTS, AND SIMILAR OBLIGATIONS OF TCL WITH RESPECT TO THE REPAIR OR REPLACEMENT OF ANY PARTS. IN NO EVENT SHALL TCL BE LIABLE FOR CONSEQUENTIAL OR INCIDENTAL DAMAGES (INCLUDING, BUT NOT LIMITED TO, LOST PROFITS, BUSINESS INTERRUPTION, OR MODIFICATION OR ERASURE OF RECORDED DATA CAUSED BY USE, MISUSE, OR INABILITY TO USE THIS PRODUCT).
No person, agent, distributor, dealer, or company is authorized to change, modify, or extend the terms of these warranties in any manner whatsoever. The time within which action must be commenced to enforce any obligation of TCL arising under this warranty or under any law of Canada or of any province thereof is hereby limited to 90 days from the date you discover, or should have discovered, the defect. This limitation does not apply to implied warranties arising under the law of any province of Canada.
THIS WARRANTY GIVES YOU SPECIFIC LEGAL RIGHTS, AND YOU MAY ALSO HAVE OTHER RIGHTS, WHICH MAY VARY FROM PROVINCE TO PROVINCE IN CANADA. SOME PROVINCES OF CANADA DO NOT ALLOW LIMITATIONS ON THE DURATION OF AN IMPLIED WARRANTY, LIMITATIONS ON THE TIME WITHIN WHICH AN ACTION MAY BE BROUGHT, OR THE EXCLUSION OR LIMITATION OF INCIDENTAL OR CONSEQUENTIAL DAMAGES; THEREFORE, THE ABOVE LIMITATIONS OR EXCLUSIONS MAY NOT APPLY TO YOU UNDER SUCH CIRCUMSTANCES.
A copy of the GPL source code in this product may be obtained by contacting Toshiba Consumer Solutions at (800)631-3811. There will be a charge to cover the costs of providing the source code.
A copy of the LGPL source code in this product may be obtained by contacting Toshiba Consumer Solutions at (800)631-3811. There will be a charge to cover the costs of providing the source code.
USB Protocol Copyright © 2005 The NetBSD Foundation, Inc. All rights reserved.
Redistribution and use in source and binary forms, with or without modification, are permitted provided that the following conditions are met:
- Redistributions of source code must retain the above copyright notice, this list of conditions and the following disclaimer.
- Redistributions in binary form must reproduce the above copyright notice, this list of conditions and the following disclaimer in the documentation and/or other materials provided with the distribution.
- Neither the name of The NetBSD Foundation nor the names of its contributors may be used to endorse or promote products derived from this software without specified prior written permission.
THIS SOFTWARE IS PROVIDED BY THE NETBSD FOUNDATION, INC. AND CONTRIBUTORS "AS IS" AND ANY EXPRESS OR IMPLIED WARRANTIES, INCLUDING, BUT NOT LIMITED TO, THE IMPLIED WARRANTIES OF MERCHANTABILITY AND FITNESS FOR A PARTICULAR PURPOSE ARE DISCLAIMED. IN NO EVENT SHALL THE FOUNDATION OR CONTRIBUTORS BE LIABLE FOR ANY DIRECT, INDIRECT, INCIDENTAL, SPECIAL, EXEMPLARY, OR CONSEQUENTIAL DAMAGES (INCLUDING, BUT NOT LIMITED TO, PROCUREMENT OF SUBSTITUTE GOODS OR SERVICES; LOSS OF USE, DATA, OR PROFITS; OR BUSINESS INTERRUPTION) HOWEVER CAUSED AND ON ANY THEORY OF LIABILITY, WHETHER IN CONTRACT, STRICT LIABILITY, OR TORT (INCLUDING NEGLIGENCE OR OTHERWISE) ARISING IN ANY WAY OUT OF THE USE OF THIS SOFTWARE, EVEN IF ADVISED OF THE POSSIBILITY OF SUCH DAMAGE.
This product includes software developed by the OpenSSL Project for use in the OpenSSL Toolkit (http://www.openssl.org).
This product includes cryptographic software written by Eric Young [eay@cryptsoft.com].
OpenSSL 0.9.7d Copyright © 1998-2000 the OpenSSL Project. All Rights reserved. Redistribution and use in source and binary forms, with or without modification, are permitted provided that the following conditions are met:
- Redistributions of source code must retain the above copyright notice, this list of conditions and the following disclaimer.
- Redistributions in binary form must reproduce the above copyright notice, this list of conditions and the following disclaimer in the documentation and/or other materials provided with the distribution.
- All advertising materials mentioning features or use of this software must display the following acknowledgement: This product includes software developed by the OpenSSL Project for use in the OpenSSL Toolkit (http://openssl.org).
- The names "OpenSSL Toolkit" and "Open SSL Project" must not be used to endorse or promote products derived from this software without prior written permission. For written permission, please contact openssl-core@openssl.org.
- Products derived from this software may not be called "OpenSSL" nor may "Open SSL" appear in their names without prior written permission of the OpenSSL Project.
- Redistributions of any form whatsoever must retain the following acknowledgement: "This product includes software developed by the OpenSSL Project for use in the OpenSSL Toolkit (http://www.openssl.org)."
THIS SOFTWARE IS PROVIDED BY THE OpenSSL PROJECT "AS IS" AND ANY EXPRESSED OR IMPLIED WARRANTIES, INCLUDING, BUT NOT LIMITED TO, THE IMPLIED WARRANTIES OF MERCHANTABILITY AND FITNESS FOR A PARTICULAR PURPOSE ARE DISCLAIMED. IN NO EVENT SHALL THE OpenSSL PROJECT OR CONTRIBUTORS BE LIABLE FOR ANY DIRECT, INDIRECT, INCIDENTAL, SPECIAL, EXEMPLARY, OR CONSEQUENTIAL DAMAGES (INCLUDING, BUT NOT LIMITED TO, PROCUREMENT OF SUBSTITUTE GOODS OR SERVICES; LOSS OF USE, DATA, OR PROFITS; OR BUSINESS INTERRUPTION) HOWEVER CAUSED AND ON ANY THEORY OF LIABILITY, WHETHER IN CONTRACT, STRICT LIABILITY, OR TORT (INCLUDING NEGLIGENCE OR OTHERWISE) ARISING IN ANY WAY OUT OF THE USE OF THIS SOFTWARE, EVEN IF ADVISED OF THE POSSIBILITY OF SUCH DAMAGE. This product includes cryptographic software written by Eric Young (eay@cryptsoft.com). This product includes software written by Tim Hudson (tjh@cryptsoft.com).
Copyright © 1995-1998 Eric Young (eay@cryptsoft.com). All Rights reserved. This package is an SSL implementation written by Eric Young (eay@cryptsoft.com). The implementation was written so as to conform with Netscapes SSL. This library is free for commercial and non-commercial use so long as the following conditions are adhered to. The following conditions apply to all code found in this distribution, be it the RC4, RSA, Ihash, DES, etc., code; not just the SSL code. The SSL documentation included with this distribution is covered by the same copyright terms except that the holder is Tim Hudson (tjh@cryptsoft.com).
Copyright remains Eric Young's, and as such any Copyright notices in the code are not to be removed. If this package is used in a product, Eric Young should be given attribution as the author of the parts of the library used. This can be in the form of a textual message at program startup or in documentation (online or textual) provided with the package. Redistribution and use in source and binary forms, with or without modification, are permitted provided that the following conditions are met:
- Redistributions of source code must retain the copyright notice, this list of conditions and the following disclaimer.
- Redistributions in binary form must reproduce the above copyright notice, this list of conditions and the following disclaimer in the documentation and/or other materials provided with the distribution.
- All advertising materials mentioning features or use of this software must display the following acknowledgement: "This product includes cryptographic software written by Eric Young (eay@cryptsoft.com)." The word 'cryptographic' can be left out if the routines from the library being used are not cryptographic related.
- If you include any Windows specific code (or derivative thereof) from the apps directory (application code) you must include an acknowledgement: "This product includes software written by Tim Hudson [tjh@cryptosoft.com]."
THIS SOFTWARE IS PROVIDED BY ERIC YOUNG "AS IS" AND ANY EXPRESS OR IMPLIED WARRANTIES, INCLUDING, BUT NOT LIMITED TO, THE IMPLIED WARRANTIES OF MERCHANTABILITY AND FITNESS FOR A PARTICULAR PURPOSE ARE DISCLAIMED. IN NO EVENT SHALL THE AUTHOR OR CONTRIBUTORS BE LIABLE FOR ANY DIRECT, INDIRECT, INCIDENTAL, SPECIAL, EXEMPLARY, OR CONSEQUENTIAL DAMAGES (INCLUDING, BUT NOT LIMITED TO, PROCUREMENT OF SUBSTITUTE GOODS OR SERVICES; LOSS OF USE, DATA, OR PROFITS; OR BUSINESS INTERRUPTION) HOWEVER CAUSED AND ON ANY THEORY OF LIABILITY, WHETHER IN CONTRACT, STRICT LIABILITY, OR TORT (INCLUDING NEGLIGENCE OR OTHERWISE) ARISING IN ANY WAY OUT OF THE USE OF THIS SOFTWARE, EVEN IF ADVISED OF THE POSSIBILITY OF SUCH DAMAGE. The license and distribution terms for any publicly available version or derivative of this code cannot be changed, i.e. this code cannot simply be copied and put under another distribution license (including the GNU Public License).
Index
A
Account 112
Antenna cables 13
Antenna input configuration 46
Audio player 104
Audio quality adjustments 90
Audio system connection 24
Auto aspect 79
Auto power off 95
AVHD 26,55
B
Back of the TV 11
Banner, Channel Browser™ 74
Blocking channels 98
C
Cable box connection 16, 18
CableCARD™ 14
CableCARD™ connection 14
CableClear ^® DNR 85
Cables 13
Cable modem 30
Camcorder connection 15
CH ▲▼ buttons 47, 72
Channel Browser™ 74
CH RTN button 76
Channel Number buttons 47, 49, 72
Channel programming:
Automatic programming 47
Manually adding and deleting 48
Cinema mode 80
Closed captions 87
Color temperature 85
ColorStream ^® 19
Connecting devices 15-30
CompactFlash ^® memory cards 101, 102
Component video cables 13
Component video
(ColorStream®) 19
D
Defaults, restore TV factory 57
Digital Audio Out 24
Digital signal meter 57
DNR (Digital Noise Reduction) 85
Dolby Digital 24
Dolby Virtual TruSurround 91
Double-window POP feature 81
DVD player connection 18, 19
D-VHS 25, 55
DSL modem 30
DVI connection 21
Dynamic Contrast 86
EFG
E-mail account setup 112
E-mail recording 106
Email 106, 112
EIA-775 25
FAV SCAN button 49, 83
Favorite channels 49, 83
Features, TV 8
Focus 91
Front of the TV 10
Front panel touchpad 10, 41
GameTimer™ 99
G-LINK™ connection 28
HIJ
HDMI audio mode 55
HDMI™ connection 21
Home file server setup 111
Home network connection 30
ID 114
IEEE1394 25
INPUT button 72
Input lock 98
Installation, care, and service 3.4
Installation, setup 9
Integrated digital tuning 8
IR blaster 22
ISP (Internet Service Provider) 106
JPEG 100, 102–103
L
Labeling video inputs 73
Lamp mode 80
Lamp unit replacement 128–130
Language selection 46
Last mode memory feature 95
LED indications 10, 124
Locking video inputs 98
LOCKS menu 96
Channels, blocking 98
Enable rating blocking 97
Front Panel lock (Control panel lock) 99
GameTimer™ 99
New PIN code 96
Unlocking programs temporarily 98
deo inputs, locking 98
MN
Memory cards 101-105
Memory Stick™ memory cards 101, 102
Menu system 40, 41
MMC memory cards 101, 102
MP3 101, 104-105
MPEG-2 digital video signals 25
MPEG noise reduction 86
MTS feature 89
MUTE button 89
Network addres 106
OPQ
ON/OFF timer 93
Optical audio cable 13
Optical audio output format 92
Panel lock 99
Password 115
PC connection 29
PC setting 94
Picture adjustments:
CableClear®/DNR (digital noise reduction) 85
Color temperature 85
Dynamic Contrast 86
MPEG noise reduction 86
Picture mode 84
Picture quality 84
Picture-out-picture (POP):
FAV SCAN button 83
SPLIT button 81
Picture scroll 79
Picture size selection 77
Picture viewer 100
POWER button 10, 31, 36
Quick Restart™ 56
B
RECALL button 95
Remote control:
Battery installation 33
Device code table 38, 39
Effective range 32
Functional key chart 34, 35
Learning about the buttons 31
Operational feature reset 37
Programming 36
Searching and sampling the code 36
Volume lock feature 37
Restore TV factory defaults 57
RJ-45 (LAN) cable 30
RJ-45 (THINC ^TM ) connection 30
Router 30
S
Safety, care, installation, and service 2–5
SAP sound 89
Satellite receiver connection 17
Sub-bass (SBS) 90
Scrolling the TheaterWide® picture 79
SD (Secure Digital™) memory cards 101, 102
Service 4
Setup, TV 41, 46
Setup, TV Guide On Screen ^® system 42
Sleep timer 93
Speakers ON/OFF 92
Specifications 131
SRS 3D 91
SRS WOW™ 91
StableSound ^® 90
Stereo sound 89
S-video cables 13
SurfLock™ 76
Symbio™ AVHD recorder 26, 55
System status 57
T
Telephone cable 30
TheaterNet™ DEVICE and
CONTROL buttons 51
TheaterNet™ control 25
TheaterNet IR device codes 52-54
TheaterWide® picture size 78
TheaterNet™ setup 50
THINC™ system 12
Time and date setting 55
Troubleshooting 119-123
TruBass 91
TV-Guide Email 112
TV Guide On Screen™ 9, 42, 58
TV/VIDEO button 72, 73
V
V-Chip blocking (Locks menu) 96-99
VCR connection 15-20
Video cables 13
Video input labels 73
Video input lock 98
VOLUME button 10, 37, 89
W, X
Warranty:
U.S. 132
Canada 133
WOW™, SRS® 91
xD-Picture Card™ 101, 102
TOSHIBA AMERICA CONSUMER PRODUCTS, L.L.C.
HEAD OFFICE: 82 TOTOWA ROAD, WAYNE, NJ 07470, U.S.A.
NATIONAL SERVICE DIVISION:1420-B TOSHIBA DRIVE, LEBANON, TN 37087, U.S.A.
CableClear, Cinema Series, ColorStream, StableSound, and TheaterWide are registered trademarks of Toshiba America Consumer Products, L.L.C. Channel Browser, GameTimer, SurfLock, Symbio, Quick Restart, TheaterNet, and THINC are trademarks of Toshiba America Consumer Products, L.L.C. Digital Light Processing, DLP™ and the DLP medallion are trademarks of Texas Instruments.
PRINTED IN USA
(05-09)
TOSHIBA
- Integrated High Definition DLP™ Projection Television
- Owner's Record
- Dear Customer,
- Safety Precautions
- Lamp Unit Replacement
- See "Lamp unit replacement and care" on pages 128–130.
- NOTICE OF POSSIBLE TV STAND INSTABILITY
- NOTE TO CATV INSTALLERS IN THE U.S.A.
- Child Safety
- It Makes A Difference Where Your TV Stands
- The Issue
- Toshiba Cares!
- Tune Into Safety
- Important Safety Instructions
- Installation, Care, and Service Installation
- Installation (continued from previous page)
- 28) DANGER: RISK OF SERIOUS PERSONAL INJURY OR DEATH!
- Care
- 31) WARNING: RISK OF ELECTRIC SHOCK!
- Care (continued from previous column)
- 35) Special care for DLP™ (Digital Light Processing) units:
- Service
- 36) WARNING: RISK OF ELECTRIC SHOCK!
- FCC Declaration of Conformity Compliance Statement (Part 15):
- Important notes about your DLP™ projection TV
- IMPORTANT NOTICE ABOUT "HOT LAMP RESTART"
- Contents
- Chapter 8: Using the TV's features ....72
- Chapter 10: Using the Picture Viewer and Audio Player .... 100
- Chapter 11: Using the THINC™ home network feature .... 106
- 1
- Introduction
- Welcome to Toshiba
- Features of your new TV
- Overview of steps for installing, setting up, and using your new TV
- DANGER: RISK OF SERIOUS PERSONAL INJURY
- 2
- Connecting your TV
- TV front and side panel controls and connections
- TV back panel connections
- TV back panel connections (continued)
- Note:
- \*THINC™ system
- (Toshiba Home Interactive Network Connection)
- Overview of cable types
- About the connection illustrations
- Connecting a digital CableCARD™
- You will need:
- ☐ To view encrypted digital channels:
- Connecting a VCR and antenna or Cable TV (no Cable box)
- Connecting a camcorder
- Connecting a VCR and Cable box
- Connecting a VCR and satellite receiver
- ☐ To use the TV Guide On Screen™ recording features:
- Connecting a DVD player with S-video, a VCR, and a Cable box
- To view basic channels and access the TV's features:
- ☐ To view premium Cable channels:
- ☐ To view the DVD player:
- To view the VCR:
- ☐ To enable the TV Guide On Screen ™ system to work with your cable box and to use the TV Guide On Screen ™ recording features:
- Connecting a DVD player with ColorStream® (component video) and a VCR
- Connecting two VCRs
- Connecting an HDMI ™ or a DVI device to the HDMI input
- NOTE: DO NOT CONNECT A PC USING THE HDMI PORT. ALWAYS use the VGA port provided to connect a PC.
- To connect an HDMI device, you will need:
- To connect a DVI device, you will need:
- Connecting a device to the IR blaster (IR pass-through)
- To connect the IR blaster cable:
- To control the device(s):
- \*If you cannot locate the device's infrared sensor:
- Connecting a device to the IR blaster (continued)
- Using the TheaterNet™ IN:
- TheaterNet™ on-screen device control
- Connecting a digital audio system
- To control the audio:
- Connecting an analog audio system
- Connecting IEEE1394 video devices
- Using analog-compatible IEEE1394 devices
- Supported signals
- •MPEG-2 digital video signals
- •Dolby Digital and MPEG digital audio signals
- •EIA-775 and AV/C digital control
- Using TheaterNet™ on-screen device control
- Connecting IEEE1394 video devices (continued)
- Connecting an AVHD (external hard drive) or D-VHS digital recorder
- When you connect a D-VHS or AVHD device to the TV:
- This TV is compatible with the new Toshiba
- Symbio™
- Audio/Video Hard Drive Recorder!
- IEEE1394 device initialization
- IEEE1394 device management
- To edit the IEEE1394 device information:
- Important information regarding IEEE1394 device interconnection
- G-LINK™ connection
- To connect to the G-LINK TM terminal:
- For details on setting up the TV Guide On Screen™ system: See Chapter 5.
- For details on using the TV Guide On Screen™ interactive program guide:
- Connecting a personal computer (PC)
- Connecting a home network
- ■ File sharing
- ■ E-mail scheduling of recordings and reminders
- Using the remote control
- Learning about the remote control
- Learning about the remote control (continued)
- Remote control effective range
- Installing the remote control batteries
- To install the remote control batteries:
- Caution:
- Using the remote control MODE button to control your other devices
- Notes:
- Programming the remote control to operate your other devices
- Device code setup
- Searching and sampling the code of a device (8500)
- To cycle through each available device code and sample its functions:
- Programming the remote control to operate your other devices (continued)
- Using the volume lock feature (8000)
- To lock the volume controls to always control the CABLE/SAT device volume (for example):
- To reset the volume controls to the original device mode:
- Operational feature reset (8900)
- Multi-brand remote control device codes
- Multi-brand remote control device codes (continued)
- Menu layout and navigation
- Main menu layout
- Setup / Installation menu layout
- Navigating the menu system
- 5
- TV Guide On Screen™ setup
- Setting up the TV Guide On Screen™ system
- To set up the TV Guide On Screen™ system:
- Configuring the location of your TV
- Setting up the TV Guide On Screen™ system (continued)
- TV Guide On Screen™ Reminder
- Turning off the TV Guide On Screen™ automatic display feature
- Setting up your TV
- Selecting the menu language
- To select the menu language:
- Configuring the antenna input sources
- To configure the ANT 1 and ANT 2 input sources:
- Programming channels into the TV's channel memory
- Programming channels automatically
- To program channels automatically:
- Programming channels into the TV's channel memory (continued)
- Manually adding and deleting channels in the channel memory
- To add or delete channels in the channel memory:
- To add a channel to the channel memory:
- To manually add digital subchannels on a physical channel:
- To remove a channel from the channel memory:
- To save your new settings:
- To revert to your original settings:
- To remove all channels from the channel memory:
- Programming your favorite channels
- To add and delete channels in the Favorite Channels sets:
- To delete the channel from the selected Favorite Channels set:
- To program favorite channels for another input:
- To clear your favorite channel lists:
- To tune your favorite channels using the favorite channel list:
- Setting up and using TheaterNet™ on-screen device control
- Setting up TheaterNet
- To set up TheaterNet device control:
- To remove a device from TheaterNet:
- Setting up and using TheaterNet™ on-screen device control (continued)
- Using the TheaterNet control icons
- TheaterNet™ IR device codes
- Amplifiers
- Brand Code
- Cable boxes
- Cable boxes (cont.)
- CD players
- CD players (cont.)
- Laser disk players
- Miscellaneous audio devices
- TheaterNet™ IR device codes (continued)
- Video accessory (HDTV decoder) Brand Code
- Receivers
- Receivers (cont.)
- Satellite receivers
- VCRs
- Setting the AVHD device skip time
- To set the AVHD device skip time:
- Setting the HDMI™ audio mode
- To set the HDMI audio mode:
- Setting the time and date
- To set the time and date:
- Viewing the CableCARD™ menu
- To view the CableCARD™ menu:
- Setting the Quick Restart™ feature
- To set the Quick Restart ™ feature:
- This is a property of DLP TV lamp technology and is NOT a sign of malfunction.
- Viewing the digital signal meter
- To view the digital signal meter:
- To return to normal viewing:
- Viewing the system status
- To view the system status:
- To restore all settings and channels to their factory default values:
- To cancel the reset:
- Using the TV Guide On Screen™ interactive program guide
- To open the TV Guide On Screen™ system:
- Navigating the TV Guide On Screen™ system
- TV Guide On Screen™ remote control functions
- Navigating the TV Guide On Screen™ system (continued)
- Video Window
- To lock/unlock the Video Window:
- Panel Menus
- Info Box
- TV Guide On Screen™ Icons
- TV Guide On Screen™ Services
- LISTINGS screen
- Episode Options panel menu
- TV Guide On Screen™ Services (continued)
- SEARCH screen
- Example: Category search
- SEARCH screen (continued)
- Example: Keyword search
- To edit or delete a keyword:
- RECORDINGS screen
- To choose the way recordings are displayed:
- To view a recording, you can do one of the following:
- SCHEDULE screen
- Record features
- 1) Set a show to Record using the REC key on the remote control
- 2) Set a show to Record from a panel menu
- Record features (continued)
- 3) Manually set a show to Record
- Recording notification banner
- Record conflict
- Record icons
- Remind features
- Remind features (continued)
- Reminder notification banner
- Remind conflict
- Remind icons
- SETUP screen
- Change system settings
- Change channel display
- SETUP screen (continued)
- Change default options
- General defaults
- Record defaults
- Remind defaults
- 8
- Using the TV's features
- Selecting the video input source to view
- To select the video input source to view:
- Labeling the video input sources
- To label the video input sources:
- Input labeling example:
- To clear the input labels:
- Tuning channels
- Using the Channel Browser™
- To toggle between Browse mode and Select mode:
- To tune to a channel in Browse mode:
- To tune to a channel in Select mode:
- Tuning channels (continued)
- Using the Channel Browser TM (continued)
- Adding and clearing channels in the channel history
- Adding channels to the channel history
- Clearing channels from the channel history
- Setting a channel as the "Home" channel for an input
- To set a channel as Home using the remote control:
- To set a channel as Home using the menus:
- To tune to the Home channel:
- Tuning your favorite channels
- Tuning to the next programmed channel
- To tune to the next programmed channel:
- Tuning to a specific channel (programmed or unprogrammed)
- Tuning analog channels:
- Tuning digital channels:
- Switching between two channels using Channel Return
- Switching between two channels using SurfLock™
- Selecting the picture size
- To select the picture size:
- Natural picture size
- Selecting the picture size (continued)
- TheaterWide 1 picture size (For 4:3 format program)
- TheaterWide 2 picture size (for letter box programs)
- TheaterWide 3 picture size (for letter box programs with subtitles)
- Full picture size (for 16:9 [480i, 480p] source programs only)
- Scrolling the TheaterWide® picture (TheaterWide 2 and 3 only)
- To set the scroll settings:
- Using the auto aspect ratio feature
- To turn on the auto aspect ratio feature:
- To turn off the auto aspect ratio feature:
- Selecting the cinema mode (480i signals only)
- To set the Cinema Mode to Film:
- To set the Cinema Mode to Video:
- Selecting the lamp mode
- To select the lamp mode:
- Using the POP features
- Using the POP double-window feature
- To display a program in the POP window:
- To close the POP window and tune to the highlighted window:
- To close the POP window:
- Notes about recording:
- Using the POP features (continued)
- Switching the speaker audio (main or POP)
- POP double-window aspect ratio
- Using the FREEZE feature
- Using the favorite channel scan feature
- To scan and tune your favorite channels:
- Adjusting the picture
- Selecting the picture mode
- To select the picture mode:
- To select the picture mode using the menu system:
- Adjusting the picture quality
- To adjust the picture quality:
- Adjusting the picture (continued)
- Using CableClear® /DNR (digital noise reduction)
- To select CableClear/DNR preferences:
- Selecting the color temperature
- To select the color temperature:
- Using MPEG noise reduction
- To select the MPEG noise reduction level:
- Using dynamic contrast
- To select dynamic contrast preferences:
- Using the closed caption mode
- To view captions or text:
- • To view captions:
- • To view text:
- • To turn off the Closed Caption mode:
- Advanced closed captions
- To customize the closed captions:
- Using the closed caption mode (continued)
- Digital closed captions
- To select digital closed captions:
- Adjusting the audio
- Muting the sound
- Using the digital audio selector
- To use the digital audio selector:
- Selecting stereo/SAP broadcasts
- To listen to stereo sound:
- Adjusting the audio (continued)
- Adjusting the audio quality
- To adjust the audio quality:
- Using the sub-bass system (SBS)
- To turn on the SBS and adjust the level:
- To turn off the SBS:
- Using the StableSound® feature
- To turn on the StableSound ® feature:
- To turn off the StableSound feature:
- Using the SRS WOW™ surround sound feature
- To adjust the WOW ™ settings:
- Using the Dolby Virtual with SRS TruSurround sound feature
- To turn on the Dolby Virtual surround sound feature:
- To turn off the Dolby Virtual surround sound feature:
- Turning off the built-in speakers
- To turn off the built-in speakers:
- To turn on the built-in speakers:
- Selecting the optical audio output format
- To select the optical audio output format:
- Setting the On/Off Timer
- To set the On/Off Timer:
- To turn off the On/Off Timer:
- Setting the sleep timer
- To set the sleep timer:
- To cancel the sleep timer:
- To set the sleep timer using the on-screen menus:
- To display the remaining sleep time:
- Using the PC setting feature
- To set the PC setting:
- • Horizontal Position/Vertical Position:
- • Horizontal Width/Vertical Hegiht:
- - Clock Phase:
- - Sampling Clock:
- Displaying TV setting information on-screen using RECALL
- To display TV setting information on-screen:
- To close TV setting information on-screen:
- Understanding the auto power off feature
- Understanding the last mode memory feature
- Using the Gray Level feature
- To set the gray level of the sidebars:
- 9
- Using the Locks menu
- Entering the PIN code
- If you cannot remember your PIN code
- Changing your PIN code
- Blocking TV programs and movies by rating (V-Chip)
- To block and unblock TV programs and movies:
- Blocking channels
- To block channels:
- To unblock individual channels:
- To block all channels at once:
- To unblock all locked channels at once:
- Unlocking programs temporarily
- This program exceeds the rating limit you set. Push 'mute' to enter PIN.
- To temporarily unlock the program:
- Locking video inputs
- To lock the video inputs:
- Using the GameTimer™
- To set the GameTimer TM :
- To cancel the GameTimer™:
- To deactivate the video lock once the GameTimer has activated it:
- Using the control panel lock feature
- To lock the control panel:
- To unlock the control panel:
- Using the Picture Viewer and Audio Player
- Media specifications
- File/folder name specifications
- Picture Viewer/JPEG file specifications
- Media specifications (continued)
- Audio Player/MP3 file specifications
- Networked PC specifications
- Memory card specifications
- Using the Picture Viewer
- Accessing JPEG files stored on a networked PC
- NOTE: ALWAYS CLOSE THE PICTURE VIEWER OR AUDIO PLAYER BEFORE REMOVING THE MEMORY CARD.
- Accessing JPEG files stored on a memory card
- Using the Picture Viewer (continued)
- Viewing JPEG files on the TV
- During the slide show:
- To set the slide show interval:
- To close the Picture Viewer:
- To restart the Picture Viewer while the memory card is still inserted:
- To close the Picture Viewer and remove the memory card:
- NOTE: ALWAYS CLOSE THE PICTURE VIEWER BEFORE REMOVING THE MEMORY CARD.
- Using the Audio Player
- Accessing MP3 files stored on a networked PC
- Accessing MP3 files stored on a memory card
- For a memory card that is already inserted in the TV:
- For a memory card that contains both MP3 files and JPEG files when no memory card is inserted in the TV:
- For a memory card that contains only MP3 files when no memory card is inserted in the TV:
- Using the Audio Player (continued)
- Playing MP3 audio files on the TV
- To use the mute function:
- To start the MP3 audio player when a memory card is already inserted:
- To close the Audio Player:
- To close the Audio Player and remove the memory card:
- Memory card care and handling
- Using the THINC™ home network feature
- - File sharing
- • E-mail scheduling of recordings and reminders
- Connect the TV to your home network
- If you want to use file sharing and e-mail scheduling:
- For home network troubleshooting tips, see pages 122-123.
- Set up the network address
- To set up the network address:
- Automatically setting up the network address
- Set up the network address (continued)
- Manually setting up the network address
- Manually setting up the network address (continued)
- Resetting the network address
- Set up file sharing on your PC
- Compatible operating systems
- To determine which operating system and service pack (if applicable) are on your PC:
- Setting up file sharing on a PC with Microsoft® Windows® XP Service Pack 1 or Service Pack 2
- Set up file sharing on your PC (continued)
- Setting up file sharing on a PC with Microsoft® Windows® 2000
- On your PC:
- In the Properties window for the selected folder:
- In the Permissions window for the selected folder:
- In the Properties window:
- The shared folder will display with a "shared folder" icon (a hand holding a folder).
- Go to section D, "Set up file sharing on the TV" on page 111.
- Set up file sharing on the TV
- Viewing/playing shared files on the TV
- USING THE ON-SCREEN KEYBOARD
- Set up e-mail scheduling
- Required information and services
- Setting up e-mail scheduling
- w: c = t y u i d p [ ]
- Set up e-mail scheduling (continued)
- If the e-mail test passes:
- If the e-mail test does not pass:
- IMPORTANT NOTE
- Description of fields in the "E-mail Scheduling Setup" window
- ■ "E-mail Scheduling" field
- ■“ID Required” field
- ■ "ID" field
- ■ "E-mail Address" field
- Description of fields in the "E-mail Scheduling Setup" window (continued)
- ■ "Account" field
- ■ "Password" field
- ■ "Incoming Mail Server" field
- ■ "Outgoing Mail Server" field
- ■ "E-mail Authorization" field
- ■ "Authorized E-mail" field
- Using e-mail scheduling
- E-mail parameters
- Sending a request e-mail to the TV
- To send a request e-mail to the TV:
- Formatting a request e-mail
- Recognized tags
- Tag and data formats
- Using e-mail scheduling (continued)
- Formatting a request e-mail (continued)
- Sample request e-mails
- ■ ADD request e-mail
- ■ GET request e-mail
- ■ DELETE request e-mail
- ■ HELP request e-mail
- Receiving an e-mail from the TV
- Modifying an existing recording or reminder
- Troubleshooting
- General troubleshooting
- TV will not turn on
- Picture problems
- General picture problems
- Noisy picture
- Video Input Selection problems
- Cannot view external signals or channel 3 or 4
- Black box on screen
- Poor color or no color
- POP problems
- Picture brightness changes soon after turning on TV
- Poor composite or S-video picture
- General troubleshooting (continued)
- Picture problems (continued)
- Picture and sound are out of sync
- "Now Booting" message appears on-screen
- Sound problems
- Remote control problems
- Channel tuning problems
- Closed caption problems
- Rating blocking (V-Chip) problems
- TV stops responding to controls
- Other problems
- Recording problems
- Memory card problems
- Audio player problems
- Picture Viewer problems
- Home network troubleshooting
- Basic network setup problems
- Home network troubleshooting (continued)
- Home server setup problems
- E-mail scheduling problems
- LED indications
- TV Guide On Screen™ FAQ
- SETUP
- TV Guide On Screen™ FAQ (continued)
- CHANNEL LINEUPS & LISTINGS
- OPERATIONS
- RECORD/REMIND
- 13
- Appendix
- Lamp unit replacement and care
- Replacing the lamp unit (User-replaceable component)
- WARNING: RISK OF ELECTRIC SHOCK!
- If you use the lamp beyond its service life:
- CAUTION: Always handle the lamp unit with care.
- When to replace the lamp unit
- You should replace the lamp unit:
- To obtain a replacement lamp unit:
- In the U.S.
- In Canada
- Lamp unit replacement and care (continued)
- How to replace the lamp unit
- CAUTION: HOT SURFACE!
- How to replace the lamp unit (continued)
- CLEANING THE LAMP UNIT GLASS
- Disposing of the used lamp unit
- Specifications
- Television System
- Channel Coverage
- Power Source
- Power Consumption
- Audio Power
- Speaker Type
- Video/Audio Terminals
- S-VIDEO INPUT:
- VIDEO/AUDIO INPUT:
- ColorStream® (component video) HD INPUT:
- Video/Audio Terminals (continued)
- HDMI™ INPUT:
- VIDEO/AUDIO OUTPUT (also for recording):
- VARIABLE AUDIO OUTPUT:
- G-LINK™:
- IEEE1394 INPUT/OUTPUT:
- DIGITAL AUDIO OUTPUT:
- PC IN:
- Dimensions
- Weight
- Supplied Accessories
- Optional Stands
- Limited United States Warranty
- for DLP™ Television Models
- Limited One (1) Year Warranty on Parts and Labor
- Limited One (1) Year Warranty on Lamp Unit
- Rental Units
- Limited Warranty for Commercial Units
- Owner's Manual and Product Registration
- Your Responsibility
- How to Obtain Warranty Service
- For additional information, visit TACP's web site: www.tacp.toshiba.com.
- Limited Canada Warranty
- Limited One (1) Year Warranty on Parts and Labor\*
- Limited One (1) Year Warranty on Lamp Unit\*
- \*Limited Warranty for Commercial Units
- How to Obtain Warranty Services
- For additional information, visit TCL's web site: www.toshiba.ca
- Index
- A
- B
- C
- D
- EFG
- HIJ
- L
- MN
- OPQ
- S
- T
- V
- W, X
- TOSHIBA AMERICA CONSUMER PRODUCTS, L.L.C.
Brand : TOSHIBA
Model : 62MX195
Category : Television