
WHC633BC - Cooker WESTINGHOUSE - Free user manual and instructions
Find the device manual for free WHC633BC WESTINGHOUSE in PDF.


| Product Type | Built-in Electric Ceramic Hob |
| Brand | Westinghouse |
| Model / SKU | WHC633BC / WHC633BC |
| Product Dimensions (H x W x D) | 520 x 590 mm |
| Cut-out Dimensions (H x W x D) | 190 x 560 mm |
| Voltage | 220-240 V |
| Frequency | 50-60 Hz |
| Total Power | 5900 W |
| Number of Cooking Zones | 3 |
| Zone Power - Front Left | 1700 W (Single) |
| Zone Power - Rear Left | 1800 W (Single) |
| Zone Power - Centre / Right | 1600/3000 W (Double, inner/outer) |
| Control Type | Touch sensor with digital display |
| Functions | Automatic warm-up, Timer (minute minder & auto cut-off), Keep warm, Child lock, Pause, Triple/Light control |
| Residual Heat Indicator | OptiHeat (3-step) |
| Safety Features | Automatic switch-off, child safety device, lock, overheating protection |
| Cleaning | Glass ceramic surface; clean with damp cloth and mild detergent; use scraper for sugar/plastic spillages |
| Warranty | 2 years (Australia/New Zealand) |
| Installation Requirements | Qualified electrician; min. distances; non-combustible barrier under bench |
| Spare Parts & Repairability | Authorized service centres; use genuine parts; contact customer care |
| Environmental Information | Recyclable packaging; WEEE disposal symbol |
Frequently Asked Questions - WHC633BC WESTINGHOUSE
User questions about WHC633BC WESTINGHOUSE
0 question about this device. Answer the ones you know or ask your own.
Ask a new question about this device
Download the instructions for your Cooker in PDF format for free! Find your manual WHC633BC - WESTINGHOUSE and take your electronic device back in hand. On this page are published all the documents necessary for the use of your device. WHC633BC by WESTINGHOUSE.
USER MANUAL WHC633BC WESTINGHOUSE
Congratulations on the purchase of your new cooktop. Before you use the cooktop, we recommend that you use through the who e user manual which provides the description of the cooktop and its functions.
To avoid the risks that are always present when you use an electrical appliance, it is important that the cooktop's installed correctly and that you read the safety instructions carefully to avoid misuse and hazards.
We recommend that you keep this instruction booklet for future reference and pass it on to any future owners. At or unpacking the appliance, please check. I is not damaged. If in doubt, do not use the appliance but contact your local Customer Care Centre.
For contact details, refer to the last page of this user manuscript. This application compies with requirements of Australian Standard AS/NZS 603352.6
Conditions of use
This appliance is intended to be used in household and similar applications such as:
- Staff kitchen areas in shops, offices and other working environments
- Farm houses
- By clients in hotels, microcls and other residential type environments
- Bed and breakfast type environments
Please ensure you read the instruction manual fully before you call for service, or a full service fee could be applicable.
- Record mode and serial number here.
Record model and serial number here:
Model number
Serial number
外公
CONTENTS
Important safety instructions....3
Product description
Operating instructions....8
Care and cleaning
Troubleshooting 14
Technical data 15
Environment concerns 15
Installation Instructions....16
Assembly 17
warranty
Please read the user manual carefully and store in a handy place for later reference.
The symbols you will see in this booklet have
these meanings.

WARNING
This symbol indicates information concerning your personal safety.

CAUTION
This symbol indicates information on how to avoid damaging the appliance.

IMPORTANT
This symbol indicates tips and information about use of the appliance.

ENVIRONMENT
This symbol indicates tips and information about economical and ecological use of the appliance.
IMPORTANT INFORMATION THAT MAY IMPACT YOUR MANUFACTURER'S WARRANTY
Adherence to the directions for use in this manual is extremely important for health and safety. Failure to strictly adhere to the requirements in this manual may result in personal injury, property damage and affect your solity to make a claim under the West righthouse manufacturer's warranty provided with your product. Products must be used, installed and operated in accordance with this manual. You may not be able to claim on the Westinghouse manufacturer's warranty in the recall that your product shall be due to failure to adhere to this manual.
IMPORTANT SAFETY INSTRUCTIONS

WARNING
Please comply with these instructions. If you do not, any damage resulting is not covered by the warranty.
General safety
• This appliance is not intended for use by persons (including children), with reduced physical sensory or mental capabilities, or lack of experience and knowledge, unless they have been given supervision or instruction concerning use of the appliance by a person responsible for their safety.
- Do not leave the appliance unattended during operation.
- This appliance should be used only for normal domestic cracking and frying of food.
- The appliance must not be used as a work surface or as a storage surface.
- Adolons or modifications to the spallance are no permitted.
- Do not place or store flammable liquids, highly inflammable materials or fusible objects (e.g., plastic film, plastic aluminium) on or near the appliance.
Children's safety
- The cooking zones will become hot when you cook. Therefore, always keep small children away from the appliance.
• The appliance is not intended for use by young children or infirm persons without supervision - Children should be supervised to ensure that they do not pay with the appliance.

WARNING
Accessible parts will become hot during use. To avoid bums young children should be kept away
Correct operation
- Always monitor the appliance during operation. Do not use an external timer or a separated remote control system. In otherwise the appliances.
- Only use the appliance for domestic cooking tasks..
- Do not use the appliance as a work or a storage surface.
- Do not put or keep very flammable liquids and materials, or fusible objects (made of plastic or aluminium) on or near the appliance
- Other then the connection point in the terminal block, do not let the electrical supply cord touch the appliance or not cockware. Ensure electrical supply cord is not tangled.
General safety
- The appliance may only be installed and connected by trained, registered service engineers.
- Built-in appliances may only be used after they have been built into suitable built-in units and work surfaces that meet standards.
- In the event of faults with the appliance or damage to the glass ceramic (craces, scralcnes or splits), the appliance must be switched off and disconnected from the electrical supply, to prevent the possibility of an electric shock.
- Repairs to the appliance must only be carried out by trained registered service engineers.
Safety during use
- Remove stickers and film from the glass ceramic.
- There is the risk of burns from the appliance it used parclessly
- Cables from electrical appliances was not found the hot surface of the appliance or hot cooker.
• Overheated fats and oils can ignite very quickly. Warning Fire hazardill
- Switch the cooking zones off after each use.

WARNING
If the surface is cracked, switch off the appliance to avoid possibility of electric shock.
PRODUCT DESCRIPTION
Cooking surface layout
WHC643BC
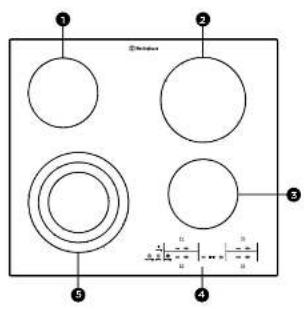
Sing cooling (arc 1200W
2 Sing ÷ cooking zone 1800W
3 Sing e cooking zone 1200W
4 Contro panel
5 Trip e cooking zone 2300/1600/800W
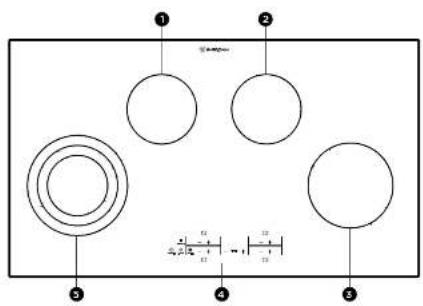
1 Single cooking zone 1200W
2 Single cooking zone 1200W
3 Single crowding /one BROW
4 Control panel
5 Triple cooking /one 2300/1600/800W
WHC933BC
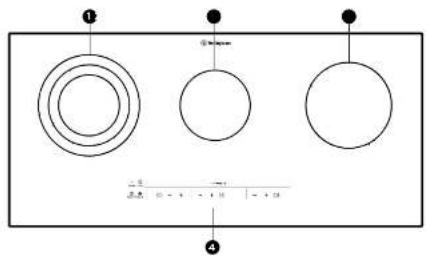
1 Trip e cook ng zone 2300/1600/800W
2 Single cooking zone 1200W
3 Single cooking zone 1900W
4 Control panel
WHC633BCWHC943BC
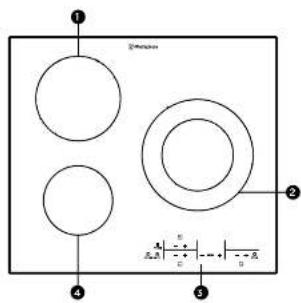
1 Single cooking zone 1800W
2 Double cooking zone 3000/600W
3 Control panel
4 Single cooking zone 1200W
PRODUCT DESCRIPTION (CONTINUED)
Control panel layout - WHC643BC, WHC943BC
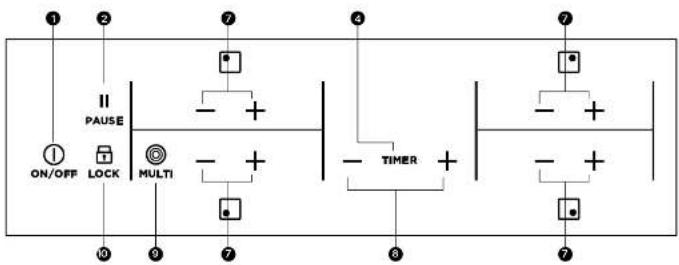
flowchart
graph TD
    A["1 ON/OFF"] --> B["2 LOCK"]
    B --> C["3 MULTI"]
    C --> D["4 TIMER"]
    D --> E["5"]
    E --> F["6"]
    F --> G["7"]
    style A fill:#f9f,stroke:#333
    style B fill:#ccf,stroke:#333
    style C fill:#cfc,stroke:#333
    style D fill:#fcc,stroke:#333
    style E fill:#cff,stroke:#333
    style F fill:#ffc,stroke:#333
    style G fill:#fcf,stroke:#333
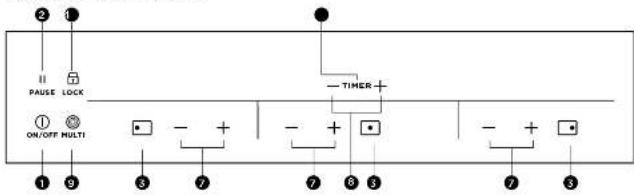
Control panel layout - WHC933BC
Control panel layout · WHC633BC
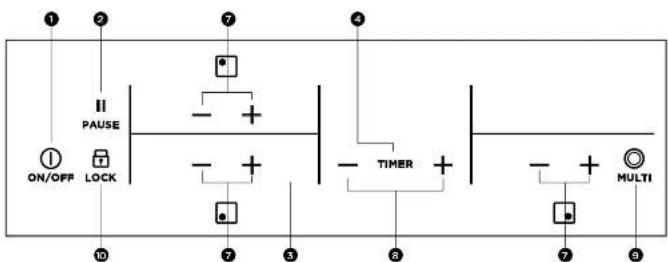
flowchart
graph TD
    A["① ON/OFF"] --> B["② LOCK"]
    B --> C["③"]
    C --> D["④ TIMER"]
    D --> E["⑤ MULTI"]
    style A fill:#f9f,stroke:#333
    style B fill:#ccf,stroke:#333
    style C fill:#cfc,stroke:#333
    style D fill:#fcc,stroke:#333
    style E fill:#cff,stroke:#333
Use the sensor fields to operate the appliance. The displays, indicators and sounds tell which functions operate.
| SENSOR FIELD FUNCTION | ||
| 1 | OR/OPR | t activates and deactivates the appliance |
| 2 | II PAUSE | Set all operating zones to a keep warm setting |
| 3 | A heat setting display | t shows the heat setting |
| 4 | TIME | t selects the cooking zone |
| 5 | Cooking zones' indications of timer | t shows 'or which zone you set the time |
| 6 | The timer display | t shows the time in minutes |
| 7 | -/+ | t increases or decreases the heat setting |
| 8 | -/+ | t increases or decreases the time |
| 9 | HATI / HATI | t activates the outer rings on the double or triple zone element |
| 10 | LOCK | t locks/unlocks the control panel |
Heat setting displays
| DISPLAY DESCRIPTION | |
| ☐ | The cooking zone is deactivated. |
| ☐ | The Keep Warm Tundler operates. |
| ☐, ☑ | The cooking zone operates. |
| ☒ | The Automatic Heat-up function operates. |
| ☒ | There is a malfunction. |
| ☒ / = / _ | A cooking zone is still hot (residual heat). |
| ☐ | The Lock/Child Safety device operates |
| ☐ | The Automatic Switchpoint box. |
OptiHeat control (3 step residual heat indicator)

WARNING
/ = / _ Risk of burns from residual heat!
OptiHeat Control shows the level of the residual heat. The induction cooking zones make the heat necessary for cooking directly in the bottom of the cookware. The glass ceramic is hot from the heat of the cookware.
OPERATING INSTRUCTIONS
Switching the appliance on and off
| CONTROL PANEL DISPLAY PILOT LIGHT | |||
| Switch on | Touch 🔊 for 2 seconds | ∅/R | lights up |
| Switch off | Touch 🔊 for 2 seconds | H/none | goes out |

IMPORTANT
After switching on, within approx. 10 seconds a heat setting or a function must be set, otherwise the appliance automatically switches itself off.
Setting the heat setting
| CONTROL PANEL INDICATOR | ||
| To increase | Touch + | ☐ to ☐ |
| To decrease | Touch - | ☐ to ☐ |
| To switch off+ | Touch + and →, the same time | ☐ |

IMPORTANT
The keep warm setting lies between and it is used to keep food warm.
Switching the outside ring on and off
by switching the outside rings on or off, the effective heating surface can be matched to the size of the cookware
| TRIPLE COOKING ZONE SENSOR PANEL POWER INDICATOR | ||
| To switch on the middle ring | Touch for 1-2 seconds | One power indicator is it |
| To switch on the outside ring | Touch for 1-2 seconds | Two power indicators are it |
| To switch off the outside ring | Touch for 1-2 seconds | The second power indicator goes out |
| To switch off the middle ring | Touch for 1-2 seconds | The first power indicator goes out |

IMPORTANT
Before an outside ring can be switched on, the inside ring must be switched on.
Locking/unlocking the control panel
The control panel with the exception of the "On/Off" sensor filed can be locked at any time in order to prevent the settings being changed e.g. by wiping over the panel with a coin.
| CONTROL PANEL DISPLAY | ||
| Switch on | Touch | (for 5 seconds) |
| Switch off | Touch | the previous y-sc, head, scaling |

IMPORTANT
When you switch the appliance off, the locking function is automatically switched off.
8 9 OPERATING INSTRUCTION SOPERATING INSTRUCTIONS
Using the automatic warm-up function
All cooking zones are equipped with an automatic warm on function. When selling a heat setting using + when starting from 0 the cooking zones switches to full power for a certain amount of time and then automatically switches back to the heat setting set.
| CONTROL PANEL DISPLAY PILOT LIGHT | |||
| Switch on Only when starting at [7] | Touch + | [1] to [8] | [8] (after a seconds) |
| Switch off | Touch - | [9] to [8]/[10] | [8] to [11] |
| Not used | Touch - | [9] to [8] | [9] to [12] |

IMPORTANT
If during the automatic warm up ① a higher heat setting is selected, e.g. from ③ to ⑤ the automatic warm up is adjusted.
| HEAT SETTING | LENGTH OF THE AUTOMATIC WARM UP (MIN:SEC) |
| A | 0.50 |
| B | 1.00 |
| C | 1.40 |
| D | 1.60 |
| E | 6.30 |
| F | 10.10 |
| G | 2.00 |
| H | 3.30 |
| I | 4.30 |
| J | --- |
The child safety device
The child safety device prevents unintentional use of the appliance.
Switching on the child safety device:
- Start the noo with ① Do not set the neat settings. - Touch B for 4 seconds. The symbol comes on. - The chile safety device is switched on.
Switching off the child safety device:
- Start the hob with ① Do not so. The hex, settings, touch ② for / seconds. The symbol ③ comes on. - Stop the hob with ④ - The chile safety devices is switched off

IMPORTANT
The child safety device can only be switched on and off, if no heat setting is set.
Overriding the child safety device:
The child safety device can be switvice off in this way for a single cooking session; it remains activated afterwards.
- Start the heb with 📄 The symbol 📋 comes on. - Touch 📄 for 4 seconds. The symbol 📋 comes on. Until the appliance is next switched to T, it can be used as normal. After switching off the appliance, the child is safely device is active again.

IMPORTANT
After overriding the child safety device, a heat setting or a function must be set within approx. 10 seconds, otherwise the appliance automatically switches itself off.
OPERATING INSTRUCTIONS (CONTINUED)
Using the timer
FUNCTION CONDITION OUTCOME AFTER THE TIME HAS ELAPSED
| Automatic cut-out A box selling is set | Acoustic signal 00 Taches Cooking zones switches of" |
| Countdown timer Cooking zones not in use | Acoustic signal 00 flashes |
i IMPORTANT
If a heat setting is set on this cooking zone in addition to a countdown timer, the cooking zone is switched off after the time set has elapsed.
| STEP CONTROL PANEL DISPLAY | |||
| 1 Touch once Pilot light inside first cooking zone flashes | .00 | ||
| 2 Touch once Pilot light inside second cooking zone flashes | .00 | ||
| 3 Touch once Pilot light inside third cooking zone flashes | .00* | ||
| 1 | touch time once | Pilot light of the fourth cooking zone flashes (ir app scale) | .00. |
i IMPORTANT
If a cooking zone is switched off, the timer function set is also switched off.
i IMPORTANT
If the pilot light is flashing more slowly, the heat setting can be set or modified.
i IMPORTANT
If other timer functions are set, after a few seconds the shortest remaining time of all the timer functions is displayed and the corresponding pilot light flashes.
Setting the time
| STEP CONTROL PANEL INDICATOR | ||
| 1 | Select times cooking zone | Pilot light for the cooking zone selected flashes |
| 2 | Touch + or - | 00 to 99 minutes |
After a few seconds the pilot light flashes more slowly. The time is set. The time counts down
Switching off the timer function
| STEP CONTROL PANEL INDICATOR | ||
| 1 | Select OTHER cooking zone | Pilot light for the cooking zone selected flashes |
| 2 | Touch— | The time remaining counts backwards to 00 |
After a few seconds the pilot light fashes more slowly. The time is set. The time points down
Changing the time
| STEP | CONTROL PANEL | INDICATOR |
| 1 | Sliced cooking20%e | Flit: light of the selected cooking zone; flashes faster. Time remaining is displayed |
2 ouch + o- 0 /to 99minutes
After a few seconds the pilot light lashes more slowly. The time is set. The time counts down.
Displaying the time remaining for a cooking zone
| CONTROL PANEL FIELD | DISPLAY |
| Select mbox cooking zone | Pilot light of the cooking zone selected fishes faster. The time remaining is dotted. After a few seconds the pilot light. Fishes more slowly. |
Switching off the acoustic signal
| CONTROL PANEL FIELD | DISPLAY |
| I touch times | The acoustic signal to acknowledge. |
| The acoustic signal stops |
Automatic switch off
Cooking surface
- If after switching on the cooking surface, a hect setting is not set for a cooling zone within approx. 10 seconds, the cooking surface automatically switches itself off.
- If one or more sensor fields are covered by objects (a pan, cloths, etc.) for longer than approx. 10 seconds, a signal sounds and the cooking surface switches off automatically.
- If a) cooking zones are switched off. The cooking surface automatically switches it-self off after approx 10 seconds.
Control panel
When the appliance is switched off, in one or more of the sensor fields on the control panel are covered for more that 10 seconds, an acoustic signal sounds. The acoustic signal switches itself off automatically when the sensor fields are no longer covered.
Cooking zones
If one of the cooking zones is not switched off after a certain time, or if the boat selling is not modified, we relevant cooking zone switches off automatically □ is displayed. Before being used again, the cooking zone must be set to □
| HEAT SETTING | SWITCHES OFF AFTER |
| 1 2 | 6 hours |
| 3 4 | 5 hours |
| 5 | 4 hours |
| 6 9 | 18 hours |
HELPFUL HINTS AND TIPS CARE AND CLEANING
Cookware
- You can recognize good cookware from the bottoms of the pans. The bottom should be as thick and flat as possible.
- Cookware made of enamelled steel or with aluminium or copper bottoms can leave discolourations on the glass ceramic surface which are difficult or impossible to remove.

ENVIRONMENT
Energy saving
• Always place cookware on the cooking zone before it is switched on.
- Switch cooking zones off before the end of the cracking time, to take advantage of residual meal.
• It possible always place lids on the pans.
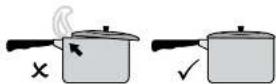
- Bottom of pans and cocking zones should be the same size.
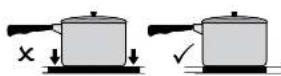

WARNING
Watch out! Risk of burns from residual heat.

WARNING
Sharp objects and abrasive cleaning materials will damage the appliance. Clean with water and washing up liquid.

WARNING
Sharp cleaning agents will damage the appliance. Remove residues with water and washing up liquid.
Cleaning the appliance after each use
- Wipe the appliance with a damp cloth and a ttle washing up cloud.
- Run the appliance dry using a clean cloth.
Removing deposits
| REMOVE AT ONCE | WHEN THE APPLIANCE HAS COOLED DOWN | USING | |
| Sugar, food containing sugar Yes --- A scraper | b | ||
| Plastics, tin foil Yes - A scraper | b | ||
| Limescale and water rings | — | Yes | Cleaner for gloss ceramic or stainless steel? |
| Fol solashes | — | Yes | Cleaner for gloss ceramic or stainless steel? |
| Shiny metallic disco-outallion | --- | Yes | Cleaner for gloss ceramic or stainless steel? |
-
"Scrapers and cleaners for glass ceramic and stainless steel can be purchased in specialised shoes.
-
Place a scraper on the glass ceramic surface at an angle.
- Remove residues by sliding the blade over the surface.
- Wipe the appliance with a damo cloth and a little washing up liquid.
- Rub the appliance cry using a clean cloth

IMPORTANT
Remove stubborn residues with a cleaner for glass ceramic or stainless steel.

IMPORTANT
Scratches or dark stains on the glass ceramic that cannot be re- moved do not however affect the functioning of the appliance.

WARNING
Residues from cleaning agents will damage the appliance. Remove residues with water and washing up liquid.
TROUBLESHOOTING TECHNICAL DATA
| PROBLEM POSSIBLE CAUSE REMEDY | ||
| Red rings, mescore or water rings, smiry metallic or other discoloration, scratchery/shadows, bubbles or other miscellaneous marks or stains on ceramic glass cooktop surface. | ·Cocktop surface has not been cleaned correctly. Cleaning/ maintenance of the cooktop surface is not covered under water only. If a ceramic cell is placed to clean the cooktop you will be charged for the visit. | ·Use a ceramic glass cleaner such as Ceropol. |
| Pitting of ceramic glass surface. | ·Spillovers of liquid with high sugar content. | ·These types of spills must be removed immediately with a special scraper for the glass. If not permanent damage to the cooktop glass can occur which is not covered under warranty. |
| The cooking zones will not switch on or are not functioning. | ·More than 10 seconds have passed since the appliance was switched on. | ·Switch the appliance on again. |
| ·The child safety device is switched on ☐ | ·Deactivate the child safety device (See the screen on "Child safety device"). | |
| ·Several sensor fields were touched at the same time. | ·Only touch one sensor held. | |
| ·Automatic switch off has been triggered. | ·Remove any objects (pan, cloths, etc.) that are lying on the control panel. Switch the appliance on again. | |
| ·The lock is switched on ☐ | ·Switch off the lock (See the section "Locking/unlocking the control panel"). | |
| Acoustic signal sounds when appliance is switched off. | ·The control panel is wholly or partly covered by objects. | ·Remove objects. |
| The residue heat indicator is not displaying anything. | ·The cooking zone was only on for a short time and is therefore not hot. | ·If the cooking zone is supposed to be hot, call the Customer Service Department. |
| The automatic warm up function is not switching (self-on). | ·There is still residues heat on the cooking zone ± / = / - | ·Let the cooking zone cool down. |
| ·The highest real sliding is set ☐ | ·The higher, heat sliding has the same power as the automatic warm up function | |
| ·The heat setting was set using the sensor field — | ·Switch off the cooking zone 2. Set the cooking zone using the sensor field + | |
| Acoustic signal sounds and appliance switches itself on and then off again after 5 seconds another acoustic signal sounds.☐ is lit. | ·The On/Oft sensor held has been covered up, e.g. by a cloth. | ·Do not place any objects on the control panel. |
| ·Overheating protection for the cooking zone has been triggered. | ·Switch off the cooking zone. Switch the cooking zone on again. | |
| ·Automatic switch off has been triggered. | ·Switch off the cooking zone. Switch the cooking zone on again. | |
| ☐ and number are c solaved. | ·Electronics fault. | ·Disconnect the appliance from the electrical supply for a few minutes (Take the fuse out of the house's wiring system). If after switching an again, ☐ is displayed again, call the customer service department. |
If you are unable to remedy the problem by following the above suggestions, please contact your dealer or the Customer Care Department.
WARNING
Repairs to the appliance are only to be carried out by qualified service engineers. Considerable danger to the user may result from improper repairs.
i IMPORTANT
If the appliance has been wrongly operated, the visit from the customer service technician or dealer may not take place free of charge, even during the warranty period.
14 15TROUBLESHOOTING TECHNICAL DATA
| MODEL | WHC643RC | WHC633RC | WHC943RC | WHC933RC |
| PNC | 949 163 126 | 949 163 135 | 949 163 140 | 949 163 129 |
| Product dimensions (x x w) mm | 520 x 590 | 520 x 590 | 520 x 800 | 410 x 800 |
| Cut-out dimensions (x x w) mm | 190 x 560 | 190 x 560 | 190 x 880 | 580 x 825 |
| Voltage (volts) | 720-240 | 720-340 | 720-240 | 720-240 |
| Cycles (Hz) | 50-60 | 50-60 | 50-60 | 50-60 |
| Total power (Watts) | 6500 | 5900 | 6500 | 5300 |
| Flexors (Watts) | 4 | 3 | 4 | 3 |
| Front Left | 800/1600/2500 | 1700 | 800/1600/2500 | 800/1600/2500 |
| Rear Left | 1200 | 1800 | 1200 | N/A |
| Front Right | 1200 | 1600/3000 | 1800 | 1600 |
| Rear Right | 1800 | N/A | 1200 | N/A |
| Centre | N/A | N/A | N/A | 200 |

ENVIRONMENT
Disposal
The symbol in the product or on its packaging indicates that this product may not be treated as household waste. Instead it should be taken to the appropriate collection point for the recycling of electrical and electronic equipment. By ensuring this product is disposed of correctly, you will help prevent potential negative consequences for the environment and human health, which could otherwise be caused, by inappropriate waste handling of this product. For more detailed information about recycling of this product, please contact your last counsel, your household waste disposal service in the shops where you purchased the product.
Packaging material
The packaging materials are friendly to the environment and can be recycled. The plastic components are identified by marking; >PE<,>PE<, etc. Discarc the packaging materials as household waste at the waste disposal facilities in your municipal by
INSTALLATION INSTRUCTIONS ASSEMBLY

WARNING
This must be read! The laws, ordinances, directives and standards in force in the country of use are to be followed (safety regulations, proper recycling in accordance with the regulations, etc.)

IMPORTANT
Installation may only be carried out by a qualified electrician. The minimum distances to other appliances and units are to be observed.
Anti-shock protection must be provided by the installation, for example drawers may only be installed with a protective floor directly underneath the appliance.
The air surfaces of the worktop are to be protected against moisture using a suitable sealant. The sea ant seals the appliance to the work top with no gap. Do not use silicon sealant between the appliance and the work top. Avoid installing the appliance next to doors on under windows. Otherwise he cookware may be knocked off the rings when doors and windows are opened.

WARNING
Risk of injury from electrical current.
• The electrical mains terminal is live.
• Make electrical mains termini free of voltage.
- follow connection schematic.
• Observe electrical safety rules
- Ensure anti-shock protection by installing personally.
- The appliance must be corrected to the electrical supply by a qualified electrician.
- Loose and inappropriate plug and socket connections can make the terminal overheat.
- Have the clamping connections correctly installed by a qualified electrician.
- Use strain relief clamp on scola

WARNING
The surface temperature exceeds 95°C. To avoid a hazard, underbench access must be restricted.
Electrical Connection
Before commencing, check that the normal voltage of the appliance, that is the voltage stater on the rating plate, corresponds to the available supply voltage. Also check the power rating of the appliance and ensure that the wire is suitably sized in accordance with local wiring rules to suit. The appliance power rating. The rating plate is located on the lower casing of the hub. Moves for disconnection must be incorporated in the fixed wiring in accordance with local wiring rules. The nob is to be connected to the mains using a device that allows the appliance to be disconnected from the mains at all soles with a contact opening width or at least 3 mm, eq.
automatic line stretching cut-out, earth cleavage trips or 'use'. If this appliance's main cable is damaged, it must be replaced by a special cable (tyce HOGBS, F Trox 90% or higher). The conventional must be carried out as shown in the diagram. The connecting links should be 'flick according to the appropriate connection diagram. The earth lead is connected to terminal. The earth lead must be longer than leads carrying electric current. The cable can be made in accordance with regulations and the terminals screws tightened securely. Finally, the connecting cable is to be secured with the mains cable closed and the covering closed by pressing firmly (lock into place). Before switching on for the first time, any prosthetic fail or stickers must be removed from the glass ceramic surface.
Connection cable
- Use the correct mains cable of type HOSPR-E Trimax 90°C (or higher) for a single phase or two phase correction.
- Replace the damaged mains cable with a special cable (type -05RR-F Tmax 90°C or higher) 3 × 2.5mm2 with an all-pole 75A breaker. Speak to your local Service Centre.
• The earth cord (green/yellow cable) must be 2cm longer than phase and neutral cable (blue and brown cables). - The cable conditions must be in accordance with regulations and the terminal screws tightened securely.
- The connecting cable is to be secured with the mains cable clots and the covering closed by pressing firmly (lock into place).
- Before switching on for the first time, any pro-celive foil or stickers must be removed from the glass ceramic surface

WARNING
Once connected to the mains supply check that all cooking zones are ready for use by briefly switching each on in turn at the maximum setting.
• A duplicate rating label is supplied with this unit. For easy identification of this unit after installation, stick it to be ready available surface adjacent to the cooktop
Sticking on the seal
• Clean the worktop around the cutout area.
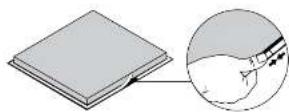
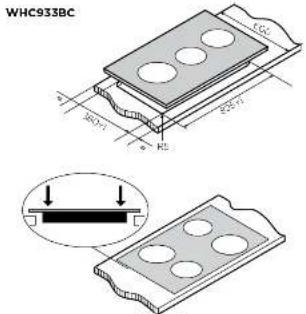
- Stick the single-sided adhesive sealing tape provided on the underside of the hob around the outside edge ensuring that it is not stretched. The two ends of the tape should join in the middle of one side. After trimming the tape (allow it to overlap by 2.3 mm), press the two ends logo, nor
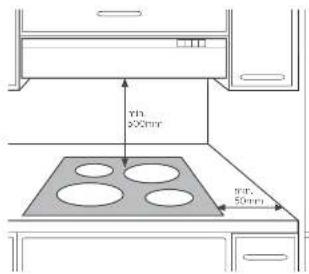
NOTE: The clearance must need or exceed the minimum recommended for both the rangehood and cooktop. Refer to the rangeood installation manual.
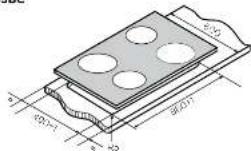
WHC643BC & WHC633BC
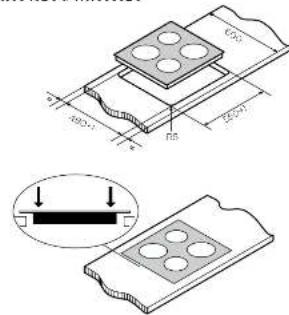

WARNING
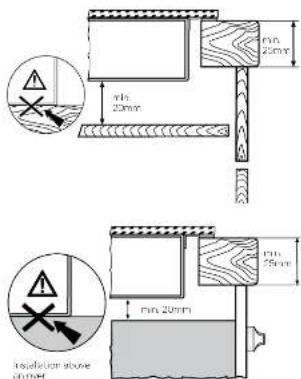
Surface temperatures of base exceed 95°C, under bench access must be restricted by use of non-combustible barrier on installation
WHC943BC
ASSEMBLY (CONTINUED)
i IMPORTANT
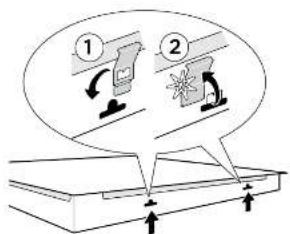
It is recommended to centre the bench cutout with equal distance front and back as shown but the product has also been certified to be installed with no clearance between the rear edge of the cooktop glass and rear wall if required. In doing so, installers still need to leave sufficient clearance to take into account that the glass dimensions are larger than the cut out.
18 19ASSEMBLY WARRANTY
Electrolux Warranty
FOR SALES IN AUSTRALIA AND NEW ZEALAND
APPUANCE WESTINGHOUSE BUILT-IN OVENG, OCOKTOPS AND THES ANDING COOKER
This document sets out the terms and conditions of the product warranties for Westinghouse Appliances. It is an important document. Please keep it with your proof of purchase documents in a safe place for future reference should there be a manufacturing defect in your Appliance. This warranty is in addition to other rights you may have under the Australian Consumer Law.
- In this warranty:
(a) "ACI" or "Australian Consumer Day" means Schedule 2 to the Competition and Consumer Act 2010.
(b) "Appliance" means any Litterax product purchased by you and accompanied by the document;
(c) 'ASO' means Electrolux's authorized service control
(f) "Westinghouse" is the brand contracted by Electrolux Home Products Pty Ltd of 13507-Border Street, Moscow NEW 2060, AIN S1 004 762 341 in respect of Appliances purchased in Australia and Elecrator (NZ) Limited Electricity ("Electrolux") at 5.0 Mall Burgess Road, Mount Wellington. In support of Appliances purchased in New Zealand.
(c) "Warranty Period" means the portion specified in clause 3 or this warranty;
(i) 'you' means the purchaser of the Appliance not having purchased the Appliance for sale, and 'your' has a corresponding meaning
-
Application: This warranty only applies to new Appliances, surgesor and used in Australia or New Zealand and is in addition to (and does not exclude, restrict, or modify in any way) other rights and re-eckles under a law to which the Appliances or service exists, including any non-excludable statutory guarantees in Australia and New Zealand.
-
Warranty Period: Subject to these teams and conductors, the warranty continues in Australia for a period of 24 months and in New Zealand for a period of 24 months, following the date of original purchase of the appliance.
-
Repair or replaces warranty: During the Warranty Record, Electrolux or its ASC will, at no extra charge for your Appliance is mainly accessible for services, without special equipment and subject to these terms and conditions repair or replace any parts which it considers to be defective. Electrolux may, in its absolute discretion, choose whether the remonny offers for a valid warranty claim in repair or replacement. Electrolux or its ASC may use reimbursed parts to repair your Appliance. You agree that any replaced Appliances or parts become the property of Electrolux.
-
Travel and transportation costs: Subject to clause 7. Electrolux will bear the reasonable cost of transportation, travel and delivery of the Appliance to and from Electrolux or the ASC. Travel and transportation will be arranged by Electrolux as part of any valid warranty claim.
-
Proof of purchase is required before you can make a claim under this warranty.
-
Exclusions: You may not make a claim under the warranty unless the deposit claimed is due to liability or defective parts or workmanship. This warranty does no cover.
(a) light globes, bacteria, fillets or similar perishable parts;
(b) parts and appliances not supplied by Echolte;
(c) cosmetic damage which does not affect the operation of the appliance.
(2) damage to the Appliance caused by: In compliance or accident.
(1) misuse or abuse, including failure to properly maintain or service;
(Improper, neglected or fully servicing for repair works done by
to normal week and fear.
(i) power surges, electrical storm damage or incorrect power supply;
3) Maximum value of Impedents Reconciliation;
(correct, improper in appropriate operation;
(1) 2023. or 2019.
(b) failure to comply with any additional instructions supplied with the Appliances;
In addition, Electrons is not liable under this warranty it:
(a) the Appliance has been, or Electrolux reasonably believes that the Appliance has been, used for purposes other than those for which the Appliance was intended. Including where the Appliance has been used for any non-domestic purchase;
(a) The Appliance is reached without authority from the location in writing;
[3] The appliance's serial number of warranty used has been removed or defaced.
B. How to claim under this warranty: to enquire about claiming under this warranty, please follow these steps:
(a) carefully check the operating instructions, user manual and the terms of this warranty;
(a) have the model and social number of the Australian available;
(c) have the panel of source data (e.g. art history analysis;
-
Australia For Appliances and services provided by Electrician in Australia. Electrician goods, some with guarantees that cannot be excluded under the Australian Consumer Law. You are entitled to a replacement for refund for a minor failure and for compensation for any other or her inability to be reliable but not damage. You see also felt that to have the Appliances expansion or expansion of the Appliances toll to be of acceptable quality and the failure does not amount to a major failure "Acceptable clarity" and major failure" have the same meaning as referred to in the AGL.
-
New Zealand: For Appliances and services provided by Electrolux, In New Zealand, the Appliances come with a guarantee by Electrolux pursuant to the provisions of the Consumer Guarantee Act, the Sale of Goods Act and the Fair Trading Act. Where the Appliance was purchased in New Zealand for commercial purposes the Consumer Guarantee Act does not apply.
-
Confidentiality: You accept that if you make a warranty or, Electrolux and its agents in inducing AES may exchange information in relation to you to enable Electrolux to meet its obligations under this warranty.
Important Notice
Before calling for service, please ensure that the steps listed in clause 5 above have been followed.
| AUSTRALIA | FOR SERVICEor to find the address of your financeauthorised service centre in AustraliaPLEASE CALL 13 13 48For the contact of a service call | FOR SPARE PARTSor to find the address of your financespare parts centre in AustraliaPLEASE CALL 13 13 50for the contact of a service call |
| NEW ZEALAND | FOR SERVICEor to find the address of your financeuniversified service centre in New ZealandPLEASE CALL 0600 10 66 10 | FOR SPARE PARTSor to find the address of your financespare parts centre in New ZealandPLEASE CALL 0600 10 66 20 |
W: 100
For more information on all Westinghouse appliances, or for dimension and installation information, call into your retailer, phone or email our customer care team or visit our website:
AUSTRALIA
phone: 13 13 49
email: customercare@electrolux.com.au
web: westinghouse.com.au
NEW ZEALAND
phone: 0800 10 66 10
email: customercare@electrolux.co.nz
web: westinghouse.co.nz
Westinghouse. We are part of the Electrolux family.
Share more of our thinking at www.electrolux.com

and WESTINGHOUSE are trademarks of Westinghouse Electric Corporation.
Used under license. All Rights Reserved.
Part Number: A19136402 Issue B
© 2019 Electrolux Home Products Pty Ltd.
ABN 51 004 762 341
ECN: 036240
WMAN_CGH_Nov19
- Conditions of use
- CONTENTS
- WARNING
- CAUTION
- IMPORTANT
- ENVIRONMENT
- IMPORTANT INFORMATION THAT MAY IMPACT YOUR MANUFACTURER'S WARRANTY
- IMPORTANT SAFETY INSTRUCTIONS
- General safety
- Children's safety
- Correct operation
- Safety during use
- PRODUCT DESCRIPTION
- OptiHeat control (3 step residual heat indicator)
- OPERATING INSTRUCTIONS
- Using the automatic warm-up function
- The child safety device
- Overriding the child safety device:
- OPERATING INSTRUCTIONS (CONTINUED)
- i IMPORTANT
- HELPFUL HINTS AND TIPS CARE AND CLEANING
- Cookware
- Energy saving
- Cleaning the appliance after each use
- Disposal
- Packaging material
- INSTALLATION INSTRUCTIONS ASSEMBLY
- Electrical Connection
- Connection cable
- Sticking on the seal
- Electrolux Warranty
- AUSTRALIA
- NEW ZEALAND
Brand : WESTINGHOUSE
Model : WHC633BC
Category : Cooker