
Discproducer PP-100BD - Disc Burner EPSON - Free user manual and instructions
Find the device manual for free Discproducer PP-100BD EPSON in PDF.


| Product Type | Disc publisher (automatic disc burning and printing) |
| Model | Discproducer PP-100BD |
| Supported Disc Formats | BD-R, BD-RE, DVD±R, DVD±RW, CD-R, CD-RW |
| Disc Capacity | 100 discs (input/output) |
| Printing Method | Inkjet (Epson Micro Piezo technology) |
| Print Resolution | Up to 4800 x 1200 dpi (print) |
| Burn Speed | BD-R: 6x; DVD±R: 16x; CD-R: 40x |
| Interface | USB 2.0, Ethernet (for PP-100N model) |
| Operating System Support | Windows 10, 8.1, 8, 7, XP, Windows Server (2008 to 2019) |
| Software | Total Disc Maker (included) |
| Dimensions (W x D x H) | 425 x 376 x 230 mm (16.7 x 14.8 x 9.1 in) |
| Weight | Approximately 13.5 kg (29.8 lbs) |
| Power Supply | AC 100-240V, 50/60Hz, 1.5A |
| Power Consumption | Operating: 50W; Standby: 15W |
| Noise Level | Operating: 45 dB(A); Standby: 35 dB(A) |
| Operating Temperature | 10°C to 35°C (50°F to 95°F) |
| Operating Humidity | 20% to 80% (non-condensing) |
| Maintenance | Clean exterior with soft dry cloth; use only Epson approved supplies |
| Safety | Do not disassemble; use only specified power adapter; avoid water and high humidity |
| Spare Parts | Ink cartridges, print head, disc trays, picking roller |
| Repairability | Service by authorized Epson technicians only; user-replaceable ink and tray |
| Warranty | 1 year limited (check local regulations) |
Frequently Asked Questions - Discproducer PP-100BD EPSON
User questions about Discproducer PP-100BD EPSON
0 question about this device. Answer the ones you know or ask your own.
Ask a new question about this device
Download the instructions for your Disc Burner in PDF format for free! Find your manual Discproducer PP-100BD - EPSON and take your electronic device back in hand. On this page are published all the documents necessary for the use of your device. Discproducer PP-100BD by EPSON.
USER MANUAL Discproducer PP-100BD EPSON
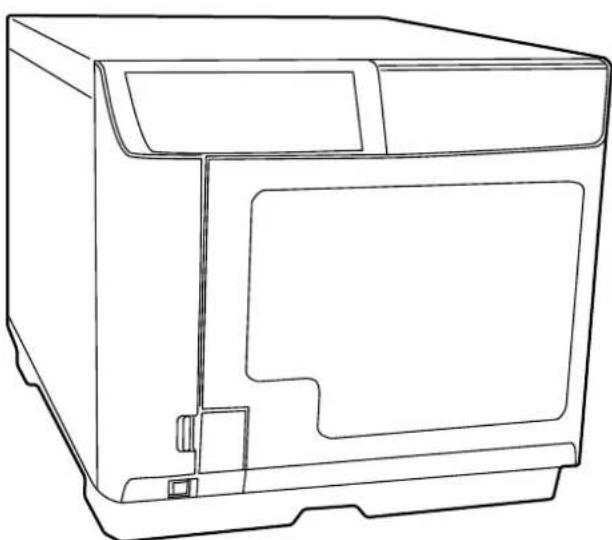
Cautions
- No part of this document may be reproduced, stored in a retrieval system, or transmitted in any form or by any means, electronic, mechanical, photocopying, recording, or otherwise, without the prior written permission of Seiko Epson Corporation.
- The contents of this document are subject to change without notice. Please contact us for the latest information.
- While every precaution has been taken in the preparation of this document, Seiko Epson Corporation assumes no responsibility for errors or omissions. Neither is any liability assumed for damages resulting from the use of the information contained herein.
- Neither Seiko Epson Corporation nor its affiliates shall be liable to the purchaser of this product or third parties for damages, losses, costs, or expenses incurred by the purchaser or third parties as a result of: accident, misuse, or abuse of this product or unauthorized modifications, repairs, or alterations to this product, or (excluding the U.S.) failure to strictly comply with Seiko Epson Corporation's operating and maintenance instructions.
- Seiko Epson Corporation shall not be liable against any damages or problems arising from the use of any options or any consumable products other than those designated as Original EPSON Products or EPSON Approved Products by Seiko Epson Corporation.
Trademarks
EPSON is a registered trademark of Seiko Epson Corporation.
Exceed Your Vision and Discproducer are registered trademarks or trademarks of Seiko Epson Corporation.
Windows and Windows Server are either registered trademarks or trademarks of Microsoft Corporation in the United States and other countries.
All other trademarks are the property of their respective owners and used for identification purpose only.
© Seiko Epson Corporation 2019. All rights reserved.
Key to Symbols
The symbols in this manual are identified by their level of importance, as defined below. Read the following carefully before handling the product.

Provides information that must be observed to avoid damage to your equipment or a malfunction.

Provides important information and useful tips.
Overview
The Total Disc Maker SilentInstall Package is used to install and set up Total Disc Maker and its driver automatically without operations on the screen. To distribute this package to the client computers (the computers that Total Disc Maker is to be installed to using SilentInstall), copy it to a CD-R or upload it to a shared folder.
Then execute the SilentInstall package in each of the computers, to enable them to use Discproducer.
![graph TD A["Setup computer"] --> B["SilentInstall Package"] B --> C["Client computer"] B --> D["Client computer"] B --> E["Client computer"] B --> F["Client computer"] C --> G["Install Install"] D --> H["Install"] E --> I["Auto-executable file"] F --> J["Auto-executable file"] K["Total Disc Maker Pa…](/content/2026/06/1195607/images/11ba42e2ee46dd4b0edbbed92207a0df0fb8929789b845e5e0644178b5a6a8b8.jpg)
Functions
With the SilentInstall Package, you can:
- Specify where to install Total Disc Maker
- Specify the model to install the application on
- Specify the IP address for PP-100N (network model)
- Specify the work folder for Total Disc Maker (Optional function that can be specified if necessary.)
Environment
The operating environment for the setup computer (the computer where the SilentInstall Package is prepared) is as follows:
| Item Specification | ||
| Operating Environment | OS | Windows 10 (32 bit / 64 bit)Home / Pro / EnterpriseWindows 8.1 (32 bit / 64 bit)Windows 8.1 Pro (32 bit / 64 bit)Windows 8 (32 bit / 64 bit)Windows 8 Pro (32 bit / 64 bit)Windows 7 SP1(32 bit / 64 bit)Home Premium / Professional / Enterprise / UltimateWindows XP SP3 Home Edition / Professional(Supports Windows XP 32 bit editions only)Windows Server 2019Essentials / StandardWindows Server 2016Essentials / StandardWindows Server 2012 R2Essentials / StandardWindows Server 2012Essentials / StandardWindows Server 2008 R2Standard / EnterpriseWindows Server 2008 SP2 (32 bit / 64 bit)Standard / Enterprise |
| CPU Core Duo T | 2700 / Core 2 Duo E6300 or faster, or an equivalent processor | |
| Memory | Windows 10 (64 bit) / Windows 8.1 (64 bit) / Windows 8 (64 bit) / Windows 7 (64 bit) / Windows Server 2019 / Windows Server 2016 / Windows Server 2012 / 2012 R2 / Windows Server 2008 / 2008 R22GB or largerWindows 10 (32 bit) / Windows 8.1 (32 bit) / Windows 8 (32 bit) / Windows 7 (32 bit) / Windows XP1GB or larger | |
| Total Disc Maker Version Total Disc Maker Ver.6.0 or later | ||
| Discproducer All models | ||
Restrictions
- Note that even after SilentInstall has been executed, the following message will appear due to Windows restrictions:
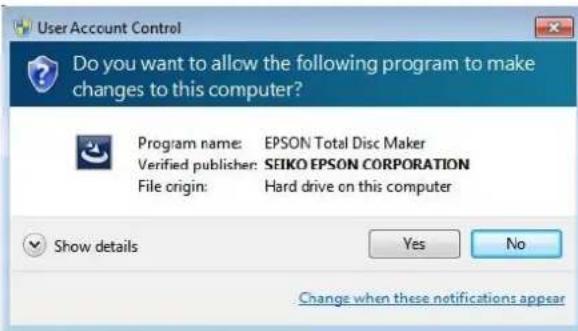
- If the setup computer runs on a 32-bit OS and the default installation folder (C:\Program Files...) is specified, SilentInstall cannot be executed on a client computer running on a 64-bit OS. To prepare a package for 64-bit computers using a 32-bit computer, specify a folder with a different name.
- The table below shows the relationship between the OS/bit and the installation folder for the setup computer and client computers.
| Setup computer Client computer | ||||
| Installation folder | Windows XP(32 bit) | Windows 7(32 bit) | Windows 7(64 bit) | |
| Windows XP(32 bit) | C:\Program Files ● | ● | ▲ | |
| Other folder ● | ● | ● | ||
| Windows 7(32 bit) | C:\Program Files ● | ● | ▲ | |
| Other folder ● | ● | ● | ||
| Windows 7(64 bit) | C:\Program Files ● | ● | ● | |
| Other folder ● | ● | ● | ||
- The SilentInstall package cannot be prepared on a computer with Total Disc Maker installed. Before preparing the SilentInstall package, uninstall Total Disc Maker. After the uninstallation, be sure to restart the computer.
- When you prepare the SilentInstall package, Total Disc Maker will be installed to the setup computer. If you prepare the SilentInstall package again, first uninstall Total Disc Maker. After the uninstallation, be sure to restart the computer.
- Multiple network models cannot be registered with SilentInstall.

The setup.iss file cannot be used in an environment with a different version of Total Disc Maker. Therefore, when you upgrade the Total Disc Maker version, you must create the setup.iss file again.
Preparing the SilentInstall package
You are now ready to prepare the Total Disc Maker SilentInstall package. Carry out this operation on the setup computer.
Workflow
1. Preparing the SilentInstall package (page 7)
Copy the Total Disc Maker package to the computer, and get a folder ready for the SilentInstall package.

2. Creating a setup.iss (page 8)
Create the setup file (setup.iss). It can specify the following items:
• Where to install Total Disc Maker - Model to install it on - IP address

3. Creating an auto-executable file (page 13)
Create an auto-executable file. The following item can be specified if necessary:
- Work folder

4. Distributing the SilentInstall package
Copy the SilentInstall package to a CD-R or upload it to a shared folder.
Preparing the SilentInstall package
To prepare the SilentInstall package, you need to install a Total Disc Maker Ver.6 or later package in the setup computer. Follow the steps below to do this.
1. Create a new folder in the setup computer.
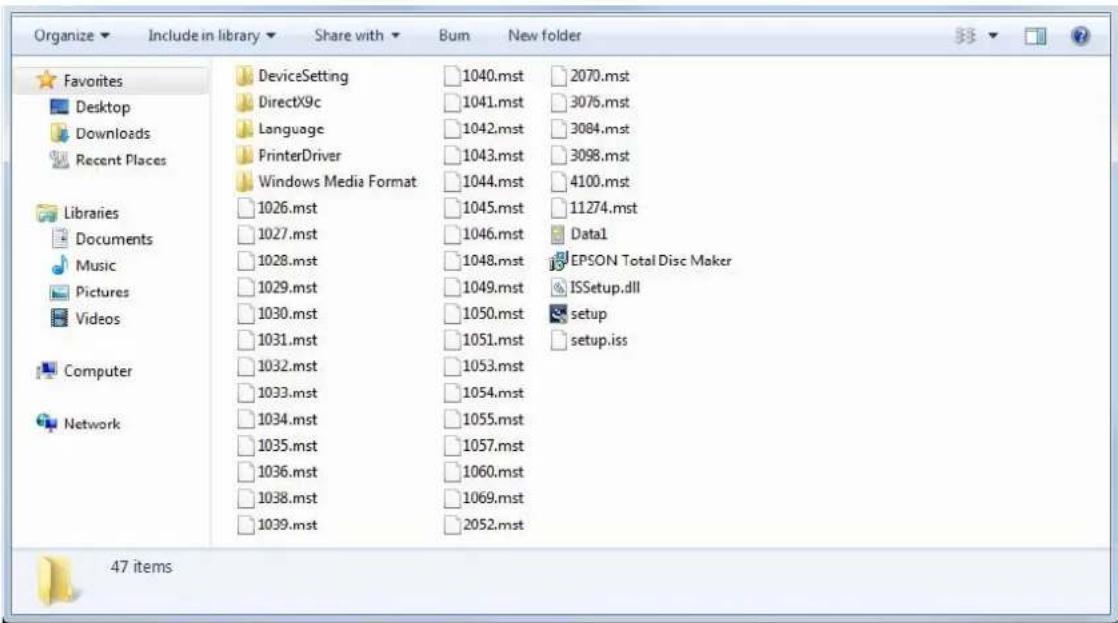
2. Prepare a Total Disc Maker package. Download EPSON Total Disc Maker (Ver.6 or later) from the Epson website, and expand it.

See the Epson homepage.
- For customers in North America, go to the following web site: www.epsonexpert.com/ and follow the on-screen instructions.
- For customers in other countries, go to the following web site: www.epson-biz.com/
3. Copy the Total Disc Maker package to the folder you have created.
Creating a setup.iss
Follow the procedure below to create a setup.iss.
1. Check whether Total Disc Maker is installed in the setup computer. If Total Disc Maker is installed, uninstall it. 2. Exit all other applications running on the setup computer. 3. Create an output folder for setup.iss. Example: C:\temp (Folder) 4. Execute the following command using the command prompt or other means: setup.exe -r -f1 (file output destination and file name) Example: setup.exe -r -f1C:\temp\setup.iss (setup.iss will be created in C:\temp)

Be sure to set the file name as "setup.iss".
![Microsoft Windows [Version 6.1.7601] Copyright (c) 2009 Microsoft Corporation. All rights reserved. c:\TotalDiscMakerVer600>setup.exe -r -f1C:\temp\setup.iss_](/content/2026/06/1195607/images/686c802cce6a4fe83dfa3eb129442fcb92399a88343d40ec48c7e9a6c77091e8.jpg)
5 The installer will start up and an installation window will appear. Click [Next].
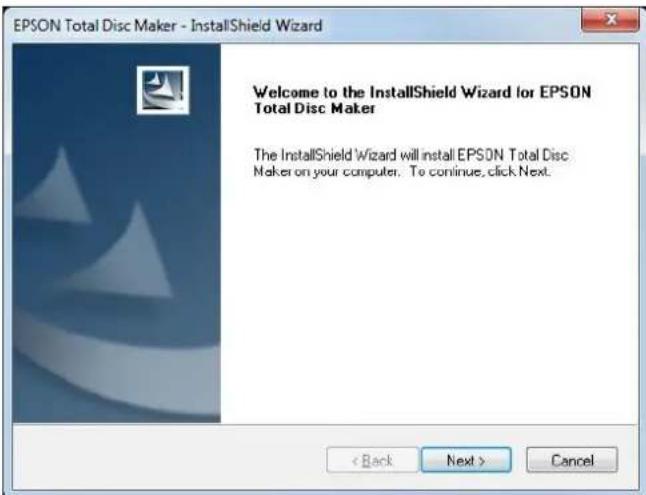

If the window shown below appears, Total Disc Maker is already installed. Uninstall it.

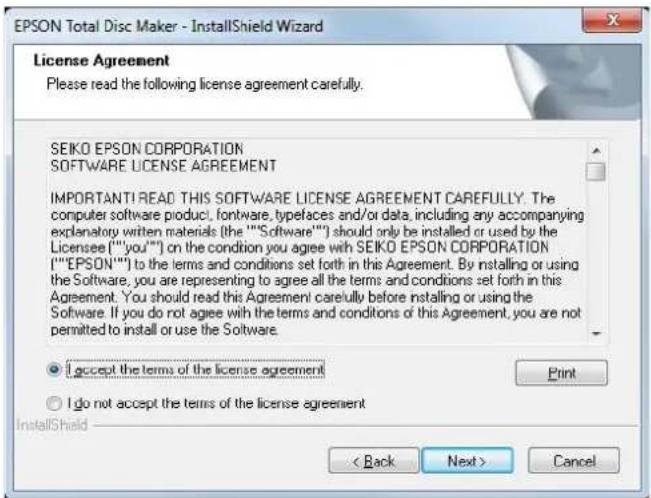
6 Read the license agreement. If you accept it, select [I accept the terms of the license agreement] and click [Next].
7 Specify the installation destination, and click [Next].
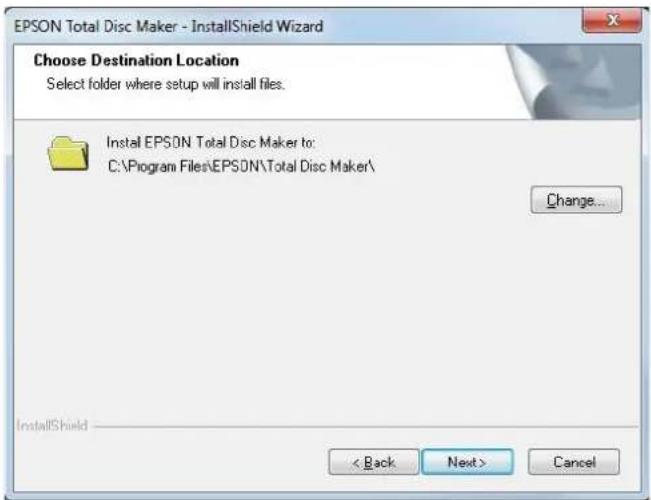

- If you specify a location other than "C:\ProgramFiles" as the installation destination, then you can install the SilentInstall package prepared on a setup computer running on a 32-bit OS to a client computer running on a 64-bit OS.
- The installation destination of Total Disc Maker will be required for changing the work folder. Be sure to record the destination.
8 When the [Model selection] screen is displayed, select the models on which you want to install the application, and then click [Next]. 9 For the setup type to install, select [Complete]. Then click [Next].
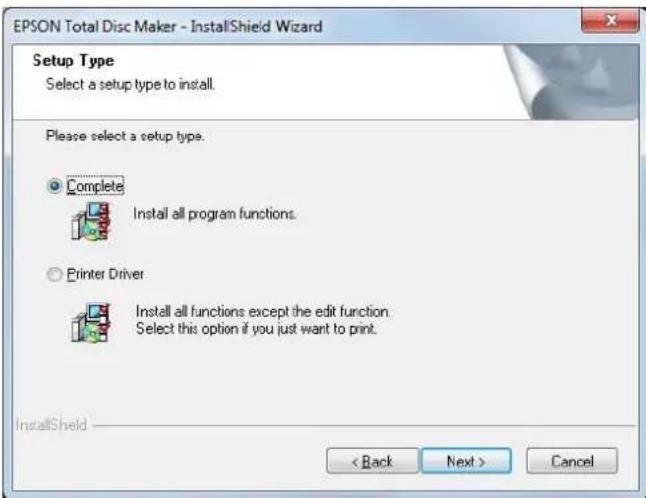

Be sure to select [Complete] for the setup type.
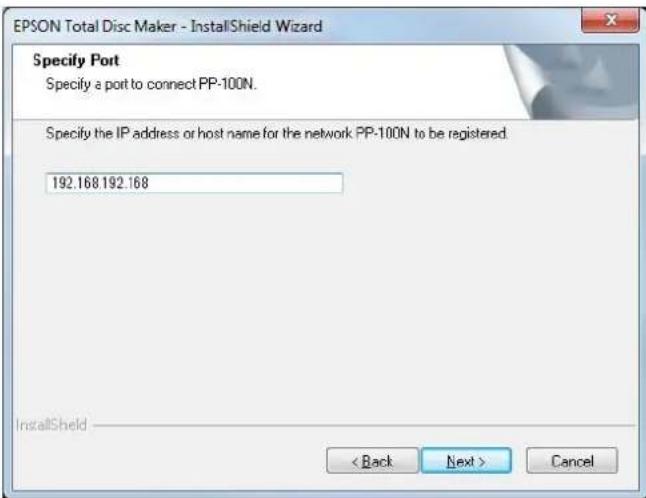
10 If you select PP-100N for the model to install the application on, specify an IP address. Click [Next].
If you do not select PP-100N, the window for specifying an IP address will not appear. Go to the next step.
11 If the window shown below appears, connect Discproducer via a USB port and turn on the power. Then go to Step 14.
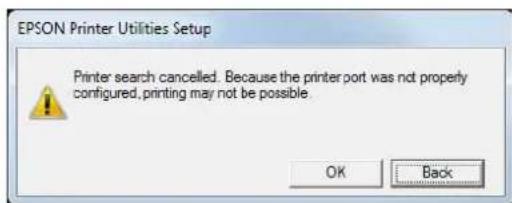
If no Discproducer is available, click [Cancel] and go to Step 12.
If the window shown below does not appear, go to Step 14.
![EPSON Printer Utilities Setup Make sure the PP-100 is turned on and connected to your computer. The program will search for the PP-100 and automatically configure the port. If you want to configure the printer port manually, click [Manual]. Manual Cancel](/content/2026/06/1195607/images/3ce8bcf47e35043715d1bffb18b0719d5bc62dcc3aace4c7a467153852fc284b.jpg)
12 The window shown below will appear. Click [OK].
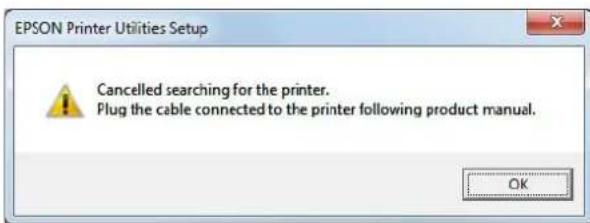
13 The window shown below will appear. Click [OK] to start installation preparation. Go to the next step.
14 A message saying that installation preparation is complete will appear. Click [Install] to start installation.
15 A message saying that installation is complete will appear. Click [Finish].
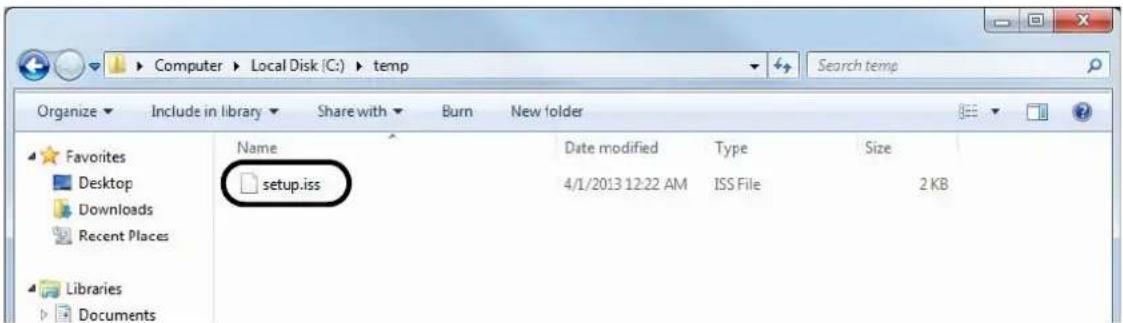
16 Check that setup.iss has been created at the specified path.
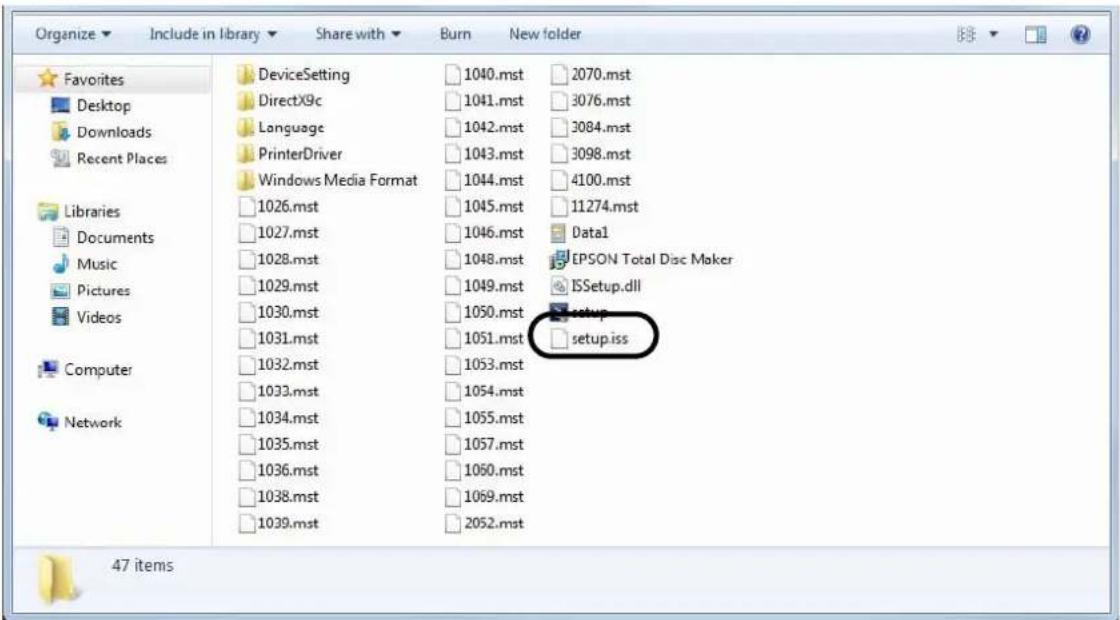
17 Replace the "setup.iss" directly under the SilentInstall package with the setup.iss you have created.
Creating an auto-executable file
Follow the procedure below to create an auto-executable file.
1 Run the text editor. 2 Enter the following command:
//Execute SilentInstall of Total Disc Maker
setup.exe -s

// Change the work folder (when necessary)
"Full path to TDSet.exe" /ChangeWorkFolder (Full path to the new folder)

The full path to TDSet.exe that you specify is the installation destination for Total Disc Maker.
Example:
If the installation destination for Total Disc Maker is specified as follows in setup.iss:
C:\Program Files\epson\Total Disc Maker
The command to be entered is as follows:
"C:\Program Files\epson\Total Disc Maker\TDSet.exe" /ChangeWorkFolder C:\MyWork
3 Set "Autoexec.bat" for the file name, and save the file in the SilentInstall package.
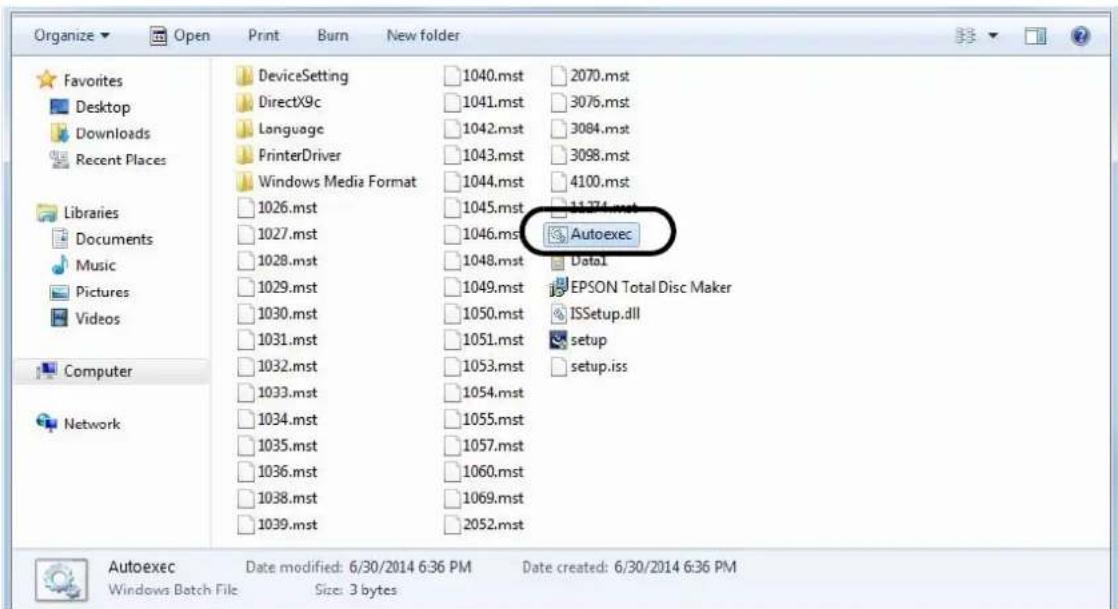
That completes preparation of the SilentInstall package.
Executing SilentInstall package
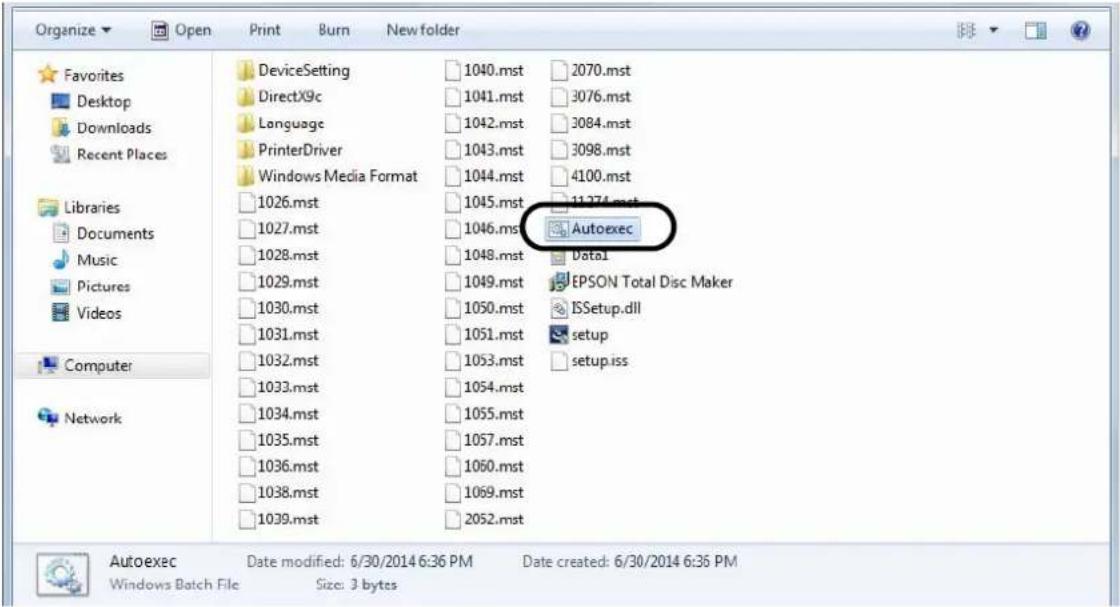
Distribute the prepared SilentInstall package to the client computers. Then, on the client computers, execute the Autoexec.bat file in the SilentInstall package.
SilentInstall will install Total Disc Maker and its driver.
- CAUTIONS
- TRADEMARKS
- KEY TO SYMBOLS
- OVERVIEW
- FUNCTIONS
- ENVIRONMENT
- RESTRICTIONS
- PREPARING THE SILENTINSTALL PACKAGE
- WORKFLOW
- PREPARING THE SILENTINSTALL PACKAGE (PAGE 7)
- CREATING A SETUP.ISS (PAGE 8)
- CREATING AN AUTO-EXECUTABLE FILE (PAGE 13)
- DISTRIBUTING THE SILENTINSTALL PACKAGE
- CREATING A SETUP.ISS
- CREATING AN AUTO-EXECUTABLE FILE
- EXECUTING SILENTINSTALL PACKAGE
Brand : EPSON
Model : Discproducer PP-100BD
Category : Disc Burner