RK6202EWUK - Freezer GORENJE - Free user manual and instructions
Find the device manual for free RK6202EWUK GORENJE in PDF.

User questions about RK6202EWUK GORENJE
0 question about this device. Answer the ones you know or ask your own.
Ask a new question about this device
Download the instructions for your Freezer in PDF format for free! Find your manual RK6202EWUK - GORENJE and take your electronic device back in hand. On this page are published all the documents necessary for the use of your device. RK6202EWUK by GORENJE.
USER MANUAL RK6202EWUK GORENJE
We thank you for the
confidence you have shown by purchasing our appliance.
We wish you find a lot of pleasure in its use.
The appliance is intended solely for household use.
Refrigerator freezer (hereinafter: the appliance) consists of two parts: the upper part is the refrigerator and the lower part is the freezer.
The refrigerator is intended for storing fresh food at temperatures above 0^ C.
The freezer is intended for freezing fresh food and for long-term storage of frozen food (up to one year, depending on the type of food).
TABLE OF CONTENTS
| 4 | IMPORTANT NOTES AND PRECAUTIONS | INTRODUCTION |
| 10 | ADVICE FOR SAVING POWER WITH REFRIGERATIONAPPLIANCES | |
| 11 | APPLIANCE DESCRIPTION | APPLIANCEDESCRIPTION |
| 12 | INSTALLATION AND CONNECTION | |
| 15 | CHANGING THE DIRECTION OF DOOR OPENING | |
| 17 | OPERATING THE APPLIANCE WITH MECHANIC CONTROLS | |
| 19 | APPLIANCE WITH ELECTRONIC CONTROL | |
| 23 | APPLIANCE INTERIOR EQUIPMENT | |
| 28 | RECOMMENDED DISTRIBUTION OF FOOD IN THE APPLIANCE | |
| 29 | STORING FOOD IN THE REFRIGERATOR | STORING ANDFREEZING FOOD |
| 31 | STORING FOOD IN THE FRESHZONE DRAWER | |
| 32 | STORING FOOD IN THE ZEROZONE DRAWER | |
| 34 | FREEZING AND STORING FROZEN FOOD | |
| 34 | Freezing process | |
| 35 | Important warnings on freezing fresh food | |
| 35 | Storage of industrially frozen food | |
| 36 | Frozen food storage time | |
| 36 | Defrosting frozen food | |
| 37 | DEFROSTING THE APPLIANCE | DEFROSTINGAND CLEANINGTHE APPLIANCE |
| 38 | CLEANING THE APPLIANCE | |
| 39 | TROUBLESHOOTING | OTHER |
| 41 | INFORMATION ABOUT APPLIANCE NOISE |

BEFORE USING THE APPLIANCE FOR THE FIRST TIME
Before connecting the appliance to the power mains, please read carefully the instructions for use which describe the appliance and its correct and safe use. The instructions apply to several appliance types/models; thus, settings or equipment may be described herein which is not available in your appliance. We recommend saving this instruction manual for future reference and attach it to the appliance if it is sold in the future.
Check for any damage or irregularities on your appliance. If you find your appliance is damaged, notify the retailer from which you have purchased the appliance.
Before connecting the appliance to the power mains, let the appliance rest in a vertical position for a minimum of 2 hours. This will reduce the possibility of operation faults due to the effect of transport on the cooling system.

natural_image
Pure mechanical diagram showing a bolt and nut assembly without any text, numbers, or symbolsSpacers are fitted on the corners of the doors.
Remove them and insert the supplied plugs into their slots (only in some models).
IMPORTANT SAFETY INSTRUCTIONS

WARNING! Risk of fire/flammable materials.
The appliance must be connected to the power mains and grounded in compliance with the effective standards and regulations.
WARNING! Do not locate multiple portable socket-outlets or portable power supplies at the rear of the appliance.
Before cleaning the appliance, unplug it from the power mains (unplug the power cord from the wall outlet).
WARNING! If the supply cord is damaged, it must be replaced by the manufacturer, its service agent or similarly qualified persons in order to avoid a hazard.
WARNING! When positioning the appliance, ensure the supply cord is not trapped or damaged.
If LED lighting does not work, call a service technician. Do not attempt a repair of the LED lighting yourself, as there is danger of contact with high voltage!

WARNING! Do not use any electric devices inside the appliance, except for those allowed by the manufacturer of this refrigeration appliance.

WARNING! Do not use mechanical devices or other means to accelerate the defrosting process, other than those recommended by the manufacturer.

WARNING! To avoid any hazard resulting from poor stability of the appliance, make sure it is installed as instructed.
Danger of frostbite
Never put frozen food in your mouth and avoid touching frozen food as this may cause frostnip or frostbite.
Safety of children and vulnerable persons
The appliance is not intended for use by persons (including children) with reduced physical, sensory or mental capabilities, or lack of experience and knowledge, unless they have been given supervision or instruction concerning use of the appliance by a person responsible for their safety.
Children should be supervised to ensure that they do not play with the appliance.
Cleaning and user maintenance shall not be made by children without supervision.
Cleaning and user maintenance shall not be made by children without supervision.
Remove the packaging intended to protect the appliance or particular parts during transport and keep it outside the reach of children.
It presents danger of injury or suffocation.
For European markets only
This appliance can be used by children aged from 8 years and above and persons with reduced physical, sensory or mental capabilities or lack of experience and knowledge if they have been given supervision or instruction concerning use of the appliance in a safe way and understand the hazards involved.
Children shall not play with the appliance.
Cleaning and user maintenance shall not be made by children without supervision.
Children aged from 3 to 8 years are allowed to load and unload refrigerating appliances.
Warning regarding the refrigerant
The appliance contains a small amount of an environmentally friendly yet flammable gas R600a. Make sure that no parts of the cooling system are damaged. A gas leak is not hazardous to the environment, but it could cause eye injury or fire.
In case of a gas leak, ventilate the room thoroughly, disconnect the appliance from the power mains, and call a service technician.
IMPORTANT INFORMATION ON THE USE OF APPLIANCE
WARNING! This appliance is intended to be used in household and similar applications such as:
- staff kitchen areas in shops, offices and other working environments;
- farm houses and by clients in hotels, motels and other residential type environments;
- bed and breakfast type environments;
- catering and similar non-retail applications.

WARNING! Keep ventilation openings, in the appliance enclosure or in the built-in structure, clear of obstruction.
The appliance may not be used outdoors and it may not be exposed to rain.
Do not store explosive substances such as aerosol cans with a flammable propellant in this appliance.
If the appliance will be out of use for an extended period of time, switch it off using the relevant button, and unplug it from the power mains. Empty the appliance, defrost it, clean it, and leave the door ajar.
In case of an error or power supply failure do not open the freezer compartment unless the freezer has not operated for over 16 hours. After this period, use the frozen food or provide sufficient cooling (e.g. a replacement appliance).
Technical information on the appliance
Rating plate can be found in the appliance interior. It indicates data on voltage, gross and net volume, type and amount of refrigerant, and information on the climate classes.
If the language on the rating plate is not the language of your choice or the language of your country, replace it with the one supplied.

ENVIRONMENT PROTECTION
Packaging is made of environmentally friendly materials that can be recycled, disposed of, or destroyed without any hazard to the environment.

Removing an obsolete appliance
To protect the environment, take the obsolete appliance to an authorized home appliance collection centre.
Before doing so, do the following:
- disconnect the appliance from the power mains;
- do not allow children to play with the appliance.

WARNING! Do not damage the refrigerant circuit. This will also prevent pollution.

The symbol on the product or its packaging indicates that the product should not be treated as normal household waste. The product should be taken to an authorized collection centre for waste electric and electronic equipment processing. Correct disposal of the product will help prevent any negative effects on the environment and health of people which could occur in case of incorrect product removal. For detailed information on removal and processing of the product, please contact the relevant municipal body in charge of waste management, your waste disposal service, or the store where you bought the product.
ADVICE FOR SAVING POWER WITH REFRIGERATION APPLIANCES
• Install the appliance as specified in the instruction manual.
- Do not open the door more often than necessary.
- Occasionally make sure air circulation underneath the appliance is unobstructed.
- Condenser unit on the rear wall should be kept clean (see chapter Cleaning the appliance).
- If the gasket is damaged or does not provide a perfect seal for other reasons, have it replaced as soon as possible.
- Store the food in tightly sealed containers or appropriate packaging.
- Before placing the food in the appliance, cool it to room temperature.
- Defrost frozen food in the refrigerator compartment.
- Remove some of the drawers from the freezer compartment as described in the instruction manual, in order to make use of the entire interior.
- Defrost your conventional freezer when an approximately 3-5 millimeter layer of frost or ice has built up on the refrigerated surfaces.
- Make sure the layout of shelves in the compartment is uniform and that the food is placed so that the air can freely circulate in the appliance interior (observe the recommended placement of food as described in the instructions).
• In appliances with a fan, do not block the fan slots.
- If you do not need the fan or the ionizer, switch them off to reduce power consumption.
text_image
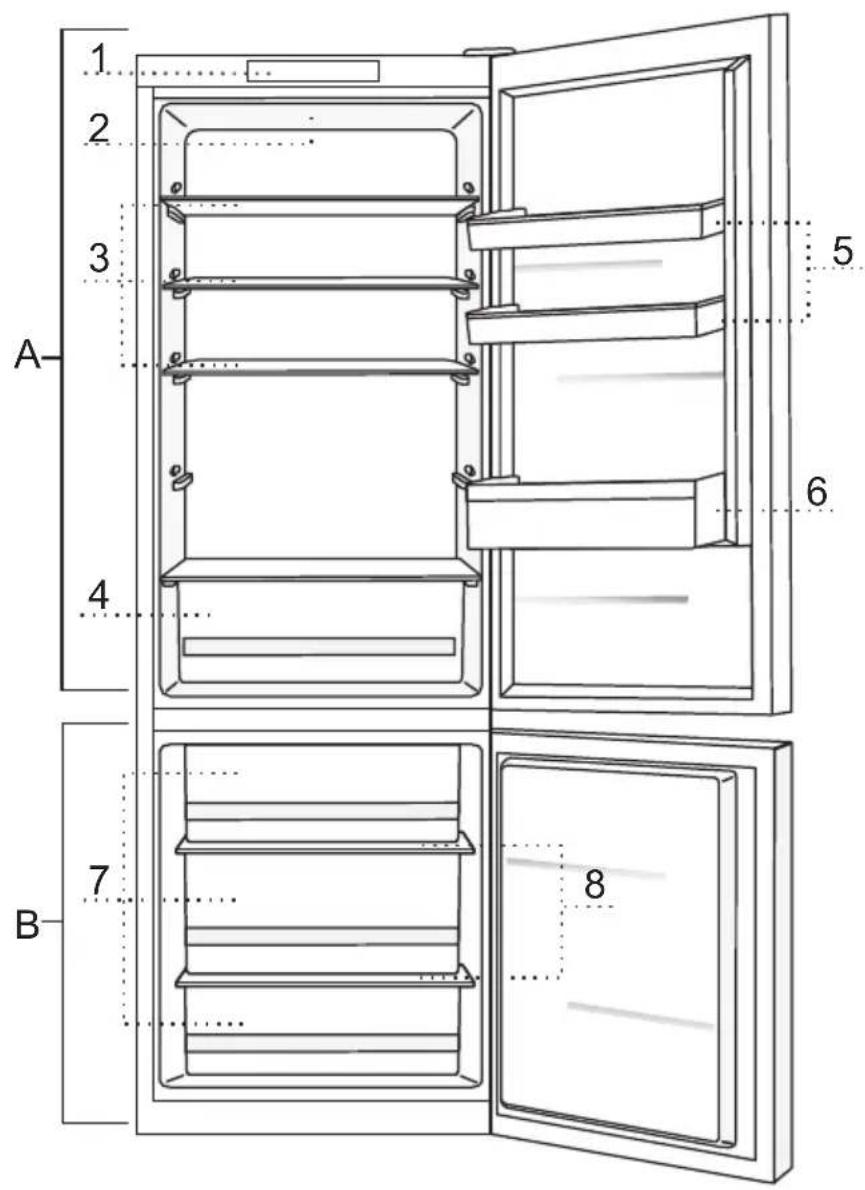
1 2 3 A 4 5 6 7 B 8A Refrigerator
1 Control unit
2 LED lighting of refrigerator interior
3 Pull-out glass shelf (height-adjustable)
4 Crisper (fruit and vegetables drawer)
5 Height-adjustable door bin
6 Bottle shelf
B Freezer
7 Freezer drawers
8 Glass shelves
- The drawers are protected against pulling out. To remove a drawer from the appliance, pull it out as far as it will go, then lift at the front and pull out completely.
- Some models also feature a control unit on the door.
INSTALLATION AND CONNECTION
SELECTING THE ROOM
- Install the appliance in a dry and well ventilated room. The appliance will operate correctly if the environment temperature is in the interval specified in the table. The appliance class is indicated on the rating plate / label with the basic information on the appliance.
| Class Temperature | |
| SN (subnormal) | from +10°C to +32°C |
| N (normal) | from +16°C to +32°C |
| ST (subtropical) | from +16°C to +38°C |
| T (tropical) | from +16°C to +43°C |
Warning: Make sure the room where the appliance is installed is large enough. There should be at least 1 m^3 of space per 8 grams of refrigerant. Amount of refrigerant is stated on the rating plate in the appliance interior.
INSTALLING THE APPLIANCE

text_image
max 30 mm 50°
natural_image
Technical diagram of a mechanical or electrical component with a spherical housing and internal structure (no visible text or symbols)Appliance installation should be carried out by at least two persons to avoid any physical injury or damage to the appliance.
- The appliance must stand level or tilted slightly to the back, stable on a solid base. At the front, the appliance is fitted with two adjustable legs that can be used to level the appliance. At the rear side, casters allow for easier installation of the appliance (only with some models).
- There should be a clearance of at least 5 cm between the appliance and any cupboard installed above it, in order to allow adequate cooling of the condenser unit.
-
The appliance is supplied with two spacers which should be installed on the lower part of the housing to prevent from pushing the appliance too close to the wall. Appliance may also be installed without the spacers; however, this may increase power consumption.
-
Do not expose the appliance to direct sunlight and do not place it near any source of heat. If this cannot be avoided, install an insulation panel.
- The appliance may stand alone or it may be placed ext to a cupboard or a wall. Consider the clearance required to fully open the door in order to allow pulling out the drawers and shelves (see installation diagram).
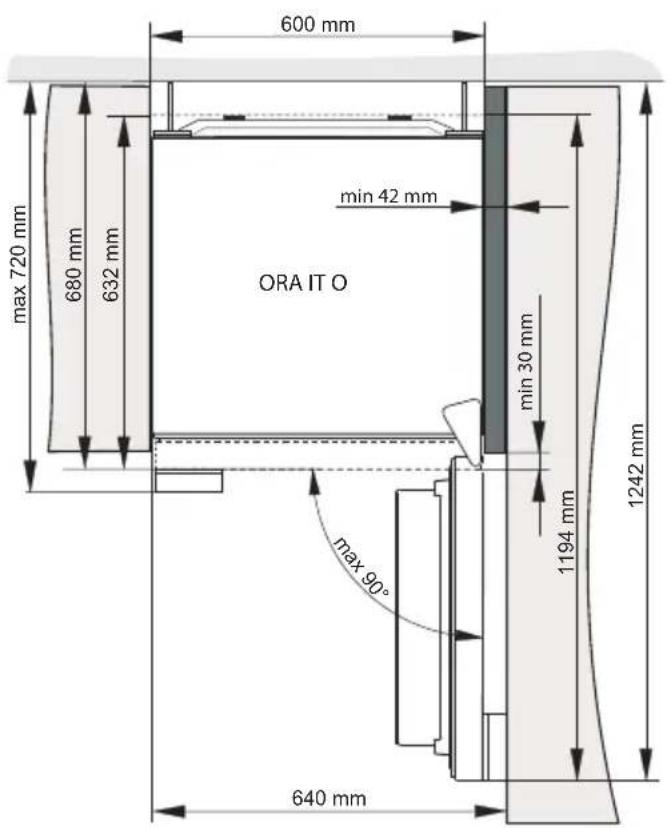
text_image
600 mm max 720 mm 680 mm 632 mm min 42 mm ORA IT O min 30 mm 1194 mm 1242 mm max 90° 640 mm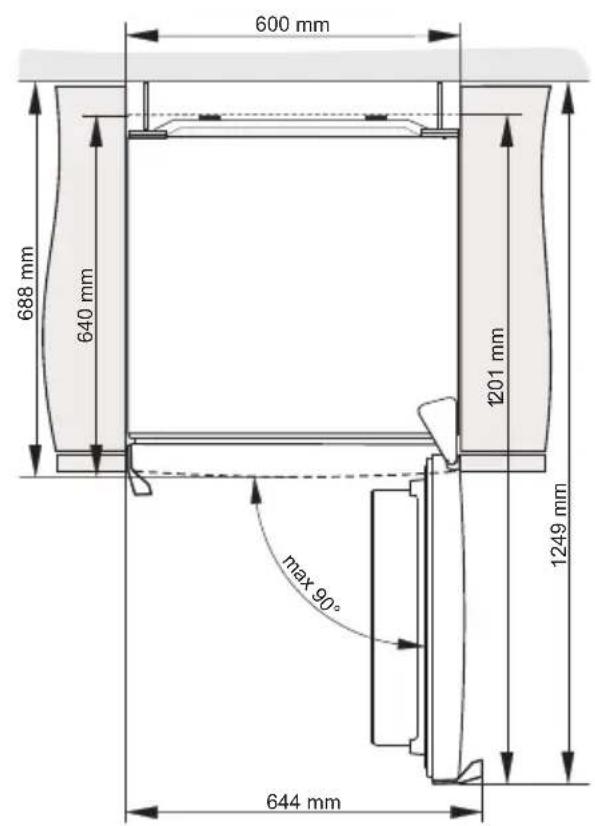
text_image
600 mm 688 mm 640 mm 1201 mm 1249 mm max 90° 644 mmNote: When placing the appliances side by side, the anti-dew (anti-condensation) set has to be purchased and installed!
Code for ordering the set:
| dry room (relative humidity below 60%) | Appliances with a height of 1850 mm | Appliances with a height of 2000 mm |
| METAL PLATE (INOX) 576604 576606 | ||
| PLASTIC PLATE | ||
| WHITE 672114 672118 | ||
| GREY 672115 672117 | ||
| BLACK 672116 672120 | ||
| humid room (relative humidity over 60%)* | Appliances with a height of 1850 mm | Appliances with a height of 2000 mm |
| METAL PLATE (INOX) 558776* 558855* |
* For safety reasons, the appliance should only be installed by an authorized service technician!
CONNECTING THE APPLIANCE
- Connect the appliance to the power mains using a connection cable. The wall outlet should be fitted with a ground contact (safety socket). Nominal voltage and frequency are indicated on the rating plate/label with basic information on the appliance.
- The appliance must be connected to the power mains and grounded in compliance with the effective standards and regulations. The appliance will withstand short-term deviations from the nominal voltage, but not more than +/- 6%.
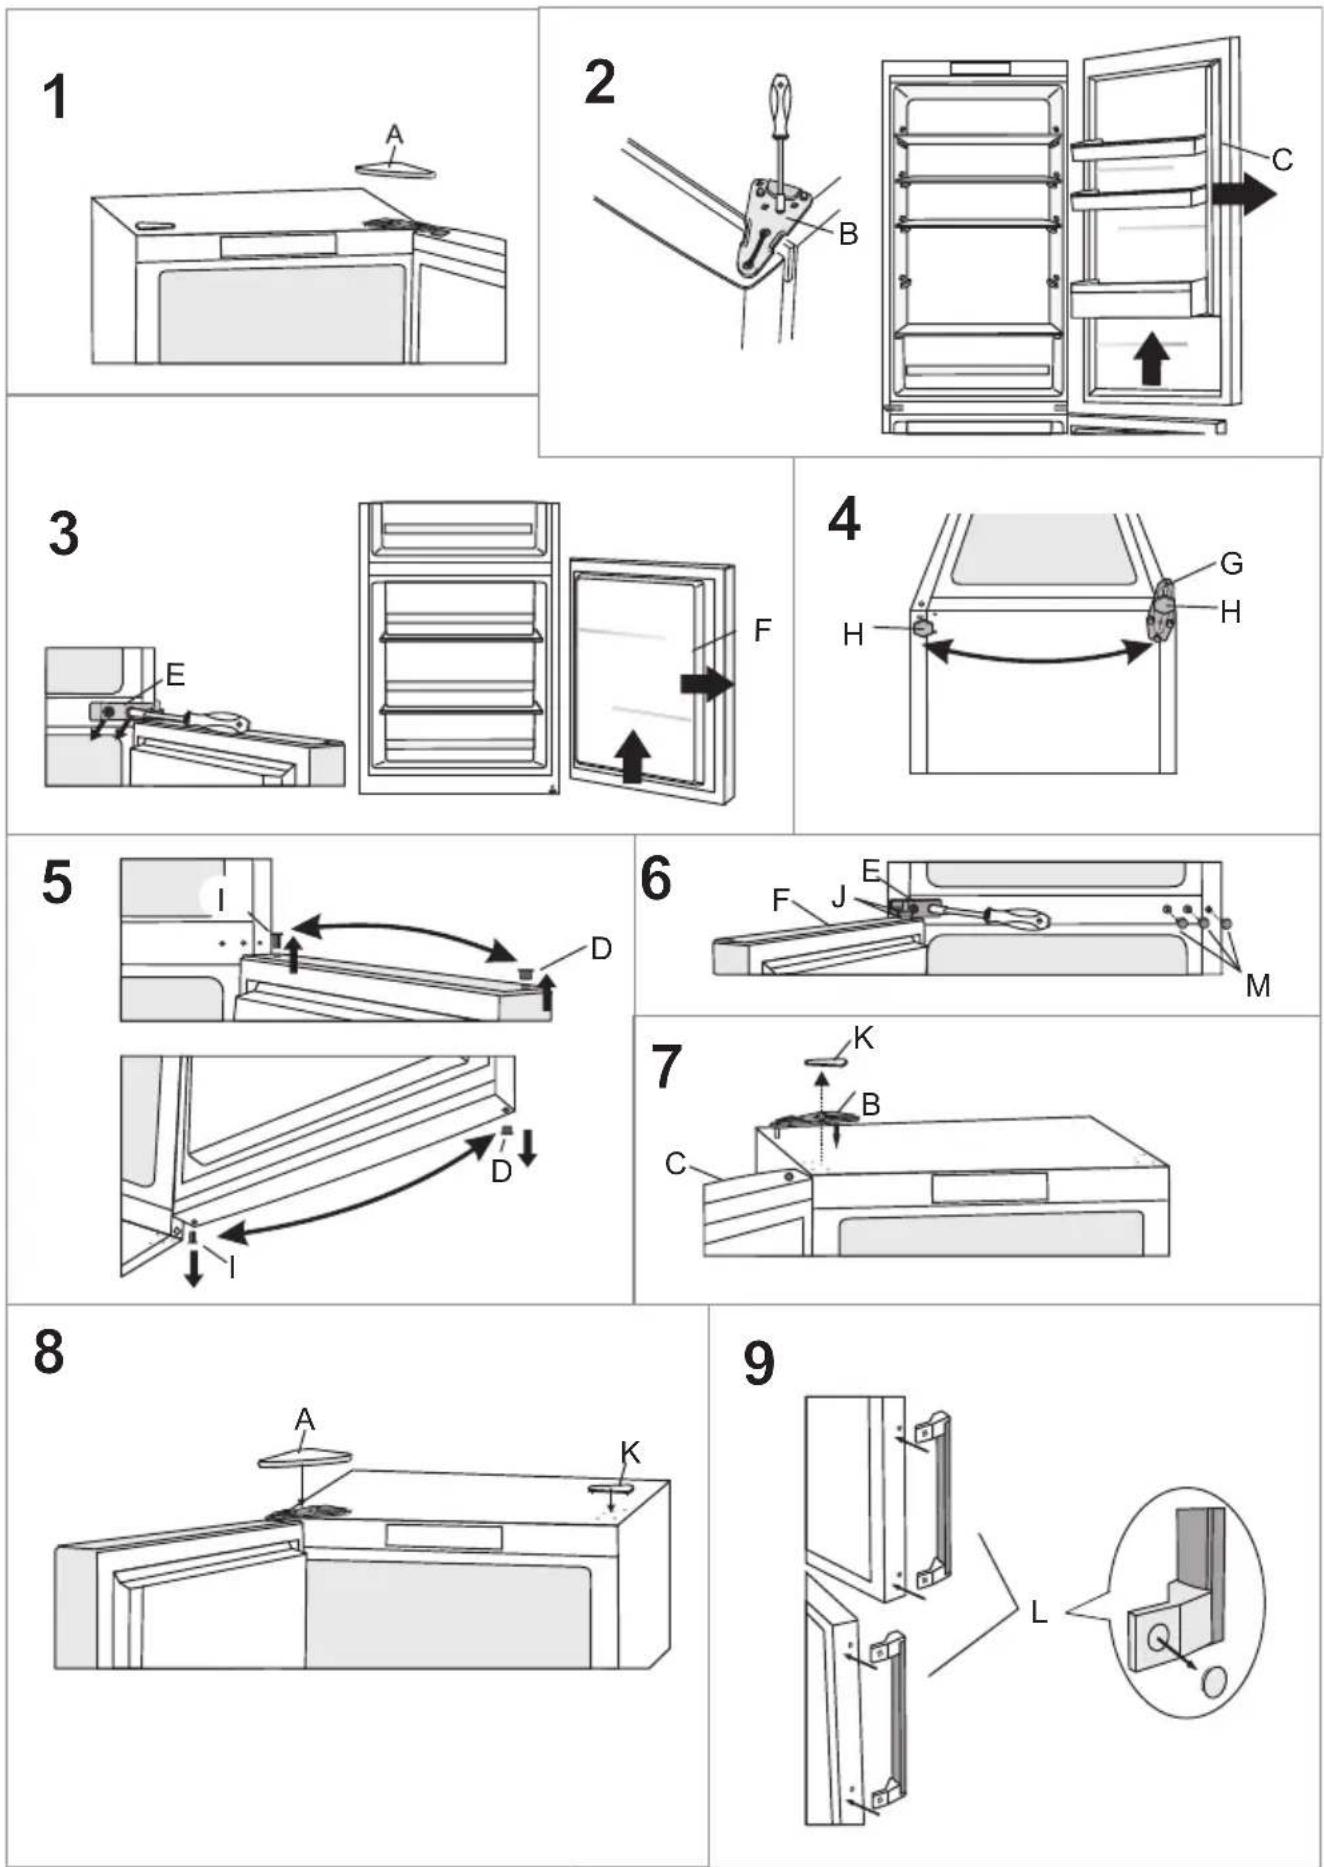
CHANGING THE DIRECTION OF DOOR OPENING
Tools required: socket wrench No. 8, Phillips screwdriver, torx 25, flat screwdriver The procedure to change the direction of door opening should be carried out by at least two persons.
- Remove the upper hinge cover (A).
- Unscrew the upper hinge (B) and remove the upper door (C).
- Then remove the covering plugs (D), unscrew the mid hinge (E) and remove the lower door (F) from the lower hinge (G).
-
Tilt the appliance backwards (make sure you do not press against the condenser unit on the rear wall of the appliance as this may damage the cooling system), unscrew the lower hinge (G) and the foot (H) and move them to the opposite side. Make sure the washer is installed like it was before disassembly.
-
Move the door hinges (I) to the opposite side.
-
Place the Mid hinge (E) on the lower door (F) and place the lower door on the lower hinge (G). Fasten the mid hinge (the door should be open while you do this). Do not forget to place the washers (J) and covering plugs (M) as they were placed before the disassembly.
-
Place the upper door (C) over the middle hinge (E), remove the covering cap (K) and fasten the upper hinge (B).
-
Install the upper hinge cover (A) and the covering cap (K).
-
Changing the side of the handle (L): remove the covering plugs/caps, undo the screws and fasten the handle on the opposite side. Place the covering plugs/caps on the opposite side.
Note: Step 9 (handle replacement) can be skipped on appliances with integrated handle.

At ORA-ITO appliances alteration of door opening direction is not possible.
OPERATING THE APPLIANCE WITH MECHANIC CONTROLS
CONTROL UNIT 1

text_image
A BA Temperature setting and on/off knob
B Lighting on/off key
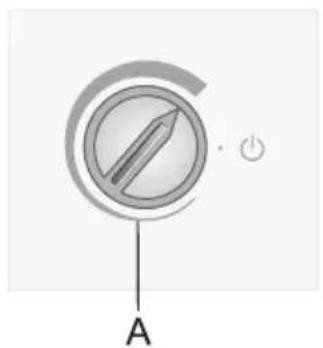
SWITCHING THE APPLIANCE ON/OFF

natural_image
Simple diagram of a circular component with a pencil and power button, labeled A (no text or symbols beyond labels)To switch on: rotate the A dial clockwise.
Switching off: Rotate the A knob back to the position in which the arrow is aligned with the symbol (caution: appliance will remain powered, i.e. there will still be electric current in the appliance).
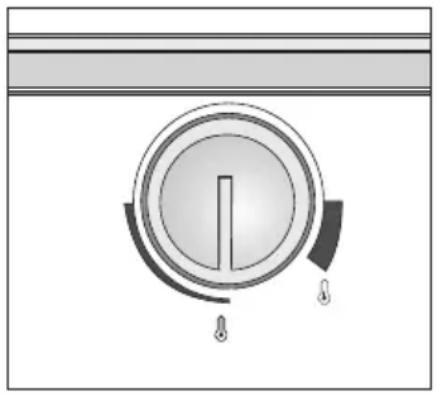
ADJUSTING THE TEMPERATURE

natural_image
Close-up of a circular mechanical knob with a pencil icon and pointer, labeled 'A' at the base (no text or symbols on the knob itself)- To set the desired temperature, rotate the A dial in clockwise direction, i.e. to the right.
- A change in the environment temperature will affect the temperature in the appliance. Adjust the setting with the A dial accordingly. Positions towards the thicker part of the sign mean a lower temperature in the appliance (cooler). Settings towards the thinner part of the sign mean a higher temperature (warmer).
- If the temperature of the room where the appliance is installed is below 16°C, we recommend setting the A dial temperature to the thickest part of the sign.
natural_image
Close-up of a circular mechanical component with a pencil icon and labeled point A, no text or symbols present.APPLIANCE WITH ELECTRONIC CONTROL
CONTROL UNIT 2

text_image
ECO AElectronicControl
A Temperature setting and on/off knob
SWITCHING THE APPLIANCE ON/OFF

text_image
εCO ATo switch on: rotate the A dial clockwise.
To switch off: rotate the A dial so that the arrow is aligned with the ⏻ sign (caution: appliance will remain powered, i.e. there will still be electric current in the appliance).
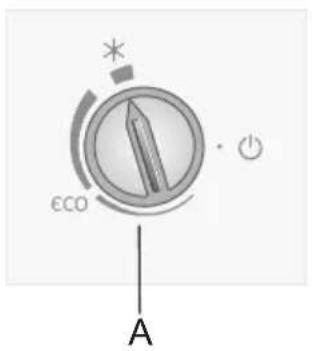
ADJUSTING THE TEMPERATURE

text_image
ECO A- To set the desired temperature, rotate the A dial in clockwise direction, i.e. to the right.
- Recommended setting of the A knob is on the eco position.
- A change in the environment temperature will affect the temperature in the appliance. Adjust the setting with the A dial accordingly. Positions towards the thicker part of the sign mean a lower temperature in the appliance (cooler). Settings towards the thinner part of the sign mean a higher temperature (warmer).
- If the temperature of the room where the appliance is installed is below 16°C, we recommend setting the A dial temperature to the thickest part of the sign.

text_image
εCO A- Moreover, when environment temperature is below 16 °C, we recommend setting the manually adjustable fl ap to position 1 (manually adjustable fl ap is only available with some appliance models).
text_image
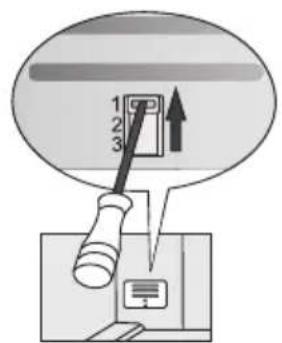
1 2 3FREEZER BOOST (SUPER FREEZE) FUNCTION (ONLY IN SOME MODELS)
Use this setting after switching on the appliance for the first time, before cleaning, or 24 hours before inserting a large amount of food.
text_image
εCO ASwitching on the freezer boost (super freeze) function:
Rotate the A dial to position*.
After the end of the freezer boost cycle, rotate the A knob back to the desired setting.
If the freezer boost is not deactivated manually, it will be automatically switched off after approximately 2 days. Then the temperature of the freezer compartment returns to the most recently set value (knob position remains at *).
MANUALLY ADJUSTABLE FLAP (ONLY WITH SOME MODELS OF NOFROST APPLIANCES)
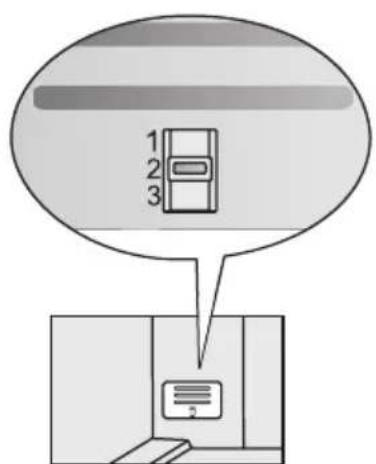
text_image
1 2 3 2The flap is located in the fruit and vegetable bin. As a factory setting, it is in position 2. If it is not possible to reach the right temperature by adjusting the settings with the knob A, then set the flap as described in the section »Troubleshooting«.
REFRIGERATOR COMPARTMENT TEMPERATURE CONTROL (ONLY WITH SOME MODELS OF NOFROST APPLIANCES)
natural_image
Simple diagram of a circular dial with a handle and two hanging drops, no text or symbols present.- Use the control to regulate the inflow of cool air from the freezer compartment and reach the desired temperature in the refrigerator compartment.
-
Set the desired temperature using the button located in the refrigerator compartment. A change in the environment temperature will affect the temperature in the appliance. Adjust the temperature setting accordingly. Positions towards the thicker part of the sign mean a lower temperature in the appliance (cooler). Settings towards the thinner part of the sign mean a higher temperature (warmer).
-
If the environment temperature is below 16^ C, we recommend a setting towards the thinner part of the sign; if the environment temperature is higher than 32^ C, a setting towards the thicker part of the sign is recommended.
- In order to attain the desired temperature in the ZeroZone drawer (only with some models), the thermostat should be set towards the thicker end of the marking.
Caution: Temperature sensor is installed behind the slots found under the dial. For correct operation of the appliance, this area should not be too crowded with food items.
APPLIANCE INTERIOR EQUIPMENT
(* Equipment depends on the model)
SHELF
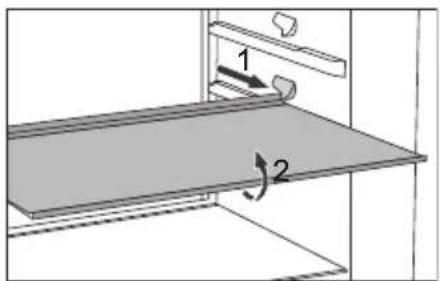
text_image
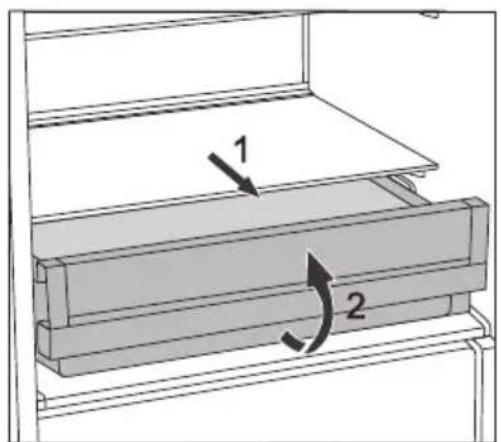
Diagram showing a mechanical or architectural component with labeled parts 1 and 2, indicating directional movement or force direction.- For easier access to food and clarity, the shelves can be partly pulled out.
- The shelves may be adjusted to suit your preferences using the guides in the refrigerator interior. To remove a shelf from the refrigerator, pull it out to the point when it is stopped by the guide. Then, lift it slightly at the front part and pull it all the way out.
Store perishables at the back of the shelf where the temperature is the lowest.
WIRE BOTTLE RACK\*
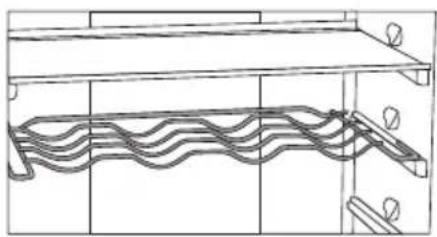
natural_image
Technical line drawing of a mechanical component with wavy internal structure and mounting brackets (no text or symbols)- Some models also feature a wire bottle holder. The bottle holder is protected against being inadvertently pulled out It can only be pulled out when it is empty. To pull it out, lift is slightly at the back and pull it towards you. Place the bottle holder so that the length of the bottles does not prevent proper closing of the door. The holder can take a maximum load of 9 0.75-liter bottles or 13 kilograms of total weight - see label on the right side in the appliance interior.
- Cans may also be placed on the bottle rack (lengthwise or crosswise).
ELASTIC BOTTLE MAT\*

natural_image
Line drawing of a cabinet shelf with a tray and drawer (no text or symbols)- Some models feature an elastic mat on which bottles or cans can be placed.
- The mat can also be used as a trivet for hot pans.
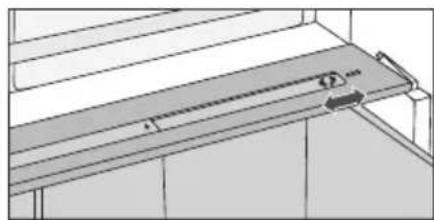
CRISPZONE - FRUIT AND VEGETABLE BIN WITH HUMIDITY CONTROL
- The bin at the bottom of the refrigerator is intended for storing fruit and vegetables. It provides humidity and prevents the food from drying out.
- Store the food in suitable packaging to prevent them from emitting or taking on odours. The bin has integrated humidity regulator which allows setting the humidity according to the amount of food stored.
natural_image
Technical line drawing of a mechanical assembly with no visible text or symbolsSmaller amounts of food - push the control slider to the right;
Larger amounts of food - push the control slider to the left;
natural_image
Technical line drawing of a mechanical drawer with directional arrows indicating movement (no text or symbols)- Pulling out the bin:
- Pull out the bin as far as it will go. Then, lift the front part and pull it out completely.
INTERIOR SIDE OF THE REFRIGERATOR DOOR
Mounted on the refrigerator door are compartments (shelves or bins) intended fro storing cheese, butter, eggs, yoghurt and other smaller packages, tubes, cans, etc. There is a bottle shelf at the lower end of the door.
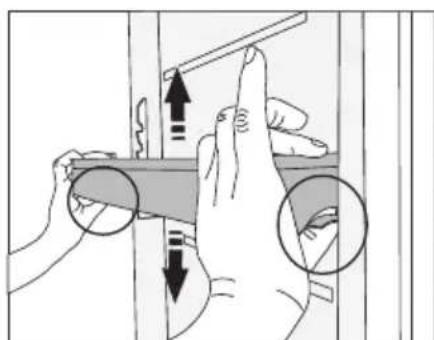
ADJUSTABLE DOOR BINS
natural_image
Illustration of hands performing a finger manipulation or adjustment task with arrows indicating movement (no text or symbols present)The height of door bins/shelves can be adjusted to your preferences without having to take them out of the appliance. Squeeze the tabs on both sides and move the bin/shelf up or down. To remove a bin from the appliance, lift it as far as it will go and pull it out.
STORAGE BIN (MULTIBOX)\*

natural_image
Technical line drawing of a mechanical assembly with a multi-tiered tray and mounting bracket (no text or symbols)- MultiBox bin offers a convenient way for storing food with a strong or pungent smell, e.g. ripened or blue-vein cheese, sausages, onions, butter etc.
- The silicone lid provides an air-tight seal that prevents the food from drying out and the odour to spread throughout the refrigerator compartment.
- The silicon lid can also be used as an egg or ice tray.
- If the fl exible lid is used as an egg tray, place it directly on the bottom of the door bin and use the open lower part of the Multibox bin to store food in smaller packages – pâté, jams, smaller tubes etc.
FAN\*
- The fan placed under the refrigerator compartment ceiling or hidden in the freezer unit will make sure the temperature is distributed more evenly and reduce condensation (dew) on the storage surfaces.
IONIZER (IONAIR)\*
- Air ionizer installed in the refrigerator compartment keeps the air permanently fresh. As a result, the food remains fresh and tasty longer.
- Air ionizer can be switched on and off using the switch located on the fan housing or on the side of the cooling tower (depending on the model).
CONVENTIONAL APPLIANCES
Control unit 1
Switching the fan and ionizer on and off
ON = OFF = 0

text_image
Diagram showing two air conditioner unit designs with one emitting a fan icon, connected to a device panel.When the fan and the ionizer are switched on, a red dot will be visible on the switch.
NO FROST APPLIANCES
Control unit 2
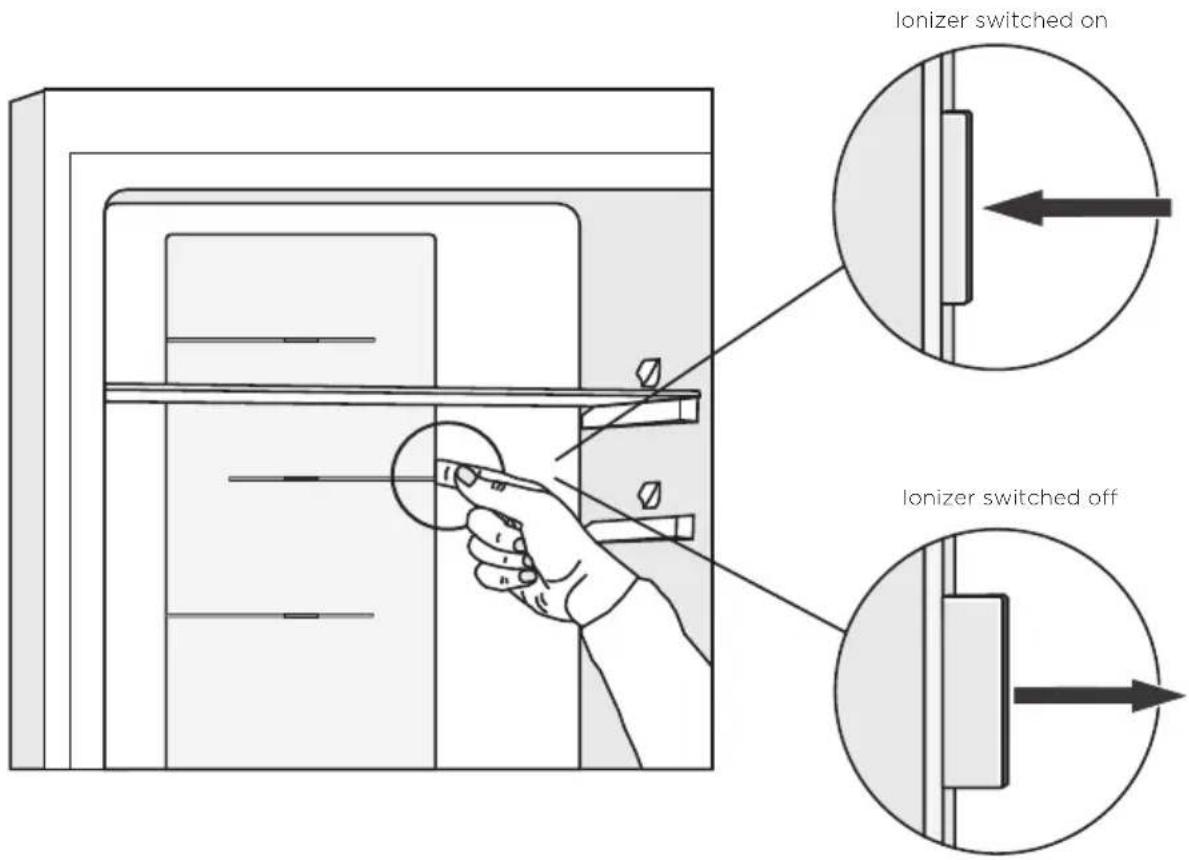
text_image
lonizer switched on lonizer switched offRECOMMENDED DISTRIBUTION OF FOOD IN THE APPLIANCE
RECOMMENDED DISTRIBUTION OF FOOD IN THE APPLIANCE
Sections of the refrigerator:
- upper part: canned food, bread, wine, pastry etc.
- middle part: dairy products, ready-made meals, desserts, soft drinks, beer, cooked food, etc.
- Fresh/Zero bin: - meat, meat produce, delicatessen;
- Fruit and vegetable bin: fresh fruit, vegetables, salads, root vegetables, potatoes, onions, garlic, tomatoes, tropical fruit, sauerkraut, turnips etc.

text_image
Illustration of a refrigerator with food items and their application icons, showing various food categories like vegetables, fish, and snacks.Sections in the refrigerator compartment door:
- upper/middle door bins: eggs, butter, cheese etc.
- lower door bins: beverages, cans, bottles etc.
Freezer sections:
- freezing, storage of frozen food (see Freezing and Storing Frozen Food).
IMPORTANT WARNINGS REGARDING FOOD STORAGE

Correct use of the appliance, appropriate packaging, maintaining the right temperature, and observing the food hygiene standards has a decisive impact on the quality of food storage.
Observe the expiry dates for the food, specified on the packaging.
Food stored in the refrigerator should be kept in closed containers or appropriate packaging to prevent them from emitting or receiving odours.
Do not store inflammable, volatile, and explosive substances in the refrigerator.
Bottles with high alcohol content should be tightly sealed and stored in an upright position.
Some organic solutions, essential oils in lemon and orange peel, butter acid, etc. may damage the plastic surfaces in case of a prolonged contact, causing damage and premature ageing of these materials.
Unpleasant odour warns of lacking cleanliness of the appliance or perished contents (see Cleaning the Appliance).
If you are leaving home for a longer period of time, remove perishables from the refrigerator.
AVOID CONTAMINATION OF FOOD
To avoid contamination of food, please respect the following instructions:
- Opening the door for long periods can cause a significant increase of the temperature in the compartments of the appliance.
- Regularly clean surfaces that can come in contact with food and accessible drainage systems.
- Store raw meat and fish in suitable containers in the refrigerator, so that it is not in contact with or drip onto other food.
- If the refrigerating appliance is left empty for long periods, switch off, defrost, clean, dry, and leave the door open to prevent mould developing within the appliance.
FOOD STORAGE TIMES
Recommended storage time in the refrigerator
| Type of food Time | |
| eggs, marinades, smoked meat up to 10 days | |
| cheese up to 10 days | |
| root vegetables up to 8 days | |
| butter up to 7 days | |
| deserts, fruit, ready-to-eat food, chunks of raw meat | up to 2 days |
| fish, raw minced meat, seafood up to 1 day |
STORING FOOD IN THE FRESHZONE DRAWER
In the FreshZone compartment, food stays fresh longer than in a conventional refrigerator, retaining more flavour and nutrients.
Decay and loss of mass are slowed down; therefore, fruit and vegetables remain fresh and natural longer.
For optimum performance, the drawer should be fully closed.
- When buying food, make sure it is fresh as this will determine the quality of the food, as well as how long it will keep in the fridge.
- Store the food in closed containers or appropriate packaging to prevent them from emitting or receiving odours.
• Take the food from the drawer 30-60 minutes before use to allow the aroma and flavour develop at room temperature. - Food sensitive to low temperature and not appropriate for storage in the FreshZone drawer include the following: pineapple, avocado, bananas, olives, potatoes, eggplant, cucumbers, beans, peppers (capsicum), melons, watermelons, pumpkins, squash, zucchini etc.
text_image
1 2• To remove the drawer:
- Pull out the drawer until it is blocked.
- Then, lift it at the front and pull it all the way out.
STORING FOOD IN THE ZEROZONE DRAWER
The ZeroZone compartment allows storing a wide variety of fresh food for up to three times longer than in a conventional refrigerator. The food stays fresh longer, retaining the flavour and nutrients. The temperature in this drawer depends on the temperature settings in the refrigerator compartment, environment temperature, frequency of door opening, and amount of food placed in it. For a temperature around 0 °C in the ZeroZone drawer, we recommend setting the refrigerator compartment temperature to 4 °C or lower. Temperature in the ZeroZone drawer may fall below 0 °C. Therefore, place the temperature-sensitive food in the upper parts of the refrigerator.
For optimum performance, the drawer should be fully closed.
- When buying food, make sure it is fresh as this will determine the quality of the food, as well as how long it will keep in the fridge.
- Store the food in closed containers or appropriate packaging to prevent them from emitting or receiving odours and humidity.
• Take the food from the drawer 30-60 minutes before use to allow the aroma and flavour develop at room temperature.
- Food sensitive to low temperature and not appropriate for storage in the ZeroZone drawer include the following: pineapple, avocado, bananas, olives, potatoes, eggplant, cucumbers, beans, peppers (capsicum), melons, watermelons, pumpkins, squash, zucchini etc.

text_image
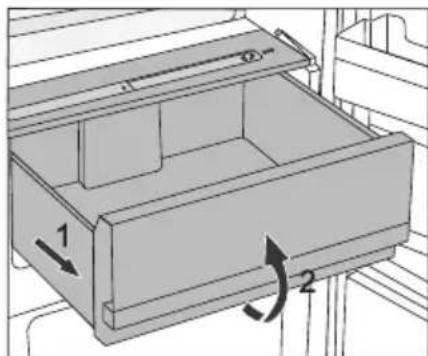
Diagram of a refrigerator interior showing labeled parts and directional arrows indicating movement or rotation.• To remove the drawer:
- Pull out the drawer until it is blocked.
- Then, lift it at the front and pull it all the way out.
APPROXIMATE STORAGE TIME IN THE ZEROZONE DRAWER*
| Type of food Time | |
| sausages, cold cuts, beef, pork, venison, raw meat up to 7 days | |
| Poultry up to 5 days | |
| fish up to 4 days | |
| seafood up to 3 days | |
| Vegetables: | |
| cabbage, garlic, carrots up to 180 days | |
| celery, herbs up to 30 days | |
| Green lettuce, cauliflower, radicchio, rhubarb up to 21 days | |
| broccoli, asparagus, kale, Chinese cabbage, kohlrabi, radish up to 14 days | |
| onions, mushrooms, spinach, peas up to 7 days | |
| Fruit: | |
| apples up to 180 days | |
| pears, kiwi up to 120 days | |
| grapes, quinces up to 90 days | |
| peaches up to 30 days | |
| recurrant, gooseberries, plums | up to 21 days |
| apricots, blueberries, cherries | up to 14 days |
| raspberries, strawberries | up to 3-5 days |
| Other: | |
| milk | up to 7 days |
| butter | up to 30 days |
| cheese | up to 30 days |
* depending on the quality and freshness of food
FREEZING PROCESS

Maximum amount of fresh food that may be inserted at once is specified on the appliance rating plate. If the amount of food to be frozen exceeds the indicated amount, the quality of freezing will be inferior; in addition, the quality of the food already frozen will deteriorate.
- To make use of the entire freezer volume, remove all drawers.
Place the food directly on the shelves and on the freezer bottom. Do not remove the bottom drawer in NO FROST appliances of A+++ energy class. - Activate the super freeze function 24 hours before freezing fresh food:
- Control unit 1: rotate the A dial towards the thickest part of the marking;
- Control unit 2: rotate the A dial to position *.
After this time, insert the fresh food into the freezing compartment.
Make sure the fresh food is not in contact with the food that is already frozen!
The most suitable place for freezing a large amount of fresh food is the upper section of the freezer.
In appliance types HZS 3669, HZS 3669F, with energy class rating A+ and control unit 1, distribute the fresh food evenly across all freezer compartments.
- When freezing smaller quantities of food (1-2 kilograms), activating the super freeze function is not required.
- After 24 hours, the food can be moved to other freezer compartments and the freezing process can be repeated as necessary.
• After the freezing process is completed, rotate the A dial back to the desired setting.
IMPORTANT WARNINGS ON FREEZING FRESH FOOD

Only freeze the food that is suitable for freezing in the freezer. Make sure the food you freeze is of high quality and fresh.
Choose appropriate packaging and use the packaging correctly.
Packaging should not be permeable to humidity; it should be airtight to prevent the food from drying out and loss of vitamins.
Label the food; indicate the type of food, amount, and date of freezing.
It is important that the food is frozen as quickly as possible. Therefore, keep the packages small. Refrigerate the food before freezing.
STORAGE OF INDUSTRIALLY FROZEN FOOD
- When storing and using frozen food, observe the manufacturer's instructions. Temperature and expiry date are indicated on the packaging.
- Only choose food with undamaged packaging, stored in freezers at temperatures of -18^ or lower.
- Do not purchase food covered in frost as this indicates they have been partly defrosted several times and that they are of inferior quality.
- Protect the food from thawing during transport. In case of an increase in temperature, storage time will be shorter and quality will deteriorate.
Recommended storage time in the freezer
| Type of food Time | |
| fruit, beef from 10 to 12 months | |
| vegetables, veal, poultry from 8 to 10 months | |
| Venison | from 6 to 8 months |
| Pork from 4 to 6 months | |
| minced meat 4 months | |
| bread, pastry, ready-to-eat meals, lean 3 months | |
| entrails | 2 |
| smoked sausage, fatty fish 1 month |
DEFROSTING FROZEN FOOD
Freezing the food does not kill the microorganisms. After the food is defrosted or thawed, bacteria is re-activated and the food spoils quickly. Use the partially or completely defrosted food as soon as possible.
Partial thawing decreases the nutritive value of the food, particularly fruit, vegetables, and ready-to-eat food.
AUTOMATIC REFRIGERATOR DEFROSTING
Refrigerator does not need defrosting because the ice on the back interior wall is thawed automatically.
Any accumulated ice will melt when the compressor unit is inactive. Drops will flow through an opening in the refrigerator rear wall into a tray fitted above the compressor, from where they will evaporate.
If an excessive layer of ice is formed on the rear wall of refrigerator interior (3-5 mm), switch off the appliance and defrost the appliance manually.
DEFROSTING A CONVENTIONAL FREEZER
- Defrost the freezer when an approximately 3-5 millimeter layer of of frost or ice has built up.
- 24 hours before defrosting, activate the super freeze function to additionally cool the food (see section »Freezing Process«).
After this period, remove the food from the freezer and protect them from defrosting.
- Switch off the appliance (see chapter Switching the appliance on/off) and unplug the power cord.
- Do not use any defrosting sprays as they may melt the plastic parts or harm your health.
- Do not use a knife or any other sharp object to remove the frost, because you may damage a pipe of the cooling system.
• To speed up the defrosting process, place a pot of hot water on the glass shelf. - Clean and dry the appliance interior (see Cleaning the Appliance).
- Before placing the food into the freezer, switch on the appliance and rotate the A dial back to the desired setting.
DEFROSTING A NO FROST FREEZER
- The NO FROST freezer will defrost automatically. Occasional frost that may appear on the walls will disappear automatically.
- Build-up of ice or frost in the freezer compartment can be a result of abnormal use of appliance (door opened too frequently and/or too long, door not properly closed etc.). In this case, unplug the appliance, remove the food from the freezer and protect them from defrosting.
Clean and dry the freezer interior. Before returning the frozen food into the freezer, switch on the appliance and select the desired setting.
CLEANING THE APPLIANCE
Before cleaning, unplug the appliance from the power mains – switch off the appliance (see chapter Switching the Appliance On/Off) and unplug the power cord from the wall outlet.
- Use a soft cloth to clean all surfaces. Cleaners that contain abrasive substances, acids, or solvents are not suitable for cleaning as they may damage the surface.
Clean the appliance exterior with water or a mild solution of suds. Lacquer-coated and aluminium surfaces may be cleaned with lukewarm water to which you have added a mild detergent. Use of cleaners with low alcohol content is allowed (e.g. window cleaners). Do not use cleaners containing alcohol for cleaning plastic materials.
Appliance interior can be cleaned with lukewarm water to which you can add some vinegar.
natural_image
Line drawing of a hand using a ruler to cut or adjust a rectangular object on a shelf (no text or symbols)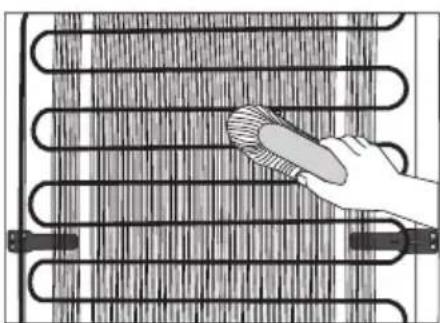
natural_image
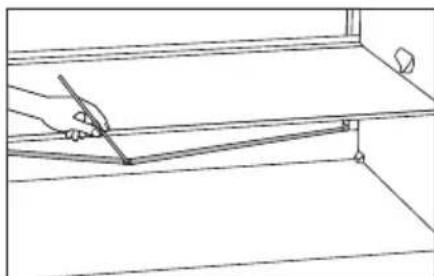
Illustration of a hand using a tool to clean or store contents on a coiled heating element (no text or symbols visible)- A gutter and an opening through which the water from thawed ice flows are located underneath the cooling panel that cools the refrigerator interior. The gutter and the opening may not be clogged. Inspect them often and clean if necessary (e.g. with a plastic straw). - Frost or ice build-up, 3-5 mm thick, will increase power consumption. Therefore, it should be regularly removed (does not apply to NO FROST freezer). Do not use any sharp objects, solvents, or sprays.
- The condenser unit mounted on the (exterior) back wall should always be kept clean, free of dust or deposits resulting from kitchen smoke or fumes.. Occasionally clean the dust using a soft non-metal brush or a vacuum cleaner.
• After cleaning, switch the appliance back on and insert the food.
| Problem: Cause or remedy: | |
| Appliance is connected to the power mains but it does not work. | Make sure there is voltage in the power outlet and that the appliance is switched on. |
Cooling system operates continuously for a long period of time: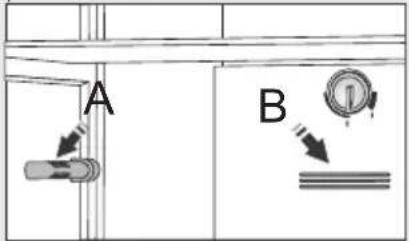 | Too high environment temperature.Door opened too frequently or too long.Door not closed correctly (possible impurities on the seal, misaligned door, damaged seal etc.).Too much fresh food inserted at once.Sensor in the refrigerator (A or B) blocked by fresh food.Make sure the air can circulate around the sensor (only with some models).Insufficient compressor and condenser cooling. Check the air circulation behind the appliance and clean the condenser unit. |
| Excessive build-up of ice on the back wall of refrigerator interior can be a result of the following: | Door opened too frequently or too long.Warm food placed in the refrigerator.Food in contact with the back interior wall of the refrigerator.Poor door sealing.If the seal is dirty or damaged, clean it or replace it. |
| Build-up of ice or frost in the freezer interior may be a result of the following: | Door opened too frequently or too long.Door not properly closed.Poor door sealing.If the seal is dirty or damaged, clean or replace it. |
| Condensate (dew) on the shelf above the drawers: | This is a transient phenomenon which cannot be entirely avoided in periods of high environment temperature and humidity. It subsides when temperature and humidity are normalized. We recommend cleaning the drawers more frequently and wiping the droplets occasionally.Open the humidity control slider.Place the food in to bags or other airtight packaging. |
| Water leaking from the refrigerator: | Clogged water discharge opening or water dripping past the water gutter.Clean the clogged opening, for example using a plastic straw.If a thick layer of ice builds up, defrost the appliance manually (see Defrosting the Appliance). |
| Door is difficult to open: • If you are trying to open the freezer door after just having closed it, this could be difficult to do.As you open the door, some cool air escapes from the appliance and it is replaced by warm air from the environment. When this air is cooled, negative pressure is generated which results in problems as you try to open the door. After a few minutes, the condition is normalized and the door can be easily opened again. | |
| Door is difficult to open: • If LED lighting does not work, call a service technician.Do not attempt a repair of the LED lighting yourself, as there is danger of contact with high voltage! | |
Temperature in the freezer too high: | • Set the manual flap (located behind the fruit and vegetables bin) by pressing the button and moving it to position 1 (only with some models). |
If none of the instructions above fixes your problem, call the nearest authorized service center and state the type, model, and serial number found on the rating plate/label which is located in the appliance interior.
INFORMATION ABOUT APPLIANCE NOISE
Cooling in refrigerator freezers is made possible by a cooling system that also includes a compressor (and a fan with some appliances), which generates some noise. The level of noise depends on installation, proper use, and age of the appliance.
- After connecting the appliance to the power mains, compressor operation, or the sound of flowing liquid, may be somewhat louder. This is not a sign of malfunction and it will not affect the useful life of the appliance. In time, appliance operation and this noise will become quieter.
- Sometimes, unusual or loud noise may appear during appliance operation; these are mostly the result of improper installation:
- The appliance must stand level and stable on a solid base.
- The appliance may not be in contact with a wall or adjacent furniture.
- Make sure the interior equipment sits firmly in its place and that the noise is not caused by cans, bottles or other containers placed next to each other.
- Due to the higher workload on the cooling system when the door is opened more frequently or for a longer time, when a large amount of fresh food is introduced, or when intensive freezing or cooling functions are activated, the appliance can temporarily generate more noise.
WE RESERVE THE RIGHT TO MAKE CHANGES THAT DO NOT AFFECT THE FUNCTIONALITY OF THE APPLIANCE.
Instructions for use of the appliance can also be found on our website at www.gorenje.com / http://www.gorenje.com /