TSS-10-B-S-SIW - Smart Home Crestron - Free user manual and instructions
Find the device manual for free TSS-10-B-S-SIW Crestron in PDF.

User questions about TSS-10-B-S-SIW Crestron
0 question about this device. Answer the ones you know or ask your own.
Ask a new question about this device
Download the instructions for your Smart Home in PDF format for free! Find your manual TSS-10-B-S-SIW - Crestron and take your electronic device back in hand. On this page are published all the documents necessary for the use of your device. TSS-10-B-S-SIW by Crestron.
USER MANUAL TSS-10-B-S-SIW Crestron
Crestron® Room Scheduling Panels
Programming Guide
Crestron Electronics, Inc.
Original Instructions
The U.S. English version of this document is the original instructions. All other languages are a translation of the original instructions.
Crestron product development software is licensed to Crestron dealers and Crestron Service Providers (CSPs) under a limited non-exclusive, non-transferable Software Development Tools License Agreement. Crestron product operating system software is licensed to Crestron dealers, CSPs, and end-users under a separate End-User License Agreement. Both of these Agreements can be found on the Crestron website at www.crestron.com/legal/software-license-agreement.
The product warranty may be found at www.crestron.com/legal/sales-terms-conditions-warranties.
The specific patents that cover Crestron products are listed at www.crestron.com/legal/patents.
Certain Crestron products contain open source software. For specific information, visit www.crestron.com/legal/open-source-software.
Contents Crestron, the Crestron logo, Crestron Fusion, and Crestron Toolbox are either trademarks or registered trademarks of Crestron Electronics, Inc. in the United States and/or other countries. macOS is either a trademark or a registered trademark of Apple, Inc. in the United States and/or other countries. Android, Google, and Google Calendar are either trademarks or registered trademarks of Google, Inc. in the United States and/or other countries. Linux is either a trademark or a registered trademark of Linus Torvalds in the United States and/or other countries. Microsoft, Visual Studio, and Windows are either trademarks or registered trademarks of Microsoft Corporation in the United States and/or other countries. Node.js is either a trademark or a registered trademark of Joyent, Inc. in the United States and/or other countries. Other trademarks, registered trademarks, and trade names may be used in this document to refer to either the entities claiming the marks and names or their products. Crestron disclaims any proprietary interest in the marks and names of others. Crestron is not responsible for errors in typography or photography.
This document was written by the Technical Publications department at Crestron. ©2019 Crestron Electronics, Inc.
Contents
Introduction....1
Basic Programming.... 2
Prerequisites 2
CSS Naming Conventions....2
Basic CSS Programming 4
Advanced CSS Programming....13
Upload a CSS File to the Scheduling Application 14
Advanced Programming ....15
Download the Source Code 15
Create the Build Environment....15
Build Arguments....20
Appendix A: Default Scheduling Application Screens....21
Appendix B: Scheduling Application UI Interface to Scheduling APK 28
Crestron® Room Scheduling Panels
Introduction
The Crestron® room scheduling application provides a complete room scheduling solution using the Crestron TSS-7, TSS-10, TSW-560, TSW-560P, TSW-760, and TSW-1060 touch screens. When the scheduling application is enabled on a touch screen installed outside of a meeting space, users may view the room's availability, check the status of nearby rooms, and book an ad hoc meeting directly through the touch screen.
The scheduling application integrates with Crestron Fusion® software, Microsoft® Exchange software, or the Google Calendar™ calendaring application (via a Google® software account) to provide real-time notifications and to intelligently monitor the meeting space.
NOTE: The scheduling application comes preinstalled on the TSS-7, TSS-10, TSW-560, TSW-560P, TSW-760, and TSW-1060 touch screens. Ensure that the touch screen is running the latest firmware version that includes the scheduling application. For more information, refer to the firmware release notes.
Crestron provides basic configuration options to modify the theme and layout of the scheduling application user interface. The user interface may be customized further with CSS programming to create a unique look and feel or to match corporate branding guidelines. For applications requiring a completely customized graphical interface (such as new UI elements), custom scheduling application projects may be created with HTML, JavaScript, and CSS programming and then uploaded to the touch screen.
The various programming options for the scheduling application are described in the sections that follow.
The following supplementary documentation is available at www.crestron.com/manuals:
- For more information about configuring the scheduling application, refer to the Crestron Room Scheduling Panels Operations Guide (Doc. 8205).
- For more information about scheduling application functionality and the user interface, refer to the Crestron Room Scheduling Panels User Guide (Doc. 8206).
Basic Programming
Many elements of the room scheduling application may be customized through the web browser configuration interface, including the application theme, the layout orientation, and the background media files for the active and idle screens.
The scheduling application may be customized further by modifying the application's embedded CSS file using custom CSS code. Programming in CSS allows for varying degrees of customization, as the programmer may decide which of the hundreds of available CSS attributes should be modified to create a unique look and feel.
For basic customization, this guide includes a selection of commonly used CSS attributes that may be modified and imported into the application. For more advanced customization, the application CSS files may be downloaded from the Crestron website and manipulated as needed. Both programming methods are explained in the sections that follow.
NOTE: To view the default scheduling application screens for the dark and light themes and for the horizontal and vertical layouts, refer to "Appendix A: Default Scheduling Application Screens" on page 15.
Prerequisites
This guide assumes that the programmer has sufficient CSS programming knowledge to perform the following tasks:
- Understand the organizational structure and naming conventions of the CSS file
- Identify the various CSS attributes that may be modified
- Modify CSS attributes by inputting the appropriate values
Additionally, this guide assumes that the modified CSS file will be uploaded to a server and linked to the scheduling application web configuration utility via a permanent URL.
CSS Naming Conventions
The scheduling application CSS files were developed using BEM (Block Element Modifier) naming conventions. BEM provides an organizational structure to CSS code that allows a programmer to easily locate information within the CSS file and to understand the relationship between parent and child entities.
The BEM organizational structure of the project's CSS files is explained below.
- Block: A block is a stand-alone, parent entity that provides a namespace for child elements and for modifiers. Blocks are not tied to any other entities for meaning.
- Example: menu
- Element: An element is a child entity of a block and has no external meaning outside of the block. An element is separated from the block by two underscores (_).
- Example: menu_icon
- Modifier: A modifier creates varying states or behaviors for a block or an element. A modifier is separated from the block or the element by two dashes (--).
- Example: menu_icon--active or menu--active
Basic CSS Programming
For basic CSS programming applications, use the sample selection of CSS code provided on the following pages to modify commonly used scheduling application attributes. This code may be saved as a CSS file and uploaded to the scheduling application using the procedure listed on page 14.
To modify the provided code, copy a selection of code to a code-modification or text-editing program, and then replace any attribute's default value with another supported value. Once the desired attributes have been modified, export the code as a CSS file.
/************************** Screensaver section **************************/
/* Room name */
.screensaver_container_room-details_name {
    text-transform: capitalize;
    white-space: nowrap;
    text-overflow: ellipsis;
    overflow: hidden;
    line-height: 1.5em;
    width: 133.33333333vh;
}

/* Color for available label */
.color_main-color-3 {
    color: #3cf799;
}

/* Color for reserved label */
.color_main-color-2 {
    color: #ff2c55;
}
/* Reserved details section */
.screensaver_container_reserved_content {
    font-family: Crestron, sans-serif;
    font-style: normal;
    font-size: 6vh;
    font-weight: 500;
    line-height: 1.2;
}

/* Available details section */
.screensaver_container_available_content {
    font-family: Crestron, sans-serif;
    font-style: normal;
    font-size: 6vh;
    font-weight: 500;
    line-height: 1.2;
}

/* Date screensaver */
.screensaver_container_current-time_date {
    font-family: Crestron, sans-serif;
    font-style: normal;
    line-height: .75em;
    font-size: 4.33333333333333333333333333333333333333333333333333333333333333333333333333333333333333
}

/* Time screensaver */
.screensaver_container_current-time_time {
    margin-top: 3.66666666667vh;
    font-family: Crestron, sans-serif;
    font-style: normal;
    line-height: .75em;
    font-size: 13vh;
    font-weight: 400;
}
/* Logo screensaver */
.screensaver_container_logo_img {
    height: 9vh;
}

/* Border color screensaver layout when reserved */
.screensaver_container--reserved {
    border-color: rgba(255,44,85,0.8);
}

/* Border color screensaver layout when available */
.screensaver_container--available {
    border-color: #3cf799;
}

/******* Horizontal Room section *****
/* Room name */
.room_container_room-details_name {
    font-family: Crestron,sans-serif;
    font-style: normal;
    font-size: 4vh;
    font-weight: 400;
    text-transform: capitalize;
    line-height: 1.2;
    margin-top: -.25em;
}
/* Current time and date */
.room_container_current-time {
    font-family: Crestron, sans-serif;
    font-style: normal;
    line-height: .75em;
    font-size: 4vh;
    font-weight: 400;
    float: right;
    margin-right: 5vh;
    margin-top: 2.5vh;
}

/* 'Available' or 'Reserved' label */
.room_container_status_title_label1 {
    font-family: Crestron, sans-serif;
    font-style: normal;
    line-height: .75em;
    font-size: 6vh;
    font-weight: 400;
    margin-top: 4.33333333333vh;
    letter-spacing: 1px;
    text-transform: uppercase;
    display: block;
}
/* 'For next' label */
.room_container_status_title_label2 {
    font-family: Crestron, sans-serif;
    font-style: normal;
    line-height: .75em;
    font-size: 3.3333333333vh;
    font-weight: 400;
    margin-top: 2vh;
    letter-spacing: 1px;
    text-transform: uppercase;
    display: block;
}

/* Color for 'reserved label' and 'countdown number' if reserved */
.room_container--reserved .room_container_status_title_label1,
.room_container--reserved .room_container_status_countdown_hours_number,
.room_container--reserved .room_container_status_countdown_minutes_number {
    color: #ff2c55;
}

/* Color for 'minutes label' and 'hours label' if reserved */
.room_container--reserved .room_container_status_countdown_hours_time,
.room_container--reserved .room_container_status_countdown_minutes_time {
    color: #ff2c55;
    border: lpx solid transparent;
    -moz-border-image: -moz-linear-gradient(top,#ff2c55 0,#f5317b 100%);
    -webkit-border-image: -webkit-linear-gradient(top,#ff2c55 0,#f5317b 100%);
    border-image: linear-gradient(to bottom,#ff2c55 0,#f5317b 100%);
    border-image-slice: 1;
}
/* Color for 'available label' and 'countdown number' if available */
.room_container--available .room_container_status_title_label1,
.room_container--available .room_container_status_countdown_hours_number,
.room_container--available .room_container_status_countdown_minutes_number {
    color: #3cf799;
}

/* Color for 'minutes label' and 'hours label' if available */
.room_container--available .room_container_status_countdown_hours_time,
.room_container--available .room_container_status_countdown_minutes_time {
    color: #3cf799;
    border: 1px solid transparent;
    -moz-border-image: -moz-linear-gradient(top,#3cf799 0,#57f171 100%);
    -webkit-border-image: -webkit-linear-gradient(top,#3cf799 0,#57f171 100%);
    border-image: linear-gradient(to bottom,#3cf799 0,#57f171 100%);
    border-image-slice: 1;
}

/* Room countdown number */
.room_container_status_countdown_hours_number,
.room_container_status_countdown_minutes_number {
    font-family: Crestron, sans-serif;
    font-style: normal;
    line-height: .75em;
    font-size: 19.6666666667vh;
    font-weight: 400;
    margin-top: 7vh;
    text-align: center;
    position: relative;
}
/* Room label under countdown number */
.room_container_status_countdown_hours_time,
.room_container_status_countdown_minutes_time {
    font-family: Crestron, sans-serif;
    font-style: normal;
    line-height: .75em;
    font-size: 3.3333333333vh;
    font-weight: 400;
    margin-top: 3.3333333333vh;
    min-width: 19vh;
    text-transform: uppercase;
    letter-spacing: 1px;
    padding: 1.1666666667vh 2.1666666667vh;
}

/* Room 'Walk up meeting' if reserved */
.room_container_status_details_subject {
    font-family: Crestron, sans-serif;
    font-style: normal;
    line-height: .75em;
    font-size: 6vh;
    font-weight: 400;
    margin: 7vh auto 0;
    white-space: nowrap;
    text-overflow: ellipsis;
    overflow: hidden;
    width: 133.333333333vh;
    line-height: 1.2;
}
/* Room 'Walk up organizer' if reserved */
.room_container_status_details_organizer {
    font-family: Crestron, sans-serif;
    font-style: normal;
    line-height: .75em;
    font-size: 4vh;
    font-weight: 400;
    margin-top: 3vh;
}

/* Room 'Meeting date' if reserved */
.room_container_status_details_date {
    font-family: Crestron, sans-serif;
    font-style: normal;
    line-height: .75em;
    font-size: 4vh;
    font-weight: 400;
    margin-top: 2vh;
}

/************************** Timeline **************************/

/* Background and border color for the timeline events created in the past */
Timeline_content_event_content--finished {
    border-color: rgba(228,228,228,.1);
    background-color: rgba(228,228,228,.05);
}

/* Background color for the timeline events created in the future */
.bg_main-color-1 {
    background-color: rgba(255,44,85,.1);
}
/* Border color for the timeline events created in the future */
.border_main-color-1 {
    border-left-color: #ff2c55;
}

/* Background and border color for the active event from timeline */
Timeline_content_event_content--active,
Timeline_content_event_content--selected {
    border-color: #ff2c55;
    background-color: rgba(255,44,85,.8);
}

/* Current time pin color when available */
.bg_main-color-2,
Timeline_content_now::before {
    background-color: #3cf799;
}

/* Current time pin color when reserved */
Timeline_content_now--reserved,
Timeline_content_now--reserved::before {
    background-color: #ff2c55;
}
Advanced CSS Programming
For advanced CSS programming applications, the application CSS files may be downloaded from the Crestron website. These files contain all of the CSS attributes that may be modified for the various application themes and layouts.
To modify the scheduling application CSS files:
- Navigate to the TSS-7, TSS-10, TSW-560, TSW-560P, TSW-760, or TSW-1060 product page at www.crestron.com.
- Click the Documentation tab.
- Locate the scheduling application CSS files under Software & Firmware, and then click Download. The CSS files are downloaded to the computer as a zipped file.
- Extract the CSS files from the zipped file.
- Open the desired CSS file in a code-modification or text-editing program.
- Replace any attribute's default value with another supported value.
- Once the desired attributes have been modified, save the CSS file.
NOTE: If the CSS attributes from multiple scheduling application CSS files are modified, all modified attributes may be included together in one custom CSS file.
Upload a CSS File to the Scheduling Application
Once a new CSS file has been created for the scheduling application, it may be uploaded to the application through the web-based configuration utility.
NOTE: Scheduling mode must be enabled on the touch screen before the configuration utility can be accessed. For more information, refer to the Crestron Room Scheduling Panels Operations Guide (Doc. 8205).
To upload a CSS file to the scheduling application:
- Upload the modified CSS file to a remote server. Note the URL of the CSS file on the server after it has been uploaded.
- Access the scheduling application configuration utility by entering the IP address of the touch screen into a web browser.
NOTE: If the touch screen is assigned an IP address using DHCP (Dynamic Host Configuration Protocol), locate the touch screen IP address on the device's main setup page. For more information on locating and configuring the touch screen IP address, refer to the TSW-560, TSW-760, and TSW-1060 Supplemental Guide (Doc. 7927) or the TSS-7 and TSS-10 Supplemental Guide (Doc. 8327) at www.crestron.com/manuals.
- Navigate to Settings > UI Settings.
- Enter the URL of the CSS file obtained in step 1 into the Theme/Style Override URL text field.
- Select Save Changes from the Action menu on the top right of the screen.
The scheduling application user interface immediately updates to reflect the modifications made in the uploaded CSS file.
NOTE: If a CSS file is modified and then uploaded to the scheduling application using the same URL as the previous version, the user interface does not update unless (a) the touch screen is rebooted or (b) the URL is deleted in the web configuration utility, changes are saved, and the URL is reentered and saved.
Advanced Programming
Custom room scheduling projects may be created using HTML, JavaScript, and CSS programming for applications where a fully customized graphical interface is desired. Custom room scheduling projects allow programmers to modify the room scheduling application to fit in seamlessly with other graphical interfaces across an enterprise and to add custom UI elements. Once a custom project is created, it may be uploaded to any touch screen running the room scheduling application.
Download the Source Code
The source code files for the application may be downloaded from the Crestron website. These files contain all of the HTML, JavaScript, and SCSS source code used to build the scheduling application.
To download the scheduling application source code files:
- Navigate to the TSS-7, TSS-10, TSW-560, TSW-560P, TSW-760, or TSW-1060 product page at www.crestron.com.
- Click the Documentation tab.
- Locate the scheduling application source code files under Software & Firmware, and then click Download. The source code files are downloaded to the computer as a zipped file.
NOTE: Ensure that the operating system version is compatible with the programs that must be installed to create the build environment. For more information, refer to the respective program release notes. The required programs are described in the procedure below.
Create the Build Environment
Once the scheduling application source code has downloaded, a dedicated build environment must be created. The build environment is used to program and build custom room scheduling projects.
The build environment may be created on a compatible Windows ^® operating system, macOS ^® operating system, or Linux ^® operating system platform.
NOTE: SCSS is used in the example project source code instead of raw CSS. SCSS is a CSS extension language that provides additional programming features. SCSS compiles down to plain CSS during the build process. New stylesheets are not required to be written in SCSS, but the programmer should have a working knowledge of the language if the existing styles must be modified in the source code.
To create a new build environment:
- Extract the contents of the provided source code zipped file to a directory on the host computer.
- Download and install Visual Studio® Code software at https://code.visualstudio.com/Download
NOTE: Visual Studio Code is recommended because it is free and cross-platform. However, comparable code editing programs may be used if preferred by the programmer.
-
Open Visual Studio Code.
-
Navigate to File > Open Folder.
-
Select the HeliumProject > app folder, and then click Select Folder.
Open Folder Dialog Box
![File Edit Selection View Go Debug Terminal Help Welcome - Visual Studio Code [Administrator] Welcome Open Folder HELIUM > HeliumProject > Organize New folder Favorites Downloads Pictures Desktop Recent Places Libraries Libraries Crestron Documents Music Pictures Subversion Videos Name Date modified Type Size app 12/14/2018 12:37 File folder build 12/14/2018 12:37 File folder prototype 12/14/2018 12:37 File folder Folder: #PP Select Folder Cancel Interactive playground Try essential editor features out in a short walkthrough](/content/2026/06/1195292/images/3a18d7fa1d9cfc67c1fcccb56225039411425f7b5918b4fbb60db5f19d0000ca.jpg)
A directory tree for the app folder appears in the EXPLORER menu on the left of the screen.
EXPLORER Menu
![File Edit Selection View Go Debug Terminal Help Welcome - app - Visual Studio Code [Administrator] EXPLORER OPEN EDITORS Welcome APP apps back public src vendor esw johintrc bower.json Gruntfile.js package-lockjson package.json README.ind server_repository.js server.js Start New file Open folder... Add workspace folder... Recent No recent folders Help Printable keyboard cheatoches Introductory videos Tips and Tricks Product documentation GitHub repository Stack Overflow Show welcome page on startup Customize Tools and languages Install support for JavaScript, TypeScript, Python, PHP, Azure... Settings and keybindings Install the settings and keyboard shortcuts of Vira, Sublime... Color theme Make the editor and your code look the way you love Learn Find and run all commands Rapidly access and search commands from the Command Pa... Interface overview Get a visual overlay highlighting the major components of th... Interactive playground Try essential editor features out in a short walkthrough OUTLINE](/content/2026/06/1195292/images/d8f393e8a8d79e6893e8f6bb3dad54529f95b3df60202917bbc573c1659905e5.jpg)
- Download and install Node.js® software from https://nodejs.org/en/download/. Node.js is required to fetch the necessary packages for the build environment.
NOTE: There is an installation option to add Node and npm to PATH that is selected by default. This option should remain selected.
- Check that the Node.js variables were added successfully:
a. In Visual Studio Code, navigate to View > Terminal.
b. When the command prompt displays, issue the node -v and npm -v commands. Version numbers are returned if the variables were added successfully.
Terminal - Node.js Variables
![Welcome Start New file Open folder... Add workspace folder... Recent No recent folders Help Printable keyboard cheapest Customize Tools and languages Install support for JavaScript, TypeScript, Python, PHP, Azure... Settings and keybindings Install the settings and keyboard shortcuts of Veri, Sublime... Color theme Make the editor and your code look the way you love Learn PROGRESS OUTPUT DEBUG CONSULT TERMINAL 1 cmd Microsoft Windows [Version 6.1.7681] Copyright (c) 2009 Microsoft Corporation. All rights reserved. C:\Users\ihammons\Desktop\HELIUM\HeliumProject\app>node -v v10.14.2 C:\Users\ihammons\Desktop\HELIUM\HeliumProject\app>npm -v 6.4.1 C:\Users\ihammons\Desktop\HELIUM\HeliumProject\app>](/content/2026/06/1195292/images/6de250ec50f5539066e737d00493c94d199055d6ea1d8953751496cb75a64bab.jpg)
NOTE: If the commands are not recognized, restart Visual Studio Code, and then reissue the commands. If the commands are still not recognized, the variables must be added manually.
- Download and install Git from https://git-scm.com/downloads.
NOTE: Select the "Use Git from Windows Command Prompt" option during installation to add the environment variable.
-
Install the following project dependences using the terminal function in Visual Studio Code (View > Terminal):
-
Issue npm install to install all Node.js and Bower dependencies. Output logging will be visible in the terminal.
- Issue npm install --g bower to install the latest version of Bower.
- Issue npm install --g grunt to install the latest version of Grunt.
Once all dependencies have been installed successfully, test the build environment by building the existing scheduling project:
- Ensure that the terminal is pointing to the project's "apps" folder.
- Issue the grunt --app=schedulingproject command.
If the command is successful, a "Done, without errors" message is returned in the terminal, and a "dist" directory is created in the EXPLORER directory tree that includes the output files.
Terminal - Success Message
Build Arguments
The following arguments may be passed into the grunt build when creating a scheduling project:
- --app=[appname]: [appname] must be the name of a folder in the "apps" directory. This argument also determines the output file name.
-
--initbuild: This argument is used when CSS customization is needed for a project. To use this argument:
-
Create a folder with the name of the project in the "apps" directory.
- Run grunt --app=[appname] --initbuild to compile all of the HTML, JavaScript, and CSS and to copy all the files into the project folder, where changes can be made that do not affect the source code.
- --build: This argument is used when customization is needed for a project. After customizing the files in the project folder, run grunt --app=[appname] --build to copy the modified files into the "dist" directory and to create a project archive.
NOTE: The --initbuild and --build arguments should be used only if small changes need to be made to a project, as this keeps all code in "src" intact. If significant changes need to be made, make changes directly to the "src" files and then issue the grunt --app=[appname] command to build.
- --debug: This argument is used for debugging. Files are compiled and copied to the "public" directory, where they may be viewed and debugged using a web browser.
NOTE: Debugging with the local browser may be used in conjunction with the --emulate command to associate the UI with a JavaScript file that emulates a scheduling provider. The JavaScript file (SchedulingPanelEmu.js) is located in the "vendor" directory.
- --emulate: This argument links the project with a JavaScript file (vendor/crestron/SchedulingPanelEmu.js) that emulates a calendar connection. This may be used for testing and debugging with the local browser.
NOTE: Emulation works by using a Node.js server instance running on the local machine. The default port is "80", which may be changed in the ".env" file.
--dist: This argument is used to prepare the project for upload to a touch screen.
- The project is packaged in a .zip file that contains the necessary components for the touch screen firmware to recognize the scheduling project.
- The output file is copied to the "dist" directory and should have the version number appended to the filename (such as "schedulingproject_0.10.5.zip").
- The .zip file may then be placed in the touch screen's "firmware" directory and installed using the ootbprojectload console command in Crestron Toolbox™ software.
Appendix A: Default Scheduling Application Screens
This appendix provides the default scheduling application screens for the light and dark themes and the horizontal and vertical layouts. Reference this appendix when modifying the CSS code for a particular theme and layout.
NOTE: The TSW-560P scheduling application screens provide the same functions as the screens shown below, but the appearance and layout of the screens have been modified for portrait orientation. The horizontal layout is not available on the TSW-560P.
Dark Theme
Active Screen - Available (Horizontal Layout)

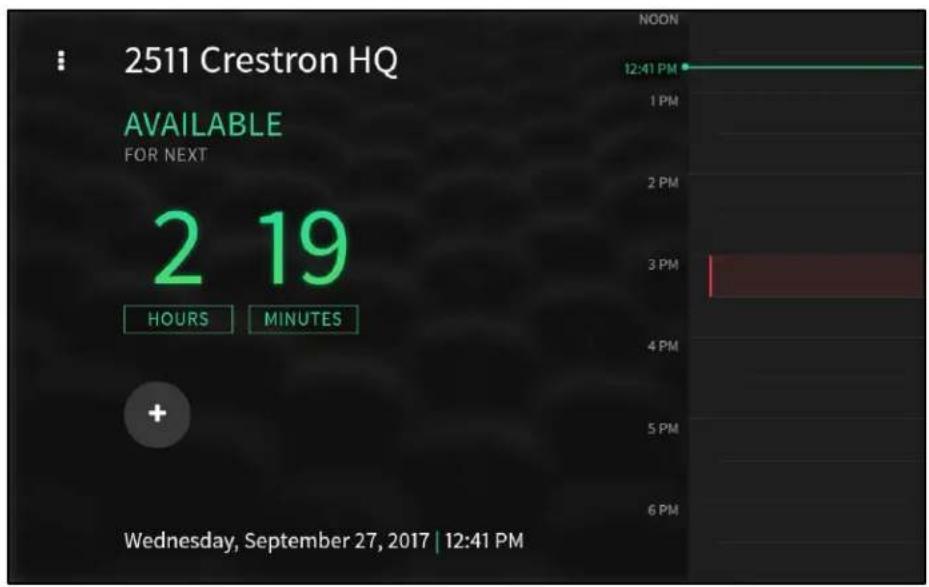
Active Screen - Available (Vertical Layout)
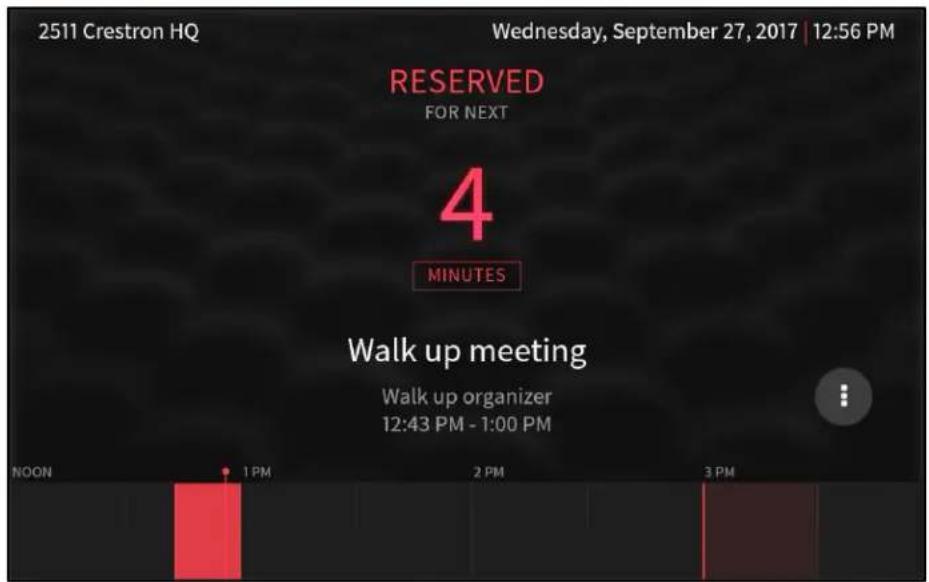
Active Screen - Reserved (Horizontal Layout)
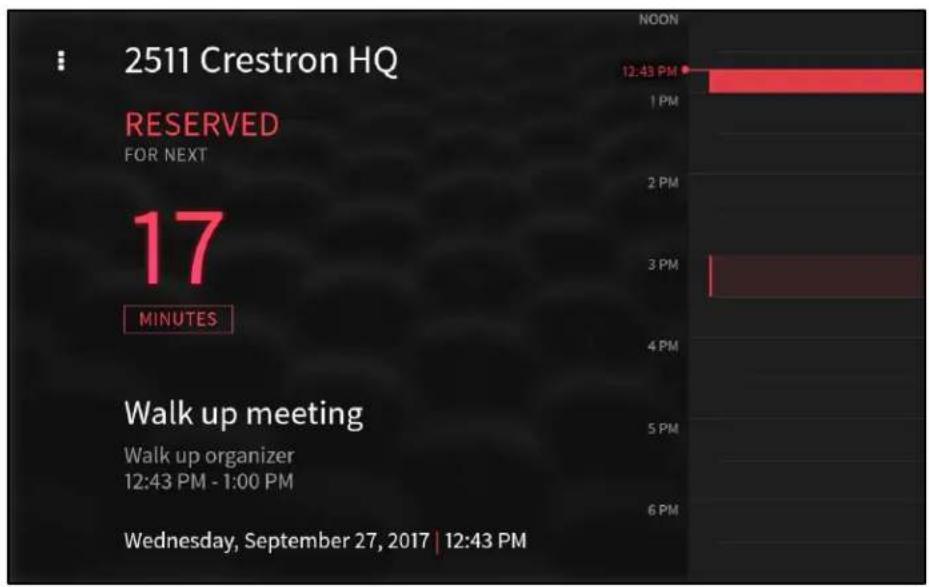
Active Screen - Reserved (Vertical Layout)
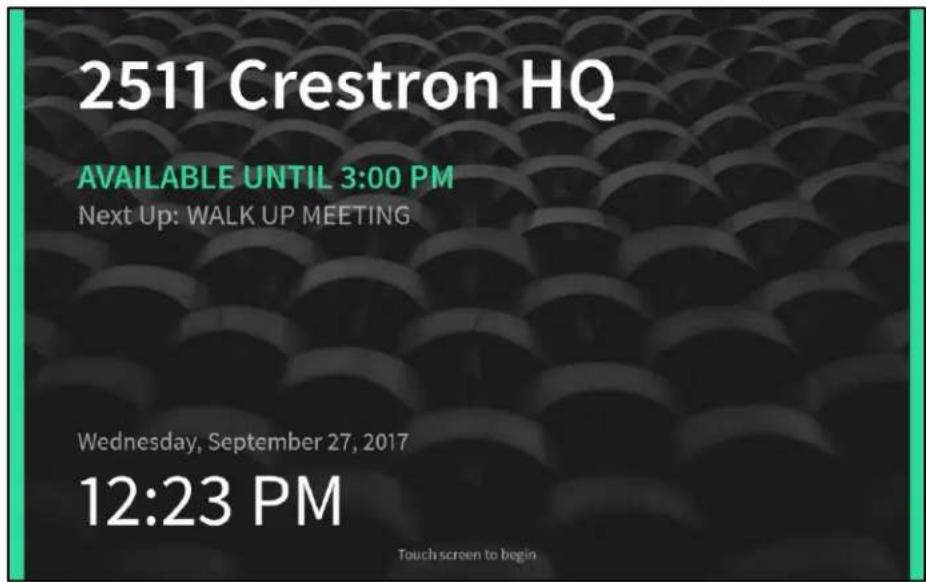
Idle Screen - Available
Idle Screen - Reserved

Light Theme
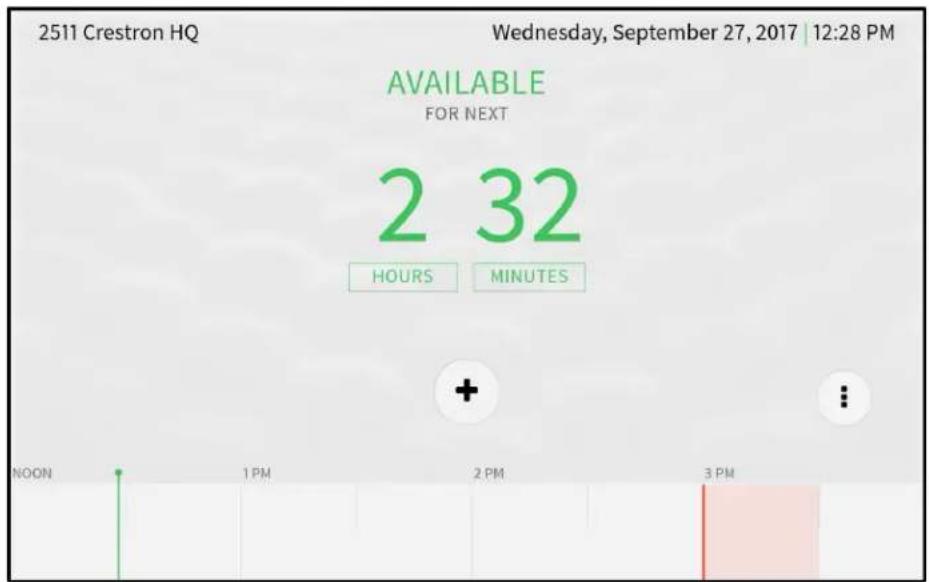
Active Screen - Available (Horizontal Layout)
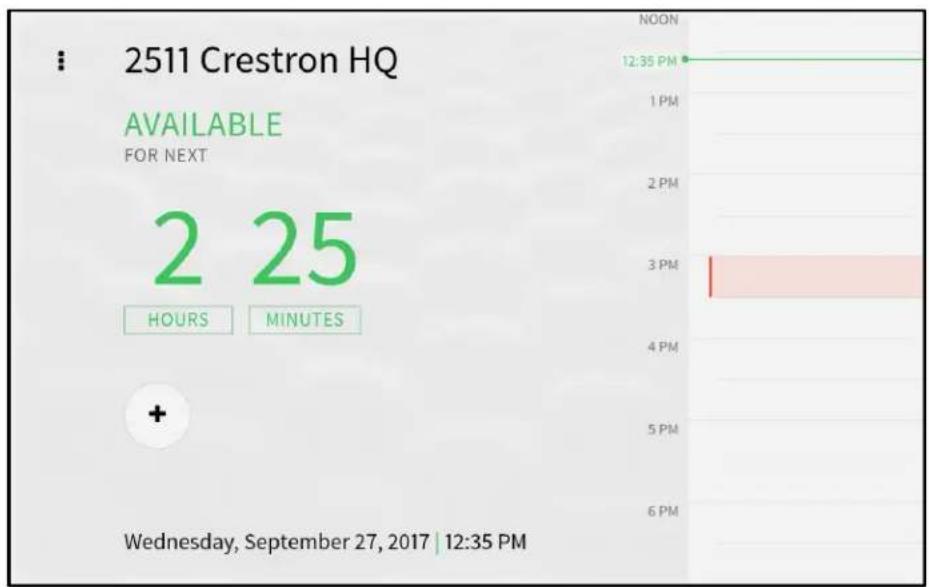
Active Screen - Available (Vertical Layout)
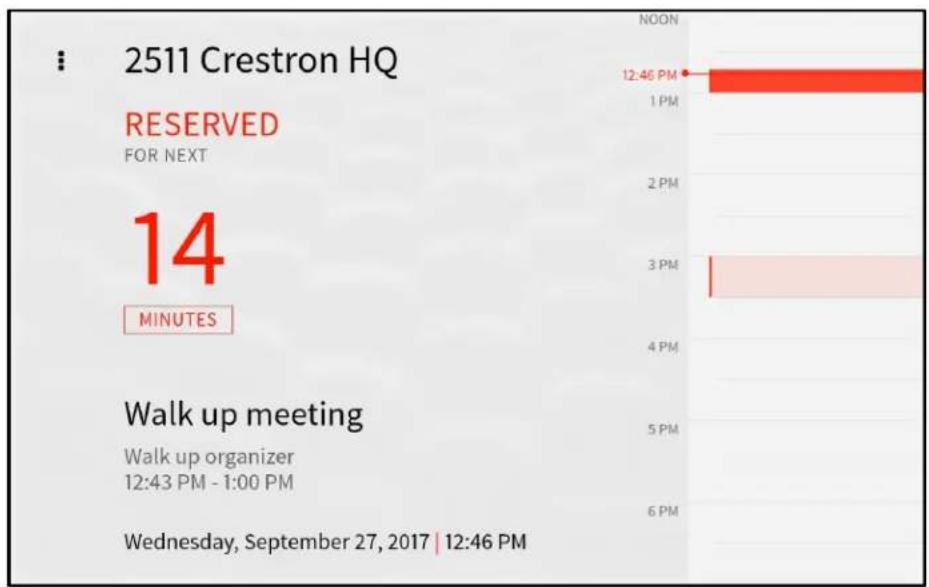
Active Screen - Reserved (Horizontal Layout)

Active Screen - Reserved (Vertical Layout)
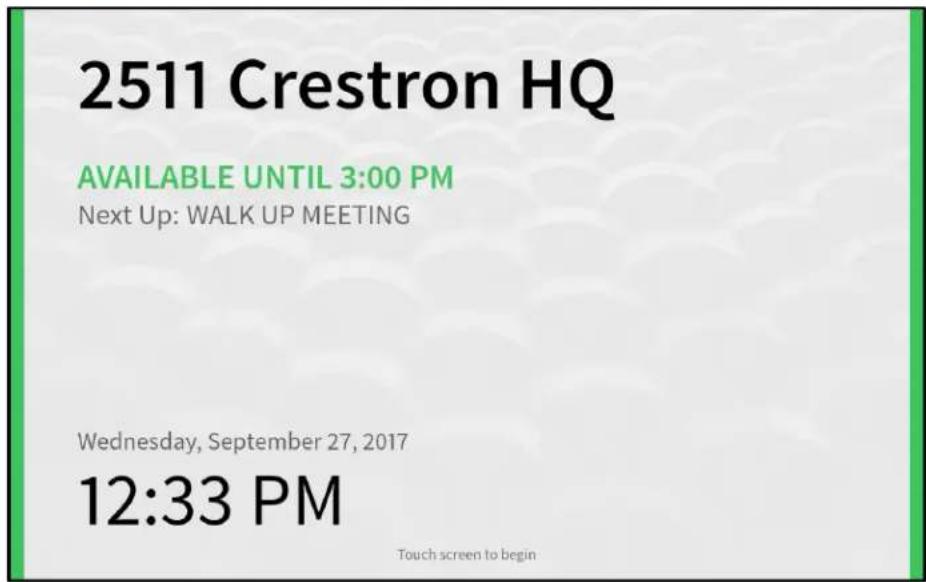
Idle Screen - Available
2511 Crestron HQ
RESERVED 12:43 PM - 1:00 PM
Meeting: WALK UP MEETING
Wednesday, September 27, 2017
12:49 PM
Touch screen to begin
Appendix B: Scheduling Application UI Interface to Scheduling APK
Programmers are not restricted to using the example scheduling program as a starting point for a custom project. Using HTM5, JavaScript, and CSS, it is possible to create a completely custom project, as long as it uses the interface described in this appendix.
This appendix outlines the scheduling application UI interface to the scheduling APK (Android® platform Package) backend. Use this interface to ensure that a custom project is communicating with the scheduling APK or to add functionality to the existing project.
Data Subscriptions
Any data that the scheduling application UI needs to obtain from the scheduling service is provided as data pushes from the scheduling APK. The
"vendor/Crestron/schedulingPanel.js" file contains the methods to subscribe to these updates. In the example project, the subscriptions are made in the "communications.js" file.
The data is grouped into the following JSON objects:
Config
The Config object is the configuration update object.
Fields:
- version: String
- settings: Object
ProviderStatus
The ProviderStatus object is fields relating to the status of the provider or room.
Fields:
- isOnline: Boolean
- message: String
- needsAuthorization: Boolean
• offlineLimit: Boolean
• roomOccupied: Boolean
- Set this field to "true" if the provider connection must be authenticated.
- If true, the application has not been able to make an initial connection to the provider, or the provider has been offline for longer than the configured "OfflineTimeout" period.
Timeline
The Timeline object is the entire schedule for the current day. This object is dispatched periodically and after any change.
Fields:
- roomId: String
• roomName: String
• events: Array
Events
The Events object is the current event and/or next event, if available. This object is dispatched periodically and after any change.
Fields:
- currentEvent: Object
- nextEvent: Object
Language
The Language object is no longer used and will be depreciated in a future release. The language update is provided with the config data.
UI Actions
Android WebView uses a component called the "JSInterface" for communication with the UI project. A global variable called "JSInterface" is created, and the following methods can be called. Each method takes an optional callback as a parameter, which will receive the response.
JSInterface.doCreateMeeting
This method is formatted as follows: "JSInterface.doCreateMeeting(timeline, messageId, roomId, subject, organizer, startDate, endDate, callback)."
Parameters:
• timeline: Boolean (Any truthy value == true)
- messageId: String (A unique ID that is sent back in the response callback)
- roomId: String
- subject: String
- organizer: String
• startDate: Int (epoch format)
• endDate: Int (epoch format)
JSInterface.doExtendMeeting
This method is formatted as follows: "JSInterface.doExtendMeeting(messageId, meetingId, instanceld, duration)."
Parameters:
- messageId: String (A unique ID that is sent back in the response callback)
- meetingId: String
- instanceld: String
• duration: String (minutes)
JSInterface.doEndMeeting
This method is formatted as follows: "JSInterface.doEndMeeting(messageId, meetingId, instanceld)
Parameters:
- messageId: String (A unique ID that is sent back in the response callback)
- meetingId: String
- instanceld: String
JSInterface.doRoomSearch
This method is formatted as follows: "JSInterface.doRoomSearch(messageId, roomId)
Parameters:
- messageId: String (A unique ID that is sent back in the response callback)
- roomId: String
JSInterface.getStatusScreenInfo
This method requests the data that must be displayed in the UI help status modal (provider, software/firmware versions, and so forth).
This method is formatted as follows: "JSInterface.doStatusScreenInfo(messageId)
Parameters:
- messageId: String (A unique ID that is sent back in the response callback)
JSInterface.doRefreshSchedule
This method triggers a full schedule refresh.
This method is formatted as follows: "JSInterface.doRefreshSchedule(messageId)
Parameters:
- messageId: String (A unique ID that is sent back in the response callback)
JSInterface.doDetailsMeeting
This method is formatted as follows: "JSInterface.doRefreshSchedule(messageId, meetingId, instanceld)
This method is not currently used by the scheduling application and is not officially supported at this time.
UI Action Responses
When an action completes or fails, the scheduling APK calls the appropriate response method in the object that is returned by schedulingPanel.js (publish.action object).
Each method has the same signature: a message that should match that of a previous request, a Boolean for the success of the operation, and the returned data object (if applicable). The "RefreshSchedule" response is an exception, as this response does not return an object.
The SchedulingPanel object is created by the schedulingPanel.js class in the example project. It is necessary to implement the following methods to receive responses for the respective actions.
SchedulingPanel.WebUI.publish.action.CreateEvent
Parameters:
- messageId: String (A unique ID that matches the ID of the action request)
- success: Boolean
- resp: Object
SchedulingPanel.WebUI.publish.action.ExtendEvent
Parameters:
- messageId: String (A unique ID that matches the ID of the action request)
- success: Boolean
- resp: Object
SchedulingPanel.WebUI.publish.action.EndEvent
Parameters:
- messageId: String (A unique ID that matches the ID of the action request)
- success: Boolean
- resp: Object
SchedulingPanel.WebUI.publish.action.CheckInEvent
Parameters:
- messageId: String (A unique ID that matches the ID of the action request)
- success: Boolean
- resp: null
SchedulingPanel.WebUI.publish.action.StatusScreenInfo
Parameters:
- messageId: String (A unique ID that matches the ID of the action request)
- success: Boolean
- resp: Object
SchedulingPanel.WebUI.publish.action.RoomSearch
Parameters:
- messageId: String (A unique ID that matches the ID of the action request)
- success: Boolean
- resp: Object
SchedulingPanel.WebUI.publish.action.RefreshSchedule
Parameters:
- messageId: String (A unique ID that matches the ID of the action request)
• success: Boolean - resp: null
Sample Action Responses
The following sample response for the various UI actions are provided for reference.
CreateEvent Response
SchedulingPanel.webUI.publish.action.createEvent('1546869958945', true, '{"data": {"dtEnd":1546871700000,"dtStart":1546869900000,"id":"73qk50jcpq5r7bs6ems6agsuk8","organizer":"Walk up organizer","subject":"Walk up meeting"}')
ExtendEvent Response
SchedulingPanel.webUI.publish.action.extendEvent('1546864211340', true, '{"data": {}')
EndEvent Response
SchedulingPanel.webUI.publish.action.endEvent('1546864253818', true, '{"data": {}')
CheckInEvent Response
SchedulingPanel.webUI.publish.action.checkInEvent('1546869790845', true, '{"data": null}')
StatusScrenInfo Response
SchedulingPanel.webUI.publish.action.statusScreenInfo('1546864276580', true, '{"data":{"helpDeviceData":{"configUrl":"http://192.168.1.18","hostName":"TSW-560-00107F8D1889","ip":"192.168.1.18"},{"isOnline":"1","name":"Fusion"},{"helpVersionData":{"application":"1.1.0.017","firmware":"2.003.0036"}}")
RoomSearch Response
SchedulingPanel.webUI.publish.action.roomSearch('1546879730619', true, '{"data": {"requestId":"RoomListRequest587301","rooms":[{"freeUntil":1546890300000,"id":"a1f82836-3ddd-492b-b160-a9e724a53a6c","location":"CMA","name":"Conference Room 108","onlineStatus":"Partially_Connected"}]}
RefreshSchedule Response
SchedulingPanel.webUI.publish.action.refreshSchedule ('1546869790854', true, '{"data": null}')
Object Descriptions
The fields for various objects are described in this section.
Event
Fields:
- id: String
- instanceld: String
- subject: String
- organizer: String
- attendees: Object
• isRecurring: Boolean - checkedIn: Boolean
- privacyLevel: String (Public, Private, Semi-Private)
Attendees
Fields:
- optional: Array
- required: Array
Settings
Fields:
• room: Object
• automation: Object
- reservation: Object
• display: Object
- schedule: Object
- accessControl: Object
- extras: Object
Room
Fields:
- id: String
- The room ID
- Provider-dependent
- Can be a GUID, a calendar address, or similar
- name: String
- Obtained from the provider
- Can be the "friendly name" if entered in the web configuration interface
- location: String
- Obtained from the provider
- Used for the room search function
- timezone: Int
- language: String
- rtl: Boolean
- If set to "true", the UI will be aligned right-to left.
- Should only be used when using an RTL language
- theme: String
- Options are "dark-theme" or "light-theme"
• verticalOrientation: Boolean
- True if the UI should be displayed with the timeline in the vertical orientation
- Has no effect on portrait touch screens (TSW-560P)
- dateFormat: String
- Options are "WMDY," "WDMY," "WYMD," WMD," "WDM," "MDY," "DMY," "YMD," "M.DY," or "D.MY"
• timeFormat: Boolean
- If set to "true," the UI will display time in 12-hour format.
- If set to "false," the UI will display time in 24-hour format.
• roomPrivacyLevel: String
- Options are "public," "private," or "semi-private"
• availabilityThresholdRoomState: Boolean
- If true, the UI will enable "Availability Threshold" mode.
• availabilityThresholdMin: Int
- The number of minutes before a meeting begins to enter the threshold state if "Availability Threshold" is enabled
- In this state, the user is not allowed to create a meeting from the touch screen because it is too close to the next meeting.
• idleTimeoutMinutes: Int
- The duration (in minutes) before the idle screen is displayed after the last user interaction
•styleOverrideUrl: String
- Specifies a URL to a custom CSS file
- The CSS file is loaded last, so it overrides any project CSS settings.
- For more information, refer to the Crestron Room Scheduling Panels Operations Guide (Doc. 8205).
Automation
Fields:
• forceOrgCheckIn: Boolean
- If true, the UI will show the meeting check-in button when applicable.
• forceOrgCheckInMin: Int
- The number of minutes before a meeting starts to show the check-in button for that meeting
• forceOrgCheckInEndMin: Int
- The number of minutes after a meeting starts to stop showing the check-in button for that meeting
- Will consider the meeting declined (no show)
• enDeclineForNoShow: Boolean
- If set to "true," a meeting can be checked into via an occupied occupancy state.
• declineForNoShowAppliesDur: Int
- The maximum meeting duration for Check-In/Decline for No Show support
- Meetings longer than this duration are not permitted or require a check-in
Reservation
Fields:
- reservationEnable: Boolean
• reserveNowMaxDur: Int
• reserveNowEvenEndTime: Boolean
• endEarlyType: String - freeUpRoomEnMin: Int
- freeUpRoomEnPer: Int
• extendReservationType: String
• extendReservationMin: Int
• extendReservationPerAfter: Int
• extendResevationMinAfter: Int
Display
Fields:
- projectorIconUrl: String
- This field is for future use only.
- backgrounds: Objectita
- Custom background data for different UI states
Backgrounds
Fields:
- reservedActive: Objectita
- The background that is displayed when the room is reserved and the UI is on the active (room) screen
- reservedIdle: Objectita
- The background that is displayed when the room is reserved and the UI is on the idle screen
• availableActive: Objectita - The background that is displayed when the room is available and the UI is on the active (room) screen
• availableIdle: Object - The background that is displayed when the room is available and the UI is on the idle screen
• availableActiveOccupied: Object - The background that is displayed when the room is available but occupied and the UI is on the active (room) screen
- Defaults to "availableActive" if not defined
• availableIdleOccupied: Objectita - The background that is displayed when the room is available but occupied and the UI is on the idle screen
- Defaults to "availableIdle" if not defined
Background
Fields:
- enabled: Boolean
-
If true, the UI will display the custom background when in the respective state.
-
url: String
- The URL for the background media resource
- mediaType: String
- Options are "image" and "video"
• mediaSubType: String - The only supported subtype for video is "video/webm"
Schedule
Fields:
• reserveCustomEn: Boolean
- If set to "true," the UI will allow for the start time of an ad hoc meeting to be adjusted
• findBtnEnable: Boolean
- If set to "true," the UI will display the "Find Rooms" button when the provider supports it (such as Crestron Fusion)
- source: String
- The scheduling provider name
AccessControl
Fields:
• securityLevel: String
- Options are "PIN" and "anonymous"
- pin: String
- The 4-digit PIN code (if applicable)
Extras
Fields:
• supportsInstanceManipulation: Boolean
- If set to "false," the selection provider does not allow modifications to any meetings that are part of a recurring series.
This page is intentionally left blank.