MPK4099BUK - Mp3 player CURTIS - Free user manual and instructions
Find the device manual for free MPK4099BUK CURTIS in PDF.

User questions about MPK4099BUK CURTIS
0 question about this device. Answer the ones you know or ask your own.
Ask a new question about this device
Download the instructions for your Mp3 player in PDF format for free! Find your manual MPK4099BUK - CURTIS and take your electronic device back in hand. On this page are published all the documents necessary for the use of your device. MPK4099BUK by CURTIS.
USER MANUAL MPK4099BUK CURTIS
natural_image
Black portable electronic device with a digital display showing a person relaxing in the sky (no visible text or symbols)What's in the box?
Operating Unit
User Manual
USB Cable
Earphone
CD Driver
Content
Buttons location and usages
Basic Operation
Intro 3 - 7
Operation of Music Mode 8 - 12
Operation of Video Mode ....13
Operation of Pictures Mode....14
Operation of FM radio....15 - 16
Operation of Camera....17
Operation of Video Recorder....18
Operation of Others....19 - 22
Technical Specification
Trouble Shooting
Buttons location and usages
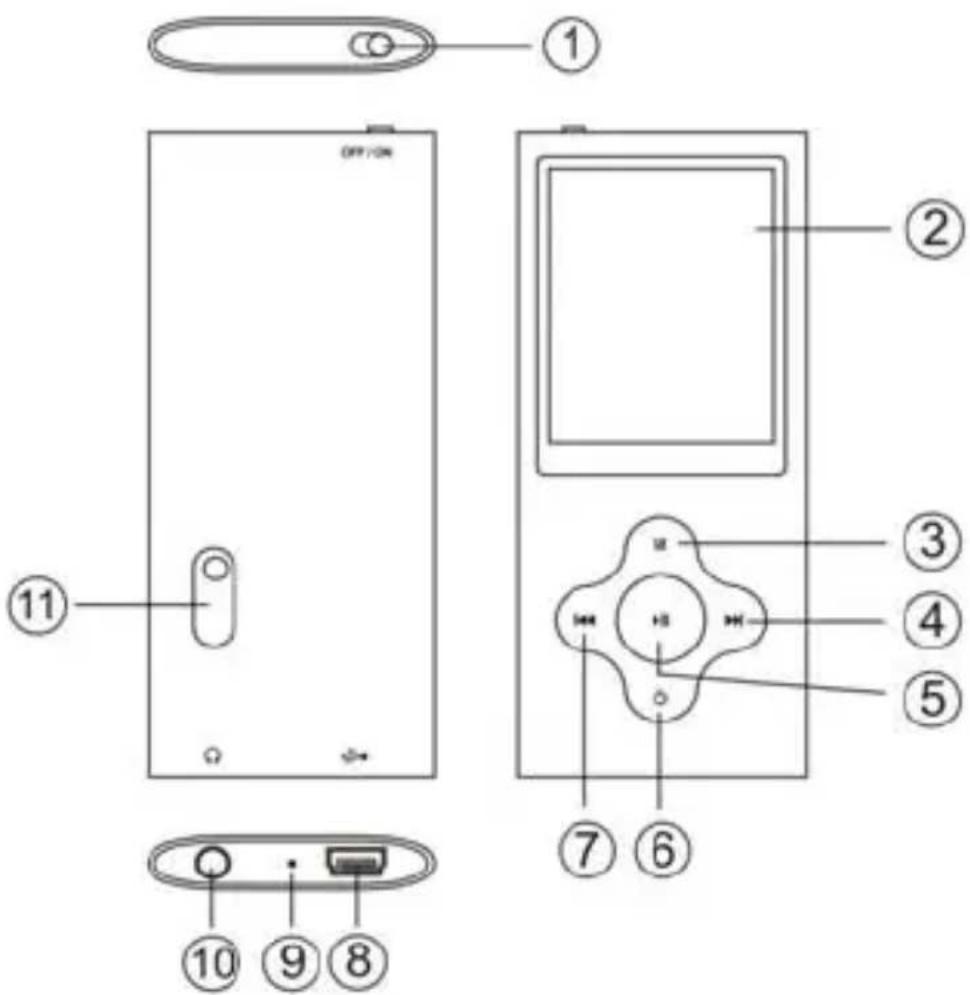
text_image
OFF/ON ① ② ③ ④ ⑤ ⑦ ⑥ ⑦ ⑧ ⑩ ⑨ ⑩(1) On/Off Button
(2) Display Screen
(3) M Button
(4) Next Button
(5) Play/ Pause Button
(6) Power Button
(7) Previous Button
(8) USB Port
(9) Microphone
(10) Earphone Jack
(11) Camera Lens
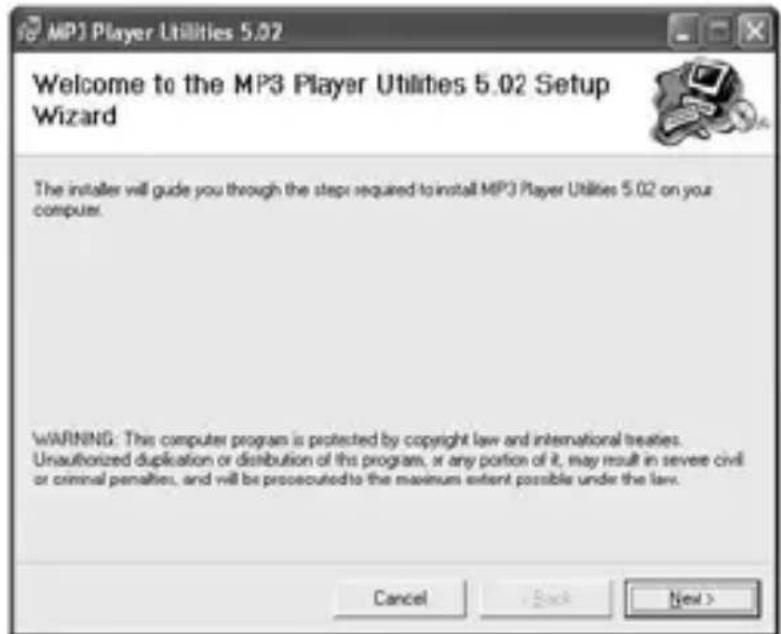
Software Utilities Installation
Insert the CD into the CD ROM Drive of your PC. Click Setup.exe to start driver installation. Follow the on-screen-menu to complete the installation.
text_image
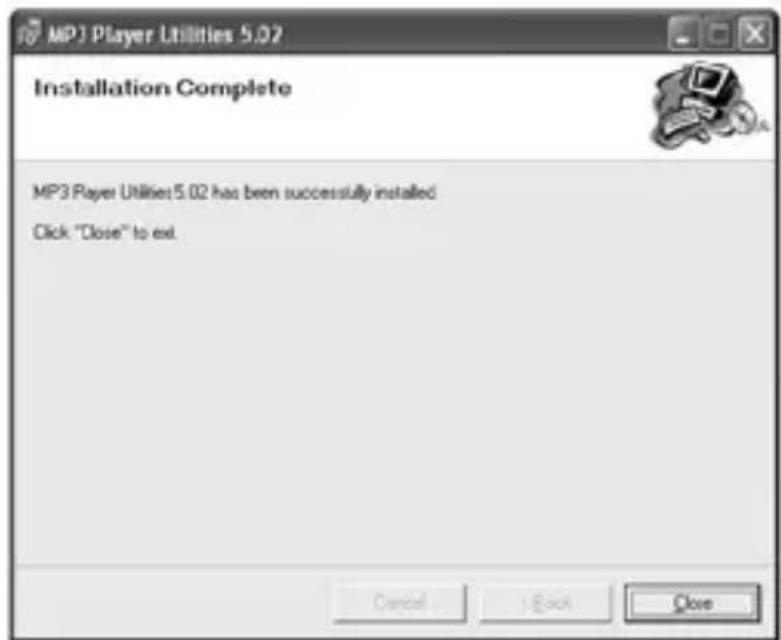
MP3 Player Utilities 5.02 Welcome to the MP3 Player Utilities 5.02 Setup Wizard The installer will guide you through the steps required to install MP3 Player Utilities 5.02 on your computer. WARNING: This computer program is protected by copyright law and international treaties. Unauthorized duplication or distribution of this program, or any portion of it, may result in severe civil or criminal penalties, and will be prosecuted to the maximum extent possible under the law. Cancel Next >Click Close once you reach the Installation Complete Screen.
text_image
MP3 Player Utilities 5.02 Installation Complete MP3 Player Utilities 5.02 has been successfully installed Click "Close" to exit. Cancel Increase CloseFor Window 98/98SE users, please install the driver in the CD-ROM before downloading any files to your player
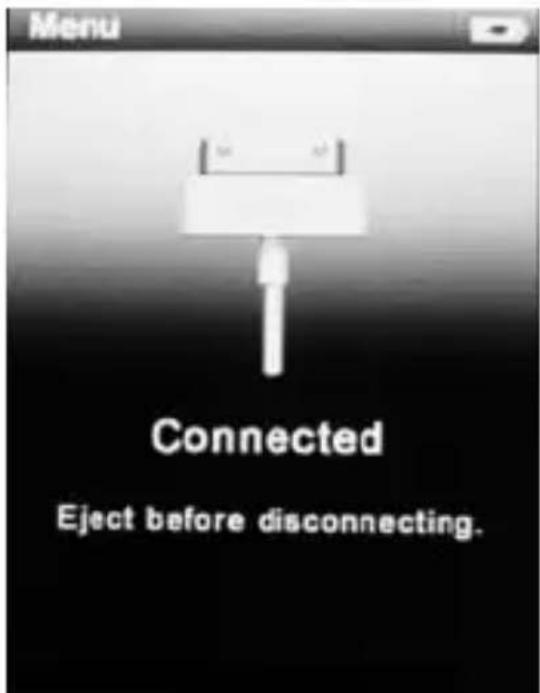
Connect & Charge

text_image
Menu Connected Eject before disconnecting.Your player will be charged while being connected to PC through the USB cable. ! You will see the charging animation in the bottom right hand corner of the display. The player is fully charged when the charging animation stops. (Switch on the player when charging)
Transfer
text_image
Menu Connected Eject before disconnecting.Step 1: Set the Online Device of the player as USB Disk (Refer to Page 6), then connect it to your PC by USB cable. Once the connection is successfully made, the above screen display would be shown. Try re-connecting the player if the above screen doesn't appear.
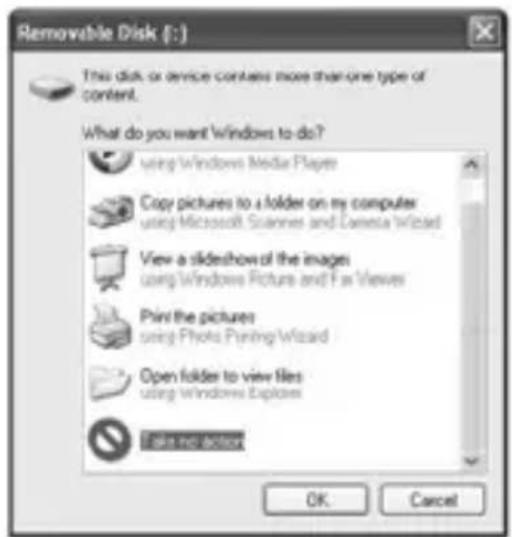
text_image
Removable Disk (I:) This disk or device contains more than one type of content. What do you want 'windows to do? using 'windows Media Player' Copy pictures to a folder on my computer using Microsoft Scanners and Camera Wizard View a slideshow of the images using 'windows Picture and Fan Viewers Print the pictures using Photo Printing Wizard Open folder to view files using 'windows Explorer Find new buttons OK CancelStep 2: The above screen would appear. (Apply only to Window XP) Choose Take no action and click OK to close the window.
text_image
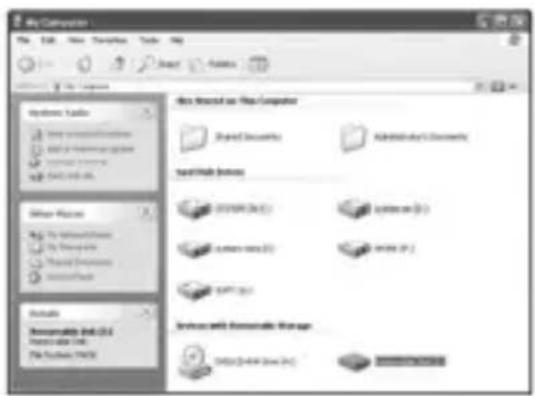
My Computer File Edit View Options Tools Help My Computer My Documents My Documents My Documents My Documents My Documents My Documents My Documents My Documents My Documents My Documents My Documents My Documents My Documents My Documents My Documents My Documents My Documents My Documents My Documents My Documents My Documents My Documents My Documents My Documents My Documents My Documents My Documents My Documents My Documents My Documents My Documents My Documents My Documents My DocumentsDouble click My Computer on your desktop and the above window would appear. Look for the Removable Disk Icon.

text_image
ANSYS NX 2.1 File and Audio Tools New user sites Project Software to the Web Program Files Other Places Add Files Add Files Add Files Add Files Add Files Add Files Add Files Add Files Add Files Add Files Add Files Add Files Add Files Add Files Add Files Add Files Add Files Add Files Add Files Add Files Add Files Add Files Add Files Add Files Add Files Add Files Add Files Add Files Add Files Add Files Add Files Add Files Add Files Add FilesDouble click the Removable Disk icon. Note: Do not disconnect the USB cable once you click into the removable disk window. Such action may cause data loss or problems to the player.
Drag and drop your media files into the removable disk. You can create any folder or directory in the removable disk. Close the removable disk window and disconnect the player from your PC after the data transfer.
Software Operation
Video Converter
You can convert your favourite video file in any other format into the .AVI format with the help of the AVI converter. The converting progress is shown.

text_image
Start Programs Access and Defaults Windows Catalogs Change Systems Program Settings Settings Search Help and Support Run... Top 20 Preferences... Top 20 Options... Start Edit Help Help Options... Add Options... Add Options... Add Options... Add Options... Add Options... Add Options... Add Options... Add Options... Add Options... Add Options... Add Options... Add Options... Add Options... Add Options... Add Options... Add Options... Add Options... Add Options... Add Options... Add Options... Add Options... Add Options... Add Options... Add Options... Add Options... Add Options... Add Options... Add Options... Add Options... Add Options... Add Options... Add Options... Add Options... Add Types... Add Types... Add Types... Add Types... Add Types... Add Types... Add Types... Add Types... Add Types... Add Types... Add Types... Add Types... Add Types... Add Types... Add Types... Add Types... Add Types... Add Types... Add Types... Add Types... Add Types... Add Types... Add Types... Add Types... Add Types... Add Types... Add Types... Add Types... Add Types... Add Types... Add Types... Add Types... Add Types... Add Types Add Types Add Types Add Types Add Types Add Types Add Types Add Types Add Types Add Types Add Types Add Types Add Types Add Types Add Types Add Types Add Types Add Types Add Types Add Types Add Types Add Types Add Types Add Types Add Types Add Types Add Types Add Types Add Types Add Types Add Types Add Types Add Types Add Types Set As: 100% Set As: 100% Set As: 100% Set As: 100% Set As: 100% Set As: 100% Set As: 100% Set As: 100% Set As: 100% Set As: 100% Set As: 100% Set As: 100% Set As: 100% Set As: Not Applicable Set As: Not Applicable Set As: Not Applicable Set As: Not Applicable Set As: Not Applicable Set As: Not Applicable Set As: Not Applicable Set As: Not Applicable Set As: Not Applicable Set As: Not Applicable Set As: Not Applicable Set As: Not Applicable Set As: Not Applicable Set As: Not Applicable Set As: Not Applicable SetAs: Not Applicable SetAs: Not Applicable SetAs: Not Applicable SetAs: Not Applicable SetAs: Not Applicable SetAs: Not Applicable SetAs: Not Applicable SetAs: Not Applicable SetAs: Not Applicable SetAs: Not Applicable SetAs: Not Applicable SetAs: Not Applicable SetAs: Not Applicable SetAs: Not Applicable SetAs:Not Applicable
text_image
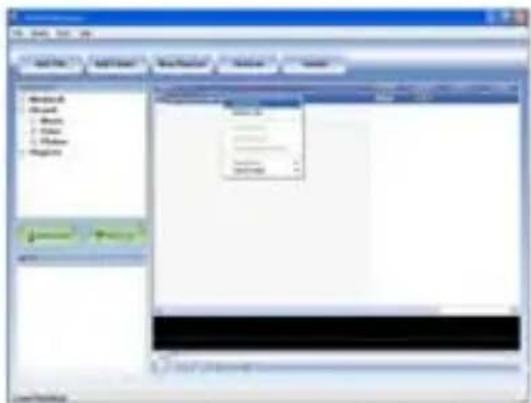
Scanned screenshot of a legacy software interface with menu options, buttons, and input fields.Media Manager
You can enjoy songs from both PC and your player thru the Media manager.
text_image
File Edit View Help Add View Edit View New Document Delete Rename Help Remove Cancel Save As... Save As... Save As... Save As... Save As... Save As... Save As... Save As... Save As... Save As... Save As... Save As... Save As... Save As... Save As... Save As... Save As... Save As... Save As... Save As... Save As... Save As... Save As... Save As... Save As... Save As... Save As... Save As... Save As... Save As... Save As... Save As... Save As... Save As... Svcs Svcs Svcs Svcs Svcs Svcs Svcs Svcs Svcs Svcs Svcs Svcs Svcs Svcs Svcs Svcs Svcs Svcs Svcs Svcs Svcs Svcs Svcs Svcs Svcs SvcsBasic Operation
Power on/off and Lock
Switch on the Power button on the top and hold ON/OFF button to switch on the device.
Main interface
Once your switch the player on you'll reach to the main interface as below..

text_image
Menu 8:13 PM Music Videos Pictures FM Radio Camera Video Recorder OtherOperation of Music Mode
Press Previous/ Next button to select “Music” and press Play/ Pause button to enter the page. Once you’ve entered the music mode, the following screen would show up.

text_image
12:38 AM NOW PLAYING All music Artist Album Genre My music list Dir list Record listNow Playing
Press Previous/ Next button to select Now Playing and press Play/ Pause button to resume playing the current song.
All Music
Press Previous/ Next button to choose All Music and press Play/ Pause button to show your library of music. Press Previous/ Next button to select
any particular song and press Play/ Pause to start playing.
Artist
Press Previous/ Next button to select Artist to show all of your artists. Press Previous/ Next to choose any particular artist to show the songs of that artist. Select song and press Play/ Pause to start playing.
Album
Press Previous/ Next button to select Album to browse all of your albums. Press Previous/ Next to choose any particular album to browse the songs of that album. Press Play/ Pause button after selected any song to start playing.
Genre
Press Previous/ Next button to select Genre to browse all genre of your songs. Press Play/Pause button to enter the genre that you’ve chosen and press Play/ Pause button to start playing the selected song.
My Music List
Press Previous/ Next to select My Music List to browse all songs that you’ve added to be your playlist. Press Previous/ Next button to select desire song list and press Play/ Pause button to start playing the selected song.
Record List
Press Previous/ Next button to select Record List to choose from FM Record or Voice. Press Play/ Pause button to start playing the selected file Press M to jump back to the main menu.
Music Player interface
Whenever you start playing a song you'll reach the Music Player Interface as below.
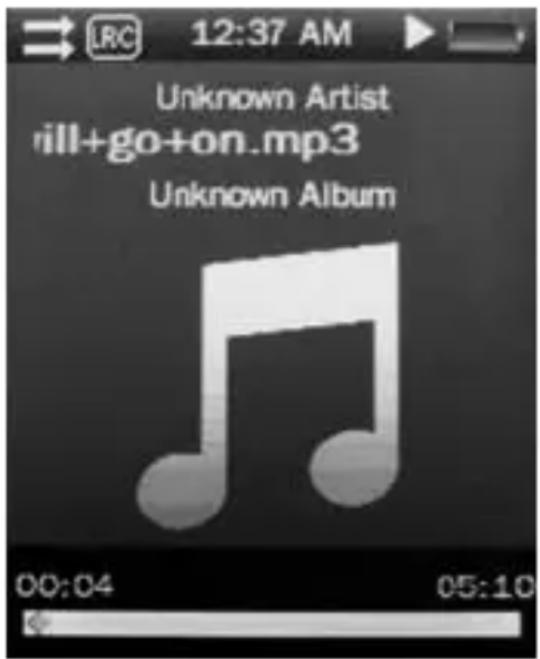
text_image
12:37 AM Unknown Artist ill+go+on.mp3 Unknown Album 00:04 05:10Play Music
Press the Play/ Pause button in the middle to start playing, and press again to pause.
Volume
Hold Play/ Pause button until the volume bar appear at the button. Press Previous/ Next button to adjust the volume.
Previous / Next
Press Next to jump to the next song, and press Previous to jump back to the previous song. Hold Previous/ Next button to go fast forward or backward
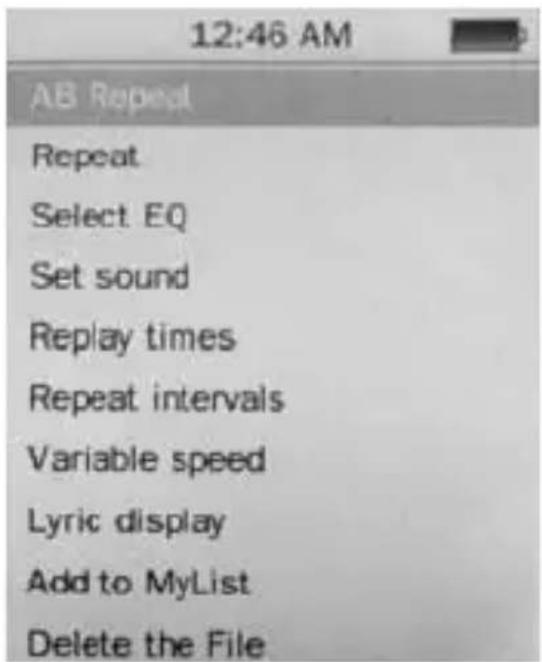
Play Option
Hold M button to enter the Play Option Menu. You can set your preference in AB Repeat/ Repeat/ Select EQ/ Set Sound/ Replay times/ Repeat intervals/ Variable speed/ Lyric display/ Add to my list/ Delete the file
text_image
12:46 AM AB Repeat Repeat Select EQ Set sound Replay times Repeat intervals Variable speed Lyric display Add to MyList Delete the FileAB Repeat
While playing music, hold M to enter the sub-menu. Press Previous/ Next to select A-B repeat and press Play/ Pause to confirm. Press Play/ Pause button to set the starting point of the A-B Repeat, then press Play/ Pause again to set the ending point. To cancel A-B repeat mode, press Play/ Pause again.
Repeat Mode
Press Previous/ Next to choose Repeat Mode and press Play/ Pause to choose from Sequence/ Repeat One/ Repeat All/ Shuffle/ Shuffle + Repeat. Once you've selected, press Play/ Pause to confirm and press M to return to sub-menu.
Select EQ
Press Previous/ Next to choose Select EQ and press Play/ Pause button enter the sub-menu and choose different EQ from Normal / Rock / Pop / Classic / Soft/Jazz / DBB. Once you've selected your choice, press Play/ Pause to confirm and press M to return to sub-menu.
Set Sound
Press Previous/ Next to select Set Sound, press Play/Pause to enter User EQ. Hold M to jump to different bar and press Previous/ Next button to adjust your own EQ Setting. Once you’ve selected, press Play/ Pause to confirm and press M to return to sub-menu.
Replay Times
Press Previous/ Next to select Repeat Mode and press Play/ Pause to choose from 1 times to infinity.
Repeat Intervals
Press Previous/ Next to select Repeat Intervals to choose from 1 Sec to 7 Sec. Once you've selected your choice, press Play/ Pause to confirm and return to sub-menu.
Variable speed
Press Previous/ Next to select Variable speed to choose from - 4 to 4. Once you’ve selected your choice, press Play/ Pause to confirm and return to sub-menu.
Lyric Display
Press Previous/ Next to select Lyric display and press Play/ Pause to enter the page. Choose enable / off and press Play/ Pause to display lyrics.
*The player only supports .LRC lyric.
Add to MyList
Press Previous/ Next to select add to my list and press Play/ Pause to choose from My Playlist 1 to My Playlist 5. Once you’ve selected your choice, press Play/ Pause to confirm and and press M to return to sub-menu.
Delete the File
Press Previous/ Next to select delete file and press Play/Pause to enter the page. Once you've selected your choice, press Play/Pause to confirm and and return to sub-menu.
Press M to return to Music mode.
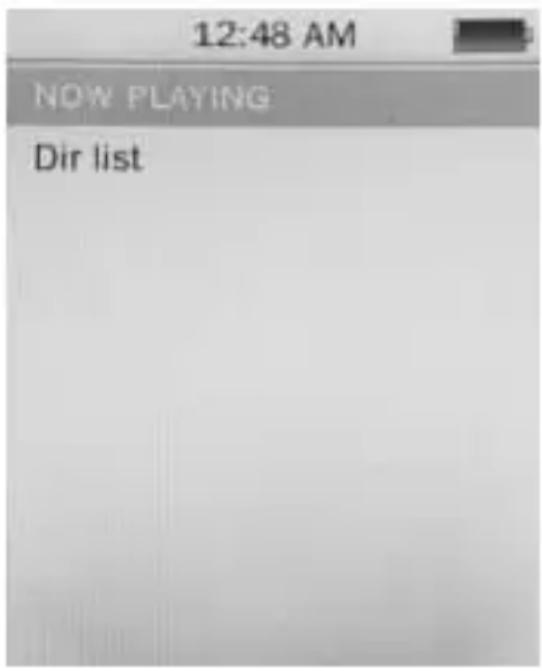
Operation of Video Mode
Press Previous/ Next button to select “Movie” and press Play/ Pause button to enter video mode. Once you’ve entered the video mode, the following screen would show up.
text_image
12:48 AM NOW PLAYING Dir listPress Previous/ Next button to select your desire movie and press Play/ Pause button to start playing.
For video recording file, it will be saved inside the CAMERA folder.
Basic Video Control
Press Previous button to choose previous movie, hold Previous to rewind. Press Next button to choose next movie, hold Next to fast-forward. Hold Play/ Pause button until volume bar appear at the bottom, press Previous/ Next button to adjust the volume.
Operation of Pictures Mode
Press Previous/ Next button to select “Pictures” on the main menu and press Play/ Pause to enter the photo mode. Once you’ve entered the photo mode.
Photo Browsing
Press Previous/ Next to select Dir List and browse all photos. Press Previous/ Next to select a particular photo, and press Play/ Pause to open it.
Menu Style
Press Previous/ Next to choose “play mode” and press Play/ Pause to choose List mode and Thumbnail.

text_image
PHOTO 12:50 AM 1/5Operation of Radio Mode
Press Previous/ Next to select “Radio” on the main menu and press Play/ Pause to enter the radio menu
Radio Sub-menu
Hold M to enter the sub-menu and press Previous/ Next to choose from FM record/ Record quality/ Record Gain/ Save Channel/ Auto search/ Station List/ FM Band.
FM record: Press Previous/ Next to choose FM record and press Play/ Pause to confirm. Once you selected the option, the player will start recording the radio. Press Play/ Pause again to pause the recording and hold M to save the file.
Record quality: Press Play/ Pause to enter this option and choose from High/ Medium/ Low.
Record Gain: Press Play/ Pause to choose from 1-7 and press Play/ Pause again to confirm.
Save Channel: Press Previous/ Next to choose save channel and press Play/ Pause to confirm. Select a channel from CH01-CH30 and press Play/ Pause to save the current channel.
Auto Search: Press Previous/ Next to choose ante search and press Play/ Pause to confirm. Press Play/ Pause button to start searching the channel and preset channel automatically.
Station List: Press Previous/ Next to choose station list and press Play/ Pause to confirm. Press Play/ Pause button to browse all preset channel.
FM Band: Press Previous/ Next to choose FM band and press Play/ Pause to enter sub-menu. Choose from USA/Japan and press Play/ Pause to confirm and return to sub-menu.
Operation of Camera Mode
Press Previous/ Next to select “Camera” and press Play/Pause button to enter the camera mode.
Basic Camera Control
Photo Shooting: Press Play/ Pause button to take photo. Zoom in/ out: Press Previous to zoom out and press Next to zoom in.
Camera Sub-menu
Hold M for 2 second to enter the camera sub-menu
Save Path: Internal memory
Resolution: Press Play/ Pause to choose from 320 x 240/640 x 480/1280 x 960/1600 x 1200/2048 x 1536
Self-timer: Press Play/ Pause to choose from off/ 5 Sec/ 10Sec/ 15 Sec/ 20 Sec
Shutter sound: Press Play/ Pause to choose from Off/sound 1/ sound 2/ sound 3
Date stamp: Press Play/Pause to choose from Off/ Date/ Date and Time.
Press M to return to Camera mode.
Operation of Video Recorder Mode
Press Previous/ Next to select “Video Recorder” and press Play/ Pause button to enter the recording mode.
Basic Video recorder Control
Press Play/ Pause button to record video and press Play/Pause again to pause the video recording. Press M during the recording to save the file.
Video Recorder Sub-menu
Hold M for 2 second to enter the sub-menu
Save Path: Internal memory
Resolution: 320 x 240
Record Quality: Press Play/ Pause to choose from High / Medium/ Low/ Auto-adapted.
Press M to return to Video recorder mode.
Operation of Others
Press Previous/ Next button to choose "Other" on the main menu to enter the page.
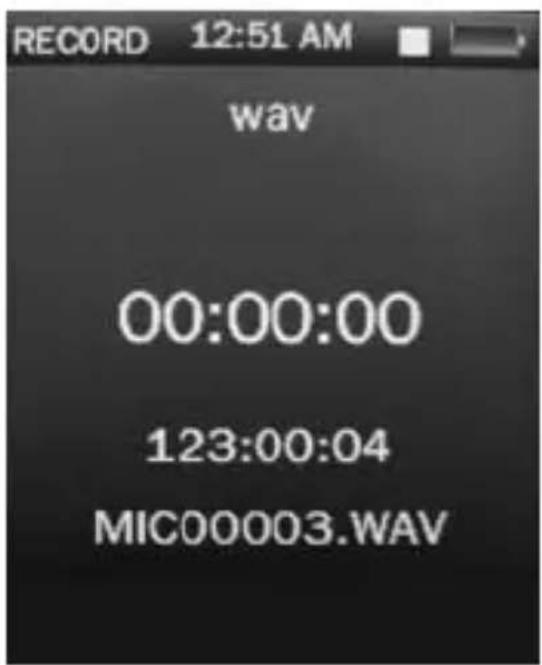
Operation of Record Mode
Press Previous/ Next button to select “Recordings” and press Play/ Pause to enter the record mode. Once you’ve entered the record mode, the following screen would show up.
text_image
RECORD 12:51 AM wav 00:00:00 123:00:04 MIC00003.WAVBasic record control
Press Play/ Pause to start recording and press Play/ Pause again to pause recording, Press M to save or cancel the recorded file.
Sub-menu of record
Hold M to enter the submenu and choose from Record format/ Record quality/ Record gain.
Operation of E-book
Press Previous/ Pause to choose “E-book” and press Play/ Pause to enter the e-book menu. Once you’ve entered the e-book menu, the following screen would show up.
Basic e-book control
Press Play/ Pause to enter the Dir List, and press Previous/ Next to select .TXT file. When opened an e-book file, press Previous to go back to previous page, and press Next to skip to the next page. Hold M to enter the E-book sub-menu.

text_image
9:02 PM Dir list Tag ListTag List:
Press Previous/ Next to Select "Tag List" and press Play/Pause to browse the list.
E-book Sub-menu
Skip to: Press Previous/ Next to adjust the percentage jumping between pages.
Auto Play Gap: Press Previous/ Pause to choose from 3 Sec/ 6 Sec/ 9 Sec/ 12 Sec/ 15 Sec.
Add Bookmark: Press Play/ Pause to confirm bookmark/Tag
Delete the file: Press Previous/ Next to choose OK and press Play/ Pause to confirm delete file.
Operation of Calculator
Press Previous/ Next to select the digit and function, press Play/ Pause to confirm the selection. Press M to return to previous menu.
Operation of Setting Mode
Press Previous/ Next to select Set up and press Play/Pause to enter the Set up menu.
Date and Time
Adjust Date: Press Play/ Pause button to enter adjust date, hold M to jump to day, month and year and press Previous/ Next to set the date. Once you've set the date, press Play/ Pause to confirm and return to previous menu.
Adjust Time: Press Play/ Pause button to enter adjust time, hold M to select hour and minutes and press Previous/ Next to adjust the time.
Display Setting
Press Play/ Pause to set blacklight time from off/ 5 Sec/ 10 Sec/ 20 Sec/ 30 Sec/ 1 Minute/ 5 Minutes
Power Saving
Idle Time: Press Previous/ Next to choose from Off/ 10 Sec/ 30 Sec/ 1 Minute/ 3 Minutes/ 5 Minutes/ 10 Minutes and press Play/ Pause to confirm setting.
Sleep Time: Press Previous/ Next to choose from Off/ 10 Minutes/ 30 Minutes/ 1 Hour/ 2 Hours/ 3 Hours/ 4 Hours/ 5 Hours and press Play/ Pause to confirm setting.
Language
Press Previous/ Next to choose your desired language and press Play/ Pause to confirm.
Advance Info
Press Previous/ Next to choose from Player Information/ Format Memory/ Reset.
Technical Specification
| Flash Memory 128MB – 16GB | |
| MP3 compressed rate supported | MP3(8 – 320 kbps)WMA(5-384kbps)OGG/ ACC/APE/WAV |
| Video format supported | FLV/ AVI |
| Photo format supported JPEG/BMP/GIF | |
| Digital camera 0.3 mega pixel | |
| Battery 3.7V Lithium rechargeable battery | |
| Interface USB2.0 high speed | |
| Display 2” Color TFT display | |
| Weight | 40g |
| Dimensions 41(W) * 8(D) * | 94(H) mm |
Trouble Shooting
What should I do if there's no sound when playing?
You should check the volume first. If the volume has been turned up, maybe the memory format of the device is incorrect..
Specifications are subject to change without notice. No part of this document may be reproduced or transmitted in any form or by any mean, electronics or mechanical including photocopying and recording or translated to another language for any purpose
We trust you are completely satisfied with this product from Argos Ltd, however please feel free to contact us if you experience any difficulties, or if you would like to express your views regarding our products.
Please write to:
Customer Services
Argos Ltd 489-499 Avebury Boulevard Saxon Gate West Central Milton Keynes MK9 2NW
Telephone: 0870 600 3030
Through the process of continuous improvement, Argos Ltd. reserves the right to change or alter specifications without prior notice. E&OE
