MPK7836 - Mp3 player CURTIS - Free user manual and instructions
Find the device manual for free MPK7836 CURTIS in PDF.

User questions about MPK7836 CURTIS
0 question about this device. Answer the ones you know or ask your own.
Ask a new question about this device
Download the instructions for your Mp3 player in PDF format for free! Find your manual MPK7836 - CURTIS and take your electronic device back in hand. On this page are published all the documents necessary for the use of your device. MPK7836 by CURTIS.
USER MANUAL MPK7836 CURTIS
Before using this product, initial touch screen adjustment is required.
- Press “Settings” option on the main menu, enter into submenu.
- Press “System” option on the submenu and choose “Touch Calibration”, touch the cross center for three times.
For your safety
Read the manual carefully to ensure proper use of the player and to avoid any danger or physical damage.
Product Use
Improper use can result in explosion, fire or electric shock.
- Do not disassemble, repair or modify this player on your own.
- Do not get the play wet or drop it in water.
- Do not place the player in damp, dusty or sooty areas, as it could result in fire or electric shock.
- Do not leave the player in areas above 35°C ( such as a sauna or inside a parked car )
To avoid your hearing damage
- Avoid using your player at high volume levels, as it may result in permanent hearing damage. If you experience ringing in your ears while using the earphone, remove the earphone immediately and lower the volume.
To avoid a risk of traffic accident
- Do not use the earphones when you driving a bicycle, automobile or motorcycle.
● Take care not to tangle the earphone cable around your arms or neighboring objects while driving, working out or walking, as it result in a car accident or other injuries.
Avoid malfunction
- Do not cause excessive impact on the player by dropping it. Do not place heavy objects on top of the player.
● Prevent any foreign particles or dust from entering into the player.
● Always use the accessories provided by or approved by your supplier. - Do not spray water on the player. Never clean the player with chemical substances such as benzene or thinner, as it may cause fire, electronic shock or deteriorate the surface.
- Do not place the player near magnetic objects, as it may cause a malfunction.
Contents
Chapter 1. Basic Information
Products features
Button Functions
Charging the Battery
Basic Use
Chapter 2. Multimedia Function
Listening to Music
Playing Video
FM Radio
Photo Viewing
Reading Text
Voice Recording
Navigation
Game
Settings
Chapter 3. Settings
Music
FM Radio
Record
Display
Auto Play
System
Power Off Time
Default Set
Upgrade
Chapter 4. Troubleshooting
Troubleshooting
Chapter 5. Appendix
Products Specifications
Converting Video Files
Button Definition
text_image
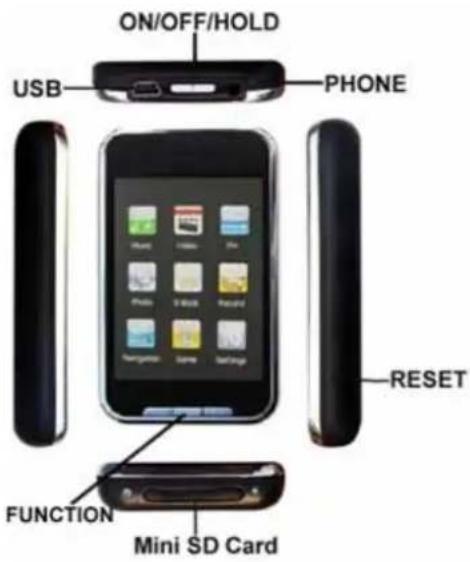
ON/OFF/HOLD USB PHONE RESET FUNCTION Mini SD CardCharger (USA Plug)
Input : 110V-240V
Output: 5V/0.35A
Chapter 1. Basic Information
Products features
● Display: 2.8-inch TFT screens with touch panel function.
● Operation interface: Friendly operation interface, easy for operation.
● Memory: Built-in flash memory
- Card slot: Micro-SD card slot to expand memory.
- Speaker: A high quality speaker.
● FM: FM stereo radio.
- Interface: USB2.0
● Language: Multi-languages.
● Audio: MP3, WMA, APE, FLAC format files, etc.
- Video: AVI format files.
● Photo: JPEG format files.
● Game: RKP format files.
Button Functions
1) ON/OFF/HOLD : Power on / off, push the buttons in three seconds. Lock the buttons, unlock the buttons
2) + / - : Increase volume; Decrease volume.
3) M : Enter / Exit
4) Reset: System Reset
Charging the Battery:
Fully charge the rechargeable battery before using the player for the first time or when it has not been used for a while.
Method of charging on the player by USB port on your PC.
Connect the USB cable to the USB port on your PC; It takes about 4 hours for the player to fully charge.
Usage of the Battery:
● Recharge and store the battery within the temperature range of -5^ 35^
- Do not over charge (Longer than 12 hours). Excessive charging or discharging may shorten the battery's life.
● Battery life naturally shorten slowly over time.
Basic Use
Switch On & Off the player
Turning the electric system ON:
Push the ON/OFF for 3 seconds, the player is turned on.
Turning the power OFF:
Push the ON/OFF for 3 seconds again, the player is turned off.
Note: Power is automatically turned off when none of the buttons have been pressed for a preset period of time.
Chapter 2. Multimedia Function
text_image
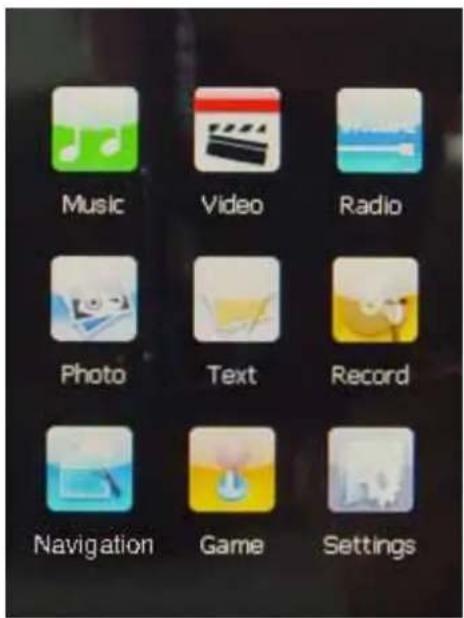
Music Video Radio Photo Text Record Navigation Game SettingsListening to Music
text_image
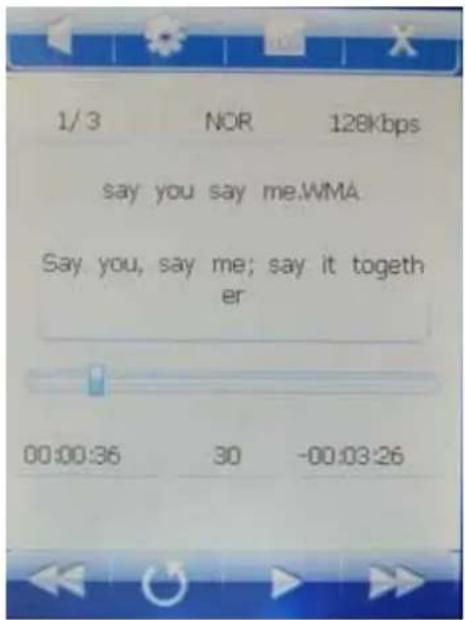
1/3 NOR 128kbps say you say me.WMA Say you, say me; say it together 00:00:36 30 -00:03:26- Play a music file:
a) Power on and move to the main menu.
b) Press to select
Play your select file: In music playing status, Press (or) to select a file.
long press for the fast forward (or fast Backward) of the current Music
c) Press the button + to increase volume; Press the button - to decrease volume.
- A-B repeat:
a) When you play the music, push the button ON/OFF to enter the A-B repeat mode. The player records this position as A point.
b) Push the button ON/OFF again, the player records this position as B point. Then the player starts repeat from A to B.
c) Exit A-B repeat mode: Once more to push the button ON/OFF to exit.
- To Pause
Press while the music is playing, the music playback will be paused.
-
Music Setup : Press to select EQ and play mode
-
Main menu: Press to Exit to main menu
-
Backward: Press to Exit to upper level
-
Disappear icon: Press the operation icon will disappear, touch the screen the operation icon will appear.
-
Close speaker: Press to close speaker the appear
Playing Video
( all video files need to be change into the mp4 avi format using avi convertor)
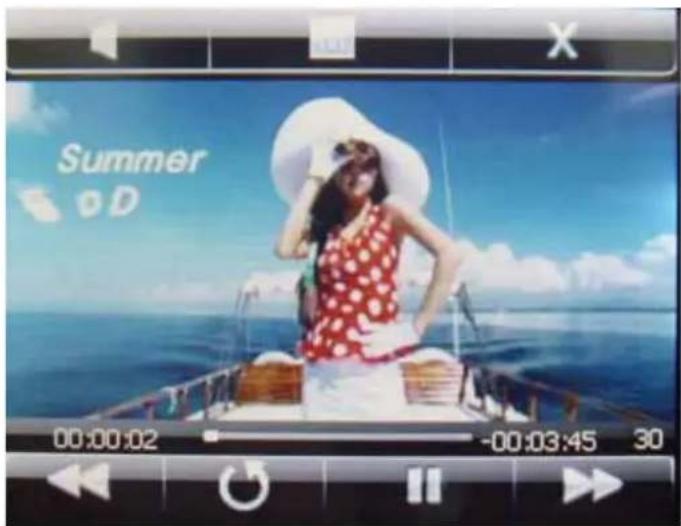
text_image
Summer 00:00:02 -00:03:45 30-
Power on and move to the main menu.
-
Press to select < Video >. Enter flash memory, enter selected a Video. The Player plays the Video
-
Press (or) to select a video file long press for the fast forward (or fast Backward) of the current video
Note: The player can only play AVI format files, for other kinds of video files, you have to convert them into AVI format files by converting tooling.
FM Radio
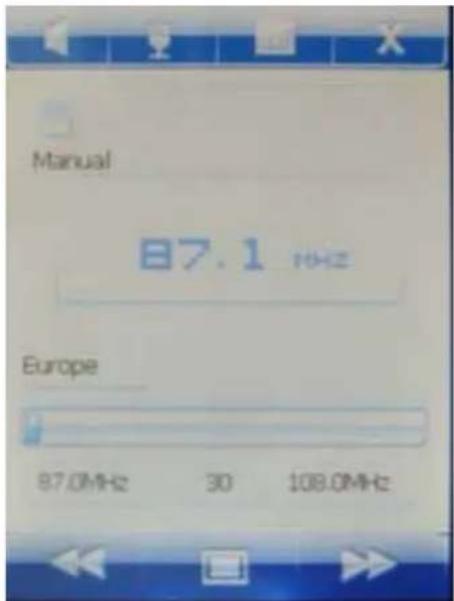
text_image
Manual 87.1 MHz Europe 87.0MHz 30 108.0MHz-
Power on and move to the main menu.
-
Press □ to select
-
Press to select an item in (Manual), (Preset), (mem), (Del) and (Auto)
a) Manual: press the (or
), you can search the station manually.
b) Preset : Press the (or
) to select Saved function,
c) mem: Save FM Channels
d) Del: Delete FM Channels
e) Auto: The player will automatically scan for FM channels
4 .Press to enter recording
Photo Viewing

natural_image
Fighter jet in flight with missile in background (no visible text or symbols)-
Power on and move to the main menu.
-
Press ☐ to select < Photo >, enter flash memory , enter selected pictures. Press 📄 , The player plays the Photo
-
Press (or) to select forward and backward.
4.Play Set: Press to select play time
- Press M to return to the main menu.
Reading Text
( The player can only display TXT format files )
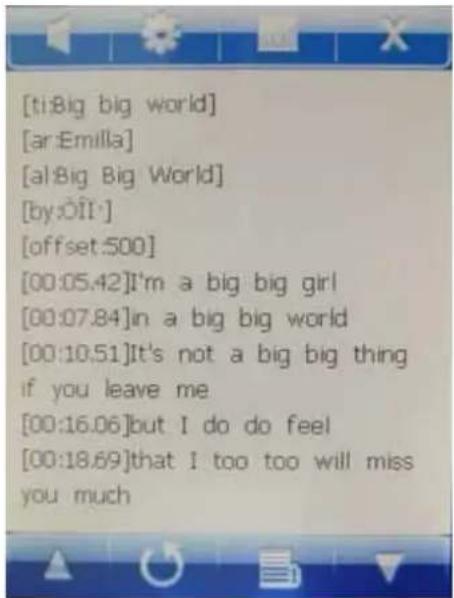
text_image
[ti:Big big world] [ar:Emilla] [al:Big Big World] [by:OII·] [offset:500] [00:05.42]I'm a big big girl [00:07.84]in a big big world [00:10.51]It's not a big big thing if you leave me [00:16.06]but I do do feel [00:18.69]that I too too will miss you much-
Download the TXT format files: Connect the player to the computer by USB cable, choose the files you need, save the file as TXT format to the player.
-
Power on and move to the main menu.
-
Press to select
, enter selected file..
a) Press ▲ (or ▼) to begin reading.
b) Press to save BookMark or Load BookMark.
c) Press return to the main menu.
d) Play Set: Press to select play time
Voice Recording
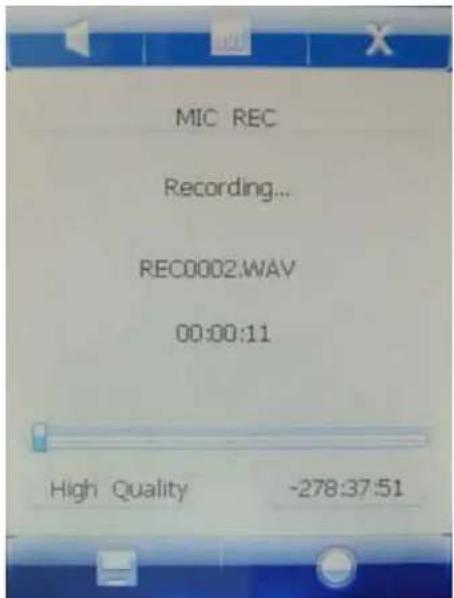
text_image
MIC REC Recording... REC0002.WAV 00:00:11 High Quality -278:37:51-
Power on and move to the main menu.
-
Press to select < Record > Enter the < Record>..Press to start recording.
-
In recording status, press to pause the recording.
-
In pause status, press again to continue the recording.
-
Press to save recording and exit.
Navigation

text_image
VOICE say you say me.lrc say you say me.WMA Big big world.lrc Big Big World.mp3(Using Navigation menu you can play any file type on one screen.)
-
Move to the main menu.
-
Press to enter submenu and select a file you want.
Games
-
Move to the main menu.
-
Press to select
-
select a game
-
Button Functions
"M" ENTER/SHOOT
“+” MOVE LEFT
“-” MOVE RIGHT
NOTICE:
To exit the game mode, do as follows:
• Under the browsing mode, long press "M" to return to main Menu
- When playing the game:
Push "ON/OFF/HOLD" button to pause the game. Select "QUIT" using the "+"/"-" button and push "ON/OFF/HOLD" again to quit the game. In the ensuing screen, long press "M" to return to browsing mode. Repeat the operation to return to main menu.
The player can only support the game named "Pirates of the Caribbean" in .RKP format created by Rockchip. The game files must go into a folder called "Game" on your player.
Chapter 3. Settings
(Menu Adjustment Setting for MP4 player)
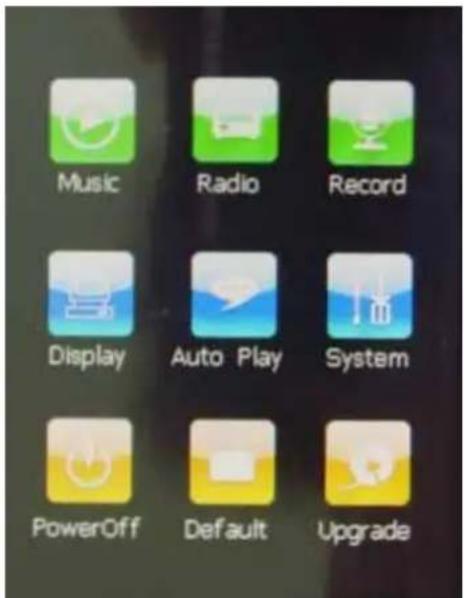
text_image
Music Radio Record Display Auto Play System PowerOff Default Upgrade1. Music:
a) Repeat mode
1) All repeat repeatedly play all the songs
2) Intro play all the songs of the songs of the first 10 seconds in the current folder
b) Play mode
1) Order
2) Shuffle
c) EQSelect
The player supports 2 bands: The band in 76MHz\~90MHz is for Japan, the band in
87MHz\~108MHz is for other countries in the world.
If you change the band setting, the player will delete your previous presets.
1) China (87MHz\~108MHz)
2) Europe (87MHz\~108MHz)
3) Japan (76MHz\~90MHz)
4) U.S.A (87MHz\~108MHz)
3. Record:
a) REC quality
1) High Quality
2) Normal Quality
b) REC Volume
1) +1 (low)
2) +2
3) +3 (middle)
4) +4
5) +5 (high)
4. Display:
a) BLight time:
3) 5 seconds
4) 10 seconds
5) 15 seconds
6) 20 seconds
7) 30 seconds
8) Always on
b) Lum:
1) 1 (dark)
2) 2
3) 3 (middle)
4) 4
5) 5 (bright)
c) BLight Mode:
1) Normal
2) Power save
5. Auto Play
a) Text (select play time)
b) Jpeg (select play time)
6. System:
a) Language selection.
b) Products Information
c) Touch screen adjustment.
7. Power Off:
a) Off
b) 10 minutes
c) 15 minutes
d) 30 minutes
e) 60 minutes
f) 120 minutes
8. Default :
In this menu, eject out the dialog box, confirm whether to resume the defaulted value, select "YES" or "No"
9. Upgrade.
Chapter 4. Troubleshooting
If you experience problems with the MP4 player, please check the following.
| Problem Check Points & Troubleshooting | |
| Fail to turn on | - Power will not turn off if the battery is fully discharged. Recharge the battery and turn the power on again.- Press the Reset Button |
| Buttons do not work | - Check if you press the right button, then press again.- Press the Reset Button |
| Screen display is blank | - Ifis selected from/the LCD will be turn off. Press any button to turn on the LCD or check the Display Settings.- The screen may not be visible under direct sunlight. |
| Power is turning off all the time | - Check the battery status.- The power is automatically turned off when the battery is fully discharged. Recharge the battery. |
| Battery life is inconsistent | - The battery time may vary, depending on the sound mode, display setting and what files you are playing- The battery life may be shortened when left for extended periods in low or high temperatures. |
| AVI Converter fail to install | - Please check if your PC requirements are met. |
| PC fail to detect | -Pleaseon the toolbar of your PC to run Windows update. Select Key Updates and Service Packs, and then update all. Reboot your PC and reconnect.- Check if the USB cable is securely connected. Reconnect if necessary |
| Cannot play files | - Check if the available file has been saved in the memory.- Check if the media file is not damaged or not compatible.- Check if there is enough battery power. |
| File fail to upload | - Check if the USB cable is securely connected. Reconnect if necessary- Check if the memory is full.- Press the Reset Button. |
| Files or data are missing | - Check if the USB cable has been disconnected during the file or data transmission. If this is the case, it may cause serious damage not only to file/data but also to the player. You have to be extra careful as weare not responsible for data loss. |
| Abnormal display of file name.(Different language display) | - Move to/in the Manual screen and set an appropriate language. |
| The player is very warm | - Heat may be generated during recharging. This has no effect on the player life or functions. |
Chapter 5. Appendix
Products Specifications
| Display 2.8 inch, TFT screen with touch panel function | |
| Power Supply Built-in 3.7V Li-polymer rechargeable battery | |
| Memory Built-in flash memory (512MB/1GB/2GB/4GB/8GB) | |
| Earphone Output | (L) 10mW + (R) 10mW (32Ω) |
| Output Frequency Range 20Hz~20KHz | |
| SNR | ≥ 85dB |
| FM Frequency 87MHz ~ 108MHz | / 76 MHz ~ 90MHz |
| Audio format MP3, WMA, APE, FL | AC etc. |
| Video format | AVI (XVID) " AVI converted by AVI converter" |
| Picture format JPEG | |
| Game format RKP | |
| Data Transmission Speed High speed USB2.0 | |
| Temperature Range for operation | -5°C ~ 35°C |
| Language | English, Spanish, Chinese, etc. |
| Operation System | Windows98/SE/ME/2000/XP/VISTA ·Mac OS 10 ·Linux 2.4.2 |
- The contents of this Manual are subject to change without prior notice for further improvement.
Converting Video Files
All files need to be change into the mp4 avi format using avi convertor
1. Install the converting tool
a) Insert the allocation CD dirve in the CD-ROM of your PC.
b) Run the "AVI Converter Setup.exe" program: Enter the install menu, click on the "NEXT" button, it will appear the figure as follows:
c) Choose the route of installation, and then click on the "Install" button, until the end of the installation.
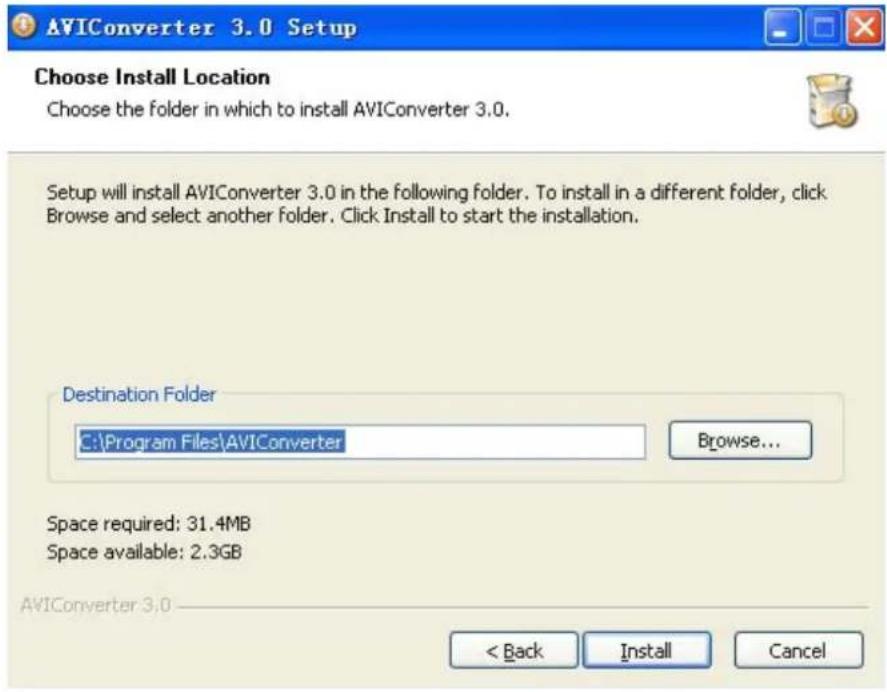
text_image
AVIComverter 3.0 Setup Choose Install Location Choose the folder in which to install AVIComverter 3.0. Setup will install AVIComverter 3.0 in the following folder. To install in a different folder, click Browse and select another folder. Click Install to start the installation. Destination Folder C:\Program Files\AVIComverter Browse... Space required: 31.4MB Space available: 2.3GB AVIComverter 3.0 < Back Install Canceld) At the end of the installation, click on the "Finish" button to finish the installation.
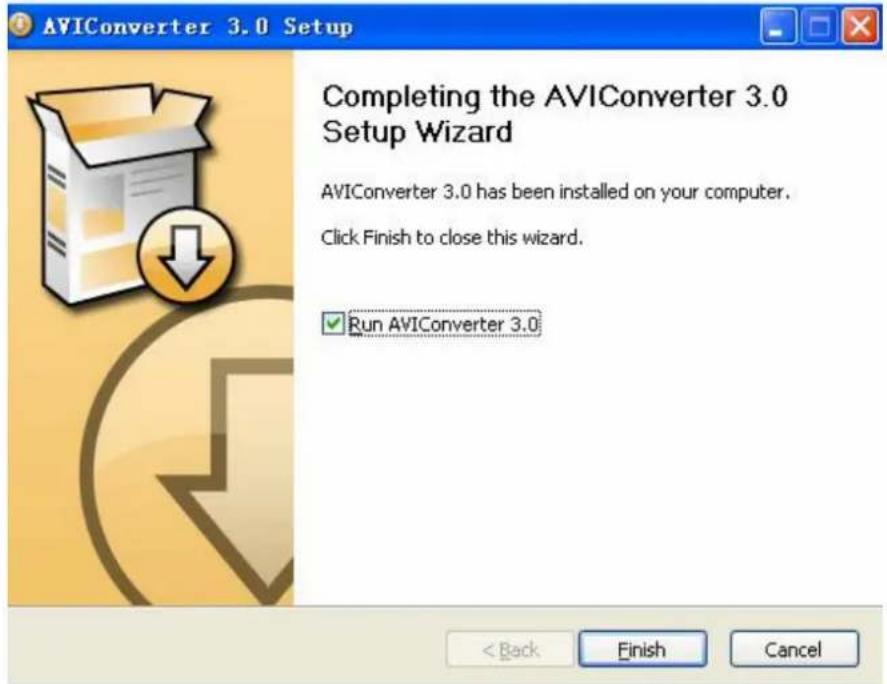
text_image
AVIConverter 3.0 Setup Completing the AVIConverter 3.0 Setup Wizard AVIConverter 3.0 has been installed on your computer. Click Finish to close this wizard. ✓ Run AVIConverter 3.0 < Back Finish Cancel2. Converting other format files to AVI format ones.
( all video files need to be change into the mp4 avi format using avi convertor)
a) Click and run the "AVI Converter.exe" program, choose the video file which need to be converted and also choose the route of the result. Picture as follows:
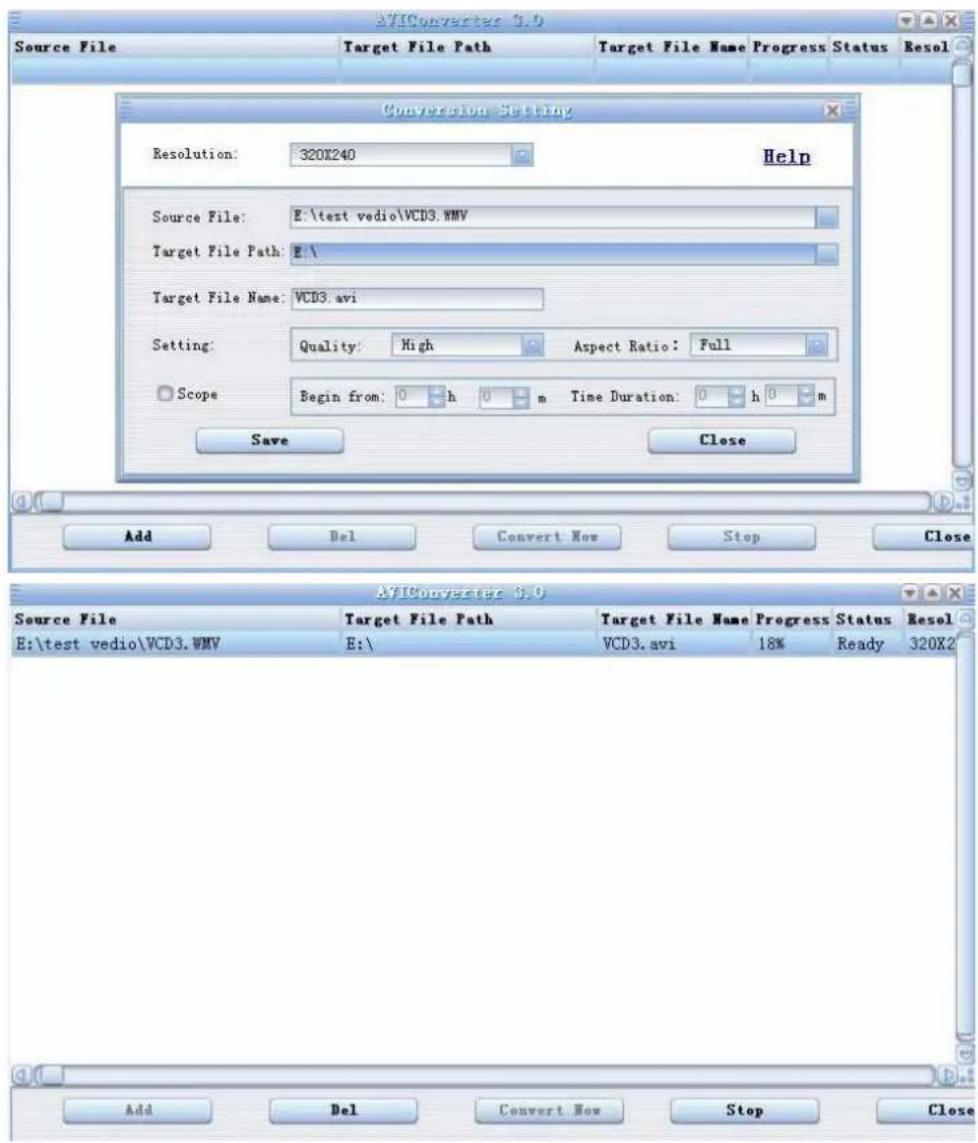
text_image
AFC Converter 3.0 Source File Target File Path Target File Name Progress Status Resol Conversion Setting Resolution: 320X240 Help Source File: E:\test vedio\VCD3.WMV Target File Path: E:\ Target File Name: VCD3.avi Setting: Quality: High Aspect Ratio: Full Scope Begin from: 0 h 0 m Time Duration: 0 h 0 m Save Close Add Del Convert Now Stop Close AFC Converter 3.0 Source File Target File Path Target File Name Progress Status Resol E:\test vedio\VCD3.WMV E:\ VCD3.avi 18% Ready 320X2 Add Del Convert Now Stop Closeb) Choose and setup the parameter of the file ( video format: 320*240 ), and then click on the "Start" button, to convert the "AVI" file.
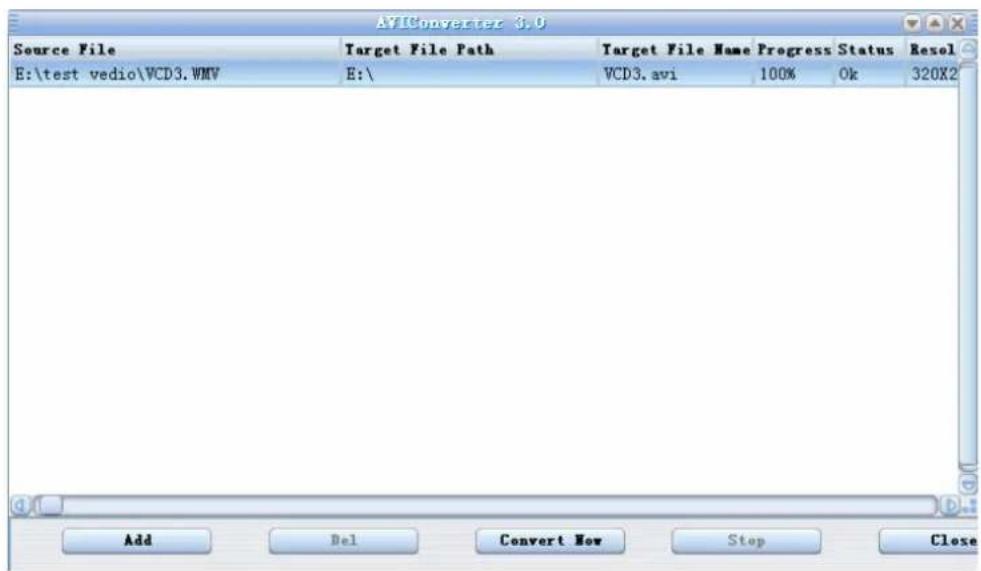
text_image
ATLConverter 3.0 Source File Target File Path Target File Name Progress Status Resol E:\test vedio\VCD3.WMV E:\ VCD3.avi 100% Ok 320X2 Add Del Convert Now Stop Closec) The player may play the video which is saved in the player when it finish the conversion.