
KD56NAIF0N - Refrigerator-freezer SIEMENS - Free user manual and instructions
Find the device manual for free KD56NAIF0N SIEMENS in PDF.


| Product Type | Freestanding Fridge Freezer |
| Brand | Siemens |
| Model | KD56NAIF0N |
| Climate Class | SN, N, ST, T (ambient temperature +10°C to +43°C) |
| Refrigerant | R600a (flammable) |
| Power Supply | 220–240 V, 50 Hz |
| Protection Class | I |
| Required Fuse | 10–16 A |
| Freezer Compartment Temperature Range | -16°C to -24°C |
| Refrigerator Compartment Temperature Range | +2°C to +8°C |
| Special Functions | Super Freezing, Super Cooling, Holiday Mode, Eco Mode, Fresh Mode |
| Defrost System | NoFrost (fully automatic) in freezer compartment |
| Alarms | Door open alarm, temperature alarm |
| Lighting | LED (maintenance-free) |
| Ice Maker | Yes (manual ice cube tray with dispenser) |
| Interior Features | Humidity control vegetable container, cold storage compartment, variable shelf, butter and cheese compartment, breakfast set, bottle shelf, drawer divider |
| Self-Test Program | Yes |
| Cleaning | Do not use abrasive cleaners; clean with soft cloth and mild detergent |
| Safety | Flammable refrigerant (R600a), keep away from ignition sources |
| Customer Service | Requires product number (E-Nr.) and production number (FD) found on rating plate |
Frequently Asked Questions - KD56NAIF0N SIEMENS
User questions about KD56NAIF0N SIEMENS
0 question about this device. Answer the ones you know or ask your own.
Ask a new question about this device
Download the instructions for your Refrigerator-freezer in PDF format for free! Find your manual KD56NAIF0N - SIEMENS and take your electronic device back in hand. On this page are published all the documents necessary for the use of your device. KD56NAIF0N by SIEMENS.
USER MANUAL KD56NAIF0N SIEMENS
Register your product on My Siemens and discover exclusive services and offers.
siemens-home.bsh-group.com/welcome
The future moving in.
en Table of Contents
Safety and warning information ...... 3
Information concerning disposal ...... 6
Scope of delivery 7
Installation location 7
Observe ambient temperature and ventilation 7
Connecting the appliance 8
Getting to know your appliance ..... 9
Switching on the appliance 10
Setting the temperature 10
Special functions ...... 11
Alarm function 12
Usable capacity 12
Refrigerator compartment 13
Super cooling 14
Freezer compartment 15
Freezing capacity 15
Freezing and storing food 15
Freezing fresh food 15
Super freezing 16
Thawing frozen food 17
Interior fittings 17
Sticker "OK" 18
Switching off and disconnecting the appliance 18
Cleaning the appliance 19
Light (LED) 20
Tips for saving energy 20
Operating noises 20
Eliminating minor faults yourself ..... 21
Appliance self-test 23
Customer Service 23
tr İçindekiler
Safety and warning information
Before you switch ON the appliance
Please read the operating and installation instructions carefully! They contain important information on how to install, use and maintain the appliance. The manufacturer is not liable if you fail to comply with the instructions and warnings. Retain all documents for subsequent use or for the next owner.
Technical safety
Fire hazard
The tubes of the
refrigeration circuit convey a small quantity of an environmentally friendly but flammable refrigerant (R600a). It does not damage the ozone layer and does not increase the greenhouse effect. If refrigerant escapes, it may injure your eyes or ignite.
If damage has occurred
- Keep naked flames and/or ignition sources away from the appliance,
■ thoroughly ventilate the room for several minutes,
■ switch off the appliance and pull out the mains plug,
■ inform customer service.
The more refrigerant an appliance contains, the larger the room must be in which the appliance is situated. Leaking refrigerant can form a flammable gas-air mixture in rooms which are too small. The room must be at least 1 m ^3 per 8 g of refrigerant. The amount of refrigerant in your appliance is indicated on the rating plate inside the appliance.
When installing the appliance, ensure that the mains cable is not trapped or damaged.
If the power cord of this appliance is damaged, it must be replaced by the manufacturer, Customer Service or a similarly qualified person. Improper installations and repairs may put the user at considerable risk.
en
Repairs may be performed by the manufacturer, customer service or a similarly qualified person only.
Only original parts supplied by the manufacturer may be used. The manufacturer guarantees that only these parts satisfy the safety requirements.
Do not use multiple sockets, extension leads or adapters.

Fire hazard
Portable multiple outlets or power supplies may overheat, causing a fire.
Never leave portable multiple outlets or portable power supplies behind the appliance.
Important information when using the appliance
■ Never use electrical appliances inside the appliance (e.g. heaters, electric ice makers, etc.). Risk of explosion!
■ Never defrost or clean the appliance with a steam cleaner! The steam may penetrate electrical parts and cause a short-circuit. Risk of electric shock!
■ Do not use additional means to accelerate the defrosting process other than those recommended by the manufacturer. Risk of explosion!
- Do not use pointed or sharp-edged implements to remove frost or layers of ice. You might damage the refrigerant tubes. Leaking refrigerant may cause eye injuries or ignite.
■ Do not store products which contain flammable propellant (e.g. spray cans) or explosive substances in the appliance. Risk of explosion!
■ Do not stand on or lean heavily against the base of the appliance, drawers, doors, etc.
■ For defrosting and cleaning, pull out the mains plug or switch off the fuse. Do not pull out the mains plug by tugging on the power cord.
■ Store high-percentage alcohol tightly sealed and in an upright position.
- Keep plastic parts and the door seal free of oil and grease. Otherwise, plastic parts and the door seal will become porous.
■ Never cover or block the ventilation openings of the appliance.
■ Avoiding placing children and vulnerable people at risk:
At risk here are children, people who have limited physical, mental or sensory abilities, as well as people who have inadequate knowledge concerning safe operation of the appliance.
Check that children and vulnerable people have understood the hazards.
A person responsible for safety must supervise or instruct children and vulnerable people who are using the appliance.
Only children aged 8 years and above may use the appliance.
Supervise children while the appliance is being cleaned or maintained.
Never allow children to play with the appliance.
■ Do not store bottled or canned liquids (especially carbonated drinks) in the freezer compartment. Bottles and cans may burst!
■ Never put frozen food straight from the freezer compartment in your mouth.
Risk of low-temperature burns!
- Avoid prolonged touching of frozen food, ice or the evaporator pipes, etc. Risk of low-temperature burns!
Children in the household
- Keep children away from packaging and its parts. Danger of suffocation from folding cartons and plastic film!
■ Do not allow children to play with the appliance!
■ If the appliance features a lock: keep the key out of the reach of children!
General regulations
The appliance is suitable
■ for refrigerating and freezing food,
■ for making ice.
This appliance is intended for use in the home and the home environment.
The refrigeration circuit has been checked for leaks.
This appliance complies with the relevant safety regulations for electrical appliances and is fitted with noise suppression.
This appliance is intended for use up to a maximum height of 2000 metres above sea level.
Information concerning disposal

Disposal of packaging
The packaging protects your appliance from damage during transit. All utilised materials are environmentally safe and recyclable. Please help us by disposing of the packaging in an environmentally friendly manner.
Please ask your dealer or inquire at your local authority about current means of disposal.

Disposal of your old pliance
Old appliances are not worthless rubbish! Valuable raw materials can be reclaimed by recycling old appliances.
This appliance is labelled in accordance with European Directive 2012/19/EU concerning used electrical and electronic appliances (waste electrical and electronic equipment - WEEE). The guideline determines the framework for the return and recycling of used appliances as applicable throughout the EU.

Warning
Redundant appliances
- Pull out the mains plug.
- Cut off the power cord and discard with the mains plug.
- Do not take out the trays and receptacles: children are therefore prevented from climbing in!
- Do not allow children to play with the appliance once it has spent its useful life. Danger of suffocation!
Refrigerators contain refrigerant and gases in the insulation. Refrigerant and gases must be disposed of professionally. Ensure that tubing of the refrigerant circuit is not damaged prior to proper disposal.
Scope of delivery
After unpacking all parts, check for any damage in transit.
If you have any complaints, please contact the dealer from whom you purchased the appliance or our customer service.
The delivery consists of the following parts:
■ Free-standing appliance
■ Interior fittings (depending on model)
■ Bag containing installation materials
- Operating instructions
■ Installation manual
■ Customer service booklet
■ Warranty enclosure
■ Information on the energy consumption and noises
Installation location
A dry, well ventilated room is suitable as an installation location. The installation location should not be exposed to direct sunlight and not placed near a heat source, e.g. a cooker, radiator, etc. If installation next to a heat source is unavoidable, use a suitable insulating plate or observe the following minimum distances from the heat source:
■ 3 cm to electric or gas cookers.
■ 30 cm to an oil or coal-fired cooker.
The floor of the installation location must not give way; if required, reinforce floor. If the floor is uneven, compensate with supports.
Distance from wall
When installing the appliance, ensure that the door can be opened by 90°.
Observe ambient temperature and ventilation
Ambient temperature
The appliance is designed for a specific climate class. Depending on the climate class, the appliance can be operated at the following temperatures.
The climate class can be found on the rating plate. Fig. 15
| Climate class Permitted ambient temperature |
| SN +10 °C to 32 °C |
| N +16 °C to 32 °C |
| ST +16 °C to 38 °C |
| T +16 °C to 43 °C |
Note
The appliance is fully functional within the room temperature limits of the indicated climatic class. If an appliance of climatic class SN is operated at colder room temperatures, the appliance will not be damaged up to a temperature of +5 °C.
Ventilation

The air on the rear panel and on the side panels of the appliance heats up. Conduction of the heated air must not be obstructed. Otherwise, the refrigerating unit must work harder. This increases power consumption. Therefore: Never cover or block the ventilation openings!
Connecting the appliance
After installing the appliance, wait at least 1 hour until the appliance is switched on. During transportation the oil in the compressor may have flowed into the refrigeration system.
Before switching on the appliance for the first time, clean the interior of the appliance (see chapter “Cleaning the appliance”).
Electrical connection
The socket must be near the appliance and also freely accessible following installation of the appliance.

Warning
Risk of electric shock!
If the length of the mains cable is inadequate, never use multiple sockets or extension leads. Instead, please contact Customer Service for alternatives.
The appliance complies with protection class I. Connect the appliance to 220–240 V/50 Hz alternating current via a correctly installed socket with protective conductor. The socket must be protected by a 10 A to 16 A fuse.
For appliances operated in non-European countries, check whether the indicated voltage and current type match the values of your electricity supply. This information can be found on the rating plate, Fig. 15.

Warning
Never connect the appliance to electronic energy saver plugs.
Our appliances can be used with mains and sine-controlled inverters. Mains-controlled inverters are used for photovoltaic systems which are connected directly to the national grid. Sine-controlled inverters must be used for isolated applications (e.g. on ships or in mountain lodges) which are not connected directly to the national grid.
Getting to know your appliance

Please fold out the illustrated last page. These operating instructions refer to several models.
The features of the models may vary. The diagrams may differ.
Fig. 1
* Not all models.
A Freezer compartment
B Refrigerator compartment
1–15 Controls
16* Butter and cheese compartment
17 Shelf for large bottles
18* Ice maker
19 Light (LED)
20* Breakfast set
21* Bottle shelf
22* Vario shelf
23 Cold storage compartment
24 Vegetable container with humidity control
Controls
Fig. 4
1 Display superfreeze
This lights up if super freezing is in operation.
2 Temperature display freezer compartment
The numbers correspond to the set freezer compartment temperatures in ^ C.
3 Display supercool
This lights up if super cooling is in operation.
4 Temperature display refrigerator compartment
The numbers correspond to the set refrigerator compartment temperatures in ^ C.
5 Display vacation
This lights up when the vacation mode is switched on.
6 Display fresh
This lights up when the freshness mode is switched on.
7 Eco mode indicator
This lights up when the eco mode is switched on.
8 Button lock function display
Indicates whether the button lock is switched on or off.
The control panel is locked.
The control panel is unlocked.
9 9 button
Switches the button lock function on. If this function is switched on, no settings are possible via the controls.
10 Button mode
Selecting the special functions.
11 Setting buttons +/-
The buttons are used to set the temperatures of the refrigerator and freezer compartment.
en
12 Status indicator
Lights up when the appliance is switched on.
13 Super button
Used to switch on the functions supercool (fridge compartment) and superfreeze (freezer compartment).
12 °C button to select a section
Used to select a section. This is necessary to change its temperature or to switch on certain special functions.
15 Display - ALARM -
This lights up if an alarm is active. This happens if the appliance gets too hot inside.
Switching on the appliance
- First insert the plug into the connection on the back of the appliance. Check that the plug has been inserted all the way.
- Then insert the other end of the cable into the socket.
The appliance is now switched on and a warning signal sounds.
Press the °C button to switch off the audible warning signal.
The - ALARM - display goes out when the appliance has reached the set temperature.
The preset temperatures are reached after several hours. Do not put any food in the appliance beforehand.
The factory has recommended the following temperatures:
■ Freezer compartment: -18 °C
■ Refrigerator compartment: +4 °C
Operating tips
■ After the appliance has been switched on, it may take several hours until the set temperatures have been reached.
■ The fully automatic NoFrost system ensures that the freezer section remains free of ice. Defrosting is no longer required.
If the door cannot be immediately re-opened after it has been closed, wait until the resulting low pressure has equalised.
■ The front and side panels of the housing are partly heated slightly. This prevents condensation from forming.
Setting the temperature
Fig. 4
Refrigerator section
The temperature can be set from +2^ to +8^ .
- Select the refrigerator section using the °C button.
- Keep pressing the +/- buttons until the required temperature is indicated.
Perishable food should not be stored above +4 °C.
Freezer compartment
The temperature can be set from -16^ to -24^ .
- Select the freezer compartment using the °C button.
- Keep pressing the +/- buttons until the required temperature is indicated.
Special functions
Fig. 4
Fresh mode
Fresh mode gives food an even longer shelf life.
Switching on:
Press mode button repeatedly until the fresh display is underlined.
The appliance sets the following temperatures automatically:
■ Refrigerator section: +2 °C
■ Freezer section: remains unchanged
Switching off:
Press mode button repeatedly until no mode is underlined.
Eco mode
Eco mode switches the appliance to energy-saving operation.
Switching on:
Press mode button repeatedly until the 7 display is underlined.
The appliance sets the following temperatures automatically:
■ Refrigerator section: +8 °C
■ Freezer section: -16 °C
Switching off:
Press mode button repeatedly until no mode is underlined.
Holiday mode
If leaving the appliance for a long period of time, you can switch the appliance over to the energy-saving holiday mode.
The temperature of the refrigerator compartment is automatically switched to +14 °C.
Do not store any food in the refrigerator compartment during this time.
Switching on:
Press mode button repeatedly until the vacation display is underlined.
The appliance sets the following temperatures automatically:
■ Refrigerator section: +14 °C
■ Freezer section: remains unchanged
Switching off:
Press mode button repeatedly until no mode is underlined.
Button lock function
To switch the button lock on, press 9 button for 3 seconds.
When the function is switched on, the 🔒 display lights up.
The control panel is now locked and so protected against unintentional operation.
To switch the button lock off, press 9 button for 3 seconds.
The ☑ display lights up when the function is switched off.
The control panel is now unlocked.
Alarm function
In the following cases an alarm may be actuated.
Door opening alarm
The door alarm (continuous sound) switches on and the Alarm 4/15 display is lit if the appliance is left open for too long. Close the appliance to switch off the door alarm.
Temperature alarm
The temperature alarm switches on if the appliance gets too hot inside and the food is at risk of thawing. An interval tone sounds and – ALARM – appears on the temperature display of the freezer compartment 2.
A temperature alarm may occur in these situations:
■ Starting up the appliance for the first time
Do not store any food until the appliance has reached the set temperature.
■ Storing large quantities of fresh food in the appliance
Switch on super freezing before storing large quantities of fresh food. Avoid contact between fresh food and food that is already frozen.
■ Appliance door is open for a very long time
Check whether food has defrosted at all. Do not refreeze food after it has defrosted, even if just partially.
■ the appliance is being heated by a second refrigerator (side-by-side installation) or another heat source Call customer service and ask them about ways of insulating your appliance.
Note
Do not refreeze thawing or thawed food. Only ready meals (boiled or fried) may be refrozen.
No longer store the frozen produce for the max. storage period.
The temperature display shows the warmest temperature reached in the freezer section. As soon as you switch the alarm off, the set temperature is displayed again.
Switching off the alarm
Press the °C button to switch off the audible warning signal.
Usable capacity
Information on the usable capacity can be found inside your appliance on the rating plate. Fig. 15
Refrigerator compartment
The refrigerator compartment is the ideal storage location for meat, sausage, fish, dairy products, eggs, ready meals and pastries.
Storing food
■ Store fresh, undamaged food. The quality and freshness will then be retained for longer.
In the case of ready-made products and bottled goods, observe the best-before date or use-by date specified by the manufacturer.
■ To retain aroma, colour and freshness, pack or cover food well before placing in the appliance. This will prevent the transfer of flavours and the discolouration of plastic parts in the refrigerator compartment.
- Allow warm food and drinks to cool down before placing in the appliance.
Note
Do not block air outlet openings with food, otherwise the air circulation will be impaired. Food which is stored directly in front of the air outlet openings may be frozen by the cold air flowing out.
Note the chill zones in the refrigerator compartment
The air circulation in the refrigerator compartment creates different chill zones:
The coldest zones are in front of the air outlet openings and in the chill compartment, Fig. 1/23.
Store perishable food (e.g. fish, sausage, meat) in the coldest zones.
■ Warmest zone is at the very top of the door.
Note
Note
Store e.g. hard cheese and butter in the warmest zone. The aroma of hard cheese can then continue to develop and butter remains spreadable.
Vegetable container with humidity control
Fig. 10
To create the optimum storage climate for fruit and vegetables, you can set the humidity level in the vegetable container:
- Mainly vegetables as well as for a mixed or small load – high air humidity
- Mainly fruit as well as for a large load – low air humidity
Notes
- Fruit sensitive to cold (e.g. pineapple, banana, papaya and citrus fruit) and vegetables sensitive to cold (e.g. aubergines, cucumbers, zucchini, peppers, tomatoes and potatoes) should be stored outside the refrigerator at temperatures of approx. +8 °C to +12 °C for optimum preservation of quality and flavour.
- Condensation may form in the vegetable container depending on the type and quantity of products stored. Remove condensation with a dry cloth and adjust air humidity in the vegetable container with the humidity controller.
Cold storage compartment
Fig. 8
The cold storage compartment has lower temperatures than the refrigerator compartment. Even temperatures below 0 °C may occur.
Ideal for storing fish, meat and sausage. Not suitable for lettuce and vegetables and produce sensitive to cold.
The temperature of the chill compartments can be varied using the ventilation opening. Push temperature controller upwards to reduce the temperature. Push temperature controller downwards to increase the temperature.
Fig. 9
Super cooling
Super cooling sets the refrigerator temperature to the coldest temperature setting for approx. 6 hours. Then the appliance automatically switches to the temperature set prior to super cooling mode.
Switch on super cooling mode, e.g.
■ before placing large quantities of food in the refrigerator compartment.
■ for the fast cooling of drinks.
Switching on and off
Fig. 4
- Select the refrigerator section using the °C button.
- Press super button.
The supercool indicator lights up.
You do not need to switch off super cooling. After 6 hours the previously set temperature will be automatically restored.
Note
When super cooling is switched on, increased operating noises may occur.
Freezer compartment
Use the freezer compartment
■ To store deep-frozen food.
■ To make ice cubes.
■ To freeze food.
Note
Ensure that the freezer compartment door has been closed properly. If the door is open, the frozen food will thaw. The freezer compartment will become covered in thick ice. Also: waste of energy due to high power consumption!
Freezing capacity
Information on the freezing capacity can be found on the rating plate. Fig. 15
Freezing and storing food
Purchasing frozen food
■ Packaging must not be damaged.
■ Use by the "use by" date.
■ Temperature in the supermarket freezer must be -18 °C or lower.
If possible, transport deep-frozen food in a cool bag and place quickly in the freezer compartment.
Freezing fresh food
Freeze fresh and undamaged food only. To retain the best possible nutritional value, flavour and colour, vegetables should be blanched before freezing. Aubergines, peppers, zucchini and asparagus do not require blanching. Literature on freezing and blanching can be found in bookshops.
Note
Keep food which is to be frozen away from food which is already frozen.
■ The following foods are suitable for freezing:
Cakes and pastries, fish and seafood, meat, game, poultry, vegetables, fruit, herbs, eggs without shells, dairy products such as cheese, butter and quark, ready meals and leftovers such as soups, stews, cooked meat and fish, potato dishes, soufflés and desserts.
■ The following foods are not suitable for freezing:
Types of vegetables, which are usually consumed raw, such as lettuce or radishes, eggs in shells, grapes, whole apples, pears and peaches, hard-boiled eggs, yoghurt, soured milk, sour cream, crème fraîche and mayonnaise.
Packing frozen food
To prevent food from losing its flavour or drying out, place in airtight containers.
- Place food in packaging.
- Remove air.
- Seal the wrapping.
- Label packaging with contents and date of freezing.
Suitable packaging:
Cling wrap, tubular film made of polyethylene, aluminium foil, freezer containers.
These products are available from specialist outlets.
Unsuitable packaging:
Wrapping paper, greaseproof paper, cellophane, bin liners and used shopping bags.
Items suitable for sealing packaged food:
Rubber bands, plastic clips, string, cold-resistant adhesive tape, etc.
Bags and tubular film made of polyethylene (PE) can be sealed with a film heat sealer.
Shelf life of frozen food
Storage duration depends on the type of food.
At a temperature of -18 °C:
■ Fish, sausage, ready meals and cakes and pastries: up to 6 months
■ Cheese, poultry and meat: up to 8 months
■ Vegetables and fruit: up to 12 months
Super freezing
Food should be frozen solid as quickly as possible in order to retain vitamins, nutritional value, appearance and flavour.
The appliance runs constantly when super freezing has been switched on. The freezer compartment temperatures are much lower than in normal operation.
Several hours before placing fresh food in the freezer compartment, switch on super freezing to prevent an unwanted temperature rise.
If the freezing capacity according to the rating plate is to be used, switch on super freezing 24 hours before the fresh products are placed in the freezer compartment.
Smaller quantities of food (up to 2 kg) can be frozen without “super freezing”.
Note
When super freezing is switched on, increased operating noises may occur.
Switching on and off
Fig. 4
- Select the freezer section using the °C button.
- Press super button.
The superfreeze indicator lights up.
You do not need to switch off super freezing. After approx. 212 days the previously set temperature will be automatically restored.
Thawing frozen food
Depending on the type and application, select one of the following options:
■ at room temperature
■ in the refrigerator
■ in an electric oven, with/without fan assisted hot-air
in the microwave

Caution
Do not refreeze thawing or thawed food. Only ready meals (boiled or fried) may be refrozen.
No longer store the frozen produce for the max. storage period.
Interior fittings
Shelves and containers
You can reposition the inner shelves and the containers in the door as required: pull shelf forwards, lower and swivel out to the side. Lift the container and remove.
Special features
(not all models)
Butter and cheese compartment
To open the butter compartment, gently press in the middle of the butter compartment flap.
To clean the compartment, lift it at the bottom and take out.
Breakfast set
Fig. 6
The containers for the breakfast set can be taken out and filled individually.
You can take out the breakfast set for loading and unloading. To do this, lift the breakfast set and pull out. The container holder can be moved.
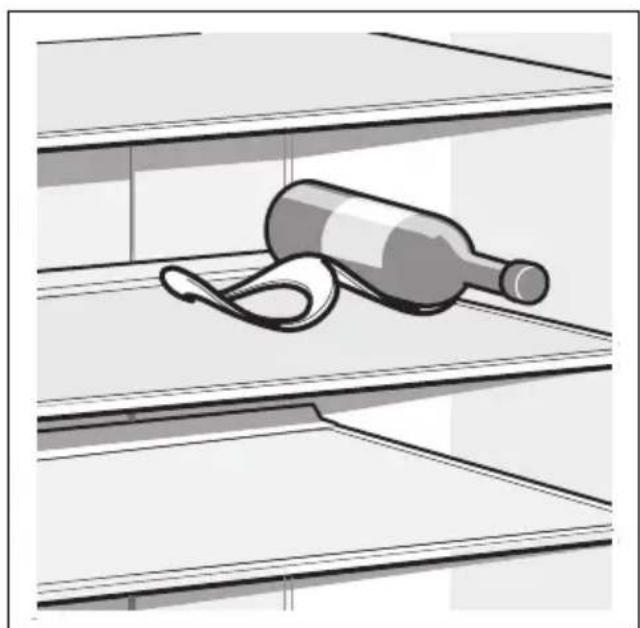
Bottle shelf
Fig. 5
Bottles can be stored securely on the bottle shelf.
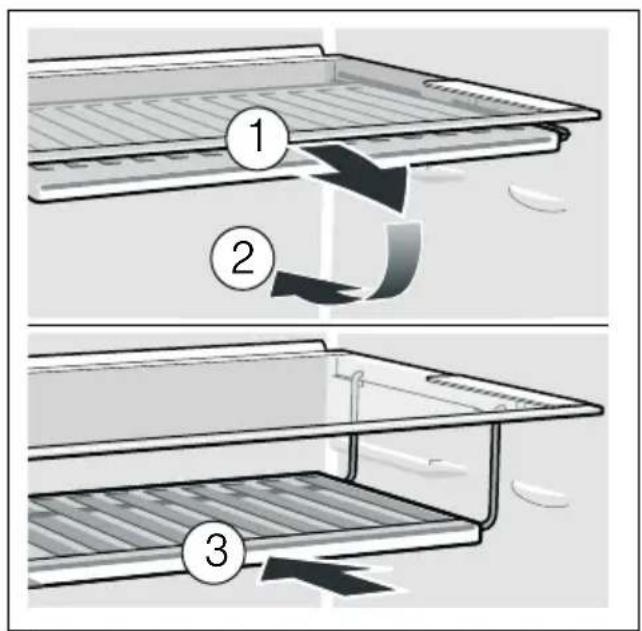
Variable shelf
Fig. 7
The shelf can be folded down if required: Pull shelf forwards, lower and press backwards.
It is suitable for storing flat storage boxes and cold baking trays.
Note
Contact with hot surfaces will damage the appliance.
Only store baking trays on the variable shelf before baking or once they have cooled down completely.
Ice cube tray
Fill the ice cube tray 34 full of drinking water and place in the freezer compartment.
If the ice tray is stuck to the freezer compartment, loosen with a blunt implement only (spoon-handle).
To loosen the ice cubes, twist the ice tray slightly or hold briefly under flowing water.
Ice maker
Fig. 13
- Take out the ice cube tray.
- Fill the ice cube tray 34 full with drinking water.
- Re-insert the ice cube tray.
- When the ice cubes are frozen, rotate the knob on the ice cube tray several times to the right and release.
The ice cubes loosen and fall into the storage container. - Remove the ice cubes from the storage container.
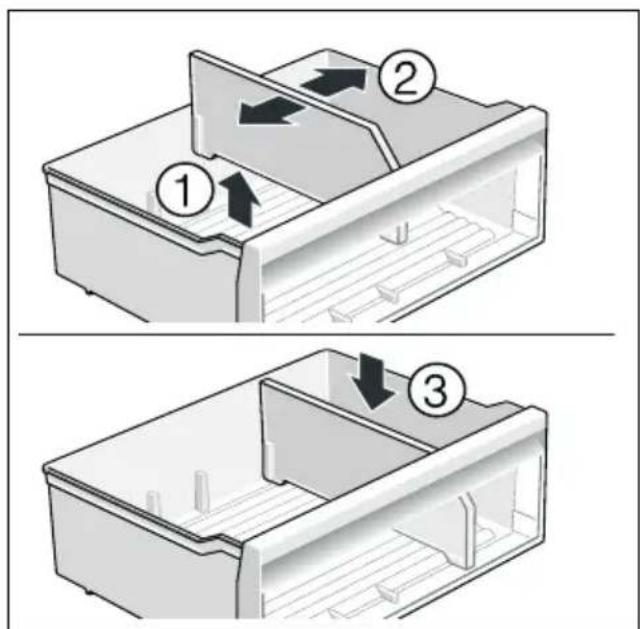
Vegetable drawer divider
Fig. 12
The divider can be removed and placed somewhere else again.
Sticker "OK"
(not all models)
The sticker “OK” lets you check whether the refrigerator compartment achieves the safe temperature ranges of +4 °C or colder recommended for food. If the sticker does not indicate “OK”, gradually reduce the temperature.
Note
When the appliance is switched on, it may take up to 12 hours until the set temperature is reached.

Correct setting
Switching off and disconnecting the appliance
Switching off the appliance
Press "+" button for 10 seconds.
The refrigeration unit switches off.
Press "+" button for 10 seconds to switch on the refrigeration unit again.
Disconnecting the appliance
If you do not use the appliance for a prolonged period:
- Pull out the mains plug or switch off the fuse.
- Clean the appliance.
- Leave appliance doors open.
Note
To avoid damage to the appliance, appliance doors must be opened far enough that they remain in that position on their own. Do not jam any objects into the door to prop it open.
Cleaning the appliance

Caution
- Do not use abrasive, chloride or acidic cleaning agents or solvents.
- Do not use scouring or abrasive sponges.
The metallic surfaces could corrode.
■ Never clean shelves and containers in the dishwasher.
The parts may become deformed!
The cleaning water must not get into the following areas:
Controls
■ Illumination
■ Ventilation openings
■ Openings in the separating plate
Proceed as follows:
- Pull out the mains plug or switch off the fuse.
- Take out the frozen food and store in a cool location. Place ice pack (if available) on the food.
- The rinsing water must not drip into the controls, lighting, ventilation openings or the openings in the partition!
Clean the appliance with a soft cloth, lukewarm water and a little pH-neutral washing-up liquid.
- Wipe the door seal with clear water only and then wipe dry thoroughly.
- After cleaning reconnect the appliance.
- Put the frozen food back into the appliance.
Interior fittings
All variable parts of the appliance can be taken out for cleaning.
Take out shelves in the door
Fig. 3
Lift shelves upwards and take out.
Take out glass shelves
Pull the glass shelves forwards and take out.
Removing the container
Fig. 8
Pull out the container all the way, lift at the front and remove.
Taking out glass shelf above vegetable container
Fig. 11
The glass shelf can be taken out and disassembled for cleaning.
Note
Before taking out the glass shelf, pull out vegetable container.
Cleaning the ice maker
Clean the ice maker regularly. This will prevent ice cubes, which were made quite a long time ago, from shrinking, having a stale taste or sticking together.
Fig. 14
- Remove and empty the ice cube tray and storage container.
- Press the push-button to release the ice maker from the holder.
- Remove the ice maker.
- Lift the rear end of the holder and lower behind the glass plate.
- Remove the holder towards the front.
- Clean all parts of the ice maker with warm water.
- Allow all parts to dry completely.
- Assemble the ice maker in reverse order and insert.
Light (LED)
Your appliance features a maintenance-free LED light.
These lights may be repaired by customer service or authorised technicians only.
Tips for saving energy
- Install the appliance in a dry, well ventilated room! The appliance should not be installed in direct sunlight or near a heat source (e.g. radiator, cooker). If required, use an insulating plate.
- Allow warm food and drinks to cool down before placing in the appliance.
- Thaw frozen food in the refrigerator compartment and use the low temperature of the frozen food to cool refrigerated food.
- Open the appliance as briefly as possible.
■ To achieve the lowest energy consumption, leave a small wall gap at the side. - Do not block the ventilation openings in the appliance.
- Do not remove or relocate the upper glass shelf.
Operating noises
Quite normal noises
Note
When super freezing is switched on, increased operating noises may occur.
Droning
Motors are running (e.g. refrigerating units, fan).
Bubbling, humming or gurgling noises Refrigerant is flowing through the tubing.
Clicking
Motor, switches or solenoid valves are switching on/off.
Cracking
Automatic defrosting is running.
Sizzling
The NoFrost system defrosts, water droplets evaporate.
Preventing noises
The appliance is not level
Please align the appliance with a spirit level. Use the height-adjustable feet or place packing underneath them.
The appliance is not free-standing
Please move the appliance away from adjacent units or appliances.
Containers or storage areas wobble or stick
Please check the removable parts and re-insert them correctly if required.
Bottles or receptacles are touching each other
Move the bottles or receptacles slightly away from each other.
Eliminating minor faults yourself
Before you call customer service:
Please check whether you can eliminate the fault yourself based on the following information.
Customer service will charge you for advice – even if the appliance is still under guarantee!
| Fault Possible cause Remedial action | ||
| Temperature differs greatly from the set value. | In some cases it is adequate to switch off the appliance for 5 minutes.If the temperature is too high wait a few hours and check whether the temperature has approached the set value.If the temperature is too low check the temperature again the next day. | |
| It is too cold in the refrigerator section or in the chill compartment. | Increase the temperature in the refrigerator section. | |
| Push temperature controller for the chill compartment downwards. Fig. 9 | ||
| The temperature in the freezer section is too warm. | Appliance opened frequently. | Do not open the appliance unnecessarily. |
| The ventilation openings have been covered. | Remove obstructions. | |
| Large quantities of fresh food are being frozen. | Do not exceed the freezing capacity. | |
| Appliance is not cooling, temperature display and light are lit up. | Showroom mode is switched on. | Press and hold °C button for 15 seconds."77" appears briefly on the control panel.After a short time check whether your appliance is cooling. |
| The side panels of the appliance are warm. | Pipes run into the side panels which heat during the cooling process. | That is normal behaviour for the appliance and not a fault.Furniture touching the appliance will not be damaged by the heat. |
| The appliance displays a temperature alarm for no apparent reason. | A heat source is located too close to the appliance.A second refrigerator is located right next to the appliance (side-by-side installation). | Call customer service. |
| The light does not function. The LED light is defective. See chapter “Light (LED)” section. | ||
| Appliance was open too long.Light is switched off after approx. 10 min. | When the appliance is closed and opened, the light is on again. | |
| Displays do not illuminate. Power failure; the fuse has been switched off; the mains plug has not been inserted properly. | Connect mains plug. Check whether the power is on, check the fuses. | |
| Freezer compartment door was open for a long time; temperature is no longer reached. | The evaporator (refrigeration generator) in the NoFrost system is covered in thick ice and can no longer be defrosted fully automatically. | To defrost the evaporator, remove the frozen food with the compartments, insulate well and store in a cool location.Switch off the appliance and move it away from the wall. Leave the appliance door open.After approx. 20 min. the condensation begins to run into the evaporation pan, at the rear of the appliance.To prevent the evaporation pan from overflowing in this case,mop up the condensation with a sponge.The evaporator is defrosted when the water stops running into the evaporation pan. Clean the interior. Switch the appliance back on again. |
| Condensation accumulates on the surface of the appliance and on the shelves inside. | The effect is reinforced if ambient temperatures are warm and humid. | Wipe away the water with a soft, dry cloth.■ Open the appliance as briefly as possible■ Make sure that the appliance is always closed properly. |
Appliance self-test
Your appliance features an automatic self-test program which shows you sources of faults which may be repaired by customer service only.
Starting the appliance self-test
- Pull out the appliance plug or switch off the fuse and wait 5 minutes.
- Plug the appliance back in or switch on the fuse and within the first 2 minutes press and hold °C button for 3 seconds until an audible signal sounds.
The self-test programme will start.
If the self-test ends and an audible signal sounds twice, your appliance is in working order.
If 5 audible signals sound, there is an error. Notify customer service.
Ending the appliance self-test
When the programme has ended, the appliance switches over to normal operation.
Customer Service
If you have any queries, are unable to rectify faults on the appliance yourself or if your appliance needs to be repaired, contact Customer Service.
You can solve many problems yourself by consulting the information on troubleshooting in these instructions or on our website. If this is not the case, contact our Customer Service.
We will always find an appropriate solution and try to avoid unnecessary visits being made by a Customer Service technician.
With any warranty claims, we will make sure that your appliance is repaired by trained Customer Service technicians using genuine spare parts, including after the manufacturer's warranty has expired.
For safety reasons repairs to the appliance should only be carried out by trained specialist staff. The warranty claim becomes void if repairs or interventions have been carried out by persons not authorised by us for that purpose or if our appliances have been fitted with spare, supplementary or accessory parts that were not genuine parts and then resulted in a defect.
Function-relevant genuine spare parts according to the relevant Ecodesign Directive can be obtained from Customer Service for a period of at least 10 years from the date on which your appliance was placed on the market.
Detailed information on the warranty period and terms of warranty in your country is available from our Customer Service, your retailer or on our website.
If you contact Customer Service, you will require the product number (E-Nr.) and the production number (FD) of your appliance.
The contact details for Customer Service can be found in the enclosed Customer Service directory or on our website.
en
Product number (E-Nr.) and production number (FD)
The product number (E-Nr.) and the production number (FD) can be found on the rating plate of the appliance. Fig. 15
Make a note of your appliance's details and the Customer Service telephone number to find them again quickly.
Technical data
Refrigerant, cubic capacity and further technical specifications can be found on the rating plate.
Further information about your model can be found online at https://enerjietiketitr.bsh-group.com. Please then follow the instructions on searching for models. The model identifier is made up of the characters before the slash in the product number (E-Nr.) shown on the rating plate. Alternatively, you can also find the model identifier in the first line of the energy label.
Repair order and advice on faults
Contact information for all countries can be found on the enclosed customer service list.
natural_image
Diagram of a vertical container with upward arrows indicating flow or movement, mounted on an electrical outlet (no text or symbols present)2

natural_image
Diagram of a mechanical assembly with two components and directional arrows indicating motion (no text or symbols)3

4
natural_image
Illustration of a wine bottle resting on a shelf (no text or symbols)5

natural_image
Diagram showing three steps of a mechanical or electronic component assembly, with arrows indicating motion direction (no text or symbols present)6
7

natural_image
Technical illustration of a mechanical assembly with layered components (no text or symbols)8

natural_image
Diagram showing two stacked storage racks with upward and downward arrows indicating movement or flow (no text or symbols)9

natural_image
Diagram of a mechanical or architectural component with layered structure and directional arrows (no text or symbols)10

11
12

flowchart
graph TD
    A["Raw Material Input"] --> B["Material Collection"]
    B --> C{Processing Step}
    C -->|1| D["Material Output"]
    C -->|2| E["Material Collection"]
    E --> F["Final Product Output"]
    G["Material Collection"] --> H["Product Output"]
    I["Material Collection"] --> J["Product Output"]
    style A fill:#f9f,stroke:#333
    style G fill:#f9f,stroke:#333
    style I fill:#f9f,stroke:#333
13

14

15
BSH Hausgeräte GmbH
Carl-Wery-Straße 34
81739 München, GERMANY
siemens-home.bsh-group.com
Manufactured by BSH Hausgeräte GmbH under Trademark License of Siemens AG

- en Table of Contents
- tr İçindekiler
- Safety and warning information
- Before you switch ON the appliance
- Technical safety
- If damage has occurred
- en
- Important information when using the appliance
- Children in the household
- General regulations
- Information concerning disposal
- Disposal of packaging
- Disposal of your old pliance
- Warning
- Scope of delivery
- Installation location
- Distance from wall
- Observe ambient temperature and ventilation
- Ambient temperature
- Note
- Ventilation
- Connecting the appliance
- Electrical connection
- Getting to know your appliance
- Controls
- Status indicator
- Super button
- °C button to select a section
- Display - ALARM -
- Switching on the appliance
- Operating tips
- Setting the temperature
- Fig. 4
- Refrigerator section
- Freezer compartment
- Special functions
- Fresh mode
- Switching on:
- Switching off:
- Eco mode
- Holiday mode
- Button lock function
- Alarm function
- Door opening alarm
- Temperature alarm
- Switching off the alarm
- Usable capacity
- Refrigerator compartment
- Storing food
- Note the chill zones in the refrigerator compartment
- Vegetable container with humidity control
- Fig. 10
- Notes
- Cold storage compartment
- Fig. 8
- Super cooling
- Switching on and off
- Use the freezer compartment
- Freezing capacity
- Freezing and storing food
- Purchasing frozen food
- Freezing fresh food
- Packing frozen food
- Suitable packaging:
- Unsuitable packaging:
- Items suitable for sealing packaged food:
- Shelf life of frozen food
- Super freezing
- Thawing frozen food
- Caution
- Interior fittings
- Shelves and containers
- Special features
- Butter and cheese compartment
- Breakfast set
- Bottle shelf
- Variable shelf
- Ice cube tray
- Ice maker
- Fig. 13
- Vegetable drawer divider
- Fig. 12
- Sticker "OK"
- Correct setting
- Switching off and disconnecting the appliance
- Switching off the appliance
- Disconnecting the appliance
- Cleaning the appliance
- The cleaning water must not get into the following areas:
- Proceed as follows:
- Take out shelves in the door
- Take out glass shelves
- Removing the container
- Taking out glass shelf above vegetable container
- Cleaning the ice maker
- Light (LED)
- Tips for saving energy
- Operating noises
- Quite normal noises
- Droning
- Clicking
- Cracking
- Sizzling
- Preventing noises
- The appliance is not level
- The appliance is not free-standing
- Containers or storage areas wobble or stick
- Bottles or receptacles are touching each other
- Eliminating minor faults yourself
- Appliance self-test
- Starting the appliance self-test
- Ending the appliance self-test
- Customer Service
- Product number (E-Nr.) and production number (FD)
- Technical data
- Repair order and advice on faults
Brand : SIEMENS
Model : KD56NAIF0N
Category : Refrigerator-freezer